1
MAIN PROJECT:
TITLE
Stopmotion
AUTHORS:
Fredrik Berg Kjølstad
Bjørn Erik Nilsen
Date:
12.05.2005
SUMMARY OF THE MAIN PROJECT
Ttitle:
Stopmotion
Participants:
Fredrik Berg Kjølstad
Bjørn Erik Nilsen
Supervisor:
Øyvind Kolås
Customer:
Skolelinux
Nr. : GR_2
Date : 12.05.2005
Contact person: Herman Robak
Catch words
Stop-motion, Animation, Education, Linux
Pages: 98
Appendixes: 8
Short summary of the main project:
Availability (open/confidential): open
During the Main project we have developed an GNU/Linux application for creating stop motion
animation movies. The program is primarly aimed at primary and secondary school students and
allows them to easily put images and sound together into an animation.
The application allows the user to import images directly from a webcamera and have three
different tools for helping the user to stage the next shot. It also helps the user to export the
animation to normal video formats such as mpeg.
The software has been developed using C++, Qt and numerous other libraries.
We have worked using an adaption to evolutionary development and the entire project has been
run as an open source project, using and open CVS repository, mailing lists, IRC channels and
numerous webpages to cooperate with various open source communities.
Throughout the project we have worked very activly on spreading the application and it has been
tested by alot of people, including Aardman features who contacted us and expressed their interest,
and it has even been accepted into the Debian apt repository as well as the Mandrake 2006 CD.
I
Preface
In November 2004 the process which would lead to our project delivery began. It
was with great excitement that we chose to work on creating an open source animation application. We have now worked with the eager people in the Skolelinux
community for half a year and have created a fully functional application.
It has already been tried and accepted by many users including at least two or
three schools in two countries and even a professional Stop motion firm. It has also
been accepted into two major GNU/Linux distributions (Debian and Mandrake).
We wish to thank the following people for their contributions to the project:
• Øyvind Kolås for supervising the project, lending us his webcamera and for
always pointing us in the right direction
• Herman Robak for volunteering to act as our customer and for tips and suggestions beyond numbering
• Our testers: Tore Sinding Bekkedal, Finn Arne Johansen, Ralf Gesellensetter, Halvor Borgen, Bjørn Are Hansen, John Steinar Bildøy, Ole-Anders Andreassen and many others
• The Skolelinux community for suggestions, feedback, hosting and for covering our expenses in participating at their developer gatherings
• Tore Sindre Bekkedal and the Greek government for selflessly giving us roof
over our head at the developer gatherings
• Andreas Schuldei for sponsoring the Stopmotion Debian package by taking
on the responsibility for uploading it to the official Debian repository
• Eskild Hustvedt for getting Stopmotion onto the Mandrake 2006 CD
• Tux and the legomen for offering us their services as actors and stuntmen,
and never complaining when they weren’t paid or insured
Gjøvik, 12th of May, 2005
________________________
Fredrik Berg Kjølstad
________________________
Bjørn Erik Nilsen
II
Contents
1
Introduction
1.1 Task definition and constraints . . . . . . . . . . . . . . . .
1.2 Project organization . . . . . . . . . . . . . . . . . . . . . .
1.3 Target group for the report . . . . . . . . . . . . . . . . . .
1.4 The groups academical background and what we had to learn
1.5 Development model . . . . . . . . . . . . . . . . . . . . . .
1.6 The organization of the report. . . . . . . . . . . . . . . . .
1.7 The layout of the report . . . . . . . . . . . . . . . . . . . .
.
.
.
.
.
.
.
1
2
2
2
3
3
4
5
2
Requirements specification
2.1 Usecase Model . . . . . . . . . . . . . . . . . . . . . . . . . . .
2.2 Supplementary specification . . . . . . . . . . . . . . . . . . . .
2.3 Requirement management . . . . . . . . . . . . . . . . . . . . .
6
7
7
9
3
User manual
3.1 What is Stopmotion . . . . . . . . . . . . . . . . .
3.2 Getting started . . . . . . . . . . . . . . . . . . . .
3.3 Adding pictures . . . . . . . . . . . . . . . . . . .
3.4 Running/previewing the animation . . . . . . . . .
3.5 Using Stopmotion with your webcamera . . . . . .
3.6 Changing the import settings . . . . . . . . . . . .
3.7 Adding sound . . . . . . . . . . . . . . . . . . . .
3.8 Exporting to video . . . . . . . . . . . . . . . . .
3.9 Using Stopmotion together with other programs . .
3.10 Getting access to the image files in your animation
3.11 Shortcut keys . . . . . . . . . . . . . . . . . . . .
3.12 Troubleshooting . . . . . . . . . . . . . . . . . . .
3.12.1 The program tells me it can’t import images
III
.
.
.
.
.
.
.
.
.
.
.
.
.
.
.
.
.
.
.
.
.
.
.
.
.
.
.
.
.
.
.
.
.
.
.
.
.
.
.
.
.
.
.
.
.
.
.
.
.
.
.
.
.
.
.
.
.
.
.
.
.
.
.
.
.
.
.
.
.
.
.
.
.
.
.
.
.
.
.
.
.
.
.
.
.
.
.
.
.
.
.
.
.
.
.
.
.
.
.
.
.
.
.
.
.
.
.
.
.
.
.
.
.
.
.
.
.
.
11
12
12
13
14
15
19
21
21
23
24
24
25
25
4
5
Design
4.1 Domain . . . . . . . . . . . . . . .
4.2 Architecture . . . . . . . . . . . . .
4.2.1 Domain Facade . . . . . . .
4.2.2 Frontend packages . . . . .
4.2.3 Observers . . . . . . . . . .
4.3 Designs . . . . . . . . . . . . . . .
4.3.1 Animation model . . . . . .
4.3.2 Undo and redo functionality
4.3.3 Audio formats . . . . . . .
4.3.4 Audio drivers . . . . . . . .
.
.
.
.
.
.
.
.
.
.
.
.
.
.
.
.
.
.
.
.
.
.
.
.
.
.
.
.
.
.
.
.
.
.
.
.
.
.
.
.
.
.
.
.
.
.
.
.
.
.
.
.
.
.
.
.
.
.
.
.
Implementation
5.1 Choice of libraries and standards . . . . . . . .
5.1.1 GUI . . . . . . . . . . . . . . . . . . .
5.1.2 XML parser . . . . . . . . . . . . . . .
5.1.3 Threads . . . . . . . . . . . . . . . . .
5.1.4 Datastructures . . . . . . . . . . . . .
5.1.5 Graphical manipulation . . . . . . . . .
5.2 Custom widgets . . . . . . . . . . . . . . . . .
5.2.1 FrameView widget . . . . . . . . . . .
5.2.2 FrameBar widget . . . . . . . . . . . .
5.3 Video import . . . . . . . . . . . . . . . . . .
5.3.1 GStreamer . . . . . . . . . . . . . . .
5.3.2 External programs . . . . . . . . . . .
5.3.3 Camera viewing modes . . . . . . . . .
5.3.3.1 Onionskinning/Image mixing
5.3.3.2 Image differentiating . . . .
5.3.3.3 Playback . . . . . . . . . . .
5.4 Video export . . . . . . . . . . . . . . . . . . .
5.5 Sound . . . . . . . . . . . . . . . . . . . . . .
5.5.1 The audio format interface . . . . . . .
5.5.2 The audio driver interface . . . . . . .
5.5.3 Let there be sound . . . . . . . . . . .
5.6 Serialization . . . . . . . . . . . . . . . . . . .
5.6.1 Project storage . . . . . . . . . . . . .
5.6.2 Recovery mode . . . . . . . . . . . . .
5.6.3 Preferences . . . . . . . . . . . . . . .
5.7 File monitoring . . . . . . . . . . . . . . . . .
5.8 Code conventions . . . . . . . . . . . . . . . .
IV
.
.
.
.
.
.
.
.
.
.
.
.
.
.
.
.
.
.
.
.
.
.
.
.
.
.
.
.
.
.
.
.
.
.
.
.
.
.
.
.
.
.
.
.
.
.
.
.
.
.
.
.
.
.
.
.
.
.
.
.
.
.
.
.
.
.
.
.
.
.
.
.
.
.
.
.
.
.
.
.
.
.
.
.
.
.
.
.
.
.
.
.
.
.
.
.
.
.
.
.
.
.
.
.
.
.
.
.
.
.
.
.
.
.
.
.
.
.
.
.
.
.
.
.
.
.
.
.
.
.
.
.
.
.
.
.
.
.
.
.
.
.
.
.
.
.
.
.
.
.
.
.
.
.
.
.
.
.
.
.
.
.
.
.
.
.
.
.
.
.
.
.
.
.
.
.
.
.
.
.
.
.
.
.
.
.
.
.
.
.
.
.
.
.
.
.
.
.
.
.
.
.
.
.
.
.
.
.
.
.
.
.
.
.
.
.
.
.
.
.
.
.
.
.
.
.
.
.
.
.
.
.
.
.
.
.
.
.
.
.
.
.
.
.
.
.
.
.
.
.
.
.
.
.
.
.
.
.
.
.
.
.
.
.
.
.
.
.
.
.
.
.
.
.
.
.
.
.
.
.
.
.
.
.
.
.
.
.
.
.
.
.
.
.
.
.
.
.
.
.
.
.
.
.
.
.
.
.
.
.
.
.
.
.
.
.
.
.
.
.
.
.
.
.
.
.
.
.
.
.
.
.
.
.
.
.
.
.
.
.
.
.
.
26
27
27
28
30
32
33
33
34
35
35
.
.
.
.
.
.
.
.
.
.
.
.
.
.
.
.
.
.
.
.
.
.
.
.
.
.
.
37
38
38
38
39
40
40
40
41
41
44
44
45
45
46
46
49
50
50
50
50
51
52
53
57
57
59
60
5.9
Documentation . . . . . . . . . . . . . . . . . . . . . . . . . . .
60
6
Testing
6.1 Unit tests . . . . . . . . . . . . . . . . . . . . . . . . . . . . . .
6.2 Script tests . . . . . . . . . . . . . . . . . . . . . . . . . . . . . .
6.3 Acceptance/User testing . . . . . . . . . . . . . . . . . . . . . .
63
64
64
64
7
Infrastructure, tools and packaging
7.1 Tools . . . . . . . . . . . . . . . . . .
7.2 Internationalization . . . . . . . . . .
7.3 Packaging the program for distribution
7.4 The Stopmotion webpage . . . . . . .
7.4.1 Maintenance . . . . . . . . .
8
9
.
.
.
.
.
.
.
.
.
.
.
.
.
.
.
.
.
.
.
.
.
.
.
.
.
.
.
.
.
.
.
.
.
.
.
.
.
.
.
.
.
.
.
.
.
.
.
.
.
.
.
.
.
.
.
.
.
.
.
.
.
.
.
.
.
66
67
69
71
73
75
Cooperation with the open source community
8.1 Spreading the message . . . . . . . . . . .
8.2 Cooperation with contributors . . . . . . .
8.3 Development gatherings . . . . . . . . . .
8.3.1 First developer gathering . . . . . .
8.3.2 Second developer gathering . . . .
.
.
.
.
.
.
.
.
.
.
.
.
.
.
.
.
.
.
.
.
.
.
.
.
.
.
.
.
.
.
.
.
.
.
.
.
.
.
.
.
.
.
.
.
.
.
.
.
.
.
.
.
.
.
.
.
.
.
.
.
76
77
77
77
78
78
Discussion of results
9.1 Evaluation of the result . . . . . . . .
9.2 Evaluation of the groups work . . . .
9.3 Evaluation of choices and technologies
9.4 Further work and new projects . . . .
.
.
.
.
.
.
.
.
.
.
.
.
.
.
.
.
.
.
.
.
.
.
.
.
.
.
.
.
.
.
.
.
.
.
.
.
.
.
.
.
.
.
.
.
.
.
.
.
79
79
80
80
83
.
.
.
.
.
.
.
.
.
.
.
.
.
.
.
.
.
.
.
.
.
.
10 Conclusion
85
Bibliography
86
A Terminology
90
B Pre-project report (without appendixes)
B.1 Goals and constraints . . . . . . . .
B.2 Extent of task . . . . . . . . . . . .
B.3 Project organization . . . . . . . . .
B.4 Planning and reporting . . . . . . .
B.5 Organization of quality assurance . .
B.6 Development plan . . . . . . . . . .
V
.
.
.
.
.
.
.
.
.
.
.
.
.
.
.
.
.
.
.
.
.
.
.
.
.
.
.
.
.
.
.
.
.
.
.
.
.
.
.
.
.
.
.
.
.
.
.
.
.
.
.
.
.
.
.
.
.
.
.
.
.
.
.
.
.
.
.
.
.
.
.
.
.
.
.
.
.
.
.
.
.
.
.
.
.
.
.
.
.
.
95
. 95
. 96
. 98
. 98
. 99
. 100
C Development model
102
D Usecases
D.1 Import picture .
D.2 Create frame . .
D.3 Add subtext . .
D.4 Create movie .
D.5 Import sound .
D.6 Run animation .
D.7 Run scene . . .
D.8 Copy frame . .
D.9 Setup camera .
104
104
105
106
106
107
108
109
109
110
.
.
.
.
.
.
.
.
.
.
.
.
.
.
.
.
.
.
.
.
.
.
.
.
.
.
.
.
.
.
.
.
.
.
.
.
.
.
.
.
.
.
.
.
.
.
.
.
.
.
.
.
.
.
.
.
.
.
.
.
.
.
.
.
.
.
.
.
.
.
.
.
.
.
.
.
.
.
.
.
.
E Code conventions
.
.
.
.
.
.
.
.
.
.
.
.
.
.
.
.
.
.
.
.
.
.
.
.
.
.
.
.
.
.
.
.
.
.
.
.
.
.
.
.
.
.
.
.
.
.
.
.
.
.
.
.
.
.
.
.
.
.
.
.
.
.
.
.
.
.
.
.
.
.
.
.
.
.
.
.
.
.
.
.
.
.
.
.
.
.
.
.
.
.
.
.
.
.
.
.
.
.
.
.
.
.
.
.
.
.
.
.
.
.
.
.
.
.
.
.
.
.
.
.
.
.
.
.
.
.
.
.
.
.
.
.
.
.
.
.
.
.
.
.
.
.
.
.
.
.
.
.
.
.
.
.
.
.
.
.
.
.
.
.
.
.
111
F Scripts
114
F.1 Script for building a new release . . . . . . . . . . . . . . . . . . 114
F.2 Translation scripts . . . . . . . . . . . . . . . . . . . . . . . . . . 117
G Various emails
119
G.1 Communication with a teachers . . . . . . . . . . . . . . . . . . . 119
G.2 Communication with Aardman features . . . . . . . . . . . . . . 121
G.3 The RFP which was sent to the BTS . . . . . . . . . . . . . . . . 124
H CD contents
126
VI
List of Figures
2.1
Usecase diagram . . . . . . . . . . . . . . . . . . . . . . . . . .
3.1
3.2
3.3
3.4
3.5
3.6
3.7
3.8
3.9
3.10
Stopmotion at startup . . . . . .
The Add frames dialog . . . . .
The Run Animation menu . . .
The Camera menu . . . . . . . .
The onionskinning/mixing mode
The differentiation mode . . . .
The playback mode . . . . . . .
The Video Import config menu .
The Video Export Menu . . . .
Adding effects with gimp . . . .
.
.
.
.
.
.
.
.
.
.
.
.
.
.
.
.
.
.
.
.
.
.
.
.
.
.
.
.
.
.
.
.
.
.
.
.
.
.
.
.
.
.
.
.
.
.
.
.
.
.
.
.
.
.
.
.
.
.
.
.
13
14
15
16
17
18
19
20
22
23
4.1
4.2
4.3
4.4
4.5
4.6
4.7
4.8
4.9
Domain model . . . . . . . . . . . . . . . . . . . . . .
Communication between layers . . . . . . . . . . . . . .
The frontend, observer and facade architecture . . . . . .
The Frontend class and the present frontends (simplified)
The Observer pattern[2] . . . . . . . . . . . . . . . . . .
Animation Model . . . . . . . . . . . . . . . . . . . . .
The Undo design . . . . . . . . . . . . . . . . . . . . .
The Audio interfaces . . . . . . . . . . . . . . . . . . .
The Audio design . . . . . . . . . . . . . . . . . . . . .
.
.
.
.
.
.
.
.
.
.
.
.
.
.
.
.
.
.
.
.
.
.
.
.
.
.
.
.
.
.
.
.
.
.
.
.
.
.
.
.
.
.
.
.
.
27
28
29
31
32
33
34
35
36
5.1
5.2
5.3
5.4
5.5
5.6
5.7
The KDE architecture . . . . . . . . . . . . . . . . . . . .
The FrameBar . . . . . . . . . . . . . . . . . . . . . . . .
The FrameBar classes with some attributes and operations
Onionskinning/Image mixing in Stopmotion . . . . . . . .
Image differentiation in Stopmotion . . . . . . . . . . . .
The structure for a saved project . . . . . . . . . . . . . .
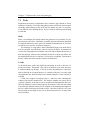
PreferencesTool Doxygen API documentation . . . . . . .
.
.
.
.
.
.
.
.
.
.
.
.
.
.
.
.
.
.
.
.
.
.
.
.
.
.
.
.
38
41
42
47
48
54
57
VII
.
.
.
.
.
.
.
.
.
.
.
.
.
.
.
.
.
.
.
.
.
.
.
.
.
.
.
.
.
.
.
.
.
.
.
.
.
.
.
.
.
.
.
.
.
.
.
.
.
.
.
.
.
.
.
.
.
.
.
.
.
.
.
.
.
.
.
.
.
.
.
.
.
.
.
.
.
.
.
.
.
.
.
.
.
.
.
.
.
.
.
.
.
.
.
.
.
.
.
.
.
.
.
.
.
.
.
.
.
.
.
.
.
.
.
.
.
.
.
.
8
5.8
5.9
Doxygen documentation style . . . . . . . . . . . . . . . . . . .
Doxygen HTML output . . . . . . . . . . . . . . . . . . . . . . .
61
61
7.1
7.2
7.3
A very basic qmake project file . . . . . . . . . . . . . . . . . . .
Translation fields in a .pro file. . . . . . . . . . . . . . . . . . . .
Stopmotion webpage . . . . . . . . . . . . . . . . . . . . . . . .
68
70
74
8.1
Typical open source development . . . . . . . . . . . . . . . . . .
78
C.1 The project development workflow/methodology . . . . . . . . . 103
VIII
Chapter 1
Introduction
The increasing demand for computers and information technology integrated in
the education, together with tight budgets, have left many schools with problems
finding funds for high quality software and modern computers to run it.
Skolelinux is an ideal organization aimed at creating a free GNU/Linux distribution especially tailored to the needs of primary and secondary schools. GNU/Linux
is an operating system based on the open source ideology1 which are gaining popularity among end users. Its main advantages is that it is free, that everyone can
alter it to suit their needs if they want to and that it can be run on many computers
which most people would consider outdated.
For Skolelinux to compete with existing solutions for schools like MS Windows it needs educational application that can cover the needs teachers and students have in the education. One such application, which was first proposed by a
teacher at a secondary school in Norway, is a program for creating Stop motion animations. This program was primarily intended to be used as part of “Arts” classes
to teach students how to plan, stage and produce a Stop Motion movie.
1
For an explanation of open source see the terminology list in Appendix A.1 on page 92
1
Chapter 1. Introduction
1.1
Task definition and constraints
Our task was to create an application for making stop motion animations. The
program should assist the user in importing pictures from an input device such
as a web-camera using techniques to make it easier to move the figures between
frames. The application should also help the user put these pictures together, add
sound and to export the animation to video formats that can be played in normal
media players.
It is important that the program is easy to use so that students can focus on the
creative process and not on figuring out advanced menus and complicated settings.
As a Skolelinux project we also had to develop the software for GNU/Linux
following the Open source ideologies and using CVS actively.
1.2
Project organization
Customer The Skolelinux organization represented by Herman Robak.
Supervisor Øyvind Kolås
Students Fredrik Berg Kjølstad and Bjørn Erik Nilsen
The customer
As previously mentioned Skolelinux is an organization which aims to create a free
operating system for schools. The organization employs four people, but is primarily run trough volunteer work from hundreds of individuals. The volunteers
range from hard core programmers who contribute just because they like to program, to secondary school teachers who need Skolelinux in order to afford a decent
computer coverage for their pupils.
Herman Robak is a volunteer on the Skolelinux project who works on various
tasks ranging from translation to testing. From 8-16 Herman punches the clock at
Opera software where he work on testing software.
1.3
Target group for the report
The target audience for this report are mainly our supervisor, Øyvind Kolås, and
the external examiner who are evaluating the project. As such the report will be
technical and the reader is expected to have knowledge of software development.
The exception is chapter 3 which is the Stopmotion user manual. This chapter
is aimed at people with little to no computer knowledge.
2
Chapter 1. Introduction
1.4
The groups academical background and what we had
to learn
The group consists of two students who are completing their bachelor of engineering, computer science degrees at HIG2 . We have both specialized in software
development and enjoy programming and the process of creating functional as well
as useful software.
We had both done a fair bit of C++ programming before so we were comfortable with this language, but pretty much all of the libraries we used were new to
us and needed to be learned. In addition one of the group members was almost
completely new to GNU/Linux and the way software are developed on this platform, but this didn’t prove to be too big of a problem as the other member was an
experienced GNU/Linux user.
As mentioned above we have had to investigate, learn and use lots of standards, software, technologies and libraries which were previously unknown to us,
or which we didn’t know very well. These include, but are not limited to: XML
and libXML2[9], SDL3 [3] and SDL_Image, GStreamer, v4l, Qt, GNU argument
parser, STL, Docbook, HTML, Doxygen[17], make, qmake, bibtex, Kdevelop,
Umbrello, Mime types, libVorbis, oss, pthread, FAM/libFAM4 and libtar.
1.5
Development model
Every project follows a development methodology whether it is explicitly or implicitly stated. The Stopmotion project is no exception and we chose early on to
go with a light weight methodology based on evolutionary system development,
but with more support than can be found in the traditional evolutionary software
development process. This is explained further in appendix C on page 102.
The reason for choosing such a light weight process is that we are a small
group consisting of only two people on a small project of only half a year. We
also considered Incremental development as well as eXtreme Programming (XP).
Incremental development were discarded because we didn’t feel it was sensible to
plan all the increments up front, considering the unclear goals and requirements
in this particular project. The reason for not choosing eXtreme Programming was
strictly that we lacked the on-site customer, which is very important in XP projects,
and were therefore discouraged from choosing it.
2
Høgskolen i Gjøvik/Gjøvik University-College
Simple Directmedia Layer
4
File Alteration Monitor
3
3
Chapter 1. Introduction
During the project period we had five iteration in which we added new functionality. The iteration plans for these iterations can be found on our webpage[4]
under “Progress”. We then had a rather long post-project phase in which we spent
allot of time testing, polishing functionality and other activities such as marketing, attending the second gathering and spreading our project to various users and
repositories (see the chapter 8 “Cooperation with the open source community” on
page 76).
Another practice we followed was to create throw-away prototypes where we
tested libraries, test-implemented features and tested architectural solutions. There
are 12 such prototypes and they can be found in the directory: /implementation/prototypes in our CVS branch.
1.6
The organization of the report.
The report is based on HIG’s template for final project reports, but is customized
to suit our particular project.
1. Introduction
Contains a general description of our project, our task and this report.
2. Requirements specification
The requirements the application has been built from.
3. Stopmotion user manual
We decided to add the application user manual here so that the reader of this document will know something about what the application is capable of before reading
on.
4. Design
The logical structure and design solutions in the application.
5. Implementation
How the design has been implemented as well as choices and tradeoffs which we
have had to make.
6. Testing
How the application has been tested and which steps have been taken to ensure the
quality of the software.
4
Chapter 1. Introduction
7. Infrastructure, tools and packaging
In our project we have had to create an infrastructure for the project as well as
scripts for creating packages, etc. Most reports place this kind of information in the
implementation chapter, which usually become enormous, but we wanted to keep
this chapter cohesive and only have information related to the implementation of
the actual program there. Therefore, after talking with the supervisor, we decided
to have a chapter with various technical information related to the project instead
of placing it in the implementation chapter.
8. Cooperation with the open source community
As an open source project we have had to work with many different people, and
felt it was sensible to have a section where we explained how we have handled this.
9. Discussion of results
Discussions and evaluations of the software and project as a whole.
10. Conclusion
Sums up the project and what we have accomplished.
Literature and index
List of articles, books and webpages which has been references in the report as
well as an index list of keyword in the report.
Appendixes
Terminologies, usecases, source code, etc.
1.7
The layout of the report
The report, with the exception of chapter 3 is made using LATEX 2ε which is a
structured typesetting language.
Chapter 3 is made using the Docbook language since this is the Stopmotion
user manual and is used other places than in this report. Docbook is also a structured typesetting language and have become the defacto language for user manuals
in KDE and is also widely used for various other computer science documents. A
Docbook document can easily be used to create very nice HTML, PDF, PS, RTF,
etc. outputs.
For this reason chapter 3 will look different than the other chapters. We could
have transfered the Docbook to latex code but this didn’t look very nice so we
chose to include the user manual as a Docbook formated PDF.
5
Chapter 2
Requirements specification
For gathering and identifying requirements we choose to use usecases together
with a short supplementary specification and a requirement risk list. This way of
doing it were heavily inspired by the approach to collecting requirements in the
RUP methodology framework as described by Craig Larman[12], most notably in
chapter 6, 7 and 36.
The usecases were very good early on for identifying requirements, and the
high level as well as the expanded written usecases were very good for getting
started and for learning about the problem domain as we had hardly even heard of
stop motion animations before this project started. Later when we knew more we
didn’t have to write out all the usecases anymore, but the usecases still drove our
process and especially the requirement risk ranking list (see page 9 in this chapter)
was very useful when planning new iterations.
6
Chapter 2. Requirements specification
2.1
Usecase Model
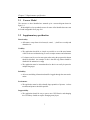
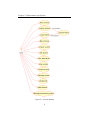
The usecases we have identified are summed up in a usecase-diagram shown in
figure 2.1.
Written high level or expanded usecases for some of the identified usecases can
be found in Appendix D on page 104.
2.2
Supplementary specification
Functionality
• All buttons, except from trivial ones(ok, cancel, ...), shall have a tooltip and
whatsthis text
Usability
• The application should be as simple as possible to use with most buttons
visible to the user without having to access complex menues and submenues
• If a button can’t be used at some point when using the program this button
should be disabled. An example of this is that the copy button should be
disabled if the animation is empty
• The application must be internationalized so that it can easily be ported to
multiple languages
Reliability
• All errors and debug information should be logged through the same mechanism
Performance
• The application must be able to handle large quantities of pictures. At least
ten thousand pictures should be possible
Supportability
• The application should be easy to port to new GUI-libraries and changing
the GUI-library should not require changing many layers
7
Chapter 2. Requirements specification
Figure 2.1: Usecase diagram
8
Chapter 2. Requirements specification
• The application should work with all of the major GNU/Linux desktop environments / window managers (KDE, GNOME, Fluxbox, WindowMaker
...)
2.3
Requirement management
When deciding which feature to implement first it is valuable to rate the different
features in relation to each other. This way one can better decide which ones are
business critical or architectural significant and which ones are just eye-candy.
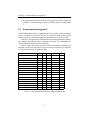
In table 2.1 the requirements for Stopmotion with values showing how heavily
they influence the different areas of importance are listed. The requirements are
ordered from most important to least important.
Table 2.2 shows the weights for each of the three areas the requirements are
ranged by. As this is an open source project we felt it was sensible to give criticality
or “early business value” the highest weight.
Requirement
Import picture
Create movie
Manage animation project
Internationalization
Create frame
Run animation
Setup camera
Run scene
Import sound
Easily ported gui
Undo/redo
Logging
Manage scene
Copy frame
Add subtext
Set speed
Type
UC
UC
UC
Feat
UC
UC
UC
UC
UC
Feat
UC
Feat
UC
UC
UC
UC
AS
2
3
3
3
3
2
1
2
2
3
1
3
2
0
1
0
Risk
3
3
0
0
0
2
2
2
2
2
1
0
1
1
2
3
Criticality
3
2
3
3
3
2
2
1
1
0
2
1
1
2
0
0
Sum
19
18
15
15
15
14
12
11
11
10
10
9
9
8
6
6
Table 2.1: The requirements with values ordered by importance
9
Chapter 2. Requirements specification
Architectrually significant
Technical risk/complexity
Criticality/Early biz. value
Weight
2
2
3
Range
0-3
0-3
0-3
Table 2.2: The weights for the requirement factors
10
Chapter 3
User manual
This is the Stopmotion user manual. As mentioned in the introduction this chapter
is made using Docbook and it is included as a PDF file using the pdfpages LATEX
package.
For this reason this chapter will have a different look and feel than the other
chapters, but we chose to do it this way because we feel the Docbook look is more
suited for software documentation. In addition, as mentioned earlier, it is also the
defacto standard for KDE and very widely used for software documentation as well
as other types of computer science documents.
The latest version of the Stopmotion manual can be retrieved from the Documentation section Stopmotion webpage[4] in both HTML and PDF format. It can
also be viewed inside the program through Help->User Manual. The application
retrieves the HTML version from the directory /usr/share/doc/stopmotion/html as
/usr/share/doc is the standard location to place program documentation on GNU/Linux systems.
11
Stopmotion user manual
Fredrik Berg Kjoelstad
Bjoern Erik Nilsen
Sunday, 14 April 2005
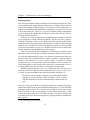
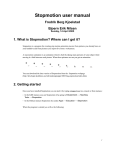
1. What is Stopmotion? Where can I get it?
Stopmotion is a program for creating stop motion animation movies from pictures you already have on
your harddrive and from pictures you import live from a webcamera.
A stop motion animation is an animation which is built by taking many pictures of some object while
moving it a little between each picture. When these pictures are run you get an animation.
You can download the lates version of Stopmotion from the Stopmotion webpage
(http://developer.skolelinux.no/info/studentgrupper/2005-hig-stopmotion/index.htm).
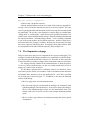
2. Getting started
Once you have installed Stopmotion you can start it by typing stopmotion in a console or from menues:
•
In the KDE menues you can Stopmotion it by going to Edutainment−→Teaching
Tools−→Stopmotion
•
In the Debian menues Stopmotion lies under Apps−→Education−→Stopmotion
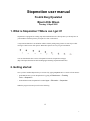
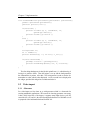
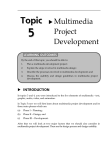
When the program is started you will se the following:
12
1
Stopmotion user manual
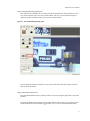
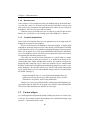
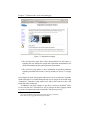
Figure 1. Stopmotion at startup
To the top you have the Framebar where you will see all the pictures in the animation. The center area is
the Frameview where you will get a closer look at your pictures, see the webcamera and preview your
animation.
The left area is the tools menu. On the top of this menu you have buttons for adding pictures from the
harddrive
, adding new scenes
as well as deleting frames and scenes
also start the webcamera with the camera button
. You can
.
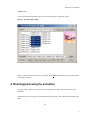
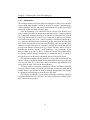
3. Adding pictures
The next step is to try adding some pictures from the harddrive. You can do this by clicking on the
13
2
Stopmotion user manual
(Ctrl-F) button.
You will get the following dialog where you can select the pictures to add to the project:
Figure 2. The Add frames dialog
When you have selected some pictures you can click on the Open button and the pictures will be added
to the project as frames.
4. Running/previewing the animation
Now that you have added some test pictures to your animations wouldn’t you like to run them as an
animation?
Stopmotion allows you to preview your animation before exporting it. This can be done through the play
panel.
14
3
Stopmotion user manual
Figure 3. The Run Animation menu
The play panel allows you to play (
(K)) and stop (
move between frames (
(J),
(L)) and scenes (
the animation preview(frames per second).
) the running of the animation. You can also
(I),
(O)) as well as changing the speed of
Note: The camera has to be off to use this menu.
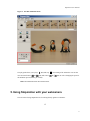
5. Using Stopmotion with your webcamera
The real value of using Stopmotion lies in working directly against a webcamera.
15
4
Stopmotion user manual
If you have a webcamera that works on your linux distribution and vgrabbj installed you can start the
camera by pressing the
(C) button.
If not you can go to the the next section “Changing the import settings” to set up your camera correctly.
Figure 4. The Camera menu
Note: For this to work you have to turn of all other programs using the webcamera.
When the camera is on you have three modes for viewing the video. These modes have different
purposes and are there to assist you in creating your animations.
16
5
Stopmotion user manual
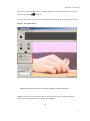
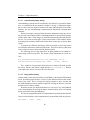
Image mixing/Onionskinning (Shortcut: 1)
The image mixing is probably the view mode you will be using the most. This mode allows you to
view previous pictures (up to five) on top of the camera. This way you can position the figure in
relation to the previous frames so that you can create smooth motions.
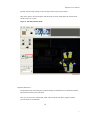
Figure 5. The onionskinning/mixing mode
You can change the number of pictures to view on top of the camera with the “Number of mixes”
slider on the camera panel.
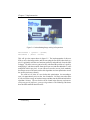
Image differentiation (Shortcut: 2)
The image differentiation mode is primarly meant as a tool for moving the figure back to a previous
position.
It displays the difference between the selected frame and the camera. This way if an object in front
off the camera has been involountairly moved
17 (fallen, etc) you can use the differentiation mode,
6
Stopmotion user manual
together with the image mixing, to move the object back to its previous position.
This can be done by moving the figure until the picture is black, which means the selected frame
and the camera are “equal”.
Figure 6. The differentiation mode
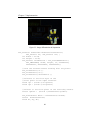
Playback (Shortcut: 3)
The playback mode will continously run the the already recorded frames as an animation with the
input from the camera as the final frame.
This way you can see the camera input, which will become the next frame, together with the
previous frames as an animation.
18
7
Stopmotion user manual
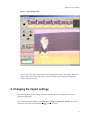
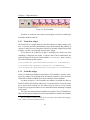
Figure 7. The playback mode
You can specify how many frame backwards that should be played (up to 50) with the “Number of
images” slider on the camera panel, and you can set how fast they should played with the FPS
chooser on the preview panel.
6. Changing the import settings
If the video importing doesn’t work or if you want other settings you can change the way video is
imported in Stopmotion.
This is done through the configure menu (Settings−→Configure Stopmotion (Ctrl-P)) and you can
either choose from one of the predefined settings
19 or create your own.
8
Stopmotion user manual
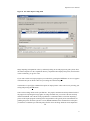
Figure 8. The Video Import config menu
Image importing in Stopmotion works by continously asking an external program to grab a picture from
the camera and place it in the .stopmotion directory. Stopmotion then displays this picture, and when this
is done continously you get live video.
If you want to add a new import program you can do this by pressing the Add button. A new row appears
in the table and you can fill in a name for your setting and a short description.
You then have to specify the command line options to import pictures. These can be set by selecting your
setting and pressing the Edit button.
There are three things which can be specified here. The prepoll, start deamon and stop deamon fields. If
the program for importing the images grabs one image and then exits you can leave the start and stop
deamon fields blank. The contents of the prepoll field is a command which is run before importing a
picture. If the import program is running in the foreground this will typically be the command line for
grabbing the picture. Note that you have to write (DEFAULTPATH) in the command line on the place
you otherwise would have speciefied the path to the file where the image should be stord. Stopmotion
20
9
Stopmotion user manual
will replace this tag with the correct path and file name.
If the program you use for importing the pictures is running as a background/deamon process you have
to specify command lines for starting and stoping the deamon. Again you should use the $importpath tag
instead of the path to the file (se above). Prepoll could still be used but is not required. One potential use
for the prepoll command when the grab program is running as a deamon process is to specify a command
line which performes a operation such as scaling or rotating the picture. This command will be called on
the pictures every time before importing them meaning the live video will be displayed with the effect.
7. Adding sound
You also can add sound to your animations. Before you can do this however you need to have a frame to
attatch the sound to. Therefore you should add some frames from the harddrive or webcamera first.
When you have one or more frames you can add a sound by double clicking with the mouse on the frame
to attatch the sound to. You will then get a menu where you can add sounds. When running the animation
the sound will be played from this frame and until the sound is completed or the animation is at an end.
Note: The only currently supported sound format is ogg.
8. Exporting to video
By now you should have a nice animation of your own. It’s time to make a video file of it. The first thing
you need to do is to install an video encoder. If you have mplayer installed you should already have one
you can use.
Go to the Configure menu (Settings−→Configure Stopmotion (Ctrl-P)). and press the Video Export
tab. You should now get a list of video export settings:
21
10
Stopmotion user manual
Figure 9. The Video Export menu
You can select one of these provided you have the programs they use or you can add one of your own. To
edit one of the present preferences press the Edit button, or use the Add button to add a new setting.
When you have set up a video export setting you can close the Configure menu by pressing the OK
button.
To export your animation to a video file just press File−→Export−→Video (Ctrl-Alt-V) and you
should have a video file of your exellent animation. Tell your friends!
22
11
Stopmotion user manual
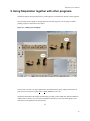
9. Using Stopmotion together with other programs.
Stopmotion supports drag and drop and you can drag pictures to and from the desktop or other programs.
One especially useful example of using Stopmotion with other programs is to use gimp (or another
painting program) to add effects to the frames.
Figure 10. Adding effects with gimp
The best way to do this is to drag a frame/picture from Stopmotion to gimp. Change around with it in
gimp, then save the picture in gimp (File−→Save (Ctrl-S)) (not save as).
Stopmotion should detect the changes automatically, provided you have FAM (File Alteration Monitor)
installed, but if it doesn’t you can switch to Stopmotion and when you select the frame/picture in the
framebar it will be updated to the altered picture.
23
12
Stopmotion user manual
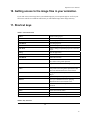
10. Getting access to the image files in your animation.
If you want access to the image files in your animation project you can open the project .sto file in your
file browser. The file is a tarball file and inside it you will find the images in the images directory.
11. Shortcut keys
Table 1. General shortcuts
Ctrl-N
Creates a New project.
Ctrl-O
Opens an excisting project.
Ctrl-S
Saves the project.
Ctrl-Shift-S
Saves the project as.
Ctrl-Alt-V
Opens a dialog to export the project as video.
Ctrl-Alt-C
Opens a dialog to export the project as a Cinerella
project.
Ctrl-Q
Quits the application.
Ctrl-Z
Undoes the last action.
Ctrl-Shift-Z
Redoes the last undo.
Ctrl-X
Cuts the selected frames out of the animation and
places them on the global clipboard.
Ctrl-C
Copies the selected frames to the global clipboard.
Ctrl-V
Paste pictures from the global clipboard and add
them to the animation after the selected frame.
Ctrl-G
Brings up a menu where you can select a frame to
jump to.
Ctrl-P
Opens the import and export preferences menu.
Shift-F1
Gives you a whatsthis arrow for querying
information about a user interface item.
Ctrl-F
Add one or several frames/pictures to the
animation.
Ctrl-E
Create a new scene
Delete
Deletes the selected frames.
Shift-Delete
Deletes the selected scene.
A
Selects all the frames in the opened scene.
Table 2. Play shortcuts
24
13
Stopmotion user manual
P, K
Play the animation.
Right, L
Go to the next frame.
Left, J
Go to the previous frame.
O
Go to the next scene.
I
Go to the previous scene.
Ctrl-L
Toggle whether the animation should loop when
playing.
Table 3. Camera shortcuts
C
Start the camera.
Space
Capture a frame from the camera video stream.
1
Switch to image mixing/onionskinning mode.
2
Switch to image differentation mode.
3
Switch to playback mode.
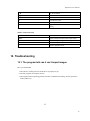
12. Troubleshooting
12.1. The program tells me it can’t import images
Have you checked that:
1. The camera is working in Linux and the driver is properly set up?
2. No other programs are using the camera?
3. The program used for importing pictures and video is installed and working. (See the preferences
menu (CTRL+P))?
25
14
Chapter 4
Design
Karl Fogel and Mosha Bar observes, in chapter 8 of their book on CVS and Open
Source development [11], that good design in open source projects is usually attained by having a well designed core and architecture and then allow the rest of
the design to incrementally grow from this.
Detailed design decisions should be postponed as long as possible so that the
participants have time to learn as much as possible about the software before making them. We have tried to do this by only designing the architecture (section
4.2) as well as the domain datastructure(section 4.3.1) up front. Designs on lower
levels such as the design of the undo functionality, the sound system design and
many other, lesser, designs have been done right before the code for them has been
implemented.
This way our design have incrementally grown from some initial “written-instone” decisions such as: “We will have an architecture based on the observer
pattern” and “We will have a Facade for communicating with the Domain”.
26
Chapter 4. Design
Figure 4.1: Domain model
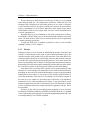
4.1
Domain
When creating an application one is trying to solve a problem. This problem lies
in some problem domain and it is useful to analyze this domain before designing
the application.
To do this we spent a lot of time in the beginning on identifying domain entities
and how these were logically connected. We then summed up what we had learned
in a Domain class diagram which is shown in figure 4.1. This model is quite
exhaustive and not all of the concepts in it were found to be useful once we learned
more about the problems our program is meant to solve.
Parts of the Domain Model then served as the inspiration for the design of the
domain layer. The rationale behind this is to make the application design as close
to the problem as possible which makes it easier to comprehend and to talk about
the design.
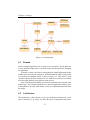
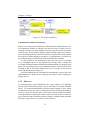
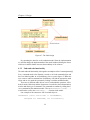
4.2
Architecture
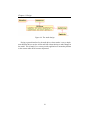
The architecture we have chosen is a five layer architecture based on the “loose
layers” principle [12, 8]. Figure 4.2 shows the layers in Stopmotion with arrows
27
Chapter 4. Design
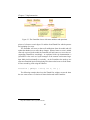
Figure 4.2: Communication between layers
describing how the layers communicate (which ones are coupled). The reason for
the layers is to split the different services into higher level services, such as those
in the presentation layer where the GUI code are, and lower level services such as
adding of frames to the model (Domain layer) and exporting to video (Technical
layer).
The Application layer acts as a mediator between the Presentation and the
lower layers, forwarding requests from the Presentation layer. The final layer;
the foundation layer, is a utility layer consisting of global singletons which offer
services such as logging and preferences saving which can be used by all the other
layers except from the technical which is completely self sufficient.
The end user will only interact with the presentation layer which in turn will
ask for services from lower layers.
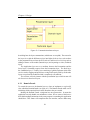
4.2.1
Domain Facade
To control the access to the domain layer we chose to implement a singleton[6]
class called the DomainFacade (see figure 4.3). The Domain Facade takes care of
initializing all the required classes in the Domain as they are needed.
Making the Domain Facade a singleton has one repercussion. It means the
application can only handle one animation at a time. We are aware of this but we
don’t think multiple animations in the same program is something this application
should have. This feature will complicate the user interface, and we doubt many
28
Chapter 4. Design
Figure 4.3: The frontend, observer and facade architecture
29
Chapter 4. Design
of the target users will need it. If they with to work with several animations at the
same time they can open several programs and move things between the animations
by drag-and-drop.
If multiple animations should become desirable at a later stage it won’t be too
hard to subclass the facade and make a new class handling multiple animation
domains. This will only require changing code in the presentation and application
layer.
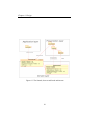
4.2.2
Frontend packages
As explained in the supplementary specification in section 2.2 on page 7 one of the
requirements for Stopmotion was that it should be easy to change the GUI of the
application without changing many parts of the code.
For this reason we chose to split the presentation layer into several frontend
packages. A frontend is set of classes enabling the use of the application, but it
doesn’t necessarily have to be GUI based. As the frontends lies in the presentation
layer they are the part of the program the users will communicate with. The frontends in turn calls on services from lower layers which performs the application
specific services and operations.
A frontend package must at least have a frontend class for starting the application and can also have one or more observers for displaying the data in the data
model. GUI frontends will also have general GUI code for displaying windows,
receiving events from the user, etc. Figure 4.4 shows the Frontend class and the
Frontend sub-classes for the current frontends.
Both the observers and the frontend class are registered dynamically through
function calls and this way one can easily write new frontends, replace existing
ones or add new observers with new ways of displaying the data without changing
a single line of existing code. One example of a new Observer could for example
be a list showing the scenes.
All of this means that even though our application is largely written using Qt,
this is only one frontend and we can both compile and link the application without
this library using the NonGUI frontend. In the future someone might also wish to
write a GTK GUI frontend to ship the application without Qt, or they might want
to port it to Windows or Macintosh. With the frontend design this can be done
without the pains of having to port all the layers.
In addition to allow for the addition of new frontends and views this structure
makes our program very modular and thereby very predictable. It is quite painless to modify the software as it is easy to guess where in the source code some
functionality can be located.
30
Chapter 4. Design
Figure 4.4: The Frontend class and the present frontends (simplified)
31
Chapter 4. Design
Figure 4.5: The Observer pattern[2]
Communication with the frontend class
Because we’re using a layered architecture with downward communication we cannot communicate with the user directly from the lower layers. In many cases it’s
important to tell the user that something went wrong and what he/she can to do to
avoid the error. We also need the ability to tell the frontend to process its events on
time-consuming operations so that the GUI doesn’t lag and to tell it when to update
the progress-bar when doing these operations. As explained above we chose to do
this communication by registering the frontend dynamically at runtime.
It’s only possible to run one frontend at the same time, but it’s no problem
to e.g. implement and use a GTK frontend for processing events. It means that
we can have different frontends with different implementations for doing the same
thing. This is possible because we have defined an interface in the form of the class
Frontend so that the API for the Domain layer (see 4.3 on page) are the same no
matter which frontend are being used.
All of the frontends have to extend this class and then they can have their own
implementation for doing the error reporting, processing of events, displaying a
progress bar, etc.
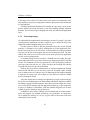
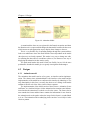
4.2.3
Observers
As mentioned above most frontends has one or more observers for displaying
the data in the Domain data structure, such as the FrameView and the FrameBar
classes. For information distribution when this model changes we have chosen
an approach based on the observer design pattern based with the push model[6].
Figure 4.5 shows the classical sketch of the observer pattern with the pull model.
Our implementation with the push model is almost the same except from that our
notify functions sends information about the change so that the update functions
don’t have to query the ConcreteSubject for the new state.
32
Chapter 4. Design
Figure 4.6: Animation Model
As mentioned the observers are registered in the Domain at runtime and when
the Domain receive a request which changes the data model it notifies the observers
which in turn can take appropriate steps to display these changes to the user.
This is a very flexible way of spreading changes through the system and have
lead to an architecture where the model and the classes dependent on the model
(the observers) are clearly separated. This makes it very easy to change one without affecting the other and we can add new observers, for instance a new way of
displaying the animation in slow motion, easily.
The push model makes this model a little less flexible, but we feel the extra
performance benefits this model gives us greatly outweigh the disadvantages.
4.3
4.3.1
Designs
Animation model
The animation data model consists of two parts, an interface and an implementation. The abstract class AnimationModel is the interface to the model and the
implementation of the model has to conform to this interface by inheriting it. The
only functionality in this class is to notify the observers of a change in the model
and thus it fills the role of the Subject in the Observer pattern.
The implementation of the model consist of three classes: Animation, Scene
and Frame. As visualized in figure 4.6 the Animation class contains some information related to the animation as a whole as well as the scenes. The Scene class in
turn contains the frames and the frames contains the information for one frame in
the animation such as the path to where the image for this frame is, sounds linked
to it, etc. The Animation with its underlying classes are the ConcreteSubject in the
Observer pattern.
33
Chapter 4. Design
Figure 4.7: The Undo design
By separating the interface to the animation model from the implementation
we can later change the implementation of the model without affecting the classes
which use it and this further increases the modularity of the software.
4.3.2
Undo and redo functionality
The undo and redo functionality is designed as an adaption of the Command pattern[6].
Every command made to the Domain is stored as an Undo command object and
these are linked together in an UndoHistory class as seen in figure 4.7.When the
user wants to undo an command the UndoHistory will find the appropriate undo
object and use it to undo the operation by feeding it with the animation model.
There are six different undo objects, one for each undoable operation. All inherits from the Undo class and the constructors for each takes the information they
need to undo their type of command. The commands are undone by calling the reverse command on the animation model. Thus an UndoRemove->undo(...)
would lead to a call to the addFrames(...) function in the model.
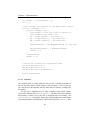
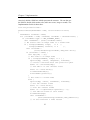
One example of the constructor API of an undo object is:
UndoRemove (const vector<char *> &frameNames,
unsigned int fromIndex, int activeScene);
34
Chapter 4. Design
Figure 4.8: The Audio interfaces
This information is all that is needed to undo the remove operations and ensures
that the undo information is very compact which means we can store allot of undo
objects.
One alternative to the command pattern adaption of the undo functionality is
to have a design based on the Memento pattern. With this design we would have
stored the state of the animation between each operation. This way one could have
undone commands by switching to a previous state and although we considered
this approach early on, it would have cause allot of information to be stored in the
memory and thus wouldn’t have been very efficient.
4.3.3
Audio formats
Nowadays there are many audio formats used by people, and there is no reason for
thinking that we shouldn’t get more of them in the future. It’s therefore important
to have a general interface for implementing different audio formats such as mp3,
waw, ogg ... you name it! This makes it easier to implement audio drivers which
are capable of playing all the different formats. The AudioFormat interface in
Stopmotion is depicted in figure 4.8 and all the different format classes must inherit
from this.
When we want to play a format we just attach it to an audio driver class and let
it communicate with this. Since all the format classes has an uniform interface it is
easy to make general audio drivers which can play any format.
4.3.4
Audio drivers
The audio drivers handles the initialization and shutdown of the audio device, as
well as the playing of sounds. There is also a general interface for the audio drivers
which is also shown in figure 4.8. The driver is coupled to the model which sends
it requests for initializing, shutdown and playing of sounds. The driver in turn
communicates with an AudioFormat class which it use to fill a buffer with data
which is then flushed directly to the audio device.
How these classes are couplet together are depicted in figure 4.9.
35
Chapter 4. Design
Figure 4.9: The Audio design
Having a general interface for the audio driver classes makes it easy to implement different drivers such as ALSA and OSS without having to make changes in
the model. This is handy if we want to port the application to an another platform
or the current audio driver becomes deprecated.
36
Chapter 5
Implementation
As an open source project we have tried to reuse as much previous work as possible
and therefore we have used a lot of libraries, standards and even reused whole
applications.
In this chapter we explain which libraries we have used, why we have used
them and how they have been used. We also describe how we have implemented
our designs and how we have solved logical as well as semantical problems.
37
Chapter 5. Implementation
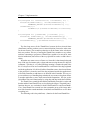
Figure 5.1: The KDE architecture
5.1
5.1.1
Choice of libraries and standards
GUI
As our GUI library we choose the Qt[16] from the start. This choice was made
mainly because it is a class library that are written in the same language as we use
(C++) and because KDE, which is the desktop Skolelinux use, is based on it.
As shown in figure 5.1 KDE applications are written using Qt and the KDE
libraries. Although Skolelinux uses KDE we didn’t want to tie our application
to closely to this graphical environment, and therefore we haven’t used the KDE
Libraries although these had several interesting classes such as the KDirWatch
which would have aided us. The KDE libraries would have been an dependency
which would have made it harder to spread our application to the wider community,
which in the end is the goal of most open source projects.
Although we selected Qt early we decided to factor out all the Qt GUI code
so that the software isn’t completely dependant on it. The way this is done was
explained in section 4.2 “Architecture” on page 27 and because of it we were able
to write a NonGUI frontend where the user can use the application from a shell.
This frontend can be used for scripting automating tasks or for a script testing
framework at a later stage.
5.1.2
XML parser
When saving the project to persistent storage we had to choose a format for serializing the data structure. A natural choice for this is XML and as this seemed to be
more than sufficient for our needs, along with being an increasingly used standard
we decided to use this format.
38
Chapter 5. Implementation
The next decision we had to make was on the type of parser to use for reading
and writing the XML file. We identified two alternatives: DOM and SAX. The
advantage with a DOM parser is in flexibility and ease of use, while a SAX parser
is faster and more efficient. We choose a DOM parser because the speed and low
memory consumption of a SAX parser didn’t have much impact on the relative
small amounts of data we are saving to XML. The ease of use in the DOM parsers
was more important to us.
When the choice to go for a DOM parser was made a natural choice of library
was libXML2 which is widely used, well documented and available on most platforms. The latter means it will be easier if someone decides to port the application
to another operating system later.
To make our XML files as standard as possible we chose to use the SMIL
standard[7] which is a W3C standard.
5.1.3
Threads
During this project we have focused on minimizing the number of threads in the
software as many threads usually leads to quirks and unpredictable bugs in the
software when the utility threads work on the same data as the main thread. Our
software still has to be able to do several things at the same time on many occasions
or else the GUI would lock/lag and lead to annoyed users. This is done in three different ways depending on the situation: Timers(playback and animation running),
Registering code in the main loop(file monitoring) and through code which allows
the event loop to perform its processing with regular intervals(frame adding).
Some places however threads either required or more practical than the other
alternatives. For thread support in Stopmotion we have used two different libraries
depending on where the code which needs threading is located. In the presentation
and application layers where we can use Qt we have used the QThread classes to
create and run threads. These classes are very handy as well as object oriented. In
the other layers we couldn’t use Qt because this would lead to a Qt dependency
and therefore tie the whole application to this library. A user who wants to use an
another frontend such as the non-GUI frontend or a new GTK fronted he or she has
written, would then still need to compile and link the application with Qt. This is
not acceptable.
Therefore, for the other layers needing support for threads, we have chosen to
use Pthread, a POSIX thread library specified by the IEEE POSIX 1003.1c standard
(1995). Pthread has good support for creating and manipulating threads and is not
a critical dependency as it’s POSIX-compliant.
39
Chapter 5. Implementation
5.1.4
Datastructures
In our software we also needed some library for handling storage in the main memory, with lists, vectors, etc. We had several choices here and chose to use Qt’s lists
and vectors in the presentation and application layers where Qt were already an
dependency. These are easy to use and very handy.
In the lower layers we couldn’t use Qt so we chose to go with STL here as these
libraries are very flexible as well as being a part of the Standard C++ libraries.
5.1.5
Graphical manipulation
Some of the most important features in our application are the viewing modes for
helping the user stage the next snapshot.
This was at first meant to be handled by GStreamer plugins. A plugin called
ImageMixer for mixing images on top of video already existed but wasn’t included
in the GStreamer code yet so we planned on shipping this plugin with our program.
There was no plugins to cover the image differentiation and playback functionalities so we would have had to write these ourself, and we have spent some time on
investigating the GStreamer plugin system.
Later when we moved away from GStreamer to a system where we import
snapshots from other programs (see section 5.3), we needed some library to efficiently display these images and add effects to them. We could have used Qt’s for
displaying these images the way we did in the framebar, but we wanted/needed
hardware acceleration for displaying and manipulating the pictures as this is a potential bottleneck. We therefore choose to go with the SDL(Simple Directmedia
Layer) which allows us to view and manipulate images and video. As quoted from
the libSDL webpage[3]:
Simple DirectMedia Layer is a cross-platform multimedia library designed to provide low level access to audio, keyboard, mouse, joystick,
3D hardware via OpenGL, and 2D video framebuffer.
SDL gives us a lot of speed and flexibility in displaying and manipulating image surfaces and also allows for the program to be ported to other platforms than
GNU/Linux if this should become desirable at a later stage.
5.2
Custom widgets
As a media application Stopmotion needed to display the pictures in various ways
to the user. We searched around in the beginning, but we didn’t find widgets using
Qt and C++ which suited all our needs.
40
Chapter 5. Implementation
Figure 5.2: The FrameBar
Therefore we needed to write some custom widgets our self, most notably the
FrameBar and the FrameView.
5.2.1
FrameView widget
The FrameView is a widget which uses the SDL libraries to display images to the
user. It can also perform Onionskinning, image differentiation and playback at
requests. FrameView uses some paint code from an example widget from the SDL
webpage1 , but has evolved greatly from this basic widget.
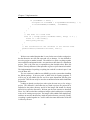
As an observer the FrameView widget is notified by the model every time
something is changed in the model. It ignores most of these notifications, but
paints the image for the frame with the number frameNumber when it receives
one of the following update requests:
void FrameView::updateNewActiveFrame(int frameNumber);
void FrameView::updatePlayFrame(int frameNumber);
void FrameView::updateAnimationChanged(int frameNumber)
5.2.2
FrameBar widget
Figure 5.2 shows the FrameBar custom widget. The FrameBar is actually a package of five widgets. The FrameBar itself, the abstract ThumbView class, the FrameThumbView and SceneThumbView classes and the SceneArrowButton.
As shown in figure 5.3 the FrameBar class inherits from both the Observer
interface and the QScrollView widget class. From QScrollView it gets the scrollbar as well as auto-scrolling2 for free and by being an Observer it can, like the
FrameView, be registered so that it receives notification when something is changed
in the model.
The figure also shows that the FrameBar can contain a series of ThumbViews.
There are two kinds of ThumbViews, the FrameThumbView which is the miniature
1
http://www.libsdl.org/cvs/qtSDL.tar.gz
The auto-scrolling is used by moving the mouse to the edge of the FrameBar while dragging a
scene, a frame or a picture from another program.
2
41
Chapter 5. Implementation
Figure 5.3: The FrameBar classes with some attributes and operations
picture of a frame as seen in figure 5.2 and the SceneThumbView which represent
the beginning of a scene.
The FrameBar will react to almost all notifications from the model and will
update the thumbviews to reflect these changes. When a frame or scene is added,
removed or moved in the model the FrameBar will add, remove or move the corresponding ThumbView accordingly. As explained in the Qt documentation3 a
QScrollView class can’t use layout managers if the contents can become larger
than 4000 pixels horizontally or vertically. As the FrameBar class needs to use
allot more than 4000 pixels for displaying all its data we had to move all the ThumbViews around by pixels using the function:
moveChild ( QWidget * child, int x, int y )
The following example shows how the ThumbView widgets are moved when
the user wants to move a selection of frames backwards in the FrameBar:
3
http://doc.trolltech.com/3.3/qscrollview.html
42
Chapter 5. Implementation
for(unsigned int i=movePosition; i<fromFrame; i++) {
moveChild(thumbViews[i], childX(thumbViews[i]) +
FRAMEBAR_HEIGHT*(toFrame-fromFrame+1), 0 );
thumbViews[i]->
setNumber(i+(toFrame-fromFrame)-activeScene);
}
for(unsigned int j=fromFrame; j<=toFrame; j++) {
moveChild( thumbViews[j], childX(thumbViews[j]) FRAMEBAR_HEIGHT*(fromFrame-movePosition), 0 );
moveThumbView(j, j-(fromFrame-movePosition));
}
The first loop moves all the ThumbViews between the first selected frame
(fromFrame) and the position to move to(movePosition) forward to make room
for the new frames. The second loop then moves all the frames in the selection to
their new position. This way of moving the ThumbViews around was very tedious
and time consuming to program as ThumbViews needed to be moved for most
kind of notifications, but because of the way QScrollView works we didn’t have a
choice.
When the user wants to move a Frame or a Scene this is done through drag and
drop. If the user for instance grabs a frame and starts moving the mouse a drag will
commence. This drag is a so called URI drag meaning it contains the path to the
file. If a dropEvent occur in a FrameThumbView it will check if the drag originated
inside the application. If it did it will tell the FrameBar to move the selected frames
to the position it is located at and if the drag originated outside the application it
will tell the FrameBar to add frames to its location in the FrameBar. This way we
get an uniform way of handling drags whether the user wants to drag them frames
to another application or move them around inside Stopmotion. We also get the
QScrollBars auto-scroll functionality by using drag and drop inside the FrameBar.
The ThumbViews extend QLabel and the functionality from this is used to add
borders and the FrameThumbViews use it to display the images. The paintEvent(..)
functions however are overloaded in both FrameThumbView and SceneThumbView. FrameThumbView extends it to draw an number on top of the image and a
note if the frame has sounds attached to it and the SceneThumbView use it to draw
everything in it:
The following code is the paintEvent(..) function for the FrameThumbView:
43
Chapter 5. Implementation
void FrameThumbView::paintEvent(QPaintEvent *paintEvent){
QLabel::paintEvent(paintEvent);
QPainter painter( this );
if(selected) {
painter.fillRect(4, 5, textWidth, 14,
QBrush(Qt::white));
painter.setPen( Qt::black );
}
else {
painter.fillRect(4, 5, textWidth, 14,
QBrush(Qt::black));
painter.setPen( Qt::white );
}
stringstream ss;
ss << number+1;
painter.drawText(5, 17, ss.str().c_str());
if(this->hasSounds) {
QPixmap noteIcon = QPixmap(note);
painter.drawPixmap(width()-32, 0, noteIcon);
}
}
The first thing that happens is that QLabel::paintEvent(..) is called thereby allowing it to paint the frame. Then the painter is set up and the background for
the framenumber is painter. After this a STL stringstream is used to cast the framenumber to a char which is then displayed. At last a sound icon is displayed in
the widget, provided this widget has a sound attached to it.
5.3
5.3.1
Video import
GStreamer
For video import we first chose to go with gstreamer which is a framework for
creating multimedia applications. The reasons for choosing gstreamer were many.
It has a fairly large base of developers, it supports many input devices (v4l, DV,
sound devices, etc) and it is the official multimedia backend for GNOME as well
as proposed as the multimedia backend for KDE 4.0.
44
Chapter 5. Implementation
Some time was spent learning gstreamer and after a lot of trying and failing we
managed to create a pipeline which displayed video from web-cameras to the user
and allowed the user to grab images and add them to the project. This pipeline was
with our application for two releases, but it soon became apparent that gstreamer
was ill suited for combining video and still pictures. For our application we also
needed still images to be mixed/onionskinned on the video as well as the ability to
combine images to a video stream and save this video as a mpeg/avi file.
Almost 150 hours was spent fighting with bugs and quirks in gstreamer without
being able to get it working properly. One issue we spent a lot of time with was that
the images we imported from .png files was broken. After a lot of time someone
told us that this was a bug with the Debian repository version of gstreamer. After
waiting for 3 weeks a new version of the gstreamer plugins library was released
and we hoped to be able to get it working now, only to discover new bugs. This,
in addition to several other issues with gstreamer, caused us to abandon it and look
for other solutions.
5.3.2
External programs
After a meeting with the project supervisor and the customer we decided to use external programs to import live video from the web-camera. The way this works is
that the user specifies a command line which calls another program that grabs a picture from the camera and puts it on the disk. Stopmotion then repeatedly calls this
command line and when the picture is saved on the disk Stopmotion imports the
picture and displays it to the user, thereby creating live video. Stopmotion comes
with several pre-set command-lines, and the Debian package has dependency to
our default grabber program which is a small application called vgrabbj.
The advantage with this way of doing it is that our application is a lot more
flexible and supports all input devices, as long as the user has a program which
can grab a picture from it. The disadvantage is that it tends to consume a lot of
resources.
We wanted to write a module for streaming video directly from V4L, but when
we finally decided to abandon GStreamer we didn’t have enough time left for both
the external program and V4L importing so we chose to go with the external programs because we though this option would to be more flexible and robust.
5.3.3
Camera viewing modes
Creating Stop Motion animations is hard and time consuming. In order to create
lifelike animations the animators need some tools to help them move the figures
between shots.
45
Chapter 5. Implementation
5.3.3.1
Onionskinning/Image mixing
Onionskinning is perhaps the most commonly used feature by stop motion animators. As explained in the user manual in chapter 3 on page 11 Stopmotion allows
the user to see the next frame in relation to the other and help them create lifelike
motions. The way onionskinning is implemented in Stopmotion is through alpha
channels.
When a new image is retrieved from the camera Stopmotion takes up to five of
the previous frames and uses SDL to add alpha channels to them with increasingly
smaller alpha values. These images are then blitted/merged together and shown to
the user. As you can see from figure 5.4 the camera frame is clears with the frames
becoming more and more faded out the further back in time they are (lower alpha
values).
To increase the efficiency the images which are merged on top of the camera
are buffered in the memory when using this mode. This was necessary as this mode
took too much resources when retrieving them from disk.
The following lines of code shows how an alpha channel can be added to a
frame image surfaces using SDL. The surface is then blitted onto the screen surface:
SDL_SetAlpha(frameSurfaces, SDL_SRCALPHA, 80/i);
SDL_BlitSurface(frameSurface, NULL , screen, &dst2);
The i variable is a loop counter which increases as frames backwards are onto
the screen. The 80/i value which is inputed in the SDL_SetAlpha(..) function
is the alpha value and as i increases this value decreases.
5.3.3.2
Image differentiating
Another mode, which was proposed by Øyvind Kolås, is the Image Differentiation
mode. Øyvind suggested we have a way to see the difference between the camera
and a given frame. This is a feature no similar program we have seen has and
the initial thought was that it would be helpful for moving an object to a previous
position in case it falls or similar.
When this feature was implemented however it proved a very useful addition
to the Onionskinning for moving the figures around, and one user even reported
that he preferred it to the Onionskinning.
The way the image differentiation is implemented is by taking the absolute difference between the three color components red, green and blue in the two pictures:
deltaRed = |red1 - red2|
46
Chapter 5. Implementation
Figure 5.4: Onionskinning/Image mixing in Stopmotion
deltaGreen = |green1 - green2|
deltaBlue = |blue1 - blue2|
This will give the output shown in figure 5.5. The implementation of this uses
SDL to access the image surface and for converting the new RGB values back to a
pixel. It originally used the two functions getPixel() and putPixel() from the SDL
webpage4 , but these were too general as they calculated the position of a pixel by
multiplying Y with the rowstride factor(pixels per row) and then added the X value
multiplied with bit per pixel. As our code never needs to access pixels randomly
but always traverses the entire surface this algorithm was later optimized to access
the surface pixel arrays directly.
The code isn’t as clear as it was before this optimization. but according to
tests it is approximately twice as fast. On a Pentium 4, 2.4 Ghz it now takes about
0.242 secs on the average to load two images and then run the differentiateSurfaces
algorithm 10 times. The test for this can be found in the directory implementation/prototypes/sdl_difference_prototype/algorithmtest. The following code shows
how the differentiation function works:
4
www.libsdl.org
47
Chapter 5. Implementation
Figure 5.5: Image differentiation in Stopmotion
SDL_Surface* FrameView::differentiateSurfaces(
SDL_Surface *s1, SDL_Surface *s2) {
int width = s2->w;
int height = s2->h;
SDL_Surface *diffSurface = SDL_CreateRGBSurface(
SDL_SWSURFACE, width, height, 32, 0xff000000,
0x00ff0000, 0x0000ff00, 0x000000ff);
//Lock the surfaces before working with the pixels
SDL_LockSurface( s1 );
SDL_LockSurface( s2 );
SDL_LockSurface( diffSurface );
//Pointers to the first byte of the
//first pixel on the input surfaces.
Uint8 *p1 = (Uint8 *)s1->pixels;
Uint8 *p2 = (Uint8 *)s2->pixels;
//Pointer to the first pixel on the resulting surface
Uint32 *pDiff = (Uint32 *)diffSurface->pixels;
SDL_PixelFormat fDiff = *diffSurface->format;
Uint32 differencePixel;
Uint8 dr, dg, db;
48
Chapter 5. Implementation
int offset = 0, pixelOffset = 0;
int i, j;
//Goes through the surfaces as one-dimensional arrays.
for(i=0; i<height; ++i) {
for(j=1; j<width; ++j) {
//px[offset] is the red value of surface x,
//px[offset+1] the green, etc.
dr = abs(p1[offset] - p2[offset]);
dg = abs(p1[offset+1] - p2[offset+1]);
db = abs(p1[offset+2] - p2[offset+2]);
differencePixel = SDL_MapRGB(&fDiff, dr, dg, db);
pDiff[pixelOffset++] = differencePixel;
offset += 3;
}
++pixelOffset;
offset += 3;
}
//Unlock the surfaces for displaying them.
SDL_UnlockSurface( s1 );
SDL_UnlockSurface( s2 );
SDL_UnlockSurface( diffSurface );
return diffSurface;
}
5.3.3.3
Playback
The playback mode is a mode where the user can see a continuous playback of
the last up to fifty frames with the camera as the final picture. This way the user
can view the next shot together with the other shots live thereby avoiding jerky
movements.
The way this is implemented is by using a starting a timer which continuously calls a function called nextPlayBack(). The interval between each time
this function is called is set by the user as explained in the user manual. The
nextPlayBack() will play the frames up to, and including, the selected frame.
After it has played the selected frame it will call the FrameViews redraw() func49
Chapter 5. Implementation
tion causing the frameview to display the picture from the camera instead of a
frame from the animation.
5.4
Video export
Exporting to video is not directly supported by the application itself. This is one
of the features which has to be handled by external programs having the ability to
run with command line options. As long as you have a command line tool such
as Mencoder or FFmpeg, you can use this from inside Stopmotion to encode the
frames to video. We only need to know how the tool is started and stopped. We
starts the encoder and runs it in a separate process when you decides to export. The
commands are set in a preferences menu as seen in section 3.8 of the User Manual.
5.5
5.5.1
Sound
The audio format interface
As explained in 4.3.3 on page 35, we have defined an interface for different audio
formats. But, what does actually an audio driver need to play sounds?
First of all, we have to decode the format to a readable format for the driver.
In most of the cases it should be a good idea to decode it to PCM – the standard
uncompressed audio format. However; the interface need to have a function for
decoding from its original format to an another format readable by the audio driver.
Before it can decode anything it need to open the file. Different formats have their
own way to open the file, so this, as well as closing of the file, have to be defined
in the interface.
We’re now ready to decode the data, but decoding makes no sense if we can’t
get the decoded data. We therefore need a defined function for getting this. The
function is defined to take a character array (used as a buffer) and an integer describing number of bytes available in the buffer. The interface should now have all
of our required functions needed to get decoded data from it.
5.5.2
The audio driver interface
The audio driver interface discussed in 4.3.4 on page 35 is implemented in such
a way that makes it easy to implement different audio drivers. At the moment
Stopmotion has an Open Sound System (OSS) based audio driver installed. This
is implemented through the OSS API. The most common way of using an audio
driver is to first initialize the audio device, then play some sounds and finally shutdown the device to freeing it so other applications can use it. It is possible to have
50
Chapter 5. Implementation
many applications accessing the device at the same time, but that requires either
support for multiple channels on your sound card or a running sound deamon taking care of it. We should not go in details on that here. Anyway, it’s actually not a
good solution having an audio driver occupying a device if it doesn’t need to do it.
Until now we have defined functions for initializing and shutdown of the driver,
and a function for playing sounds. At least we need a function for adding audio
files to the list over sounds which have to be played. The audio files is of the type
as described in the above section.
5.5.3
Let there be sound
As you have seen we have two well defined interfaces describing how the different
parts of the sound system should be implemented. Both of the interfaces makes
playing of sounds very modular. You can easily switch the OSS driver with an
another preferred driver or add new audio formats.
Each and one of the sounds which should be played during the animation are
placed sequentially in a vector. We then iterates through the vector and plays them.
Each sound is playing in a own thread that is automatically created before the
play function is called, so this is handled inside the class itself. The reason for a
own thread for each sound is the play function which is looping until the sound is
finished:
void OSSDriver::play() {
if (audioFD != -1 && audioFD != EBUSY) {
AudioFormat *tmp = audioFiles.back();
if ( tmp->open() != -1 ) {
// How many bytes can be written to the buffer
int avail = sizeof(audioBuffer);
// Fill the buffer with up to ’avail’ bytes
int written = tmp->fillBuffer(audioBuffer, avail);
// While the producer has written more than zero
// bytes to the buffer
while (written > 0) {
// flush it to the device
write(audioFD, audioBuffer, written);
// and fill again
written = tmp->fillBuffer(audioBuffer, avail);
}
51
Chapter 5. Implementation
tmp->close();
}
}
}
The sound functionality is not that good as it should be. There are a lot of things
which should be improved and fine tuned in the future. Especially synchronizing
with the frames. The sound should detect which frame to play, not the other way.
The solution that is implemented now starts playing a sound based on which frame
is playing. So, if the user has added a sound to frame number 10 and pressed the
the play button, the sound starts playing when the animation reaches that frame.
The sound will then play until it’s completed or the animation reaches its end.
In the future we would like to add the ability to define a start and stop position
for the audio files to be played. We will also add functionality for multiplexing
different sounds overlapping each other. In practice, the above text indicates that
Stopmotion has some lack of good sound functionality. We have nor focused on
getting it perfect and feature complete since it’s not one of the main functionalities.
But it’s important to emphasize that the design is well organized for extension in
the future. However, playing some background music from one or many – not
overlapping – audio files during the animation, works quite good with the current
implementation.
5.6
Serialization
The main function is running a initializing routine at startup which ensures that we
have a packer, tmp and trash directory located at $HOME5 /.stopmotion/ ready to
be used by the program. “Ready to be used” means that the directories exists and
we have read/write permissions to them. If the initializing routine fails to create the
directories, it means there is no space left on the hard drive or the user doesn’t have
permission to write or execute in its own home directory (which probably never
should be the fact, if so: we’re dealing with a very strange user). The program
displays an error message to the user and exits if one of the above cases occurs.
So, in short: the directories are checked and ready to be used if the initializing
routine was run successfully.
The reason for creating the above directories is that adding of images and
sounds always goes through the tmp directory before they eventually are saved
to a project file. If the user wants to add an image from the hard drive it means
5
This is an environment variable pointing to the users home directory, e.g. /home/foo. This is
referred to as ~/ later in this document.
52
Chapter 5. Implementation
that we’re making a copy of it in the tmp directory. Exactly the same routine is
run when grabbing an image from the camera. As described in section 5.3 on page
44, couple of images are written to capturedFile.[jpg|png|xxx] when the camera
is turned on. So, when the user decides to grab an image, we’re making a copy
of capturedFile in the tmp directory. By this way of doing it we ensures that the
original image never is lost or damaged during processing in the application.
Naturally, it might happen that the user doesn’t liked the newly grabbed image,
or a selection of images, and deletes it. Wait a minute. What if the user changes
opinion and wants the deleted image(s) back? It’s here the trash directory comes
in. The “secret” is that every image which is selected as deleted and removed from
the visible widgets, are placed in the trash directory. We can then use an undo
operation, explained in section 4.3.2 on page 34, to regenerate the images. The
regenerated images are then moved back to the tmp directory and displayed to the
user. The packer directory is used for project storage and will be explained in the
following section.
5.6.1
Project storage
A typical project created by an user contains images, scenes and sounds. The user
will normally spend a lot of time making the animation as good as possible, and
he/she will of course want to have the ability to save it for editing at a later point
in time. But how should we save all the images etc? We doesn’t want to just
leave the tmp directory opened and let the user manually add everything again next
time he/she wants to do more editing. Just imagine a project containing thousands
of images placed in different scenes with couple of sounds. Loading of a saved
project should therefore be an easy operation for the user to do. It’s not just time
consuming and cumbersome to load everything manually. It’s also bigger chance
to get the data in the tmp directory broken or changed in such a way that it affects
the created animation.
To separate the different parts of the animation and make it more structured,
we creates two directories – images and sounds – inside the packer directory.
Then, when the user decides to save the project, images are moved to the “packer/<projectname>/images” directory and sounds to the “packer/<projectname>/sounds”
directory. This will not make it easier and less time consuming for the user to load
a saved project, but it will be easier for us to create a function doing it. The only
problem is how we could determine which images and sounds which belongs to the
different scenes. It’s actually not a big problem because a XML file can do it for
us. The structure, paths to images and sounds and which scenes they belong to, is
therefore saved in a XML file located at packer/<projectname>/<projectname>.dat
(see figure5.6 on page 54). Then, in our function, we just reads the XML file and
53
Chapter 5. Implementation
Figure 5.6: The structure for a saved project
54
Chapter 5. Implementation
recursively builds a DOM tree which represents the structure. We can then use
the DOM to decide which action to do (add a new scene, image or sound). The
Implementation for this is shown here:
void ProjectSerializer::
getAttributes(xmlNodePtr node, vector<Scene*>& sVect)
{
xmlNodePtr currNode = NULL;
for (currNode = node; currNode; currNode = currNode->next) {
if (currNode->type == XML_ELEMENT_NODE) {
char *nodeName = (char*)currNode->name;
// We either have an image node or a sound node
if ( strcmp(nodeName, "img")
== 0 ||
strcmp(nodeName, "audio") == 0
) {
char *filename =
(char*)xmlGetProp(currNode, BAD_CAST "src");
if (filename != NULL) {
char tmp[256] = {0};
// The node is an image node
if ( strcmp(nodeName, "img") == 0 ) {
sprintf(tmp, "%s%s", imagePath, filename);
// Create a new fram with the given file path
Frame *f = new Frame(tmp);
// and add it to the current scene
Scene *s = sVect.back();
s->addSavedFrame(f);
f->markAsProjectFile();
}
// The node is a sound node
else {
sprintf(tmp, "%s%s", soundPath, filename);
// Get the current scene
Scene *s = sVect.back();
// with the current frame
Frame *f = s->getFrame(s->getSize() - 1);
// and add the sound to this frame
f->addSound(tmp);
char *soundName =
(char*)xmlGetProp(currNode, BAD_CAST"alt");
// If the sound has a name setted
55
Chapter 5. Implementation
if (soundName != NULL) {
unsigned int soundNum = f->getNumberOfSounds() - 1;
f->setSoundName(soundNum, soundName);
}
}
}
}
// The node is a scene node
else if ( strcmp((char*)currNode->name, "seq") == 0 ) {
Scene *s = new Scene();
sVect.push_back(s);
}
}
// Get attributes for the children to the current node
getAttributes(currNode->children, sVect);
}
}
We have now reached the point that it’s easy for the user to load a saved project,
but the directories are still wide open and easy to damage. It’s also difficult to
move the project to another location. The solution is to pack everything together
into a tarball file and append it with a .sto extension to show that it is a Stopmotion
project. This is the same way as openoffice.org has decided to have theirs file
format. The only difference is that openoffice.org uses a zip file instead of a tarball.
The implementation for packing everything into a tarball is written in pure C and
uses the libtar API.
The .sto extension is added as own MIME type to the system when installing
the Debian package. If the user prefer to doble click for opening programs, it
will be easy to just dobbel click the .sto file to open Stopmotion with the given
project file. This file can easily be moved to an another location and be loaded into
Stopmotion.
Loading an already saved project works quite the same way as for saving a
project. The difference is that when the user loads a project, the project-file is
unpacked to the packer directory and all of the images and sounds are already
placed in its respective directories. We then gets the same structure as described
above. So, if the user decides to add more images to the loaded project, everything
works as for creating a new project: The images will be added to the tmp directory
and later on moved to the directory inside the packer directory on saving. Finally,
everything is packed together in a .sto file where the name and location of the file
is chosen by the user.
56
Chapter 5. Implementation
Figure 5.7: PreferencesTool Doxygen API documentation
5.6.2
Recovery mode
You might already have been wondering about when we’re deleting all of the directories created in ~/.stopmotion/. The program has registered a clean-up function to
be run at normal program termination. Normal program termination means if the
user has pressed quit or closed the application with pressing the cross in the upper
right corner. That means, if something causes stopmotion to exit abnormally the
directories containing the data will still be intact. When the user then restarts the
program we can figure out, by checking if the directories still exits and contains
data, if the program was exited abnormally last time it was run. It’s then easy to
regenerate exactly the same structure of the program as it was at the point it was
exiting abnormally.
If ~/.stopmotion/packer/foo/ with its sub directories still exists it means that the
user had a project called foo (stored in the file foo.sto) opened. And if there also exists images in the tmp directory it means that the user had added additional images
to the foo project without saving it. As you probably remember, the deleted images
are placed in the trash directory. So even though the undo history for deleting of
images can be reproduced.
All of the above discussed directories are deleted if the user doesn’t wants to
recover the data. The initializing routine will then be run and we’re back to the
beginning where everything is “ready to be used”.
5.6.3
Preferences
Most programs have some sort of preferences that needs to be saved. For this reason we were quite surprised when Qt didn’t have a system for saving preferences,
like Javas Preferences and Properties packages.
We decided to implement our own preferences system, and this was done
through a singleton class in the Foundation layer called PreferencesTool. The PreferencesTool use libXML2 as this was already an project dependency and saves the
preferences in key-value pairs.
57
Chapter 5. Implementation
Figure 5.7 shows the api to the PreferencesTool class. As the tool is a singleton
the functions are used by calling the static get functions on the class for retrieving
the singleton instance and then call its functions, eg:
PreferencesTool::get()->setPreference(...);
The setPreferencesFile function is used to specify where the preferences file
should be saved as well as the version. In our case the preferences file is saved in
~/.stopmotion/preferences.xml.
The version is used to make the preferences for a program backward compatible. The setPreference functions are used for storing preferences. They take a key,
for example “fps-setting” with and an attribute. The attribute can either be an int
or a char. The preference will be flushed to file instantly to avoid loss of data if the
program crashes, but if one wants to save allot of preferences at the same time one
can set the flushLater attribute and then call the flushPreferences function when
all the preferences are saved. The getPreference functions are obviously used for
retrieving preferences.
The way the PreferencesTool works internally is by creating a XML tree which
mirrors the XML file. When one ask for a preference it retrieves this preference
from the three and when a preference is saved a node is attached to the three and the
node is flushed to disk. We considered using hashing for retrieving nodes, but we
decided this wasn’t necessary because of the relative small amount of preference
information almost all programs have.
The following code demonstrates how one of the the functions for adding a
preference adds a node to the internal three and flushes it to disk:
bool PreferencesTool::setPreference(const char* key,
const char* attribute, bool flushLater )
{
checkInitialized();
xmlNodePtr node = NULL;
node = findNode(key);
if( node == NULL ) {
node = xmlNewChild(preferences, NULL,
BAD_CAST "pref", NULL);
xmlNewProp(node, BAD_CAST "key",
BAD_CAST key);
xmlNewProp(node, BAD_CAST "attribute",
BAD_CAST attribute);
58
Chapter 5. Implementation
}
else {
xmlSetProp(node, BAD_CAST "attribute",
BAD_CAST attribute);
}
return (!flushLater) ? flushPreferences() : true;
}
The preferences tool, like all classes, in the foundation layer, is very general. It
can easily be reused in other application and has been used for preferences storage
in the AdminWorm application[15]. It can run on all platform libXML2 runs on
which means most platforms.
5.7
File monitoring
The ability to interact with other programs such as gimp through drag and drop is an
important feature of Stopmotion. We wanted to make this feature more responsive
so we decided to implement a file monitoring scheme.
Stopmotion uses a deamon service called FAM (File Alteration Monitor)[14] to
monitor the image files in the opened project. If one of these files change FAM will
notify Stopmotion and the file will automatically be reloaded. This result in a very
responsive way of interfacing to other applications and aids the user in creating
stop motion animations. As stated on the FAM webpage referred to above:
GUI tools should not mislead the user; they should display the current
state of the system, even when changes to the system originate from
outside of the tools themselves. FAM helps make GUI tools more usable by notifying them when the files they’re interested in are created,
modified, executed, and removed.
Stopmotion has a class in the Application layer called ExternalChangeMonitor
which supervises the file monitoring. This class communicates with FAM by using a library called libFAM. It has functions for starting, stopping, suspending and
resuming monitoring as well as a function for specifying a new working directory
when the user saves a project for the first time.
When it receives a request to start monitoring it attempts to open a connection to FAM through the function FAMOpen2(...). If this was successful it tells
FAM to monitor the tmp directory with the function FAMMonitorDirectory(...).
59
Chapter 5. Implementation
After the fam connection is set up the ExternalChangeMonitor creates a QSocketNotifier which monitors the fam connection for events. The socketNotifier will run
in the main event loop and frees us from the complications and drawbacks involved
in creating a thread for polling the connection.
When a user drags a file from Stopmotion to another program, as explained in
section 3.9 on page 23, a URI drag is performed. That means the path to the file is
passed to the retrieving application and loaded there. If the user for instance drags
the file over to GIMP, GIMP will work directly on the file.
When the user saves the file it is immediately notified by FAM. Stopmotion
receives many notifications while GIMP saves the file, so when it receives the first
notification it starts checking every 500ms if it has received another notification.
If it hasn’t it means that GIMP has saved and is done with the file. The following
function in the DomainFacade is then called:
animationChanged (const char *alteredFile)
This triggers the notifyAnimationChanged event and all the Observers are notified of the change through the function:
updateAnimationChanged(int frameNumber)
5.8
Code conventions
As we explained in the pre-project report (Appendix B.4, page 99) we chose early
to go with a standard code convention so that all the code would look similar. We
never changed these conventions so they are still in their original form and can be
found in Appendix E on page 111.
5.9
Documentation
Being an open source project it is important that people can easily get into the
development if they want to. The user might want to change something which
annoys them, write a new GUI or maybe start helping out with the development by
submitting patches.
For this reason we needed some way to document the API of our software
as well as design diagrams to document the design. We chose to use Doxygen
for documenting. Doxygen is a common API documentation system for C++ and
various of other programming languages. An example of the documentation for
a member function can be seen in figure 5.8 on page 61, and the output when
converting it to HTML is shown in figure 5.9 on page 61.
60
Chapter 5. Implementation
Figure 5.8: Doxygen documentation style
Figure 5.9: Doxygen HTML output
61
Chapter 5. Implementation
For writing design diagrams we used an open source program called Umbrello
UML for design diagrams.
All the documentation for Stopmotion was too big for this report (about 200
pages in PDF format), but can be found under documentation on the Stopmotion
webpage[4] and is retrieved directly from our CVS-branch so it is always updated.
62
Chapter 6
Testing
For an open source software project, like any software project, testing is extremely
important. Getting testers is not easy when you can’t pay them, and for the testing
to have real value the testers should preferably have a stake in the outcome of the
application.
For this reason we have spent quite a bit of time finding and communicating
with people who are interested in and need Stopmotion and all of this is explained
in this chapter.
63
Chapter 6. Testing
6.1
Unit tests
We started out doing unit-testing and TDD[5] using the CxxTest unit testing framework (like Javas JUnit) which, after testing 5 different frameworks proved to be the
most flexible. After the first two iteration we had 20-30 tests running for the domain layer with a nice green bar.
The unit tests however required a lot of maintaining and and due to us programming with C++ the tests needed to be compiled before being run. All of this
took too much time, with too few benefits so we decided the time would be better
spent on other tasks, and chose to focus more on user testing instead.
Other problems with the unit tests in this project was that they they broke
very easily as our program design continuously changed. As mentioned earlier
we choose an evolutionary development process and only designed the core of the
software as well as the architecture up front. The design at lower levels, such as
function prototypes, continuously changed and this broke the tests on a daily basis
without really signaling errors in the software.
We still consider TDD to be great, but it was not for this project, and we are
not sure it is worth the overhead when programming in C++, unless there are more
programmers. Then it would be more important for the programmers to “protect
their code” with tests, which is much of the rationale behind unit testing in methodologies such as XP.
6.2
Script tests
As mentioned in the section on the choice of GUI (5.1.1 on 38) we created the Presentation Layer of the software highly modular, and also created a NonGUIFronted
which could be used through command lines. This allows us to create a script testing framework that can test the creation of projects, etc, but this framework has not
been implemented yet.
6.3
Acceptance/User testing
User testing have been considered the most important form of testing in this project
and we have therefore actively sought testers for our application. Being an open
source project we had a large community to recruit testers from. To stimulate
people to test the application we released the first version very early, only two
weeks after the pre-project, and then released every second week (see chapter 8
for more on this). After a while people in the open source communities became
interested in the application, downloaded and tested it.
64
Chapter 6. Testing
Having testers who were actually interested in the outcome of the application
lead to us getting constant feedback, suggestions and bug reports from actual users.
This enabled us to fix most of the bugs in the application and make sure it worked
on different GNU/Linux distributions with different input devices.
Another benefit with having lots of different people testing the application was
that they all use the application different and in ways we didn’t expect, and this
uncovered several weird bugs and quirks.
We also used much of the developer gathering in Greece to get people to test
our application, and in the fifth iteration and the post-project phase we made several
small animations, as well as one large to test how the program performed when
using it seriously.
In addition we did a lot of testing ourself. One of the tests we ran was a stress
test where we added thousands of pictures to see if Stopmotion could handle them.
It could.
65
Chapter 7
Infrastructure, tools and
packaging
In this chapter we have collected some sections that are mostly technical, but which
we didn’t think fitted in the implementation chapter. We wanted to keep the Implementation chapter cohesive and only write about issues related to the implementation of the actual application.
This chapter explains how we have managed documents and how the infrastructure we have created for distributing these documents work. We will also describe
how the Stopmotion packages are built and the various tools we have used during
our project.
66
Chapter 7. Infrastructure, tools and packaging
7.1
Tools
Stopmotion has become an application with a relatively large amount of classes
and allot of code lines. To navigate through these classes effectively and recompile
repeatedly without having to stare at the roof for minutes at a time, it’s necessary
to use different tools speeding this up. We have used the following tools helping
us with that:
Make
Make is an intelligent tool which controls the generation of executables of a program from its source files. It builds the executable based on information described
in a makefile following a strict syntax. The makefile should therefore be well written and has to be error free for make to interpret it.
The advantage of using make is that it automatically figures out which files it
need to recompile, and which ones it doesn’t need to recompile. It determines if
a source file is dependant on an another source file and recompiles them if one of
them has changed. Make uses the timestamp for the file to figure out when it was
last modified and uses this to find out if it need to be recompiled. That means it
doesn’t actually check the contents of the file for differences.
Ccache
As described above, make only checks the timestamp for a file to find out if it
needs to be rebuilt. That means a file will be recompiled if you opens and saves
it without making any changes. If the file also has dependencies to other files,
make will decide to recompile them too. It would be really nice if we only could
recompiled the files which actually has its contents changed. Ccache can help us
with that.
Ccache uses wrappers for both gcc and g++ and has a cache containing the
contents of previously compiled files. The wrapper compiler acts exactly like its
“original” compiler, so the source code is interpreted and compiled the same way.
The only difference is that Ccache compares the content of a file with the content
of the same file found in cache before it compiles it. Recompiling only happens if
the file is different from the file found in cache. This often results in a five to ten
times speedup on recompile. In our case we have measured it to be 11 times faster
on its maximum.
67
Chapter 7. Infrastructure, tools and packaging
Figure 7.1: A very basic qmake project file
QMake
Writing makefiles by hand is time consuming, boring and very error prone. QMake
is a tool created by Trolltech which auto-generates the makefiles and takes care
of getting the right dependencies for the running platform and compiler. Since it
doesn’t have super cow powers it needs to be fed with some input from a project file
(.pro). This file can be auto-generated by qmake itself by running qmake -project in
the top-level directory containing the source code. QMake will then scan through
all of the files in the running directory and sub-directories and generate the file. It’s
also possible to edit the file by hand if you need to add additional information. The
project file format is simple and human readable and a very basic example file can
be found in section 7.1 on page 68. When the project file satisfies all of your needs,
the makefile can be generated with executing qmake <filename>.pro.
Qmake will auto-generate makefiles and do a lot of job for us, but in our case
we still have to do some work on the .pro file. It’s not sufficient to let qmake
auto-generate the .pro file because of the dependencies tied to Stopmotion. It’s
necessary to add some include paths and linking parameters which are specific for
these libraries. By the way, this isn’t good supported by the format if you use
pkg-config or similar tools. In our case, when using sdl-config, we had to use sed
and grep like this to get it work: INCLUDEPATH += $$system(sdl-config –cflags
| sed -e ’s/-I//g’). We also had to list some other files to get them included with the
tarball generated with make dist.
In addition the .pro file is also used when generating the translation files, but
this is explained in section 7.2.
68
Chapter 7. Infrastructure, tools and packaging
KDevelop
KDevelop has a separate QMake template which is excellent to use when programming Qt applications. KDevelop takes care of editing the .pro file with a tool called
QMake Manager. This tool will automatically add information needed in the .pro
file when adding new header files or source files to the project, and it will not
override the manual settings such as the include path mentioned above.
In addition to this there’s a lot of short cut keys such as F8 for compiling,
Shift-F9 for executing the program, Ctrl-Shift-s for getting a Doxygen template for
documentation etc. It’s easy and quick to move between header files and theirs
source files, and a lot of external programs such as debugging tools are available
from the menus, if they’re installed on the system.
7.2
Internationalization
Internationalization is important for any software, perhaps even more so for an
open source project. We aim at having users in a variety of countries in all parts
of the world and internationalization and translation of the application is therefore
very important. We can’t expect everyone to read English, especially when our
software is primarly aimed at students in primary and secondary schools.
Qt supports internationalization and provides some functions and tools which
eases this work. All text in a Qt application which should be translated to various
languages have to use QStrings and has to be processed with the tr() function.
Here is an example of how some user visible text (a tooltip using HTML formating), which needs to be translated are entered using the tr function:
infoText =
tr("<h4>Remove Selection (Delete)</h4> "
"<p>Click this button to <em>remove</em> "
"the selected frames from the animation.</p>");
As mentioned above Qt has several tools to ease the translation process.
Ts files
The lupdate program takes the stopmotion.pro file and the source-code as input.
It then scans through the source code looking for instances of the tr() function.
All of these instances are added to XML based files with the extension .ts (eg.
stopmotion_no_nb.ts, stopmotion_gr.ts, ...). This file contains the English text,
69
Chapter 7. Infrastructure, tools and packaging
Figure 7.2: Translation fields in a .pro file.
from the tr() functions as well as the translation in the language for that file. The
translators can then use a tool called Qt linguist to translate the .ts files.
Before using lupdate on the .pro file however, some fields have to be added to
this describing which translation files to make as shown in figure .
When some or all of the text have been translated one can create a .qm file
using lupdate program, again with the stopmotion.pro file as input. The .qm files
can then be loaded in the source code using the QTranslator class and used to
translate strings.
Po files
The system with the .ts files is all one should need for translating the application,
but as we are working on an open source project we can’t tell people to do things
our way. If we want people to use their spare time for free to help us translate our
application it has to happen on their terms.
The translators in the Skolelinux didn’t like the .ts files as they were accustomed to a file type called .po. To recruit translators and to be able to upload
our files to the Skolelinux i18n repository we needed .po files of the strings to be
translated.
Qt used to use this format in older versions so we were able to find some tools
called findtr, msg2qm and mergetr. findtr will scan through the inputed source files
and produce a .po file. msg2qm produces .qm files from the .po files and mergetr
will merge to .po files.
One problem we had with the findtr command was that it was less intelligent
than the equivalent lupdate command. This meant that we had to change some
parts of the source code in order to allow it to find the strings to translate. We also
made some small scripts to ease the use of the findtr command to create po files for
many languages. These scripts can be found in section F.2 on page 117.
To translate the .po files there are several tools out there. They are in ASCII
format so one could use any text editor, but if one want a graphical environment for
the translation one can for example use the KBabel program, which is very popular
in the KDE world.
70
Chapter 7. Infrastructure, tools and packaging
Implementation
Blanchette and Summerfield points out in chapter 15 of their excellent book on
Qt programming[10] that for most application it is enough to set the language at
startup. We wanted the user to be able to switch language at runtime so we had to
go through some extra effort to do this. When the user selects a new language we
have to retranslate all the strings in the program so that Qt updates them.
The user can change language by going to the Settings->Languages menu.
Stopmotion dynamically detects and loads all the translation .qm files which have
been translated or partly translated and adds them to this menu. With Qt program it is customary to place the translation files in the catalogue /usr/share/<programname>/translations and the translation files for Stopmotion is thus placed
in the catalogue /usr/share/stopmotion/translations when one installs it from the
Debian package.
Our module for creating language menus and loading translators (LanguageHandler) was another piece of code which proved to be very general and as such
our sister Skolelinux project, the gnup project, was able to use the class directly in
their AdminWorm application[15].
Stopmotion has currently only been translated to English and Norwegian no_NB,
but now that we have .po files and now that the strings have stabilized we think we
should get some speed in this process.
7.3
Packaging the program for distribution
Gunzipped tarball
This is the most simple format for a package. It only contains source code and files
needed to build the program. Dependencies are often checked with a configure
script which gives an error if unmet dependencies are found. The user is responsible for getting the libraries needed to build or run the program. In other words, the
user needs to do everything by hand for getting it up and running. However, many
peoples still prefer to do it this way, especially Slackware users.
In our case, this kind of package isn’t difficult to build since Qmake already
has added a section in the Makefile taking care of this. Running make dist will give
us the gunzipped tarball, named stopmotion.tar.gz, which is ready to be shipped
out to the people. To make it easier for the people to see which version the new
package reflects, we repacks it with the name stopmotion-x.y.z.tar.gz, where x, y
and z are the current version (e.g. 0.3pre.2). All this is done automatically with a
script which will be further described below.
71
Chapter 7. Infrastructure, tools and packaging
Debian package
One of the most fabulous things with Debian is the package management system.
In contradiction to the simple tarball described above, everything is done automatically when installing a Debian package. Each and one of the dependencies to a
package are downloaded and installed when installing the package itself. It can do
a lot of more things too. However, to get such a complex package management
system working well, packages have to follow strict rules; they have to be fully in
line with the Debian policies.
When the 2.0 version of Stopmotion was finished in late of march, we decided
to try getting this excellent software into Debian. The first step was to report a
“Request For Package” (RFP) into the Debian Bug Tracking System (BTS). RFP
means that someone has found and an interesting piece of software and would like
someone else to maintain it for Debian. The bug report which was sent to the BTS
can be read in appendix G on page 124. We had to do this because no others than
Debian developers can upload packages to the repository.
After two weeks nobody had responded to our RFP, but we could still see the
light in the tunnel. We knew that it would be at least three official Debian developers at the upcoming gathering in Greece. The chance for catching one of them was
therefore good. We succeeded with that. Andreas Schuldei, a German software
developer, was willing to be a sponsor for the package. A sponsor is a Debian
developer who acts as a mentor; they checks the package to see if it’s packed correctly and uploads it to the Debian archive when they’re satisfied with it. One of
the group members therefore needed to be a maintainer for the package.
Building a Debian package is not a very complicated task if you have some
experience with GNU/Linux and Unix programming. But, if you’re a real novice,
it’s hard. An experienced Debian developer has stated the following [13]:
One thing is certain, though: to properly create and maintain Debian
packages you need man hours. Make no mistake, for our system to
work the maintainers need to be both technically competent and diligent.
Since one of the project members already had builded few Stopmotion packages
and became familiar with the most important Debian policies, it wasn’t that hard
getting the package correct. So, a few days after we had arrived Norway and was
back in business, we had our first package into the Debian upload queue. After
a while the package move on to the Debian repository1 and now everybody who
uses Debian can easily install our program by typing the following command in
their consoles:
1
http://packages.debian.org/stopmotion
72
Chapter 7. Infrastructure, tools and packaging
apt-get install stopmotion.
In other words: Our dream came true.
After the package had been built twice by hand, a bash script (see appendix F.1
on page 114) was created to automate the process as much as possible. The script
creates a gunzipped tarball which contains all of the necessary files needed to build
the application. The .pro file is also changed so compiler flags are switched from
“debug mode” to “release mode”, which means a more optimized executable. The
tarball is then used to build the Debian package. When the building is finished and
the output from lintian – a Debian package checker – is ok, everything is uploaded
to one of the group members private Debian repository. Andreas is then given a
hint about that a new package is available. He then gets the necessary files from
the private repository and checks them. Everything is then signed with his GPG
key and uploaded to the official Debian repository if the package is ok.
7.4
The Stopmotion webpage
Being an open source project it was important to have a proper webpage[4]. The
webpage is usually the first thing a potential user or contributor sees and if it doesn’t
give them the right information they will move on. Therefore we have spent allot
of time and effort on creating a webpage which is informative and easy to navigate.
Our webpage literally contains all the information there is about the project.
It isn’t very fancy with flash menus, etc, but it is visually tasteful and it serves its
purpose as a portal for the our project.
The first thing a potential user or contributor wants to see when they enter a
open source project website is screenshots, a link to a download section and some
information about what they can use the application for. All of this is provided
on our front page as shown in figure 7.3. In addition we also have the following
sections worth noting:
• The News page where we make announcements.
• The Download page one can download the packages for Stopmotion, both
as Debian packages (i386 and powerpc), as tar.gz files and as rpm packages.
There is also information there on how one can download the entire CVS
branch, a link to the ViewCVS as well as some example animations and this
report.
• The Screenshots page with more screenshots presenting the various aspects
of stopmotion.
73
Chapter 7. Infrastructure, tools and packaging
Figure 7.3: Stopmotion webpage
• The Documentation page where all the documentation for this project is,
including the user manual, the design and requirement documentation, the
API documentation and the general project documentation.
• The Translators page where we have information for potential translators
including translation files in both .ts and .po format (see section 7.2 on page
69).
Our webpage has been quite popular and some of our users and testers originally
found us through it. It is ranked among the top sites on google for the search string
“stopmotion”, sometimes being number one, and we have had more than 1100
unique hits when writing this.
In addition to our main webpage we also have a section on freshmeat2 where
we have 650 hits and 7 subscribers as well as sections on other webpages which
we never even registered at such as linuxlinks3 and directory.fsf.org4 .
2
www.freshmeat.net
http://www.linuxlinks.com/portal/cgi-bin/search.cgi?query=stopmotion
4
http://directory.fsf.org/graphics/anim/Stopmotion.html
3
74
Chapter 7. Infrastructure, tools and packaging
7.4.1
Maintenance
The webpage contains a lot of text which isn’t changed over time, but we also have
sections with highly dynamic content. Especially the sections containing downloadable packages, API doc and general documentation such as this project report
and iteration plans can change on a daily basis.
From the beginning of we wanted the newest versions of all our docs to be
easily available at all times for people interested in the project. A script responsible
for creating PDF documents from all of our LYX files was therefore early created.
This script was set to run in a cron job every second hour. It updates a pool with the
newest files from the CVS server – where everything is continuously checked in by
us – and creates PDF documents from all the LYX files in this pool. All of the PDF
files are then automatically moved over to the webpage, where they become www
readable when the export process is finished. The PDF files on the web site will
have the same directory structure as the LYX “source” files have on the CVS server
and since this directory structure is well organized it’s easy to navigate. It also
makes it usable for us when we have to read the docs ourself. The group members
has actually used the webpage consequently for reading the docs as it is faster to
navigate than our own directories and already have the files in PDF format.
The Stopmotion manuals are also updated by a script which builds the PDF and
HTML versions using docbook2PDF and docbook2html and this script also runs
as a cron job. This way we never have think of it and more important, the users
always have the latest version of the documentation.
A similar script was created for generating the API doc in HTML format with
Doxygen. This one wasn’t set to run in a cron job since it sometimes needs manual
editing. However, the API doc can easily be updated and uploaded to the webpage
by running the script allowing us to do this on a daily basis.
The webpage is updated by a script with new packages immediately after they
are builded and ensured to be error free. This makes the packages available for the
hole world as soon as possible.
75
Chapter 8
Cooperation with the open source
community
During this project we have had to cooperate with loosely coupled open source
communities such the Skolelinux community.
The Skolelinux community is structured around mailing lists and IRC channels
and communication with them usually went through these. It is based on volunteer
work and although there are a few people who are employed the vast majority
work for free. This has been a key factor to us when trying to get people involved
as there are no one who can tell anyone what to do. We have therefore tried to
make the application appealing and to inspire people to get involved in the testing,
debugging, translation and further development.
76
Chapter 8. Cooperation with the open source community
8.1
Spreading the message
As previously stated one of the most important factors, if not the most important,
of an open source project is getting people involved in the project and getting them
to use the software. This cannot be stressed enough as an open source application
which isn’t used will die. Because of this we have spent much time and effort on
advertising our project. As explained earlier we had allot of incremental releases,
and for every one we advertised it on up to seven national and international mailing
lists as well as through repositories such as freshmeat1 and linuxlinks2 .
We have also worked hard to get Stopmotion into repositories such as the Debian archive thereby not only making it easier for people to get it, but also getting
free publicity.
8.2
Cooperation with contributors
Cooperation with contributors for the most part went through email and IRC channels. Our testers would send us an email suggesting new features and notifying us
of current bugs.
Some of the people who were interested in the project and therefore contributed
with suggestions, testing and bug-reports found us through the mailing lists and
freshmeat page, but some, like for example Aardman Features3 found us through
search engines and contacted us through the email at our webpages. Some of these
emails are added in appendix G on page 121.
When people contributed to the project in one way or another we always tried
to respond as quick as possible if only to say we are on it. This way make them
feel like their opinion matters and this stimulates them to contribute more.
8.3
Development gatherings
As a Skolelinux project we are expected to attend their developer gatherings. These
gatherings are meant as a way for the community to come together, get to know
each other and work hard for a couple of days on improving Skolelinux. The
gathering, including the transportation to it, are for the most part paid for by the
“Fri programvare i skolen” organization.
1
www.freshmeat.net
www.linuxlinks.com/New/
3
The Wallace and Gromit/Chicken run people
2
77
Chapter 8. Cooperation with the open source community
Figure 8.1: Typical open source development
8.3.1
First developer gathering
The first developer gathering was held in Oslo in the weekend from the 28th to
the 30th of January. On this gathering we spent most of the time getting to know
people, explaining and getting input on our program and coding.
The gathering was a good experience and helped us in understanding the requirements of our application and what it can become. We got a lot of suggestions
on everything from GUI organization to how to manage releases and cooperation
with the community. We also managed to get some people interesting and some
agreed to help us with the user/acceptance testing of the software.
8.3.2
Second developer gathering
The second developer gathering was held in Nafplion, Greece. On this gathering
we spent a lot of time demonstrating and advertising our software, writing user
manuals as well as searching for a Debian sponsor.
We found one person, Andreas Schuldei, who was willing to sponsor us so that
we could get into the official Debian repository. We also had a presentation for
everyone on the gathering, which included both teachers and developers, where we
demonstrated the use of Stopmotion.
In addition to this we were interviewed by a journalist from Magaz, The Greek
Linux Magazine, who wanted to write an article on us. This article in will be
published in the next edition of the magazine. We also spent some time staging
new screenshots of Stopmotion 0.3 both for the magazine and our webpages.
78
Chapter 9
Discussion of results
In this chapter we have written subjective opinions on our work and on the technologies we have had to use. Some of the technologies discussed earlier are readdressed here without the objectivity we have had to use in other chapters.
9.1
Evaluation of the result
During this project we have created a complete functional software with all the
most important features which were sketched out in addition to some which wasn’t
uncovered until well into the project.
According to the requirement specification in chapter 2 we have completed all
the initial usecases except from the “Add subtitle” usecase and the microphone part
of the “Import sound” usecase. The latter can however easily be done through the
interfacing with for example GIMP (see section 3.9 on page 23) and the sound import usecase was never prioritized during the project as there are other GNU/Linux
applications such as Audacity[1] which are custom made for this.
Features we didn’t uncover in the initial requirement analysis, but which were
later conceptualized are for example the storage scheme with tarball files, image
differentiation(section 5.3.3.2), playback(section 5.3.3.3) and the file alteration
monitoring(section 5.7). These were considered so practical that we prioritized
these before less valuable features such as subtitles.
We are also very pleased with the way video import and export turned out
(section 5.3 and 5.4). By using external programs we decrease the list of library
dependencies and increase the flexibility of Stopmotion enormously, and after seeing this in practice we believe this solution was actually better than the initial drive
toward multimedia frameworks such as GStreamer and video4linux.
79
Chapter 9. Discussion of results
9.2
Evaluation of the groups work
The group have worked well together and we have only had one conflict which was
quickly resolved. Being only two people, and considering the amount of marketing
and communication we needed to do, we have had to work long hours.
In the beginning we didn’t explicitly distribute tasks between the members and
worked back and forth on the tasks within one iteration. After a couple of iterations
we started to distribute the tasks more strictly to get more control over what the
individual should do at a given time and this worked very well.
All in all we feel we have worked hard and steadily throughout the entire
project period and are satisfied with our effort. Logs of our work day-by-day and
meeting summaries can be found in the Documentation section of our homepage
under “Project files”.
9.3
Evaluation of choices and technologies
When working on this project we have sometime stood at crossroads where we
had to make a lasting commitment to a tool, library or design. We feel that most
of the choices we have made have been sound, but with the wisdom that comes
with looking backwards we see that there are some choices we should have made
differently.
Development model
As explained in the pre-project report in section B.6 of the pre-project report as
well as appendix C we chose to go with a light-weight approach to evolutionary
development, planning the iteration right before they begin using iteration plans.
This is a choice we felt was good as it gave us some direction without giving us too
much overhead. Being only two people methodologies such as RUP would have
been overkill.
We never quite managed to get the iteration locks to work, being an open source
project, but all in all we are happy with our development model. Now that we have
some experience with open source development we feel that model which plans the
project up front such as Incremental development or the Waterfall model are very
ill suited for these kinds of projects. Such models are just to rigid for this kind of
development as much of the strength with open source development is it’s dynamic
nature and evolutionary growth over time.
80
Chapter 9. Discussion of results
Video import/export
As described in section 5.3.1 of the Implementation chapter we planned on using
the GStreamer library from the start for doing video import and export. This library
lead us to no end of troubles and we as mentioned we spent up to 150 hours trying
to get this library working. In retrospect we probably shouldn’t have spent this
much time with it, but there was no way to tell that it wasn’t yet sufficient to our
needs and as it was the media backend in Gnome we had a lot of hopes in it.
Even though we, as stated above, spent up to 150 hours on gstreamer the number of hours actually lost is probably much lower. The work with gstreamer thought
us more about how this part of our application should work and allot of the design
could be reused with the new approach. A more reasonable estimate of the hours
we lost is maybe around one hundred hours.
Although we did choose gstreamer we didn’t put all our eggs in one basket. We
started out by creating some prototypes testing it out, and it wasn’t introduced in
our program before we had prototype which could show video from a webcamera
and grab pictures. Already at this stage GStreamer proved troublesome so we did
as we like to do with most libraries, we refactored out the code for using it and
limited it to some selected classes using polymorphism to separate the interface
and the implementation. This way it was easy to to remove GStreamer without
changing many classes when we decided to move away from it, and it will also
be easy to reintroduce it if this is desirable at a later stage. The old classes for
using GStreamer to display video and capture frame is actually still in the CVS,
although it isn’t compiled/linked anymore, and can probably be plugged in with
only a couple of hours work.
The approach with the external program was one we never thought of in the
beginning of the project and when it was first suggested we viewed it with sceptism.
Now, that we have seen this solution in practice, we actually think it is better than
GStreamer would have been if it was less buggy and we are very happy with this
implementation.
C++
As explained in the pre-project report in appendix B we chose to go with C++ from
the start for making our application, despite discouragements from our supervisor
who felt that C++ was a cancer. The most prominent alternatives we had to C++
was C.
We are quite happy with the choice of C++. Although we couldn’t develop as
fast as we would have been able to if we could have used programming languages
such as Java and C# the resulting application is much faster.
81
Chapter 9. Discussion of results
Although we agree with some of the critique leveled against C++ we still feel
that it is a good programming language and are very comfertable using it. We never
really had any problem related to using C++ and choosing this language enabled
us to use the Qt libraries.
Qt
In appendix B we also explain our reasons for choosing Qt. After having spent a
lot of time working with this library we still feel that it is great. It is easy to use,
very well documented and it is also quite flexible.
The QMake system is also a plus with Qt as this eases the process of creating
makefiles as compared to the GNU Automake system.
The only drawback with using Qt is that we had GPL licence the application.
The GPL licence is infectious and we would therefore have preferred to ship our
application with LGPL.
KDevelop
All the code in this project has been written using the unstable release of KDevelop
(KDevelop3). Although this release is still a bit buggy it has a lot of nice feature
which KDevelop2 doesn’t have and in addition it is very integrated with Qt. We
think that this environment is very good with much support and would have used it
again.
LATEX 2ε and LYX
This report, as well as almost all the documents we have produces are written using
LATEX, mostly through the LYX frontend. Using LATEX was never a question for us
as we had used this document processor for a couple of years now, and we feel it is
vastly superior to WYSIWYGs1 , like Ms Word and Openoffice Writer, for writing
medium to large documents and more so if these contains many figures or tables.
It takes care of all the typesetting and we only have to focus on the structure of the
documents, not how it should look.
Just before the project began we discovered LYX which is a graphical fronted
for LATEX. LYX claims, somewhat sarcastic, to be a WYSIWYM2 and exports
documents by generating LATEX code which is then run through the LATEX compiler.
LYX has several benefits. It eases the process of creating LATEX code by hiding
much of the tags from the user, but it is still possible to use custom LATEX commands
1
2
What You See Is What You Get
What You See Is What You Mean, pun on wysiwyg.
82
Chapter 9. Discussion of results
through so called ERT(Evil red text) boxes, which we have used extensively for
advanced functionality.
Although LYX in many cases speeds up the process of creating documents it
is still quite buggy and and we feel it sometimes makes it too easy to tweak the
outputs. This is bad because LATEX knows better than the user how things will look
best in 99% of the circumstances.
One valid alternative to using LATEX would have been to use Docbook for all
the parts of the document, but we don’t feel that the Docbook processors give as
nice output as LATEX does and we are altogether more comfertable with LATEX.
CVS
When working on an open source project CVS or similar systems like Subversion
or Bitkeeper is essential. Open source projects need to make it easy for people to
retrieve and modify source files.
Skolelinux use the somewhat old CVS system for version control and source
code distribution. On of the demands placed on us early was that we had to use
their CVS. This was never a problem for us as we were accustomed to working
with such systems and can’t imagine developing software without.
The Skolelinux CVS is linked to a mailing list where all commits are posted. At
the first developers gathering one in the Skolelinux, somewhat jokingly, grilled us
about spamming down his inbox, so we started using a macro called CVS_SILENT
to suppress the commits from the mailing lists. The Skolelinux CVS also use
ViewCVS so that one can access all the versions of all files through a web-browser
and a link to our ViewCVS branch can be found on our webpage. ViewCVS was
very useful for us when working on the code as it allowed us to see old source
code, and even get back old functions.
The things we love the most about CVS is that we never have to worry about
loosing anything and that we can edit any file without asking the others if they are
using that file as CVS will automatically merge them. CVS is a great tool and we
have used it actively, with about 3700 commits in total throughout this semester.
9.4
Further work and new projects
When writing this the version number of Stopmotion is 0.3. As explained above in
section 9.1 it contains almost all of the required features, except from sound import
through microphones and subtitles.
Many of the features in Stopmotion could however be extended and refined.
Further work should primarly focus on testing Stopmotion with more input devices
83
Chapter 9. Discussion of results
such as HDTV and make out-of-the-box profiles for these. This should be possible
with Stopmotion as it is, but needs to be tried out and we never had such devices
at our disposal. We think we might get Neil Baker at Aardman Features to help us
with this as he has offered to help us with testing and the GUI.
As a fairly new and relative complex open source application Stopmotion haven’t
had time to fully mature/stabilize and further testing and some debugging is therefore also required. The group however will continue to work on maintaining and
polishing Stopmotion mainly under the Skolelinux banner and we hope to reach
1.0 not too far into the future.
84
Chapter 10
Conclusion
We have now spent half a year completing our final project at HIG. During this
semester we have learned a lot about software development in general and open
source development in GNU/Linux in particular. This have been a new way of
working for us with a community of user who constantly want something added or
changed. We have therefore learned much about communicating with people, advertisement and marketing which have been some of the key factors in this project.
We decided early on that we didn’t want to spend half a year creating something
which would then become abandoned, so we have gone to great lengths to advertise
and spread our work and we feel we have succeeded in this beyond our hopes.
As previously mentioned Stopmotion has been accepted in two of the major
GNU/Linux distributions as well as being linked on several portals. It has been
tested in several countries such as Greece, where a Linux magazine wrote a article
about it, Germany and Norway where it has been tested by students and teachers
and England, where Aardman features1 contacted us and expressed their interest in
it.
We have also had to investigate and learn a lot of libraries, standards and techniques which were previously unknown to us and this has taught us much about
navigating information and more importantly, avoiding pitfalls due to bad, lacking
or even wrong documentation or advice from people.
We are especially pleased with the architectural solutions in Stopmotion as
explained in chapter 4. We have learned a lot about design as well as how to make
software modular and this is all knowledge we will bring with us into later projects
when we finish at HIG.
1
The Wallace and Gromit/chicken run people
85
Bibliography
[1] The free, cross-platform sound editor, 2005. http://audacity.sourceforge.net/.
[2] Observer design pattern, 2005.
http://sern.ucalgary.ca/courses/SENG/609.04/W98/lamsh/observerLib.html.
[3] Sdl – simple directmedia layer, 2005. http://www.libsdl.org/.
[4] The ultimate stopmotion webpage, 2005.
http://developer.skolelinux.no/info/studentgrupper/2005-hig-stopmotion/.
[5] Kenth Beck. Test Driven Development: By Example. Addison-Wesley Professional, 2002.
[6] Ralph Johnson John Vlissides Erich Gamma, Richard Helm. Design Patterns.
Addison-Wesley Professional, 1 edition, 1995.
[7] Chris Forno. Smil, 2005.
http://ttt.forno.us/en/tutorial/learning_to_smil/introduction.html.
[8] Hans Rohnert Peter Sommerlad Michael Stal Frank Buschmann, Regine Meunier. Pattern-Oriented Software Architecture. John Wiley & Sons, 1 edition,
1996.
[9] Gnome. libxml – the xml c parser and toolkit, 2005. http://www.libxml.org.
[10] Mark Summerfield Jasmin Blanchette. C++ GUI Programming with Qt3.
Pearson Education, inc, 2004.
[11] Moshe Bar Karl Fogel. Open Source Development with CVS. Coriolis Group
Books, 2001.
[12] Craig Larman. Applying UML and Patterns: An Introduction to ObjectOriented Analysis and Design and the Unified Process. Prentice Hall, 2 edition, 2001.
86
Chapter 10. BIBLIOGRAPHY
[13] Josip Rodin. Debian new maintainers’ guide, 2005.
http://www.debian.org/doc/maint-guide/ch-start.en.html.
[14] SGI. File alteration monitor, 2005. http://oss.sgi.com/projects/fam/.
[15] The GNUP team. Gruppe nr. 8, skolelinux og nagios[Group nr. 8th,
Skolelinux and Nagios], 2005.
http://hovedprosjekter.hig.no/v2005/data/gr8_nettverk/.
[16] Trolltech. Qt, 2005. http://www.trolltech.com/products/qt/index.html.
[17] Dimitri van Heesch. Doxygen, 2005. http://www.doxygen.org.
87
Index
Make, 67
Model, 33
Aardman, 121
Architecture, 27
Audio
drivers, 35, 50
formats, 35, 50
Observer, 32
push model, 32
Onionskinning, 46
Open Sound System (OSS), 50
Open Source, 26
BTS, 72
C++, 81
Ccache, 67
CVS, 2, 75
CxxTest, 64
Packaging for distribution, 71
PDF, 75
POSIX, 39
Preferences, 57
Project storage, 53
Pthread, 39
Debian package, 72
Design, 33
Development Model, 3
Directory structure, 52
QMake, 68, 82
Qt, 38, 82
Facade, 28
Frontends, 30
Recovery, 57
Redo, 34
Requirements, 6
Management, 9
Supplementary specification, 7
Usecase, 7
RFP, 72, 124
RUP, 6
GPL, 82
GStreamer, 44
GUI, 38
Gunzipped tarball, 71
Internationalization, 69
KDevelop, 69, 82
SDL, 40
Singleton, 28, 57
Skolelinux, 1, 2, 38
LaTeX2e, 5, 82
Lintian, 73
Linux, 1
LyX, 82
TDD, 64
Testing, 63
88
Chapter 10. INDEX
Unit tests, 64
User testing, 64
Threads, 39
Tools, 67
Translation, 69
Undo, 34
Usecase, 104
v4l, see Video4linux
Various emails, 119
Video
Export, 50, 81
Import, 44, 81
Video4linux, 45
View
Image differentiating, 46
Image Mixing, 46
Playback, 49
Webpage, 73
XML, 39
XP, 3, 64
89
Appendix A
Terminology
ALSA
Alpha channel
API
APT
BTS
Ccache
Cron job
CVS
CxxTest
Debian
Debian package
Docbook
Advanced Linux Sound Architecture. Provides audio and
MIDI functionality to the Linux operating system.
An extra layer of a 32 bit image which is used to specify
the transparency of each pixel in the image.
Application Programmable Interface. The parts of a library
the programmer works against. Eg. the function prototypes
and classes.
Advanced Packaging Tool. It’s Debian’s package transfer
library with super cow powers.
In this scheme refered to as Debian’s Bug Tracking System. This is used to report bugs and various wishes related
to a Debian package.
Compiler cache which is used to speedup compilations.
An automated process that operates at predefined time intervals.
Concurrent Version System. A set of scripts that perform
version controll and that merges text files.
Unit testing framework for C++, using perl or python to
generate some of the test code. See also TDD
A popular and advanced Linux distribution.
An intelligent package that contains information needed by
APT to properly install it.
Markup language for technical documentation, originally
intended for authoring technical documents related to computer hardware and software.
90
Chapter A. Terminology
Drag ’n drop
DOM
Doxygen
Facade
Frameworks
FAM
Freshmeat
gcc/g++
GIMP
GNU
GNU/Linux
GPG
GPL
GStreamer
GUI
IEEE
Image Mixing
KDevelop
A term which means the act of dragging some data, with
the mouse, from one application to another, or within one
application.
Document Object Model. Is a form of representation of
structured documents as an object oriented model.
Documentation system for creating API docs.
Pattern where one have a class which act as the gateway
for communicating with a larger set of classes. See also
pattern
Another Stop motion program for Linux.
File Alteration Monitor. Deamon process that tracks
changes in the file system and notify its subscriber of them.
Portal for registering and distributing open source projects.
The defacto C and C++ compilers used on GNU/Linux systems.
The GNU Image Manipulation Program. It can be used for
photo retouching, image composition and image authoring.
Gnu’s Not UNIX: A UNIX-compatible operating system
developed by the Free Software Foundation.
Free, open source, operating system based on Unix which
are gaining popularity among end users.
GNU Privacy Guard. Cryptographic software to encrypt
information.
The GNU General Purpose Licence. The most common
open source licence which states that the source code must
be distributed with a program. It also states that programs
using GPL licenced code must also be GPL licenced and
thus it is infectious.
Framework for multimedia in Linux.
Graphical User Interface. A way to use applications with a
mouse, as opposed to command line applications.
Institute of Electrical and Electronics Engineers. Standardization organization who work on creating standards for
electronic and computers science.
See Onionskinning.
Development environment especially tailored for KDE/Qt
development. See also KDE and Qt
91
Chapter A. Terminology
KDE
LATEX 2ε
Layer
LGPL
libVorbis
libSDL
libTar
libXML
Lintian
Fri programvare i
skolen
LYX
Magaz
Make
Mandrake
Memento
Observer
Onionskinning
Open source
OSS
Window manager for GNU/Linux. See also GNU/Linux
and KDevelop
Script language for creating document using the TEX engine written by Donald Knuth.
Pattern where one splits the code in layers to make it more
modular. See also pattern
The Lesser (former: library) General Purpose Licence.
Same as GPL, but it doesn’t state that code using LGPL
must be LGPL. See also GPL
The main vorbis codec library. See also Vorbis.
Library for using SDL. See also SDL
Library for creating tar files. See also Tar
GNU Library for creating XML files. See also XML
A tool to check Debian packages for policy violations.
The organization which runs the Skolelinux project.
Graphical frontend for producing document using
LATEX 2ε . See also LATEX 2ε
A Greek Linux magazine who wrote an article on us.
Make is a tool which controls the generation of executables
and other non-source files of a program from the program’s
source files.
Populat GNU/Linux distro. See also GNU/Linux
Pattern for storing the internal structure of an object. See
also pattern
Pattern for coupling a model together with one or multiple views, without them being dependant on each other. It
forms the basis of the Model/View/Controller pattern and
is also known as publish/subscriber. See also pattern
Onionskinning is a technique where two or more translucent images are laid on top of each other so that one can
see them together. For an example see figure 5.4
Open source is an ideology where the source code has to
be openly accessible for the users so that they can view and
change it if they want to.
Open Sound System. OSS is a set of device drivers that
provide a uniform API across all the major UNIX architectures.
92
Chapter A. Terminology
Pattern
PCM
POSIX
Pull model
Push model
QMake
Qt
RFP
RGB
SAX
SDL
Serialization
Skolelinux
SLX
STL
Simplified a pattern in software design is a solution to a
problem, as well as the circumstances in which this solution should not be used.
Pulse Code Modulation. A method of encoding an audio
signal in digital format.
A set of operating system portable interface standards defined by IEEE.
A variant of the Observer pattern where the Observers retrieve the required information from the model upon an update. See also observer
A variant of the Observer pattern where the Observers recieve the information from the model with the update notifications. See also observer
Tool created by Trolltech which autogenerates makefiles.
GUI toolkit for C++ which compiles on several platforms
(Windows, Linux, Macintosh, etc). It ships with two licences, one of which is the GPL.
Request For Package. A request which is sent to Debian’s BTS to indicate that someone has found an interesting piece of software and would like someone else to
maintain it for Debian.
Red Green Blue. A color space commonly used on computers.
Simple API for XML. An event based interface for processing XML documents.
Simple Directmedia Layer. Library for accessing and manipulating audio, keyboard, mouse, 3D hardware and 2D
video buffers.
The process of saving a project with its data and the structure of this data.
An Linux distribution for schools.
Short for Skolelinux
Standard Template Library. One of the three C++ Standard Libraries which provides containers, iterators and algorithms.
93
Chapter A. Terminology
Stop motion animations
Tarball
TDD
Tux
URI
Unit testing
v4l
video4linux
Vorbis
Widget
XML parser
A stop motion animation is an animation created by taking
multiple still pictures of something while moving it a little between each picture. When these pictures are played
rapidly it appears to humans as live video.
A jargon term for a tar archive which is a group of files
collected together as one.
Test Driven Development. This is a process where unit
tests are written before the code that satisfies the tests is
made. The rationale behind this is that writing the test will
lead to a better understanding of what a function should do.
The coolest penguin south of the north pole.
Uniform Resource Identifier. This is a generic name for
any of a class of ways of identifying resources. In this
report it is used in the context of sending a file-name as a
drag event. See also Drag ’n drop
The process of testing software by writing small modules
which calls functions and checks the result. See also TDD
see video4linux
Video API for GNU/Linux. See also API
Open sound file format
Window gadget. Term which is used about all control elements in a GUI. See also GUI
A program that interprets the contents of an XML file and
determines what to do with the input.
94