1
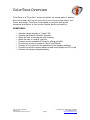
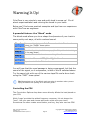
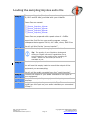
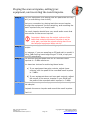
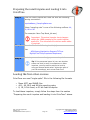
ColorTone
User’s Manual
TTD_ColorTone_Manual
Version 2
Last Modified: October 4, 2011
Copyright 2005-2011 TriTone Digital
All Rights Reserved
www.tritonedigital.com
Table of Contents
Welcome to the Land of Tone!........................................................................... 1
ColorTone Overview........................................................................................... 2
ColorTone System Requirements ..................................................................... 3
Installation Instructions ......................................Erreur ! Signet non défini.
Authorizing Your Plugin ................................................................................... 5
ColorTone Features............................................................................................ 6
Warming It Up!................................................................................................... 8
Sampling Your Own Equipment......................................................................10
Loading the sampling impulse audio file....................................................11
Playing the source impulse, setting your equipment, and recording the
result impulse ...............................................................................................12
Preparing the result impulse and loading it into ColorTone ....................13
ColorTone Version History..............................................................................14
Support .............................................................................................................15
TTD_ColorTone_Manual
Version 1.2
Last Modified: October 4, 2011
Copyright 2005-2008 TriTone Digital
All Rights Reserved
www.tritonedigital.com
Welcome to the Land of Tone!
Congratulations on your purchase (or free download) of a great new
TriTone Digital plugin!
This document contains all the information you need to get up and
running, and for you to understand the features and capabilities of
your new plugin.
On a more personal note, we warmly invite you to join our user forum.
There, we provide additional support, take suggestions for
enhancements to our products, and provide our users with sneakpeaks and beta testing opportunities.
The forum can be found at:
http://www.tritonedigital.com/index.php?option=com_jfusion&Itemid=9
We hope you will enjoy your new plugin and, as always, please do not
hesitate to contact us with any questions or just to say hello!
Warmest regards,
Salvator
CEO & Developper
TriTone Digital
TTD_ColorTone_Manual
Version 1.2
Last Modified: October 4, 2011
Page 1
Copyright 2005-2008 TriTone Digital
All Rights Reserved
www.tritonedigital.com
ColorTone Overview
ColorTone is a “Tone Box” which simulates the signal path of analog
devices through the use of convolution and various proprietary nonlinear processes. ColorTone is designed to provide analog-like
character and flavor to the modern digital audio workstation.
FREATURES :
•
•
•
•
•
•
•
•
•
Includes a large selection of “classic” IRs
Features the powerful “Warmth“ algorithm
Allows the user to increase the color intensity
Allows the user to “reverse” the color
Features a user-accessible IR folder for adding more IRs
Provides two modes of operation (“Norm” and “Blend”)
Contains a Trim control for fine adjustment of the dynamic behavior
Provides convolution options (adjusts overall sound quality and CPU load)
Features a frequency response display
TTD_ColorTone_Manual
Version 1.2
Last Modified: October 4, 2011
Page 2
Copyright 2005-2008 TriTone Digital
All Rights Reserved
www.tritonedigital.com
ColorTone System Requirements
ColorTone requires the following minimum system configuration:
•
•
•
•
•
Mac OSX 10.4 or later
Intel Mac Core Duo or faster recommended
Up to 32 bit/96 kHz operation
VST, RTAS and AU support
ProTools 7 or higher for RTAS use
TTD_ColorTone_Manual
Version 1.2
Last Modified: October 4, 2011
Page 3
Copyright 2005-2008 TriTone Digital
All Rights Reserved
www.tritonedigital.com
Mac installation (VST, RTAS & AU)
Step 1
Launch the TriTone Digital plugin installer.
Step 2
Follow the on-screen instructions, click “Continue”, read and
agree to the License Agreement, and then click “Install”.
Step 3
Select the various formats you would like to install.
Step 4
Enter your Mac OSX Admin Password.
Step 5
Installation is now complete!
TTD_ColorTone_Manual
Version 1.2
Last Modified: October 4, 2011
Page 4
Copyright 2005-2008 TriTone Digital
All Rights Reserved
www.tritonedigital.com
Authorizing Your Plugin
After installing your plugin, it’s time to authorize it so you can get to
work! Our plugins are protected by a proprietary Challenge/Response
authorization system, based on the unique ID of your computer.
NOTE : You need to download and install the full retail version to
complete authorization.
The demo version cannot recall parameters settings or load XML
presets, and it will also mute itself after 5 min of processing.
You can re-instantiate the insert if you want to demo further.
The retail version recall parameters settings, and the timeout
limitation is removed once authorization is completed.
Just follow the steps below:
Step 1
Step 2
Step 3
Step 4
Step 5
Step 6
Step 7
Launch your favorite audio application and insert your new
TriTone Digital Plugin on a track.
From the plugin interface, click on the button labeled
“AUTHORIZE”.
Click on the newly displayed button labelled “COPY
CHALLENGE”. This will copy your “Challenge” into your OSX
clipboard.
Send us an authorization request once you have purchased.
From our site www.tritonedigital.com go to the menu :
Support/Authorize a plugin and paste your Challenge.
We will send your response key back to you by email (usually
within 24-48h). Check your emails and copy your “Response”
key into your OSX clipboard.
Back to the the plugin (retail version), click on “AUTHORIZE”.
Click on the newly displayed button labeled “Paste Response”.
A message will confirm that authorization is successful. Restart
your audio application in order to update all plugins instances,
and you are now authorized!
Tip 1: You can demo the plugin, then copy Challenge and email us an
authorization request along your purchase. That way, you’ll get you’ll
not have to wait
Tip 2:
TTD_ColorTone_Manual
Version 1.2
Last Modified: October 4, 2011
Page 5
Copyright 2005-2008 TriTone Digital
All Rights Reserved
www.tritonedigital.com
ColorTone Features
10
4
11
2
5
1
12
7
13
6
3
1
Warmth
2
Color
3
Value
4
Frequency
display
5
Models
6
Norm/Blend
8
9
Adds additional, pleasing harmonic content to the
signal. Negative settings “thin” the signal.
Multiplies the intensity of the original Impulse
Response (aka ‘IR’) color from natural to several
times greater. Negative settings “reverse” the color.
Displays the numeric value for the current position of
the associated control. Click to enter numerical data.
Displays the frequency curve of the currently loaded
IR including any changes due to Color (2) or Trim (8)
adjustments. The horizontal middle line is for unity
gain. Vertical lines represent 100Hz, 1kHz & 10kHz.
Selects the desired IR. Up and down arrows allow
you to scroll through the list more easily.
Norm mode is straight modeling (100% wet).
The intensity is set by the Color (2) control.
In Blend mode, a cross-fade is calculated in real-time
between the dry (original) and the wet (convoluted)
signals.
The ratio of these signals, as a result of this crossfade, is based on the amplitude of your input signal.
TTD_ColorTone_Manual
Version 1.2
Last Modified: October 4, 2011
Page 6
Copyright 2005-2008 TriTone Digital
All Rights Reserved
www.tritonedigital.com
14
The hotter the input signal, the more color in the
final result, as the cross-fade will tend more towards
the wet signal.
That’s pretty cool already, but here’s something even
better!
By changing the strength of the “wet” signal, you can
reshape the dynamics of your audio!
- If the wet signal is lower than unity gain,
you’re turning the plugin into a compressor!
- If the wet signal is higher than unity gain,
you’re turning the plugin into an expander!
7
Convolution
options
8
Knee
9
Trim
10 Meter
11 Meter select
12 Input
13 Output
14 “The Lock”
TTD_ColorTone_Manual
Version 1.2
Last Modified: October 4, 2011
And this compression (or expansion) is oh-so-nice
and colored!
This drop-down menu provides settings for the
convolution lengh. Up and down arrows allow you to
scroll through the list more easily.
The longer the convolution, the better the bass
response, but the higher the CPU load.
User-selectable speed /knee options for blend mode
operation (6). "SLOW" will provide a gentle softknee
and smooth blend crossfade for "compressor-like"
operation. "FAST" use an harder and more agressive
knee, with faster blend reaction which emulate
saturation of preamps & tape machines.
Lowers the amplitude of the currently loaded IR.
This allows you to compensate for louder IRs and
helps to more easily achieve the various dynamic
effects available in Blend (6) mode.
VU meters.
Switches the meters between metering the input and
the output of the plugin process.
Controls the main input level.
Controls the main output level.
When “The Lock” is on, the output knob
automatically compensates for the gain setting of the
input knob.
In Blend (6) mode, this allows you to “drive” the
plugin, providing the Blend process with a hotter
input signal, while maintaining a balanced output
gain.
Page 7
Copyright 2005-2008 TriTone Digital
All Rights Reserved
www.tritonedigital.com
Warming It Up!
ColorTone is very simple to use and really hard to screw up! It’s all
about experimentation and coloring the sound to your taste.
Below you’ll find some practical examples and tips from our experience
with ColorTone as engineers:
A powerful feature…the “Blend” mode
The blend mode allows you to re-shape the dynamics of your track in
some pretty cool ways, all with a colored sound:
Step 1
Step 2
Step 3
On a vocal track, insert ColorTone and set it to Blend mode.
Select the “SLOW” knee option.
Turn “The Lock” on.
Step 4
Turn the Input knob all the way up (the Output knob should go
all the way down).
Turn the Trim knob down to something like –6.
Step 5
Select the IR named "TTD_TubeEQ_NiceCurve”.
Step 6
Experiment with the Trim knob.
You will hear that the vocal passage is being compressed, but that the
sound of the signal, as it compresses, is that of the IR selected above.
Try the same trick with one of the various tape IRs and a drum track
using the “FAST” knee option!
Tip! Appropriate use of the Blend mode can also do wonders when you are
trying to balance the picking of an acoustic guitar!
Controlling the CPU
The Convolution Options drop-down menu directly affects the load placed on
your CPU.
While ‘Large’ provides the widest frequency response, it’s not always the
“best”. Use your ears and choose whichever mode suits your track.
Sometimes the other modes sound better, and hey, they also use less CPU!
TTD_ColorTone_Manual
Version 1.2
Last Modified: October 4, 2011
Page 8
Copyright 2005-2008 TriTone Digital
All Rights Reserved
www.tritonedigital.com
Warm magic
Adding harmonic richness to a signal is often perceived as making
the signal sound “thicker” or “fuller”. Thus, positive value settings on
the Warmth control sound more “analog-like” (warm), while negative values
sound “cooler” and thinner. Both can be very cool!
Note: With the Warmth algorithm, a little goes a long way! It’s very easy to
overdo it!
Tip! A positive warmth value, coupled with a thin IR or a negative color
setting, can sound very interesting!
I want some more OOOMMPH!
In “Blend” mode, driving the plugin (raising the input while lowering the
output) provides stronger color and increased dynamic effect.
Tip! The “lock” control is very useful for objective comparisons.
TTD_ColorTone_Manual
Version 1.2
Last Modified: October 4, 2011
Page 9
Copyright 2005-2008 TriTone Digital
All Rights Reserved
www.tritonedigital.com
Sampling Your Own Equipment
Sampling your own signal paths is not as hard as you might think!
With that said:
IMPORTANT: Please note that ColorTone is only suitable
for sampling equipment that is stable/linear in the timedomain.
This means that the sampling of processes like chorus,
amplifier distortion, etc. is not supported.
Additionally, the actual compression action of
compressors cannot be sampled (by their nature the
attack and release components of compression change
the shape of the signal over time).
However, the signal path “color” of a compressor can be
sampled as long as compression is not triggered.
Finally, ColorTone uses short impulse responses and,
thus, is not suitable for modeling reverberation.
The sampling process consists of 3 basic steps:
1. Load the source impulse audio file into your favorite audio
program.
2. Play the source impulse out through the gear you wish to sample
and record the resulting impulse back into your audio program.
3. Prepare the result impulse file and place it in the designated
ColorTone impulse folder.
You will repeat these steps for each sampling rate you wish to support
(up to 96 kHz).
Please note that ColorTone is capable of up-sampling the sampling
rate of the IR to match that of the session. However, sample rate
conversion is never absolutely perfect, so it’s useful to sample your
gear at each sample rate you plan to work in.
Now that you have the basic idea, let’s look at each step in detail.
TTD_ColorTone_Manual
Version 1.2
Last Modified: October 4, 2011
Page 10
Copyright 2005-2008 TriTone Digital
All Rights Reserved
www.tritonedigital.com
Loading the sampling impulse audio file
Step 1
There are 4 impulse files (one for each sampling rate: 44.1,
48, 88.2 and 96 kHz) provided with your installer.
These files are named:
CT_Source_Impulse_44.wav
CT_Source_Impulse_48.wav
CT_Source_Impulse_88.wav
CT_Source_Impulse_96.wav
These files are prepared with a peak value of –6 dBfs.
Import the first file into your audio program, using a
workspace that supports 24 bit, 44.1 kHz, mono, WAV files.
Step 2
We will call this file the “source impulse’”.
Set this file to playback through your audio interface.
Tip! The quality of your Digital-to-Analog and
Analog-to-Digital conversion capabilities has a
strong impact on the quality of the resulting IR
model. Please use the best D/A and A.D
available to you.
Step 3
Create an empty mono track.
You will use this empty track to record the output of the
equipment you are sampling.
Step 4
Step 5
Step 6
We will call the audio recorded here the “result impulse”.
Connect the output of your audio interface to the input of
your equipment.
Connect the output of your equipment to input your audio
interface.
Assign the empty track you created in Step 3 to receive
signal from the input on your audio interface you connected
in Step 5.
TTD_ColorTone_Manual
Version 1.2
Last Modified: October 4, 2011
Page 11
Copyright 2005-2008 TriTone Digital
All Rights Reserved
www.tritonedigital.com
Playing the source impulse, setting your
equipment, and recording the result impulse
Step 1
Set your equipment to a setting that will pass audio at unity
gain (or something close to this).
Test your connection by playing back the source impulse
through the equipment you are sampling, and recording the
result impulse onto your empty track.
The result impulse should be a very small audio event that
looks similar to the source impulse.
Step 2
Step 3
Important: Make sure the output volume of the
track that contains the source impulse is set to
unity gain, and that the signal coming back from
the sampled equipment does not clip.
Now, set your equipment to the settings you wish to
sample.
For instance, if you are sampling an EQ and wish to model it
with a 3dB shelving boost beginning at 12 kHz, simply set
your EQ accordingly.
The desired recorded peak-level for all recorded result
impulses is –3 dBfs maximum.
You have two choices for achieving these levels:
a) If you equipment has gain controls, adjust these
controls until the peak of the recorded result impulse
is –3 dBfs.
b) If your equipment does not have gain controls, adjust
Step 4
the output of the source impulse in your DAW until
the peak of the recorded result impulse is –3 dBfs.
Once you have set your levels, you are ready to record your
first sample!
Playback the source impulse and record the result impulse.
That’s it!
TTD_ColorTone_Manual
Version 1.2
Last Modified: October 4, 2011
Page 12
Copyright 2005-2008 TriTone Digital
All Rights Reserved
www.tritonedigital.com
Preparing the result impulse and loading it into
ColorTone
Step 1
Save the result impulse as a new file with the following
naming convention:
ImpulseName_SamplingRate.wav
Where “sampling rate” is one of the following suffixes: 44,
48, 88 or 96.
(For example: Neve Top Boost_44.wav)
Step 2
Important: The actual impulse has to happen
within the 1000 samples of the result impulse
audio file. Trim the audio file with an audio editor
if required.
Place the file in the following location(s):
Mac:
- HD/Library/Application Support/TriTone
Digital/ColorTone/Impulses Responses/
Step 4
Restart your session and enjoy your new impulse!
Tip! If the processed sound of your new impulse
seems too loud (or soft) in comparison to other
impulses, you may need to adjust its level by
using an external audio editor. Adjust the gain of
your IR accordingly, and re-load ColorTone.
Loading IRs from other sources
ColorTone can read “single-spike” IRs in the following file formats:
•
•
•
Mono AIFF, and WAVE files
44.1, 48, 88.2 and 96 kHz sampling rates
8, 16, 24 bit fixed, or 32 bit float bit-depths
To load these impulses, simply follow the steps from the section
“Preparing the result impulse and loading it into ColorTone” above.
TTD_ColorTone_Manual
Version 1.2
Last Modified: October 4, 2011
Page 13
Copyright 2005-2008 TriTone Digital
All Rights Reserved
www.tritonedigital.com
ColorTone Version History
ColorTone
Version 2.0
Version 1.0
TTD_ColorTone_Manual
Version 1.2
Last Modified: October 4, 2011
•
•
•
•
•
•
•
•
•
•
•
•
•
•
•
Native VST/AU/RTAS (pluggo no longer needed).
30% less CPU usage
Load x3 faster
New bigger and improved convolutions
Improved Blend algo with fast(distortion) or
slow(compression) settings
Improved FFT display
Allow to class user IR’s with sub-folders
A/B comparison of settings added
Option-click to reset parameters to default
Mousewheel support added
Lower latency
New plugin ID with better RTAS compliance.
Intel-based Mac only for now.
Initial pluggo release.
Page 14
Copyright 2005-2008 TriTone Digital
All Rights Reserved
www.tritonedigital.com
Support
If you have any issues with your new plugin, please first re-read this
manual, paying particular attention to the sections on System
Requirements, Installation Instructions and Features. Please also note
any sections of the document indicated by these symbols.
Tips
Warnings
Also consider visiting our user forum at:
http://www.tritonedigital.com/index.php?option=com_jfusion&Itemid=9
We often interact directly with our users on this forum to solve their
issues. By searching the forum you may find your issue has already
been solved!
If these tips do not solve your issues, then please don’t hesitate to
contact us at [email protected].
TTD_ColorTone_Manual
Version 1.2
Last Modified: October 4, 2011
Page 15
Copyright 2005-2008 TriTone Digital
All Rights Reserved
www.tritonedigital.com