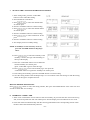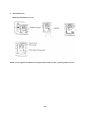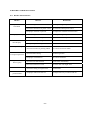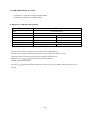
1
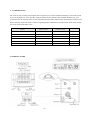
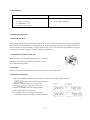
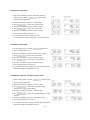
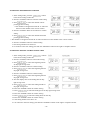
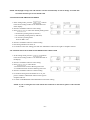
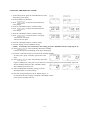
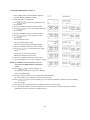
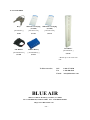
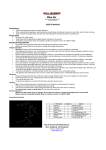
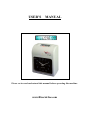
USER’S
MANUAL
Please review and understand this manual before operating this machine.
www.BlueAirInc.com
CONTENTS
1. INTRODUCTION ············································································································
2. NOMENCLATURE ·········································································································
3. BEFORE OPERATION ·····································································································
3.1. Power Source ·····················································································································
3.2. Opening & Closing The Lid ······························································································
4. SETTING ·····························································································································
4.1. Setting Year ·····················································································································
4.2. Setting Date ·····················································································································
4.3. Setting Time ····················································································································
4.4. Setting Day Light Savings Time ·························································································
4.5. Setting Card Format ········································································································
4.6. Setting Time Card Type & Pay Period Ending Date ····························································
4.7. Setting Hours Mode ··········································································································
4.8. Setting Printing Format ····································································································
4.9. Setting Day Light Savings Time ·························································································
4.10. Setting Printing Format ···································································································
4.11. Setting Function For Auto-detecting Time Card ·································································
5. SETTING PRINTING COLOR ·······················································································
6. SETTING MUSIC/OUTPUT ···························································································
7. SETTING COLUMN FOR PRINTING POSITION ·····················································
8. INSERTING TIME CARD ·······························································································
9. MAINTENANCE ···············································································································
9.1. Replacing Ribbon Cassette ··································································································
10. HITCHES AND RESOLUTIONS ···················································································
10.1. Hitches And Resolution ·····································································································
10.2. The Error Display Codes ···································································································
11. REQUESTS AND SPECIFICATIONS ···········································································
12. ACCESSORIES ················································································································
1
1
2
2
2
2
2
3
3
3
4
4
4
5
5
6
6
7
8
9
9
10
10
11
11
12
12
13
1. INTRODUCTION
Our series of time recorders are designed with a compact size to achieve Hi-End technology to meet and exceed
all of your expectations. It also provides superior performance to guarantee the extended reliability. For your
convenience we ask that you please review and understand this entire manual before operating this machine. Also
please retain this manual for future reference regarding further maintenance and information needs. This manual
is used for all Time Recorder series.
MODEL
SINGLE COLOR
DOUBLE COLOR
BELL
O
O
PERPETUAL CALENDAR
O
O
IN ADDITION
IN ADDITION
O
O
CLOCK FACE
CLOCK FACE
PRINT FOR POWER OUTAGE
DISLOCATION AUTOMATICALLY
TIME TARGET
SIGN FOR EARLY & LATE LEAVE
O
2. NOMENCLATURE
-1-
COMPONENTS
Parts Identification
1)
2)
3)
4)
Special Package
Time Recorder
Keys – 1 set 2 ea
Ink Ribbon - 1ea
Time Cards -50card
1) Card Rack – 1 ea
2) Time Cards - 500 cards
3. BEFORE OPERATING
3.1 POWER SOURCE
Always plug the unit into a continuous and correct power source (refer to indication of voltage on the label of
each machine). A lithium Battery is installed in the PC board to keep the correct time and programming for 1
year of cumulate power failure hours. Always plug the unit to the correct time and programming for up to 1
year. Always remember to replace the battery after any malfunction.
3.2 OPENING & CLOSING THE LID
When you want to set and reset the display items or change
the ribbon cassette, just open the lid, put the keys in, and
do as indicated in the picture.
4. SETTING
Open the lid and move the “SETTING” button to the right to enter setting mode.
4.1 SETTING THE YEAR
1. Move the “SETTING” button (under setup) to the left, enter the setting mode, press the
buttons to the choice setting number 01.
2. Press the “ENTER” button to enter the year.
3. Press
to select the correct year.
4. Press the “ENTER” button to confirm settings.
5. The setting number now shows 02.
6. To continue to the next settings just slide the
“SETTING” button to the right to complete and exit .
-2-
4.2 SETTING THE DATE
1. Move the “SETTING” button to the left, enter the
setting mode, press the
buttons to the
choice setting number 02.
2. Press the “ENTER” button to enter the date.
3. Press
to select the correct month.
4. Press the “ENTER” button to confirm settings.
5. Press
to select the correct date.
6. Press the “ENTER” button to confirm settings.
7. The setting number now shows 03.
8. To continue to the next settings just slide
the “SETTING” button to the right to complete and exit.
4.3 SETTING THE TIME
1. In the setting mode, press the
buttons to
choice setting number 03.
2. Press the “ENTER” button to enter the time setting.
3. Press
to select the correct hour.
4. Press the “ENTER” button to confirm settings.
5. Press
to select the correct minutes.
6. Press the “ENTER” button to confirm settings.
7. The setting number now shows 04.
8. To continue to the next settings just slide the “SETTING”
button to the right to complete and exit.
4.4 SETTING THE DAY LIGHT SAVINGS TIME
1. In the setting mode, press the
buttons to the
choice setting number 04.
2. Press the “ENTER” button to enter the setting.
3. Press
to select the desired day light
savings hour (origin setting 00:00).
4. Press the “ENTER” button to confirm setting.
5. Press
to select the desired day light savings
minutes.
6. Press the “ENTER” button to confirm the setting.
7. The setting number now shows 05.
8. To continue to the next settings just slide the “SETTING”
button to the right to complete and exit.
-3-
4.5 SETTING THE CARD FORMAT
1. In the setting mode, press the
buttons to
the choice setting number 05.
2. Press the “ENTER” button to enter the setting.
3. Press
to select the desired time card format.
00-the 1st row blank (standard time card)
01-the 16th row blank
4. Press the “ENTER” button to confirm setting.
5. The setting number should now show 06.
6. To continue to the next settings just slide the “SETTING” button to the right to complete and exit.
4.6 SETTING THE TIME CARD & PAY RERIOD ENDING DATE
1. In the setting mode, press the
buttons to
the choice setting number 06.
2. Press the “ENTER” button to enter the setting.
3. Press
to select 00/01 for time card type.
00-the monthly pay period on time card
01-the weekly pay period on time card
A. If 01-weekly pay period is chosen, the display will
automatically change to weekdays setting.
B. Press
to select a weekday for the
pay period ending date.
4. Press the “ENTER” button to confirm setting.
5. The setting number now shows 07.
6. To continue to the next settings just slide the “SETTING” button to the right to complete and exit.
4.7 SETTING THE HOURS MODE
1. In the setting mode, press the
buttons to the
choice setting number 07.
2. Press the “ENTER” button to enter the hours mode setting.
3. Press
to select the desired hours.
* 12-12 hours mode (EX.PM 1:00=13:00)
* 24-24 hours mode
4. Press the “ENTER” button to confirm setting.
5. The setting number now shows 08.
6. To continue to the next settings just slide the “SETTING” button to the right to complete and exit.
NOTE: This function is not on the LCD machine.
-4-
4.8 SETTING THE PRINTING POSITION
1. In the setting mode, press the
button
to the choice setting number 08.
2. Press the “ENTER” button to enter the mode setting.
3. Press
to select the desired vertical
printing position setting.
* The numbers will appear between 00-15. This will
then move the number to the correct column.
4. Press the “ENTER” & the 00-15 buttons to confirm
setting.
5. Press
to select the desired horizontal
printing position setting.
* The numbers will appear between 00-30. This will then move the number to the correct column.
6. Press the “ENTER” button to confirm setting.
7. The setting number now shows 09.
8. To continue to the next settings just slide the “SETTING” button to the right to complete and exit.
4.9 SETTING THE DAY LIGHT SAVINGS TIME
1. In the setting mode, press the
buttons
to the choice setting number 09.
2. Press the “ENTER” button to enter mode setting.
3. Press
to select the beginning month
for day light savings time.
4. Press the “ENTER” button to confirm setting.
5. Press
to select the beginning date for
day light savings time.
6. Press the “ENTER” button to confirm setting.
7. Press
to select the beginning date for
day light savings time.
8. Now the display turns to the ending date for day
light savings time.
9. Press
to select the ending month for
day light savings time.
10. Press the “ENTER” button to confirm setting.
11. Press
to select the ending hours for day light savings time.
12. Press the “ENTER” button to confirm setting.
13. Press
to select the ending hours for the day.
14. Press the “ENTER” button to confirm setting.
15. The setting number now shows 10.
16. To continue to the next settings just slide the “SETTING” button to the right to complete and exit.
-5-
NOTE: The daylight savings time will advance one hour automatically at time of change. To enable this
convenient function just set the month to 00.
4.10 SETTING THE PRINTING FORMAT
1 .In the setting mode, press the
buttons
to the choice setting number 10 on the bottom left
of the display.
2. Press the “ENTER” button to enter setting.
3. Press
to select the desired printing mode.
* 00-24 hours printing mode (1/60 hour)
* 01-centennial printing mode (1/100 hour)
* 02-12 hours printing mode
Ex.01:0=PM 13:00
4. Press the “ENTER” button to confirm setting.
5. The setting number now shows 11.
6. To continue to the next settings just slide the “SETTING” button to the right to complete and exit.
4.11 SETTING FUNCTION FOR AUTO-DETECTING TIME CARD
1. In the setting mode, press the
buttons
to the choice setting number 11 on the bottom left of
the display.
2. Press the “ENTER” button to enter setting.
3. Press
to select 00/01.
* 00-with function for auto-detecting time card.
* 01-without function for auto-detecting time card.
4. Press the “ENTER” button to confirm setting.
5. To continue setting from the number 01 to 11 just
press or slide the “SETTING” button to the right to
complete and exit.
6. To select COLOR/MUSIC/COLUMN button to function setting.
NOTE: If you are using the time card without the small hole on the bottom, please set the function
to “01”.
-6-
5. SETTING THE PRINTING COLOR
1. In the setting mode, press the COLOR button to enter
the printing color setting.
2. Press ENTER to set the hours.
3. Press
to select the desired hours for
color change.
4. Press the “ENTER” button to confirm setting.
5. Press
to select a desired minute for
color change.
6. Press the “ENTER” button to confirm setting.
7. Press
to select 01/02 for color print.
*01-for black color print
*02-for red color print
8 .Press the “ENTER” button to confirm setting.
9. Now the display turns to weekdays setting.
NOTE: If weekdays are not necessary for setting, press the “ENTER” button to skip step 10-13.
10. Press
to select weekdays. When the weekday
is chosen the sign will be flashing on the top of the display.
11. Press the “COLOR” button once to delete the selected weekday
for color print. (press “COLOR” again to show the
sign).
12. Press
to move the weekday sign and to
register weekdays for color print. If you choose to reset again, please press the same button again and
choose weekdays then press the “COLOR” button.
The weekday sign will recover.
13. After completing the weekdays setting, press the
“ENTER” button to confirm setting.
14. Now the setting number turns to 02. Repeat steps 2-13
to continue to the next settings or slide the “SETTING” button
to the right to complete and exit.
-7-
6. SETTING THE MUSIC OUTPUT
1. In the setting mode, press the MUSIC button to
enter the MUSIC/OUTPUT setting.
2. Press “ENTER” to set the hours.
3. Press
to select the desired hours for
music/output.
4. Press the “ENTER” button to confirm setting.
5. Press
to select the desired minute for
music/output.
6. Press the “ENTER” button to confirm setting.
7. Press
to select 01/02 or 03 for
music/output.
*01-internal music bell.
*02-external bell alarm output.
*03-music bell & external bell alarm output.
8. Press the “ENTER” button to confirm setting.
9. Press
to set the duration for signal
output.
*Origin setting -00:22 (22 seconds)
*Maximum duration-59 min.59 sec.
10. Press the “ENTER” button to confirm setting.
11. Now the display turns to the weekdays setting.
NOTE: If weekdays are not necessary to be set,
press the “ENTER” button to skip steps
12-15.
12. Press
to select weekdays. If
the weekday is chosen, the sign will be flashing
on the top of the display.
13. Press the “MUSIC” button once to delete the selected weekday
for music/output. (press “MUSIC” again to show the sign).
14. Press
to move the weekday sign. Also press the “MUSIC” button to register weekdays
for music/output.
15. After setting the weekdays press the “ENTER” button to confirm setting.
16. Now the setting number turns to 02. Repeat steps 2-16 to continue to the next settings or slide the
“SETTING” button to the left to complete and exit.
-8-
7.
SETTING THE COLUMN FOR PRINTING POSITION
1. In the setting mode, press the “COLUMN”
button to enter COLUMN setting.
2. Press ENTER to set the hours.
3. Press
to select the desired hours
for column print.
4. Press the “ENTER” button to confirm setting.
5. Press
to select the desired minute
for column print.
6. Press the “ENTER” button to confirm setting.
7. Press
to select columns 01-06 for
print.
8. Press the “ENTER” button to confirm setting.
9. Now display turns to weekday setting.
NOTE: If weekdays are not necessary to be set,
press the “ENTER” button to skip steps
10-13.
10. Press
to select the weekday. If the
weekday is chosen, the sign will be flashing on
the top of the display.
11. Press the “COLUMN” button once to delete the
selected weekday for column print.
(press “COLUMN” again to show the sign).
12. Press
to move the weekday sign. Also press the
“COLUMN” button to register the weekdays for column print.
13. After setting the weekdays, press the “ENTER” button to confirm setting.
14. Now the setting number reads 02. Repeat steps 2-13 to continue to the next settings or slide the setting
button to the right to complete and exit.
HOW TO DELETE THE SETTING
Press
button to select the setting number, then press the ENTER button at the same time for 3
seconds to delete that set of settings.
8. INSERTING A TIME CARD
1. Insert a time card with the correct side into card slot carefully. (If you insert the time card on the wrong
side, it will be rejected from this unit without print. Also the display face will indicate an error code.
2. Time card will be fed automatically with the correctly printed data in the corresponding column. Then
the time card will be automatically returned.
-9-
9. MAINTENANCE
Replacing The Ribbon Cassette
NOTE: Always tighten the ribbon by turning the knob clockwise after replacing ribbon cassette.
- 10 -
10. HITCHES AND RESOLUTIONS
10.1
Hitches and Resolutions
Hitches
Faulty Automatic
Card Feed
No Display Reading
Un-Standard
Time Display
Reasons
Resolutions
1) Power outage
1) Keep waiting until power-recovers
2) Incorrect connection of power source
2) Check the outlet power source
3) Improper insertion or pull-out
3) Inspect the method of card-insertion
1) Power outage
1) Keep waiting until power-recovers
2) Incorrect connection of power source
2) Check the outlet power source
1) Inaccurate set-up of original time
1) Reset standard time
2) Long-term power outage
1) Reset standard time
1) Incorrect location of printing ribbon
1) Correct location if ribbon
1) Incorrect date-setting
1) Reset right date
2) Improper card-insertion
2) Correct automatic
1) Inversion of card-insertion
1) Re-insert immediately
2) Incorrect insertion of card
2) Insert card with slight force
1) Incorrect setting of original time
1) Reset date
1) Improper method of card-use
1) Respect the way of card-in and out
Faulty Coloring
Marks in
Unexpected position
Long sound “ Bi”
but no typing
Date Error
Inclination of
printed marks
- 11 -
10.2 THE ERROR DISPLAY CODES
1. Problem E2: The location of left and right mistakes.
2. Problem E5: The pointer is malfunctioning.
11. REQUESTS AND SPECIFICATIONS
Time Display
LCD & Analog
Type
Automatic Digital
Working Power Source
Measurement (WxDxH)
Weight
Working Temperature
115V
7 ½” x 4 ½” x 9 ½”
19cm x11cm x 24cm
6 lb
2.5KG
32 ~104 F
0 ~ 40 C
Working Humidity
Size of Card (WxL)
10%~80%
3 3/8” x 7 3/8”
86mm x 189mm
COLOR: Set the time for changing color, 24 hours in all. (Red & Black)
MUSIC: Set the length of music time and time for output connection, 24 hours in all.
COLUMN: Set the print place and the time for changing, 24 hours in all.
DELETE: Press
button to select the setting number.
ENTER: Input the information.
Then press
settings.
and the “ENTER” button at the same time for 3 seconds to delete that specific set of
- 12 -
12. ACCESSORIES
[ BT1000-Key ]
500 Time Cards/pkg
(2-sided)
[ BT1000-Card ]
1000 Time Cards/pkg
(2-sided)
[ BT1000-Card ]
$4.50
$17.55
$32.75
Ink Ribbon
[ BT1000-Ribbon ]
Lithium Battery
[ BT1000-Battery]
$ 10.85
$12.15
Keys
Card Rack*
[ BT1000-Rack ]
$24.55
* Holds up to 20 cards each
rack
To Place an order;
Call
Fax
E-mail
1-866-677-8500
1-310-808-0262
[email protected]
BLUE AIR
Address: 15001 S. Broadway, Gardena, CA 90248
Tel: 1-310-808-0102, 1-866-677-8500 Fax: 1-310-808-0242/0262
Http://www.BlueAirInc.com
– 13 –
NOTE :