1
Internet Radio
Item-No. 99040
User Manual
2008/10/08 Ver 1.8
1
Contents
Copyright Statement
5
Chapter 1 Overview
6
1.1 Introduction
1.2 Audio sources
1.3 Storage
6
1.4 Record
1.5 Networking
1.6 Others
6
6
6
6
7
Chapter 2 Installation
7
2.1 Installation
7
2.1.1 Installing onto network (LAN)
7
2.1.2 Installation of a wireless network (WLAN)
8
2.2 Starting The Equipment for The First Time
2.2.1 Turn on the radio
8
9
Chapter 3 Intenet Radio
15
3.1 Introduction
15
3.2 World Station
3.3 SHOUTCast
15
16
3.3.1 Listen to SHOUTCast
17
3.4 Add/Delete a Radio Station
17
3.5 Record A Song From An Internet Radio Station
18
Chapter 4
Podcast
19
4.1 PodCast Setting
4.2 Browse/Subscribe/Play Podcasts
19
4.3 Play/Download the Podcasts from USB or SD/MMC
4.4 Unsubscribe Podcast from USB or SD/MMC
4.5 Download Podcasts in Standby Mode
21
Chapter 5
USB
20
23
24
25
5.1 Playing Songs on the USB Disk
25
2
Contents
Chapter 6 SD/MMC
26
6.1 Playing Songs on the SD/MMC Card
Chapter 7 FM Radio
26
26
7.1 Listening to FM Radio
26
7.2 Tuning the FM Frequency
7.3 Prescanning All Active FM Radio Stations
7.4 Presetting a Favorite Station
7.5 Listening to a Preset Station
27
7.6 Recording From FM
30
Chapter 8 Media Server
28
29
30
8.1 Supported Media Server
8.2 Setting Upnp Environment
30
30
8.2.1 UPnP Networked Environment Diagram
8.3 Playing Songs on UPnP Media Server
Chapter 9 File Manager
30
31
32
9.1 Copy/Move Files to an USB Disk or SD/MMC Card
Chapter 10
27
iPod Dock
32
33
10.1 Dock
33
10.2 Dock – Extended Mode
34
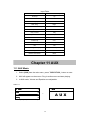
Chapter 11
AUX
36
11.1 AUX Mode
11.2 Recording in AUX Mode
Chapter 12
36
37
Setting
38
12.1 Date & Time
38
12.1.1 Setting the Date
38
12.1.2 Setting the Time
38
12.1.3 Setting the Time formation
39
12.2 Alarm
40
3
Contents
12.2.1 Setting the Alarm
40
12.2.2 Setting the Alarm Sound
41
12.2.3 Disarming the Alarm
42
12.3 Play Mode
12.4 Sleep
43
43
12.4.1 How to Turn on/off Sleep Mode
43
12.5 Docking Mode
12.6 Network
44
44
12.6.1 Understanding the Networking States on the system
44
12.6.2 Setting the Wi-Fi Connectivity in Infrastruct Mode
45
12.6.3 Setting the Wi-Fi Connectivity in Ad-Hoc Mode
45
12.6.4 Setting the Wi-Fi Connectivity by Wi-Fi Wizard
46
12.6.5 Inputting Static IP
47
12.6.6 Inputting DNS
48
12.6.7 Inputting Proxy
49
12.7 Language
12.8 Information
12.9 Auto-upgrade
12.10 Reset All Settings
52
12.11 Firmware Upgrade
56
52
52
53
12.11.1 Upgrade Firmware by Using USB / SD/MMC
53
12.11.2 On-Line Upgrade
54
4
Copyright Statements
● MEPG Layer-3 audio coding technology licensed from Fraunhofer IIS and Thomson.
● Supply of this product does not convey a license nor imply any right to distribute content
created with this product in revenue-generating broadcast systems (terrestrial, satellite,
cable and/or other distribution channels), streaming applications (via Internet, intranets
and/or
other
networks),
other
content
distribution
systems
(pay-audio
or
audio-on-demand applications and the like) or on physical media (compact discs, digital
versatile discs, semiconductor chips, hard drives, memory cards and the like). An
independent
license
for
such
use
is
required.
For
detail
please
visit
http://mp3licensing.com.
● Microsoft® and Windows Media® are either registered trademarks or trademarks of
Microsoft Corporation in the United States and/or other countries.
● RealNetworks, RealAudio and the Real logo is a trademark or a registered trademark of
RealNetworks, Inc. Real Format Client Code is included under license from
RealNetworks, Inc. Copyright 1995-2007, RealNetworks, Inc. All rights reserved.
● As to the following GPL software, you have a right to receive, modify and distribute the
source code of the software (uClinux kernel, busybox, init, sash). You can download the
source code from the following site: http://www.penbex.com.tw/gpl
Notice
Recording/Ripping any audio content made with this system is only for your
personal use. It should not be sold, distributed, and played for a public audience
without copyright holder’ permission.
5
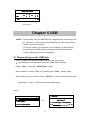
Chapter 1 Overview
1.1 Introduction
Internet Radio is a radio system integrated digital audio playback that functions with
network connectivity. The system can play MP3/WMA audio files, iPod, USB devices,
SD/MMC card, FM radio, and internet radio services such as World Station and
SHOUTCast which provide above 20,000 internet radio stations. Internet Radio also
supports audio streaming via UPnP Media Server.
1.2 Audio Sources
˙Support MP3/ Windows Media® audio files (known as WMA)(Included ID3V1 ,2)
˙Support static lyrics and synced lyrics (.txt /.lrc /.smi)
˙Support USB Flash drive, USB HD drive, SD/MMC card
˙Support iPod Dock function
˙SHOUTCast Internet Radio (http://www.shoutcast.com)
˙Local FM (On-Line Radio)
˙FM (87.5~109.5MHz)
˙Support AUX
1.3 Storage
˙Support standard USB Mass Storage device (FAT16/32).
˙Support SD/MMC card up to 2G. SDHC is not supported.
1.4 Recording
˙Be able to record audio data from internet radio stations (World Station / SHOUTCast)
and transfer audio data into 128K MP3 format.
˙Be able to record audio data from FM and transfer audio data into 128K MP3 format.
1.5 Networking
˙Support Ethernet 10/100 Mbps
˙Support Wireless LAN IEEE 802.11 b/g dognle (optional)
˙Support Infrastructure / Ad-hoc
˙Support WEP64/128 and WPA-PSK encryption
˙Support Proxy Setting
˙The system provides a wireless setting wizard to make wireless network setup easier.
6
1.6 Others
˙Support two alarm clock settings
˙Support time sync technology (* network available)
˙Support firmware upgrade
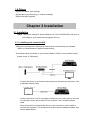
Chapter 2 Installation
2.1 Installation
NOTE: The proper voltage for Internet Radio is AC 110V~240V/50-60Hz. Be sure to
the voltage in your area before plugging in the unit.
2.1.1 Installing onto network (LAN)
˙ Make sure the internet environment is ready and the network setting is available
(ADSL or Cable Modems is highly recommended).
.
˙The default setting of network in your Internet Radio is DHCP. (more network setting
please check 11.6 Network)
-
Connect the device to an Internet connected router according to the picture. Use
a standard network cable.
-
Connect the device to a PC according to the picture if it is only going to be used
for listening to music that is stored in the computer. Use a crossed network
cable.
-
When the device is connected like this you can only listen to music which is
stored in the computer. The computer must have special software installed. See
section Media Server.
7
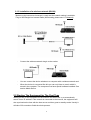
2.1.2 Installation of a wireless network (WLAN)
˙Make sure the internet environment is ready and the network setting is available.
˙Plug-in Wifi Dongle into Internet Radio (More setting please see 11.6 Network)
-
Connect the wireless network dongle to the socket.
-
You can connect the device wireless to a computer with a wireless network card.
-
When the device is connected like this you can only listen to music which is
stored in the computer. The computer must have special software installed. See
section Media Server.
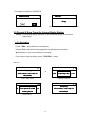
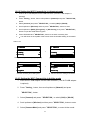
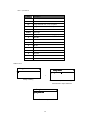
2.2 Starting The Equipment for The First Time
When you turn on the equipment for the first time the stereo will try to automatically
search for an IP address. If the network is connected to the Internet, the equipment will
also synchronize the time with the time server and then goes to standby mode. Usually it
will take 6-30 seconds to finish the whole process.
8
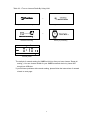
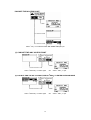
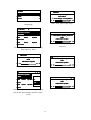
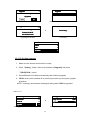
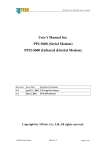
Table 2.2.1 Turn on Internet Radio By Using LAN
1
Penbex
→
Checking available network devices
When power-on,Penbex Logo shows up
→
Network Connecting
Connecting …
Network Connecting
Time Sync processing
20072007-MayMay-03 Thu..
PM
Off
off
Stand-By Mode
˙The default of network setting for SMBB is LAN (or after you have chosen “Reset all
setting”). You can choose WLAN for your SMBB’s network device by insert WiFi
dongle into USB slot.
˙If you still have problems with network setting, please follow the instructions of network
wizard on next page.
9
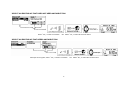
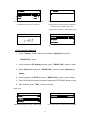
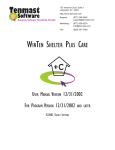
˙NETWORK SETTING – LAN
Select LAN to connect internet
Select WLAN to connect internet
˙CAN NOT GET DHCP
10
Exit network wizard mode
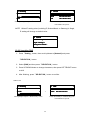
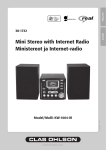
˙NETWORK SETTING – WLAN (with Wifi dongle)
Select LAN to connect internet
Select WLAN to connect internet
11
Exit network wizard mode
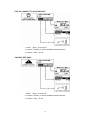
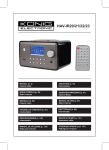
˙CAN NOT FIND ACCESS POINT
Select「GO」to run Wizard mode OR Select「EXIT」to quit
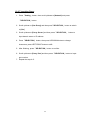
(1) CAN NOT FIND ANY ACCESS POINT
Select「RESCAN」to search again
OR
Select「EXIT」to quit
(2) CAN NOT FIND THE AP YOU WANT, PRESS「
「ESC」
」TO ENTER PRESCAN MODE
Select「RESCAN」to search again
12
OR
Select「EXIT」to quit
˙SELECT AN EXISTING AP THAT DOES NOT NEED AN ENCRYPTION
Select「Yes」to make a connection
OR
Select「No」to select other Access Points
˙SELECT AN EXISTING AP THAT NEEDS AN ENCRYPTION
After input the encryption, Select「Yes」to make a connection
13
OR Select「No」to select other Access Points
˙FAIL TO CONNECT TO ACCESS POINT
1. Select 「Retry」to reconnect
2. or Select「Wizard」to search available wireless networks
3. or Select「EXIT」to exit
˙CAN NOT GET DHCP
1. Select 「Retry」to reconnect
2. or Select「Wizard」to search available wireless networks
3. or Select「EXIT」to exit
14
Chapter 3 Internet Radio
3.1 Introduction
By using internet radio, listeners receive a continuous stream of audio from
internet radio stations.Internet Radio supports many audio stream sources such as
Microsoft (mms://..), Live365, and SHOUTCast.
˙World Station (http://station.penbex.com.tw)
˙SHOUTCast (http://www.shoutcast.com)
Today most traditional FM radio stations in the world offer on-line radio
services or programs. Internet Radio can connect to those on-line radio services or
programs. Moreover, Internet Radio categorizes those stations by country, and sort
them under World Station file. This makes it easy to search or find a particular radio
station.
3.2 World Station
System requirements: Recommend broadband internet connection (xDSL/Cable
Modem). However, Internet Radio does not support PPPoE(ADSL) or ISP Proxy
(cable modem). We strongly recommend connecting with a broadband router to
have better quality of audio streaming.
˙If there is no internet connection on your Internet Radio, Wizard mode will be
automatically activated. Please follow the instructions shown on the screen to
establish network connection.
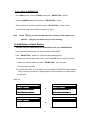
3.2.1 Listen to World Station
˙Go to[Main] menu, choose [i.Radio] and press「SELECT/OK」button.
˙Choose [World Station] and then press「SELECT/OK」button.
˙Scroll up/down to a station and then press「SELECT/OK」button to play.
˙You will hear music after buffering reaches to 100%.
Note : For fast search for an internet radio station, press「Right」
」button to jump
from radio stations started with alphabet A to alphabet B, alphabet B
to alphabet C, and so on. Press「
「Left」
」button to jump backward.
15
Table 3.2.1
Main
i.Radio
i.Radio
>
USB
>
SD/MMC
>
→
Select「i.Radio」
>
Americas
>
Asia
>
→
Categorized by Area
SHOUTCast
>
South Korea
>
SriLanka
>
Taiwan
>
World Station
Africa
>
Americas
>
Asia
>
→
Press◄ / ► button for fast search
Caribbean
>
Europe
>
Middle
Middle East
>
The name of stations change alphabetically
1/1637
1/999
‘A
A’ NET STATION
→
.977 The Oldies Channel
007 Audio - #1 For The
007 Audio - #1 For The
Press INFO button
The amount of stations will show on the screen
World Station
National Education Radio 1
>
Categorized by Country
World Station
HitFM 90.1 Taiwan
World Station
World Station
Africa
.977 The Oldies Channel
>
Choose「World Station」
i.Radio
‘A
A’ NET STATION
Favorite
i.Radio
HitFM 90.1 Taiwan
→
National Education Radio 2
WMA ,48 Kbps
Categorized by alphanumeric order
Playing
3.3 SHOUTCast
System requirements: Recommend broadband internet connection (xDSL/Cable
Modem). However, Internet Radio does not support PPPoE(ADSL) or ISP Proxy
(cable modem). We strongly recommend connecting with a broadband router to
have better quality of audio streaming.
16
3.3.1 Listen to SHOUTCast
˙Go to[Main] menu, choose [i.Radio] and press「SELECT/OK」button.
˙Choose [SHOUTCast] and then press「SELECT/OK」button.
˙Scroll up/down to a station and then press「SELECT/OK」button to play.
˙You will hear music after buffering reaches to 100%.
Note :Press「
「INFO」
」to show the total amount of internet radio stations in a
specific
category and which one you are browsing.
3.4 Add/Delete a Radio Station
NOTES: You can add at most 20 radio stations into your FAVORITE file.
˙Roll to the radio station that you want to add into FAVORITE.
˙Hold「SELECT/OK」button for 2 seconds after blinking stops.
˙To delete an internet radio station from your FAVORITE file is to scroll to a radio
station you want to delete and hold「SELECT/OK」for 2 seconds.
Choose [Yes] to confirm.
˙The system will inform you if a station you try to add into FAVORITE exists already.
˙It may consume more than 1 storage space if the information of a radio station
is extensive.
Table 3.4
World Station
HitFM 90.1 Taiwan
National Education Radio 1
World Station
→
National Education Radio 2
HitFM 90.1 Taiwan
National Education Radio 1
National Education Radio 2
Rolling bar blinks twice
Hold「SELECT / OK」for 2 seconds
Favorite
Favorite
HitFM 90.1 Taiwan
HitFM 90.1 Taiwan
→
Hold「SELECT/OK」for 2 seconds to delete it
17
The station is added into FAVORITE
Delete Favorite
Favorite
Delete this station?
Empty
Choose「Yes」then press「SELECT/OK」to delete
Confirm
3.5 Record A Song From An Internet Radio Station
NOTE: The recording quality depends on the broadcast quality of the internet
radio station.
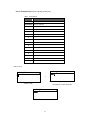
3.5.1 Recording
˙Press「REC」button while you are listening.
˙Internet Radio will ckeck if the storage has enough space for recording.
˙ will shown on your screen while it is recording.
˙If you want to stop recording, press「STOP/ESC」button.
Table 3.5.1
i.Radio
i.Radio
Whispering
<Phil Collins> <Can’t
<Can t Stop Lo
→
<Phi
Preparing to Rip
p Lo
MP3,96kbps
Press「REC」button
Preparing to Record
i.Radio
i.Radio
Message
<P
Free Space:24.33 MB
Whispering
Lo
<Phil Collins> <Can’t
<Can t Stop Lo
Starting Record
MP3,96kbps
Check memory...
Recording
18
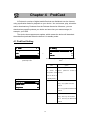
Chapter 4
PodCast
A Podcast is a series of digital-media files that are distributed over the Internet
using syndication feeds for playback on your device. You can browse, play, subscribe
and/or download any Podcasts from the Podcast directories. Moreover, you can
download any specific podcast you desire and store into your mass storage, for
example, your USB.
The device also supports auto-update, which means the device will download
the subscribed podcasts when the device is in standby mode.
4.1 PodCast Setting
Main
Setting
FileMgr
>
AUX
>
Setting
>
→
PodCast Setting
>
iPod
>
Network
>
In Main Menu, scroll down to [Setting] and press
Scroll down to [Podcast Setting] and press [Select/OK]
[Select/OK] button
button
Item
Option
Update Mode
(To
decide
Auto:Auto-update the content
the Manual : update the content by
auto-update mode manually.
when the device is
in Standby Mode )
PodCast
Update Mode
Auto
Update Items
All
Keep Items
All
Update Items
All:All contents
Newly:Only update those new
contents
Last 3:Only update the latest three
contents
Keep Items
All:Save all contents
Newly:Save only new contents
Last 3:Save only the latest three
contents
19
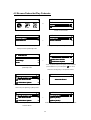
4.2 Browse/Subscribe/Play Podcasts
PodCast
Main
or
i.Radio
>
PodCast
>
USB
>
Podcast icon in Smart Boombox
Podcast in Internet Radio
1
1
PodCast
PodCast St…
St
PodCast Station
Station
>
Subscribed List
>
→
To browse Podcast station, scroll to [Podcast
PodCast List
>
Penbex Collection
>
Select [Podcast List] and Press [Select/OK] button
station] and Press [Select/OK] button
News
PodCast List
Art
>
Audio Blogs
>
Books
>
→
ABC News Nightline
>
ABC News Shuffle
>
CNN News Update
>
The list of podcast stations will appear. For the available
Choose from different categories and Press
podcast stations for your subscription.
icon can be
[Select/OK] button
observed in the beginning of the podcast stations.
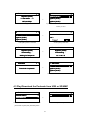
News
News
ABC News Nightline
>
ABC News Shuffle
>
CNN News Update
>
→
Subscribe Done !
To subscribe the Podcast, insert your USB into the
You have subscribed the Podcast station
device and press [Memory] or [REC] button
ABC News
ABC News
ABC News Nightline
>
ABC News Shuffle
>
CNN News Update
>
Press [Select/OK] button to browse the lists of
Nightline
Nightline (Audio)
→
Nightline (Audio)
Nightline (Audio)
Scroll to the content and Press [Select/OK] button to listen
Podcast stations
20
PodCast List
ABC News
Nightline (Audio)
Nightline (Audio)
→
*** ABC News …***
***
Nightline (Audio)
(Audio)
MP3,48 Kbps
Nightline (Audio)
Playing. . .
If you want to download a specific content, scroll to the
content you want
ABC News
ABC News …
Nightline (Audio)
Download
→
Nightline (Audio)
this
audio
file
Now ?
Nightline (Audio)
Press [REC] button to download
Choose [YES] to download
Download
Download
Nightline (Audio)
Nightline (Audio)
→
Downloading …
Downloading …
Waiting for Response
1/1 -> 25.7 %
Connecting. . .
Download. . .
ABC News
Download
Nightline (Audio)
→
Download Completed !
Nightline (Audio)
Nightline (Audio)
Download completed
Go back to the content list after download finished
4.3 Play/Download the Podcasts from USB or SD/MMC
1
1
PodCast
Subscribed
PodCast Station
>
Subscribed List
>
USB
>
→
Insert your USB or SD/MMC to the device. Choose
Press [Select/OK] button
[Subscribed List] and press [Select/OK] button
21
USB
News
My Download
>
News
>
ABC News Nightline
>
→
Sports
To download a specific content, scroll to [My
The subscribed podcast list
Download] and press [Select/OK] button
1/2
My Download
Nightline
Nightline (07.11.08)
editor
080711_ntl.mp3
→
080710_ntl.mp3
02:
02:30
18:
18:53
Scroll to the content and then press [Select/OK]
Playing…
button
1/2
My Download
080711_ntl.mp3
Nightline (07.11.08)
editor
→
080710_ntl.mp3
080709_ntl.mp3
02:
02:30
Or make your Playlist by Press [Memory] button
18:
18:53
Press [Select/OK] button to listen from your playlist
USB
News
My Download
>
News
>
ABC News Nightline
>
→
Sports
To browse your subscribed podcast, scroll to the
Choose the Podcast station and Press [Select/OK] button
categories (e.g. News) and press [Select/OK]
News
ABC News …
Update now ?
…Please
Please Wait…
Wait
→
Checking Database
Updated contents are available and choose [YES] to
download.
22
Update
Update
ABC News Nightline
→
Updateing …
…Please
Please Wait…
Wait
1/5 -> 36.7%
You can stop downloading anytime by press
Processing
[ESC/STOP] button
1/3
ABC News
Nightline (Audio)
Nightline (04.01.08)
ABCNews.com
→
Nightline (Audio)
Nightline (Audio)
02:
02:30
The contents you have downloaded.
18:
18:53
Press [Select/OK] button to play
ABC News
ABC News
Nightline (Audio)
Nightline (Audio)
→
Nightline (Audio)
Nightline (Audio)
Nightline (Audio)
Nightline (Audio)
After contents are played, icon will disappear.
Or you can make your playlist by press [Memory] buttom
4.4 Unsubscribe Podcast from USB or SD/MMC
PodCast
Subscribed
PodCast Station
>
Subscribed List
>
USB
>
→
Insert your USB, scroll to [Subscribed List] and
Choose [USB] and press [Select/OK] button
then press [Select/OK] button
USB
News
My Download
>
News
>
ABC News Nightline
>
→
Sports
Choose the category and press [Select/OK] button
Choose a podcast station you want to unsubscribe and
press [Memory] button
23
News
News
Unsubscribe this RSS
And delete its files ?
Unsubscribe Success !
→
Choose [YES] to confirm and press [Select/OK]
Unsubscribe Success
button
4.5 Download Podcasts in Standby Mode
When the device is in Standby Mode, it will download your subscribed podcasts
automatically. So you insert your USB or SD/MMC card before you go to sleep at night.
The device will check if there is any updated content available and download it for
you.
20082008-JulJul-15 Thu..
News
ABC News Nightline
>
→
PM
Off
Press [Power] to make the device goes into
off
The device is in Standby mode.
Standby Mode
20082008-JulJul-15 Thu..
20082008-JulJul-15 Thu..
1830 Magazine
Getting RSS …
Off
off
On the top right of screen,
1/9 -> 86.2 %
→
Off
off
If there is any updated content
icon will appear and
blink. It means that the device is trying to get RSS
at that moment.
20082008-JulJul-15 Thu..
20082008-JulJul-15 Thu..
PM
Off
off
1830 Magazine
→
3/9 -> 86.2 %
Off
The screen of the device will get back to clock
mode. But the device is still downloading the
updated content. (
off
Downloading. . .
icon)
→
24
20082008-JulJul-15 Thu..
PM
Off
off
After download finished, the device will go back to
Standby Mode.
Chapter 5 USB
NOTE: 1. Please make sure your USB device is, charged before connecting to the
unit. Otherwise, it may not be detected. Backup your data on this device
in order for it to work properly.
2. In all play modes, if the filename is not in English, the international
character for MP3/WMA tracks is replaced with “disorder character”.
3. Some USB devices may be incompatible.
5.1 Playing Songs on the USB Disk
˙Insert an USB device with MP3/WMA audio files into your system.
˙
icon will show on the top side of the screen when USB is detected.
˙Select「USB」, and press「SELECT/OK」button
˙Scroll up/down to a song, folder or All then press「PLAY」button to play.
˙Select marked songs or folders: Press「MEMORY」button to make a check mark
, then press「PLAY」button to play these marked songs.
Table 5.1
001/012
USB
All
Phil Collins
Can’t
Can t Stop Loving You
Phil Collins
*** Love Songs: A Compilation
or
Do You Remember
02:
02:30
Press「PLAY」
04:
04:30
Music playing
25
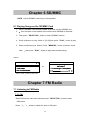
Chapter 6 SD/MMC
NOTE : Some SD/MMC cards may be incompatible.
6.1 Playing Songs on the SD/MMC Card
1. Insert a SD/MMC card with MP3/WMA audio files into the SD/MMC slot.
2.
icon will show on the topside of the screen when SD/MMC is detected.
3. Then press「SELECT/OK」button to enter SD/MMC function.
4. Scroll up/down to a song, folder or, [ All] then press「PLAY」button to play.
5. Select marked songs or folders: Press「MEMORY」button to make a check
mark
, then press「PLAY」button to play these marked songs.
Table 6.1
001/012
SD/MMC
All
Can’t
Can t Stop Loving You
Phil Collins
*** Love Songs: A Compilation
or
Phil Collins
Do You Remember
02:
02:30
Press「PLAY」button to play music
04:
04:30
Playing
Chapter 7 FM Radio
7.1 Listening to FM Radio
7.1.1 FM
˙Select FM from the main menu and then press「SELECT/OK」button to enter
FM function.
˙Press「」「」button to switch the tuner to FM radio
26
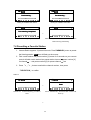
7.2 Tuning the FM Frequency
● Press「」button to decrease 0.05MHz (Europe).
● Press「」button to add 0.05MHz (Europe).
Autoscan mode will be activated when holding「」button for 3 seconds and
release「」button (from 87.5MHz to 108MHz increasingly). Holding「」 button
for 3 seconds and release「」button will autoscan frequency from 108MHz to
87.5MHz decreasingly)
Table 7.2
FM
FM
90.10
90.10 MHz
90.15
90.15 MHz
→
Pressor to adjust frequency
Increase/decrease 0.05MHz per step
7.3 Prescanning All Active FM Radio Stations
˙Enter FM function and hold「SELECT/OK」button until the message [Prescan]
shows on the screen.
˙Then release「SELECT/OK」button to Pre-Scan all active FM radio stations.
Table 7.3
FM
FM
90.10 MHz
PrePre-Scan
87.50 MHz
PrePre-Scanning …
→
Press and hold「SELECT/OK」until
Release「SELECT/OK」button to start scanning all
“Pre-Scan” shows on the screen
active radio stations from 87.5MHz.
→
27
FM
FM
89.30 MHz
Pre--Scanning …
Pre
92.10 MHz
Pre--Scanning …
Pre
Finding an available radio station
Finding an available radio station
FM
FM
108.00 MHz
PrePre-Scanning Completed
90.10 MHz
→
Press「PLAY」to listen to the radio stations that have
Prescanning completed
been found by prescanning
7.4 Presetting a Favorite Station
1. Internet Radio supports 10 preset channels. Press「MEMORY」button to preset
the listening station. CH1 icon will flash on the screen.
2. Find a radio station and press number [1] button for 3 seconds on your remote
control will add a radio station into preset station channel
(press number [2]
for channel
). or
…. and press number [0] for preset channel
3. Press「」「」button to switch the channel number, then press
「SELECT/OK」to confirm.
Table 7.4
FM
FM
90.10 MHz
92.10 MHz
Prset
→
Press◄ / ► to find a frequency you want to
Press「SELECT/OK」button and then “Preset” will
store
show up
→
28
FM
FM
92.10 MHz
CH1
92.10 MHz
CH2
CH1 icon will flash on the screen
Press / to find a channel, and press
.
「SELECT/OK」button to store
CH1
87.50MHz 87.55MHZ
Overwrite ?
The system will inform you if you want to overwrite the preset station.
7.5 Listening to a Preset Station
˙Under FM mode, press numbered key [1]-[0] on your remote control will play the
stations in your preset channel 1-10.
OR
˙Press UP/DOWN to select a channel.
Table 7.5
FM
FM
87.50 MHz
89.10 MHz
CH1
→
Radio Playing
Press「Up」/「Down」call
1
FM
MHz
CH3
You haven’t preset a frequency for this channel yet
29
7.6 Recording From FM
˙Press「REC」when listening FM.
Table 7.6
FM
FM
90.10 MHz
90.10
90.10 MHz
→
Pressor to adjust frequency
Press「REC」and prepare to record
Chapter 8 Media Server
8.1 Supported Media Server
˙WMP11(Windows Media Player 11) (Windows XP SP2 / Vista Premium 32 Bits)
8.2 Setting Upnp Environment
NOTE:
˙Before you use your PC as a media server, make sure your PC (or the media
serve you try to connect) has WMP11 (Windows Media Player 11) installed.
Each media server has to have its WMP11 installed.
˙Usually, the default of your PC firewall is to block not necessary connection.
Make sure Upnp function is enabled on your PC (media server).
˙Disable Proxy function in your INTERNET RADIO.
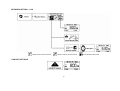
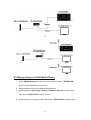
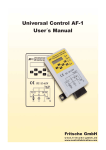
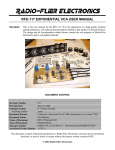
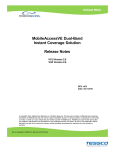
8.2.1 UPnP Networked Environment Diagram
˙Please connect this system and UPnP Media Server on the same local LAN.,
and make sure the network setting is correct.
˙The UPnP networked environment diagram is as follows.
30
or
8.3 Playing Songs on UPnP Media Server
1. Select [Media Server] from the main menu and then press「SELECT/OK」
button to enter Media Server function.
2. Select one server from all available media servers.
3. Scroll up/down to [All songs], [Artists], [Albums], [Genres] or other items,
then press「SELECT/OK」button to enter.
4. Scroll up/down to a song or folder, then press「SELECT/OK」button to play.
31
Table 8.3
Main
Servers
USB
>
SD/MMC
>
Media Server
Server
>
Windows Media Connect (Penbex)
or
Intel AV Media Server (Lianban
MediaTomb
Select [Media Server] and press「SELECT/OK」
Select one server, then press「SELECT/OK」
UPNP
All Image Items
>
All Audio Items
>
All Video Items
Items
>
Select a song or folder, then press「PLAY」to play.
Charpter 9 File Manager
9.1 Copy/Move Files to an USB Disk or SD/MMC Card
1. Insert an USB disk or a SD/MMC card.
2. Select [FileMgr] from the main menu, then press「SELECT/OK」button to
enter File Manager function (
icon will show on the screen).
3. Scroll up/down to [USB] or [SD/MMC], then press「SELECT/OK」 button to
enter.
4. Scroll up/down to a file or folder, then press「MEMORY」button to make a
check mark
5. Press 「REC」button to select [Copy] or [Move], then press 「SELECT/OK」
button.
6. Select a target directory.
7. Press「REC」button to select [Paste], then press「SELECT/OK」button to
paste.
32
Table 9.1
FileMgr
FileMgr
USB
>
SD/MMC
>
or
All
Recording
Readme.txt
Select a file or folder, then press 「MEMORY」.
Select [USB], then press「SELECT/OK」
FileMgr
FileMgr
All
Copy
USB
>
Recording
Move
SD/MMC
>
Readme.txt
Del
icon will show on the screen.
Press「REC」, then select a function.
1
FileMgr
FileMgr
USB
>
SD/MMC
>
Paste
No files Cancel
Select a target directory.
Press「REC」again to paste.
FileMgr
FileMgr
USB To SD:
SD:1/1
USB To SD:
SD:1/1
Copying 25%
Successful !
Copying files
It is successful to finish copying.
Charpter 10
iPod Dock
10.1 Dock
˙Put your iPod on the dock.
˙Scroll to [Dock] and then press「SELECT/OK」button to enter dock mode.
˙You can use your remote control to operate and play the songs by observing the
display of iPod.
33
Table 10.1
Dock
Main
Dock
>
AUX
>
Setting
>
Select [Dock] and press「SELECT/OK」
Enter iPod DOCK mode
Input Table
IPod dock
Remote Control Keys
Scroll Up
Up
Scroll Down
Down
Prior Song/Repeat
Left
Next Song
Right
Select Submenu/Song
OK
Play / Pause
Play
Leave dock mode
ESC
Repear All / Once
Repeat
Random
Random
Volumn Up
Vol +
Volumn Down
Vol -
EQ
EQ
Back to Prior Menu
Menu
10.2 Dock - Extended Mode
˙You are able to read the contents that inside of iPod by observing the display of the
system and operate your iPod.
˙To setup the Extended mode, please check 11.5 Docking mode.
˙Put your iPod on the dock.
˙Scroll to [Dock] and then press「SELECT/OK」button to enter dock mode.
Table 10.2
iPod
Main
Dock
Dock
>
Music
>
AUX
>
Shuffle Songs
Setting
>
Enter iPod Extended Mode
Select [Dock] and press「SELECT/OK」
34
iPod
Playlists
>
Aritists
>
Albums
>
052/067
Can’t
Can t Stop Loving
Loving You
Phil Collins
*** Love Songs: A Compilation
02:
02:30
Select the song from playlist by press
Press「Play」button to play songs
「SELECT/OK」
All Son…
Son
CNN News Update
001/002
(2008(2008-0505-3
CNN
News
*** CNN News Update (2008(2008-0505CNN
CNN News Update
Update
(2008(2008-0505-3
CNN
04:
04:30
News
02:
02:30
Update
04:
04:30
Press「Play」button to play your favorite
(2008(2008-0505-3
songs only
Or to select your favorite songs from playlist by
press「Memory」button
Normal
Normal
Bass +12
+12
*** CNN News Update (2008(2008-0505CNN
CNN News Update
02:
02:30
*** CNN News Update (2008(2008-0505CNN
CNN News Update
04:
04:30
02:
02:30
04:
04:30
Press「EQ」button to change EQ mode
All Son…
Son
CNN News Update
(2008
CNN
Save
News
To
Update To…
*** CNN News Update (2008(2008-0505CNN
CNN News Update
USB
(2008
CNN
001/001
News
Update SD/MMC
02:
02:30
(2008
04:
04:30
Recording..
Press「Memory」to select the songs you want to
store at other mass storages. And Press「REC」
to store
35
Input Table
IPod dock
Remote Control Keys
Scroll Up
Up
Scroll Down
Down
Prior Song/Repeat
Left
Next Song
Right
Select Submenu/Song
OK
Back to prior menu
ESC
Play / Pause
Play
Repear All / Once
Repeat
Random
Random
Volumn Up
Vol +
Volumn Down
Vol -
EQ
EQ
Select songs from playlist
Memory
Record a song to USB / SD
Rec
Back to main menu
Menu
Chapter 11 AUX
11.1 AUX Mode
1. Select [AUX] from the main menu, press「SELECT/OK」button to enter.
2. AUX will appear on the screen. Plug in audio source and start playing.
3. In AUX mode, Volume and Equalizer are adjustable.
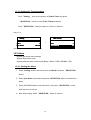
Table 11.1
AUX
Main
Dock
>
AUX
>
Setting
>
→
AUX
Enter AUX Mode
Select [AUX] and press「SELECT/OK」
1
36
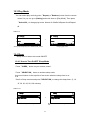
AUX
Normal
Normal
AUX
AUX
In AUX mode, volume and P-EQ are adjustable
Press EQ to adjust Equalizer
11.2 Recording in AUX Mode
SMBB can accept different audio sources (such as MP3 Player, Discman, or
Bluetooth audio receiver) and play those sources by connected with a 3.5mm
audio input cable.
1. Select [AUX] from the main menu, press「SELECT/OK」button to enter.
2. AUX will appear on the screen. Plug in audio source and start playing.
3. Press「REC」to start recording.
4. Press「STOP/ESC」to quit
Table 11.2
AUX
AUX
AUX
Free Space
→
112.4 MB
Starting to Record !
Enter AUX mode
Press「REC」to start recording
1
1
AUX
AUX
AUX
AUX
The recording quality depends on the quality
Press「ESC」to stop recording
of your audio source.
37
Chapter 12 Setting
12.1 Date & Time
˙Support NTP (network time protocol).
˙Auto-sync time via internet at 00:00 and 12:00 or everytime SMBB is on.
˙Support manual date & time settings.
˙Support DST & Time Zone settings
12.1.1 Setting the Date
˙Go to「Setting」, then scroll up/down to [Date & Time] and press
「SELECT/OK」button to enter [Date] submenu.
˙The default [TimeSync] is Yes.
˙To scrolling Up/Down key to change the year, month, and day. And Press
「SELECT/OK」to shift from year, month, and day.
˙After finish setting, then press「SELECT/OK」button to confirm and save.
Table 12.1.1
Setting
Date & Time
Date & Time
>
Alarm
>
Play Mode
→
Normal
Yes
Date
>
Time
>
The default TimeSync is Yes
Select [Date & Time], and press「SELECT/OK」
Date & Time
TimeSync
TimeSync
Date
Yes
Date
>
Time
>
→
2008
05
10
Scroll Up / Down to adjust year, month, and day
Scroll to [Date] and press「SELECT/OK」
38
Date & Time
TimeSync
Yes
Date
>
Time
>
After finishing, the changes will be saved
12.1.2 Setting the Time
˙Go to「Setting」, then scroll up/down to [Date & Time] and press
「SELECT/OK」button to enter [Time] submenu.
˙The default [TimeSync] is Yes.
˙To scrolling Up/Down key to change the hour and minute. And Press
「SELECT/OK」to shift from hour and minute.
˙After finish setting, then press「SELECT/OK」button to confirm and save.
Table 12.1.2
Setting
Date & Time
Date & Time
>
Alarm
>
Play Mode
→
Normal
Date & Time
Date
>
Time
>
Time
Yes
Date
>
Time
>
→
Yes
>
Time
>
13 : 41 : 23
Scroll Up / Down to adjust the hours and minutes
Date & Time
Date
Scroll to [Time] and press「SELECT/OK」
TimeSync
Yes
The default TimeSync is Yes
Select [Date & Time], and press「SELECT/OK」
TimeSync
TimeSync
After finishing, the changes will be saved
39
12.1.3 Setting the Time formation
˙Go to「Setting」, then scroll up/down to [Date & Time] and press
「SELECT/OK」button to enter [Time Format] submenu.
˙Press「SELECT/OK」button to select to 12-hour or 24-hour.
Table 12.1.3
Setting
Date & Time
Date & Time
>
Alarm
>
Play Mode
→
Normal
Date
>
Time
>
Time Format
24
Choose [Time Format] to change
Select [Date & Time], and press「SELECT/OK」
12.2 Alarm
˙Support two alarm clock settings.
˙Support Daily alarm clock.
˙Support different alarm-clock sound (Beep / i.Radio / USB / SD/MMC / FM).
12.2.1 Setting the Alarm
1. Press「Setting」button, then scroll down to [Alarm] and press 「SELECT/OK」
button.
2. Select [Use Alarm 1] submenu and press「SELECT/OK」button to activate the
alarm.
3. Press UP/DOWN button to set alarm time, and press「SELECT/OK」button
shift from hour to minute.
4. After finish setting, press「SELECT/OK」button to confirm.
40
Table 12.2.1
Alarm
Alarm
Use Alarm 1
No
Set Alarm 1
>
Use Alarm 2
No
→
The default [Use Alarm 1] is No.
Use Alarm 1
Yes
Set Alarm 1
>
Use Alarm 2
No
Scroll to [Set Alarm 1] to set the alarm clock
20082008-MayMay-10 Thu..
Alarm 1
14 : 54 : 00
PM
PM 6:00
Scroll Up/Down to set hours and minutes
off
After finishing, the changes will be saved
Note:
:Some models can activate/disarm alarms by press Alarm 1/Alarm 2 button
while INTERNET RADIO is in Standby mode.
12.2.2 Setting the Alarm Sound
1. Press「Setting」and scroll down to [Alarm] and press「SELECT/OK」.
2. Select [Alarm Source] and then press「SELECT/OK」button to enter.
3. Press UP/DOWN button to determine an alarm sound, and then press
「SELECT/OK」button to confirm.
4. In some circumstances the screen of Internet Radio will flash to inform you as
the alarm time is up.
Table 12.2.2
Alarm Source
Beep
i.Radio
USB
Scroll UP/DOWN button to determine an alarm sound, and then press「SELECT/OK」button to confirm
41
NOTE:
˙The default alarm sound is “Beep”.
˙The alarm goes off with the sound source in the standby mode when time is up.
˙The default alarm source of i.Radio is the first radio station under the FAVORITE
file.
12.2.3 Disarming the Alarm
˙When alarm time is up in the “Standby Alarm” mode, the screen will flash and the
alarm source will be played.
˙Press「Standby」, or「STOP/ESC」, or「Alarm」button to disarm the alarm.
˙The system will force to stop playing audio sources when the alarm time is up.
˙If the system is on a work that is not able to stop, the screen will blink to inform
you the alarm time is up.
Table 12.2.3
20082008-MayMay-03 Wed.
Alarm
→
PM
PM 3:20
PM
off
PM 3:20
off
STAND BY Mode
When alarm time is up, the screen will flash.
Alarm
Snooze
PM
PM
PM 3:20
off
PM 3:20
When alarm time is up, the screen will flash.
off
Press [Snooze] to enter SNOOZE mode if
Snooze function has been activated,
1
20082008-MayMay-03 Thu..
PM
PM 3:20
off
Press [STANDBY], [STOP/ESC],or [ALARM] to disarm the alarm
42
12.3 Play Mode
˙You can select play mode by press 「Repeat」or「Random」button from the remote
control. Or you can go to [Setting] and scroll down to [Play Mode]. Then press
「Select/OK」to change play mode. Normal ShuffleRepeat OneRepeat
All.
Table 12.3
Setting
Setting
Date & Time
>
Alarm
>
Play Mode
→
Normal
Date & Time
>
Alarm
>
Play Mode
Select [Play Mode] and press「SELECT/OK」button
Repaet All
Changing play mode
12.4 Sleep
˙Sleep mode is able to be turned ON/OFF.
12.4.1 How to Turn On/OFF Sleep Mode
˙Press「SLEEP」button on your remote control.
˙Press「SELECT/OK」button to activate sleep mode.
˙
icon will show on the top side of the screen when the sleep timer is on.
˙Scroll to Sleep minutes and press「SELECT/OK」to change the sleep timer. (5, 10,
15, 20, 30, 60, 90, 120 minutes)
Table 12.4.1
Sleep
Sleep
Sleep Miuntes
Miuntes
Sleep
off
5
→
Sleep
Sleep Miuntes
On
5
icon will show on the top side of the screen
Press「SLEEP」button on your remote
43
12.5 Docking Mode
˙To select a simple mode or extended mode from iPod Dock. Yes means Extended
Mode and No means Simple Mode.
12.6 Network
˙Support LAN (Ethernet) and WLAN (802.11b/g wifi Dongle is optional)
˙Support Wi-Fi Encryption WEP64/128 and WPA-PSK
˙Support dynamic IP via DHCP (Dynamic Host Configuration Protocol) and static IP.
Default setting is Ethernet and DHCP.
˙Support Infrastruct mode and Ad-hoc mode.
˙Support Upnp.
˙Auto-detect and auto-run LAN or WLAN(wireless LAN) environment.
12.6.1 Understanding the Networking States on The System
˙The network connectivity status icon will show on the top side of the screen.
Table 12.6.1.1
-
LAN Status
Title
→
Title
→
● It is successful to detect the Ethernet cable.
Title
→
● It is successful to detect the Ethernet cable.
Table 12.6.1.2
-
˙● It is failed to detect the Ethernet cable.
● It is failed to get available DHCP information.
● It is successful to get available DHCP information
WLAN Status
Title
→
Title
→
● It is successful to detect the USB Wi-Fi adapter.
Title
→
● It is successful to detect the USB Wi-Fi adapter.
44
● It is failed to detect the USB Wi-Fi adapter.
● It is failed to get available DHCP information.
● It is successful to get available DHCP information.
12.6.2 Setting the Wi-Fi Connectivity in infrastruct mode
1. Insert a Wi-Fi USB adapter into the USB connector. (The Wi-Fi USB adapter is
optional)
2. Press「Setting」button, then scroll up/down to [Network] and press「SELECT/OK」
button.
3. Select [Connect] and pesss「SELECT/OK」to switch [LAN] to [WLAN].
4. Scroll up/down to [Wireless] and then press「SELECT/OK」button to enter.
5. Scroll up/down to [SSID], [Encryption], or [Site Survey], then press「SELECT/OK」
button to input the SSID and encryption.
6. Press UP/DOWN and「SELECT/OK」button to set each necessary item.
7.
icon will show on the topside of the screen when the wireless setting is successful.
Table 12.6.2
Network
Connect
Network
LAN
IP Setting
>
Use Proxy
No
→
Select [Connect] and switch [LAN] to [WLAN].
>
IP Setting
>
Wireless
>
[Wireless] item will appear on the screen.
Wireless
Wireless
Wizard
Wireless
Infra
SSID
>
Encryption
>
→
Set each necessary Wi-Fi setting item.
SSID
>
Encryption
>
Site Survey
>
will show when the setting is successful.
12.6.3 Setting the Wi-Fi Connectivity in Ad-Hoc mode
1. Insert a Wi-Fi USB adapter into the USB connector. (The Wi-Fi USB adapter
is optional)
2. Press「Setting」button, then scroll up/down to [Network] and press
「SELECT/OK」button.
3. Select [Connect] and pesss「SELECT/OK」to switch [LAN] to [WLAN].
4. Scroll up/down to [Wireless] and then press「SELECT/OK」button to enter.
5. Select [Connect Mode] and press「SELECT/OK」to enter Ad-hoc mode.
45
6. Scroll up/down to [SSID], [Encryption], or [Site Survey], then press
「SELECT/OK」button to input the SSID and encryption.
7. If you have a desired channel, scroll to [Channel] and press 「SELECT/OK」
to change. (from channel 1 to channel 11).
icon will show on the topside of the screen when the wireless setting is
8.
successful.
12.6.4 Setting the Wi-Fi Connectivity by Wi-Fi Wizard
1. Insert a Wi-Fi USB adapter into the USB connector. (The Wi-Fi USB adapter is
optional).
2. Press「Setting」button, then scroll up/down to [Network] and press
「SELECT/OK」button.
3. Select [Connect] and switch [LAN] to [WLAN].
4. Select [Wizard] and then press「SELECT/OK」button.
5. Scroll up/down to an access point you want to connect, and then press
「SELECT/OK」button.
6. If the access point that you are selecting is protected, press「SELECT/OK」
button to select the protected AP.
7. To input the encryption key, press UP/DOWN (or numbered key) button to
change characters and press LEFT/RIGHT button to shift.
8. Press「SELECT/OK」after you finish setting.
9.
icon will show on the topside of the screen if the wireless setting is
successful.
Table 12.6.4
Network
Connect
Network
LAN
IP Setting
>
Use Proxy
No
→
Select [Connect] and switch [LAN] to [WLAN].
Connect(any~)
WLAN
Wizard
>
IP Setting
>
Select [Wizard] and press [SELECT/OK] button
46
Wizard
Wizard
ap01
61%
D-LINK
85%
default
21%
>
Enter [Wizard], then all available AP and its signal
→
strength will be shown on the screen.
Use UP/DOWN (or numbered key) to input an
encryption key to access the AP if necessary.
After key-in the encryption key, press
「SELECT/OK」and press 「STOP/ESC」to exit
Wizard
Network
Network
>
Language
>
Information
>
will show when the setting is successful.
Proofing the encryption key…
12.6.5 Inputting Static IP
1. Press「Setting」button, then scroll up/down to [Network] and press
「SELECT/OK」button.
2. Scroll up/down to [IP Setting] and then press「SELECT/OK」button to enter.
3. Select [IP Source] and press「SELECT/OK」button to switch [Dynamic] to
[Static].
4. Scroll up/down to [TCP/IP] and press「SELECT/OK」button to start editing.
5. Press UP/DOWN to change characters and press LEFT/RIGHT button to shift.
6. After finishing, press「REC」button to confirm.
Table 12.6.5
Network
Connect
IP Setting
LAN
IP Setting
>
Use Proxy
No
→
Select [IP Setting], then press「SELECT./OK」
IP Source
Dymanic
Press「SELECT/OK」to switch [IP Source] to [Static]
→
47
IP Setting
IP Source
TCP/IP
Static
IP
192.169.001.100
TCP/IP
>
Mask
255.255.255.000
DNS
>
GW
192.169.001.254
Press UP/DOWN (or numbered key) then
Select [TCP/IP], then press「SELECT./OK」
LEFT/RIGHT to input IP.
NOTE:When IP setting value (including IP, Subnet Mask, or Gateway) is illegal,
IP setting will change to default value.
TCP/IP
The IP Setting Value is
illegal ! Setting is
Changed to Default !
12.6.6 Inputting DNS
1. Press「Setting」button, then scroll up/down to [Network] and press
「SELECT/OK」button.
2. Select [DNS] and then press「SELECT/OK」button.
3. Press UP/DOWN button to change characters, then press LEFT/RIGHT button
to shift.
4. After finishing, press「SELECT/OK」button to confirm.
Table 12.6.6
IP Setting
Setting
IP Source
DNS
Static
TCP/IP
>
DNS
>
→
DNS1
168.095.001.001
DNS2
000.000.000.000
Press UP/DOWN (or numbered key) then
Select [DNS] and press「SELECT/OK」button
LEFT/RIGHT to input IP
48
12.6.7 Inputting Proxy
1. Press「Setting」button, then scroll up/down to [Network] and press
「SELECT/OK」button.
2. Scroll up/down to [Use Proxy] and then press「SELECT/OK」 button to switch
to [Yes].
3. Scroll up/down to [Proxy Server] and then press「SELECT/OK」 button to
input domain name or IP address.
4. Press「SELECT/OK」button, then press UP/DOWN button to change
characters, press LEFT/RIGHT button to shift.
5. After finishing, press「SELECT/OK」button to confirm.
6. Scroll up/down to [Proxy Port] and then press「SELECT/OK」button to input
port number.
7. Repeat the step 4~5.
49
Table:Input Method
Key
Description
OK / Select End editing
STOP/ESC Delete a character
Up
Change character 0-9, a-z ,A-Z, symbol
DOWN
Change character 0-9, a-z ,A-Z, symbol
LEFT
RIGHT
Shift to left
Shift to right
1
1./_!@# $ % ^ & * : ; '
2
2 abc ABC
3
3 def DEF
4
4 ehi EHI
5
5 jkl JKL
6
6 mno MNO
7
7 pqrs PQRS
8
8 tuv TUV
9
9 wxyz WXYZ
0
0
" / \ ( ) [ ] { } space
Table 12.6.7.1
Proxy Server
Proxy Server
>
>proxy.hinet.net
>proxy.hinet.net
→
Ready to Editing
Press UP/DOWN (or numbered key) then
LEFT/RIGHT to input characters.
Proxy Server
>proxy.hinet.net
Press「SELECT/OK」to confirm
50
˙Select [Proxy Port] to input a proxy server port
Table:Input Method
Key
Description
OK / Select End editing
STOP/ESC Delete a character
Up
Change character 0-9
DOWN
Change character 0-9
LEFT
RIGHT
Shift to left
Shift to right
1
1
2
2
3
3
4
4
5
5
6
6
7
7
8
8
9
9
0
0
Table 12.6.7.2
Proxy Port
Proxy Port
>8080
>8080
>
→
Press UP/DOWN (or numbered key) then
Ready to Edit
LEFT/RIGHT to input characters
Proxy Port
>8080
Press「SELECT/OK」to confirm
51
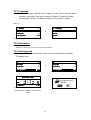
12.7 Language
˙Support 11 languages –Danish, Dutch, English, Finnish, French, German, Italian,
Japanese, Norwegian, Portuguese, Spanish, Swedish, Traditional Chinese
and Simplified Chinese. The default language of the system is English.
Table 12.7
Setting
Language
Language
>
Information
>
Auto Upgrade
→
No
English
German
Spanish
Select Language
Select「Setting」and choose「Language」
12.8 Information
˙Display the firmware version and network information.
12.9 Auto Upgrade
˙The system will check automatically if there is any updated firmware available.
˙The default is No.
Setting
Setting
Language
>
Information
>
Auto Upgrade
Upgrade
→
No
Language
>
Information
>
Auto Upgrade
Select [Auto Upgrade]
Press「SELECT/OK」to choose Yes / No
20082008-MayMay-11Sat.
PM
PM 6:00
Yes
off
If it is Yes, the system will check if there is any
Confirm
updated firmware available while in Standby
mode
52
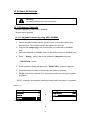
12.10 Reset All Settings
● Reset all settings to factory default.
Warning :
All settings will be reset to factory default.
12.11 Firmware Upgrade
˙Support upgrade by using USB or SD/MMC
˙Support online upgrade
12.11.1 Upgrade firmware by using USB / SD/MMC
1. Get an accurate firmware version (please check your model number) from
manufactures. The firmware version file appears as .UPG file.
2. Copy the file [image.upg] to the root directory on a USB disk or SD/MMC
card.
3. Insert the USB disk or SD/MMC card into the USB connector or SD/MMC slot.
4. Press 「Setting」button, then scroll up/down to [Upgrade] and press
「SELECT/OK」button.
5. Scroll up/down to [Yes] and then press「SELECT/OK」button to upgrade.
6. Smart Boombox will restart automatically after finishing upgrade.
7. SBMM must not be switched off or press any function key during the upgrade
procedure.
NOTE: It strongly recommends resetting all setting after the system is upgraded.
Table 12.11.1
Setting
Upgrade
Information
>
Reset all
>
Upgrade
>
→
Select [Upgrade], then press「SELECT/OK」
Image Source
Upgrade
USB
>
Select [Upgrade], then press「SELECT/OK」
→
53
Upgrade
Upgrade
Do You Really Want
I-RADIORADIO-070639.UPG
Upgrade?
Confirm
Select the firmware and Press「SELECT/OK」
Upgrade Process
>>> Processing <<<
→
Please DO NOT
Processing …
Cut off the Power
Upgrading the firmware
Processing…
i.Radio
i.Radio
>
USB
>
SD/MMC
>
The upgrade is complete.
12.11.2 On-line upgrade
1. Make sure the internet environment is ready
2. Press「Setting」button, then scroll up/down to [Upgrade] and press
「SELECT/OK」button.
3. Smart Boombox will restart automatically after finishing upgrade.
4. SBMM must not be switched off or press any function key during the upgrade
procedure.
NOTE: It strongly recommends resetting all setting after SMBB is upgraded.
Table 12.11.2
Setting
Upgrade
Information
>
Reset all
>
Upgrade
>
→
Select [Upgrade], then press「SELECT/OK」
Image Source
Upgrade
USB
>
Select [Upgrade], then press「SELECT/OK」
54
Upgrade
Upgrade
Do You Really Want
Upgrade ?
Checking Firmware …
Confirm
Checking if there is any update firmware
Upgrade
Upgrade
I-RADIORADIO-070639.UPG
Visible:
Visible:01.00.00.00
Upgrade To:
To:02.00.00.00
Select [Yes] to confirm
Select the firmware and Press「SELECT/OK」
Upgrade
Downloading …
Processing
Processing …
33 % Completed
>Press Cancel to Exit<
Processing…
Downloading…press「ESC/STOP」to cancel
download
i.Radio
i.Radio
>
USB
>
SD/MMC
>
The upgrade is complete.
www.kraftwerk.eu
55