1
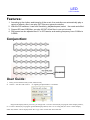
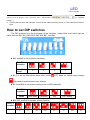
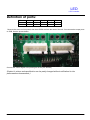
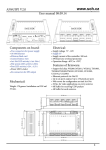
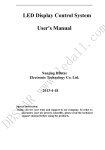
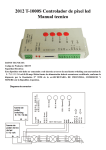
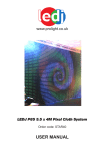
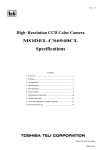
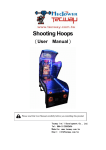
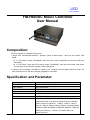
LED LED Controller YM-H803SC Music Controller User Manual Composition: This led controller is composed of two parts: 1. Single LED controller(YM-H803SC)-- provide 2 ports for data output, each port can control 1024 pixels, In “Auto Music” mode, YM-H803SC, each port can control 1024pixels, but the two ports have same data. In “DAT Music” mode and “DAT orderly” mode, YM-H803SC, each port can control 1024 pixels, and the data can be different, actually control 2048 pixels 2. Lighting control software- LED BUILD, install in your computer, edit the display effects or video you want, transfer them to SD card, and then playback in controllers. Specification and Parameter: Load Capacity 2048pixels (1024 pixels only for “Auto Music”) Grayscales 256levels R,G,B each channel Input Voltage AC110V/AC220V Power Consumption 1W Software LED BUILD Size L145 x W140 x H54 Temperature -40C°--70C° LPD6803,LPD8806,TLS3001,TM1812, TM1809, TM1804,TM1803, UCS1903,UCS1909,UCS1912, WS2801, P9813, SM16716, DMX512, DM412,DM413,DM114, DM115,DM13C, DM134, DM135, DM136, 74HC595, 6B595, MBI5001, MBI5168, MBI5016, MBI5026, MBI5027, TB62726, TB62706, ST2221A,ST2221C, XLT5026, ZQL9712, ZQL9712HV etc. Control IC LED LED Controller Features: 1. According to the rhythm and intensity of the music, the controller can automatically play a variety of effects, also it can play DAT files as a general controller. 2. With the DIP switches, it can sent Sensitivity, playback speed, select the mode and effect. 3. Support SD card 2GB Max, can play 63 DAT effect files in one unit at most. 4. Play speed can be adjusted from 1 to 25 Frame/s, and working frequency from 0.1MHz to 2.0MHz. Conjunction: User Guide: 1. Firstly, format the SD card by FAT( NOT FAT32), 2. Choose “ Two line with a slave” in “Lighting Sculpt Window” of software. Program the display effects you want, you will get file *.scu and *.hmc file(If you program music display effects), or *.scu and *.dat file(if you program general dat display effects) The *.scu is config file, the *.hmc is music display effect file, and the *.dat is display effect file. Copy *.hmc or/and *.dat file to SD card. LED LED Controller in “Lighting (When you do the program, select “Controller type”—SB/SC/SD/SU. setting”.) 3. Put SD card into slot of led controller, connect all the cables, and then power on. The controller will start to work. How to set DIP switches The DIP switches is on the front panel of the controller. It has 8 bits, from left to right we name them as Bit1, Bit 2, Bit3, Bit4, Bit5, Bit6, Bit7, and Bit8. Bit1 and Bit2 to set up Music Sensitivity. Bit1 Bit2 Location Sensitivity Level 4 3 2 Bit 3 to set up Auto-Music wave effect mode, 1 -OFF stand for vertical color-change, - ON stand for whole screen color change. Bit 4 and Bit 4 to set up the working mode of LED controller Bit4 Bit5 Location Mode Auto music Dat Music N/A DAT orderly 15 17 Bit6, Bit7 and Bit8 to set play speed (frame/s) Bit6,7,8 Location Speed 1 5 10 12 20 25 LED LED Controller Definition of ports: PIN 1 2 3 4 IIC GND CLK DAT DMX512 GND D- D+ 5 LAT EN Remove the screw on front panel, then draw PCBA out from the case of the unit. You can see the output ports on PCB. See the picture below: Connect the control signal to led pixel lights as they are defined) (Product 's picture and specification can be partly changed without notification for the performance enhancements.)