1
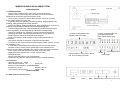
Wireless
Burglar Alarm system
(Model No.ATS-502)
Operation Instruction
Before operating the system, please read this manual thoroughly, and retain it for future reference.
WIRELESS BURGLAR ALARM SYSTEM
1.1 INTRODUCTION:
*8 wired zone, 8 wireless zone, each zone can be partial armed.
*Quickly number communicate way, use Ademco4+2 communication
agreement to transfer the signal to the alarm center.
*There could be 4 groups of police calling number, one group of center
police calling number, recycling call.
*5 guarding ways: left guarding, perimeter guarding, single guarding area
guarding, delay guarding and remote guarding.
*5 kinds of guarding: instant guarding area, delay guarding area, 24 hours of
guarding area, perimeter guarding area and side guarding area
*4 kinds of off guarding way: code keyboard off guarding, wireless remote
control off guarding, remote off guarding and accept call off guarding
*3 kinds of controlling way: keyboard, remote control and remote call
*Receiving call center, telephone and local alarm to recycle alarming
*inside monitor to remote knowing the scene situation
*inside voice module, could record invoice for nearly 20 seconds for
voice-alarm
*use remote controller to set guard, off guard and urgent alarm
*4 numbers of user code are used for protecting the system security, it could
be modified by user.
*it could dials 4 sets of telephone number and one set of center number
*recorder, monitor, remote control, guard area control, telephone line
checking and its relative parameter, they could be set by the system keyboard
*it can use the main sets keyboard to operate, simper and easy.
*wired guard area could be open or close, easy to install
*LED light direction
*has the guard dog function, can void shutdown
*accept CPU tiny dispose, SMT manufacture to be a stable capability
Nail spin
Speaker
1*SPECIFICATION:
Hanger Spin
Lines connecting
8 guard areas in the right
he lines connecting side of 8
wired guard areas Red,
black, yellow, brown, grey,
white
Corresponded to the power, alarm
Connecting to the earth
12VDC
Alarm outlet
1 to 8 are corresponded to the
bell, and connecting the earth
1.2 Parameter:
*operated: DC12-18V. 40mA
*alarm: high than400mA, 12V
power<1W
*wireless receive frequency: 315MHZ/433MHZ
*temperature:-10-55℃
humidity: 40-70%
* size: 160mm*115mm*40mm
weight: 0.8kg
2*INSTALLATION
2.1 Back picture of the main unit
on
off
Switch
Powe
Alarm Telephone line Outlet line Invoice recorder
i
2.2. The installation of raw lines.
2.2.1 There’re 2 rows of 8 lines. The first row is guard area lines in 8 colors.
Red, black, yellow, green, blue, brown, gray, and white, different color means
different guard area; the second row lines are in 3 colors, 2 red lines are
connected to +12v current, one yellow line connect to alarm +outlet, 5 lines are
GND
2.2.2. The first row is in the upper, the second row is in the bottom.
2.2.3. The situation when needed row lines. * when not connected to wired
detectors; * power plug and bell use the pin.
3.1.1: A- off guard; B+D, set guard; C- emergency; off alarm: press A in two
successive times
3.2 the picture of the panel
2.3 power connecting
2.3.1 The first connecting way: let the DC12V power line connected to the
power pin, and let the power plug connected to the power input.
2.3.2 The second connecting way; let DC12V+ power line connected to the
red line which in the second row, DC12V- power line connected to the GND
( any black line is ok).
2.4 wired detectors connecting
2.4.1 The way of connecting the signal line: let the one side connected to
relevant guard area line in the first row, the other side connected to the second
row line ( any black line is ok)
2.4.2 The way of connecting the power: let the wired detector + connected to
the red line which in the second row, let the wired detector – connected to the
GND which in the second row ( any black line is ok)
2.4.3 The other guard area which didn’t used ples connected to the GND
which in the second row ( any black line is ok)
2.5 connecting of bell
2.5.1 The first way: let the bell connected to the bell pin, and let the pin
connected to the bell outlet which in the side of the main unit.
2.5.2 The second way: let the bell + connected to the yellow line which in the
second row, the bell- connected to the GND black line ( any black line is ok)
2.6. Connecting of phone lines: telephone line to the telephone outlet, the one
side of the external line connects to the main unit, the other side connects to
the telephone set
2.7 The installation of the main unit: let the holder fixed to the wall, and let the
holes connected to the relevant holes..
3.* SYSTEM OPERATION
3.1 remote controller:
1 :a. Power
○
b. Guarding
c. Communication
d. Detector voltage
e. program
f. Wireless signal
①.
②.
③.
④.
⑤.
function LEDs
guard areas LEDs
emergency keys
number keys
celerity keys
3.3 Set guarding
3.3.1 left guarding: all the guarding areas are in the alarm states. If any
guard area touched off, the main would alarm, and dial the phone call of the
police, the stored phone number or the local police system..
3.3.2 press F1 key or use remote controller to set left guard
3.4. perimeter guarding:
3.4.1 perimeter guard area in the alarm states. Other guard area would not
alarm though touched off.
3.4.2 operation: press F2 to set guard
3.5 single guarding area:
3.5.1 the chosen guard area into the guard situation, other area when
touched off would not alarm.
3.5.2 operation: guard area number + F1 press key
3.6 set off guarding
3.6.1 operation: user’s code +F4
4.4 Exit setting
1. operate: *#
2.state: after the exiting, the buzzer di………, the setting light off,Or after 30
seconds, exit automatically.
3.turn the switch to the ON
3.7 set off alarm
3.7.1 operation: user’s code + F4
Chapter 4
4.1 the basic set in the factory
Name
2. operating : installer’s code( 6 numbers)+ F4(affirmance button) (the
installer’s code in the factory is 666666)
3. state: after the setting, the buzzer will di………, the program LED
indicating light will be on.
The basic set and instruction
1
2
3
4
5
6
7
8
9
Code of installer
Code of user
Type of zone
Wired zone
Report code
Telephone remote controller
The alarming times
Delaying alarm
Telephone line detect
666666
1234
0---instant alarm zone
1-effect
1-send
0-ineffect
8-8 times
0- no delaying
No detect
10
Centre transmission code
An da 4+2
11
12
13
14
Recording
Wireless detectors
User’s code number
Alarming telephone number
/
/
FFFF
/
Attention: Item one to ten will be renewed to the basic setting in the factory
after replacement.
4.2 Replacement
1. turn the switch to OFF ( in the side of main unit)
2. operating : 951753082+ F4
3. state: after the replacement, the buzzer will di………, all the LED
indicating lights will be on for 1 second.
4. turn the switch to the ON
4.3 Setting
1. turn the switch to OFF ( in the side of main unit)
4.5 change the installer’s code
1. join the setting state
2. format: 30+new installer’s code(6 numbers)+ F4(affirmance button)
3. after the long di………..,exit the setting state( refer to 4.4), the new
installer’s code will be effective.
4.6 change the user’s code
1. the former user’s code(4 numbers)+08+ F4(affirmance button), setting
LED light will be on (the user’s code in the factory is 1234)
2. input the new user’s code (4 numbers) + F4(affirmance button),after the long
di………..,the setting indicating light will be off, the new user’s code will be
effective.
4.7 record and broadcasting
1. turn the switch to OFF ( in the side of main unit)
2. join the state of recording and broadcasting: the user’s code+68+
F4(affirmance button), the setting indicating light will be on.
3. record: under this state, push button 1 during the 20 seconds’ recording.
4. broadcasting: under this state, push button 2 during listening the 20
seconds’ recording.
5. you can repeat this operating until you are content.
6. push *# to exit the recording and broadcasting state or after 30 seconds, it
exits automatically.
7. turn the switch to the ON
4.8 the information about the wireless detector’ code learning
1. operate under the setting state
2. choose the zone you want to learn code: 20+ zone number(2 numbers)+
F4(affirmance button). The zone number is 01-08,indicating 1-8 zones. The
light will be on to indicate accordingly zones.9-16zones can be learned codes
for the remote controller’s alarming and disalarming. They haven’t the LED
indicating lights and don’t occupy the useful zone resource.
3. code marching: push the remote controller or touch off the detector to let
the detector sent signals.The wireless signal indicating light in the main unit will
be on after the main unit get the signals. This means that the main unit get the
signal and then remember it to the indicating zone.
Attention: the signal getting indicating light won’t be off if the detector stops
sending signals.
4. push the F4(affirmance button), the indicating light of the accordingly zone
will be off. And the learning is over.
5. repeat step 2-4 to continue learning new remote controller or wireless
detectors
6. exit setting state
7. touch off the detector, the main unit will identify the detector according to
the learned zone.
Attention: the system will delete the original remembering when learning the
new zone if the remote controller or detector have learned a zone.
4.9 delete the learned code of wireless detector
1. operate under the setting state
2. delete the learned code of wireless detector: 21+zone number(2
numbers)+ F4(affirmance button). The zone number is same with the learned
so that the remote controller or detector will be deleted
3. repeat step 2 if continuing deleting the remote controller or detector in
other zones.
4. exit the setting state
5. delete the touch off of the detector, the wireless indicating light in the main
unit won’t be on
4.10 zone model and setting of the outputting of the alarm sound
1. under setting state
2. model: zone number(2 numbers)+ zone model(1 number)+alarming
state(1 number)+ F4(affirmance button),Zone number 01-08 indicate zone 1 to
zone 8.
Models of zones : 0 is instant alarming zone;1-3 is delaying alarming
zones( 1: delaying 13seconds,2: delaying 26 seconds,3: delaying 39
seconds);4 is 24 hours’ zone; 5 is around alarming zone ( outside alarming
zone) 7 beside alarming zone. The setting in the factory is 0 zone.
State of alarming sound: 0 is silent alarming ,1 is sound alarming. The
factory setting is 1
3. exit the setting state
4.11 setting of the user’s code number( centre code number): the input
panel number(4 numbers) distributed by the alarming centre when
connected to the panel
1. operate under the setting state ( refer to 4.3)
2. set the user’s code number: 31+ 4 numbers’ user’s code number+
F4(affirmance button);Delete the user’s code number: 32+ F4(affirmance
button)
3. exit the setting state
Attention: don’t set this item if not connected to the pannel
4.12 set the time of delaying alarm
1. under the setting state (refer to 4.3)
2. model:40+time+ F4(affirmance button)
3. exit the setting state ( refer to 4.4)
time is 00-90 second
4.13 set the alarming telephone number
1.under setting state( refer to 4.3)
2. set alarming telephone number
The set of joining the alarming centre:50+telephone number+
F4(affirmance button) (forget about it if don’t connect to the panel)
Delete the phone number of joining the alarming centre:51+ F4(affirmance
button)
Set first telephone number: 51+telephone number+ F4(affirmance button)
Delete first telephone number: 51+ F4(affirmance button)
Set second telephone number: 52+telephone number+ F4(affirmance
button)
Delete second telephone number: 52+ F4(affirmance button)
The third: set: 53+telephone number+ F4(affirmance button)
Delete: 53+ F4 (affirmance button)
The forth: set: 54+telephone number+ F4 (affirmance button)
Delete: 54+ F4 (affirmance button)
3. exit setting state (refer to 4.4)
4. the information sent when dialing the centre telephone: Restartup of the
system,setting,replacement, alarming, disalarming, ABCemergent alarming,
zone alarming, zone regain
5. message of .dialing the first to forth group: ABC emergent alarming(stop
dialing the number after alarming and broadcasting the voice message and
won’t be effected by the setting and alarming and disalarming),Zone alarming:
( it will stop dialing the phone number immediately after disalarming)
6. setting the telephone : set the telephone number according to how you will
dial the number. There should be a pause when internal line changes to
exterior line and push F3 and then continue input the rest phone numbers.
Attention:
1. better.delete well before setting the phone number
2. dial from centre phone number to group 1 to group 4….dial ten rounds if
haven’t get the signal
3. If disalarming the 4 groups, it won’t effect the centre number and the four
groups will stop dialing the telephone number immediately
4.14 set the report transmission
1. under setting state ( refer to 4.3)
2.model:70+state+ F4 (affirmance button);State: 0 is don’t transmit,1 is
transmission ( set 1 in the factory)
3.exit setting state (refer to 4.4)
4.15 remote controller setting
1. under setting state ( refer to 4.3)
2. model:71+state+ F4 (affirmance button);State: 0 is can’t remote controll,1
is can remote control (set 0 in the factory)
3. exit setting state (refer to 4.4)
4.16 set the remote controller’s alarming times
1. under setting state ( refer to 4.3)
2.model:72+times+ F4 (affirmance button);Times: 1-8 times (set 8 in the
factory)
3.exit setting state (refer to 4.4)
4.17 set the wired zone’s shield or open
1. under setting state ( refer to 4.3)
2.model:73+state+ F4 (affirmance button);State: 0 wired zone’s shielding,1
wired zone’s opening (set 1 in the factory)
3.exit setting state (refer to 4.4)
4.18 set the phone line testing’s shielding or opening
1. under setting state ( refer to 4.3)
2.model:78+state+ F4 (affirmance button);State: 0 don’t test telephone line,
1 test telephone line. It will alarm when the telephone line is cut off (set 0 in
the factory)
3.exit setting state (refer to 4.4)
4.19 set the code of the message agreement of alarm centre
1. under setting state ( refer to 4.3)
2. model:77+state+ F4 (affirmance button);State: 1 is anda 4+2 code,2 is
4+2 programmable code( refer to 4.20)(set 1: anda 4+2 code in the factory)
3.exit setting state (refer to 4.4)
4.20 set programmable 4+2 code
1. under setting state ( refer to 4.3)
2. mode:77+2+ F4 (affirmance button) to join the programmable setting, X is
the code of programming content.Y is zone number or the user’s code number
State
code address +X+Y+F4 (affirmance button)
Stare the system
60+ X+Y+F4 (affirmance button)
Alarm
61+ X+Y+F4 (affirmance button)
Disalarm
62+ X+Y+F4 (affirmance button)
Alarming with sound
63+ X+Y+F4 (affirmance button)
Programming’s finishing
64+ X+Y+F4 (affirmance button)
Low VAC of the detector
65+ X+Y+F4 (affirmance button)
Resume the zone
66+ X+Y+F4 (affirmance button)
Button A
67+ X+Y+F4 (affirmance button)
Button B
68+ X+Y+F4 (affirmance button)
Button C
69+ X+Y+F4 (affirmance button)
3 exit the state of setting obstruction (refer to 4.4)
Changeable table
Hexadecimal
ACCORDINGLY BUTTON
A
*0
B
*1
C
*2
D
*3
E
*4
F
*5
![[User manual] - KX_series_user_EN](http://vs1.manualzilla.com/store/data/005985322_1-73e2348e6003cbf1e0abe0da04f5dcec-150x150.png)