1
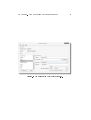
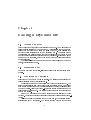
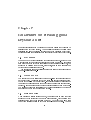
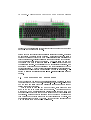
keyTouch editor 3.0 user manual
Marvin Raaijmakers
15 May 2006
Chapter 1
Introduction
Of course it may be possible that your keyboard is not supported yet by keyTouch. However by using keyTouch editor 3.0 you can get your keyboard supported. This document describes how to use keyTouch editor. KeyTouch editor
3.0 has a graphical userinterface that makes it very easy to use the application.
KeyTouch retrieves information about your keyboard from a so called "keyboard le". Such a keyboard le contains information about the extra function
keys of your keyboard. To support a keyboard, there must be a keyboard le
for it. With keyTouch editor 3.0 you can create these les. The created le can
be imported in keyTouch (this is described in the keyTouch 2.1 user manual).
KeyTouch editor 3.0 supports all normal keyboards, including keyboards
connected via USB. It does not support ACPI hotkeys that may be used on your
notebook. If you want to create a keyboard le that includes these hotkeys, you
should use keyTouch editor 2.1.
1.1 Who should read this document
If you only want to create a keyboard le for keyTouch 2.1, you are reading
the right document now. If you are also interested in the document format
of a keyboard le, you should read "How to get your keyboard supported in
keyTouch 2.1" or "keyTouch 2.1 le documentation".
1
Chapter 2
Running keyTouch editor
You can start keyTouch editor by running "keytouch-editor" or by launching
the application from your desktop application menu. KeyTouch editor will be
started after lling in the root password.
2
Chapter 3
Choosing your keyboard
KeyTouch editor will listen to a device for events. You will have to tell the
application what device it should listen to. After keyTouch editor is started,
you will see a list of all event devices (gure 3.1). One (or two) of these event
devices belongs to your keyboard. Select that device and click "OK". You will
then be asked to press one of the extra function keys on you keyboard. Press
"Cancel" if nothing happens after pressing the key and try another event device.
USB keyboards will have two event devices. The rst device is for all "normal" keys and the second for the extra function keys. You should choose the
second device. Note that it is possible that not all extra function keys work on
a USB keyboard.
After choosing the correct device the main window of keyTouch editor will be
visible. If you want to change the event device, click "Edit" and then "Change
keyboard..." in the menu of the main window.
3
CHAPTER 3. CHOOSING YOUR KEYBOARD
Figure 3.1: Select the event device for your keyboard in this list.
4
Chapter 4
The main window user
interface
The main window (gure 4.1) consists of two parts. The rst part contains the
model and manufacturer name of the keyboard. The second part contains a list
of all extra function keys and the settings of the selected key. The main window
also has a menu that allows you to save, open and create a new keyboard le,
quit the program and change the keyboard.
Keys can be add to the list by clicking "New". You can remove a key from
the list by selecting it and followed by clicking "Remove". The settings of a key
will be visible in the "Key settings" frame after selecting the key in the list.
You can change these settings.
5
CHAPTER 4. THE MAIN WINDOW USER INTERFACE
Figure 4.1: The main window of keyTouch editor 3.0.
6
Chapter 5
Editing a keyboard le
5.1 Adding a new key
Click the "New" button below the key list to add a new key. You will be asked to
press the extra function key you want to add. After pressing the key, a window
will appear that asks you to ll in the name of the key. It is possible that
keyTouch editor recognizes the key and suggests a name. You should change
the suggested name if it does not match the text label of the key (if the key has
one) or does not describe the function of the key well enough. It is recommended
to name the key in English, except when the keyboard model is only produced
for your language.
The default action and keycode of the new key will be lled in by keyTouch
editor, if it recognizes the key.
5.2 Removing a key
To remove a key from the key list, select it and click the "Remove" button below
the list.
5.3 Modifying key settings
Select the key you want to modify in the list. The settings of the selected key
will be visible in the "Key settings" frame.
The scancode is the number that allows keyTouch to identify the key. The
scancode was retrieved from the keyboard when you pressed the key. You should
only change the scancode when you accidentally hit the wrong key while adding
the key to the list. Click the "Change..." button to change the scancode and you
will be asked to press the key. The scancode will be changed to the scancode of
the key you pressed.
Keys of USB keyboards do not have a scancode and are identied by their
keycode. The keycode of these keys can also be changed by clicking the "Change..."
button.
Like we (humans) can identify the key by its name, the operating system
identies the key by its keycode. You should choose a keycode that matches
7
CHAPTER 5. EDITING A KEYBOARD FILE
8
the function of the key the best. If there is no such keycode, you can choose
another keycode. It is important to know that a keycode can only be used for
one key.
It is important to realize that the default action for a key, is not the action
you want to use for this key, but one that corresponds to the function of the
key. The default action can be a program or a plugin. If it is a program, just ll
in the name (= command) of the program. If it is a plugin, you should choose a
plugin and a function of the plugin. It is recommended to rst look for a plugin
that corresponds to the function of the key. You should choose a program if
there is no such plugin.
Chapter 6
Save, open and create
keyboard les
You can open an existing keyboard le by clicking "File" and then "Open" in
the menu of the main window. A dialog will appear that allows you to open
the keyboard le. You can create a new keyboard le by clicking "New" in the
"File" menu.
Saving a keyboard le is done by clicking "Save" in the "File" menu. Before
the keyboard le is saved you will be asked if you want to send the keyboard
le to the developer of keyTouch. This will make it possible to add support for
your keyboard to keyTouch. Only send the keyboard le when it is complete
and nished (please also read chapter 7). Before sending the keyboard le you
will be asked to ll in your name and e-mail address. This information will be
used for the administration of the keyboard les and your e-mail address will
not be published anywhere.
If you opened a le and want to save it under another lename, you should
click "Save As" in the "File" menu.
9
Chapter 7
Guidelines for creating good
keyboard les
This chapter describes how to create good keyboard les so that these can be
usefull for the keyTouch project. You are really encouraged to follow these
guidelines and send the created keyboard le to the developer of keyTouch,
because this will make it possible to add support for your keyboard to keyTouch.
7.1 Key names
The name of a key should correspond to the function of the key. If the key has
a text label on it you should use this text as the name of the key. If there is
only a symbol on the key and it is not clear what the function of the key is, you
should try to describe the symbol or, even better, look in the manual of your
keyboard for a description of the key.
You should only use non-English names for keys if the keyboard is produced
for a non-English language.
7.2 Order of keys
The rst key in the key list should the the upper-left most extra function key
on your keyboard. You should add keys by going from left to the right and from
the top to the bottom on your keyboard. If the extra function keys are grouped
you should add all keys in such group and then add all keys in another group.
Figure 7.1 shows an example of the order of extra function keys on a keyboard.
The groups of these keys are surrounded by green rectangles and the keys are
numbered in the way they appear in the key list.
7.3 Default action
When choosing a default action for a key, you should keep in mind that this
should not be the action that you want to use for this key, but the action that
corresponds the best to the function of the key. Note that you will be able
to set your preferred action in keyTouch (so not keyTouch editor). You are
10
CHAPTER 7. GUIDELINES FOR CREATING GOOD KEYBOARD FILES11
Figure 7.1: The extra function keys on this keyboard are marked and numbered
in the way they appear in the key list.
recommended to look rst if there is a suitable plugin for the action. If there is
no such plugin, you should choose a program. Here it is important to ll in a
program that does not depend too much on a particular system installation or
desktop environment. It is also possible to run another program if the program
that was specied rst cannot be executed. To do this ll in the name of
the program that must be tried rst followed by " || " (without quotes) and
the alternative program. It is possible to add more alternative programs. For
example we would like to run a calculator when the "Calculator" key on the
keyboard is pressed. We want to use "kcalc" if it is installed, otherwise "gnomecalculator" and if that program is not installed we want to use "xcalc". This
is done by lling in the following: "kcalc || gnome-calculator || xcalc" (without
quotes).
7.4 Manufacturer and model name
It may be clear how the name of the manufacturer should be written. In doubt
you should look at http://keytouch.sourceforge.net/dl-keyboards.html and see
how the name is written there (you will see for example that "HP" is used
instead of "Hewlett Packard").
Most of the times when you buy a new keyboard, there will be a model
name on the box or on bottom side of the keyboard. Use this name as the
model name. Some manufacturers use dierent names for one model. For
example when the keyboard can be bought loose or as a keyboard plus mouse
combination. Because of that it is recommended to append a model number
(can be found on the bottom side of the keyboard) surrounded by braces. For
example: "Internet Keyboard (Y-ST39)". If your keyboard is connected via
USB you should add " (USB)" to the model name.