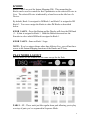
1
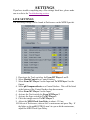
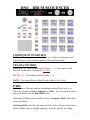
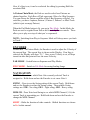
Preset: pKC-DSQ v1.0.4
IMPORTANT NOTE: If you are new to using
pKComponents and/or MT Player or if you need Support,
please refer to the pKC-General Manual. However, this
Preset does differ from the reset of the pKC Series in terms
of its layout.
SETTINGS
LIVE SETTINGS
OTHER SOFTWARE SETTINGS
MT PLAYER SETTINGS
DSQ – DRUM SEQUENCER
COMPONENT OVERVIEW
TRACK CONTROL
PADS
ENCODER
NAVIGATION
TRANSPORT
X/Y PAD
MISC
KNOBS
PLAY MODE LAYOUT
FILE MODE
NOTES
TROUBLESHOOTING
SUPPORT
SETTINGS
If you have trouble completing any of the settings listed here, please make
sure to refer to the Troubleshooting section.
LIVE SETTINGS
The following settings will be found in Preferences on the MIDI/Sync tab.
1. Deactivate the Track switches for From MT Player 1 and 2.
2. Select MackieControl as a Control Surface.
3. Select From MT Player 1 as the Input and To MT Player 1 as the
Output.
4. Select pKComponentSeries as a Control Surface. This will be listed
at the bottom of the Control Surface drop-down menu.
5. Select From MT Player 1 as the Input.
6. Activate the Track switch for From MT Player 3.
7. Activate the Sync switch for To MT Player 3.
8. Click the triangle next to To MT Player 3.
9. Adjust the MIDI Clock Sync Delay to about -12.0 ms.
10. Exit out of Preferences, turn on Live’s metronome and press Play. If
the lights on the padKONTROL aren’t in sync with the metronome,
adjust the MIDI Clock Sync Delay.
1
NOTE: If you will be using any of the 16 Scenes in Play (normal) mode,
you will need to activate the Track and/or Remote switches for the
padKONTROL’s Input in Live. This is usually called “padKONTROL 1
PORT A” or “padKONTROL : PORT A (KORG INC.)”.
OTHER SOFTWARE SETTINGS
If you’re using an application other than Ableton Live, you will need to set
the software up to receive MIDI from “From MT Player 3”.
You’ll need to set the software up to send MIDI Clock to “To MT Player
3”. You may also need to adjust the sync delay.
In order to use the Play and Stop controls, you’ll need to set up the Mackie
Control (or Mackie Control Universal) as a control surface in your software.
For the control surface’s input, you’ll select “From MT Player 1”. For the
output, you’ll select “To MT Player 1”.
NOTE: If the software you’re using doesn’t support the Mackie Control,
the Play and Stop controls won’t work. You will need to start/stop the
sequencer by using the transport controls provided in the software.
MT PLAYER SETTINGS
The first time you use your padKONTROL in MT Player, you will need to
setup the padKONTROL’s ports. You are prompted to do this as soon as a
Preset is selected in MT Player. However, if you bypass those prompts, you
can access the settings by right-clicking on MT Player and selecting MIDI
Settings.
1. From the Port Name menu, select “IN: padKONTROL 1 PORT A”.
2. From the MIDI In port menu, select your padKONTROL’s PORT A
and click OK.
3. Go back into MIDI Settings.
4. From the Port Name menu, select “OUT: padKONTROL 1 CTRL”.
5. From the MIDI Out port menu, select your padKONTROL’s CTRL
PORT and click OK.
6. Click the Restart button.
You can learn more about MT Player in the pKC General Manual.
2
DSQ – DRUM SEQUENCER
COMPONENT OVERVIEW
DSQ is a 4-Track sequencer. Each Track has 3 Patterns of 16 Steps each.
These Patterns can be chained together in Pattern Chain Mode.
TRACK CONTROL
TRACK 1 - 4 – These Buttons Select Tracks 1 – 4. You cannot switch
between Tracks while touching the X/Y Pad.
MUTE 1 - 4 – These Buttons Mute Tracks 1 – 4.
NOTE: You cannot Select or Mute Tracks while in Play Mode.
PADS
The Pads have different functions depending on which Mode you’re in.
There are 2 main Pad Modes; Sequence and Play. You can switch between
these two Modes with the Pad Mode button.
When the Pad Mode button is unlit, you are in Sequence Mode, which has 2
of its own Modes.
In Pattern Mode, the Pads will turn on/off one of the 16 Steps in the current
Pattern. When a Step is initially turned on, it will be selected for editing.
3
Also, if a Step is on, it can be reselected for editing by pressing Shift+the
associated Pad.
In Pattern Chain Mode, the Pads are used to select how Patterns are
chained together. Each Row of Pads represents 1 Bar of a 4 Bar Sequence.
You can choose the Pattern each Bar of the 4 Bar Sequence will play. For
each Bar, you have 4 options; Pattern 1, Pattern 2, Pattern 3 or Mute Track
(which is just an empty Pattern).
When the Pad Mode button is lit, you are in Play Mode. In this Mode, the
Pads are used as regular Drum Pads with Octave Up/Down controls. These
allow you to play over top of what you’ve sequenced.
NOTE: Switching from Play to Sequence Mode will always move you back
to Track 1.
ENCODER
VELO SET – In Pattern Mode, the Encoder is used to adjust the Velocity of
the current Step. The current Step is shown on the Display. If no Step is
selected, the Display will show “S--". Once a new Velocity is set, all Steps
turned on after that point will use the same Velocity.
PAD MODE – Switch between Sequence and Play Modes.
FILE MODE – Switch to File Mode for saving/loading Songs.
NAVIGATION
NOTE # – Press to see which Note # the currently selected Track is
assigned to. Hold down and use the Encoder to set a new Note #.
SWING – Press to see the Swing setting of the current Track. Hold down
and use the Encoder to adjust the Swing setting. The available Swing
settings are: STR – No swing, GR1 – Light swing, GR2 – Heavy swing.
MIDI CH – Press Note# and Swing to see which MIDI Channel (1-16) the
current Track is transmitting on. Hold both down and use the Encoder to
change the MIDI Channel.
SHIFT – Shifts the function of other controls. Shifted functions are shown
in Red in this manual.
4
TRANSPORT
PLAY/STOP – Play/Stop playback.
PTN/CHAIN – Switch between Pattern and Pattern Chain Mode for the
selected Track. Upon switching between Modes, the newly selected Pattern
will not start playing until the previously selected Pattern finishes playing.
Also, you cannot switch between these Modes while in Play Mode.
PTN 1 - 3 – Select Pattern 1 – 3 of the currently selected Track. Pattern
Selection is quantized, so the Pattern will not change until the current Pattern
finishes playing.
CLEAR PTN 1 – 3 – Clear all data from Pattern 1 – 3.
COPYING – You can copy Patterns by pressing and holding the button of
the Source Pattern and then pressing the button of the Destination Pattern.
NOTE: You cannot Select, Clear or Copy Patterns while in Play Mode.
X/Y PAD
The X/Y Pad controls a Repeat effect for the currently selected Track.
While the sequencer is playing back, any time you touch the X/Y Pad, the
Pattern or Pattern Chain playing on the current Track will be overridden by
the Repeat Effect until the X/Y Pad is released (unless the Hold Repeat
switch is on). The Y axis controls the Velocity of the Repeat effect.
MISC
HOLD REPEAT – When this switch is on, the Repeat effect will hold even
after you’ve released the X/Y Pad. This will also hold the value of the
parameter assigned to the X Axis. When switching between Tracks or
between Sequence and Play Modes, the hold switch will be turned off.
X AXIS – Press to see which IM Knob is assigned to the X axis (see the
next section for more info on IM Knobs). Hold down and use the Encoder
to assign a new parameter.
REPEAT SPEED – Press to see the Repeat effect’s Speed. Hold down and
use the Encoder to set a new Speed. The available Speeds are 1/8, 1/8T,
1/16, 1/16T and 1/32.
5
KNOBS
Knobs 1 and 2 are used for Instant Mapping (IM). This means that the
Knobs can be used to control the first 8 parameters on the selected Device in
Live. The selected Device is indicated by a hand icon on the title bar of a
Device.
By default, Knob 1 is assigned to IM Knob 1 and Knob 2 is assigned to IM
Knob 2. You can re-assign the Knobs to other IM Knobs as described
below.
KNOB 1 ASGN – Press this Button and the Display will show the IM Knob
(1 – 8) that is assigned to Knob 1. Hold this Button down and use the
Encoder to select which IM Knob is assigned to Knob 1.
KNOB 2 ASGN – Same as Knob 1 Asgn.
NOTE: If you’re using software other than Ableton Live, you will not have
access to the Instant Mapping functions of the Knobs and X Axis.
PLAY MODE LAYOUT
In Play Mode, all the controls are the same except for the Pads.
PADS 1 – 12 – These work just like regular drum pads allowing you to play
over top of parts you’ve sequenced in Sequence Mode.
6
OCT DOWN/OCT UP
– Shift Pads 1-12 down/up one octave.
FIXED VELO – Turns Fixed Velocity On/Off for the Pads.
NOTE: Pads 1-12 will transmit on the MIDI Channel of the currently
selected Track.
FILE MODE
This Mode allows you to save or load Songs. A Song consists of all the
sequencer’s data.
Upon entering this Mode, the display will indicate the current action; “SAV”
for saving or “Lod” for loading.
You can switch between “SAV” and “Lod” with the Encoder.
Once you’ve selected the desired action, press the Setting button. The
display will then indicate the location (L1 – L8) to save to/load from.
You can select different locations with the Encoder. See below for more
info on locations.
Once you’ve selected the desired location, press the Setting button to
perform the save/load. While the save/load is performed, your
padKONTROL will boot in and out of native mode.
You can exit this mode at any time without saving or loading by pressing the
Message button.
NOTE: The sequencer’s data is actually stored in Scenes on your
padKONTROL. Saving will overwrite your padKONTROL’s Scene data.
So please make sure to back up your Scenes before using the save function.
LOCATIONS:
L1 = Save to/load from Scene 15 and 16
L2 = Save to/load from Scene 13 and 14
L3 = Save to/load from Scene 11 and 12
L4 = Save to/load from Scene 9 and 10
L5 = Save to/load from Scene 7 and 8
L6 = Save to/load from Scene 5 and 6
L7 = Save to/load from Scene 3 and 4
L8 = Save to/load from Scene 1 and 2
7
NOTES
The sequencer sends out notes with virtually no length, so it may not work
with every kit and/or plugin. If it’s not working with a particular kit and/or
plugin, you can try to adjust the Release time on the kit and/or samples
within the kit to get it working.
TROUBLESHOOTING
1. Why don’t I see pKComponentSeries listed under Live’s Control Surface
drop-down menu?
WINDOWS: On Windows, the pKComponentSeries script will have gotten
installed during install of pKC. If it’s not showing up, please try reinstalling
the pKC installer. No need to uninstall first.
OS X: On OS X, you can find the pKComponentSeries Script along with
transfer instructions in:
(your name)/Bome’s Midi Translator/Player.
2. In the demo video I saw from you, you were using some functions that I
don’t have. Where are they?
Presets evolve over time in regard to refinements and new functionality. In
some cases, it’s necessary to reposition existing controls to make way for
new functions. We try to keep rearrangements to a minimum and any
rearrangements will always be covered in the Preset’s manual.
3. I have multiple copies of MT Player ports listed, which should I use?
You should try to use the listings that start with “From” or “To”. For
example, you shouldn’t use “3-From MT Player 1”, you should use “From
MT Player 1”. In some cases, you will not have listings that start with
“From” or “To”.
8
SUPPORT
Email:
[email protected]
Forum:
Beatwise Network
Videos:
Stray's YouTube Channel
Copyright 2013-2014 nativeKONTROL. All rights reserved.
This document, as well as the software described in it, is provided under license and may be used or copied only in accordance with
the terms of this license. The content of this document is furnished for informational use only, is subject to change without notice, and
should not be construed as a commitment by nativeKONTROL. Every effort has been made to ensure that the information in this
document is accurate. nativeKONTROL assumes no responsibility or liability for any errors or inaccuracies that may appear in this
document.
All product and company names mentioned in this document, as well as the software it describes, are trademarks or registered
trademarks of their respective owners. This software is solely endorsed and supported by nativeKONTROL
9