1
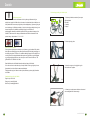
EL CYKEL BRUGERMANUAL
E-BIKE USERMANUAL
www.life-bike.dk
www.life-bike.dk
DK
1
EN
18
Danish
1
1. Første prøvetur på din Lifebike
Bedste måde at komme i gang med din Lifebike på, er hvis du har cyklet på en almindelig
cykel før. Slå strømmen til og tag en prøvetur. Strøm afbryderen sidder under
baggagebæren. Indstil hastigheden på (low) på instrumentpanelet. Sæt den i 1 gear ved
at vrid på højre håndtag og træd på pedalerne. Så længe du træder pedalerne fremad får
du el-hjælp.
Når du stopper med at træde på pedalerne eller bremser, ophører el-hjælpen automatisk.
Når du træder på pedalerne igen, får du el-hjælp igen.
Prøv derefter at øge til medium fart ved at trykke på plus knappen en gang og derefter
kan du trykke på plus knappen en gang til for at få den maksimale el-hjælp op til 25 km I
timen. Derefter kan du trykke på minus knappen for at få el-hjælp til en lavere fart.
Sværere er det såmænd ikke.
En god ting at vide, er at det tager et lille sekund for motoren at sætte i gang, fra du
begynder at træde. Samme ting gælder når du stopper med at træde eller bremser.
Eftersom både fodbremsen og håndbremsen er meget effektive og er helt indkapslede,
påvirkes de ikke mekanisk af skidt, støv, sne, is eller kulde. Dette indebærer at du altid
har fuld funktion på bremserne. Derfor er det vigtigt at du bremser blødt på glat underlag
med mest effekt på fodbremsen, på samme måde som på en almindelig cykel.
2
Du har valt elassistans upp till 22 km/tim
3
Kontroll av batteriets laddning
2. Hur långt kan du cykla innan batteriet tar slut?
Den vanligaste frågan som gäller Lifebike är hur långt du kan cykla med elassistans?
Svaret är inte självklart, eftersom det beror dels på hur du cyklar, var du cyklar, på vilket
underlag du cyklar, hur kuperad din cykelväg är och även på vilken utomhus-temperatur
som råder.
En varm sommardag kan du cykla upp till 7 mil på din Lifebike med elassistans på vanlig
plan väg. Lite mindre om din cykelväg innehåller många uppförsbackar.
En mycket kall vinterdag kanske du bara får elassistans under ett par mil. Det beror
nämligen på att batteriet på din Lifebike fungerar som alla andra batterier. Det går ner i
kapacitet nä temperaturen sjunker och ökar kapaciteten när värmen ökar. Därför kan du
under vintern både ladda batteriet och förvara det under natten inomhus. Speciellt när det
är mycket kallt ute.
Bra att veta, är att du alltid kan cykla på din Lifebike, även om batteriet har tagit slut. Din
Lifebike fungerar då precis som en vanlig treväxlad cykel
Når du har prøvekørt din cykel i nogle minutter, og oplevet hvordan det føles at cykle på
din Lifebike både med og uden el-hjælp, kan du vende tilbage til håndbogen og
gennemgå alle kapitlerne. Der får du svar på de spørgsmål som er dukket op under den
prøvetur.
Gode råd: Når du parkerer din Lifebike og skal låse den, anvend så gerne både en
godkendt cykellås plus en wirelås eller kæde til at fastlåse din Lifebike til en stolpe eller
anden jernkonstruktion.
Lifebike er et smart valg: Når du vælger at tage dine pendlerture til og fra arbejde med
Lifebike, gør du ikke bare et klima smart valg, du får også mange fordele: Du sparer både
penge og sædvanligvis tid, til sammenligning med at tage bilen hvis du bor i en forstad
med tæt trafik. Du får let en parkeringsplads. Du ved nøjagtig, hvor lang tid din rejse
tager. Desuden får du bedre kondition og helbred.
1
www.life-bike.dk
2
Danish
4
75% af batteriets opladning er tilbage
5
Med strømafbryderen starter du batteriet
3. Hvordan fungerer de forskellige knapper på kontrolpanelet og hvad viser lamperne?
Begynd med at tænde for strømmen. Hovedafbryderen for alt el til din Lifebike, sidder
bag ved sadlen under baggagebæren, længst fremme i venstre side. Når du tænder for
strømmen tændes nogle lamper på kontrolpanelet, når batteriet er opladet..
Hvordan ved du hvor meget dit batteri er opladet ?
Bedste måde at se det på, er at tænde for strømmen og se hvor mange røde lamper som
tændes på panelet. Når alle fire røde lamper lyser, er batteriet fuldt opladet. Jo færre
lamper der lyser desto mindre opladning er der på batteriet. Når kun en rød lampe lyser,
har du ca. 25% el tilbage.
6
WALK fungerer som en almindelig tænd- og sluk knap
og giver dig permanent el-hjælp i WALK.
4. Sådan bruger du knappen WALK
Når du trykker på knappen begynder forhjulet at rulle med 6 km/timen. Tryk-knappen
WALK kan du anvende når du skal gå med din Lifebike op ad en stejl bakke, eller hvis
du skal trække din Lifebike over et vejkryds eller en stejl bakke.
Hvad det er som sker når du trykker på 6 km-knappen, er at du tænder for el-motoren i
forhjulet som begynder at rulle i en fart af 6 km/timen, som er en behagelig
ganghastighed. Du behøver altså ikke at røre pedalerne. Du kan nemt styre din
Lifebike, uden at anstrenge dig.
Plus og minus knapperne
Ved hjælp af plus og minus knapperne kan du indstille hvilken max hastighed du vil have
el-hjælp til . LOW giver dig el-hjælp op til ca. 18 km i timen. Vil du cykle hurtigere end det,
så trykker du en gang til på plus knappen til indstillingen MEDIUM og så får du el-hjælp
op til ca. 22 km i timen. Endnu et tryk på plus knappen til indstillingen HIGH, og så får du
el-hjælp op til 25 km i timen. En forudsætning for at du over hovedet skal få el-hjælp, er
dels at kontakten for hovedstrømmen, som sidder under baggagebæren på venstre side
er tændt, (rød lampe lyser længst bag på batteriet som du ser når du trækker håndtaget
op på batteriets bagkant) og dels at batteriet er tilstrækkeligt opladet for at klare dine
ønsker. Med fuldt opladet batteri kan du lettere komme op på den ønskede fart selv op ad
bakke.
Når du skal mindske din indstillede el-hjælp fart, trykker du på minus knappen en eller to
gange, alt efter hvad du ønsker. Vær dog opmærksom på at når du har valgt den laveste
indstilling og trykker på minus knappen en gang til, så slukker du helt for el-hjælpen. Vil
du tænde for el-hjælpen igen, trykker du en, to eller tre gange på plus knappen, alt efter
hvilken hastighed du ønsker at holde.
3
www.life-bike.dk
4
Danish
9
7
8
Under en og samme cykeltur skifter de fire røde lamper med at dels vise hvor meget
strøm der er tilbage på batteriet, og dels hvor meget du belaster batteriet når du udnytter
el-hjælpen.
5. Sådan fungerer de fire røde lamper mellem EMPTY og FULL når du cykler
På kontrolpanelet findes 4 røde lamper i række mellem EMPTY og FULL. De fungerer på
to helt forskellige måder.
For det første, når du har tændt for strømmen på din Lifebike som står stille eller cykler så
hurtigt at el-hjælpen er slået fra, så viser lampe rækken hvor meget opladning som netop
nu er tilbage i batteriet. Er batteriet nyligt opladet, så lyser alle fire lamper.
For det andet viser samme lamper, når du får el-hjælp, hvor meget kraft du netop nu
tager fra batteriet . Cykler du for eksempel op ad en bakke i andet gear og lader elhjælpen gøre den største del af arbejdet, så lyser måske kun to røde lamper. Når du
senere kommer op på toppen og vejbanen hælder nedad, kan der ske det at el-hjælpen
slår fra fordi du cykler hurtigere end 25 km i timen, og så lyser der fire lamper igen. Så
afhængigt af hvor meget du belaster batteriet med din el-hjælp eller hvis du selv cykler
hurtigere end den el-hjælp du har valgt, skifter antallet af lamper der lyser.
Et eksempel:
Du cykler med el-hjælp indstillet på 18 km/tim. Op til den hastighed, viser så de fire røde
lamper hvor meget du belaster batteriet. Jo højere belastning, desto færre lamper lyser.
Cykler du derefter hurtigere end18 km ved egen kraft, kobles el-hjælpen automatisk fra
og så viser lamperne hvor meget opladning du har tilbage i batteriet.
10
11
12
ås batteriet op med nøglen og træk det ud for at oplade det indendørs eller oplad batteriet
mens det sidder på din Lifebike.
6. Sådan oplader du batteriet
Batteriet oplader du ved at tilslutte laderen som hører til din Lifebike, i et 220 volts
strømudtag. Du kan oplade batteriet på to måder. Dels kan du oplade batteriet mens det
sidder på din Lifebike. Og dels kan du aftage batteriet og oplade det på et andet sted. For
eksempel hvis du bor et sted hvor du kan låse og fastlåse din Lifebike udendørs i et
cykelstativ, så kan det være bekvemt at tage batteriet med dig og oplade det indendørs.
Har du mulighed for at opbevare din Lifebike i et låst rum såsom en garage eller et
kælderrum med eksisterende el udtag, så kan det være en nem måde.
Sådan gør du når du skal oplade batteriet når det sidder på din Lifebike:
Tilslut batteriopladeren til el udtaget og tilslut ladekontakten i batteriets ladeudtag.
Batteriet er indsat under baggagebæreren og ladeudtaget sidder længst bagude på højre
side. Træk op i håndtaget under baggagebæreren og fjern gummibeskyttelsen på
ladeudtaget. Indsæt ladekablet fra batteriladeren i ladeudtaget på siden. En rød lampe
tændes på batteriladeren når batteriet skal oplades. Når batteriet er fuldt opladet lyser
lampen grønt. Opladning af batteriet fra tomt til fuldt opladet tager mellem 4- 5 timer. Du
kan også kontrollere at batteriet er fuldt opladet ved at tilslutte strømmen (bag ved
sadlen) og kontrollere at alle fire lamper lyser på kontrolpanelet.
Sådan gør du når du skal oplade batteriet på et andet sted:
Fjern det fastlåste batteri ved at anvende den runde nøgle som følger med din Lifebike
og træk hele batteriet ud med håndtaget ved baglygten. Det kan gå lidt stramt i begyndelsen
når cyklen er ny, men det er bare at tage lidt ekstra fat, så går det letter efter nogle gange.
Fordelen ved at tage batteriet ud er, at du kan oplade det indendørs i stue temperatur
eller på jobbet hvis du er cykelpendler og vil have et fuldt opladet batteri når det er tid til at
cykle hjem. Er det koldt udenfor, så indebærer en indendørs opladning at du altid starter med et
stue tempereret og fuldt opladet batteri. Eftersom kraften går ned i batterier ved stærk
kulde kan forskellen være stor allerede når der er 4-5 minus grader eller endnu koldere
udenfor, og det har indflydelse på hvor langt du kan cykle på din Lifebike med el-hjælp.
Gode råd for at kontrollere batteriets opladning når du har fjernet det fra din Lifebike
Fire lamper finder du i bagkanten på batteriet når du trækker batteriets bærehåndtag op.
Tre grønne og en rød som viser hvor meget batteriet er opladet, når du trykker på
kontakten under lamperne. En god ting, når du har fjernet batteriet fra din Lifebike og vil
kontrollere hvor meget batteriet er opladet. Også godt når du oplader det afmonterede
batteri i dit hjem eller på jobbet, og vil kontrollerer at det er fuldt opladet.
5
www.life-bike.dk
6
Danish
13
14
15
16
7. Hvordan du tænder for lyset og skifter pærer
Din Lifebike er udstyret med effektiv elektrisk belysning både foran og bagpå. Strømmen
kommer fra batteriet. Baglygten sidder under baggagebæren. Du kan slukke både
forlygten og baglygten ved at trykke på knappen under strømkontakten.
Tænk på at belysningen får strøm fra batteriet.Hvis du cykler i mørket og batteriet løber tør
for el-hjælp, kan du alligevel få strøm til lyset hvis du slukker for el-hjælpen ved at trykke
en ekstra gang på minus knappen på kontrolpanelet. Batteriet fungerer ganske hurtig igen,
nok til at klare belysningen.
Udskiftning af pærer
Udskiftning af pærer i forlygten gøres ved at skrue den stjerneskrue ud som sidder under
forlygten, ved hjælp af en lille og kort stjerneskruetrækker. En ny pærer fås hos din
nærmeste cykelhandler.
Udskiftning af pærer i baglygten gøres ved at skrue fire meget små stjerneskruer ud som
sidder I baglygtens fire hjørner. Vær forsigtig så du ikke taber skruerne, eftersom de er
små og korte.
17
Lær dig delene på el kontakten til motoren at kende.
8. Hvordan du afmonterer ledningen til motoren når du har brug for at tage forhjulet af
Nogle gange er det nødvendigt at afmontere forhjulet for at lappe dækket eller udskifte
det eller for at kunne transportere din Lifebike i et trangt bagagerum på en bil. Så kan det
være godt at vide hvordan du skal adskille stikket på ledningen som går til el-motoren i
navet på forhjulet.
Sådan gør du når du skal afmontere forhjulet:
Begynd med at trække strømledningen til el-motoren ud af for navet. Den gummi
overtrukne kontakt sidder i venstre side nede ved hjulnavet. Gør sådan her når du
adskiller kontakten:
Tag fat i begge delene på kontakten og skru gummikappen af på den nederste del som
går ind i navet. Undgå at trække. Gevindet er meget fint, for at den skal holde skidt, støv
og vand ude, så der skal skrues mange omgange. Når du har delt gummikappen kan du
skille begge stikkene fra hinanden, ved forsigtigt at vrikke dem fra hinanden. Det er vigtigt
at du sætter dem korrekt tilbage. En pol er broncefarvet og to poler er sølvfarvede.
Polerne skal sidde således at farverne stemmer overens.
Når det er tid til at skrue kontaktens gummikapper sammen, er det vigtigt at gummikappen
bliver rigtigt sat sammen og skruet sammen, således at den tredelte kontakt fortsætter
med at være vandtæt..
7
www.life-bike.dk
8
Danish
18
Stelummeret til din Lifebike er standset ind i stellet
Lifebike cykling er både til nytte og fornøjelse
9. Hvordan du mindsker risikoen for at din Lifebike bliver stjålet
Først og fremmest er der to ting som er vigtige for at cykeltyven skal holde sig fra din
10. Nogle ord om Lifebike cykling - mere frihed og mindre sved
Mange som begynder at cykle på Lifebike, opdager at en el-cykel giver en helt ny
Lifebike. For det første skal du både låse din Lifebike og derudover låse den fast med en
overtrukket wire eller en kæde, når du forlader den uden opsyn. Wiren eller kæden trækker
du ind mellem både hjulet og stellet inden du sætter den fast til en fastforankret genstand,
f. eks. et cykelstativ, rundt om en træstamme eller lign. Der findes mange låse hos din
nærmeste cykeforhandler. Der kan du både få en løs lås med cykelholder, så låsen sidder
fast under kørsel såvel som en fast monteret lås til baghjulet, som fås som tilbehør til din
Lifebike.
dimension til det at cykle, som kan beskrives kort og godt som: Større oplevelse og frihed
og mindre sved. Med Lifebike virker næsten ingenting længere umuligt. Du behøver ikke
at blive særlig træt når du cykler. Du oplever naturen og omgivelserne som når du er ude
For det andet er det altid en fordel hvis du kan parkerer din Lifebike således at den står på
et godt oplyst sted hvor mange mennesker passerer eller hurtigt kan dukke op, f. eks ved
en trappeopgang, indgang til et velbesøgt sted såsom en forretning eller café, godt oplyst
parkeringsplads hvor en bil hurtigt kan dukke op. Det bedste er naturligvis hvis du kan
parkere din Lifebike indendørs i f. eks en entré, hall på jobbet eller i en trappeopgang. Alt
sammen for at cykeltyven skal holde sig fra din cykel eftersom risikoen så er større for at
blive opdaget.
9
19
at gå en tur, men du kommer hurtigere frem og får set mere med minimal anstrengelse.
Desuden kan du stoppe næsten hvor som helst når du føler for det.
Du kan beregne din cykel tid mellem A og B effektivt, til forskel fra når du kører bil i
bytrafik. Fordelen ved at cykle til din arbejdsplads indebærer at du ved, med nogle
få minutters marginal hvornår du er fremme ved din arbejdsplads, og hvornår du kommer
hjem fra arbejdet. Cyklister er desuden mere langtids friske end mere stille siddende
mennesker. Du får derudover mere overskud for at klare hverdagens rutiner.
Når du kører på Lifebike ved du desuden at du ikke kommer særlig svedig frem.
Selvfølgelig er du mere udsat i sne og regnvejr, men et todelt regnsæt som bare vejer
nogle få gram, kan købes i en hver velassorteret cykel forretning. Og med en god taske på
ryggen eller hvorfor ikke i en sadeltaske, ved du at din bærbare computer ligger godt
beskyttet.
En anden effektiv måde at holde øje med hvor din Lifebike er, er at anmelde den til et
tyveri sikrings register, til eksempel SmartSafety-registret . Så får du et skilt til at sætte på
stellet som er svær at fjerne, med et unikt nummer på og et telefonnummer til tyveri
sikrings organisationen Smart Safety registret som du kan kontakte på
opleve naturlig frihed og årstidens dufte. Bådfolket ligeså. Nu er det Lifebike-cyklisternes
[email protected]. Når politiet eller finderen får fat i en Smartsafety mærket Lifebike
kan de kontakte Smartsafety via oplysningerne på skiltet og så bliver du som ejer kontaktet
og får at vide hvor din Lifebike er.
tur til at få lov til at glide frem på sadlen og opleve mere kontakt med naturen. Du sveder
mindre med el cykling til og fra jobbet, og når du skal ordne små ærinder, såsom som at
købe avisen.
Et andet alternativ er at du også kan placere en lille gps-sender i en boks på din Lifebike,
således at du kan spore din Lifebike ved hjælp af din mobil eller håndsender.
I din fritid kan du nemt komme ud på turer fyldt med oplevelser, indtryk, dufte og
føle friheden. Mere ofte kommer du til at opdage at du ikke vælger den absolut korteste
vej, derimod måske den mest stimulerende vej, selvom at det er en omvej, som du ikke
plejer at køre. Hvad betyder en ekstra kilometer eller to, når du cykler på Lifebike?
Bil entusiaster betaler store beløb for at få lov til at cruise rundt i cabriolet modeller og
www.life-bike.dk
10
Danish
20
21
22
1.Værktøj og batteri nøgler
2.Justeringsskrue til gearet
3.Justering af håndbremse
23
24
25
26
Sadlen kan sættes op og ned, skydes frem og tilbage med fast nøglen og hæves med
Umbraco nøglenl. Styre stangen kan hæves eller sænkes ved hjælp af Umbraco nøglen.
11. Nogle praktiske service råd
1. Værktøj som følger med din Lifebike som du kan anvende til at løsne hjulene ved
behov, justere sadlen, låse batterilåsen op så du kan tage det med til indendørs
opladning eller for at mindske risikoen for tyveri.
2. Hvis du har brug for at justere gearet, skal du løsne plastkåben som beskytter mod
skidt og støv, skru låsemøtrikken løs og juster derefter wire længden således at gearene
fungerer som de skal for respektive gear trin.
3. Når du skal justere håndbremsen løsner du først den sorte låsemøtrik og derefter
skruer du gevindskruen ud til bremsen føles effektiv og derefter skruer du
låsemøtrikken fast igen..
27
28
29
30
31
32
12. Original-tilbehør som letter tilværelsen med din Lifebike
Lifebike cykeltasker
Praktiske cykeltasker som passer til baggagebæren på din Lifebike. Taskerne er lavet af
stærkt materiale for at holde regn, sne og vejstøv ude. De er gode når du vil tage din
oplader og måske et ekstra batteri med til din Lifebike eller hvorfor ikke din computer
taske. Artikelnr: 610-10043
Lifebike padlock
En rigtig god cykellås som kan monteres på din Lifebike. Låsen er testet og anbefales
af Svenske Tyveribeskyttelsesforening. Artikelnr: 610-10046
...og teknisk information for din Lifebike
Batteri
24v/10ah li-ion
Dimensioner
Længde 190 cm - Bredde 70 cm - Højde 118 cm
Motor
24V/200W
Vægt
23 kg
Maks. hastighed ( el-hælp)
25 km/timen
Maks last
100 kg
Køre længde med fuldt batteri sommertid
60-70 km
Lifebike batteri oplader
Selvom der medfølger en oplader når du køber en Lifebike, så kan du lette din
tilværelse med en ekstra oplader på kontoret eller i sommerhuset.
Opladning
Opladningstid
4-6 timer af tomt batteri
Strømkilde
220 volt vekselstrøm/60 hz , jordet udtag
Kapacitet
60 watt
Kontrolsystem
11
Beskyttelse mod lav spænding
21 +/- 1 Volt
Beskyttelse mod strøm overbelastning
15 +/- 1 Ampere
Lifebike cykelkurv med fast-lock.
En kraftig cykelkurv i sort metal med bærerhåndtag og med en fast-lock som gør det let
at tage kurven med. Perfekt til at lægge varer i, badetøj til stranden eller en ekstra trøje
eller jakke. Artikelnr: 610-10044
www.life-bike.dk
12
Danish
13.Monteringsvejledning for Lifebike hybrid
1. Monteret på stellet ,start med at fjerne styret.
A:Batterioplader
B:Pedaler
C:Værktøj
D:Nøgler
Lifebike ekstra batteri
Et ekstra batteri kan forenkle din tilværelse hvis du cykler nogle kilometer til og fra
arbejde hver dag på din Lifebike. Når du investerer i et ekstra batteri, kan du altid have et
fuldt opladet batteri som venter på dig, både på din arbejdsplads og i hjemmet. Også godt
når du skal bruge din Lifebike på arbejdet, f. eks hvis du hurtigt og smidigt har brug for at
komme hurtigt frem i by trafikken og samtidigt vil slippe for at lede efter en
parkeringsplads. Normalt kan et batteri oplades 500-600 gange inden det trænger til at
udskiftes. Takket være de fire lamper på batteriet kan du altid se når batteriet er fuldt
33
opladet. Vægt: 1,6kg Artikelnr: 1701-10001-35
2. Monter styret på cyklen
Bulls Eye Vento cykelhjelm
En flot og sikker cykelhjelm som desuden er let at justere og godt ventileret. Din cykeltur
bliver både mere behagelig og mere sikker. Hjelmens mulighed for hurtig justering gør at
du altid får god pasform, fri for slør. 31 ventilations åbninger sørger for at du slipper for at
svede i hjelmen. De mange komfortable inder puder som giver både en god beskyttelse
og gør hjelmen behagelig at bære, selv når vejret er varmt. Findes i blå eller rød. CE
godkendt EN 1077 Artikelnr: 610-10048
34
Bestil dit tilbehør hos din Lifebike forhandler eller bestil dem på life-bike.dk.
Vil du vide mere kan du maile eller ringe til os på Lifebike. Du kan også gå ind på vores
hjemmeside hvor du kan finde den nærmeste forhandler.
På hjemmesiden oplyser vi tilmed om alle nyheder, tilbehør og anden nyttig information
om Lifebike.
Kontaktoplysninger til os på Lifebike:
Ring til os på: 2628 8042
Besøg os på: www.life-bike.dk
Mail til os på: [email protected]
3. Kontroller at styret er i det rigtige hul og før
det derefter ned i forgaflen.
35
4. Stram styret ved at stramme Umbraco skruen med
den medfølgende M6 Umbraco nøgle.
36
13
www.life-bike.dk
14
Danish
11. Umbraco skruen (M5) på sadlen løsnes, og sadlen
justeres til passende højde og stram skruen.
5. Stram skruen som på billederne a,b,c. Anbefalet
stramningsmoment er 14N.m.
37
41
6. Placer styret i passende position og kontroller at
12. Fjern beskyttelses plasten fra cyklen
kontrol enheden på styret sidder i passende vinkel.
7. Kontroller at sikkerhedsmærket på styret ikke er synligt
8. Fastgør kablerne
38
42
Oplad batteriet
9.Placeret på baggagebæren finder du pedalerne.
OBS!
Tænk på at batteriet skal oplades i mindst 10 timer
første gang, se brugermanualen for yderligere
information under opladning og vedligehold af batteriet.
39
43
10. Monter pedalerne på cyklen og stram dem med den
medfølgende ringnøgle.
40
15
www.life-bike.dk
16
Danish
Lifebike importeres og distribueres af Trend-import.DK
Danmark
Trend-import. DK
Lunikvej 30 A
2670 Greve
Tlf.: +45 2628 8042
Fax:+045 4390 7377
www.trend-import.dk
Autoriseret Lifebike Forhandler:
17
18
1
1.Your first familiarisation ride on your new Lifebike
The best way to get started with your Lifebike, if you have only used a regular bicycle
before is to turn on the power and take a test ride. The circuit breaker (main power
switch) is located beneath the luggage carrier (refer to Fig.5). Select a low speed on the
control panel; put the first gear on by turning the right handle and then start pedalling. All
electric bicycles are electric assist (power assist) bicycles, which means that a regular
bicycle optimised for human power has been modified to include an electric motor to
assist the rider. The electric assist is only activated by pedalling. So as long as you move
your feet on the pedals, you get electric assist. When you stop pedalling or when you are
braking the electric assist stops automatically. When you start pedalling again the electric
assist is activated again.
There are 3 power-aid levels: “low”, “medium” and “high”. Try to increase the speed from
low to medium by pressing the “+” button once; press the “+” button a second time to
select a “high” speed. The bike travels around 25 km/h at level “high”. Press the ”-”
button to decrease the speed. It's not difficult at all.
Good to know: when you start pedalling, it takes more than a second before the engine
starts. The same is true when you stop pedalling or when you are braking, which means
that when you stop pedalling it takes more than a second before the engine shuts off.
Since both the foot brake and the handbrake are very efficient and fully encapsulated,
they are not mechanically affected by dirt, dust, snow, ice or cold. That means that your
brakes always have full function. It is therefore important that you brake gently on slippery
surfaces with the most effect on the foot brake, just like on a regular bicycle.
2
You have selected the electric assist of up to 22 km/h
3
Check your battery charge level
2.How far can you ride before the battery runs out?
The most common question related to Lifebike is how far you can ride with electric assist?
The answer is not obvious, because it depends on how you ride, where you ride, on which
surface you ride, how hilly your cycle path is and even on the outdoor temperature.
On a hot summer day you can ride up to 70 km on your bike with electric assist, when you
are riding along an ordinary plane road. A little less if your cycle path has many uphill
slopes.
On a very cold winter day you might just get electric assist for only a 20 km. This is
because your electric bicycle battery works like any other battery. It goes down in capacity
when the temperature drops and the capacity increases when the temperature rises. That
is why in the winter it is recommended to charge and store the battery (during the night)
indoors - especially when it is very cold outside.
Good to know: You can always ride your electric bicycle, even if the battery is empty.
After you have cycled for a few minutes and experienced how it feels to ride your
Lifebike, both with and without electric assist, you can return to the manual and go
through all the chapters. There you will get answers to your questions that have arisen
during your ride.
Good advice: When parking your bicycle, we also recommend you protect your bike
against theft. Please use both a bicycle lock and a plastic cable or chain to fasten your
bike to a bicycle stand or another immovable object or iron construction.
Lifebike is a smart choice: When you choose to make your commuting trips to and from
work with Lifebike, you not only make the environmentally friendly choice but can get
many other benefits as well. If you live in the suburbs, where the traffic is always dense,
you save both money and time as compared to going by car. It's much easier to park your
bike than it is to park a car. You know exactly how much time your trip takes. In addition,
you keep fit and improve your health.
19
20
4
75 % of power is left in your battery .
5
Use the power switch to turn on the power
3.How do the various buttons on the control panel work and what do the indicator lights mean?
Start your bike by turning on the power. The main power switch which controls all the
electricity of you bike is located behind the saddle. When you turn on the power, some
lights light up on the control panel if the battery is charged.
Good to know: Below the power switch, there is a small black button, which you can turn
on/off the front and rear lights.
During your riding, it is easier to check the front control panel and see if you need to
recharge your battery. Please recharge the battery whenever possible. When the bike is
standing still, the front panel will show four red lights shinning, and after riding for a while,
it will show the remained capacity of your battery. When only two lights are shinning, it's
better to recharge the battery.
6
The WALK button works like a standard ON/OFF button and gives you permanent electric assist at
WALK
4. How to use the WALK button?
The WALK push-button is different from the others. When you press it, the front wheel
starts turning at about 6km/h. You can use the WALK push-button when you are walking
with your bike up a steep slope or when you are leading your bike over a crossing or a
steep uphill.
What happens when you press the WALK button is that you turn on the electric motor in
the front wheel and the front wheel starts turning at a speed of 6km/h, which is a
comfortable walking speed. You do not need to move treadles. You can comfortably lead
your bike without straining yourself.
How do I know if my battery is fully charged or not?
The best way to see it is to Press the red button and see how many green lights are
shinning on the battery indicator. When all four green lights are on, your battery is fully
charged. When the light of the charger turns to green, it means the battery is fully
charged (4-6hours). Then the charger is still charging the battery with weak current, which
is not dangerous if the plug is not pulled off. The charger has the protection of over
charging, however, please pull off the plug within 24 hours.
Plus and minus buttons
Using the plus and minus buttons, you can switch between different power-aid levels
(“low”, “medium” and “high”). The bike travels around 18 km/h at level ”low”. If you want to
ride faster than that press the plus button once to switch to the next power-aid level (to
“MEDIUM”). The bike travels around 22 km/h at level ”medium”. Another press on the
plus button helps you switch to the next power-aid level to ”HIGH”. The bike travels
around 25 km/h at level ”high”. One prerequisite for you to get the electric assist at all is,
firstly, to make sure that the main power switch located behind the saddle is at “on”
position(a red light lights up, refer to the photo on Fig.4), and secondly, to check that the
battery has enough power to meet your needs.
With a fully charged battery you can easily reach the desired speed even along uphill slopes.
When you want to reduce the power-aided speed you have set before, press the minus
button once or twice, depending on your preference. Please note that when the bike is at
level “low” and you press the minus button again, the electric assist will be turned off
completely. If you want to turn on the electric assist again, press one, two or three times
on the plus button, depending on the speed which you wish to keep.
21
22
9
7
8
During your bike ride the four red battery indicator lights show how much power is left in
the battery and how much load your battery is carrying when you are using the electric
assist. The more you use human power, the more lights are shining. The fewer lights are
shinning, the less power is left in your battery. When it is only one red light shinning, you
must recharge your battery. When only two lights are shinning, it's better to recharge
the battery. When it's only one red light shinning, you must recharge your battery .
5. This is how the battery indicator lights on the control panel show the status of your
battery, when you are riding your bike
There is a row of 4 red lights on the control panel between EMPTY and FULL. They work
in two completely different ways.
When the power is turned on and your bike stands still or when you are riding so fast that
the electric assist is no longer activated, those indicator lights show how much power
remains in the battery at that specific moment of time. If you just turned on the bike and
have enough battery, all four lights are shinning.
When you are riding with the electric assist, however, the same lamps show how much
power you are using from the battery. For example, if you are bicycling up a hill with
second gear and letting the electric assist make the most of the job for you, only two red
lights may be shining. Later, when you reach the crest and the road starts sloping downhill
making it possible for you to go faster than 25 km/h, the electric assist may turn off and the
four lights will be shining again. So, the number of the shining lights changes depending
on how much load you are putting on the battery (how much power you are consuming) by
using the electric assist or, on the contrary, by not using it because of high speed.
An example:
You are bicycling with the electric assist set at 18 km/h. Up to that speed limit, those four
red lights are showing how much load you are putting on the battery (how much power
you are using).The higher the load, the fewer lights are shining . If you are riding faster
than 18 km/h by using your own power, the electric assist will be switched off automatically
and the lights will then show how much power is left in the battery. The more lights are
shining, the more power you have left in the battery.
A piece of advice:
You ride up a steep hill with the electric assist set to LOW. You think it is too slow and want
some extra power. In that case you can press twice on the plus button to switch to the
HIGH power-aid level and get extra power from the battery that lets you get more help and
it makes your cycling easier. When you are on a flat road again, you can go back to LOW
for a more economic electric assist.
23
10
11
12
Unlock the battery with a key, and then pull the handle of the battery to remove the battery
for charging. You can remove the battery and charge it indoors, but you can also charge it
directly on the bike.
6. Battery charging
You can charge the battery by inserting the output plug of the charger into the charger
connection plug of the battery case and then by inserting the input plug of the charger into a
220V AC socket.You can charge the battery in two ways. You can either charge it directly
on the bike or you can remove it and charge it elsewhere. For example, if you live in a place
where you can lock and fasten your bike to a bicycle stand, it may be convenient to take
your battery with you and charge it indoors. But if you have the opportunity to keep your
bike in a locked room such as a garage or a basement with electrical sockets, it will be
more convenient to charge your battery directly on the bike.
Please follow these steps when you charge the battery directly on the bike:
Insert the output plug of the charger into the charger connection plug of the battery case
and then insert the input plug of the charger into a 220V AC socket. The battery is located
beneath the luggage carrier and the charger connection plug of the battery case is located
at the back of the battery on the right. Fold up the battery case handle beneath the luggage
carrier and remove the rubber cover from the charger connection plug. Insert the output
plug of the charger into the charger connection plug of the battery case and then insert the
input plug of the charger into a socket. A red light lights up on the battery charger when the
battery needs recharging. When the battery is fully charged, the light on the battery charger
turns to green. It takes about 4-6 hours to charge the battery from empty to full. You can
also check if the battery is fully charged by turning on the power (behind the saddle) and
checking whether all four battery indicator lights on the battery are shining.
Please follow these steps when you take out the battery for charging:
Remove the battery, which is locked, by using the key that comes with your bike and pull
out the battery from the handle. It might be a bit difficult to take out the battery, especially
when the bike is new, but just a little more effort will be enough. It will become easier to
remove the battery after a few times.
The advantage of charging the battery by removing it first is that you can charge it indoors
at room temperature for instance, at work, if you use the bike to commute between work
and home and want to be sure that the battery is fully charged when it is time to ride home.
If it is cold outside, you can charge indoors to make sure that when you start your ride, the
battery is warm and full. In extreme cold, the power in batteries goes down and you can
already feel the difference, when it is 4-5 degrees below zero, because low temperature
affects how far you can ride your bike with electric assist.
Good advice: how to check how much power is left in the battery, when you have removed
the battery from your bike?
Four LED-lights can be found in the rear edge of the battery, see photo as above. When the
battery is fully charged, pressing the red button, four green lights are shinning. It's good to
use this method, when you have removed the battery from your bike and you want to check
how charged the battery is. It is convenient to use this method, when you are charging the
removed battery at your home or at work and want to check that the battery is fully charged.
24
13
14
15
16
17
7. How to turn on the lights and change the bulbs .
Your electric bicycle is equipped with efficient electric lighting both in the front and in the
rear. The front and rear LED lights are powered by the main battery. The taillight is
located beneath the luggage carrier. You can switch on and off both the front and the rear
lights by pressing the small black button which under the power switch. Note that the lights
are powered by the battery. If your battery runs out in the dark, you can still get power for
the lights if you turn off the electric assist by pressing on the minus button on the control
panel. The battery recovers its power to provide illumination very quickly.
8. How to disconnect the power cord from the engine to remove the front wheel
Sometimes you have to take off the front wheel, for example, if the cycle tyre is punctured,
if you have to replace the tyre or if you want to transport your bicycle in a car trunk. In
order to do that you need to know how to disconnect the power cord that goes to the
electric hub motor of the front wheel.
Changing bulbs
To change a light bulb in the front: unscrew the Phillips-head screw located under the
lampby using a small and short Phillips screwdriver. You can buy a new bulb at your local
bicycle dealer.
Please do the following, when you want to take off the front wheel:
Start by unplugging the power cord from the electric hub motor of the front wheel. The
rubber-coated power plug is located on the left side near the wheel hub. Please follow
these steps, if you want to disconnect the power connector from the power plug:
To change a light bulb in the back: unscrew the six tiny Phillips-head screws located on
the backside of battery case. Be careful not to drop the screws, because they are very
small and short.
Get a good hold of both parts of the electrical connector and pull out the top part. You may
see eight poles coupling are silver-coloured at that top part. And the bottom part has eight
holes to match them .
Learn to disconnect the power cord from the engine properly
When it's time to connect two parts back, please make sure that the poles are properly
merged, so that the connector continues to be watertight.
25
26
18
The frame number of your bike is stamped onto the front fork .
Cycling is wholesome and fun
9. How can you reduce the risk of your bike being stolen?
There are several things you can do to reduce the risk of having your bike stolen. First
and foremost, when parking your bicycle or when leaving it unattended, we strongly
recommend you to protect your bike against theft. Please use both a bicycle lock and a
plastic cable or a chain to fasten your bike. Wrap the cable or chain between the two
wheels and the frame before you fasten your bike to a bicycle stand or another immovable
object (for example a tree).
10. Riding an electric bike gives you more freedom and less sweat
Many people who start riding a Lifebike find that cycling with the electric assist (riding an
electric bicycle) gives a whole new dimension to cycling, which can be described as: More
adventure and freedom and less sweat.
There are many different locks which you can buy at your local bicycle dealer: wheel locks,
padlocks, cable locks and chains. You can get a wheel lock (also called an O-lock or ringlock; for the front wheel) with a bike carrier, and then the lock is located on the bike all the
time while you travel with your car. You can also get a fixed lock for the rear wheel, which
is available as an extra accessory for your bike.
Secondly, it is always an advantage if you can park your bike so that it stands in a well
lighted place where many people pass by or can suddenly appear, for example near a
staircase or the entrance of a well-visited business centre or a shop, or in a well lighted
car-park, where a car may suddenly appear. It is very good, if you can park your bicycle
indoors or in the entrance hall of your workplace or a mall. It is ideal to park your bicycle
in those places because the risk of having your bike stolen is not so big: bicycle thieves
will not risk stealing your bicycle from a place where the risk of detection is greater.
Another effective way to keep track where your bike is, is to register you bike at Smart
Safety. You will get a theft protection sticker which you can put on your bicycle frame. The
sticker has a unique registration number on it which is listed in the Smart Safety register.
The sticker also bears the telephone number of the Smart Safety Customer Centre, which
can be reached at [email protected]. When the police or anyone else finds a bicycle
registered in the Smart Safety register, they can call the Smart Safety Customer Centre
and the owner will be notified of where the bicycle can be picked up. (Only in sweden:
lock options can be available.)
Another option for you is to place a small GPS transmitter in a box on your bike, so that
you could always keep track of your bike by using your mobile phone or a handheld
transmitter.
27
19
With Lifebike nothing seems impossible. Riding will not make you tired anymore. You can
experience nature and the surroundings as you do by foot , and reach different places
faster and see more with minimal effort. Besides, you can stop almost anywhere when you
feel like it.
You can efficiently calculate your cycling time between point A and point B, which you
cannot do when you are driving a car in the city traffic. The advantage of bicycling to your
workplace is that you know when you arrive and when you get home from work. Cyclists
are much healthier than people with a sedentary lifestyle. You also get more strength and
stamina to cope with your everyday routines.
When you are riding an electric bicycle, you can be sure that you will not arrive too sweaty
at work. Of course, in the rain and snowfall you are a bit more exposed, but a two-piece
rain suit weighing only a few hectograms can be found in any well-stocked bicycle shop.
And you know that your laptop is protected in a good backpack or saddle bag.
Car enthusiasts will pay large amounts of money to get a ride in a Cabriolet and
experience the natural freedom and seasonal scents. The same is true for boaters. Now it
is Lifebike cyclists turn to slide forward mounted on the saddle and feel more natural
contact. You sweat less when using the electric assist to and from work and on small
errands like buying a tabloid.
In your free time you can easily set out on a tour full of experiences, impressions and
scents and feel a great freedom. Gradually you will discover that you do not choose short
cuts anymore, but on the contrary, prefer longer, but more stimulating routes which you
used to avoid. What difference does an extra mile or two make, when you are riding the
Lifebike?
28
20
1. Tools and battery keys
21
2. Adjustment screw for gears
23
22
27
28
29
30
31
32
3. Adjustment of the handbrake
24
25
26
The saddle can be moved up and down, pushed forward and backward with the fixed key
and raised with the hex key (also known as the Allen key).
The steering tube can be raised or lowered by using the hex key (also known as an Allen
key)
11. Service instructions
1. You can use the tools that come with your Lifebike to remove the wheel if necessary, and
to adjust the saddle; unlock the battery lock so that you can remove the battery to charge it
indoors or simply to reduce the risk of theft.
2. If you need to adjust the gears, remove the plastic cover that protects them against dust
and dirt, loosen the lock nut and then adjust the length of the cable, so that the gears are
working properly.
3. When you need to adjust the handbrake, first loosen the black lock nut and then screw
out the threaded sleeve until the brake feels effective and then tighten the lock nut again.
…and technical parameters
Battery
24v/10ah li-ion
Dimensions
Length:190 cm Width:70 cm Height:118 cm
Motor
24V/200W
Weight
25 kg
Maximum speed (with electric assist)
25 km/h
Maximum load
100 kg
12. Equipment and accessories for your bike
Lifebike Bicycle Bags (panniers )
Practical bicycle bags, that easily fit onto the luggage carrier of your bike. The bags are
made from a durable material to be able to keep away rain, snow and road dust. This kind
of bags are very useful and practical when you want to take your charger and maybe an
extra battery or even your laptop with you for the ride.
Lifebike Padlock
A reliable wheel lock (also called an O-lock or ring-lock) that can be put on your bike. The
lock has been tested and is recommended by the Swedish Theft Protection Association.
Lifebike Battery Charger
Even though the battery charger is always included when you buy a bike, you can make
your life easier by having an extra battery charger in the office or the summer house.
Mileage with fully charged battery in summer 60-70 km
Charger parameters
Charging time
4-6 hours (depending on how empty the battery is)
Input voltage
AC220V/60Hz , grounded outlet
Capacity
60 W
Lifebike Bicycle Basket with mounting bracket
A steady bicycle basket in black metal with a handlebar and a mounting bracket, that
allows you to easily place this handlebar basket onto your bike. Perfect for keeping
products, swimsuits if you are going to beach or an extra sweater or jacket.
Controller parameters
29
Under-voltage protection
21 +/- 1 V
Over-current protection
15 +/- 1 A
30
13.Assembly instructions
Lifebike extra battery
An extra battery can make your life much easier if you commute ca 10 km or more every
day with your bike. When you invest in an extra battery, you can always have a fully
charged battery waiting for you, both in your workplace and at home. It may also come in
handy if use your Lifebike at work, for example, if you need to move quickly trough the
city traffic and do not want to look for parking places which are difficult to find. Normally,
a battery can be recharged 500-600 times before it needs to be replaced. Thanks to the
four LED-lights on the battery, you can always see when the battery is fully charged.
Weight: 1,6kg
1. Start by removing the steering bar that is fixed to
the frame .
A. Battery charger
B. Pedals
C. Tools
D. Keys to the frack
33
2. Assemble steering bar to the bike .
Bulls Eye Vento bicycle helmet
A stylish and safe bicycle helmet, which is also easily adjustable and well ventilated. Your
bike ride will be both enjoyable and safer. The quickly adjustable helmet is always a good
fit. The helmet has 31 ventilation openings, so you will not be sweating when wearing it.
The comfortable interior cushions provide good protection and make the helmet
comfortable to wear even when the weather is warm. Available in blue or red. CE
approved EN 1077.
34
Order your accessories at your Lifebike dealer or order them at lifebike.se.
If you want to know more, you can e-mail or call us at Lifebike. You can also visit our
website where you can find out the location of your nearest dealer and service facility.
Our website also contains news, articles and other useful information about Lifebike.
Contact us at Lifebike:
Call us at: +46 077-448 89 00
Visit us at: www.lifebike.se
E-mail us at: [email protected]
3. Check to ensure that the steering bar is in the
right direction and then assembled it to the front
fork .
35
4. Fixate the steering bar by tightening the inner 6
bolt with the included M6 tool .
36
31
32
11. Loosen the inner 5 for the saddle. Adjust to a
suitable height and tighten the bolt .
5. Tightening the screw/bolts according to the order
of Fig. A-b-c.Required torque for the screws and
bolts tightening is 14N.m .
37
41
6. Place the handle in an appropriate position and
check that the controls are easily accessible .
7. Ensure that safety mark on the stem bar can not
be seen.
8. Place the cables and wires from the handlebar in
the specially designed holder.
38
12.Remove the protective plastic from the bike .
42
Charge the battery
9. Situated on the package holder, you will find the
following parts .
NOTE!
Remember that the battery will need to be charged
for approximately 10 hours the first time. Pleas refer
to the user manual for further information regarding
charging and maintenance of the battery
39
43
10. Mount the pedals on the bike and tighten them
with the included tool.
40
33
34
Lifebike is imported and distributed by Trendimport AB:
Stockholm
Trendimport AB - Headquarter
Org. nr. 556650-8908
Tel: 08-522 168 00
Fax: 08-702 95 00
Address: Ryssviksvägen 2, 131 36 Nacka
Delivery address: As above
Visit address: As above
Höör
Trendimport AB - Branch Office / Warehouse
Tel: 0413-298 10
Fax: 0413-274 90
Address: Pumpvägen 7, 243 93 Höör
Delivery address: As above
Visit address: As above
Trendimport Shanghai Office
Building C, 327 Tianyaoqiao Road, Xuhui, Shanghai
Authorized Lifebike Dealer:
35