1
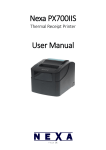
Using the Nexa CM-500M with Library Automation Systems The CM-500M’s accompanying Scanner Operation Guide provides all of the basic instructions and information necessary to use the CM-500M for normal bar code scanning and storage. The CM-500M incorporates a TimeStamp feature that can be used for Asset Collection Systems and Time and Attendance applications. For users of library automation systems these features are not normally required, it is therefore important to ensure the CM-500M’s TimeStamp feature is TURNED OFF. The following set of command bar codes can be used to ensure the CM-500M is configured correctly for use with Library Automation Systems like Bookmark; Amlib; Oliver; Oasis; E-Library; Alice; ResourceMate etc. Preparing the Nexa CM-500M scanner …. Identify the following two barcodes “All Default”. Scan both of these barcodes from top to bottom to ensure the CM-500M has been fully reset. ALL DEFAULT */$%ENT* *ZADE* Next note the barcode column “Disable Headers” below, scan each of the three barcodes in this column from top to bottom to ensure the CM-500M does not send the download headers. “<Memory>” & “<End>”. Next, identify the central barcode column “Disable TimeStamp”, scan each of the barcodes in this column from top to bottom to ensure the CM-500M does not include the time and date with data downloads. Finally, scan each of the 6 barcodes from top to bottom in the column “Set Download Delay” to make provision for an adequate time delay period between each data record downloaded. This ensures that the automation system software has time to process the data being received. DISABLE HEADER DISABLE TIMESTAMP SET DOWNLOAD DELAY */$%ENT* */$%ENT* */$%ENT* *7A00* *7A10* *7042* *ZEND* *ZEND* *%01* *%05* *%OK* *ZEND* Should the CM-500M be programmatically reconfigured at any time it may be necessary to repeat the above sequence to ensure compatibility with various automation systems. These instructions and the accompanying bar code command chart have been created by Dataman Barcode Systems and are copyright. It is recommended that copies are made and at least one copy laminated. Dataman Barcode Systems P.O. Box 855, Happy Valley S.A. 5159, Australia Tel:- 088 322 7675 Fax:- 088 322 7288 Web:- www.datamanbarcode.com.au E-mail:- [email protected] International Tel:- +(618) 8322 7675 International Fax:- +(618) 8322 7288 Using the Nexa CM-500M with Library Automation Systems All NEXA CM-500M portable scanners supplied by Dataman Barcode Systems include a set of two important control barcode labels titled “CM-500M SEND DATA” & “CM-500M CLEAR DATA”. These bar codes are encoded with command instructions for the CM-500M unit, they are intuitively named and should be kept in a secure location for use when required. The CM-500M is supplied with a USB cable that connects to the body of the CM-500M unit and allows the CM-500M to be interfaced to the computer (P.C. or MAC) using a conventional USB style socket. The CM500M is fitted with a Li-ion rechargeable battery that derives its charge from the computer while it is connected to the USB port, the Charge State is indicated by the red light on CM-500M unit. When installing the CM-500M for the first time the computer should already be ON and operational, once the CM-500M is connected the computer will recognise the connection and automatically accommodate for the required USB HID drivers, this is often referred to as plug & play. User installed software drivers are not necessary, the accompanying disk contains a copy of the user manual. While the CM-500M is attached to the computer it can be used as a conventional bar code scanner, the CM500M should be held a short distance away from the bar code to be scanned (20 – 100 mm) and not immediately upon it. The required distance will vary between bar code types and depends upon the original density at which the bar code was produced, bar codes produced at a higher print density usually need the CM-500M to be held closer to the bar code. Depressing the large blue button with the thumb will cause the unit to emit the scanning beam, the CM-500M will give an audible beep once the bar code has been read successfully. Adjusting the focal distance the CM500M is held from the bar code while scanning until the beep is heard will indicate the optimum focal range for the particular range of bar codes being used. When the CM-500M is detached from its cable it can be used remotely to collect and store data, the CM500MV2 has a maximum storage capacity of approximately 4000 library bar codes. For security reasons it is recommended that data is collected and downloaded in smaller batches of a few hundred at a time. In order to download the collected data the CM-500M must be reconnected to the computer using the supplied USB cable. When the library software has been prepared to receive the collected data downloading from the CM-500M is initiated by simply scanning the supplied command bar code “CM-500M SEND DATA”. The collected data can also be downloaded into popular data editors like Notepad or Wordpad and the files saved for further reference. Once the collected data has been successfully saved the CM-500M memory can be reset/cleared to enable another batch of data to be stored. Clearing the memory is accomplished by scanning the supplied command bar code “CM-500M CLEAR DATA”. The CM-500M can also be optionally set to record the time and date when each remotely scanned bar code was read, this feature while not used for libraries enables the CM-500M to be used for many other applications including asset management, time management and auditing. If the CM-500M is to be used as a conventionally tethered bar code scanner for lengthy periods of time care should be undertaken to ensure that the small cable connection plug and socket are not subjected to excessive stress and wear. Replacement CM-500M command bar codes can be obtained from Dataman Barcode Systems for a nominal $10.00 fee that covers postal and handling costs, or free if supplied with stamped and addressed envelope. These instructions and the accompanying bar code command charts have been created by Dataman Barcode Systems and are copyright. It is recommended that copies are made and at least one copy laminated. Dataman Barcode Systems P.O. Box 855, Happy Valley S.A. 5159, Australia Tel:- 088 322 7675 Fax:- 088 322 7288 Web:- www.datamanbarcode.com.au E-mail:- [email protected] International Tel:- +(618) 8322 7675 International Fax:- +(618) 8322 7288 Start Instruction Mode Set time and date formats as below for compatibility with Bar-Key. (Optional) ALL DEFAULT Start Instruction Mode Settings will be reset to default conditions. Barcode by Dataman CM-500M Regional Date & Time Entry Chart Copyright 2012 Dataman Barcode www.datamanbarcode.com.au Set Regional Time & Date for TimeStamp To set the current regional Date & Time on the CM-500M the "Set Date & Time" command is enabled by firstly scanning the "Start Instruction Mode" bar code followed by the "Set Date & Time" barcode. Next, by using the decimal digit bar codes 0 - 9 in the right hand column scan a total of 10 digits to represent the current date & time. Example:- 0910141220, the date/time output will be 2009-10-14 12:20 for Year-Month-Date Time. To complete the setting scan the SET bar code followed by the Finish bar code. Time Format Date Format 0 Finish Start Instruction Mode Set Date & Time 1 2 3 TAB 0 4 Tab or Comma separators for Time, Date & Data see user manual for other characters. See above descriptor SET Finish Start Instruction Mode 5 9 COMMA 6 7 2 Time/Date Separator Range #00 - #FF (Ascii Code) SET 8 C Finish 9 CM-500M Instruction Commands Download Data to Host Computer Barcode by Dataman Datam Barcod System Clear Stored Data SEND Provides an adequate time delay period between each data record downloaded. Data Download Delay CLEAR <End> Enable Download Header Start Instruction Mode Disable Download Header Finish Enable TimeStamp Start Instruction Mode Disable TimeStamp Finish <Memory> Start Instruction Mode Finish Good read off mode:- LED source automatically turns off after successful barcode read. Start Instruction Mode Trigger Off Scan Mode Finish Warning:- Timestamp must be enabled to report correct time and date of recorded data. Scanner Operation Guide Configuration Instructions This Quick start gives you a quick understanding of how to operate the memory scanner and function keys. More product configuration options, please refer to standard user manual provided in the CD. Operation Mode When plug in the USB cable with scanner. Function keys and LED Indicator Overview of situations The scanner can be used in memory mode and USB cable mode. Scan key: Read or store barcode data. Green To connect the scanner with the USB cable, it will automatically switch to USB cable scanner. Erase key: LED will be indicated when scan key pressed. USB cable can be used as file transferring cable and battery recharge cable. When recharging the battery, if red LED is flashing rapidly, it means recharge failure. Please contact local distributor. d) Uploading the saved barcode data from memory to PC, press the Erase key for few seconds until beep sound indicates. OR scan the “Send” barcode (page 5). It will automatically send the saved barcode data to PC. Erase all data: press and hold the erase key for approximately 8 seconds until the red light indicator on, and beep sound indicates. All barcode data saved in the memory will be erased. when the battery is running low, pressing the scan key, the red LED will be indicated. During the recharging process, the red LED will be always on. When recharging process is completed, the red LED will be flashing slowly while cable is plugged in. No extra software needed for uploading the barcode data from memory to PC. Transmitting / Clearing barcode data by pressing the erase key OR scan the send / clear barcode in page 5. b) Execute Word, Excel or any word processing software; scan the barcode will transmit the barcode data to the word processing software in real time. c) When barcode successfully read, beep sound and green LED will be indicated. Erase single data: press the erase key and point to the scanned barcode, this action will erase the previous saved barcode data in the memory scanner. Power indicator: a) It will start with short melody and the red LED will be indicated. Good read indicator: Note: after uploading the barcode data to PC, the barcode data in the memory will not be erase. User needs to erase the barcode data manually OR scan “Clear” barcode (page 5) to erase all barcode data. When the barcode is successfully read, the orange LED will be indicated. Wireless indicator: When initiating Bluetooth connection Blue LED will be flashing, if connection established, Blue LED will be always on. USB Port: charge battery or data transmission. 2 Strap hole 3 4 CM 500 Series Important Notice: When Unplug the USB cable with scanner. 2 in 1 Memory / USB Cable a) It will automatically switch to Memory scanner. b) Press the erase key and point to the scanned barcode label, this action will erase the previously saved barcode data in the memory scanner. c) Press and hold the erase key for approximately 8 seconds until the red LED and beep indication, all barcode data saved in the memory will be erased. 1. Do not beam the light source to eyes, it may cause discomfort. 2. When the red LED is flashing, it indicates the battery is running low. Please recharge the battery as soon as possible. 3. The scanner battery can be recharge by USB cable or power adapter (sold separately). 4. First time battery charge will take about 1.5 hours. During the battery recharge process, the red LED will be on. If the battery is fully charged, the red LED will be flashing per 2 seconds. 5. If using USB cable to charge the battery, make sure your PC is not in power saving mode. Avoid any USB HUB devices to charge the battery. 6. Any damages or malfunctioning, please contact with your local dealer. Do not open the scanner by yourself, warranty will not apply. Transmitting barcode Data */$%MTX* (Send) Connecting USB cable and scan this Barcode will transmit the barcode data to PC. Clearing all saved barcode data Scanner */$%MCR* (Clear) Clear all barcode data in the memory Caution: This information is subject to Warning: Scan the “Clear” barcode change without prior notice. will lose all the barcode data. 5 6 Quick Start