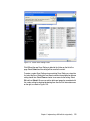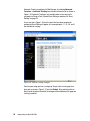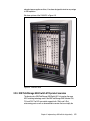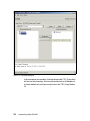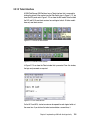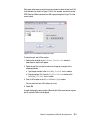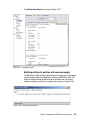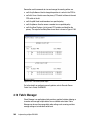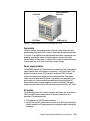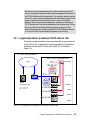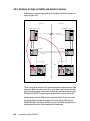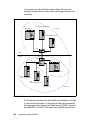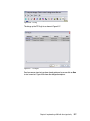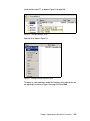
1
Front cover IBM TotalStorage: Implementing an Open IBM SAN Discover the latest additions to the IBM SAN family Enhance your skills while using an easy-to-follow format Grow with the new technology Jon Tate Cameron Hildebran Jeannie Ostdiek ibm.com/redbooks International Technical Support Organization Implementing an Open IBM SAN December 2004 SG24-6116-03 Note: Before using this information and the product it supports, read the information in “Notices” on page xxix. Fifth Edition (December 2004) This edition applies to the SAN hardware and software products described herein. © Copyright International Business Machines Corporation 2000, 2001, 2002, 2003. All rights reserved. Note to U.S. Government Users Restricted Rights -- Use, duplication or disclosure restricted by GSA ADP Schedule Contract with IBM Corp. Summary of changes This section describes the major technical changes made in this edition of the book and in previous editions. This edition may also include minor corrections and editorial changes that are not identified. Summary of Changes for SG24-6116-03 for Implementing an Open IBM SAN as created or updated on December 30, 2004. December 2004, Fifth Edition This revision reflects the addition, deletion, or modification of new and changed information described below. New information Added IBM TotalStorage Storage Switch L10 Changed information Removed BladeCenter chapter Removed IBM TotalStorage SAN Controller 160 Removed SAN Data Gateway Removed CNT FC/9000 T_Port mode © Copyright IBM Corp. 2000, 2001, 2002, 2003. All rights reserved. v vi Implementing an Open IBM SAN Contents Summary of changes . . . . . . . . . . . . . . . . . . . . . . . . . . . . . . . . . . . . . . . . . . . . v December 2004, Fifth Edition. . . . . . . . . . . . . . . . . . . . . . . . . . . . . . . . . . . . . . . v Figures . . . . . . . . . . . . . . . . . . . . . . . . . . . . . . . . . . . . . . . . . . . . . . . . . . . . . . xiii Tables . . . . . . . . . . . . . . . . . . . . . . . . . . . . . . . . . . . . . . . . . . . . . . . . . . . . . .xxvii Notices . . . . . . . . . . . . . . . . . . . . . . . . . . . . . . . . . . . . . . . . . . . . . . . . . . . . . xxix Trademarks . . . . . . . . . . . . . . . . . . . . . . . . . . . . . . . . . . . . . . . . . . . . . . . . . . xxx Preface . . . . . . . . . . . . . . . . . . . . . . . . . . . . . . . . . . . . . . . . . . . . . . . . . . . . . xxxi The team that wrote this redbook. . . . . . . . . . . . . . . . . . . . . . . . . . . . . . . . . . xxxi Become a published author . . . . . . . . . . . . . . . . . . . . . . . . . . . . . . . . . . . . . xxxiv Comments welcome. . . . . . . . . . . . . . . . . . . . . . . . . . . . . . . . . . . . . . . . . . . xxxv Chapter 1. Implementing a SAN with the e-type family . . . . . . . . . . . . . . . . 1 1.1 Configuring the switch . . . . . . . . . . . . . . . . . . . . . . . . . . . . . . . . . . . . . . . . . 3 1.1.1 Switch network setup . . . . . . . . . . . . . . . . . . . . . . . . . . . . . . . . . . . . . 3 1.1.2 Switch setup with Web Manager. . . . . . . . . . . . . . . . . . . . . . . . . . . . . 9 1.2 Switch management . . . . . . . . . . . . . . . . . . . . . . . . . . . . . . . . . . . . . . . . . 15 1.2.1 Switch management with the Web Manager. . . . . . . . . . . . . . . . . . . 15 1.2.2 Switch management with the Command Line Interface . . . . . . . . . . 35 1.3 Monitoring the switch. . . . . . . . . . . . . . . . . . . . . . . . . . . . . . . . . . . . . . . . . 37 Chapter 2. Implementing a SAN with the b-type family . . . . . . . . . . . . . . . 49 2.1 Introducing the IBM TotalStorage SAN Switch . . . . . . . . . . . . . . . . . . . . . 50 2.1.1 Software specifications . . . . . . . . . . . . . . . . . . . . . . . . . . . . . . . . . . . 52 2.2 IBM TotalStorage SAN Switch Models . . . . . . . . . . . . . . . . . . . . . . . . . . . 55 2.2.1 IBM TotalStorage SAN Switch F16 . . . . . . . . . . . . . . . . . . . . . . . . . . 55 2.2.2 IBM TotalStorage SAN Switch F16 product overview. . . . . . . . . . . . 56 2.2.3 IBM TotalStorage SAN Switch F32 . . . . . . . . . . . . . . . . . . . . . . . . . . 57 2.2.4 IBM TotalStorage SAN Switch F32 product overview. . . . . . . . . . . . 58 2.2.5 IBM TotalStorage SAN Switch H08 and H16 . . . . . . . . . . . . . . . . . . 60 2.2.6 IBM TotalStorage SAN Switch H08. . . . . . . . . . . . . . . . . . . . . . . . . . 60 2.2.7 IBM TotalStorage SAN Switch H16. . . . . . . . . . . . . . . . . . . . . . . . . . 61 2.2.8 IBM TotalStorage SAN Switch 2109-M12 . . . . . . . . . . . . . . . . . . . . . 62 2.2.9 IBM TotalStorage SAN Switch M12 product overview . . . . . . . . . . . 63 2.2.10 Hardware components . . . . . . . . . . . . . . . . . . . . . . . . . . . . . . . . . . 65 2.2.11 IBM TotalStorage SAN Switch M14 . . . . . . . . . . . . . . . . . . . . . . . . 72 © Copyright IBM Corp. 2000, 2001, 2002, 2003. All rights reserved. vii 2.2.12 Hardware Components M14 . . . . . . . . . . . . . . . . . . . . . . . . . . . . . . 74 2.2.13 IBM TotalStorage SAN Switch B32. . . . . . . . . . . . . . . . . . . . . . . . . 80 2.2.14 Product Overview . . . . . . . . . . . . . . . . . . . . . . . . . . . . . . . . . . . . . . 81 2.2.15 Support Optional Features . . . . . . . . . . . . . . . . . . . . . . . . . . . . . . . 83 2.3 Installing the IBM TotalStorage SAN Switch . . . . . . . . . . . . . . . . . . . . . . . 87 2.3.1 Setting the IP address using the serial port . . . . . . . . . . . . . . . . . . . 88 2.3.2 Connecting to the switch . . . . . . . . . . . . . . . . . . . . . . . . . . . . . . . . . . 98 2.3.3 Setting Core PID format . . . . . . . . . . . . . . . . . . . . . . . . . . . . . . . . . 100 2.3.4 Setting the date . . . . . . . . . . . . . . . . . . . . . . . . . . . . . . . . . . . . . . . . 101 2.3.5 Launching Web Tools with the 4.4 FOS . . . . . . . . . . . . . . . . . . . . . 102 2.3.6 Zone Admin. . . . . . . . . . . . . . . . . . . . . . . . . . . . . . . . . . . . . . . . . . . 111 2.3.7 Implementing zoning . . . . . . . . . . . . . . . . . . . . . . . . . . . . . . . . . . . . 114 2.3.8 Web Tools Switch View. . . . . . . . . . . . . . . . . . . . . . . . . . . . . . . . . . 133 2.3.9 Admin Button. . . . . . . . . . . . . . . . . . . . . . . . . . . . . . . . . . . . . . . . . . 148 2.3.10 Telnet interface . . . . . . . . . . . . . . . . . . . . . . . . . . . . . . . . . . . . . . . 193 2.4 Performance Monitor. . . . . . . . . . . . . . . . . . . . . . . . . . . . . . . . . . . . . . . . 194 2.4.1 Advanced Performance Monitoring. . . . . . . . . . . . . . . . . . . . . . . . . 205 2.4.2 Performance Monitoring with Telnet commands. . . . . . . . . . . . . . . 206 2.4.3 Performance Monitoring with Web Tools . . . . . . . . . . . . . . . . . . . . 207 2.5 Fabric Watch . . . . . . . . . . . . . . . . . . . . . . . . . . . . . . . . . . . . . . . . . . . . . . 228 2.5.1 Beaconing . . . . . . . . . . . . . . . . . . . . . . . . . . . . . . . . . . . . . . . . . . . . 244 2.6 Merging SAN fabrics . . . . . . . . . . . . . . . . . . . . . . . . . . . . . . . . . . . . . . . . 245 2.6.1 Duplicate domain IDs . . . . . . . . . . . . . . . . . . . . . . . . . . . . . . . . . . . 248 2.6.2 Zoning configuration conflicts . . . . . . . . . . . . . . . . . . . . . . . . . . . . . 248 2.6.3 Operating parameters conflicts . . . . . . . . . . . . . . . . . . . . . . . . . . . . 250 2.7 Upgrading switch firmware . . . . . . . . . . . . . . . . . . . . . . . . . . . . . . . . . . . 251 2.8 Distributed fabrics . . . . . . . . . . . . . . . . . . . . . . . . . . . . . . . . . . . . . . . . . . 261 2.8.1 ISL R_RDY Mode . . . . . . . . . . . . . . . . . . . . . . . . . . . . . . . . . . . . . . 262 2.8.2 Remote Switch . . . . . . . . . . . . . . . . . . . . . . . . . . . . . . . . . . . . . . . . 262 2.8.3 Using Remote Switch . . . . . . . . . . . . . . . . . . . . . . . . . . . . . . . . . . . 263 2.8.4 Configuring a Remote Switch fabric . . . . . . . . . . . . . . . . . . . . . . . . 263 2.8.5 Extended Fabrics . . . . . . . . . . . . . . . . . . . . . . . . . . . . . . . . . . . . . . 265 2.8.6 Using Extended Fabrics . . . . . . . . . . . . . . . . . . . . . . . . . . . . . . . . . 265 2.8.7 Configuring Extended Fabrics. . . . . . . . . . . . . . . . . . . . . . . . . . . . . 266 2.9 Advanced Security . . . . . . . . . . . . . . . . . . . . . . . . . . . . . . . . . . . . . . . . . 268 2.9.1 Implementing Advanced Security . . . . . . . . . . . . . . . . . . . . . . . . . . 269 2.9.2 Enabling Advanced Security . . . . . . . . . . . . . . . . . . . . . . . . . . . . . . 282 2.10 Fabric Manager . . . . . . . . . . . . . . . . . . . . . . . . . . . . . . . . . . . . . . . . . . . 286 2.10.1 Fabric Manager Requirements . . . . . . . . . . . . . . . . . . . . . . . . . . . 289 2.10.2 Installing Fabric Manager . . . . . . . . . . . . . . . . . . . . . . . . . . . . . . . 289 2.10.3 Launching Fabric Manager . . . . . . . . . . . . . . . . . . . . . . . . . . . . . . 291 2.10.4 Implementing Fabric Manager . . . . . . . . . . . . . . . . . . . . . . . . . . . 291 2.10.5 Fabric Login . . . . . . . . . . . . . . . . . . . . . . . . . . . . . . . . . . . . . . . . . 300 viii Implementing an Open IBM SAN 2.10.6 Sequence Rebooting. . . . . . . . . . . . . . . . . . . . . . . . . . . . . . . . . . . 304 2.10.7 Fabric Merge . . . . . . . . . . . . . . . . . . . . . . . . . . . . . . . . . . . . . . . . . 308 2.10.8 Loading switch configuration . . . . . . . . . . . . . . . . . . . . . . . . . . . . . 314 2.10.9 Managing licenses . . . . . . . . . . . . . . . . . . . . . . . . . . . . . . . . . . . . 320 QuickLoop . . . . . . . . . . . . . . . . . . . . . . . . . . . . . . . . . . . . . . . . . . . . . . . . . . . 325 Chapter 3. Implementing a SAN with the m-type family . . . . . . . . . . . . . 331 3.1 Product description . . . . . . . . . . . . . . . . . . . . . . . . . . . . . . . . . . . . . . . . . 333 3.1.1 Machine type and model number changes . . . . . . . . . . . . . . . . . . . 333 3.1.2 McDATA Sphereon 4300 Fabric Switch . . . . . . . . . . . . . . . . . . . . . 333 3.1.3 McDATA Sphereon 4500 Fabric Switch . . . . . . . . . . . . . . . . . . . . . 335 3.1.4 McDATA Sphereon 3232 Fabric Switch . . . . . . . . . . . . . . . . . . . . . 337 3.1.5 McDATA Intrepid 6140 Director . . . . . . . . . . . . . . . . . . . . . . . . . . . 340 3.1.6 McDATA Intrepid 6064 Director . . . . . . . . . . . . . . . . . . . . . . . . . . . 348 3.1.7 The Fabricenter cabinet . . . . . . . . . . . . . . . . . . . . . . . . . . . . . . . . . 355 3.2 Setting up the network environment . . . . . . . . . . . . . . . . . . . . . . . . . . . . 356 3.2.1 m-type family SAN on a dedicated TCP/IP ethernet LAN . . . . . . . . 357 3.3 Product management . . . . . . . . . . . . . . . . . . . . . . . . . . . . . . . . . . . . . . . 358 3.3.1 SANpilot: the Web based interface . . . . . . . . . . . . . . . . . . . . . . . . . 359 3.3.2 EFC Manager . . . . . . . . . . . . . . . . . . . . . . . . . . . . . . . . . . . . . . . . . 361 3.3.3 Accessing the EFC Manager client installation software . . . . . . . . 365 3.3.4 Downloading and installing the EFC Manager client. . . . . . . . . . . . 366 3.3.5 Configuring EFCM access through a firewall . . . . . . . . . . . . . . . . . 369 3.3.6 Configuring the IP address for out-of-band management . . . . . . . . 370 3.4 Managing the environment using the EFC Manager . . . . . . . . . . . . . . . . 372 3.4.1 Logging in to the EFC Manager . . . . . . . . . . . . . . . . . . . . . . . . . . . 373 3.4.2 Administering the SAN using the EFC Manager . . . . . . . . . . . . . . . 374 3.4.3 Defining users on the EFC Manager. . . . . . . . . . . . . . . . . . . . . . . . 375 3.4.4 Identifying devices to the EFC Manager . . . . . . . . . . . . . . . . . . . . . 380 3.4.5 Assigning nicknames to World Wide Port Names . . . . . . . . . . . . . . 386 3.5 Managing devices using the Element Manager . . . . . . . . . . . . . . . . . . . 390 3.5.1 Managing different m-type devices . . . . . . . . . . . . . . . . . . . . . . . . . 391 3.5.2 Configuring m-type devices using EFC Element Manager . . . . . . . 392 3.5.3 Configuring ES-4500 switch for arbitrated loop. . . . . . . . . . . . . . . . 405 3.5.4 ES-4500 port configuration options. . . . . . . . . . . . . . . . . . . . . . . . . 410 3.5.5 ES-4500 switch port configuration . . . . . . . . . . . . . . . . . . . . . . . . . 410 3.6 Troubleshooting the m-type SAN . . . . . . . . . . . . . . . . . . . . . . . . . . . . . . 414 3.6.1 Logs available for Troubleshooting . . . . . . . . . . . . . . . . . . . . . . . . . 414 3.6.2 Identifying and resolving hardware symptoms . . . . . . . . . . . . . . . . 415 3.7 Understanding the McDATA zoning concepts. . . . . . . . . . . . . . . . . . . . . 419 3.7.1 Why we need zoning. . . . . . . . . . . . . . . . . . . . . . . . . . . . . . . . . . . . 420 3.7.2 Zoning implementation . . . . . . . . . . . . . . . . . . . . . . . . . . . . . . . . . . 420 3.7.3 Zone member definitions. . . . . . . . . . . . . . . . . . . . . . . . . . . . . . . . . 421 Contents ix 3.7.4 Zone management with zone sets . . . . . . . . . . . . . . . . . . . . . . . . . 422 3.8 Managing the fabric with EFCM . . . . . . . . . . . . . . . . . . . . . . . . . . . . . . . 425 3.8.1 The Zoning Dialog Box . . . . . . . . . . . . . . . . . . . . . . . . . . . . . . . . . . 426 3.8.2 Zones, zone sets, and zoning . . . . . . . . . . . . . . . . . . . . . . . . . . . . . 428 3.9 Building a multi-switch fabric . . . . . . . . . . . . . . . . . . . . . . . . . . . . . . . . . . 440 3.9.1 Multi switch fabric considerations . . . . . . . . . . . . . . . . . . . . . . . . . . 440 3.9.2 Solutions for high availability and disaster tolerance . . . . . . . . . . . 442 3.9.3 Setting up our zoned multi switch fabric . . . . . . . . . . . . . . . . . . . . . 446 3.10 Open Trunking. . . . . . . . . . . . . . . . . . . . . . . . . . . . . . . . . . . . . . . . . . . . 456 3.10.1 Configuring Open Trunking . . . . . . . . . . . . . . . . . . . . . . . . . . . . . . 457 3.10.2 Enabling Open Trunking . . . . . . . . . . . . . . . . . . . . . . . . . . . . . . . . 461 3.11 SANtegrity . . . . . . . . . . . . . . . . . . . . . . . . . . . . . . . . . . . . . . . . . . . . . . . 463 3.11.1 Fabric Binding . . . . . . . . . . . . . . . . . . . . . . . . . . . . . . . . . . . . . . . . 463 3.11.2 Switch Binding. . . . . . . . . . . . . . . . . . . . . . . . . . . . . . . . . . . . . . . . 467 3.11.3 Configuring Switch Binding . . . . . . . . . . . . . . . . . . . . . . . . . . . . . . 469 3.12 Firmware download procedure . . . . . . . . . . . . . . . . . . . . . . . . . . . . . . . 472 Chapter 4. Implementing a SAN with the n-type family . . . . . . . . . . . . . . 483 4.1 Introducing the SAN256N Director . . . . . . . . . . . . . . . . . . . . . . . . . . . . . 483 4.1.1 Director Models . . . . . . . . . . . . . . . . . . . . . . . . . . . . . . . . . . . . . . . . 483 4.1.2 Basic components. . . . . . . . . . . . . . . . . . . . . . . . . . . . . . . . . . . . . . 484 4.1.3 Port modes . . . . . . . . . . . . . . . . . . . . . . . . . . . . . . . . . . . . . . . . . . . 486 4.1.4 Supported protocols . . . . . . . . . . . . . . . . . . . . . . . . . . . . . . . . . . . . 486 4.1.5 Supported device attachment . . . . . . . . . . . . . . . . . . . . . . . . . . . . . 487 4.2 Getting started. . . . . . . . . . . . . . . . . . . . . . . . . . . . . . . . . . . . . . . . . . . . . 488 4.2.1 Initial IP settings . . . . . . . . . . . . . . . . . . . . . . . . . . . . . . . . . . . . . . . 488 4.2.2 Establishing network connection. . . . . . . . . . . . . . . . . . . . . . . . . . . 488 4.2.3 In-band and out-of-band . . . . . . . . . . . . . . . . . . . . . . . . . . . . . . . . . 491 4.3 Accessing with inVSN Enterprise Manager . . . . . . . . . . . . . . . . . . . . . . . 492 4.3.1 Defining Users. . . . . . . . . . . . . . . . . . . . . . . . . . . . . . . . . . . . . . . . . 496 4.3.2 Fabric security. . . . . . . . . . . . . . . . . . . . . . . . . . . . . . . . . . . . . . . . . 501 4.3.3 Port Groups. . . . . . . . . . . . . . . . . . . . . . . . . . . . . . . . . . . . . . . . . . . 502 4.3.4 Port and switch binding . . . . . . . . . . . . . . . . . . . . . . . . . . . . . . . . . . 503 4.3.5 Force ports down . . . . . . . . . . . . . . . . . . . . . . . . . . . . . . . . . . . . . . 506 4.3.6 Setting the director clock. . . . . . . . . . . . . . . . . . . . . . . . . . . . . . . . . 506 4.3.7 Assigning names and aliases . . . . . . . . . . . . . . . . . . . . . . . . . . . . . 507 4.3.8 Implementing zoning . . . . . . . . . . . . . . . . . . . . . . . . . . . . . . . . . . . . 509 4.3.9 Defining Zones . . . . . . . . . . . . . . . . . . . . . . . . . . . . . . . . . . . . . . . . 509 4.3.10 Logical domains . . . . . . . . . . . . . . . . . . . . . . . . . . . . . . . . . . . . . . 517 4.3.11 Database backup . . . . . . . . . . . . . . . . . . . . . . . . . . . . . . . . . . . . . 518 4.3.12 One button code load . . . . . . . . . . . . . . . . . . . . . . . . . . . . . . . . . . 519 4.3.13 Monitoring user activities. . . . . . . . . . . . . . . . . . . . . . . . . . . . . . . . 522 4.3.14 Event log . . . . . . . . . . . . . . . . . . . . . . . . . . . . . . . . . . . . . . . . . . . . 523 x Implementing an Open IBM SAN 4.3.15 4.3.16 4.3.17 4.3.18 Notification Preferences . . . . . . . . . . . . . . . . . . . . . . . . . . . . . . . . 524 Link rate test . . . . . . . . . . . . . . . . . . . . . . . . . . . . . . . . . . . . . . . . . 526 FC Ping . . . . . . . . . . . . . . . . . . . . . . . . . . . . . . . . . . . . . . . . . . . . . 526 Attaching legacy loop ports . . . . . . . . . . . . . . . . . . . . . . . . . . . . . . 529 Chapter 5. Implementing a SAN with the Cisco family . . . . . . . . . . . . . . 535 5.1 FCP and the Cisco MDS 9000 products . . . . . . . . . . . . . . . . . . . . . . . . . 536 5.1.1 Port addressing and port modes . . . . . . . . . . . . . . . . . . . . . . . . . . . 536 5.1.2 Zoning . . . . . . . . . . . . . . . . . . . . . . . . . . . . . . . . . . . . . . . . . . . . . . . 538 5.1.3 VSAN . . . . . . . . . . . . . . . . . . . . . . . . . . . . . . . . . . . . . . . . . . . . . . . 538 5.1.4 Trunking and PortChannel . . . . . . . . . . . . . . . . . . . . . . . . . . . . . . . 539 5.1.5 iSCSI and FCIP support . . . . . . . . . . . . . . . . . . . . . . . . . . . . . . . . . 540 5.2 Installing FM and DM . . . . . . . . . . . . . . . . . . . . . . . . . . . . . . . . . . . . . . . 541 5.3 Obtain the source files. . . . . . . . . . . . . . . . . . . . . . . . . . . . . . . . . . . . . . . 541 5.3.1 System requirements . . . . . . . . . . . . . . . . . . . . . . . . . . . . . . . . . . . 541 5.4 Obtaining current versions . . . . . . . . . . . . . . . . . . . . . . . . . . . . . . . . . . . 542 5.4.1 Setting up the initial parameters with the setup program . . . . . . . . 544 5.5 Updating the current FM version . . . . . . . . . . . . . . . . . . . . . . . . . . . . . . . 547 5.6 FM Server versus the bundled version . . . . . . . . . . . . . . . . . . . . . . . . . . 554 5.6.1 Licensing . . . . . . . . . . . . . . . . . . . . . . . . . . . . . . . . . . . . . . . . . . . . . 554 5.6.2 Advantages of FM Server over freeware . . . . . . . . . . . . . . . . . . . . 561 5.7 Device Manager . . . . . . . . . . . . . . . . . . . . . . . . . . . . . . . . . . . . . . . . . . . 562 5.8 Initial setup of the Cisco MDS 9000 products . . . . . . . . . . . . . . . . . . . . . 565 5.8.1 Preparing to configure the switch . . . . . . . . . . . . . . . . . . . . . . . . . . 565 5.8.2 Connecting to the switch via the serial port. . . . . . . . . . . . . . . . . . . 565 5.8.3 Setting up the initial parameters with the setup program . . . . . . . . 566 5.8.4 Installing the Cisco Fabric Manager and Device Manager . . . . . . . 569 5.9 Managing the Cisco SAN with the Fabric Manager. . . . . . . . . . . . . . . . . 574 5.9.1 Getting started. . . . . . . . . . . . . . . . . . . . . . . . . . . . . . . . . . . . . . . . . 574 5.9.2 User interface . . . . . . . . . . . . . . . . . . . . . . . . . . . . . . . . . . . . . . . . . 575 5.10 Managing zones and zone sets. . . . . . . . . . . . . . . . . . . . . . . . . . . . . . . 578 5.10.1 Creating aliases, zones and zone sets . . . . . . . . . . . . . . . . . . . . . 606 Glossary . . . . . . . . . . . . . . . . . . . . . . . . . . . . . . . . . . . . . . . . . . . . . . . . . . . . 617 Related publications . . . . . . . . . . . . . . . . . . . . . . . . . . . . . . . . . . . . . . . . . . 641 IBM Redbooks . . . . . . . . . . . . . . . . . . . . . . . . . . . . . . . . . . . . . . . . . . . . . . . . 641 Other resources . . . . . . . . . . . . . . . . . . . . . . . . . . . . . . . . . . . . . . . . . . . . 642 Referenced Web sites . . . . . . . . . . . . . . . . . . . . . . . . . . . . . . . . . . . . . . . . . . 642 How to get IBM Redbooks . . . . . . . . . . . . . . . . . . . . . . . . . . . . . . . . . . . . . . . 644 IBM Redbooks collections . . . . . . . . . . . . . . . . . . . . . . . . . . . . . . . . . . . . . 644 Index . . . . . . . . . . . . . . . . . . . . . . . . . . . . . . . . . . . . . . . . . . . . . . . . . . . . . . . 645 Contents xi xii Implementing an Open IBM SAN Figures 1-1 1-2 1-3 1-4 1-5 1-6 1-7 1-8 1-9 1-10 1-11 1-12 1-13 1-14 1-15 1-16 1-17 1-18 1-19 1-20 1-21 1-22 1-23 1-24 1-25 1-26 1-27 1-28 1-29 1-30 1-31 1-32 1-33 1-34 1-35 1-36 1-37 1-38 IBM TotalStorage Storage Switch L10 . . . . . . . . . . . . . . . . . . . . . . . . . . . 2 HyperTerminal configuration: Name session . . . . . . . . . . . . . . . . . . . . . . 4 HyperTerminal configuration: COM port settings . . . . . . . . . . . . . . . . . . . 5 Switch configuration: IP address change command . . . . . . . . . . . . . . . . 6 Switch configuration: IP address change continued . . . . . . . . . . . . . . . . 7 Switch configuration: IP address change confirmation . . . . . . . . . . . . . . 8 Switch configuration: Display new settings . . . . . . . . . . . . . . . . . . . . . . . 9 Web Manager: Storage Switch view . . . . . . . . . . . . . . . . . . . . . . . . . . . 10 Web Manager: Login confirmation . . . . . . . . . . . . . . . . . . . . . . . . . . . . . 11 Web Manager: New password . . . . . . . . . . . . . . . . . . . . . . . . . . . . . . . . 12 Web Manager: New password confirmation . . . . . . . . . . . . . . . . . . . . . 13 Web Manager: Switch name change . . . . . . . . . . . . . . . . . . . . . . . . . . . 14 Web Manager: Switch name change continued . . . . . . . . . . . . . . . . . . 15 Switch Configuration: General information . . . . . . . . . . . . . . . . . . . . . . 16 Switch Configuration: SNMP Trap Configuration . . . . . . . . . . . . . . . . . . 17 Switch Configuration: Thresholds . . . . . . . . . . . . . . . . . . . . . . . . . . . . . 18 Port Configuration: Smart Settings, main. . . . . . . . . . . . . . . . . . . . . . . . 19 Configuration: Smart Settings, expanded . . . . . . . . . . . . . . . . . . . . . . . 20 Custom Smart Setting: Create . . . . . . . . . . . . . . . . . . . . . . . . . . . . . . . . 23 Custom Smart Setting: Port properties . . . . . . . . . . . . . . . . . . . . . . . . . 24 One-Step Zoning page. . . . . . . . . . . . . . . . . . . . . . . . . . . . . . . . . . . . . . 25 One-Step Zoning page: Port selection . . . . . . . . . . . . . . . . . . . . . . . . . . 26 One-Step Zoning page: Port confirmation . . . . . . . . . . . . . . . . . . . . . . . 26 One-Step Zoning page: Zone activation . . . . . . . . . . . . . . . . . . . . . . . . 27 One-Step Zoning page: Adding device to multiple zones . . . . . . . . . . . 28 Automatic Trunking: Configure . . . . . . . . . . . . . . . . . . . . . . . . . . . . . . . 30 Automatic Trunking: Assign ports . . . . . . . . . . . . . . . . . . . . . . . . . . . . . 31 Configure Load Balancing . . . . . . . . . . . . . . . . . . . . . . . . . . . . . . . . . . . 32 Firmware upgrade: Available versions . . . . . . . . . . . . . . . . . . . . . . . . . . 33 Firmware upgrade: Browse firmware file . . . . . . . . . . . . . . . . . . . . . . . . 34 Firmware upgrade: Alternate Version . . . . . . . . . . . . . . . . . . . . . . . . . . 35 CLI: telnet session invocation . . . . . . . . . . . . . . . . . . . . . . . . . . . . . . . . 36 CLI: telnet session confirmation . . . . . . . . . . . . . . . . . . . . . . . . . . . . . . . 36 CLI: telnet session login . . . . . . . . . . . . . . . . . . . . . . . . . . . . . . . . . . . . . 37 Switch monitoring: Switch Information . . . . . . . . . . . . . . . . . . . . . . . . . . 38 Port: Information . . . . . . . . . . . . . . . . . . . . . . . . . . . . . . . . . . . . . . . . . . 40 Port: Utilization. . . . . . . . . . . . . . . . . . . . . . . . . . . . . . . . . . . . . . . . . . . . 41 Port Diagnostics . . . . . . . . . . . . . . . . . . . . . . . . . . . . . . . . . . . . . . . . . . . 42 © Copyright IBM Corp. 2000, 2001, 2002, 2003. All rights reserved. xiii 1-39 1-40 1-41 1-42 1-43 2-1 2-2 2-3 2-4 2-5 2-6 2-7 2-8 2-9 2-10 2-11 2-12 2-13 2-14 2-15 2-16 2-17 2-18 2-19 2-20 2-21 2-22 2-23 2-24 2-25 2-26 2-27 2-28 2-29 2-30 2-31 2-32 2-33 2-34 2-35 2-36 2-37 2-38 xiv Port Diagnostics: Advanced Functions . . . . . . . . . . . . . . . . . . . . . . . . . 44 Port Diagnostics: File upload . . . . . . . . . . . . . . . . . . . . . . . . . . . . . . . . . 44 Port Diagnostics: sysdump.log. . . . . . . . . . . . . . . . . . . . . . . . . . . . . . . . 45 Event Log. . . . . . . . . . . . . . . . . . . . . . . . . . . . . . . . . . . . . . . . . . . . . . . . 46 Event Log: Export . . . . . . . . . . . . . . . . . . . . . . . . . . . . . . . . . . . . . . . . . 47 2109-F16 switch. . . . . . . . . . . . . . . . . . . . . . . . . . . . . . . . . . . . . . . . . . . 56 IBM TotalStorage SAN Switch F16 faceplate . . . . . . . . . . . . . . . . . . . . 57 IBM TotalStorage SAN Switch F16 back panel . . . . . . . . . . . . . . . . . . . 57 2109-F32 switch. . . . . . . . . . . . . . . . . . . . . . . . . . . . . . . . . . . . . . . . . . . 58 IBM TotalStorage SAN Switch F32 faceplate . . . . . . . . . . . . . . . . . . . . 59 Rear components of the IBM TotalStorage SAN Switch F32 . . . . . . . . 60 View of H08 . . . . . . . . . . . . . . . . . . . . . . . . . . . . . . . . . . . . . . . . . . . . . . 61 View of H16 . . . . . . . . . . . . . . . . . . . . . . . . . . . . . . . . . . . . . . . . . . . . . . 61 2109-M12 switch . . . . . . . . . . . . . . . . . . . . . . . . . . . . . . . . . . . . . . . . . . 63 Port side view of the M12. . . . . . . . . . . . . . . . . . . . . . . . . . . . . . . . . . . . 67 Blower side view . . . . . . . . . . . . . . . . . . . . . . . . . . . . . . . . . . . . . . . . . . 69 Logical Switch layout . . . . . . . . . . . . . . . . . . . . . . . . . . . . . . . . . . . . . . . 70 Physical port numbering . . . . . . . . . . . . . . . . . . . . . . . . . . . . . . . . . . . . 70 Physical port location to area numbering cross reference . . . . . . . . . . . 72 2109-M14 Switch . . . . . . . . . . . . . . . . . . . . . . . . . . . . . . . . . . . . . . . . . . 73 M14 Port Side View . . . . . . . . . . . . . . . . . . . . . . . . . . . . . . . . . . . . . . . . 77 M14 Blower Side View . . . . . . . . . . . . . . . . . . . . . . . . . . . . . . . . . . . . . . 79 M14 Physical Port Numbering . . . . . . . . . . . . . . . . . . . . . . . . . . . . . . . . 80 B32 Front . . . . . . . . . . . . . . . . . . . . . . . . . . . . . . . . . . . . . . . . . . . . . . . . 81 B32 Port Side View . . . . . . . . . . . . . . . . . . . . . . . . . . . . . . . . . . . . . . . . 82 B32 Port Numbering . . . . . . . . . . . . . . . . . . . . . . . . . . . . . . . . . . . . . . . 83 B32 Non port side . . . . . . . . . . . . . . . . . . . . . . . . . . . . . . . . . . . . . . . . . 83 Increased Trunking capability . . . . . . . . . . . . . . . . . . . . . . . . . . . . . . . . 85 Dynamic Path Selection example . . . . . . . . . . . . . . . . . . . . . . . . . . . . . 85 HyperTerm COM1 properties window . . . . . . . . . . . . . . . . . . . . . . . . . . 89 Setting the Ethernet IP address . . . . . . . . . . . . . . . . . . . . . . . . . . . . . . . 91 Telnet login to Logical switch 1 (slots 7-10) . . . . . . . . . . . . . . . . . . . . . . 95 Configuring Domain ID from Telnet . . . . . . . . . . . . . . . . . . . . . . . . . . . . 96 Optional modem line and data connections . . . . . . . . . . . . . . . . . . . . . . 97 Setting the time and date with telnet . . . . . . . . . . . . . . . . . . . . . . . . . . 102 B32 Web View . . . . . . . . . . . . . . . . . . . . . . . . . . . . . . . . . . . . . . . . . . . 104 Fabric, Topology, Name Server and Zone Admin buttons . . . . . . . . . . 104 M12 Fabric Events . . . . . . . . . . . . . . . . . . . . . . . . . . . . . . . . . . . . . . . . 105 Fabric Topology report . . . . . . . . . . . . . . . . . . . . . . . . . . . . . . . . . . . . . 106 Fabric Topology report - continued . . . . . . . . . . . . . . . . . . . . . . . . . . . 107 B32 Name Server table part 1 . . . . . . . . . . . . . . . . . . . . . . . . . . . . . . . 108 B32 Name Server details . . . . . . . . . . . . . . . . . . . . . . . . . . . . . . . . . . . 109 B32 Name Server table part 2 . . . . . . . . . . . . . . . . . . . . . . . . . . . . . . . 110 Implementing an Open IBM SAN 2-39 2-40 2-41 2-42 2-43 2-44 2-45 2-46 2-47 2-48 2-49 2-50 2-51 2-52 2-53 2-54 2-55 2-56 2-57 2-58 2-59 2-60 2-61 2-62 2-63 2-64 2-65 2-66 2-67 2-68 2-69 2-70 2-71 2-72 2-73 2-74 2-75 2-76 2-77 2-78 2-79 2-80 2-81 B32 Name Server table part 3 . . . . . . . . . . . . . . . . . . . . . . . . . . . . . . . 111 Zone admin button . . . . . . . . . . . . . . . . . . . . . . . . . . . . . . . . . . . . . . . . 112 Authentication . . . . . . . . . . . . . . . . . . . . . . . . . . . . . . . . . . . . . . . . . . . 112 B32 Port Zoning Initial view . . . . . . . . . . . . . . . . . . . . . . . . . . . . . . . . . 113 B32 Create new alias . . . . . . . . . . . . . . . . . . . . . . . . . . . . . . . . . . . . . . 115 Alias Administration . . . . . . . . . . . . . . . . . . . . . . . . . . . . . . . . . . . . . . . 116 M12 Zoning - Slot/Port area number . . . . . . . . . . . . . . . . . . . . . . . . . . 119 B32 Adding a member to a Zone . . . . . . . . . . . . . . . . . . . . . . . . . . . . . 120 QuickLoop zoning tab . . . . . . . . . . . . . . . . . . . . . . . . . . . . . . . . . . . . . 122 Fabric Assist zoning tab . . . . . . . . . . . . . . . . . . . . . . . . . . . . . . . . . . . . 124 B32 Save config only . . . . . . . . . . . . . . . . . . . . . . . . . . . . . . . . . . . . . . 126 Refresh Fabric prompt . . . . . . . . . . . . . . . . . . . . . . . . . . . . . . . . . . . . . 127 Sample of analyze config output . . . . . . . . . . . . . . . . . . . . . . . . . . . . . 128 B32 Actions Pulldown menu . . . . . . . . . . . . . . . . . . . . . . . . . . . . . . . . 129 B32 Select config to enable prompt . . . . . . . . . . . . . . . . . . . . . . . . . . . 129 B32 Config Enable warning . . . . . . . . . . . . . . . . . . . . . . . . . . . . . . . . . 130 B32 Enable zoning config successfully completed . . . . . . . . . . . . . . . 131 Zoning implementation — E_Ports and Zoning . . . . . . . . . . . . . . . . . . 132 B32 Switch View from Web Tools . . . . . . . . . . . . . . . . . . . . . . . . . . . . 133 Web Tools M12 Switch View . . . . . . . . . . . . . . . . . . . . . . . . . . . . . . . . 134 B32 Displaying port information . . . . . . . . . . . . . . . . . . . . . . . . . . . . . . 135 B32 Port details . . . . . . . . . . . . . . . . . . . . . . . . . . . . . . . . . . . . . . . . . . 135 2109-M12 Switch view . . . . . . . . . . . . . . . . . . . . . . . . . . . . . . . . . . . . . 136 Port detail view. . . . . . . . . . . . . . . . . . . . . . . . . . . . . . . . . . . . . . . . . . . 137 M12 Display Switch status . . . . . . . . . . . . . . . . . . . . . . . . . . . . . . . . . . 138 B32 Switch Status . . . . . . . . . . . . . . . . . . . . . . . . . . . . . . . . . . . . . . . . 138 B32 Status Port Details . . . . . . . . . . . . . . . . . . . . . . . . . . . . . . . . . . . . 139 B32 Telnet switchstatusshow . . . . . . . . . . . . . . . . . 140 M12 High availability Synchronize services . . . . . . . . . . . . . . . . . . . . . 141 Warning Synchronizing services . . . . . . . . . . . . . . . . . . . . . . . . . . . . . 142 M12 High availability CP status . . . . . . . . . . . . . . . . . . . . . . . . . . . . . . 143 M12 failover warning . . . . . . . . . . . . . . . . . . . . . . . . . . . . . . . . . . . . . . 144 M12 failover in progress. . . . . . . . . . . . . . . . . . . . . . . . . . . . . . . . . . . . 145 M12 failover complete . . . . . . . . . . . . . . . . . . . . . . . . . . . . . . . . . . . . . 145 M12 power status. . . . . . . . . . . . . . . . . . . . . . . . . . . . . . . . . . . . . . . . . 146 M12 Fan details . . . . . . . . . . . . . . . . . . . . . . . . . . . . . . . . . . . . . . . . . . 147 M12 fanshow command . . . . . . . . . . . . . . . . . . . . . . . . . . . . . . . . . . . . 147 M12 Temperature Show window . . . . . . . . . . . . . . . . . . . . . . . . . . . . . 148 M12 tempshow command . . . . . . . . . . . . . . . . . . . . . . . . . . . . . . . . . . 148 B32 Admin Tools from Web Tools . . . . . . . . . . . . . . . . . . . . . . . . . . . . 149 M12 Display Admin tools . . . . . . . . . . . . . . . . . . . . . . . . . . . . . . . . . . . 149 B32 Administration window layout . . . . . . . . . . . . . . . . . . . . . . . . . . . . 150 B32 Switch Settings View . . . . . . . . . . . . . . . . . . . . . . . . . . . . . . . . . . 151 Figures xv 2-82 2-83 2-84 2-85 2-86 2-87 2-88 2-89 2-90 2-91 2-92 2-93 2-94 2-95 2-96 2-97 2-98 2-99 2-100 2-101 2-102 2-103 2-104 2-105 2-106 2-107 2-108 2-109 2-110 2-111 2-112 2-113 2-114 2-115 2-116 2-117 2-118 2-119 2-120 2-121 2-122 2-123 2-124 xvi B32 Switch report. . . . . . . . . . . . . . . . . . . . . . . . . . . . . . . . . . . . . . . . . 153 B32 Network config panel . . . . . . . . . . . . . . . . . . . . . . . . . . . . . . . . . . 154 Admin View — Network Config . . . . . . . . . . . . . . . . . . . . . . . . . . . . . . 156 M12 download firmware Web Tools. . . . . . . . . . . . . . . . . . . . . . . . . . . 157 M12 confirm firmware download . . . . . . . . . . . . . . . . . . . . . . . . . . . . . 158 M12 firmware download upload completed . . . . . . . . . . . . . . . . . . . . . 158 SNMP Tab . . . . . . . . . . . . . . . . . . . . . . . . . . . . . . . . . . . . . . . . . . . . . . 159 License Keys . . . . . . . . . . . . . . . . . . . . . . . . . . . . . . . . . . . . . . . . . . . . 162 licenseShow CLI output . . . . . . . . . . . . . . . . . . . . . . . . . . . . . . . . . . . . 163 M12 Port Settings Tab . . . . . . . . . . . . . . . . . . . . . . . . . . . . . . . . . . . . . 164 User Account Information . . . . . . . . . . . . . . . . . . . . . . . . . . . . . . . . . . 166 Add new user . . . . . . . . . . . . . . . . . . . . . . . . . . . . . . . . . . . . . . . . . . . . 167 Modify User account status . . . . . . . . . . . . . . . . . . . . . . . . . . . . . . . . . 168 Change password window . . . . . . . . . . . . . . . . . . . . . . . . . . . . . . . . . . 169 Confirm changes to User accounts . . . . . . . . . . . . . . . . . . . . . . . . . . . 169 User account changes report window . . . . . . . . . . . . . . . . . . . . . . . . . 170 B32 Configure tab . . . . . . . . . . . . . . . . . . . . . . . . . . . . . . . . . . . . . . . . 171 B32 Configure tab to upload config file . . . . . . . . . . . . . . . . . . . . . . . . 174 Confirm configuration upload . . . . . . . . . . . . . . . . . . . . . . . . . . . . . . . . 175 Routing tab. . . . . . . . . . . . . . . . . . . . . . . . . . . . . . . . . . . . . . . . . . . . . . 176 Routing - Static Route . . . . . . . . . . . . . . . . . . . . . . . . . . . . . . . . . . . . . 178 Routing link cost. . . . . . . . . . . . . . . . . . . . . . . . . . . . . . . . . . . . . . . . . . 179 M12 Extended fabric tab . . . . . . . . . . . . . . . . . . . . . . . . . . . . . . . . . . . 180 AAA . . . . . . . . . . . . . . . . . . . . . . . . . . . . . . . . . . . . . . . . . . . . . . . . . . . 182 Add RADIUS configuration . . . . . . . . . . . . . . . . . . . . . . . . . . . . . . . . . 183 Trace . . . . . . . . . . . . . . . . . . . . . . . . . . . . . . . . . . . . . . . . . . . . . . . . . . 185 FICON CUP tab1 . . . . . . . . . . . . . . . . . . . . . . . . . . . . . . . . . . . . . . . . . 187 FICON tab Configure CUP connectivity . . . . . . . . . . . . . . . . . . . . . . . . 188 Enable trunking on port . . . . . . . . . . . . . . . . . . . . . . . . . . . . . . . . . . . . 189 M12 Go to Telnet Session . . . . . . . . . . . . . . . . . . . . . . . . . . . . . . . . . . 193 B32 Go to Telnet session. . . . . . . . . . . . . . . . . . . . . . . . . . . . . . . . . . . 193 M12 Telnet Session . . . . . . . . . . . . . . . . . . . . . . . . . . . . . . . . . . . . . . . 193 M12 Performance graphs . . . . . . . . . . . . . . . . . . . . . . . . . . . . . . . . . . 194 M12 Performance Monitoring Default Graph . . . . . . . . . . . . . . . . . . . . 196 M12 Action Menu Selection . . . . . . . . . . . . . . . . . . . . . . . . . . . . . . . . . 197 Display canvas configuration . . . . . . . . . . . . . . . . . . . . . . . . . . . . . . . . 198 Save current canvas selection . . . . . . . . . . . . . . . . . . . . . . . . . . . . . . . 199 Resource Usage Display window . . . . . . . . . . . . . . . . . . . . . . . . . . . . 200 Performance Graphs menu . . . . . . . . . . . . . . . . . . . . . . . . . . . . . . . . . 201 Basic Monitoring with all functions selected. . . . . . . . . . . . . . . . . . . . . 202 Graphs additional options . . . . . . . . . . . . . . . . . . . . . . . . . . . . . . . . . . 203 Port throughput graph setup . . . . . . . . . . . . . . . . . . . . . . . . . . . . . . . . 204 Port Throughput graph . . . . . . . . . . . . . . . . . . . . . . . . . . . . . . . . . . . . . 205 Implementing an Open IBM SAN 2-125 2-126 2-127 2-128 2-129 2-130 2-131 2-132 2-133 2-134 2-135 2-136 2-137 2-138 2-139 2-140 2-141 2-142 2-143 2-144 2-145 2-146 2-147 2-148 2-149 2-150 2-151 2-152 2-153 2-154 2-155 2-156 2-157 2-158 2-159 2-160 2-161 2-162 2-163 2-164 2-165 2-166 2-167 Advanced monitoring options. . . . . . . . . . . . . . . . . . . . . . . . . . . . . . . . 207 Advanced monitoring range of options . . . . . . . . . . . . . . . . . . . . . . . . 208 SID/DID performance setup . . . . . . . . . . . . . . . . . . . . . . . . . . . . . . . . . 210 SID/DID graph example . . . . . . . . . . . . . . . . . . . . . . . . . . . . . . . . . . . . 211 Proper placement of SID/DID performance monitors . . . . . . . . . . . . . 212 SCSI read/write LUN per port setup . . . . . . . . . . . . . . . . . . . . . . . . . . 213 SCSI Read/Write on a LUN per port graph . . . . . . . . . . . . . . . . . . . . . 214 SCSI versus IP traffic graph. . . . . . . . . . . . . . . . . . . . . . . . . . . . . . . . . 215 AL_PA error graph setup window . . . . . . . . . . . . . . . . . . . . . . . . . . . . 216 AL_PA error graph . . . . . . . . . . . . . . . . . . . . . . . . . . . . . . . . . . . . . . . . 217 AL_PA CRC error count display . . . . . . . . . . . . . . . . . . . . . . . . . . . . . 218 Clear AL_PA CRC error count . . . . . . . . . . . . . . . . . . . . . . . . . . . . . . . 218 Setting end-to-end monitor on a port . . . . . . . . . . . . . . . . . . . . . . . . . . 219 Add an end-to-end monitor to switch2 port 3 . . . . . . . . . . . . . . . . . . . . 220 Mask positions for end-to-end monitors . . . . . . . . . . . . . . . . . . . . . . . . 221 Set a mask on switch2, port 3 . . . . . . . . . . . . . . . . . . . . . . . . . . . . . . . 222 Displaying the end-to-end mask of a port . . . . . . . . . . . . . . . . . . . . . . 222 Displaying end-to-end monitor using perfShowEEMonitor . . . . . . . . . 223 Displaying end-to-end monitor with a interval . . . . . . . . . . . . . . . . . . . 223 Deleting end-to-end monitors. . . . . . . . . . . . . . . . . . . . . . . . . . . . . . . . 224 Adding filter monitors to a port . . . . . . . . . . . . . . . . . . . . . . . . . . . . . . . 226 Displaying filter monitor . . . . . . . . . . . . . . . . . . . . . . . . . . . . . . . . . . . . 227 M12 Go to Fabric Watch . . . . . . . . . . . . . . . . . . . . . . . . . . . . . . . . . . . 231 Fabric watch initial view . . . . . . . . . . . . . . . . . . . . . . . . . . . . . . . . . . . . 231 Fabric watch alarm notifications. . . . . . . . . . . . . . . . . . . . . . . . . . . . . . 232 Configure Thresholds. . . . . . . . . . . . . . . . . . . . . . . . . . . . . . . . . . . . . . 233 Update/Change view warning . . . . . . . . . . . . . . . . . . . . . . . . . . . . . . . 234 Environmental Thresholds . . . . . . . . . . . . . . . . . . . . . . . . . . . . . . . . . . 235 SFP thresholds . . . . . . . . . . . . . . . . . . . . . . . . . . . . . . . . . . . . . . . . . . 236 Port Thresholds . . . . . . . . . . . . . . . . . . . . . . . . . . . . . . . . . . . . . . . . . . 238 Thresholds Tab for End-to-End . . . . . . . . . . . . . . . . . . . . . . . . . . . . . . 239 Thresholds tab with Filter based class . . . . . . . . . . . . . . . . . . . . . . . . . 240 Configuration report . . . . . . . . . . . . . . . . . . . . . . . . . . . . . . . . . . . . . . . 241 Checking the switch status . . . . . . . . . . . . . . . . . . . . . . . . . . . . . . . . . 241 Changing the default setting . . . . . . . . . . . . . . . . . . . . . . . . . . . . . . . . 242 Setting up email notification . . . . . . . . . . . . . . . . . . . . . . . . . . . . . . . . . 244 M12 Start Beaconing . . . . . . . . . . . . . . . . . . . . . . . . . . . . . . . . . . . . . . 245 Two separate SAN fabrics . . . . . . . . . . . . . . . . . . . . . . . . . . . . . . . . . . 246 A merged fabric . . . . . . . . . . . . . . . . . . . . . . . . . . . . . . . . . . . . . . . . . . 247 Domain ID segmentation error log . . . . . . . . . . . . . . . . . . . . . . . . . . . . 248 Zone conflict error log . . . . . . . . . . . . . . . . . . . . . . . . . . . . . . . . . . . . . 249 Clearing all zoning information. . . . . . . . . . . . . . . . . . . . . . . . . . . . . . . 250 Fabric parameter segmentation error log. . . . . . . . . . . . . . . . . . . . . . . 250 Figures xvii 2-168 2-169 2-170 2-171 2-172 2-173 2-174 2-175 2-176 2-177 2-178 2-179 2-180 2-181 2-182 2-183 2-184 2-185 2-186 2-187 2-188 2-189 2-190 2-191 2-192 2-193 2-194 2-195 2-196 2-197 2-198 2-199 2-200 2-201 2-202 2-203 2-204 2-205 2-206 2-207 2-208 2-209 2-210 xviii IBM product support Web page . . . . . . . . . . . . . . . . . . . . . . . . . . . . . . 252 Redirect to Brocade confirmation. . . . . . . . . . . . . . . . . . . . . . . . . . . . . 253 Brocade Web Firmware levels download list . . . . . . . . . . . . . . . . . . . . 254 B32 Firmware upload . . . . . . . . . . . . . . . . . . . . . . . . . . . . . . . . . . . . . . 258 Confirm firmware download . . . . . . . . . . . . . . . . . . . . . . . . . . . . . . . . . 259 M12 Firmware download progress. . . . . . . . . . . . . . . . . . . . . . . . . . . . 260 M12 Web Tools firmware upload completed . . . . . . . . . . . . . . . . . . . . 261 Feature Keys Web Page for M12. . . . . . . . . . . . . . . . . . . . . . . . . . . . . 271 Field Upgrade Process Web Page. . . . . . . . . . . . . . . . . . . . . . . . . . . . 272 Download Windows security certificate . . . . . . . . . . . . . . . . . . . . . . . . 273 PKI Cert Utility menu . . . . . . . . . . . . . . . . . . . . . . . . . . . . . . . . . . . . . . 274 PKI CSR file name . . . . . . . . . . . . . . . . . . . . . . . . . . . . . . . . . . . . . . . . 275 PKI Certificate retrieval status . . . . . . . . . . . . . . . . . . . . . . . . . . . . . . . 275 Brocade request Certificate confirmation . . . . . . . . . . . . . . . . . . . . . . . 276 IP address input . . . . . . . . . . . . . . . . . . . . . . . . . . . . . . . . . . . . . . . . . . 277 Target fabric selection . . . . . . . . . . . . . . . . . . . . . . . . . . . . . . . . . . . . . 278 Certificate installation success . . . . . . . . . . . . . . . . . . . . . . . . . . . . . . . 278 Secure Telnet Install . . . . . . . . . . . . . . . . . . . . . . . . . . . . . . . . . . . . . . 280 Secure Telnet client configuration . . . . . . . . . . . . . . . . . . . . . . . . . . . . 281 Secure Telnet session . . . . . . . . . . . . . . . . . . . . . . . . . . . . . . . . . . . . . 281 The secModeEnable command . . . . . . . . . . . . . . . . . . . . . . . . . . . . . . 283 The secPolicyShow output. . . . . . . . . . . . . . . . . . . . . . . . . . . . . . . . . . 286 Pointer to Fabric Manager download . . . . . . . . . . . . . . . . . . . . . . . . . . 290 Brocade download Fabric manager . . . . . . . . . . . . . . . . . . . . . . . . . . . 290 Fabric Manager address window . . . . . . . . . . . . . . . . . . . . . . . . . . . . . 292 Fabric manager view of multiple switches . . . . . . . . . . . . . . . . . . . . . . 293 Applying filter to SAN elements display . . . . . . . . . . . . . . . . . . . . . . . . 294 Fabric Detail . . . . . . . . . . . . . . . . . . . . . . . . . . . . . . . . . . . . . . . . . . . . . 295 File Transfer options . . . . . . . . . . . . . . . . . . . . . . . . . . . . . . . . . . . . . . 296 Edit switch groups . . . . . . . . . . . . . . . . . . . . . . . . . . . . . . . . . . . . . . . . 297 Creating a new switch group . . . . . . . . . . . . . . . . . . . . . . . . . . . . . . . . 298 Create group . . . . . . . . . . . . . . . . . . . . . . . . . . . . . . . . . . . . . . . . . . . . 298 Viewing new groups by switch view . . . . . . . . . . . . . . . . . . . . . . . . . . . 299 Fabric login button . . . . . . . . . . . . . . . . . . . . . . . . . . . . . . . . . . . . . . . . 300 Fabric Login . . . . . . . . . . . . . . . . . . . . . . . . . . . . . . . . . . . . . . . . . . . . . 301 Download firmware to switches . . . . . . . . . . . . . . . . . . . . . . . . . . . . . . 302 Download firmware window . . . . . . . . . . . . . . . . . . . . . . . . . . . . . . . . . 303 Creating a reboot group . . . . . . . . . . . . . . . . . . . . . . . . . . . . . . . . . . . . 304 Create reboot group options window . . . . . . . . . . . . . . . . . . . . . . . . . . 305 Add switches to reboot group . . . . . . . . . . . . . . . . . . . . . . . . . . . . . . . 306 Sequenced reboot button. . . . . . . . . . . . . . . . . . . . . . . . . . . . . . . . . . . 307 Rebooting switches . . . . . . . . . . . . . . . . . . . . . . . . . . . . . . . . . . . . . . . 308 Launch the Fabric Merge window . . . . . . . . . . . . . . . . . . . . . . . . . . . . 309 Implementing an Open IBM SAN 2-211 2-212 2-213 2-214 2-215 2-216 2-217 2-218 2-219 2-220 2-221 2-222 2-223 2-224 2-225 2-226 2-227 2-228 2-229 2-230 2-231 2-232 2-233 3-1 3-2 3-3 3-4 3-5 3-6 3-7 3-8 3-9 3-10 3-11 3-12 3-13 3-14 3-15 3-16 3-17 3-18 3-19 3-20 Choose two fabric to merge . . . . . . . . . . . . . . . . . . . . . . . . . . . . . . . . . 309 Merge check failure . . . . . . . . . . . . . . . . . . . . . . . . . . . . . . . . . . . . . . . 310 Zone merge manager prompt . . . . . . . . . . . . . . . . . . . . . . . . . . . . . . . 310 Zone Merge window. . . . . . . . . . . . . . . . . . . . . . . . . . . . . . . . . . . . . . . 311 Zone merge conflict removed . . . . . . . . . . . . . . . . . . . . . . . . . . . . . . . 312 Merged zone window . . . . . . . . . . . . . . . . . . . . . . . . . . . . . . . . . . . . . . 313 Save Baseline selection window . . . . . . . . . . . . . . . . . . . . . . . . . . . . . 314 Save Baseline — Switch selection. . . . . . . . . . . . . . . . . . . . . . . . . . . . 315 Save Baseline — Parameter Selection . . . . . . . . . . . . . . . . . . . . . . . . 316 Edit parameter key . . . . . . . . . . . . . . . . . . . . . . . . . . . . . . . . . . . . . . . . 316 Choose a location for configuration file . . . . . . . . . . . . . . . . . . . . . . . . 317 Select configuration file to compare/download . . . . . . . . . . . . . . . . . . 318 Compare download from file — Target Switch Selection. . . . . . . . . . . 318 Compare/Download from file — Comparison . . . . . . . . . . . . . . . . . . . 319 Apply baseline to the switches . . . . . . . . . . . . . . . . . . . . . . . . . . . . . . . 319 License administration — Switch tab . . . . . . . . . . . . . . . . . . . . . . . . . . 320 License Administration — File tab . . . . . . . . . . . . . . . . . . . . . . . . . . . . 321 ISL Checking event entry . . . . . . . . . . . . . . . . . . . . . . . . . . . . . . . . . . . 322 Selecting Security management . . . . . . . . . . . . . . . . . . . . . . . . . . . . . 323 Password error message . . . . . . . . . . . . . . . . . . . . . . . . . . . . . . . . . . . 324 Security Policy management . . . . . . . . . . . . . . . . . . . . . . . . . . . . . . . . 324 QuickLoop tab . . . . . . . . . . . . . . . . . . . . . . . . . . . . . . . . . . . . . . . . . . . 326 Trunking Information panel . . . . . . . . . . . . . . . . . . . . . . . . . . . . . . . . . 330 McDATA Sphereon 4300 Fabric Switch . . . . . . . . . . . . . . . . . . . . . . . 334 McDATA Sphereon 4500 Fabric Switch . . . . . . . . . . . . . . . . . . . . . . . 336 McDATA Sphereon 3232 Fabric Switch switch . . . . . . . . . . . . . . . . . . 337 McDATA Intrepid 6140 Director . . . . . . . . . . . . . . . . . . . . . . . . . . . . . . 340 ED-SAN140M port map (front). . . . . . . . . . . . . . . . . . . . . . . . . . . . . . . 342 ED-SAN140M port map (rear) . . . . . . . . . . . . . . . . . . . . . . . . . . . . . . . 342 McDATA Intrepid 6140 Director hardware (front view) . . . . . . . . . . . . 345 McDATA Intrepid 6140 Director hardware (rear view) . . . . . . . . . . . . . 346 McDATA Intrepid 6064 Director . . . . . . . . . . . . . . . . . . . . . . . . . . . . . . 348 ED-6064 port map . . . . . . . . . . . . . . . . . . . . . . . . . . . . . . . . . . . . . . . . 349 McDATA Intrepid 6064 Director hardware (front view) . . . . . . . . . . . . 351 McDATA Intrepid 6064 Director hardware (rear view) . . . . . . . . . . . . . 353 The Fabricenter . . . . . . . . . . . . . . . . . . . . . . . . . . . . . . . . . . . . . . . . . . 356 Suggested IBM TotalStorage SAN m-type family network setup. . . . . 357 ED-6064 hardware view from the SANPilot Web interface . . . . . . . . . 360 OSMS enablement via SANpilot . . . . . . . . . . . . . . . . . . . . . . . . . . . . . 361 EFCM 8.0 main window . . . . . . . . . . . . . . . . . . . . . . . . . . . . . . . . . . . . 363 Start page for remote EFC Manager client installation . . . . . . . . . . . . 365 Start page for remote EFC Manager client installation continued . . . . 366 Windows client download. . . . . . . . . . . . . . . . . . . . . . . . . . . . . . . . . . . 367 Figures xix 3-21 3-22 3-23 3-24 3-25 3-26 3-27 3-28 3-29 3-30 3-31 3-32 3-33 3-34 3-35 3-36 3-37 3-38 3-39 3-40 3-41 3-42 3-43 3-44 3-45 3-46 3-47 3-48 3-49 3-50 3-51 3-52 3-53 3-54 3-55 3-56 3-57 3-58 3-59 3-60 3-61 3-62 3-63 xx Start download prompt. . . . . . . . . . . . . . . . . . . . . . . . . . . . . . . . . . . . . 367 EFC Manager client installation . . . . . . . . . . . . . . . . . . . . . . . . . . . . . . 368 EFC Manager client installation continued. . . . . . . . . . . . . . . . . . . . . . 369 COM1 properties . . . . . . . . . . . . . . . . . . . . . . . . . . . . . . . . . . . . . . . . . 371 IP address configuration procedure . . . . . . . . . . . . . . . . . . . . . . . . . . . 372 Logging in to the EFC Manager on the EFC Server . . . . . . . . . . . . . . 373 EFC Manager workstation icon . . . . . . . . . . . . . . . . . . . . . . . . . . . . . . 373 Remote login in to the EFC Manager. . . . . . . . . . . . . . . . . . . . . . . . . . 374 EFC Manager, Product View, no switches defined . . . . . . . . . . . . . . . 375 EFC Manager, Product View . . . . . . . . . . . . . . . . . . . . . . . . . . . . . . . . 376 EFC Manager, Configure Users, New User . . . . . . . . . . . . . . . . . . . . . 377 User groups . . . . . . . . . . . . . . . . . . . . . . . . . . . . . . . . . . . . . . . . . . . . . 378 EFC Manager, Configuring Users, Modify User. . . . . . . . . . . . . . . . . . 379 EFC Manager, Product View, no switches defined . . . . . . . . . . . . . . . 380 EFC Manager, Discover Setup... . . . . . . . . . . . . . . . . . . . . . . . . . . . . . 381 Discover Setup screen . . . . . . . . . . . . . . . . . . . . . . . . . . . . . . . . . . . . . 382 Defining new ED-6064 with its IP address . . . . . . . . . . . . . . . . . . . . . . 383 Adding device to Selected Addresses . . . . . . . . . . . . . . . . . . . . . . . . . 383 EFC Manager, new SAN140M icon . . . . . . . . . . . . . . . . . . . . . . . . . . . 384 Right click director icon . . . . . . . . . . . . . . . . . . . . . . . . . . . . . . . . . . . . 385 Director Properties . . . . . . . . . . . . . . . . . . . . . . . . . . . . . . . . . . . . . . . . 386 EFC Manager, port name Properties . . . . . . . . . . . . . . . . . . . . . . . . . . 387 EFC Manager, port Properties, assigning nickname . . . . . . . . . . . . . . 388 Configure Zoning, Label With Nickname . . . . . . . . . . . . . . . . . . . . . . . 389 Element Manager IBM TotalStorage SAN32M Hardware View . . . . . . 391 Element Manager SAN140M: Hardware View . . . . . . . . . . . . . . . . . . . 392 Element Manager SAN140M: Port card view and properties . . . . . . . 393 SAN140M port card viewing and configuration options . . . . . . . . . . . . 394 Element Manager SAN140M: Back to Hardware View . . . . . . . . . . . . 394 Element Manager SAN140M: Configure Identification . . . . . . . . . . . . 395 SAN140M Hardware View changed director information. . . . . . . . . . . 396 Element Manager SAN140M: Configure Management Style. . . . . . . . 397 Element Manager SAN140M: Configure Operating Mode Open Fabric398 Element Manager SAN140M: Configure Ports . . . . . . . . . . . . . . . . . . 399 Element Manager SAN140M: Configure Ports port type . . . . . . . . . . . 400 Element Manager: LIN log . . . . . . . . . . . . . . . . . . . . . . . . . . . . . . . . . . 401 Element Manager SAN140M: Port List View Port Properties . . . . . . . 402 Element Manager SAN140M: Set Online State . . . . . . . . . . . . . . . . . . 403 Element Manager SAN140M: Set Online State continued . . . . . . . . . 403 Element Manager SAN140M: Configure Operating Parameters . . . . . 404 Configure Preferred Domain ID . . . . . . . . . . . . . . . . . . . . . . . . . . . . . . 405 Configure ES-4500 Identification from EFC Element Manager . . . . . . 406 ES-4500 Sphereon Switch icon in the EFC Element Manager . . . . . . 406 Implementing an Open IBM SAN 3-64 3-65 3-66 3-67 3-68 3-69 3-70 3-71 3-72 3-73 3-74 3-75 3-76 3-77 3-78 3-79 3-80 3-81 3-82 3-83 3-84 3-85 3-86 3-87 3-88 3-89 3-90 3-91 3-92 3-93 3-94 3-95 3-96 3-97 3-98 3-99 3-100 3-101 3-102 3-103 3-104 3-105 3-106 ES-4500 switch front and rear view . . . . . . . . . . . . . . . . . . . . . . . . . . . 407 ES-4500 Operating Parameters menu. . . . . . . . . . . . . . . . . . . . . . . . . 408 Configure Fabric Parameters menu . . . . . . . . . . . . . . . . . . . . . . . . . . . 409 Configure Switch Parameters menu . . . . . . . . . . . . . . . . . . . . . . . . . . 409 ES-4500 port configuration options . . . . . . . . . . . . . . . . . . . . . . . . . . . 411 Port list menu . . . . . . . . . . . . . . . . . . . . . . . . . . . . . . . . . . . . . . . . . . . . 412 Port # 5 is Online as an FL_Port type. . . . . . . . . . . . . . . . . . . . . . . . . . 413 Node List display of tape device . . . . . . . . . . . . . . . . . . . . . . . . . . . . . 414 EFCM indicating attention required . . . . . . . . . . . . . . . . . . . . . . . . . . . 416 Attention indicators show a failed power supply module . . . . . . . . . . . 417 Maintenance log indicates problem . . . . . . . . . . . . . . . . . . . . . . . . . . . 418 Product icon changed to normal state . . . . . . . . . . . . . . . . . . . . . . . . . 419 Relationship of zone sets, zones, the default zone and node ports. . . 424 EFC Manager fabric view. . . . . . . . . . . . . . . . . . . . . . . . . . . . . . . . . . . 426 Initiating the Zoning Dialog Box . . . . . . . . . . . . . . . . . . . . . . . . . . . . . . 427 Zoning Dialog Box . . . . . . . . . . . . . . . . . . . . . . . . . . . . . . . . . . . . . . . . 428 Zoning Dialog Box: Zone creation . . . . . . . . . . . . . . . . . . . . . . . . . . . . 429 Zoning Dialog Box: Fabric choice . . . . . . . . . . . . . . . . . . . . . . . . . . . . 430 Zoning Dialog Box: Label With Nickname . . . . . . . . . . . . . . . . . . . . . . 431 Zoning Dialog Box: Adding members to zone . . . . . . . . . . . . . . . . . . . 432 Zoning Dialog Box: Zone Set creation . . . . . . . . . . . . . . . . . . . . . . . . . 433 Zoning Dialog Box: Adding zone to zone set . . . . . . . . . . . . . . . . . . . . 434 Zone set activation. . . . . . . . . . . . . . . . . . . . . . . . . . . . . . . . . . . . . . . . 435 Zone set activation: Summary and detail . . . . . . . . . . . . . . . . . . . . . . . 436 Zone set activation: Confirmation . . . . . . . . . . . . . . . . . . . . . . . . . . . . 436 Zoning Dialog Box: Zone set activated . . . . . . . . . . . . . . . . . . . . . . . . 437 Adding zone to existing zone set . . . . . . . . . . . . . . . . . . . . . . . . . . . . . 438 Adding zone to existing zone set: Confirmation . . . . . . . . . . . . . . . . . . 439 Modifying zone sets: Default zone . . . . . . . . . . . . . . . . . . . . . . . . . . . . 440 LVM mirroring using the SAN . . . . . . . . . . . . . . . . . . . . . . . . . . . . . . . 442 Using two independent fabrics for high availability . . . . . . . . . . . . . . . 443 Our zoned multi switch fabric . . . . . . . . . . . . . . . . . . . . . . . . . . . . . . . . 444 EFC Manager: with two managed switches. . . . . . . . . . . . . . . . . . . . . 446 Element Manager: Configure Operating Parameters, Fabric. . . . . . . . 447 Element Manager: Configure Operating Parameters, Switch . . . . . . . 448 Switch properties, Active Domain ID . . . . . . . . . . . . . . . . . . . . . . . . . . 449 Element Manager: Configure Ports . . . . . . . . . . . . . . . . . . . . . . . . . . . 450 EFC Manager: Independent fabrics . . . . . . . . . . . . . . . . . . . . . . . . . . . 452 EFC Manager: Physical Map view, one merged fabric . . . . . . . . . . . . 453 EFC Manager: Persist Fabric. . . . . . . . . . . . . . . . . . . . . . . . . . . . . . . . 454 EFC Manager: Product Nicknames . . . . . . . . . . . . . . . . . . . . . . . . . . . 455 EFC Manager: broken ISL . . . . . . . . . . . . . . . . . . . . . . . . . . . . . . . . . . 456 Unit Properties menu from SANpilot interface . . . . . . . . . . . . . . . . . . . 459 Figures xxi 3-107 3-108 3-109 3-110 3-111 3-112 3-113 3-114 3-115 3-116 3-117 3-118 3-119 3-120 3-121 3-122 3-123 3-124 3-125 3-126 3-127 3-128 3-129 3-130 3-131 4-1 4-2 4-3 4-4 4-5 4-6 4-7 4-8 4-9 4-10 4-11 4-12 4-13 4-14 4-15 4-16 4-17 4-18 xxii Feature key installation tab under Operations menu . . . . . . . . . . . . . . 460 Activating the new features . . . . . . . . . . . . . . . . . . . . . . . . . . . . . . . . . 460 The successful feature installation and activation menu . . . . . . . . . . . 461 Open Trunking State option . . . . . . . . . . . . . . . . . . . . . . . . . . . . . . . . . 462 Open Trunking Log view . . . . . . . . . . . . . . . . . . . . . . . . . . . . . . . . . . . 463 Fabric Tree list . . . . . . . . . . . . . . . . . . . . . . . . . . . . . . . . . . . . . . . . . . . 465 Configure Fabric Binding menu . . . . . . . . . . . . . . . . . . . . . . . . . . . . . . 466 Fabric Binding: Adding Members . . . . . . . . . . . . . . . . . . . . . . . . . . . . . 467 Configure Switch Binding Change State . . . . . . . . . . . . . . . . . . . . . . . 470 The Switch Binding Edit Membership List menu . . . . . . . . . . . . . . . . . 470 Switch Binding Edit Membership List . . . . . . . . . . . . . . . . . . . . . . . . . 471 Switch Binding Change State and Enforcement mode . . . . . . . . . . . . 471 Element Manager icon . . . . . . . . . . . . . . . . . . . . . . . . . . . . . . . . . . . . . 473 Invoking Element Manager . . . . . . . . . . . . . . . . . . . . . . . . . . . . . . . . . 474 Backup and Restore Configuration menu . . . . . . . . . . . . . . . . . . . . . . 474 Backup initiation confirmation . . . . . . . . . . . . . . . . . . . . . . . . . . . . . . . 475 EFCM Firmware Library . . . . . . . . . . . . . . . . . . . . . . . . . . . . . . . . . . . . 476 New firmware version transferred to firmware library. . . . . . . . . . . . . . 477 Firmware description . . . . . . . . . . . . . . . . . . . . . . . . . . . . . . . . . . . . . . 477 CTP card status . . . . . . . . . . . . . . . . . . . . . . . . . . . . . . . . . . . . . . . . . . 478 CTP Switchover . . . . . . . . . . . . . . . . . . . . . . . . . . . . . . . . . . . . . . . . . . 479 CTP Switchover button . . . . . . . . . . . . . . . . . . . . . . . . . . . . . . . . . . . . 479 Send firmware download confirmation prompt. . . . . . . . . . . . . . . . . . . 480 The firmware download progress menu. . . . . . . . . . . . . . . . . . . . . . . . 481 Active Firmware Version . . . . . . . . . . . . . . . . . . . . . . . . . . . . . . . . . . . 481 The CNT FC/9000 family . . . . . . . . . . . . . . . . . . . . . . . . . . . . . . . . . . . 484 SAN256N director . . . . . . . . . . . . . . . . . . . . . . . . . . . . . . . . . . . . . . . . 484 Private IP network for initial inVSN management ability . . . . . . . . . . . 489 CNT setup attached to a corporate network . . . . . . . . . . . . . . . . . . . . 490 CNT setup with secure director access . . . . . . . . . . . . . . . . . . . . . . . . 491 Enterprise Manager initial view . . . . . . . . . . . . . . . . . . . . . . . . . . . . . . 493 Installing Enterprise Manager client . . . . . . . . . . . . . . . . . . . . . . . . . . . 494 Enterprise Manager Login . . . . . . . . . . . . . . . . . . . . . . . . . . . . . . . . . . 494 Enterprise Manager initial view of switch . . . . . . . . . . . . . . . . . . . . . . . 495 User Security . . . . . . . . . . . . . . . . . . . . . . . . . . . . . . . . . . . . . . . . . . . . 497 User group definition . . . . . . . . . . . . . . . . . . . . . . . . . . . . . . . . . . . . . . 498 Profile definitions . . . . . . . . . . . . . . . . . . . . . . . . . . . . . . . . . . . . . . . . . 499 Confirm User Security changes . . . . . . . . . . . . . . . . . . . . . . . . . . . . . . 500 Setting the director clock . . . . . . . . . . . . . . . . . . . . . . . . . . . . . . . . . . . 507 Select Port WWN Devicenames . . . . . . . . . . . . . . . . . . . . . . . . . . . . . 508 Port WWN Device Names configuration . . . . . . . . . . . . . . . . . . . . . . . 508 Zoning button . . . . . . . . . . . . . . . . . . . . . . . . . . . . . . . . . . . . . . . . . . . . 510 Zoning tool . . . . . . . . . . . . . . . . . . . . . . . . . . . . . . . . . . . . . . . . . . . . . . 510 Implementing an Open IBM SAN 4-19 4-20 4-21 4-22 4-23 4-24 4-25 4-26 4-27 4-28 4-29 4-30 4-31 4-32 4-33 4-34 4-35 4-36 4-37 4-38 4-39 4-40 4-41 4-42 5-1 5-2 5-3 5-4 5-5 5-6 5-7 5-8 5-9 5-10 5-11 5-12 5-13 5-14 5-15 5-16 5-17 5-18 5-19 Using Zoning function . . . . . . . . . . . . . . . . . . . . . . . . . . . . . . . . . . . . . 511 Creating new zoneset . . . . . . . . . . . . . . . . . . . . . . . . . . . . . . . . . . . . . 511 Create a new zone part2 . . . . . . . . . . . . . . . . . . . . . . . . . . . . . . . . . . . 512 Adding WWN to zone. . . . . . . . . . . . . . . . . . . . . . . . . . . . . . . . . . . . . . 513 Adding by Port WWN . . . . . . . . . . . . . . . . . . . . . . . . . . . . . . . . . . . . . . 514 Adding zones to the zoneset . . . . . . . . . . . . . . . . . . . . . . . . . . . . . . . . 515 Selecting the zones to add to the zoneset . . . . . . . . . . . . . . . . . . . . . . 516 Activate new zoneset . . . . . . . . . . . . . . . . . . . . . . . . . . . . . . . . . . . . . . 517 One Button Code Load Icon . . . . . . . . . . . . . . . . . . . . . . . . . . . . . . . . 519 FC/9000 One Button CodeLoad options . . . . . . . . . . . . . . . . . . . . . . . 519 2045 One Button Code Load options. . . . . . . . . . . . . . . . . . . . . . . . . . 521 Audit trail log . . . . . . . . . . . . . . . . . . . . . . . . . . . . . . . . . . . . . . . . . . . . 522 Events log button . . . . . . . . . . . . . . . . . . . . . . . . . . . . . . . . . . . . . . . . . 523 Event Log. . . . . . . . . . . . . . . . . . . . . . . . . . . . . . . . . . . . . . . . . . . . . . . 523 Notification Preferences . . . . . . . . . . . . . . . . . . . . . . . . . . . . . . . . . . . . 525 Event notification settings . . . . . . . . . . . . . . . . . . . . . . . . . . . . . . . . . . 526 Link rate test . . . . . . . . . . . . . . . . . . . . . . . . . . . . . . . . . . . . . . . . . . . . 526 FC Ping . . . . . . . . . . . . . . . . . . . . . . . . . . . . . . . . . . . . . . . . . . . . . . . . 527 FC Ping list. . . . . . . . . . . . . . . . . . . . . . . . . . . . . . . . . . . . . . . . . . . . . . 527 Configuring an FC ping test . . . . . . . . . . . . . . . . . . . . . . . . . . . . . . . . . 528 Enabling the loop attachment for a single port. . . . . . . . . . . . . . . . . . . 530 Loop ports in name server table . . . . . . . . . . . . . . . . . . . . . . . . . . . . . 531 inVSN: Bypassing loop devices . . . . . . . . . . . . . . . . . . . . . . . . . . . . . . 532 inVSN: Enabling and Disabling Loop devices . . . . . . . . . . . . . . . . . . . 533 FM Client 1.3(4a) Version . . . . . . . . . . . . . . . . . . . . . . . . . . . . . . . . . . 542 The Fabric Manager .jar file . . . . . . . . . . . . . . . . . . . . . . . . . . . . . . . . . 543 Installing FM Client code from .jar file . . . . . . . . . . . . . . . . . . . . . . . . . 543 FM Client Install Options . . . . . . . . . . . . . . . . . . . . . . . . . . . . . . . . . . . 544 The FM client code is now 1.3(5) . . . . . . . . . . . . . . . . . . . . . . . . . . . . . 544 The browser panel for Fabric and Device Manager . . . . . . . . . . . . . . . 548 The install page for FM - with an incompatible Java RTE . . . . . . . . . . 549 Choosing to install new FM . . . . . . . . . . . . . . . . . . . . . . . . . . . . . . . . . 550 Fabric Manager login . . . . . . . . . . . . . . . . . . . . . . . . . . . . . . . . . . . . . . 551 FM connectivity message . . . . . . . . . . . . . . . . . . . . . . . . . . . . . . . . . . 551 Initial security message from switch . . . . . . . . . . . . . . . . . . . . . . . . . . 552 The FM Server service needs activation . . . . . . . . . . . . . . . . . . . . . . . 552 Interim Starting window . . . . . . . . . . . . . . . . . . . . . . . . . . . . . . . . . . . . 552 FM Application Physical view. . . . . . . . . . . . . . . . . . . . . . . . . . . . . . . . 553 Licensed FM Server version . . . . . . . . . . . . . . . . . . . . . . . . . . . . . . . . 554 Standard FM . . . . . . . . . . . . . . . . . . . . . . . . . . . . . . . . . . . . . . . . . . . . 554 Viewing current license information . . . . . . . . . . . . . . . . . . . . . . . . . . . 555 Current installed switch license status . . . . . . . . . . . . . . . . . . . . . . . . . 555 Licensed Feature information . . . . . . . . . . . . . . . . . . . . . . . . . . . . . . . 556 Figures xxiii 5-20 5-21 5-22 5-23 5-24 5-25 5-26 5-27 5-28 5-29 5-30 5-31 5-32 5-33 5-34 5-35 5-36 5-37 5-38 5-39 5-40 5-41 5-42 5-43 5-44 5-45 5-46 5-47 5-48 5-49 5-50 5-51 5-52 5-53 5-54 5-55 5-56 5-57 5-58 5-59 5-60 5-61 5-62 xxiv Accessing License Install Wizard from FM . . . . . . . . . . . . . . . . . . . . . 557 FM License Install Wizard - Panel 1 . . . . . . . . . . . . . . . . . . . . . . . . . . 558 License Install Wizard - Panel 2. . . . . . . . . . . . . . . . . . . . . . . . . . . . . . 558 Identifying the location of the new license key . . . . . . . . . . . . . . . . . . . 559 FM License Install Wizard - Part 2 . . . . . . . . . . . . . . . . . . . . . . . . . . . . 560 Sample License install progress message. . . . . . . . . . . . . . . . . . . . . . 560 Example of a License Install Wizard error message . . . . . . . . . . . . . . 560 FM License Install Wizard - completion . . . . . . . . . . . . . . . . . . . . . . . . 561 FM Server License is now installed . . . . . . . . . . . . . . . . . . . . . . . . . . . 561 Selective access to Device Manager . . . . . . . . . . . . . . . . . . . . . . . . . . 563 DM login window . . . . . . . . . . . . . . . . . . . . . . . . . . . . . . . . . . . . . . . . . 564 DM Application main menu . . . . . . . . . . . . . . . . . . . . . . . . . . . . . . . . . 564 HyperTerminal serial port properties window. . . . . . . . . . . . . . . . . . . . 566 The install page for Cisco Fabric Manager software . . . . . . . . . . . . . . 570 Fabric Manager security warning . . . . . . . . . . . . . . . . . . . . . . . . . . . . . 571 Fabric Manager initial login window . . . . . . . . . . . . . . . . . . . . . . . . . . . 571 Initial install for Device Manager . . . . . . . . . . . . . . . . . . . . . . . . . . . . . 572 Device Manager initial login window . . . . . . . . . . . . . . . . . . . . . . . . . . 573 Fabric Manager device names pull-down menu . . . . . . . . . . . . . . . . . 574 Fabric Manager login time-out error message . . . . . . . . . . . . . . . . . . . 575 Fabric Manager logical view . . . . . . . . . . . . . . . . . . . . . . . . . . . . . . . . 576 Fabric Manager SNMP time-out message . . . . . . . . . . . . . . . . . . . . . . 577 Refresh values being displayed . . . . . . . . . . . . . . . . . . . . . . . . . . . . . . 577 Unsaved running configuration warning. . . . . . . . . . . . . . . . . . . . . . . . 578 Unsaved local fabric database warning . . . . . . . . . . . . . . . . . . . . . . . . 578 Open systems working topology . . . . . . . . . . . . . . . . . . . . . . . . . . . . . 579 Open FM with Logical view . . . . . . . . . . . . . . . . . . . . . . . . . . . . . . . . . 580 Create Vsan (1) . . . . . . . . . . . . . . . . . . . . . . . . . . . . . . . . . . . . . . . . . . 581 FM create VSAN panel . . . . . . . . . . . . . . . . . . . . . . . . . . . . . . . . . . . . 581 FM Domain Manager Configuration panel . . . . . . . . . . . . . . . . . . . . . . 582 FM Domain Manager Configuration panel . . . . . . . . . . . . . . . . . . . . . . 582 FM Domain Manager running configuration panel . . . . . . . . . . . . . . . . 582 FM Persistent FCID Setup panel . . . . . . . . . . . . . . . . . . . . . . . . . . . . . 583 FM Persistent FCID Setup panel . . . . . . . . . . . . . . . . . . . . . . . . . . . . . 583 FM FC Physical interfaces panel . . . . . . . . . . . . . . . . . . . . . . . . . . . . . 583 FM Persistent FCIDs panel . . . . . . . . . . . . . . . . . . . . . . . . . . . . . . . . . 584 FM Create VSAN ICON . . . . . . . . . . . . . . . . . . . . . . . . . . . . . . . . . . . . 584 FM VSAN create panel . . . . . . . . . . . . . . . . . . . . . . . . . . . . . . . . . . . . 585 FM FC Physical interfaces panel . . . . . . . . . . . . . . . . . . . . . . . . . . . . . 585 FM FC Physical interfaces panel . . . . . . . . . . . . . . . . . . . . . . . . . . . . . 586 FM Edit zone database pull-down . . . . . . . . . . . . . . . . . . . . . . . . . . . . 586 FM edit zone database panel. . . . . . . . . . . . . . . . . . . . . . . . . . . . . . . . 587 FM zoneset pull-down menu . . . . . . . . . . . . . . . . . . . . . . . . . . . . . . . . 587 Implementing an Open IBM SAN 5-63 5-64 5-65 5-66 5-67 5-68 5-69 5-70 5-71 5-72 5-73 5-74 5-75 5-76 5-77 5-78 5-79 5-80 5-81 5-82 5-83 5-84 5-85 5-86 5-87 5-88 5-89 5-90 5-91 5-92 5-93 5-94 5-95 5-96 5-97 5-98 5-99 5-100 5-101 5-102 5-103 5-104 5-105 FM zoneset name panel . . . . . . . . . . . . . . . . . . . . . . . . . . . . . . . . . . . 588 FM Zones pull-down menu . . . . . . . . . . . . . . . . . . . . . . . . . . . . . . . . . 588 FM zone name panel . . . . . . . . . . . . . . . . . . . . . . . . . . . . . . . . . . . . . . 588 FM edit zone database panel. . . . . . . . . . . . . . . . . . . . . . . . . . . . . . . . 589 Dragging a Zone to a Zoneset in FM . . . . . . . . . . . . . . . . . . . . . . . . . 589 FM edit zone database panel. . . . . . . . . . . . . . . . . . . . . . . . . . . . . . . . 590 FM edit zone database panel. . . . . . . . . . . . . . . . . . . . . . . . . . . . . . . . 591 FM continue zoneset activation prompt . . . . . . . . . . . . . . . . . . . . . . . . 592 FM edit zone database panel. . . . . . . . . . . . . . . . . . . . . . . . . . . . . . . . 592 FM zone display . . . . . . . . . . . . . . . . . . . . . . . . . . . . . . . . . . . . . . . . . . 593 FM map of a highlighted zone . . . . . . . . . . . . . . . . . . . . . . . . . . . . . . . 593 FM edit zone database pull-down menu . . . . . . . . . . . . . . . . . . . . . . . 594 FM zoneset pull-down menu . . . . . . . . . . . . . . . . . . . . . . . . . . . . . . . . 594 FM zoneset name panel . . . . . . . . . . . . . . . . . . . . . . . . . . . . . . . . . . . 594 FM zone pull-down menu. . . . . . . . . . . . . . . . . . . . . . . . . . . . . . . . . . . 595 FM continue zoneset activation prompt . . . . . . . . . . . . . . . . . . . . . . . . 595 FM edit zone database panel. . . . . . . . . . . . . . . . . . . . . . . . . . . . . . . . 595 FM dragging a zone on top of a zoneset display . . . . . . . . . . . . . . . . . 596 FM edit zone database panel. . . . . . . . . . . . . . . . . . . . . . . . . . . . . . . . 596 FM edit zone database panel. . . . . . . . . . . . . . . . . . . . . . . . . . . . . . . . 596 FM continue zoneset activation prompt . . . . . . . . . . . . . . . . . . . . . . . . 597 FM edit zone database panel. . . . . . . . . . . . . . . . . . . . . . . . . . . . . . . . 597 FM Create VSAN wizard . . . . . . . . . . . . . . . . . . . . . . . . . . . . . . . . . . . 598 Active ISL between our switches . . . . . . . . . . . . . . . . . . . . . . . . . . . . . 598 FM VSAN create panel . . . . . . . . . . . . . . . . . . . . . . . . . . . . . . . . . . . . 599 FM display of a segmented VSAN . . . . . . . . . . . . . . . . . . . . . . . . . . . . 599 FM PortChannel Trunk Config panel . . . . . . . . . . . . . . . . . . . . . . . . . . 600 FM PortChannel Trunk Config panel . . . . . . . . . . . . . . . . . . . . . . . . . . 600 FM PortChannel Trunk Config panel . . . . . . . . . . . . . . . . . . . . . . . . . . 600 FM PortChannel Trunk Config panel . . . . . . . . . . . . . . . . . . . . . . . . . . 601 FM PortChannel Trunk Config panel . . . . . . . . . . . . . . . . . . . . . . . . . . 601 FM FC Physical Interfaces display. . . . . . . . . . . . . . . . . . . . . . . . . . . . 602 FM Edit zone database pull-down menu . . . . . . . . . . . . . . . . . . . . . . . 602 FM zoneset pull-down menu . . . . . . . . . . . . . . . . . . . . . . . . . . . . . . . . 602 FM zoneset name panel . . . . . . . . . . . . . . . . . . . . . . . . . . . . . . . . . . . 603 FM zone pull-down menu. . . . . . . . . . . . . . . . . . . . . . . . . . . . . . . . . . . 603 FM zone name panel . . . . . . . . . . . . . . . . . . . . . . . . . . . . . . . . . . . . . . 603 FM edit zone database panel. . . . . . . . . . . . . . . . . . . . . . . . . . . . . . . . 604 Dragging a zone onto a zoneset in FM display . . . . . . . . . . . . . . . . . . 604 FM edit zone database panel. . . . . . . . . . . . . . . . . . . . . . . . . . . . . . . . 604 FM edit zone database panel. . . . . . . . . . . . . . . . . . . . . . . . . . . . . . . . 605 FM continue zoneset activation prompt . . . . . . . . . . . . . . . . . . . . . . . . 605 FM edit zone database panel. . . . . . . . . . . . . . . . . . . . . . . . . . . . . . . . 606 Figures xxv 5-106 5-107 5-108 5-109 5-110 5-111 5-112 5-113 5-114 5-115 5-116 5-117 5-118 5-119 5-120 5-121 5-122 5-123 5-124 xxvi Creating a new Vsan for open traffic - Step 1 . . . . . . . . . . . . . . . . . . . 607 Creating a new Vsan for open traffic - Step 2 . . . . . . . . . . . . . . . . . . . 607 Creating a new Vsan for Open traffic - Step 3 . . . . . . . . . . . . . . . . . . . 608 Creating a new Vsan for Open traffic - Step 4 . . . . . . . . . . . . . . . . . . . 608 Select the Aliases option . . . . . . . . . . . . . . . . . . . . . . . . . . . . . . . . . . . 609 Select Insert from action line . . . . . . . . . . . . . . . . . . . . . . . . . . . . . . . . 609 Entering Alias data into the Create Alias wizard . . . . . . . . . . . . . . . . . 609 The newly defined Aliases are now visible . . . . . . . . . . . . . . . . . . . . . 610 Creating Zones - Step 1 . . . . . . . . . . . . . . . . . . . . . . . . . . . . . . . . . . . . 610 Defining the new IntelZone . . . . . . . . . . . . . . . . . . . . . . . . . . . . . . . . . 611 Drag and drop the new Aliases into their Zones . . . . . . . . . . . . . . . . . 611 Each new Zone with its Aliases . . . . . . . . . . . . . . . . . . . . . . . . . . . . . . 612 Creating a new Zoneset - Step 1 . . . . . . . . . . . . . . . . . . . . . . . . . . . . . 612 Creating a new Zoneset - Step 2 . . . . . . . . . . . . . . . . . . . . . . . . . . . . . 613 Adding Zones to the new ZoneSet - Step 1 . . . . . . . . . . . . . . . . . . . . . 613 Adding Zones to the new ZoneSet - Step 2 . . . . . . . . . . . . . . . . . . . . . 614 Activate the OpenZone Zoneset . . . . . . . . . . . . . . . . . . . . . . . . . . . . . 614 Alternative ZoneSet Activation . . . . . . . . . . . . . . . . . . . . . . . . . . . . . . . 615 Save the configuration . . . . . . . . . . . . . . . . . . . . . . . . . . . . . . . . . . . . . 615 Implementing an Open IBM SAN Tables 2-1 2-2 2-3 2-4 2-5 2-6 2-7 2-8 2-9 2-10 2-11 2-12 2-13 2-14 2-15 2-16 2-17 2-18 2-19 2-20 2-21 2-22 2-23 2-24 2-25 2-26 3-1 4-1 4-2 4-3 4-4 5-1 Model types . . . . . . . . . . . . . . . . . . . . . . . . . . . . . . . . . . . . . . . . . . . . . . 50 IBM and Brocade model numbers . . . . . . . . . . . . . . . . . . . . . . . . . . . . . 55 Fabric Events log details . . . . . . . . . . . . . . . . . . . . . . . . . . . . . . . . . . . 105 Alias tab description: . . . . . . . . . . . . . . . . . . . . . . . . . . . . . . . . . . . . . . 117 Zone tab description . . . . . . . . . . . . . . . . . . . . . . . . . . . . . . . . . . . . . . 121 QuickLoop tab description . . . . . . . . . . . . . . . . . . . . . . . . . . . . . . . . . . 123 Fabric Assist tab description . . . . . . . . . . . . . . . . . . . . . . . . . . . . . . . . 125 Config tab description . . . . . . . . . . . . . . . . . . . . . . . . . . . . . . . . . . . . . 127 Switch Information tab . . . . . . . . . . . . . . . . . . . . . . . . . . . . . . . . . . . . . 152 Network config tab . . . . . . . . . . . . . . . . . . . . . . . . . . . . . . . . . . . . . . . . 155 SNMP tab. . . . . . . . . . . . . . . . . . . . . . . . . . . . . . . . . . . . . . . . . . . . . . . 160 License admin tab . . . . . . . . . . . . . . . . . . . . . . . . . . . . . . . . . . . . . . . . 163 Ports details . . . . . . . . . . . . . . . . . . . . . . . . . . . . . . . . . . . . . . . . . . . . . 165 FSPF Route Field Descriptions . . . . . . . . . . . . . . . . . . . . . . . . . . . . . . 177 Extended Fabric configuration . . . . . . . . . . . . . . . . . . . . . . . . . . . . . . 181 AAA tab functions . . . . . . . . . . . . . . . . . . . . . . . . . . . . . . . . . . . . . . . . 183 Trace Tab functions . . . . . . . . . . . . . . . . . . . . . . . . . . . . . . . . . . . . . . . 185 ISL Telnet commands . . . . . . . . . . . . . . . . . . . . . . . . . . . . . . . . . . . . . 192 Canvas Configuration List window — fields . . . . . . . . . . . . . . . . . . . . . 198 Graphs available in Basic Monitor . . . . . . . . . . . . . . . . . . . . . . . . . . . . 202 Graphs available in Advanced Monitoring feature . . . . . . . . . . . . . . . . 209 Add Filter based monitor commands . . . . . . . . . . . . . . . . . . . . . . . . . . 225 Fabric Watch Classes and Area . . . . . . . . . . . . . . . . . . . . . . . . . . . . . 229 Trait configuration threshold . . . . . . . . . . . . . . . . . . . . . . . . . . . . . . . . 235 Alarm Configuration settings . . . . . . . . . . . . . . . . . . . . . . . . . . . . . . . . 237 Combination of long distance ports that are available . . . . . . . . . . . . . 267 Machine type and model number changes . . . . . . . . . . . . . . . . . . . . . 333 Fibre Channel port modes . . . . . . . . . . . . . . . . . . . . . . . . . . . . . . . . . . 486 CNT Tool Bar . . . . . . . . . . . . . . . . . . . . . . . . . . . . . . . . . . . . . . . . . . . . 495 Audit Trail Log details . . . . . . . . . . . . . . . . . . . . . . . . . . . . . . . . . . . . . 522 Event log details. . . . . . . . . . . . . . . . . . . . . . . . . . . . . . . . . . . . . . . . . . 524 Fibre Channel port operational modes. . . . . . . . . . . . . . . . . . . . . . . . . 537 © Copyright IBM Corp. 2000, 2001, 2002, 2003. All rights reserved. xxvii xxviii Implementing an Open IBM SAN Notices This information was developed for products and services offered in the U.S.A. IBM may not offer the products, services, or features discussed in this document in other countries. Consult your local IBM representative for information on the products and services currently available in your area. Any reference to an IBM product, program, or service is not intended to state or imply that only that IBM product, program, or service may be used. Any functionally equivalent product, program, or service that does not infringe any IBM intellectual property right may be used instead. However, it is the user's responsibility to evaluate and verify the operation of any non-IBM product, program, or service. IBM may have patents or pending patent applications covering subject matter described in this document. The furnishing of this document does not give you any license to these patents. You can send license inquiries, in writing, to: IBM Director of Licensing, IBM Corporation, North Castle Drive Armonk, NY 10504-1785 U.S.A. The following paragraph does not apply to the United Kingdom or any other country where such provisions are inconsistent with local law: INTERNATIONAL BUSINESS MACHINES CORPORATION PROVIDES THIS PUBLICATION "AS IS" WITHOUT WARRANTY OF ANY KIND, EITHER EXPRESS OR IMPLIED, INCLUDING, BUT NOT LIMITED TO, THE IMPLIED WARRANTIES OF NON-INFRINGEMENT, MERCHANTABILITY OR FITNESS FOR A PARTICULAR PURPOSE. Some states do not allow disclaimer of express or implied warranties in certain transactions, therefore, this statement may not apply to you. This information could include technical inaccuracies or typographical errors. Changes are periodically made to the information herein; these changes will be incorporated in new editions of the publication. IBM may make improvements and/or changes in the product(s) and/or the program(s) described in this publication at any time without notice. Any references in this information to non-IBM Web sites are provided for convenience only and do not in any manner serve as an endorsement of those Web sites. The materials at those Web sites are not part of the materials for this IBM product and use of those Web sites is at your own risk. IBM may use or distribute any of the information you supply in any way it believes appropriate without incurring any obligation to you. Information concerning non-IBM products was obtained from the suppliers of those products, their published announcements or other publicly available sources. IBM has not tested those products and cannot confirm the accuracy of performance, compatibility or any other claims related to non-IBM products. Questions on the capabilities of non-IBM products should be addressed to the suppliers of those products. This information contains examples of data and reports used in daily business operations. To illustrate them as completely as possible, the examples include the names of individuals, companies, brands, and products. All of these names are fictitious and any similarity to the names and addresses used by an actual business enterprise is entirely coincidental. COPYRIGHT LICENSE: This information contains sample application programs in source language, which illustrates programming techniques on various operating platforms. You may copy, modify, and distribute these sample programs in any form without payment to IBM, for the purposes of developing, using, marketing or distributing application programs conforming to the application programming interface for the operating platform for which the sample programs are written. These examples have not been thoroughly tested under all conditions. IBM, therefore, cannot guarantee or imply reliability, serviceability, or function of these programs. You may copy, modify, and distribute these sample programs in any form without payment to IBM for the purposes of developing, using, marketing, or distributing application programs conforming to IBM's application programming interfaces. © Copyright IBM Corp. 2000, 2001, 2002, 2003. All rights reserved. xxix Trademarks The following terms are trademarks of the International Business Machines Corporation in the United States, other countries, or both: AIX® BladeCenter™ DB2® Enterprise Storage Server® ESCON® ^™ FICON™ Illustra™ IBM® ibm.com® Netfinity® NUMA-Q® OS/390® PowerPC® pSeries® Rational® Redbooks™ Redbooks (logo) RS/6000® S/390® ™ Storage Tank™ System/390® SANergy™ SP2® Tivoli® TotalStorage® Wave® xSeries® zSeries® The following terms are trademarks of other companies: Intel, Intel Inside (logos), MMX, and Pentium are trademarks of Intel Corporation in the United States, other countries, or both. Microsoft, Windows, Windows NT, and the Windows logo are trademarks of Microsoft Corporation in the United States, other countries, or both. Java and all Java-based trademarks and logos are trademarks or registered trademarks of Sun Microsystems, Inc. in the United States, other countries, or both. UNIX is a registered trademark of The Open Group in the United States and other countries. SET, SET Secure Electronic Transaction, and the SET Logo are trademarks owned by SET Secure Electronic Transaction LLC. Other company, product, and service names may be trademarks or service marks of others. xxx Implementing an Open IBM SAN Preface “Do everything that is necessary and absolutely nothing that is not.” In this IBM® Redbook, which is an update and major revision of the previous version, we have tried to consolidate as much of the critical information as possible while covering procedures and tasks that are likely to be encountered on a daily basis. Each of the products described has much, much more functionality than we could ever hope to cover in just one redbook. The IBM SAN portfolio is rich in quality products that bring a vast amount of technicality and vitality to the SAN world. Their inclusion and selection is based on a thorough understanding of the storage networking environment that positions IBM, and therefore its customers and partners, in an ideal position to take advantage by their deployment. We cover the latest additions to the IBM SAN family, which includes products from companies such as Brocade, Cisco, CNT, Emulex, and McDATA. We show how they can be implemented in an open systems environment, and we focus on the Fibre Channel protocol (FCP) environment in particular. We address some of the key concepts that they bring to the market, and in each case, we give an overview of those functions that are essential to building a robust SAN environment. In other redbooks we explore in greater depth the IBM SAN product family, Fibre Channel basics, and SAN design concepts. More information can be found in the IBM Redbooks™: Introduction to Storage Area Networks, SG24-5470 IBM SAN Survival Guide, SG24-6143 The team that wrote this redbook This redbook was produced by a team of specialists from around the world working at the International Technical Support Organization, San Jose Center. © Copyright IBM Corp. 2000, 2001, 2002, 2003. All rights reserved. xxxi L-R Cameron, Jeannie, and Jon Jon Tate is a Project Manager for IBM TotalStorage® SAN Solutions at the International Technical Support Organization, San Jose Center. Before joining the ITSO in 1999, he worked in the IBM Technical Support Center, providing Level 2 support for IBM storage products. Jon has 19 years of experience in storage software and management, services and support, and is both an IBM Certified IT Specialist, and an IBM SAN Certified Specialist. Cameron Hildebran is an I/T Architect with IBM in Boulder Colorado, specializing in pSeries server and storage solutions since 2000. He has over ten years IT experience including work as a Senior Software Engineer for Iris Associates (with expertise on IBM Lotus Domino for AIX, Solaris, Linux and Win32 platforms) and as a Performance Engineer for Digital Equipment Corporation. Cameron has co-authored three IBM Redpapers and an IBM Redbook, and written articles regarding Linux, performance, and storage networks. He has also presented at numerous technical conferences on storage solutions, performance tuning, capacity sizing, and Lotus Domino development and performance. xxxii Implementing an Open IBM SAN Jeannie Ostdiek is an Advisory Systems Engineer working in the IBM Technical Support Center providing Level 2 support for IBM Total Storage products (such as SAN Volume Controller, SDD and SFS). Jeanne has 12 years experience supporting IBM customers in storage software. Thanks to the following people for their contributions to this project: Tom Cady Deanna Polm Sangam Racherla Sokkieng Wang International Technical Support Organization, San Jose Center Khalid Ansari George DeBiasi Brian Cartwright Sven Eichelbaum Uwe Hofmann Thomas Jahn Pauli Ramo Glen Routley Eric Wong The previous authors of this redbook John Wickes IBM Global Services Jim Banask Cal Blombaum William Champion Scott Drummond Parker Grannis Edith Kropf Pam Lukes Victoria Perris Michael Starling Diana Tseng Ernie Williamson Michelle Wright IBM Storage Systems Group Jim Baldyga Brian Steffler Brocade Communications Systems Preface xxxiii Tony Almeida Mike Blair Bob Bracalante Guy Brunsdon Susheel Chitre Reena Choudry Tory Long Seth Mason Bob Milroy Paul Raytick Robert Santiago Faiyaz Shahpurwala Wayne Wilson Cisco Systems, Inc. Dave Burchwell CNT Technologies Corporation Brent Anderson McDATA Corporation Tom and Jenny Chang Garden Inn Hotel, Los Gatos, California Become a published author Join us for a two- to six-week residency program! Help write an IBM Redbook dealing with specific products or solutions, while getting hands-on experience with leading-edge technologies. You'll team with IBM technical professionals, Business Partners and/or customers. Your efforts will help increase product acceptance and customer satisfaction. As a bonus, you'll develop a network of contacts in IBM development labs, and increase your productivity and marketability. Find out more about the residency program, browse the residency index, and apply online at: ibm.com/redbooks/residencies.html xxxiv Implementing an Open IBM SAN Comments welcome Your comments are important to us! We want our Redbooks to be as helpful as possible. Send us your comments about this or other Redbooks in one of the following ways: Use the online Contact us review redbook form found at: ibm.com/redbooks Send your comments in an Internet note to: [email protected] Mail your comments to: IBM Corporation, International Technical Support Organization Dept. QXXE Building 80-E2 650 Harry Road San Jose, California 95120-6099 Preface xxxv xxxvi Implementing an Open IBM SAN 1 Chapter 1. Implementing a SAN with the e-type family For less complex SAN environments, with fewer servers and storage arrays, single switch or dual cascaded switches offers redundancy and performance with minimal administration and lower cost than larger directors. One option for these smaller infrastructures is an entry-level switch such as the IBM TotalStorage Storage Switch L10. The IBM TotalStorage Storage Switch L10 is a one-half width, 1U rack height, ten-port switch as shown in Figure 1-1. This entry ten-port storage switch includes zoning and an integrated Web server. The L10 switch is supported with xSeries and BladeCenter servers. Two storage switches may be cascaded for expanded solutions with Microsoft Windows NT, 2000 Server and Cluster Service (MSCS); Red Hat and SUSE LINUX and Novell NetWare. The features the L10 provides are: 1 or 2 gigabit per second throughput on all ports Connectivity for up to eighteen devices when cascaded with a second L10 switch One step, port based zoning Automatic trunking for inter-switch link (ISL) failover © Copyright IBM Corp. 2000, 2001, 2002, 2003. All rights reserved. 1 Hot-pluggable optical transceivers can be replaced without taking switch offline All firmware included, no additional license keys required Figure 1-1 IBM TotalStorage Storage Switch L10 More option and pricing information on the TotalStorage Switch L10 can be found on the IBM storage website at http://www-1.ibm.com/servers/storage/san/e_type/l10/ 2 Implementing an Open IBM SAN 1.1 Configuring the switch Before we can use the switch we have to perform initial setup and prepare it for network connectivity. There are only a few steps for booting up this switch, and they are uncomplicated. Once any attached storage devices are powered on we simply insert the power cord into the switch. This initiates the Power-On-Self-Test (POST) diagnostics which verify the integrity of the switch ports. During this period the switch LEDs will illuminate and then turn off. Note: The power cord plug serves as the only disconnect device on the L10 switch. To cycle power on the switch you must remove and reconnect the power cord. Once the POST has finished power on any other switches connected to the SAN and then power on the host servers. At this point the SAN should be operational and can be configured via the switch. 1.1.1 Switch network setup Before we can administer the L10 switch with the embedded Web Manager tool we must configure the network properties of the switch for our Ethernet environment. The default IP settings the switch ships with are as follows: IP Address: 192.168.1.129 Netmask: 255.255.255.0 Gateway: 192.168.1.1 We will connect to the switch through a serial interface to adjust these for our environment example. To do this we use the included RS-232 cable attached from the switch to the serial port of our computer. For this Windows instance we use Microsoft HyperTerminal as the terminal emulation application. We use the following steps to set up HyperTerminal to connect to the switch. 1. First we launch the HyperTerminal application and name this session for future use as shown in Figure 1-2. Chapter 1. Implementing a SAN with the e-type family 3 Figure 1-2 HyperTerminal configuration: Name session 2. After creating the connection we select the COM port the RE-232 cable is attached to and then select File -> Properties, and select the Settings tab to change the serial port parameters to the below settings, as shown in Figure 1-3. Select OK to save the changes. – Bits per second: 19200 – Data bits: 8 – Parity: None – Stop bits: 1 – Flow control: None 4 Implementing an Open IBM SAN Figure 1-3 HyperTerminal configuration: COM port settings 3. At the HyperTerminal prompt for the switch enter the password, the default password the switch ships with is ‘password’. Now we are logged in to the switch. 4. Next we type config network ip and press Enter. This lists the current IP settings for the switch and displays a prompt for entering the new IP address as shown in Figure 1-4. Chapter 1. Implementing a SAN with the e-type family 5 Figure 1-4 Switch configuration: IP address change command 5. We type the new IP and press Enter. If we need to change the subnet mask or gateway we use the mask and gateway commands respectively. 6. Next we type save and press Enter 7. Then we type root reset and press Enter as shown in Figure 1-5. 6 Implementing an Open IBM SAN Figure 1-5 Switch configuration: IP address change continued Chapter 1. Implementing a SAN with the e-type family 7 8. This presents us with a confirmation to proceed. We type y and press Enter, which reboots the switch as shown in Figure 1-6. Figure 1-6 Switch configuration: IP address change confirmation 9. When we next log in to the switch we can type sysinfo and press Enter to see that the changes have taken effect. This is shown in Figure 1-7. 8 Implementing an Open IBM SAN Figure 1-7 Switch configuration: Display new settings We can now communicate with the switch through a web browser and an Ethernet connection by attaching a cross-over RJ-45 cable directly to the Ethernet port on the switch, or by connecting the switch and our computer to a hub. 1.1.2 Switch setup with Web Manager Now that the network parameters of the switch are configured for our environment we can connect to it with a web browser. Note: The Web Manager supports Microsoft Internet Explorer version 5.5 for Windows or later. After launching Microsoft Internet Explorer and typing the IP address of the switch in the address bar we are presented with the Storage Switch view as shown in Figure 1-8. Chapter 1. Implementing a SAN with the e-type family 9 Figure 1-8 Web Manager: Storage Switch view This initial page shows an overview of the L10 switch. The general status of the switch is displayed and it is continuously refreshed to display current information. This page presents data such as the switch status, port utilization and health, and the operational status of the fan and power supply. We can return to this main page at any time by selecting the Storage Switch command button at the top of the menu tree. We can use the command buttons on this page to login or logout, refresh the page and even reboot the switch. From here we can also use command buttons to load pages for viewing or changing switch and port configuration settings. For this setup portion we will login to change the default password and the name of the switch. Change switch password To login we select the Login button and then select OK on the message box that appears, as shown in Figure 1-9. 10 Implementing an Open IBM SAN Figure 1-9 Web Manager: Login confirmation We enter the default password of password and click the Login button. We are now successfully logged in to the switch and can continue with configuration, and in this example changing the password. Next select Switch -> Password to access the password page. Type the new password in the New Password text box and retype to confirm in the Confirm New Password box, as shown in Figure 1-10. Note: The password is case sensitive and must be between 6 and 25 characters long. Chapter 1. Implementing a SAN with the e-type family 11 Figure 1-10 Web Manager: New password Select Submit which will display a message box to confirm the change. Click OK and a password success appears as shown in Figure 1-11 for confirmation of the change. 12 Implementing an Open IBM SAN Figure 1-11 Web Manager: New password confirmation Change switch name For easier identification purposes we will change the name of our switch. This becomes increasingly important as we add more devices to the SAN. From the main Storage Switch page select Switch -> Configuration and type a new name in the Name text box as shown in Figure 1-12. Chapter 1. Implementing a SAN with the e-type family 13 Figure 1-12 Web Manager: Switch name change After clicking Submit a dialog box will appear to confirm that you want to write the new data to the switch. Select OK and the new name of the switch appears in the title bar as well as the Name text box. This is shown in Figure 1-13. 14 Implementing an Open IBM SAN Figure 1-13 Web Manager: Switch name change continued Our switch is now properly configured for our environment. 1.2 Switch management This section details steps for controlling various aspects of the L10 switch. We step through managing switch and port settings, updating firmware versions, editing configuration files, and setting switch thresholds. Also covered are One-Step Zoning configuration and performance related offerings included with the switch, such as Automatic Trunking and Load Balancing. 1.2.1 Switch management with the Web Manager Most configuration tasks can be accomplished with the Web Manager. We have already changed the password and name of our switch with this tool. Now we will configure operational aspects with the Web Manager. Chapter 1. Implementing a SAN with the e-type family 15 General switch settings Many general settings for the L10 switch are found through Web Manager by selecting Switch -> Configuration. This page displays multiple configurable switch parameters as well as non-editable information about the switch. As shown in Figure 1-14 this includes name and network information as well as speed and current code versions installed. Figure 1-14 Switch Configuration: General information To change editable fields such as the switch name, location or contact name simply type the new information in the appropriate location and select Submit. You can select the switch speed from this page as well. The default speed is set to 2 Gb/s. All ports on the switch operate at the same speed so selecting a different speed will effect all connections to the switch. This is also where we define the Blocking ARB, which is sent to all other ports when two ports begin communication, until the session is terminated. The default value is FF. Normally this would not need to be changed, but if other devices connected to the switch already use FF then a different value can be chosen for the switch here. 16 Implementing an Open IBM SAN The Agent Up Time is updated whenever the switch comes online after reboot or power cycle and displays the amount of time that has passed since the switch was booted. SNMP trap configuration To view or adjust the SNMP trap configuration, select Switch -> SNMP Traps as shown in Figure 1-15. Here we can enter an IP address of the device that SNMP trap information will be sent to, as well as trap port number, which is normally 162 with Windows. Select an Active State to have messages sent to the displayed IP, or Inactive if the trap is not to be operational. Setting the state to Delete will delete the trap after selecting Submit. Figure 1-15 Switch Configuration: SNMP Trap Configuration Switch thresholds To adjust thresholds on the switch select Advanced Functions -> Thresholds -> Switch as shown in Figure 1-16. Chapter 1. Implementing a SAN with the e-type family 17 Figure 1-16 Switch Configuration: Thresholds The L10 switch thresholds and their definitions, along with valid entry values are listed on this page. For more detailed explanation and impact of these settings refer to the 2006 Model L10 Installation and User’s Guide, GC26-7651. Configure port settings Port settings are accessed from the Port option in the Web Manager navigation menu. This gives three subselections, Information, Utilization and Smart Settings. In this section we will focus on Smart Settings, as port information and utilization are covered in “Port utilization and health” on page 38. Smart Settings The Port Smart Settings page displays the current configuration settings assigned to each port and enables you to modify them or create new ones. To adjust the port Smart Settings we select Port -> Smart Settings, which takes us to the Port Smart Settings page as shown in Figure 1-17. 18 Implementing an Open IBM SAN Figure 1-17 Port Configuration: Smart Settings, main More configuration option are seen by expanding the menus on the right side of the page as shown in Figure 1-18. Chapter 1. Implementing a SAN with the e-type family 19 Figure 1-18 Configuration: Smart Settings, expanded Default Smart Settings There are many default Smart Settings already available on the L10 switch when shipped. These default settings cannot be modified or deleted, they can however be used as templates to create custom Smart Settings. 20 Implementing an Open IBM SAN Note: These default Smart Settings were created by Fibre Channel storage experts to ensure the switch is optimally configured for performance and stability. Changing the setting of a port may affect the performance or behavior of the system Following is a brief description of each default Smart Setting. Initiator or Target: This is the default setting for all switch ports from the factory. Initiators and targets can be connected to ports with this default value setting. Initiator with Stealth: This setting is used to connect a host device to the port. When a port is set to this Smart Setting, changes are not sent from the initiator to other devices, but change notifications are received by the initiator. Target with Stealth: This setting is used for connecting embedded storage devices or external RAID systems. With this Smart Setting, change notifications are sent to other devices, but change notifications are not received by the target. Fabric Connection: This Smart Setting is used when connecting a port to a Fabric switch. Tree Cascade: This setting is for connecting two or more switches together in a tree configuration. Up to four tree cascades are supported between switches. String Cascade: This setting is used for connecting two switches together in a string configuration. Up to four string cascades are supported between switches. IBM Smart Setting: This Smart Setting is a custom setting defined by IBM. IBM Linux Initiator: This Smart Setting is a custom setting defined by IBM which has the Port Test Before Insert (PTBI) policy disabled. Chapter 1. Implementing a SAN with the e-type family 21 IBM Linux Stealth Initiator: This Smart Setting is a custom setting defined by IBM that has the PTBI policy disabled, and the Stealth Intelligent Change Manager feature is enabled and set to “only Receive Changes”. To assign a Smart Setting to a port: 1. Select the Smart Setting from the list box. 2. Select a port from the list of port numbers under the Assign heading. 3. Click Submit to write the changes to the switch. Custom Smart Settings To create custom Smart Settings: Select Create. This brings up a text box where we enter a name for our new custom setting, as shown in Figure 1-19. Note: The name can consist of up to 28 alphanumeric characters and cannot contain spaces. 22 Implementing an Open IBM SAN Figure 1-19 Custom Smart Setting: Create Click OK and the new Smart Setting is added to the list box on the left of the page. Select Submit and the setting will be saved to the switch. To create a custom Smart Setting using an existing Smart Setting as a template first select the Smart Setting that most closely matches the configuration the new setting should take. Select Clone and enter a new name for the setting. Select OK and then Submit. We can now add or delete port properties associated with this custom setting by selecting/deselecting them from the Port Information menu on the right, as shown in Figure 1-20. Chapter 1. Implementing a SAN with the e-type family 23 Figure 1-20 Custom Smart Setting: Port properties These Port Information settings cannot be adjusted on the default Smart Settings. Configure One-Step Zoning We use zoning to separate activity on the SAN. Zoning is useful for dividing test or maintenance areas from production ones and for separating different operating system environments. Zoning with the L10 switch is accomplished with the Web Manager’s One-Step Zoning page. This is reached by selecting Advanced Functions -> One-Step Zoning as shown in Figure 1-21. The L10 switch supports a maximum of twelve zones. By default all ports are allocated to zone zero but can be selected and placed in another zone. 24 Implementing an Open IBM SAN Figure 1-21 One-Step Zoning page Zone creation To activate zoning we first select ports. For this example we selected ports 2, 4 and 5 for placement into zone 2, as shown in Figure 1-22. Chapter 1. Implementing a SAN with the e-type family 25 Figure 1-22 One-Step Zoning page: Port selection Next we click Submit which brings up a confirmation dialog box, shown in Figure 1-23, stating that the data will be written to the switch. We select Ok and the data is written. Figure 1-23 One-Step Zoning page: Port confirmation At this point the zone has been created but is not active. To activate it we select the Zoning Active check box underneath the Zones and Ports grid, and again click Submit as shown in Figure 1-24. 26 Implementing an Open IBM SAN Figure 1-24 One-Step Zoning page: Zone activation After again confirming we want to write the data to the switch, zoning is activated. The zone’s status color will now change from yellow to green. Note: Zone status: The color of the zones show at a glance their status. If a zone is red then there is a hardware failure keeping the zone from functioning properly and the zone is down. When a zone is depicted in green the zone is active and hardware is operational. If the zone color is yellow then ports have been selected but the zone has not yet been activated. Finally, the color gray indicates that the zone is undefined, meaning that no ports have been selected for this zone. In addition to separating groups of devices into zones, each port can be placed in a single different zone to completely segregate all attached devices. Shared resource zoning Zoning is also used to allow shared resource access by allowing a port to exist in multiple zones. Chapter 1. Implementing a SAN with the e-type family 27 For instance we will keep zone 2 from the previous example, and assign ports 1, 3, 5, and 7 to a new zone, zone 9. We now have two zones, which are made up of different ports, with the exception that they now both contain port 5. We can see this from the Web Manager view shown in Figure 1-25. Figure 1-25 One-Step Zoning page: Adding device to multiple zones Multiple switch zoning Zones can be configured across multiple switches using a similar procedure to a single switch. However, multiple switch zoning requires some coordination between the switches. Note: To ensure zone integrity when configuring multiple switch zoning, you must implement AL_PA zoning through the CLI. AL_PA zoning is a specific zoning configuration that prevents devices from accessing one another For multiple switch zoning we move devices onto the two switches and have the zones stretch between the two. To configure multiple switch zoning we have to take the same steps with both switches. 28 Implementing an Open IBM SAN 1. Plan which ports should belong in each zone. 2. From the One-Step Zoning page select the appropriate ports for each zone. 3. Ensure that the Zoning active check box is selected for both switches as shown in Figure 1-24. 4. Once all changes are made, select Submit. Cascading switches When multiple switches are connected, the connecting links between the switches are referred to as cascades. There are two distinct cascade configurations to consider when configuring the SAN for optimal performance and connectivity, they are string cascades and tree cascades. A string cascade connects two switches together in a “daisy-chained” configuration. When one device requests access to another device, the request is sent to each switch in the cascade before device access is granted. This arbitration method promotes fairness between the switches. However, when compared to tree cascades, string cascades offer less performance due to the increased latency between the switches. A tree cascade consists of a root switch connected to additional switches (up to eight switches maximum). When a device on a switch requests access to another device, the request is sent to the particular switch for that device. The limitation to the tree cascade configuration is the random nature of devices gaining access to one another, as fairness is not used for tree cascades. Configure Automatic Trunking Trunking combines multiple Inter-Switch Links (ISL) to increase bandwidth and provide failover. When ports are properly configured between two L10 switches trunking is automatically enabled. The maximum number of trunks supported between L10 switches is four. Each trunk is part of a trunk group. Each trunk group is made up of two or more cascades between switches. There is a primary trunk for each trunk group. The primary trunk is the trunk containing the lowest numbered port. All traffic in the trunk group will flow through the primary trunk unless Load Balancing is enabled as explained in “Configure load balancing” on page 31. Each switch can only have one trunk group between itself and another switch. By default, if the primary trunk fails the secondary trunk takes over as the primary trunk. This can be configured to behave differently. Once multiple paths between switches have been established with the Automatic Trunking feature failover capacity exists between the switches. Chapter 1. Implementing a SAN with the e-type family 29 Automatic Trunking is configured in Web Manager, by selecting Advanced Functions -> Automatic Trunking from the menu tree on the left as shown in Figure 1-26. Automatic Trunking is only available when at least one port is assigned to a String or Tree Cascade Smart Setting as explained in “Smart Settings” on page 18. As you can see in Figure 1-26, only the ports that have been assigned an appropriate Smart Setting will appear, in our example ports 1, 2, 3, 4, 8, and 9 are available for trunking. Figure 1-26 Automatic Trunking: Configure From here we assign ports to a trunk group. Simply select a trunk group for a given port as shown in Figure 1-27 and click Submit. After confirming that we want to write the data to the switch the changes will be reflected on this page and trunking is enabled. 30 Implementing an Open IBM SAN Figure 1-27 Automatic Trunking: Assign ports Configure load balancing With load balancing we can use trunking for more than simple failover. We specify with load balancing the specific path that switches use to exchange data. Therefore we can distribute the traffic across multiple cascade ports. These are the ports connected between L10 switches that we configure with a String or Tree Cascade Smart Setting as in “Smart Settings” on page 18. Note: Automatic trunking must be configured before load balancing can take effect. To configure load balancing select Advanced Functions -> Load Balancing in Web Manager as shown in Figure 1-28. Chapter 1. Implementing a SAN with the e-type family 31 Figure 1-28 Configure Load Balancing This view displays the available ports and trunk groups, as well as a load indicator for the ports and trunk groups. The port load indicator to the right of the ports displays a horizontal bar to give a visual representation of load. The trunk load indicator below the trunk groups uses a vertical bar to do the same. If one of these bars depicts overloading then move ports to different trunks in the group. From this page we assign the ports to trunk groups in order to manually distribute the traffic load. We do this by selecting the radio button corresponding to the port and trunk group desired and selecting Submit. In this fashion we could also assign a specific port solely to a particular cascade to ensure the device has a dedicated trunk at all times. Update the firmware version We can choose form multiple firmware versions, and download new alternative versions to the switch from Web Manager as they become available. There are multiple methods for obtaining new firmware versions but the quickest is to simply select Help -> Downloads from the menu tree on the left of the Web Manager view. 32 Implementing an Open IBM SAN To install firmware to the switch from an attached computer follow these steps. 1. After logging into the switch the firmware options can be accessed by selecting Switch -> Files to display the Switch Firmware Files as shown in Figure 1-29. Figure 1-29 Firmware upgrade: Available versions 2. Select Browse and navigate to the new firmware file location, highlight the file and select Open as shown in Figure 1-30. Chapter 1. Implementing a SAN with the e-type family 33 Figure 1-30 Firmware upgrade: Browse firmware file 3. This brings us back to the Switch Firmware Files page where we select Start. After the new firmware (.bin) file is downloaded to the switch it is displayed as the Alternate Version as shown in Figure 1-31. The Use Alternate Version on Next Reboot box is checked by default, meaning this new firmware version will be used the next time the switch is rebooted unless we uncheck the box. 34 Implementing an Open IBM SAN Figure 1-31 Firmware upgrade: Alternate Version 4. Cycle the power to the switch or select the Reboot button and the newly downloaded firmware version is in effect when the L10 boots up. 1.2.2 Switch management with the Command Line Interface There are some advanced features for switch configuration which are not available in the Web Manager. Use of these features requires the Command Line Interface (CLI). The CLI is utilized from inside a telnet session, which can be started from any terminal emulation program as explained in 1.1.1, “Switch network setup” on page 3. Alternatively a telnet session can also be invoked by the Web Manager. To initiate a telnet session via the Web Manager select Advanced Functions -> Telnet Session as shown in Figure 1-32. Chapter 1. Implementing a SAN with the e-type family 35 Figure 1-32 CLI: telnet session invocation Select OK in the dialog box shown in Figure 1-33 to confirm the IP of the switch you plan to connect to with the telnet session. Figure 1-33 CLI: telnet session confirmation This initiates a telnet session. Next type the password and press Enter. Now we are logged on to the switch and ready to enter CLI commands as shown in Figure 1-34. 36 Implementing an Open IBM SAN Figure 1-34 CLI: telnet session login For a full list of CLI commands refer to the 2006 Model L10 CLI Reference Guide. 1.3 Monitoring the switch There are several included options for monitoring the L10 switch status and port information. This section describes how to view switch status, port information and utilization, port diagnostics, and the event log. General switch status The first tool for monitoring the L10 switch is the home page that loads when we launch the Web Manager. This switch information page displays the overall health of the switch, the SOC status, switch temperature and fan operation as shown in Figure 1-35. Chapter 1. Implementing a SAN with the e-type family 37 Figure 1-35 Switch monitoring: Switch Information The Switch Information area of the page indicates the following status: Switch Status Green (OK) - the switch is operating normally. Red (Fault) - one or more of the ports has failed, the internal temperature has exceeded acceptable levels, or another error has occurred. Errors appear in the event log. SOC Status Green (OK) - the switch chipset is operating normally. Red (Fault) - the switch chipset selftest has failed. Enclosure Temp Green (OK) - switch temperature is within normal range. Red (OverTemp) - enclosure temperature has exceeded recommended operating range. Fan Green (OK) - the fan unit is working properly. Red (Fault) the fan unit has stopped operating. Port utilization and health This Web Manager main page also show us an overview of the port utilization and health. This part of the page displays each port number, the port’s health 38 Implementing an Open IBM SAN status and a vertical bar indicating the utilization of the port. More detailed utilization information can be found from the Port menu as detailed in “Port utilization” on page 40. The color of the port number reflects its current health, described below. Green A small form-factor pluggable transceiver (SFP) is inserted into the port and a device is connected the SFP. Yellow This could reflect one of multiple issues. First, a port may be bypassed, meaning as SFP is inserted but no device is connected to it. Second, the port is in loopback mode, meaning the transmit and receiver are connected together on the SFP. Thirdly, if the switch is receiving an F8 failure notification then the port is bypassed to allow remaining devices to proceed with initialization. Finally, if the port is a failover link in a cascade and is not currently active it will show this status. Red This status reflects a serious fault. This could include an SFP fault, loss of signal amplitude from the device, or loss of word synchronization for a specified time. Gray Either there is no SFP inserted in the port or the port status cannot be determined. Port Information For more information on the ports select Port -> Information, this displays the ports’ number, Smart Setting, Serial ID and Identified AL_PA’s as shown in Figure 1-36. Chapter 1. Implementing a SAN with the e-type family 39 Figure 1-36 Port: Information The Serial ID displays information about an SFP if one exists on that port. Identified AL_PA’s displays attached AL_PA’s, Initiator AL_PA’s are highlighted in blue. Port utilization The Port -> Utilization selection displays the ports and the percentage of usage in three categories as shown in Figure 1-37. 40 Implementing an Open IBM SAN Figure 1-37 Port: Utilization These utilization percentages are reflective of the Smart Setting on the port, in that they are dependent on whether the port is an Initiator or a Target as is listed in the port configuration page from Figure 1-36. An initiator port displays utilization for data it transmits to a target, but the target port does not display a value. If the initiator port receives data from the target then the target port displays the utilization value, not the initiator port. The three utilization values correspond to traffic patterns in a given period of time. The interval of time between sample collection is measured in seconds. The High value displays the highest percentage of data through the port for that given time period. The Average displays the average percentage for that same time. While the Low value reflects the lowest percentage of data through the port in the same period of time. The utilization collection interval is set by selecting Advanced Functions -> Thresholds -> Switch as shown in Figure 1-16. Port diagnostics Diagnostic information on the ports is found by selecting Advanced Functions -> Diagnostics -> Port as shown in Figure 1-38. Chapter 1. Implementing a SAN with the e-type family 41 Figure 1-38 Port Diagnostics This page displays diagnostic information pertaining to each port in the switch. This information is used to diagnose abnormally high error counts on a particular port. A description for each statistic from the 2006 Model L10 Installation and User’s Guide is listed below: 42 Port & Health Color indicators in green, yellow or red. These color indicators are described in “Port utilization and health” on page 38. Insertion Count Number of times this port has been inserted into the network since the switch was reset or the counters were cleared. CRC Errors Number of CRC errors that are detected in frames passing through this port since the switch was reset or the counters were cleared. Implementing an Open IBM SAN Ordered Set Errors Number of Ordered Sets that are received on this port with an encoding error since the switch was reset or the counters were cleared. Clock Delta Difference (in parts per million) between the internal switch clock and the received clock signal on the port. State Current state of port - either inserted or bypassed. Beacon Port Forces both port LEDs to flash on and off continuously. Use this to locate and take action on a specific port. Bypass Port A single instance operation that forces a port into bypass mode. This feature may be used to diagnose device problems when a device is locked up or experiencing a high number of failures on a port. Reset Port A single instance operation that places a port in bypass mode and then immediately sets the port to auto-detect to re-insert the port. This feature may be used to diagnose device problems when a device is locked up or experiencing a high number of failures on a port. To save diagnostic information, first select Advanced Functions -> Diagnostics -> Port from the Web Manager as shown in Figure 1-39. Chapter 1. Implementing a SAN with the e-type family 43 Figure 1-39 Port Diagnostics: Advanced Functions Next select Upload and answer OK to the file download dialog box that appears in Figure 1-40. Figure 1-40 Port Diagnostics: File upload This will produce a sysdump.log file as shown in Figure 1-41. 44 Implementing an Open IBM SAN Figure 1-41 Port Diagnostics: sysdump.log Event Log The Event Log contains a list of event log messages generated by the switch. This log is viewed on the Switch Log page by selecting Switch -> Event Log with Web Manager as shown in Figure 1-42. Chapter 1. Implementing a SAN with the e-type family 45 Figure 1-42 Event Log Each message in the event log contains the following information: Event Number - the number assigned to that specific event in the log. Event Date and Time - the date and time when the event was recorded in the log. Event Severity - the severity level for that event. Event Type - the identifier assigned to that event. Event Description - a brief description of the event. To delete the current list of event log messages select Clear at the bottom of the event log page. To save the event log select Export from the event log page. This will either bring up the host system’s default text editor as shown in Figure 1-43, or it will give a dialog box to save the file to disk. 46 Implementing an Open IBM SAN Figure 1-43 Event Log: Export Chapter 1. Implementing a SAN with the e-type family 47 48 Implementing an Open IBM SAN 2 Chapter 2. Implementing a SAN with the b-type family In this chapter we introduce the IBM TotalStorage SAN Switch (3534, 2109 and 2005) products. We perform the steps required to install and configure a fabric using IBM TotalStorage SAN Switches; and then we perform some management functions, including upgrading firmware, implementing a secure fabric, and monitoring performance within the fabric. © Copyright IBM Corp. 2000, 2001, 2002, 2003. All rights reserved. 49 2.1 Introducing the IBM TotalStorage SAN Switch The IBM TotalStorage SAN Switch b-type family of products provide a range of entry and midrange switches and enterprise directors. The entry level and midrange models provide 2 and 4 Gb/s port-to-port non-blocking throughput with auto-sensing capability for connecting to older 1 Gb/s host servers, storage, and switches. Unlike hub-based Fibre Channel Arbitrated Loop (FC-AL) solutions, which reduce performance as devices are added by sharing the bandwidth, an IBM TotalStorage SAN Switch Fabric throughput continues to increase as additional ports are interconnected. In Table 2-1, we list the available model types with speed and port capabilities as well as the FOS version currently being supported for that model type. Table 2-1 Model types switch type ports speed FOS Secure FOS 3534-1RU, 2109-S08, S16 8-16 1 Gb/s 2.6.x 2.6.x 3534-F08, 2109-F16 8-16 1 and 2Gb/s 3.1.x 3.1.x 2109-F32 16-32 1 and 2 Gb/s 4.4.x 4.4.x 2005-H08 4-8 1 and 2 Gb/s 4.4.x 4.4.x 2005-H16 8-16 1 and 2 Gb/s 4.4.x 4.4.x 2109-M12 16-32 and 32-64 1 and 2 Gb/s 4.4.x 4.4.x 2109-M14 32-128 1 and 2 Gb/s 4.4.x 4.2.x 2005-B32 16, 24 and 32 1, 2 and 4 Gb/s 4.4.x 4.4.x All of these models are fully interoperable with the previous IBM TotalStorage SAN Switches, and can be added to existing fabrics, enabling transition from existing Fibre Channel storage networks to the faster technology. Features In the following paragraphs, we describe some of the standard features available on all of the IBM TotalStorage SAN Switches. Auto-sensing speed negotiation The IBM TotalStorage SAN Switch uses internal Application Specific Integrated Circuits (ASICs) supporting link operation at either 4 Gb/s or 2 Gb/s or 1 Gb/s. As 50 Implementing an Open IBM SAN a device is connected to a port, the link speed is negotiated to the highest speed that is supported by the device. This speed selection is auto-negotiated by the ASIC driver on a per-port basis. If multiple devices are connected to a port (for example, on an FL_Port), the driver auto-negotiates for the highest common speed and sets the transmitter and receiver accordingly. Auto-sensing negotiation allows easy configuration. Frame filtering Zoning is a fabric management service that can be used to create logical subsets of devices within a SAN and enable partitioning of resources for management and access control purposes. Frame filtering enables the switch to provide zoning functions with finer granularity. Frame filtering can be used to set up port level zoning, world wide name zoning, device level zoning, protocol level zoning, and LUN level zoning. After the filter is set up, the complicated function of zoning and filtering can be achieved at wire speed. Performance Monitoring Performance Monitoring is a licensed feature that provides error and performance information to manage your storage environment. There are three types of monitoring: Arbitrated Loop Physical Address (AL_PA) monitoring: This provides information regarding the number of CRC errors. End-to-end monitoring: This provides information regarding a configured source identifier (SID) to destination identifier (DID) pair. Information includes the number of CRC errors for frames with the SID-DID pair, Fibre Channel words transmitted from the port for the SID-DID pair, and Fibre Channel words received for the port for the SID-DID pair. Filter-based monitoring: This provides error information with a customer-determined threshold. Trunking Trunking is a feature that enables traffic to be balanced across available inter-switch links (ISLs) while still preserving in-order delivery. On some Fibre Channel protocol devices, frame traffic between a source device and destination device must be delivered in-order within an exchange. The requirement for in-order delivery in conjunction with the FSPF forces current devices to fix a routing path within a fabric. Consequently, certain traffic patterns in a fabric can cause all active traffic to be allocated to a single available path and leave other paths unused. Chapter 2. Implementing a SAN with the b-type family 51 A trunking group (a set of available paths linking two adjacent switches) is created at the ASIC level within a switch, and therefore all paths in a trunking group must be within the same ASIC to form the trunk. Ports in the trunking group are called trunking ports. One trunking port is designated as the trunking master port and is used to set up all routing paths for the entire trunking group. The trunk provides up to an 8 Gb/s single-aggregate ISL pipe between switches using four ISL paths. 2.1.1 Software specifications In this section we describe the software for the IBM TotalStorage SAN Switches. Fabric Operating System The Fabric Operating System (FOS) manages the operation of the switch and delivers the same, and compatible, functionality to the different models of switches. The switch firmware is designed to make the switches easy to install and use while retaining the flexibility needed to accommodate user requirements. A fabric constructed with cascaded 2109 switches automatically assigns individual switch addresses, establishes frame routes, configures the internal name server, and so on. Users can access internal management functions using standard host-based Simple Network Management Protocol (SNMP) software or Web browsers. They can access these functions using network connectivity through the Ethernet port or using Internet Protocol (IP) over the Fibre Channel ports. SCSI Enclosure Services (SES) is also supported as a management method. The management functions of the switch allow a user to monitor frame throughput, error statistics, fabric topology, fans, cooling, media type, port status, IDs, and other information to aid in system debugging and performance analysis. Fabric OS version The FOS includes all the basic switch and fabric support software as well as optionally licensed software that is enabled using license keys. It is comprised of two major software components: firmware that initializes and manages the switch hardware, and diagnostics. Fabric OS (FOS) Version 4.x is a Linux Based OS, while the FOS Version 3.x and the earlier version 2.x, were based on a VxWorks operating system. We show the models and required Firmware versions Table 2-1 on page 50. In the last column of the table (Table 2-1 on page 50), we show the levels of FOS required to implement a secure fabric which we describe in 2.9, “Advanced 52 Implementing an Open IBM SAN Security” on page 268. These Secure FOS levels may also be used for fabrics without implementing fabric security. Initialization When the switch is powered on or restarted, the following operations are performed: 1. Early power-on self test (POST) diagnostics are run. POST is run before the FOS is started. 2. The FOS is initialized. 3. The hardware is initialized. The switch is reset, the internal addresses are assigned, the Ethernet port is initialized, the serial port is initialized, and the front panel is initialized. 4. A full POST is run. 5. The links are initialized. Receiver and transmitter negotiation is run to bring the connected ports online. 6. During the Fabric Login (FLOGI), link parameters are exchanged. This determines whether any ports are connected to other switches. If so, it negotiates who becomes the principal switch. 7. Domain addresses are assigned. After the principal switch is identified, port addresses are assigned. Each switch tries to keep the same domain ID that it used previously. Previous IDs are stored in the configuration Flash memory. 8. The routing table is constructed. After the addresses are assigned, the unicast routing tables are constructed. 9. Normal Nx_Port operation is enabled. Routing The switches control processor maintains two routing tables, one for unicast and one for multicast. The unicast routing tables are constructed during fabric initialization. The multicast tables are initially empty, except for broadcast addresses. After the tables have been constructed they are loaded into each ASIC. The unicast tables change if ports or links come online or go offline, or if some other topology changes occur. These updates are triggered by a Resource State Change Notification (RSCN). When new paths become available, the control processor can change some routes in order to share the traffic load. The multicast tables change as ports register with the alias server to create, join, or leave a multicast group. Each time a table changes it must be reloaded into the ASICs. Chapter 2. Implementing a SAN with the b-type family 53 Service functions The ASIC interrupts the embedded processor when a frame arrives that has an error (for example, incorrect source ID), when a frame times-out, or when a frame arrives for a destination that is not in its routing tables. In the latter case, the frame might be addressed to an illegal destination ID, or it might be addressed to one of the service functions that are provided by the embedded processor such as SNMP, name server, or alias server. SNMP Simple Network Management Protocol (SNMP) allows network devices to be monitored, controlled, and configured remotely from a network management station running a network manager program. SNMP agent code in the network device allows management by transferring data that is specified by a Management Information Base (MIB). The switch agent supports the following features: SNMPv1 manager SNMPv3 in FOS 4.4 compatible with older SNMPv1 Command-line utilities to provide access to and command the agent MIB-II system group, interface group, and SNMP group Fabric-element MIB IBM-specific MIBs Standard generic traps IBM-specific traps Diagnostics The switch supports a set of power-on self tests (POSTs), as well as tests that can be invoked using a command line interface. These diagnostics are used during the manufacturing process as well as for fault isolation of the product in customer installations. Diagnostic environment Most diagnostics are written to run in the FOS environment. However, as the FOS does not run without a working SDRAM, a SDRAM/boot EEPROM test is run as part of the pre-FOS startup code to verify that the basic processor connected memories are functioning properly. Hardware support Loop-back paths for frame traffic are provided in the hardware for diagnostic purposes. A loop-back path within the ASIC, at the final stages of the Fibre Channel interface, can be used to verify that the internal Fibre Channel port logic is functioning properly, as well as paths between the interface and the central memory. 54 Implementing an Open IBM SAN Additionally, the SerialLink macro within the ASIC includes a serial data loop-back function that can be enabled through a register in the corresponding ASIC. Diagnostics are provided to allow traffic to be circulated between two switch ports that are connected with an external cable. This allows the diagnostics to verify the integrity of the final stage of the SERDES interface, as well as the SFP module. Diagnostic coverage The POST and diagnostic commands concentrate on the Fibre Channel ports and verify switch functionality of the switch 2.2 IBM TotalStorage SAN Switch Models In the next sections, we will discuss the different switch models. Table 2-2 shows the IBM model number along with its Brocade model number equivalent. Table 2-2 IBM and Brocade model numbers IBM product and model number Brocade model number 2005-H08 Silkworm 3250 2109-F16 Silkworm 3800 2005-H16 Silkworm 3850 2109-F32 Silkworm 3900 2109-M12 Silkworm 12000 2109-M14 Silkworm 24000 2005-B32 Silkworm 4100 2.2.1 IBM TotalStorage SAN Switch F16 The IBM TotalStorage SAN Switch F16, also known as a 2109-F16, is a Full Fabric, sixteen 2 Gb/s Fibre Channel port switch, with an optional second concurrently replaceable power supply, and replaceable fan assembly. It provides a cost affective high availability solution for small and medium size SANs. We show a picture of the 2109-F16 in Figure 2-1. Chapter 2. Implementing a SAN with the b-type family 55 Figure 2-1 2109-F16 switch 2.2.2 IBM TotalStorage SAN Switch F16 product overview IBM TotalStorage SAN Switch F16 is equivalent to a Brocade SilkWorm 3800, and provides the following features: Sixteen Fibre Channel ports, each capable of full-duplex throughput at either 1 or 2 gigabits per second. All ports are auto-sensing ports that self-negotiate to the highest speed supported by the attached server, storage, or switch. They are all Universal ports that self-configure as F_Ports, FL_Ports, or E_Ports. Each Fibre Channel port uses Small Form-Factor Pluggable (SFP) media with options for either shortwave optical connection for distances up to 300 meters, or longwave optical connections for distances up to 10 kilometers. A 1U package that can be either rack-mounted or used in a table-top configuration, with the option of a redundant power supply, providing a highly available switch. Hardware zoning controlled at the port level, and at the worldwide name level. Cascading support for flexibility in creating scalable fabric topologies. Distributed fabric services such as name serving, routing, Advanced Zoning, Fabric Watch, and microcode upgrade. Web Tools, which provides a comprehensive set of management tools that support a Web browser interface for flexible, easy-to-use operations. Optional features activated by License key include: 56 Implementing an Open IBM SAN Extended fabric, Remote Switch, QuickLoop, Security. Performance Bundle, which provides Inter-Switch Link (ISL) Trunking and Advanced Performance Monitoring. Figure 2-2 shows the layout of the different elements in the F16 faceplate. Figure 2-2 IBM TotalStorage SAN Switch F16 faceplate Figure 2-3 shows the IBM TotalStorage SAN Switch F16 rear view. Figure 2-3 IBM TotalStorage SAN Switch F16 back panel 2.2.3 IBM TotalStorage SAN Switch F32 The IBM TotalStorage SAN Switch F32, also known as 2109-F32, is a 32 port, 2 Gigabits per second, Full Fabric, highly available Fibre Channel switch. With its concurrently replaceable redundant power supplies, and concurrent firmware upgrade ability, it is a good solution for customers with growing SAN environments and limited down time opportunities. Chapter 2. Implementing a SAN with the b-type family 57 In Figure 2-4 we show a picture of the IBM TotalStorage SAN Switch F32: Figure 2-4 2109-F32 switch 2.2.4 IBM TotalStorage SAN Switch F32 product overview IBM TotalStorage SAN Switch F32 is equivalent to a Brocade SilkWorm 3900 and includes the following features: Thirty-two ports, each port capable of full-duplex throughput at either 1 or 2 gigabits per second. Auto-sensing ports that self-negotiate to the highest speed supported by the attached server, storage, or switch. Universal ports that self-configure as F_Ports, FL_Ports, or E_Ports. Each port supports the new Small Form-Factor Pluggable (SFP) media with options for either shortwave optical connection for distances up to 300 meters, or longwave optical connections for distances up to 10 kilometers. A 1.5U package that can be either rack-mounted or used in a table-top configuration, with a redundant power supply, providing a highly available switch. Hardware zoning controlled at the port level, and at the worldwide name level. Performance Bundle feature, which provides Inter-Switch Link (ISL) Trunking and Advanced Performance Monitoring. Cascading support for flexibility in creating scalable fabric topologies. Distributed fabric services such as name serving, Advanced Zoning, routing. Web Tools, which provides a comprehensive set of management tools that support a Web browser interface for flexible, easy-to-use operations. Concurrent code activation, allowing switch firmware upgrades without the need to remove the switch from the fabric. Optional features activated by License key include: 58 Implementing an Open IBM SAN Extended fabric, Remote Switch, Security. Attention: QuickLoop support will not be provided with the F32 Switch. IBM TotalStorage SAN Switches with QuickLoop capability may be used to attach private loop devices in a core/edge fabric. In Figure 2-5 we identify the various indicators and ports on the front panel of the IBM TotalStorage SAN Switch F32. Figure 2-5 IBM TotalStorage SAN Switch F32 faceplate Figure 2-6 shows the rear components of the IBM TotalStorage SAN Switch F32. Chapter 2. Implementing a SAN with the b-type family 59 Figure 2-6 Rear components of the IBM TotalStorage SAN Switch F32 2.2.5 IBM TotalStorage SAN Switch H08 and H16 The IBM TotalStorage SAN Switch H08 and IBM TotalStorage SAN Switch H16 delivers next generation performance and functionality for Fibre Channel Storage Area Networks (SAN), comprising 1 and 2 Gb/s auto-sensing capability with fully non-blocking performance and designed to be completely interoperable with other members of IBM TotalStorage SAN Switch family. The base functionality for both IBM TotalStorage SAN Switch H08 and IBM TotalStorage SAN Switch H16 models includes webtools, advanced zoning, and hot code activation standard in Fabric OS 4.2. Just like all the IBM TotalStorage SAN Switch family, all ports are numbered sequentially starting with zero for the left-most port. The switch faceplate includes a silk screen imprint of the port numbers. With the 2 Gb/s switches, the ports are color-coded into quad-groups to indicate which ports can be used in the same ISL trunking group. Both models support Fibre Channel classes 2, 3 and F and has a latency of less than 2 µs with no contention (assuming the destination port is free). 2.2.6 IBM TotalStorage SAN Switch H08 TheIBM TotalStorage SAN Switch H08 as shown in Figure 2-7 is designed for entry level SAN applications, and provides 8 Fibre Channel ports, a single power supply, and fans in 1U rack height. The base IBM TotalStorage SAN Switch H08 functionality supports one E-Port connection to one other IBM SAN switch. The 60 Implementing an Open IBM SAN Entry Fabric configuration includes four SW-SFP transceivers. A mixture of SW, LW and extended LW-SFPs features may also be added. The H08 comes with the EZ Setup Wizard which is a new GUI interface enabling easy switch setup. This is the only model to come with the EZ Setup Wizard. Figure 2-7 View of H08 2.2.7 IBM TotalStorage SAN Switch H16 The IBM TotalStorage SAN Switch H16 as shown in Figure 2-8 is a 16-port SAN switch which is designed for mid-range SAN applications and provides dual power supplies and fans in 1U rack height. The base IBM TotalStorage SAN Switch H16 functionality supports connections with up to three other IBM SAN switches. The base configuration includes eight SW-SFP transceivers. A mixture of eight SW, LW and extended LW-SFP features may be added. Figure 2-8 View of H16 Features and functions of model H08 and model H16 The model H08 and H16 provide the following features and functions: Chapter 2. Implementing a SAN with the b-type family 61 Provides eight (Model H08) or sixteen (Model H16) Fibre Channel ports with the following characteristics: – Automatic negotiation to the highest common speed of all devices connected to port. – Compatible port interfaces with small form factor pluggable (SFP) transceivers for both short wavelength (SWL), long wavelength (LWL) and extended long wavelength (ELWL). – Universal and self-configuring: capable of becoming an F_Port, FL_Port, or E_Port. Supports a domain limit of 2 for Model H08 and a domain limit of 4 for Model H16. A single (Model H08) or dual (Model H16) power supply with fixed fans A small 1U chassis that can be either rack-mounted or used in a table-top configuration. Runs Fabric OS 4.2 and supports the following licensed features: Advance Zoning, ISL, Fabric Watch, Advanced Performance Monitoring, Extended Fabrics, Remote Switch, Web Tools and Secure Fabric OS. It also has a concurrent code activation. Full fabric activation feature adds unlimited E_Ports. Distance capability feature increases buffer credits. One RS-232 serial port, designed to connect to a DTE port. One 10/100 MB/s Ethernet port with RJ-45 connector. Non-blocking performance architecture and distance support. For more information, H08 and H16 datasheets can be downloaded at: http://www.storage.ibm.com/ibmsan/products/2109/library.html#support 2.2.8 IBM TotalStorage SAN Switch 2109-M12 The IBM TotalStorage SAN Switch M12 is designed to be used as the core of a fabric, with its high availability and port count eliminating the need for multiple small switches. It can be used to upgrade from smaller existing 2109 core switches, or to implement a new large Fabric, and may be used as one or two separate switches. It is scalable, in 16 port increments, from a single 32 port switch up to 2 x 64 port switches, providing 128 ports in one chassis, utilizing autosensing 1 or 2 Gb/s full duplex SFP ports. Also providing redundant Control Processors (CP) for non-disruptive fail-over, concurrent code upgrade activation, and multiple 62 Implementing an Open IBM SAN redundant power supplies and fans, it has been designed to minimize any outage to SAN operation. We show a picture of the 2109-M12 in Figure 2-9. Figure 2-9 2109-M12 switch 2.2.9 IBM TotalStorage SAN Switch M12 product overview The director class IBM TotalStorage SAN Switch M12 is based on the same ASIC switching technology used in the IBM TotalStorage SAN Switches F08, F16, and F32. The M12 core switch supports both 1 Gb/s and 2 Gb/s auto-sensing ports as well as advanced fabric services that can simplify the Chapter 2. Implementing a SAN with the b-type family 63 design, administration, and management of enterprise SANs. The M12 provides investment protection, since it is fully compatible with existing IBM SAN Switches S08, S16, F08, F16, and F32, and it will provide a high performance, scalable, flexible, function rich, and reliable core to a large SAN fabric solution. The IBM TotalStorage SAN Switch M12 is equivalent to a Brocade silkworm 12000, and provides the following features: High availability with redundant / hot swappable components, FSPF rerouting around failed links, and non-disruptive firmware upgrades. Up to one hundred and twenty-eight non-blocking ports, each with full-duplex throughput at either 2 Gb/s per second or 1 Gb/s per second. The dual switch capability allows either one or two 64-port switches per chassis. The switches may be interconnected to create a high port count solution, or they can be used to create two independent fabrics. Auto-sensing ports that self-negotiate to the highest speed supported by the attached switch, server, or storage. Universal ports that self-configure as E_Ports, F_Ports, or FL_Ports. Each port supports the Small Form-Factor Pluggable (SFP) media with options for either shortwave optical connection for distances up to 300 meters, or longwave optical connections for distances up to 10 kilometers. The 14U package can be mounted in a standard 19 inch rack or purchased mounted in the IBM 2109-C36 SAN rack. Licenses for the M12 chassis apply to both logical switches, and include: Web Tools Full Fabric Advanced Zoning FabricWatch ISL-Trunking Advanced Performance Monitoring Optional licenses: Fabric Manager Extended Fabric Remote Switch Security Attention: QuickLoop support will not be provided with the M12 and M14 Switches. IBM TotalStorage SAN Switches with QuickLoop capability may be used to attach private loop devices in a core/edge fabric. 64 Implementing an Open IBM SAN All of the licensed features mentioned above are described in detail throughout this chapter. 2.2.10 Hardware components In this section we describe some of the hardware components of the IBM TotalStorage SAN Switch M12. Backplane At the heart of the M12 is a backplane, which has been designed to allow for future enhancements, including 10 Gb/s throughput, and 128 port single switch. It easily provides continuous 100% utilization and non-blocking throughput on all ports at the same time. The design also allows for the hot plugging of the blade assemblies. CP blade assembly The M12 contains two CP blade assemblies for redundancy. Referring to Figure 2-10, we show the CP blades installed in slots 5 and 6, providing a physical divider between the two logical switches of the chassis. The active CP provides control and management functions, including these: System initialization Switch drivers High availability drivers Name server System management Fabric OS Fabric Access Extended Fabrics Fabric Watch Remote Switch Web Tools Zoning Each CP blade has a PowerPC® 405GP 200-MHz microprocessor (PPC405) on the assembly. It contains a high-performance reduced instruction set computer (RISC) core, synchronous dynamic random access memory (SDRAM) controller, PCI bus interface, direct memory access (DMA) engine, serial ports, IC interface, read-only memory, and general purpose I/O. In addition, the CP blade assembly offers the following features: Hot-plugged interface circuitry to support reliability, availability, serviceability, and failover; if one CP stops functioning, the other CP automatically takes its place. An amber LED to indicate error status for the CP. Chapter 2. Implementing a SAN with the b-type family 65 A green LED to indicate the proper operation for the CP power. Ethernet ports Each CP blade has its own 10/100 BASE-T ethernet port, giving the ability to connect remotely to the switch through your ethernet network. Each port has LEDs to indicate speed and status, and they also are assigned separate IP addresses, allowing full redundancy, and LAN management access to the offline CP. Serial ports Each CP blade also contains 2 serial ports. The top serial port is for connection of a modem, which allows remote dial-in support to the switch. The lower serial port is for connection of an RS-232 compatible terminal port for command line interface (CLI) communication. Switch blade assembly Each switch blade assembly has 16 external Fibre Channel ports that run at an auto-negotiated rate of 1 Gb/s or 2 Gb/s. They support trunking, and are universal (E_Port, F_Port, and FL_Port). Port speed can be managed through the management interface. A full chassis, shown in Figure 2-10, may consist of up to eight switch blade assemblies, providing a maximum of 128 ports; while the minimum configuration is two switch blade assemblies, providing 32 ports. It is responsible for Fibre Channel switching circuitry, and houses the ASIC, backplane serial-deserializer (SERDES), external SERDES, and status LEDs for external SERDES such as port speed and port state, as well as the SFP fiber optic media. Each switch blade assembly is hot-pluggable, allowing installation of new blades while the switch is running to increase the port count of the switch or to replace a failed blade. This is accomplished by the high performance connectors to the backplane using long pins, short pins, or both to assure proper ground-voltage-signal sequencing. Field effect transistor (FET) switches, such as QuickSwitches, are used to isolate the PCI interfaces. When a switch blade assembly is inserted, the power regulation circuitry inhibits the in-blade DC converter (DCC) and keeps the switch blade assembly turned off. The CP, under software control, enables the DCC, and thus turns on the switch blade assembly. When the switch blade assembly is ready, it interrupts the CP for initialization. Each switch blade assembly has an on-board serial EEPROM that is only accessible through the IC bus interface. This serial EEPROM can be accessed by a CP to determine information, including: OEM serial number IBM serial number 66 Implementing an Open IBM SAN Manufacturing date Manufacturing location Part number Revision Error logs Figure 2-10 Port side view of the M12 Chapter 2. Implementing a SAN with the b-type family 67 Power supplies Looking at the port side of the M12, we can see four power supplies on the right hand side; we show this in Figure 2-10. These power supplies are split across the two AC inputs. That is to say, power supplies 1 and 3 are fed from the left-hand AC input, and power supplies 2 and 4 are fed from the right-hand AC input. With this power distribution configuration, a fully configured chassis is capable of continuous operation during periods of losing any two power supplies. The power supplies are hot-pluggable for non-disruptive repair actions. Blower assembly side The WWN bezel is found at the top of the blower side of the chassis. The WWN card contains status LEDs, chassis serial number, the IP addresses assigned to the CP cards, and the logical switch names, IP addresses, and WWNs for the two logical switches (switch 0 assumes the WWN of the chassis, and switch 1 is the chassis WWN + 1). The LEDs show the OK/Attention status of the port side blades and power supplies, as shown in Figure 2-11. The WWN card is concurrently replaceable after v4.1 of firmware. At levels prior to v4.1, it is not replaceable without disrupting the chassis operation. Blowers There are three blower assemblies in the M12; these provide the cooling to the chassis components. If a blower fails, the remaining two blowers increase their speed to continue adequate cooling. The blower assemblies are hot-pluggable for non-disruptive replacement. Should a second blower fail, the M12 has been designed to sequence down the switch blades, so as not to overheat and damage any components. This sequence is predefined, but may also be modified to suit your configuration, and can maintain a degraded system configuration during such circumstances. 68 Implementing an Open IBM SAN Figure 2-11 Blower side view Locations The M12 uses a numbering scheme to reference components and ports. Component numbering starts from left to right, and bottom to top, as shown in Figure 2-10 on page 67. Power supplies number from 1 at the bottom through 4 at the top. Slots are numbered from 1 on the left through 10 on the right. Port blades installed in slots 1 through 4 are part of logical switch 0, while blades installed in slots 7 through 10 are part of logical switch 1. We show this in Figure 2-12. Chapter 2. Implementing a SAN with the b-type family 69 Logical Switch 0 Logical Switch 1 Figure 2-12 Logical Switch layout Physical port numbering for each port card begins with port 0 at the bottom, and port 15 at the top of the card, as shown in Figure 2-13. Port 15 Port 0 Figure 2-13 Physical port numbering 70 Implementing an Open IBM SAN As each logical switch can have up to 64 ports, there is a need to number these ports from a switch perspective, not just at a blade level. This switch port numbering is known as port area (sometimes referred to as the absolute port number), numbering the ports for each logical switch from area 0 through 63. Using the Command Line interface, zoning commands use the port area numbering, while other commands require the slot/port method. Refer to section “Selecting ports on the M12 or the M14” on page 117 for more information. At a telnet command line session, we can display the slot / port numbering in relation to the area numbering by using the switchShow command. We show the output of this for our logical switch 0: sw96:admin> switchshow switchName: sw96 switchType: 10.1 switchState: Online switchRole: Principal switchDomain: 1 switchId: fffc01 switchWwn: 10:00:00:60:69:80:06:7a switchBeacon: OFF blade1: Beacon: OFF blade3: Beacon: OFF Area Slot Port Gbic Speed State ===================================== 0 1 0 id N2 No_Light LE 1 1 1 id N2 No_Light 2 1 2 id N2 No_Light 3 1 3 id N2 No_Light 4 1 4 id N2 No_Light 5 1 5 id N2 No_Light 6 1 6 id N2 No_Light 7 1 7 id N2 No_Light 8 1 8 id N2 No_Light 9 1 9 id N2 No_Light 10 1 10 id N2 No_Light 11 1 11 id N2 No_Light 12 1 12 id N2 No_Light 13 1 13 id N2 No_Light 14 1 14 id N2 No_Light 15 1 15 id N2 No_Light 32 3 0 id N2 No_Light 33 3 1 id N2 No_Light 34 3 2 id N2 No_Light 35 3 3 id N2 No_Light 36 3 4 id N2 No_Light Chapter 2. Implementing a SAN with the b-type family 71 37 38 39 40 41 42 43 44 45 46 47 3 3 3 3 3 3 3 3 3 3 3 5 6 7 8 9 10 11 12 13 14 15 id id id id id id id id id id id N2 N2 N2 N2 N2 N2 N2 N2 N2 N2 N2 No_Light No_Light No_Light No_Light No_Light No_Light No_Light No_Light No_Light No_Light No_Light The table presented in Figure 2-14 shows the area number for each physical port location. The Physical Slot number refers to logical switch 0 / logical switch 1 slot position. The Logical Slot numbering is only used to help define the FC address. Figure 2-14 Physical port location to area numbering cross reference 2.2.11 IBM TotalStorage SAN Switch M14 The director class IBM TotalStorage SAN Switch M14 is a 128-port non-blocking core fabric SAN switch that delivers high performance, scalability, flexibility, 72 Implementing an Open IBM SAN functionality and availability. It can have a 32 to 128 ports in a single domain. The M14 bladed switch architecture expands connectivity in sixteen port increments providing full-duplex link speeds of 1 and 2 Gb/s capable of automatically negotiating to the highest speed supported by the attached server, storage or switch. A mixture of shortwave and longwave ports can be configured by adding optical SFP transceivers. This director class IBM TotalStorage SAN Switch M14 is designed to provide high-availability with redundant hot pluggable components. It protects Customer’s investments, since they are compatible to all existing IBM TotalStorage SAN switches. A fully-configured IBM TotalStorage SAN Switch M14 shown in Figure 2-15 also consumes approximately 60% less power compared to a fully-configured IBM TotalStorage SAN Switch M12. Figure 2-15 2109-M14 Switch The IBM TotalStorage SAN Switch M14 enhances IBM TotalStorage SAN Switch M12 functionality and provides the following features: 128 ports in a single chassis that provides a high-density, rack-ready solution for SAN backbones. Chapter 2. Implementing a SAN with the b-type family 73 Enables non-disruptive scalability from 32 to 128 ports since it can support 128 concurrently active 2 Gb/s full-duplex ports in a single domain. High-availability platform for mission-critical SAN designed applications. Dual, redundant control processors (CP) which enables nondisruptive software upgrades. Nonblocking architecture that provides all 128 ports to operate at full 2 Gb/s speed simultaneously. Universal ports that self-configure as E_Port, F_Port, or FL_Port. Each ports supports Small Form-Factor Pluggable (SFP) optical transceivers with options for either short wavelength (SWL), long wavelength (LWL) and extended longwavelength (ELWL) optical media on a single switch module (the 16-port card).Multiprotocol design supports additional blades, such as application platform blades and blades that provide iSCSI and FCIP capabilities. Support for 1 and 2 Gb/s autosensing Fibre Channel ports (trunking technology groups up to four ports together to create high-performance 8 Gb/s ISL trunks between switches. Standard License features includes: Fabric Watch Advance Web Tools Advanced Zoning ISL Trunking Advanced Performance Monitoring Optional features activated by License key includes: Extended Fabrics Remote Switch Advanced Security Fabric Manager 2.2.12 Hardware Components M14 In this section, we describe some of the hardware components of the IBM TotalStorage SAN Switch M14. 74 Implementing an Open IBM SAN Backplane At the heart of the M14 is a backplane, which has been designed to allow for future enhancements, including 10 Gb/s throughput, and 128 port single switch. Note that the M14 can also be configured like an M12 as two logical switches. It easily provides continuous 100% utilization and non-blocking throughput on all ports at the same time. The design also allows for the hot plugging of the blade assemblies. CP blade assembly The M14 contains two CP blade assemblies for redundancy. Referring to Figure 2-15 on page 73, we show the CP blades installed in slots 5 and 6. The active CP provides control and management functions, including these: System initialization Switch drivers High availability drivers Name server System management Fabric OS Fabric Access Extended Fabrics Fabric Watch Remote Switch Web Tools Zoning Each CP blade has a PowerPC® 405GP 200-MHz microprocessor (PPC405) on the assembly. It contains a high-performance reduced instruction set computer (RISC) core, synchronous dynamic random access memory (SDRAM) controller, PCI bus interface, direct memory access (DMA) engine, serial ports, IC interface, read-only memory, and general purpose I/O. In addition, the CP blade assembly offers the following features: Hot-plugged interface circuitry to support reliability, availability, serviceability, and failover; if one CP stops functioning, the other CP automatically takes its place. An amber LED to indicate error status for the CP. A green LED to indicate the proper operation for the CP power. Ethernet ports Each CP blade has its own 10/100 BASE-T ethernet port, giving the ability to connect remotely to the switch through your ethernet network. Each port has LEDs to indicate speed and status, and they also are assigned separate IP addresses, allowing full redundancy, and LAN management access to the offline CP. Chapter 2. Implementing a SAN with the b-type family 75 Serial ports Each CP blade also contains 2 serial ports. The top serial port is for connection of a modem, which allows remote dial-in support to the switch. The lower serial port is for connection of an RS-232 compatible terminal port for command line interface (CLI) communication. Switch blade assembly Each switch blade assembly has 16 external Fibre Channel ports that run at an auto-negotiated rate of 1 Gb/s or 2 Gb/s. They support trunking, and are universal (E_Port, F_Port, and FL_Port). Port speed can be managed through the management interface. A full chassis, shown in Figure 2-15 on page 73, may consist of up to eight switch blade assemblies, providing a maximum of 128 ports; while the minimum configuration is two switch blade assemblies, providing 32 ports. It is responsible for Fibre Channel switching circuitry, and houses the ASIC, backplane serial-deserializer (SERDES), external SERDES, and status LEDs for external SERDES such as port speed and port state, as well as the SFP fiber optic media. Each switch blade assembly is hot-pluggable, allowing installation of new blades while the switch is running to increase the port count of the switch or to replace a failed blade. This is accomplished by the high performance connectors to the backplane using long pins, short pins, or both to assure proper ground-voltage-signal sequencing. Field effect transistor (FET) switches, such as QuickSwitches, are used to isolate the PCI interfaces. When a switch blade assembly is inserted, the power regulation circuitry inhibits the in-blade DC converter (DCC) and keeps the switch blade assembly turned off. The CP, under software control, enables the DCC, and thus turns on the switch blade assembly. When the switch blade assembly is ready, it interrupts the CP for initialization. Each switch blade assembly has an on-board serial EEPROM that is only accessible through the IC bus interface. This serial EEPROM can be accessed by a CP to determine information, including: 76 OEM serial number IBM serial number Manufacturing date Manufacturing location Part number Revision Error Logs Implementing an Open IBM SAN Power supplies Looking at the port side of the M14, we can see four power supplies on the right hand side; we show this in Figure 2-16. These power supplies are split across the two AC inputs. That is to say, power supplies 1 and 3 are fed from the left-hand AC input, and power supplies 2 and 4 are fed from the right-hand AC input. With this power distribution configuration, a fully configured chassis is capable of continuous operation during periods of losing any two power supplies. The power supplies are hot-pluggable for non-disruptive repair actions. Figure 2-16 M14 Port Side View Chapter 2. Implementing a SAN with the b-type family 77 Blower assembly side The WWN bezel is found at the top of the blower side of the chassis. The WWN card contains status LEDs, chassis serial number, and the IP addresses assigned to the CP cards. The LEDs show the OK/Attention status of the port side blades and power supplies, as shown in Figure 2-17. The WWN card is concurrently replaceable after v4.1 of firmware. At levels prior to v4.1, it is not replaceable without disrupting the chassis operation. Blowers There are three blower assemblies in the M14; these provide the cooling to the chassis components. If a blower fails, the remaining two blowers increase their speed to continue adequate cooling. The blower assemblies are hot-pluggable for non-disruptive replacement. Should a second blower fail, the M14 has been designed to sequence down the switch blades, so as not to overheat and damage any components. This sequence is predefined, but may also be modified to suit your configuration, and can maintain a degraded system configuration during such circumstances. 78 Implementing an Open IBM SAN Figure 2-17 M14 Blower Side View Physical port numbering for each port card begins with port 0 at the bottom, and port 15 at the top of the card as show in Figure 2-18. Chapter 2. Implementing a SAN with the b-type family 79 Figure 2-18 M14 Physical Port Numbering The M14 is a logical switch that can have up to 128 ports. The switch port numbering is known as port area (sometimes referred to as the absolute port number), numbering the ports for each logical switch from area 0 through 127. Note that the M14 can also be configured as two logical switches like an M12. Using the Command Line interface, zoning commands use the port area numbering, while other commands require the slot/port method. 2.2.13 IBM TotalStorage SAN Switch B32 IBM TotalStorage SAN Switch B32 model is the first switch to introduce 4 Gb/s throughput capability to mid-range and enterprise SANs as well as Ports On Demand. The front view of the switch is shown in Figure 2-19. This switch includes Fabric OS 4.4 and features full forward and backward compatibility with all the IBM TotalStorage SAN switch models. 80 Implementing an Open IBM SAN Figure 2-19 B32 Front 2.2.14 Product Overview Features and functions of IBM TotalStorage SANB32 Switch 4Gbs per second port-to-port throughput with auto-sensing capability for connecting to existing 1, 2, and 4 gigabit host servers, storage and switches 1U form factor for enhanced port density and space utilization High availability features – 3 hot-pluggable redundant fans – 2 hot-pluggable redundant power supplies – automatic path routing Scalability from mid-range to very large enterprise SAN fabrics 32 non-blocking ports with full duplex throughput at 1, 2 or 4 gigabits per second link speeds Support for 2- and 4- gigabit short wave and long wave small form-factor pluggable (SFP) optical transceivers Open Fibre Channel Protocol (FCP) support One RS-232 serial port (DB-9 connector) One 10/100 MB/sec Ethernet port with an RJ-45 connector LEDs that indicate: – – – – – – – Power statue System status Ethernet status Ethernet speed Port status and port speed for each port Power supply status for each power supply Fan status for each fan Web browser interface compatible with any Java-enabled browser provides configuration monitoring and diagnostics using the Internet or intranet Chapter 2. Implementing a SAN with the b-type family 81 Scalable (16, 24 or 32 ports) to accommodate a broad range of connectivity solutions for a wide variety of host and storage types (optional Port Activation feature available for upgrade to 24 and 32 ports) Auto Fabric discovery allows external host and storage systems to discover other supported SAN-enabled systems that are connected to the fabric Base features include: Advanced Zoning, Web Tools, Fabric Watch, FOS 4.4 Optional features include: Additional Port Activation, Fabric Manager V4 Max Supported Domains, Extended Fabrics, Remote Switch, Advanced Security, Inter-Switch Link (ISL) Trunking and Performance Monitor Hardware components Port side of the B32 As seen below in Figure 2-20, the serial port, Ethernet port and the Fibre Channel ports are all located on this side of the switch. All LEDs except the fan and power supply LEDs are located on the port side of the switch. These LEDs display the system status, power status, port status, and port speed. The switch ID pull-out tab is located on the port side of the switch, directly below the serial and Ethernet ports. Figure 2-20 B32 Port Side View The B32 enclosure has forced-air cooling, with the fans pushing the air from the non-port side of the chassis through the enclosure, and exhausting through the holes on the port side. The Fibre Channel ports are numbered from left to right in eight-port groups as noted in Figure 2-21. They are also numbered on the faceplate between the Fibre Channel port status and port speed LEDs shown in Figure 2-20. Each group of eight ports is referred as an ‘octlet’. This makes creating 4 or 8 port trunking groups much easier. It also used expanding to 24 and 32 ports (additional port activation). 82 Implementing an Open IBM SAN Figure 2-21 B32 Port Numbering Nonport side of B32 The non port side of the B32 as seen in Figure 2-22 contains the two redundant hot-pluggable power supplies. Each power supply has a built-in fan for cooling. The switch also has three redundant hot-pluggable fan assemblies for cooling the entire switch. These fans have two speeds which are set automatically and cannot be modified. They default to high speed upon boot, then switch to low speed as Fabric OS comes online, returning to high speed only as required. Figure 2-22 B32 Non port side 2.2.15 Support Optional Features The base B32 supports the following optional licensed software which can be activated with the purchase of the corresponding license key. Additional Port Activation (also described as Ports on Demand) Fabric Manager V4 max Domains Remote Switch Extended Fabric Advanced Security Performance Bundle (Performance Monitoring and ISL Trunking) We describe these briefly in the next paragraphs. Additional Port Activation The base B32 model comes with the first sixteen ports enabled. Customers can optionally purchase port activation for ports seventeen to twenty-four (first eight port increment) and ports twenty-five to thirty-two (second eight port increment). Port activation features do not include fibre optic transceivers. Chapter 2. Implementing a SAN with the b-type family 83 Fabric Manager V4 Max Domains The Fabric Manager V4 Max Domains optional feature is designed to enhance capabilities of the Java™ based Fabric Manager application to help simplify management of up to eight fabrics. The key functions are: Enhanced security management Additional RAS features Call-home capabilities We will discuss Fabric Manager V4 requirements later in this chapter. Remote Switch Remote Switch Activation extends the distance of SAN fabric by enabling two Fibre Channel switches to interconnect with a pair of CNT’s Open System Gateways across an asynchronous transfer mode (ATM) WAN. Extended Fabric Extended Fabric Activation extends SAN fabrics beyond the Fibre Channel standard 10 km by optimizing the internal switch buffers to maintain performance on ISL at distances up to 70 km. Advanced Security Advanced Security Activation is designed to enable policy-based security mechanisms integrated within FOS versions 2.6, 3.1, and 4.1. To enable advanced security capabilities, all switches within the IBM SAN Switches Fabric must be configured with their respective FOS version (2.6, 3.1 and 4.1) before activating the Advanced Security feature license key. When activated across the IBM SAN Switch Fabric, the Advanced Security Activation feature offers these comprehensive security capabilities: Centralized security management (trusted switches) Fabric-wide security policies to control access Port-level access control Switch-level access control Management access controls (Telnet, SNMP, HTTP, API) Encryption of management data such as passwords Strong and non-reputable authentication between switches Performance Bundle ISL Trunking Performance Bundle Activation adds support ISL-Trunking with up to four links and up to eight GB/s bandwidth. A trunking license is required on both switches that participate in trunking. 84 Implementing an Open IBM SAN To create 8 port trunk on B32, need another B32 as well as 4 Gb/s SFPs. The latest improvements in trunking - optimal performance by distributing traffic across the shared bandwidth of all interswitch links on the trunk. Figure 2-23 Increased Trunking capability Figure 2-24 Dynamic Path Selection example Performance Monitoring Chapter 2. Implementing a SAN with the b-type family 85 Advanced Performance Monitoring provides SAN performance monitoring through an end-to-end monitoring system that provides: Increased end-to-end visibility into the fabric. More accurate reporting for service-level agreements and charged access applications. Shortened troubleshooting time. Better capacity planning. Increased productivity through preformatted and customized screens and reports. Note: In FOS 4.4 the AL_PA measurements for end-to-end monitors is no longer available. The CRC error count can still be obtained through the Web Tools. 86 Implementing an Open IBM SAN 2.3 Installing the IBM TotalStorage SAN Switch The first step to install an IBM TotalStorage SAN Switch is the physical mounting and connection to electrical outlets. This is the customer’s responsibility, although the IBM TotalStorage SAN Switch 2109-M12 and M14 can be purchased separately or pre-installed in the 2109-C36 SAN rack, and it is the responsibility of the IBM service representative to physically install the chassis or rack in the location you have planned. Once the switch is installed and powered on, it will require some initial configuration parameters to be set. All of the b-type switches require the same initial setup. The steps have not changed from the earlier switch models. A service may be purchased from IBM to perform these steps: IP addresses: To access the management interfaces of a switch from a remote workstation on a network, we need to set the IP address, subnetmask, and gateway address for the switch, or for each of the logical switches in an M12. These settings can be modified using the ipAddrSet command. We show the steps to perform this in “Setting the IP address using the serial port” on page 88. The default IP address and subnet mask for the F08, F16 and F32 switches is as follows: – 10.77.77.77 255.255.255.0 The default logical IP addresses, subnet mask and switch names for an M12 are as follows. These IP addresses correspond to “sw0”, (slots 1-4), and “sw1”, (slots 7-10): – 10.77.77.77 255.255.255.0 sw0 – 10.77.77.76 255.255.255.0 sw1 An M12 also has native IP addresses to access each CP card. The default native IP addresses, subnet masks, and hostnames are as follows: – 10.77.77.75 255.255.255.0 CP0 (the CP Card in slot 5 at the time of configuration) – 10.77.77.74 255.255.255.0 CP1 (the CP Card in slot 6 at the time of configuration) Domain ID: For switches to be connected together within a fabric, each switch must have different domain ID’s. The default domain ID for a switch is 1. In an M12 the domain ID for the logical switch in slots 1 through 4, and the logical switch in slots 7 through 10, are both 1 by default. If two switches are connected via ISL after initialization is complete, they will segment due to both switches having the same domain ID. Domain IDs can be modified using Chapter 2. Implementing a SAN with the b-type family 87 the configure command. We show an example of how to do this in “Connecting to the switch” on page 98. Switch names: Setting a switch name to identify different switches within a site is recommended. This is very helpful in identifying a switch easily that you are connected to. By using the switchname command you can assign your own switch names that can be up to 15 characters long, must begin with an alpha character, and can include alpha, numeric, and underscore characters. Following are the steps we took to configure the above settings and connect our switch for use in a network and fabric. We also include the extra steps required to configure a 2109-M12. The time required to accomplish this is approximately 15 minutes. The items required are: 2005 or 2109 physically installed and connected to a power source Workstation that has a terminal emulator application (we used HyperTerminal) Serial cable provided with the switch, for connecting the switch to the workstation An unused IP address (2109-M12 requires four IP addresses) Ethernet cable for connecting the switch to the workstation or to a network containing the workstation SWL or LWL SFPs and fiber optic cables as required 2.3.1 Setting the IP address using the serial port As IBM TotalStorage SAN Switches ship with a default IP address, it is possible to perform initial configuration using a telnet connection and the 10.77.77.77 address. However, we recommend not to connect the switch to your LAN until IP settings are properly configured and will not conflict with any other devices in your network. Following are the steps we used to set the IP address using the serial port on an IBM TotalStorage SAN Switch F16. The procedure is the same for all b-type switches except for the IBM TotalStorage SAN Switch M12 where the procedure is different. We show the steps for an M12 in “M12 configuration procedure” on page 92. 1. Remove the shipping plug from the serial port and insert the serial cable provided with the switch. 2. Connect the other end of the serial cable to an RS-232 serial port on the workstation. 88 Implementing an Open IBM SAN Tip: The serial cable shipped with the switch is a straight-through cable, not a cross-over cable. We recommend labeling the cable as such to minimize confusion at a later date. 3. Verify that the switch is on and initialization has completed; refer to “Initialization” on page 53. 4. Disable any serial communication programs running on the workstation, such as PDA synchronization. 5. Open a terminal emulator application (such as HyperTerminal on a PC, or TERM in a UNIX® environment), and configure as follows: a. In a Microsoft® Windows® environment, adjust the following parameters and values if necessary: • • • • • Bits per second: 9600 Databits: 8 Parity: None Stop bits: 1 Flow control: None Figure 2-25 HyperTerm COM1 properties window Chapter 2. Implementing a SAN with the b-type family 89 b. In a UNIX environment, enter the following string at the prompt: tip /dev/ttyb -9600 6. From the terminal emulator application, log on to the switch through the serial connection. The default administrative logon is admin and the default password is password. 7. Enter the following at the prompt: ipAddrSet 8. Enter the following information at the corresponding prompts, listed below: Ethernet IP Address [10.77.77.77]: Enter new ethernet IP address Ethernet Subnetmask [255.255.254.0]: Enter new ethernet subnetmask Fibre Channel IP Address [none]: Enter new Fibre Channel IP address if desired Fibre Channel Subnet Mask [none]: Enter new Fibre Channel subnet mask if desired Gateway Address [none]: Enter new gateway address Set IP address now? [y = set now, n = next reboot]: Enter “y” to set now 9. We can verify that the address was correctly set by entering the following: ipAddrShow 10.Once the IP address is verified as correct, remove the serial cable, and replace the shipping plug in the serial port. Note: The serial port is intended only for use during the initial setting of the IP address and for service purposes. Using the serial port during normal switch operation or for regular maintenance is not recommended. 11.Record the IP address for future reference. 90 Implementing an Open IBM SAN In Figure 2-26, we show how the foregoing steps are performed. Figure 2-26 Setting the Ethernet IP address Once the IP address is set, we are able to connect the switch to the workstation computer by ethernet cable (this can be a direct cross-over connection or through a network) by following these steps: 1. Remove the shipping cover from the ethernet port. 2. Insert one end of an ethernet cable in the ethernet port. 3. Connect the other end of the ethernet cable to the workstation or to an ethernet network containing the workstation. Note: The switch can now be accessed remotely, through Telnet or Web Tools. As a result, it is important to ensure that the switch is not being modified simultaneously from any other connections during the remaining steps. 4. Continue with “Connecting to the switch” on page 98. Chapter 2. Implementing a SAN with the b-type family 91 M12 configuration procedure After verifying that the M12 is on and POST tests have completed, we log on to the CP Card installed in slot 5 by establishing a serial connection from our workstation that has a terminal emulator application (such as HyperTerminal for Windows, or TERM in a UNIX environment). Tip: Disable any serial communication programs running on the workstation (such as synchronization programs for a PDA). 1. Remove the protective shipping cap from the terminal serial port on the CP Card in slot 5, and insert the serial cable. The terminal serial port is the second serial port from the top of the CP Card, shown in Figure 2-10 on page 67. 2. Open your terminal emulator application and configure as described below. For Windows, we must set our terminal emulator for the following parameters: Bits per second: Databits: Parity: Stop bits: Flow control: 9600 8 None 1 None For most UNIX systems, enter the following string at the prompt: tip /dev/ttyb -9600 When the terminal emulator application stops reporting information, press Enter to get the following prompt: At the following prompt, we enter 0 to log in to switch 0: Enter switch number to login <0 or 1>: 0 3. We enter the administrative logon admin and the password of password. CP0 Console Login: At the initial login we are prompted to enter new Admin and User passwords. The same administrative account applies to both logical switches. If the passwords are changed on switch 0, they are automatically changed on switch 1. We bypassed modifying the password, by pressing CTRL-C. 4. When we arrive at the Command prompt we need to determine which CP Card is active by using the haShow command: switch:admin> haShow Local CP (Slot 5, CP0): Active Remote CP (Slot 6, CP1): Standby HA Enabled, Heartbeat Up 92 Implementing an Open IBM SAN We can see that CP0 is active and must use this CP to perform the IP configuration for both CP cards. Tip: If the CP Card in slot 5 is not the active CP Card, disconnect the serial cable from the CP Card, connect it to the CP Card in slot 6, and log on again. 5. First we set the IP addresses for the CP cards: a. Using the ipAddrSet command at the prompt, and entering 2 for the CP Card in slot 5, or 3 for the active CP Card in slot 6. For example: switch:admin> ipAddrSet 2 Entering ipAddrSet alone will prompt for the switch or CP number: Switch number [0 for switch0, 1 for switch1, 2 for CP0, 3 for CP1]: 2 b. Enter the requested information at the prompts, as shown below (the current information is shown in square brackets): Ethernet IP Address [10.77.77.75]: 9.43.236.107 Ethernet Subnetmask [255.0.0.0]: 255.255.254.0 Host Name [switch0]: Gateway Address [0.0.0.0]: 9.43.236.1 Important: The same gateway address must be used for both CP Cards (these gateway addresses are referenced for the logical IP addresses). The native IP address of the active CP Card is updated immediately. The native IP address of the standby CP Card is updated at the next reboot. c. Repeat Step 5a-b for the other CP Card by issuing ipAddrSet 3 command. 6. Next we configure the two logical switch IP addresses: a. To configure the first logical switch IP address, we enter ipAddrSet 0 at the prompt and enter the requested information: switch:admin> ipAddrSet 0 Ethernet IP Address [10.77.77.77]: 9.43.236.96 Ethernet Subnetmask [0.0.0.0]: 255.255.254.0 Fibre Channel IP Address [none]: Fibre Channel Subnet Mask [none]: The logical IP address is updated immediately. b. Next we configure the second logical switch IP address, by entering ipAddrSet 1 at the prompt: Enter the requested information for this IP address at the prompts, as described in Step 6a. Chapter 2. Implementing a SAN with the b-type family 93 7. Reboot the switches by entering reboot at the prompt: switch:admin> reboot Important: If the reboot command is issued from the active CP, it will reboot the entire cabinet (both switches). If reboot is issued while connected to the standby CP, only the standby CP will reboot. After monitoring the messages during reboot for any errors, we remove the serial cable and replace the protective dust cap on the port. Now connection of the ethernet interfaces to our corporate LAN enables us to manage the switches by using Fabric Manager, Web Tools, or telnet. To change any CP setting, we are only able to perform this by using the Serial connection, or Telnet to the Active CPs assigned IP address. Tip: The M12 supports a maximum of two telnet sessions with administrative privileges at the same time. 8. Now by using telnet to a logical switch IP address, we are able to change the switch name by using the switchName command, this will cause a domain address format RSCN to be issued to the fabric. We recommend not changing the switch name unless necessary for your installation; we chose to change ours to sw96 as shown: switch:admin> switchName "sw96" 9. As we changed the slot1-4 switch name (sw0), we also need to change the name of the logical switch in slots 7-10 (sw1). To do this we need to telnet to the address of that switch and use the switchName command again to change the name to sw97 in our case, as shown in Figure 2-27. 94 Implementing an Open IBM SAN Figure 2-27 Telnet login to Logical switch 1 (slots 7-10) Attention: Telnet to the active CP, the logical switch in slots 1-4 (sw0), or the logical switch in slots 7-10 (sw1), all look the same at initial logon. Telnet to sw1 will be different with the command prompt showing its switch name, although telnet to the active CP or sw0 will display the same logical switch name at the prompt. Care must be taken as some commands will not be available between CP sessions and logical switch sessions, and some commands may have very different results from what was expected. 10.Next we can change the default domain ID for both switches if required. Both logical switches are set to ID “1” from the factory, so to prevent a domain ID conflict, we make the domain IDs unique before connecting the switches to a fabric. A list of current domain IDs is available by using the fabricShow command. To change the domain ID from telnet, we perform the following steps, and this is also shown in Figure 2-28. a. Disable the switch using the switchDisable command. b. Enter the configure command. c. Reply y to the configure Fabric parameters prompt. d. Enter the new ID 2 at the Domain prompt. e. Complete the remaining prompts (or press CTRL+d to accept the other settings and exit). f. Enter switchEnable to re-enable the switch. g. Perform steps 10a through 10f for the other switch if required. Chapter 2. Implementing a SAN with the b-type family 95 Figure 2-28 Configuring Domain ID from Telnet Optional modem setup The M12 and M14 have the ability for modems to be connected to each CP card, to allow a redundant remote dial up facility into the switches for remote support. The modems are not supplied with the switch, and Hayes compatible modems must be purchased separately if you wish to use this facility. As the modems can only be detected at power on of the chassis, or CP failover, we recommend connecting them now. One modem is attached to each CP card. The active CP will answer an incoming call after one ring. If for some reason the Active CP is unable to accept the call, the Standby CP will answer the call after 7 rings. For this to occur, both modems need to share the same telephone line, as this sharing also allows a single number to be used to dial into the chassis no matter which CP is active. See Figure 2-29. 96 Implementing an Open IBM SAN Figure 2-29 Optional modem line and data connections Remote connection settings For Windows, we must set our terminal emulator for the following parameters: Parameter Port Speed (bits per second) Data Protocol Compression Flow control Data bits Parity Stop bits Modulation Value 115200 Standard EC Enabled Hardware 8 None 1 Standard Chapter 2. Implementing a SAN with the b-type family 97 Now, entering the telephone number into your Emulator program should dial and successfully connect to the active CP allowing the command line interface to be used. 2.3.2 Connecting to the switch Once the switch IP address is set, we need to set the operating parameters (for example, domain ID) and insert SFPs before connecting it to the fabric. We perform the following steps to prepare for fabric connection: 1. Log on to the switch by using Telnet. The default administrative logon is admin and the default password is password. 2. Modify the domain IDs if desired. Note: The default domain ID is 1. If both switches are powered on, and the domain ID is already in use when the switch is connected to the fabric, the fabric will segment. If the new switch is connected and then powered on, the domain ID for the new switch is automatically negotiated to a unique value. The domain IDs currently in use can be determined by issuing the command fabricShow. a. Disable the switch by entering: switchDisable b. Enter the following command: configure c. Enter “y” after the “Fabric parameters” prompt: Fabric parameters (yes, y, no, n): [no] y d. Enter a unique domain ID (such as the domain ID used by the previous switch, if still available). Domain: (1..239) [1] 3 e. Complete the remaining prompts (or press CTRL+D to accept the remaining settings without completing all the prompts). f. Re-enable the switch by entering: switchEnable 3. We set the switchname to itsosw4 by entering: switchname “itsosw4” Entering switchname without any parameter will display the current name. 98 Implementing an Open IBM SAN 4. An optional step is to specify any custom status policies for the fabric: a. Enter the following at the prompt: switchStatusPolicySet b. Specify the desired status policies. To completely deactivate the alarm for a particular condition, enter “0” at the prompt for that condition. 5. Add SFPs and fiber optic cables to the ports as required. Note: The ports and cables used in trunking groups must meet specific requirements. a. Remove the shipping plug from the ports to be used. b. Position the SFP so that the key (the tab near the cable-end of the SFP) is on top, and insert the SFP into the port until it is firmly seated and the latching mechanism makes a clicking sound. For specific instructions, refer to the SFP manufacturer’s documentation. Note: The SFP module is keyed so that it can only be correctly inserted into the port. If the module does not slide in easily, try turning it over. c. Connect the fiber optic cables to the SFPs as appropriate to the fabric topology by positioning each cable so that the key (the ridge on one side of the cable connector) is aligned with the slot in the SFP, then inserting the cable into the SFP until it is firmly seated and the latching mechanism makes a clicking sound. Note: The cable is keyed so that it can only be correctly inserted into the SFP. If the cable does not slide in easily, try turning it over. 6. Verify the correct operation of the switch. a. Enter the following at the Telnet prompt: switchShow Note: This command provides information about the status of the switch and the ports. Backing up the configuration after any initial configuration changes, and periodically thereafter, is strongly recommended. This ensures that a complete configuration is available if ever required for uploading to a replacement switch. Chapter 2. Implementing a SAN with the b-type family 99 2.3.3 Setting Core PID format The Core PID format parameter is a fabric wide parameter that needs to be set in legacy 1-2 Gb/s and 16 port switches (3534-S08, 2109-F08 and 2109-F16) for port addressing capability with newer switches (2109-F32, 2005-H08, 2005-H16, 2109-M12, 2109-M14 and 2005-B32). As the change to set this parameter is disruptive to switch and fabric operation, we recommend setting this parameter during fabric install, to make adding an H08, H16, F32, M12, M14 or B32 at a later date, be of minimal impact. Important: The Core PID format must be set on ALL switches with FOS 2.X or 3.X if your SAN includes or will include a 2109-F32, 2109-M12 or 2109-M14. By setting it without an F32, M12, M14 or B32 present, we are preparing our fabric for a future capacity upgrade with minimal disruption. The Core PID option requires a minimum firmware level of v2.6.0c (for 1RU, S08, and S16 switches) and v3.0.2c (for F08 and F16). Before attempting to set the Core PID format, check to see if it is already set. Later switch models are shipped with the Core PID format already set to 1. Switches shipped with 4.x FOS already have a Core PID format of 1. To check and set the Core PID format, open a telnet session to the switch. Issue the configShow “fabric” command: itsosw4:admin> configshow "fabric" fabric.domain: 4 fabric.ops.BBCredit: 16 fabric.ops.E_D_TOV: 2000 fabric.ops.R_A_TOV: 10000 fabric.ops.dataFieldSize: 2112 fabric.ops.max_hops: 7 fabric.ops.mode.SeqSwitching: 0 fabric.ops.mode.fcpProbeDisable: fabric.ops.mode.isolate: 0 fabric.ops.mode.longDistance: 0 fabric.ops.mode.noClassF: 0 fabric.ops.mode.pidFormat: 0 fabric.ops.mode.sync: 0 ~~~~~~~~~~~~~~~~~~~~~~~~~~~~~~~~~~~~~ lines deleted for clarity ~~~~~~~~~~~~~~~~~~~~~~~~~~~~~~~~~~~~~ Type <CR> to continue, Q<CR> to stop: 100 Implementing an Open IBM SAN 0 Note: New FOS version show ‘switch pid format’ instead of CORE PID. There are also three options (0, 1 or 2) at 4.4.x FOS. Note that the Core PID is to zero so we will now set the Core PID by following these steps: 1. Disable the switch with the switchDisable command: switchdisable 2. Run the configure command: configure 3. The command prompts you to set Fabric Parameters. Type y: Fabric parameters (yes, y, no, n): [no] y 4. Press Enter to use default parameters for settings until you are prompted for the Core PID format setting. Set the parameter to 1. Core Switch PID Format: (0..1) [0] 1 5. Continue to press Enter to skip other settings. You should get the following message: Committing configuration...done. 6. Enable the switch: switchenable 7. Fastboot the switch: fastboot 2.3.4 Setting the date Now is also a good opportunity to set the date and time in the switch. Although a switch with incorrect date and time will function properly, it is used for time stamping during logging of events. We suggest setting these parameters prior to any further operations. We do this by using the date “MMDDhhmmYY” command, where MM = Month, DD = Day, hh = hour, mm = minutes, YY = Year. Setting the Time and Date in one switch will also set the other switch. An example of this is shown in Figure 2-30. Chapter 2. Implementing a SAN with the b-type family 101 Figure 2-30 Setting the time and date with telnet The firmware is year 2000 compliant. Year values greater than 69 are interpreted as 1970 - 1999; year values less than 70 are interpreted as 2000 - 2069. We have now completed the steps to install, although we would recommend upgrading to the latest level of firmware available at this time before making the switch available for use. Refer to 2.7, “Upgrading switch firmware” on page 251 to perform this step. 2.3.5 Launching Web Tools with the 4.4 FOS The Web Tools display has changed significantly since the earlier FOS v3.x or v4.x. We are going to show the Web Tools using FOS v4.4. The tools still have the same basic look and feel to them that they had in previous versions. Access to Web Tools interface is provided by using a Java™ -enabled Web browser. The following are the minimum levels required for some popular browsers: For Microsoft® Windows® 2000, 2003 and XP: – Internet Explorer 6.0 ® For Solaris 2.8 and 2.9: – Mozilla 1.6 In addition, the latest level of Java™ Plug-In 1.4.2_03 is recommended. To launch 1. Start the Web Browser if it is not already active. 2. Enter the switch name or IP address in the Location/Address Field. Tip: When managing a multi switch fabric, it is recommended to enter the switch name or IP address of the switch with the largest port count, and the highest firmware level. 102 Implementing an Open IBM SAN 3. A Fabric View appears in the left column, displaying all compatible switches in the fabric. Also a Switch View and detail of the switch we targeted with the IP address displays in the larger area on the right side of the browser. In Figure 2-31, we show the Web Tools view window for a single switch fabric for the 2005-B32. In this figure we have not defined anything to see more switches; it is a feature of Web Tools that it will display all interconnected switches within a fabric. There are three main components (frames) of the Fabric View window. On the left-hand side is the fabric management frame, also shown in Figure 2-31, which includes a list of all the switches in the fabric. At the bottom of the frame are buttons for opening separate fabric events, topology, nameserver, and zoning windows shown in Figure 2-32. The larger two frames display the switch view and information view of the switch IP address we pointed our Web browser to. After the initial browser connection to a switch within the fabric, we can select other switch views by clicking the desired switch within the fabric frame. In the following sections, we describe the Web Tools features in more detail. Chapter 2. Implementing a SAN with the b-type family 103 Figure 2-31 B32 Web View Figure 2-32 Fabric, Topology, Name Server and Zone Admin buttons Fabric Events Fabric Events is a log of all the events that have occurred across the fabric. The Fabric Watch conditions will be logged as well as other Fabric-wide events. In Figure 2-33, we’ve launched the Fabric Events log for our M12. With the M12 and M14, there is an Events button for each logical switch. 104 Implementing an Open IBM SAN Figure 2-33 M12 Fabric Events We can sort the columns into ascending or descending order by clicking on the column headings; in our example we have sorted by time, indicated by the small arrow head in the Time column heading. We can also re-arrange the columns to suit our requirements by dragging and dropping them as required. To exit from the log, just close the window. Table 2-3 explains the Fabric Events log. Table 2-3 Fabric Events log details Field Name Description Switch Name of switch for which events occur Number Order number of when event occurred, most current at top Time Date and time stamp of message Service Which service part of switch encountered error Count Number of times this error occurred Level Whether message is Informational, warning or error Message ID Message ID number Message One line detail description of the message Chapter 2. Implementing a SAN with the b-type family 105 Topology The Topology is the physical configuration of the fabric, including active domains and paths. The topology report is as viewed from the local domain (the local domain is the switch that was selected in the fabric view frame). Clicking on the second button from the left as shown in Figure 2-32 on page 104 takes us to the Fabric Topology report shown in Figure 2-34 and continued in Figure 2-35. For our purposes, we have shown a Topology with multiple switches. Figure 2-34 Fabric Topology report 106 Implementing an Open IBM SAN Figure 2-35 Fabric Topology report - continued Chapter 2. Implementing a SAN with the b-type family 107 The Fabric Topology report lists the domain IDs and switch names for all the active domains in the fabric. For each switch in the fabric, the window displays the active paths to the local domain (these are the Inter-Switch Links (ISLs). Also shown are the output port numbers (ISL ports), input port numbers and the hop count. Name Server The Name Server table provides the name server entries listed in the name server database as shown in Figure 2-36. This includes all name server entries for the fabric, not only those local to the host domain. Each row in the table represents a different device which has logged into the fabric. The Name Server table provides a good cross reference of WWPN / WWN and the port position on the switch. It also lists the zones that the port is a member of, and therefore can be a very useful problem determination tool. Figure 2-36 B32 Name Server table part 1 The Name Server table contains the following parameters: Domain 108 Implementing an Open IBM SAN Domain ID of the switch to which the device is connected Port # Port number of the switch to which the device is connected Port ID The Fibre Channel Port address of the device (basically a 24 bit hexadecimal number) Port Type Shows whether the port is a public loop port (NL) or whether it is a normal switch fabric port (N) Device Port WWN World-wide name for the device port (WWPN) Device Node WWN World-wide name of the device node (WWNN) Device Name Name of the device according to the SCSI INQUIRY such as FCP or IP To view all of the details for a given device in the Name Server table, we highlight the device we are interested in. Next, we click on the Detail View button. This will bring up the Details View window as seen in Figure 2-37. Figure 2-37 B32 Name Server details Scrolling to the right, as shown below in Figure 2-38 and Figure 2-39, we are able to see the rest of the parameters that are available. Chapter 2. Implementing a SAN with the b-type family 109 Figure 2-38 B32 Name Server table part 2 110 FDMI Host Name Displays the FDMI host name of the device WWN Company ID Displays vendor company based on device WWN Virtual Vs Physical Identify type of device, virtual or physical Host Vs Target Identify type of device, host or target Member of Zones List of zones to which the device belongs Member of Aliases List of aliases for this device Implementing an Open IBM SAN Figure 2-39 B32 Name Server table part 3 FC4 Type Fibre Channel FC4 layer types supported by device, such as FCP or IP Class of Service Class of service that the device supports Fabric Port Name Displays the name of the port Fabric Port WWN The worldwide name of the fabric port Port IP Address IP address of the fabric port (may be zeroes) Hard Address Hard address assigned to the fabric port 2.3.6 Zone Admin The Zone Admin function is used to set up, maintain and activate the zones across the fabric. From here we can also define aliases for members in a zone and can create the zones that will form the active configuration across the fabric. A zoning license and administrative privileges are required to access this function. All 2109 and 2005 models are delivered with the zoning license Chapter 2. Implementing a SAN with the b-type family 111 pre-installed. When administering zoning on an IBM TotalStorage SAN Switch, the following steps are recommended: Define zone aliases to establish groupings. Add zone members. Place zones into one or more zone configurations. Enable one of the zone configurations (only one can be enabled at a time). To access the zone administration, we click on the Zone Admin button on the bottom left hand corner as noted in Figure 2-40. Figure 2-40 Zone admin button After clicking on the Zone Admin button, we are prompted for our user name and password shown in Figure 2-41. Figure 2-41 Authentication After entering user name and password, click OK (The defaults are admin / password). Upon selecting Port Zoning from the View menu, the Port Zoning view appears with the Alias tab displayed shown in Figure 2-42. 112 Implementing an Open IBM SAN Figure 2-42 B32 Port Zoning Initial view We describe the zoning schemes in the following sections. Mixed zoning In this scheme, all objects are displayed in the Member Selection List. Any object, being a WWN, switch, port, AL_PA, or alias, can be selected to be managed in the Members list. When the Zoning management function is opened, this is the default scheme. Working in the mixed zoning scheme allows us to define a WWN and a physical port to be within the same configuration. If we have mixed members in a zone, the zoning uses session based hard zoning. Port zoning This zoning scheme only offers physical switches and ports to be selected and defined as members for alias, zoning, QuickLoop, Fabric Assist, and configuration groups. Aliases, zones, and configuration groups which have objects other than physical ports will not be displayed in this scheme. Chapter 2. Implementing a SAN with the b-type family 113 If we work only in this Port zoning scheme, our configuration will be hardware enforced by the switch ASICs (hard zoned). WWN zoning This scheme only allows aliases, zoning and configuration file operations on WWNs. Aliases, zones, and configuration files which have objects other than WWNs will not be displayed within this scheme. If we work only in this WWN zoning scheme, our configuration will be hardware enforced by the switch ASICs (hard zoned). AL_PA zoning This scheme allows only aliases, zoning and configuration file operations on AL_PA’s in a QuickLoop. Aliases, zones and configuration files which have objects other than AL_PA’s in a QuickLoop will not be displayed. If we work only in this AL_PA zoning scheme, our configuration will be hardware enforced by the switch ASICs (hard zoned). 2.3.7 Implementing zoning In the following examples, we will show the windows in which we apply zoning concepts that have previously been discussed. For our purposes we have chosen the Port Zoning scheme although the procedure is the same for WWN, AL_PA and Mixed zoning schemes. Alias tab By defining an alias to a port(s) or WWN(s), we simplify our understanding of what the device is that we are working on the other tabs. We recommend assigning aliases and ensuring they are maintained to correctly identify SAN components. This can be accomplished by using the Alias tab. To create a new alias, we click on the Create button and the Create New Alias window is displayed. Type in the new alias name and click on OK as seen in Figure 2-43. 114 Implementing an Open IBM SAN Figure 2-43 B32 Create new alias After clicking OK, we see the name displayed in the Name field. We can now select a member or multiple members from the Member Selection List on the left. We select port 4 on switch domain 1, and then click the Add Member button to add it to the Alias Members List in the right panel as shown in Figure 2-44. If a host or device has multiple HBAs, we may wish to add more members to our alias. As we are defining an alias for one AIX production host, we wish to only define this single port as shown. We have successfully identified port 4 on switch domain 1 to have an alias of DorysB32_FAStT4 as shown in Figure 2-44. Chapter 2. Implementing a SAN with the b-type family 115 Figure 2-44 Alias Administration We would follow the same procedure for all our hosts and storage before adding them to zones. Table 2-4 describes the fields and buttons on the Alias tab. 116 Implementing an Open IBM SAN Table 2-4 Alias tab description: Button Function Name Select an existing alias name to be modified. Create Select to create a new alias. A new alias dialog displays. Enter a new alias name that is unique. The new alias name cannot contain spaces. Delete Select to delete the alias selected in the Name field. Deleting an alias automatically removes it from all zones. Rename Select to rename the alias selected in the Name field. A dialog displays in which you can edit the alias name. Renaming an alias automatically renames it in all zones. Member Selection List This field contains a list of potential alias members, including switches, ports, Nodes, WWNs, and QuickLoop AL_PAs. Add FA Host > Use this button to add a Fabric Assist Host to the member list. Add Member > Select to add the item selected in the Member Selection List to the Alias Members list. You can add individual ports or an entire switch. If a switch is added, all ports on the switch are added. To add a device WWN, select either a node WWN (folder icon) or port WWN (blue circle icon) from the WWN sub-tree. < Remove Member Select to remove the member selected from the Alias Name Members Selection list. Add Other Port Select to add a switch/port combination that currently is not part of the fabric. Add Other Port Host Select to add a switch/port combination of a host that currently is not part of the fabric. Selecting ports on the M12 or the M14 Some consideration must be taken to understand the port addressing when zoning an IBM TotalStorage SAN Switch M12 and M14. In previous versions of the Fabric OS (version 2.0 and version 3.0), the primary method for identifying a port within the fabric was the “domain, port” combination. For example, to add port 1 on domain 5 to a zone: sw96:admin>zoneadd "bluezone","5,1" The “domain, port” method of selecting ports cannot be used in the M12 or M14 because of the addition of slots and the high port count of the switch. This method was replaced in Fabric OS version 4.0 by two methods to specify a particular port: the slot/port method and the port area number method. Slot/port method To select a specific port, you must identify both the slot number and port number that you are working with. Chapter 2. Implementing a SAN with the b-type family 117 When specifying a particular slot and port for a command, the slot number operand must be followed by the slash (/) and then a value for the port number. For example, to enable port 63, we specify: portEnable 10/15 The M12 and M14 have a total of 10 slots, counted 1 - 10. Slot number 5 and slot number 6 are CP cards, and slots 1 - 4 and 7 - 10 are switch cards. On each switch card, there are 16 ports counted from the bottom 0 - 15. A particular port must be represented by both slot number (1 - 10) and port number (0 - 15). Restriction: No spaces are allowed between the slot number, the slash (/), and the port number. Port area number method Some commands, such as zoning commands, require you to specify ports using the port area number method. In the Fabric OS version 4.0 each port on a particular domain is given a unique area ID. The chassis contains two logical switches. The Area IDs for both logical 64-port switches range from 0 - 63. Both logical switch 0 and 1 have a port that is referenced with Area ID 0. An area ID for each port is unique inside each logical switch (that is, each assigned domain ID). These are two of the three parts of a 24-bit Fibre Channel address ID: 8-bit domain ID, 8-bit area ID, and 8-bit port ID. Use the switchShow command to display all ports on the current (logical) switch and their corresponding area IDs, as follows: Area Slot Port Media Speed State ===================================== 0 7 0 -N2 No_Module 1 7 1 -N2 No_Module 2 7 2 -N2 No_Module 3 7 3 -N2 No_Module 4 7 4 id N2 Online ~~~~~~~~~~~~~~~~~~~~~~~~~~~~~~~~~~~~ lines removed for clarity ~~~~~~~~~~~~~~~~~~~~~~~~~~~~~~~~~~~~ 62 10 14 -N2 No_Module 63 10 15 id N2 No_Light 118 Implementing an Open IBM SAN Figure 2-45 M12 Zoning - Slot/Port area number Figure 2-45 shows how the Web Tools interface for the M12 Zoning view displays the slot and associated ports for a domain (switch). Zone Tab We use the Zone tab to specify which switch ports are to be in the selected zone and to create and manage zones. A zone can have one or multiple members, and can include switches, ports, WWNs, aliases, AL_PAs or Quickloop. Note that Quickloop is no longer supported at 4.4.x FOS. Chapter 2. Implementing a SAN with the b-type family 119 Important: We recommend creating individual zones of each host to the disk storage subsystems. Also, hosts should have a separate HBA for Tape communication, and again be in another individual Host / Tape zone. This small granularity of zoning removes unnecessary PLOGI activity from host to host, as well as removing the risk of problems caused by a faulty HBA affecting others. In the example shown in Figure 2-46, we have created a zone name of DorysB32_AIXprodZone. Figure 2-46 B32 Adding a member to a Zone 120 Implementing an Open IBM SAN Then we added the switch ports which have our FAStT attached, and also added the alias DorysB32_AIXprod, representing our host which we defined in the previous topic. As mentioned in the previous recommendation, we could add another HBA installed in server to this zone, but we do not recommend adding other hosts. We choose to define a separate zone for each host. Table 2-5 describes the fields and buttons on the Zone tab. Table 2-5 Zone tab description Button Function Name Select an existing alias name to be modified. Create Select to create a new alias. A new alias dialog displays. Enter a new alias name that is unique. The new alias name cannot contain spaces. Delete Select to delete the alias selected in the Name field. Deleting an alias automatically removes it from all zones. Rename Select to rename the alias selected in the Name field. A dialog displays in which you can edit the alias name. Renaming an alias automatically renames it in all zones. Member Selection List This field contains a list of potential alias members, including switches, ports, Nodes, WWNs, and QuickLoop AL_PAs. Add Member > Select to add the item selected in the Member Selection List to the Alias Members list. You can add individual ports or an entire switch. If a switch is added, all ports on the switch are added. To add a device WWN, select either a node WWN (folder icon) or port WWN (blue circle icon) from the WWN sub-tree. < Remove Member Select to remove the member selected from the Alias Name Members Selection list. Add Other Port Select to add a switch/port combination that currently is not part of the fabric. QuickLoop Tab Note that Quickloop is not supported in FOS 4.4. The information we will talk about here is to provide an example for those that are running on the older versions of the product. A QuickLoop license is required to use this tab. You can use the QuickLoop tab to create and manage QuickLoops if used in conjunction with zoning. The QuickLoop tab is shown in Figure 2-47. Chapter 2. Implementing a SAN with the b-type family 121 Figure 2-47 QuickLoop zoning tab In this example we have created a QuickLoop Name called ITSO_QLoop which will have two switch members. We have already added sw2 to the Members list and have selected sw4 so that we can add it also to the ITSO_QLoop Member list. 122 Implementing an Open IBM SAN Table 2-6 describes the fields and buttons on the QuickLoop tab. Table 2-6 QuickLoop tab description Field Function Name To modify an existing QuickLoop, select a QuickLoop name. Create Click to create a new QuickLoop. A dialog displays in which you can enter the name of the new QuickLoop. All names must be unique and contain no spaces. Delete Click to delete the QuickLoop selected in the QuickLoop Name field. Deleting a QuickLoop automatically removes it from all aliases, zones, and zone configurations, including the associated AL_PAs. Rename Click to edit the name of the QuickLoop selected in the QuickLoop Name field. A dialog displays in which you can edit the name of the QuickLoop. Member Selection List A list of valid members available to add to a QuickLoop. Add Member > Click to add the switch selected in the Switch Selection List to the QuickLoop Members list. < Remove Member Click to remove the selected member from the QuickLoop Member list. Fabric Assist Tab Fabric Assist (FA) is a feature that allows Private Loop hosts on QuickLoop enabled ports, to communicate with fabric storage devices on F_Ports. We use the Fabric Assist tab to create and manage Fabric Assists. A QuickLoop license is required to use this tab. The Fabric Assist tab is shown in Figure 2-48. Chapter 2. Implementing a SAN with the b-type family 123 Figure 2-48 Fabric Assist zoning tab In this example we created a Dorys_FA group name, where we then added Host port 100,1 by using the Add FA Host button. We have then added the Alias AIX_DorysShark by using the Add Member button. Table 2-7 describes the fields and buttons in the Fabric Assist tab. 124 Implementing an Open IBM SAN Table 2-7 Fabric Assist tab description Field Function Name Select an existing Fabric Assist name to be modified or viewed. Create Click to create a new Port Fabric Assist name. A dialog displays. Enter the name of the new Port Fabric Assist. All names must be unique and contain no spaces. Delete Click to delete the Port Fabric Assist selected in the FA Name field. Deleting a Port Fabric Assist automatically removes it from all aliases, zones, and zone configurations, including the associated AL_PAs. Rename Select to edit the name of the Port Fabric Assist selected in the FA Name field. Member Selection List This field displays a list of members available to add to the Port Fabric Assist list. Add FA Host > Click to add the selected item in the Member Selection List as a host to the Fabric Assist name list. Only one domain port or a WWN can be added as a host. Add Member > Click to add the member selected in the Member Selection List to the Fabric Assist name list. < Remove Member Click to remove the selected member from the Fabric Assist name list. Add Other... Click to add a switch/port combination that is not currently part of the fabric. Add Other Host... Click to add a switch/port/host combination that currently is not part of the fabric. Fabric Assist Members This field displays a list of the members that belong to the Fabric Assist group currently selected in the Name field. Config tab We now use the Config tab to create a zone configuration. Zone configurations are used to enable or disable a group of zones at the same time. Chapter 2. Implementing a SAN with the b-type family 125 Figure 2-49 B32 Save config only In this example we have created a config and then used the Add Member> button to move the zones we created in the previous steps, listed in the left column, to the Config Members list on the right. This process creates a configuration containing all the desired zones we wish to activate. At this stage we are just saving this example. Table 2-8 contains a description of the fields and buttons that appear on the Config tab. 126 Implementing an Open IBM SAN Table 2-8 Config tab description Button Function Name Select an existing configuration to modify. Create Click to create a new configuration. A dialog displays. Enter the name of the new configuration. All names must be unique and contain no spaces. Delete Click to delete the configuration selected in the Cfg Name field. Rename Click to edit the name of the configuration selected in the Cfg Name field. Member Selection List This field provides a list of the zones and QuickLoops available to add to the configuration. Add Member > Click to add the switch selected in the Zone/QLoop Selection List to the Config Members list. < Remove Member Click to remove the selected member from the Config Members list. Analyze Config Analyzes the configuration that is selected along with it’s member zones and aliases. A zoning configuration error window appears in the event of a conflict. Device Accessibility View initiator/target accessibility matrix based on selected configuration. Before we activate our zone config, we save our it to the switch, using the Save Config Only function from the Actions pulldown menu as shown in Figure 2-49. This only saves the config to nonvolatile storage, it does not bring the config active. After our config is saved, we click the Analyze Config button as shown in Figure 2-49. This checks the validity of our zoning configuration, and alerts us to ports and WWNs that we have not included. We are prompted to refresh the current configuration from the switch as shown in Figure 2-50. The Analyze checks the most recent information from the switch. Figure 2-50 Refresh Fabric prompt Chapter 2. Implementing a SAN with the b-type family 127 The output from the Analyze run against our config is shown in Figure 2-51. Review the analyze output and make adjustments (if appropriate) before activating the configuration. Figure 2-51 Sample of analyze config output The Zoning Configuration Analyze window displays a summary of the saved configuration and attempts to point out some of the zoning conflicts before applying the changes to the switch. Some of the potential errors it might catch are: Ports/WWNs/Devices that are part of the selected configuration, but not part of the fabric. Zones with only a single member. 128 Implementing an Open IBM SAN Activating a zoning configuration To make the zoning definitions active, we need to enable the configuration that we have built. We do this by using the Enable Config... selection from the Actions pulldown menu shown in Figure 2-52. Figure 2-52 B32 Actions Pulldown menu We are prompted to select which config we would like to enable as shown in Figure 2-53. Figure 2-53 B32 Select config to enable prompt We are prompted as shown in Figure 2-54 to confirm that we want to enable the configuration. Attention: Care must be taken when enabling zone configs. Adding new zones will not impact any currently running definitions, although removing a zone may have a large impact to the current environment. Chapter 2. Implementing a SAN with the b-type family 129 Figure 2-54 B32 Config Enable warning At this point the new zone config definitions take place on the SAN fabric. Messages appear in the syslogd area of the window to show successful completion. The window is also updated to reflect the enabled configuration as shown in Figure 2-55. 130 Implementing an Open IBM SAN Figure 2-55 B32 Enable zoning config successfully completed Modifying an existing configuration When adding a new host or a new device into the fabric, changes to the zoning will be necessary. For example, we add a new host, define a newhost alias, create a newhost_FAStT zone. Using the procedures previously described in this topic, we then add the newhost_FAStT zone to our config. We then have two choices, immediate implementation, or we can save our updates and perform the activate at a later time: Choose Enable Config... from the Actions pulldown menu, the changes are saved and take effect immediately. Choose Save Config only from the Actions pulldown menu. The changes are saved, but will not take effect immediately. For the changes to take effect, we have to select the configuration in the names list, and then select Enable Config... from the Actions pulldown menu. Chapter 2. Implementing a SAN with the b-type family 131 Zoning and E_Ports When creating a zone, we only work with device ports or host ports (F_Ports, FL_Ports, L_Ports). ISL Ports (E_Port) should not be included in zone definitions. If we take the example presented in Figure 2-56. Zone A Host A itsosw4 Domain ID 4 Port 3 Device A itsosw02 Domain ID 2 Port 9 Port 7 8 16 Host B Port 6 Port 5 Port 2 Device B Zone B Figure 2-56 Zoning implementation — E_Ports and Zoning To create Zone A, we include: Domain ID 4, Port 3 (4,3) Domain ID 2, Port 6 (2,6) But do not include any ISL ports, that is to say: Domain ID 4, Port 2 (4,2) Domain ID 4, Port 9 (4,9) Domain ID 2, Port 5 (2,5) Domain ID 2, Port 7 (2,7) Similarly, to create Zone B, we only include: Domain ID 4, Port 2 (4,2) Domain ID 2, Port 5 (2,5) Zones do not affect data traffic across ISLs in cascaded switch configurations. Because Hard Zoning enforcement is performed at the destination, an ISL can carry data traffic from all zones. 132 Implementing an Open IBM SAN Therefore, when dealing with zoning, the fabric should be seen as a “cloud” to which are attached devices and hosts. That is, we define the end-to-end destinations, and do not include the path to get there. 2.3.8 Web Tools Switch View From the Switch View of Web Tools, we are able to view a summary of the state of the individual switch, firmware version, IP addresses, port state, and if there is any out-of-line status. In this section, we will use both the B32 and M12 to describe the GUI although the functions are identical on any of the IBM TotalStorage SAN Switch family and equally apply. The Switch View presents a picture of the switch as shown in Figure 2-57. Figure 2-57 B32 Switch View from Web Tools From the Switch View, we have an overview of the actual switch front panel and monitor LEDs. Chapter 2. Implementing a SAN with the b-type family 133 There are buttons that allow us to drill down further into the switch. We can select to view status of the switch, FabricWatch events, administrative duties, open a telnet session, performance, check fan and temperature. Next we point our browser to the IP address of logical switch 0 in an IBM TotalStorage SAN Switch M12 as shown in Figure 2-58. Here we can see its detailed information, which would be similar for the other models. Figure 2-58 Web Tools M12 Switch View From the M12 Switch view, we can also look at temperature, fan speeds, CP status, and power supply status for the overall chassis. Port Information To access the detailed port information, click the port as shown in Figure 2-59. 134 Implementing an Open IBM SAN Figure 2-59 B32 Displaying port information The port information will be displayed for the switch as shown in Figure 2-60. Figure 2-60 B32 Port details From this window, we can select any of the switch ports. If an SFP is installed, then additional information on the SFP itself can be selected by accessing the SFP tab. The Loop tab contains information about the loop on a port, including QuickLoop statistics if a QuickLoop license is available. Chapter 2. Implementing a SAN with the b-type family 135 Port Information for the M12 The graphical representation of the physical M12 chassis, in the middle frame, includes both logical switches, as shown in Figure 2-61. Figure 2-61 2109-M12 Switch view This view shows only the physically installed port blades for each switch. We have port blade slots 1 and 2 for switch 0; and port blades 7 and 8 for switch 1. The Active CP is also indicated by the arrow below it. Double-clicking a particular port gives us a view of the detailed information for that port as seen in Figure 2-62. 136 Implementing an Open IBM SAN Figure 2-62 Port detail view While the actual port information view is similar to other 2109 models, this display also has tabs along the top to select the particular port card slot installed in the logical switch. In our example, we chose logical switch 1, and then we double-clicked port 14 in slot 8. While this takes us directly to statistics for the port we selected, we can also now click any port or slot tab to view statistics for the other ports in this logical switch. Other information from the switch view is available by clicking the appropriate button at the bottom of the view. In Figure 2-63, we can see that the buttons for an M12 are logically divided into three groups, as per the divider marks between the buttons. The first group of eight buttons on the left are for logical switch 0 (slots 1-4), the next group of four buttons in the center are for overall chassis functions, and the last group of eight buttons on the right are for logical switch 1 (slots 7-10). While most of these buttons perform the same function on all switches, we chose to explain the Status button using the M12, as it also allows us to explain the buttons that only the M12 has. Chapter 2. Implementing a SAN with the b-type family 137 Figure 2-63 M12 Display Switch status Status Button The Status button is available on all IBM TotalStorage SAN Switch models. Clicking on the Status button brings up a window showing you the health of the switch as shown in Figure 2-64. Figure 2-64 B32 Switch Status From here, we can navigate to obtain information about the health of the different ports on the switch. Under Port Detail, we can view the different ports in the 138 Implementing an Open IBM SAN Healthy status, Marginal status and Faulty status. Clicking on the All view will display details on all the ports. In Figure 2-65 we show the details for just the healthy ports. This information is helpful in understanding the port states. Figure 2-65 B32 Status Port Details At a telnet prompt, the same information could be displayed by entering switchstatusshow as seen in Figure 2-66. Chapter 2. Implementing a SAN with the b-type family 139 Figure 2-66 B32 Telnet switchstatusshow High Availability The M12 and M14 are the only models with the High Availability features module. The background color of the Hi Avail button indicates the overall status of the switch. It enables us to perform tasks such as CP failover or to synchronize services on the CP. Clicking on the Hi Avail button launches the High Availability services shown in Figure 2-67. The first tab shows the status of the Services for each logical switch. Note in the upper right corner the HA status field is green and displays: Non-disruptive failover ready. If the HA status field was other than green, then we would need to synchronize the services before attempting to initiate failover. When the HA status field shows Non-disruptive failover ready, a failover can be initiated without disrupting the fabric. 140 Implementing an Open IBM SAN Figure 2-67 M12 High availability Synchronize services When selecting the Synchronize services button, we are prompted with a warning asking us to confirm our actions as shown in Figure 2-68. Chapter 2. Implementing a SAN with the b-type family 141 Figure 2-68 Warning Synchronizing services The CP tab is where we are able to initiate the failover and monitor the status as shown in Figure 2-69. Note that clicking on the details shows us that the status of the standby CP is healthy. 142 Implementing an Open IBM SAN Figure 2-69 M12 High availability CP status We can initiate failover because the CP status is healthy. When we click on the Initiate failover button, we are prompted with a warning to confirm our action as shown in Figure 2-70. Chapter 2. Implementing a SAN with the b-type family 143 Figure 2-70 M12 failover warning After clicking on Yes, failover is initiated and the HA status field changes to red with the message: Non-redundant failover to indicate failover is taking place as shown in Figure 2-71. 144 Implementing an Open IBM SAN Figure 2-71 M12 failover in progress Just before it completes HA status shows yellow and Disruptive Failover Ready. When it has finally completed, we can see that the CPs have changed as shown in and HA status returns to Nondisruptive Failover Ready. Figure 2-72 M12 failover complete Chapter 2. Implementing a SAN with the b-type family 145 Note that a nondisruptive failover might take a few minutes to complete and it is possible that the connection to the switch might be lost during that time. Web Tools will automatically resume the connection after the failover. Power Button The background color of the Power button indicates the overall health of the power supply status. Clicking on the Power button displays the window shown in Figure 2-73. Figure 2-73 M12 power status Fan Button The Fan button is an alerting icon on all models except the M12 (and M14). If all conditions are normal according to the switch policy settings, the icon should be green. On the M12 and M14, it is a chassis wide status button. Clicking the Fan button displays an informational window describing the state of each fan, as shown in Figure 2-74. 146 Implementing an Open IBM SAN Figure 2-74 M12 Fan details It is possible to gather the same information from a telnet command line by typing fanshow if preferred as shown in Figure 2-75. Figure 2-75 M12 fanshow command Temp button The Temp button is an alerting icon on all switch models except the M12 and M14. It will change color from green to show that all temperatures are within the defined limits, and to yellow or red depending on the policy thresholds. On the M12, clicking the Temp button will display detailed temperature information for each slot in the chassis shown in Figure 2-76. Chapter 2. Implementing a SAN with the b-type family 147 Figure 2-76 M12 Temperature Show window To display similar information at a telnet command line, issue tempShow as shown in Figure 2-77. Figure 2-77 M12 tempshow command 2.3.9 Admin Button In 2.3, “Installing the IBM TotalStorage SAN Switch” on page 87, we showed how to configure many settings using the Command Line Interface. Most of these settings may also be configured using the Web Tools Web Tools Administration Tools interface. 148 Implementing an Open IBM SAN To perform administration and setup functions on a single switch, we select the appropriate switch from the fabric view, then from the switch view frame we click the Admin button as shown in Figure 2-78. Figure 2-78 B32 Admin Tools from Web Tools With an M12 or M14, choosing the Admin Button from the Left or the Right group of buttons works on only that logical switch as shown in Figure 2-79. Figure 2-79 M12 Display Admin tools Tip: We recommend checking the Name of the switch, found in the Admin view, to ensure that you are working on the correct switch. Administration tools window layout Once the administration window has opened, we can see it is composed of five areas as shown in Figure 2-80. Tip: By hovering the mouse over buttons and other areas of the window, we can find out their function. Chapter 2. Implementing a SAN with the b-type family 149 Figure 2-80 B32 Administration window layout Area A: Displays summary information, switch name, domain id, date, time. Area B: Allows navigation through the different management panels. The contents of this area depends on the licenses installed on the switch. Area C: Contains parameters to be set in the current panel. Area D: Contains the button bar. Area E: Contains the report window that allows viewing of the switch report upon operation completion. Switch Information When the administration window is first opened, the Switch Information tab is the displayed by default as shown here in Figure 2-81. 150 Implementing an Open IBM SAN Figure 2-81 B32 Switch Settings View On the first tab we can define the switch name and the domain ID, set the base e-mail configuration, enable or disable the entire switch and view a detailed report of the switch. Chapter 2. Implementing a SAN with the b-type family 151 Table 2-9 describes the fields on the Switch Information tab. Table 2-9 Switch Information tab Field Description Name Enter data for the switch name. Enter a new name to change a name in this field. Domain ID Displays or sets switch domain ID. Domain IDs must be unique within a fabric. To change domain ID, enter new domain ID in this field. Use a number from 1 to 239 for normal operating mode (FCSW compatible) and a number from 0 to 31 for VC encoded address format mode (backward compatible to SilkWorm 1000 series). Manufacturer Serial # Physical serial number of the switch. Supplier Serial # Supplier serial number of switch for display only. (Status) Enable Click the radio button to enable the switch. (Status) Disable Click the radio button to disable the switch. Apply Click to save any changes made to this tab and remain in the current tab. Additional changes can be made and the Apply button clicked when making changes incrementally. Close Click to exit the Switch Admin view. If changes have been made and not committed by clicking the Apply button, a dialog box is presented. It allows the changes to be committed or deleted. Reset Click to reset the tab to the last set of saved changes. Refresh Click to retrieve current values from the switch. View Report Clicking on the View Report button will display the window as shown in Figure 2-82. The detailed report includes a list of all the types of switches connected to our local switch, the inter-switch links, list of ports, the Name Server information, details on the configured zones and SFP serial ID information. 152 Implementing an Open IBM SAN Figure 2-82 B32 Switch report Network Config Use the Network config tab to modify the IP settings of the switch as shown in figure Figure 2-83. Chapter 2. Implementing a SAN with the b-type family 153 Figure 2-83 B32 Network config panel The lower section of the window is for configuring the Syslog daemon. 154 Implementing an Open IBM SAN Table 2-10 describes the fields on the Network Config tab. Table 2-10 Network config tab Field Description Ethernet IP Displays or sets the Ethernet IP address Ethernet Mask Displays or sets the Ethernet IP Subnet Mask. Gateway IP Displays or sets the Gateway IP address. Fibre Channel Net IP Displays or sets the Fibre Channel IP address. Fibre Channel Net Mask Displays the Fibre Channel SubnetMask address. Syslog IPs Displays the six Syslog IP address for a user to configure. Add Add syslog IP address entered in field. Remove Remove syslog IP address in field. Clear All Remove all previous syslog IP entries. Apply Click to save the changes made to this tab and to stay in the current tab. Additional changes can be made and the Apply button clicked when making changes incrementally. Close Click to exit Admin window. If changes have been made but not committed by clicking the Apply button, a dialog box displays. Refresh Click to retrieve current values from the switch. Overview of syslogd The Fabric OS maintains an internal log of all error messages, but the internal log buffers are limited in capacity; when the internal buffers are full, new messages overwrite old messages. The IBM TotalStorage SAN Switch can be configured to send error log messages to a UNIX host system that supports syslogd. This host system can be configured to receive error/event messages from the switch and store them in its file system, overcoming the size limitations of the internal log buffers on the switch. The host system can be running UNIX, Linux, or any other operating system as long as it supports standard syslogd functionality. The IBM TotalStorage SAN Switch by itself does not assume any particular operating system to be running on the host system. Chapter 2. Implementing a SAN with the b-type family 155 To configure the syslog function, we simply put the IP address of the host running the syslogd in the Syslog IP field, and click Add. After adding all logging host IP addresses to the list, we must click Apply to save the changes. Network Config When configuring the network settings on an M12 or M14 using this tab, extra care should be taken that we have opened the Admin function for the correct logical switch, as the settings only apply to that logical switch. There is also an extra button to allow setting the IP address and subnet mask for each CP, as shown in Figure 2-84. Figure 2-84 Admin View — Network Config Selecting the Advanced button takes us to a window where we are able to set the ethernet IP addresses for both of the CP cards. These same settings were configured earlier by using the command line install procedure, detailed in “M12 configuration procedure” on page 92. 156 Implementing an Open IBM SAN Firmware As shown in Figure 2-85 we use this tab to: Download firmware Reboot switch Fastboot switch The configuration upload functions have been moved to the Configure tab under “Upload/Download” on page 173. Figure 2-85 M12 download firmware Web Tools Here we click on the radio button for Firmware download. Next we fill in the host ip address of where the firmware is loaded, we enter the file name, the user name and user password for log in. Once these fields are complete, we click on the Apply button. We are prompted to confirm our selection as shown in Figure 2-86. Chapter 2. Implementing a SAN with the b-type family 157 Figure 2-86 M12 confirm firmware download Once the download has completed as shown in Figure 2-87, we can see that both the download and reboot have completed. Figure 2-87 M12 firmware download upload completed 158 Implementing an Open IBM SAN SNMP Use the SNMP tab for administration of the SNMP Subsystem. From the SNMP tab we can specify the switch community string, location, trap level and trap recipients. SNMP v3 is now available with FOS 4.4 as well as SNMP v1. As shown in Figure 2-88, traps can be set using either SNMP v1 or SNMP v3. SNMP parameters can also be set with Telnet commands or Fabric Manager. Figure 2-88 SNMP Tab To create a new SNMPv1 trap: 1. Double-click a community string in the SNMPv1 section and type a new community string. 2. Double-click a recipient IP address in the SNMPv1 section and type a new IP address. 3. Click Apply. Chapter 2. Implementing a SAN with the b-type family 159 To create a new SNMPv3 trap: 1. Select a user name from the User Name drop-down list in the SNMPv3 section. 2. Double-click a recipient IP address in the SNMP v3 section and type a new IP address. 3. Select a trap level from the Trap Level drop-down list. 4. Click Apply. In Table 2-11 we describe the fields on the SNMP tab. Table 2-11 SNMP tab SNMP Basic information: Contact Name Displays or sets contact information for switch. Default is Field Support. Description Displays or sets system description. Default is Fibre Channel Switch. Location Displays or sets the location of switch. Default is End User Premise. Enable Authentication Trap Check to enable authentication traps; uncheck to disable (recommended). SNMPv1 Community/Trap Recipient 160 Community String Displays the community strings that are available to use. A community refers to a relationship between a group of SNMP managers and an SNMP agent, in which authentication, access control, and proxy characteristics are defined. A maximum of six community strings can be saved to the switch. Recipient Displays the IP address of the Trap Recipient. A trap recipient receives the message sent by an SNMP agent to inform the SNMP management station of a critical error. Access Control Displays the Read/Write access of a particular community string. Read only access means that a member of a community string has the right to view, but cannot be changed. Read/Write access means that a member of a community string can be both viewed and changed. Trap Level Sets severity level of switch events that prompt SNMP traps. Default is 0. Implementing an Open IBM SAN SNMPv3 Trap Recipient User Name Displays user names that are available to use. The user names are predefined with different Read/Write or Read Only access. The predefined user names are snmpadmin1, snmpadmin2, snmpadmin3 with Read/Write access and snmpuser1, snmpuser2, snmpuser3 with Read Only access. Recipient IP Displays the IP address of the Trap Recipient. A trap recipient receives the message sent by an SNMP agent to inform the SNMP management station of a critical error. Trap Level Sets severity level of switch events that prompt SNMP traps. Default is 0 Access Control List Configuration: Access Host Displays the IP address of the host of the access list. Access Control List Displays the Read/Write access of a particular access list. Read only access means that a member of an access list has the right to view, but cannot make changes. Read/Write access means that a member of an access list can both view and make changes. Apply Click to save the changes made to this tab. Additional changes can be made and the Apply button clicked when making changes incrementally. Close Click to exit the Admin Window. If changes have been made but not committed by clicking the Apply button, a dialog box displays. Refresh Click to retrieve current values from the switch. We can also set SNMP parameters with Telnet using the agtcfgSet command and the agtcfgShow command to display the current SNMP settings. Note: In order for the switches to send SNMP traps, we must first enter the Telnet command snmpMibCapSet. This enables the MIBs on all switches to be monitored. itsosw4:admin> snmpMibCapSet The SNMP Mib/Trap Capability has been set to support FE-MIB SW-MIB FA-MIB (yes, y, no, n): [no] y SW-TRAP (yes, y, no, n): [no] y FA-TRAP (yes, y, no, n): [no] y SW-EXTTRAP (yes, y, no, n): [no] y Committing configuration...done. Chapter 2. Implementing a SAN with the b-type family 161 License We use the License tab to install license keys that have been purchased. License keys are used to enable additional features on a switch. We can also use the table within the License tab to remove a listed license from the switch. The License tab is shown in Figure 2-89. Figure 2-89 License Keys Adding a License Key 1. Click Add. The Add License dialog displays. 2. Paste or type a license key in the field. 3. Click Add License. 4. Click Refresh to display the new licenses in the License tab. Removing a License Key To remove a license key we follow the reverse procedure of above. 1. Highlight the license key to remove. 162 Implementing an Open IBM SAN 2. Click Remove. 3. Click Yes to confirm we are removing the license. 4. Click Refresh to show that the license has been removed. In Table 2-12 we describe the fields on the License Administration tab. Table 2-12 License admin tab Field Description License Key Enter license key to be added or removed. Feature(s) A list of the licenses installed on the switch. Add Select to add the specified license. Remove Select to remove the specified license. Close Select to exit the Admin Window. Refresh Click to retrieve current values from the switch. Installing a license key through CLI To install a license key feature using the CLI, perform the following steps: 1. From a command prompt, use the Telnet command to log onto the switch using an account that has administrative privileges. For example: C:\telnet address Here, address is replaced with switch IP address. 2. To determine which licenses are already installed on the switch, type licenseShow at the command line. Figure 2-90 licenseShow CLI output Chapter 2. Implementing a SAN with the b-type family 163 A list displays of all the licenses currently installed on the switch as shown in Figure 2-90. 3. To install a license key enter the following on the command line: licenseAdd “key” Here, “key” is the license key provided to you, enclosed in double quotes. The license key is case sensitive and must be entered exactly as given. 4. Verify the license was added by entering the following on the command line: licenseShow If the license is listed, the feature is installed and immediately available. If the license is not listed, repeat step 3. Ports Clicking on the Ports tab displays the panel shown in Figure 2-91. Figure 2-91 M12 Port Settings Tab 164 Implementing an Open IBM SAN In this panel we perform the following functions: Set or reset a persistent Disable per port Disable or enable a specific port Disable or enable trunking for a specific port (default value is enabled) View the current port state View the current speed for the switch ports Manually set the speed for a specific port Define a symbolic name to identify what is attached to the port. Table 2-13 describes the fields on the Ports tab. Table 2-13 Ports details Field Description Port Number The port number. Licensed Port For B32 models shows which ports are licensed. As additional ports are installed and licensed, this field reflects that the new ports are licensed. Persistent Disable Check to disable port, remains disabled through switch reboots and power cycles. Uncheck to enable the port. Enable Port Check to disable the port, uncheck to enable. At power on or reboot, the port will be enabled. Enable Trunking Check to enable the port trunking. Four trunk ports form a group with one of them in the role of master port. Port State Displays the current state of each port (online or no light). Current Speed Displays the speed of the port connection. 1G, 2G, 4G as set speeds and N1, N2 or N4 as negotiated speeds. Change Speed To change the speed, for example, from negotiated to set speed. Port Name Click here to assign a symbolic name to the port. Apply Apply and commit the changes to the switch. Close Close the administration window Refresh Refresh the view with the most recent information from switch. User To perform User Administration functions, go to the User tab as shown in Figure 2-92. Chapter 2. Implementing a SAN with the b-type family 165 Figure 2-92 User Account Information From this window, we can manage the User accounts that allow access to the switches from the TotalStorage Switch Specialist. To add a new user, click on the Add button and Switch Admin:Add User Account window will appear as shown Figure 2-93. When the new user is added, select the proper authority level and if it should be enabled or disabled. For our purposes, we have not enabled this user account when adding it. 166 Implementing an Open IBM SAN Figure 2-93 Add new user Chapter 2. Implementing a SAN with the b-type family 167 To enable a user account, we highlight the User name and click on the Modify button. A window pops up as shown in Figure 2-94. Here, we click on the Enable radio button and then click OK. Figure 2-94 Modify User account status Restriction: Changing the User Name does NOT create additional users, it is only changing the existing ID to a new name. If we only wish to change the password, we highlight the User and then click on Change Password button. 168 Implementing an Open IBM SAN . Figure 2-95 Change password window At the popup window as shown in Figure 2-95, we enter our current password and the new password into Password and Confirm Password fields. Clicking OK validates the changes. If we wish to remove a User account, we highlight the user to select it and then click on Remove button. For the changes to be successfully committed to the switch, we must click on the Apply button. When we do, a window pops up to confirm our actions as shown in Figure 2-96. Figure 2-96 Confirm changes to User accounts Chapter 2. Implementing a SAN with the b-type family 169 After clicking on Yes, the changes are committed to the switch. The messages are reported in the report window as shown in Figure 2-97. Figure 2-97 User account changes report window Admin access level This access level allows change and view access to all functions. From telnet access, the Admin level allows use of all commands within the Help Menu. Typically, most switch administration is performed at this level. User access level This access level provides view access only. Users are not able to make zoning changes or any switch configuration changes. This level is recommended for monitoring switch activity. 170 Implementing an Open IBM SAN Configure Clicking the Configure tab displays the panel shown in Figure 2-98. We are unable to make any changes to the settings on this tab if the switch is enabled. Figure 2-98 B32 Configure tab The following paragraphs describe the different parameters found on the sub-tabs shown in Figure 2-98. Fabric parameters The Fabric parameters available are: BB Credit: The buffer-to-buffer (BB) credit represents the number of buffers available to attached devices for frame receipt. This value ranges from 1 to 27. Default value is 16. Chapter 2. Implementing a SAN with the b-type family 171 R_A_TOV: The Resource Allocation Time Out Value (R_A_TOV) is displayed in milliseconds. Allocated circuit resources with detected errors are not released until this time value has expired. If the condition is resolved prior to the time out, the internal time out clock resets and waits for the next error condition. E_D_TOV: Error Detect Time Out Value (E_D_TOV) is displayed in milliseconds. This timer is used to flag a potential error condition when an expected response is not received (an acknowledgment or reply in response to packet receipt, for example) within the set time limit. If the time for an expected response exceeds the set value, then an error condition occurs. Datafield Size: The largest data field size in bytes. Switch Pid Format: When set to 1, allows 0-base, 256 port addressing that is used for core switches. When set to 2, allows 16-base, 256 port addressing. This parameter must be set the same on all switches in the fabric, for more information refer to “Setting Core PID format” on page 100. Sequence Level Switching: When Sequence Level Switching is enabled, frames of the same sequence from a particular source are transmitted together as a group. When this feature disabled, frames are transmitted interleaved among multiple sequences. Under normal conditions, Sequence Level Switching should be disabled for better performance. Disable Device Probing: When Disable Device Probing is enabled, devices that do not register with the Name Server are not present in the Name Server data base. Set this mode only if the switch N_Port discovery process (PLOGI, PRLI, INQUIRY) causes an attached device to fail. Per-Frame Routing Priority: In addition to the eight virtual channels used in frame routing priority, support is also available for per-frame based prioritization when this value is set. When Per-frame Route Priority is enabled, the virtual channel ID is used in conjunction with a frame header to form the final virtual channel ID. Suppress Class F Traffic: When enabled, all class F interswitch frames are transmitted as class 2 frames. This is to support remote fabrics which involve ATM gateways which don't support class F traffic. Insistent Domain ID Mode: Setting this mode makes the current domain ID insistent across reboots, power cycles and failover. This is required fabric wide to transmit FICON® data. Virtual Channels parameters This feature enables fine tuning of Inter Switch Links by configuring parameters for the eight virtual channels. These parameters are used for congestion control. We recommend to leave the default values for these parameters alone unless expert advice is available. 172 Implementing an Open IBM SAN Arbitrated Loop parameters These are the Arbitrated Loop Parameters: Send Fan Frames: Specifies that fabric address notification (FAN) frames be sent to public loop devices to notify them of their node ID and address. When enabled, frames are sent; when disabled, frames are not sent. Always send RSCN: Following the completion of loop initialization, a remote state change notification (RSCN) is issued when FL_Ports detect the presence of new devices or the absence of pre-existing devices. When this mode is enabled, a RSCN is issued upon completion of loop initialization, regardless of the presence or absence of new or preexisting devices. Do Not Allow AL_PA 0x00: This option disallows AL_PA values from being 0. System Services parameter The System Services parameter lets you set activity monitoring on the switch. rstatd: Allows you to dynamically enable or disable a server that returns details about system operation information through remote procedure calls (RPCs). Note that only Ethernet statistics and system up time are supported. The retrieval of this information is supported by a number of operating systems. For example, most UNIX-based systems use the rup or rsysinfo command to retrieve the information. rapid: Allows you to dynamically enable or disable a service that handles RPC requests for the API server. rusersd: Allows you to dynamically enable or disable a server that returns information about the user logged into the system through RPC. The retrieval of this information is supported by a number of operating systems. For example, most UNIX-based systems use the rusers command to retrieve the information. Disable RLS probing: Allows you to disable Read Link Error Status of the AL_PAs. Upload/Download The functions on the configure tab now allow us to save our configuration file as shown in Figure 2-99. Chapter 2. Implementing a SAN with the b-type family 173 Figure 2-99 B32 Configure tab to upload config file Note that when we back up the configuration file for the M12 or the M14, they are saved as two logical switch configurations so that both logical switches must have each config file backed up. To upload the configuration file, click on Config Upload to Host, provide the host ip address, file name of config file, user name and password and click Apply. We are prompted to verify that we want to perform this function shown in Figure 2-99, we click on Yes to continue. 174 Implementing an Open IBM SAN Figure 2-100 Confirm configuration upload Once completed, the messages will appear on the report window. Routing In Figure 2-101, we show the Routing tab with the port-based routing policy is enabled. When a device-based or exchange based routing policy is enabled, the interface is different: the Static Route information and the Dynamic Load Sharing radio buttons are not displayed. Chapter 2. Implementing a SAN with the b-type family 175 Figure 2-101 Routing tab Dynamic Load Sharing (DLS) Routing is generally based on the incoming port and the destination domain. This means that all the traffic coming in from a port (either E_Port or Fx_Port) directed to the same remote domain is routed through the same output E_Port. To optimize fabric routing, when there are multiple equivalent paths to a remote switch, traffic is shared among all the paths. Load sharing is recomputed when a switch is booted up or every time a change in the fabric occurs. A change in the fabric is defined as an E_Port going up or down, or an Fx_Port going up or down. In an IBM fabric, if DLS is turned off, load sharing is performed only at boot time or when an Fx_Port comes up. Optimal load sharing is rarely achieved with DLS disabled. 176 Implementing an Open IBM SAN If DLS is turned on, routing changes can affect working ports. For example, if an Fx_Port goes down, another Fx_Port may be rerouted from one E_Port to a different E_Port. The switch minimizes the number of routing changes, but some are necessary in order to achieve optimal load sharing. Turning on DLS can affect performances when using it in conjunction with the In-Order Delivery option. In-Order Delivery (IOD) Use the IOD option to enforce in-order delivery of frames during a fabric topology change. In a stable fabric, frames are always delivered in-order, even when the traffic between switches is shared among multiple paths. However, when topology changes occur in the fabric (for instance, a link goes down), traffic is rerouted around the failure. When topology changes occur, generally, some frames are delivered out-of-order. This option ensures that frames are not delivered out-of-order, even during fabric topology changes. In an IBM fabric, the IOD option is to be set on. This option should be used with care, because it can cause a delay in the establishment of a new path when a topology change occurs. Only if there are devices connected to the fabric that do not tolerate occasional out-of-order delivery of frames, should this command be used. FSPF Route As shown in Figure 2-101, the FSPF Route option is selected (highlighted) under the Routing tree. The main area of the window then displays the FSPF routing table, including the destination domain and port, hop count, and the metric being the cost assigned to that link. We define the different columns in Table 2-14. Table 2-14 FSPF Route Field Descriptions Field Description In Port Displays the Port number where the frames enter the switch. Destination Domain Displays the destination domain ID for the participating static routes for a particular In Port. The destination domain is the target of the out port. Out Port Displays the Out port. It should be within the range of ports that are available for static routes for the current domain. More than one out port can be used for any In port with a different domain id. Each domain id requires an out port. Metric Displays the calculated cost of reaching the destination domain. Chapter 2. Implementing a SAN with the b-type family 177 Field Description Hops Displays the number of hops in the “shortest path” route. Flags Displays whether the route is Static (S) or Dynamic (D). Next Domain Displays the next domain ID in the routing path. The Next Domain is the switch that the “Out Port” is connected to. Next Port Displays the next Port in the routing path. The Next Port is the port number that the “Out Port” is physically connected to. Static Route This section can be used to define static routes. A static route is a route that is defining a specific path, and will not change when a topology changes occur, unless the path defined by the route becomes unavailable. In Figure 2-102 we are defining a static route so that all frames received on port 0 with a destination domain of 2 will be transmitted through port 10. Clicking OK will add our definition to the list. We then need to click apply to bring this definition active; the active definition can be seen in the FSPF routing table in Figure 2-101 identified by the S flag. To remove a static route, we need to select the specific definition in the static routes list and then click Delete. Figure 2-102 Routing - Static Route Link Cost By selecting the next option under the Routing tree, we can view the link cost for a specific link as shown in Figure 2-103. By double-clicking in the Cost field for the specific port, we are able to modify the cost. This setting will have an effect on the cost value the local switch has for this link. It will use this value to calculate the lowest cost path to a destination on other switch(es) within the fabric. For a 1 Gb/s per second ISL, the default cost is 1000. For a 2 Gb/s ISL, the default cost is 500. Valid values for link cost are from 1 to 9999. 178 Implementing an Open IBM SAN Figure 2-103 Routing link cost Extended Fabric The Extended Fabric tab allows us to configure long distance ports. The M12 and M14 have slot subtabs when configuring a given port as shown in Figure 2-104. First we select slot 7 subtab and then highlight port 0. For all other models we would just highlight the given port we wish to configure as long distance. Chapter 2. Implementing a SAN with the b-type family 179 Figure 2-104 M12 Extended fabric tab After highlighting the port to configure, we go to the Long Distance column on the far right hand side and click on the down arrow to show the options available for configuration. Table 2-15 lists the details with the Extended Fabric tab. 180 Implementing an Open IBM SAN Table 2-15 Extended Fabric configuration Port Number Port Number for all switch models, see Slot Number tab description for M12 and M14 model number Buffer Limited XXXXXXXXXXXXXXXXXXXXXXXXXXXXXXXXXXXXX Port Speed 1G, 2G, 4G as set speeds N1, N2 N4 as negotiated speeds Buffer Usage Actual buffer usage of port Actual Distance Real distance in kilometers Desired Distance Desired distance in kilometers for the port based on port speed Long Distance L0 = Normal value, long distance disabled LE = Extended normal enabled The following require Extended Fabric License L0.5 = 25km or less L1 = Medium long distance enabled, 50km or less L2 = Long distance enabled, 100km or less LD = Dynamic link enabled, operates at distances up to 500km for 1Gb/s, 250km for 2Gb/s, or 125km for 4Gb/s depending upon frame buffer availability within port group Slot Number Tab Subtab for the slots in the M12 and M14 displaying the ports on the given slot for the logical switch Apply Apply and commit changes to the switch Close Close Administrator Window Refresh Refresh the view with current data from switch AAA Service FOS 4.4 now supports the RADIUS authentication, authorization and accounting service (known as AAA). When the switch is configured for RADIUS, it becomes a Network Access Server that acts as a RADIUS client. The authentication records are stored in the RADIUS host server database. We can use the AAA tab to manage the Radius Server as shown in Figure 2-105. Chapter 2. Implementing a SAN with the b-type family 181 Figure 2-105 AAA To add a new Radius server, click on Add button and fill in the RADIUS server with a valid ip address or DNS string. The other fields are optional and automatically filled in as shown in Figure 2-106. After we fill in the ip address, we click OK. 182 Implementing an Open IBM SAN Figure 2-106 Add RADIUS configuration Note: Each server must have a unique IP address or DNS name. Now that the servers are defined, we can modify or remove them by highlighting them and clicking on either Modify or Remove. Once we have finished listing all the servers in the configuration, we can now change the order in which they are contacted for authentication by using the up and down arrow on the right of the window displaying the list of servers. Details are described in Table 2-16. Table 2-16 AAA tab functions Function Description Primary AAA Service XXXXXXXXXXXXXXXXXXXXXXXXXXXXXXXXXXXXX Secondary AAA Service XXXXXXXXXXXXXXXXXXXXXXXXXXXXXXXXXXXXX RADIUS Configuration Window displaying RADIUS servers in the configuration Port Port for which RADIUS server is defined Timeout(s) Timeout value in minutes Authentication Authentication protocol used Up/Down Arrows Navigate order for which servers are contacted Add Add a new RADIUS server Modify Modify an existing RADIUS server Remove Remove an existing RADIUS server Chapter 2. Implementing a SAN with the b-type family 183 Function Description Apply Apply and commit changes to the switch Close Close the Administration window Refresh Refresh the view from the current switch data Trace The Trace tab allows us to view and configure the FTP host target or disable automatic trace uploads and manually update a trace dump as shown in Figure 2-107. Tracing is always ‘on’ and will generate a trace dump on certain actions within the switch: Triggered manually through tracedump command Critical level log message occurs Particular log message occurs because traceTrig command has been used Kernel panic occurs Hardware watchdog timer expires. The trace dump is maintained on the switch until it is uploaded via FTP or another trace dump is generated. Note that a new trace dump will overwrite the previous trace dump. 184 Implementing an Open IBM SAN Figure 2-107 Trace In Table 2-17 we describe the Trace Tab functions. Table 2-17 Trace Tab functions Function Description Trace FTP Host Window to enter host information Host IP Host IP address to ftp to Remote Directory Remote directory on host to store dump data User name User name used to log in to host Password Password for user name to log in to host Trace Dump Availability Window for dump availability, if trace dump is not available, message is displayed stating Trace dump is not available Chapter 2. Implementing a SAN with the b-type family 185 Function Description NOTE FOR M12 and M14: Dumps are gathered for each logical CP - Active CP and Standby CP Trace Auto FTP Uploaded When box is checked, trace dumps automatically uploaded to defined host Auto FTP Upload Radio button to enable or disable the auto upload function Upload Trace Once clicked, upload of data begins Apply Apply and commit any changes to the switch Close Close the Administrator window Refresh Refresh the view with current switch detail FICON CUP FICON Manager Server (FMS) is used to support switch management using CUP. To be able to use the CUP functionality, all switches in the fabric must have FICON Management Server mode (FMS mode) enabled. FICON Management Server mode is a per switch setting. After FICON Management Server mode is enabled, you can activate a CUP license without rebooting the director. We will briefly discuss some of the basic functions on the FICON CUP tab. For complete information, refer to the Brocade Advanced Web Tools Administrator’s Guide, 53-0000522-07. The first subtab under FICON CUP tab is where we enable the FICON Management Server mode as shown in Figure 2-108. 186 Implementing an Open IBM SAN Figure 2-108 FICON CUP tab1 The first section determines the mode of the FICON Management server, either enabled or disabled. The next section is entitled FICON Management Server Behavior Control and has some default settings already defined. The Code Page section displays what language is used to exchange information with Host Programming. The Control Device is in a default neutral state. When it is neutral, the Control Device accepts commands from any channel that has established a logic path with it and will accept commands from alternate managers. When the Control Device is switched, it establishes a logical path and accepts commands only from that logical path (device allegiance). Once the FICON Management Server is enabled, we go to the CUP port connectivity subtab to configure the ports as shown in Figure 2-109. Chapter 2. Implementing a SAN with the b-type family 187 Figure 2-109 FICON tab Configure CUP connectivity The CUP Port Connectivity subtab shown in Figure 2-109 has a default view which displays the CUP configuration list. The functions on this tab are: Activate Edit Delete Copy New Activate a configuration Modify an existing configuration (that is inactive) Delete a configuration Copy a configuration Create a new configuration We will not go into detail here on CUP configurations, refer to the Brocade Advanced Web Tools Administrator’s Guide, 53-0000522-07 as mentioned earlier. 188 Implementing an Open IBM SAN Trunking This panel is for viewing only. Disabling or enabling trunking is done through the Port Setting panel. This is shown in Figure 2-110 for port 0,1, and 2 by checking the Enable Trunking box. Figure 2-110 Enable trunking on port We describe the Trunking feature below. ISL Trunking is shipped as standard with the 2109-F32, M12 and M14 switches. With the 3434-F08 or 2109-F16, it requires a separate Performance Bundle License key to be purchased and installed. The ISL Trunking feature allows up to four Interswitch Links (ISLs) to merge logically into a single link. An ISL is a connection between two switches through an Expansion Port (E_Port). When using ISL Trunking to aggregate bandwidth of up to four ports, the speed of the ISLs between switches in a fabric is quadrupled. For example, at 2 Gb/s speeds, trunking delivers ISL throughput of 4, 6, and up to 8 Gb/s. Chapter 2. Implementing a SAN with the b-type family 189 ISL Trunking supports high-bandwidth, large-scale SANs which include core switches. The primary task of ISL Trunking is to provide high bandwidth path between switches in a fabric, while balancing the traffic across the individual links and maintaining In-Order Delivery of data packets to their destination. Attention: In-Order Delivery is the default setting in an IBM fabric, this setting may be changed by the user. ISL Trunking may be managed using Telnet commands or the Web Tools interface. Advantages of ISL Trunking The ISL Trunking feature has many advantages; for example, it ensures optimal ISL bandwidth use across trunked links, while preserving in-order delivery (see previous Attention box). ISL Trunking uses frame-level load balancing, as opposed to Fibre Channel Shortest Path First (FSPF), to achieve faster fabric convergence, as well as higher availability in the fabric. Routing without the ISL Trunking feature Prior to the implementation of the ISL Trunking feature, device-level load sharing was done through Fibre Channel networks that created ISLs and operated using the FSPF routing protocol. The FSPF routing protocol established and communicated the shortest paths for data to be carried from source to destination. Although FSPF compliant switches ensure fixed routing paths, and guarantee that all frames are delivered in-order, congestion occurs if the aggregation of the stream exceeds the capacity of one of the ISLs in the path. For example, four untrunked ISLs have a maximum capacity of 2 Gb/s, which provides for a maximum throughput of 8 Gb/s. Due to traffic that is not trunked, the throughput of the four ISLs is determined as follows: 2 Gb/s + 1.5 Gb/s +.5 Gb/s + 1 Gb/s, which gives a 5 Gb/s total. This is because two 2 Gb/s data streams are competing for the same path. Routing with the ISL Trunking feature With ISL Trunking four ISLs provide 8 Gb/s of total throughput. With the implementation of ISL Trunking, bandwidth is shared across the trunked ISLs, permitting a total throughput of: 2 Gb/s + 1.5 Gb/s + 0.5 Gb/s + 1 Gb/s + 2 Gb/s, for a total 7 Gb/s in this case. 190 Implementing an Open IBM SAN Because the trunk aggregates the four individual paths into one and preserves in-order deliver of frames, the total throughput is increased compared to a non-trunked group of ISLs. Trunking groups, ports, and masters ISL Trunking dynamically performs load balancing, at the frame level, across a set of available links between two adjacent switches to establish a trunking group. Ports that belong to a trunking group are called trunking ports. One port is used to assign traffic for the group, and is referred to as the trunking master. Trunking groups A trunking group is identified by the trunking master that represents the entire group. The rest of the group members are referred to as slave links that help the trunking master direct traffic across ISLs, allowing efficient and balanced in-order communication. Trunking ports Trunking ports in a trunking group should meet the following criteria: Port must be configured as E_Ports. Ports must reside in the same contiguous four-port groups (quad). Each switch has the four-port quads identified on the port panel with alternating colors: – – – – – Group 1: port 0 to port 3 Group 2: port 4 to port 7 Group 3: port 8 to port 11 Group 4:port 12 to port 15 etc... Trunking Ports must run at the same speed, 2 Gb/s or 4 Gb/s speeds. Each switch must have a trunking license installed. B32 can only trunk 4 Gb/s to another B32. The cable difference between all ports in a trunking group must be less than 500 meters. Trunking masters The trunking master implicitly defines the trunking group. All ports with the same master are considered to be part of the same group. Each trunking group includes a single trunking master and several trunking slave links. The first ISL found in any trunking group is assigned to be the trunking master, also known as the principal ISL. After the trunking group is fully established, all data packets intended for transmission across the trunk are dynamically distributed at frame level across the ISLs in the trunking group, while preserving in-order delivery. Chapter 2. Implementing a SAN with the b-type family 191 Installing ISL Trunking The ISL Trunking feature requires a 2109-M14, 2109-M12, 2109-F32, 2109-F16 or a 3534-F08 switch. The M12, M14 and F32 ship with the feature already installed. The F16 and F08 require that a Performance Bundle license be installed to enable trunking using either Telnet or the Web interface. Both switches at either end of an ISL Trunk require an active license for trunking to work. A license may have been installed in the switch at the factory. If not, contact your switch supplier to obtain a license key. Administering ISL Trunking The ISL Trunking feature is managed by performing some administration tasks. These tasks include: Enabling or disabling the trunking Enabling and disabling ports of a switch Setting the speed of a port Debugging a trunking link failure The ISL Trunking feature is administered using Telnet commands. ISL Trunking Telnet commands Table 2-18 describes the Telnet commands used to manage the ISL Trunking feature. Table 2-18 ISL Telnet commands Command Description Example portCfgTrunkport Use this command to configure a port to be enabled or disabled for trunking. To enable port 5 for ISL TRUNKING, enter: portCfgTrunkport 5, 1 To disable port 5 for ISL TRUNKING, enter: portCfgTrunkport 5, 0 switchCfgTrunk Use this command to enable or disable trunking on all ports of a switch. To enable trunking on all ports of a switch, enter: switchCfgTrunk 1 To disable ISL Trunking on all ports of a switch, enter: switchCfgTrunk 0 trunkDebug Use this command to debug a trunk link failure. To debug ports 1 and 2, enter: trunkDebug 1, 2 trunkshow Use this command to display ISL Trunking membership information. To display ISL Trunking membership information about users, enter: trunkshow 192 Implementing an Open IBM SAN 2.3.10 Telnet interface All IBM TotalStorage SAN Switches have a Telnet interface that is accessed by clicking the picture of the monitor from the Web Switch view. In Figure 2-111, we show the M12 panel and in Figure 2-112 we show the B32 model. Note that both the M12 and M14 have telnet sessions for each logical switch. All other models have only one telnet session. Figure 2-111 M12 Go to Telnet Session Figure 2-112 B32 Go to Telnet session In Figure 2-113 we show the Telnet window that is presented. From this window, the login and password are required. Figure 2-113 M12 Telnet Session On the M12 and M14, a telnet session can be opened for each logical switch at the same time. If you click on the telnet session button a second time, it Chapter 2. Implementing a SAN with the b-type family 193 automatically brings you to the telnet session that is already opened. For a complete list of Telnet commands is listed in or additional information on telnet commands, refer to the Brocade Command Reference Guide, 53-0000519-09. 2.4 Performance Monitor The Performance Monitor performs the following functions: It graphically displays throughput (megabytes per second) for each port and for the entire switch. Port throughput is the number of bytes that are received at a port plus the number of bytes that are transmitted. Switch throughput is the sum of the throughput for all the ports. The Performance Monitor also allows the graphing of traffic based on the Source ID and the Destination ID hardware-filtering mechanism. It provides the ability to change the configuration of a switch or port visually by using the graphics. To access the Performance Monitor, we click the Perf button from the M12 switch view in Web Tools as shown in Figure 2-114. Figure 2-114 M12 Performance graphs The Performance Monitor contains a collection of graphs on the display panel, or canvas. The graphs are sized based on the number of graphs loaded on the canvas. Double-clicking a graph expands the graph to the size of the display. Features These are some of the features available in the Performance Monitor: An existing report can be selected from a list of reports that are predefined. In some cases, you can supply the object to be monitored and graphed (such as port number, SID/DID pair, AL_PA, or switch domain number). Graphs are displayed on a canvas, which can hold a maximum of eight graphs simultaneously. An individual graph can be maximized to occupy the entire canvas. The size of the graphs on the canvas is determined by the number of graphs being displayed. The window does not need to be scrolled to view all the selected graphs. 194 Implementing an Open IBM SAN The collection of graphs in the canvas can be stored for later retrieval on the switch. Up to 20 individual canvases can be saved. Each canvas is saved with its name, a brief description, and the graphs that comprise the canvas. Any graph can be magnified and detached from the main canvas or removed from the main canvas using a pop-up menu. You can display the pop-up menu by pointing the mouse at any graph on the main canvas and clicking the right mouse button. To reattach the detached (Zoomed Out) graph back to the main canvas, you can point the mouse to the detached graph, click the right button and select Zoom In. Each graph can be printed. After clicking the Perf button from the Switch View, we see the default performance graph as shown in Figure 2-115. Chapter 2. Implementing a SAN with the b-type family 195 Figure 2-115 M12 Performance Monitoring Default Graph All graphs are real-time. Depending on the graph chosen, it is updated either every 5 or 15 seconds. 196 Implementing an Open IBM SAN Performance Monitor menus The Performance Monitor is made up of two main menus: Actions menu Performance graphs menu Actions menu The Actions menu of the Performance Monitor feature, shown in Figure 2-116, is made up of the following sub-menus: Display canvas configurations Save current canvas configuration Resource usage display Print all graphs A canvas is a collection of predefined graphs. Figure 2-116 M12 Action Menu Selection Display canvas configurations Use this item to display and edit the various canvas configurations previously saved, as shown in Figure 2-118 on page 199. Chapter 2. Implementing a SAN with the b-type family 197 Figure 2-117 Display canvas configuration Table 2-19 describes the fields on the Canvas Configuration List window. Table 2-19 Canvas Configuration List window — fields Available in Canvas Configuration List Load Select to load a canvas of 1 to 8 graphs onto the Performance Monitor facility by choosing the highlighted canvas name. Edit Select to make changes to a canvas or change configurations. A list of graphs which comprise the highlighted canvas will appear. Copy Select to copy the highlighted canvas configuration from the list to the switch flash. You will be prompted to type in the name and description of the canvas to which you want to copy your chosen graph. Remove Select to remove a highlighted canvas from the list and the switch flash. You will be prompted with a warning that you are going to delete the selected canvas. Close Select to close the canvas configuration list. Available in Edit Canvas Window Save 198 Select to save an edited canvas. Implementing an Open IBM SAN Edit Select to make changes to a graph on a canvas. A data entry frame will appear. Add Select to add a graph to a canvas. A pop-up menu of available graphs will display. Use this option to select the type of graph to add. For more information, refer to the Basic Monitoring and Advanced Monitoring sections of this chapter. Remove Select to delete a graph. The graph currently highlighted will be removed. Cancel Select to exit the window without making any changes. Available in Copy Canvas List Name Type in the name of the canvas to which you want to copy the graph. Description Type in a description of the graph to be copied. Copy Canvas Select to copy the selected graph to another canvas. Cancel Select to exit the window without making a copy. Save Current Canvas Configuration The Save Current Canvas Configuration menu saves the currently configured canvas to the switch. It uses a canvas name and a brief description to save the canvas, as shown in Figure 2-118. Figure 2-118 Save current canvas selection Chapter 2. Implementing a SAN with the b-type family 199 If the canvas already exists, the Confirm Override Canvas confirmation window pops up. Use the override option when you need to update an existing canvas. Display Resource Usage The Resource Usage Display window allows you to view the resources that are allocated for end-to-end use, as well as providing filter-based monitoring for each port, as shown in Figure 2-119. Figure 2-119 Resource Usage Display window These are the fields available in the Resource Usage Display window: Refresh: Select to refresh the window immediately. Cancel: Select to close the window. Print all graphs Use this item to print all the graphs on the selected canvas. 200 Implementing an Open IBM SAN Performance Graphs menu We show the Performance Graphs menu in Figure 2-120. Figure 2-120 Performance Graphs menu The Performance Graphs menu gives access to two sets of performance graphs: Basic Monitoring Advanced Monitoring (requires an additional license key) Basic Monitoring We have selected all the options available in basic monitoring and have created a canvas that includes them. This is shown in Figure 2-121. Chapter 2. Implementing a SAN with the b-type family 201 Figure 2-121 Basic Monitoring with all functions selected The graphs available on this canvas are described in Table 2-20. Table 2-20 Graphs available in Basic Monitor 202 Graph Name Type Description Port Throughput Graph Line Displays the performance of a port based on four-byte frames received and transmitted. Switch Aggregate Throughput Graph Line Displays the aggregate performance of all ports of a switch. S Implementing an Open IBM SAN Blade Aggregate Throughput Graph see note below Line Displays the aggregate performance of the ports on a given blade. Switch Throughput Utilization Graph Horizontal Bar Displays the port throughput at the time the sample is taken. Port Error Graph Line Displays a line of CRC errors for a given port. Switch Percent Utilization Graph Horizontal Bar Displays the percentage of usage of a chosen switch at the time the sample is taken. Ports SnapShot Error Graph Vertical Bar Displays the CRC error count between sampling periods for all the ports on a switch. Note: Blade Aggregate Throughput is only available on M12 and M14 models. For each graph, additional options are available by right-clicking the graph as shown in Figure 2-122. Figure 2-122 Graphs additional options These are the options: Zoom In: Detach the graph from the canvas in a larger window. We then have the option to Zoom Out to place the graph back on the canvas. Remove: Remove the graph from the canvas Chapter 2. Implementing a SAN with the b-type family 203 Print: Print the graph Show Tx/Rx: Display both transmitted and received bytes Show Tx: Display only transmitted bytes Show Rx: Display only received bytes Example: Port throughput graph To view the throughput of a port, we select Performance Graphs —> Basic Monitoring —> Port Throughput. The Port Throughput Setup is then displayed, shown in Figure 2-123. For the M12 and M14, we need to specify slot and port number. All other models, we only need to specify the port number. Note: To expand the Domain folder, we need to double-click it to open the port tree. Figure 2-123 Port throughput graph setup We enter the number of the slot and port that we want to monitor. A new graph is then added to the canvas. If we zoom in, we get the window shown in Figure 2-124. 204 Implementing an Open IBM SAN Figure 2-124 Port Throughput graph Tip: We can get more detailed information by dragging the mouse pointer over a graph. 2.4.1 Advanced Performance Monitoring Performance Monitoring is an optionally licensed product that runs on all switch models. It provides SAN performance management through an end-to-end monitoring system that enables you to: Increase end-to-end visibility into the fabric Chapter 2. Implementing a SAN with the b-type family 205 Enable more accurate reporting for service level agreements and charged access applications Improve performance tuning and resource optimization Shorten troubleshooting time Promote better capacity planning Simplify administration and setup Increase productivity with pre formatted and customizable windows and reports The Performance Monitoring product: Monitors transaction performance from its source to its destination Provides device performance measurements by port, AL_PA, and LUN Reports CRC error measurement statistics Measures trunking performance Compares IP versus SCSI traffic on each port Includes a wide range of predefined reports Allows you to create customized user-defined reports You can administer Performance Monitoring through either Telnet commands or Web Tools. If you use Web Tools, a Web Tools license must also be installed on the switch. 2.4.2 Performance Monitoring with Telnet commands Three different types of Performance Monitoring can be done using Telnet commands: AL_PA monitoring End-to-end monitoring Filter-based monitoring AL_PA monitoring AL_PA monitoring provides information about the number of CRC errors occurring in Fibre Channel frames in a loop configuration. AL_PA monitoring collects CRC error counts for each AL_PA that is attached to a specific port. End-to-end monitoring End-to-end monitoring provides information about transaction performance between the transactions source (SID) and destination (DID) on a fabric or a loop. Up to 16 SID-DID pairs per port can be specified. For each of the SID-DID pairs, the following information is available: CRC error count on the frames for the SID-DID pair Fibre Channel words transmitted from the port for the SID-DID pair Fibre Channel words received by the port for the SID-DID pair 206 Implementing an Open IBM SAN Filter-based monitoring Filter-based monitoring provides information about a filter’s hit count. Any parameter in the first 64 bytes of the Fibre Channel frame can be measured. The counter increases each time a frame is filtered through the corresponding port. Examples of port filter statistics that can be measured are: SCSI read, write, or read/write commands CRC error statistics (port and AL_PA) IP versus SCSI traffic comparison For the latest information on the commands available, refer to the Brocade Fabric OS Command Reference Manual, 53-0000519-09. 2.4.3 Performance Monitoring with Web Tools You can monitor performance using the Web Tools if a Web Tools license is also installed. The enhanced Performance Monitoring features in Web Tools provide: Predefined performance graphs for AL_PA, end-to-end, and filter-based User-defined graphs Performance canvas for application-level or fabric-level views Configuration editor (save, copy, edit, and remove multiple configurations) Persistent graphs across restarts (saves parameter data across restarts) Print capabilities Predefined performance graphs Predefined graphs are provided to simplify performance monitoring. A wide range of end-to-end fabric, LUN, device, and port metrics are included. Figure 2-125 shows the predefined performance graphs available. Figure 2-125 Advanced monitoring options Chapter 2. Implementing a SAN with the b-type family 207 Installing Performance Monitoring To enable Performance Monitoring, you must install a license on each switch that will use this feature. Contact your switch supplier to obtain a license key. Note: A license might have already been installed on the switch at the factory. You can install a Performance Monitoring license through Telnet commands or using Web Tools. as discussed in “License” on page 162. Using Advanced Performance Monitoring with Web Tools Attention: As the monitoring of any switch is subjective by nature, we just show the windows to give the reader some familiarity with features that can be monitored. In Figure 2-126, we can see some of the options that are available. Figure 2-126 Advanced monitoring range of options 208 Implementing an Open IBM SAN Table 2-21 describes the types of graphs available in the Advanced Monitoring menu. Table 2-21 Graphs available in Advanced Monitoring feature Graph Name Type Description SID/DID Performance Graph Line This graph charts the traffic between a SID (or WWN) and a DID (or WWN) pair on the switch being managed. SCSI Commands Graph Line The total number of Read/Write commands on a given port to a specific LUN. Provides the following choices: SCSI Read/Write on a LUN per port. SCSI Read on a LUN per port. SCSI Write on a LUN per port. SCSI Read/Write per port. SCSI Read per port. SCSI Write per port. SCSI vs IP Graph Vertical Bar Shows percentage of SCSI versus IP frame traffic on each individual port. AL_PA Error Graph Line Displays CRC errors for a given port and a given AL_PA. SID/DID Performance Graph Go to Performance Graphs —> Advanced Monitoring —> SID/DID Performance. To set up our parameters for SID/DID performance monitoring, we then use the window shown in Figure 2-127. Chapter 2. Implementing a SAN with the b-type family 209 Figure 2-127 SID/DID performance setup To choose the slot/port and SID/DID that we want to graph: 1. Double-click a folder in the Port Selection List window. A drop-down list of ports will appear. 2. Select the port that you want to monitor or change by using one of the following methods: a. Type the slot/port number in the Enter /Drag Slot,Port Numbers window. b. Drag the slot/port “folder” from the Slot/Port Selection window to the Enter/Drag slot,port number window. 3. Select the port “folder”, or the small icon that appears next to it. A drop-down list of SID/DID files will appear. 210 Implementing an Open IBM SAN 4. Select the SID/DID numbers that you want to graph by using one of the following methods: a. Type the SID number in the Enter /drag SID Number(hex) window. Repeat for the DID number. a. Drag the SID “file” from the Port Selection window to the Enter/drag SID Number(Hex) window. Repeat for the DID number. 5. Select OK. An example of an SID/DID graph, displaying the traffic between a SID and a DID pair, is shown in Figure 2-128. Figure 2-128 SID/DID graph example Chapter 2. Implementing a SAN with the b-type family 211 Note that SID/DID monitoring monitors traffic on the port logically closest to the SID on the current switch. Figure 2-129 shows several switches and the proper ports on which to add performance monitors for a specified SID/DID pair. Add monitors here SID 0x021300 Host A ... ... Switch 2 Switch 4 Port 3 ... ... Switch 3 Switch 5 Add monitors here DID SID 0x031200 0x021300 Host A ... ... Dev B Port 9 Port 0 Port 6 DID 0x031200 ... ... Dev B Figure 2-129 Proper placement of SID/DID performance monitors In Figure 2-129, monitoring Port 6 on Switch 4 specifying Host A as the SID and Dev B as the DID is correct. But monitoring Port 6 on Switch 4 specifying Dev B as the SID and Host A as the DID will not display a valid graph, as traffic will be shown as null. SCSI command graph When you select the SCSI graph in Performance Graphs —> Advanced Monitoring —> SCSI Commands, the following options will be displayed in a pull-down menu: 212 SCSI Read/Write on a LUN per port SCSI Read on a LUN per port SCSI Write on a LUN per port SCSI Read/Write per port SCSI Read per port SCSI Write per port Implementing an Open IBM SAN Each graph will prompt you with a data entry window to select the port and LUN to be monitored, as shown in Figure 2-130. In this example, we want to monitor SCSI Read and Writes command on LUN 0 going through slot 8, port 15 of the current switch. Figure 2-130 SCSI read/write LUN per port setup To select the port and LUN to monitor: 1. Double-click the folder in the Slot/Port Selection List window. A drop-down list of ports will appear. 2. Select the port that you want to monitor or change by using one of the following methods: a. Type the port number in the Enter/Drag Slot,Port Number window. b. Drag the slot/port “file” from the Slot/Port Selection window to the Enter/Drag Slot,Port Number window. 3. Enter a LUN number in the Enter LUN Number (Hex) window. You can enter only four LUN numbers at a time. 4. Select OK. A graph displaying the total number of Read and/or Write commands on a given port to a specific LUN will be displayed. Chapter 2. Implementing a SAN with the b-type family 213 An example of a SCSI graph, using the Write on a LUN per port option, is shown in Figure 2-131. Figure 2-131 SCSI Read/Write on a LUN per port graph 214 Implementing an Open IBM SAN SCSI versus IP Traffic Graph The SCSI versus IP Traffic graph is accessible via Performance Graphs —> Advanced Monitoring —>SCSI versus IP Traffic. An example of this graph, displaying the percentage of SCSI versus IP frame traffic, is shown in Figure 2-132. Figure 2-132 SCSI versus IP traffic graph This graph gives us the percentage of IP and SCSI traffic on the current switch on a port basis. AL_PA Error graph When you select an AL_PA Error graph via Performance Graphs —> Advanced Monitoring —>AL_PA Error, you will be prompted to choose the port that you want to monitor for various errors. Chapter 2. Implementing a SAN with the b-type family 215 Figure 2-133 is an example of the data entry window that you will see when you choose to create an AL_PA Error Graph. Figure 2-133 AL_PA error graph setup window To choose the port and AL_PA that we wish to graph: 1. Double-click the Domain folder in the Port or AL_PA Selection List window. A drop-down list of ports will appear. 2. We select the port that we wish to monitor or change by using one of the following methods: a. Type the port number in the Enter/Drag Port Numbers window. b. Drag the port “folder” from the Port Selection window to the Enter/Drag Port Number window. 3. We select the small plus that appears next the port “folder”. A drop-down list of AL_PAs on that port will appear. 4. We select the AL_PA number that we wish to graph by using one of the following methods: a. Type the AL_PA number in the Enter/drag SID Numbers window. b. Drag the AL_PA “file” from the Port Selection window to the Enter/drag ALPA Number window. 5. Select OK. An AL_PA Error graph will be displayed, as shown in Figure 2-134. 216 Implementing an Open IBM SAN Figure 2-134 AL_PA error graph Using Advanced Performance Monitoring with Telnet Three different types of Performance Monitoring can be done using Telnet commands: AL_PA monitoring End-to-end monitoring Filter-based monitoring AL_PA monitoring AL_PA monitoring provides information about the number of CRC errors occurring in Fibre Channel frames in a loop configuration. AL_PA monitoring collects CRC error counts for each AL_PA that is attached to a specific port. AL_PA-based performance monitoring does not require explicit configuration. The switch hardware and firmware automatically monitors CRC errors for all valid AL_PAs. Chapter 2. Implementing a SAN with the b-type family 217 Displaying the CRC Error Count Use the perfShowAlpaCrc command to display the CRC error count for all AL_PA devices or a single AL_PA on a specific port. The port must be an active L_Port. Figure 2-135 shows the CRC error count for all AL_PA devices on port 0. Figure 2-135 AL_PA CRC error count display We can display the CRC error count for one AL_PA by specifying this AL_PA as: perfShowAlpaCrc 0, 0xef Clearing the CRC Error Count Use the perfClrAlpaCrc command to clear the CRC error count for AL_PA devices on a specific port. We can clear the error counts for all the AL_PA devices on a port as shown in Figure 2-136. Figure 2-136 Clear AL_PA CRC error count We clear the CRC error count for a specific AL_PA by specifying this AL_PA: perfClrAlpaCrc 0, 0xef End-to-end monitoring End-to-end monitoring provides information about transaction performance between the transactions source (SID) and destination (DID) on a fabric or a loop. Up to 16 SID-DID pairs per port can be specified. For each of the SID-DID pairs, the following information is available: 218 Implementing an Open IBM SAN CRC error count on the frames for the SID-DID pair Fibre Channel words transmitted from the port for the SID-DID pair Fibre Channel words received by the port for the SID-DID pair To enable end-to-end performance monitoring, you must configure an end-to-end monitor on a port, specifying the SID-DID pair. The monitor counts only those frames with matching SID and DID. Each SID or DID has three fields, listed in the following order: Domain ID (DD) Port ID (AA) AL_PA (PP) For example, the SID 0x118a0f has domain ID 0x11, Port ID 0x8a, and AL_PA 0x0f (the prefix “0x” denotes a hexadecimal number). Adding End-to-end Monitors Use the perfAddEEMonitor command to add an end-to-end monitor to a port. With this command we specify the port, the SID, and the DID that we want to monitor. Depending on the application, we can select any port along the routing path for monitoring. Figure 2-137 shows two devices: Host A, which is connected to port 3 on switch 2; and Dev B, which is connected to port 2 on switch 3. SID 0x020300 Host A Switch 2 DID 0x030200 Switch 3 ... monitor number 1 on Port 3 ... Dev B Monitor 1 on Port 2 Figure 2-137 Setting end-to-end monitor on a port To monitor the traffic from Host A to Dev B, work on Switch 2 and add a monitor to port 3, specifying 0x020300 as the SID and 0x030200 as the DID. To monitor the traffic from Dev B to Host A, work on Switch 3 and add a monitor to port 2, specifying 0x030200 as the SID and 0x020300 as the DID. We use perfAddEEMonitor as shown in Figure 2-138. Chapter 2. Implementing a SAN with the b-type family 219 Figure 2-138 Add an end-to-end monitor to switch2 port 3 As shown in Figure 2-138, monitor number 0 counts the frames that have an SID of 0x020300 and a DID of 0x030200. For monitor number 0, RX_COUNT is the number of words from Host A to Dev B, CRC_COUNT is the number of frames from Host A to Dev B with CRC errors, and TX_COUNT is the number of words from Dev B to Host A. Note that the monitor must be properly placed as explained in “SID/DID Performance Graph” on page 209. In Figure 2-137, if we add a monitor to switch2, port 3 specifying Dev B as the SID and Host A as the DID, no counters are incremented: Valid: perfAddEEMonitor 3,"0x020300","0x030200" Not valid: perfAddEEMonitor 3,"0x030200","0x020300" Setting a Mask for End-to-End Monitors End-to-End monitors count the number of words in Fibre Channel frames that match a specific SID/DID pair. If we want to match only part of the SID or DID, we can set a mask on the port to compare only certain parts of the SID or DID. With no mask set, the frame must match the entire SID and DID to trigger the monitor. By setting a mask, we can choose to have the frame match only one or two of the three fields (Domain ID, Area ID, AL_PA) to trigger the monitor. Note: We can set only one mask per port. The mask is applied to all of the end-to-end monitors on a port. If we subsequently create new monitors on the port, the mask is applied to these new monitors as well. All of the counters are reset when we set the mask. The mask is specified in the form “dd:aa:pp” where dd is the domain ID mask, aa is the Port ID mask, and pp is the AL_PA mask. The values for dd, aa, and pp are either: ff (the field must match) 00 (the field is ignored). Use the perfSetPortEEMask to set a mask for end-to-end monitors. The command sets the mask for all end-to-end monitors of a port. 220 Implementing an Open IBM SAN The perfSetPortEEMask command sets a mask for the domain ID, Port ID, and AL_PA of the SIDs and DIDs for frames transmitted from and received by the port. Figure 2-139 shows the mask positions in the command. Transmitted from port SID mask DID mask Received by port SID mask DID mask perfSetPortEEMask 3, "ff:00:00" "ff:00:00" "ff:00:00" "ff:00:00" AL_PA mask Port ID mask Domain ID mask Figure 2-139 Mask positions for end-to-end monitors In Figure 2-139, a mask (“ff”) is set on port 3 to compare the domain ID fields on the SID and DID in all frames (transmitted and received) on port 3. The AL_PA and Port ID fields in all frames are ignored, as no mask is set on these fields. If we set the following monitor on port 3: perfAddEEMonitor 3,"0x020300","0x030200" Then, without any mask, then the SID must be 0x020300 and the DID must be 0x030200 to trigger the monitor. If you set the mask shown in Figure 2-139, then the frame SID and DID must match only the domain ID portion of the specified SID-DID pair. That is, frames with SID of “0x02nnnn” and DID of “0x03nnnn” trigger the monitor, where nnnn is any number. Each port can have only one EE mask. The mask is applied to all end-to-end monitors on the port. You cannot specify individual masks for each monitor on the port. If you define a new end-to-end monitor on a port after you have created a mask for that port, the mask is automatically applied to the new monitor. The default EE mask value upon power-on is “ff:ff:ff” for everything—SID and DID on all transmitted and received frames. In Figure 2-140, we use the perfSetPortEEMask command to set a mask on the SID and DID domain ID of frames transmitted from switch 2, port 3. After the mask is set, the monitor number created previously in Figure 2-138 on page 220 counts the number of words in incoming Fibre Channel frames that have an SID of 0x02nnnn and a DID of 0x03nnnn, where nnnn is any number. Chapter 2. Implementing a SAN with the b-type family 221 Figure 2-140 Set a mask on switch2, port 3 Displaying the end-to-end mask of a port You can use the perfShowPortEEMask command to display the current end-to-end mask of a port as shown in Figure 2-141. Figure 2-141 Displaying the end-to-end mask of a port The end-to-end mask has 12 fields, with each having a value of on or off. Displaying the end-to-end monitors We use the perfShowEEMonitor command to display the end-to-end monitors defined on the port. We can display cumulative counters as shown in Figure 2-142. 222 Implementing an Open IBM SAN Figure 2-142 Displaying end-to-end monitor using perfShowEEMonitor This command displays: Key: Monitor number SID: Source ID DID: Destination ID OWNER_APP: TELNET or WEB_TOOLS OWNER_IP_ADDR: IP address of the owner of the filter monitor TX_COUNT: Transmitting frame count RX_COUNT: Receiving frame count CRC_COUNT: CRC error count The cumulative counters are 64-bit values in hexadecimal format. If we specify an interval number in the perfShowEEMonitor command, the command displays a rolling table of CRC error, Tx, and Rx counters on a per-interval basis for all the valid monitors on the port as shown in Figure 2-143. The counter values are the number of bytes, in decimal format. Figure 2-143 Displaying end-to-end monitor with a interval Chapter 2. Implementing a SAN with the b-type family 223 The counter values in Figure 2-143 are the number of bytes in decimal format. The “m” stands for megabytes. You may also see “g” which stands for gigabytes, or “k” which stands for kilobytes. Note: The minimum interval value that can be specified is 5 seconds. Deleting end-to-end monitors Use the perfDelEEMonitor command to delete an end-to-end monitor on a port as shown in Figure 2-144. Indicate which monitor to delete by specifying the monitor number that was returned by a previous perfAddEEMonitor command. Figure 2-144 Deleting end-to-end monitors The following command deletes all of the end-to-end monitors on port 2: sw1:admin> perfDelEEMonitor 2 This will remove ALL EE monitors on port 2, continue? [y|n]y Clearing end-to-end monitor counters To clear all of the end-to-end monitor counters on a port, use the perfSetPortEEMask command to reset all of the end-to-end monitor counters on that port. The perfSetPortEEMask command also sets the end-to-end mask, so if you do not want to change the mask, you must re-specify the current mask settings. You can view the current mask settings using the perfShowPortEEMask command. To clear the counters for a single end-to-end monitor, delete the monitor using the perfDelEEMonitor command, and then add the monitor again, using the perfAddEEMonitor command. Filter-based monitoring Filter-based monitoring provides information about a filter’s hit count. Any parameter in the first 64 bytes of the Fibre Channel frame can be measured. The counter increases each time a frame is filtered through the corresponding port. Examples of port filter statistics that can be measured are: SCSI read, write, or read/write commands CRC error statistics (port and AL_PA) IP versus SCSI traffic comparison 224 Implementing an Open IBM SAN The filter can be a standard filter (for example, a read command filter that counts the number of read commands that have been received by the port) or a user-defined filter that you customize for your particular use. The maximum number of filters is eight per port, in any combination of standard filters and user-defined filters. Adding standard filter-based monitors This section describes how to add standard filter-based monitors to a port. Use the telnet commands listed in Table 2-22 to define filter-based monitors on a port. Table 2-22 Add Filter based monitor commands Command Description perfAddReadMonitor Count the number of SCSI Read commands perfAddWriteMonitor Count the number of SCSI Write commands perfAddRWMonitor Count the number of SCSI Read and Write commands perfAddSCSIMonitor Count the number of SCSI traffic frames perfAddIPMonitor Count the number of IP traffic frames Chapter 2. Implementing a SAN with the b-type family 225 In Figure 2-145 we add several filter monitors to switch2, port 3. Figure 2-145 Adding filter monitors to a port Adding user-defined filter-based monitors In addition to the standard filters (read, write, read/write, and frame count), you can create custom filters to qualify frames for statistics gathering to fit your own special needs. To define a custom filter, use the perfAddUserMonitor telnet command. With this command, you must specify a series of offsets, masks, values and an alias for the monitor. The following actions are performed. For all incoming frames, the switch: 1. Locates the byte found in the frame at the specified offset 2. Applies the mask to the byte found in the frame 3. Compares the value with the given values in the perfAddUserMonitor command 4. Increments the filter counter if a match is found You can specify up to six different offsets for each port, and up to four values to compare against each offset. If more than one offset is required to properly define a filter, the bytes found at each offset must match one of the given values for the filter to increment its counter. If one or more of the given offsets does not match any of the given values, the counter does not increment. 226 Implementing an Open IBM SAN The value of the offset must be between 0 and 63, in decimal format. Byte 0 indicates the first byte of the Start of Frame (SOF), byte 4 is the first byte of the frame header, and byte 28 is the first byte of the payload. Thus only the SOF, frame header, and first 36 bytes of payload may be selected as part of a filter definition. Displaying filter-based monitors Use the perfShowFilterMonitor command to display all the filter-based monitors of a port. You can display a cumulative count of the traffic detected by the monitors, or you can display a snapshot of the traffic at specified intervals. Note: Intervals must be specified in multiples of 5 seconds, for example, 5, 10, 15, 20, 25, etc., because registers are scanned every 5 seconds. This command displays all the filter-based monitors defined on the specified port. It displays all the valid monitor numbers and user-defined aliases on the specified port. Figure 2-146 shows the traffic at a specified interval of six seconds on port 0. Figure 2-146 Displaying filter monitor Note: A defined filter will only increment if set on receiving ports. Chapter 2. Implementing a SAN with the b-type family 227 Deleting filter-based monitors To delete a filter-based monitor, first list the valid monitor numbers using the perfShowFilterMonitor command, then use the perfDelFilterMonitor command to delete a specific monitor. If you do not specify which monitor number to delete, you will be asked if you want to delete all entries. 2.5 Fabric Watch Fabric Watch monitors key fabric and switch elements, making it easy to quickly identify and escalate potential problems. It monitors each element for out-of-boundary values or counters and provides notification when any exceed the defined boundaries. Fabric Watch can configure elements, such as error status, and performance counters within a switch, and how they are monitored. If an element exceeds the specified threshold or trigger value, Fabric Watch will issue an alert. This can be in the form of writing to the event log, logging to the port log, issuing an SNMP trap, or sending an e-mail (or a combination of any of these). The Fabric Watch feature monitors the performance and status IBM TotalStorage SAN Switch, and can alert SAN managers when problems arise. The real-time alerts from Fabric Watch software help SAN managers solve problems before they become costly failures. SAN managers can configure Fabric Watch software to monitor any of the following occurrences: Fabric events (such as topology re-configurations and zone changes) Physical switch conditions (such as fans, power supplies, and temperature) Port behavior (such as state changes, errors, and performance) SFPs (for switches equipped with SMART SFPs) Range monitoring With Fabric Watch, each switch continuously monitors error and performance counters against a set of defined ranges. This and other information specific to each monitored element is made available by Fabric Watch for viewing and, in some cases, modification. This set of information about each element is called a threshold, and the upper and lower limits of the defined ranges are called boundaries. If conditions break out of acceptable ranges, an event is considered to have occurred, and one or more alarms (reporting mechanisms) are generated if configured for the relevant threshold. There are three types of alarms: SNMP trap Entry in the switch event log Locking of the port log to preserve the relevant information 228 Implementing an Open IBM SAN Element categories Fabric Watch elements include any component of the fabric or switch that Fabric Watch software monitors. To monitor elements, Fabric Watch software categorizes them into areas, and groups these areas into classes. Classes Classes (also known as agents) are high-level categories of elements. Fabric Watch software monitors elements that compose the following classes: Fabric Environment Port (includes E_Port, Optical F/FL_Port, Copper F/FL_Port) SPF Performance Monitor (AL_PA, End-to-End, Filter) Areas Areas are the behaviors that Fabric Watch software monitors. Table 2-23 lists all Fabric Watch classes, the areas within those classes, and a description of each area. Table 2-23 Fabric Watch Classes and Area Class Area Area Description Fabric E_Ports downs Monitors E_Port status. Fabric Reconfigure Monitors changes to the fabric configuration. Domain ID Changes Monitors forcible domain ID changes. Segmentation Changes Monitors segmentation changes. Zone Changes Monitors changes to currently enabled zoning configurations. Fabric <-> QL Monitors changes to QuickLoop Fabric logins Monitors the number of host device fabric logins (FLOGI). SFP State Change Monitors insertion/removal of smart SFP. Temperature Monitors switch temperature in degrees Celsius. Fan Monitors switch fan speed in RPMs. Environmental Chapter 2. Implementing a SAN with the b-type family 229 Class Area Area Description Port Link Loss Monitors the link failure rate of each port. Tracks the number of link failures per configured time interval. Sync Loss Monitors the number of synchronization loss errors per configured time interval. Signal Loss Monitors the number of signal loss errors per configured time interval. Protocol Error Monitors the number of protocol errors per configured time interval. Invalid Words Monitors the number of invalid words transmitted (from a device to a port) per configured time interval. Invalid CRCs Monitors the number of CRC errors per configured time interval. Rx Performance Monitors receive rate in KB/sec. Tx Performance Monitors transmit rate in KB/sec. State Changes Monitors state changes. Temperature Monitors SFP temperature in degrees Celsius. Rx Power Monitors SFP receiver power in uWatts. Tx Power Monitors SFP transmitter power in uWatts Current Monitors SFP current in mAmps. Voltage Monitors SFP power in mVolts. CRC Errors Monitors the number of CRC errors that occur (for AL_PA or for a SiD-DiD pair) per configured time interval (in seconds). FCW Received Monitors receive rate of a SiD-DiD pair in KB per second. FCW Transmitted Monitors transmit rate of a SiD-DiD pair in KB per second. Custom Filter Counter Monitors the filter-based counter that the user defines. SFP Performance Monitor 230 Implementing an Open IBM SAN Accessing Fabric Watch To access the Fabric Watch function, click the “magnifying glass” button (labeled Watch) from the Switch View, as shown in Figure 2-147. Figure 2-147 M12 Go to Fabric Watch Accessing Fabric Watch will require admin logon and password. Once authentication is complete, the Fabric Watch window as shown in Figure 2-148, is then displayed. Figure 2-148 Fabric watch initial view The window is divided into two sections. The left-hand side has a tree structure that lists the Classes that can be monitored using Fabric Watch. If you expand the Classes, all the Areas that are associated with a particular Class are displayed. The main part of the window on the right-hand side has a display with three tabs: Alarm Notification tab Threshold Configuration tab Email Configuration tab Chapter 2. Implementing a SAN with the b-type family 231 Alarm Notification Use the Alarm Notification tab to view the information for all elements of the Fabric Watch, Fabric, or Performance Monitor classes. The information displayed includes: The name of the fabric The current value The last event type The last event time The last event value The last event state The Alarm Notification will refresh the displayed information according to the threshold configuration. The Alarm Notification tab is shown in Figure 2-149. Figure 2-149 Fabric watch alarm notifications Configure Thresholds Use the Thresholds Configuration tab to view and configure Fabric Watch thresholds for the Fabric Watch class currently selected in the organizational tree on the left side of the window. The Thresholds Configuration tab is shown in Figure 2-150. 232 Implementing an Open IBM SAN Figure 2-150 Configure Thresholds The Thresholds Configuration display changes according to the Class and Area selected in the organizational tree. However, the Thresholds Configuration tab always contains the same buttons as described below. Default Click to return settings to default values. Custom Define Specify new settings. Apply Click to apply the values specified in the current display. Refresh Refresh view with current information from switch. Chapter 2. Implementing a SAN with the b-type family 233 Important: Note that when making changes in a given window, they are not saved until we click on the Apply button. If we do not want to save the changes that we made, we can cancel them by clicking on another tab to view. Doing this will bring up the Update/Change View warning window shown in Figure 2-151 where we are able to click Yes and continue without saving the changes. Figure 2-151 Update/Change view warning Thresholds for the Environmental classes The Environmental classes are displayed by highlighting Environment in the panel on the left and then clicking on the Threshold Configuration tab as shown in Figure 2-152. 234 Implementing an Open IBM SAN Figure 2-152 Environmental Thresholds The panel contains four tabs to define how we intend to monitor the environmental factors of the switch. They are the Trait Configuration, Alarm Configuration, Element Configuration and Configuration Report. Each tab contains an Area Selection pulldown menu to select the Fabric Watch area. In the example in Figure 2-152, we selected Temperature. The values and information on the Trait Configuration tab are described in Table 2-24. Table 2-24 Trait configuration threshold Value Description Unit The string used to define the unit of measurement for the area Time base The time base for the area Low Boundary The low threshold for the event setting comparison Chapter 2. Implementing a SAN with the b-type family 235 Value Description High Boundary The high threshold for the event setting comparison Buffer size Size of the buffer zone in the event setting comparison Activate level Radio button to use Default settings or Custom Define settings Apply Apply the new values to the switch Refresh Refresh view with current information from the switch Thresholds for the SFP Classes The SFP classes are displayed by highlighting SFP in the panel on the left and clicking on the Alarm Notification tab. The Area Selection pull down menu displays the Classes to be configured as shown in Figure 2-153. Figure 2-153 SFP thresholds 236 Implementing an Open IBM SAN The available areas are Temperature, RX Power, TX Power, Current and Voltage. The Alarm Configuration tab has two areas to show the Default settings and the Customer define settings. These areas are described in Table 2-25. Table 2-25 Alarm Configuration settings Value Description Changed Event of counter changed Below Event of counter fell below low boundary Above Event of counter fell above high boundary Inbetween Event of counter is between the high/low boundaries ERROR_LOG Event notification to error log SNMP_TRAP Event notification through SNMP trap RAPI_TRAP Event notification through RAPI trap EMAIL_ALERT Event notification through email System Default Radio button indicating system defaults taken Custom Define Radio button indicating custom defined Thresholds for the remaining classes The Port, E_Port, F/FL Copper Port, F/FL Optical Port classes display the following fields for each area (Link Loss, Sync Loss, Signal Loss, Protocol Error, Invalid Words, Invalid CRCs, RX Performance, TX Performance, State Changes. The thresholds for the Port class are displayed as shown in Figure 2-154. Chapter 2. Implementing a SAN with the b-type family 237 Figure 2-154 Port Thresholds Use the Threshold Configuration tab to view and configure End-to-End thresholds for the Performance class currently selected in the organizational tree on the left side of the window. Note that you must define the SID/DID pair through the Performance Monitor before you can monitor the threshold in the End-to-End class. The Threshold Configuration tab for the End-to-end Thresholds is shown in Figure 2-155. 238 Implementing an Open IBM SAN Figure 2-155 Thresholds Tab for End-to-End Use the Threshold Configuration tab to view and configure Filter-based thresholds for the Performance class currently selected in the organizational tree on the left side of the window as shown in Note that the filter type must be predefined in the Performance Monitor before you can use the Filter-Based thresholds. For more information on the Performance Monitor, refer to “Advanced Performance Monitoring” on page 205. Chapter 2. Implementing a SAN with the b-type family 239 The Configure Thresholds tab is shown in Figure 2-156. Figure 2-156 Thresholds tab with Filter based class Configuration Report tab Use the Configuration Report tab to view the current Fabric Watch threshold parameters for the area selected in the Fabric Watch tree. 240 Implementing an Open IBM SAN The Configuration Report tab is shown in Figure 2-157. Figure 2-157 Configuration report Modifying settings for switches with one power supply The IBM default settings for Fabric Watch will cause a switch with a single power supply to appear yellow in the Web Tools, indicating a MARGINAL status. The status can also be clicking the Status button in the switch view, this opens a window describing the cause of our marginal state as shown in Figure 2-158. Figure 2-158 Checking the switch status Chapter 2. Implementing a SAN with the b-type family 241 The switch status can be changed to HEALTHY using a Telnet connection. Figure 2-159 shows the command that we issued to change the status of the switch to ensure that a switch with only one power supply is shown with a HEALTHY status. Figure 2-159 Changing the default setting To change the default settings, we issue the command: switchstatuspolicyset. The first section of response to the command is the same as if we had issued the switchstatuspolicyshow command and displays a list of the current settings. Here we can see that the PowerSupplies line is defined to be Marginal if the switch is powered by one power supply. These default settings assume that the switch has two power supplies and that one has failed. Obviously, for a switch purchased with a single power supply, this is not valid. 242 Implementing an Open IBM SAN We are then prompted to enter the new values for each setting, starting with the DOWN value for the Faulty Ports, then the MARGINAL value for Faulty Ports. We press Enter to use default values; we are prompted for the next setting, and eventually, for the Power supply DOWN and MARGINAL values. We enter zero for the number of bad power supplies contributing to the DOWN status and zero for the number of bad power supplies contributing to the MARGINAL status. Indeed, as we are working with only one power supply, if this power supply goes down, then the whole switch goes down. There is no marginal status. At the bottom of the Telnet display in Figure 2-159, after our change to the policy parameter takes affect, Fabric Watch (FW) issues a message indicating that the status of the switch has changed from MARGINAL to HEALTHY. Email Configuration Use the Email Configuration tab to configure the destination e-mail ID to receive any alerts selected in the threshold configuration to deliver to e-mail as shown in Figure 2-160. Also on this tab, we are able to generally enable or disable the e-mail function for fabric Watch alerts, and send a test e-mail to ensure that the function is working. Chapter 2. Implementing a SAN with the b-type family 243 Figure 2-160 Setting up email notification 2.5.1 Beaconing The Beaconing function will locate a switch by sending a signal to the specified switch, which causes an LED yellow light pattern to flash from side to side of the switch. This makes the switch very easy to find. 244 Implementing an Open IBM SAN To activate Beaconing, click the lighthouse icon on the Switch View as shown on the M12 as shown in Figure 2-161. Figure 2-161 M12 Start Beaconing This function can be toggled on and off once the switch is identified. 2.6 Merging SAN fabrics Merging a SAN fabric occurs where two or more separate fabrics are combined. An example of this is shown in Figure 2-162. Chapter 2. Implementing a SAN with the b-type family 245 Separate Fabrics Blue Fabric Open Systems Server Open Systems Server Disk Client Tape Disk Switch Red Fabric Switch Open Systems Server Client Disk Tape Figure 2-162 Two separate SAN fabrics These separate SAN fabrics can be merged to form a larger SAN fabric by connecting the switches using an Inter-Switch Link (ISL) as shown in Figure 2-163. 246 Implementing an Open IBM SAN Merged Fabrics Open Systems Server Disk Client Open Systems Server Tape Disk Switch Inter Switch Links Switch Open Systems Server Client Disk Tape Figure 2-163 A merged fabric The zoning information for each fabric is retained as are the domain IDs for the switches, assuming that there are no conflicting definitions. This could happen when an organization acquires another company or when two business units within one company merge. The result is that a SAN fabric is extended through the addition of another complete fabric. Important: You should always disable a switch before adding it to an existing fabric. Some conflicts may occur as two fabrics are merged. Some of the most common sources of conflict are: Duplicate domain ID Zoning configuration conflicts Operating parameters inconsistency (for example, Core PID format) Chapter 2. Implementing a SAN with the b-type family 247 When this occurs, part of the SAN fabric is said to be segmented. You can identify a segmentation from the slow flashing orange LED on the ISL port. The following section describes these three conflicts and their possible solution. 2.6.1 Duplicate domain IDs Domain IDs are used to uniquely identify a switch within a fabric. Therefore, each switch within the same fabric must have a unique domain ID. Duplicate domains causes the ISL between the two switches to be segmented as shown in Figure 2-164. Figure 2-164 Domain ID segmentation error log To solve this overlap, change the domain ID of one of the switches participating in the ISL. This can be done using the Web Tools GUI in the Switch Settings tab or using the configure telnet command as shown in 2.3.2, “Connecting to the switch” on page 98. Domain ID overlap can be easily avoided by disabling the switches first using the switchDisable command. When bringing back the switches online automatically, the domain ID is negotiated set to a valid value. 2.6.2 Zoning configuration conflicts When merging two fabrics, zoning information from the two previously separate fabrics is merged as much as possible into the new fabric. Sometimes, zoning inconsistency can occur and zoning information cannot be merged. 248 Implementing an Open IBM SAN An example of segmentation due to zoning is shown in Figure 2-165. Figure 2-165 Zone conflict error log In the example above, we have a different active configuration enabled on each of the two fabrics, and each of the configurations we have an alias defined for banda, each alias definition pointing to a different switch/port. One of the solutions is to make sure, before attempting the merge, that zoning information on both fabrics does not have any duplicate name definitions. The other solution is to make sure that the switch we are adding to the fabric is cleared of any zoning information. This can be done by following this process: 1. Disable the active configuration using cfgdisable. 2. Issue the cfgclear command to clear all zoning information. 3. Issue the cfgsave command to save the changes. 4. Issue switchenable to enable the switch. Figure 2-166 shows an example command flow of this process. Chapter 2. Implementing a SAN with the b-type family 249 Figure 2-166 Clearing all zoning information 2.6.3 Operating parameters conflicts Conflicts due to fabric wide operating parameters are less common since default values for these settings suit most needs. They can occur when dealing with multi vendor environment or distance solution installations, for example. Error log messages vary a lot depending on the source of the problem. An example is shown in Figure 2-167. Figure 2-167 Fabric parameter segmentation error log In the example above, we have core PID set on in one fabric and not in the other which caused the segmentation. One solution to this problem is to make sure the fabric wide operating parameters are consistent across all participating switches. 250 Implementing an Open IBM SAN If default values are used, then follow these steps to reset the settings: 1. Telnet into the switch that you are adding, for example, telnet 9.1.38.1.157, and press Enter. 2. Login, enter the switch userid and password 3. Disable the switch with switchdisable 4. Reset parameters using configdefault 5. Set IBM fabric parameters iodset and dlsreset 6. Use configure to set required domain ID and other specific parameters, ensuring all except the domain ID are identical. 7. Reboot the switch using the reboot or fastboot commands (the switch will be enabled after the boot completes). 2.7 Upgrading switch firmware From time to time new versions of firmware will be released, in the following example we have documented the steps to upgrade a switch from v4.2.0.c to v4.4.0 FOS code. This can be performed using Telnet or by using the Web Tools interface. We will perform both methods. The latest microcode levels can be obtained for the various switches from the IBM support website. The following link provides documentation downloads as well as the links to the firmware downloads. http://www-1.ibm.com/servers/storage/san/b_type/library.html#downloads Note: As new firmware levels are introduced regularly, the process we document here will apply to subsequent firmware releases. It is likely that by the time this redbook is published, new firmware will be available. In this example, we went to the website and have chosen the link for the Version 4.x firmware download shown in Figure 2-168. Chapter 2. Implementing a SAN with the b-type family 251 Figure 2-168 IBM product support Web page http://www-1.ibm.com/servers/storage/san/b_type/library.html#downloads We can arrive at the above weblink by a number of ways. When viewing the product details for any switch, just look for the tab or arrow entitled Downloads. By clicking on Downloads, it will bring us to all the available downloads for all models. By clicking on the Version 4.x firmware download link, it will redirects us to the Brocade download site which allows us to download firmware and documentation for all of the IBM TotalStorage SAN Switch products. A pop-up window appears warning us of the redirection off the IBM hosted Web site shown in Figure 2-169. 252 Implementing an Open IBM SAN Figure 2-169 Redirect to Brocade confirmation We click Continue and arrive at the Brocade downloads website shown in Figure 2-170 where it shows all available levels. From here, we select the V4.4 Firmware and are directed to all available downloads for V4.4.x. Chapter 2. Implementing a SAN with the b-type family 253 Figure 2-170 Brocade Web Firmware levels download list Tip: When selecting the latest level to download, always ensure that it is compatible with other hardware in the SAN. Once we have selected a firmware level to download, we are prompted to provide our company name and address as information. Once the code is downloaded, then we are able to unzip the files to prepare for the install. In our example, we downloaded the Unix version and stored the files on an AIX server. The firmware can be downloaded by one of the following ways: Telnet session Web Tools administration functions Fabric Manager Upgrading the firmware with Telnet Before we begin the upgrade, we recommend setting the timeout value to 0 as the upgrade could take some time and the telnet session could timeout. We also recommend saving the configuration to the host. Below we show these actions. IBM_2109_M12_B:admin>timeout Current IDLE Timeout is 10 minutes IBM_2109_M12_B:admin>timeout 0 IDLE Timeout Changed to 0 minutes The modified IDLE Timeout will be in effect after NEXT login IBM_2109_M12_B:admin> 254 Implementing an Open IBM SAN After setting the value to 0 remember to logout and login again as the message indicates below. Here we will save the configuration to the host by configupload command and respond to the prompts: IBM_2109_M12_B:ADMIN>configupload Server Name or IP Address [host]: 9.42.166.193 User Name [user]: anonymous File Name [config.txt]: teams/sc/m12config.txt Password: Upload complete Now we are ready to perform the download. In our example we will use the M12 so that we can see how the switch updates each CP and reboots. First we check to ensure that both CPs are available with the hashow command: IBM_2109_M12_B:admin> hashow Local CP (Slot 5, CP0): Active Remote CP (Slot 6, CP1): Standby, Healthy HA enabled, Heartbeat Up, HA State synchronized IBM_2109_M12_B:admin> Both CPs are available so now we issue the firmwaredownload command and respond to the prompts with the IP address, the user name, file name and password. Important: Firmware code files must be unzipped prior to downloading to the switch. IBM_2109_M12_B:admin> firmwaredownload This command will upgrade both CPs in the switch. If you want to upgrade a single CP only, please use -s option. You can run firmwareDownloadStatus to get the status of this command. This command will cause the active CP to reset and will require that existing telnet, secure telnet or SSH sessions be restarted. Do you want to continue [Y]: y Server Name or IP Address: 9.42.164.135 User Name: root File Name: /tmp/san/v4.4.0/release.plist Password: Chapter 2. Implementing a SAN with the b-type family 255 Firmwaredownload has started on Standby CP. It may take up to 30 minutes. Firmwaredownload has completed successfully on Standby CP. Standby CP reboots. Standby CP booted up. Standby CP booted up with new firmware. At this point we are disconnected from the switch because it has rebooted. We will log back in and issue the firmwaredownloadstatus command to check on the current status of the upgrade. We already know that it has completed by the Firmwaredownload has completed successfully message. IBM_2109_M12_B:admin> firmwaredownloadstatus [0]: Wed Nov 24 16:43:49 2004 cp0: Firmwaredownload has started on Standby CP. It may take up to 30 minutes. [1]: Wed Nov 24 16:50:06 2004 cp0: Firmwaredownload has completed successfully on Standby CP. [2]: Wed Nov 24 16:50:09 2004 cp0: Standby CP is going for reboot. [3]: Wed Nov 24 16:53:09 2004 cp0: Standby CP booted up. [4]: Wed Nov 24 16:55:43 2004 cp1: Forced failover succeeded. New Active CP is running new firmware [5]: Wed Nov 24 16:55:46 2004 cp1: Firmwaredownload has started on Standby CP. It may take up to 30 minutes. [6]: Wed Nov 24 17:02:35 2004 cp1: Firmwaredownload has completed successfully on Standby CP. [7]: Wed Nov 24 17:02:37 2004 cp1: Standby CP reboots. 256 Implementing an Open IBM SAN [8]: Wed Nov 24 17:06:01 2004 cp1: Standby CP booted successfully with new firmware. [9]: Wed Nov 24 17:06:03 2004 cp1: Firmwarecommit has started on both Active and Standby CPs. [10]: Wed Nov 24 17:15:15 2004 cp1: Firmwarecommit has completed successfully on Active CP. [11]: Wed Nov 24 17:15:17 2004 cp1: Firmwaredownload command has completed successfully. Now we issue the hashow command to view the status of the Standby CP. IBM_2109_M12_B:admin> hashow Local CP (Slot 6, CP1): Active Remote CP (Slot 5, CP0): Standby, Healthy HA enabled, Heartbeat Up, HA State synchronized Now we issue the firmwareshow command to confirm that both CPs have the same firmware levels. IBM_2109_M12_B:admin> firmwareshow Local CP (Slot 6, CP1): Active Primary partition:v4.4.0 Secondary Partition:v4.4.0 Remote CP (Slot 5, CP0): Standby Primary partition:v4.4.0 Secondary Partition:v4.4.0 Note: If Local CP and Remote CP have different versions of firmware, please retry firmwaredownload command. IBM_2109_M12_B:admin> exit This completes the telnet method of firmware download and upgrade process. For more detailed information on the commands, please refer to the Brocade Fabric OS Command Reference Version 4.4, 53-0000519-09. Upgrading the firmware using the Web Tools As with upgrading the firmware using Telnet, we need to make sure that our FTP server is running, and that we have the server IP address. To upgrade the firmware using the Web Tools, we point our Web browser to the IP address of the SAN switch. Next we click on the Admin button to get into the Administration function. From there we navigate to the Firmware tab as shown in Figure 2-171. Chapter 2. Implementing a SAN with the b-type family 257 t Figure 2-171 B32 Firmware upload As mentioned earlier, we need to know the ip address of the host where we downloaded the firmware, the file name, user name and password for logging in to the host. Once these fields are filled in, we click on Apply. We are prompted to confirm our actions as shown in Figure 2-172. 258 Implementing an Open IBM SAN Figure 2-172 Confirm firmware download Tip: While performing the firmware upgrade, we recommend that you take advantage of your scheduled fabric outage and enable the core PID setting if it is not already set. Refer to “Setting Core PID format” on page 100, and “Configure” on page 171 to enable using Web Tools. The download begins. Status messages are logged in the report window. There is also a Firmware download status indicator which shows the progress as shown in Figure 2-173. Chapter 2. Implementing a SAN with the b-type family 259 Figure 2-173 M12 Firmware download progress Once the download completes and both CPs have been rebooted, we receive a message indicating that we need to shutdown all Web Tools and browser windows and restart the Web Tools. We can also see the completion messages in the report window in Figure 2-174. Our firmware update using Web Tools is now complete. 260 Implementing an Open IBM SAN Figure 2-174 M12 Web Tools firmware upload completed 2.8 Distributed fabrics There are three features available on the IBM TotalStorage SAN Switch that allow for remote distribution of the fabric: ISL R_RDY mode Remote switch Extended fabrics We discuss these features in the topics that follow. Chapter 2. Implementing a SAN with the b-type family 261 2.8.1 ISL R_RDY Mode ISL R_RDY Mode is a new standard feature with v3.1 and v4.1 of FOS. It is designed as a replacement of the Remote Switch feature as it is more flexible and is supported by many gateway manufacturers. When first establishing a connection to another switch or Node, switch ports initialize using Exchange Link Parameters (ELP) Mode 1. Gateways however, expect an initialization that uses ELP mode 2. Setting a port ISL R_RDY mode prepares the port for Gateway connections by causing the port initialization to use the expected method (ELP mode 2). Therefore, the WAN gateway does not need to support a special mode for these switches. To enable R_RDY on port 9, we use the portcfgislmode command: itsosw4:admin> portcfgislmode 9, 1 Committing configuration...done. ISL R_RDY Mode is enabled for port 9. Please make sure the PID formats are consistent across the entire fabric. itsosw4:admin> After ensuring that the above steps have been performed on the other remote switch, and all parameters, including core PID, match — our remote switch link is now operational. 2.8.2 Remote Switch The Remote Switch feature is an optionally licensed feature on the 3534 and 2109 series switches with Fabric OS version 3.0, 4.0 or higher. Remote Switch enables us to connect two remote IBM TotalStorage SAN Switch fabrics over an IP network, enabling communication of IP or ATM protocols as well as the normal Fibre Channel traffic. The Remote Switch feature functions with the aid of a “bridging device” or network bridge. The network-bridge must support both a Fibre Channel physical interface and a secondary non-Fibre Channel physical interface such as IP or ATM. With Remote Switch on both sides of a fabric, the network-bridge accepts Fibre Channel frames from one side of a fabric, tunnels them across the network, and then passes them to the other side of the fabric. The two switches are cascaded together to form a fabric that, from the viewpoint of the connected hosts and storage devices, interact the same as locally connected switches. The performance limitations depend only on the type of connection that is used. 262 Implementing an Open IBM SAN The Remote Switch feature supports a maximum of two switches in a fabric, and provides these benefits: Coordinated fabric services: The Remote Switch fabric configuration fully supports all fabric services, including Distributed Name Services, Registered State Change Notifications, and Alias Services. Distributed management: Access to the management facilities (Web Tools, Telnet, SNMP, and SES) is available from either the local or the remote switch. Interconnect for switch management is routed through the Fibre Channel connection; no additional network connection is required between sites. Ability to support multiple interswitch links (ISLs): Sites requiring redundant configurations can connect multiple E_Ports to remote sites by using multiple gateways. Standard Fabric OS routing facilities automatically maximize throughput by using the E_Ports to load share traffic during normal operation, with automatic failover and failback during interruption on the Wide Area Network (WAN) connection. 2.8.3 Using Remote Switch To transfer frames across a WAN using ATM protocol, the Fibre Channel frames (from 256 to 2112 bytes) must be broken into smaller pieces (53 byte ATM cells) at the local end of the ATM network. After the frames are broken into smaller pieces, they are tunnelled inside ATM cells to be transmitted across the ATM network. At the remote end of the ATM network, these pieces are reassembled back into complete Fibre Channel frames and are transmitted through the remote Fibre Channel interface. To accomplish this, the gateway provides an E_Port interface that links to the IBM TotalStorage SAN Switch E_Port. After the link between the two E_Ports is negotiated, the gateway E_Port moves to pass-through mode and passes Fibre Channel traffic from the IBM TotalStorage SAN Switch E_Port to the ATM network. 2.8.4 Configuring a Remote Switch fabric A Remote Switch fabric requires two 3534 or 2109 series switches with identical configurations. A separate Extended Fabric license is not required to operate the switch at distances greater than 100 km. This is achieved when the switch operates over the gateway network. Performance is limited to the link used. In addition to normal switch configuration options, the following parameters must be configured for the remote switch environment: Chapter 2. Implementing a SAN with the b-type family 263 Time-out values: The Resource Allocation Time-out Value (R_A_TOV), and Error Detect Time-out Value (E_D_TOV) must be increased, as appropriate, for all switches participating in the Remote Switch fabric. This provides for the possible increase in transit time caused by the introduction of WAN links into the fabric. Data field size: All switches participating in the Remote Switch fabric must have the data field size configured to the maximum of 2048 bytes to accommodate the maximum field size that is supported by ATM gateways. Data field sizes smaller than 2048 bytes can be set, but they might cause significant performance degradation. Class F frame suppression: All switches participating in the Remote Switch fabric must have the Class F frame suppression flag set. Class F frames are automatically converted to Class 2 frames. BB credit: The setting for BB credit must be the same on both switches. Switches with a different value will segment. Setting parameter values through Telnet Using the telnet interface, we will use the configure command to set the following parameter values: BB credit R_A_TOV and E_D_TOV Data field size Class F frame suppression flag Using the following commands, we changed the parameter values: itsosw2:admin>switchDisable itsosw2:admin> configure Configure... Fabric parameters (yes, y, no, n): [no] y Domain: (1..239) [4] BB credit: (1..27) [16] R_A_TOV: (4000..120000) [10000] E_D_TOV: (1000..5000) [2000] 5000 WAN_TOV: (1000..120000) [0] Data field size: (256..2112) [2112] 2048 Sequence Level Switching: (0..1) [0] Disable Device Probing: (0..1) [0] Suppress Class F Traffic: (0..1) [0] 1 SYNC IO mode: (0..1) [0] VC Encoded Address Mode: (0..1) [0] Core Switch PID Format: (0..1) [1] ^D 264 Implementing an Open IBM SAN Committing configuration...done. itsosw4:admin>itsosw2:admin>switch:admin>switchEnable 2.8.5 Extended Fabrics Extended Fabrics is an optionally licensed product that runs on 3534 or 2109 series switches with Fabric OS version 3.0, 4.0 or higher. The Extended Fabrics feature creates an interconnected fabric at distances of up to 100 km using Fibre Channel technology. Extended Fabrics can increase the allowable distance between two switches. Extended Fabrics optimizes the internal buffering algorithm for IBM TotalStorage SAN Switches. It provides maximum buffering between E_Ports that are connected over an extended distance through buffer re-configuration. This results in line speed performance of close to full Fibre Channel speed for switches that are interconnected at 100 km, thus providing the highest possible performance for transfers between switches. The Fibre Channel connection extensions can be provided by extended distance SFPs, Fibre Channel repeaters, or wave division multiplexing (WDM) devices. Note: Performance can vary depending on the condition of the fiber optic connections between the switches. Losses due to splicing, connectors, tight bends, and other degradation can affect the performance over the link and the maximum distance possible. To enable Extended Fabrics, an Extended Fabrics license must be installed. If a fabric is created with a 2109 Model F16 switch, the long distance extended fabric configuration needs to be set only once for each fabric at the edge port connector switch. The edge port connector switch automatically works with the rest of the switches in the fabric. Note: To enable Extended Fabrics in a fabric created with 3534 switches, each switch in the fabric must be configured individually. 2.8.6 Using Extended Fabrics We can configure ports to support long distance links through the Telnet or Web Tools interfaces. Chapter 2. Implementing a SAN with the b-type family 265 Supported configurations An Extended Fabric can be created with either 3534 or 2109 series switches respectively, that are running Fabric OS v3.0 or v4.0 at a minimum. An Extended Fabric can consist of: 3534 switches only 2109 series switches only A combination of 3534 and 2109 series switches Note: In a combination (3534 and 2109 series) configuration, the long-distance ISL that connects the fabrics must be installed between edge-port switches of same series. An Extended Fabric does not work if the long distance ISL is installed between non-matching edge port switches. 2.8.7 Configuring Extended Fabrics In order to run Extended Fabrics, the following two parameters need to be set: Switch configuration to enable long distance Port configuration to select the long distance mode In the 3534 switches, each switch within the fabric must have the switch configuration turned on. In the 2109 series switches, only the edge-port switches need to have the switch configuration turned on. Perform the following steps to set the long distance fabric mode bit: 1. Login to the switch through Telnet. 2. At the command line, type the following command: switchDisable 3. At the command line, type the following command: configure 4. Type Y at the Fabric parameters prompt. 5. Type 1 at the following prompt: Long Distance Fabric [0]: There are three possible long distance levels for a port: Level 0 — Re-configures the port as a regular switch port. The number of buffers reserved for the port supports up to 10 km links. Level 1 — Distances up to 50 km will support 1 Gb/s and 2 Gb/s switches (3534 and 2109 series). 266 Implementing an Open IBM SAN Level 2 — Distances up to 100 km will support 1 Gb/s and 2 Gb/s switches (3534 and 2109 series). Ports are grouped into quads, each of which consists of four adjacent ports that share a common pool of frame buffers. The possible quad groupings are: Ports 0 -3 Ports 4 -7 Ports 8 -11 Ports 12 - 15 Certain buffers are dedicated for each port, and others are shared among the ports. In Extended Fabric mode, one port is given an increase of dedicated buffers from this pool. The total number of frame buffers in a quad is limited, and the Extended Fabric port matrix introduces a combination of long distance ports that are available. This is shown in Table 2-26. Table 2-26 Combination of long distance ports that are available Port 0 Port 1 Port 2 Port 3 L1 F or E F or E F or E L1 L1 F or E F or E L1 L1 L1 F or E L1 L1 L1 L1 L2 F F F L2 E F L2 E L2 L1 L2 L1 F Where: L0 represents an Extended Fabric mode of 10 km L1 represents an Extended Fabric mode of 50 km L2 represents an Extended Fabric mode of 100 km F represents the F_Port that is used when connected to devices E represents the E_Port that is used for interswitch connectivity Chapter 2. Implementing a SAN with the b-type family 267 Setting the port configuration We can configure a port to support long distance links by using the Telnet command portCfgLongDistance or by using the Web Tools. 2.9 Advanced Security To implement a secure fabric on an IBM TotalStorage SAN Switch, we require two things: an optional Advanced Security (AS) license key, and a firmware version supporting Secure Fabric OS (SFOS). When installed and configured, it provides a comprehensive SAN security solution for IBM 2109 and 3534 switches and the devices that are attached to them. All IBM 2109 and 3534 switch models are supported, and may be used in a mixed environment. Note: IBM has OEM’d Brocade’s Secure Fabric OS, and the IBM name for this product is Advanced Security. At some stages throughout this topic, we will interchange the nomenclature. Features Advanced Security provides the ability to: Secure the SAN infrastructure from unauthorized management and device access. Share resources within the same fabric by tightly controlling where devices (servers / hosts) can attach. Provide a secure means for distributing fabric wide security and zoning information (trusted switch). Create a “trusted SAN infrastructure”. Control The security level for the fabric is defined by a Fabric Management Policy Set (FMPS) that consists of: Fabric Configuration Server (FCS) policy Management Access Control (MAC) policies Device Connection Control (DCC) policies Switch Connection Control (SCC) policy Options policy (prevents Node WWN usage) Management To manage an Advanced Security environment, we can use Telnet, Fabric Manager, or API integration into SAN Management software, such as Tivoli® SAN Manager. 268 Implementing an Open IBM SAN Planning Before we leap ahead and enable security on our fabric, we need to do some planning to minimize any disruption to our SAN services: Document the switch name, WWN, and IP address of every switch in the fabric(s). Identify which switches will be the Fabric Configuration Server (FCS), and also identify at least one to be the backup FCS. Determine the policy requirements for each device and host. Identify management workstations to install secure Telnet or SSH client on. All switches must have minimum firmware levels to support SFOS as listed in Table 2-2 on page 55. All switches in the fabric must have a zoning and security license. Digital certificates must be installed on each switch in the fabric before enabling security. Note: Only switches upgraded to v2.6.1, v3.1 and v4.1 firmware will require digital certificates to be added. All new switches shipped with these levels of firmware pre-installed will already have the digital certificates loaded. 2.9.1 Implementing Advanced Security We will now perform the steps to implement security on our fabric, assuming that we have completed upgrading firmware to the required levels by following the procedure in 2.7, “Upgrading switch firmware” on page 251. We also assume that the security license key has been purchased and installed on all switches in the fabric. The first step we perform is to back up the configuration of all the switches in our fabric. This is an important step that allows us to be able to restore the switch to its current condition if anything should go wrong during our implementation process. To do this, we follow the procedures outlined in “Firmware” on page 157 for each switch, ensuring that we select the Config Upload option. This may also be accomplished using the configUpload command in a telnet session. Our next step is to determine if digital certificates are installed on our switches in the fabric. We perform this on all switches by using the configshow “pki” command on switches at v2.6.1+ or v3.1+ as follows: SF16SW1:admin> configshow "pki" pki.CSR: Exist pki.Certificate: Empty pki.Passphrase: Exist Chapter 2. Implementing a SAN with the b-type family 269 pki.Private_Key: pki.Root_CA_Cert: SF16SW1:admin> Exist Exist For switches using firmware v4.1+ we use the pkishow command as follows: IBM_2109_M12_B:admin> pkishow Passphrase : Exist Private Key : Exist CSR : Exist Certificate : Empty Root Certificate: Exist IBM_2109_M12_B:admin> We can see in both cases that the Certificate shows as Empty, therefore we need to install the certificates. We will perform this for anM12 although the procedure is the same on all switch models. We visit the IBM TotalStorage SAN Switch Web site at: http://www-1.ibm.com/servers/storage/san/b_type/index.html From this Web site, we select the model of the switch we are working with. In our example, we have selected the SAN switch M12. From the displayed Web page, we now select the Feature Keys tab, which allows you to select the Field Upgrade Process for the Secure Fabric OS upgrade as seen in Figure 2-175. 270 Implementing an Open IBM SAN Figure 2-175 Feature Keys Web Page for M12 Once we select the field upgrade process, we can then select the “Obtain PKI Certificate” as shown in Figure 2-176. Chapter 2. Implementing a SAN with the b-type family 271 Figure 2-176 Field Upgrade Process Web Page From here we are directed to the site where we download the PKICert utility. We are presented with two options, one for Windows and one for Solaris. In the 272 Implementing an Open IBM SAN example shown in Figure 2-177, we selected the option to download the Windows® certificate. Figure 2-177 Download Windows security certificate We extract the zip file to a temporary directory, where we can then run the Setup.exe to install the utility on our workstation. During the install process, we select all the default options. When the install completes, we run c:\nt_pki\pkicert.exe. After this opens, we press Enter to accept the default log file, and are then presented with the menu shown in Figure 2-178. Chapter 2. Implementing a SAN with the b-type family 273 Figure 2-178 PKI Cert Utility menu Obtain CSRs From the menu we take option 1, to retrieve CSRs from switches and write a CSR file. This takes us to another menu where we are given the following options: 1) 2) r) Manually enter fabric address Read addresses from a file (name to be given) Return to Main menu We take option 1 to allow us to manually enter our fabric(s) address. From the next window we only need to enter an IP address of one switch within a fabric, we can enter multiple fabrics if we wish, and by just hitting enter without entering an address on a line continue to the next window. At this point the PKI Cert utility connects to the fabric, and prompts us for the userid and password (we are given 5 attempts). The next window prompts us for a file name as shown in Figure 2-179, where we enter a fully qualified file name and path where we would like to store the CSR information from the fabric switches. 274 Implementing an Open IBM SAN Figure 2-179 PKI CSR file name After entering the file name we are asked if we would like to Include (optional) licensed product data; we replied yes to save the optional data. We are then asked if we want to get CSRs from switches that already have certificates. As our aim here is to install certificates on switches without them currently, we answer No to this question. Next we are asked which fabric we wish to retrieve from; we selected all. Now the utility retrieves the CSRs from each switch, giving us its progress as shown in Figure 2-180. Figure 2-180 PKI Certificate retrieval status Once this completes, we press Enter to continue. This returns us to the first menu, where we select q to quit. Chapter 2. Implementing a SAN with the b-type family 275 Request Certificates Now that we have saved the CSR file on our workstation, we return to step 6 on the Field Upgrade process Web page, as shown in Figure 2-176 on page 272. We click the Request Certificates link at step 6, and are taken to the Brocade switch key activation site. After agreeing to the licensing, and filling out our details, we point the browser to the CSR file we saved from the switches in the previous steps, and click the Submit button. We verify our information and click Submit again. Figure 2-181shows the request certificate confirmation. Figure 2-181 Brocade request Certificate confirmation After we have submitted our collected file, an automated machine will process it, shortly after we have received the digital certificates at the e-mail address we provided in the submit form. We detach the certificates file to a temporary directory, and execute the c:\nt_pki\pkicert.exe utility again. 276 Implementing an Open IBM SAN Note: If the CSR collected includes a switch without a Security license, the submitted CSR file will not be processed. Install the certificates This time, from the PKICert utility menu shown in Figure 2-178 on page 274, we select option 2 to Install Certificates contained in the Certificate file we received. We then select option 1 to Manually enter the fabric IP address. We show the IP address entry in Figure 2-182, where pressing Enter on the second line (instead of supplying another IP address) advances us to the next window. Figure 2-182 IP address input At this point we are asked to provide the login user and password for PKICert to connect to the fabric. Once PKICert successfully connects to the fabric, we are prompted for the full path and file name of the Certificate file we received in the e-mail earlier. Next we select the target fabric as shown in Figure 2-183. Chapter 2. Implementing a SAN with the b-type family 277 Figure 2-183 Target fabric selection If we had entered multiple fabric IP addresses earlier we could now select an individual fabric or all the fabrics listed. In our case, we have only entered a single fabric. The utility now installs the certificates on each switch in the fabric, confirming the success or failure as displayed in Figure 2-184. Figure 2-184 Certificate installation success After pressing Enter to continue, we select q to quit the PKICert Utility. 278 Implementing an Open IBM SAN We now confirm that we have successfully installed the digital certificates by issuing the configshow “pki” command for v2.6.1 and v3.1: SF16SW1:admin> configshow "pki" pki.CSR: Exist pki.Certificate: Exist pki.Passphrase: Exist pki.Private_Key: Exist pki.Root_CA_Cert: Exist SF16SW1:admin> or pkishow command for v4.1 SM12SW1:admin> pkishow Passphrase : Exist Private Key : Exist CSR : Exist Certificate : Exist Root Certificate: Exist SM12SW1:admin> How to telnet to a switch securely Now that we have successfully installed the digital certificates on all our switches, we need to prepare our workstation to be able to securely communicate with the FCS switches in the fabric once we enable security, as normal telnet will not be allowed to connect. From step 8 in the Web page shown in Figure 2-177 on page 273, we click the Obtain Secure Telnet Client link, and to download the client, we are taken to another Web page where we may select a Windows or Solaris client. We selected the Windows download link and saved ntsectelnet.zip to our workstation. We then unzip the file, making sure we maintain the directory structure (if the directory structure is not maintained, the install will fail). From our temporary unzip location, we then execute setup.exe. Chapter 2. Implementing a SAN with the b-type family 279 Figure 2-185 Secure Telnet Install Figure 2-185 shows the Install shield splash window for the Brocade Secure Telnet client installer, we use the Next button to install the client with all default values and complete the install process. This puts a Secure Telnet Icon on our desktop, we double click this icon to open the window shown in Figure 2-186. 280 Implementing an Open IBM SAN Figure 2-186 Secure Telnet client configuration In this secTelnet Configuration window, we enter the IP address of the FCS switch we want to connect to in the Switch Name field, and then click the Open button. We also have an option of saving the connection definition, by entering a name in the Saved Sessions field and clicking the Save button. In our example we have saved a session for the itsosw4 switch. Now, by double-clicking the name, we launch a secure Telnet session to that switch, as shown in Figure 2-187. Figure 2-187 Secure Telnet session As the secure Telnet session uses the digital certificates that we have previously installed on the switch, establishing a connection verifies that we are ready to begin enabling Advanced Security. Chapter 2. Implementing a SAN with the b-type family 281 Tip: Before enabling Advanced Security on the fabric, we recommend performing the secure Telnet session establishment to each switch in the fabric to verify that the certificates are working properly before we lock the fabric with security policies. 2.9.2 Enabling Advanced Security Before continuing, we recommend performing a backup of the configuration of all the switches in our fabric again. This lets us restore the switch to this checkpoint in the procedure, if all is well currently. To do this, we follow the procedures outlined in “Firmware” on page 157, ensuring that we select the Config Upload option. This may also be accomplished using the configUpload command in a telnet session. If a restore of these saved configuration is required, this may be accomplished using the configDownload command. Tip: Using different configUpload save names will ensure that we have two different restore points. We have now prepared our fabric for Advanced Security; also, during our planning step, we have identified which switches we will make the Primary and Backup FCSs. To continue, we need to schedule a fabric outage, as enabling Advanced Security is a fabric-wide setting, and will cause all switches in the fabric to reboot. Enabling secure mode: Creates a default Fabric Management Policy Set (FMPS) using the FCS policy containing the WWNs that are specified in the list. Distributes the FMPS to all switches in the fabric Activates the FMPS Reboots all switches The Primary FCS switch: Distributes the default policy sets to all switches in the fabric Activates the zoning configurations and any future zone management Applies the FMPS policy set Using the secTelnet client we installed earlier, we now connect to the switch we have identified as being our Primary FCS. After logging in to the switch, we use the secModeEnable command as shown in Figure 2-188, where we must read and agree to the End User License Agreement. 282 Implementing an Open IBM SAN Figure 2-188 The secModeEnable command We enter y to agree to the terms. Next we are asked to define the FCS list; at a minimum, we recommend defining two separate switches as FCS. One switch will operate as the primary Fabric Configuration Server and the other as backup, in case the primary were ever to fail. More FCS switches may be defined, although we do recommend that these switches also be located in a physically secure environment. The following sample coding shows how we defined an M12 and the F32 in our fabric as FCS switches: This command requires Switch Certificate, Security license and Zoning license to be installed on every switch in the fabric. PLEASE NOTE: On successful completion of this command, all login sessions will be closed and all switches will go through a reboot to form a secure fabric. This is an interactive session to create a FCS list. The new FCS list is empty. Enter WWN, Domain, or switch name(Leave blank when done): SM12SW1 Switch WWN is 10:00:00:60:69:80:06:7a. The new FCS list: 10:00:00:60:69:80:06:7a Enter WWN, Domain, or switch name(Leave blank when done): SF32SW1 Switch WWN is 10:00:00:60:69:90:03:9d. Chapter 2. Implementing a SAN with the b-type family 283 The new FCS list: 10:00:00:60:69:80:06:7a 10:00:00:60:69:90:03:9d Enter WWN, Domain, or switch name(Leave blank when done): Are you done? (yes, y, no, n): [no] y Is the new FCS list correct? (yes, y, no, n): [no] y In our example we defined the FCS switches by entering their switch names; we could also define them by entering their domain ID, or WWN. The process continues by prompting us to change the current passwords, which include: Root password for the FCS switch Factory password for the FCS switch Admin password for the FCS switch User password for the fabric Admin password for the non-FCS switches The following coding shows the prompts to define each of these passwords. Also shown is the case where we entered a password that was too short; passwords must be between 8 and 40 characters in length: Please enter current admin account password: Changing password for root New FCS switch root password: Password must be between 8 and 40 characters long. New FCS switch root password: Re-type new password: Changing password for factory New FCS switch factory password: Re-type new password: Changing password for admin New FCS switch admin password: You cannot reuse the old password. New FCS switch admin password: Re-type new password: Changing password for user New fabric wide user password: Re-type new password: Changing password for admin New Non FCS switch admin password: Re-type new password: After entering the last password verification, we received the following messages as all switches in the fabric reboot: 284 Implementing an Open IBM SAN Broadcast message from root Tue Jul 29 11:36:46 2003... Security Policy or Password Change: admin user will be logged out on switch 1 Broadcast message from root Tue Jul 29 11:36:48 2003... Security Policy or Password Change: root factory will be logged out on switch 1 Broadcast message from root Tue Jul 29 11:36:52 2003... Security Policy or Password Change: root factory admin user will be logged out on switch 0 After all switch reboots are complete, the fabric is now secured using default policies. With the secure fabric now enabled, we are only able to manage the fabric from the FCS switches. If we are running FCS switches that have v4.1 or higher firmware, we can secure our fabric further by disabling the telnet daemon to our FCS switches, only allowing SSH sessions to be established. To disable the telnet interface, we use secTelnet to our FCS switch and run the configure command. Note: The configure command on a secure FCS switch does not require the switch to be disabled as it normally is in a non-secure or non-FCS switch, and only presents specific options which may be changed concurrently. SM12SW1:admin> configure Not all options will be available on an enabled switch. To disable the switch, use the "switchDisable" command. Configure... System services (yes, y, no, n): [no] y rstatd (on, off): [off] rusersd (on, off): [off] telnetd (on, off): [on] off Broadcast message from root (pts/1) Tue Jul 29 15:24:29 2003... Security policy change: TTY pts on switch instance 0 will be logged out. As we have now disabled the telnetd daemon completely, we are only able to use an SSH client to connect to the switch. An example of an SSH client is PuTTY, which may be freely downloaded from the Internet. Chapter 2. Implementing a SAN with the b-type family 285 Some other useful commands to view and manage the security policies are: secPolicyFcsRemove: Used to change the position of a switch in the FCS list. secFcsFailover: Used to cause the primary FCS switch to failover to the next FCS switch in the list. secPolicyAdd: Used to add members to a specified policy. secPolicyRemove: Used to remove a member from a specified policy. secPolicyShow: Displays a list of current FCS switches and identifies the primary. The output of secPolicyShow for our fabric is shown in Figure 2-189. Figure 2-189 The secPolicyShow output For further details on configuring security policies, refer to Brocade Secure Fabric User’s Guide, 53-0000526. 2.10 Fabric Manager Fabric Manager is an application which provides a graphical interface allowing us to monitor and manage multiple fabrics from a standard workstation. Fabric Manager can be used to manage fabric wide settings such as zoning and also manage settings at an individual switch level. 286 Implementing an Open IBM SAN Fabric Manager provides high-level summary information about all switches in a fabric, automatically launching the Web Tools interface when more detailed information is required. The launching of Web Tools is transparent, providing a seamless user interface. In addition to the ability to view switches as a groups, Fabric Manager provides improved performance over Web Tools alone. Fabric Manager installs on a workstation, and can be used to manage IBM TotalStorage SAN Switches that have Fabric OS version 2.2 or later and the Web Tools license installed. All the switches in the fabric are represented in the main window of Fabric Manager, but only those with a Web Tools license can be managed through Fabric Manager. Advantages Fabric Manager is a complete SAN management tool, and provides the following advantages: Provides a highly scalable Java-based application that manages multiple switches and multiple fabrics in real-time. Assists you with configuring, monitoring, dynamic provisioning, and daily management of SANs. Lowers the cost of SAN ownership by intuitively facilitating SAN management tasks. Saves time by enabling the global integration and running of processes across multiple fabrics through its single-point SAN management platform. Allows more effective management by providing rapid access to critical SAN information across both Fabric OS SANs and enhanced Fabric OS SANs. Capabilities With Web Tools, Fabric Manager provides the following information and capabilities: Configures and manages the fabric on multiple efficient levels. Intelligently groups multiple SAN objects and SAN management functions to provide ease and time-efficiency in administering tasks. Identifies, isolates, and manages SAN events across multiple switches and fabrics. Provides drill-down capability to individual SAN components through tightly coupled Web Tools and Fabric Watch integration. Discovers all SAN components and views the real-time state of all fabrics. Provides multi-fabric administration of secure Fabric OS SANs through a single encrypted console. Chapter 2. Implementing a SAN with the b-type family 287 Implements scalable SAN management tasks through functionality and tools that intelligently span eight fabrics and 200 switches. Monitors ISLs. Manages switch licenses. Performs fabric stamping. Concepts The following is a description of the concepts that are supported by Fabric Manager. Logical groups We can create logical groups to monitor the status of their component switches and propagate actions over the chosen group of switches. We can also use this feature to quickly determine the status of a large number of switches without looking through each one. A logical group differs from a physical group in that it does not necessarily represent a physically grouped set of switches. Local files Fabric Manager saves groups and other information to local files. Fabric Manager stores these files in our home directory. Log files are under the following directory: user home/Fabric Manager/log Import/export Logical groups and other configuration information can be saved to local files and shared between hosts through the Import and Export options. Additionally, configuration information can be imported from files. ISL checking ISL checking is done by stamping or taking a snapshot of a topology. When we turn on ISL checking for a fabric, a stamp is taken of the topology of the ISLs. Then when a change occurs in these ISLs, the status of the switch changes and the detailed information is shown on the Events page. Security Note: This feature is not available without Advanced Security. Security is implemented on a policy basis. Advanced Security enables sensitive operations to be restricted to a few trusted switches. It allows us to designate a small number of switches (known as Fabric Configuration servers) for fabric-wide management operations. Individual switches will still be accessed for local 288 Implementing an Open IBM SAN configuration. It is possible to configure Advanced Security in such a way that Fabric Manager is unable to access most of the switches. In this case Fabric Manager can only be used in a reduced mode without most monitoring features and lacking many of the administration launch point. 2.10.1 Fabric Manager Requirements Following is a description of some of the requirements for Fabric Manager. Switch requirements Fabric Manager can be used to manage IBM TotalStorage SAN Switches that meet the following requirements: Web Tools license installed. Fabric OS v2.2 or greater required. Fabric Manager can be used to manage switches with earlier versions of Fabric OS, but status and event information will not be available. Workstation requirements The following items are required for the correct installation and operation of Fabric Manager on the computer workstation: One of the following operating systems: – Fabric Manager Server: Windows 2000 pro or server – Fabric Manager Client: Windows NT® 4.0, Windows 2000, Solaris 2.7 or Solaris 2.8 Adequate RAM: – 128 MB for fabrics of 21 switches or less – 256 MB for fabrics containing more than 21 switches 10 MB of free disk space One of the following Web browsers: – Netscape Communicator 4.7x or 6.2. – Internet Explorer 5.5 or 6.x. 2.10.2 Installing Fabric Manager The latest level of Fabric Manager can be downloaded from the following link: http://www-1.ibm.com/servers/storage/san/b_type/library.html#downloads which we show in Figure 2-190. Chapter 2. Implementing a SAN with the b-type family 289 Figure 2-190 Pointer to Fabric Manager download From here we are redirected to the Brocade website. We can download whatever Fabric Manager version matches the FOS that we are running as shown in Figure 2-191. Figure 2-191 Brocade download Fabric manager For our purposes, we downloaded the Fabric Manager 4.4.0 for Windows. The installation instructions are easy to follow so we will not go into that detail here. 290 Implementing an Open IBM SAN 2.10.3 Launching Fabric Manager We will demonstrate how to use the Fabric Manager in a Windows environment. Launching in Windows We can launch Fabric Manager once Fabric Manager and the Java Plug-in are both installed on the workstation. To launch Fabric Manager: Select Start —>Programs —> Fabric Manager —> Fabric Manager We first get a logon window where we use our Windows domain userid and password. Once authenticated, the Fabric Manager View window displays. 2.10.4 Implementing Fabric Manager In the following paragraphs, we go through some of the more useful functions. For more functions and a detailed description of Fabric Manager, refer to the Brocade Fabric Manager User’s Guide, 53_0000823-09. Fabric Manager view The Fabric Manager detail view is the first view that displays when we launch Fabric Manager. It provides access to specific information about the fabric and switches through a panel that represents each switch. Every switch in the fabric, including any unlicensed switches, is represented by a switch panel in Fabric Manager view. However, only switches with a Web Tools license can be managed from Fabric Manager. To add a license for an unlicensed switch, click the corresponding switch icon in Fabric Manager view, and a license window automatically displays. Chapter 2. Implementing a SAN with the b-type family 291 The initial Fabric Manager view opens as shown in Figure 2-192. Figure 2-192 Fabric Manager address window 1. Type the switch name or IP address in the Address field. Note: When working in a multiswitch environment, we recommend you enter the IP address of the switch with the highest port count and highest level of firmware. If an M12 is installed, then use that IP address. 2. Press Enter to submit the address. After we add the ip addresses of the switches we want to manage with Fabric Manager, we can now see details as shown in Figure 2-193. 292 Implementing an Open IBM SAN Figure 2-193 Fabric manager view of multiple switches The left-hand side is the SAN Elements panel. It is comprised of a pull-down menu where we can select to display by “Name”, “IP”, “Domain ID”, “WWN”, the Navigation Tree control, and two tabs (“SAN elements” and “Filter”). The Navigation Tree control of the SAN Elements panel displays various nodes, such as Fabrics, Groups, Reboot Groups, Devices, Switches, Ports, and so on. By selecting one of the options from the pulldown menu, we can modify the display of the SAN elements on the SAN Elements panel: Name: Displays the defined switch name. IP: Displays the switch IP address. WWN: Displays the switch WWN. Domain ID: Displays each switch’s domain ID. Chapter 2. Implementing a SAN with the b-type family 293 The Filter panel allows us to filter the browser display and show only switches matching one of the following criteria: IP Name Type Version WWN Domain ID To filter the display, choose one criteria in the list box, type the desired value in the edit box, and press Enter. This displays a window similar to Figure 2-194. Figure 2-194 Applying filter to SAN elements display In Figure 2-194, we want to restrict WWN display to devices running firmware version v3.1. The right-hand side of the Fabric View window is the Switch View portion of the Fabric View. We can use it to manage individual switches. From this view, we can access switch specific operations such as: 294 Switch events Switch settings Telnet window Switch front panel view Implementing an Open IBM SAN Launching the Switch View in Fabric Manager actually launches the Web Tools interface for that switch. Depending on our selection in the navigation tree, the Switch View will display either a fabric icon or individual switch icons. Figure 2-195 shows the window display at a fabric level. Figure 2-195 Fabric Detail From the icons on the right hand side of this window, we can access fabric-wide operations such as: Fabric events Zone administration Name server Fabric topology Setting the File Transfer options In order to get certain information from fabric switches, Fabric Manager needs to be able to connect to an FTP server. This FTP connection would be used, for example, to retrieve all configuration information. To set the File Transfer options, go to File —> Options. This displays the window shown in Figure 2-196, where we select File Transfer from the Configurations tree menu on the left. Chapter 2. Implementing a SAN with the b-type family 295 Figure 2-196 File Transfer options In this window we set the IP address of the remote FTP server as well as all necessary valid user information. We can then test the connection using the “Test” button. Fabric Manager will attempt a connection and return the result. Creating logical groups Logical groups allow us to operate on a set of switches that are not necessarily physically connected or part of the same fabric. For example, we could create logical groups according to the switch model. We can create Port Groups, Switch Groups and Reboot groups. To create a Switch Group, we to go to File pull down menu and select Groups and then Edit Switch Groups as shown in Figure 2-197. 296 Implementing an Open IBM SAN Figure 2-197 Edit switch groups This brings us to the Edit Switch Group panel where we are able to perform various functions on the Switch groups as shown in Figure 2-198. Chapter 2. Implementing a SAN with the b-type family 297 Figure 2-198 Creating a new switch group We are creating a new switch group so we click on Create button and enter the name in the Create Group window shown in Figure 2-199. Figure 2-199 Create group Once the group is created, we highlight it so that we can add members from the left hand side panel. To add members, we simply highlight them in the left hand side panel and then click on the right arrow in the middle to add it to the group on the right hand side panel. This is shown in Figure 2-198. 298 Implementing an Open IBM SAN Click OK to close this window. The group is now visible in the SwitchGroups View in the navigation tree as shown in Figure 2-200. We have also chosen to view our group with the Switches tab in this figure. To create Port Groups, we go to the File pull down menu and select Groups and then select Edit Port Groups. Here we go through the same steps as we did for creating a switch group. When we are done adding a Port Group, we click on OK to return to the main panel. We now see the new groups added in Figure 2-200. Figure 2-200 Viewing new groups by switch view Sharing logical groups definitions We can export logical group definitions in order to back up our configuration or to share this definition with another host. To share logical groups definitions, perform the following steps: 1. Select File —> Groups. Chapter 2. Implementing a SAN with the b-type family 299 2. Select Export. 3. Use the Browse button to select a file to Export a Group to. 4. Type a name for your “group” file. 5. Highlight the name of the group(s) to be exported from the navigation-tree. 6. Add the group to be exported by clicking the arrow button, or by dragging and dropping selections from the navigation-tree to the table. 7. Select Save. We can now import our group to a separate Fabric Manager machine. 1. Select File —> Groups. 2. Select Import. 3. Browse to select the file you previously exported to. 2.10.5 Fabric Login In order to be able to operate on the switches in the fabric, we need to perform a “Fabric Login”. Fabric Login is necessary, for example, to perform firmware upgrades or a switch reboot. To define the Fabric Login procedure, click the key icon in the Fabric View as shown in Figure 2-201, which will launch the process. Figure 2-201 Fabric login button To login to multiple switches: From the left-hand side navigation tree, highlight the switches or groups of switches to be selected. (We can select multiple items by holding down the Ctrl key while clicking). Use the Add/Delete arrows in the middle column to select the switches. The selected switches will be applied in a table with all their details. Enter the User Name and Password that apply to the switches you selected. This User Name is the same as the one you would use to log into the switch using a Telnet command. Choose the Apply button to test and apply the login. 300 Implementing an Open IBM SAN Figure 2-202 shows an example of the Fabric Login window. We can see in the status field, authorization failed for one of the switches. Figure 2-202 Fabric Login Downloading firmware to multiple switches Fabric Manager allows us to upgrade firmware on multiple switches without having to log into every single device and run the firmware download process. Prior to downloading firmware to multiple switches, you should make sure that you are logged into the switches you want to upgrade. We access the firmware download by clicking the Download Firmware to switches icon as shown in Figure 2-203. Chapter 2. Implementing a SAN with the b-type family 301 Figure 2-203 Download firmware to switches 302 Implementing an Open IBM SAN The firmware download window is then displayed as shown in Figure 2-204. Figure 2-204 Download firmware window To use the Download Firmware window to upgrade the firmware of multiple switches: Highlight switches or groups of switches to be targeted for firmware upgrade. Use the Select/Deselect arrows in the middle column to move the switches or drag and drop from the navigation window to the table. The selected switches will be applied in a table with all their details. Enter the Host Name or Host IP address. Enter the Remote User Name. Use the Browse button to select a firmware file from the local host. Select download protocol (RSHD or FTP). If FTP is the chosen protocol, enter the FTP password. Choose the Download button to begin firmware download. Chapter 2. Implementing a SAN with the b-type family 303 Once the download process is begun, you can check the process status in the status field. As soon as the firmware download is completed successfully, the Status field will turn green. Note that for the new firmware to take effect, we need to reboot the switches. This can be done by clicking the Reboot button and following the steps described in the next section. 2.10.6 Sequence Rebooting Fabric Manager allows us to manage switch reboots and operate on multiple switches at a time. Create a Reboot Group The first step is to create Reboot Groups. To do so, select Tools —> Reboot —> Create Reboot Sequence. This displays the window shown Figure 2-205. Figure 2-205 Creating a reboot group 304 Implementing an Open IBM SAN The left hand window displays created group. The right hand side are the switches available in the fabric that we chose from the Select Fabric pulldown list. To create a reboot group, click the Create button. This displays the Create Reboot Group window where we enter the group name and specify the reboot group options as shown in Figure 2-206. Figure 2-206 Create reboot group options window We click OK and return to the main window. To add switches, we take the following steps shown in Figure 2-207: 1. Highlight the group on the left side list 2. Highlight the switches to add on the right side list 3. Click the left Assign Switches to Reboot Group arrow Chapter 2. Implementing a SAN with the b-type family 305 Figure 2-207 Add switches to reboot group We now click Apply to save or OK to save and exit. 306 Implementing an Open IBM SAN Rebooting the switches To reboot switches, either select Tools—> Reboot—> Sequence Reboot or click the Sequenced reboot button shown in. Figure 2-208 Sequenced reboot button Once the sequenced reboot window is open, the list on the left hand side displays the Reboot groups. The list on the right hand side displays the switch(es) selected for reboot. Highlight a switch or reboot group and then click on the right Select Switches arrow as shown in Figure 2-209. Now we select either the Fastboot or Reboot button to perform the reboot on the selected switches. We can see the switch status of the reboot process in Figure 2-209. Chapter 2. Implementing a SAN with the b-type family 307 Figure 2-209 Rebooting switches The switches are rebooted in sequence. As shown in Figure 2-209, the first switch has completed, showing green status and Done. The second one shows yellow status and Rebooting. Once the reboot is finished, we receive an Information window notifying us that the reboot sequence is complete; also the “Status” field will displays Done in green for both switches. We can then click Close to exit the window. 2.10.7 Fabric Merge When merging two different fabrics, conflicts related to zoning, domain ID or operating parameters can occur, causing the new fabric to be segmented. The Fabric Merge function allows you to check the compatibility of two fabrics before actually merging them. You can launch “Fabric Merge” by going to Tools —>Fabric Merge as shown in Figure 2-210. 308 Implementing an Open IBM SAN For example, in this section, we will work with two fabrics: Fabric A with one hub Fabric B with two switches Each of these fabrics has its own set of domain IDs, zoning configurations and operating parameters. Figure 2-210 Launch the Fabric Merge window The first step is to choose the two fabrics to merge, as shown in Figure 2-211. Figure 2-211 Choose two fabric to merge For the two fabrics specified here, Fabric Manager downloads the configuration file and checks for any inconsistencies with respect to zoning, domain IDs, and various operating parameters. Chapter 2. Implementing a SAN with the b-type family 309 Once you have clicked the Check button, Fabric Manager attempts to connect to each of the fabrics and download their configuration files to the FTP server defined in “Setting the File Transfer options” on page 295. Once the Fabric Manager gets the configuration files, it compares them. In Figure 2-212 we show an example of the parameters not matching, due to core PID not matching. Figure 2-212 Merge check failure At this point, we would now close the Merge manager, and manually configure our core PID to match in both fabrics. If all fabric parameter settings pass the checking, we are then prompted to run the zone merge manager as shown in Figure 2-213. Figure 2-213 Zone merge manager prompt By clicking OK we let Fabric Manager help us to resolve conflicts. Fabric manager displays a window shown in Figure 2-214 with each fabric’s configuration listed. 310 Implementing an Open IBM SAN Figure 2-214 Zone Merge window The conflicts are highlighted in red in each config tree. In our example, we have conflicts because the configurations both have duplicate alias names. We can remove the conflicts in one of the fabrics by selecting the conflicts and clicking the Remove conflict(s) button. After removing a conflict, we could restore it by clicking the Reset button. In our example, this will remove all the aliases for second HBA in each host. This would not be a desirable result, so we cancel the Merge Manager, and alter our aliases on one fabric. Then, when rerunning the Merge Manager, our configs do not have any conflicts, although the config names are highlighted in red, as shown in Figure 2-215. Chapter 2. Implementing a SAN with the b-type family 311 Figure 2-215 Zone merge conflict removed We need to disable one of the fabrics configs, so that the merge can occur. We use the appropriate Disable CFG button to do this. Now we can click View Merged Results to display the final zoning information as shown in Figure 2-216. 312 Implementing an Open IBM SAN Figure 2-216 Merged zone window From this window we can apply the displayed zoning configuration or cancel to return to the previous window. Attention: Clicking Apply will modify the zoning configuration in both fabrics according to the display shown in Figure 2-216, even if the merge is not completed. In our example, the previously active configuration “SAN_2” in Fabric itsosw4 was disabled. Once these steps have completed, without errors, the two fabrics are ready for merging by connecting a physical ISL between them. Tip: We can use Fabric Manager’s ability to load configuration parameters to multiple switches to configure a whole fabric without having to logon to every single switch. Chapter 2. Implementing a SAN with the b-type family 313 2.10.8 Loading switch configuration Fabric Manager allows us to download switch configuration parameters to a file and upload this configuration or part of it to multiple switches. This can be used, for example, to set SNMP information or fabric operating parameters to multiple switches without having to set these values on each individual device. The first step is to save an existing configuration from a switch. This can be done by accessing the switch configuration menu Tools —> Config —> Save Baseline in the Fabric View. This brings up the window shown in Figure 2-217. Figure 2-217 Save Baseline selection window In this window you can select the way in which Fabric Manager will present the configuration parameters: Full Configuration: This lets you choose from among all the parameters. SNMP/Fabric Watch: This restricts the selection to SNMP and Fabric Watch parameters only. In our example, we will choose Full Configuration. Selecting one of the above templates will enable the Next button. The next step is to choose the switch from which you wish to download the configuration, as shown in Figure 2-218. 314 Implementing an Open IBM SAN Figure 2-218 Save Baseline — Switch selection Select the switch from the left-hand list and click the right facing arrow. This adds the switch to the left-hand list. You can download the configuration from only one switch at a time. You can use the Login button to define the log into the switch if it is not already done. At this time, you should make sure that the FTP server specified in the options is running. Clicking OK will start the download of the switch configuration file for file manager internal process. The window shown in Figure 2-219 is displayed. Chapter 2. Implementing a SAN with the b-type family 315 Figure 2-219 Save Baseline — Parameter Selection From this window, we can choose which parameters or set of parameters we would like to save by checking the corresponding check boxes. In this example, we choose to save only information related to Fabric Parameters. If we would like to change a parameter before saving this Baseline, we can select the key, we chose pidFormat (the checkbox is slightly greyed), and then clicked the Edit Key button, giving us the window shown in Figure 2-220. Figure 2-220 Edit parameter key 316 Implementing an Open IBM SAN From the Edit Key window we can change the Value field to what we desire to be set as our Baseline save. Once we have chosen the parameters to be saved we click Save. This will open a file browsing window where we are able to specify a location for the configuration file as shown in Figure 2-221. Figure 2-221 Choose a location for configuration file The saved file can now be used to upload the parameters to another switch later on, or can be kept as a backup. Compare and download file from a file We can use the file saved in the preceding paragraph to propagate the saved parameters to multiple switches. This can be useful for SNMP information or fabric wide parameters, for example. Go to Tools —> Config —>Compare/Download from File. The first step is to choose the file in which configuration parameters are stored. We are prompted to choose a configuration file as shown in Figure 2-222. Chapter 2. Implementing a SAN with the b-type family 317 Figure 2-222 Select configuration file to compare/download Next, you have to choose the target switches, that is to say, the switches to which you want to apply the configuration. This is shown in Figure 2-223. Figure 2-223 Compare download from file — Target Switch Selection 318 Implementing an Open IBM SAN From the left-hand side list we can select multiple switches. Then click the right facing arrow or drag and drop the selection to the right-hand side list. Clicking OK will start the configuration download from the target switches. Fabric Manager then compares the parameters available in the baseline file to the ones set in the target switch and displays the window shown in Figure 2-224. Figure 2-224 Compare/Download from file — Comparison This window displays in red the differences between the baseline file and the current switches settings. Clicking the Show Difference button will show only the differences. Then we have the choice to print the comparison report, cancel the operation, edit or apply the baseline, or perform the compare again. We chose to apply the baseline, so the window in Figure 2-225 is displayed. Figure 2-225 Apply baseline to the switches Fabric Manager will upload the parameters to each switch, one at a time and reboot it. As one switch is done (configured and rebooted), it will have a strike-through in the switch list in the left-hand side of the window. Note that you can check the status of the switch being updated in the Status field. Once the baseline is applied to all switches, you can click Close to return to the Fabric View. Chapter 2. Implementing a SAN with the b-type family 319 2.10.9 Managing licenses Fabric Manager lets you manage licenses on switches across the fabric. You can: View licensing information on each individual switch Save licensing information from a switch to a local file for backup, for example Download a license file to a switch for upgrade To manage licensing, go to Tools —>Licensing —> Load from switch. This displays a switch selection window. Select one or more switches in the left-hand side list and click the right arrow. Validate with “OK”. Note that you have to be logged into the switch. If not, Fabric Manager will display the fabric login window and let you enter login information. The License Administration window is shown in Figure 2-226. Figure 2-226 License administration — Switch tab Four tabs are available in this window: Switch: – Allows us to view licenses currently installed on the selected switches. – Loads licensing information from switches by clicking the “Load from switch” button. – Saves the selected license information to an XML file by highlighting the appropriate line(s) and clicking “Export to file”. – Allows a specific license from the display and removed, using the “Remove from switch” button. 320 Implementing an Open IBM SAN File: – Allows us to load licensing information from a saved XML file for display – Lets us select a displayed license and install it to the corresponding switch Obtained Licenses: – Allows the management and installation of electronically purchased Licenses. All: – Allows you to have a consolidated view of all licenses displayed on the other three tabs. Tip: Do not remove the Web license, as it is required to use Fabric Manager on a switch! The File tab is shown in Figure 2-227. Figure 2-227 License Administration — File tab ISL Checking Use the ISL option of the Actions menu to record and monitor the ISL configuration for a fabric. There are two separate actions that can be taken when using the ISL option: ISL Checking Restamp (available only when ISL Checking is enabled) Chapter 2. Implementing a SAN with the b-type family 321 Enabling ISL checking When ISL Checking is enabled, a snapshot (or stamp) is taken of the topology. When a change occurs in the ISLs, the detailed information will be shown on the Status Reason section of the Events. To enable ISL Checking: Highlight the Fabric. Select Actions. Select ISL. Select ISL Checking. A check mark should appear, showing that ISL checking is enabled and the node icon will change. When ISL Checking is turned on, the following changes will take place: If an event occurs, the Status Legend color will change to represent the appropriate Event. In our example we have lost the ISL on ITSOsw4 fabric. The navigation frame now shows itsosw2 and itsosw4 as two separate fabrics, with itsosw4 in red indicating a down condition. Any events will be shown in the Fabric Events window. We received an event stating that the connection between switch 4 port 9 and switch 2 port 7 has been removed, resulting an a Down fabric status. Figure 2-228 shows the event entry for our example of ISL loss. Figure 2-228 ISL Checking event entry 322 Implementing an Open IBM SAN Using Restamp As enabling ISL checking takes a persistent snapshot of the fabric topology, we need to refresh this snapshot when adding or removing ISLs. To restamp the fabric topology, and have the most current topology information noted in Fabric Events, use the Restamp option. This option is only available if ISL Checking is already enabled. To restamp the fabric: Select Actions —> ISL. Select Restamp. A snapshot is taken of the fabric Select Actions —> Fabric Events. You can now view the latest changes within the fabric in the top of the Fabric Events window. Security After enabling an Advanced Security fabric as discussed in 2.9, “Advanced Security” on page 268, we are able to manage the security policies from Fabric Manager. By right-clicking our fabric icon we launch a menu as shown in Figure 2-229 where we select the Security... option. Figure 2-229 Selecting Security management When we do this we receive a message shown in Figure 2-230 indicating that passwords have not been learned, although Fabric Manager previously had been defined with passwords for this fabric, during the enabling of Advanced Security we were forced to change all the passwords. Chapter 2. Implementing a SAN with the b-type family 323 Figure 2-230 Password error message We answer Yes to the message and re-define the passwords as defined in our enabling Security section. Once the passwords have been successfully learned, the Security Administration window opens, as shown in Figure 2-231. Figure 2-231 Security Policy management From this window we can view the various security policies, and define them by clicking the appropriate tab on the left side of the window. 324 Implementing an Open IBM SAN QuickLoop QuickLoop is an additional feature enabled by license key, which may be installed on all IBM TotalStorage SAN Switch models except the 2109-F32, 2109-M12 and M14 Core switch. The tab displayed in Figure 2-232 only appears after the license key has been installed. Quickloop is a unique method used to enable Private arbitrated loop devices to connect to a fabric, and complies with FC-AL standards. Because this allows private loops to be attached to fabrics, it can best be described as a Private Loop Fabric Attach (PLFA), as compared to a Private Loop Direct Attach (PLDA). In the following sections, we discuss the different sections of the QuickLoop tab displayed. Chapter 2. Implementing a SAN with the b-type family 325 Figure 2-232 QuickLoop tab QuickLoop status The QuickLoop status area displays the current state of the QuickLoop feature. In our example, we can see that our switch is the Master, if there are no QuickLoops in operation, that state should be online. Also displayed in this area is the scope of the QuickLoop partnership; ours is in single switch mode. QuickLoop partner A QuickLoop is either a “single switch”, where all looplets are located on a single switch; or a “dual switch”, where looplets are located on either of the two partner switches. 326 Implementing an Open IBM SAN In this area we can select a partner switch by scrolling down the Partner Switch Name box. The switch name and World Wide Name are then displayed. The same would be required to be performed on the partner switch also. Restriction: A switch can only be in one QuickLoop partnership. QuickLoop settings In this area we can set QuickLoop at the switch level or at the individual port level: Enable: Allows you to enable QuickLoop on all ports on the switch (except E_Ports). Disable: Allows you to disable QuickLoop on all ports by checking an individual box. Enabled: Allows individual ports to use the QuickLoop feature. Local switch This section allows us to view all AL_PAs for Loop devices connected to the local switch ports. Partner switch This section allows us to view AL_PAs for Loop devices connected to the partner switch ports if a partner switch is defined. Looplets A QuickLoop consists of multiple private arbitrated looplets (a set of devices connected to a single port) that are connected by a fabric. All devices in a QuickLoop share a single AL_PA space and behave as if they are in one loop. This allows private devices to communicate with other devices over the fabric, provided they are in the same QuickLoop. QuickLoop has the following characteristics: A QuickLoop can include up to two switches and support up to 126 devices. Each individual switch can only be included in one QuickLoop. A QuickLoop can include all or a subset of ports on an individual switch. Multiple QuickLoops can exist in a fabric of multiple switches. QuickLoop enabled switches can exist in the same fabric as non-QuickLoop enabled switches. A device attached to a QuickLoop can communicate with all other devices attached to the same QuickLoop. Chapter 2. Implementing a SAN with the b-type family 327 A private device in a QuickLoop can communicate with devices in the same QuickLoop only. Existing PLDA capable host drivers need no modification to perform I/O operations with storage devices. Public devices that are arbitrated loop capable are treated as private devices when connected to QuickLoop ports (their fabric login, or “FLOGI,” is rejected). QuickLoop supports the use of legacy devices, allowing them to be attached to a fabric and operate as if in a Private Loop Direct Attach (PLDA) environment. QuickLoop functionality can be enabled or disabled for either the entire switch or for individual ports. When QuickLoop is disabled on an individual port, that port returns to fabric mode. Each looplet in a QuickLoop has its own unshared bandwidth and can support transfer rates up to 200 MB/sec. Multiple devices can communicate simultaneously and at full bandwidth within multiple looplets located in the same QuickLoop. If a looplet error is detected, QuickLoop automatically takes the looplet out of service. If the error condition is cleared, the looplet is automatically reinstated. Private loop migration QuickLoop provides a potential migration path from deploying a single private loop to deploying a fabric-based Storage Area Network (SAN). Initially, QuickLoop-enabled switches can be used to replace hubs when the SAN is first deployed and only has private devices attached. Then, as the SAN grows, fabric switches can be added without any detrimental effect to the QuickLoop enabled switches. Address translation QuickLoop address translation is transparent and requires no actions on the part of the user. It is achieved through hardware translative mode (also known as phantom mode), in which a device not physically located in a looplet is made addressable by a unique AL_PA in that looplet. There are two hardware translative modes available to a QuickLoop enabled switch: Standard translative mode: This allows public hosts to communicate with private target devices across the fabric. QuickLoop mode: This allows private hosts to communicate with private target devices across the fabric. The switch automatically determines and sets the appropriate mode. 328 Implementing an Open IBM SAN QuickLoop and zoning QuickLoop can be used in conjunction with zoning. Using the products together provides the following additional features: AL_PAs from multiple QuickLoops can be used to add members to a zone. This is due to the Zoning ability to name QuickLoops and therefore identify the QuickLoop to which the AL_PA belongs. Additional control over access to QuickLoop devices is possible. Fabric devices in a zoned fabric can only access the QuickLoop (and fabric) devices that are in the same zone. Zones can be created within QuickLoops. Zoning can be used to partition QuickLoops. This creates “QuickLoop zones” (as opposed to fabric zones), which support identification by either physical port number or AL_PA. For more information on QuickLoop zoning, refer to “Fabric Assist Tab” on page 123. Managing QuickLoop We can enable QuickLoop for each port or for the whole switch by using the Web Tools as detailed in “QuickLoop and zoning” on page 329, or by using the telnet commands, qlEnable, qlDisable, qlPortEnable, and qlPortDisable. Chapter 2. Implementing a SAN with the b-type family 329 Figure 2-233 Trunking Information panel 330 Implementing an Open IBM SAN 3 Chapter 3. Implementing a SAN with the m-type family On October 5, 2004, IBM announced that it will offer IBM TotalStorage branded SAN switch and director products from McDATA. A new OEM agreement will provide an expanded portfolio of IBM TotalStorage infrastructure simplification and business continuity solutions to customers worldwide. These products will replace McDATA branded products being resold by IBM. This announcement is expected to provide customers more choices and flexibility as they build storage area networks (SANs). IBM has announced: IBM TotalStorage SAN12M-1 entry fabric switch (2026-E12); scalable from 4 to 12-ports, with 4-port FlexPort feature, for entry IBM TotalStorage SAN solutions. The SAN12M-1 switch replaces the McDATA 4300 Fabric Switch (2031-212). IBM TotalStorage SAN24M-1 midrange fabric switch (2026-224); scalable from 8 to 24-ports, with 8-port FlexPort feature, for midrange IBM TotalStorage SAN solutions. The SAN24M-1 switch replaces the McDATA 4500 Fabric Switch (2031-224 and E24). IBM TotalStorage SAN32M-1 enterprise fabric switch (2027-232); scalable from 8 to 32-ports, with affordable four-pack features, for enterprise mainframe FICON and open system IBM TotalStorage SAN solutions. The SAN32M-1 switch replaces the McDATA 3232 Fabric Switch (2031-232). IBM TotalStorage SAN140M enterprise director (2027-140), scalable from 16 to 128 ports for large enterprise mainframe FICON and open system IBM © Copyright IBM Corp. 2000, 2001, 2002, 2003. All rights reserved. 331 TotalStorage SAN solutions. The SAN140M director replaces the McDATA 6140 Enterprise Director (2032-140) and the McDATA 6064 Enterprise Director (2032-064). IBM will continue to offer field upgrade features for McDATA products resold by IBM. This includes warranty extension, port-card and future features. Since IBM branded products are technically the same as McDATA branded products, they may be added to existing McDATA switch networks and be managed under McDATA management software. This helps protect customer McDATA switch investments. The core-to-edge family of connectivity products fully complements these initiatives, allowing users to begin to build a small SAN environment and still be able to expand to a full enterprise-wide SAN. In this chapter, we cover the full IBM portfolio of McDATA including products currently offered, recently offered, and supported by IBM. Further details of these can be obtained at the following Web site: http://www-1.ibm.com/servers/storage/san/m_type/ We also cover those McDATA products that are being replaced and these will be referred to by their McDATA designation. 332 Implementing an Open IBM SAN 3.1 Product description The IBM TotalStorage SAN m-type family supports e-business and other mission-critical applications that require the highest levels of system availability, including 24x7 business requirements. The directors’ high availability features complement the high availability features of the IBM TotalStorage Enterprise Storage Server (ESS). With their FICON switching capabilities, directors and the McDATA Sphereon 3232 Fabric Switch also support IBM 9672 Parallel Enterprise G5, G6 and zSeries Servers with FICON Channel Cards. 3.1.1 Machine type and model number changes With the OEM agreement, changes have also been made to the machine type and model numbers. In Table 3-1 we show the old and new designations: Table 3-1 Machine type and model number changes Old New 2031-212 2026-E12 2031-224 2026-224 2031-232 2027-232 2032-140 2027-140 3.1.2 McDATA Sphereon 4300 Fabric Switch The McDATA Sphereon 4300 Fabric Switch is the IBM 2026-E12. It is an entry level switch in a 1U high design and offers up to twelve non-blocking longwave or shortwave ports providing 1 and 2 Gb/s Fibre Channel Arbitrated Loop (FC-AL) and Fabric (FC-SW) operation. The switch utilizes auto-sensing and auto-negotiating ports and allows customers to purchase connectivity in four-port increments. The entry version does not support full fabric connectivity, but can be upgraded with a software feature to provide such support. The switch may be non-rack installed (desktop) or installed into an FC-512 Cabinet or an industry standard 19" rack. The power supplies are input rated at 90 to 265 volts alternating current (VAC), at 47-63Hz. Chapter 3. Implementing a SAN with the m-type family 333 Figure 3-1 McDATA Sphereon 4300 Fabric Switch Scalability The entry version consists of four, eight or twelve shortwave ports. Each port is self-configuring as a fabric (F_port) or fabric loop port (FL_port). The full fabric version additionally supports longwave ports, and the ports will also self-configure as expansion ports (E_port). The longwave SFP transceivers support connections up to 10 km. The switch provides scalable upgrades, in 4-port increments, without fabric disruption. Each FlexPort upgrade consists of four shortwave SFP transceivers and an activation key which adds four ports to the fabric switch. Longwave transceivers are purchased individually. Availability Being an entry level switch, the 2026-E12 is not designed to be as highly available as the 2026-224, and as such only has a single fixed power supply. Three fans are installed, two of which are required for machine operation. Hot-pluggable optical transceivers can be replaced without taking the switch offline. Firmware upgrades can be downloaded and activated while the fabric switch remains operational. Serviceability The switch provides the following error detection, reporting, and serviceability features: Light-emitting diodes (LEDs) on switch FRUs and adjacent to Fibre Channel ports that provide visual indicators of hardware status or malfunctions. A design that enables quick removal and replacement of SFP transceivers without the use of tools or equipment. System alerts and logs that display switch, Ethernet link, and Fibre Channel link status at the SANpilot interface. 334 Implementing an Open IBM SAN Diagnostic software that performs power-on self-tests (POSTs) and port diagnostics (loopback tests). An RS-232 maintenance port at the rear of the switch (port access is password protected) that enables installation or service personnel to change the switch’s IP address, subnet mask, and gateway address. These parameters can also be changed through a Telnet session, access for which is provided through a local or remote PC with an Internet connection to the switch. Data collection through the SANpilot interface application to help isolate system problems. The data includes a memory dump file and audit, hardware, and engineering logs. Beaconing to assist service personnel in locating a specific port or switch. When port beaconing is enabled, the amber LED associated with the port flashes. When unit beaconing is enabled, the system error indicator on the front panel flashes. Beaconing does not affect port or switch operation. Restriction: The 2026-E12 does not provide an Element Manager feature, and hence cannot be fully managed by the EFCM application. Launching the 2026-E12 from EFCM will result in the SANpilot web interface opening. 3.1.3 McDATA Sphereon 4500 Fabric Switch The McDATA Sphereon 4500 Fabric Switch is the IBM 2026- 224. It provides storage consolidation using a high-port density 1U high design, ports for longwave and shortwave transceivers, offers up to twenty-four non-blocking ports providing 1 and 2 Gb/s Fibre Channel Arbitrated Loop (FC-AL) and Fabric (FC-SW) operation. The switch utilizes auto-sensing and auto-negotiating ports, allows customers to purchase connectivity in eight-port increments, and provides integrated support for full fabric and FC-AL tape attachment to core fabric switches and directors. The switch may be non-rack installed (desktop) or installed into an FC-512 Cabinet or an industry standard 19" rack. The power supplies are input rated at 100 to 240 volts alternating current (VAC), at 47-63Hz. Chapter 3. Implementing a SAN with the m-type family 335 Figure 3-2 McDATA Sphereon 4500 Fabric Switch Scalability The switch versions include an entry 8-port, a midrange 16-port and enterprise 24-port edge switch. The entry switch version consists of eight shortwave ports. Each port is self-configuring as a fabric, fabric loop or expansion port. Longwave SFP transceivers may be added to the first four ports for 2 Gb/s connections up to 10 km. The switch provides scalable upgrades, in 8-port increments, without fabric disruption. Each FlexPort upgrade consists of eight shortwave SFP transceivers and an activation key which adds eight ports to the fabric switch. Availability The 2026-224 provides hot-swappable, load-sharing dual power supplies that allow the switch to remain online if one supply fails. Dual power cords enable attachment to separate power sources for improved availability. Hot-swappable power and cooling components eliminate downtime for service when replacing a failed component and eliminates the risk of erroneously cabling a replacement switch because of a simple component failure. Failed power supplies and fans can be replaced without special tools. Hot-pluggable optical transceivers can be replaced without taking the switch offline. Firmware upgrades can be downloaded and activated while the fabric switch remains operational. Serviceability The switch provides the following error detection, reporting, and serviceability features: Light-emitting diodes (LEDs) on switch FRUs and adjacent to Fibre Channel ports that provide visual indicators of hardware status or malfunctions. Redundant FRUs (SFP transceivers and integrated cooling fan and power supply assemblies) that are removed or replaced without disrupting switch or Fibre Channel link operation. A modular design that enables quick removal and replacement of FRUs without the use of tools or equipment. 336 Implementing an Open IBM SAN System alerts and logs that display switch, Ethernet link, and Fibre Channel link status at the SANpilot interface, EFC Server, customer-supplied server (running the EFCM Lite application), or remote workstation. Diagnostic software that performs power-on self-tests (POSTs) and port diagnostics (loopback tests). An RS-232 maintenance port at the rear of the switch (port access is password protected) that enables installation or service personnel to change the switch’s IP address, subnet mask, and gateway address. These parameters can also be changed through a Telnet session, access for which is provided through a local or remote PC with an Internet connection to the switch. Data collection through the SANpilot interface or Element Manager application to help isolate system problems. The data includes a memory dump file and audit, hardware, and engineering logs. Beaconing to assist service personnel in locating a specific port or switch. When port beaconing is enabled, the amber LED associated with the port flashes. When unit beaconing is enabled, the system error indicator on the front panel flashes. Beaconing does not affect port or switch operation. An external modem for use by support personnel to dial-in to the EFC Server (optional) for event notification and to perform remote diagnostics. 3.1.4 McDATA Sphereon 3232 Fabric Switch The McDATA Sphereon 3232 Fabric Switch, which is the IBM 2027-232, is a 2 Gb/s Fabric Switch intended for departmental Fibre Channel SAN applications and connections to SAN backbones utilizing directors. The switch shown in Figure 3-3 is 1.5U high and can be mounted in the FC-512 Cabinet, an IBM 2101 or 7014 rack, an industry standard 19" rack, or used in a stand-alone table-top configuration. The power supplies are input rated at 100 to 240 volts alternating current (VAC), at 47-63Hz. Figure 3-3 McDATA Sphereon 3232 Fabric Switch switch Chapter 3. Implementing a SAN with the m-type family 337 Scalability Each fabric switch is capable of providing up to 32 ports of non-blocking Fibre Channel switching capability, featuring hot-pluggable SFP transceivers. The switch ships with redundant hot-swappable power supplies and cooling units. The minimum configuration contains 16 shortwave transceivers. You can add up to sixteen additional transceivers, either shortwave or longwave, for device interconnection up to 10km using the longwave transceiver. Extended distance longwave transceivers are available for interconnection up to 35 km. Generic ports (G_Port) automatically determine the port type when connected to a node port (N_Port) or an expansion port (E_Port). Any port can function as an F_Port when connected to a device or as an E_Port when connected to another switch. This switch does not support direct connection of arbitrated loop devices. If you plan to use arbitrated loop, it is recommended that you consider the 2026-224 switch. Availability features The switch is initialized, configured and controlled by a control processor (CTP) card. The CTP card contains microprocessor and an application specific integrated circuit (ASIC) subsystem that provides port communication functions and enables frame transmission between switch ports without software intervention. The CTP card also provides non-volatile memory for storing firmware (two memory regions to be able to store two firmware versions), switch configuration information, persistent operating parameters and memory dump files. There is also a 10/100 Mb/s Ethernet port and an RS-232 maintenance port controlled by the CTP card. Note: The CTP is not a FRU and if it fails the entire switch must be replaced. The features that ensure high availability for the switches are covered in the following topics. Power supplies Two redundant power supplies share the operating load. If one supply fails, the other supply handles the full load. The failed power supply can be replaced concurrently. There are separate receptacles at the rear of the switch for input power connection. For full redundancy each input should come from a different power source. 338 Implementing an Open IBM SAN Fans The switches have six fans. Two on each power supply and two in the center section of the switch. If a single fan fails, the redundant fans provide cooling until it is replaced. If two or more fan fails they must be replaced immediately. Spare ports Unused ports can be used as spare ports. In case of a port failure the cable can be moved to a spare port to continue switch operation. Care should be taken when zoning is configured specifying port numbers since any affected zone(s) may need to be re-configured. Depending on the operating system, the path may need to be re-configured to be able to continue operation on a new port. Concurrent firmware upgrade The CTP card provides two nonvolatile memory regions for storing firmware. Storing two firmware versions allow firmware upgrades to be performed concurrently without disrupting switch operation. This includes non-disruptive activation of the new code. Serviceability The switch provides the following error detection, reporting, and serviceability features: LEDs on switch FRUs and next to each Fibre Channel port that provide visual indication of status or failures System alerts that display at the EFC Server or a remote workstation connected to it Event logs, audit logs, link incident logs, and hardware logs Diagnostic software that performs power on self tests (POSTs) and port diagnostics, including internal and external loopback wrap tests Automatic notification to support personnel or administrators by e-mail messages Automatic notification to service support center by the call home feature Dial-in capabilities for use by service personnel to monitor or perform remote diagnostics RS-232 maintenance port that is password protected and allows service personnel to change the switch network address Redundant FRUs (power supplies and fans) that are removed and replaced without affecting switch operations; no special tools needed to remove and replace FRUs Chapter 3. Implementing a SAN with the m-type family 339 SFP transceivers that are removed and replaced without affecting operation of other ports Beaconing for quick identification of a switch or specific port by a flashing LED without affecting operation Data collection through the Element Manager application to help isolate problems Unsolicited SNMP trap messages indicating operational state changes and failure conditions sent to authorized workstations 3.1.5 McDATA Intrepid 6140 Director The McDATA Intrepid 6140 Director is the IBM 2027-140. The director is a 140-port product that provides dynamic switched connections between Fibre Channel servers and devices in a SAN environment. It is 12U high, so up to three can be configured in an FC-512 Fabricenter equipment cabinet, which can provide up to 420 ports in a single cabinet. The McDATA Intrepid 6140 Director, shown in Figure 3-4, provides 140-port, 2 Gb/s, high availability switching and enterprise-level scalability for data center class core/edge fabrics, and long transmission distances (up to 35 km, or up to 100 km with repeaters). . Figure 3-4 McDATA Intrepid 6140 Director 340 Implementing an Open IBM SAN Scalability Each director comes with a minimum of four 4-port UPM (Universal Port Modules) consisting of 16 G_Ports. The McDATA Intrepid 6140 Director is capable of supporting from 16 up to 140 ports by adding additional UPMs. The ability to support a number of different port types aids in building a scalable environment. A G_Port is a generic port that can function as either an F_Port or an E_Port. When the director is connected with an N_Port (node device), the G_Port state changes to an F_Port (fabric port). When a G_Port is interconnected with another director, the port state on each director changes to an E_Port. E_Ports are used for Inter-Switch Link (ISL) connections. An arbitrated loop topology connects multiple device node loop (NL_Ports) in a loop (or hub) configuration without benefit of a multi-switch fabric. Although the director does not support direct connection of arbitrated loop devices, such devices can communicate with the director via an interconnect with the McDATA Sphereon 4500 Fabric Switch. For shortwave ports, the maximum distance is 500 m at 1 Gb/s and 300 m at 2 Gb/s using 50 micron fiber. For longwave ports the maximum distance to a device is 20 km at 1 Gb/s and 10 km at 2 Gb/s using 9 micron fiber. Using longwave ports and four repeaters spaced 20 km each, distances of up to 100 km can be reached. There is an extended distance option that can be configured on a port basis by port basis. The extended distance option is used to assign additional buffers (60) to the specified port in order to support operation at distances of up to 100 km using repeaters. Connectivity The director contains ports at the front and the rear of the director. The ports on the front are numbered from 0-127 and continue in the rear from 132-143. Ports 128-131 are not available ports. In Figure 3-5 we show the numbering scheme of UPM cards and the associated fiber ports for the front of the director. On the bottom, the port count starts at the right most UPM and goes from the top to the bottom on each UPM. On the top, the port count continues from the right most UPM but the count now starts from the bottom to the top of each UPM. This is because the cards on the top are physically installed upside-down compared to the bottom cards. Tip: The large, bold, hexadecimal numbers are the Link Port Addresses used for FICON IOCP configurations on zSeries processors. Chapter 3. Implementing a SAN with the m-type family 341 Figure 3-5 ED-SAN140M port map (front) In Figure 3-6 we show the numbering scheme for the rear ports. This scheme is slightly different. On the bottom left UPM, the ports count from right to left; the next sequential UPM is on the top right card, where the ports count from left to right; and finally, the top left card, where the ports count from right to left. Figure 3-6 ED-SAN140M port map (rear) For availability purposes it is recommended that you spread your storage ports across multiple cards. Servers with multiple HBAs connected to the director should also be connected to ports spread across multiple cards, as should any ISLs to another director or switch. In the event of a UPM card failure, only a single link to a given storage device or server will be impacted, which will minimize any performance degradation. 342 Implementing an Open IBM SAN Availability Pairs of critical field replaceable units (FRUs) installed in the director provide redundancy in case a FRU fails. When an active FRU fails, the backup FRU takes over operation automatically (by failover processing) to maintain director and Fibre Channel link operation. A standard availability director has all possible FRUs installed and is fully redundant. Standard redundancy is provided through dual sets of FRUs and spare (unused) ports on UPM cards The director offers excellent redundancy and maintenance capabilities such as: All active components are redundant Active components provide support for automatic failover Redundant power and cooling Hot swapping of all field replaceable units Automatic fault detection and isolation Non-disruptive firmware updates The director provides a modular design that enables quick removal and replacement of components. Backplane The backplane provides 48 VDC power distribution and connections for all logic cards. The backplane is a non-concurrent FRU. The director must be powered off prior to FRU removal and replacement. CTP2 card The director is delivered with two CTP2 cards. The active CTP2 card initializes and configures the director after power on and contains the microprocessor and associated logic that coordinate director operation. A CTP2 card provides an initial machine load (IML) button on the faceplate. When the button is pressed and held for three seconds, the director reloads firmware and resets the CTP2 card without switching off power or affecting operational fiber-optic links. Each CTP2 card also provides a 10/100 Mb/s RJ-45 twisted pair connector on the faceplate that attaches to an Ethernet local area network (LAN) to communicate with the EFC Server or a simple network management protocol (SNMP) management station. During an IML, this Ethernet connection will also drop. Each CTP2 card provides system services processor (SSP) and embedded port (EP) subsystems. The SSP subsystem runs director applications and the underlying operating system, communicates with director ports, and controls the RS-232 maintenance port and 10/100 Mb/s Ethernet port. The EP subsystem provides Class F and exception frame processing, and manages frame Chapter 3. Implementing a SAN with the m-type family 343 transmission to and from the SBAR assembly. In addition, a CTP2 card provides non-volatile memory for storing firmware, director configuration information, persistent operating parameters, and memory dump files. Director firmware is upgradable concurrently (without disrupting operation). The backup CTP2 card takes over operation if the active card fails. Failover from a faulty card to the backup card is transparent to attached devices, and includes transferal of the TCP/IP address using the same media access control (MAC) address as the original interface. Each card faceplate contains a green LED that illuminates if the card is operational and active, and an amber LED that illuminates if the card fails. Both LEDs are extinguished on an operational backup card. The amber LED blinks if FRU beaconing is enabled. UPM card A UPM card is a concurrent FRU and can be added or replaced while the director is powered on and operating. Each UPM card provides four full-duplex generic ports (G_Ports) that transmit and receive data at 2 Gb/s or 1 Gb/s. UPM cards use non-open fiber control (OFC) Class 1 laser transceivers. Port cards do not automatically failover and continue link operation after a port card failure. To continue device operation, the fiber optic cable from a failed port must be physically moved to an unused operational port. Hence it is advisable to reserve sufficient spare ports in a director to allow for this possibility. When a cable is moved, additional SAN configuration may be necessary for continued data availability. In Figure 3-7, we show a front view of the director containing the CTP2 and UPM cards. 344 Implementing an Open IBM SAN Front Bezel Power and System Error LEDs CTP2 Cards UPM Cards (32) Figure 3-7 McDATA Intrepid 6140 Director hardware (front view) Fan module Three fan modules, each containing one system fan (three system fans total), provide cooling for director FRUs, as well as redundancy for continued operation if a fan fails. A fan module can be replaced while the director is powered on and operating, provided the module is replaced within ten minutes (after which software powers off the director). An amber LED for reach fan module illuminates if one or more fans fail or rotate at insufficient angular velocity. Power supply modules The McDATA Intrepid 6140 Director contains two redundant, load-sharing power supply modules which are installed in slot positions 1 and 0 (left to right). They provide 48-volt direct current (VDC) power to the director FRUs. The power supplies also provide over-voltage and over-current protection. Either power supply can be replaced while the director is powered on and operational. Each power supply has a separate backplane connection to allow for different AC power sources which is recommended for full power redundancy. The power supplies are input rated at 200 to 240 volts alternating current (VAC), at 47-63Hz. AC module The alternating current (AC) module is located at the bottom rear of the director. Either AC module can be replaced while the director is powered on and operational. The module provides: Two single-phase, 220 VAC, power connectors. An input filter and AC system harness (internal to the FRU) that provides the wiring to connect the AC power connectors to the power supplies (through the backplane). Chapter 3. Implementing a SAN with the m-type family 345 SBAR assembly The director is delivered with two serial crossbars (SBAR) assemblies. The active SBAR is responsible for Fibre Channel frame transmission from any director port to any other director port. Connections are established without software intervention. The assembly accepts a connection request from a port, determines if a connection can be established, and establishes the connection if the destination port is available. The assembly also stores busy, source connection, and error status for each director port. The backup SBAR takes over operation if the active assembly fails, and provides the ability to maintain connectivity and data frame transmission without interruption. Failover to the backup assembly is transparent to attached devices. Each SBAR assembly consists of a card and steel carriage that mounts flush on the backplane. The carriage provides protection for the back of the card, distributes cooling airflow, and assists in aligning the assembly during installation. The rear of the carriage contains a green LED that illuminates if the assembly is operational and active, and an amber LED that illuminates if the assembly fails. Both LEDs are extinguished on an operational backup assembly. The amber LED blinks if FRU beaconing is enabled. In Figure 3-8 we show a rear view of the director, including three additional UPM cards. Cooling Fans UPM Cards (3) Maintenance Port SBAR Assemblies AC Modules Power Supplies Figure 3-8 McDATA Intrepid 6140 Director hardware (rear view) 346 Implementing an Open IBM SAN Serviceability The director, with its associated software and hardware, provides the following error detection, reporting, and serviceability features: Light-emitting diodes (LEDs) on director FRUs and the front bezel that provide visual indicators of hardware status or malfunctions. System and threshold alerts, and event logs, audit logs, link incident logs, threshold alert logs, and hardware logs that display director, Ethernet link, and Fibre Channel link status at the EFC Server, customer-supplied server (running the EFCM Lite application), or remote workstation. Diagnostic software that performs power-on self-tests (POSTs) and port diagnostics (internal loopback, external loopback, and Fibre Channel (FC) wrap tests). The FC wrap test applies only when the director is configured to operate in S/390 mode. Automatic notification of significant system events (to support personnel or administrators) through e-mail messages or the call-home feature. The call-home feature may not be available if the EFC Manager application (EFCM Lite) is installed on a customer-supplied PC. An external modem for use by support personnel to dial-in to the EFC Server for event notification and to perform remote diagnostics. An RS-232 maintenance port at the rear of the director (port access is password protected) that enables installation or service personnel to change the director’s internet protocol (IP) address, subnet mask, and gateway address; or to run diagnostics and isolate system problems through a local or remote terminal. Redundant FRUs (logic cards, power supplies, and cooling fans) that are removed or replaced without disrupting director or Fibre Channel link operation. A modular design that enables quick removal and replacement of FRUs without the use of special tools or equipment. Concurrent port maintenance. UPM cards are added or replaced and fiber-optic cables are attached to ports without interrupting other ports or director operation. Beaconing to assist service personnel in locating a specific port, FRU, or director in a multi-switch environment. When port beaconing is enabled, the amber LED associated with the port flashes. When FRU beaconing is enabled, the amber (service required) LED on the FRU flashes. When unit beaconing is enabled, the system error indicator on the front bezel flashes. Beaconing does not affect port, FRU, or director operation. Chapter 3. Implementing a SAN with the m-type family 347 Data collection through the Element Manager application to help isolate system problems. The data includes a memory dump file and audit, hardware, and engineering logs. Status monitoring of redundant FRUs and alternate Fibre Channel data paths to ensure continued director availability in case of failover. The EFC Manager application queries the status of each backup FRU daily. A backup FRU failure is indicated by an illuminated amber LED. 3.1.6 McDATA Intrepid 6064 Director The McDATA Intrepid 6064 Director is the IBM 2032 Model 064 (2032-064). The ED-6064 director is a 64-port product that provides dynamic switched connections between Fibre Channel servers and devices in a SAN environment. It is 9U high, so up to four ED-6064 directors can be installed in an FC-512 equipment cabinet, which can provide up to 256 ports in a single cabinet. The director implements Fibre Channel technology that provides a scalable bandwidth (2 Gb/s), redundant switched data paths, and long transmission distances (up to 35 km, or up to 100 km with repeaters). Figure 3-9 McDATA Intrepid 6064 Director Scalability The McDATA Intrepid 6064 Director is capable of supporting from 16 up to 64 ports by adding additional UPM cards. Each director comes with a minimum of four 4-port UPMs (Universal Port Modules), consisting of 16 G_Ports. 348 Implementing an Open IBM SAN The ability to support a number of different port types aids in building a scalable environment. A G_Port is a generic port that can function as either an F_Port or an E_Port. When the director is connected with an N_Port (node device), the G_Port state changes to an F_Port (fabric port). When a G_Port is interconnected with another director or switch, the port state changes to an E_Port. E_Ports are used for Inter-Switch Link (ISL) connections. An arbitrated loop topology connects multiple device node loop (NL_Ports) in a loop configuration without benefit of a multi-switch fabric. Although the director does not support direct connection of arbitrated loop devices, such devices can communicate with the director via an interconnect with the McDATA Sphereon 4500 Fabric Switch. For shortwave ports the maximum distance is 500 m at 1 Gb/s and 300 m at 2 Gb/s using 50 micron fiber. For longwave ports the maximum distance to a device is 20 km at 1 Gb/s and 10 km at 2 Gb/s using 9 micron fiber. Using longwave laser ports and four repeaters spaced 20 km each, distances of up to 100 km can be reached. There is an extended distance option that can be configured on a port by port basis. The extended distance option is used to assign additional buffers (60) to the specified port in order to support operation at distances of up to 100 km. Note: To obtain 2 Gb/s port speeds, all port cards must be UPMs and both CTPs must be CTP2s. If any port cards are FPMs (as shipped with early ED-6064s), then the whole director will run at 1 Gb/s. Connectivity In Figure 3-10 we show the numbering scheme of UPM cards and associated fiber ports. UPM cards are numbered from right to left and ports on each UPM count from bottom to top. Figure 3-10 ED-6064 port map Chapter 3. Implementing a SAN with the m-type family 349 For availability purposes it is recommended that you spread your storage ports across multiple cards. Servers with multiple HBAs connected to the same director should also be connected to ports spread across multiple cards, as should any ISLs to another director or switch. In the event of a UPM card failure, only a single link to a given storage device or server will be impacted, which will minimize any performance degradation. Availability Pairs of critical field replaceable units (FRUs) installed in the director provide redundancy in case a FRU fails. When an active FRU fails, the backup FRU takes over operation automatically (failover) to maintain director and Fibre Channel link operation. A standard availability director has all possible FRUs installed and is fully redundant. Standard redundancy is provided through dual sets of FRUs and spare (unused) ports on UPM cards. The McDATA director offers excellent redundancy and maintenance capabilities, such as these: All active components are redundant Active components provide support for automatic failover Redundant power and cooling Hot swapping of all field replaceable units Automatic fault detection and isolation Non-disruptive firmware updates The director provides a modular design that enables quick removal and replacement of components. Backplane The backplane provides 48 VDC power distribution and connections for all logic cards. The backplane is a non-concurrent FRU. The director must be powered off prior to FRU removal and replacement. The backplane in the director supports 2 Gb/s operation. CTP2 cards The director is delivered with two CTP2 cards. The active CTP2 card initializes and configures the director after power on and contains the microprocessor and associated logic that coordinate director operation. A CTP2 card provides an initial machine load (IML) button on the faceplate. When the button is pressed and held for three seconds, the director reloads firmware and resets the CTP2 card without switching off power or affecting operational fiber-optic links. Each CTP2 card also provides a 10/100 Mb/s RJ-45 twisted pair connector on the faceplate that attaches to an Ethernet local area network (LAN) to communicate 350 Implementing an Open IBM SAN with the EFC Server or a simple network management protocol (SNMP) management station. During an IML, this Ethernet connection will also drop. Each CTP2 card provides system services processor (SSP) and embedded port (EP) subsystems. The SSP subsystem runs director applications and the underlying operating system, communicates with director ports, and controls the RS-232 maintenance port and 10/100 Mb/s Ethernet port. The EP subsystem provides Class F and exception frame processing, and manages frame transmission to and from the SBAR assembly. In addition, a CTP2 card provides nonvolatile memory for storing firmware, director configuration information, persistent operating parameters, and memory dump files. Director firmware is upgradable concurrently (without disrupting operation). The backup CTP2 card takes over operation if the active card fails. Failover from a faulty card to the backup card is transparent to attached devices, and includes transferal of the TCP/IP address using the same media access control (MAC) address as the original interface. Each card faceplate contains a green LED that illuminates if the card is operational and active, and an amber LED that illuminates if the card fails. Both LEDs are extinguished on an operational backup card. The amber LED blinks if FRU beaconing is enabled. Figure 3-11 McDATA Intrepid 6064 Director hardware (front view) UPM cards A UPM card is a concurrent FRU and can be added or replaced while the director is powered on and operating. Each UPM card provides four full-duplex generic Chapter 3. Implementing a SAN with the m-type family 351 ports (G_Ports) that transmit and receive data at 2 Gb/s or 1 Gb/s. UPM cards use non-open fiber control (OFC) Class 1 laser transceivers. Port cards do not automatically failover and continue link operation after a port card failure. To continue device operation, the fiber optic cable from a failed port must be physically moved to an unused operational port. Hence it is advisable to reserve sufficient spare ports in a director to allow for this possibility. When a cable is moved, additional SAN configuration may be necessary for continued data availability. Fan modules Two fan modules, each containing three fans (six fans total), provide cooling for director FRUs, as well as redundancy for continued operation if a fan fails. A fan module can be replaced while the director is powered on and operating, provided the module is replaced within ten minutes (after which software powers off the director). An amber LED for each fan module illuminates if one or more fans fail or rotate insufficiently. Power supply module Redundant, load-sharing power supplies step down and rectify input power to provide 48-volt direct current (VDC) power to director FRUs. The power supplies also provide over-voltage and over-current protection. Either power supply can be replaced while the director is powered on and operational. Each power supply has a separate backplane connection to allow for different alternating current (AC) power sources. The power supplies are input rated at 100 to 240 volts alternating current (VAC), at 47-63Hz. Power module assembly The power module assembly is located at the bottom rear of the director. The module is a non-concurrent FRU, and the director must be powered off prior to scheduled removal and replacement. The module provides: Two single-phase AC power connectors. Each connector is input rated at 100 to 240 VAC. A power switch (circuit breaker) that controls AC power distribution to both power supplies. The breaker is set manually, or is automatically tripped by internal software if thermal sensors indicate the director is overheated. A 9-pin maintenance port that provides a connection for a local terminal or dial-in connection for a remote terminal. Although the port is typically used by maintenance personnel, operations personnel use the port to configure network addresses. 352 Implementing an Open IBM SAN An input filter and AC system harness (internal to the FRU) that provides the wiring to connect the AC power connectors to the power switch and power supplies (through the backplane). Figure 3-12 shows a rear view of the ED-6064. Figure 3-12 McDATA Intrepid 6064 Director hardware (rear view) SBAR assemblies The director contains two serial crossbar (SBAR) assemblies. Each SBAR card is responsible for Fibre Channel frame transmission from any director port to any other director port. Connections are established without software intervention. The card accepts a connection request from a port, determines if a connection can be established, and establishes the connection if the destination port is available. The card also stores busy, source connection, and error status for each director port. The redundant serial SBAR assembly ensures uninterrupted transmission and receipt of Fibre Channel frames between ports if the active SBAR card fails. Failover to the backup card is transparent to attached devices. RFI Shield The RFI shield covers and provides RFI protection for all rear-access FRUs except the power module assembly. The RFI shield is concurrent and can be removed or replaced while the director is powered on and operating. Chapter 3. Implementing a SAN with the m-type family 353 Serviceability The director is configured with reporting, and serviceability features. The director provides the following error detection, reporting, and serviceability features: Light-emitting diodes (LEDs) on director FRUs and the front bezel that provide visual indicators of hardware status or malfunctions. System and threshold alerts, and event logs, audit logs, link incident logs, threshold alert logs, and hardware logs that display director, Ethernet link, and Fibre Channel link status at the EFC Server, customer-supplied server (running the EFCM Lite application), or remote workstation. Diagnostic software that performs power-on self-tests (POSTs) and port diagnostics (internal loopback, external loopback, and FC wrap tests). The FC wrap test applies only when the director is configured to operate in S/390 mode. Automatic notification of significant system events (to support personnel or administrators) through e-mail messages or the call-home feature. The call-home feature may not be available if the EFC Manager application (EFCM Lite) is installed on a customer-supplied PC. An external modem for use by support personnel to dial-in to the EFC Server for event notification and to perform remote diagnostics. An RS-232 maintenance port at the rear of the director (port access is password protected) that enables installation or service personnel to change the director’s internet protocol (IP) address, subnet mask, and gateway address; or to run diagnostics and isolate system problems through a local or remote terminal. Redundant FRUs (logic cards, power supplies, and cooling fans) that are removed or replaced without disrupting director or Fibre Channel link operation. A modular design that enables quick removal and replacement of FRUs without the use of special tools or equipment. Concurrent port maintenance. UPM cards are added or replaced and fiber-optic cables are attached to ports without interrupting other ports or director operation. Beaconing to assist service personnel in locating a specific port, FRU, or director in a multi-switch environment. When port beaconing is enabled, the amber LED associated with the port flashes. When FRU beaconing is enabled, the amber (service required) LED on the FRU flashes. When unit beaconing is enabled, the system error indicator on the front bezel flashes. Beaconing does not affect port, FRU, or director operation. 354 Implementing an Open IBM SAN Data collection through the Element Manager application to help isolate system problems. The data includes a memory dump file and audit, hardware, and engineering logs. Status monitoring of redundant FRUs and alternate Fibre Channel data paths to ensure continued director availability in case of failover. The EFC Manager application queries the status of each backup FRU daily. A backup FRU failure is indicated by an illuminated amber LED. 3.1.7 The Fabricenter cabinet The Fabricenter Management configuration (Part number FC-512) includes: EFC Manager software providing a fabric-wide view of the entire storage network allowing IT administrators to monitor and control all switched enterprise components from a single remote or local console. EFC Manager laptop server mounted on slide out tray External zip drive Modem for call-home support Ethernet hub, 24-port, 10/100 Base-T Power distribution package (24 single connections or 12 with dual independent power distribution) One Fabricenter Management product can manage up to three expansion cabinets of equipment. Support for: – Up to 512 Fibre Channel ports – Up to three SAN140M Directors – Up to four ED-6064 Directors – Or a combination of up to 12 high-availability, dual power-connected directors and switches Chapter 3. Implementing a SAN with the m-type family 355 Figure 3-13 shows the Fabricenter. Figure 3-13 The Fabricenter 3.2 Setting up the network environment Before we proceed with configuring the IBM TotalStorage SAN m-type family products (directors, switches and EFCM) for out-of-band management via Ethernet over TCP/IP interface, we first need to focus on designing the LAN architecture to maintain high availability, security, and optimal throughput. 356 Implementing an Open IBM SAN Tip: We recommend connecting the primary ethernet interface on the EFC server to the corporate network to allow remote management of the Fabric via the EFCM, SANpilot and telnet applications. The secondary ethernet interface on the EFC server should be connected to the private network to protect from known vulnerabilities such as broadcast storms, viruses, and hacking. Broadcast storms are a common phenomenon, especially in ethernet over TCP/IP environments. Any malfunctioning device can bring the entire LAN to a halt by continuously transmitting broadcast packets, causing the Fabric devices to interrupt the IO activity and handle the TCP/IP broadcast packets. As a result the Fibre Channel Read/Write operations get timed out. 3.2.1 m-type family SAN on a dedicated TCP/IP ethernet LAN For security and high availability reasons, we connect the m-type products to a private LAN. We use a second ethernet switch to establish a private ethernet connection from the local EFC server and the SAN. This is illustrated in Figure 3-14. 9.1.10.0 / 255.255.255.0 192.168.10.0 / 255.255.255.0 Private McDATA LAN Intranet Ethernet Ethernet Hub 192.168.10.1 secondary network interface Ethernet Corporate LAN Remote EFC Manager client 9.1.10.111 9.1.1.111 primary network interface EFC Server Loopswitch 192.168.10.45 Switch 192.168.10.32 Director 192.168.10.64 Cabinet Figure 3-14 Suggested IBM TotalStorage SAN m-type family network setup Chapter 3. Implementing a SAN with the m-type family 357 To simplify our implementation we assign the IP address range of 9.1.1.0/255.255.0.0 for the corporate LAN and use the 192.168.10.0 / 255.255.255.0 range for the private LAN. In this example we configure IP address 9.1.1.111 on the primary Ethernet interface for the EFC server and assign 192.168.10.1 on the secondary interface of the EFC server. The arrows indicate the path from the remote EFC Manager client to the EFC Server. As illustrated the m-type SAN is segregated from the corporate public network. We strongly recommended this LAN architecture to maintain high availability, manageability, fabric integrity and optimal performance. The primary ethernet interface of the EFC Server connecting to the corporate LAN can be manually configured with a valid and unique IP address or it can be configured to obtain the IP address automatically from a DHCP server. The secondary Ethernet interface must be hard configured with a IP address since we do not use a DHCP server on the private LAN. For more information on configuring the network environment, refer to the SAN Planning documentation found at Web site: http://www.mcdata.com/knowcenter/techpubs/index.html 3.3 Product management The IBM TotalStorage SAN m-type family products can be managed using the out-of-band and in-band product management interfaces. The following out-of-band management access methods are currently available: Management through the EFC Manager and Element Manager applications. From the Internet using the SANpilot interface installed on the product. This interface supports configuration, statistics monitoring, and basic operation of the product, but does not offer all the capabilities of the corresponding EFC Element Manager application. From a Telnet session using the command line interface. Any platform that supports Telnet client software can be used. From a serial connection to the RS-232 port also known as the maintenance port using the null modem cable. The default baud speed configured on com1 port is 57600 with flow control set to none. Management using simple network management protocol (SNMP). 358 Implementing an Open IBM SAN 3.3.1 SANpilot: the Web based interface The SANpilot interface is a standard, no charge, feature of all switches and directors. It is a management tool consisting of an embedded Web server which enables administrators and operators with an internet browser to monitor and manage individual switches or directors. The SANpilot interface does not replace nor offer the management capability of the EFC Manager and Element Manager applications (for example, the Web server does not support all director maintenance functions). SANpilot users can perform the following operations: Display the operational status of the director, FRUs, and Fibre Channel ports, and display director operating parameters. Configure the director (identification, date and time, operating parameters, and network parameters), ports, SNMP trap message recipients, fabric zones and zone sets, and user rights (administrator and operator). Monitor port status, port statistics, and the active zone set, and display the event log and node list. Perform director firmware upgrades and port diagnostics, reset ports, enable port beaconing, and set the director online or offline. The SANpilot interface can be opened from a standard Web browser running Netscape Navigator 4.6 or higher, or Microsoft Internet Explorer 4.0 or higher. At the browser, enter the IP address of the director or switch. Figure 3-15 shows the SANpilot interface initial panel. Chapter 3. Implementing a SAN with the m-type family 359 Figure 3-15 ED-6064 hardware view from the SANPilot Web interface Important: Note that with E/OS 06.02.00, when configuring or modifying zones via SANpilot, a maximum of 140 nodes will be listed, regardless of how many devices are in the fabric. As shown in Figure 3-16, with E/OS 06.02.00 the Open Systems Management Server (OSMS) is now available as a standard feature which can be enabled/disabled through SANpilot as well as the command line interface (CLI) and Enterprise Fabric Connectivity Manager (EFCM). Other SANpilot enhancements with E/OS 06.00.00 and higher include support for the SANtegrity Binding feature, Enterprise Fabric Mode, the Link Incident (LIN) Log and the Open Trunking Log. For full details refer to E/OS 06.02.00 Release Notes (P/N 958-000190-620 Rev A) 360 Implementing an Open IBM SAN Figure 3-16 OSMS enablement via SANpilot For more details about the various configuration and management features available with SANpilot, refer to the SAN planning documentation found at this Web site: http://www.mcdata.com/knowcenter/techpubs/index.html 3.3.2 EFC Manager The EFC Manager application provides a common Java-based GUI for all managed McDATA products which support the Element Manager feature. It is intended to give a fabric wide view of the SAN, and can discover non-McDATA switches, provided the principal switch in a fabric is a McDATA switch. The application is accessed on the EFC Server through a network connection from a remote user workstation. The application operates independently from the director, switch, or other product managed by the EFC Server. Note The EFC Server and EFC Manager application provide a GUI to monitor and manage m-type products, and are a dedicated hardware and software solution that should not be used for other tasks. McDATA tests the EFC Manager application installed on the EFC Server, but does not test the compatibility of any third-party software. Modifications to the EFC Server hardware or installation of additional software, including patches or service packs may interfere with normal operation. For detailed information about the EFC Manager and how to use it, refer to the McDATA Enterprise Fabric Connectivity Manager User Manual, 620-005001. Chapter 3. Implementing a SAN with the m-type family 361 The EFC Manager may be used locally from the EFC Server laptop, but it is also possible to use it from a remote workstation. To do so we need to download the code from the EFC server, and install it on our workstation. This workstation can be running Windows, AIX, Solaris, HP-UX or LINUX. In our case we will be using a PC running Windows NT. Users can perform the following common product functions: Configure new McDATA products and their associated network addresses (or product names) to the EFC Server for access through the EFC Manager and Element Manager applications. Display product icons that provide operational status and other information for each managed McDATA product. Open an instance of the Element Manager application to manage and monitor a specific McDATA product. Open the Fabrics View to display managed fabrics, manage and monitor fabric topologies, manage and monitor zones and zone sets, and show routes (data paths) between end devices attached to a multi-switch fabric. Define and configure user names, nicknames, passwords, SNMP agents, and user rights for access to the EFC Server, EFC Manager application, and managed McDATA products, either locally or from remote user workstations. Configure Ethernet events, e-mail notification for system events, and call-home notification for system events. Display EFC audit, EFC event, session, product status, and fabric logs. With EFCM 8.0 and later, there is greater control over user privileges than in earlier versions. The new version has the same look and feel as the SANavigator product, as shown in Figure 3-17, and includes some of the function that was previously only available with that product. Important: EFCM 8.x requires a serial number (available from the EFCM CD jewel case) and a license key to install. 362 Implementing an Open IBM SAN Figure 3-17 EFCM 8.0 main window Optional features There are currently two optional and chargeable features: Performance and Event Management Module Performance Monitoring allows you to measure the current performance statistics, historic metrics and future trends of every switch port on the SAN. Event Management provides the ability to automate routine tasks and reduce the amount of manual intervention necessary for the management of the SAN. SAN Planning Module The tools available in the Planning module help evaluate the effects of a new device deployment on an existing SAN or plan for a completely new storage network using a set of best practice configuration rules. Chapter 3. Implementing a SAN with the m-type family 363 Why EFC manager is required for enterprise SANs One of the major factors for enterprise businesses to use the EFC server to manage their SAN is the capability to backup and restore device and fabric configuration for all the products managed by the local or remote EFC server. It enables the enterprise SAN to become disaster proof. The EFC Server uses the Element Manager application to backup and restore the configuration data stored in the nonvolatile random-access memory (NV-RAM) on a director or switch CTP card on the EFC Manager data directory. The other feature backs up (to the Zip drive) or restores the entire EFC Manager data directory. The NV-RAM data includes: Product identification data, port configuration data, and link incident (LIN) alerts Operating parameters such as flow control values, preferred domain ID, Active zoning configuration and SNMP configuration The EFC Manager data directory includes: All EFC Manager configuration data such as product definitions, user definitions session options and remote event notifications All log files, such as EFC Manager logs and individual director or switch Element Manager logs Zoning library includes all configured zone sets and zone definitions Firmware library Call-home settings such as phone numbers and dialing options Configuration data for each managed product, stored on the EFC Server and in NV-RAM on each director or switch 364 Implementing an Open IBM SAN 3.3.3 Accessing the EFC Manager client installation software The software can be installed locally from CD or disk, or it can be downloaded from the EFC server. The download and installation of the EFC Manager from an EFC Server is done using a Web and Java based installation procedure. All we need is a Web browser, for this example we will use Microsoft Internet Explorer. In the Address (URL) field of the Explorer we point to the IP address of the EFC server to access the initial page. This takes us to the start page for the remote EFC Manager client installation, as shown in Figure 3-18 and Figure 3-19, where we can choose the correct client for the operating system of our remote workstation. From here, we can also download the SNMP MIB files later on, if required. Figure 3-18 Start page for remote EFC Manager client installation Chapter 3. Implementing a SAN with the m-type family 365 Figure 3-19 Start page for remote EFC Manager client installation continued 3.3.4 Downloading and installing the EFC Manager client We will be installing the EFC Manager client software on a Microsoft Windows system, so we select that option as shown in Figure 3-19. 366 Implementing an Open IBM SAN Figure 3-20 Windows client download After doing so, we are given the option to open or save the file. This is shown in Figure 3-21. Figure 3-21 Start download prompt Chapter 3. Implementing a SAN with the m-type family 367 After clicking the Save button the software starts downloading to our local machine. Next we execute the downloaded installer file, mcdataClientInstall.exe, which launches the installer shown in Figure 3-22. We now follow the prompts to install the EFC Manager client. After confirming the License agreement, we get information about which version we are going to install, as shown in Figure 3-22. Figure 3-22 EFC Manager client installation After choosing the path select Next which will begin the installation, as shown in Figure 3-23. 368 Implementing an Open IBM SAN Figure 3-23 EFC Manager client installation continued Once the installation is complete, we are asked if we would like to start the EFCM client. Important: If you plan on accessing the EFC Server across the firewall, some manual editing of the EFC Server configuration must be made. 3.3.5 Configuring EFCM access through a firewall EFCM clients use random TCP ports to connect to EFC Servers. This allows a client machine to run multiple instances of the EFCM client to the same or different EFC Servers. Because of the use of random TCP ports, pass-through ports cannot be configured on network firewalls. To get around this, manual configuration is required on the server, on the client, and on the firewall itself as follows: 1. On the EFCM Server (Win32), edit the file named: C:\Program Files\EFCM 8.x\resources\Server\Config.properties (where 8.x corresponds to installed version) Add the following line to the file: RmiExportPort = 1098 Chapter 3. Implementing a SAN with the m-type family 369 This will hard-code the server to listen on TCP port 1098 instead of on random ports. This value can be any decimal TCP port desired. In addition to this port, the server also listens for connections on the well-known RMI port 1099, which cannot be changed. 2. On the EFCM Client (Win32), edit the file named: C:\Program Files\EFCM 8.x\resources\Client\Config.properties (where 8.x corresponds to installed version) This will hard-code the client to listen for connections back from the server on port 1098 instead of on random ports. This value can be any decimal TCP port desired, and it does not need to match the value used on the server side. 3. On the network firewall between the EFCM client and the EFCM server, configure the firewall to allow the configured ports through. EFCM also uses FTP between the client and the server, so the firewall administrator must allow the well-known FTP port 21 through the firewall as well. 3.3.6 Configuring the IP address for out-of-band management The default IP address will be changed to allow access from local and remote hosts using SANpilot, EFC Manager and remote client in our environment. We will use the hyper terminal application to access the serial port using the null modem cable. The COM1 port properties are shown in Figure 3-24. 370 Implementing an Open IBM SAN Figure 3-24 COM1 properties Chapter 3. Implementing a SAN with the m-type family 371 Once you login to the switch, run the ipconfig command to verify the current IP configuration and configure the new IP address as shown in Figure 3-25. Figure 3-25 IP address configuration procedure We can now manage the SAN using the EFC Manager, EFC Client, SANpilot and from a Telnet session. 3.4 Managing the environment using the EFC Manager The EFC Manager is used for fabric specific administration of the m-type SAN. The EFC Manager also serves as the entry point to the applications for managing the m-type devices as well as the fabric. The applications used for these tasks are the Element Manager and Fabric Manager. In the following topics we will access the EFC Manager and perform some of the administration tasks that have to be accomplished using the EFC Manager, before we move on to the management of the devices and the fabric. 372 Implementing an Open IBM SAN 3.4.1 Logging in to the EFC Manager The following administration and configuration steps can be done locally from the EFC Server or remotely using the EFCM client Logging in to the EFC Manager on the EFC Server To start the EFC Manager, we logon for the first time with the default user ID and password, Administrator and password. We are working locally on the EFC server and therefore we specify in the EFC Host Server entry field localhost, which is shown in Figure 3-26. Figure 3-26 Logging in to the EFC Manager on the EFC Server Remote login to the EFC Manager After finishing the installation of our client workstation, there will be a shortcut to the EFC Manager on the desktop as shown in Figure 3-27. Figure 3-27 EFC Manager workstation icon Chapter 3. Implementing a SAN with the m-type family 373 By double-clicking on the icon, we get to the EFC Manager login window. We now login to the EFC Manager using the default username and password and the IP address of the EFC server to login, as shown in Figure 3-28. Figure 3-28 Remote login in to the EFC Manager 3.4.2 Administering the SAN using the EFC Manager After a successful login, we can move on to administer the m-type SAN products. Following are examples of the options that we can configure using the EFC Manager. After logging on to the EFC Manager, it opens with the Product View shown in Figure 3-29. 374 Implementing an Open IBM SAN Figure 3-29 EFC Manager, Product View, no switches defined At the top of the window, there is a pull-down menu bar that allows us to perform various configuration and monitoring tasks. The main window is empty because there are no devices configured on the EFC Manager yet, as shown in Figure 3-29. 3.4.3 Defining users on the EFC Manager First, we want to define users on the EFC Manager because we do not want the Administrator user ID to be used remotely, so we will create a new user and use that for remote access. We can define up to 16 users for the EFC Manager but only a maximum of four can log on concurrently. With the user of the EFC Manager running locally on the EFC server there can be five sessions open concurrently. Chapter 3. Implementing a SAN with the m-type family 375 From the pull-down menu, we select San—> Users... as shown in Figure 3-30. Figure 3-30 EFC Manager, Product View We are presented with a list of defined users and the options to add users, modify existing users, view the rights of a user, and delete users. We will add another user by clicking the Add button and then specifying the name, password, and optionally email address of the new user. Also, this window is used to specify the rights that the new user should have. This is shown in Figure 3-31. 376 Implementing an Open IBM SAN Figure 3-31 EFC Manager, Configure Users, New User To assign rights to the user, we click on the user name, then the group that user is to be added to, then click the arrow to add the user to the group as shown in 3-32. The rights are: System Administrator Maintenance Operator Product Administrator Chapter 3. Implementing a SAN with the m-type family 377 Figure 3-32 User groups The System Administrator right grants access to every control and configuration task that needs to be performed from within the EFC Manager and can be viewed as the highest level of authority. It only has “view” rights while operating in a Element Manager application. Here we need the Product Administrator right to perform changes. All new users initially have view rights and this cannot be removed. For a table of user rights of Element Manager functions, refer to the McDATA Enterprise Fabric Connectivity Manager User Manual, P/N 620-005001. To change the settings for a user, for instance to change the password, we go to SAN—> Users. Using the Edit button, we are presented with a window similar to the New window where we can change our password and the user rights. This is shown in Figure 3-33. 378 Implementing an Open IBM SAN Figure 3-33 EFC Manager, Configuring Users, Modify User Once the new user has been defined, we can login to the EFC server with the newly created user ID and password. Chapter 3. Implementing a SAN with the m-type family 379 3.4.4 Identifying devices to the EFC Manager We have to identify the devices that are going to be configured and monitored through this EFC Manager. Those devices, then, cannot be managed by another active EFC Server. After logging on to the EFC server the Product View opens with no devices installed as shown in Figure 3-34. Figure 3-34 EFC Manager, Product View, no switches defined 380 Implementing an Open IBM SAN To identify the ED-6064 to the EFC Manager we need to tell the EFC Manager the IP address of the ED-6064. This is accomplished by selecting Discover -> Setup..., as shown in Figure 3-35. Figure 3-35 EFC Manager, Discover Setup... Selecting this takes us to the Discover Setup screen, where we click Add... as shown in Figure 3-36. This brings up the Domain Information input box for the new device. Chapter 3. Implementing a SAN with the m-type family 381 Figure 3-36 Discover Setup screen The Domain Information input box is where we fill in a name and the IP address of the director that we want to add. This is shown in Figure 3-37. 382 Implementing an Open IBM SAN Figure 3-37 Defining new ED-6064 with its IP address The device will then show in the Available Addresses window on the left. Next we click the device we want to manage and then click the arrow to add device to the Selected Individual Addresses window on the right. This is shown in Figure 3-38. Figure 3-38 Adding device to Selected Addresses A few moments after clicking Ok the new device will appear. Chapter 3. Implementing a SAN with the m-type family 383 The SAN140M was correctly installed in the network previously, and now the EFC server can communicate with it. Therefore, the newly discovered director appears as an icon in the View All window, as shown in Figure 3-39. Figure 3-39 EFC Manager, new SAN140M icon We can right click the icon as in Figure 3-40, to see the properties of the director or assign it a name as shown in Figure 3-41. 384 Implementing an Open IBM SAN Figure 3-40 Right click director icon Chapter 3. Implementing a SAN with the m-type family 385 Figure 3-41 Director Properties 3.4.5 Assigning nicknames to World Wide Port Names As with IP addresses and the DNS, managing the SAN can be made easier by defining nicknames for WWNs. The names can be the DNS host name in the case of only one adapter in one host. If there is more than one adapter in one device, we recommend that the nickname should consist of the hostname and some extension to distinguish between adapters. This will help later when we have to identify devices, for instance while configuring zoning. The easiest place to assign a nickname to a WWN is on the main screen of EFCM. Here you can see the fabric topology, system log, and asset list. Expand the list on the left to display the switches then again to display the nodes. We next right click on a WWN and select Properties as shown in Figure 3-42. 386 Implementing an Open IBM SAN Figure 3-42 EFC Manager, port name Properties Chapter 3. Implementing a SAN with the m-type family 387 This brings up a dialog box where we enter the nickname for that device as shown in Figure 3-43. Figure 3-43 EFC Manager, port Properties, assigning nickname We want this nickname to display for future zoning. Select Configure -> Zoning, then right-click on the node you want and select Label With -> Nickname as shown in Figure 3-44. 388 Implementing an Open IBM SAN Figure 3-44 Configure Zoning, Label With Nickname Doing this is similar to using a hosts file on an IP host. In some simple cases it might be tempting to work with the WWN and to skip or ignore the task of assigning nicknames. However, as more devices attach, maintaining the fabric with names is more convenient and easier than figuring out which WWN belongs to which machine at a later date. After assigning nicknames, the Node List View of the Element Manager shows the names of those that are currently attached. With a growing SAN, it becomes more and more important to be able to distinguish between the node ports. Chapter 3. Implementing a SAN with the m-type family 389 3.5 Managing devices using the Element Manager Now we are in a position to configure the devices. The Element Manager provides different options for every device type to be configured which reflect the specific hardware and the configuration options that the devices provide. For instance, the SAN32M-1 and SAN24M-1 switches do not feature all of the high availability features available with SAN140M and ED-6064, and the SAN24M-1 is the only switch from the IBM TotalStorage SAN m-type family product line currently marketed that supports arbitrated loop topology. We only configure options that are necessary for our SAN, for instance, the operating parameters. We do not cover administration tasks such as configuring SNMP. The Element Manager presents different front and rear views of the devices in the Hardware View. These are interactive views which display the status of monitored units, for instance, if they have failed. Additionally, clicking a unit opens a window with more information about the unit. 390 Implementing an Open IBM SAN 3.5.1 Managing different m-type devices The Hardware View of the SAN32M-1 looks like that shown in Figure 3-45. Figure 3-45 Element Manager IBM TotalStorage SAN32M Hardware View Other options available for configuration, for example the operating mode, the operating parameters and the ports, are the same as with the SAN140M, As that is the case we will use the SAN140M to manage our McDATA SAN but it is safe to assume that the operations are similar for the other models. The menus and drop down boxes will look identical for an available task regardless of the physical switch type. Chapter 3. Implementing a SAN with the m-type family 391 3.5.2 Configuring m-type devices using EFC Element Manager We double-click the SAN140M icon for the director to open the Element Manager. This opens the Element Manager in its own window with the Hardware View, as shown in Figure 3-46. This illustrates how monitored interactive parts show up when we move the mouse cursor over them. Figure 3-46 Element Manager SAN140M: Hardware View 392 Implementing an Open IBM SAN At the top of the window we see the operational status of the switch itself. The switch is fully operational and online. The Front View and the Rear View of the unit show the installed components. The graphics representing the components of the switch are interactive, which means by selecting them, we are able to view more information, or to perform configuration or maintenance actions. They are also monitored so that we have a graphical representation of the failed part in the front and rear view. Using the interactive port card view As we can see, there are 12 port cards installed in our switch, which makes a total of 48 ports. Double-clicking one of the port cards opens the Port Card View as shown in Figure 3-47. Figure 3-47 Element Manager SAN140M: Port card view and properties Chapter 3. Implementing a SAN with the m-type family 393 By moving the mouse over a specific port, we see its port number. By double-clicking it, we get detailed port information and this is also shown in Figure 3-47. The port we selected is Blocked and shows as a G_Port. Also, we see the parameters that are currently defined for this port and that the port is online. Right-clicking a port gives us a context menu as shown in Figure 3-48. Figure 3-48 SAN140M port card viewing and configuration options From here, we can perform actions on the port such as resetting the port or performing diagnosis. To go back to the full Hardware View, we click once in the the field shown in Figure 3-49. Figure 3-49 Element Manager SAN140M: Back to Hardware View 394 Implementing an Open IBM SAN Configuring the director identification There are fields for the name, description, location and a contact point for the director in the main window. This is useful to distinguish among a number of installed directors. To configure this information, we select Configure —> Identification..., and are presented with a dialog window with data entry fields, as shown in Figure 3-50. Figure 3-50 Element Manager SAN140M: Configure Identification After activation, the display of the main window changes and places the name of the director in the title bar, and the name, description and location displayed in the window, as shown in Figure 3-51. This information is used in various locations of the Element Manager to identify the selected director. Chapter 3. Implementing a SAN with the m-type family 395 Figure 3-51 SAN140M Hardware View changed director information Configuring the Management Style The ED-6064 features the capability to change the operating mode. To configure it, we select Product —> Management Style and get the following option menu shown in Figure 3-52. 396 Implementing an Open IBM SAN Figure 3-52 Element Manager SAN140M: Configure Management Style This provides a secondary menu with options to enable Open Systems and FICON management styles. These options change some Element Manager menu options to allow management of the director in open systems or FICON environments. Open Systems. Select Management Style --> Open Systems button for (non-FICON) FCP environments. FICON. select Management Style -->FICON button when attaching an IBM S/390 Parallel Enterprise or zSeries server to the director and implementing in-band director management through a Fibre Connection (FICON) channel. Chapter 3. Implementing a SAN with the m-type family 397 For more details, refer to the IBM TotalStorage SAN140M user’s manual at the following Web site: http://www.mcdata.com/downloads/tpub/umanual/ibm_man_140m_em_efcm83.pdf Configure Open Fabric 1.0 Mode McDATA provides with their switches and directors the Open Fabric 1.0 option that allows the McDATA switch or director to interconnect with multi-vendor fabrics such as Cisco, Brocade, BladeCenter, and CNT. We select the following menu options: Configure -->Operating Parameters-->Fabric Parameters, which brings up the Configure Fabric options shown in Figure 3-53. Restriction: The port based zoning is not available with McDATA switch and director in Open Fabric 1.0 mode. Contact McDATA support for details on compatible firmware levels and tested configurations in Open Fabric mode. Figure 3-53 Element Manager SAN140M: Configure Operating Mode Open Fabric 398 Implementing an Open IBM SAN If the Interop Mode is configured for Open-Fabric 1.0, so that any open fabric compliant switch can be connected, those are then visible in the EFC Manager and the Fabric can be zoned from within the Fabric Manager. However, these switches cannot be managed through the Element Manager. In McDATA Fabric 1.0 mode, the connectivity is restricted to McDATA switches. If connected to a non-McDATA switch it will be marked as ‘Invalid Attachment’. Note: With E/OS 06.00.00 and higher, the factory-set default for Interop Mode has changed from McDATA Fabric 1.0 to Open Fabric 1.0 Configuring the FC ports To configure the options relating to each port, we select Configure —> Ports.... and we are now presented with the Configuration Ports window, which is shown in Figure 3-54. Figure 3-54 Element Manager SAN140M: Configure Ports The port number is automatically assigned and cannot be changed. We can specify a port name here, but this is only useful if the cabling on the port does not change often. The port name then appears in the Element Manager to identify the port, for example in the Port Properties dialog box. Of more interest here is the ability to block specific ports, or to use extended distance buffering when connecting remote sites with channel extenders, and to define the port type. The ports are by default G_Ports, which means they can auto configure by sensing the type of node ports attached on the port. For Chapter 3. Implementing a SAN with the m-type family 399 example, a G_Port will act as an E_Port if connected to another switch port. By left-clicking in a ports Type field we can lock the port type to be only used as E_Ports for ISLs, or as F_Ports for connectivity to node ports. Alternatively, we can right-click any Type field as shown in Figure 3-55 to reset any port to G_Port. Figure 3-55 Element Manager SAN140M: Configure Ports port type The Port speed can be set in a similar method to the port type, the Speed may be set to 2 Gb/s, 1 Gb/s, or Auto-negotiate. Also,.link incident (LIN) alerts can be disabled here. A link incident is a problem on a link which is visible in the Link Incident Log. It is indicated with a small yellow triangle next to the port. To view the LIN log, go to Logs -> Link Incident Log..., as shown in Figure 3-56. 400 Implementing an Open IBM SAN Figure 3-56 Element Manager: LIN log Using the Port List View To view the status of all installed ports in a tabular view and see the changes that have been made, we select the Port List Tab, as shown in Figure 3-57. Chapter 3. Implementing a SAN with the m-type family 401 Figure 3-57 Element Manager SAN140M: Port List View Port Properties Configuring the FC operating parameters To change the operating parameters, we first have to set the SAN140M offline. To set the director offline, which will terminate all FC operations, we select Maintenance —> Set Online State... which is shown in Figure 3-58. 402 Implementing an Open IBM SAN Figure 3-58 Element Manager SAN140M: Set Online State Then select Set Offline as shown in Figure 3-59. Figure 3-59 Element Manager SAN140M: Set Online State continued Now we can go to the Configure Operating Parameters window by selecting Configure —> Operating Parameters.---> Fabric Parameters... Here we can change some of the Fibre Channel parameters for the director, for example, the switch priority and flow control values. This is shown in Figure 3-60. Chapter 3. Implementing a SAN with the m-type family 403 Figure 3-60 Element Manager SAN140M: Configure Operating Parameters The BB_Credit of 16 is the default credit value. The R_A_TOV is a time-out value for operations that depend on the maximum time that frames can be delayed and still be delivered. The E_D_TOV defines the time that the director waits for a response before declaring an error condition. The flow control values R_A_TOV,E_D_TOV values must be the identical on all switches in order to build a multi switch fabric. The switch priority is used to define the principal switch in a multi switch fabric. We may want this director to always be the Principal switch, or we may select Never Principal on an edge switch, for example an SAN24M-1. By using Default as our switch priority, the Principal is automatically negotiated. We can also set the Interop Mode form here. We now move on to configure the switch parameters by selecting Configure ---> Operating Parameters ---> Switch Parameters. An important configuration parameter here is the Preferred Domain ID. The Preferred Domain ID is shown in Figure 3-61. Important: For the McData Intrepid 6064 director, the director speed can also be set (to 1Gb/sec or 2Gb/sec) in Switch Parameters. This option is not necessary or available for IBM TotalStorage SAN140M used in this example. 404 Implementing an Open IBM SAN Figure 3-61 Configure Preferred Domain ID The domain ID has to be unique for each switch or director within a multi switch fabric. If we add a switch or director to our SAN, its domain ID is allocated by the principal switch. If the preferred domain ID is already in use by another switch, then the switch will get another unused domain ID. However, when two fabrics join and they recognize a domain ID conflict, the fabric will become segmented. If other switches or directors join the fabric, there will be a rerouting delay. This is to ensure that frames are delivered in the correct order in a multi-switch fabric. Also, the routes through the fabric will be recalculated to make sure that the shortest path is taken first. Now the director is ready for production use in the Fibre Channel network. It can be connected to devices, such as other switches, storage, or hosts. 3.5.3 Configuring ES-4500 switch for arbitrated loop The ES-4500 replaces the ES-1000 switch and it is an enhancement to ES-1000 hub. It provides arbitrated loop topology support directly by configuring its ports as FL_Port. We are using the ES-4500 switch configuration using EFCM to demonstrate the arbitrated loop topology support by connecting an IBM 3584 LTO device. We will identify the ES-4500 Sphereon switch from the EFC Manager by selecting Product---->New and select the ES-4500 Sphereon from the drop down menu and assign a valid IP address, as shown in Figure 3-62. Chapter 3. Implementing a SAN with the m-type family 405 Figure 3-62 Configure ES-4500 Identification from EFC Element Manager Adding the new device will create an icon in the Element Manager window, as shown in Figure 3-63. Figure 3-63 ES-4500 Sphereon Switch icon in the EFC Element Manager 406 Implementing an Open IBM SAN Select the ES-4500 icon from the Element Manager window to perform configuration and management as shown in Figure 3-64, and to show the switch’s front and rear view. Figure 3-64 ES-4500 switch front and rear view Chapter 3. Implementing a SAN with the m-type family 407 From the ES-4500 Element Manager we will configure the operating parameters. To do this, we select Configure—>Operating Parameters as shown in Figure 3-65. Figure 3-65 ES-4500 Operating Parameters menu Configuring the ES-4500 operating parameters As the ES-4500 is deployed in a core-to-edge topology, we will select the ES-4500 to be Never Principal so that the SAN140M is always the principal switch in the fabric. Notice in the Configure Fabric Parameters menu the BB_Credit option is not listed. This is because of the ES-4500 shared memory architecture and it has a fixed allocation of BB_Credits across the 24 ports. We will configure the ES-4500 to be Never Principal, as we want the director to be the Principal. To configure this, select Configure----> Operating parameters ----> Fabric Parameters from the ES-4500 Element Manager and set the switch priority to be Never Principal. The R_A_TOV and E_D_TOV values will not be changed from the default, as shown in Figure 3-66. 408 Implementing an Open IBM SAN Figure 3-66 Configure Fabric Parameters menu To configure the preferred Domain ID for ES-4500 switch select Configure -----> Operating Parameters -----> Switch Parameters, the domain ID has to be unique throughout the fabric. We will assign 5 as the domain ID value on the ES-4500 switch, as shown in Figure 3-67. Figure 3-67 Configure Switch Parameters menu The other parameters from the Configure Switch Parameters menu will be set to default and remain unselected as shown above. Chapter 3. Implementing a SAN with the m-type family 409 3.5.4 ES-4500 port configuration options The ES-4500 port configuration features are unique from the other IBM/McDATA products. It provides GX, FX, G, F and E_Port options; while the ED-6140, ED-6064, and SAN32M-1 provide F_Port, E_Port, and G Port options. GX_Port The GX_Port is the default option and it can auto configure to F_Port, FL_Port or E_Port. The GX_Port should always be the preferred port setting in order to connect an ISL or N port (fabric node) or an FL_Port (arbitrated loop public or private device). A private device can only be attached to a GX_Port. FX_Port The FX_Port option will lock the port to auto-configure as either an F_Port or an FL_Port. The FX_Port does not allow an ISL to another switch. G_Port The G_Port option will allow the port to auto-configure as an F_Port or an E_Port. F_Port If the port is chosen as an F_Port, then it disables the E_Port and FL_Port function on that port. E_Port If selected, then only inter switch links (E_Port) are allowed on that port. 3.5.5 ES-4500 switch port configuration The ES-4500 port configuration menu is displayed. Port #’s 8 and 10 are used as inter switch links (ISLs) to the SAN140M, and on Port # 15, a Windows host is attached. The GX_Port can auto-sense the connecting device and configure itself accordingly. For example, if Port # 8 is set as a GX_Port, it should automatically detect the SAN140M and automatically configure itself as an E_Port. Port # 15 is also set as a GX_Port and can automatically detect the Windows host attachment and automatically configure itself as an F_Port. Similarly, Port # 5 is configured as an FX_Port so that it can auto-sense the connecting arbitrated loop device and automatically configure itself as an FL_Port. 410 Implementing an Open IBM SAN Figure 3-68 shows that Ports # 8 and # 15 are set as GX_Ports, Port # 10 is set as an E_Port, and Port # 5 is configured as an FX_Port. Click the Activate button after making the changes to the port types as shown in Figure 3-68. Figure 3-68 ES-4500 port configuration options ES-4500 port list view To view the port status and verify if all ports have automatically configured themselves correctly, click the Port List tab from ES-4500 Element Manager view as shown in Figure 3-69. Chapter 3. Implementing a SAN with the m-type family 411 Figure 3-69 Port list menu It can be confirmed that: Port # 5 has automatically configured itself as an FL_Port because an arbitrated loop device is connected. Port # 8 has automatically configured itself as an E_Port as it has an ISL to SAN140M. Port # 10 has automatically configured itself as an E_Port as it has an ISL to ED-6064. Port # 15 has automatically configured itself as an F_Port as a Windows device is attached on that port. In all cases the operating speed has also been automatically negotiated. 412 Implementing an Open IBM SAN Tape attachment to the ES-4500 The ES-4500 switch with its GX or FX_Port capability provides connectivity to Fibre Channel arbitrated loop capable devices. The port type, if set to the default GX_Port or if configured as an FX_Port, will automatically detect an attached FC-AL device and configure the port as an FL_Port. Tip: The latency involved during the link initialization process can be reduced by manually configuring the port type to FX_Port and changing the speed mode from auto-negotiate to 1 or 2 Gb/s. If the port type and speed are set to default values (GX_Port and auto-negotiate) then the port has to go through the various stages of link initialization such as speed negotiation and port configuration before bringing the port to an online state. The IBM 3584 Tape Library is attached on Port # 5 as an FL_Port with 1 Gb/s speed. If you notice in Figure 3-71, Port # 5 configured type is set to default GX_Port but it can also be locked as an FX_Port so that it only allows an F_Port connection or an FL_Port connection. The tape device attached on Port # 5 is in an Online state with the port type displayed as FL_Port and 1 Gb/s operating port speed as shown in Figure 3-70. Figure 3-70 Port # 5 is Online as an FL_Port type. Chapter 3. Implementing a SAN with the m-type family 413 If we click the Node List tab, we see that the IBM 3584 Tape is connected on Port # 5 and the fabric address is 6509CA, where CA is the arbitrated loop physical address (AL_PA) of the tape device. This is shown in Figure 3-71. Figure 3-71 Node List display of tape device 3.6 Troubleshooting the m-type SAN In the sections that follow we will show some of the ways in which you can troubleshoot the SAN. 3.6.1 Logs available for Troubleshooting When it is necessary to perform fabric problem determination, usually the first step will be to check for any alerts. If alerts are detected, the alert details should be checked. After this the appropriate logs should be examined. Some logs are part of the EFCM application, each director or switch will also have its own logs viewable via the Element Manager. EFCM logs The EFCM has six logs: Audit log Displays a history of user actions performed through the application (except login/logout). Event log The EFC Manager’s Event Log displays errors related to SNMP traps and Client-Server communications. 414 Implementing an Open IBM SAN Session log Displays the users who have logged in and out of the Server. Product status log Displays operational status changes of managed products. Fabric log This log displays events that have occurred for a selected fabric. To display the log, you must have persisted the fabric through the Persist Fabric dialog box. You must also select the persisted fabric from the Physical Map before selecting Fabric Log from the menu. Master log The Master Log, which displays in the lower left area of the main desktop, lists all events from the Element Manager and EFCM logs that occurred throughout the SAN in the past 48 hours. These include user actions, client/server communications, SNMP trap errors, product hardware errors, product link incident and threshold errors, and Ethernet events. This log combines entries from all other EFC Manager and Element Manager logs. Note: The Master Log is not available with the 8.xb (low RAM) version. 3.6.2 Identifying and resolving hardware symptoms In this section, we will identify products that have their attention indicator on (indicating a problem) and then show the steps taken to identify and resolve the cause. In Figure 3-72 we can see from the EFCM that a ED-6064 director and ES-3016 require attention in this environment. Chapter 3. Implementing a SAN with the m-type family 415 Figure 3-72 EFCM indicating attention required By double-clicking the ED-6064 icon the product menu window is opened as shown in Figure 3-73. 416 Implementing an Open IBM SAN Figure 3-73 Attention indicators show a failed power supply module We notice that the attention indicator is blinking on the ED-6064 power supply # 1, and by double-clicking the blinking icon, the new pop-up window lists the details of the FRU and its state. We can see that the power supply module is in a failed state and is the cause for the attention indicator. To fix the problem and clear the attention indicator, a service call has to be placed. To open a defect call, you need to gather the device type and serial number of the ED-6064 and then initiate a call to replace the failed power supply. The part number and serial number are shown in the FRU properties box initiated when we double clicked the failed power supply in Figure 3-73. You can also view the ED-6064 event log to retrieve this information as well as problem description, time of activity, and FRU-position, as shown in Figure 3-74. Chapter 3. Implementing a SAN with the m-type family 417 Figure 3-74 Maintenance log indicates problem After installing the new power supply, the attention indicator will disappear and the power redundancy in ED-6064 is restored as shown in Figure 3-75. 418 Implementing an Open IBM SAN Figure 3-75 Product icon changed to normal state Similarly, the bad power supply and fan units on the ES-3016 are also replaced to restore the switch status from degraded to normal operation. 3.7 Understanding the McDATA zoning concepts Fabric zoning is the most common mechanism being implemented in today’s SANs to segregate the devices connected to the fabric. Zoning restricts the visibility and connectivity between devices connected to a single or multi-switch fabric. Chapter 3. Implementing a SAN with the m-type family 419 3.7.1 Why we need zoning In today’s heterogeneous SANs, where AIX, Linux, Solaris, HP_UX and Windows hosts can be connected to the same fabric, and have LUNs configured on the same storage device, without zoning it is difficult to guarantee data integrity, security, high availability and fabric stability. For a comprehensive discussion on zoning and the concepts associated with it, refer to the IBM Redbook: IBM SAN Survival Guide, SG24-6143-01 3.7.2 Zoning implementation There are different ways to implement zoning for a fabric. One such difference is the implementation of the various zoning definitions. For instance, zoning enforced through the name server table and the access to information about connected node ports, or through additional frame flow control is enforced by the route table in the switch. Soft zoning McDATA uses name server zoning, which is implemented by authorizing or restricting access to name server information. The name server database on McDATA switches stores information on node WWNs and port numbers to identify the devices during the link initialization. The main purpose of the name server is to provide this information to attached node ports about the other node ports in the fabric. The attached node port does not need to probe every destination for information. Instead, it logs in with the name server and requests information on attached node ports. With name server zoning enforced, the port that asks for information will only receive information about ports from within the same zone. This is also called soft zoning, because the name server enforces the zones, but there is no control of the real data flow. The name server cannot prevent a host communicating with the target bypassing the name server if it discovers the WWPN of the target device from a previous configuration, or if it has been hard configured by the end user (persistent binding is a good example of hard configuring the device address). Hard zoning In contrast to soft zoning, hardware enforced zoning restricts the frame flow to zone members in a route table based in the switch hardware (ASIC). If a source port is not a member of the same zone as the destination port then the routing table for that port is disabled and communication between the two is denied at the entry port. 420 Implementing an Open IBM SAN Hard zoning controls access at the ingress port. When a device attempts to communicate with a destination device outside of its zone by sending a PLOGI, the frame is blocked. A Class 2 frame will get fabric rejected, and a Class 3 frame will be dropped. With 5.01.00 or later release of firmware, hard zoning is enabled by default. Hard zoning is enforced in the software and as such the user can configure a zone based on port WWN, port number, or both. The firmware upgrade from 4.x to 5.01.00 will automatically enforce hard zoning without any manual intervention. Note: E/OS 06.00.00 and higher extends Hard Zoning to loop (FL) ports on IBM TotalStorage SAN12M-1 and SAN24M-1 Switches. Previously zoning on FL ports was regulated in software. 3.7.3 Zone member definitions A zone member is specified either by the switch port number (and with it, the node ports connected to it), or by the WWPN of a node port, or by a mixed approach. Note that the WWNNs are not used for zoning definition. Zone member definition by WWPN The major advantage with WWPN based zoning is that it provides the flexibility to move any device from one port to another port and it still remains the member of the same zone. The WWPN based zoning provides some diagnostic capabilities. For instance, to isolate a bad GBIC or HBA issue on the switch, the device can be connected to one of the spare ports on the switch just by moving the cable from the failing port to another good port, without making any changes to the active zone set. Each WWPN can span multiple zones. Note: The ESS can now be configured to administer the WWPNs of the ESS FC ports locally, which means they get their WWPN based on the locations in the ESS interface bays. So with zoning based on WWPNs, even in the case of the replacement of an ESS FC adapter, the WWPN does not change and therefore the zoning definitions do not have to be changed. Zone member definition by switch port number Port based zoning is also known as static zoning. It consists of specifying the domain and the port number of the switch. Port based zoning allows greater control to the system administrator. Chapter 3. Implementing a SAN with the m-type family 421 Another advantage of port based zoning is that a defective host bus adapter can be replaced and reconnected to the same port, even though it has a new WWPN, but the device can resume communication with other members in its zone without any modifications to the active zone set. A single port can also be a member of multiple zones. Mixing the two approaches The two approaches to define FC node ports as zone members can be mixed. Node ports specified by their WWPN or switch ports specified by their number, can be members of more than one zone. 3.7.4 Zone management with zone sets From within the McDATA Fabric Manager, we can specify up to 64 zone sets. This is purely an EFCM limitation, not a device one. A zone set consists of one or more zones that can be activated and deactivated at the same time. Each zone set can contain a maximum of 1024 zones and each zone can contain a maximum of 2048 members. Only one zone set can be active at one time. Activating an inactive zone will deactivate the currently active zone set. Restriction: If all zone names are configured with 64 character names, the number of allowed zones in the zone set is limited to 777. Zone Name Length limit: 16 =1024 max zones stored 20 =1024 max zones stored 32 =1024 max zones stored 64 =777 max zones stored Node ports that are not configured in a zone within the active zone set are considered as members of the default zone (this takes up one of the 1024 maximum active zones). The default zone can be disabled independently from the active zone. Also, if no zone sets are activated all node ports are in the default zone. If the default zone is disabled while no zone set is active, no node ports can communicate. With the default zone enabled it is possible for all node ports in the default zone to communicate with each other in parallel to the currently active zone set. 422 Implementing an Open IBM SAN There can be multiple zone sets configured for different tasks, for example if we want to have certain node ports in the same zone for backup, but not during normal operation. Our zoning example An example of how zones and zone sets are related is shown in Figure 3-76. Chapter 3. Implementing a SAN with the m-type family 423 Amount of node ports one port of a node Default Zone Active Zone Set: ITSO_Zone_Set_1 NT_Zone_1 AIX_Zone_1 Nonactive Zone Set Nonactive Zone Set Figure 3-76 Relationship of zone sets, zones, the default zone and node ports 424 Implementing an Open IBM SAN The node symbols here (from servers and from the ESS), represent one or more node ports and not necessarily the whole FC node with all ports. This is because zones with McDATA are built up with node ports. For example, all three ESS symbols could be ports of the same ESS. The solid (blue, red, and purple) areas represent areas where traffic is permitted. The blue and the red zone represent the AIX and the NT zone to be defined in this topic. The green dotted line around the zones represents the active zone set. The purple area is the default zone. In this example the default zone is enabled, which makes it possible for all node ports, which are not configured in a zone of the currently active zone set, to communicate with each other. There might be cases where it is appropriate to disable the default zone — for example, if for management and security reasons, the only communicating node ports are those that are explicitly allowed. In this case, connecting node ports without defining them to a zone would prevent them from accessing other ports. 3.8 Managing the fabric with EFCM The initial view from EFCM shows the topology of existing fabrics. The fabrics are listed on the left side of the view, and linked to the Fabric name are the products making up the highlighted fabric as shown in Figure 3-77. Note that in this example we have two Fabrics, and we have selected the first fabric which is comprised of three products. As also shown in Figure 3-77, fabrics and devices can be viewed by Name, Nickname, Node Name, IP Address, or Domain ID. Chapter 3. Implementing a SAN with the m-type family 425 Figure 3-77 EFC Manager fabric view 3.8.1 The Zoning Dialog Box To view details of the fabrics, zonesets, zones and members, or to make changes we invoke the zoning dialog box by selecting Configure -> Zoning... , as shown in Figure 3-78 426 Implementing an Open IBM SAN Figure 3-78 Initiating the Zoning Dialog Box This brings up the Zoning Dialog Box shown in Figure 3-79. Chapter 3. Implementing a SAN with the m-type family 427 Figure 3-79 Zoning Dialog Box We use the zoning dialog box to accomplish the following tasks: View fabric zones and members Move members to and from zones Create zones and zone sets Move zones to and from zone sets Activate and deactivate zone sets Enable or disable the default zone Import or export zone libraries 3.8.2 Zones, zone sets, and zoning As an example, we will go through the process of creating zones, adding members to the to a zone, and creating zone sets for the zones. First we again 428 Implementing an Open IBM SAN initiate the Zoning Dialog Box, by selecting Configure -> Zoning... from the EFCM. Creating a new zone We need to create at least one zone to go in our zone set. We select New Zone under the Zones window and type a name, for this example we use the name SUN_ZONE, as shown in Figure 3-80. We repeat these steps to create more zones for use in later examples. Figure 3-80 Zoning Dialog Box: Zone creation Adding members to the zone In the Zoning Dialog Box the leftmost window, labeled Potential Zone Members, displays the available devices and their ports. Here we can view all of the WWPNs or nicknames of the connected FC ports. Here we need to be very careful, in a multi-fabric environment, that we choose the correct fabric we wish to work on. Chapter 3. Implementing a SAN with the m-type family 429 This can be selected by clicking the drop-down menu in the upper left corner, as shown in Figure 3-81. In this example we view the fabrics by nickname. Figure 3-81 Zoning Dialog Box: Fabric choice Below the left column there is a drop down list with two choices. Here we can choose if we want to assign by WWN or by Domain/Port. To display WWN nickname when zoning, right-click on the node you want and select Label With -> Nickname as shown in Figure 3-82 430 Implementing an Open IBM SAN Figure 3-82 Zoning Dialog Box: Label With Nickname To add members to the zone we created we select the WWN on the left, then select the zone we want to add to in the middle window, and then click the arrow to move the selected member to the selected zone as illustrated in Figure 3-83. Chapter 3. Implementing a SAN with the m-type family 431 Figure 3-83 Zoning Dialog Box: Adding members to zone We repeat these steps for this example and create another zone named AIX_ZONE. Creating a new zone set Because there are no zone sets in the library, we will need to create one. To create a new zone set from the Zoning Dialog Box we select New Set under the Zone Sets window and type in a name for our new zone set as shown in Figure 3-84. 432 Implementing an Open IBM SAN Figure 3-84 Zoning Dialog Box: Zone Set creation Once we have a zone that contains at least one member, we can add that zone to a zoneset with the same steps we used to add members to the zone. First highlight the zone, then select the zone set in the right column and click the arrow as shown in Figure 3-85. Chapter 3. Implementing a SAN with the m-type family 433 Figure 3-85 Zoning Dialog Box: Adding zone to zone set Activating the zone set and making the fabric zoned To finish our zoning example we will activate the zone set now. This is done from the Zoning Dialog Box by highlighting the zone set and selecting the Activate button as shown in Figure 3-86. This action brings up a dialog box showing us the fabric name, current and new zone set, the directors/switches affected and gives us the option to generate a report of the activation as illustrated in Figure 3-87. 434 Implementing an Open IBM SAN Figure 3-86 Zone set activation Chapter 3. Implementing a SAN with the m-type family 435 Figure 3-87 Zone set activation: Summary and detail If we have modified an existing zone set and are activating the same zone set, we are presented with a window displaying the changes that are about to be made by the activation. We confirm our changes and click OK. Now we are given a confirmation box as shown in Figure 3-88, and if we want to complete the activation we select Yes. Figure 3-88 Zone set activation: Confirmation 436 Implementing an Open IBM SAN After a progress message the activation is complete. Viewing the active zoning configuration The icons of the active zone set and zones it contains now show up in color, as opposed to non-active zones sets or zones (such as SUN_ZONE in this example), which appear grayed out, as in Figure 3-89. Figure 3-89 Zoning Dialog Box: Zone set activated Modifying zone sets We can also manipulate the zone sets, for example, adding or removing zones, deactivating a zone set or saving the zone set. We can add a zone to the existing zone set with the same steps we used before. For instance, if we had a group of Sun servers that we wanted to access our storage with, we could create and populate a zone for them, and add them to the existing zone set. Then we select Activate to activate the zone set again, as in Chapter 3. Implementing a SAN with the m-type family 437 Figure 3-90. This brings up a dialog box, as before, to display what changes will be made, this is shown in Figure 3-91. We enable or disable the default zone via the Default Zone... button which gives a dialog box with the options of OK or Cancel, as shown in Figure 3-92. Figure 3-90 Adding zone to existing zone set 438 Implementing an Open IBM SAN Figure 3-91 Adding zone to existing zone set: Confirmation Chapter 3. Implementing a SAN with the m-type family 439 Figure 3-92 Modifying zone sets: Default zone 3.9 Building a multi-switch fabric The focus of McDATA is highly available connectivity in a data-centric approach where the director is the core for connectivity of nodes. However, there is also a need for core-to-edge connectivity, and this is provided with the E_Port capability of the McDATA G_Ports. 3.9.1 Multi switch fabric considerations The planning of multi switch fabrics depends on many things. Are we going to have a local SAN in one site with up to 64 node ports connected? Then we might not consider cascading our switches. If we want to build a SAN to connect two sites together, or if we want to have more ports in a single fabric, cascading 440 Implementing an Open IBM SAN becomes a valued commodity. Also, if we want to extend the SAN to provide departmental user groups with access to centralized storage devices or to establish a centralized backup which does not affect the LAN, cascading becomes a necessity. Nevertheless, we still might think about whether or not, or to what extent, we want to cascade switches. The reason for this is that by using E_Ports we will sacrifice F_Ports. Also, with an extended fabric, the ISLs can possibly become a bottleneck. This will lead to the use of more ISLs which means even fewer F_Ports available for the attachment of devices. That which seems easy, in the first instance, can get more complicated once we add the zoning concept, load balancing, and any bandwidth issues that may appear. Examples for multi switch fabric solutions There are many solutions which are only possible by using a multi switch fabric. For example, disaster tolerant solutions that are using a SAN can be built upon a McDATA SAN but only when connecting two sites. We need switches at both sites to back up one site completely. Disaster tolerance and high availability of the host systems and the storage can be established together using a multi switch fabric, and open system hosts using Logical Volume Manager (LVM) mirroring together with clustering software, such as HACMP for AIX or Veritas Cluster Server. To further extend the availability, two footprints (parallel independent fabrics) could be used. Building upon the disaster tolerant and highly available approach, the SAN can be extended to become a core-to-edge approach, especially if more hosts in the company need access to the SAN — for example, for storage consolidation where there is a need to provide access to distributed hosts to resources in the data center. For hosts that do not need the RAS or bandwidth provided by directors, the McDATA switches connected to the directors serve as connectivity to the SAN backbone. This is useful if a company wants to get rid of those hundreds of smaller departmental servers (for example, file servers). Disk consolidation which is possible with a corporate-wide SAN can be seen as the first step for server consolidation. Of course, just the connectivity of user groups to centralized disk storage does not replace a file serving solution. McDATA directors and the 16-port and 32-port switches do not support loop devices directly, but by extending the fabric with the loop switch, this makes the attachment of legacy loop only devices and loop only tapes possible. Chapter 3. Implementing a SAN with the m-type family 441 3.9.2 Solutions for high availability and disaster tolerance An example of a solution that provides high availability with disaster tolerance is shown in Figure 3-93. lo c a l s i te re m o te s i te o p e n s ys te m s s e rve r o p e n s ys te m s s e rve r h e a rtb e a t E D -6 0 6 4 E D -6 0 6 4 LW IS L 's ESS ESS Figure 3-93 LVM mirroring using the SAN This is a setup which consists of the same configuration at both the local and the remote site. Both sites can be up to 10 km apart when using 9 micron fiber optic cable. The open systems server cluster, for example, can consist of two or more RS/6000 with HACMP. The mirroring can be done with the native LVM on AIX. Another solution could be SUN servers running the Veritas Cluster Server and the Veritas Volume Manager, for example. Due to the high availability of the McDATA ED-6064, one may be sufficient, but only if that leaves enough ports to accommodate the rest of the environment and its expansion. 442 Implementing an Open IBM SAN When more ports and even higher availability are desired, this solution can be extended with another director at each site. Even though a director is highly available, using two independent fabrics (red and blue) removes the director itself as an single point of failure and may not always be regarded as a paranoia. This is shown in Figure 3-94. local site remote site open systems servers open systems servers heartbeat ED-6064 ISL's ED-6064 ISL's ESS ESS Figure 3-94 Using two independent fabrics for high availability The arrows indicate a possible route for the data to get to both parts of the mirrored sets. In this setup there is no single point of failure at a device level, and even if one site completely fails, the other site will take over operation immediately. Chapter 3. Implementing a SAN with the m-type family 443 In our example for a multi switch fabric, shown in Figure 3-95, we are not focusing on clustering. What we want to show is how to apply zoning in a multi switch fabric. ESS RPKA93_C1B2A1 NT - Qlogic-20:00:00:E0:8B:00:52:5E NT_Zone_1 NT Emulex-10:00:00:00:C9:20:CA:E6 ES-3016 local site LW ISL's remote site ED-6064 ESS - Emulex-10:00:00:00:C9:20:E7:F3 RS6K Emulex-10:00:00:00:C9:20:DC:71 RS6K Emulex-10:00:00:00:C9:20:E7:C7 RS6K - KATE_FCS0 AIX_Zone_1 Figure 3-95 Our zoned multi switch fabric Our NT zone spans over both sites, with two ESSs and two Netfinity’s. One ESS is at the local site and the other is at the remote site. Both sites are connected with three longwave ISLs between one ED-6064 and one ES-3016 (it could also be an SAN32M-1 or ES-3216). At the remote site are the AIXD zone with three 444 Implementing an Open IBM SAN AIX servers and one ESS that is also a member of the NT zone. This example can be used to establish a mirrored set from within the Windows NT Disk Administrator, with one local copy of the data and one remote. Conversely, the AIX zone is limited to the devices at their site. Limits for McDATA multi switch fabrics The McDATA fabric supports up to 31 interconnected switches managed from one EFC Server (the domain IDs range is from 1 to 31). Although we can connect many switches, the hop count supported by McDATA is limited to three, due to the delay that is applied traversing every switch. The hop count with McDATA is equal to the number of ISL connections traversed between the source and the destination. Note: In IP networking a hop count means the number of connectivity devices (for instance routers) between the source and destination. This makes up the difference of one more hop in IP networking than in FC networks with the same amount of interconnected devices. These are some additional requirements: Every McDATA product should be configured with a unique domain ID and IP address. The two fabric devices (director or switch) will not merge if they have the same configured domain ID. Only one principal switch is elected per single fabric. The flow control parameters (BB_Credit, RA_TOV, ED_TOV) must be the same on every switch that joins the fabric. IBM supports, with its McDATA products, a homogenous SAN environment. Chapter 3. Implementing a SAN with the m-type family 445 3.9.3 Setting up our zoned multi switch fabric We will use one ED-6064 and one ES-3016 for our zoned cascading example. We configure both switches as we did before. First, we define the director with its EFC Server and then we define the switch to the same EFC Server and configure it with the Element Manager. After defining the switch to the EFC Server, the Product List Panel now looks like that shown in Figure 3-96. Figure 3-96 EFC Manager: with two managed switches To include the second switch in the fabric of the first, we basically need to connect the switches with longwave or shortwave Fibre Channel cables. The fabric building process itself is transparent to us, as the switches will recognize the connection and automatically configure the G_Ports to be used as E_Ports. However, there are some configuration options that need to be set up or reviewed before connecting the switches. 446 Implementing an Open IBM SAN Setting the switch priority In every multi switch fabric, one switch has responsibility for the domain address manager functionality. This switch is known as the principal switch. It controls the allocation and distribution of the domain IDs for all connected switches in the fabric, there must always be a principal switch in a fabric. A switch can be manually set to be the principal switch, or it may be set to never be principal. This may be done in a core-to-edge environment, for example, where it makes sense for a core switch to normally be principal. If switches are set to the “default” priority, the one with the lowest numerical WWN value becomes the principal switch. To change the Switch Priority we use the Element Manager and select Configure -> Operating Parameters -> Fabric Parameters..., as shown in Figure 3-97. Figure 3-97 Element Manager: Configure Operating Parameters, Fabric Chapter 3. Implementing a SAN with the m-type family 447 Figure 3-98 Element Manager: Configure Operating Parameters, Switch Setting the domain ID Each switch is recognized in the fabric as a domain and is identified with a domain ID. Domains are used for the 24-bit FC addresses that identify the switch ports in a fabric. Every domain ID in the fabric must be unique ranging from 1 to 31. To view or to change the domain ID, we go to the Element Manager of the specific switch. Then we select Configure -> Operating Parameters -> Switch Parameters.... In the next window, as shown in Figure 3-98, we can change the preferred domain ID and other Fibre Channel parameters for the director. 448 Implementing an Open IBM SAN Figure 3-99 Switch properties, Active Domain ID Tip: To change any operating parameters, the switch must be offline. The domain ID is requested from the principal switch once the switch comes online to the fabric. The preferred domain ID is only used if it does not exist in the fabric. If it is in use already, an unused ID is assigned. This can be seen in the Switch properties display, found by selecting Product —> Properties... from the Element Manager, as shown in Figure 3-99. We recommend manually setting the domain IDs prior to building the multi switch fabric and prior to zoning. One reason is that when two switches are joined while active, they will determine if the domain ID is already in use, but if there is a conflict it cannot be changed in an active switch. This conflict will cause the fabric merging process to fail. Chapter 3. Implementing a SAN with the m-type family 449 The second reason is that the domain ID is used to identify switch ports when zoning is implemented using the domain and switch port number. If domain ID’s are negotiated at every fabric start up, there is no guarantee that the same switch will have the same ID next time, and therefore any zoning definitions may become invalid. Configuring the ports for the ISLs The ports for the ISLs can be configured just like the other ports as we described in “Configuring the FC ports” on page 399. From here we can assign a name reflecting the usage of the ports, we can check the check box for extended distance buffering, and we can verify and change the port definitions. In our example, illustrated in Figure 3-100, ports 0 and 1 of the ED-6064 are both able to build ISLs. Port 1 is already connected and defined as an E_Port and port 2 is a G_Port that will recognize that it has to act as an E_Port when connected to another switch. Figure 3-100 Element Manager: Configure Ports Other prerequisites for a multi switch fabric To be able to successfully establish a multi switch fabric, other prerequisites also apply. The operating parameters, resource allocation time-out value (R_A_TOV) and error detection time-out value (E_D_TOV) must be the same and the zoning configuration must be compatible. 450 Implementing an Open IBM SAN Verifying the compatibility of the zoning configuration Once the switches are connected with ISLs the adjacent switches exchange their zoning information and merge it to a single active zone set. This resulting zone set now applies to every switch of the merged fabric. Fabrics can be joined when none of them are zoned, when one of them is zoned or when both of them are zoned. Not zoned means no zone set is active and the default zone is enabled: 1. If none of the fabrics are zoned, no zoning information will be exchanged and the result will be a multi switch fabric with no zoning. 2. If one of the fabrics is zoned, the active zone set will propagate across the fabric and the result will be a multi switch fabric with the zoning information of the former standalone fabric which was zoned before. 3. If both of the fabrics are zoned, the zoning will only work if the configurations are compatible. If the zone configurations are not compatible, the E_Ports of the switches become segmented, which means they cannot carry traffic from node ports, but they can still carry management traffic. Zoning configurations are compatible if one of the two requirements are met: – The active zone names of each fabric to be merged are unique, if the zone members are not identical. – The active zone names of each fabric to be merged can be identical, if the zone members are identical as well. In our case, the director fabric is zoned, the switch fabric is not. This means that the active zoning information will propagate across the fabric and the two independent fabrics will join to form a multi switch fabric. If the switch was also zoned, we may end up with a segmented fabric when attempting to merge due to “incompatible zoning”. Prior to connecting the switches, the Fabric View of the EFC Manager looks like that shown in Figure 3-101. Chapter 3. Implementing a SAN with the m-type family 451 Figure 3-101 EFC Manager: Independent fabrics This shows that we have multiple independent fabrics which are not connected with ISLs. It could also look the same, for instance, if the ISL ports have been blocked or have been configured as an F_Port, or if the zoning configuration was incompatible. Connecting the switches Now we can connect the two switches with ISLs. We are using one longwave ISL between the two switches. The Physical Map view of the EFC Manager now looks like that shown in Figure 3-102. 452 Implementing an Open IBM SAN Figure 3-102 EFC Manager: Physical Map view, one merged fabric Notice now that the left column shows two fabric switches under the same principal WWN. Moving the mouse pointer over the link indicates that the connection of the two switches consists of one ISL. This would change as we add more ISLs between these two switches. Clicking either product icon will open the Element Manager for the associated switch. Also note that we have chosen to view the products by their domain ID. Another feature of EFCM is “Persist Fabric”, which allows us to be notified of changes to the fabric, for example, in the event of a switch failure, or an ISL failure. To turn on “Persist Fabric”, we right-click in the background area of the fabric display; this opens a context menu as shown in Figure 3-103. Chapter 3. Implementing a SAN with the m-type family 453 Figure 3-103 EFC Manager: Persist Fabric We give the fabric a nickname by right-clicking and selecting Properties, we will call it “ITSO Lab51”. Similarly, we can give each product a nickname by right-clicking each product and selecting Properties, and this is very helpful to simplify the identification of each switch, as shown in Figure 3-104. 454 Implementing an Open IBM SAN Figure 3-104 EFC Manager: Product Nicknames Note that we have selected in the line below the menu bar, to view our fabric by Nickname. Now, with Persist Fabric turned on, a failure of the ISL between our switches would be shown with the yellow triangle attention icon and the ISL changing to a broken yellow line. We show this in Figure 3-105. Further detail of why the fabric failure occurred can be seen by selecting Monitor -> Logs -> Fabric Log... from the pull-down menu or selecting the fabric icon in the lower left corner of EFC Manager. Chapter 3. Implementing a SAN with the m-type family 455 Figure 3-105 EFC Manager: broken ISL If we connect another switch to the fabric without defining the switch to EFCM, or if another EFC server is managing that switch, we see an ISL and a switch in the fabric view, but there is no green circle around the third switch. This is because the EFC Manager is not able to retrieve any information about the device and is unable to manage this device. We have now successfully completed all the steps necessary to cascade McDATA switches with zoning. 3.10 Open Trunking Open Trunking addresses ISL over-subscription and under-subscription problems experienced in the fabrics due to the load distributed across multiple 456 Implementing an Open IBM SAN ISLs in a round-robin fashion. The current load sharing mechanism does not have the capability to detect the link utilization in terms of bandwidth usage. There is no traffic monitoring and sampling done on ISL(s), it is purely done by dedicating a switch input/output ports to route traffic for single or multiple devices. With this mechanism of static allocation of fabric ports to end devices, this can result in over-utilization when a single or multiple high end servers and storage device are directed to use the same switch port for data flow. Another scenario is link under-utilization, which could be performed by dedicating an ISL(s) for low end devices that may only use 15% of the link’s capacity. This static distribution of load remains constant as long as the fabric is stable. If the end device reboots or if the fabric reconfigures due to a new link being added or removed, this will result in re-discovery of the routes and assigning new paths to end devices. The chances of eliminating link congestion in a logical fashion are minimal with the static load sharing mechanism, even by adding new ISL(s) between the two switches. The Open Trunking feature monitors the average data rates of all traffic flow on ISLs (from a receive port to a target domain), and periodically configures routing tables to reroute data flow from congested links to under-utilized links and efficiently uses bandwidth. The objective of Open Trunking is to make the most efficient possible use of redundant ISLs between neighboring switches, even if these ISLs have different bandwidths. Open Trunking is performed using the FSPF shortest-path routing database. This solution uses McDATA patented technology to provide real-time traffic monitoring. The feature controls Fibre Channel traffic at a flow level, rather than at a per frame level in order to achieve optimal throughput. This feature may be used on McDATA switches in homogeneous as well as heterogeneous fabrics. This feature complies with current Fibre Channel ANSI standards. Open Trunking is an optional, user-purchasable software feature that provides automatic, dynamic, statistical traffic load balancing across ISLs in a fabric environment. This feature is available with EO/S 5.1 and EFCM 7.1 and can be enabled on a per-switch basis. It operates transparently to the existing FSPF algorithms for path selection within a fabric. Open Trunking is discussed more in the IBM Redbook: IBM SAN Survival Guide, SG24-6143 3.10.1 Configuring Open Trunking The load-balancing aspect is not a user configurable feature. The user can enable/disable OpenTrunking on the switch and configure the settings for Chapter 3. Implementing a SAN with the m-type family 457 congestion thresholds (per port) and the low BB_Credit threshold for fine tuning purposes if required. The ISLs between two switches cannot be manually configured as “trunk groups” and there is no concept of master trunk. The least cost paths are already stored in the path selection table and will be used to redistribute traffic automatically when congestion is experienced on the ISL(s). This means that flow may be rerouted onto a link that goes to a different adjacent switch, as long as that link is on the least cost/shortest path to the destination domain ID. Installing the Open Trunking feature key The Open Trunking feature key can be installed using the EFC Element Manager, CLI and also from the SANPilot interface. A feature key is a string of alphanumeric characters consisting of both uppercase and lowercase. The following is an example of a feature key format: AUY2-9t7A-D7qs-D4. Note: The total number of characters may vary. The key is case sensitive and it must be entered exactly, including the dashes. To purchase the Open Trunking feature key, you must supply the device type and serial number of the device that you want to install the feature on. The easiest way to retrieve the serial number is using the SANpilot interface listed under the Unit Properties menu as shown in Figure 3-106. The Unit Properties menu lists the switch type, serial number, WWN, firmware and so on. If you are trying to install the feature on an unsupported firmware level you will be notified that a firmware upgrade is required in order to use the feature. In Figure 3-106 we show the Unit Properties view. 458 Implementing an Open IBM SAN Figure 3-106 Unit Properties menu from SANpilot interface Once you have received the feature key you can proceed to install the feature key as shown in the following topics. Attention: The feature key, which is encoded with a device’s serial number, can only be installed on the device to which it is assigned. You can enable the feature key with the director online. However, if a current feature is disabled by activating a new feature key, you should take the director offline before enabling the new feature key. Installing the feature Key using SANpilot Access the switch or director on which you want to install the feature using the Web browser, then select Feature Installation tab under the Operations menu as shown in Figure 3-107. In this example the IBM SAN24M1 switch is used to demonstrate the procedure. Chapter 3. Implementing a SAN with the m-type family 459 Figure 3-107 Feature key installation tab under Operations menu Insert or paste the alpha-numeric feature key in the text box and click the Activate button. You will be prompted with a message to verify and confirm the New features that will be installed and any old features that may be deleted after the activation is successful. Notice that the new features, as shown in Figure 3-108, that will be installed are Open Trunking and McDATA SANtegrity. In this case the two optional features were purchased for the SAN24M1. Click the Activate button after verifying the current and new feature information as shown in Figure 3-108. Figure 3-108 Activating the new features 460 Implementing an Open IBM SAN If the correct key was supplied, then the feature installation is successful, as shown in Figure 3-109. Figure 3-109 The successful feature installation and activation menu 3.10.2 Enabling Open Trunking The OpenTrunking feature can be enabled for a specific switch using the EFC Element Manager, CLI and the SANpilot Interface. The SAN140M director is used to demonstrate the procedure to enable Open Trunking using the SANpilot interface. Access the switch using the browser and select the Performance tab under the Configure menu and switch the Open Trunking State to Enable from the drop-down list as shown in Figure 3-110. Chapter 3. Implementing a SAN with the m-type family 461 Figure 3-110 Open Trunking State option More detail regarding fine-tuning the other options can be found at the Web site: http://www.mcdata.com/knowcenter/techpubs/index.html Open Trunking log The Open Trunking log is available from the EFC Element Manager and log flow redistribution data. From the EFC Element Manager, select the Logs—> Open Trunking Log option and the window that opens will list data for any rerouting that is experienced on the director or switch, as shown in Figure 3-111. 462 Implementing an Open IBM SAN Figure 3-111 Open Trunking Log view 3.11 SANtegrity SANtegrity binding enhances data security in large and complex SANs and consists of Fabric and Switch Binding features. These features provide permit and deny operations for connecting a switch to the fabric, and end device attachment to the switch or fabric. SANtegrity, and therefore the binding features, can be enabled by purchasing a feature key and then installing and activating that feature key. 3.11.1 Fabric Binding SANtegrity Fabric Binding gives access control tools across the fabric through which the system administrator can permit or deny switches from connecting to the fabric in a SAN. Without the Fabric Binding feature enabled, the fabric/zone configuration can be easily modified or deleted by connecting a new switch to the fabric, and there are no built-in mechanisms to permit or deny any switch from merging into the fabric. It gives greater control to the system administrator and gives protection from hacking into the fabric. Chapter 3. Implementing a SAN with the m-type family 463 Once Fabric Binding is activated, the Fabric Membership List (FML) automatically includes all the switches that are members of the fabric at the time of Fabric Binding activation. Switches and directors not in the Fabric Membership List at the time of activation are prohibited from joining, and raise alerts and attention indicators as invalid attachments. In order to add a new switch to an existing fabric that has Fabric Binding activated, the existing Fabric Membership List must be updated with the WWN and domain ID of the switch or director that will be added to the fabric. The new switch or director must also have Fabric Binding activated (prior to joining the existing fabric) and a Fabric Membership List containing the WWN and domain ID of every switch in the existing fabric. The list identifies switches by WWN and domain ID, so domain ID’s must be statically allocated while Fabric Binding is active. Because of this, the Insistent Domain ID feature is automatically enabled on each switch in the fabric when Fabric Binding is activated, and it cannot be disabled while Fabric Binding is active. EFCM will provide Fabric Binding configuration options in the Fabric Manager (that is to say, for a specific fabric), and not in the Element Manager. Fabric Binding can also be configured using the embedded CLI interface. General rules for Fabric Binding These are some general rules that apply to Fabric Binding: Not surprisingly, Fabric Binding activation is disallowed if SANtegrity is not installed. Fabric Binding activation is disallowed if the switch is offline. Switches can only be removed from the Fabric Membership List if they are not currently in the fabric. If the Fabric Binding configuration in the two fabrics is incompatible (that is to say, the Fabric Membership list is not identical), then the fabrics will not join. This is resolved by adding the attached switch to the Fabric Membership list or changing the Fabric Binding state to Inactive. The Fabric Membership list should be identical on all the switches in the fabric. Fabric Binding deactivation is prohibited if the Enterprise Fabric Mode is set to Active. Configuring Fabric Binding We will use EFCM Manager to demonstrate the procedure to configure Fabric Binding. From the EFC Manager, select the fabric on which the Fabric Binding feature needs to be activated from the Fabric Tree menu in the left hand column, as shown in Figure 3-112. 464 Implementing an Open IBM SAN Figure 3-112 Fabric Tree list The fabric WWN has been highlighted (in blue), and once selected, the topology view shows the number of switches in the fabric. Figure 3-112 shows that there are three switches in the fabric, so the Fabric Binding feature will be activated on those three switches and they will automatically be included the Fabric Membership List. From the EFC Fabric Manager menu, select Configure —> Fabric Binding, and the menu to enable Fabric Binding appears as shown in Figure 3-113. Chapter 3. Implementing a SAN with the m-type family 465 Figure 3-113 Configure Fabric Binding menu Members (switches) can be added or removed from the list before Fabric Binding activation. It also allows you to add detached nodes to the list for future use. At this point the Fabric Binding feature has been activated and the fabric is now locked. Any new switch will be denied access to join the fabric without manual intervention. The System Administrator must edit the Fabric Membership List and add the domain ID and WWN of the new switch to enable it to join the fabric. Furthermore, the new switch should have SANtegrity installed, the Fabric Binding feature enabled, and also have the same Fabric Membership List currently active in the fabric. More details about SANtegrity can be found at Web site: http://www.mcdata.com/knowcenter/techpubs/index.html Edit Fabric Membership List procedure To Add a new member (switch) to the list, from the EFC Manager select Configure —> Fabric Binding, then highlight member to add and select the arrow as shown in Figure 3-114. 466 Implementing an Open IBM SAN Figure 3-114 Fabric Binding: Adding Members 3.11.2 Switch Binding SANtegrity Switch Binding allows an administrator the option to permit/deny which end devices can be connected to which director or switch ports by specifying the WWN of the devices in the Switch Membership List. Without the Switch Binding feature active on the switch, any device can connect to any switch port and there is no built-in mechanism to prohibit end device connectivity. This feature provides an additional layer of security and greater access control tools for the system administrator managing complex environments that include a large number of devices. When Switch Binding is enabled, only devices that are connected and online are identified and added to the Switch Membership List automatically. Thus the devices in the Switch Membership List are allowed to connect. Servers, storage, and other switches not in the Switch Membership List while Switch Binding is enabled are prohibited from connecting, and will raise alerts and attention indicators as invalid attachments. Switch Binding can be implemented for all connections (switch or director binding) or for individual connections (port binding) to give greater granularity. Chapter 3. Implementing a SAN with the m-type family 467 Switch Binding enforcement modes Switch Binding has different enforcement modes: Restrict E_Ports E_Ports are blocked from forming ISL connections with any switch WWN not explicitly identified in the Switch Membership List. There is no restriction for F_Ports from connecting to the switch. Restrict F_Ports F_Ports prohibit connections from any end device not explicitly identified in the Switch Membership List. There is no restriction for E_Ports to form ISL connections with other switches. Restrict All Both E_Ports and F_Ports are prevented from connecting if the switch and end device WWN is not explicitly in the Switch Membership List. Switch Binding rules The following rules apply to the Switch Binding feature: The Switch Binding feature cannot be enabled if SANtegrity is NOT Installed. If the switch is online and Switch Binding is disabled, the switch will automatically add the WWN of currently connected/online devices to the Switch Membership List (SML) if they are not already in the list. If the switch is online and Switch Binding is already enabled, then the user is only allowed to change the enforcement mode (Restrict E_Ports, Restrict F_Ports, Restrict All). In this case, the switch must automatically add currently attached devices to the SML if any are not already in the list. If the switch is offline when Switch Binding is enabled, then the switch does not automatically add attached devices to the Switch Membership List. WWNs can only be removed from the list only if the switch is either offline, or Switch Binding is disabled, or if the WWN is not currently connected to the switch. A WWN can also be removed if Switch Binding is not enabled for the same port type as the WWN, meaning a WWN for an E_Port can be removed if Switch Binding is enabled and in Restrict F_Ports mode. Error message “WWN is already connected on port number [N] and cannot be removed from the list. You must first block the port or disconnect the device.” If Switch Binding is enabled and restricting either E_Ports or All ports, then the switch searches for the WWN in the Switch Membership List. If the WWN is not in the list, an Invalid Attachment Reason Code is returned indicating a Switch Binding violation. 468 Implementing an Open IBM SAN If the WWN is not authorized, the port is placed in the Invalid Attachment state, and an Event Log entry (WWN Not Authorized) is generated. This is resolved in several different ways, such as adding the attached switch to the Switch Membership List, changing the Switch Binding state from Restricting E_Ports to Restricting F_Ports, or changing the Switch Binding state to Disabled. When a new device attempts to login to the fabric, the switch determines if the Port WWN of the attached device is authorized to connect in the following order: a. The WWN is verified against the current Port Binding configuration. b. The WWN is verified against the current Switch Binding configuration. If Switch Binding is enabled and restricting either F_Ports or All ports, then the switch searches for the WWN in the Switch Membership List. If the WWN is not in the list, the switch returns an Invalid Attachment Reason Code indicating a Switch Binding violation. If the WWN is not authorized, the port is placed in the Invalid Attachment state, and an Event Log entry (WWN Not Authorized) is generated. Switch Binding Disablement is prohibited if Enterprise Fabric Mode is Active and the switch is online. User interfaces will display an error message. 3.11.3 Configuring Switch Binding The Switch Binding configuration can be performed from the EFCM Element Manager (Switch Binding is configured independently on each switch) and also from the embedded CLI. Before the Switch Binding feature is enabled, it is best to verify the Switch Membership List to ensure that all the devices are attached to the Switch and you can permit or deny any device from the Edit Membership List menu. From the EFCM Element Manager menu, select Configure —>Switch Binding —> Edit Membership List as shown in Figure 3-115. Chapter 3. Implementing a SAN with the m-type family 469 Figure 3-115 Configure Switch Binding Change State The Edit Membership List menu is displayed. It lists all the end devices that are currently connected/online to the switch as shown in Figure 3-116. Figure 3-116 The Switch Binding Edit Membership List menu Attention: The Switch Membership List can be edited only if the Switch Binding feature is disabled. From the Edit Membership List menu, you can Add and Remove members from the Switch Membership List. To Add a device that is currently attached but not in the Switch Membership List, select the WWN of the device under the Attached Nodes list and it will enable the Add button, which can then be clicked as shown in Figure 3-116. 470 Implementing an Open IBM SAN Similarly, the end devices can be removed from the Switch Membership List by selecting the device under the Switch Membership List, as it will enable the Remove option button, as shown in Figure 3-117. Figure 3-117 Switch Binding Edit Membership List The Switch Binding Change State and the enforcement mode configuration options are available from the EFCM Element Manager view by selecting Configure —> Switch Binding —> Change State as shown in Figure 3-115 on page 470. Once in the Switch Binding Change State menu, check the Switch Binding Enable option, and by default the Restrict All Ports option is selected as shown in Figure 3-118. Once Switch Binding is enabled, the option to edit Switch Membership List is not available, but it will allow you to change the enforcement mode. Figure 3-118 Switch Binding Change State and Enforcement mode Chapter 3. Implementing a SAN with the m-type family 471 3.12 Firmware download procedure Before proceeding to download and activate any new firmware, it is a best practice to carefully read the firmware release notes to understand the implications and also verify the fix list for any known problems. The release notes (and other documentation) are available (once registered) at the McDATA File Center site found at Web site: http://www.mcdata.com/filecenter/template?page=docs.search The EFCM Element Manager is used to demonstrate the procedure to download the firmware on the IBM TotalStorage SAN140M. We recommend that a maintenance window is scheduled in order to activate the new firmware and/or to negate any loss of connectivity issues that may occur, or be required, during the install. These are the steps that we took to update the firmware: 1. Upgrade EFCM software on the EFC Server to version 08.01.00. This process is covered in “Downloading and installing the EFC Manager client” on page 366. 2. Backup configuration; This step enables you to revert to the old configuration, in case of configuration loss or corruption issues due to CTP hang or incomplete firmware download. The EFC Server uses the Element manager application to back up and restore the configuration data stored in the nonvolatile random-access memory (NV-RAM) on a director or switch CTP card on the EFC Manager data directory. The location and file name of the saved configuration cannot be modified. It only allows you to restore the configuration on the director by specifying the correct IP address by setting the director in OFFLINE state. Back up the device configuration by following the procedure given below. a. In addition to double clicking the device icon to open the Element Manager as we did before we could also select the Element Manager icon shown in Figure 3-119, or right click the director in the EFCM view and choose Element Manager as shown in Figure 3-120. 472 Implementing an Open IBM SAN Figure 3-119 Element Manager icon Chapter 3. Implementing a SAN with the m-type family 473 Figure 3-120 Invoking Element Manager b. From the SAN140M Element Manager menu, select Maintenance —> Backup & Restore Configuration, then select the Backup option as shown in Figure 3-121. Figure 3-121 Backup and Restore Configuration menu The following configurations are backed up to the EFC Server: – Identification data (director name, description, and location). – Port configuration data (port names, blocked states, and extended distance settings). 474 Implementing an Open IBM SAN – Operating parameters (BB_Credit, E_D_TOV, R_A_TOV, director priority, preferred domain ID, rerouting delay, and director speed). – SNMP configuration (trap recipients, community names, and write authorizations). – Zoning configuration (active zone set and default zone state). Backup is immediately attempted when you click the Backup button. A dialog box confirms backup has been initiated as shown in Figure 3-122. – A dialog box displays to confirm that the backup to the server is complete. – If the backup fails, a dialog box displays to inform you that the backup to the server failed. Figure 3-122 Backup initiation confirmation 3. Download the firmware image file and transfer it to the firmware library: a. From the SAN140M Element Manager menu, select Maintenance —> Firmware Library and then select the New... option shown in Figure 3-123. Chapter 3. Implementing a SAN with the m-type family 475 Figure 3-123 EFCM Firmware Library b. Now browse and select the firmware image file and select Save as shown in Figure 3-124. 476 Implementing an Open IBM SAN Figure 3-124 New firmware version transferred to firmware library Type a description and the Save option will transfer the image file into the firmware library database. This is shown in Figure 3-125. Figure 3-125 Firmware description The message box is displayed with a transfer completed message. This means the firmware library has stored the new firmware. Chapter 3. Implementing a SAN with the m-type family 477 4. The active CTP Card must be swapped to ensure that once the firmware is activated the CTP cards can successfully synchronize and a possibility of the hang symptom is ruled out. Using the Element Manager, execute a CTP swap: a. Verify that an amber LED indicator does not display for either CTP card. b. Verify the active and backup CTP cards from the hardware menu of the ED-6064 Element Manager view by double-clicking the CTP cards. The CTP card in slot 0 is active, as shown in Figure 3-126. Figure 3-126 CTP card status c. Right-click the active CTP (CTP 0 in our example) in order to show the Switchover... button as shown in Figure 3-127. 478 Implementing an Open IBM SAN Figure 3-127 CTP Switchover d. On the Switchover CTP dialog box, click the Switchover... button as shown in Figure 3-128 to switch operation to the backup CTP card. When switchover occurs, the green LED illuminates on the backup CTP card to indicate that it is now the active card. Note: The director will lose its Ethernet connection for a short period during the switchover process. Figure 3-128 CTP Switchover button Chapter 3. Implementing a SAN with the m-type family 479 5. Download and Activate Firmware EOS 06.02.00: a. From the firmware library menu, select the firmware that was stored previously and click Send... and it will prompt for confirmation to send the firmware, as shown in Figure 3-129. Figure 3-129 Send firmware download confirmation prompt The send function verifies the existence of certain director conditions before the download process is initiated. If an error occurs, a message is displayed indicating the problem must be fixed before the firmware is downloaded. Conditions that terminate the download process include these: – There is a redundant CTP2 card failure. – The firmware version is being installed to the director by another user. – The director-to-EFC Server link is down. Select Yes if all is satisfactory. As the download begins, a Writing data to FLASH message is displayed at the top of the window, followed by a Sending Files message. This message remains as the progress bar travels across the window indicating the percent completion of the download. The bar progresses to 50% when the last file is transmitted to the first CTP2 card. The bar remains at the 50% point until the director performs an IPL (indicated by an IPLing message). During the IPL, the director-to-EFC Server link drops momentarily and the following occurs at the Element Manager: As the network connection drops, the SAN140M Status table turns yellow, the Status field displays No Link, and the State field displays a message stating the reason for this. 480 Implementing an Open IBM SAN In the Product View, the director icon displays a grey square, indicating that the director status is unknown. Illustrated FRUs in the Hardware View disappear, and appear again as the connection is re-established. After the IPL, a Synchronizing CTPs message displays. This message remains as files are transmitted to the second CTP card and the progress bar travels across the window to 100%. When the download reaches 100%, a Send firmware complete message is displayed as shown in Figure 3-130. Figure 3-130 The firmware download progress menu The firmware update is now complete as indicated by the Active Firmware Version line at the bottom of the Firmware Library screen shown in Figure 3-131. Normal service is now resumed. Figure 3-131 Active Firmware Version The firmware is now activated. Chapter 3. Implementing a SAN with the m-type family 481 482 Implementing an Open IBM SAN 4 Chapter 4. Implementing a SAN with the n-type family In this topic we show the basic features and functions of the CNT director. 4.1 Introducing the SAN256N Director IBM TotalStorage SAN n-type directors provide ultra-scalable CNT director technology with worldwide IBM warranty, maintenance service and support for mid-range and enterprise infrastructure simplification and business continuity solutions. Infrastructure simplification solutions include storage and SAN consolidation, virtualization and automation with integrated n-type director logical domain and multi-protocol features. Business continuity solutions included data protection with shared IBM TotalStorage tape libraries and IBM Tivoli software; and disaster tolerance with remote tape libraries and data replication over metro and global distances with integrated n-type director features. 4.1.1 Director Models The latest model of directors available in the n-type family are: IBM SAN256N director CNT UltraNet Multi-service Director (UMD) Model N16 CNT FC/9000 Directors © Copyright IBM Corp. 2000, 2001, 2002, 2003. All rights reserved. 483 The CNT FC/9000 family of Fibre Channel directors in Figure 4-1. The models from left to right are FC/9000-256, FC/9000-128, and FC/9000-64. Figure 4-1 The CNT FC/9000 family Figure 4-2 SAN256N director In this chapter we are going to focus on the IBM TotalStorage SAN256N director as shown in Figure 4-2. 4.1.2 Basic components The basic components of the SAN256N director system include the following: 484 Implementing an Open IBM SAN TFIO 16 port I/O Blade TCM control module TSW switch module TMP midplane TMF/TFD upper fan control module Power supply assemblies Upper fan assemblies Side fan assemblies Cabinet Enterprise Manager Software TFIO 16-port blade The SAN256N director Fibre Channel I/O blade (TFIO) is a sixteen-port input/output line care that plus into a slot in the front of the chassis. The chassis is capable of accepting up to sixteen TFIO blades, providing a total port count of 256 ports per chassis. The TFIO blade has 16 Fibre Channel ports to accept IBM certified SFP shortwave (850nM) and longwave (1310-1550nM) modules. Depending on what devices they are connected to, the SFP modules can auto negotiate at either 1.0625 Gb/s or 2.125 Gb/s. TCM Control Module The SAN256N director control module (TCM) provides a control interface for the SAN256N director system. The module is responsible for monitoring the general health of the system and acting as a proxy for all external communications destined for other modules in the system. The TCM also provides control and management of communications, between itself and the TFIO and TSW modules, as well as the system clock. The TCM is a critical module in the SAN256N director system, requiring a redundant module in the system acting as a standby. The TCM monitors the following components: TFIO blades TSW modules TCM modules Power supply assemblies Fans, upper and side assemblies TSW switch module The TSW switch modules provide physical and logical connectivity between the TFIO blades in the cabinet. The TSWs provide non-blocking any-to-any switching capabilities between the switch fabric ports and the TFIO blades. Chapter 4. Implementing a SAN with the n-type family 485 A typical switch fabric supporting up to 256 Fibre Channel user ports (at 2.125 Gb/s per port uses three TSW modules to provide the switch fabric. Only two TSWs are required for full bandwidth and any-to-any connectivity. Enterprise Manager software Enterprise Manager is the graphical user interface (GUI) which manages the fabrics made up of SAN256N Director and FC/9000 Director switches. Enterprise Manager is capable of managing SAN256N director and FC/9000 director fabrics that connect to FC/9000-8, FC/9000-16 and FC16-2 switches. Currently, the SAN256N director can control FC/9000 8- and 16-port switches and FC/9000 64-, 128-, and 256-port directors. Enterprise Manager allows you to view, but not control the FC16-2 switch, and switches from other vendors. 4.1.3 Port modes The different Fibre Channel port modes supported are described in Table 4-1. Table 4-1 Fibre Channel port modes Mode Description E_Port ISL port in the E_Port mode F_Port Fabric port, can connect to one N_Port TL_Port Translative loop port for connecting private loop devices to the fabric, only available in the legacy T_Port mode* Note this only available on FC/9000 1 Gb/s models OffLine Port forced offline Test Port forced into test mode Loop capability is only available and supported on the FC/9000 models. 4.1.4 Supported protocols In most environments, a homogeneous landscape of servers and storage is hard to find. For example, most tape-drives solely support FC_AL (known as arbitrated loop), whereas modern disk systems are widely used with point-to-point protocol (sometimes called P2P). CNT supports these protocols in E_Port mode: Open Systems: – Arbitrated Loop – FC-SW (Fibre Channel Switched Fabric) 486 Implementing an Open IBM SAN zSeries®: – FICON All these can attach to a single CNT director at the same time. Support of cascading To create even larger fabrics FC/9000 directors can be cascaded. By doing this you can create fabrics with more than a thousand external ports. Today, IBM supports fabrics with up to 8 cascaded CNT FC/9000 directors. Cascading is also supported when using FICON attachments. 4.1.5 Supported device attachment For the latest support matrix of the IBM TotalStorage SAN256N director and interoperability guides refer to: http://www-1.ibm.com/servers/storage/san/n_type/ Chapter 4. Implementing a SAN with the n-type family 487 4.2 Getting started Most of the management activities for the CNT directors can be performed from the inVSN management console. 4.2.1 Initial IP settings The SAN256N Director is delivered with the current supported level of firmware and default IP addresses 10.1.1.51 and 10.1.1.52, and a subnet mask of 255.255.255.0. There is also a default chassis ID, switch ID, and fabric ID. Without doing any kind of cascading, there is no need to change these IDs. It is the responsibility of an IBM Customer Engineer (CE) to reset all default addresses to reflect the environment in which it is being installed. For added security, the TCP/IP address can only be set or reset by the CE, using an RS232 connection and entering the CE user id and password. The new TCP/IP address is displayed in an LED panel that can be located on the FCM module. The PC that is used for the Enterprise Manager server to be connected to the FCM modules using the Ethernet ports. You should also ascertain whether the applicable microcode level is installed or needs to be installed. The same is true for the Enterprise Manager software: The director microcode level that we will use is: 5.0.0. The Enterprise Manager server and client code that we will use is: 9.0.1. Since these codes are subject to change as new functions are added and improvements made, ask your IBM or CNT technical contact what the currently supported levels are. 4.2.2 Establishing network connection As mentioned previously, the SAN256N director and its management PC are delivered with pre-installed IP settings. They are adequate to set up a small private network with just directors and the management PC as members. You can leave the initial IP setup as it was delivered for use as, or similar to, a private network. Consequently, only local users can attach to the directors and its inVSN management tool. You can also adopt your corporate network settings to enable remote Enterprise Manager access. 488 Implementing an Open IBM SAN Leaving all IP settings as a private network For using the Enterprise Manager software from this local private network, the supplied hub is sufficient. To enable all IP based components to communicate, plug in the Management PC and both CNT IP ports to this Hub. So initially, our network setup looks like that shown in Figure 4-3. Management PC Ethernet-Hub FC/9000 64 Figure 4-3 Private IP network for initial inVSN management ability Enabling inVSN access from a corporate network To exploit the remote management capabilities of the inVSN management software, we recommend that you connect this network as a subnet to the corporate LAN. Before actually changing any parameters, it is important to obtain all the information you need in advance, such as: Available IP addresses Valid subnet mask Default gateway To connect the CNT subnet to your corporate LAN follow these steps: 1. Change the IP setting of the primary FCM blade using the RS232 Interface (this should be done by CNT or IBM Customer Engineers). 2. Change the IP setting of the secondary FCM blade using the RS232 interface (this should be done by CNT or IBM Customer Engineers). 3. Change the IP settings of the management PC using the common Windows Control Panel tools, and reboot the Windows server. 4. From the management PC, ping both IP addresses of the director to ensure that everything is set properly (provided that all components are still connected to the 3Com IP-Hub). 5. Attach all required ports to a switch or hub that is part of the corporate network, or connect the supplied hub to the corporate network. Chapter 4. Implementing a SAN with the n-type family 489 After attaching our CNT setup to the corporate network, as shown in Figure 4-4, we are now able to access the Enterprise Manager server from wherever we are in the corporate network. Management PC Ethernet-Hub FC/9000 Corporate network Figure 4-4 CNT setup attached to a corporate network Setting up high security network access In the previous setup we described a network layout in which the Management PC as well as the fabric components were connected to the corporate network. However, if this corporate network itself cannot be considered as secure enough, we recommend that you separate the fabric components from the corporate network. The only bridge between such a separated fabric management network and the corporate network would be the Management PC. Referring to Figure 4-5, we see that now only the Management PC can access the directors’s IP ports. 490 Implementing an Open IBM SAN other directors ITSO director Ethernet Ethernet-Hub IN-VSN server on Management PC (with two network interfaces) Corporate network ITSO Workstation with IN-VSN client ITSO Workstation with IN-VSN client Figure 4-5 CNT setup with secure director access Direct IP access from the corporate network to directors is now impossible. The only way to gain access is using the Enterprise Manager server. We consider this as the most secure network setup for remote Enterprise Manager access. However, you need two network interfaces in the Management PC. 4.2.3 In-band and out-of-band Control of a director or switch by the Enterprise Manager Software is accomplished either in-band or out-of-band. Release 3.x and above of the Enterprise Manager Software supports in-band control of FC/9000 and SAN256N director and switches. Chapter 4. Implementing a SAN with the n-type family 491 In-band In-band control is accomplished when the Enterprise Manager controls a Director or switch via the IP address of another Director in the fabric. The Directors and switches communicate via Interswitch Links (ISLs). In-band control is always enabled in the FC/9000. By default, In-band control is disabled in the SAN256N director. Contact your IBM support representative before activating this feature. In-band control for the SAN256N director is accomplished by activating the functionality via a selectable option at the Enterprise Manager Server. Enable or disable in-band control by selecting the option from the EM Server and then selecting Maintenance from the toolbar. Click the in-band and out-of-band control option. A dialog with a drop down list appears. Select the type of control you wish for the SAN256N director from the drop down list and then click on OK. Click through the verification windows. Out-of-band Out-of-band control is accomplished when director(s) or switch(es) are controlled via the FCME or TCM IP address(es). 4.3 Accessing with inVSN Enterprise Manager Point a web browser to the name of the switch or the ip address. The initial popup window is shown in Table 4-6. 492 Implementing an Open IBM SAN Figure 4-6 Enterprise Manager initial view The initial launch window lists the Java 1.4.2 requirements and allows us to click on Java Web Start to update our Java version. After this has completed, we click on the Launch button. The launch button will install the files required to run the Enterprise Manager client from any remote workstation. When logging in for the first time, the Enterprise Manager Client code downloaded to our pc accessing the switch as shown in Figure 4-7. Chapter 4. Implementing a SAN with the n-type family 493 Figure 4-7 Installing Enterprise Manager client Once the download has completed, we are prompted for the user name and password as shown in Figure 4-8. Figure 4-8 Enterprise Manager Login Here we enter default user name admin and default password admin. The first time we log in to the switch, we will see default values. However, in our example we will show the initial view with some of the switches and directors already configured. 494 Implementing an Open IBM SAN Figure 4-9 Enterprise Manager initial view of switch As shown in Figure 4-9, we can now manage our switches and directors. The Title Bar displays Enterprise Manager Client and the name of the switch so we know which switch or director we are connected to. Just below this is the Menu Bar with File, View, Traps, Director and Help functions. Immediately below is the toolbar with the buttons described in Table 4-2. Table 4-2 CNT Tool Bar Button (from left to right) Function Left Arrow Navigate back to previous selection Right Arrow Navigate forward from a previous selection Check Mark Apply changes to the switch Red X Cancel changes being made to the switch Refresh Refresh view with current details from switch Chapter 4. Implementing a SAN with the n-type family 495 Button (from left to right) Function Port WWN Device Names Display Port WWN Device names configuration Zoning Perform Zoning administrative functions One Button Code Load Load latest firmware levels Events Display event log for all switches and directors in SAN Trace Perform Trace functions 2045 FTP FTP User Security Perform User administration functions LRT Link rate test list FC FC ping 4.3.1 Defining Users There are four predefined user groups: operator, admin, viewer and maint. Each has a single member consisting of a profile with the same name. The user name has a default password that is the same name. We recommend changing these before beginning any fabric configuration to avoid any unauthorized and unwanted access. To manage users, we can access this function in two ways. We can click on the pulldown menu under File and then select User Security. We can also click on the User security button which is the third button from the right. Both selections will bring us into the User Security function as shown in Figure 4-10. 496 Implementing an Open IBM SAN Figure 4-10 User Security We have four tabs, Users, User Groups, Profiles and Categories. Adding new users The first tab Users allows us to add a new user. To do this, we fill in the User Name field with the new user name and then the Password with the new password. Next, we select the type of user and the user group from the pulldown menus under User Type and User Group. Now we click on Add to add the user. In the example shown in Figure 4-10, we are adding User name ITSOuser and a password, for User Type EM and User Group of admin. The User Type is based on the various methods which the switch or director may be controlled. The available options are: EM (Enterprise Manager) SNMP Ver1&2 Telnet GS3 or GS4 Chapter 4. Implementing a SAN with the n-type family 497 CUP FTP CIM There are 4 predefined user groups: Operator Maint Admin Viewer The User Groups tab allows us to manage the different user groups. This is useful if we want to create a user group for a specific set of switches. To create a new user group, we just type in the name of the User Group we want to create and select the type of group profile from the Profile pulldown menu on the right. After this is done, we click on Add as shown in Figure 4-11. Figure 4-11 User group definition The Profiles tab shows us the predefined profiles: 498 Implementing an Open IBM SAN Operator Maint Admin Viewer To view the permissions for a given profile, highlight the profile and the permissions are displayed in the bottom half of the tab. These can be changed by highlighting them and then clicking on Modify. To add a new user profile, we type the name of the profile we wish to create and click on Add. Next we will add permissions from the selections in the bottom half of the tab by highlighting the profile in the top half of the tab, then click on the selection to add and then click on Modify as shown in Figure 4-12 Profile definitions The changes will take effect when we click on either the OK or Apply button. We are then prompted to confirm that we want to make the changes as seen in Figure 4-13. Chapter 4. Implementing a SAN with the n-type family 499 Figure 4-13 Confirm User Security changes To cancel out of this, we can either click on No or close the popup window. Deleting and modifying users To delete a user or a user group or a profile, we highlight the name of the user that we wish to delete and click on the Delete button. We are prompted to confirm that we want to delete the user and we click on Yes. This is the same procedure to delete a user group or a profile, just highlight the name and then click on the Delete button responding Yes to the confirmation prompt. To modify a user or user group or profile, highlight the name in question. Make the modifications as appropriate and then click on Modify. Once the changes occur, the user or user group or profile is updated with the changes made. 500 Implementing an Open IBM SAN 4.3.2 Fabric security The Fabric Security option (also referred to as Fabric Binding) allows you to enable or disable the ability to control the Interswitch Links (ISLs) of Directors within a fabric. Fabric security is a licensable option and is required in a FICON Cascade implementation. Using Fabric Security in open systems configurations is optional. Enabling fabric security Enable fabric security at the System Configuration window called at the SAN view. 1. Select Enabled from the Fabric Security drop-down list. 2. Click Apply to complete the process. Disabling fabric security Disable fabric security at the System Configuration window. 1. Select Disabled from the Fabric Security drop-down list. 2. Click Apply to complete the process. Creating a membership list To be Interswitch Linked with other members of a list, the Fabric Binding Membership List of a Director must match the list of every other director in that grouping. 1. Click the Membership List button at the System Configuration window of the director with which you would like to create a membership list. The Fabric Binding Membership List dialog appears. 2. Do one of the following to add switches to the list. a. Enter the Domain ID and WWN of each switch that you would like to add. b. Click the Known Switches button. The Known Directors List dialog appears. c. Select the switches you would like to add, and then click Add. 3. Click Add. 4. Click OK. Note: If any director that is not on the Membership List is connected to this director, the ISL will not go online. Instead, an “invalid attachment” is reported on the isolated E_Port. This is called out via a yellow border around the port. Once the Membership List is correct and Interswitch Links are attached, they will come online. For FICON devices, you can now vary online devices which are defined correctly in the Input/Output Configuration Program (IOCP). Chapter 4. Implementing a SAN with the n-type family 501 4.3.3 Port Groups Port Groups are a collection of ports. In larger Directors and Logical Domains, grouping ports will allow for smaller matrixes of blocking and prohibiting assignments. Creating a Port Group Use the following procedure to create a Port Group. 1. At the SAN view window select a director or Logical Domain in which you would like to create a port group, the select the Ports tab. 2. Click the Configure button. The Port Group window appears. 3. Click Create. The Create Port Group window appears. 4. Type in the name you want to give the group and then click OK. Available ports associated with the specified group now appear in the Port Group window. 5. Select the ports that you want to add to a Port Group from the Available Ports list, then click Add. The ports you selected now appear in the Ports in Group list. 6. If you are finished adding ports to the group, click Save to save the group and then click OK on the confirmation message dialog that appears. 7. Click Close when you are finished. Removing ports from a Port Group Use the following procedure to remove ports from a port group. 1. At the SAN view, select the Director or Logical Domain from which you would like to remove ports in a port group. 2. At the Ports drop-down list, select the port group from which you wish to remove ports and then click the Configure button to the right of the list. The Port Group window appears. 3. Select the ports that you want to remove from the port group and then click Remove. 4. Click Save to save the changes to the port group and then click OK at the confirmation dialog. 5. Click Close to close the Port Group window if you are finished. Deleting a Port Group Use the following procedure to delete a port group from a selected director. 502 Implementing an Open IBM SAN 1. At the SAN view, select the Director or Logical Domain from which you would like to delete a port group. 2. At the Ports drop-down list, select the port group you wish to delete and then click the Configure button to the right of the list. 3. Click Delete to delete the Port Group and then click Yes on the confirmation dialog. 4. Click Save and then click OK on the confirmation dialog. 5. Click Close to close the Port Groups window. Copying a Port Group Use the following procedure to copy a Port Group and then rename it as another Port Group. 1. At the SAN view, select the Director or Logical Domain at which you would like to copy a port group. 2. At the Port Group drop-down list, select the port group you want to copy and then click Configure. 3. Click Copy. 4. Type in the name of the new Port Group in the Copy Port Group window, and then click OK. 5. Click Save after you make any changes (adding or removing ports) that you wish to accomplish with the new Port Group and then click OK at the confirmation dialog. 6. Click Close when you are finished with the Port Group window. 4.3.4 Port and switch binding Port and switch binding allows users to restrict access to a director and its individual ports from other nodes in a fabric. It could also be called Device Connection Control (DCC). When binding is disabled, any node is permitted access through any port in the switch. Note: Port and switch binding are only available for the FC/9000 8- and 16port switches and 64-, 128- and 256- port directors. Switch binding initial setup 1. Highlight an FC/9000 switch or director at the SAN list of the navigation tree. 2. Click Director at the menu bar and select the Device Binding option. 3. At the Device Binding configuration window, the default view is Switch Binding. 4. To bind devices to a switch, simply choose them from the left panel by either selecting them individually by using standard windows selection procedures or use the Add/Remove All button to add all devices, and then move them to the right panel by clicking on the Add Selected button. Note that the radio Chapter 4. Implementing a SAN with the n-type family 503 buttons above the available device list allow you to toggle the view of devices from all devices in the fabric to devices currently connected to the switch at which you are attempting to bind devices. 5. After you have moved the devices you want to bind to this switch, you can click the Apply button. This will move the list of devices to the switch. Any device that attempts to log into the switch, such as new attachments, that is not part of the switch binding list will be rejected, and the attached port is isolated with “Invalid Attachment.” 6. Click the Enable radio button, and then click OK at the confirmation window. This enables the list as the devices which may attach to this switch. Port binding Clicking the Device Binding tab opens the Device Binding window. Port binding is a way to ensure that devices communicate through a particular port on a director. 1. After invoking the Device Binding Configuration window, click the Port Binding tab. 2. At the Port drop down list, select the port to which you will bind devices by scrolling through the list of port and highlighting the port of your choice. 3. At the Devices list, determine whether you want to view all devices in the fabric, or only those currently connected to the director at which you will be binding the devices, by clicking either the Connected or all radio button. 4. Use standard Windows selection procedures to select the devices you would like to bind to the port you selected earlier. 5. Click the Add Selections button to move the ports you selected to the list at the right panel. You may also click on the Add All button to move all of the devices listed in the panel at the left to the list on the right. 6. Click the Apply button to send the list to the switch. 7. Click the Enable radio button, and then click OK at the confirmation window. This enables the list to the switch and binds the devices you chose to the port you chose. Any device that attempts to log into the switch via the specified port, such as new attachments, that is not part of the port binding list will be rejected, and the attached port is isolated with Invalid Attachment. Adding devices to the switch binding list 1. Invoke the Device Binding Configuration window. 2. In the panel on the left, highlight the devices you wish to add. Use the All or Connected button to show the devices you wish to add. 3. Click the Add Selected button. 4. Click Apply. 5. Click the Enable button, and then click OK at the confirmation window to complete the task. 504 Implementing an Open IBM SAN Removing devices from the switch binding list 1. 2. 3. 4. 5. Invoke the Device Binding Configuration window. In the panel on the right, highlight the devices you wish to remove. Click the Remove Selected button. Click Apply. Click on the Enable radio button, then click OK at the confirmation window to complete the task. When the last device is removed from the switch binding list, only devices that have been configured in a specific port binding list will be permitted access to the switch, and only through an attachment on that specific port. Adding devices to the port binding list 1. Invoke the Device Binding Configuration window. 2. Click the Port Binding tab. 3. Use the Port drop down list to choose the port to which you would like to bind devices. 4. In the panel on the left, highlight the devices you wish to add. Use the All or Connected button to show the devices you wish to add. 5. Click the Add Selected button. 6. Click Apply. 7. Click the Enable button, and then click OK at the confirmation window to complete the task. Removing devices from the port binding list 1. Open the Device Binding Configuration window. 2. Click the Port Binding tab. 3. Use the Port drop down list to choose the port from at you would like to remove bound devices. 4. In the panel on the right, highlight the devices you wish to remove. 5. Click the Remove Selected button. 6. Click Apply. 7. Click the Enable button, and then click OK at the confirmation window to complete the task. When the last device is removed from a specific post binding list, then all devices attached to that port will be enforced from the switch binding list. Combined switch/port binding for entire switch 1. Open the Device Binding Configuration window. 2. Use the Quick Configure panel (upper right section of the Device Binding Configuration window). 3. Clicking Connected and then Apply would stage the switch/ports bound list in the switch. Chapter 4. Implementing a SAN with the n-type family 505 4. Clicking Clear All and then Apply would clear the switch/ports bound list in the switch. 5. Click the Enable button, and then click OK at the confirmation window to complete the task. Globally disable all bindings To disable all bindings, open the Device Binding Configuration window and click Clear All. 4.3.5 Force ports down The director has the ability to take a front port off line if the attached device is behaving abnormally. This is done to prevent the director port from being flooded with erroneous data. If a front port is forced down, the user can use the Enterprise Manager Software to place the port administratively off line and then on line which will restore operation. A backlink can also be forced down if improper behavior is detected. A backlink can also be restored via the Enterprise Manager. Typical reasons that a port can be forced down: More than four log-ins within 10 seconds Excessive LOS occurrences within 10 seconds Various frame-error events within 10 seconds The forcedown feature is turned on by default, but it can be disabled for the entire director via the Enterprise Manager. To enable or disable force ports down 1. Select the director at the SAN tree view upon which you would like to enable or disable the Force Ports Down feature. 2. Right-click in the gray area next to the graphic of the director, and select the System Configuration option. 3. Select Disable or Enable from the drop down list at the Force Ports Down option. 4. Click Apply, and then click OK at the confirmation windows which follow. 4.3.6 Setting the director clock All directors are delivered with preset time and date settings. However, in most cases, these clock settings do not match with the local times. 506 Implementing an Open IBM SAN These clock settings do not affect the fabric functionality at all. However, it is important to set them because this makes reading and understanding the time-stamped logs much easier. To set the director clock, just click the specific director in the navigation tree and then choose the path Director—>Set Director Clock from the main menu. Enter your desired time settings and apply this by clicking OK as shown in Figure 4-14. Figure 4-14 Setting the director clock 4.3.7 Assigning names and aliases To make it easier to manage large SANs, you can assign names to directors and individual ports. While this step is not mandatory, we recommend giving the directors and ports meaningful names. This makes the management of the SAN much easier. Note: The names you give to the director ports belong to the physical ports of the director, and not to the attached devices. When changing the cabling of the director, we recommend that you also change the names to reflect the new environment. Assigning the director’s name We have two ways to assign aliases. We can select it from the File pulldown menu or by clicking on the PortWWNDeviceNames button as shown in Figure 4-15. Chapter 4. Implementing a SAN with the n-type family 507 Figure 4-15 Select Port WWN Devicenames Clicking on either option will open the Port WWN DeviceNames Configuration as shown in Figure 4-16. Figure 4-16 Port WWN Device Names configuration The configuration lists the Port WWN followed by the Device Name and then Port Vendor. The Device Name is blank because we have not defined an alias for this 508 Implementing an Open IBM SAN WWN. The Port Vendor shows the vendor of the product that is attached to the given port. To assign the alias, we fill in the Device name for the given WWN. 4.3.8 Implementing zoning One of the basic purposes of SAN fabric products is to enable or disable communication between the different ports (devices) attached to them. In most cases it is helpful to limit the potential access of ports. Zoning provides an effective tool to limit and control the communication between fabric ports. There are multiple reasons to want to limit access: We may want to avoid Windows servers seeing all disks in a fabric. Otherwise there would be a high risk of getting signatures written on all disks which would then mean these disks are unusable by other operating systems. For security reasons we may want to limit the access to disk with confidential data to only selected servers. We would like to get control of the amount of paths a FC host adapter has to a specific disk. This is because not all environments are flexible in their usage of multipathing software. Understanding WWN zoning WWN zoning allows you to designate devices using their WWPN. This means you can group devices by WWNs with WWN zoning. These zones can then be grouped into zonesets. All zones within a zoneset are in effect at the same time and only one zoneset is active in the fabric at any given time. Enterprise Manager lets you manage several zonesets across the fabric with only one of them active at a time. Note that the active zoneset cannot be modified. One zoneset may be comprised of 1 to 256 zones. That zoneset may accommodate up to 3500 member devices. Note that all zones are present in the fabric and available to any user which may have access to the fabric. WWN gives greater flexibility to manage a fabric as devices can be moved across the fabric without having to change zoning configurations. 4.3.9 Defining Zones To access Zoning, we click on the Zoning button as shown in Table 4-17. Chapter 4. Implementing a SAN with the n-type family 509 Figure 4-17 Zoning button In our example, we are adding a zone to an existing fabric. Once we bring up the Zoning window, we must double click on the fabric name or zoom in as described in the messages at the bottom of the window as shown in Figure 4-18. Figure 4-18 Zoning tool We double click on the existing configuration and it displays all the zonesets currently defined as shown in Figure 4-19. 510 Implementing an Open IBM SAN Figure 4-19 Using Zoning function To add a new zoneset we must double click on one of the inactive zonesets. After double clicking on Curly-128, we now have the ability to create a new zone set as well as Save our changes as shown in Figure 4-20. We can also arrive at the same point by clicking on the ZoomIn button. Figure 4-20 Creating new zoneset Chapter 4. Implementing a SAN with the n-type family 511 Next, choose the newly created zone, and click the Zoom In button. In our fabric there are other zones defined so we also see those. We scroll to the bottom and highlight the <CreateZone> field as shown in Figure 4-21. In this example we type in DorysZone, select whether this is a Hard or Soft zone from the pulldown menu on the right and press enter. Note that with the SAN256N, Soft zone is the default. Figure 4-21 Create a new zone part2 There are a couple of ways we can add zone members at this window. We can type them in, or we can drag and drop them from the Navigation Tree at the left and drop them in as shown in Figure 4-22 (click the plus sign next to a director to expand the view and see the available ports for that director). 512 Implementing an Open IBM SAN Figure 4-22 Adding WWN to zone We can also right-click over <Add WWN> and select Add Zone Members as shown in Figure 4-23. A list of known WWNs and their nicknames, or Node FC Addresses will pop up as shown. Select the WWNs you wish to add, and then click Add. For the FC16-2, FC8-2, non-IBM switches and QLogic Sanbox2’s you will have to manually add their WWNs to the zone. To expand the Navigation Tree to get to the port level, click the plus sign (+) to the left of the director. Then click on a port, and all the devices which are assigned to that port are listed beneath it. There are two types of zone members that can be added to a zoneset: WWN (note that the WWN type may also appear as the nickname for the device), and Node FC Address. Highlight and then drag the zone member to the next available line cell and drop it there. It will then be listed in the zone member list. You can also type in a member manually by clicking in the pertinent cell at the next available line and typing in the information. Chapter 4. Implementing a SAN with the n-type family 513 Figure 4-23 Adding by Port WWN Once the required WWNs have been added, click the Save button. To create additional zones, click Zoom Out from the previous panel and repeat the same process followed to create the first zone. The next step is to create the zoneset. Click the Zoom Out button to go back to the list of zones, click the Zonesets tab, and highlight <Create Zoneset>. Type in the name of the zoneset and press Enter. Note: The zoneset name must begin with an alphabetic character (A-Z, a-z). Use alphanumeric ASCII characters to create the rest of the zoneset name. You can also use the following three characters in a zoneset name: “$” or “_” or “-”. To add zones to this zoneset, right click over the zoneset and choose Add Zones in the contextual menu as shown in Figure 4-24. 514 Implementing an Open IBM SAN Figure 4-24 Adding zones to the zoneset Select the zones you want to add. We select DorysZone and click Add. We can also select multiple entries by holding down the Ctrl key while selecting the zones as shown in Figure 4-26. Chapter 4. Implementing a SAN with the n-type family 515 Figure 4-25 Selecting the zones to add to the zoneset We return to the main window and click Save to save the zoneset configuration. The zoneset is now defined but we still have to activate it. To activate the zoneset, right-click it and choose Activate from the menu as shown in Figure 4-25. 516 Implementing an Open IBM SAN Figure 4-26 Activate new zoneset We confirm that we want to activate the zoneset by clicking Yes on the confirmation screen. The zoneset is now activated. 4.3.10 Logical domains Selecting the Logical Domains tab displays the System Configuration for Director: The default configuration is that everything is in logical domain 0, and Zero Cost ISL (ZISL) Group Network 0. All have the diagonal lines and mustard color. Note: The ability to change the logical domain configuration is a licensed option. Please call your support representative for information on how to obtain a license or logical domain functionality. You may create three other logical domains and three other ZISL Groups. Configure logical domain Configure logical domains as a means of creating two separate logical directors within one physical director. Chapter 4. Implementing a SAN with the n-type family 517 Click the director at the director view where you would like to create a logical domain. Right-click in the grey area to the left of the director view and then select the System Configuration option. Then click on the Logical Domains tab. Click the Configure button Select the pre-configured option which fits how you want to set up the logical domains of the director. Determine how many logical domains you will have, and the slot count of each of them. Note that there are sixteen ports per slot or board. Zero cost InterSwitch Links is a way to set up an ISL between logical partitions without having to physically cable them together. When finished, click OK. After the configuration, click Apply. Click OK at the confirmation windows which appear. 4.3.11 Database backup The database backup feature allows us to back up files from the server window. All necessary files will be backed up. We can use the backup to restore our configuration data. From the Enterprise Manager server, we click on the File menu and select the Backup function. The Backup dialog appears and we type in the backup File name (if we wish to change it from the default file name) and then click on the Backup button. Note that if we give the backup file a name that already exists, we will be prompted to overwrite the older version. We recommend using different file names and including a month and year in the file name format. When the file has been successfully backed up, we will get a confirmation message. To set an automatic backup, we perform the following steps: Log in to the Enterprise Manager server Select the AutoBackup function from the Configuration menu and click on the Auto Backup Enabled box when the Auto Backup dialog box appears Now the Auto Backup Settings window appears. We used Windows Explorer to locate the file we want to backup. After selecting the file, we click Backup The cursor is now in the Every field. This field determines the frequency in hours by which we want the file backed up. We must type in a number and click OK to continue We have now completed setting up the Auto Backup. 518 Implementing an Open IBM SAN 4.3.12 One button code load By clicking on the One Button Code Load button as shown in Figure 4-27, we are able to perform code load functions on the FC/9000 and SAN256N. Figure 4-27 One Button Code Load Icon The dialog box appears and we have two tabs, one for FC/9000 and one for the 2045 (also known as the SAN256N). In Figure 4-28, we see the options for the FC/9000. They are different than for the SAN256N. Figure 4-28 FC/9000 One Button CodeLoad options One button code load via the Enterprise Manager Software allows maintenance level users the ability to load code into an FC/9000 director or switch. Chapter 4. Implementing a SAN with the n-type family 519 One button code load for FC/9000 1. Click the Code Load button. 2. After clicking the Code Load button, the One Button Code Load window is displayed. a. Hard reset boards after application code move: i. Enterprise Manager by default does a soft reset after an application code move to boards. By selecting this option, Enterprise Manager will perform hard resets to those boards. By default, this option is not selected. b. Hard reset board(s) after FPGA code move: i. Move code to failed boards: User has option to select if they want to move code to failed boards. If selected, an attempt will be made to move FCM flash code to failed boards (Application as well as FPGA). The board will be hard reset after move code. By default this option is selected. c. Stop after first error (for each director): User can select if they want to stop/continue after any error has encountered. By default this option is selected. 3. Select the code load set from the drop down box at the right by clicking the arrow and then clicking the code set you want to load. Note that you must choose a code set for each director into which you want to load code. Also note that you may choose a different available code set for directors and concurrently complete those code loads when you click the Start button. 4. Select the director(s) to which you wish to download code by clicking on them. Note that all directors known by the Enterprise Manager Software will be listed. Inband and out of band directors must be loaded in separate sessions. Upgrade out of band directors first. Then Inband directors secondly. 5. Select the options you wish to apply and click the Start button. Click the OK button at the confirmation window to continue the process. Note that if you wish to stop the process, click the Abort button and not the Close button. Clicking the Close button simply closes the window but does not stop the process. Clicking the Detail Status button shows progress of the code load. One button code load for SAN256N director 1. Click the Code Load button. 2. After clicking the Code Load button, click the SAN256N director tab to see the following window. 520 Implementing an Open IBM SAN 3. Select the code load set from the drop down box at the right by clicking on the arrow and then clicking on the code set you want to load. Note that you must choose a code set for each director into which you want to load code. 4. Select the director(s) to which you wish to download code by clicking on them. Note that all directors known by the Enterprise Manager will be listed. Note: Inband and out of band directors must be loaded in separate sessions. Upgrade out of band directors first. Then Inband directors secondly. 5. Click the Load and Activate button, or click Load if you want to only load the code at this time and want to manually choose Activate. Click the OK button at the confirmation window to continue the process. Note that if you wish to stop the process, click on the Abort button and not the Close button. Clicking the Close button simply closes the window but does not stop the process. Clicking on the Detail Status button shows progress of the code load. Figure 4-29 2045 One Button Code Load options In Figure 4-29, we see the options available to us for the 2045. Chapter 4. Implementing a SAN with the n-type family 521 4.3.13 Monitoring user activities To monitor user activities, we can view the Audit Trail. All user levels (admin, oper, viewer) can access the audit trail. All activities are logged and categorized into different types. These are some examples of these operation types: User login IP address of user login Fabric definition User definitions Name server zoning Switch name changed We can access the Audit Trail log by going to View and then selecting Audit Trail. The Audit Trail log is displayed as shown in Figure 4-30. Figure 4-30 Audit trail log In Table 4-3 we describe the details of the Audit Trail Log. Table 4-3 Audit Trail Log details 522 Column Title Description Started Time event started Completed Time event completed Operation Operation performed Status Status of operation, succeeded, failed Fabric Name of Fabric operation occurred on Implementing an Open IBM SAN Column Title Description Director Name of Director operation occurred on Entity User User name that performed function User IP IP address of user logged in Description Detailed description of function performed 4.3.14 Event log The event log contains all important events that have occurred. This includes events triggered by users and events caused by other external or internal influences such as FRU failures or losing power. To read the event log, click EventLog button as shown in Figure 4-31. Figure 4-31 Events log button The Event log is displayed as shown in Figure 4-32 and contains information for all fabrics managed by this Enterprise Manager. Figure 4-32 Event Log Chapter 4. Implementing a SAN with the n-type family 523 To file this log for future usage you are able to export it by clicking the Export button as shown in Figure 4-32. Two file types can be used to export the log: Comma Separated Value Files (*.csv) Text Files (*.txt) In the Table 4-4, we describe the different columns displayed in the Event log. Table 4-4 Event log details Column Heading Description EM Seq# Tracking number assigned by the Enterprise Manager FW Seq# Tracking number assigned by the Enterprise Manager for firmware tracking EM Time Time the event was recorded by the Enterprise Manager Event Time Time the event was recorded Director Name of switch where the event occurred Event Brief description of event FRU Identifier of Field Replaceable Unit that was affected by the event Severity A severity assigned from 1 to 5 with 1 being the highest Event Code Numerical representation of error log for support For more information on the Event log, please refer to the Enterprise Manager Installation and Operation Guide GC26-7720-00. 4.3.15 Notification Preferences We can select Notification Preferences from the File pulldown menu to define how administrators are notified regarding traps and other such information as shown in Figure 4-33. 524 Implementing an Open IBM SAN Figure 4-33 Notification Preferences We can also go to the Event Notification Settings to configure who gets informed when selected events occur as shown in Figure 4-34. Chapter 4. Implementing a SAN with the n-type family 525 Figure 4-34 Event notification settings 4.3.16 Link rate test The Link Rate Test (LRT) button shown Figure 4-35in launches a diagnostic tool that will test ports, modules and switching capabilities of the SAN256N. Ports must be administratively set offline for testing. Figure 4-35 Link rate test The test is run in two parts: Setting up and configuring the tests (which can be multiple tests) Running the tests For more information about setting up and configuring the Link Rate Test, refer to the Enterprise Manager Installation and Operation Guide GC26-7720-00. 4.3.17 FC Ping The FC Ping functionality allows us to check the route or physical link between a source port and a device connected to the switch. To perform the test, we click on the FC button as shown in Figure 4-36. 526 Implementing an Open IBM SAN Figure 4-36 FC Ping This brings up the FC Ping List as shown in Figure 4-37. Figure 4-37 FC Ping list From here we can view tests we have already performed, or we can click on New to start a new test. Figure 4-38 shows the configuration options. Chapter 4. Implementing a SAN with the n-type family 527 Figure 4-38 Configuring an FC ping test To configure a new test we perform the following steps: 1. On the left side of the window, we begin by selecting the director on which the board and port the source of the FC Ping test will reside, (the port which will send out the ping) 2. From the drop down list below the source director, select the source port. Note that the port we choose can not be the port from which the ping originates 3. Select the director (if an FC/9000) or Logical Domain upon which the port through which the device is connected from the right side of the window 4. Choose the port type from the Port Type drop down list, and then choose the port. 5. Select either the default Echo Data option (three pings) or set up a custom configuration. d. To set up a custom configuration, perform the following: 528 Implementing an Open IBM SAN ii. Select the pattern type from the drop down list iii. Select the Pattern iv. Select either the number of iterations or indefinite iterations by clicking on the radio button of our choice. If we select the number button, we type in the number of iterations we want the test to run. v. Select the Data Size we would like to run by entering in a number vi. Enter a Time Out value. 6. Click the Start button to begin the test. When the test is finished, a Detail Status button will appear at the window. For more information on FC Ping functions, please refer to the Enterprise Manager Installation and Operation Guide GC26-7720-00. 4.3.18 Attaching legacy loop ports Today, the storage and server industry is moving rapidly towards switched fabrics. However, there are still a lot of systems that use Loop protocol. For instance, most tape devices, as well as lots of legacy FC host adapters, use FC-AL Note: To read the following topics, it is useful to understand the differences between terms like director port, loop port, loop devices, initiators, targets: A director port is an actual physical port of the FC/9000 director. Loop ports are the external ports attached to a director port. Loop ports use loop protocols like private loop or public loop. They are sometimes referred as loop devices or loop nodes. Loop devices running public loop are referred as NL_Ports. To make loop node attachment possible, you have to enable the director ports to autosense loop devices. You can enable autosense for a single port at a time, or all ports at once. Note that the ports in the new XFIO2 module do not support loop devices. Enabling loop attachments for a specific director port To enable loop attachments for a single port, choose the port from the device tree in the left side of the inVSN Enterprise Manager window. You will see the properties of that port as shown in Figure 4-39. Activate the Auto Sense Arbitrated Loop Enabled check box and click the Apply button. Chapter 4. Implementing a SAN with the n-type family 529 Figure 4-39 Enabling the loop attachment for a single port You will have to confirm the changes, and after that, you are able to use loop attachments on that port. Enabling loop attachment for the entire director To enable loop attachment for all ports in the director, choose the director in the device tree and choose the menu path Director—>Auto Sense Arbitrated Loop Enable. You will have to confirm the changes, and after that, you are able to use loop attachments on all of the ports in the director. Loop ports in a name server table Once you have a port enabled to sense Arbitrated Loop ports and there is actually a loop port attached, you can verify that it has been recognized correctly by reading the name server table. You can do this by choosing the director from the device menu and clicking the Name Service tab*- as shown in Figure 4-40. 530 Implementing an Open IBM SAN Figure 4-40 Loop ports in name server table Public loop ports are displayed as NL_Ports (Node Loop). The port Port-000 was set to enable AutoSense AL and we actually attached this port physically. After logging in, this port is displayed as an NL_Port, since this is a public loop port. There are also four devices connected to the loop in that port. Bypassing loop devices In cases where you have multiple loop devices attached to one director port, you can specify which devices should be actually used in the fabric. Chapter 4. Implementing a SAN with the n-type family 531 In our example we have four loop devices attached to one director port. This is shown in Figure 4-41. Actually attached Loop Devices device no: 1 Not in Bypass device no: 2 Not in Bypass device no: 3 Bypassed device no: 4 Not in Bypass Loop enabled director port Loop Devices m ade available to the fabric Figure 4-41 inVSN: Bypassing loop devices We have decided that device 3 should not be seen in the fabric. To achieve this type of filtering, device 3 must be disabled and therefore set to Bypassed. In this case it means that a bypassed device is disabled from being used in the fabric. This does not change the availability of the external Arbitrated Loop itself. For instance, even if a bypassed device fails, it might affect the other external loop members as well. So, take into account that this kind of bypassing is just a way of filtering, but is not necessarily an improvement of the availability. To disable a particular device, select it in the Loop Devices tab of the specific director port. Click Disable to change its state to Bypassed as shown in Figure 4-42. To enable a particular device, use the same menu and click Enable. 532 Implementing an Open IBM SAN Figure 4-42 inVSN: Enabling and Disabling Loop devices You should have at least one device per port left that is Not in Bypass. By default, all attached loop devices are set to Not in Bypass. Note: Not all loop devices support Bypass. In such cases, even after clicking the Disable button, they remain in Not in Bypass mode. That means such devices are always enabled. Usage of public loop You can attach public loop initiators or targets without any additional settings provided that the director port is set to enable AL. However, attaching a public loop port does not automatically mean that this port can talk to any other ports in the fabric. This port is recognized as an NL_Port and can be zoned in the same way as normal N_Ports can be zoned. Chapter 4. Implementing a SAN with the n-type family 533 Impact of LIP in the fabric Ports in loop networks use a process called Loop Initialization Primitive (LIP) sequence to establish their port addresses. All members of that loop are involved in a LIP. Loop initialization occurs whenever there is a change in the layout of a loop, such as adding a new node, a node leaving, or breaks in service in the loop. The start of a LIP causes data transfers in progress to stop momentarily thereby severely affecting the performance and availability of Arbitrated Loops. These LIPs are not propagated to other fabric members. This is true even if multiple loop ports are zoned together. Therefore, all LIP impact is limited only to the external physical loop (for example, an FC_AL hub). 534 Implementing an Open IBM SAN 5 Chapter 5. Implementing a SAN with the Cisco family In this chapter we introduce the Cisco MDS 9000 family of Fibre Channel switches and directors. We describe the initial setup required to activate the Cisco Fabric Manager client GUI, and describe how to configure the Cisco SAN with the GUI. Note: We used Cisco Multilayer intelligent SAN operating system (SAN-OS) Version 1.3(4a) for all our testing. If your SAN-OS level is different, some of the panels may not look the same. However, the concepts introduced here should still apply. © Copyright IBM Corp. 2000, 2001, 2002, 2003. All rights reserved. 535 5.1 FCP and the Cisco MDS 9000 products In this chapter we assume that you have already performed the basic switch setup and installed the Fabric Manager client on your workstation. However, we also include a brief setup description in this chapter for those who need it. If you already have the Fabric Manager client code on your workstation, and you have completed the basic switch setup, you may omit reading 5.8, “Initial setup of the Cisco MDS 9000 products” on page 565. 5.1.1 Port addressing and port modes The Fibre Channel ports in the Cisco MDS 9000 family are addressed with addresses in the form of fc<slot>/<port>, where <slot> is the slot number of the line card (1-9), and <port> is the port number on the line card (1-32). For example, the first port of the line card in slot 1 is fc1/1, and the seventh port of the line card in slot 3 is fc3/7. Fibre Channel IDs and persistent FCIDs Contrary to other switch manufacturers, there is no direct correlation between physical Fibre Channel ports and Fibre Channel IDs (FCID). This is necessary to allow intermixing line cards with different number of ports, while being able to utilize all port addresses, to allow both fabric and loop devices to coexist, and also to allow switches larger than 256 ports (currently 224 possible ports on the 9509) in the future. The following applies to the FCID assignment for any VSAN: When an N_Port or NL_Port logs into the switch it is assigned an FCID N_Ports receive the same FCID if disconnected and reconnected to any port within the same switch, and within the same VSAN NL_Ports receive the same FCID only if reconnected to the same port within the same switch where the port was originally connected If the persistent FCIDs feature is not enabled for a VSAN, the following apply: The WWN of the N_Port or NL_Port and the assigned FCID are stored in a volatile cache, and are not saved across switch reboots The switch preserves the binding of FCID to WWN on a best-effort basis The volatile cache has room for a maximum of 4000 entries and if the cache gets full, oldest entries are overwritten If the persistent FCID feature is enabled for a VSAN, the following apply: The FCID to WWN mapping of the WWNs currently in use is stored to a nonvolatile database, and is saved across reboots 536 Implementing an Open IBM SAN The FCID to WWN mapping of any new device connected to the switch is automatically stored into the non-volatile database You can also manually configure the FCID to WWN mappings if necessary Note: If you attach AIX or HP-UX hosts to a VSAN, you must have persistent FCIDs enabled for that VSAN. This is because these operating systems use the FCIDs in device addressing. If the FCID of a device changes, the operating system considers it to be a new device, and gives it a new name. Port modes The Fibre Channel ports in the Cisco MDS 9000 family can operate in several modes. The operational modes are described in Table 5-1. Table 5-1 Fibre Channel port operational modes Mode Description E_Port An expansion port (E_Port) interconnects two Fibre Channel switches, forming an ISL between an E_Port in each switch. The ISL belongs to a single VSAN, and can also be connected to third-party switches. F_Port A fabric port (F_Port) connects the switch to a N_Port in a host or storage device using a point-to-point link. Only one N_Port can connect to the F_Port. FL_Port A fabric loop port (FL_Port) connects the switch to a public FC-AL loop. Only one FL_Port can be operational in a single FC-AL loop at any given time. TE_Port A trunking E_Port (TE_Port) interconnects two Fibre Channel switches, forming an extended ISL (EISL) between a TE_Port in each switch. The EISL can multiplex the traffic of several VSANs. However, the EISL is currently only available in the Cisco MDS 9000 family of switches. TL_Port A translative loop port (TL_Port) connects the switch to a private FC-AL loop. SD_Port A SPAN destination port (SD_Port) acts as a snooper port, allowing the monitoring of the switch traffic with a standard Fibre Channel analyzer. B_Port A bridge port (B_Port) is used to connect some SAN extender devices to the switch, instead of E_Port. Fx_Port A Fx_Port can operate as either F_Port or FL_Port, depending on the device connected to it. The port mode is determined during interface initialization. Chapter 5. Implementing a SAN with the Cisco family 537 Mode Description Auto A port configured as auto can operate as E_Port, F_Port, FL_Port, or TE_Port, depending on the device connected to it. The port mode is determined during interface initialization. 5.1.2 Zoning The Cisco MDS 9000 family zoning can be administrated from any switch in the fabric, and all changes are automatically distributed to all of the switches. The Cisco MDS 9000 family supports zoning by the following criteria: Port world wide name (pWWN) - the WWN of the Nx_Port (device) attached to the switch Fabric pWWN (fWWN) - the WWN of the fabric port (port-based zoning) FCID — the FCID of the N_Port attached to the switch To make management of zoning easier, the Cisco MDS 9000 family supports alias names for all of the elements above. The Cisco MDS 9000 family supports a default zone. All ports and WWNs not assigned to any zone belong to the default zone. If zoning is not activated, all devices belong to the default zone. You can control access between default zone members by default zone policy. This is both a per-switch and per-VSAN setting. The Cisco MDS 9000 family supports both soft and hard zoning. Soft zoning In soft zoning, zoning restrictions are applied during the interaction between the name server and the end device. If an end device somehow manages to know or guess the FCID of another end device, it can access that device. Hard zoning In hard zoning, the zoning is enforced for each frame sent by an Nx_Port as the frame enters the switch. This prevents any unauthorized access at all times. The enforcement is done by the switch hardware at wire speed. 5.1.3 VSAN A Virtual Storage Area Network (VSAN) is a unique feature of Cisco MDS 9000 series that enables dividing the physical Fibre Channel fabric to virtual SAN fabrics. Each VSAN is a completely separate SAN fabric, with its own set of domain IDs, fabric services, zones, namespace, and interoperability mode. 538 Implementing an Open IBM SAN Each port in the switch fabric belongs to exactly one of the VSANs at any given time, with the exception of trunking E_Ports (TE_Ports) that can multiplex the traffic of several VSANs over a single physical link. Up to 256 VSANs can be configured in a single switch. The VSAN numbers can range from 1 to 4094. VSAN number 1 is called the default VSAN, and is the VSAN that initially contains all of the ports in the switch. If you do not need to divide the fabric into VSANs, you can leave all ports in the default VSAN. The VSAN number 4094 is called the isolated VSAN, and any port configured into that VSAN is isolated from all other ports. If you delete a VSAN, all ports in it are moved to the isolated VSAN to avoid implicit transfer of the ports to the default VSAN. Note: We recommend that good management practice is to move all unused ports out of VSAN 1 to prevent accidental usage if VSAN 1 is activated. 5.1.4 Trunking and PortChannel In Cisco terminology, the term trunking is used to describe a single trunking E_Port (TE_Port) with the remit to multiplex the traffic of more than one VSAN on a single physical interface. This is in contrast to other Fibre Channel switch manufacturers who use that term (trunking) to describe the aggregation of several physical interfaces into a single logical interface. Cisco calls this latter feature PortChannel. Trunking and PortChannel features are available for both Fibre Channel and gigabit ethernet interfaces on the Cisco MDS 9000 family. Since the configuration rules for these features are different we will describe both of them separately. FC trunking Trunking, also known as VSAN trunking, enables interconnect ports to transmit and receive frames in more than one VSAN over the same physical link. In this case the link is configured as an extended ISL (EISL) link using the EISL frame format. Trunking is only applicable to E_Ports and used for inter-switch connections. Trunking is normally enabled for all ports in the switch but can be disabled on a port-by-port basis. If the port becomes operational as a trunking E_Port, it is referred to as a TE_Port. If a port, with trunking enabled, is connected to a third-party switch, it works as a normal E_Port. Chapter 5. Implementing a SAN with the Cisco family 539 FC PortChannel The PortChannel feature can be used to aggregate up to 16 ISL or EISL links into a single logical link. The Fibre Channel ports can be any Fibre Channel ports in any 16-port Fibre Channel line card. The PortChannel feature increases the available aggregate bandwidth of the logical link since the traffic is distributed among all functional links in the channel. It also provides high availability, since the channel remains active as long as at least one of the links forming it remains active, and the traffic is transparently distributed over the remaining links. Since PortChannel can be built on EISL links, both trunking and PortChannel are supported simultaneously. 5.1.5 iSCSI and FCIP support The Cisco MDS 9000 series simultaneously supports both iSCSI and FCIP on the 4 and 8-port IP line cards, if present. iSCSI The iSCSI support is used to connect iSCSI capable hosts to Fibre Channel storage devices. Support for iSCSI is included in the base price of the 4 and 8-port IP line cards. FCIP The FCIP support is used to connect separate SAN islands over an IP network. Each defined connection is a virtual E_Port (VE_Port), and can work as an E_Port or a TE_Port. Each gigabit ethernet interface can support up to three FCIP tunnels. To use FCIP, you need to purchase the “FCIP Activation for 8-port IP Services Line Card” feature for every installed 8-port IP line card in the switch. The feature codes (f/c) are f/c 2209 for the MDS 9216, and f/c 2210 for the MDS 9506 and MDS 9509. The corresponding FCIP Activation feature for the 4-port IP Services Line Cards is f/c 2219 for the MDS 9216, and f/c 2220 for the MDS 9506 and MDS 9509. FCIP VE_Ports and TE_Ports may also be aggregated to form a PortChannel between Cisco MDS switches. The FCIP based PortChannel may then be configured to carry specified VSAN traffic between switches in the same manner as that carried by conventional FC based PortChannels. 540 Implementing an Open IBM SAN 5.2 Installing FM and DM First we show how to install and configure Fabric Manager (FM) and Device Manager (DM). 5.3 Obtain the source files Cisco Fabric Manager and Cisco Device Manager software is embedded in every Cisco MDS 9000 Family Switch. This software is transferred from the switch and installed automatically through Java Web Start when you access a switch via a supported, Java-enabled Web browser, such as Windows Internet Explorer, or Netscape Navigator. Directors and switches in the Cisco MDS 9000 Multilayer Fabric Switch Family are shipped with levels of firmware already installed that are current at the time of shipping. This code level is usually sufficient to begin the switch implementation process, but we recommend that you regularly check for the latest supported code levels and install updated code when required. To check the currently supported levels of code for the Cisco MDS 9000 switch family, go to: http://www.ibm.com/servers/storage/support/san/mds9506.html Attention: Cisco regularly makes new releases of code available on their Web site for authorized users to download. IBM conducts additional integration testing on this code before issuing its approval, so we recommend that you always install only the IBM recommended code levels. If you experience problems with an unapproved code release IBM may ask you to install an approved release before continuing with problem resolution. 5.3.1 System requirements The hardware and software requirements for the Cisco Fabric Manager clients and servers are as follows: Processor Intel® Pentium® III 500 MHz processor (minimum) for Windows and Linux® Sun UltraSPARC 550 MHz processor (minimum) for Solaris Memory 128 MB (minimum) Chapter 5. Implementing a SAN with the Cisco family 541 Disk space Cisco Fabric Manager application - 6 MB Java Virtual Machine - 35 MB Historical performance statistics - 76 KB per port or flow monitored Software Windows 2000 or XP, Solaris 2.8, Red Hat Linux operating systems Java Virtual Machine version 1.4 or later (version 1.4.2 is recommended minimum level to support current Fabric Manager and Device Manager) TCP/IP software stack Protocols Cisco Fabric Manager uses these standard protocols: SNMP Versions 1, 2c, and 3 HTTP Remote Method Invocation (RMI) 5.4 Obtaining current versions After checking for the currently supported code levels, one simple way to check is to log on to a switch with your FM client, as seen below in Figure 5-1, and looking at the version in the active window bar. Figure 5-1 FM Client 1.3(4a) Version You may want to update your version of the Device Manager and Fabric Manager code other than by simply loading it from one of your Cisco switches. There are two other ways to get supported code: If you have an authorized sign-on to the Cisco Web site, you can download the appropriate supported Device Manager and Fabric Manager code which is shipped as a java .jar file. If you don’t have authorized access to Cisco’s Web site, you must request the .jar files from your IBM support. Having obtained the .jar file, follow these steps to install it from the java file. 542 Implementing an Open IBM SAN Locate the file on your PC, as shown in Figure 5-2 on page 543. Figure 5-2 The Fabric Manager .jar file Open the file as shown in Figure 5-3. Figure 5-3 Installing FM Client code from .jar file This opens up a self-explanatory window that describes which code version you are upgrading to as shown in Figure 5-4 on page 544. Select Next. Chapter 5. Implementing a SAN with the Cisco family 543 Figure 5-4 FM Client Install Options The FM code takes a few seconds to self-install on your PC. The next time you open your FM application, the newly installed version is used, as shown in Figure 5-5. Figure 5-5 The FM client code is now 1.3(5) 5.4.1 Setting up the initial parameters with the setup program We will assume that you are already connected to the console serial port of the switch, but that the switch is still powered off. In the following example we connect to an MDS 9216. Note: The steps you have to take may be different depending on which features you want to activate. However, the prompts from the setup program should be self-explanatory. 1. Power on the switch ... ---- Basic System Configuration Dialog ---- 544 Implementing an Open IBM SAN This setup utility will guide you through the basic configuration of the system. Setup configures only enough connectivity for management of the system. Press Enter incase you want to skip any dialog. Use ctrl-c at anytime to skip away remaining dialogs. 2. Enter yes to enter setup mode Would you like to enter the basic configuration dialog (yes/no): yes 3. Enter the new password for the administrator (user admin) Enter the password for "admin" : newpass 4. Enter no to not create additional accounts at this time Create another login account (yes/no) [n]: no 5. Enter yes to create a SNMPv3 account for Fabric Manager Configure SNMPv3 Management parameters (yes/no) [y]: yes a. Enter the user name SNMPv3 user name [admin]: admin b. Enter the SNMPv3 password (eight characters minimum) SNMPv3 user authentication password : admin123 The same password will be used for SNMPv3 privacy as well. 6. Enter no, to not create read-only SNMP community string Configure read-only SNMP community string (yes/no) [n]: no 7. Enter no, to not create SNMP community string Configure read-write SNMP community string (yes/no) [n]: no 8. Enter a name for the switch Enter the switch name : RTP9216 9. Enter yes to configure out-of-band management (the ethernet management interface mgmt0) Continue with Out-of-band (mgmt0) management configuration? (yes/no) [y]: yes a. Enter the mgmt0 IP address Mgmt0 IP address : 172.18.44.49 b. enter the mgmt0 subnet mask Mgmt0 IP netmask : 255.255.255.128 10.Enter no to not configure in-band management at this time Continue with In-band (vsan1) management configuration? (yes/no) [n]: no Chapter 5. Implementing a SAN with the Cisco family 545 11.Enter yes to enable the IP routing and default gateway Enable the ip routing capabilities? (yes/no) [y]: yes a. Enter no to not configure a static route Configure static route? (yes/no) [y]:no b. Enter no to not configure the default network Configure the default network? (yes/no) [y]: no c. Enter yes, if you want to configure the default gateway Configure the default gateway? (yes/no) [y]: yes i. Enter the default gateway IP address IP address of the default gateway : 172.18.44.1 12.Enter no, to not configure a DNS server Configure the DNS IP address? (yes/no) [n]: no 13.Enter no, to not configure the default domain name (for DNS) Configure the default domain name? (yes/no) [n]: no 14.Enter yes to enable the telnet service Enable the telnet service? (yes/no) [y]: yes 15.Enter yes to enable the SSH service Enable the ssh service? (yes/no) [n]: no 16.Enter no, to not configure a NTP server (time server) Configure the ntp server? (yes/no) [n]: no 17.Enter shut to configure the default switchport interface to the shut state Configure default switchport interface state (shut/noshut) [shut]: shut 18.Enter on to configure the default switchport trunk mode Configure default switchport trunk mode (on/off/auto) [on]: on 19.Enter deny, to deny traffic across the default zone Configure default zone policy (permit/deny) [deny]: deny 20.Review the configuration that you have just entered The following configuration will be applied: username admin password admin role network-admin snmp-server user Falkon network-admin auth md5 password priv password switchname RTP9216 interface mgmt0 ip address 172.182.44.49 255.255.255.128 no shutdown ip default-gateway 172.18.44.49 546 Implementing an Open IBM SAN telnet server enable system default switchport shutdown system default switchport trunk mode on no zone default-zone permit vsan 1-4093 21.Enter no, if you are pleased with the configuration; otherwise enter yes and go back to Step 2 Would you like to edit the configuration? (yes/no) [n]: no 22.Enter yes to save the configuration Use this configuration and save it? (yes/no) [y]: yes Note: If you do not save the configuration at this point, none of your changes are updated until the next time the switch is rebooted. Ensure that you type yes here to save the new configuration. 23.Wait until the configuration has been saved, and you will get the command prompt displaying your newly updated switchname as additional confirmation that your updates have been successfully applied ########################################] 100% Exiting the basic config setup. RTP9216# Your basic configuration is now finished, and you can proceed to install or update the Cisco Fabric Manager and Device Manager. 5.5 Updating the current FM version Cisco Fabric Manager (FM) software is embedded in every Cisco MDS 9000 Family Switch. This software is transferred from the switch and installed automatically through Java Web Start. The simplest way to update your Fabric Manager software is at the same time as you update the switch software on any of your installations Cisco MDS 9000 Multilayer Fabric Switch Family switches. As soon as one switch has the latest code on it, by accessing that switch by pointing your browser to the IP address we just configured into the switch as described in 5.8.3, “Setting up the initial parameters with the setup program” on page 566. Chapter 5. Implementing a SAN with the Cisco family 547 You will be given the opportunity to update your DM client, FM client or FM Server code. As shown in Figure 5-6 we selected the installation of Cisco Fabric Manager option. Figure 5-6 The browser panel for Fabric and Device Manager This should take us to an Install Options window as shown in Figure 5-8 on page 550. However, if you get any error messages at this point, you may not have the pre-requisite software installed. For example, if you don’t have Java Web Start installed, you will get an error message similar to that shown in Figure 5-7 on page 549. 548 Implementing an Open IBM SAN Figure 5-7 The install page for FM - with an incompatible Java RTE We recommend that you install the JRE and Java Web Start using the link provided by the installation page if you have access to the internet from this server. If you don’t, then you must exit from this session and install the requested level of Java Web Start and JRE before returning to the Fabric Manager installation. The next step takes us to the Install Options window, shown inFigure 5-8 on page 550, where we can decide whether we want to proceed with the installation of FM and DM client code. Chapter 5. Implementing a SAN with the Cisco family 549 Figure 5-8 Choosing to install new FM If we choose to continue with the code upgrade, select the Next action button. If we install fresh code, or we already have the current code on our system, the next window we see, as shown in Figure 5-9 on page 551, is the Fabric Manager login window. You need to enter the username and password that we configured with the Setup process, and press the Open button. Note: The FM Server is running now on localhost (your system). 550 Implementing an Open IBM SAN Figure 5-9 Fabric Manager login Note: Remember that the User Name and Auth Password required for Fabric Manager and Device Manager is the one created during the initial switch setup process when we set up an SNMPv3 account for Fabric Manager. This is described in 5.8.3, “Setting up the initial parameters with the setup program” on page 566. In our case we used admin/admin123. As this is the first logon to this switch, we received the security message shown in Figure 5-11 on page 552. Alternatively you may experience the network connectivity problem as shown in Figure 5-10. Figure 5-10 FM connectivity message The no route message refers to our system. Chapter 5. Implementing a SAN with the Cisco family 551 Figure 5-11 Initial security message from switch Another message that may appear on this switch is that shown in Figure 5-12, which informs us that localhost needs the FM Server service to be running on the local system. Reply Yes, to start the service. Figure 5-12 The FM Server service needs activation After a few seconds, the Fabric Manager application will start, and we are presented briefly with the informational message shown in Figure 5-13. Figure 5-13 Interim Starting window 552 Implementing an Open IBM SAN The success of the install is judged by the next window. As we got the FM application itself, as shown in Figure 5-14, we know that we were successful. The Authorization failure displayed is for another switch in this fabric which was being updated at the same time. Figure 5-14 FM Application Physical view Chapter 5. Implementing a SAN with the Cisco family 553 5.6 FM Server versus the bundled version The standard Cisco Fabric Manager and Device Manager applications bundled at no charge with the Cisco MDS switches provide basic configuration and troubleshooting capabilities. The Cisco Fabric Manager Server package extends Cisco Fabric Manager by providing historical performance monitoring for network traffic hot-spot analysis, centralized fabric-wide management services, and advanced application integration for greater management efficiency in enterprise environments. 5.6.1 Licensing Although the FM Server feature code is included with each Cisco MDS switch, it is only enabled to view a single switch or fabric, and can manage individual switches. To invoke the full FM Server functionality to manage multiple switches and fabrics at the same time, the licensed feature must be enabled. The simplest way to determine if you are using the FMS version is the presence of the Fabric drop-down in the FMS version as shown in Figure 5-15, which shows the two fabrics that we have available to us. Figure 5-15 Licensed FM Server version The unlicensed Fabric Manager does not have this drop-down, as shown in Figure 5-16. Figure 5-16 Standard FM In addition to the basic FM, the FM Server license provides the following features: 554 Implementing an Open IBM SAN Multiple fabric management (one fabric at a time) Centralized management server with discovery Continuous health and event monitoring Historical performance monitoring and reporting Cisco Fabric Analyzer integration Roaming users profiles To determine the currently installed licenses from a Fabric Manager session, select Licence Manager from the Switches folder icon in the Physical view as shown in Figure 5-17. Figure 5-17 Viewing current license information A closer look at the current License Feature Usage for FM_Server_Pkg feature in Figure 5-18 shows that the grace period for the FM Server license for one of our switches has expired. Figure 5-18 Current installed switch license status Chapter 5. Implementing a SAN with the Cisco family 555 This License Feature Usage tab shows the Switch IP Address, name of the feature package, the type of license installed, the number of licenses used (Usage Count), the Expiry Date, the Grace Period (if you do not have a license for a particular feature), and any Errors. Clicking the License Keys tab displays information about each of the current License Key Files installed on your switch (if any), and these actual license keys may be individually examined by further clicking on the specific license Name field, as shown in Figure 5-19, for the mainframe licence on the switch at 172.18.44.49 (our MDS 9216). Figure 5-19 Licensed Feature information Important: These license details must not be altered in any way The steps required to obtaining license key files are listed below. For further reference go to the following URL which describes this process in greater detail. http://www.cisco.com/en/US/products/hw/ps4159/ps4358/products_configura tion_guide_chapter09186a008021d49f.html To obtain new or updated license key files, follow these steps: 1. Collect the host ID of the switch, also referred to as the switch serial number. 2. Obtain your Claim Certificate or the Proof of Purchase document. 556 Implementing an Open IBM SAN 3. Locate the Product Authorization Key (PAK) from the Claim Certificate or Proof of Purchase document. 4. Locate the Web site URL from the Claim Certificate or Proof of Purchase document. 5. Access the specified URL that applies to your switch and enter the switch serial number and the PAK. The license key file is sent to you by e-mail. The license key file is digitally signed to only authorize use on the switch for which it was requested. The requested features are also enabled once the SAN-OS software on the specified switch accesses the license key file. Once you have received your digitally signed license key(s) they can now be installed on the switch. The license files can be copied to the switch bootflash beforehand, or they can be copied during the install process. For this next step we will be using the License Install Wizard icon in FM, which we access by clicking on the License Install icon in Fabric Manager as shown in Figure 5-20. This will also allow us to copy and install licenses on multiple switches at the same time. In our example, we are using the FM Server by exploiting the grace period for this function on the switch we are connected to. Figure 5-20 Accessing License Install Wizard from FM We are going to install the FM Server license on the switch at 172.18.44.49. This switch already has the Mainframe license installed, and is presently using the default grace period for its FM Server license. Remember, we saw this when we selected the License Install icon in Fabric Manager for this switch, as illustrated in Figure 5-17 on page 555. We already have the full FM Server license key for this switch currently filed on the PC we are using to access FM, so we only need to check the I have already obtained the licence key files box as shown in Figure 5-21 on page 558. Select Next. Chapter 5. Implementing a SAN with the Cisco family 557 Figure 5-21 FM License Install Wizard - Panel 1 This will open another pop-up window as illustrated in Figure 5-22, where we select the switch(es) we want to install license(s) on. Figure 5-22 License Install Wizard - Panel 2 558 Implementing an Open IBM SAN We only have the FM Server license key for the switch at 172.18.44.49, so select that one, and double-click on its License File Name field. This will bring up another Windows menu where you select the exact location of the actual license file as shown in Figure 5-23. Attention: We may need to repeat the license install process separately for other switches that need new licenses. Figure 5-23 Identifying the location of the new license key Then press Open on that Windows menu. This copies the license key name into the License File Name field in the Wizard menu as shown in Figure 5-24 on page 560. Chapter 5. Implementing a SAN with the Cisco family 559 Figure 5-24 FM License Install Wizard - Part 2 Press Finish. The FM License Install Wizard then proceeds to install the license. This process takes a few seconds, and progress or error messages such as the Flash Copy Started message shown in Figure 5-25, are displayed in the Status field of this panel. Figure 5-25 Sample License install progress message Or a color-coded error message may be highlighted, as shown in Figure 5-26. Figure 5-26 Example of a License Install Wizard error message 560 Implementing an Open IBM SAN When completed, the Status field in this display is updated with a Success message as shown in Figure 5-27. Figure 5-27 FM License Install Wizard - completion A final confirmation that the license feature has been installed is seen by revisiting the same License Feature Usage tab we first saw in Figure 5-17 on page 555 and Figure 5-18 on page 555. Our newly installed FM Server license for the MDS 9216 at 172.18.44.49 is now seen as permanent as shown in Figure 5-28. Figure 5-28 FM Server License is now installed 5.6.2 Advantages of FM Server over freeware There is no difference in the actual configuration process when using FM Server as compared to FM standalone, but FM Server provides the services to concurrently monitor Fabric Manager clients from up to 16 switches from multiple Chapter 5. Implementing a SAN with the Cisco family 561 fabrics. This allows an administrator to gain access to continuous health and monitoring data that has been captured at the FM Server. FM standalone provides the ability to manage multiple switches from a single fabric (one switch at a time), provided they are already interconnected with at least a single ISL, but monitoring multiple switches requires a user session to remain connected to each switch, and is therefore not as seamless as it is with FM Server. The FM Server is available 24 x 7 to log and review SAN incidents. Note: We recommend using FM Server if your installation needs to continuously monitor multiple switches from the Cisco MDS 9000 Multilayer Fabric Switch Family, and you are running a 24 x 7 operation. 5.7 Device Manager The Device Manager software may be installed at the same time that you install or upgrade the Fabric Manager application by selecting the Cisco Device Manager hotspot as shown in Figure 5-29 on page 563. 562 Implementing an Open IBM SAN Figure 5-29 Selective access to Device Manager After selecting the Cisco Device Manager option, we are directed to the Device Manager logon window, as shown in Figure 5-30 on page 564, as DM code was included with the FM code installation. Chapter 5. Implementing a SAN with the Cisco family 563 Figure 5-30 DM login window We logon with the same user ID and password as we did for FM, and we enter the DM application as shown in Figure 5-31. Figure 5-31 DM Application main menu Our installation of FM and DM is now complete. 564 Implementing an Open IBM SAN 5.8 Initial setup of the Cisco MDS 9000 products Before you can manage the Cisco MDS 9000 series switch through the network, you have to set up the TCP/IP parameters for the switch. The first time the switch is powered on it automatically runs the setup program, and prompts you for the IP address and other configuration information necessary to communicate over the management ethernet interface. You can also start the setup program with the setup command later if necessary. 5.8.1 Preparing to configure the switch Before you configure the switch for the first time, you need to gather the following information: New administrator password Switch name IP address for the management ethernet Subnet mask for the management ethernet Default gateway IP address (optional) DNS server IP address (optional) NTP server IP address (optional) SNMP v3 secret key (optional) 5.8.2 Connecting to the switch via the serial port 1. Connect the serial cable provided with the switch to the RJ-45 socket in the switch, using the console port in the: – Interface module in MDS 9216 – Supervisor module in slot 5/6 in the MDS 9506 and MDS 9509 2. Connect the other end of the serial cable to an RS-232 serial port on the workstation 3. Disable any serial communication programs running on the workstation 4. Open a terminal emulation application (such as HyperTerminal on a PC), and configure it as follows: Bits per second: 9600 Data bits: 8 Parity: none Stop bits: 1 Flow control: none An example of the HyperTerminal serial port properties window is shown in Figure 5-32 on page 566. Chapter 5. Implementing a SAN with the Cisco family 565 Figure 5-32 HyperTerminal serial port properties window 5.8.3 Setting up the initial parameters with the setup program We will assume that you are already connected to the console serial port of the switch, but that the switch is still powered off. In the following example we connect to an MDS 9216. Note: The steps you have to take may be different depending on which features you want to activate. However, the prompts of the setup program should be self-explanatory. 1. Power on the switch ... ---- Basic System Configuration Dialog ---This setup utility will guide you through the basic configuration of the system. Setup configures only enough connectivity for management of the system. Press Enter incase you want to skip any dialog. Use ctrl-c at anytime to skip away remaining dialogs. 566 Implementing an Open IBM SAN 2. Enter yes to enter setup mode Would you like to enter the basic configuration dialog (yes/no): yes 3. Enter the new password for the administrator (user admin) Enter the password for "admin" : newpass 4. Enter no to not create additional accounts at this time Create another login account (yes/no) [n]: no 5. Enter yes to create a SNMPv3 account for Fabric Manager Configure SNMPv3 Management parameters (yes/no) [y]: yes a. Enter the user name SNMPv3 user name [admin]: admin b. Enter the SNMPv3 password (eight characters minimum) SNMPv3 user authentication password : admin123 The same password will be used for SNMPv3 privacy as well. 6. Enter no, to not create read-only SNMP community string Configure read-only SNMP community string (yes/no) [n]: no 7. Enter no, to not create SNMP community string Configure read-write SNMP community string (yes/no) [n]: no 8. Enter a name for the switch Enter the switch name : RTP9216 9. Enter yes to configure out-of-band management (the ethernet management interface mgmt0) Continue with Out-of-band (mgmt0) management configuration? (yes/no) [y]: yes a. Enter the mgmt0 IP address Mgmt0 IP address : 172.18.44.49 b. enter the mgmt0 subnet mask Mgmt0 IP netmask : 255.255.255.128 10.Enter no to not configure in-band management at this time Continue with In-band (vsan1) management configuration? (yes/no) [n]: no 11.Enter yes to enable the IP routing and default gateway Enable the ip routing capabilities? (yes/no) [y]: yes a. Enter no to not configure a static route Configure static route? (yes/no) [y]:no b. Enter no to not configure the default network Chapter 5. Implementing a SAN with the Cisco family 567 Configure the default network? (yes/no) [y]: no c. Enter yes, if you want to configure the default gateway Configure the default gateway? (yes/no) [y]: yes i. Enter the default gateway IP address IP address of the default gateway : 172.18.44.1 12.Enter no, to not configure a DNS server Configure the DNS IP address? (yes/no) [n]: no 13.Enter no, to not configure the default domain name (for DNS) Configure the default domain name? (yes/no) [n]: no 14.Enter yes to enable the telnet service Enable the telnet service? (yes/no) [y]: yes 15.Enter yes to enable the SSH service Enable the ssh service? (yes/no) [n]: yes a. Enter the SSH key type (dsa, rsa or rsa1) Type of ssh key you would like to generate (dsa/rsa/rsa1) : dsa b. Enter the number of bits for the SSH key (512-2048) Number of key bits <768-2048> : 1024 16.Enter no, to not configure a NTP server (time server) Configure the ntp server? (yes/no) [n]: no 17.Enter shut to configure the default switchport interface to the shut state Configure default switchport interface state (shut/noshut) [shut]: shut 18.Enter on to configure the default switchport trunk mode Configure default switchport trunk mode (on/off/auto) [on]: on 19.Enter deny, to deny traffic across the default zone Configure default zone policy (permit/deny) [deny]: deny 20.Review the configuration that you have just entered The following configuration will be applied: username admin password admin role network-admin snmp-server user Falkon network-admin auth md5 password priv password switchname RTP9216 interface mgmt0 ip address 172.182.44.49 255.255.255.128 no shutdown ip default-gateway 172.18.44.49 telnet server enable ssh key dsa 1024 force 568 Implementing an Open IBM SAN ssh server enable system default switchport shutdown system default switchport trunk mode on no zone default-zone permit vsan 1-4093 21.Enter no, if you are pleased with the configuration; otherwise enter yes and go back to Step 2 Would you like to edit the configuration? (yes/no) [n]: no 22.Enter yes to save the configuration Use this configuration and save it? (yes/no) [y]: yes Note: If you do not save the configuration at this point, none of your changes are updated the next time the switch is rebooted. Ensure that you type yes here to save the new configuration. 23.Wait until the configuration has been saved, and you will get the command prompt displaying your newly updated switchname as additional confirmation that your updates have been successfully applied ########################################] 100% Exiting the basic config setup. RTP9216# 24.Your basic configuration is now finished, and you can proceed to install the Cisco Fabric Manager and Device Manager. 5.8.4 Installing the Cisco Fabric Manager and Device Manager To install the Cisco Fabric Manager on your workstation, you should already have Java Runtime Environment (JRE) 1.4, or later, and Java Web Start installed. Tip: Before you start, check IP connectivity to the switch by pinging it from your workstation using the new IP address that you just configured. 1. Start your Web browser and open the Web page from the newly updated IP address of your switch. This should take you directly to the FM Install page, as shown below in Figure 5-33 on page 570. Chapter 5. Implementing a SAN with the Cisco family 569 Figure 5-33 The install page for Cisco Fabric Manager software We recommend that you install the JRE and Java Web Start using the link provided by the installation page if you have access to the internet from this server. If you don’t, then you must exit from this session and install the requested level of Java Web Start and JRE before returning to the Fabric Manager installation. 2. Start the installation of Fabric Manager from the Web browser by clicking the Install/Run Fabric Manager button. If this is a first time install of the Cisco applications you may get the security warning shown in Figure 5-34 on page 571. Click the Start button to proceed. 570 Implementing an Open IBM SAN Figure 5-34 Fabric Manager security warning 3. When the installation is complete you should see the Fabric Manager login window as shown in Figure 5-35. The Fabric Manager is now ready for use. Figure 5-35 Fabric Manager initial login window 4. Start the installation of Device Manager from the Web browser by clicking the Cisco Device Manager link shown in Figure 5-36 on page 572. Chapter 5. Implementing a SAN with the Cisco family 571 Figure 5-36 Initial install for Device Manager 5. When the installation is complete, you see the Device Manager login window, as shown in Figure 5-37 on page 573. The Device Manager is now ready for use. 572 Implementing an Open IBM SAN Figure 5-37 Device Manager initial login window Note: The user ID and password that is required to access both Fabric Manager and the Device Manager is the one you created during the initial setup process in response to the setup dialog’s Configure SNMPv3 Management parameters (yes/no) question (we used admin/admin123). Chapter 5. Implementing a SAN with the Cisco family 573 5.9 Managing the Cisco SAN with the Fabric Manager The Fabric Manager is a centralized tool used to manage the Cisco SAN fabric and the devices connected to it. 5.9.1 Getting started You can start the Fabric Manager from the icon on your desktop or Windows Start menu. Enter the IP address or host name of your switch, the SNMPv3 username and password, and the privacy password, if you have one set up. If you have used the Fabric Manager before, you can choose one of the devices you have used previously from the pull-down menu, as shown in Figure 5-38. Figure 5-38 Fabric Manager device names pull-down menu If the connection cannot be established, you will get an error message, similar to that seen in Figure 5-39 on page 575. 574 Implementing an Open IBM SAN Figure 5-39 Fabric Manager login time-out error message 5.9.2 User interface When you start the Fabric Manager you will see the logical view of your switch fabric, as shown in Figure 5-40 on page 576. Chapter 5. Implementing a SAN with the Cisco family 575 Figure 5-40 Fabric Manager logical view The window contains the graphical representation of your switch fabric on the bottom right, an information area on the top right, and a navigation menu on the left. Any of the areas can be hidden to give more space to the other windows. The content of the information area changes automatically to represent the selection chosen in the navigation menu, and the current selection is shown on top of the information area. There are two navigation menus available, and the menus can be selected by the tabs below the menu area. The logical menu is a representation of the VSANs defined in the network and the zone sets, zones and zone members 576 Implementing an Open IBM SAN within each VSAN. The physical menu is a representation of all the physical assets in the SAN, and can also be used to configure most operating parameters of all of the switches in the SAN. SNMP time-outs The Fabric Manager uses the SNMP protocol to communicate with the switch. SNMP is a stateless protocol, and when you apply changes to the switch, the Fabric Manager sends a request packet with the changes to the switch and waits for a response packet. Depending on your network, either the request packet or the response packet may end up being dropped. This results in a SNMP time-out message, similar to that shown in Figure 5-41. Figure 5-41 Fabric Manager SNMP time-out message If you get this message, you do not know which of the packets was dropped. This means that you do not know if your changes are applied to the switch or not. We recommend that you click the Refresh Values button as shown in Figure 5-42to ensure that the information in the Fabric Manager is up to date before making any further changes. Figure 5-42 Refresh values being displayed Stopping Fabric Manager If you have made changes to the Cisco running configuration that have not yet been copied to the startup configuration, you will get a message similar to that shown in Figure 5-43 on page 578 when you exit from, or leave an FM session. Chapter 5. Implementing a SAN with the Cisco family 577 Figure 5-43 Unsaved running configuration warning You can click Yes to go to the Copy Configuration window, and then click Apply Changes to do the actual copy, and wait for the copy processes to finish. After all of the copy processes are finished you can close the Fabric Manager. The Fabric Manager can also save information about your switch fabric into a local database in your workstation. If you have changes that have not been saved, you will get a message similar to that shown in Figure 5-44. Figure 5-44 Unsaved local fabric database warning Since having the local database up to date helps you to see any changes to the fabric, when you open the Fabric Manager again, it is a good idea to click Yes here. 5.10 Managing zones and zone sets In the switches in the Cisco MDS 9000 family each VSAN has its own zones and zone sets. Only one zone set can be active in a VSAN at any given time. The zone set can contain multiple zones, and a zone can belong to multiple zone sets. We will build the open systems topology shown in Figure 5-45 on page 579. We will be creating three separate VSANs, VSAN 20 (green) for the AIX system and HDS storage on switch 9506 (0x50), VSAN 40 for the W2K system and EMC storage on switch 9506 (0x50), and VSAN 50 for the W2K system and EMC storage on switches 0x51 and 0x52. 578 Implementing an Open IBM SAN Figure 5-45 Open systems working topology Each switch has a local zone database for each VSAN, that can be used to create zoning configurations. The zoning information for the active zone set is propagated to all of the switches when a zone set defined in the local zone database is activated. However, the local zone database is not replicated to the other switches. We recommend that you choose one of the switches in the fabric, and use it to maintain your zone database. For our example, we chose the switch at 172.18.44.122 (an MDS 9506). Open the Fabric Manager and view the default Logical window, as shown in Figure 5-46 on page 580. Chapter 5. Implementing a SAN with the Cisco family 579 Figure 5-46 Open FM with Logical view We are going to create two new VSANs to segregate our open systems traffic. We chose VSAN 20 for AIX, and VSAN 40 for Windows traffic. This is simply achieved through the FM menus as follows: Select the Create Vsan option as shown in Figure 5-47 on page 581 580 Implementing an Open IBM SAN Figure 5-47 Create Vsan (1) This will display the panel shown in Figure 5-48. We will create this VSAN on switch 172.18.44.122, the VSAN ID is 20, and we will be using the default values for the LoadBalancing, InterOperValue, and AdminState parameters. These work very well in most open systems environments. Figure 5-48 FM create VSAN panel Now that VSAN 20 has been created we will need to configure a static domain ID and enable FCID persistence. To perform this task we selected the FM Logical tab, opened the AIX_VSAN20 folder, and selected Domain Manager. Then in the Chapter 5. Implementing a SAN with the Cisco family 581 right information pane above the FM map we selected the Configuration tab, entered a DomainId value of 20, set the IdType to static, and chose the disruptive Restart option as shown in Figure 5-49. Figure 5-49 FM Domain Manager Configuration panel The next step is to Apply Changes as shown in Figure 5-50. Figure 5-50 FM Domain Manager Configuration panel If you select the Running tab you can see that your domain ID change has been completed as shown in Figure 5-51. Figure 5-51 FM Domain Manager running configuration panel The next step is to enable FCID persistence by selecting the Persistent Setup tab and check the Enable box as shown in Figure 5-52 on page 583. 582 Implementing an Open IBM SAN Figure 5-52 FM Persistent FCID Setup panel Apply Changes as shown in Figure 5-53. Figure 5-53 FM Persistent FCID Setup panel The next step is to move interfaces FC2/4 and FC2/8 into VSAN 20. To accomplish this we selected the FM Physical tab, opened the Switches->Interfaces folders, and selected FC Physical. We then selected the General tab in the right information pane above the FM map, entered a value of 20 in the PortVsan fields, and selected the Apply Changes icon as shown in Figure 5-54. Figure 5-54 FM FC Physical interfaces panel Now that the ports have been moved into VSAN 20 we can select the FC Logical tab, open the AIX_VSAN20 folder, and select Domain Manager. We can then select the Persistent Fcids tab in the right information pane above the FM map and see that our two Fcids have now been created. Note that they have Chapter 5. Implementing a SAN with the Cisco family 583 been created dynamically. The switch has created these entries automatically. This is the preferred way to setup persistent FCIDs as it requires the least amount of manual configuration. Figure 5-55 FM Persistent FCIDs panel That completes the definitions for VSAN 20. Next we will create VSAN 40, one of the W2K VSANs. This will be done by again clicking on the FM Create Vsan wizard as shown in Figure 5-56. Figure 5-56 FM Create VSAN ICON This will display the FM Create VSAN panel shown in Figure 5-57 on page 585. We will create this VSAN on switch 172.18.44.122, the VSAN ID is 40, the name we entered was W2K_VSAN40, and we will be using the default values for the LoadBalancing, InterOperValue, and AdminState parameters. These defaults work very well in most open systems environments. 584 Implementing an Open IBM SAN Figure 5-57 FM VSAN create panel The next step is to move interfaces FC1/5 and FC1/16 into VSAN 40. To accomplish this we selected the FM Physical tab, opened the Switches->Interfaces folders, and selected FC Physical. We then selected the General tab in the right information pane above the FM map, entered a value of 40 in the PortVsan fields, and selected the Apply Changes icon as shown in Figure 5-58 and Figure 5-59 on page 586. Figure 5-58 FM FC Physical interfaces panel Apply Changes as shown in Figure 5-59 on page 586. Chapter 5. Implementing a SAN with the Cisco family 585 Figure 5-59 FM FC Physical interfaces panel Next we will create a zone and zoneset for VSAN 20. This is done by selecting the AIX_VSAN20 VSAN, and then right-clicking and selecting Edit Local Full Zone Database from the pop-up menu as shown in Figure 5-60. Figure 5-60 FM Edit zone database pull-down This will display the FM Edit Local Full Zone Database panel shown in Figure 5-61 on page 587. 586 Implementing an Open IBM SAN Figure 5-61 FM edit zone database panel Next we will create a zoneset by selecting Zoneset, and then right-clicking and selecting Insert from the pull-down menu as shown in Figure 5-62. Figure 5-62 FM zoneset pull-down menu We enter the name of our zoneset and select OK as shown in Figure 5-63 on page 588. Chapter 5. Implementing a SAN with the Cisco family 587 Figure 5-63 FM zoneset name panel Next we will create a zone by selecting Zones, and then right-clicking and selecting Insert from the pull-down menu as shown in Figure 5-64. Figure 5-64 FM Zones pull-down menu We enter the name of our zone, aix_v20_zone, and select OK as shown in Figure 5-65. Figure 5-65 FM zone name panel The next step is to drag the devices in the lower right pane of Figure 5-66 on page 589 onto the aix_v20_zone. This will add these devices to that zone. Both the zoneset and zone we created now show up in the FM Edit Local Full Zone Database Panel as shown in Figure 5-66 on page 589. When we select the aix_v20_zone the current members display in the top right information pane. 588 Implementing an Open IBM SAN Figure 5-66 FM edit zone database panel The next step is to select the aix_v20_zone and drag it on top of the aiz_v20_zs zoneset as shown in Figure 5-67. This will add this zone to the zoneset. Figure 5-67 Dragging a Zone to a Zoneset in FM When we select the aix_v20_zs zoneset, the zones and zone members which make up this zoneset are displayed as shown in Figure 5-68 on page 590. Chapter 5. Implementing a SAN with the Cisco family 589 Figure 5-68 FM edit zone database panel The next step is to activate this zoneset by selecting it and clicking on the Activate button as shown in Figure 5-69 on page 591. 590 Implementing an Open IBM SAN Figure 5-69 FM edit zone database panel We are then prompted to proceed with this activation and given the opportunity to save the switches running configuration to the startup configuration, as well as creating a text file of the zoning configuration. Select Continue Activation to proceed as shown in Figure 5-70 on page 592. Chapter 5. Implementing a SAN with the Cisco family 591 Figure 5-70 FM continue zoneset activation prompt We see a status message in the bottom left of the Edit Local Full Zone Database panel as shown in Figure 5-71, indicating if the zoneset was activated successfully. Figure 5-71 FM edit zone database panel 592 Implementing an Open IBM SAN We will select the aix_v20_zone from the AIX_VSAN20 folder as shown in Figure 5-72. Figure 5-72 FM zone display The members of this zone will be highlighted in the FM map as shown in Figure 5-73. Figure 5-73 FM map of a highlighted zone Next we will create a zone and zoneset for VSAN 40. This is done by selecting the W2K_VSAN40 VSAN, and then right-clicking and selecting Edit Local Full Zone Database from the pop-up menu as shown in Figure 5-74 on page 594. Chapter 5. Implementing a SAN with the Cisco family 593 Figure 5-74 FM edit zone database pull-down menu Next we will create a zoneset by selecting Zoneset, and then right-click and select Insert from the pull-down menu as shown in Figure 5-75. Figure 5-75 FM zoneset pull-down menu We enter the name of our zoneset and select OK as shown in Figure 5-76. Figure 5-76 FM zoneset name panel Next we will create a zone by selecting Zones, and then right-click and select Insert from the pull-down menu as shown in Figure 5-77 on page 595. 594 Implementing an Open IBM SAN Figure 5-77 FM zone pull-down menu We enter the name of our zoneset and select OK as shown in Figure 5-78. Figure 5-78 FM continue zoneset activation prompt The next step is to drag the devices in the bottom right pane onto the w2k_v40zone zone. This will add these devices to that zone. Both the zoneset and zone we created now show up in the FM Edit Local Full Zone Database Panel as shown in Figure 5-66 on page 589. When we select the w2k_v40_zone the current members display in the upper right information pane. Figure 5-79 FM edit zone database panel The next step is to select the w2k_v40_zone and drag it on top of the w2k_v40_zs zoneset as shown in Figure 5-80 on page 596. This will add this zone to the zoneset. Chapter 5. Implementing a SAN with the Cisco family 595 Figure 5-80 FM dragging a zone on top of a zoneset display When we select the w2k_v40_zs zoneset all zones and zone members which make up this zoneset are displayed as shown in Figure 5-81. Figure 5-81 FM edit zone database panel The next step is to activate this zoneset by selecting it and clicking on the Activate button as shown in Figure 5-82. Figure 5-82 FM edit zone database panel We are then prompted to proceed with this activation and given the opportunity to save the switches running configuration to the startup configuration, as well as 596 Implementing an Open IBM SAN creating a text file of the zoning configuration. Select Continue Activation to proceed as shown in Figure 5-83. Figure 5-83 FM continue zoneset activation prompt We see status messages in the lower left of the Edit Local Full Zone Database panel as shown in Figure 5-84 indicating Success if the zoneset was activated successfully. Figure 5-84 FM edit zone database panel Next we will create VSAN 50, which will be used for the second, independent path to the storage device used by our W2K server. This other W2K VSAN is located in our second fabric (a two switch configuration). This will be done by clicking on the FM Create VSAN wizard on one of the switches in this other Chapter 5. Implementing a SAN with the Cisco family 597 fabric, shown in Figure 5-85. We pointed our browser to the switch at 172.18.44.81. Figure 5-85 FM Create VSAN wizard This will display the FM Create VSAN panel shown in Figure 5-87 on page 599. We will create this VSAN on the switches at 172.18.44.49 and 172.18.44.81. The VSAN ID is 50, and again we will be using the default values for the LoadBalancing, InterOperValue, and AdminState parameters. These work very well in most open systems environments. As you can see, we have visibility to both the switches in this fabric, as they are already connected with an ISL as shown in Figure 5-86. Figure 5-86 Active ISL between our switches 598 Implementing an Open IBM SAN Figure 5-87 FM VSAN create panel You may notice that this VSAN shows up as segmented in FM, as shown in Figure 5-88. This is normal and is due to the fact that PortChannel 1 and PortChannel 2 have not been configured to carry traffic (trunk) for this VSAN. Figure 5-88 FM display of a segmented VSAN To configure PortChannel 1 to allow traffic to flow for VSAN 50, select the FM Physical tab, open Connectivity->ISLs->172.18.44.49<->172.18.44.81->channel1<->channel1 Chapter 5. Implementing a SAN with the Cisco family 599 folders, and select the Trunk Config tab in the right information pane as shown in Figure 5-89. Figure 5-89 FM PortChannel Trunk Config panel Add VSAN 50 to the Allowed Vsans (1 and 10) on both switches and select Apply Changes as shown in Figure 5-90. Figure 5-90 FM PortChannel Trunk Config panel To configure PortChannel 2 to also allow VSAN 50 traffic, select the FM Physical tab, open Connectivity->ISLs->172.18.44.49<->172.18.44.81->channel2<->channel2 folders, and select the Trunk Config tab in the right information pane. Add VSAN 50 to the allowed VSANs (1 and 10) on both switches and select Apply Changes as shown in Figure 5-91. Figure 5-91 FM PortChannel Trunk Config panel 600 Implementing an Open IBM SAN We will verify that PortChannel 1 is now trunking VSAN 50 as well as VSANs 1 and 10 by selecting the FM Physical tab, so we open the Connectivity->ISLs->172.18.44.49<->172.18.44.81->channel1<->channel1 folders, and select the Trunk Config tab in the right information pane. Figure 5-92 FM PortChannel Trunk Config panel We can verify that PortChannel 2 is now trunking VSAN 50 as well as VSANs 1 and 10 by selecting the FM Physical tab, so we open the Connectivity->ISLs->172.18.44.49<->172.18.44.81->channel2<->channel2 folders, and select the Trunk Config tab in the right information pane. Figure 5-93 FM PortChannel Trunk Config panel Attention: Notice that both FC ISL PortChannel 1 and FCIP PortChannel 2 are trunking both FICON and open systems VSANs. The next step is to move interfaces FC2/5 on the 9506, and FC1/13 on the 9216 into VSAN 50. To accomplish this, we selected the FM Physical tab, opened the Switches->Interfaces folders, and selected FC Physical. We then selected the General tab in the right information pane above the FM map, entered a value of 50 in the PortVsan fields, and selected the Apply Changes icon as shown in Figure 5-58 on page 585 and Figure 5-59 on page 586. Chapter 5. Implementing a SAN with the Cisco family 601 Figure 5-94 FM FC Physical Interfaces display Next we will create a zone and zoneset for VSAN 50. This is done by selecting the W2K_VSAN50 VSAN, and then right-click and select Edit Local Full Zone Database from the drop-down menu as shown Figure 5-95. Figure 5-95 FM Edit zone database pull-down menu Next we will create our zoneset by selecting Zoneset, and then right-click and select Insert from the pull-down menu as shown in Figure 5-96. Figure 5-96 FM zoneset pull-down menu We enter the name of our zoneset and select OK as shown in Figure 5-97 on page 603. 602 Implementing an Open IBM SAN Figure 5-97 FM zoneset name panel Next we will create a zoneset by selecting Zoneset, and then right-click and select Insert from the pull-down menu as shown in Figure 5-98. Figure 5-98 FM zone pull-down menu We enter the name of our zoneset and select OK as shown in Figure 5-99. Figure 5-99 FM zone name panel The next step is to drag the devices in the bottom pane of the FM Edit Local Full Zone Database Panel onto the w2k_v50_zone. This will add these devices to that zone. Both the zoneset and zone we created now show up in the FM Edit Local Full Zone Database Panel as shown in Figure 5-100 on page 604. When we select the w2k_v50_zone the current members display in the top right information pane. Chapter 5. Implementing a SAN with the Cisco family 603 Figure 5-100 FM edit zone database panel The next step is to select the w2k_v50_zone and drag it on top of the w2k_v50_zs zoneset as shown in Figure 5-101. This will add this zone to the zoneset. Figure 5-101 Dragging a zone onto a zoneset in FM display Now when we select the w2k_v50_zs zoneset all zones and zone members which make up this zoneset are displayed as shown in Figure 5-102. Figure 5-102 FM edit zone database panel The next step is to activate this zoneset by selecting it and clicking on the Activate button as shown in Figure 5-103 on page 605. 604 Implementing an Open IBM SAN Figure 5-103 FM edit zone database panel We are then prompted to proceed with this activation and are given the opportunity to save the switches running configuration to the startup configuration, as well as creating a text file of the zoning configuration. Select Continue Activation to proceed as shown in Figure 5-104. Figure 5-104 FM continue zoneset activation prompt You will see a status message in the bottom left of the Edit Local Full Zone Database panel as shown in Figure 5-105 on page 606 indicating if the zoneset was activated successfully. Chapter 5. Implementing a SAN with the Cisco family 605 Figure 5-105 FM edit zone database panel 5.10.1 Creating aliases, zones and zone sets In a more complex fabric, with many servers, it is useful to define each adapter’s WWN by using an alias name for zoning purposes, instead of the full WWN. This simplifies the task of maintaining your zoning configurations when physically changing or replacing adapters, as the single alias definition is the only place that needs to be altered when a replacement adapter is installed. When creating the initial zoning for the fabric using aliases, we recommend starting from the bottom and working your way up the tree. That is, start by first creating aliases for your devices, then zones, and finally the zone set, and finish by activating your zone set. We will start by creating a new, different, empty local zone database that we will call OpenVsan, and number it as VSAN 15. We begin with our FM main menu as shown in Figure 5-106 on page 607, by selecting All Vsans --> Create Vsan. 606 Implementing an Open IBM SAN Figure 5-106 Creating a new Vsan for open traffic - Step 1 This takes us to the Vsan Create Vsan panel, where we enter our new Vsan ID (15) and name (OpenVsan) as shown in Figure 5-107, then click the Create button. Figure 5-107 Creating a new Vsan for open traffic - Step 2 We can now return to the FM main menu, and see that our OpenVsan entry is present. Select the Edit Local Full Zone Database option, as shown in Figure 5-108 on page 608. Chapter 5. Implementing a SAN with the Cisco family 607 Figure 5-108 Creating a new Vsan for Open traffic - Step 3 This opens the Edit Local Full Zone Database window, defaulting to the Members view, as shown in Figure 5-109. Figure 5-109 Creating a new Vsan for Open traffic - Step 4 We now select the Aliases view as shown in Figure 5-110 on page 609. 608 Implementing an Open IBM SAN Figure 5-110 Select the Aliases option From the Aliases view, you will notice that the Insert icon becomes active on the action line. Select this Insert action as shown in Figure 5-111. Figure 5-111 Select Insert from action line Enter an appropriate name in the Create Alias pop-up window Name field, and select the matching WWN from the drop-down list as shown in Figure 5-112. Figure 5-112 Entering Alias data into the Create Alias wizard Continue to add the remaining aliases that you require, as shown in Figure 5-113 on page 610. Chapter 5. Implementing a SAN with the Cisco family 609 Note: If your hosts have not yet successfully logged in to their switch ports, you will not have a list of available WWNs to select from. You will need to manually enter the appropriate WWN values into the Port WWN field, which you can obtain from the server OS. Don’t forget the period separation characters. Figure 5-113 The newly defined Aliases are now visible Still working from the bottom up, we now add our zone definitions. Select the Insert option as shown, from the Zones icon in Figure 5-114. Figure 5-114 Creating Zones - Step 1 Proceed to define the IntelZone as shown in Figure 5-115 on page 611. 610 Implementing an Open IBM SAN Figure 5-115 Defining the new IntelZone Now we can drag and drop the new Alias names to their corresponding new Zones, as shown in Figure 5-116. Figure 5-116 Drag and drop the new Aliases into their Zones We continue until we have added aliases to their respective zones, and we will have completed the zoning definition process using aliases as shown in Figure 5-117 on page 612. Chapter 5. Implementing a SAN with the Cisco family 611 Figure 5-117 Each new Zone with its Aliases Now all that remains to complete our zoning exercise using Aliases is to define our new ZoneSet. Select Insert from the ZoneSets icon as shown in Figure 5-118. Figure 5-118 Creating a new Zoneset - Step 1 We name our new Zoneset OpenZone, as shown in Figure 5-119 on page 613. 612 Implementing an Open IBM SAN Figure 5-119 Creating a new Zoneset - Step 2 The remaining step is to add our Zones to this new OpenZone Zoneset by selecting the Insert option from the new OpenZone as shown in Figure 5-120. Figure 5-120 Adding Zones to the new ZoneSet - Step 1 Then select the new zones and Add them to the Zoneset, as shown in Figure 5-121 on page 614. Chapter 5. Implementing a SAN with the Cisco family 613 Figure 5-121 Adding Zones to the new ZoneSet - Step 2 We have now completed setting up our zoning using alias names, and all that remains now is to Activate our new OpenZone as shown in Figure 5-122. Figure 5-122 Activate the OpenZone Zoneset Or we could have selected the OpenZone icon, and used the Activate action button, as shown in Figure 5-123 on page 615. 614 Implementing an Open IBM SAN Figure 5-123 Alternative ZoneSet Activation Once more we are reminded to Save the Running configuration and Continue Activation as shown in Figure 5-124. Figure 5-124 Save the configuration Examining the contents of this saved file, we see the following: zone name IntelZone vsan 15 member fcalias HDS_Storage member fcalias IntelServer_FC1 zone name AIXzone vsan 15 member fcalias HDS_Storage member fcalias AIXserver_fcs0 zone default-zone permit vsan 2 zone default-zone permit vsan 5 zoneset name OpenZone vsan 15 Chapter 5. Implementing a SAN with the Cisco family 615 member IntelZone member AIXzone zoneset activate name OpenZone vsan 15 (which includes the Alias Names we used). 616 Implementing an Open IBM SAN Glossary 8b/10b A data encoding scheme developed by IBM, translating byte-wide data to an encoded 10-bit format. Fibre Channel's FC-1 level defines this as the method to be used to encode and decode data transmissions over the Fibre channel. active configuration. In an ESCON environment, the ESCON Director configuration determined by the status of the current set of connectivity attributes. Contrast with saved configuration. Adapter A hardware unit that aggregates other I/O units, devices or communications links to a system bus. ADSM ADSTAR Distributed Storage Manager. Agent (1) In the client-server model, the part of the system that performs information preparation and exchange on behalf of a client or server application. (2) In SNMP, the word agent refers to the managed system. See also: Management Agent Aggregation In the Storage Networking Industry Association Storage Model (SNIA), "virtualization" is known as "aggregation.This aggregation can take place at the file level or at the level of individual blocks that are transferred to disk. AIT Advanced Intelligent Tape - A magnetic tape format by Sony that uses 8mm cassettes, but is only used in specific drives. AL See Arbitrated Loop allowed. In an ESCON Director, the attribute that, when set, establishes dynamic connectivity capability. Contrast with prohibited. AL_PA Arbitrated Loop Physical Address ANSI American National Standards Institute The primary organization for fostering the development of technology standards in the United States. The ANSI family of Fibre Channel documents provide the standards basis for the Fibre Channel architecture and technology. See FC-PH APAR. See authorized program analysis report. authorized program analysis report (APAR). A report of a problem caused by a suspected defect in a current, unaltered release of a program. Arbitration The process of selecting one respondent from a collection of several candidates that request service concurrently. Arbitrated Loop A Fibre Channel interconnection technology that allows up to 126 participating node ports and one participating fabric port to communicate. ATL Automated Tape Library - Large scale tape storage system, which uses multiple tape drives and mechanisms to address 50 or more cassettes. ATM Asynchronous Transfer Mode - A type of packet switching that transmits fixed-length units of data. Backup A copy of computer data that is used to recreate data that has been lost, mislaid, © Copyright IBM Corp. 2000, 2001, 2002, 2003. All rights reserved. 617 corrupted, or erased. The act of creating a copy of computer data that can be used to recreate data that has been lost, mislaid, corrupted or erased. Bandwidth Measure of the information capacity of a transmission channel. basic mode. A S/390 or zSeries central processing mode that does not use logical partitioning. Contrast with logically partitioned (LPAR) mode. blocked. In an ESCON and FICON Director, the attribute that, when set, removes the communication capability of a specific port. Contrast with unblocked. Bridge (1) A component used to attach more than one I/O unit to a port. (2) A data communications device that connects two or more networks and forwards packets between them. The bridge may use similar or dissimilar media and signaling systems. It operates at the data link level of the OSI model. Bridges read and filter data packets and frames. Bridge/Router A device that can provide the functions of a bridge, router or both concurrently. A bridge/router can route one or more protocols, such as TCP/IP, and bridge all other traffic. See also: Bridge, Router Broadcast Sending a transmission to all N_Ports on a fabric. byte. (1) In fibre channel, an eight-bit entity prior to encoding or after decoding, with its least significant bit denoted as bit 0, and most significant bit as bit 7. The most significant bit is shown on the left side in FC-FS unless otherwise shown. (2) In S/390 architecture or zSeries z/Architecture (and FICON), an eight-bit entity prior to encoding or after decoding, with its least significant bit denoted as bit 7, and most significant bit as bit 0. The 618 Implementing an Open IBM SAN most significant bit is shown on the left side in S/390 architecture and zSeries z/Architecture. Cascaded switches. The connecting of one Fibre Channel switch to another Fibre Channel switch, thereby creating a cascaded switch route between two N_Nodes connected to a fibre channel fabric. chained. In an ESCON environment, pertaining to the physical attachment of two ESCON Directors (ESCDs) to each other. channel. (1) A processor system element that controls one channel path, whose mode of operation depends on the type of hardware to which it is attached. In a channel subsystem, each channel controls an I/O interface between the channel control element and the logically attached control units. (2) In the ESA/390 or zSeries architecture (z/Architecture), the part of a channel subsystem that manages a single I/O interface between a channel subsystem and a set of controllers (control units). channel I/O A form of I/O where request and response correlation is maintained through some form of source, destination and request identification. channel path (CHP). A single interface between a central processor and one or more control units along which signals and data can be sent to perform I/O requests. channel path identifier (CHPID). In a channel subsystem, a value assigned to each installed channel path of the system that uniquely identifies that path to the system. channel subsystem (CSS). Relieves the processor of direct I/O communication tasks, and performs path management functions. Uses a collection of subchannels to direct a channel to control the flow of information between I/O devices and main storage. with confirmed delivery or notification of non-deliverability. channel-attached. (1) Pertaining to attachment of devices directly by data channels (I/O channels) to a computer. (2) Pertaining to devices attached to a controlling unit by cables rather than by telecommunication lines. Client A software program used to contact and obtain data from a server software program on another computer -- often across a great distance. Each client program is designed to work specifically with one or more kinds of server programs and each server requires a specific kind of client program. CHPID. Channel path identifier. CIFS Common Internet File System cladding. In an optical cable, the region of low refractive index surrounding the core. See also core and optical fiber. Class of Service A Fibre Channel frame delivery scheme exhibiting a specified set of delivery characteristics and attributes. Class-1 A class of service providing dedicated connection between two ports with confirmed delivery or notification of non-deliverability. Class-2 A class of service providing a frame switching service between two ports with confirmed delivery or notification of non-deliverability. Class-3 A class of service providing frame switching datagram service between two ports or a multicast service between a multicast originator and one or more multicast recipients. Class-4 A class of service providing a fractional bandwidth virtual circuit between two ports with confirmed delivery or notification of non-deliverability. Class-6 A class of service providing a multicast connection between a multicast originator and one or more multicast recipients Client/Server The relationship between machines in a communications network. The client is the requesting machine, the server the supplying machine. Also used to describe the information management relationship between software components in a processing system. Cluster A type of parallel or distributed system that consists of a collection of interconnected whole computers and is used as a single, unified computing resource. CNC. Mnemonic for an ESCON channel used to communicate to an ESCON-capable device. configuration matrix. In an ESCON environment or FICON, an array of connectivity attributes that appear as rows and columns on a display device and can be used to determine or change active and saved ESCON or FICON director configurations. connected. In an ESCON Director, the attribute that, when set, establishes a dedicated connection between two ESCON ports. Contrast with disconnected. connection. In an ESCON Director, an association established between two ports that provides a physical communication path between them. connectivity attribute. In an ESCON and FICON Director, the characteristic that Glossary 619 determines a particular element of a port's status. See allowed, prohibited, blocked, unblocked, (connected and disconnected). control unit. A hardware unit that controls the reading, writing, or displaying of data at one or more input/output units. Controller A component that attaches to the system topology through a channel semantic protocol that includes some form of request/response identification. core. (1) In an optical cable, the central region of an optical fiber through which light is transmitted. (2) In an optical cable, the central region of an optical fiber that has an index of refraction greater than the surrounding cladding material. See also cladding and optical fiber. coupler. In an ESCON environment, link hardware used to join optical fiber connectors of the same type. Contrast with adapter. Coaxial Cable A transmission media (cable) used for high speed transmission. It is called coaxial because it includes one physical channel that carries the signal surrounded (after a layer of insulation) by another concentric physical channel, both of which run along the same axis. The inner channel carries the signal and the outer channel serves as a ground. CRC Cyclic Redundancy Check - An error-correcting code used in Fibre Channel. CTC. (1) Channel-to-channel. (2) Mnemonic for an ESCON channel attached to another ESCON channel, where one of the two ESCON channels is defined as an ESCON CTC channel and the other ESCON channel would be defined as a ESCON CNC channel (3) Mnemonic for a FICON channel supporting a CTC Control Unit function logically or 620 Implementing an Open IBM SAN physically connected to another FICON channel that also supports a CTC Control Unit function. FICON channels supporting the FICON CTC control unit function are defined as normal FICON native (FC) mode channels. CVC. Mnemonic for an ESCON channel attached to an IBM 9034 convertor. The 9034 converts from ESCON CVC signals to parallel channel interface (OEMI) communication operating in block multiplex mode (Bus and Tag). Contrast with CBY. DASD Direct Access Storage Device - any on-line storage device: a disc, drive or CD-ROM. DAT Digital Audio Tape - A tape media technology designed for very high quality audio recording and data backup. DAT cartridges look like audio cassettes and are often used in mechanical auto-loaders. typically, a DAT cartridge provides 2GB of storage. But new DAT systems have much larger capacities. Data Sharing A SAN solution in which files on a storage device are shared between multiple hosts. Datagram Refers to the Class 3 Fibre Channel Service that allows data to be sent rapidly to multiple devices attached to the fabric, with no confirmation of delivery. DDM. See disk drive module. dedicated connection. In an ESCON Director, a connection between two ports that is not affected by information contained in the transmission frames. This connection, which restricts those ports from communicating with any other port, can be established or removed only as a result of actions performed by a host control program or at the ESCD console. Contrast with dynamic connection. Note: The two links having a dedicated connection appear as one continuous link. power. Attenuation (loss) is expressed as dB/km default. Pertaining to an attribute, value, or option that is assumed when none is explicitly specified. direct access storage device (DASD). A mass storage medium on which a computer stores data. Dense Wavelength Division Multiplexing (DWDM). The concept of packing multiple signals tightly together in separate groups, and transmitting them simultaneously over a common carrier wave. disconnected. In an ESCON Director, the attribute that, when set, removes a dedicated connection. Contrast with connected. destination. Any point or location, such as a node, station, or a particular terminal, to which information is to be sent. An example is a Fibre Channel fabric F_Port; when attached to a fibre channel N_port, communication to the N_port via the F_port is said to be to the F_Port destination identifier (D_ID). device. A mechanical, electrical, or electronic contrivance with a specific purpose. device address. (1) In ESA/390 architecture and zSeries z/Architecture, the field of an ESCON device-level frame that selects a specific device on a control unit image. (2) In the FICON channel FC-SB-2 architecture, the device address field in an SB-2 header that is used to select a specific device on a control unit image. device number. (1) In ESA/390 and zSeries z/Architecture, a four-hexadecimal character identifier (for example, 19A0) that you associate with a device to facilitate communication between the program and the host operator. (2) The device number that you associate with a subchannel that uniquely identifies an I/O device. dB Decibel - a ratio measurement distinguishing the percentage of signal attenuation between the input and output disk. A mass storage medium on which a computer stores data. disk drive module (DDM). A disk storage medium that you use for any host data that is stored within a disk subsystem. Disk Mirroring A fault-tolerant technique that writes data simultaneously to two hard disks using the same hard disk controller. Disk Pooling A SAN solution in which disk storage resources are pooled across multiple hosts rather than be dedicated to a specific host. distribution panel. (1) In an ESCON and FICON environment, a panel that provides a central location for the attachment of trunk and jumper cables and can be mounted in a rack, wiring closet, or on a wall. DLT Digital Linear Tape - A magnetic tape technology originally developed by Digital Equipment Corporation (DEC) and now sold by Quantum. DLT cartridges provide storage capacities from 10 to 35GB. duplex. Pertaining to communication in which data or control information can be sent and received at the same time, from the same node. Contrast with half duplex. duplex connector. In an ESCON environment, an optical fiber component that Glossary 621 terminates both jumper cable fibers in one housing and provides physical keying for attachment to a duplex receptacle. duplex receptacle. In an ESCON environment, a fixed or stationary optical fiber component that provides a keyed attachment method for a duplex connector. dynamic connection. In an ESCON Director, a connection between two ports, established or removed by the ESCD and that, when active, appears as one continuous link. The duration of the connection depends on the protocol defined for the frames transmitted through the ports and on the state of the ports. Contrast with dedicated connection. dynamic connectivity. In an ESCON Director, the capability that allows connections to be established and removed at any time. The I/O interface uses ESA/390 logical protocols over a serial interface that configures attached units to a communication fabric. (2) A set of IBM products and services that provide a dynamically connected environment within an enterprise. Enterprise Systems Architecture/390 (ESA/390). An IBM architecture for mainframe computers and peripherals. Processors that follow this architecture include the S/390 Server family of processors. Entity In general, a real or existing thing from the Latin ens, or being, which makes the distinction between a thing's existence and it qualities. In programming, engineering and probably many other contexts, the word is used to identify units, whether concrete things or abstract ideas, that have no ready name or label. Dynamic I/O Reconfiguration. A S/390 and z/Architecture function that allows I/O configuration changes to be made non-disruptively to the current operating I/O configuration. ESA/390. See Enterprise Systems Architecture/390. ECL Emitter Coupled Logic - The type of transmitter used to drive copper media such as Twinax, Shielded Twisted Pair, or Coax. ESCD console. The ESCON Director display and keyboard device used to perform operator and service tasks at the ESCD. ELS. See Extended Link Services. ESCON. See Enterprise System Connection. EMIF. See ESCON Multiple Image Facility. ESCON channel. A channel having an Enterprise Systems Connection channel-to-control-unit I/O interface that uses optical cables as a transmission medium. May operate in CBY, CNC, CTC or CVC mode. Contrast with parallel channel. E_Port Expansion Port - a port on a switch used to link multiple switches together into a Fibre Channel switch fabric. Enterprise Network A geographically dispersed network under the auspices of one organization. Enterprise System Connection (ESCON). (1) An ESA/390 computer peripheral interface. 622 Implementing an Open IBM SAN ESCD. Enterprise Systems Connection (ESCON) Director. ESCON Director. An I/O interface switch that provides the interconnection capability of multiple ESCON interfaces (or FICON Bridge (FCV) mode - 9032-5) in a distributed-star topology. ESCON Multiple Image Facility (EMIF). In the ESA/390 architecture and zSeries z/Architecture, a function that allows LPARs to share an ESCON and FICON channel path (and other channel types) by providing each LPAR with its own channel-subsystem image. Extended Link Services (ELS). An Extended Link Service (command) request solicits a destination port (N_Port or F_Port) to perform a function or service. Each ELS request consists of an Link Service (LS) command; the N_Port ELS commands are defined in the FC-FS architecture. Exchange A group of sequences which share a unique identifier. All sequences within a given exchange use the same protocol. Frames from multiple sequences can be multiplexed to prevent a single exchange from consuming all the bandwidth. See also: Sequence F_Node Fabric Node - a fabric attached node. F_Port Fabric Port - a port used to attach a Node Port (N_Port) to a switch fabric. Fabric Fibre Channel employs a fabric to connect devices. A fabric can be as simple as a single cable connecting two devices. The term is most often used to describe a more complex network utilizing hubs, switches and gateways. Fabric Login Fabric Login (FLOGI) is used by an N_Port to determine if a fabric is present and, if so, to initiate a session with the fabric by exchanging service parameters with the fabric. Fabric Login is performed by an N_Port following link initialization and before communication with other N_Ports is attempted. FC. (1) (Fibre Channel), a short form when referring to something that is part of the fibre channel standard. (2) Also used by the IBM I/O definition process when defining a FICON channel (using IOCP of HCD) that will be used in FICON native mode (using the FC-SB-2 communication protocol). FC-FS. Fibre Channel-Framing and Signalling, the term used to describe the FC-FS architecture. FC Fibre Channel FC-0 Lowest level of the Fibre Channel Physical standard, covering the physical characteristics of the interface and media FC-1 Middle level of the Fibre Channel Physical standard, defining the 8b/10b encoding/decoding and transmission protocol. FC-2 Highest level of the Fibre Channel Physical standard, defining the rules for signaling protocol and describing transfer of frame, sequence and exchanges. FC-3 The hierarchical level in the Fibre Channel standard that provides common services such as striping definition. FC-4 The hierarchical level in the Fibre Channel standard that specifies the mapping of upper-layer protocols to levels below. FCA Fibre Channel Association. FC-AL Fibre Channel Arbitrated Loop - A reference to the Fibre Channel Arbitrated Loop standard, a shared gigabit media for up to 127 nodes, one of which may be attached to a switch fabric. See also: Arbitrated Loop. FC-CT Fibre Channel common transport protocol FC-FG Fibre Channel Fabric Generic - A reference to the document (ANSI X3.289-1996) which defines the concepts, Glossary 623 behavior and characteristics of the Fibre Channel Fabric along with suggested partitioning of the 24-bit address space to facilitate the routing of frames. FC-FP Fibre Channel HIPPI Framing Protocol - A reference to the document (ANSI X3.254-1994) defining how the HIPPI framing protocol is transported via the Fibre Channel FC-GS Fibre Channel Generic Services -A reference to the document (ANSI X3.289-1996) describing a common transport protocol used to communicate with the server functions, a full X500 based directory service, mapping of the Simple Network Management Protocol (SNMP) directly to the Fibre Channel, a time server and an alias server. FC-LE Fibre Channel Link Encapsulation - A reference to the document (ANSI X3.287-1996) which defines how IEEE 802.2 Logical Link Control (LLC) information is transported via the Fibre Channel. FC-PH A reference to the Fibre Channel Physical and Signaling standard ANSI X3.230, containing the definition of the three lower levels (FC-0, FC-1, and FC-2) of the Fibre Channel. FC-PLDA Fibre Channel Private Loop Direct Attach - See PLDA. FC-SB Fibre Channel Single Byte Command Code Set - A reference to the document (ANSI X.271-1996) which defines how the ESCON command set protocol is transported using the Fibre Channel. FC-SW Fibre Channel Switch Fabric - A reference to the ANSI standard under development that further defines the fabric behavior described in FC-FG and defines the communications between different fabric elements required for those elements to 624 Implementing an Open IBM SAN coordinate their operations and management address assignment. FC Storage Director See SAN Storage Director FCA Fibre Channel Association - a Fibre Channel industry association that works to promote awareness and understanding of the Fibre Channel technology and its application and provides a means for implementers to support the standards committee activities. FCLC Fibre Channel Loop Association - an independent working group of the Fibre Channel Association focused on the marketing aspects of the Fibre Channel Loop technology. FCP Fibre Channel Protocol - the mapping of SCSI-3 operations to Fibre Channel. FCS. See fibre channel standard. fiber. See optical fiber. fiber optic cable. See optical cable. fiber optics. The branch of optical technology concerned with the transmission of radiant power through fibers made of transparent materials such as glass, fused silica, and plastic. Note: Telecommunication applications of fiber optics use optical fibers. Either a single discrete fiber or a non-spatially aligned fiber bundle can be used for each information channel. Such fibers are often called “optical fibers” to differentiate them from fibers used in non-communication applications. Fibre Channel A technology for transmitting data between computer devices at a data rate of up to 4 Gbps. It is especially suited for connecting computer servers to shared storage devices and for interconnecting storage controllers and drives. fibre channel standard. An ANSI standard for a computer peripheral interface. The I/O interface defines a protocol for communication over a serial interface that configures attached units to a communication fabric. The protocol has four layers. The lower of the four layers defines the physical media and interface, the upper of the four layers defines one or more Upper Layer Protocols (ULP)—for example, FCP for SCSI command protocols and FC-SB-2 for FICON protocol supported by ESA/390 and z/Architecture. Refer to ANSI X3.230.1999x. FICON. (1) An ESA/390 and zSeries computer peripheral interface. The I/O interface uses ESA/390 and zSeries FICON protocols (FC-FS and FC-SB-2) over a Fibre Channel serial interface that configures attached units to a FICON supported Fibre Channel communication fabric. (2) An FC4 proposed standard that defines an effective mechanism for the export of the SBCCS-2 (FC-SB-2) command protocol via fibre channels. FICON channel. A channel having a Fibre Channel connection (FICON) channel-to-control-unit I/O interface that uses optical cables as a transmission medium. May operate in either FC or FCV mode. FICON Director. A Fibre Channel switch that supports the ESCON-like “control unit port” (CUP function) that is assigned a 24-bit FC port address to allow FC-SB-2 addressing of the CUP function to perform command and data transfer (in the FC world, it is a means of in-band management using a FC-4 ULP). field replaceable unit (FRU). An assembly that is replaced in its entirety when any one of its required components fails. FL_Port Fabric Loop Port - the access point of the fabric for physically connecting the user's Node Loop Port (NL_Port). FLOGI See Fabric Log In Frame A linear set of transmitted bits that define the basic transport unit. The frame is the most basic element of a message in Fibre Channel communications, consisting of a 24-byte header and zero to 2112 bytes of data. See also: Sequence FRU. See field replaceable unit. FSP Fibre Channel Service Protocol - The common FC-4 level protocol for all services, transparent to the fabric type or topology. FSPF Fabric Shortest Path First - is an intelligent path selection and routing standard and is part of the Fibre Channel Protocol. Full-Duplex A mode of communications allowing simultaneous transmission and reception of frames. G_Port Generic Port - a generic switch port that is either a Fabric Port (F_Port) or an Expansion Port (E_Port). The function is automatically determined during login. Gateway A node on a network that interconnects two otherwise incompatible networks. Gb/s Gigabits per second. Also sometimes referred to as Gbps. In computing terms it is approximately 1,000,000,000 bits per second. Most precisely it is 1,073,741,824 (1024 x 1024 x 1024) bits per second. GB/s Gigabytes per second. Also sometimes referred to as GBps. In computing terms it is approximately 1,000,000,000 bytes per Glossary 625 second. Most precisely it is 1,073,741,824 (1024 x 1024 x 1024) bytes per second. transfers data between CPUs and from a CPU to disk arrays and other peripherals. GBIC GigaBit Interface Converter - Industry standard transceivers for connection of Fibre Channel nodes to arbitrated loop hubs and fabric switches. HMMP HyperMedia Management Protocol Gigabit One billion bits, or one thousand megabits. GLM Gigabit Link Module - a generic Fibre Channel transceiver unit that integrates the key functions necessary for installation of a Fibre channel media interface on most systems. half duplex. In data communication, pertaining to transmission in only one direction at a time. Contrast with duplex. hard disk drive. (1) A storage media within a storage server used to maintain information that the storage server requires. (2) A mass storage medium for computers that is typically available as a fixed disk or a removable cartridge. Hardware The mechanical, magnetic and electronic components of a system, e.g., computers, telephone switches, terminals and the like. HMMS HyperMedia Management Schema the definition of an implementation-independent, extensible, common data description/schema allowing data from a variety of sources to be described and accessed in real time regardless of the source of the data. See also: WEBM, HMMP hop A FC frame may travel from a switch to a director, a switch to a switch, or director to a director which, in this case, is one hop. HSM Hierarchical Storage Management - A software and hardware system that moves files from disk to slower, less expensive storage media based on rules and observation of file activity. Modern HSM systems move files from magnetic disk to optical disk to magnetic tape. HUB A Fibre Channel device that connects nodes into a logical loop by using a physical star topology. Hubs will automatically recognize an active node and insert the node into the loop. A node that fails or is powered off is automatically removed from the loop. HUB Topology see Loop Topology HBA Host Bus Adapter HCD. Hardware Configuration Dialog. HDA. Head and disk assembly. HDD. See hard disk drive. head and disk assembly. The portion of an HDD associated with the medium and the read/write head. HIPPI High Performance Parallel Interface An ANSI standard defining a channel that 626 Implementing an Open IBM SAN Hunt Group A set of associated Node Ports (N_Ports) attached to a single node, assigned a special identifier that allows any frames containing this identifier to be routed to any available Node Port (N_Port) in the set. ID. See identifier. identifier. A unique name or address that identifies things such as programs, devices or systems. In-band Signaling This is signaling that is carried in the same channel as the information. Also referred to as in-band. In-band virtualization An implementation in which the virtualization process takes place in the data path between servers and disk systems. The virtualization can be implemented as software running on servers or in dedicated engines. Information Unit A unit of information defined by an FC-4 mapping. Information Units are transferred as a Fibre Channel Sequence. initial program load (IPL). (1) The initialization procedure that causes an operating system to commence operation. (2) The process by which a configuration image is loaded into storage at the beginning of a work day, or after a system malfunction. (3) The process of loading system programs and preparing a system to run jobs. input/output (I/O). (1) Pertaining to a device whose parts can perform an input process and an output process at the same time. (2) Pertaining to a functional unit or channel involved in an input process, output process, or both, concurrently or not, and to the data involved in such a process. (3) Pertaining to input, output, or both. input/output configuration data set (IOCDS). The data set in the S/390 and zSeries processor (in the support element) that contains an I/O configuration definition built by the input/output configuration program (IOCP). input/output configuration program (IOCP). A S/390 program that defines to a system the channels, I/O devices, paths to the I/O devices, and the addresses of the I/O devices.The output is normally written to a S/390 or zSeries IOCDS. interface. (1) A shared boundary between two functional units, defined by functional characteristics, signal characteristics, or other characteristics as appropriate. The concept includes the specification of the connection of two devices having different functions. (2) Hardware, software, or both, that links systems, programs, or devices. Intermix A mode of service defined by Fibre Channel that reserves the full Fibre Channel bandwidth for a dedicated Class 1 connection, but also allows connection-less Class 2 traffic to share the link if the bandwidth is available. Inter switch link A FC connection between switches and/or directors. Also known as ISL. I/O. See input/output. I/O configuration. The collection of channel paths, control units, and I/O devices that attaches to the processor. This may also include channel switches (for example, an ESCON Director). IOCDS. See Input/Output configuration data set. IOCP. See Input/Output configuration control program. IODF. The data set that contains the S/390 or zSeries I/O configuration definition file produced during the defining of the S/390 or zSeries I/O configuration by HCD. Used as a source for IPL, IOCP and Dynamic I/O Reconfiguration. IPL. See initial program load. I/O Input/output IP Internet Protocol IPI Intelligent Peripheral Interface Glossary 627 ISL See Inter switch link. Isochronous Transmission Data transmission which supports network-wide timing requirements. A typical application for isochronous transmission is a broadcast environment which needs information to be delivered at a predictable time. JBOD Just a bunch of disks. Jukebox A device that holds multiple optical disks and one or more disk drives, and can swap disks in and out of the drive as needed. jumper cable. In an ESCON and FICON environment, an optical cable having two conductors that provides physical attachment between a channel and a distribution panel or an ESCON/FICON Director port or a control unit/device, or between an ESCON/FICON Director port and a distribution panel or a control unit/device, or between a control unit/device and a distribution panel. Contrast with trunk cable. laser. A device that produces optical radiation using a population inversion to provide light amplification by stimulated emission of radiation and (generally) an optical resonant cavity to provide positive feedback. Laser radiation can be highly coherent temporally, or spatially, or both. L_Port Loop Port - A node or fabric port capable of performing Arbitrated Loop functions and protocols. NL_Ports and FL_Ports are loop-capable ports. LAN - A network covering a relatively small geographic area (usually not larger than a floor or small building). Transmissions within a Local Area Network are mostly digital, carrying data among stations at rates usually above one megabit/s. 628 Implementing an Open IBM SAN Latency A measurement of the time it takes to send a frame between two locations. LC Lucent Connector. A registered trademark of Lucent Technologies. LCU. See Logical Control Unit. LED. See light emitting diode. licensed internal code (LIC). Microcode that IBM does not sell as part of a machine, but instead, licenses it to the customer. LIC is implemented in a part of storage that is not addressable by user programs. Some IBM products use it to implement functions as an alternate to hard-wire circuitry. light-emitting diode (LED). A semiconductor chip that gives off visible or infrared light when activated. Contrast Laser. link. (1) In an ESCON environment or FICON environment (fibre channel environment), the physical connection and transmission medium used between an optical transmitter and an optical receiver. A link consists of two conductors, one used for sending and the other for receiving, thereby providing a duplex communication path. (2) In an ESCON I/O interface, the physical connection and transmission medium used between a channel and a control unit, a channel and an ESCD, a control unit and an ESCD, or, at times, between two ESCDs. (3) In a FICON I/O interface, the physical connection and transmission medium used between a channel and a control unit, a channel and a FICON Director, a control unit and a fibre channel FICON Director, or, at times, between two fibre channels switches. link address. (1) On an ESCON interface, the portion of a source or destination address in a frame that ESCON uses to route a frame through an ESCON director. ESCON associates the link address with a specific switch port that is on the ESCON director. See also port address. (2) On a FICON interface, the port address (1-byte link address), or domain and port address (2-byte link address) portion of a source (S_ID) or destination address (D_ID) in a fibre channel frame that the fibre channel switch uses to route a frame through a fibre channel switch or fibre channel switch fabric. See also port address. Link_Control_Facility A termination card that handles the logical and physical control of the Fibre Channel link for each mode of use. LIP A Loop Initialization Primitive sequence is a special Fibre Channel sequence that is used to start loop initialization. Allows ports to establish their port addresses. local area network (LAN). A computer network located in a user’s premises within a limited geographic area. logical control unit (LCU). A separately addressable control unit function within a physical control unit. Usually a physical control unit that supports several LCUs. For ESCON, the maximum number of LCUs that can be in a control unit (and addressed from the same ESCON fiber link) is 16; they are addressed from x’0’ to x’F’. For FICON architecture, the maximum number of LCUs that can be in a control unit (and addressed from the same FICON fibre link) is 256; they are addressed from x’00’ to x’FF’. For both ESCON and FICON, the actual number supported, and the LCU address value, is both processor- and control unit implementation-dependent. logical partition (LPAR). A set of functions that create a programming environment that is defined by the ESA/390 architecture or zSeries z/Architecture. ESA/390 architecture or zSeries z/Architecture uses the term LPAR when more than one logical partition is established on a processor. An LPAR is conceptually similar to a virtual machine environment except that the LPAR is a function of the processor. Also, LPAR does not depend on an operating system to create the virtual machine environment. logical switch number (LSN). A two-digit number used by the I/O Configuration Program (IOCP) to identify a specific ESCON or FICON Director. (This number is separate from the director’s “switch device number” and, for FICON, it is separate from the director’s “FC switch address”). logically partitioned (LPAR) mode. A central processor mode, available on the Configuration frame when using the PR/SM facility, that allows an operator to allocate processor hardware resources among logical partitions. Contrast with basic mode. Login Server Entity within the Fibre Channel fabric that receives and responds to login requests. Loop Circuit A temporary point-to-point like path that allows bi-directional communications between loop-capable ports. Loop Topology An interconnection structure in which each point has physical links to two neighbors resulting in a closed circuit. In a loop topology, the available bandwidth is shared. LPAR. See logical partition. LVD Low Voltage Differential Management Agent A process that exchanges a managed node's information with a management station. Managed Node A managed node is a computer, a storage system, a gateway, a Glossary 629 media device such as a switch or hub, a control instrument, a software product such as an operating system or an accounting package, or a machine on a factory floor, such as a robot. Managed Object A variable of a managed node. This variable contains one piece of information about the node. Each node can have several objects. Management Station A host system that runs the management software. MAR Media Access Rules. Enable systems to self-configure themselves is a SAN environment Mb/s Megabits per second. Also sometimes referred to as Mbps. In computing terms it is approximately 1,000,000 bits per second. Most precisely it is 1,048,576 (1024 x 1024) bits per second. MB/s Megabytes per second. Also sometimes referred to as MBps. In computing terms it is approximately 1,000,000 bytes per second. Most precisely it is 1,048,576 (1024 x 1024) bytes per second. Metadata server In Storage Tank, servers that maintain information ("metadata") about the data files and grant permission for application servers to communicate directly with disk systems. Meter 39.37 inches, or just slightly larger than a yard (36 inches) Media Plural of medium. The physical environment through which transmission signals pass. Common media include copper and fiber optic cable. Media Access Rules (MAR). 630 Implementing an Open IBM SAN MIA Media Interface Adapter - MIAs enable optic-based adapters to interface to copper-based devices, including adapters, hubs, and switches. MIB Management Information Block - A formal description of a set of network objects that can be managed using the Simple Network Management Protocol (SNMP). The format of the MIB is defined as part of SNMP and is a hierarchical structure of information relevant to a specific device, defined in object oriented terminology as a collection of objects, relations, and operations among objects. Mirroring The process of writing data to two separate physical devices simultaneously. MM Multi-Mode - See Multi-Mode Fiber MMF See Multi-Mode Fiber - - In optical fiber technology, an optical fiber that is designed to carry multiple light rays or modes concurrently, each at a slightly different reflection angle within the optical core. Multi-Mode fiber transmission is used for relatively short distances because the modes tend to disperse over longer distances. See also: Single-Mode Fiber, SMF Multicast Sending a copy of the same transmission from a single source device to multiple destination devices on a fabric. This includes sending to all N_Ports on a fabric (broadcast) or to only a subset of the N_Ports on a fabric (multicast). Multi-Mode Fiber (MMF) In optical fiber technology, an optical fiber that is designed to carry multiple light rays or modes concurrently, each at a slightly different reflection angle within the optical core. Multi-Mode fiber transmission is used for relatively short distances because the modes tend to disperse over longer distances. See also: Single-Mode Fiber Multiplex The ability to intersperse data from multiple sources and destinations onto a single transmission medium. Refers to delivering a single transmission to multiple destination Node Ports (N_Ports). N_Port Node Port - A Fibre Channel-defined hardware entity at the end of a link which provides the mechanisms necessary to transport information units to or from another node. N_Port Login N_Port Login (PLOGI) allows two N_Ports to establish a session and exchange identities and service parameters. It is performed following completion of the fabric login process and prior to the FC-4 level operations with the destination port. N_Port Login may be either explicit or implicit. Name Server Provides translation from a given node name to one or more associated N_Port identifiers. NAS Network Attached Storage - a term used to describe a technology where an integrated storage system is attached to a messaging network that uses common communications protocols, such as TCP/IP. ND. See node descriptor. requirements and geographical distribution of users. NFS Network File System - A distributed file system in UNIX developed by Sun Microsystems which allows a set of computers to cooperatively access each other's files in a transparent manner. NL_Port Node Loop Port - a node port that supports Arbitrated Loop devices. NMS Network Management System - A system responsible for managing at least part of a network. NMSs communicate with agents to help keep track of network statistics and resources. Node An entity with one or more N_Ports or NL_Ports. node descriptor. In an ESCON and FICON environment, a node descriptor (ND) is a 32-byte field that describes a node, channel, ESCON Director port or a FICON Director port, or a control unit. node-element descriptor. In an ESCON and FICON environment, a node-element descriptor (NED) is a 32-byte field that describes a node element, such as a disk (DASD) device. NDMP Network Data Management Protocol NED. See node-element descriptor. Network An aggregation of interconnected nodes, workstations, file servers, and/or peripherals, with its own protocol that supports interaction. Network Topology Physical arrangement of nodes and interconnecting communications links in networks based on application Non-Blocking A term used to indicate that the capabilities of a switch are such that the total number of available transmission paths is equal to the number of ports. Therefore, all ports can have simultaneous access through the switch. Non-L_Port A Node or Fabric port that is not capable of performing the Arbitrated Loop functions and protocols. N_Ports and F_Ports are not loop-capable ports. Glossary 631 OEMI. See original equipment manufacturers information. functions, such as frame demarcation and signaling between two ends of a link. open system. A system whose characteristics comply with standards made available throughout the industry and that therefore can be connected to other systems complying with the same standards. original equipment manufacturer information (OEMI). A reference to an IBM guideline for a computer peripheral interface. More specifically, it refers to IBM S/360 and S/370 Channel to Control Unit Original Equipment Manufacturer Information. The interface uses ESA/390 logical protocols over an I/O interface that configures attached units in a multi-drop bus environment. This OEMI interface is also supported by the zSeries 900 processors. Operation A term defined in FC-2 that refers to one of the Fibre Channel building blocks composed of one or more, possibly concurrent, exchanges. optical cable. A fiber, multiple fibers, or a fiber bundle in a structure built to meet optical, mechanical, and environmental specifications. See also jumper cable, optical cable assembly, and trunk cable. optical cable assembly. An optical cable that is connector-terminated. Generally, an optical cable that has been connector-terminated by a manufacturer and is ready for installation. See also jumper cable and optical cable. optical fiber. Any filament made of dialectic materials that guides light, regardless of its ability to send signals. See also fiber optics and optical waveguide. optical fiber connector. A hardware component that transfers optical power between two optical fibers or bundles and is designed to be repeatedly connected and disconnected. optical waveguide. (1) A structure capable of guiding optical power. (2) In optical communications, generally a fiber designed to transmit optical signals. See optical fiber. Ordered Set A Fibre Channel term referring to four 10 -bit characters (a combination of data and special characters) providing low-level link 632 Implementing an Open IBM SAN Originator A Fibre Channel term referring to the initiating device. Out of Band Signaling This is signaling that is separated from the channel carrying the information. Also referred to as out-of-band. Out-of-band virtualization An alternative type of virtualization in which servers communicate directly with disk systems under control of a virtualization function that is not involved in the data transfer. parallel channel. A channel having a System/360 and System/370 channel-to-control-unit I/O interface that uses bus and tag cables as a transmission medium. Contrast with ESCON channel. path. In a channel or communication network, any route between any two nodes. For ESCON and FICON this would be the route between the channel and the control unit/device, or sometimes from the operating system control block for the device and the device itself. path group. The ESA/390 and zSeries architecture (z/Architecture) term for a set of channel paths that are defined to a controller as being associated with a single S/390 image. The channel paths are in a group state and are on-line to the host. path-group identifier. The ESA/390 and zSeries architecture (z/Architecture) term for the identifier that uniquely identifies a given LPAR. The path-group identifier is used in communication between the system image program and a device. The identifier associates the path-group with one or more channel paths, thereby defining these paths to the control unit as being associated with the same system image. Peripheral Any computer device that is not part of the essential computer (the processor, memory and data paths) but is situated relatively close by. A near synonym is input/output (I/O) device. Petard A device that is small and sometimes explosive. PLDA Private Loop Direct Attach - A technical report which defines a subset of the relevant standards suitable for the operation of peripheral devices such as disks and tapes on a private loop. PCICC. (IBM) PCI Cryptographic Coprocessor. PLOGI See N_Port Login Point-to-Point Topology An interconnection structure in which each point has physical links to only one neighbor resulting in a closed circuit. In point-to-point topology, the available bandwidth is dedicated. Policy-based management Management of data on the basis of business policies (for example, "all production database data must be backed up every day"), rather than technological considerations (for example, "all data stored on this disk system is protected by remote copy"). port. (1) An access point for data entry or exit. (2) A receptacle on a device to which a cable for another device is attached. (3) See also duplex receptacle. port address. (1) In an ESCON Director, an address used to specify port connectivity parameters and to assign link addresses for attached channels and control units. See also link address. (2) In a FICON director or Fibre Channel switch, it is the middle 8 bits of the full 24-bit FC port address. This field is also referred to as the “area field” in the 24-bit FC port address. See also link address. Port Bypass Circuit A circuit used in hubs and disk enclosures to automatically open or close the loop to add or remove nodes on the loop. port card. In an ESCON and FICON environment, a field-replaceable hardware component that provides the optomechanical attachment method for jumper cables and performs specific device-dependent logic functions. port name. In an ESCON or FICON Director, a user-defined symbolic name of 24 characters or less that identifies a particular port. Private NL_Port An NL_Port which does not attempt login with the fabric and only communicates with other NL Ports on the same loop. processor complex. A system configuration that consists of all the machines required for operation; for example, a processor unit, a processor controller, a system display, a Glossary 633 service support display, and a power and coolant distribution unit. multiple disk drives in a storage subsystem for high availability and high performance. program temporary fix (PTF). A temporary solution or bypass of a problem diagnosed by IBM in a current unaltered release of a program. Raid 0 Level 0 RAID support - Striping, no redundancy prohibited. In an ESCON or FICON Director, the attribute that, when set, removes dynamic connectivity capability. Contrast with allowed. protocol. (1) A set of semantic and syntactic rules that determines the behavior of functional units in achieving communication. (2) In fibre channel, the meanings of and the sequencing rules for requests and responses used for managing the switch or switch fabric, transferring data, and synchronizing the states of fibre channel fabric components. (3) A specification for the format and relative timing of information exchanged between communicating parties. PTF. See program temporary fix. Public NL_Port An NL_Port that attempts login with the fabric and can observe the rules of either public or private loop behavior. A public NL_Port may communicate with both private and public NL_Ports. Quality of Service (QoS) A set of communications characteristics required by an application. Each QoS defines a specific transmission priority, level of route reliability, and security level. Raid 1 Level 1 RAID support - mirroring, complete redundancy Raid 5 Level 5 RAID support, Striping with parity Repeater A device that receives a signal on an electromagnetic or optical transmission medium, amplifies the signal, and then retransmits it along the next leg of the medium. Responder A Fibre Channel term referring to the answering device. route. The path that an ESCON frame takes from a channel through an ESCD to a control unit/device. Router (1) A device that can decide which of several paths network traffic will follow based on some optimal metric. Routers forward packets from one network to another based on network-layer information. (2) A dedicated computer hardware and/or software package which manages the connection between two or more networks. See also: Bridge, Bridge/Router SAF-TE SCSI Accessed Fault-Tolerant Enclosures Quick Loop is a unique fibre-channel topology that combines arbitrated loop and fabric topologies. It is an optional licensed product that allows arbitrated loops with private devices to be attached to a fabric. SAN A Storage Area Network (SAN) is a dedicated, centrally managed, secure information infrastructure, which enables any-to-any interconnection of servers and storage systems. RAID Redundant Array of Inexpensive or Independent Disks. A method of configuring SAN System Area Network - term originally used to describe a particular symmetric 634 Implementing an Open IBM SAN multiprocessing (SMP) architecture in which a switched interconnect is used in place of a shared bus. Server Area Network - refers to a switched interconnect between multiple SMPs. SANSymphony In-band block-level virtualization software made by DataCore Software Corporation and resold by IBM. SCSI- 5 8 5 7 6 2 Wide 5 16 10 15 6 10 8 10 7 6 10 16 20 15 6 2 Ultra 20 8 20 7 1.5 SCSI Ultra 20 16 40 7 12 40 16 80 15 12 SCSI2 Fast SCSI2 Fast Wide SCSI- saved configuration. In an ESCON or FICON Director environment, a stored set of connectivity attributes whose values determine a configuration that can be used to replace all or part of the ESCD's or FICON’s active configuration. Contrast with active configuration. SCSI2 Ultra2 LVD SCSI SC Connector A fiber optic connector standardized by ANSI TIA/EIA-568A for use in structured wiring installations. Scalability The ability of a computer application or product (hardware or software) to continue to function well as it (or its context) is changed in size or volume. For example, the ability to retain performance levels when adding additional processors, memory and/or storage. SCSI Small Computer System Interface - A set of evolving ANSI standard electronic interfaces that allow personal computers to communicate with peripheral hardware such as disk drives, tape drives, CD_ROM drives, printers and scanners faster and more flexibly than previous interfaces. The table below identifies the major characteristics of the different SCSI version. SCSI Signal BusWi Max. Max. Max. Versio Rate dth DTR Num. Cable n MHz (bits) (MBps Devic Lengt 8 ) 5 es 7 h (m) 6 SCSI1 5 SCSI-3 SCSI-3 consists of a set of primary commands and additional specialized command sets to meet the needs of specific device types. The SCSI-3 command sets are used not only for the SCSI-3 parallel interface but for additional parallel and serial protocols, including Fibre Channel, Serial Bus Protocol (used with IEEE 1394 Firewire physical protocol) and the Serial Storage Protocol (SSP). SCSI-FCP The term used to refer to the ANSI Fibre Channel Protocol for SCSI document (X3.269-199x) that describes the FC-4 protocol mappings and the definition of how the SCSI protocol and command set are transported using a Fibre Channel interface. Sequence A series of frames strung together in numbered order which can be transmitted over a Fibre Channel connection as a single operation. See also: Exchange service element (SE). A dedicated service processing unit used to service a S/390 machine (processor). Glossary 635 SERDES Serializer Deserializer SN Storage Network. See also: SAN Server A computer which is dedicated to one task. SNMP Simple Network Management Protocol - The Internet network management protocol which provides a means to monitor and set network configuration and run-time parameters. SES SCSI Enclosure Services - ANSI SCSI-3 proposal that defines a command set for soliciting basic device status (temperature, fan speed, power supply status, etc.) from a storage enclosures. Single-Mode Fiber In optical fiber technology, an optical fiber that is designed for the transmission of a single ray or mode of light as a carrier. It is a single light path used for long-distance signal transmission. See also: Multi-Mode Fiber Small Computer System Interface (SCSI). (1) An ANSI standard for a logical interface to computer peripherals and for a computer peripheral interface. The interface uses an SCSI logical protocol over an I/O interface that configures attached targets and initiators in a multi-drop bus topology. (2) A standard hardware interface that enables a variety of peripheral devices to communicate with one another. SMART Self Monitoring and Reporting Technology SNMWG Storage Network Management Working Group is chartered to identify, define and support open standards needed to address the increased management requirements imposed by storage area network environments. SSA Serial Storage Architecture - A high speed serial loop-based interface developed as a high speed point-to-point connection for peripherals, particularly high speed storage arrays, RAID and CD-ROM storage by IBM. Star The physical configuration used with hubs in which each user is connected by communications links radiating out of a central hub that handles all communications. Storage Tank An IBM file aggregation project that enables a pool of storage, and even individual files, to be shared by servers of different types. In this way, Storage Tank can greatly improve storage utilization and enables data sharing. SM Single Mode - See Single-Mode Fiber SMF Single-Mode Fiber - In optical fiber technology, an optical fiber that is designed for the transmission of a single ray or mode of light as a carrier. It is a single light path used for long-distance signal transmission. See also: MMF SNIA Storage Networking Industry Association. A non-profit organization comprised of more than 77 companies and individuals in the storage industry. 636 Implementing an Open IBM SAN StorWatch Expert These are StorWatch applications that employ a 3 tiered architecture that includes a management interface, a StorWatch manager and agents that run on the storage resource(s) being managed. Expert products employ a StorWatch data base that can be used for saving key management data (e.g. capacity or performance metrics). Expert products use the agents as well as analysis of storage data saved in the data base to perform higher value functions including -- reporting of capacity, performance, etc. over time (trends), configuration of multiple devices based on policies, monitoring of capacity and performance, automated responses to events or conditions, and storage related data mining. StorWatch Specialist A StorWatch interface for managing an individual fibre Channel device or a limited number of like devices (that can be viewed as a single group). StorWatch specialists typically provide simple, point-in-time management functions such as configuration, reporting on asset and status information, simple device and event monitoring, and perhaps some service utilities. Striping A method for achieving higher bandwidth using multiple N_Ports in parallel to transmit a single information unit across multiple levels. STP Shielded Twisted Pair Storage Media The physical device itself, onto which data is recorded. Magnetic tape, optical disks, floppy disks are all storage media. subchannel. A logical function of a channel subsystem associated with the management of a single device. subsystem. (1) A secondary or subordinate system, or programming support, usually capable of operating independently of or asynchronously with a controlling system. switch topology, the available bandwidth is scalable. T11 A technical committee of the National Committee for Information Technology Standards, titled T11 I/O Interfaces. It is tasked with developing standards for moving data in and out of computers. Tape Backup Making magnetic tape copies of hard disk and optical disc files for disaster recovery. Tape Pooling A SAN solution in which tape resources are pooled and shared across multiple hosts rather than being dedicated to a specific host. TCP Transmission Control Protocol - a reliable, full duplex, connection-oriented end-to-end transport protocol running on top of IP. TCP/IP Transmission Control Protocol/ Internet Protocol - a set of communications protocols that support peer-to-peer connectivity functions for both local and wide area networks. Time Server A Fibre Channel-defined service function that allows for the management of all timers used within a Fibre Channel system. SWCH. In ESCON Manager, the mnemonic used to represent an ESCON Director. Topology An interconnection scheme that allows multiple Fibre Channel ports to communicate. For example, point-to-point, Arbitrated Loop, and switched fabric are all Fibre Channel topologies. Switch A component with multiple entry/exit points (ports) that provides dynamic connection between any two of these points. T_Port An ISL port more commonly known as an E_Port, referred to as a Trunk port and used by INRANGE. Switch Topology An interconnection structure in which any entry point can be dynamically connected to any exit point. In a TL_Port A private to public bridging of switches or directors, referred to as Translative Loop. Glossary 637 trunk cable. In an ESCON and FICON environment, a cable consisting of multiple fiber pairs that do not directly attach to an active device. This cable usually exists between distribution panels (or sometimes between a set processor channels and a distribution panel) and can be located within, or external to, a building. Contrast with jumper cable. Twinax A transmission media (cable) consisting of two insulated central conducting leads of coaxial cable. Twisted Pair A transmission media (cable) consisting of two insulated copper wires twisted around each other to reduce the induction (thus interference) from one wire to another. The twists, or lays, are varied in length to reduce the potential for signal interference between pairs. Several sets of twisted pair wires may be enclosed in a single cable. This is the most common type of transmission media. ULP Upper Level Protocols unblocked. In an ESCON and FICON Director, the attribute that, when set, establishes communication capability for a specific port. Contrast with blocked. unit address. The ESA/390 and zSeries term for the address associated with a device on a given controller. On ESCON and FICON interfaces, the unit address is the same as the device address. On OEMI interfaces, the unit address specifies a controller and device pair on the interface. UTC Under-The-Covers, a term used to characterize a subsystem in which a small number of hard drives are mounted inside a higher function unit. The power and cooling are obtained from the system unit. Connection 638 Implementing an Open IBM SAN is by parallel copper ribbon cable or pluggable backplane, using IDE or SCSI protocols. UTP Unshielded Twisted Pair Virtual Circuit A unidirectional path between two communicating N_Ports that permits fractional bandwidth. Virtualization An abstraction of storage where the representation of a storage unit to the operating system and applications on a server is divorced from the actual physical storage where the information is contained. Virtualization engine Dedicated hardware and software that is used to implement virtualization. WAN Wide Area Network - A network which encompasses inter-connectivity between devices over a wide geographic area. A wide area network may be privately owned or rented, but the term usually connotes the inclusion of public (shared) networks. WDM Wave Division Multiplexing - A technology that puts data from different sources together on an optical fiber, with each signal carried on its own separate light wavelength. Using WDM, up to 80 (and theoretically more) separate wavelengths or channels of data can be multiplexed into a stream of light transmitted on a single optical fiber. WEBM Web-Based Enterprise Management A consortium working on the development of a series of standards to enable active management and monitoring of network-based elements. Zoning In Fibre Channel environments, the grouping together of multiple ports to form a virtual private storage network. Ports that are members of a group or zone can communicate with each other but are isolated from ports in other zones. z/Architecture. An IBM architecture for mainframe computers and peripherals. Processors that follow this architecture include the zSeries family of processors. zSeries. A family of IBM mainframe servers that support high performance, availability, connectivity, security and integrity. Glossary 639 640 Implementing an Open IBM SAN Related publications The publications listed in this section are considered particularly suitable for a more detailed discussion of the topics covered in this redbook. IBM Redbooks IBM TotalStorage: SAN Products, Design, and Optimization Guide, SG24-6384 Implementing the Cisco MDS 9000 in an Intermix FCP, FCIP, and FICON Environment, SG24-6397 IBM SAN Survival Guide, SG24-6143 Designing and Optimizing an IBM Storage Area Network, SG24-6419 Designing an IBM Storage Area Network, SG24-5758 Introduction to SAN Distance Solutions, SG24-6408 Introducing Hosts to the SAN fabric, SG24-6411 Introduction to Storage Area Networks, SG24-5470 IP Storage Networking: IBM NAS and iSCSI Solutions, SG24-6240 The IBM TotalStorage NAS 200 and 300 Integration Guide, SG24-6505 Implementing the IBM TotalStorage NAS 300G: High Speed Cross Platform Storage and Tivoli SANergy!, SG24-6278 iSCSI Performance Testing & Tuning, SG24-6531 Using iSCSI Solutions’ Planning and Implementation, SG24-6291 Storage Networking Virtualization: What’s it all about?, SG24-6210 IBM Storage Solutions for Server Consolidation, SG24-5355 Implementing the Enterprise Storage Server in Your Environment, SG24-5420 Implementing Linux with IBM Disk Storage, SG24-6261 Storage Area Networks: Tape Future In Fabrics, SG24-5474 IBM Enterprise Storage Server, SG24-5465 © Copyright IBM Corp. 2000, 2001, 2002, 2003. All rights reserved. 641 Other resources These publications are also relevant as further information sources: Building Storage Networks, ISBN 0072120509 These IBM publications are also relevant as further information sources: ESS Web Interface User’s Guide for ESS Specialist and ESS Copy Services, SC26-7346 IBM Enterprise Storage Server Configuration Planner, SC26-7353 IBM Enterprise Storage Server Quick Configuration Guide, SC26-7354 IBM Enterprise Storage Server Introduction and Planning Guide, 2105 Models E10, E20, F10 and F20, GC26-7294 IBM Enterprise Storage Server User’s Guide, 2105 Models E10, E20, F10 and F20, SC26-7295 IBM Enterprise Storage Server Host Systems Attachment Guide, 2105 Models E10, E20, F10 and F20, SC26-7296 IBM Enterprise Storage Server SCSI Command Reference, 2105 Models E10, E20, F10 and F20, SC26-7297 IBM Enterprise Storage Server System/390 Command Reference, 2105 Models E10, E20, F10 and F20, SC26-7298 IBM Storage Solutions Safety Notices, GC26-7229 Brocade Secure Fabric User’s Guide, 53-0000526 PCI Adapter Placement Reference, SA38-0583 Translated External Devices/Safety Information, SA26-7003 Electrical Safety for IBM Customer Engineers, S229-8124 Referenced Web sites These Web sites are also relevant as further information sources: IBM TotalStorage hardware, software and solutions: http://www.storage.ibm.com IBM TotalStorage Storage Networking: http://www.storage.ibm.com/snetwork/index.html Brocade: http://www.brocade.com 642 Implementing an Open IBM SAN Cisco: www.cisco.com CNT: http://www.inrange.com McDATA: http://www.mcdata.com QLogic: http://www.qlogic.com Emulex: http://www.emulex.com Finisar: http://www.finisar.co Veritas: http://www.veritas.co Vixel: http://www.vixel.com Tivoli: http://www.tivoli.co JNI: http://www.Jni.com IEEE: http://www.ieee.org Storage Networking Industry Association: http://www.snia.org Fibre Channel Industry Association: http://www.fibrechannel.com SCSI Trade Association: http://www.scsita.org Internet Engineering Task Force: http://www.ietf.org American National Standards Institute: http://www.ansi.org Technical Committee T10: Related publications 643 http://www.t10.org Technical Committee T11: http://www.t11.org IBM ^™ xSeries® 430 and NUMA-Q Information Center: http://webdocs.numaq.ibm.com How to get IBM Redbooks You can order hardcopy Redbooks, as well as view, download, or search for Redbooks at the following Web site: ibm.com/redbooks You can also download additional materials (code samples or diskette/CD-ROM images) from that site. IBM Redbooks collections Redbooks are also available on CD-ROMs. Click the CD-ROMs button on the Redbooks Web site for information about all the CD-ROMs offered, as well as updates and formats. 644 Implementing an Open IBM SAN Index Numerics 2032-001 348 2109-F16 55, 63 2109-F16 installing 87 2109-F16 License Administration 162 A AC module 345 access 378 access control 467 access level 170 activate 472 activate zoneset 516 activate zoning 25 active CP 94 active CTP Card 478 active zone set 579 active zoneset 509 active zoning configuration 437 adding end-to-end monitors 219 filter-based monitors 225 address translation 328 addresses assigned 53 adjacent switches 451 Admin button 149 administer McDATA SAN 374 administration 372–373 administration tasks 372 administrator 545, 562, 565, 567 Advanced Performance Monitoring 205, 208, 217 Agent Up Time 17 aggregate bandwidth 189, 540 airflow 346 AL_PA Level Zoning 114 AL_PA monitoring 206, 217 AL_PA zoning 28 AL_PAs 40, 327 Alarm Notifications tab, Fabric Watch View 232 alert 228 alerts 414, 464 alias 606 alias names 538, 614, 616 aliases 606, 608–612 API server 173 application specific integrated circuit 338 Arbitrated Loop 530 arbitrated loop 349 arbitrated loop device 410 arbitrated loop topology 390, 405 area 229 areas 229, 538, 576 AS 268 ASIC 50–51, 338, 420 ASIC interrupts 54 ASIC switching technology 63 ATM 263 ATM gateways 172 attention icon 455 attention indicator 415 attention indicators 464 Audit Trail 522 authority 378 Automatic Trunking 15, 29 Auto-negotiate 400 auto-negotiate 413 auto-negotiating 333, 335 auto-sense 410 AutoSense AL 531 autosense loop devices 529 auto-sensing 51, 56, 58, 64, 333, 335 autosensing 62 auto-sensing capability 50 auto-sensing speed negotiation 50 availability 342, 350 average data rates 457 B backbones 337 backplane 65, 75, 343, 345, 350 backup 269, 364 backup CTP2 344, 351 backup FRU 350 backup SBAR 346 bandwidth issues 441 bandwidth usage 457 © Copyright IBM Corp. 2000, 2001, 2002, 2003. All rights reserved. 645 baseline file 319 basic monitoring 201 BB Credit 171 BB credit 264 BB_Credit 404, 408, 475 BB_Credit threshold 458 beaconing 244, 335, 337, 354 binding features 463 BladeCenter 398 blinking 417 Blocking ARB 16 blower assemblies 68, 78 bottlenecks 441 bridge 490, 537 bridging 637 broadcast 53 broadcast storms 357 Brocade 398 Brocade SilkWorm 3800 56 browser, web 289 buffer reconfiguration 265 buffering 265, 399 buffer-to-buffer 171 bypassed device 532 bypassing 532 C Canvas 199 canvas 194, 201 Canvas Configuration List 198 cascade 31 cascaded 1, 52, 262, 487 cascades 29 cascading 441, 488 certificates 275 change the domain ID 448 channel extenders 399 chassis functions 137 chassis wide 146 circuit breaker 352 Cisco xxxiv, 398, 539, 541–542, 555–556, 562–563, 571, 574, 577 Cisco Fabric Manager 535, 541, 547, 554, 569–570 Cisco MDS 9000 535–541, 547, 565, 578 class F interswitch frames 172 classes 229 clearing CRC error count 218 646 Implementing an Open IBM SAN end-to-end monitor counters 224 CLI 35 Client 535–536, 542–544, 548–549 clock 507 clock settings 506 cluster 442 CNT 398 CNT FC/9000 484 Command Line Interface 35 command prompt 547, 569 communication 509, 565 compatibility 308 concurrent code upgrade 62 configuration 373, 375, 393 configuration file 317 configuration files 15 configuration options 390 configuration parameters 313 configuration task 378 configure 390 configure ports 265 Configure Thresholds tab, Fabric Watch View 239 conflicts 247, 311 congested links 457 congestion 190 connecting device 410 connecting links 29 connectivity 332, 399, 545, 551, 566, 599–601 console serial port 544, 566 consolidation 441 contact name 16 control 378 controlling 15 copy 557, 560 Copy Configuration 578 copy processes 578 core PID 250, 262, 310 core-to-edge 332 cost 177 counter values 224 counters 223, 228 CP blade 65, 75 CP card 96 CRC errors 206, 217, 220 CRC errors, displaying 218 create alias 609 CSR 274 CSRs 274 CTP 338 CTP Card 350 CTP2 card 343 cumulative counters 222 current topology 323 custom filter 226 D daisy-chained 29 data field size 172 data flow 457 data packets 191 data traffic 132 date 506, 556, 577–578 DCC 268 dedicated LAN 357 default cost 178 default domain ID 95 default IP address 88 default policy 282 default values 581, 584, 598 default VSAN 539 default zone 425, 538, 546, 568 default zone policy 538, 546, 568 defect call 417 degraded 419 deleting end-to-end monitors 224 filter-based monitors 228 denied access 466 device 132 Device Connection Control 268 device identification 380 device level zoning 51 DHCP server 358 diagnosis 394 diagnostic commands 55 diagnostics 41, 54, 347 DID 51, 206, 218, 564 digital certificates 269, 281 direct memory access 65, 75 director 475, 535, 541 director class 63 director clock 506 director identification 395 director offline 402 disable 532, 565 Disable Device Probing 172 disaster proof 364 disaster tolerance 442 disaster tolerant solutions 441 displaying CRC error count 218 filter-based monitors 227 disruptive 582 distance 349 distance option 341, 349 distributed fabrics 261 Distributed Name Services 263 DLS 176 DNS 386, 546, 565, 568 DNS host name 386 domain 448, 546, 568 domain address manager 447 Domain ID 87 domain ID 405, 409, 448–449, 464, 538, 581–582 Domain ID conflict 449 domain IDs 98 Domain Manager 581–583 download 472 Download Firmware 303 download switch configuration 314 duplicate alias names 311 duplicate domains 248 Dynamic Load Sharing 176 E E_D_TOV 172, 264, 404, 408, 450, 475 E_Port 189, 338, 341, 349, 400, 410, 440, 450, 537–539 E_Ports 56, 58, 132, 446 EE mask 221 EEPROM 66, 76 EFC login 374 EFC Manager 361 EFC Manager client installation 365 EFC operational status 393 EFC port number 399 EFC Server 361 EFC server 364 EFCM client 369 EISL 537, 539–540 elements 229, 538 ELP 262 e-mail 557 enable 532 Enable Config 131 Index 647 End-to-end monitoring 206, 218 end-to-end monitors adding 219 clearing counters 224 deleting 224 setting a mask 220 enforcement mode configuration 471 enforcement modes 468 entry switch 336 Environmental classes 234 equivalent paths 176 error 556, 574–575 error counts 42 error detection 334, 336, 339, 347, 354 error detection time out value (E_D_TOV) 450 error messages 155, 548, 560 errors 228 ES-1000 338 ES-3016 338 ES-3032 338 ES-3232 391 ethernet 156, 539–540, 545, 567 ethernet port 66, 75 event log 37, 45, 417, 523 events 523 Exchange Link Parameters 262 Expansion Port 189 expansion port 537 Export 288 export 524 export logical group 299 extended distance 399 extended distance buffering 450 external loop 532 F F_Port 338, 341, 349, 410, 537–538 F_Ports 56, 58, 441 fabric address notification 173 Fabric Assist 123 Fabric Binding 463 Fabric Binding activation 464 Fabric Binding configuration 464 fabric building process 446 fabric compliant 399 Fabric Configuration Server 268, 283 Fabric Connection 21 fabric exploration 53 648 Implementing an Open IBM SAN Fabric Login 300 fabric management 490, 555 Fabric Management Policy Set 282 Fabric Manager 286–287, 535–536, 541–542, 545, 547, 549–552, 554–555, 557, 561–562, 567, 569–571, 573–574, 577–579 Fabric Membership List 464 Fabric Merge 308 fabric merging process 449 fabric operating parameters 314 Fabric OS 155 Fabric OS Version 4.0 52 fabric rejected 421 fabric routing 176 fabric start up 450 Fabric Watch 228 Fabric Watch View Alarm Notifications tab 232 Configure Thresholds tab 239 fabric wide setting 282 fabric wide settings 286 fabric zoned 434 Fabricenter 340, 355 fabrics 538, 554, 562 failback 263 failed fan 147 failed part 393 failed state 417 failing port 421 failover 263 FAN 173 fan 37 fan button 146 fan modules 345 fans 228, 339 FC ID 536–538 FC operating parameters 402 FC PortChannel 540 FC ports 399 FC Trunking 539 FC_AL 534 FC-AL 529, 537 FCIP 540, 601 FCS 268 FCS switches 285 feature codes 540 Fibre Channel 535–540 Fibre Channel IDs 536 Fibre Channel Line Card 540 FICON 333, 397 FICON attachments 487 field replaceable units 343 file serving solution 441 file transfer option 295 File Transfer Options 295 filter 225 filter type 239 Filter-based monitoring 207, 224 filter-based monitoring 200 filter-based monitors 225 adding 225 deleting 228 displaying 227 filtering 532 firewall 369–370 firmware 15, 32, 251, 303, 488, 541 firmware download 301 Firmware download procedure 472 firmware library 480 firmware upgrade 257, 303 firmware version 32 fixed allocation 408 fixed routing paths 190 FL_Port 537–538 FL_Ports 56, 58 flexibility 509 flow control 565 flow level 457 FML 464 FMPS 282 FPM cards 351 FPM numbering scheme 341, 349 frame 191 frame filtering 51 frame level 457 frame routing priority 172 frame traffic 54 frames 220, 263, 538–539 frames transmitted 221 FRU 343, 523 FRU beaconing 347 FSPF 190, 457 FSPF compliant 190 FSPF Route 177 FSPF routing table 178 FTP server 295, 310, 315 fWWN 538 FX_Port 410, 537 G G_Port 338, 349, 394, 410, 450 G_Ports 338, 341, 344, 349, 399, 440, 446 gateway 546, 565, 567–568 gateway manufacturers 262 general settings 16 generic port 341, 349 graph 194 graphical representation 576 graphing 194 graphs 200–201 green circle 456 GX_Port 410 H hacking 357, 463 HACMP 441–442 hard configuring 420 hard zoning 538 hardware 390, 538, 541 hardware enforced zoning 420 health 38, 555, 562 high availability 333, 356, 441–442, 540 hit count 224 homogeneous 486 homogenous SAN environment 445 hop count 445 hot-swappable 336 hub 489 HyperTerminal 3, 92, 565 I IBM default settings 241 IBM Linux Initiator 21 IBM Linux Stealth Initiator 22 IBM Smart Setting 21 IBM TotalStorage SAN Switch F16 55 IBM TotalStorage SAN Switch M12 62 identify 381 implement zoning 420 Import 288 in-band 358, 545, 567 independent fabrics 452 information area 576 informs 552 initial machine load 343 initial zoning 606 initialization 52, 413, 537–538 Index 649 Initiator 21 Initiator AL_PAs 40 initiators 533 In-Order Delivery 177 in-order delivery 191 install firmware 33 installation 548–549, 562–564, 570–572 installed components 393 installed ports 401 installing performance monitoring 208 installing the 2109-F16 Switch 87 inter switch links 410 internal log 155 Internet Explorer 541 Interop Mode 399 interoperability mode 538 Inter-Switch Link 246 Inter-Switch Link Trunking 57–58 interval number 223 Invalid Attachment 399 Invalid CRCs 237 Invalid Words 237 IN-VSN management console 488 IOD 177 IP address 545–547, 556, 565, 567–569, 574 IP addresses 87 IP connectivity 569 IP line card 540 IP settings 488 IP traffic 215 IP versus SCSI traffic 207, 224 iSCSI 540 ISL 1, 29, 51, 108, 189, 246, 341, 349, 441, 444, 456, 537, 539–540, 562, 598–601, 637 ISL Checking 321–322 ISL checking 288, 323 ISL connections 445 ISL option 321 ISL over-subscription 456 ISL R_RDY Mode 262 ISL trunking 189 isolated VSAN 539 J Java 542, 549 Java Runtime Environment 569 Java Web Start 541, 547–549, 569–570 JRE 549, 569–570 650 Implementing an Open IBM SAN L L10 1 LAN architecture 356 larger fabrics 487 latency 413 least cost paths 458 legacy FC 529 library 432 license agreement 368 license file 320, 559 license key 163, 556–557, 559 license keys 162 licensing 276, 554 licensing information 320 link congestion 457 link cost 178 link incident 400 link initialization 420 Link Loss 237 link utilization 457 Linux 52, 541 LIP 534 LIP impact 534 load 31 Load Balancing 15, 29 load balancing 31, 191 load share 263 load sharing 176 load sharing mechanism 457 load-balancing 457 load-sharing power supply 345 local files 288 local switch 327 local times 506 local zone database 579, 606 location 16, 559 locked 466 log 542, 562 logging events 101 logical groups 288, 296 logical interface 539 logical switch 134 Logical Volume Manager (LVM) 441–442 login window 550, 571–573 long distance 265 loop 537 loop configuration 217 loop devices 531–532, 536 loop initialization 173 Loop Initialization Primitive 534 loop node 529 loop ports 531 Loop protocol 529 loop switch 441 loop-back function 55 looplets 326 LUN level zoning 51 M M12 64, 156 M12 zoning 117 MAC 268 maintenance 393 maintenance port 335, 337, 339, 354 maintenance window 472 manage licenses 320 manage multiple fabrics 286 management 15, 372, 538–539, 545, 554–555, 566–567, 573 Management Access Control 268 management activities 488 management ethernet 565 Management Information Base 54 management interface 545, 567 management PC 488 managing switch 15 mappings 537 mask 220, 545, 565, 567 mask for end-to-end monitors setting 220 master port 52 master trunk 458 McDATA define users 375 McDATA Intrepid 6064 Director 348 McDATA Intrepid 6140 340 McDATA Sphereon 3232 337 McDATA Sphereon 4500 fabric switch 333, 335 McDATA zoning concepts 419 mcdataClientInstall.exe 368 MDS 9000 535–541, 547, 565, 578 MDS 9216 540, 544, 556, 561, 565–566 MDS 9506 540, 565, 579 MDS 9509 540, 565 memory 541 merging 308 merging SAN fabrics 245 merging two fabrics 248 messages 45 metric 177 MIB 54 MIB files 365 microcode level 488 Microcode-loads 519 migration path 328 Mixed Level Zoning 113 Mode 537–538, 545, 567 modem 66, 76, 96 Modem Setup 96 monitor 204, 561–562 monitor elements 229 monitored 392–393, 542 monitored element 228 monitoring 37, 375, 537, 555, 562 monitoring switch activity 170 multicast 53 multiple interswitch links 263 multiple switch zoning 28 multiswitch 404 multiswitch fabric 404, 440, 444, 447, 450–451 multiswitch fabric solutions 441 multiswitch fabrics 440, 445 multi-vendor 398 N N_Ports 536 name server 108, 538 name server database 420 Name server enforced zoning 420 name server information 420 name server table 420, 530 name server zoning 420 name serving 56, 58 names 538, 574, 611, 614, 616 navigation menu 576 Netscape 365, 541 new alias 611 new firmware 32 new messages 155 new user 375 new VSAN 607–608 new zone 429, 612 new zone set 432 nickname 386 nicknames 386, 389, 429 NL_Ports 536 Index 651 node symbols 425 non blocking ports 64 non-volatile memory 338, 344 nonvolatile storage 127 numbering scheme 69, 342 NV-RAM 364 O one power supply 241–242 One-Step Zoning 15, 24 Open Systems 397, 578, 580–581, 584, 598, 601 Open Trunking 456 Open Trunking feature key 458 Open Trunking log 462 Open-Fabric 1.0 399 operating mode 391, 396 operating parameters 391, 577 operating parameters conflict 250 operational modes 537 optimal throughput 356, 457 Options policy 268 organizational tree 233 out-of-band 358, 545, 567 overlap 248 over-utilzation 457 P P2P 486 parameters 544, 565–567, 573, 577, 581, 584, 598 partner switch 327 partner switches 326 pass-through ports 369 password 11 passwords 323 path selection table 458 PCI bus 65, 75 perfAddEEMonitor command 219 perfAddIPMonitor command 225 perfClrAlpaCrc command 218 perfDelEEMonitor command 224 perfDelFilterMonitor command 228 performance 228, 342, 350, 542 Performance Bundle 57–58, 192 Performance Graphs 201 performance management 205 Performance Monitor 194, 197, 239 Performance Monitoring 57–58 performance monitoring 51, 554–555 652 Implementing an Open IBM SAN perfSetPortEEMask command 220 perfShowAlpaCRC command 218 perfShowFilterMonitor command 227 Persist Fabric 455 Persisted Fabric 453 persistent 165, 537, 582–583 persistent binding 420 Persistent FcIds 536, 583–584 persistent snapshot 323 physical port location 72 PKI Cert utility 274 PLDA 325 PLFA 325 point-to-point protocol 486 policy basis 288 Port addressing 536 port area number 117–118 port area numbering 71, 80 port based zoning 398, 422 port binding 467 port blades 136 port card view 393 port cards 393 port configuration 413 port count 341 port diagnostics 37 port failure 339 port filter statistics 207, 224 port information 37, 394 port information view 137 port level zoning 51 Port List View 401 port maintenance 347 port modes 536–537 port numbering 70 port properties 565–566 port settings 15 Port Smart Settings 18 port utilization 38 PortChannel 539–540, 599–601 ports 39, 391 PortVsan 583, 585, 601 POST 55, 92 POST) diagnostics 3 power 523, 544, 566 power cord 3 power distribution configuration 68, 77 power module assembly 352 power redundancy 418 power supplies 68, 77, 228, 336, 338 power supply 241 PowerPC 65, 75 preferred domain ID 404–405, 475 preferred port 410 primary ethernet interface 357 Primary FCS switch 282 primary interface 358 primary trunk 29 principal switch 53, 404, 447, 449 principal WWN 453 privacy password 574 private arbitrated looplets 327 private ethernet connection 357 private LAN 357 Private Loop 123 Private Loop Direct Attach 325 Private Loop Fabric Attach 325 private loop migration 325 probe 420 problem description 417 problem determination 414 problems 541 Product Administrator 378 Product Manager 390 Product View 374 protection 463 Protocol Error 237 protocol level zoning 51 public loop 533 public loop port 531 pull-down 574 pWWN 538 Q QuickLoop 121, 325–327 QuickLoop partnership 326 QuickLoop status 326 R R_A_TOV 172, 264, 404, 408, 450, 475 random TCP ports 369 range monitoring 228 ranges 228 real-time alerts 228 real-time traffic monitoring 457 reboot 304, 319 reboot command 94 reboot groups 304 reboot switches 307 rebooted 34 reboots 536 Redbooks Web site 644 Contact us xxxv redistribute traffic 458 redundancy 343 redundant fans 339 redundant serial SBAR 353 remote dial up 96 remote distribution 261 remote EFC Manager 358 remote procedure calls 173 remote sites 399 remote support 96 Remote Switch 262 Remote Switch fabric 263 remote workstation 362 removing end-to-end monitors 224 filter-based monitors 228 repeaters 341, 349 reporting 334, 336, 339, 347, 354, 555 Request Certificates 276 request packet 577 requirements switch 289 workstation 289 rerouting delay 405 resetting 394 resource allocation time out value (R_A_TOV) 450 Resource Usage 200 resources 200 response packet 577 Restamp 321 restamp 323 restore 364 RFI shield 353 rights 376–378 RISC 65, 75 RMI port 1099 370 round-robin 457 route table 420 Route table enforced zoning 420 routing database 457 routing path 51 routing table 53 routing tables 53, 457 Index 653 RPC 173 RSCN 173 running configuration 577–578, 582, 591, 596, 605, 615 RX Performance 237 S sampling 457 SANpilot 359 SANtegrity 463 SANtegrity binding 463 SANtegrity Fabric Binding 463 SANtegrity Switch Binding 467 Save Config 131 SBAR 346, 353 SBAR assemblies 351 SBAR assembly 346 SCC 268 SCSI Enclosure Services 52 SCSI graph 212 SCSI read 207, 224 SCSI traffic 215 SDRAM 54, 65, 75 secondary network interface 358 secondary trunk 29 secure 490 secure environment 283 Secure Fabric OS 268 secure mode 282 Secure Telnet Client 279 secure Telnet session 281 security 356–357, 467, 551–552, 570–571 security policies 282, 323 segmentation 250 segmented 405, 451, 599 segmented fabric 451 separate fabrics 245 sequence down 68, 78 Sequence Level Switching 172 SERDES 66, 76 serial crossbar 353 serial crossbars 346 serial ports 66, 76 serial-deserializer 66, 76 SerialLink 55 service call 417 serviceability 334, 336, 339, 347, 354 SES 52 654 Implementing an Open IBM SAN setting mask for end-to-end monitors 220 setup program 544, 565–566 SFOS 268 SFP 40, 56, 58, 64, 99 SFP classes 236 shared memory architecture 408 shortest path 405 SID 51, 206, 218 SID/DID 238 SID/DID pair 194 SID/DID performance monitoring 209 Signal Loss 237 significant system events 347 simple network management protocol 358 slot number 117, 536 Slot/port method 117 slot/port method 71, 80 slots 117 Small Form-Factor Pluggable 56, 58, 64 Smart 18 Smart Setting 41 SMART SFPs 228 SML 468 snapshot 227 SNMP 17, 52, 54, 343, 358, 365, 542, 545–546, 565, 567–568, 577 SNMP information 314 SNMP protocol 577 SNMP timeout 577 SNMP trap 228 SNMP traps 161 SOF 227 soft zoning 420, 538 Solaris 541 Span Destination 537 spare ports 339 speed 165, 400, 538 speed negotiation 413 standard filter-based monitors 225 startup configuration 577, 591, 596, 605 State Changes 237 state changes 228 stateless protocol 577 static allocation 457 static distribution 457 static routes 178 static zoning 421 statically allocated 464 statistics gathering 226 status 10 Stealth 21 String Cascade 21 string cascades 29 supervisor module 565 switch requirements 289 switch administration 170 Switch Binding 467 Switch Binding configuration 469 Switch Binding rules 468 switch blade 66, 76 Switch Connection Control 268 switch fabric 539, 575–576, 578 switch functionality 55 Switch Membership List 467–468 switch name 13, 88, 545, 565, 567 switch port numbers 421 switch ports 610 switch priority 404, 408, 447 switch settings 16 switch status 37 Switch/Port Level Zoning 113 Switch/Port Zoning Port Fabric Assist Tab 123 switchover 479 Switchover CTP 479 symbolic name 165 Sync Loss 237 sysdump.log 44 syslogd 155 T Target 21 targets 533 TCP port 1098 370 TE_Ports 537–540 Telnet 251 telnet 35, 546–547, 568 Temp button 147 temperature 37, 228 TERM 92, 539 terminal emulation program 35 terminal emulator application 89 The director contains two fan 352 threshold 228, 240 threshold alerts 354 thresholds 15, 18, 238 time 506 TL_Ports 537 topology changes 177–178 topology reconfigurations 228 total throughput 190 TotalStorage Storage Switch L10 1 traffic 425 traffic flow 457 translative loop 537 translative modes 328 transmitter negotiation 53 trap 17 trap configuration 17 Tree Cascade 21 tree cascades 29 tree structure 231 trigger value 228 troubleshoot 414 troubleshooting 414 trunk 29 trunk group 29 trunk groups 458 Trunk Mode 546, 568–569 trunked ISLs 190 Trunking 57–58 trunking 1, 31, 51, 165, 189, 539–540, 601 trunking E_Port 537, 539 trunking group 52, 60, 191 trunking groups 191 trunking master 191 Trunking masters 191 trunking ports 52, 191 Trunking Telnet commands 192 TX Performance 237 U under-subscription 456 under-utilization 457 under-utilized 457 unicast 53 unique AL_PA 328 Universal Port Modules 341 unlicensed 291, 554 unused domain ID 405 upgrade firmware 301 upgrading 543 upgrading firmware 269 upload 319 Index 655 UPM card 344 URL 365, 556–557 user activities 522 user interface 575 user rights 378 users 376, 541, 555 utilization 37 V VE_Port 540 virtual channels 172 virtual E_Port 540 viruses 357 visibility 598 VSAN trunking 539 VxWorks 53 W WAN gateway 262 Web based interface 359 Web browser 541, 569–571 web browser 289 Web Manager 3, 9 Web Tools 295 WEB TOOLS license 291 workstation requirements 289 world wide name zoning 51 WWN 386, 389, 464, 536–538, 606, 609–610 WWN bezel 68, 78 WWN Level Zoning 114 WWN zoning 509 WWPN 421, 509 X XFIO2 529 Y yellow triangle 400, 455 Z Zip drive 364 zone changes 228 zone database 579, 586–593, 595–597, 602–607 Zone management 422 Zone member definition 421 zone members 538, 576, 589, 596, 604 656 Implementing an Open IBM SAN zone names 422 zone set 432 zone sets 422, 576, 578–579, 606, 612 zoned cascading 446 zones 538, 576, 578, 588–589, 594, 596, 604, 606, 610–611, 613–614 zonesets 509 zoning 1, 24, 339, 386, 509, 538, 591, 597, 605–606, 611–612, 614 Zoning Configuration Analyze 128 zoning configurations 579, 606 zoning definitions 420 zoning inconsistency 248 zoning information 247, 579 Implementing an Open IBM SAN (1.5” spine) 1.5”<-> 1.998” 789 <->1051 pages Back cover ® IBM TotalStorage: Implementing an Open IBM SAN Discover the latest additions to the IBM SAN family Enhance your skills while using an easy-to-follow format Grow with the new technology “Do everything that is necessary and absolutely nothing that is not.” In this IBM Redbook, which is an update and major revision of the previous version, we have tried to consolidate as much of the critical information as possible while covering procedures and tasks that are likely to be encountered on a daily basis. Each of the products described has much, much more functionality than we could ever hope to cover in just one redbook. The IBM SAN portfolio is rich in quality products that bring a vast amount of technicality and vitality to the SAN world. Their inclusion and selection is based on a thorough understanding of the storage networking environment that positions IBM, and therefore its customers and partners, in an ideal position to take advantage by their deployment. We cover the latest additions to the IBM SAN family, which includes products from companies such as Brocade, Cisco, CNT, Emulex, and McDATA. We show how they can be implemented in an open systems environment, and we focus on the Fibre Channel protocol (FCP) environment in particular. We address some of the key concepts that they bring to the market, and in each case, we give an overview of those functions that are essential to building a robust SAN environment. SG24-6116-04 ISBN INTERNATIONAL TECHNICAL SUPPORT ORGANIZATION BUILDING TECHNICAL INFORMATION BASED ON PRACTICAL EXPERIENCE IBM Redbooks are developed by the IBM International Technical Support Organization. Experts from IBM, Customers and Partners from around the world create timely technical information based on realistic scenarios. Specific recommendations are provided to help you implement IT solutions more effectively in your environment. For more information: ibm.com/redbooks