1
owner’ s Manual
sELF-ADJUsTING
LAsER LEVEL
CAUTIo`3efore using this LaseΓ LeVeI,
read th⒗ ManuaI and fOIIoW aIIits safety
RuI∫ 【
:;s and operating Instructions.
・AssembIy
・Features'ContΓ ols
・A叫 ustments
・operation
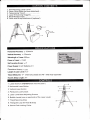
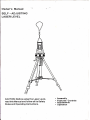
1 selfAdjusting Laser Level¨ ¨¨¨¨Ⅱ¨
2 Laser Level Base(arrives deteched)¨
3 Telescoping Tripod¨ ¨¨ ¨.¨ ¨∴…
4 Laser Enhancing Goggles¨ ¨¨¨ ∶¨
5Blow Molded Case¨ ¨ …¨……¨…
6 Hook and strap Attachment(optionol)
ˉ
ˉ
Ⅱ
贾
⑾
Ⅱ
~♀
)ˉ
VertiCaI Accuracy:±
± 05mm/m
05mm/m
Wavelength of Laser∶
650nm
HoHzon妇 l
ACCuraCy∶
POwer of Laser≤
1mW
ser LeveⅡ ng sGoρ e∶ ±4°
Power suppIy∶ 2/ˇ 吖 BatteHes3V
5m
0ρ era刂 eve Afstand∶ ≤
Length of Laser LeveI∶ 75”
Tripod Measures∶
17”
Hook&strap Length∶
when fu"y Closed and46” vvhen fu"y eXpanded
24”
1 Laser Aperture(NEVER stareinto the Laser)
2 HOrizontal Laser Button
3 Vertical Laser Button
4 Pendulum LOck/UnloCk
5Laser LeVel BaseAdjusting screWs
6 Bubble Levels(one on each side ofthe Laser LeVel)
7 Triρ
od seCuring C"ps
8 Triangular Loop for Hook&strap
9 Center POle LOcking Collar
Γ
wARNNG
▲ 丨
D0 N0Ta"oW Ch"dren to handIe the IeveI A" σnlookers should oe kept away
The hioh θnergy is
from the work area, DO not stare at the Iaser beam、
harmful to your eyes. Never point a IaseΓ beam at anyone’ s face.
extΓ emely
wARNING
▲∶
Working safely with this se亻 冖AdjustiRg Laser Level is onlˇ possibIe Whθ n
aII of the instructions are read completely∷
and stdcuy fo"owed.
・D0 N0T operate the laser in explosive atmospheres, suCh as in the presence of
fIanη
mable "quids, gasses, or dust
・D0 N0T use optiCaI tools suCh as a telescoρ
e or transit to vieW the laser beam
serious eye injury Could resu"
・D0
aser in a pos"ion WhiCh may cause anyone to intentionally or
NOT plaCe the 丨
unintentiona"y stare into the laser be合 m serious eye injury could resu"
・D0 N0T operate the laser around ch"dren or a"oW ch"dren to operate the laser
serious eye injury could resu"
・D0N0T
remove or deface Warning hbels
RemoVing labels increases the risk
of exposure to rad∶ ation
n
・The use in combination with other opticaI instruments,manipulauons, or use ∶
appⅡ cations other than desCribed herρ
Can lead to dangerous laser outputs
・D0N0t disassemble the laser Disassembling the laser wⅢ
the product
DO not modify the
void a"Warranties on
ρroduGt in any way MOdifying the tool may resu"
in Hazardous Laser Radiatioh EXposuro
・Make sure the PenduIum LOcking sˇ Vitch on the Laser.Level is in the L0Cκ position
when in storage or not in use to prevent damage to the PenduIum
・When using the Laser Leve丨 , make sure you pos"ion the laser secureIy Damageto
ˉ
the laser or serious injury could resu" if the laser fa"s
・The include- Laser Enhancing Glasses are N0Tintended for use as eye protection
NEVER stare at the Iaser or point it at anyone
・D0N0T
sTARE lNT0THE LAsER BEAM AT ANΥ TlME,
・D0 N0T direCt1he Iaser beam at any other person.
・D0 N0ta"oW ch"dren to operate the Laser LeveI.
婪
诵谢忖跗戚璐滞
跛羼碉丨
邙撺琥韩湫锟懋
,
method f。 r you,read the fo"owing instructions‘
WARNING
▲ ∶
%担
瑟
茧
⒕
秤
⒈
腽叩
a}£
s∶
g满
fs::扌 :a七
慰
tJ:e牦
扣治
鼎η
T
wARNNG
▲丨
J卩 :::型 |
:m‰s襦 i昆 撬I摁 1I帑 黜
枷褐
辅撕 擗 嬲辖
;∶ :i∶ I∶
{i狲
u圩
带襁∫
驷⒒社
:剪
3
3 FOr heights above 52’ ’, use the Laser
罨
W娥 ∶古铲唧
r∶ ;丨i∶ :丨 ;j乍
:;忘 :;廾
章
莒:ga帚
v丨
褓 掣品惜
r早
极 :肯 胥
:lf∶
⒊渊甜吊l隰 裆毖m
c,Cross Hair(Both Ho"zontaI and
:ρ
:。
e∶
∶
萎
丨
麒
⒍
:∶i{;i:享 l∶
|!i
麟扌
莛
跚 辙蛋
掇虿
l撖胛
弼
⒎
⒈
n%窍
″
:飞
∶
∶
∶
;e∶ :混
∶丿
c:。
l丨;营
胝以
£
显
黾
l俨 s$lJ浞 1eded
su汀
aCe Wm
推膦 召
篷撤拧踹浸势
⒉
舾 抻鄹胃
麇
硝
枷
Vertical)Beam
;∶
e mner pend凵 ⑾
糯iI∶ 焦
拶Ieds饰
3 The
Laser
Level
Base
has
three
adjusting screws and two bubbIe leVels
贺 l:J糟 up“ wn b center the
⒋ L罐 引 m#e晶
狲 揭 摁
屏馏
d°
1廿 :∶
movement
eη
Γ匕
For additional extension, loosen the smaⅡ black
To ensure a long working Iife for the self-
knob on the side ofthe Tripod and turn the handle
secure the
C丨 oCkWise to raise the Triρ od Neck
Trlpod Neck at the desired height by tightening the
sma" black knob At its highest sett ng the Triρ od
raises the Laser LeVel to apρ rox 52” from the
Adjusting Laser LeveI and components, be
floor
s set on relatiVe|y |eve|
4 Make sure the Triρ od 丨
surface lftho su汗 ace is extremely uneVen, adjust
the tripod |egs and the screws on the Laser Level
Base to create a relauve|y level surface
Notθ
:
The sel仁 LeVeⅡ ng Feature wⅡ l comρ ensate for+4°
,
sure to fo"oW a" instructions regardlng
proper safety, Maintenance, and Storage
1 Use on丨 y mild soap and a damp cloth to
clean the tool
2 Never let any "quid get inside the tool
3 Never immerse any part of the toolin liquid
4When not in use,store the se忏 -Adlus刂 ng
Laser Level and a" components in the
incluoed Blow^田
olded Case Using the case
for storage 、
ⅣⅡ丨help protect the Laser Level
The included H0ok & Strap Attachment aⅡ oWs
″hHe hanging
the Laser Level to be adjusted 、
from an aboVe location Use the Hook & strap
when a Laser Line above 52” is needed The
丨
nc|uded strap is 24Ⅱ long with10” of adjustab|e
Velcro strlps
and components from damage store in a
co° 1dry
place away from extremes in heat
or cold
5 Always keep the PenduIum Locking Svvitch
‘
‘
L○ CK” pos"ion when in storage
or not in use to prevent damage to the
丨
n
the
Pendulum
▲
i wARNING
D0N0T stare at the Iaser beam Fa"ure to
fOIIOw this Waming cou!d resu"in se"ous injury
1 Attach the Hook & strap to the Laser Level
Triangular Loop
2 Hang
the Laser Level strap from
a
high
location suCh as a drop ce"ing,or Wood beam
3 secure the strap into pIaCe With the10”
adjustable
Velcro strips The Laser Level can be raised or
loWered within the |ength of the striρ
s for added
fleXib"ity
4 VVhen the Hook&strap is seCured into place, you
can begin using the Laser Level The self~LeVe"ng
feature wⅡ l automatica"ylevelthe Laser Line No
manual adjustments are needed
The sef-Adjustuig Laser Level indudes 2AA’
s important to
Batteries when purchased " ∶
replace the batteries if yokI notice the Laser
is not
v̌orking or beConning dim
1 LOcate the battery comρ a"ment on the back of-he
Laser Level
2 Open the Compartment coVer by
ρressing doWn on
the tab
3 Remove old batteries and replace kVith2Working
卢¢V Batt0ries in the correCt+and-pos"ions