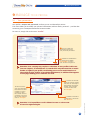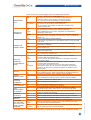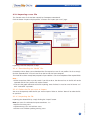
1
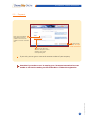
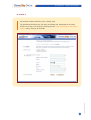
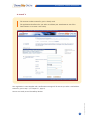
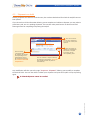
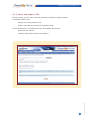
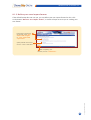
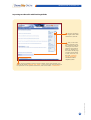
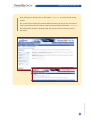
INTRODUCING CHRONOSHIP® ONLINE
1 INTRODUCING CHRONOSHIP® ONLINE
1.1 • What is ChronoShip® OnLine?
ChronoShip® OnLine is the latest Chronopost International shipping assistance solution. Entirely on line
and secure, it does not require a specific type of computer installation.
Reserved initially for customers with a Chronopost International account number, this solution enables:
• The printing of waybill on a simple desktop printer;
• The printing of Proforma invoices enclosed with your international shipments;
• The management of an address book;
• The importing / exporting of an existing address book;
• Access for tracking the shipments made.
New functions shall be added progressively to enhance this application. For example, a link for collection
on request or the possibility of online payment.
ChronoShip® OnLine is particularly directed at occasional users of the Chronopost International services.
For example, if you have 1 to 2 shipments per day, ChronoShip® OnLine is ideal for you!
1.2 • Pre-requisites for using ChronoShip® OnLine
To use ChronoShip® OnLine, you should have:
• A Chronopost International account number;
• A computer;
• A printer;
• An internet connection;
• An internet browser: • Microsoft Internet Explorer, version 5.5 and above;
• Netscape Communicator, version 6.0 and above.
However, for maximum compatibility, we recommend using Microsoft
Internet Explorer V5.5 Service Pack 2. This browser is completely
free and can be downloaded from the site www.microsoft.fr,
link downloads.
• Adobe Acrobat Reader utility, version 5 or above.
All the printouts produced by ChronoShip® OnLine are generated in pdf format (Portable Document
Format). Therefore, for using the ChronoShip® OnLine, the Adobe Acrobat Reader software
has to be installed.
2
© Copyright Paris 2005 Chronopost SA
This software is completely free and can be downloaded from the site www.adobe.fr.
CHRONOSHIP® ONLINE
REGISTRATION
2 CHRONOSHIP® ONLINE REGISTRATION
If you are already
registered, simply enter
your e-mail address,
password and validate.
If you are not
registered, click
here to fill in the
registration form.
ChronoShip® OnLine automatically checks the compatibility of your computer
configuration before each use. You can refresh the page by clicking on the button
“Check configuration”.
If you have forgotten your password or if you wish to receive mail for the confirmation
of your registration again, click on the corresponding link.
Follow these 4 steps for online registration :
• Enter your identification;
• Enter your address details;
• Enter the Chronopost International account number of your company and an invoice number
corresponding to this account;
3
© Copyright Paris 2005 Chronopost SA
• Terminate your registration.
CHRONOSHIP® ONLINE
REGISTRATION
2.1 • Identification
1 Enter your
e-mail address
as identifier and
a password.
Before validating 2
this step, you
should have taken
note of the general
conditions of sale
and the general
conditions of use.
Attention: We recommend
that you enter a password
of 6 characters containing
alphanumerical
characteristics.
Click on the button 3
“Accept and continue”.
You should also have consulted the information relating to Confidentiality and Security
by clicking on the corresponding link
4
© Copyright Paris 2005 Chronopost SA
Please check that the e-mail address entered is correctly input and that it contains
no mistakes: a message confirming the registration shall be sent to this e-mail address
when your registration is completed.
CHRONOSHIP® ONLINE
REGISTRATION
2.2 • Your address details
Please fill in these fields correctly because they will be used for identifying you as the sender.
1 Enter all the required
informations.
The compulsory fields are
marked with an asterisk.
2 Click on the
button “Accept
5
© Copyright Paris 2005 Chronopost SA
and continue”.
CHRONOSHIP® ONLINE
REGISTRATION
2.3 • Payment
Enter your Chronopost 1
International account
number and an invoice
number less than 3-months
old
2 Click on the
button “Accept
and continue”.
If you do not know
where to find your invoice
number, click on the
corresponding link.
If you wish, you can give a name to the account number of your company.
6
© Copyright Paris 2005 Chronopost SA
Attention: If you make an error in entering your Chronopost International account
number or the invoice number, you will not be able to continue the registration.
CHRONOSHIP® ONLINE
REGISTRATION
2.4 • Terminate
Enter here the invoicing address details of the company holding the Chronopost International account
that you provided in the previous step.
Usually, these details correspond to the address mentioned on your Chronopost International invoice.
They may be identical to the address entered in step 2, but in certain cases (employees working from
home, roaming persons…) they may be different.
This address shall not be mentioned in the transport documents. Only the address entered in step 2
(belonging to the user) is mentioned.
Three cases are possible:
➜ Case no 1
7
© Copyright Paris 2005 Chronopost SA
The account number entered by you is not used in ChronoShip® OnLine.
Therefore you have to enter the details of your company in order to register it.
CHRONOSHIP® ONLINE
REGISTRATION
➜ Case no 2
The account number entered by you is already used.
The application therefore asks you either to validate your attachment to the entity
found or to create a new entity by checking the box “I do not belong to the entity
8
© Copyright Paris 2005 Chronopost SA
found” and by filling in all the fields.
CHRONOSHIP® ONLINE
REGISTRATION
➜ Case no 3
The account number entered by you is already used.
The application therefore asks you either to validate your attachment to one of the
listed entities or to create a new entity.
Your registration is now complete and a confirmation message will be sent to you at the e-mail address
entered by you in step 1 (c.f. Chapter 2.1, page 4).
9
© Copyright Paris 2005 Chronopost SA
You are now ready to use ChronoShip® OnLine.
LAUNCHING CHRONOSHIP® ONLINE
3 LAUNCHING CHRONOSHIP® ONLINE
If you are already
registered, you can
simply enter your e-mail
address, password and
validate.
If you are not
registered, click here
to fill in the registration
form
If you have forgotten your password, enter your e-mail address and click on the
corresponding link. You will then receive a message with a new password. We suggest
that you modify it at once to help you remember it easily. For this, after connecting to
ChronoShip® OnLine, go to your parameters, menu “Profile”.
If you have not received your online registration confirmation message, you can ask
ChronoShip® OnLine to send it again. For this, enter your e-mail address (the one used
during registration) and click on the corresponding link.
ChronoShip® OnLine automatically checks the compatibility of your computer
configuration before each use. You can refresh the page by clicking on the button
“Check configuration”.
From the home page, you can modify the user language or access to the “User guide”,
the “Term of Uses”, the links “Contact us” and “Legal notices”.
10
© Copyright Paris 2005 Chronopost SA
The user language can be only modified from ChronoShip® OnLine’s home page.
It is not possible when you are in the application.
SHIPPING WITH CHRONOSHIP® ONLINE
4 SHIPPING
WITH
CHRONOSHIP® ONLINE
4.1 • Preparing a shipment
After identification of the user, the page “prepare a shipment” is automatically loaded. It allows
you to enter and print your transport letter.
Select the Chronopost 1
International service
that you wish to use
for making your shipment.
The button “reset”
allows you to clear
a wrong selection.
NB: An additional scrolling menu may appear on this screen, enabling you to select
a shipping address.
If you use Netscape navigator as your browser, you must validate after selecting
the service in order to continue. Under Internet Explorer, the rest of the page
is automatically loaded
3 Entering the
information qualifying
your shipment:
• Reference;
• Dimensions;
• Weights;
• Nature of shipment;
• Nature of goods;
• Value declared
(for international
shipments).
Entering the destination,
2
you can :
• Search the address
book if the addressee
already exists by clicking
on the link Find an
address;
• Enter all the address
details and add this new
addressee to your address
book by checking the
corresponding box.
4 Entering the options:
• Saturday delivery;
• Optional insurance.
Click on
6
“accept” to print
your transport letter
or on “Put on Hold”.
NB: Your company may require the administration of all existing user profiles.
In this case, an administrator is created within your company. This administrator
will be entitled to link a number of access rights to your profile and restrict your
access to certain functionalities of ChronoShip® OnLine.
11
© Copyright Paris 2005 Chronopost SA
Selection of Chronopost 5
International account number
to be invoiced.
SHIPPING WITH CHRONOSHIP® ONLINE
• For proceeding faster:
The consignee already exists in the address book and you know the code?
• Enter this code directly in the field “Consignee code” then press the “Enter” key of your
keyboard and the complete record will be displayed.
• Or enter the beginning of the code or the company name and click on the link “Quick search”.
If you wish to make several shipments to the same consignee, remember to
check the box “save this consignee for next shipment”, you need then enter only
the information qualifying your shipment.
A Proforma invoice for accompanying your international shipments can be
entered from the sub-menu “validated shipments”.
At any time, find the information that you need by clicking on the corresponding
links (accompanying document, information on the destination country,
estimate of delivery time).
If ChronoShip® OnLine detects an error or if any information is missing,
a message explaining the cause of the problem is displayed. In all cases,
correct your input and validate the shipment again.
• What is the difference between “Put on hold” and “Accept”?
The validation allows the transport letter conforming to the information entered and checked to
be printed. A validated shipment is no longer modifiable, but it can be consulted or reprinted from
the sub-menu “Validated shipments”.
12
© Copyright Paris 2005 Chronopost SA
Keeping a shipment pending allows an incomplete input to be made. None of the information
entered is then checked by ChronoShip® OnLine. In this case, the shipment can be consulted
and modified from the sub-menu “Shipments on hold”.
SHIPPING WITH CHRONOSHIP® ONLINE
4.2 • Validated shipments
The validated shipments are the shipments for which the entry has been checked and the waybill have
been printed. These shipments are ready for handing over to Chronopost International.
You can display the
information entered
for a transport letter
by clicking on the link
of the object number.
You can delete
a waybill by checking
the button corresponding
to the shipment that has
to be deleted and clicking
on “Cancel selected
shipments”.
You can search for
one or more shipments
by using the search/sort
options.
You can enter and print
a Proforma invoice for your
international shipments by
clicking on the button
“Proforma”.
You can reprint
a waybill by clicking
on the button “Reprint”.
A shipment cannot be modified after its validation.You can however delete it.
A deleted shipment cannot be recalled.
4.2.1 Printing a Proforma invoice
ChronoShip® OnLine offers you the possibility of printing a Proforma invoice to accompany your goods
and documents of commercial value abroad.
2 Click on “Add”,
and repeat the operation
as many times as there
are articles composing
your Proforma invoice.
3
Click on
“Print”.
13
© Copyright Paris 2005 Chronopost SA
Enter the 1
designation, quantity
and price of the
articles contained
in your parcel
SHIPPING WITH CHRONOSHIP® ONLINE
4.3 • Shipments on hold
Pending shipments are those for which the entry has not been checked and for which the waybill have not
been printed.
If you do not have all the information allowing you to complete and validate a shipment, you can make its
partial entry and save it in pending shipments. You can thus make partial entries in advance and find
them again later for completing and printing the waybill.
You can search for
one or more shipments
by using the search/sort
options.
You can delete
a transport letter
by checking the button
corresponding to the
shipment that has to
be deleted and clicking
on “Cancel selected
shipments”.
You can display or
modify the information
entered for a waybill
by clicking on the
corresponding links.
You can validate a shipment directly
by clicking on the button “Accept”.
The waybill will then be printed
automatically.
Any modification will take you to the page “Prepare a shipment” allowing you to modify or complete
the desired fields. You can then either validate your shipment and print the waybill or keep it pending
again.
14
© Copyright Paris 2005 Chronopost SA
A deleted shipment cannot be recalled.
DELIVERY
5 DELIVERY
NOTE
NOTE
The ChronoShip® OnLine delivery note allows:
➜ the listing of all the shipments validated during a working day;
➜ the archiving of all validated shipments in the history, enabling access to tracking.
Click on the button
1
“Print delivery
note”.
NB: An additional scrolling menu may be displayed on this screen allowing you to select
the shipper address for which you want to print the delivery note.
Click on the link. 2
The system automatically outputs the document in the print utilities. You can then print it from the printer
of your choice.
Do not forget to print the delivery note in two copies, one must be submitted
at the depot, the other is to be kept for your records. Both of them must be signed.
NB: This menu might not be accessible. If an administrator has been designated in
your company, he can restrict your access rights by preventing you from printing the
delivery note.
15
© Copyright Paris 2005 Chronopost SA
It is possible to reprint a delivery note. For this, go to the menu “History”, and click
on the sub-menu “Reprint a delivery note”.
HISTORY
6 HISTORY
All the shipments handed over to Chronopost International are archived in this ChronoShip® OnLine menu.
The validated shipments are automatically archived every day at midnight (GMT).
This history management menu allows:
• one or more archived shipments to be found and consulted;
• the details of an archived shipment to be consulted;
• access to the tracking of your shipments.
Select the search
criteria.
Select the date
interval in which
you wish to search.
Select the sort criteria
for displaying your search.
You can access
the tracking of
each shipment by
clicking on its object
number.
Run the search
by clicking on the
corresponding button.
You can display all the information
corresponding to your shipment
by clicking on the link “View”.
The three criteria function in combined mode, that is, the selection will be made
by taking into account all three criteria simultaneously. However, you can search
on a single criterion.
16
© Copyright Paris 2005 Chronopost SA
NB: This menu might not be accessible. if an administrator has been designated in
your company, he can restrict your access rights by preventing you from accessing
the history.
YOUR ADDRESSES
7
YOUR
ADDRESSES
In order to facilitate the entry of shipments, ChronoShip® OnLine allows you to manage your address book.
Various options are available for enhancing this address book:
• Direct entry into the address book;
• Saving an address while entering a shipment via the option “Add to address book”
in the shipment entry screens;
• Importing an address file via the import tool.
Each consignee must be identified by a “unique code” of alphanumerical type.
For opening the
address search page.
For opening the
shipment preparation
page by reusing the
address selected here
as the consignee.
For deleting
an address.
For recording a new
address.
For access to the
previous or the next
record.
For validating and saving
the information recorded.
All the operations for managing an address book are possible: “Consult”, “Search”, “Create”,
“Modify”, “Delete an address”, as described in the Chapter 7.1 to 7.5.
17
© Copyright Paris 2005 Chronopost SA
NB: This menu or certain functionalities of this menu may not be accessible. If an
administrator has been designated in your company, he can define your specific
access authorization to the address book.
YOUR ADDRESSES
7.1 • Consult the address book
ChronoShip® OnLine automatically displays the first address in your address book. The links “Previous”
and “Next” allow you then to navigate.
You can directly access an addressee record by entering the consignee code and
validating with the key “Enter”.
7.2 • Searching an address
• Click on the link “Look for an address” to open the address book:
This page shows the contents of your address book with 10 addresses per page.
You can then navigate using the links “Previous” and “Next” but it is easier to make
a search by using the options “Starts” and “Contains…”.
In our example, we have asked the system to display all the consignee codes starting
with the figures “00”.
18
© Copyright Paris 2005 Chronopost SA
The “Starts…” search consists of selecting the addresses whose company name or town
or zip code is greater than or equal to the criterion entered in an increasing sort order
in the selected search zone.
YOUR ADDRESSES
The “Contains …” search consists of selecting the addresses whose company name
or town or postal code contains the criterion entered.
In our example, we have asked the system to display all the consignee codes starting
with the figures “00”.
To carry out a search, simply select a search criterion from the scrolling list (company name, town…),
select a search option “Starts…” or “Contains…”, enter the search criterion and click on the button
“Search”.
The entry of search criterion is not case sensitive.
19
© Copyright Paris 2005 Chronopost SA
To consult, modify or delete an address, select it and click on “Continue”, the system
shall quit the search page and display the address in the main page.
YOUR ADDRESSES
7.3 • Create an address
To create an address, click on the button “New”, the entry fields are initialised allowing you to enter a
new address:
List of information contained in the Address record:
Consignee code
It is a unique identification of the consignee and allows the complete
record to be selected while entering the shipments; you can enter numbers
and letters.
Consignee
(name or
You can enter a company name and addition (division, service, department, unit…).
company name)
Address
Two address lines are available.
Door code
The door code is useful for delivering your shipments.
Country
Select the country from the scrolling list. It is possible to position yourself
in the list by entering the first letter of the country name.
Region / Department
In this zone, you can enter the information concerning your addressee’s region.
Town and zip code
In this zone, you can enter the information concerning your town and zip code.
Name of contact
Enter a contact name.
Telephone,
mobile phone, fax
25 characters are available to you for defining a fixed phone number,
a mobile phone number and a fax number.
E-mail
The structure of the e-mail address must respect the syntax
“[email protected]”
20
© Copyright Paris 2005 Chronopost SA
After completing your entry, click on the button “Save” to save the address record.
YOUR ADDRESSES
7.4 • Modifying an address
To modify an address, simply select it from the list (it is displayed on the main page), make the necessary
modifications and click on the button “Save” to save the modified record.
7.5 • Delete an address
To delete an address, simply select it from the list (it is displayed on the main page), then click on the
button “Delete”. A confirmation message is displayed, click on “OK” to confirm the deletion or click on
the “Cancel”.
Deletion of an address is irreversible and final.
7.6 • Direct selection of an address for creating a shipment
The main page of the address book includes a link for directly creating a shipment using the current
address. To carry out this operation, simply display the address on the main screen and click on the link
“Prepare a shipment for this consignee”.
The page “Prepare a shipment” is opened for allowing the selection of the service using the pre-filled
information for the selected address.
The address will be displayed only when you have selected the service to be used.
21
© Copyright Paris 2005 Chronopost SA
ChronoShip® OnLine checks that the destination is indeed covered by the
selected service.
IMPORT/EXPORT AN ADDRESS
8 IMPORT/EXPORT
FILE
AN ADDRESS FILE
8.1 • Import
A tool for importing addresses is included with ChronoShip® OnLine. This tool is accessible from the
sub-menu “Imports” of the menu “Your addresses”. It allows an address book to be imported in
a pre-defined format or to create your own import format.
It is possible to:
• Define if the address book should be entirely replaced by the new imported address book
or if the new addressee records from the imported address book should be added to the
existing address book;
• Update the existing records based on the addressee code.
You can perform three distinct actions from this page:
• Use the ChronoShip® OnLine import format;
• Define and use an import format;
• Use an existing import format.
Click on this link to
access the simplified import
Click on this link to create
a new import format.
Click on this link
to display the format
corresponding to this
format
Click on this button
after selecting an existing
format, to access the import
page.
22
© Copyright Paris 2005 Chronopost SA
NB: This menu may not be accessible. If an administrator has been appointed in your
company, he can restrict your access rights by preventing you from importing an
address file.
IMPORT/EXPORT AN ADDRESS
FILE
8.1.1 Simplified import
The simplified import consists of using the ChronoShip® OnLine standard import format.
23
© Copyright Paris 2005 Chronopost SA
For assisting you and your import, ChronoShip® OnLine displays its standard format along with some
explanations.
IMPORT/EXPORT AN ADDRESS
FILE
8.1.2 Select and import a file
From this screen, you can select a file to be imported and define its import conditions:
ChronoShip® OnLine must:
• Replace the existing address book;
• Add the new addresses to the existing address book.
In case of duplicates in the addressee codes, ChronoShip® OnLine must:
• Ignore the new address;
24
© Copyright Paris 2005 Chronopost SA
• Update the old address with the new address.
IMPORT/EXPORT AN ADDRESS
FILE
8.1.3 Define your own import format
If the default format does not suit you, you can define your own import format. For this, click
on the button “Define a new import format”, a wizard will open to assist you in creating your
own format.
Depending on the format
of your file, select “File
1
with fixed length”
or “File with Field
separator”.
Specify whether the contact 2
name is in one or two fields.
25
© Copyright Paris 2005 Chronopost SA
3 After completing your
selection, click on “Continue”.
IMPORT/EXPORT AN ADDRESS
FILE
Importing an address file with fixed length fields
1 Start by specifying
the length of each field
contained in your file.
2 Then, in the order
of their position in the
file, select the fields by
clicking on each name.
Note that the selected
fields are displayed in
the bottom of the page.
To ignore certain fields
in your source file, use
the field “column
to be ignored”.
The fields in bold are
compulsory fields.
26
© Copyright Paris 2005 Chronopost SA
3 If you have forgotten a field or made a mistake in the order of fields, you
can use the button “Delete last item”, It will cancel your last selection and
the operation can be repeated. Otherwise, click on the button “Continue”.
IMPORT/EXPORT AN ADDRESS
FILE
After defining your format, click on the button “Continue” to access the saving
phase.
The system will re-display the structure defined and will ask you to save your
format under a name chosen by you. Enter an explicit name and click on the
button “Continue”. The confirmation window is displayed and asks you to use
27
© Copyright Paris 2005 Chronopost SA
the wizard for processing the import.
IMPORT/EXPORT AN ADDRESS
FILE
Import an address book with fields separated by a character
1 Start by defining the
character separating each
field: for example, the comma.
Then, if necessary, enter the
character surrounding the
data for each field: for example,
the double quotes «“ ”».
2 Then, in the order of
their position in the file,
select the fields by clicking
on each name. Note that the
selected fields are displayed
at the bottom of the page.
For ignoring certain fields in
your source file, use the field
“column to be igored”.
The fields in bold are
compulsory fields.
28
© Copyright Paris 2005 Chronopost SA
3 If you have forgotten a field or made a mistake in the
order of fields, you can use the button “Delete last items”,
It will cancel your last selection and the operation can be
repeated. Otherwise, click on the button “Continue”.
IMPORT/EXPORT AN ADDRESS
FILE
After defining your format, click on the button “Continue” to access the file saving
screens.
The system will re-display the structure defined and will ask you to save your format
under a name chosen by you. Enter an explicit name and click on the button “Continue”.
29
© Copyright Paris 2005 Chronopost SA
The confirmation window is displayed and asks you to use the assistance process
the import.
IMPORT/EXPORT AN ADDRESS
FILE
8.2 • Exporting the address book
To retrieve your entire address book or to make global corrections in it, ChronoShip® OnLine allows
you to export its entire contents in the form of a CSV file (file of comma separated by values).
For this, click on the sub-menu “Export” of menu “Your addresses”. A dialog box is displayed and
asks you to save the file on disk or open it directly.
If you choose to save it on the disk, you must select the destination folder, modify the default name,
if required (exported_ab.csv) and validate the operation by clicking on “Save”.
If you choose to open the address book from its current location, your Internet browser will automatically
run the desktop application associated with the CSV file format (file of comma separated by values)
and display the address online; for information, the CSV files are very often associated with “spreadsheet”
software such as Microsoft Excel.
30
© Copyright Paris 2005 Chronopost SA
If you make changes directly on the opened file, you must save them on the hard disk
of your computer.
MANAGE YOUR
9 MANAGE
PROFILE
YOUR PROFILE
9.1 • Your parameters
Your profile is unique and personnel, it allows you to use ChronoShip® OnLine.
This menu allows you to modify your personal informations (address details, password…), and the data
concerning your Chronopost International account number.
To access it, simply click on the menu “Profile”.
1 You can modify the
information concerning
your personnel parameters.
2 Validate the modifications
by clicking on the button
“Continue” to access
your account management.
Attention ! Your company may require to administer all user profiles. In this case
(see next chapter), an administrator is created which may then associate a certain
number of rights to your profile, not allowing you to access certain functions of
ChronoShip OnLine. If there is an existing administrator, an additional link appears
on this page, enabling you to send him an e-mail.
3 To delete an account or
a sub-account : click on the
link “Delete”.
Attention ! It is impossible to recall a deleted account or sub-account.
It has to be registered again.
31
© Copyright Paris 2005 Chronopost SA
To add an account: 1
enter the Chronopost
International account
number, an invoice
number less than
three month old and
eventually a name for
this account and then
click on “Accept”.
2 To add a sub-account:
select the account number
and enter the Chronopost
International sub-account
number, and eventually
a name and then click
on “Accept”.
MANAGE YOUR
PROFILE
9.2 • User management
If you are registered as a customer administrator, you can create new users and allocate them a certain
number of access rights.
This management can then be carried out using this menu.
From the user management
screen, it is possible to:
• Add a user (chapter 9.2.1)
• Modify a user (chapter 9.2.2)
• Delete a user (chapter 9.2.3)
• Importing a user file
(chapter 9.2.4)
9.2.1 Creating a user
Click on the button "Create a profile" to access a blank page of the following type:
32
© Copyright Paris 2005 Chronopost SA
Enter the information
needed to create
the user.
MANAGE YOUR
PROFILE
Complete the following fields:
Title
Select the user's title.
First name
Enter the user's first name.
Surname
Enter the user's surname.
Telephone
Enter the user's telephone number.
Fax
Enter the user's fax number.
e-mail
Enter the user's e-mail address.
NB: this e-mail address will be his/her login.
Your password
Enter a password. NB: this must have a minimum of 6 characters.
Company
Enter the name of the user's company. Two lines are available.
Position
Enter the user's position.
Department
Enter the user's department in the company.
Address
Enter the user's home (street) address. You have 2 lines for this.
Country
Enter the country of the user's address.
Region/
department
Enter the region or department of the user's address.
Post code
Enter the post code for the user's address.
Town
Enter the town for the user's address.
33
© Copyright Paris 2005 Chronopost SA
Confirm password Enter again the same password as above.
MANAGE YOUR
PROFILE
Box
ticked
Autonomous
user
Manage all
shipments
Yes
No
Yes
The user is considered as autonomous, i.e.
• he does not have access to existing sender addresses
(only the address of his profile is accessible to him);
• he can only consult and manage his own shipments.
The user is then considered as administrated i.e.
• he can access all existing sender addresses;
• he can consult and manage all shipments made by other
administrated users.
Access prohibited for entry and consultation of shipments.
Entry of shipments authorised but deletion prohibited.
Access prohibited to entry of the shipments but consultation
and deletion authorised.
Access prohibited to entry of the shipments but consultation authorised.
Total access to the management of shipments: entry, modification,
deletion, etc.
Access to the address book prohibited.
The box "Only use addresses in the address book" is only activated
in this case.
Entry and consultation of addresses authorised but deletion
modification prohibited.
Access to entry of addresses prohibited but consultation and
deletion authorised.
Access to entry of addresses prohibited but consultation and
modification authorised.
Total access to the management of receiver addresses:
entry, modification, deletion, etc.
This box is activated when the parameter "none" is entered
at address book management level.
The user can then only make shipments to consignees referenced
in the address book.
This box is activated when the parameter "none" is entered
at address book management level.
The user does not then have access to consignees registered
in the address book, but can still make shipments to temporary
consignees (it will not be possible to register the address in the
address book).
Total access to the import/export tool for consignee addresses.
Access prohibited to the import/export tool for consignee addresses.
Total access to delivery notes. Creation and consultation.
Box
not ticked
None
Add
Delete
Modify
All
None
Add
Manage the
address book
Delete
Modify
All
Box
ticked
Only use
addresses
in the address
book
Import
Print
another
delivery note
Box
not ticked
No
Access prohibited to delivery notes. Creation and consultation.
Consult
archived
shipments
Yes
Total access authorised to history menu.
No
Access to history menu prohibited.
Manage
your accounts
Yes
No
Yes
Yes
No
Yes
No
Total access to the management of accounts.
Access to accounts management prohibited.
The account number used to validate the shipment is hidden.
This function only works when there is one account registered.
There is no restriction, the user can select and visualise the account
number to validate the shipment.
Option of subscribing to an optional insurance is accessible.
Option of subscribing to an optional insurance is not accessible.
Option of requesting Saturday delivery is accessible.
Option of requesting Saturday delivery is not accessible.
Box
ticked
Allows to automatically send the user a mail informing him that
his profile has been created/modified.
Box
no ticked
The function has not been activated: the user will not be informed
that his profile has been created/modified.
User
cannot select
an account
Optional
insurance
Saturday
delivery
Informing
the user that
his access has
been created/
modified
No
Once the entry is completed, the new profile is registered by clicking on the "Continue" button.
34
© Copyright Paris 2005 Chronopost SA
Then select the profile rights from the following options:
MANAGE YOUR
PROFILE
The final stage in creating a user profile consists of registering the Chronopost
International account number(s) enabling the creation of shipments.
2 To add a
sub-account:
1
To add an
account:
• select the account
number,
• enter the account
number, and a name
for the account if
relevant,
• enter the sub-account
number, and a name
for the sub-account
if relevant,
• click on "Validate".
• click on "Validate".
To delete an account or sub-account number, click on the "Delete"
link of this account.
To invalidate an account, i.e. so it cannot be used to create shipments,
click on the "Deactivate" link of this account.
NB: It is impossible to retrieve a deleted account or sub-account.
It will have to be recreated.
9.2.2 Modifying a user
From the "User Management" screen, select the user to be modified from the list, click on the "Consult
a profile" button, and the profile page will appear.
Make the modifications required, and then save the changes.
The modifications will take effect as from the next user connection.
9.2.3 Deleting a user
From the "User Management" screen, select the user to be deleted, and then click on the "Delete a profile"
button. A warning message will ask for confirmation of the deletion.
35
© Copyright Paris 2005 Chronopost SA
NB: It is impossible to retrieve a deleted account
MANAGE YOUR
PROFILE
9.2.4 Importing a user file
This function must first have been actived by Chronopost International.
Click the button “import multiple profiles” to access the “import your users” page.
Importing a user file comprises 3 steps:
9.2.4.1 Downloading the “Model” file:
ChronoShip Online allows you to download the file required to save all user profiles. To do so simply
click the “download file” link and save file to the hard disk of your computer
This Excel file has been aready been prepared; all you need do is save it and complete all the required fields.
Note :
• All the compulsory fields must be saved. If you fail to do so, the relevant lines in the file will not be
imported and the user profiles will not be created.
• To ensure the good realization of the file importing, once finalized, it must be saved in format “csv”
with “semi-colon” separators.
9.2.4.2 Select the file you want to import:
You must subsequently select the file you want to import. To do so, click on “browse” to select the file
on your disk.
9.2.4.3 Importing the file:
Note: you must first indicate the import conditions, i.e.:
• replace all existing users,
• update existing users and add new users,
• add new users without updating existing users.
36
© Copyright Paris 2005 Chronopost SA
Importing the selected file by simply clicking the “import” button.
F.A.Q.
10 F.A.Q.
> How to register on ChronoShip® OnLine?
Refer to Chapter 2 of this manual for guidance on your registration. Attention, since the service
is reserved for customers with a Chronopost International account, you will be asked for this account
number as well as an associated invoice number (dating less than three months)
> How to place the transport letter on your parcel?
It's quick and easy, just fold it in half and insert it in a clear plastic envelope with adhesive back,
minimum format: 225 x 165 mm (available in all office supply stores).
Note: bar codes and addresses printed on the air waybill must always be visible.
> Where to deposit your shipments?
Your shipments can be deposited and taken charge:
• In any French post office;
• In all our French agencies or Chronopost International sales outlets;
• Directly in your home/office, if a collection service is available to you.
> If you are unable to connect
Check that your Internet connection is still active: For this, try to connect to an Internet site of your choice.
Your network parameters may have been modified.
Contact the network administrator of your company or your computer technician to check whether any
modifications have been made to the Internet connection.
Otherwise, contact us by dialling 0825 335 345 (0,15 € VAT included per minute, as of November 1 2004
st
from Monday to Tuesday between 9h and 18h).
In any case, you can always hand over your shipments using the traditional waybill.
> If you are unable to print your transport letter
You can reprint an already validated waybill from the validated shipments page.
> How many transport letters are required with your shipments?
For both shipments within France and abroad, you need to print only one waybill. This consists of
one sheet for domestic shipments and two sheets for abroad (Export treatment and Receiver’s copy).
Do not forget that if you enclose a Proforma invoice with your international shipments, you must print
out five copies of this invoice on letter-headed paper.
> If you have produced a transport letter but the parcel is not sent…
You can simply delete this shipment from the list of validated shipments. In all cases, only shipments
handed over to the Chronopost International network shall be invoiced.
> What is a sub-account?
37
© Copyright Paris 2005 Chronopost SA
In order to facilitate the processing of your invoices, Chronopost International offers you the possibility
of sub-accounts, in which you can enter your shipments. The shipments are then directly sorted according
to the sub-accounts in your invoice. To save sub-accounts in ChronoShip® OnLine, go to the sub-menu
“Your parameters” in the menu “Profile”.
F.A.Q.
> How much will you be invoiced?
Your tariff agreement has been negotiated with the representative of your company.
If you do not have your tariff grid, please contact your usual commercial representative.
> Is it compulsory to print the Proforma invoice via ChronoShip®
OnLine?
Not at all. You can enclose your own Proforma invoice without producing it through ChronoShip® OnLine.
> Which products can be accessed from ChronoShip® OnLine?
You can use ChronoShip® OnLine for the following services:
• Chrono Premium® domestic;
• Chrono Classic® domestic;
• Chrono Premium® international;
• Chrono Classic® international;
• Chrono Hold at location.
> To convert an Excel file (.xls) into text format (.csv)
In order to import a file in ChronoShip® OnLine, you must first convert the format of your file.
For this, under Excel, go to the menu File > Save as…
In “Type of file”, select CSV (separator: semi-colon) and click on the button Save.
> How can you be designated client-administrator?
Simply submit a request to your usual commercial representative.
> You cannot access all the functionalities described in this user manual?
38
© Copyright Paris 2005 Chronopost SA
You company may already have administrator who manages the access rights of all ChronoShip®
OnLine users.
Contact him via the “profile” menu by clicking on the relevant link.