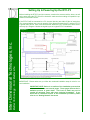
1
RTC-P3 Retail Traffic Counter User’s Manual January 2006 Firmware Version 5.1 Better Technology...For A Better Life Inter-Dimensional Technologies, Inc. (Manual last updated: February 2010) -1- Table of Contents Introduction Page 3 Key Features Page 4 Setting Up & Powering Up the RTC-P3 Page 7 Better Technology...For A Better Life Inter-Dimensional Technologies, Inc. Menu Options Page 22 View Today’s Traffic Page 23 Set Date/Time Page 24 Adjust Contrast Page 25 Clear All Traffic Data Page 26 Clear Traffic Data Range Page 27 Buzzer Status Page 28 Sensor Sensitivity Page 29 Change Access Code Page 30 View Traffic Page 31 Transmit Page 32 Door Type Page 33 # Days to Transmit Page 34 Clear In-House Total Page 35 Select Memory Layout Page 36 Setting Up to Communicate with the PC Page 38 Displaying and Printing the Traffic Data with Microsoft Excel Template Page 39 Frequently-Asked Questions Page 40 Data Format Page 44 Technical Specifications Page 45 Cable Specifications Page 46 Contact Information Page 47 -2- Introduction Congratulations on your purchase of the RTC-P3 Pedestrian Counter. We are confident that the RTC-P3 will be a valuable asset to you and your business. The information that the RTCP3 Pedestrian Counter enables you to gather can help you become more efficient and profitable. Features: Records up to 250 days of traffic and compiles results hour-by-hour Entrance indicator buzzer included RS-232 communications with Personal Computers (PC), or Point-of-Sale Systems (POS) or any other compatible device Sense traffic on up to three entrances simultaneously Security features to protect against tampering Ability to save traffic totals for each door sensor individually Directional sensor compatibility Battery Backup so the date, day-of-week and time are kept when power is turned off Records up to 65,535 customers per hour Adjustable LCD contrast Alignment LED’s IMPORTANT NOTICE: Better Technology...For A Better Life Inter-Dimensional Technologies, Inc. The RTC-P3 Pedestrian Counter has many features that are usually found in more expensive systems. Features like: Door sensors are required for use with this product. We have two different model door sensors. The RTC-S2X is our standard door sensor. It is capable of sensing traffic on entrances as wide as 8’. The RTC-S2XL is our long-range door sensor. It is capable of sensing traffic on entrances wider than 8’, such as those found in mall environments. The RTC-P3 can accommodate up to three of these sensors, in any combination. -3- Key Features The RTC-P3 has a few key features that greatly dictate its operation. Therefore, please read this section carefully so that the RTC-P3 works as desired. Door Type Choosing the correct “door type” is extremely important in determining when pedestrians will be counted. There are three different settings for this option: Door Swings Out, Door Swings In and Count In & Out. There are two reasons why this option exists. First, the action of the doors of the establishment can interfere with the RTC-P3’s door sensors. Our door sensors are bi-directional. This means that the door sensors can normally determine if the pedestrian is entering or leaving the establishment. The door sensors do this by using two infrared sensors that protrude from the door sensor case and run parallel to each other, as shown in Diagram 1 below. Diagram 1 Better Technology...For A Better Life Inter-Dimensional Technologies, Inc. NOTE: This setting can be changed through the menu options. See the Menu Options section for details. If the beam that is closer to the entrance is broken first, the door sensor knows that a pedestrian should be entering the establishment. When the beam that is further from the entrance is broken first, the door sensor knows that a pedestrian should be leaving the establishment. If all doors to the establishment physically swing outside the establishment (or if there is no door, such as those found in mall environments), then the doors will not interfere with the door sensor’s infrared beams. Therefore, this option should be set to Doors Swing Out and the RTC-P3 and its door sensors will perform as described in the preceding paragraph. However, if at least one of the doors physically swings into the establishment, there is the potential for that door to interfere with the door sensor’s infrared beams. To illustrate this, the following is a description of what happens when a pedestrian enters through a door that physically swings outside the establishment, and then when a pedestrian enters through a -4- However, the interference usually happens when the pedestrian exits the establishment. To illustrate this, the following is a description of what happens when a pedestrian exits through a door that physically swings outside the establishment, and then when a pedestrian exits through a door that physically swings into the establishment. When a pedestrian exits through a door that swings outside the establishment, he will push the door open and walk through the entrance. The pedestrian will break the beam of the door sensor that is further from the entrance. The door sensor knows that a pedestrian is exiting and does not send a signal to the RTC-P3 to count that pedestrian. When a pedestrian exits through a door that swings into the establishment, he will pull the door open and then exit the establishment. This time, the door may break the beam closer to the entrance first. This is where the potential interference occurs. Since the pedestrian pulls the door open, the beam closer to the entrance will be broken first and the door sensor may be “fooled” and send a signal to the RTCP3 to count a pedestrian. This may happen even though the pedestrian is exiting the establishment. Better Technology...For A Better Life Inter-Dimensional Technologies, Inc. door that physically swings into the establishment. When a pedestrian enters through a door that swings outside the establishment, he will pull the door open and walk through the entrance. The pedestrian will break the beam of the door sensor that is closer to the entrance first. The door sensor knows that a pedestrian is entering and sends a signal to the RTC-P3 to count that pedestrian. When a pedestrian enters through a door that swings into the establishment, he will push the door open and then enter the establishment. This time, the door may break the beam closer to the entrance first, not the pedestrian. The result is the same. We combat this interference by using the Door Swings In option. This option counts every other piece of activity sensed by the door sensor. This must be done because, when this option is set to Door Swings Out, the action of the door that physically swings into the establishment may always make the door sensor send a signal to the RTC-P3 to count the pedestrian. That is because, regardless of if the pedestrian is entering or exiting the establishment, the action of the door will always break the beam that is closer to the entrance first. This would double the traffic totals. To illustrate how this option works, the following is an example. First, pedestrian #1 enters the establishment and is counted. Next, pedestrian #2 enters the establishment and is not counted. At this point, there are two pedestrians in the establishment, but the RTC-P3 traffic total is one (1). Next, let’s assume that one of the pedestrians, say, pedestrian #2, exits the establishment. The pedestrian is counted because the RTC-P3 counts every other piece of activity sensed by the door sensor. The traffic total is now two (2). When pedestrian #1 exits the establishment, the RTC-P3 does not count the pedestrian and the traffic total remains at two. No matter what order the pedestrians enter and exit, when all pedestrians have left, the traffic total will be correct. This is the reason we need these first two options: Door Swings Out and Door Swings In. The third option is more straightforward to understand. It is the Count In & Out. This option is used in cases where it is important to count each and every occurrence of a pedestrian, regardless of if they have been previously counted or if they are entering or exiting the establishment. An example of when to use this option is when the need arises to analyze advertising in the area. That is because, in advertising, if a particular pedestrian passes through the entrance ten times, that individual should be counted ten times. This option can be used regardless of if the doors physically swing into or outside the establishment. This option is usually only used to analyze advertising in areas such as malls and other public areas. NOTE: Not all doors that physically swing into the establishment will interfere with the door sensor. This will largely depend upon the design of the door. If the door is all glass, the door sensor may not sense it and there will be no interference. If the door is solid, or has a thick frame, there is more of a chance that the door sensor will sense the door and have interference. If you have a door that physically swings into the establishment, you must determine if your door can be sensed by the door sensor. NOTE: This setting can be changed for each of the three door sensors that -5- can be connected to the RTC-P3. However, if at least one door physically swings into the establishment, then all doors should be set to Door Swings In. Otherwise, you can use Door Swings Out and Count In & Out, in any combination. This option may seem confusing. If you are not sure what setting to use, please give us a call and we will discuss your installation. Better Technology...For A Better Life Inter-Dimensional Technologies, Inc. Select Memory Layout The RTC-P3 gives you two memory layout settings. First, the traffic counter will save the last 250 days of traffic history. If you have more than one door sensor connected to the RTC-P3, all traffic from each door sensor will be combined. For example, if a pedestrian enters through one door during the 1pm hour (1:00pm to 1:59pm) and another pedestrian enters through another door during that same hour, the traffic total for that hour will be two (2). The advantage to this option is that the RTC-P3 will save 250 days of traffic history. The disadvantage is that the traffic history will not be separated for each entrance. If you have only one door sensor connected to the RTC-P3, or it is not important to know the traffic history for each entrance, then select this option. The other memory layout setting will save 83 days of traffic history. If you have more than one door sensor connected to the RTC-P3, the traffic history from each door sensor will be separated. For example, if two pedestrians enter through one door during the 1pm hour and a third enters through another door during that same hour, the traffic total for the first door will be two (2) and the traffic total for the second door will be one (1). The advantage to this option is that the RTC-P3 will separate the traffic history for each entrance. The disadvantage is that the RTC-P3 will save 83 days of traffic history instead of 250 days. If you have more than one door sensor connected to the RTC-P3 and want to capture the individual traffic history for each door sensor, then select this option. This setting would be used when one door sensor is connected to the entrance of the establishment, while one or two other door sensors are set up in different areas of the establishment. This will not only allow the RTC-P3 to capture the traffic entering the establishment, but will also allow the analysis of traffic patterns in different areas of the establishment with the other door sensors, such as different departments in a retail store. -6- Setting Up & Powering Up the RTC-P3 Before installing the RTC-P3 and door sensors, examine the area around the doors, as well as the area where the RTC-P3 will be located to make sure that nothing will impede the operations of the traffic counter. If the RTC-P3 will be connected to a PC, be sure that they are within 50 feet of each other. The communications may not work properly if the distance between the PC and the RTC-P3 is greater than 50 feet. Also, make sure that the cables are not in a traffic area where someone may trip. Diagram 2 shows the logical layout of a typical RTC-P3 installation. Better Technology...For A Better Life Inter-Dimensional Technologies, Inc. Diagram 2 IMPORTANT: Please make sure you follow the numbered installation steps in order for correct installation: IMPORTANT NOTE: Below is an outline of the installation process that will be detailed in the next several pages. These pages discuss the installation process in great detail. This level of detail may not be needed by advanced users with some technical knowledge. If you would like a condensed version of the installation procedure, please refer to our “Getting Started” document. -7- 1. Install the Hardware a. Run the Communications Cable(s) b. Install the RTC-P3 Traffic Counter i. Connect the RTC-P3 to the PC (optional) ii. Connect the RTC-P3 to the Door Sensor(s) iii. Connect the RTC-P3 to the Wall Outlet c. Install the Door Sensors i. Install the RTC-S2X Standard Door Sensor (optional) 1. Mount the RTC-S2X Enclosure 2. Find the “Sweet Spot” of the Infrared Beams 3. Mount the Reflector ii. Install the RTC-S2XL Long-Range Door Sensor (optional) 1. Run the Communications Cable Over the Top of The Entrance 2. Mount one of the Enclosures for the RTC-S2XL 3. Find the “Sweet Spot” of the Infrared Beams 4. Mount the other Enclosure for the RTC-S2XL d. Continue Setting Up the RTC-P3 2. Test the Hardware 3. Install the Software (optional) a. Insert Installation CD b. Begin Software Installation c. Select Directory for Programs 4. Set up the Software a. Set up a Shortcut Icon to the Software b. Select Transmission Option c. Select Data Directory Better Technology...For A Better Life Inter-Dimensional Technologies, Inc. Installation Overview: 1. Install the Hardware (Refer to Diagram 2) 1.a. Run the Communications Cable(s) The first step in the installation process should be to install the communications cable that connects the RTC-P3 traffic counter to each door sensor. This is Category 5 cable, which is a very common cable that is used to connect many computer networks. If there is a long distance from the traffic counter to the door sensor(s), or if the cable needs to be run in the ceiling or walls, it may be advantageous to hire a third party to run the cable, such as a network installer, licensed electrician or contractor. If the cable is to be run inside walls or ceilings, the cable should have plenum shielding to help conform to fire codes. If it is to be run outside the wall PVC shielding will be sufficient. The cable should be kept as far away from florescent lighting, relays, motors, power cables and any other devices that may radiate EMI. If the networking cable must cross a power cable, they should be crossed at right angles. Do not run the communications cable and power cable along side each other. If the cable is going to be run outside the wall, be sure to tie the cable to the base of the wall with the supplied cable ties. 1.b. Install the RTC-P3 Traffic Counter Find a location for the RTC-P3 traffic counter to be placed. It should be placed near the PC or POS to which it is being connected. We supply a Serial cable that is six feet in length. This is the cable that is used to connect the traffic counter to the PC. Also, the Serial -8- Communications standard dictates that the two devices cannot be more than 50 feet apart. 1.b.i. Connect the RTC-P3 to the PC (optional) The RTC-P3 does not need to be connected to a PC in order to operate. The only time that the RTC-P3 and the PC interact is when the traffic data is being transmitted. Therefore, if a PC is not available at the establishment, a laptop can be connected to the RTC-P3 periodically and the traffic data transmitted. In either case, the following should be done when connecting the RTC-P3 to the PC. 1.b.ii. Connect the RTC-P3 to the Door Sensor(s) In Step 1.a, the communications cable was installed. Now, it’s time to connect the ends of the cable. Connect one end of the cable to one of the three door sensor ports, labeled “Door 1,” “Door 2” and “Door 3.” It does not matter into which port the cable is plugged. However, it is usually only natural to start at Door 1. This will also make it more logical when analyzing the data with the software. For now, leave the other end of the cable unconnected. That will be done when the door sensors are installed. If there is more than one door sensor, connect the other cables to the RTC-P3 in the same fashion. Better Technology...For A Better Life Inter-Dimensional Technologies, Inc. Find the Serial cable that was included with the RTC-P3. It is the cable with the nine-pin connectors. Connect the cable into the port on the RTC-P3 labeled, “RS-232.” Connect the other end of the cable into a Serial port on the PC. If the PC does not have an available Serial port, the RTC-P3 can be connected to a USB port with a Serial-to-USB converter that we resell. 1.b.iii. Connect the RTC-P3 to the Wall Outlet Plug the two-prong connector on the power supply into the wall. Plug the other end of the cable into the RTC-P3’s “Power” socket. Do not turn on the traffic counter yet. We will turn it on after we have the door sensors mounted. -9- 1.c. Install the Door Sensors General Background - Door Sensor Operation: The door sensors emit two infrared (invisible) beams, which will cross the entrance. These beams are emitted from the two round sensors that protrude from the door sensor case. These beams must hit the reflector so that the reflector reflects the beams back to the door sensor. When this happens, the door sensor is aligned with the reflector. The two alignment LED’s which are above each of the round sensors will not be lit when alignment is achieved. Two beams are used so that the system can determine whether a pedestrian is entering or leaving. It can do this because, in the split second that a pedestrian passes, the system can tell which beam was broken first. If the beam closer to the exterior of the establishment is broken first, then the system knows that the pedestrian entered the establishment. If the beam closer to the interior of the establishment is broken first, then the system knows that the pedestrian left the establishment. When a pedestrian comes through the entrance, each of the alignment LED’s will flash. This is because the pedestrian came between the door sensor and reflector. When this happens, the door sensor senses the absence of the infrared beam, and therefore, knows that someone has walked through the entrance. Better Technology...For A Better Life Inter-Dimensional Technologies, Inc. Both, the RTC-S2X standard door sensor and RTC-S2XL long-range door sensor use this technology. However, the RTC-S2X is a box that is mounted on one side of the entrance and a reflector on the other side. The RTC-S2XL has a box on each side of the entrance and does not use a reflector. If a door sensor does not sense the infrared beam reflecting back from the reflector for more than ten seconds, a beep will be emitted from the RTC-P3 once every three seconds. At least one of the alignment LED’s on the door sensor will also be lit. This will happen if the door sensor becomes misaligned or if someone stands in the entrance for more than ten seconds. If someone is standing in the entrance, the beeping will stop when the pedestrian moves out of the way. If the door sensor is not aligned, then the proper adjustments must be made. The purpose of the beep is to bring attention to the situation. The purpose of the alignment LED’s is to show which of the two round sensors is not aligned with the reflector. The RTC-P3 can accept up to three of these door sensors, in any combination. Diagram 5 through Diagram 8 will help illustrate how the door sensors operate. - 10 - Sensor Mounting Height: There is one obscure, but important, point to mention concerning the mounting height of the door sensors. As described earlier in this section, the door sensors can determine if a pedestrian is entering or leaving the establishment, based on which beam is broken by the pedestrian first. Many establishments have the very common single- or double-swinging glass doors. These typically swing outside of the building and have a push bar for the customer to use when opening the door when exiting with their hands full. Be sure that you don’t mount the door sensors at the same height as the push bar. That is because, as the pedestrian is leaving, he will raise his hand to push the push bar. He may reach over the top of the beams and not break them, but then, after he pushes the door open, his arm will swing down, causing the beam closer to the exterior to be broken first. The system will interpret this as a pedestrian entered the establishment. Therefore, do not mount the sensor at (or approximately at) the height of the push bars. Also, if the establishment has a door that physically swings into the building, this may cause the system to not count properly. There is a menu option that can fix this. See the “Door Count Type” option in the RTC-P3 User’s Manual for more details. 1.c.i. Better Technology...For A Better Life Inter-Dimensional Technologies, Inc. There are various schools of thought as to how high off the ground the door sensors should be mounted. We recommend that they be mounted at approximately thigh-height. If the sensors are mounted too low (knee-height, for example), the system could lose accuracy because of the angle in which the lower leg crosses the beams. If the sensors are mounted too high (five feet, for example), the system may not always count shorter pedestrians (5’ 5”, for example). Install the RTC-S2X Standard Door Sensor (optional) NOTE: Refer to Diagram 3. 1.c.i.1. Mount the RTC-S2X Enclosure Mount the RTC-S2X enclosure on the wall or molding near the entrance. The two red alignment LED’s and two round sensors protruding from the side should be pointed such that they point across the entrance area, as seen in Diagram 3. The mounting brackets for the door sensor have slots in them. This is so the door sensor can be moved closer to or further away from the wall. To make this adjustment, simply loosen the screws that secure the bracket to the door sensor. Then adjust the bracket as needed. Do not loosen the screws too much or the hex nut on the inside of the case will come off. If you cannot loosen these screws so that the bracket will move, then you must unscrew the screw in each of the four corners of the bottom of the door sensor. This will allow you to loosen the hex nuts that secure the brackets to the door sensor. Once the hex nuts are loosened, adjust the brackets as needed and then retighten the hex nuts. Then put the door sensor case back together by screwing the four screws back into place. There are additional holes in the door sensor case where the mounting brackets can be attached. These additional holes may be useful for unusual mounting situations. However, they are usually not needed. The unit is assembled at the factory to be mounted on the left-hand side of the door as you are facing the outside. If, - 11 - for any reason, the unit needs to be mounted on the left, simply unscrew the screw in each of the four corners on the bottom of the sensor case. Then turn the bottom of the case around so that the brackets are now on the other side. Put the case back together by screwing the four screws back into place. Use a level to ensure that the enclosure is mounted so that it is level and parallel to the ground. 1.c.i.2. Find the “Sweet Spot” of the Infrared Beams The infrared beams that are emitted from the door sensors actually spread out as they get further away from the door sensor. This is to help with alignment of the door sensors. There is usually an area of approximately five inches in diameter when the beams reach the other side of the entrance area. It is best to orient the reflector in the center of this area. This is what we call the “sweet spot.” Another reason this should be done is to ensure that, if the reflector is bumped, the door sensor will stay aligned with the reflector. However, if the reflector is oriented such that it is on the edge of one of the infrared beam, it can be bumped out of alignment rather easily. Better Technology...For A Better Life Inter-Dimensional Technologies, Inc. NOTE: Diagrams 5 through 8 help illustrate the concept of the sweet spot. It is vitally important to find the sweet spot or the sensors may not distinguish between incoming and outgoing traffic correctly. Although Diagrams 5 through 8 use the RTC-S2X standard door sensor as an example, the RTC-S2XL works in a similar manner. Therefore, it is imperative to orient the reflector in the middle of the sweet spot. The next thing to do is to turn the power on to the RTC-P3. (The RTC-P3 should have the date and time set correctly. However, it will be east coast time. If you live in another time zone, you will have to adjust the time. See the “Set Date/Time” option in Menu Options section of the RTC-P3 User’s Manual. The contrast will also be set. The contrast can also be adjusted. See the “Adjust Contrast” option in Menu Options section of the RTC-P3 User’s Manual.) Turning on the power to the RTC-P3 will now supply power to the RTC-S2X door sensor via the communications cable, and therefore, turn on the red alignment LED’s. When an alignment LED is turned on, it means that the sensor immediately below that LED is not aligned with the reflector. Therefore, if both LED’s are turned on, then neither sensor is aligned with the reflector. Now, hold the reflector in your hand and move it up, down, left and right, while observing when the red alignment LED’s turn off and on. Continue to move the reflector until the sweet spot is found. Again, the sweet spot will be the area where the reflector can be moved without the alignment LED’s turning on. - 12 - 1.c.i.3. Mount the Reflector Once the sweet spot is found, mount the reflector and bracket on the wall at the correct vertical position. Make sure that the reflective side of the reflector is facing the door Better Technology...For A Better Life Inter-Dimensional Technologies, Inc. Diagram 3 Diagram 4 - 13 - sensor. If the reflector and door sensor are misaligned, the door sensor will not sense traffic. Also, slide the reflector along the slot of the bracket to adjust the horizontal position of the reflector. After the reflector is mounted, the red alignment LED’s should turn off. When a pedestrian passes through the beams, the red alignment LED’s will flash quickly. This is normal. Install the RTC-S2XL Long-Range Door Sensor (optional) NOTE: Refer to Diagram 4. 1.c.ii.1. Install the Communications Cable Over the Top of The Entrance The RTC-S2XL has two boxes, the “master” (RTC-S2XLM) and the “slave” (RTC-S2XLS). Although they are two separate enclosures, they act as one unit. Therefore, a communications cable must connect the two enclosures. Typically, it is run up the entrance, across the top of the entrance and then down the other side. It can usually be hidden away fairly well by securing the cable along the molding of the entrance with the supplied cable ties. This cable can obviously be mounted in the wall, if desired. Better Technology...For A Better Life Inter-Dimensional Technologies, Inc. 1.c.ii. If this cable is longer than needed, it will look sloppy. Therefore, measure the amount of cable that will be needed. First, it must be determined at what height the enclosures will be mounted. The length of cable will be the distance from the enclosure up to the top of the entrance, plus the distance across the entrance, plus the distance back down to the other enclosure. It’s best to install this cable before attempting to mount and align the RTC-S2XL enclosures. 1.c.ii.2. Mount one of the Enclosures for the RTC-S2XL Mount one of the enclosures for the RTC-S2XL on the wall or molding near the entrance. The red alignment LED and two round sensors protruding from the side should be pointed such that they point across the entrance area. Use a level to ensure that the enclosure is mounted so that it is level and parallel to the ground. Connect the cable that was run over the top of the entrance to the enclosure. If the master enclosure is the one currently being mounted, that cable should be put in the “RTCS2XLS” port. You can also connect the cable that was run back to the RTC-P3 to the “RTC-P3” port. If the slave enclosure is the one currently being mounted, the cable that is run over the top of the entrance should be put in the “RTCS2XLM” port. 1.c.ii.3. Find the “Sweet Spot” of the Infrared Beams - 14 - NOTE: Diagrams 5 through 8 help illustrate the concept of the sweet spot. It is vitally important to find the sweet spot or the sensors may not distinguish between incoming and outgoing traffic correctly. Although Diagrams 5 through 8 use the RTC-S2X standard door sensor as an example, the RTC-S2XL works in a similar manner. There is usually an area of approximately five inches in diameter when the beams reach the other side of the entrance area. It is best to orient each enclosure such that it is in the center of this area of the other enclosure. This is what we call the “sweet spot.” Another reason this should be done is to ensure that, if one of the enclosures is bumped, they will keep their alignment. However, if one of the enclosures is oriented such that it is on the edge of one of the infrared beam, it can be bumped out of alignment rather easily. Better Technology...For A Better Life Inter-Dimensional Technologies, Inc. The infrared beams that are emitted from the door sensors actually spread out as they get further away from the door sensor. This is to help with alignment of the infrared beams that are emitted from the two RTC-S2XL’s enclosures. Therefore, it is imperative to orient each enclosure in the middle of the sweet spot. The next thing to do is to turn the power on to the RTC-P3. (The RTC-P3 should have the date and time set correctly. However, it will be east coast time. If you live in another time zone, you will have to adjust the time. See the “Set Date/Time” option in Menu Options section of the RTC-P3 User’s Manual. The contrast will also be set. The contrast can also be adjusted. See the “Adjust Contrast” option in Menu Options section of the RTC-P3 User’s Manual.) Turning on the power to the RTC-P3 will now supply power to the RTC-S2XL door sensor via the communications cable, and therefore, turn on the red alignment LED’s. When an alignment LED is turned on, it means that the beam immediately below the LED is not aligned with the other enclosure. Therefore, if both LED’s are turned on, then both enclosures are not aligned. Next, connect the cable that was run over the top of the entrance to the enclosure. If the master enclosure is the one currently being mounted, that cable should be put in the “RTC-S2XLS” port. You can also connect the cable that was run back to the RTC-P3 to the “RTC-P3” port. If the slave enclosure is the one currently being mounted, the cable that is run over the top of the entrance should be put in the “RTC-S2XLM” port. Now, hold the enclosure that is not mounted yet, in your hand and move it up, down, left and right, while observing when the red alignment LED’s turn off and on. Continue to move this enclosure until the sweet spot is found. Again, the sweet spot will be the area where the unmounted enclosure can be moved without the alignment LED’s turning on. - 15 - 1.c.ii.4. Mount the other Enclosure for the RTC-S2XL Once the sweet spot is found, mount the unmounted enclosure on the wall at the correct vertical position. Also, slide the enclosures along the slots of the brackets to adjust the horizontal position. After both enclosures are mounted, the red alignment LED’s should turn off. When a pedestrian passes through the beams, the red alignment LED’s will flash quickly. This is normal. The RTC-P3 will also attempt to set the contrast display to an acceptable level. If the display contrast needs to be adjusted, use the “Adjust Contrast” option in the Menu Options section. At this point in time, the installation of the hardware is complete. However, although the door sensors’ infrared beams are aligned correctly, there should still be some basic testing of the door sensor installations. That will be discussed next. 2. Test the Hardware In the case of the RTC-S2X standard door sensor, if the beams hit the reflector at a right angle, they should reflect back to the RTC-S2X perfectly. In the case of the RTCS2XL long-range door sensor, if the beams from the enclosures hit the other at right angles, they are optimally aligned. Better Technology...For A Better Life Inter-Dimensional Technologies, Inc. 1.d. Continue Setting Up the RTC-P3 Turn on the RTC-P3 by pressing the power button towards the upper-right corner of the aluminum panel. The date, day-of-week and time should be set. The time will be set to east coast time. If you are in another time zone, adjust it by using the “Set Date/Time” option in the Menu Options section. Please note that the time is in 24-hour military format. However, if the beams are not at right angles, subtle problems can arise. In the case of the RTC-S2X, if the beams do not hit the reflector at a right angle, they will not reflect back to the RTC-S2X perfectly. Then why don’t the red alignment LED’s become lit? If the reflector is not perpendicular to the beams, both beams will reflect back to one side of the RTC-S2X slightly. One of the beams may reflect back to both sensors in the door sensor enclosure. When this beam is broken, both sensors will blink simultaneously, or near simultaneously. This will cause the system to interpret every pedestrian as always entering or always leaving, depending upon which side of the RTC-S2X the beams are being reflect back to. Therefore, we should test to make sure our beams are aligned at right angles. First, you should understand what the beeps mean when a pedestrian passes through an entrance. The beep that is heard when a pedestrian enters should be longer than the beep that is heard when a pedestrian leaves. Therefore, the best way to check the door sensors is to enter the establishment by walk through the entrance and observe the length of the beep. Next, leave the establishment by walking through the entrance. Once again, observe the beep. It should be a shorter beep than when simulating the pedestrian entering. This test should be done a few inches from the door sensor, then in the middle of the entrance, and finally, a few inches away from the reflector. This is because you may get varying results in different areas of the entrance, especially if the entrance is more than a few feet wide. Please note, that you may get a few erroneous hits near the reflector. This can be caused by the reflection of the beams off of the reflector. If these erroneous hits seem to be affecting the traffic drastically, the reflector can be moved further away from the RTC-S2X. - 16 - Diagram 5 Explanation: Better Technology...For A Better Life Inter-Dimensional Technologies, Inc. Diagram 5 Diagram 5.a: Top View – Ideal Alignment (Recommended): This diagram shows the top view of a door sensor that has ideal alignment in the horizontal plane. This is because the reflector is being hit by both beams. Notice that neither of the alignment LED’s are lit. In terms of the horizontal alignment, this is the ideal alignment. How do you know that you have an ideal alignment situation? By moving the reflector around and observing when the alignment LED’s turn off and on. This will help find the “sweet spot” (the center of the beams). If you find the center of the beams (both horizontally and vertically), the door sensor will not lose alignment easily if a pedestrian bumps the door sensor or reflector. There will be a certain amount of forgiveness. Diagram 5.b: Top View – Borderline Alignment (Not Recommended): This diagram shows the top view of a door sensor that does not have ideal alignment in the horizontal plane. Although the reflector i s being hit by both beams, the beam depicted with the solid line is barely hitting the reflector. Notice that neither of the alignment LED’s are lit. However, this is not an ideal alignment situation because, if the reflector is bumped by a pedestrian, the sensor can lose alignment with the reflector easily. If this happens, a situation such as the one depicted in Diagram 6.a can occur. In terms of horizontal alignment, this is not the ideal alignment situation. The reflector and/or sensor should be adjusted. How do you know that you have a borderline alignment situation? By moving the reflector around and observing when the alignment LED’s turn off and on. This will help find the “sweet spot” (the center of the beams). Diagram 5.c: Top View – Borderline Alignment (Not Recommended): This diagram shows the top view of a door sensor that does not have ideal alignment in the horizontal plane. Although the reflector is being hit by both beams, the beam depicted with the dashed line is barely hitting the reflector. Notice that neither of the alignment LED’s are lit. However, this is not an ideal alignment situation because, if the reflector is bumped by a pedestrian, the sensor can lose alignment with the reflector easily. If this happens, a situation such as the one depicted in Diagram 6.b can occur. In terms of horizontal alignment, this is not the ideal alignment situation. The reflector and/or sensor should be adjusted. How do you know that you have a borderline alignment situation? By moving the reflector around and observing when the alignment LED’s turn off and on. This will help find the “sweet spot” (the center of the beams) before mounting the reflector. - 17 - Diagram 6 Explanation: Better Technology...For A Better Life Inter-Dimensional Technologies, Inc. Diagram 6 Diagram 6.a: Top View – One Sensor Not Aligned (Solid Line): This diagram shows the top view of a door sensor that has one sensor beam aligned with the reflector and one that is not aligned. This is because the beam depicted by the solid lines is not hitting the reflector. Notice that the alignment LED above the sensor that is not hitting the reflector is lit. We do not have horizontal alignment and the RTC-P3 will beep once every three seconds to indicate that a sensor is not aligned correctly with its reflector. Diagram 6.b: Top View – One Sensor Not Aligned (Dashed Line): This diagram shows the top view of a door sensor that has one sensor beam aligned with the reflector and one that is not aligned. This is because the beam depicted by the dashed lines is not hitting the reflector. Notice that the alignment LED above the sensor that is not hitting the reflector is lit. We do not have horizontal alignment and the RTC-P3 will beep once every three seconds to indicate that a sensor is not aligned correctly with its reflector. Diagram 6.c: Top View – Both Sensors Not Aligned: This diagram shows the top view of a door sensor that has neither of the two sensors aligned with the reflector. This is because neither of the beams is hitting the reflector. Notice that the alignment LED above each sensor is lit. We do not have horizontal alignment and the RTC-P3 will beep once every three seconds to indicate that a sensor is not aligned correctly with its reflector. - 18 - Diagram 7 Explanation: Better Technology...For A Better Life Inter-Dimensional Technologies, Inc. Diagram 7 Diagram 7.a: Side View – Ideal Alignment (Recommended): This diagram shows the side view of a door sensor that has ideal alignment in the vertical plane. This is because the reflector is being hit by both beams. Notice that neither of the alignment LED’s are lit. In terms of the vertical alignment, this is the ideal alignment. How do you know that you have an ideal alignment situation? By moving the reflector around and observing when the alignment LED’s turn off and on. This will help find the “sweet spot” (the center of the beams). If you find the center of the beams (both horizontally and vertically), the door sensor will not lose alignment easily if a pedestrian bumps the door sensor or reflector. There will be a certain amount of forgiveness. Diagram 7.b: Side View – Borderline Alignment (Not Recommended): This diagram shows the side view of a door sensor that does not have ideal alignment in the vertical plane. Although the reflector is being hit by both beams, the beams are barely hitting the reflector. Notice that neither of the alignment LED’s are lit. However, this is not an ideal alignment situation because, if the reflector is bumped by a pedestrian, the sensor can lose alignment with the reflector easily. If this happens, a situation such as the one depicted in Diagram 8.a can occur. In terms of vertical alignment, this is not the ideal alignment situation. The reflector and/or sensor should be adjusted. How do you know that you have a borderline alignment situation? By moving the reflector around and observing when the alignment LED’s turn off and on. This will help find the “sweet spot” (the center of the beams). Diagram 7.c: Side View – Borderline Alignment (Not Recommended): This diagram shows the side view of a door sensor that does not have ideal alignment in the vertical plane. Although the reflector is being hit by both beams, the beams are barely hitting the reflector. Notice that neither of the alignment LED’s are lit. However, this is not an ideal alignment situation because, if the reflector is bumped by a pedestrian, the sensor can lose alignment with the reflector easily. If this happens, a situation such as the one depicted in Diagram 8.b can occur. In terms of vertical alignment, this is not the ideal alignment situation. The reflector and/or sensor should be adjusted. How do you know that you have a borderline alignment situation? By moving the reflector around and observing when the alignment LED’s turn off and on. This will help find the “sweet spot” (the center of the beams) before mounting the reflector. - 19 - Diagram 8 Explanation: Better Technology...For A Better Life Inter-Dimensional Technologies, Inc. Diagram 8 Diagram 8.a: Side View – Both Sensors Not Aligned: This diagram shows the side view of a door sensor that has neither of the two sensors aligned with the reflector. This is because neither of the beams is hitting the reflector. Notice that the alignment LED above each sensor is lit. We do not have vertical alignment and the RTC-P3 will beep once every three seconds to indicate that a sensor is not aligned correctly with its reflector. Diagram 8.b: Side View – Both Sensors Not Aligned: This diagram shows the side view of a door sensor that has neither of the two sensors aligned with the reflector. This is because neither of the beams is hitting the reflector. Notice that the alignment LED above each sensor is lit. We do not have vertical alignment and the RTC-P3 will beep once every three seconds to indicate that a sensor is not aligned correctly with its reflector. - 20 - 3. Install the Software (optional) The software that we supply with the RTC-P3 performs two functions. It communicates with the RTC-P3 and also allows the user to view and print the traffic data. Our software does not need to be used with the RTC-P3; however, we recommend that you use it. Our software does not need to be used because we use industry standards. First, the RTC-P3 communicates via standard Serial communications. This means that virtually any communications application can be used. Second, the data is transmitted in a standard comma-delimited format. Virtually any software application can import a comma-delimited ASCII format, such as Microsoft Excel, or a custom database application. 3.b. Begin Software Installation Click “Start” and then click “Run.” A window will appear. Enter the CD drive letter followed by \setup. For example, if the CD drive is e:, then the user would enter, e:\setup. The user can also click the <Browse> button to select the file. After the file name is set, click the <OK> button. The installation process will begin. Most installation can simply accept all of the default settings. 4. Set up the Software (optional) There are two optional options that can be used regarding the software. 4.a. Select Transmission Option See Transmission/Graphing software for details. 4.b. Select Data Directory See Transmission/Graphing software for details. Better Technology...For A Better Life Inter-Dimensional Technologies, Inc. 3.a. Insert Installation CD Insert the installation CD into the CD drive. - 21 - Menu Options To enter the system’s Menu Mode, press <ENTER> on the keypad. You will be prompted for the five-digit security code. Use 12345 as your security code upon initial startup. If the correct security code is entered, the first menu option will be displayed and the red "Menu Mode" LED will be lit in the lower right-hand corner of the front panel. EXTREMELY IMPORTANT: When you are in a menu option, no traffic will be sensed by the RTC-P3. For this reason, it is important that you perform the required function immediately after entering "Menu Mode" so the system can return to sensing traffic. In order for traffic to be sensed, the red "Menu Mode" LED in the lower right-hand corner of the panel must NOT be on and the main screen should look similar to the following: NOTE: We recommend you change the initial code from 12345 to a personalized one for security reasons. See the menu option "Change Access Code" in the "Menu Options" section for instructions. The day currently being cleared will be displayed. Once this option is complete, the RTC-P3 will exit Menu Mode and return to monitoring the door sensor(s) for traffic. Better Technology...For A Better Life Inter-Dimensional Technologies, Inc. 10/18/03SA 14:32 Version 5.1 NOTE: The RTC-P3 saves 250 days (83 days when saving traffic data per entrance) of traffic. After the 250th day (or 83rd), the system will automatically overwrite the first day of data; therefore, for standard operation this function is not normally necessary. This is usually only used at the instruction of IDT technical support personnel. - 22 - View Today’s Traffic Press <ENTER> from the main screen. You will be prompted for your 5-digit security code. Enter your 5-digit code. This should be the first menu option that is displayed. It is the first option that appears because it is a very common option. Therefore, the user does not have to search for the option each time it is needed. The screen will look similar to the following: View Today’s Traffic Press <ENTER> to select this option. After you press <ENTER>, the screen will look similar to the following: Total: 14 In-House: 3 The “Total” field is the total number of pedestrians that have entered the establishment for the current day. Although the name of this menu option is “View Today’s Traffic,” this option also gives two other pieces of information. The “In-House” field is an estimate of the number of individuals that are currently in the establishment. This is an occupancy total that is useful for establishments such as bars and nightclubs. See the “Clear In-House Total” menu option for more information. The final line displays the current memory layout. There are two options; “250 days, 1 set of data” and “83 days, 3 sets of data.” Refer to the “Set Memory Layout” menu option for more information. Better Technology...For A Better Life Inter-Dimensional Technologies, Inc. 250 Days — 1 Set After viewing the information, press <ENTER> to exit the Menu Mode. The RTC-P3 will continue to sense for traffic again. - 23 - Set Date/Time Press <ENTER> from the main screen. You will be prompted for your 5-digit security code. Enter your 5-digit code. The first menu option will appear on the display. Use the and keys on the keypad to move through the menu options until you come to the following screen: Set Date/Time Press <ENTER> to select this option. After you press <ENTER>, the screen will show the current date, day-of-week and time and look similar to the following: Press and hold the and to select the month, date, year, day-of-the-week, hour and minutes (also known as fields). The blinking block (also known as a cursor) indicates selection. The RTC-P3 will default to the last date and day of week when it is powered on. However, the time will always default to 12:00. To change the value of any given field (date, time etc.) use the and . The date format is MM/DD/YY and the time is in the military format (i.e. 1:00 p.m. registers as 13:00). After all the fields have been set correctly, press <ENTER> to accept the changes and exit the Menu Mode. Press <CLEAR> to cancel the changes that were made. The new date, time and day of week will be displayed on the main screen. Better Technology...For A Better Life Inter-Dimensional Technologies, Inc. 01/01/01SU 12:00 NOTE: It is very important for the operation of this system that the date, time and day-of week information is entered correctly. EXTREMELY IMPORTANT: If for any reason the power supply is interrupted, you will have to repeat this process before correct operation can begin again. This is similar to a PC being rebooted. It will not pick up where it left off. You must set the display contrast and the date, time and day of week before traffic can be sensed. - 24 - Adjust Contrast Press <ENTER> from the main screen. You will be prompted for your 5-digit security code. Enter your 5-digit code. The first menu option will appear on the display. Use the and keys on the keypad to move through the menu options until you come to the following screen: Adjust Contrast Press <ENTER> to select this option. After you press <ENTER>, the screen will change to the following: The following keys can be used with this option: : : : : Makes the display darker slowly Makes the display darker quickly Makes the display lighter slowly Makes the display lighter quickly As these arrows are used, the contrast on the screen will change accordingly. Once the desired contrast is attained, press <ENTER> to accept the setting and exit the Menu Mode. Better Technology...For A Better Life Inter-Dimensional Technologies, Inc. Adjust Contrast With Arrows Enter to Accept - 25 - Clear All Traffic Data Press <ENTER> from the main screen. You will be prompted for your 5-digit security code. Enter your 5-digit code. The first menu option will appear on the display. Use the and keys on the keypad to move through the menu options until you come to the following screen: Clear *ALL* Traffic Data Press <ENTER> to select this option. After you press <ENTER>, the screen will change to the following: If you want to delete, press <ENTER> once again. If you do not want to delete this data, press <CLEAR>. NOTE: The RTC-P3 saves 250 days (83 days when saving traffic data per entrance) of traffic. After the 250th day (or 83rd), the system will automatically overwrite the first day of data; therefore, for standard operation this function is not normally necessary. This would be useful if the system were to be moved to a new location and a fresh traffic count would be necessary. Better Technology...For A Better Life Inter-Dimensional Technologies, Inc. Clear *ALL* Traffic Data Confirm: Enter=Y; Clear=N - 26 - Clear Traffic Data Range Press <ENTER> from the main screen. You will be prompted for your 5-digit security code. Enter your 5-digit code. The first menu option will appear on the display. Use the and keys on the keypad to move through the menu options until you come to the following screen: Clear Traffic Data Range Press <ENTER> to select this option. After you press <ENTER>, the screen will change to the following: The two numbers on the bottom line will be the days’ memory location range that is to be cleared. The cursor will be blinking on the active field. Use the arrow keys to adjust each of the two fields as follows: : : : : Increments the field value by one Increments the field value by ten Decrements the field value by one Decrements the field value by ten To switch fields, use the <0> (zero) key. If you want to delete, press <ENTER> once the field values are set as desired. If you do not want to delete this data, press <CLEAR>. If <ENTER> is pressed, a screen similar to the following will be shown: Better Technology...For A Better Life Inter-Dimensional Technologies, Inc. Clear Traffic Data Range 1 1 Clearing: Day #: 198 The day currently being cleared will be displayed. Once this option is complete, the RTC-P3 will exit Menu Mode and return to monitoring the door sensor(s) for traffic. NOTE: The RTC-P3 saves 250 days (83 days when saving traffic data per entrance) of traffic. After the 250th day (or 83rd), the system will automatically overwrite the first day of data; therefore, for standard operation this function is not normally necessary. This is usually only used at the instruction of IDT technical support personnel. - 27 - Buzzer Status If you do not want the buzzer to sound each time traffic comes through an entrance, you can shut it off. The system allows the user to change the buzzer status for each door. Press <ENTER> from the main screen. You will be prompted for your 5-digit security code. Enter your 5-digit code. The first menu option will appear on the display. Use the and keys on the keypad to move through the menu options until you come to the following screen: Clear Traffic Data Range Buzzer Status Door 1:On Door 2:On Door 3:On The bottom three lines will either display “On” or “Off.” This is the current status of the buzzer for Door #1, Door #2 and Door #3, respectively. The cursor will be flashing on the buzzer status of Door #1. Use the and keys to switch to a different door. The cursor will change to indicate the current door. Use the and key to toggle between the on and off positions. Press <ENTER> and the changes will be saved and the traffic counter will go back to the main screen and continue sensing traffic. Better Technology...For A Better Life Inter-Dimensional Technologies, Inc. Press <ENTER> to select this option. After you press <ENTER>, the screen will look similar to the following: - 28 - Sensor Sensitivity This option is useful when determining whether or not you want groups of people who pass through the entrance together counted individually. For example, if a husband and wife enter and you want the RTC-P3 to only increment the traffic count by one and not two, then you must set the sensor sensitivity such that it is delayed long enough for both people to pass through the entrance. The door sensor sensitivity (delay) can be from one half of one-second to ten seconds. A good setting to start at is 1.5 seconds. This means that when the RTC-P3 senses traffic, it will ignore all other traffic for 1.5 seconds. Depending on your needs, you can adjust this as needed. The system allows the user to change the sensor sensitivity for each door. Press <ENTER> from the main screen. You will be prompted for your 5-digit security code. Enter your 5-digit code. The first menu option will appear on the display. Use the and keys on the keypad to move through the menu options until you come to the following screen: Sensor Sensitivity Press <ENTER> to select this option. After you press <ENTER>, the screen will look similar to the following: Sensor Sens Door 1:1500 ms Door 2:1500 ms Door 3:1500 ms Better Technology...For A Better Life Inter-Dimensional Technologies, Inc. NOTE: The sensor sensitivity is shown in milliseconds. This simply means that 1000 ms equals 1 second. Simply divide the value on the display by 1000 and that is how many seconds the delay will be. For example, 1500 ms is 1.5 seconds. The bottom three lines will display the current sensor sensitivity setting for Door #1, Door #2 and Door #3, respectively. The cursor will be flashing on the sensor sensitivity setting of Door #1. Use the and keys to switch to a different door. The cursor will change to indicate the current door. Use the and keys to decrease and increase the sensor sensitivity setting. Press <ENTER> and the changes will be saved and the traffic counter will go back to the main screen and continue sensing traffic. You can test the delay by quickly swinging your arm back and forth through the path of the door sensor’s infrared beams and wait to hear when the second beep sounds. Continue to adjust the sensitivity until the desired delay is achieved. - 29 - Change Access Code Press <ENTER> from the main screen. You will be prompted for your 5-digit security code. Enter your 5-digit code. The first menu option will appear on the display. Use the and keys on the keypad to move through the menu options until you come to following screen: Change Access Code Press <ENTER> to select this option. After you press <ENTER>, the screen will change to the following: Using the numbers on the keypad, enter the new 5-digit code. Press <ENTER> to accept the changes. Press <CLEAR> to cancel the changes. Better Technology...For A Better Life Inter-Dimensional Technologies, Inc. Code:12345 New Code - 30 - View Traffic Press <ENTER> from the main screen. You will be prompted for your 5-digit security code. Enter your 5-digit code. The first menu option will appear on the display. Use the and keys on the keypad to move through the menu options until you come to the following screen: View Traffic Press <ENTER> to select this option. After you press <ENTER>, the screen will look similar to the following: 12 13 14 15 15 0 0 0 The first line on the display will show the traffic for the current date and hour for all doors combined. Use the following keys for this option: : Display the previous four hours of traffic for the day : Display the next four hours of traffic for the day :Display the traffic for the previous day : Display the traffic for the next day This is the default screen for viewing traffic. However, there are four additional screens that can be accessed. Press <1>, <2> or <3> to access the traffic totals for Door #1, Door #2 or Door #3, respectively. These screens will look similar to the screen shown above. After viewing traffic totals for the individual doors, press <0> to access the traffic totals for all doors combined once again. Better Technology...For A Better Life Inter-Dimensional Technologies, Inc. SU01/01 SU01/01 SU01/01 SU01/01 2003 2003 2003 2003 26 26 26 26 15 0 0 0 Press <4> to show the year and the memory location of the current day. The screen will look similar to the following: 2003 26 This memory location will be between 1 and 250 if the system is not saving traffic for each individual door sensor. The range will be between 1 and 83 if the system is saving traffic for each individual door sensor. The memory location will usually only be used at the instruction of IDT technical support personnel. See the “Select Memory Layout” menu option for details on the memory layout. Press <ENTER> when done viewing the traffic. The system will return to sensing traffic. NOTE: If the system is not saving traffic for each individual door, screens zero through four will all be the same; that is, they will all show the total traffic of all door sensors combined. NOTE: Pressing and holding the <1> button will display the traffic total for the day when on the main screen. - 31 - Transmit Press <ENTER> from the main screen. You will be prompted for your 5-digit security code. Enter your 5-digit code. The first menu option will appear on the display. Use the and keys on the keypad to move through the menu options until you come to the following screen: Transmit Press <ENTER> to select this option. After you press <ENTER>, the screen will look similar to the following: This option will not be needed when using our transmission software because our software sends a signal to the RTC-P3 to initiate the transmission automatically. This option is only used when using software such as HyperTerminal, which does not have the ability to send the proper signals to initiate the transmission automatically. NOTE: This option will transmit the number of days which are specified in the “# Days to Transmit” menu option. Better Technology...For A Better Life Inter-Dimensional Technologies, Inc. Transmitting... - 32 - Door Type NOTE: Please read the section entitled, Key Features for a detailed explanation as to how to determine the setting of this option. Press <ENTER> from the main screen. You will be prompted for your 5-digit security code. Enter your 5-digit code. The first menu option will appear on the display. Use the and keys on the keypad to move through the menu options until you come to the following screen: Door Type Door Door Door Door Type Swings Out Swings Out Swings Out The bottom three lines will display the current door type setting for Door #1, Door #2 and Door #3, respectively. The cursor will be flashing on the door type setting of Door #1. Use the and keys to switch to a different door. The cursor will change to indicate the current door. Use the and keys to adjust each door type setting. Press <ENTER> and the changes will be saved and the traffic counter will go back to the main screen and continue sensing traffic. The directions were shown immediately above to explain how to use this option. Next we will describe when each of these options is used. Better Technology...For A Better Life Inter-Dimensional Technologies, Inc. Press <ENTER> to select this option. After you press <ENTER>, the screen will look similar to the following: Doors Swing Out: This option is used when all of the entrances to the establishment have doors that swing outside of the establishment. In brief, this option counts all pedestrians when they are entering the establishment and does not count any pedestrians when they are leaving the establishment. Doors Swing In: This option must be used when at least one of the entrances to the establishment has doors that swing into the establishment. This option is necessary because if any doors swing into the establishment, they may interfere with the infrared beams from the door sensors. Because of the door interference, with the default setting (Door Sw Out) set, the RTC-P3 may count pedestrians, even if they are leaving because the action of the door is such that the door is coming from the outside of the establishment. This is because the door sensor can sense from which direction the activity is coming. The door, of course, will always swing into the establishment, regardless of if the pedestrian is coming into or leaving the establishment. In brief, to remedy this problem, this option counts every other pedestrian, whether they are entering or leaving. Count In & Out: This option is used when you want to count the total traffic that passes through the entrances. This is useful for analyzing traffic patterns in an area where you are showing advertising. In these cases, you would want to see the total number of times an advertisement is seen. Even if a given individual passes through the area more than once. This option can be used with doors that swing into or out of the establishment. EXTREMELY IMPORTANT: It is vitally important that this option be set correctly. If you have any questions about this option, give us a call and we can make sure the setting is correct. - 33 - # Days to Transmit Press <ENTER> from the main screen. You will be prompted for your 5-digit security code. Enter your 5-digit code. The first menu option will appear on the display. Use the and keys on the keypad to move through the menu options until you come to the following screen: # Days to Transmit Press <ENTER> to select this option. After you press <ENTER>, the screen will change to the following: The number on the bottom line is the number of days that will be transmitted. The default from the factory is seven days. This means that each time a transmission takes place, the last seven days will be transmitted, starting with the current day and moving backwards. Use the arrow keys to adjust this value as follows: : : : : Increments the field value by one Increments the field value by ten Decrements the field value by one Decrements the field value by ten Press <ENTER> to accept the change, or <CLEAR> to cancel the change. Better Technology...For A Better Life Inter-Dimensional Technologies, Inc. # Days to Transmit Use Arrows 7 - 34 - Clear In-House Total Press <ENTER> from the main screen. You will be prompted for your 5-digit security code. Enter your 5-digit code. The first menu option will appear on the display. Use the and keys on the keypad to move through the menu options until you come to the following screen: Clear In-House Total This option will clear the running count of the number of customers currently in the establishment. This is most commonly used immediately before the establishment is open for business. You see, any employees who have entered the establishment will increase the total. Once the employees are in the establishment, this option can be performed and the in-house total will reset to zero. Of course, if an employee enters the establishment after you perform this option, the in-house total may not be totally accurate. However, this is meant to be used for general information. NOTE: This total is not saved in the RTC-P3 memory. If the RTC-P3 is turned off, this total will be zero when the unit is powered back on. NOTE: When the “Count Type” option is set to Doors Swing Out or Count In & Out, the in-house total can be displayed by pressing and holding the <2> button. When the “Count Type” option is set to Doors Swing In, the in-house total can not be displayed with this option. Only the total traffic count for the day will be displayed. The reason for this is because in this mode, the door (s) swings into the establishment. This means that the RTC-P3 cannot determine when an individual is entering or leaving the establishment. Better Technology...For A Better Life Inter-Dimensional Technologies, Inc. Press <ENTER> to select this option. The in-house total will reset to zero and then return to the main screen. - 35 - Select Memory Layout NOTE: Please read the section entitled, Key Features for a detailed explanation as to how to determine the setting of this option. The RTC-P3 has two memory layout modes. The first mode saves 250 days of traffic data in 24 hourly increments. This is used when there is no need to save the traffic data for each door individually. This is the default setting from the factory. The second mode saves 83 days of traffic data in 24 hourly increments. This mode saves the traffic data for each door individually. Since this mode will save data for each of the three doors that are available, the history can only save 1/3 of the 250 maximum days. Press <ENTER> from the main screen. You will be prompted for your 5-digit security code. Enter your 5-digit code. The first menu option will appear on the display. Use the and keys on the keypad to move through the menu options until you come to the following screen: Press <ENTER> to select this option. After you press <ENTER>, the screen will look similar to the following: Change Memory Layout to: 83 Days—3 Sets Enter=Y; Clear=N When the screen displays “83 Days – 3 Sets” as it does above, the current layout is “250 Days – 1 Set.” In other words, it will toggle the two modes when the user presses <ENTER>. Better Technology...For A Better Life Inter-Dimensional Technologies, Inc. Select Memory Layout IMPORTANT NOTE: When this option is executed, all traffic history will be deleted because the memory layout must be restructured. Therefore, if you must do this, you may want to transmit the entire traffic history before executing this option. Press the <CLEAR> key to cancel this option. The RTC-P3 will go back to sensing traffic again. Press the <ENTER> key to continue with this option. A next screen will change to the following: Confirm Memory Layout Change Enter=Y; Clear=N Press the <CLEAR> key to cancel this option. The RTC-P3 will go back to sensing traffic again. Press the <ENTER> key to execute this option. A screen similar to the following will be displayed: Confirm Memory Layout Change Enter=Y; Clear=N - 36 - NOTE: The system will now clear the traffic history. If the system is being changed to save traffic for each individual door, the display will count up to 83. If the system is being changed to not save traffic for each individual door, the display will count up to 250. Once the traffic history has been cleared, the system will begin sensing traffic, while using the new memory layout setting. NOTE: Clearing the traffic history will take a few minutes. Better Technology...For A Better Life Inter-Dimensional Technologies, Inc. NOTE: Pressing and holding the <2> key while on the main screen will display the current memory layout setting. - 37 - Setting Up to Communicate with the PC Better Technology...For A Better Life Inter-Dimensional Technologies, Inc. NOTE: The RTC-P3 can communicate with a PC with many different software applications. However, we strongly recommend that you use our transmission software, which is included with the RTC-P3. This software is on the Installation CD. Please refer to this software’s user’s manual for the installation directions for this software. - 38 - Displaying and Printing the Traffic Data with Microsoft Excel Template We supply a Microsoft Excel spreadsheet template that can be used to import traffic data. However, we strongly recommend that you view and print the traffic data from our Transmission & Graphical Traffic-Analysis software. The spreadsheet templates are on the Installation CD and are installed in the same directory in which the user specifies that the application programs be installed. For backward compatibility, there are three templates. However, new users should use the newest version, viewtraffic3.exe. If you do not have one of these CD’s, please call us and we can send you one or e-mail you the files. This spreadsheet template, view-traffic3.exe, is designed to import the last 31 days of data. Therefore, the “# Days to Transmit” menu option should be set to 31 or less when using this spreadsheet template. Better Technology...For A Better Life Inter-Dimensional Technologies, Inc. The spreadsheet templates require that Microsoft Excel 2000 or greater be used on your computer. If you have a prior version, the template can still be used; however, the Excel Import Wizard must be used. - 39 - Frequently-Asked Questions Q: Where are the installation instructions located? A: There is an installation section for the RTC-P3 and door sensors in the RTC-P3 User’s Manual. There is an installation section for the Graphing/Transmission software in that software’s User’s Manual. Each of these manuals is located on the installation CD, which was included in the RTC-P3 User’s Manual. The User’s Manual can also be found in the Downloads section of our website at www.IDTelectronics.com. A: Each of our sensors emit two infrared (invisible light) beams, which span across the entrance. These beams are parallel to the floor. In the split second that a pedestrian passes through the beams, the system can determine which of the two beams was broken by the pedestrian’s body first. If the beam closer to the exterior of the establishment is broken first, the door sensor knows that the pedestrian is entering. If the beam closer to the interior of the establishment is broken first, the door sensor knows that the pedestrian is exiting. Based on this idea, the door sensors send the proper electrical signals to the RTC-P3. Therefore, although the red alignment LEDs found on the door sensors are usually off, they will blink quickly when a pedestrian passes through the entrance. This is normal because the alignment LEDs indicate when the beams have been broken. If an alignment LED is lit, and no one and nothing is in the path of the beams, the door sensor is not aligned. When the door sensor is not aligned, pedestrians are not being sensed or counted. Q: Why are there red LEDs located on the door sensors? Better Technology...For A Better Life Inter-Dimensional Technologies, Inc. Q: In brief, how do the sensors work? A: These LEDs are alignment LEDs. In brief, when at least one of these LEDs is lit, the door sensor is not aligned and, as a result, will not count traffic on any of the door sensors. These LEDs are used to help align the sensors correctly during the installation process. In the case of the RTC-S2X, our standard door sensor, the RTC-S2X is mounted on one side of the entrance and a reflector, which is included, is mounted on the other side. The RTCS2X contains two black round sensor eyes. Each of these eyes is an emitter and a receiver. This means that each will emit an infrared beam and then sense its reflection from the reflector. There are two alignment LEDs in this sensor, one directly over each of the sensor eyes. Each LED gives the status of the sensor eye that is directly below it. For example, if one of the LEDs is lit and the other is not, the sensor that is directly below the lit LED is not hitting the reflector, meaning that the RTC-S2X is not aligned with the reflector. Note that in this example, although one of the LEDs is not lit, which means that the beam from the sensor eye directly below it is hitting the reflector, the sensor is still not aligned and no traffic will be sensed or counted. The RTC-S2XL, our long-range door sensor, works in a very similar manner to the RTC-S2X. However, the RTC-S2XL consists of two boxes, one mounted on either side of the entrance. The RTC-S2XL does not use a reflector. Instead of having two LEDs on one enclosure, the RTC-S2XL has one LED on each of the enclosures. When these enclosures are pointed towards each other, the LEDs will be on opposite sides of each other. There are two round sensor eyes on each enclosure, though. The sensor eye that is directly below the LED is a receiver only. The sensor eye that does not have an LED above it is an emitter only. You will notice that each receiver is opposed by an emitter on the other enclosure. If a receiver does not sense the infrared beam from the opposing emitter, the LED above the receiver will become lit. Therefore, as with the RTC-S2X, if at least one of the alignment LEDs is lit in at - 40 - least one of the enclosures, the door sensor is not aligned and will not sense traffic. When aligning a door sensor and attempting to get the alignment LEDs to turn off, you should also attempt to find the sweet spot of the sensors. See the question concerning the sweet spot for further information. A: Yes. When aligning the door sensor, the alignment LEDs need to be turned off in order to achieve proper alignment. However, many installers will simply mount the door sensors and/ or the reflector when the alignment LEDs turn off. However, before permanently mounting the equipment, look for the “sweet spot.” You see, as the infrared beams span across the entrance, the beams also become wider, in order to ease the alignment of the sensors. Therefore, the beams will typically have a radius of approximately four to six inches at the other side of the entrance. So it is usually relatively easy to make the alignment LEDs turn off. However, there is a chance that one or both of the sensor beams are barely aligned. This can cause a problem because the door sensor can become misaligned easily if someone bumps the equipment hard enough. Also, the walls of many storefronts consist primarily of windows. These walls can vibrate when the door slams closed. This will vibrate the door sensor and/or reflector, which are mounted to the wall. Although this vibration is very slight, it can be enough to create “mis-hits” when the equipment vibrates because the beams will break for a split second. Therefore, before permanently mounting the equipment, move the equipment up, down, left and right and observe when at least one of the alignment LEDs is lit. This is the perimeter of the sweet spot. Placing the equipment in the middle of the sweet spot will eliminate these issues and allow the system to work properly, without having to be readjusted in the future. Q: The RTC-P3 is beeping once every three seconds. What does this mean? Better Technology...For A Better Life Inter-Dimensional Technologies, Inc. Q: Is there anything important to know when mounting the door sensors? A: This is to call attention to the system. It means that at least one of the alignment LEDs on at least one of the door sensors is lit and, therefore, not aligned. This means that there is no traffic being sensed or counted from any of the door sensors. Therefore, it is imperative that the misaligned sensor be aligned as soon as possible, to eliminate any additional loss of traffic data. Q: The RTC-P3 is not transmitting the data to the PC. What is wrong? A: There can be a few things that may be to blame. Here are some things to try. Reboot the computer and try again. Sometimes Microsoft Windows will lock the Serial port inadvertently. Rebooting can unlock the port. Make sure that the Serial cable that came with the RTC-P3 is connected to the “RS-232” port on the one end and that the other end is connected to a Serial port on the back of the PC. Serial ports are also referred to as COM ports (short for communication). Make sure that the COM port number (COM1, COM2, etc) in the Settings section of our Graphing/Transmission software is set to match the COM port to which the Serial cable is connected. If it is not known to which COM port the Serial cable is connected on the PC, a list of COM ports can be viewed in the Device Manager in Windows. The Device Manager can be found by clicking on Control Panel, then System, then the Hardware tab of the window. A Device Manager button will appear. Click that button and a list of all components on the PC will appear. Next, - 41 - Q: What is the significance of the Menu Mode LED on the RTC-P3? A: Whenever the Menu Mode LED is lit, the system is not sensing or counting traffic. The Menu Mode LED will be lit when the user enters the Menu Mode. This is done by pressing the <ENTER> button and then entering the five-digit security code. Therefore, the user should perform the needed menu option as quickly as possible. Also, all new RTC-P3s include a battery backup that keeps the date and time set when the system is off. However, older versions of the RTC-P3 didn’t include a battery backup. If power to the unit was lost, the date and time had to be reset before any traffic can be sensed and counted. The Menu Mode LED will turn on when this boot-up process is needed. Better Technology...For A Better Life Inter-Dimensional Technologies, Inc. click the plus sign next to the “Ports” line. This will reveal the list of all COM ports in your system. (There may also be an LPT port, which is the printer port and this can be ignored.) Make note of all of the COM ports in this list. The user should then set the COM port in our software’s Settings section to each of these valid ports until the transmission works correctly. If a USB converter is being used: If the system came with a USB converter, the software drivers must be installed form the installation CD that was included in the USB converter box. See the installation pamphlet in the USB converter box for instructions. Once these drivers are installed, a new line will appear in the Device Manager (which was described in the previous bulleted point). The line will have the word, “Prolific” in it. This will also have a COM port number associated with it. The user should then set the COM port in the Settings section of our software to this COM port number. If none of the above solves the transmission problem, the COM port may be disabled in the computer’s BIOS. The BIOS (Basic Input/Output System) is run when the computer is booted. When the PC displays a line such as “Press F1 to enter setup,” it is referring to the BIOS. Different manufacturers may use different function keys. The COM port may simply need to be enabled in the BIOS. However, the BIOS should not be entered and the BIOS settings should not be modified by individual unfamiliar with working in the BIOS settings. It is very easy to change a BIOS setting, which may render the PC unbootable. Q: How do I access the various menu options in the RTC-P3? A: Press the <ENTER> button. The system will request the five-digit security code. Once the security code is entered successfully, the first menu option will be displayed on the screen. Only one menu option is displayed at a time. Use the and buttons to scroll through the menu options. Once a given menu option is displayed, it can be accessed by pressing the <ENTER> button. Be sure to review the Menu Options section of the RTC-P3 User’s Manual before changing these settings. Q: I need to adjust the date or time. How do I do this? A: Press the <ENTER> button and enter the five-digit security code. Use the and buttons to select the Set Date/Time option. The date and time is not set with the numeric buttons. Instead, use the and buttons to change the value of the given field. Use the and buttons to move to a different field. Please note that the and arrows are on the and buttons. In order to use the arrow, press and hold the red <2nd> button and then press thebutton. Similarly, to use the arrow, press and hold the red <2nd> button and then press the button. The red <2 nd> button can be viewed as being similar to the <Shift> button on a PC keyboard. - 42 - Q: I am setting up the system and need to enter the Menu Mode. What is the initial security code setting? A: The initial security code is 12345. Q: Should I turn the system off when the establishment is empty, such as at night when we are closed? Q: How can we contact you for technical support? A: We can be contacted at 570-289-0989 or [email protected]. Better Technology...For A Better Life Inter-Dimensional Technologies, Inc. A: No. The system is designed to be kept on 24 hours per day and takes up very little power. Therefore, the user should not have to be bothered with turning this on and off each day. - 43 - Data Format Each day of traffic is saved in the traffic counter in 24 hourly increments. Therefore, each day should be thought of as a record. Each record will have 28 fields. The first three are the month, day and year, respectively. The next 24 fields are the hourly traffic totals starting at 12:00am-12:59am and ending at 11:00pm-11:59pm. These fields are comma-delimited. At the end of each record the traffic counter sends across a LF/CR combination which will indicate that the first field of the next day is coming next. As you can see, there is no field for the total traffic for the day. The PC software should loop through fields 4 through 27 and calculate this figure if needed. Better Technology...For A Better Life Inter-Dimensional Technologies, Inc. In other words, we save the data in a standard comma-delimited ASCII file. This file can not only be imported into our graphing software which we supply to the user, but it can be imported into Microsoft Excel, or any other apField Valid Field Valid plication which can imField # Description Values Field # Description Values port comma-delimited 1 Month 1..12 15 11 AM Traffic Total 0..65,535 files. View the chart to 2 Date 1..31 * 16 12 PM Traffic Total 0..65,535 the right for a summary of the 28 fields. 3 Year ** 17 1 PM Traffic Total 0..65,535 4 12 AM Traffic Total 0..65,535 18 2 PM Traffic Total 0..65,535 5 1 AM Traffic Total 0..65,535 19 3 PM Traffic Total 0..65,535 6 2 AM Traffic Total 0..65,535 20 4 PM Traffic Total 0..65,535 7 3 AM Traffic Total 0..65,535 21 5 PM Traffic Total 0..65,535 8 4 AM Traffic Total 0..65,535 22 6 PM Traffic Total 0..65,535 9 5 AM Traffic Total 0..65,535 23 7 PM Traffic Total 0..65,535 10 6 AM Traffic Total 0..65,535 24 8 PM Traffic Total 0..65,535 11 7 AM Traffic Total 0..65,535 25 9 PM Traffic Total 0..65,535 Of course, the data 12 8 AM Traffic Total 0..65,535 26 10 PM Traffic Total 0..65,535 which was imported can be saved to any 13 9 AM Traffic Total 0..65,535 27 11 PM Traffic Total 0..65,535 subdirectory and can 14 10 AM Traffic Total 0..65,535 28 Door Number *** 1..3 use any filename. (We use c:\idt\rtc-p3.dat as our default. We then append this data to a c:\idt\rtc-p3.his, which is used to analyze the traffic data graphically in our software.) Of course, you may opt to import the data directly into your application’s data format instead of saving it to disk in the comma-delimited ASCII format. Notes concerning Field Summary Chart: * - Date: The valid values are 1..31. However, this is the maximum value. Obviousl y, the greatest value will be dependent upon field #1, Month. ** - Year: Currently in four-digit format. However, some earlier versions of our firmware only sent one digit. For example, 2003 came across as 3. So your software should still convert anything that is not in four-digit format, just to be safe. *** - Door Number: By default, the RTC-P3 sums the data for all door sensors into one set of data. However, there is a menu option on the RTC-P3 to allow for the separating of the traffic data for each door. If we transmit one day of traffic history, and the data is being summed for all door sensors, then one record will be transmitted and the last field will be “1.” If we transmit one day of traffic history, and the data is being separated for each door sensor, then three records will be transmitted and the last field of each of those records will be “1,” “2,” and “3,” respectively. Three records will be transmitted, even if there are only two door sensors being used. There will be one record with all zeros for the traffic totals. - 44 - Technical Specifications RTC-P3 Traffic Counter Weight: RTC-P3: Approx 1 lb 8 oz Dimensions: RTC-P3: Approx 5 3/8” W x 8 1/2" L x 3 1/8” H Power Consumption: Approx 250 mA (with three sensors connected) Power Supply Required: Input: 120 V AC, 60 Hz Output: 14 – 15 V DC, 500 mA or greater UL Listed Max Distance from RTC-P3 to Entrance: Approx 1600 ft RTC-S2X Standard Door Sensor Weight: Approx 6 oz. Dimensions: Approx 3 1/4" W 5 3/4" L x 1 11/16” H Power Supply Required: None required. Powered through RTC-P3 Sensor Range: Entrances of 8’ or less Max Distance from RTC-P3 to Entrance Approx 1600 ft RTC-S2XL Long-Range Door Sensor Weight: Approx 6 oz for each piece Dimensions: Approx 5 3/4" W x 3 1/4” L x 1 11/16” H for each piece Power Consumption: Included in RTC -P3 Specifications Power Supply Required: None required. Powered through RTC-P3 Better Technology...For A Better Life Inter-Dimensional Technologies, Inc. Power Consumption: Included in RTC -P3 Specifications Sensor Range: Entrances 65’ or less Max Distance from RTC-P3 to Entrance Approx 1600 ft - 45 - Cable Specifications When installing the RTC-P3, some customers choose to have their installers run the cable in the wall, such as when the walls are still open before a store is open for business. If you need to run your own cable for this reason, or any other reason, the following are the cable specifications. Note: If cable is to be run inside wall or ceiling, the cable should have plenum shielding to help conform to fire codes. If it is to be run outside the wall PVC shielding will be sufficient. The cable should be kept as far away from florescent lighting, relays, motors, power cables and any other devices that may radiate EMI. If the networking cable must cross a power cable, cross them at right angles. Do not run them along side each other. Please feel free to contact us with any questions that you may have. Connector Type RJ45 Internal Wiring Wired straight-through Scheme For example: pin 1 to pin 1; pin 8 to pin 8 Better Technology...For A Better Life Inter-Dimensional Technologies, Inc. Cable Type 8-conductor, Category 5 networking cable - 46 - Contact Information Mailing Address: Inter-Dimensional Technologies, Inc. P.O. Box 392 Hop Bottom, PA 18824-0392 Shipping Address: Inter-Dimensional Technologies, Inc. 322 Greenwood Street Hop Bottom, PA 18824 Voice: 570.289.0989 Better Technology...For A Better Life Inter-Dimensional Technologies, Inc. E-Mail Address: [email protected] Website Address: www.IDTElectronics.com - 47 -