1
Advanced Advert Manager
Manual
Last Updated: 02/06/2004
Table Of Contents
Advanced Advert Manager ...........................................................................................5
Before We Start.............................................................................................................5
Getting Started ..............................................................................................................5
Logging In.................................................................................................................6
Selecting The Q-NXT Database You Want To Work With .....................................6
Scheduling Adverts v’s Importing Adverts From A 3rd Party System..........................7
How Advanced Advert Manager Looks If You Are Scheduling Adverts ................9
How Advanced Advert Manager Looks If You Are Importing Adverts From A 3rd
Party System ..............................................................................................................9
Using The Advanced Advert Manager To Schedule Adverts.....................................11
The Advanced Advert Manager Interface...................................................................12
Before We Add Our First Client, We A Should Set Up Collisions ............................13
Setting Your Collisions ...........................................................................................13
Hard Collisions........................................................................................................14
Soft Collisions.........................................................................................................14
Clients .........................................................................................................................14
Adding Your First Client ........................................................................................14
Searching For A Client............................................................................................17
Alternative Method Of Locating A Client Using The Find Button ........................19
Deleting A Client From The System.......................................................................20
Adding Your First Advert To The System..............................................................20
The General Tab..................................................................................................21
Advert Details .....................................................................................................21
Cart Details..........................................................................................................22
Playing, Editing & Recording Carts....................................................................23
Start And End Dates............................................................................................24
The Rotation Grid ...............................................................................................24
The Collisions Tab ..............................................................................................25
Hard Collisions....................................................................................................26
Soft Collisions.....................................................................................................26
Using Collisions ..................................................................................................26
Other Collisions ..................................................................................................27
The Notes Tab .....................................................................................................27
The Play History Tab ..........................................................................................28
Date / Time Range ..............................................................................................29
Terminals (Workstations)....................................................................................29
View Play History ...............................................................................................30
Save Results As Reconciliation File ...................................................................31
Finding Adverts That Are Already On The System................................................32
Finding Adverts For A Specific Client ...............................................................32
Finding A Specific Advert ..................................................................................33
Find An Advert Using The Client And Advert Reference Number....................34
Deleting An Advert From The System ...................................................................36
The AutoSchedule Tab (For Scheduling & Importing Adverts).................................37
Checking That The Q-NXT Log Includes Advert Breaks To Schedule In To .......37
Scheduling / Importing Adverts ..............................................................................38
Date And Time Range.........................................................................................39
Diagnostic Report................................................................................................40
Force Non-Scheduled Ads In To Log .................................................................41
2
Begin Scheduling / Importing .............................................................................41
Post Advert Scheduling Report...........................................................................42
Removing Adverts ..................................................................................................43
Viewing The Advert Schedule ................................................................................45
The File Menu .............................................................................................................46
New .........................................................................................................................47
Close........................................................................................................................47
Print Setup...............................................................................................................47
Print .........................................................................................................................48
Change Working Database......................................................................................48
Exit ..........................................................................................................................49
The Adverts Menu.......................................................................................................50
Collisions.................................................................................................................50
The Carts Menu...........................................................................................................50
Cart Browser ...........................................................................................................50
Cart Pad...................................................................................................................51
Run A General Cart Report.....................................................................................52
Cart Range...........................................................................................................53
Compression Options ..........................................................................................54
Cart Length Options............................................................................................54
More Options ......................................................................................................55
Report Results .....................................................................................................56
The Report Tool Bar ...........................................................................................57
Play Cart..............................................................................................................58
Edit Cart ..............................................................................................................58
Print Report .........................................................................................................58
Block Copy..........................................................................................................58
Block Move.........................................................................................................60
Mass Colour Change ...........................................................................................60
Update Cart Chunk Information..........................................................................60
Export To Pad .....................................................................................................61
Erase Last Play History.......................................................................................62
Mass Delete.........................................................................................................62
The Reports Menu.......................................................................................................62
Copyright Report.....................................................................................................63
Overview .............................................................................................................63
Description of the Reports (Profiles) ..................................................................64
General Myriad Copyright Information ..............................................................64
Commercial Return / Music Return Profiles.......................................................64
UK PRS Music Return ........................................................................................65
UK PRS Commercial Return ..............................................................................65
Adding the Copyright Information to a Cart.......................................................66
Running a Report ................................................................................................67
Obtaining Information from Terminals...............................................................69
Start / End Cart Numbers ....................................................................................69
Print / Run the Report .........................................................................................69
The Settings Menu ......................................................................................................70
Q-NXT Database Settings.......................................................................................70
Schedule Adverts ................................................................................................71
Logs Directory ....................................................................................................71
3
Log Filename Prefix............................................................................................71
File Date Format .................................................................................................71
Amount To Add To Cart Numbers ............................................................72
Only Use Adverts Marked For Transmission Chain...........................................72
Myriad Settings / File Locations .............................................................................72
Program Settings .....................................................................................................73
When Advanced Advert Manager Starts, Open The Database That Was Last
Used .....................................................................................................................74
Users Must Login Before They Can Use Advanced Advert Manager................74
The Windows Menu....................................................................................................74
The Help Menu ...........................................................................................................74
And That’s It ...............................................................................................................74
4
Advanced Advert Manager
Before We Start
The P Squared Advanced Advert Manager is used to either generate lists of adverts
that need to be played, or to take a list of adverts already generated by a third party
advert scheduling system (like Broadnet™) and ‘push’ them in to your Q-NXT Log
ready to be played back by Myriad.
Whether you are using the Advanced Advert Manager to generate a list of adverts or
to simply import a list from a third party system, the import process is basically the
same.
Before you get started with the Advanced Advert Manager, you should ensure that
you have created a music schedule for the time period you want to ‘push’ adverts in to
(using either AutoTrack™ Pro or a third party music scheduling system such as
Powergold™ or Selector™) and that your music schedule contains Advert Breaks that
the Advanced Advert Manager will use to fill with adverts (see scheduling system
documentation for details on how to do this). Finally you need to have ‘pushed’ the
music schedule in to Myriad’s Q-NXT Log before you attempt to schedule or import
adverts. In AutoTrack this happens as part of the scheduling process but if you are
using a third party music scheduling system then you will need to use the separate P
Squared Log Import program.
Now that the warnings about what you need to have done before starting are out of the
way, lest get started by running the Advert Scheduler.
Getting Started
The Advanced Advert Manager should be installed on a PC that has access to your
Myriad network.
Take a complete copy of the Ad Manager folder from the installation CD onto the
myriad machine where it will finally live (It can only be installed on a licensed
Myriad Terminal) and then create a shortcut to the Ad Manager.exe on your desktop.
Once installed, the Advanced Advert Manager icon will like an orange on a P Squared
logo background. Double click on this icon to start Advanced Advert Manager for the
first time.
5
In the majority of cases, you will see the splash screen above for a few seconds while
the system loads up. If your Myriad system is configured to run with multiple
configurations, you will first have to select which configuration you wish to use by
clicking on the appropriate icon. If you do not have multiple configurations set up or
have no idea what we are talking about then don’t worry, chances are you can forget
about this paragraph.
Logging In
Myriad has a built in security system in which users of the system are given a Login
Name and Password which determines how much access they have to the system. As
part of the Myriad family, Advanced Advert Manager is no exception, so assuming
that you are using User Security and that you have added some users to your system
with Myriad Manager, you will have to Login to Advanced Advert Manager before
you can proceed any further.
It may seem obvious but you must Login with a Login Name and Password that
includes adequate User Rights to allow you to use the Advanced Advert Manager (see
Myriad Manager Manual for more details).
Selecting The Q -NXT Database You Want To Work With
The first time that you run the Advanced Advert Manager, you will be asked to select
the Q-NXT Database that you wish to work with. This is the database that contain s
6
the music schedule that you want to schedule / push adverts in to. Most stations will
only have one Q-NXT database because they will only be using there Myriad system
for one station but if you are running more than one station from the same system (i.e.
FM and AM sister stations etc) then you may have multiple Q-NXT Database to
choose from.
In the example above, there are a number of databases to choose from. To select a
database, either double click on it or highlight it (it goes blue) and click on the OK
button.
If you are not sure which Q-NXT Database you want to work with or you have
several databases that you will need to use, don’t worry, the Change Working
Database option on the File menu allows you to select a different Q-NXT Database at
any time.
Once you have selected the Q-NXT Database then the Advanced Advert Manager will
finish loading and we are ready to start playing.
Scheduling Adverts v’s Importing Adverts From A 3rd
Party System
At this stage, the Advanced Advert Manager has been started successfully but it will
look very different depending on whether you plan to use the Advanced Advert
Manager to schedule the adverts for you or you wish it to ‘import’ the adverts from a
list created by a third party advert scheduling system such as Broadnet™. If you are
not sure then answer this simple question.
Have you purchased an advert scheduling system from a company other than P
Squared?
Yes: Then you will want to use the Advanced Advert Manager to ‘import’ the list of
adverts that the third party system has generated. To do this you will need to
configure the third party to output a file to a specific format that the Advanced Advert
Manager can understand and have that file available either on your computer or a
floppy disk. For information on configuring your third party advert scheduling system
to work with Myriad, contact P squared initially for details and then be prepared to
contact to the supply of the third party software to make any necessary modification.
7
No: If you have not purchased a third party advert scheduling system but want to
include adverts on your station then don’t panic. As part of the standard Myriad
package, we have included the Advanced Advert Manager, which has the ability to
schedule adverts for you. The Advanced Advert Manager is not intended to be any
more than a basic advert scheduling system and as such, if it does not meet your
requirements you may have to consider investing in a third party product – but why
don’t we wait and see before you spend any more of your stations heard earned
money.
Whether you are using the Advanced Advert Manager to schedule adverts or not is
determined by the Schedule Logs setting in the Q-NXT Database that you have
opened (located on the Ads/Logs tab of Q-NXT settings) and determines how the
Advanced Advert Manager looks when it starts up.
Create an Adverts Database:
Run the program, goto the settings menu then choose Q-NXT Database Settings,
finally click on the Ads/Log Import tab (as shown below).
On the bottom section of this window you need to put a tick in the box for "Schedule
Adverts" - this will enable the select button.
Click select, this will then open the database chooser, from the "Options" menu of this
window, create a new database.
Make sure that you give it an obvious filename and description so that you don't get
confused with the other databases you are storing.
Now you have specified a client database, the full functionality of the Advanced
Advert Manager is enabled.
8
How Advanced Advert Manager Looks If You Are Scheduling
Adverts
How Advanced Advert Manager Looks If You Are Importing
Adverts From A 3 rd Party System
9
If the Advanced Advert Manager is being used to import lists of advert breaks from a
3rd party advert scheduling system then the Clients tab appears to be ‘greyed out’ as
you will not be needing to add any Client s to the system. The Autoschedule tab
remain valid for both modes of operation.
If you are not planning on using Advanced Advert Manager to generate advert breaks
then you can skip straight ahead to the AutoSchedule tab. All of the operations on the
Autoschedule tab are the same if your are importing a list, the only difference is that
instead of making it’s own list, Advanced Advert Manager will use the list you have
already generated using a third party product.
10
Using The Advanced Advert Manager To Schedule
Adverts
If you are reading this part of the manual, hopefully you have already flicked through
the first section of and have come to the conclusion that you want to use the
Advanced Advert Manager to generate your stations advert breaks for you as opposed
to importing a list of adverts from a 3rd party system. You should also have generated
a music schedule that contains advert breaks, ‘pushed’ this schedule in to Myriad (so
it appears on the Q-NXT screen) and have configured the Ads / Logs section of QNXT Settings to Schedule Adverts – if the answer is yes then well done, we are ready
to begin.
11
The Advanced Advert Manager Interface
The picture above shows the basic layout of the Advanced Advert Manager when it is
being used for scheduling adverts. The most important sections are the Clients Tab
which is used to add clients / adverts to the system and the AutoSchedule Tab which
is used to actually schedule the adverts in to advert breaks for your station. The Cart
Player is used for auditioning Carts on the Myriad Audio Wall and the Menu bar
offers a range of menu options for configuring and using the system. All of these
elements are explained in greater depth in this manual.
12
Before We Add Our First Client, We A Should Set Up
Collisions
The vast majority of settings for Advanced Advert Manager are automatically
detected from the Myriad system when the program is installed. Even if you do not
have Myriad installed on the PC you are using for Advanced Advert Manager then it
may well still detect all the appropriate settings. If the settings are not automatically
set then you will be prompted to add the settings the first time you run the program.
For details on how to do this, please refer to the Settings Menu section of this manual
for information on manually configuring your system.
One of the settings that will not automatically be set is the Collisions list. Collisions
are used by the Advanced Advert Manager to keep adverts for similar products apart
in your advert breaks. Lets say for example that your station is running adverts from
two rival double-glazing firms at the same time. You may want to ensure that the
adverts for each company do not appear next to each other in your Q-NXT Log. This
would be done by setting up a Collision called ‘double-glazing’ and ticking the
‘double-glazing’ Collision option on the advert for each company. The system will
then treat them as similar and attempt to keep them in separate advert breaks or, when
this is not possible, apart in a single advert break. Off course, if you started running an
advert for a third double-glazing company, ticking the ‘double-glazing’ Collision for
that advert would instruct the system to keep all three separate.
Setting Your Collisions
You do not have to set all the Collision before you get started but it would help to set
a couple so that you can see how to use them when we come to adding our first advert
to the system.
To set your Collisions, click on the Adverts Menu and select Collisions from the
menu list.
This will open up a small window with two sections. The Hard Collision Names
section allows you to set up to eight Hard Collision Names, the Soft Collisions
13
sections allows you to set up to eight – you guessed it- Soft Collision Names. But
what is the different?
Hard Collisions
Hard Collisions are Collision that the system WILL NOT allow to happen under any
circumstances. Lets say that we have several double- glazing firm adverts and we tick
the ‘double- glazing’ Hard Collision option on all of them. The system will attempt to
keep them all in separate advert breaks. If is can not do that then it will try to shuffle
the advert breaks so that none of the double-glazing adverts are played next to each
other. If is can not do that then because it is a Hard Collision then it will actually drop
on of the adverts rather then let then collide. You would then have to intervene to
manually sort out the problem.
Soft Collisions
In the case of Soft Collisions, the same process as with Hard Collisions applies but at
the final stage, if it cannot keep two colliding adverts apart, it will leave them in the
schedule next to each other. Soft Collisions are usually used for adverts that should be
kept apart but must also be played.
In the example screen shot above, the same names have been used for both Hard and
Soft Collisions but this does not have to be the case.
Once you have finished, click on the OK button to save your Collision Names.
Clients
Clients are the people who buy ‘air space’ on your station. In Advanced Advert
Manager, you have a database of Clients and for each Client you can have one or
more adverts. The Client database contains all the adverts for a Client, past present or
future and every advert you want to run on your station must be attached to a Client.
Adding Your First Client
Although Clients are fundamental to the Advanced Advert Manager, adding and
managing them is pretty straightforward. Throughout this manual, we will use a
number of ‘made up’ Clients. These are for demonstration purposes only and are not
intended to be representative of real companies.
To add a new click, click on the New button on the Client Tab.
14
This will open a blank Client Record Card to allow you to start to add the details for
your client. The first thing to do is to add in the general details for your client on the
General tab. The only thing that you need to make sure is the Client Reference is a
unique reference; you cannot use the same Client Reference for two different clients.
In the example, the general details for a new Client have been added. You must give
each Client a Reference and a Company Name, the rest of the information fields are
optional.
Next, click on the Addresses Tab to add in the Clients address.
15
The More Details Tab allows you to add in the Clients Company and VAT number as
well as the date of your last contact with them and when you should contact them
next.
Finally, the Notes Tab allows you to add some text notes about the Client you are
adding to the system.
16
That’s it! Click on OK to save your new Client’s details or Cancel if you want to
discard what you have just done.
N.B. The bottom half of the Client Record Card shows the adverts that the Client is
currently running, adverts that have ran in the past and any that are pending in the
future. We will cover this in more depth in the Adverts section of the manual but as
this is a new Client, there are no adverts listed in on the Client Record Card.
You can also use the Find button to look up a clients details based on their Reference
but the Search option on the Client Tab offers a more comprehensive search facility.
Searching For A Client
Once you have added a few Clients to the system, you may well want to go back to a
particular Client Record Card to look at their contact details or see what adverts they
are running. The easiest way of doing this is to use the Search button on the Client
Tab to search for a Client.
Click on the Search button on the Client Tab.
17
This will open the Client Search window which allows you to select a Client
Reference, Their Reference, Company Name or Contact Name to search for. You can
do this by either typing in the appropriate boxes or selecting an a name from the ‘drop
down’ list on each option.
When you are happy, click on the OK button to start the search. Once the search has
completed, the results will be displayed in the Client Search Results window. In the
example below, only Fred’s Bakery matched the criteria but if more than one Client
meets the search criteria then the results are displayed as a list in the Client Search
Result Window.
18
To open the actual Client Record Card, double click on it in the Client Search Results
Window.
And here we are again with the contact details for Fred the Baker!
Alternative Method Of Locating A Client Using The Find
Button
As an alternative to using the Search button, if you are already in the Client Record
Card screen and you want to find the specific details about a Client on the system, you
can do so by selecting the Client’s Reference from the drop down list and then
clicking on the Find button.
19
This will then fill in all the rest of the details for you from the Clients Database.
If you want to look up a new Client but you are already looking at Client’s details,
clicking the Clear button will clear all the current Client’s details for you allow you to
select a new Reference and Find the details using the Find button.
Deleting A Client From The Sy stem
To delete a Client for the system, all you have to do is use either the Search button on
the Client Tab or the Find button inside the Client Record Card screens to open the
details of the Client you want to delete. Once you have the Client Record Card open,
the Delete button becomes enabled at the bottom of the screen.
To delete the Client from the system, click on the Delete button.
You will then be asked to confirm that you want to delete the Client. CAUTION: You
will be given one warning only and once a Client has been deleted, there is no going
back, all the information will be lost for all eternity so BE CAREFUL!
Adding Your First Advert To The System
20
Once we have added our first Client to the system, we are ready to start to add some
adverts to the system. Before we get started, in this example, the advert has already
been produced and added to the Myriad system. The Cart Number that the advert has
been recorded in to is known and the advert is complete and ready to play ‘on air’. It
is not necessary to do it this way round, you could add the advert in Advanced Advert
Manager first, select a blank Cart Number from the Audio Wall and record the advert
in to that Cart Number at a later date.
To get started adding an advert to the system, click on the New Ad button on the
Clients Tab.
This will open a blank Advert Window to allow us to create a new advert.
The General Tab
Advert Details
The first thing that we have to do is select the Client that we want the advert to be for.
Selecting the unique Client Reference from the ‘drop down’ list does this. In this
example, we want to add in a new advert for Fred The Bakers so we select ‘fredbake’
for the Client Reference.
Next we need to give the advert a unique reference of it’s own. As this is the first
advert for Fred’s Bakery, we need to type in a new Advert Reference (in this case
‘fredbakead1’) but in future, if we add more adverts for Fred’s Bakery, we will be
able to select an Advert Reference using the ‘drop down’ list and then modify it
accordingly (i.e. fredbakead2 can be added by selecting fredbakead1 from the list and
changing the last number).
Finally, we need to give the advert a descriptive title that can be used to identify the
advert when we need to work with it in the future.
21
Cart Details
Once we have added the basic details for the advert, we need to tell the Advanced
Advert Manager where the advert is on the Myriad Audio Wall. This is done by
specifying the Cart number that the advert has been recorded in to.
To add a Cart Number to your advert, either type Cart Number directly in to the Cart
Number box or click on the Cart Number button to open the Cart Browser which
allows you to ‘browse’ the Audio Wall for the Cart you are looking for.
22
Once you have found the Cart that you want to use in the Cart Browser, click on it to
select it.
Tip: You can use the Jump function on the Cart Browser to jump to a specific Cart
Number or the Find (F key) to search the Audio Wall for a specific Cart.
Playing, Editing & Recording Carts
Once you have selected a Cart from the Audio Wall, the Play and Edit buttons
become enabled. The Play button is used to review the Cart you have selected by
loading in to the Cart Player located at the bottom of the Advanced Advert Manager.
While the Cart is playing in the Cart Player, you can jump around with the audio of
the Cart by clicking on the progress bar to jump to that point in the Cart. You can also
use the ‘transport controls’ located to the right of the Cart Player to control playback
of the audio.
The Edit button opens the Edit Cart screen from Myriad, which allows you to edit the
details for the Cart that appear on the Myriad Audio Wall.
23
From here, you can add any additional text or picture information, the copyright
details and information that you want Myriad to display on your web site. You can
also set the Extro for the Cart and even use the Record button to record the advert on
to the Audio Wall using the audio input to your computer’s sound card.
Start And End Dates
The next thing that we need to set for our new advert is a Start and End date for the
advert to run between. Using Advanced Advert Manager you must specify a start and
end date for each advert in the system so that the Advanced Advert Manager can
schedule adverts that are ‘current’ when it is generating the advert schedule.
To set the start and end dates, use the ‘drop down’ list to select the respective dates.
Once you have selected a date range, the advert will automatically be included in all
advert scheduling that occurs between and including those dates.
The Rotation Grid
24
The final element that MUST be completed on the General Tab of the Advert Record
Card is the Rotation grid.
The Rotation Grid is the grid of 168 squares that is located at the bottom of the Advert
Record Card. Each square is used to represent a single hour in a week and the number
that is entered in to the hour square is the number of time within that hour that the
advert will be scheduled to be played. Initially, the Rotation Grid will be empty
(white) but we need to put a number in to each hour of the week that you want the
advert to be played.
In the example above, the advert has been set to play every hour of the week at least
once but between the hours of 6:00 – 10:00 and 16:00 – 19:00 throughout the week,
the advert will be scheduled twice in each hour.
Now, I am sure at this point you are thinking that it will take ages to fill in every box
on the grid, and you would be right but luckily you can use the left mouse button to
select several hours at once and then type in the number you want to be added to each
box. Give it a try and you will soon see that it is dead simple.
At this stage, we have added enough information for the system to start scheduling the
advert; all we need to do is click on the OK button to save the information to the
database.
The Collisions Tab
25
The Collisions Tab allows you to specify what type company or product this advert is
for so that the system can attempt to keep it separate from other adverts for similar
products or services.
Click on the Collisions Tab to view the Collisions screen for the advert.
Hard Collisions
Hard Collisions are set- up using the Collisions option under the Adverts Menu in the
Advanced Advert Manager. Hard Collisions are used by the system to keep adverts
for similar products or services in separate advert breaks within any given hour. If this
is not possible the system will put them in the same advert break but will shuffle the
order of the adverts within the advert break to ensure that the similar adverts are not
scheduled to play ‘back to back’. If you are using Hard Collisions then should the
system not be able to shuffle the order of the adverts to keep similar adverts apart, it
will drop one or more of the colliding adverts in order to stop the collisions from
occurring.
Soft Collisions
Soft Collisions do exactly the same as Hard Collisions (see above) but with the
exception that if it cannot keep tow similar adverts from colliding, the system will
allow them to be scheduled together. In general, Soft Collision should be used for
most adverts unless you specifically do not want a collision between particular adverts
to occur.
Using Collisions
26
To use the Collisions, simple tick the box next to the Hard or Soft Collision that you
wish to add to the advert. You can tick as many Hard and Soft Collision Names for an
individual advert as you wish.
N.B. You set the Collision Names when you first get the system. They can be altered
by access the Collisions option on the Adverts menu.
In our example, we have been adding a new advert for a local bakery called Fred’s
Bakers. We do not have a Collision set-up for bakers but we do have one for the ‘Fast
Food’ so we could tick the Soft Collision option so that the system would attempt to
keep Fred’s the Baker’s ad separate from the McDonald’s advert but if it has to it will
allow them to play together.
Other Collisions
There are two more options on the Collisions Tab, both of which are fairly selfexplanatory.
The first allows the system to schedule different adverts from the same Client in to a
single advert break. The second allows the system to schedule the same advert twice
in a single advert break should it be necessary. You can elect whether to allow either
or both of these options by ticking the appropriate box.
The Notes Tab
The Notes Tab allows you to add some additional text information about an advert.
To add notes to an advert, click on the Notes Tab and type in to the white box
provided.
27
The Play History Tab
The final tab on the Advert Record Card is the Play History Tab, which as the name
suggests, allows you to look at the history of an advert to see when it has been played
by your Myriad system.
28
Date / Time Range
The top section of the Play History tab allows you to set the date and time range that
you want to look between to see how often the advert was played.
Clicking on the Select Start / End Date and Time buttons open the standard Myriad
time and date selection window which you can use to select the date and time range
you want.
Tip: The clock on the right hand side of the screen allows you to select the time that
you want. The inner green section represents the AM hours whilst the out red section
presents the PM hours.
Terminals (Workstations)
Once you have selected the time and date range that you are interested in, you can use
the Terminals (Workstations) section to restrict the Advert Play History results to only
display when the advert was played on a certain Myriad workstations on your
network. The Terminal list is a list of all the Myriad workstations that you have set-up
on your Myriad system (see PowerNet Set- up in the Myriad Configuration Manual for
more details on how to set these up). Usually, you would see names like Studio 1,
Studio 2 and Myriad Admin but in the example system that has been used to write this
manual, all of the Myriad workstations on the network have been given girls names.
To select the Terminal(s) that you want to be included in the Play History search
results, simply tick the box next to the Terminal name. If you do not want to restrict
the search at all then do not tick any of the boxes and all Terminals will be included in
the search results.
Example: Lets say that in this case we are only interested in every time the advert has
been played in the last two days on workstation called Kylie 3 (long story behind that
name). All we have to do is set the start and end date and time accordingly and tick
the box next to Kylie 3 in the list.
29
We are now ready to look at the results by clicking on the View Play History button.
View Play History
The View Play History button displays the results of the Advert Play History search
based on the criteria that you have specified on the Play History tab. The results are
displayed in a new window.
The results are displayed in chronological order with a number of additional items of
information such as who was logged in to the system, any hardware lines that were
triggered and which Cart Player was used. You can change the order of the search
results by clicking on the heading for each column (like a spread sheet).
There are also four buttons located at the top of the Play History Log Reports.
30
In order, these buttons are used for:
Play – Plays the advert in the Advanced Advert Manager’s Cart Player.
Edit – Allows you to alter the Carts information on the Audio Wall using the standard
Edit Cart screen from Myriad.
Print – Print the Play History results to the computers default printer.
Pad – The final button opens up the Pad, which can be used to stack a number of
adverts for ‘back to back playback’. See the Pad section of the manual for more
details on using the Pad.
Save Results As Reconciliation File
Once you have the history for the adverts that you are interested in, you can save the
results as a special ‘reconciliation file’ that is used by external 3rd party advert
scheduling systems to confirm to customers that their adverts have been played and
that they will be billed accordingly. Currently, the Advanced Advert Manager outputs
reconciliation files that are compatible with Broadnet™ but compatibility with other
systems could be added in future so please check with P Squared for more details.
To generate a reconciliation file, click on the Save Results As Reconciliation File
button. You will then have to select the Q-NXT Database that you want to work with.
The reason for this is the location that the reconciliation file needs to be saved in is
stored as part of this database. To select a database, either double click on it or
highlight it and click on OK.
The reconciliation file will then automatically be generated and you will receive
confirmation before you continue using the Advanced Advert Manager.
31
Finding Adverts That Are Already On The System
Once adverts have been added to the system, there are three main methods for finding
them again if you want to view their details or make amendments to them.
Finding Adverts For A Specific Client
Probably the most obvious method to find a particular advert is to look at the Client
Record Card for the client that placed the advert. All you have to do is open the Client
Record Card (see Searching For A Client) and you will see a list of adverts that the
Client has placed located at the bottom of the record card.
In the example above, the Fred The Bakers has two current adverts that are displayed
at the bottom of the Client Record Card. To view the details for either of those
adverts, all we would need to do would be to double click on them.
32
Note: There are four tabs located along the bottom of the Clients Record Card that
allow you to look at the Current Adverts, the adverts that have expired (Old Adverts),
any future adverts that have been added to the system but are not currently running
(Pending Adverts) or All Adverts regardless of status.
Finding A Specific Advert
If you know what advert you are looking for but do not really care about the Client it
is attached to then you can view a list of all of the adverts on the system by using the
Adverts button on the Clients Tab.
This will display a list of all the adverts on the system.
33
You can use this list to look for the advert that you are interested in. You can alter the
order in which the adverts are displayed by clicking on the column titles (like a spread
sheet). You can also switch between Current Adverts, Expired Adverts, Pending
Adverts or All Adverts regardless of status by using the tab strip at the top of the
window.
To view or amend the details for any of the adverts listed, double click on them to
open the Advert Record Card.
Find An Advert Using The Client And Advert Reference Number
The final way of finding an advert that has been added to the system is to use the
unique Client and Advert Reference numbers that is assigned to each advert on the
system. To do this, click on the New Ad button on the Client tab as if you were about
to add a new advert to the system.
Once the blank Advert Record Card has appeared, use the Client Reference drop
down list to select the client reference you want to work with. Next, use the Advert
Reference drop down list to select the reference for the advert that you are looking
for.
34
Once you have selected both the Client Reference and the Advert References from the
lists, click on the Find button (bottom left hand corner) to call up the details for the
advert.
Tip: Once you have finished, if you want to look up another advert, click on the Clear
button to clear all the details and get a blank Advert Record Card. You can then start
the procedure again.
35
Deleting An Advert From The S ystem
You can delete an advert from the system at any time using the Delete button that is
located on the Advert Record Card.
To delete an advert, first find the advert you want to delete (using any of the three
methods described previously) and open the Advert Record Card for the advert.
Once you are sure that you have the correct advert and that you definitely want to
delete the advert, click on the Delete button.
You will then be asked if you want to delete the advert from the system. If you click
on Yes then the advert will be deleted from the system. CAUTION – Deleting an
advert from the system is permanent and cannot be undone. If you delete an advert by
mistake, you will have to enter the advert back in to the system manually.
Deleting adverts from Advanced Advert Manager only deletes them from your advert
database. The Cart which the advert was recorded in to on the Myriad Audio Wall
remains intact until you manually deleting using either Myriad or the Myriad
Manager.
36
The AutoSchedule Tab (For Scheduling & Importing
Adverts)
The AutoSchedule Tab has all the tools that you need to actually schedule or import
adverts in to your Q-NXT Database ready to be played out by your Myriad system.
Before we get started, it would be worth checking that the Q-NXT Database that we
selected to work with at the beginning of the session has a schedule generated for the
time and date range that we want to generate adverts for and that the Running Orders
(in AutoTrack) for the scheduled period have advert breaks in them.
Checking That The Q -NXT Log Includes Advert Breaks To
Schedule In To
We can check the selected Q-NXT Database to ensure that the schedule that has been
generated includes advert breaks for the Advanced Advert Manager to schedule the
adverts in to. This is important because when scheduling adverts, the Advanced
Advert Manager first checks the Client Database to compile a list of all the adverts
that are valid and scheduled to be played in a given hour. Once it has that, it then
looks at the Q-NXT Log to see how many Advert Breaks have been scheduled for that
hour and uses this information to decide how many adverts to place in each Advert
Break. Lets say for the 6 – 7pm hour on a Tuesday, there are nine valid adverts that
37
should be scheduled and the Q-NXT Log for that hour includes three Advert Breaks
then the Advanced Advert Manager will place three adverts in each break in order to
spread the adverts evenly over the hour.
If you are not sure how many Advert Breaks have been included in the Q-NXT Log
that has been generated by AutoTrack, then you can check it clicking on the Breaks
button located at the bottom of the AutoSchedule tab.
The Advanced Advert Manager will check the Q-NXT Database for you and show
you how many Advert Breaks it finds in each hour.
In the above example, there are three Advert Breaks per hour throughout the entire
week. Remember, this only tells you how many Advert Breaks there are in an hour, it
does not show how many adverts each break contains once the adverts have been
scheduled.
Scheduling / Importing Adverts
Once we have added your adverts to the database and checked to see that Advert
Breaks exist in the selected Q-NXT Log then we are ready to actually schedule the
adverts.
To do this, click on the Schedule button on the AutoSchedule tab to open the
Schedule window.
38
The Schedule window allows you to enter the date and time range within which you
want the system to schedule advert for you. It also allows you to generate a diagnostic
report to track down any problems and gives you the option to have the system force
all adverts in to the available Advert Breaks regardless of collisions, should this be
necessary.
Date And Time Range
The first thing that we need to do in order to schedule some adverts is to select a start
and end date and time using the Select Start / End Date and Time buttons.
39
Use the calendar located to the left of the window to select the date and the click to
the right to select the time. The inner (green) circle represents the AM hours whilst
the outer (red) circle represents the PM hours.
Once you have set the time and date range, the dates will appear in the main Schedule
window.
N.B. The date that adverts have been scheduled up to is displayed at the top of the
window and the start of the next advert time date range defaults to the next hour.
We are now ready to begin scheduling advert but there are a couple of other settings,
which we could use if we wanted to.
Diagnostic Report
The Diagnostic Report option generates a report at the end of the advert scheduling
session to show the processes that the Advanced Advert Manager went though to
schedule the valid adverts in to the advert breaks in your schedule log. The Diagnostic
Report is not really of an practical use on day to day scheduling but is worth running
if you are having difficulties scheduling adverts and are considering contacting P
Squared for technical assistance.
40
Once Advanced Advert Manager has finished scheduling the adverts, it will display
the Diagnostic Report in a window before sending the adverts to the Playout system.
You can then print the report or save it as a text file for viewing at a latter date.
Force Non-Scheduled Ads In To Log
The final option on schedule adverts window allows you to instruct the Advanced
Advert Manager to schedule all valid adverts in to available breaks even doing so
breaks some Hard Collisions (see The Collisions Tab section for more details on
collisions).
This option is not available if you are importing adverts from a 3rd party scheduling
system as the adverts have already been scheduled.
Begin Scheduling / Importing
Once you have selected the time and date range that you want to schedule adverts in
to, and selected whether you want to force or adverts or generate a diagnostic report,
you are ready to schedule the adverts.
To schedule the adverts, click on the Begin Scheduling button.
Advanced Advert Manager will check the Q-NXT Log to find the advert breaks that it
can use,
then look at all the adverts in your database to see which ones are valid. Finally, it
will fill the advert breaks with an even distribution of adverts taking care to keep
colliding adverts in separate breaks or apart from each other in the same advert break.
The whole process should only take a few seconds and progress is displayed as it
performs each stage of the scheduling process.
If you are importing a list of adverts then instead of generating the advert lists,
Advanced Advert Manager checks the pre-generated list.
41
Once Advanced Advert Manager has finished scheduling / importing the adverts, you
will be asked if you wish to ‘push’ the adverts in to your Q-NXT Log. Click on Yes to
merge the advert breaks with your Q-NXT Log.
Your Done! – Your adverts have been scheduled and automatically inserted in to the
blank advert breaks in your Q-NXT log. All you have to do now is sit back and watch
the money roll in.
Post Advert Scheduling Report
Once Advanced Advert Manager has finished scheduling the advert and ‘pushed’
them in to the Q-NXT Log, you will be given a brief summary of the amount of
adverts that have been scheduled and the amount of advert breaks that they have been
pushed in to.
In addition to this, the Advanced Advert Manager also ‘flags up’ any potential
problems with the scheduled advert breaks in the form of a report on any complete
scheduled hours that fall short of containing an hours worth of content.
42
Advanced Advert Manager will also include any adverts that have been scheduled to
play Carts that do not exist on the Myriad Audio Wall. This allows you to keep track
of any copy that is missing from your playout system ahead of the first scheduled play
of an advert. You can print or save the post advert schedule report.
Removing Adverts
Lets say you have scheduled all your adverts for the entire week, you are sitting back,
enjoying a nice cup of coffee and a chocolate ‘hob knob’ when the phone rings with
you biggest client screaming that the phone number on their latest advert is wrong.
Ok, don’t panic. The first thing to do is swear profusely about the production
department. Once that is done head straight for the Auto Schedule Tab on the
Advanced Advert Manager and click on the Remove button.
The Remove button allows you to ‘pull’ all of the advert breaks from a particular time
and date range, from the Q-NXT Log allow you to re-schedule them and ‘push’ them
back in at a later date. Clicking on the Remove button opens the Remove Advert
Breaks window.
43
To complete remove the advert breaks from the Q-NXT Log for a specific time and
date range, click on the Select Start / End Date and Time buttons respectively and
select the time and date that you want to remove advert between.
Alternatively, you can type in the date and time in a variety of formats in the white
date and time boxes to the right of the Select Start / End Date and Time buttons.
N.B. The latest date that adverts have been scheduled up to is displayed at the top of
the Remove Advert Breaks Window.
Once you are happy that you have select the correct date and time range, click on the
Remove Logs From Playout System button to begin the removal process.
You will be asked to confirm the date and time range one final time before Advanced
Advert Manager starts to remove the advert breaks.
Once it has finished removing the advert breaks from the Q-NXT Log, you will see a
brief summary of what it has done.
44
CAUTION: Once an advert break has been removed, you can not re insert it. You
must re-schedule the adverts for this time period (see Scheduling Adverts) and push
them back in the Q-NXT Log. The adverts will be re-scheduled as normal but the
exact order may be different from the advert breaks that you removed.
Viewing The Advert Schedule
The View button on the AutoSchedule tab allows you to review the adverts that have
been scheduled in to each advert break in any given day.
Clicking on this button opens the Advert Schedule Viewer window, which allow you
to select a day and view the adverts that have been scheduled.
45
To select a particular date and time, either click on the Display Log From button and
select date and time in the usual way (see Scheduling Adverts) or type the time and
date in to the white boxes to the right of the button.
Once you are happy with the date and time, click on the View button to display the
advert breaks for that day.
N.B. You cannot alter the advert logs from this window, the View Logs window is
purely for reference. If you want to alter the adverts scheduled in a particular break
you could either manually alter then in the Q-NXT Log using Myriad or simply
remove the hour in question and reschedule it again (although it may schedule them
exactly the same the second time around).
The File Menu
The File Menu is used to allow you to open and close windows within the Advanced
Advert Manager, to print items (where applicable) and to select the Clients database
that you want to work with.
46
New
Selecting the New option from the File Menu opens a new (blank) Client Record card
to allow you to add a new Client to the system. The keyboard shortcut for New is Ctrl
+ N.
Close
The Close option closes whichever floating window is active in the Advanced Advert
Manager (i.e. the one that is highlighted). Pressing Ctrl + F4 on the keyboard will also
do the same thing.
Print Setup
The Print Setup option on the File Menu allows you to set up the printer that you want
Advanced Advert Manager to use when printing information.
47
User the drop down list to select the local or network printer that you wish to use and
alter the printer setting by clicking on the Properties button.
Once you are happy with your printer settings, click on OK to close the Print Setup
window.
Print
The Print option on the File Menu in Advanced Advert Manager is only enabled when
certain printable items are selected in the Advanced Advert Manager. In general, all
reports or lists can be printed by either selecting the Print option from the File Menu
or pressing the Ctrl + P button, the selected item will then be printed using the printed
selected in Print Setup (or the default printer for the PC of you have not specified a
particular printer).
Change Working Database
Advanced Advert Manager can be used to generator or import advert breaks for
multiple Myriad systems. When you have multiple Myriad systems, each system has a
unique Q-NXT database and it is in these databases that the settings that Advanced
Advert Manager’s settings are stored. This means that if you have two stations (say an
FM and an AM station), each would have a separate Q-NXT database and inside each
database would be information about the Advanced Advert Manager configuration for
the station.
In the Advanced Advert Manager, you can select the Q-NXT database (and therefore
the Clients and Advert Databses) that you want to work with by using the Change
Working Database option on the File Menu.
To select a database, either double click on the desired icon or highlight it and click
on the OK button.
In addition to selecting the Q-NXT Database you wish to work with, you can also use
this window to create a new Q-NXT database, copy en existing one or even remove a
database from the system.
48
The options menu allows choose from the following options:
Create A New Database – Creates a new Q-NXT Database
Change The Database Description – Alters the text below the icon
Copy This Database – Copies the highlighted database
Change The Databases Filename – Alters the actual file name for the database
Delete This Database – Deletes the highlighted database
The View menu allows you to alter the way in which the listed databases are
displayed. The options are:
Large Icons – Shows the databases as large icons (as in the screen shot)
List – Displays the databases as a simple text list (no icons)
Details – Shows additional details such as file name for each database
Please note, for more information on the Q-NXT Database Browser please consult the
Myriad documentation.
Exit
Closes the Advanced Advert Manager. You will be prompted to save any unsaved
information before the program shuts down completely.
49
The Adverts Menu
Collisions
The Collisions option on the Adverts Menu allows you to configure both the hard and
soft collisions that you want to use when scheduling adverts.
There are eight hard collision and eight soft collision slots and to alter one, simply
select it with the mouse and type in the new collision name.
For details on the difference between hard and soft collisions and also how to use
collisions when scheduling adverts. Please refer to the Collision section of this
manual.
The Carts Menu
The Carts menu on Advanced Advert Manager offers a range of options related to the
Carts on you’re your Myriad system’s Audio Wall.
Cart Browser
50
The Cart Browser option on the Carts menu opens the Myriad Cart Browser to allow
you to browse the Myriad Audio Wall and drag Carts in to the Cart Players. You can
also open the Cart Browser by pressing Shift + Ctrl + F1 on the keyboard.
Once the Cart Browser is open, you can use the Jump button to jump to a specific Cart
number or the Find button to search the Audio Wall for a particular Cart.
For more details on using the Cart Browser, please refer to the Myriad User Manual.
Tip: If you have recorded an Advert on to your Audio Wall, you can drag it
directly
from the Cart Browser on the Advanced Advert Manager main background and a new
Advert Record Card will automatically be created using the details for the Cart itself.
Cart Pad
The Cart Pad option on the Cart menu of Advanced Advert Manager opens the
standard Pad, which is used in Myriad to play lists of Carts from the Audio Wall. You
can also open the Pad by pressing Shift + Ctrl + F1 on your keyboard.
51
Once the Pad is open, Carts can be dragged in to it directly from the Cart Browser or
the Find Cart results window. The Pad can then be used to play the Carts back in
order or to save a list of Carts to be loaded in the Pad in Myriad for playback in a
studio.
To save a list of Carts, click on the ‘ring binder’ button at the top of the Pad and select
Save from the list that drops down. You can then select the location that you want to
save the list to.
For full details on how to use the Pad and the features that it offers, please consult The
Pad section of the Myriad Manual.
Run A General Car t Report
The Run A General Cart Report option on the Carts menu allows you to search the
Myriad Audio Wall for a specific Cart or a range of Carts and also to cross check with
which Carts are also listed as adverts in the Advanced Advert Manager database. You
can also press Ctrl + R to start a new Cart Report.
When you select the Run A General Cart Report option, the first thing you will be
asked is whether you wish to look for all Carts, only the Carts that are in the database
or only Carts that are not in the database.
52
Select the option that you want to use and click on OK to continue.
Cart Range
You can select which area of the Audio Wall you want to search, by using the Cart
Range settings and typing in the numbers of the Carts that want to search between
(inclusively). If you are not sure of the exact number then you can use the Browse
button to open the familiar Cart Browser window, which you can use to select the
Cart Numbers by double clicking on the desired Cart.
As with other areas of Myriad, you can use the Cart Browser in the same way you use
the main Audio Wall to find the Carts you are looking at. The “J” key or J button will
53
allow you to Jump to a specific Cart Number whilst the “F” Key or the F button will
allow you to search the Audio Wall for a specific Cart name.
Tip: You can use Cart Ranges to narrow the results of your Reports. Say for example
you want to look for uncompressed Adverts on the system, if you limit the Cart Range
to just the area of the Audio Wall where your adverts are stored (and select the
Compressed Carts only option) then you will get the Report that you want.
Compression Options
You can use the Compression Options to prepare Cart Reports based on whether Carts
are compressed (for instance, using IMA ADPCM 4:1 compression) or linear (uncompressed or PCM).
Show all Carts regardless of compression: lists all the Carts in the Cart Range
regardless of whether they are compressed or not.
Only show Carts that are compressed: only list Carts in the Cart Range that are
compressed.
Only show Carts that are linear (non compressed): will only list Carts in the Cart
Range that have no compression at all.
Only show Carts that aren’t 44100 Stereo: will only show Carts that are not of the
audio quality and format that you specify.
Cart Length Options
Only show Carts with Extro lengths greater than XX seconds: This option allows
you to list all the Carts in the Cart Range that have an Extro length greater than the
time you set. This is really useful when you want to check the Audio Wall for Carts
that have overly long Extros that you feel will not sound great ‘on air’. Long Extros
54
usually make for sloppy sounding automation so it is useful to be able to keep on top
of it with this report.
Only show Carts from XX to XX seconds long: Allows you to limit the report
results to Carts within a specific running time range.
Only show Carts whose file lengths don’t match their Cart lengths: When you
first record or import a Cart in to Myriad, Myriad works out the Carts length based on
the length of the file at that time. Once it has done this, it will only check the length
again if you go in to Edit Cart on the Audio Wall, otherwise, it assumes that nothing
is different.
Now, lets say we imported a Billie Piper song some time ago and Myriad worked out
(correctly) that the track was 3 minutes and 20 seconds long. We have not edited it
since so Myriad still knows that the length is correct. Now, lets say that last week our
troublesome breakfast jock was playing around with Cool Edit, but instead of opening
it through Edit Cart>Edit Audio on the Audio Wall he just ran Cool from the Start
menu. Say he then trims 20 seconds off of the end of the track. Because he did not do
it through Edit Cart>Edit Audio, Myriad doesn’t know that the length has changed.
Myriad still thinks it is 3min 20 seconds long even although it is now only 3 minutes
long. Later that day, the same track is due to be played in an automated show and of
course Q-NXT thinks it is 20 seconds longer than it actually is so when it comes to
play it, it will end 20 seconds early which momentarily confuses Q-NXT. Q-NXT will
recovers by recalculating any Auto-Fading to ensure that any Absolute Time Markers
are hit correctly - so other than a sloppy segue, no harm is done. Unless you spot the
problem though, it will happen every time the song is scheduled to play.
This Report Option allows you to track down rogue problems like this by comparing
Myriad Cart lengths with the actual file lengths and reporting any Carts that show
discrepancies. You also have the option to automatically fix these problems as Myriad
Manager runs the report. If you select this option then you will get a list of incorrect
Carts but they will all be fixed before the report is produced.
It is unlikely that you will get many situations like this - but if you do, this Report is
your only way of tracking it down short of listening every to every Cart on the Audio
Wall.
More Options
The More Options tab allows you to refine your Report by specifying in greater detail
what it is you are looking for.
55
If a Cart is empty, but now has a WAV file, import the information: This option
searches through the Myriad Audio Wall and finds any Carts that have a valid wave
file (e.g. Myr03000.wav) but do not appear on the Audio Wall itself. Selecting this
option automatically adds any Carts it finds to the Myriad Audio Wall.
Only show Carts that have not been played in XX days: Allows you to limit the
report to Carts that have not been played recently.
Report Results
Once you have selected the criteria for your report, the Advanced Advert Manager
will take a few seconds before collating the results in the Report Results window.
56
The Report Results are displayed initially in Cart number order, although you can sort
the results by clicking on the column titles (just like in Windows™ Explorer). If you
double click on one of the results, it will open the Edit Cart screen for that Cart,
allowing you to adjust the title, Intro & Extro times, Notes, Internet hyperlinks etc.
For more information on Edit Cart, please see the Myriad Manual.
The Report Tool Bar
You may have noticed that the Report Results window had a number of icon buttons
along the top. These perform a range of tasks, which are outlined below.
57
Play Cart
The Play Cart button will load the last selected Cart from the report in to the Cart
Player so that you can listen to it.
Edit Cart
This button will open up the Myriad Edit Cart screen for the last selected Cart from
the report (see above).
Print Report
This allows you to get a hard copy of any reports you run. If you click on the Print
Report button you will then have the option to select a printer if you have more than
one set up on your computer, if not it will use your default printer.
Block Copy
You can select multiple Carts from within the report window by either using the
mouse to drag a ‘rubber band’ around the Carts you want to select, or using the Alt
key on the keyboard and clicking on several items. Once you have selected the items
that you want to work with, the Block Copy button will allow you to copy those Carts
to a new location on the Audio Wall.
To do this, the first thing you need to do is select more than one Cart from the results.
58
Next click on the Block Copy button and the Cart Browser will appear.
Use the Cart Browser to find the position on the Audio Wall that you want to copy the
Carts to then double click on it.
You will be asked to confirm the position you want to copy to, click on Yes to
confirm.
Next you will be asked if you want to overwrite any existing Carts that are in the
range you are copying to. If you say yes then Myriad Manager will overwrite them. If
you say no then Myriad Manager will work around existing Carts ensuring no loss of
data.
Whatever you decide, a progress bar will appear to tell you how the copy is preceding
and when it is finished you will get a confirmation message.
59
Block Move
Block Move works in exactly the same way as Block Copy (see above) but instead of
copying the Carts, the Carts are actually moved from the original position to the
destination.
CAUTION! If you Block Move Carts that have been added to AutoTrack as either
Songs, Adverts or Jingles then AutoTrack will not know that they have been moved
and so will continue to schedule them using their old Cart Numbers. This will have
major consequences on the reliability of your scheduling and automation. If you move
Carts on the Audio Wall, you must update AutoTrack accordingly.
Mass Colour Change
The Mass Colour Change utility allows you to select a range of Carts from the Report
window and then change their background and text colours on the Audio Wall to the
colours of your choice.
To use this facility, select a range of Carts (as before) and then click on the Mass
Colour Change button. You will then be asked to select the colour that you want to
change the selected Cart’s background to. Select a colour from the standard Windows
colour palette and click on OK. You will then be asked to select a colour for the
description text to appear on the Audio Wall. Once you have selected the text colour,
you will be asked to confirm your changes before the Audio Wall is automatically
updated.
Update Cart Chunk Information
Cart Chuck is a new international standard for embedding Artist, Title, Intro, Extro
and additional information about songs, adverts and jingles in to the actual file header
of a .WAV file. The theory is that it will make audio transferable between different
playout systems and make the distribution of audio easier. Myriad is now fully Cart
Chuck compliant but as it is a new standard, Carts created with older versions of
Myriad do not include the Cart Chunk information. This tool allows you to select a
range of Carts and then have the system go through them and ‘stamp’ the Cart Chunk
information in the file headers.
Before performing this conversion, you should check that all the audio editors and
tools you use support Cart Chunk because although the theory is that non compliant
software will ignore the extra information, it is always worth checking because the
info can not be removed from the header once in. Our tests indicate that Cool Edit
works fine with Cart Chunk enabled .WAV files.
60
Export To Pad
The Export To Pad button will add the selected Carts from your report, to a Pad run
(just like in the Audio Wall). This Pad can then be used to listen to the Carts in order
or to save the entire list as a single Cart on the Myriad Audio Wall.
If the PC that is running Advanced Advert Manager is equipped with either a multi
channel sound card or multiple sound cards then you will have two Cart Players at the
bottom of the screen. In this case, you can listen to the Pad by clicking on the Play
(triangle) button on the Pad to load the first item in to Cart Player 1. You can then
press play on Cart Player 1 to start the Pad running through the items in the list.
61
For full details on using the Pad and the facilities that it offers, please consult the
Myriad User Manual.
Erase Last Play History
Whenever a Cart is played in Myriad, it is noted down in two separate places. Firstly
the Play Logs are maintained by Myriad and are a definitive list of all Carts played on
the system. Secondly, each Cart on the Audio Wall keeps track of the last five times it
has been played so that the User can quickly see when a Cart was last played and who
played it (this information is also used to mark Carts as recently played if that option
is enabled). The Erase Last Play History button allows you to select a range of Carts
and then erase the record of the last five times that they were played. This does not
affect the record in the Myriad Play Logs so you can still get the information through
Myriad Manager if you have to.
Mass Delete
The final tool on the tool bar is the Mass Delete function, which allows you to select a
range of Carts and then delete them from the Audio Wall
CAUTION! Use this feature with care, you will be asked to confirm several times but
if you do proceed with the Mass Delete process then there is no way to recover the
deleted Carts so BE CAREFUL.
The Reports Menu
62
The Reports menu allows access to the Copyright Report Generator, which produces a
‘played Cart’ report for a specific Cart or range of Carts including the Copyright
Information for the Carts if the information has been entered on to the Audio Wall.
Copyright Report
The Copyright Report option on the Reports and Statistics menu opens the P Squared
Copyright Report Generator which is a sub program that generates logs of played
Carts based on Myriad’s Play Logs, in a format suitable for a number of copyright
protection bodies. Use of the Copyright Report Generator is outlined below.
Overview
The P Squared Ltd. Copyright Report Generator is a solution to the problem of ‘PRS
Sweeps’. Basically, it does exactly what it says on the tin! It generates copyright
reports. However, the reports generated are only as good as the information you put
into them. If you take the time and trouble to put complete copyright information into
Myriad, then this program will make the dreaded nightmare of PRS returns a breeze* .
For those of you who don’t know, ‘PRS Sweeps’ are the checks made periodically by
the Performing Rights Society, which require just about every piece of copyright
information you have on what you play ‘On Air’. PRS Sweeps can last from as little
as 24 hours, to a few weeks at a time. It all depends on your TSA (Transmission
Service Area) and how accurate your last returns were. The more accurate the
information you supply, the shorter the Sweep will last.
However, it is not always that easy to supply accurate information at a moment’s
notice. You may have the constant problem of chasing up DJs to make sure they
supply you with the details of any music beds they decided to play on their shows.
Furthermore, you can spend days talking to agencies, most of whom don’t even know
that their 26 week, 7 different ads a day, campaign was heard outside of London! You
have to do a lot of work, collating how many times jingles were played, what different
ads were transmitted, and also you have to collate the commercial returns separately
from the music returns.
Traditionally, this has involved printing reports from several computer systems,
liasing with different departments, and often, getting the returns in late.
The P Squared Ltd. Copyright Report Generator interfaces directly with the audio
played within Myriad and Q-NXT allowing all returns to be quickly and accurately
generated from one, user- friendly program. At a glance, you can check on whether
your presenters have accurate copyright information for their personal jingles or
sweepers.
63
Description of the Reports (Profiles)
Within Copyright Report Generator you can view, but not alter, copyright
information, which is entered into the Audio Wall (see Adding Copyright information
to a Cart later in this guide). This information is displayed for viewing, and printing
from, different ‘Profiles’.
The Copyright Report Generator has a ‘General’ profile where all the possible
information for played Carts can be viewed (as shown below); the Performing Rights
Society however will never require this type of report. In a PRS Sweep, the
Performing Rights Society requires 2 different types of information: a Music Return
and a Commercial Return, which have different fields of information that need to be
supplied.
General Myriad Copyright Information
This report outputs all the possible, available information on played Carts from the
Audio Wall.
Commercial Return / Music Return Profiles
The File menu is where you can select the different report profiles, and which profile
is displayed when you launch the program (e.g. Default).
N.B. The Copyright Report Generator also allows you to save the report out to a file;
this is a particular file type that can be imported into other software, for example:
64
Microsoftä Excelä or Lotus123ä . This is known as ‘Comma Separated Variables’
or ‘CSV’.
UK PRS Music Return
For a Music Return, PRS require the following information (shown in the left hand
column of the diagram below), the example being “Sitting Down Here” by Lene
Marlin (which is the 3rd song from the top on the screen-shot above):
Music Title
Code
Performer
Composer /
Arranger
Publisher
Record
Label
Record(ing)
Number
Duration
The title of the song “Sitting Down Here”
Is it a D= Disc / C= Commercial / P= Promo / S=Station ID / L= Live or Local
“Lene Marlin” can be identified on the CD / LP sleeve notes
“Lene Marlin” can be identified on the CD / LP sleeve notes
“EMI” can be identified on the CD / LP sleeve notes by a ‘(P)’ symbol
“Virgin” can normally be identified on the CD / LP sleeve by a logo
“CDVIR83” is a unique number assigned to each CD / LP produced by the record
company and is found on the sleeve
“3:51” is the exact duration played on air
N.B. Although a Cart Number field is displayed on screen, it is not needed by PRS,
and is therefore not included in the final printout. It is there to allow you to generate a
report, identify which carts need the information entering, and regenerate the report.
UK PRS Commercial Return
65
For a Commercial Return, PRS require the following information in addition to a
copy of your advert logs:
Cart
Number
Product
Title
Play Count
Music Title
Composer /
Arranger
Publisher
Record(ing)
Number
Music
Duration
Duration
This number is referenced against your advert logs which you will have to supply to
PRS for the duration of the sweep
Normally this is the ‘Client’ of the advert for example: Vodafone
How many times this ad was played over the report duration
This is the title of the music used in the advert
This can be identified on the CD sleeve notes, or from IMD or your commercial
production departments consignment notes
This can be identified on the CD sleeve notes, or from IMD or your commercial
production departments consignment notes
This can be identified on the CD sleeve notes, or from IMD or your commercial
production departments consignment notes
This is the duration of the music contained in the advert. A 30sec ad may only have
a 10 second piece of music at the end
This is the duration of the entire advert, e.g. 30sec
Adding the Copyright Information to a Cart
To be able to generate a report, the program needs the copyright information to begin
with. There is no way around it, you (or someone you know), will have to fill this
information in manually.
When you edit a Cart on the Audio Wall, you may have noticed the Copyright tab.
This is where the information is entered.
66
This is where you enter the details you have found out from the CD / LP sleeve notes.
The Copy button next to the Product Title field, will copy the information you have
added onto line 1 of your Cart Description (within the General tab, of Edit Cart). This
is also the case for the Music Title field.
The Performer field’s Copy button, copies the information entered onto Cart
Description lines 2 and 3, separated by a comma.
These details are unique to the Cart, and are saved in a file in addition to the audio.
Therefore if you delete the audio, you also delete the file with the details in.
For example: Your PRS Sweep runs from Mon 1st December to Fri 5th December,
you generate your report on Mon 8th December, and go off in search of details. By that
Friday you have found all the music details, entered it onto the Audio Wall and
decided to have a couple of days off. However, the “evil traffic manager” has decided
to tidy up and delete some Carts before you get back off holiday. Therefore when you
next run your report, all the details are missing, because the carts have been deleted.
So, it is vitally important that no one deletes the Carts before you have completed
your PRS returns.
Running a Report
67
When you launch the Copyright Report Generator for the first time, it will default to
the General Myriad Copyright Information section (described earlier in this guide).
This is a good starting point, as it will show you all of the information associated to
the Carts, and you can change the profile at any point during this process to become a
UK PRS Commercial Return or a UK PRS Music Return by clicking on the File and
Select Profile buttons as shown above.
Start / End Time of Report
Press the Start Time button, to select the beginning of the PRS Sweep. This will
launch a now familiar screen.
Press the End Time button, to select the end of the PRS Sweep.
This will now display the PRS Sweep duration in the information banner at the top of
the window prefixed by Date/Time range.
68
Obtaining Information from Terminals
Use the Start/End Terminal boxes to select which PC’s to include in your report. If
you only used one studio ‘On-Air’ during your PRS Sweep then select the Terminal
name from the drop down menu, and make sure the End Terminal displays the same
location.
Start / End Cart Numbers
To select the played Carts that you wish to display information for, enter the numbers
in the Start/End Cart boxes. Most radio stations have assigned Cart groupings to
various Cart types, for example, Adverts start at Cart 1000 and end at Cart 1999.
Songs start at 3000 and go to 7999, it all depends on how you have organised your
own Audio Wall. Now you need to collect the information from a certain Cart range,
obviously if you are about to prepare the UK PRS Commercial Return report, you
don’t want to search through all of your songs, just the adverts. Just type the Cart
number you want the report to start at in the Start Cart field, and type where the report
will end in the End Cart field.
Print / Run the Report
If you have been a good boy (& or) girl, and entered complete copyright details every
time you have recorded audio onto the Audio Wall, then all you need do now is press
the Print button, take the printed report and put it in an envelope. Send it to PRS and
sit back and wait for 6 years until the next PRS sweep!
However mostly, for one reason or another, the information is incomplete. Therefore
you need to amend it. To do this, press the Run button; this will generate the report on
screen. Now you can go through the list and spot which Carts need the information
adding, and add it via the Audio Wall (see instructions above for adding copyright
information to a Cart). You can run and re-run a report as many times as you like to
get it right.
69
The Settings Menu
The Setting menu is used to configure Advanced Advert Manager to work with your
stations Myriad system and also to configure the way you use Advanced Advert
Manager.
Q-NXT Database Settings
The Q-NXT Database Settings gives you direct access to the settings for the Q-NXT
database that you opened at the beginning of the Advert Scheduling session.
CAUTION: The Q-NXT Database Settings include advanced setting for your main
playout system and should not be touched unless you know what you are doing. Even
if you do know what you are doing, you should only alter settings on the Ads / Logs
Import tabas they are the only settings that have any relevance to advert management.
Altering other settings can seriously affect your stations output!
70
The bottom half of the screen is dedicated to the settings needed to import
advert logs from the Advanced Advert Manager or from third party advert
scheduling systems such as Broadnet™.
Schedule Adverts
The first option is a tick box marked as Schedule Adverts. Ticking this option
will instruct the Advanced Advert Manager to actually schedule the adverts in
the database rather than just import a pre-scheduled advert log generated by
a third party advert scheduler such as Broadnet™. Once this option is
selected, the Select button becomes enabled which allows you to select the
advert database that you want to schedule the adverts from.
Logs Directory
The Logs Directory setting allows you to specify the drive and directory where
the advert log file is located. This option is only enabled if the Schedule
Adverts option is not ticked as it is only used to locate advert log files that
have been generated by a third party advert scheduler. To select the
database you want to use, click on the Browse button and double click on the
desired database.
Log Filename Prefix
The Log Filename Prefix allows you to set a text character prefix to the advert
log file name. Typically, advert log files have a unique prefix and the date of
the log embedded in the actual filename so an example might be
AD110402.log for the adverts fir the 11th of April 2002. In this example the Log
Filename Prefix would have to be set to AD.
N.B. The overall filename format needs to tally with the filename format
generated by your advert scheduling system.
File Date Format
As outlined in the Log Filename Prefix, advert log files usually include the date
that the file covers in the actual filename and you have one file per day. The
File Date Format allows you to select the format that this date follows.
N.B. This needs to tally with the date format used by your advert scheduling
system.
71
Amount To Add To Cart Numbers
This option allows you to set an ‘off set’ on the numbers that come from the
advert log generated by a third party advert scheduling system, and the
adverts that are stored as Carts on the actual Audio Wall. If the first advert on
your advert scheduling system is number one but the adverts start at 4001 on
your Audio Wall then you would put 4000 in to this setting to make it work. It is
common practice to put the correct Cart numbers in to your advert scheduling
system in which case then this setting can be left blank.
Only Use Adverts Marked For Transmission Chain
The final setting is concerned with the use of Transmission Chains Codes,
which are used by some third party advert scheduling systems when
scheduling adverts for multiple transmission chains. For details on the use of
transmission codes, please consult your advert scheduling system
documentation.
Myriad Settings / File Locations
The File Locations section of Myriad Settings allows you to alter the location
of the Myriad data and Audio files that Advanced Advert Manager uses to get
databases and Cart information from. These settings are automatically
configured when you first run the Advanced Advert Manager (based on your
Myriad settings) and should not be altered unless you are told to by a P
Squared support engineer.
Selecting this option allows you to select the new data and audio file locations
by clicking on the browse button.
72
The Data location is the base folder that all Myriad data is stored in. This
includes the Clients database that is used by Advanced Advert Manager to
store all the information about the clients and adverts in the system, and the
Q-NXT database, which is used to ‘push’ the adverts in to the studio.
The Cart locations are used to store all the files that make up the Myriad
Audio Wall.
Caution: Changing settings on this screen can affect your entire station. Do
not alter these settings unless you are full familiar with configuring Myriad and
have read all the documentation on Myriad Configuration.
Program Settings
The Program Settings section of the Settings menu allows you to configure the way
Avert Manager works.
73
When Advanced Advert Manager Starts, Open The Database That
Was Last Used
If this option is ticked then the Advanced Advert Manager will automatically open the
last database you were working with whenever you restart the program. If this option
is not ticked then you will be prompted to select a Q-NXT database each time you
start the program.
Even if this option is ticked, you can still switch databases once the program has
started by using the Change Working Database option on the File Menu.
Users Must Login Before They Can Use Advanced Advert Manager
As the name suggests, ticking this option will force you to log in to the Advanced
Advert Manager before you can use it. If this option is enabled then the standard
Myriad Users database is used and you will have to log in using the same name and
password as you use to get in to Myriad.
Caution: Make sure you (or at least somebody around) has either User rights to
generate Logs/ Advert or User rights to go in to Myriad Manager to and alter User
rights to allow you to gain access to the Advanced Advert Manager. Otherwise you
may spend a frustrated night locked out of the system until somebody who does have
access rights turns up!
The Windows Menu
The windows menu offers a range of options for positioning and displaying the
various windows that Advanced Advert Manager opens.
The Help Menu
The Help Menu offers access to product up date information and the About box which
displays the exact version number of the product that you are using. You will need to
know this before you contact P Squared for any technical assistance.
And That’s It
The Advanced Advert Manager is designed to be a simple program to us so chances
are you have not had to read too much of this manual. As long as you remember the
basics, Clients had adverts, your station has advert breaks and Advanced Advert
Manager combines the two and hopefully makes you some money.
It is hoped that you have found this documentation informative and (in places)
entertaining. Feedback is an important part of the development process and that
74
includes documentation so if you have any questions or comments, please direct them
to [email protected] and we will endeavour to get back to as soon as possible.
This documentation and the pictures and text that it contains remains the
intellectual property of P Squared and should not be altered or expanded
upon without express permission.
75


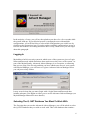
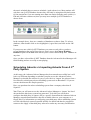


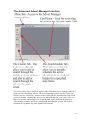
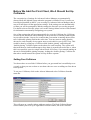
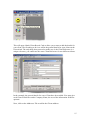


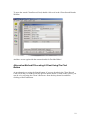
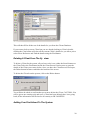
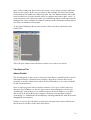

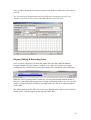


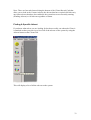


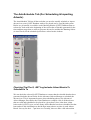


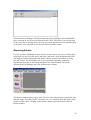


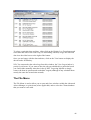
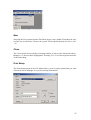


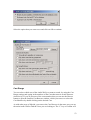


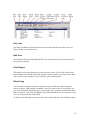
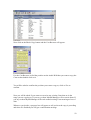

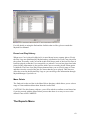


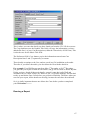
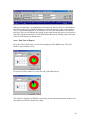
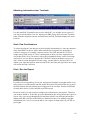
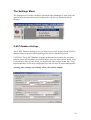


![Main lSetup l Cleanup] Parameters Locals}](http://vs1.manualzilla.com/store/data/005794368_1-f1180d1b21e5ef681561217b8f35e179-150x150.png)