1
1080P Digital
VGA RGB/HD
Video Scaler
Operation Manual
Specifications:
HDMI 1.2 Compliant
Input format
Resolution
480i/576i
480p/576p
720p@(60/50)
1080i@(60/50)
1080p@(60/50)
INPUT
Component
V
V
V
V
V
VGA@(60/72/75/85)
SVGA@(56/60/72/75/85)
XGA@(60/70/75/85)
SXGA@(60/75/85)
UXGA@60
WXGA@60(1280X800)
WSXGA@60(1680X1050)
WUXGA@60(1920X1200)
Output format
D-SUB DVI/HDMI
*
V
V
V
V
V
V
V
V
V
V
V
V
V
V
V
V
V
V
V
V
V
V
V
* 480i 30x2 / 576i 30x2
OUTPUT
D-SUB DVI/HDMI
480i/576i
V
*
480p/576p
V
V
720p@(60/50)
V
V
1080i@(60/50)
V
V
1080p@(60/50)
V
V
V(@60) V(@60)
VGA@(60/72/75/85)
SVGA@(56/60/72/75/85) V(@60) V(@60)
V(@60) V(@60)
XGA@(60/70/75/85)
V(@60) V(@60)
SXGA@(60/75/85)
V(@60)
UXGA@60
V
WXGA@60(1280X800)
V
V
WSXGA@60(1680X1050)
V
WUXGA@60(1920X1200)
Resolution
* 480i 30x2 / 576i 30x2
Input connectors:
- Component Video x 1 via 3 RCA jack
- PC VGA x 1 via 15 pin D-sub
- DVI x 1
Output connector:
- DVI x 1
- PC VGA 15 pin D-sub x 1
Dimension: 180(W)x124(D)x25(H)mm
DC 5V 2.6 Amp
8
Note (PC): Available only when PC is selected as input.
To adjust picture quality, Use "+,-" to move the highlight bar to your desired adjust
item, press the Menu/Enter to confirm your selection.
At this point, the selected parameter will turn red, you can then use +,- to
increase or decrease the value of the parameter.
When adjustment is complete, press "Menu" to leave the parameter. Move the
highlight bar to "Exit", then press Menu/Enter to exit.
Note: The "H-position" and "V-position" are only available when component or PC
input is selected. Neither are available when the DVI input is selected.
Picture mode-there are 4 picture modes for customer to choose from.
User: Select to adjust to your favorite setting and store it.
Standard: Standard factory default setting for optimal display in a normal
environment.
Vivid: High saturation picture for optimal display in a bright room.
Movie: Picture for comfortable low brightness display in a dark room.
Scale: select overscan when input source is SD or HD video to ensure no black
band around screen border. Select underscan when input source is PC
signal to ensure full picture content fall within screen border.
Noise Reduction: This function only works when input is analog RGB or
component. It will not work for DVI input. There are four steps of
Noise Reduction-Off, Low, Middle High. The Noise Reduction will
remove the noise that results from analog to digital conversion
and digital scaling processing.
H & V position: To adjust for best horizontal and vertical position of the picture
in the screen.
6.2 Color:
R
User: Select to adjust to your favorite color temperature setting. 0
Normal: Normal color tone setting where white is pure white. G
0
Warm: Warm color tone makes white reddish.
B
Cool: Cool color tone makes white bluish.
0
(1).Introduction........................................................................................... P1
(2).Features..................................................................................................P1
(3).What's included.................................................................................... P1
(4).Operation Controls and Functions..................................................... P2
Front Panel.............................................................................................P2
Rear Panel............................................................................................. P2
Remote Control and functions........................................................... P3
(5).Installation.............................................................................................. P4
50
100
50
100
50
100
Value of Normal
Setting
6.3 Output: The HDV5 can output a wide variety of PC and HD resolutions.
Refer to product specifications.
6.4 OSD Adjust:
H.Position: Adjust the horizontal position of the OSD graphic.
V.Position: Adjust the vertical position of the OSD graphic.
Time out: Set a predetermined time to turn off OSD menu on the screen.
Background: To select transparent or solid background of OSD graphic.
6.5 Information:
Project: Show product model number.
Input: Show resolution of the current input.
Output: Show resolution of the output.
Date: Show date of firmware version.
7
Table of contents
Input Connection................................................................................. P4
Output Connection.............................................................................. P5
(6).OSD Operation......................................................................................P6
Specifications........................................................................................ P8
OSD Operation
Introduction:
Congratulations on your purchase of this digital video scaler HDV5 model.
Our professional video scaler products have been serving the display
industry for many years.
In addition to video scalers, Ambery also offers a full line of PC Imaging
Multimedia converters, TV video standard converters, audio video switches,
A/V distributors, HDMI/DVI and other SD/HDTV video processor products.
This HDV5 model marks great advance in our High Definition video
converter series. It is an absolute must for all HDTV entertainment systems
and computer image conversion product. By providing the all-in-one
solution for HD video resolution scaling up or down, PC VGA to HD
conversion plus multiple video format conversion between SD and HD.
Maximize your HDTV investment by enhancing videos to the supreme 1080P
progressive scan HD resolution for LCD/DLP projectors, projection TVs, Home
Theater Systems, LCD/TFT/CRT monitors, LCD TVs, Plasma and all other flat panel
displays for professional large screen presentation.
Product Features:
1. Total HDTV and HD PC solution with digital video outputs up to 1080P or
1920x1200 pixels for all digital flat panel displays.
2. Digital detail enhancement improves image details on a pixel-by-pixel basis,
delivering SD that approaches HD quality.
3. Dual HDTV video scaling engines built in to ensure highest and sharp
picture quality outputs.
4. Flexible analog RGB and digital RGB/HD outputs with selectable output
output resolution from 480i to 1080p and 640x480 to 1920x1200 pixels.
5. Ultra high bandwidth to ensure error-free inputs and noise-free outputs.
6. Seamless input switching between various video sources. Individual input
selection buttons available from the remote controller for fast transition.
7. Native output resolution ensures most optimal display resolution on your
screen. When "Native" is selected as the output resolution, the HDV5 will
automatically detect the native resolution of the display and send out the
most optimal pixel timing to match TV's final display resolution.
8. Output picture adjustment on brightness, contrast, color, RGB level, and
H-V position.
9. The DVI input is HDCP compliant which means if input is HDCP encrypted
then DVI output is also HDCP encrypted.
10. Supports Overscan/Underscan modes for PC application and 4-level noise
reduction(DNR) to product the clearest images.
Package Content:
The following items are included in the standard package.
1. Digital Video Scaler.
2. VGA cable x 1
3. Component Video Cable x 1
4. AC power adaptor 5V/ 2A, center positive.
1
After power on the unit, press the "menu" button will bring up the main
menu as follows:
Main Menu
Video (or PC)
Color
Output
OSD
Info
Video(PC)
Color
Output
OSD
Info
Contrast
User
VGA
H.Position
Brightness
Normal
SVGA
V.Position
Warm
Hue
XGA
Time out
Cool
Sat
SXGA
Background
Sharpness
UXGA
Exit
Picture Mode
WXGA
Scale
WSXGA
NR
WUXGA
(H-position)
480i
(V-position)
480p
Exit
576i
576p
720p(50/60)
1080i(50/60)
1080p(50/60)
NATIVE
Project
Input
Output
Date
Use +, - button to move highlight bar to your desired parameter, then press
MENU/ENTER to enter into sub-menu of your selected parameter.
6.1 Video (or PC): When Video is selected a sub menu as below comes up.
Contrast
Brightness
Hue / Sharpness
Saturation
user
standard
Picture Mode
vivid
movie
Scale
overscan
underscan
Letterbox
Panscan
Full
low
middle
NR
high
off
H-position (PC)
V-position (PC)
Exit
6
This unit accepts total of 3 video inputs, component video, PC and DVI(HDMI)
inputs. The formats supported by these inputs are as follows:
- When connecting to a PC source, use a VGA 15-pin cable to connect the
output of a computer to the VGA input of this unit.
- When connecting to a component source (either SD or HD resolution) use a
component video cable to connect the component video output of a DVD or
satellite receiver to the component video input of this unit.
- When connecting to a DVI source, use a DVI-I or DVI-D cable to connect the
DVI output of a PC or DVI video source to the DVI input of this HDV5 model.
- When connecting to a HDMI source, use a HDMI to DVI cable to connect the
the HDMI end to the HDMI video source, such as DVD or other media player.
Next connect the DVI connector of the HDMI to DVI adapter cable to the DVI
input of the HDV5 unit.
This unit automatically detects the input resolution from the video source.
To switch from one input source to another just press the input button on the
front panel ("+") or on the remote control.
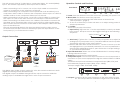
Output Connection
5V 2A
DVI
Cable
PC out
DVI out
or
DVI
Cable
DVI IN
PC IN
or
RGBHV
DVI to HDMI
connector
adaptor
HDMI TV
LCD TV
LCD
or
Monitor
HDMI TV
This digital video scaler outputs various PC VGA, SD and HD resolutions in both
digital and analog format simultaneously.
The digital output is available through the DVI output connector while the
analog output is available through the PC VGA output connector.
Operation Controls and Functions
Front Panel
INPUT
Cr/Pr
MENU
Cb/Pb
HD
DHD
Y/HD
6
5
PCPC DVI
4
ENTER
2
AUTO INPUT
ADJUST
POWER
+
-
3
1
1. Power: Press the button to turn ON or turn OFF (standby) the power of the unit.
2. Menu/Enter: This button serves two purposes.
a. Press the button to bring up OSD main menu as shown in the
"OSD Operation". (page 7)
b. To act as a "Enter" key to enter sub menu or to adjust setting value of the
selected parameter.
3. +/- button:
The buttons provide 3 functions:
a. Input select ("+"): Press the "+" button repeatedly to select your desired
input source. The input sources are toggled through in the following
sequence.
YPbPr (YCbCr) PC DVI
b. Auto Tune ("-"): Press the "-" button to carry out picture auto adjust for
analog inputs (component or PC). The HDV5 will fine tune the position
(centering) and color of the output picture.
c. When in the OSD menu mode: Press the +, - button to move up or down
the highlight bar to your desired parameter. Or once a parameter is
selected with MENU/Enter button, press the button to adjust setting value
of your selected parameter.
4. Input LED Indicators: When one of the LED illuminates its corresponding source
is being selected as input.
5. IR Sensor: Infrared remote control sensor.
6. Component Input: Connects this input connector to the Component output
connector of your source equipment using the enclosed 3RCA to 3RCA
cable.
The HDV5 accepts both interlaced component input (480i, 576i) and
De-interlaced progressive input (480p, 576p...1080p).
The input range is 480i, 570i~1080i, 1080p.
Rear Panel
5V 2A
DVI OUT
D-SUB OUT
DVIIN
D-SUB IN
5
4
3
2
1
1. PC input: Connects this PC input connector to the VGA output of your
PC. The acceptable PC resolutions range from VGA~WUXGA.
5
2
2. DVI/HDMI input: Connects this DVI input connector to the DVI output of your
DVI source to the HDMI out of the HDMI device via HDMI to DVI cable. The DVI
or HDMI input should be digital only and should not include analog RGB signal.
The use of DVI-I connector is to ensure both DVI-I and DVI-D male connector
of the DVI cable can fit into this input connector. The digital DVI input
resolution can range from 480i~1080p, or VGA~WUXGA.
3. PC- D-sub out: The connector for scaled analog RGB output.
Connect this output port to the analog PC RGB input of your monitor, or
connect it to the RGBHV input of your HD display using D-sub to 5 BNC
adaptor cable. (not included in the package)
Note: When input is a HDCP encrypted DVI signal this analog output will be
turned off.
4. DVI output: Scaled digital DVI output. Connect this output to the DVI input or
HDMI input of your Digital display.
Note: When input is a HDCP encrypted DVI signal the DVI output is also HDCP
encrypted. The monitor/display that connected to this output also need to
be HDCP compliant in order to get a nice and clean picture. A non-HDCP
compliant display can only display non-HDCP signal and picture will
become noise when input is a HDCP-encrypted signal.
5. Power jack: Connect to the 5V 2A DC power adaptor.
Remote Control and functions:
1. Power: Press the button once to power on the HDV5. Press again to enter
standby mode.
2. Input: Press the button repeatedly to toggle through various input sources as
follows.
Component PC DVI
10. OK (Enter): Press the button to confirm your selection.
11. Reset: Press the button to reset the unit's firmware setting to the factory
default value.
12. Auto Adjust: Press the button to optimize the position of the picture
(picture centering) on the screen.
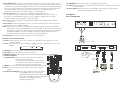
Installation:
Input Connection
INPUT
HD
Cr/Pr
3
Cb/Pb
PC
DVI
Y/HD
INPUT
AUTO
ADJUST
+
-
ENTER
POWER
Component in
Component out
DVD or Set Top Box
DC 5V
3. HD input: Press the button to select component input.
4. PC input: Press the button to select PC input.
5. HDMI/DVI input: Press the button to select DVI (or HDMI) input.
6.
6. Output
Output resolution
resolution:
2
Select buttons: Press any one of the button to directly
select output resolution.
3
For other output resolutions that are not
covered by these buttons please enter
6
Menu/Output page to select them.
7. MENU: Press the button to bring up OSD main menu page.
8. Exit: Press the button to exit from a sub menu or main
8
menu.
10
9. Up/Down/Left/Right: Press the Up/Down button to move
11
the highlight bar to your desired
parameter during the OSD operation.
Press the Left/Right button to increase/
decrease the setting value of a
selected parameter.
MENU
DVI OUT
PC OUT
DVI IN
PC IN
DVI
4
1
5
HDMI to DVI
connector
adaptor
HDMI
DVI
Cable
or
HDMI
Cable
-PC-in
HDMI
DVI out
7
9
12
HDMI out
PC
STB
DVD
4
PC


![Overview cPR67 and cPR84 [v00]](http://vs1.manualzilla.com/store/data/005648847_1-d158a5d3d4b92d14c7a3179652b88ffd-150x150.png)