1
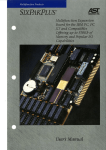
SuperPak
TK
Installation Supplement
000347-001 B
June 1987
AST RESEARCH, INC.
Irvine, California
(714) 863-1333
Second Edition (June 1987)
AST and SlxPakPlus are registered trademarks of AST Research, Inc.
Rampage/2, Smart Switch. SixPakPremium, Split Memory Addressing
SuperPak, SuperSpool, fASTdisk, and SuperDrlve are trademarks of AST
Research, Inc.
IBM and AT are registered trademarks of International Business Machines
Corporation. Personal System/2 is a trademark of International Business
Machines Corporation. Lotus, 1-2-3 and Symphony are registered trademarks of
Lotus Development Corporation. FRAMEWORK II is a registered trademark of
Ashton-Tate. Intel is a registered trademark of Intel Corporation. Microsoft is a
registered trademark of Microsoft Corporation. SuperCalc is a registered
trademark of Computer Associates International, Inc. Other trademarks are
solely for reference purposes.
In view of demonstrated product reliability and comprehensive warranty policies,
AST Research, Inc. does not normally provide schematics or material lists. AST
recognizes that some customers with a large installed b~se of AST products
want supportive documentation for their own service organizations. In such
cases, customers should contact AST Research corporate offices to consider an
appropriate nondisclosure agreement to obtain this documentation.
Changes are periodically made to the information contained in this manual;
these changes will be incorporated into new editions.
A Product Comment Form is provided at the back of this publication. If this form
has been removed, please address your comments to: AST Research, Inc., Attn:
Product Marketing, 2121 Alton Ave., Irvine, CA 92714. AST Research may use or
distribute any of the Information you supply in any it deems appropriate without
incurring any obligations whatsover.
Copyright 1987 AST Research. Inc. All rights are reserved. including those to
reproduce this book or parts thereof in any form without permission in writing
from AST Research, Inc.
WARNING
This manual Is protected by United States Copyright law
(Title 17 United States Code). Unauthorized reproduction
and/or sales may result in Imprisonment of up to one year
and fines of up to $10,000 (17 USC 506). Copyright
infringers may be subject to civil liability.
CONTENTS
1. BEFORE YOU BEGIN .....................•.................................. 1-1
1.1 About this Supplement...
.
1-2
.
1.2 System Requirements
1-2
1.3 What You Need to Know Before You Start
1.3.1 Configuration Checklist...
1.3.2 Memory Requirements
1-3
1-6
1-7
2. BASIC SUPERPAK INSTALLATION
2-1
.
2.1 Starting the INSTALL Program ...
2.2 Installing Options
2-1
2-6
.
..... 2-8
2.3 Save the Installation...
3. ADVANCED SUPERPAK INSTALLATION
PROCEDURES
3.1 Using INSTALL.
3-1
... 3-1
.
.
3.2 Running the INSTALL Program ....
3.3 Installing SuperPak Software
for Another System
3-4
3.4 INSTALL Main Menu
3.5 Installing fASTdisk
3.6 Installing SuperDrive
3-3
.... 3-6
.
.
.
3-8
.
.
3-10
iii
CONTENTS
3.7 Installing the AST Expanded Memory Manager
3-13
3.8 Installing the Clock/Calendar
3-14
3.9 Installing SuperSpool ..
...3-15
3.10 Saving the Installation
..................................... 3-18
FIGURES
Figure 2-1. Initial INSTALL Screen
Figure 2-2. Main INSTALL Menu
Figure 3-1.
Figure 3-2.
Figure 3-3.
Figure 3-4.
iv
INSTALL Main Menu
INSTALL with fASTdisk Edit Box
INSTALL with SuperDrive Edit Box
INSTALL with SuperSpool Edit Box
2-3
2-5
3-7
3-9
3-12
3-17
BEFORE YOU BEGIN ...
1
This supplement introduces you to the menu-driven SuperPakTK
INSTALL program. This program installs simple configurations of
SuperPak programs. INSTALL also adds the drivers you need for
using expanded memory on Rampage/2 TH and other AST
expanded memory boards.
INSTALL places simple, basic configurations of the following
SuperPak programs on your boot disk. You may customize these
programs to suit your needs:
•
The AST Expanded Memory software allows expanded
memory specification (EMS) and enhanced expanded
memory specification (EEMS) application programs to
use your board's expanded memory.
The expanded memory software consists of two
programs: REMM.SYS, the Rampage Expanded Memory
Manager, is required to use memory beyond the disk
operating system (DOS) limit of 640 kilobytes (KB) on
your AST expanded memory boards. REX.SYS, the
Rampage Expanded Memory Emulator, allows expanded
memory to emulate the extended memory of a PC AT @l
•
fASTdisk TH , a RAM disk that emulates a fixed disk drive.
•
SuperDriveTH , 360 KB a RAM disk that emulates a 5 1/4"
floppy diskette drive. (This feature is not available for the
Personal System/2 (PS/2) Model 30 or PC AT.)
•
SuperSpoolTH, a print spooling buffer that allows you to
continue using your computer while you print.
•
ASTCLOCK TH , a Clock/Calendar program that keeps track
of the time and date, even when your computer is off.
1-1
SuperPak Installation Supplement
This feature does not apply to AST products that do not
have a Clock/Calendar.
The INSTALL program copies the needed SuperPak program files
onto the boot diskette and adds statements to the
AUTOEXEC.BAT and CONFIG.SYS files on your boot disk or
creates them if they do not already exist. AUTOEXEC.BAT is a
batch file that contains commands that are automatically
executed when you boot up your computer. CONFiG.SYS
contains the software drivers that allow devices that are external
to your computer (such as REMM, REX and fASTdisk) to function.
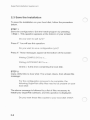
1.1 About this Supplement
This supplement is divided into three sections:
•
Section 1 provides yOll with information you need to
know before running INSTALL.
•
Section 2 gives a step-by-step procedure for creating a
simple SuperPak configuration using INSTALL.
•
Section 3 outlines detailed procedures for creating and
modifying each SuperPak program.
For information on the format notation used in this supplement
and suggested additionai reading, refer to your SuperPak User's
Manual.
1.2 System ReqUirements
The minimum hardware requirements for installing SuperPak are
an IBM PC, PC XT, PS/2 Model 30 or compatible with two floppy
diskette drives or a floppy diskette drive and a hard disk.
SuperPak is compatible with DOS 2.0, or later, or an MS-DOS
equivalent on the PC, PC XT, PC AT, or PS/2 Model 30
1-2
Before You Begin ...
1.3 What You Need to Know Before You Start
This section tells you need before you begin installing SuperPak.
A checklist appears in Section 1.3.1. Fill out the checklist as you
answer each question.
A. In what computer are you installing SuperPak?
SuperPak is designed to work with the IBM PC, PC XT,
PC AT, PS/2 Model 30 and compatible computers.
SuperDrive is designed to emulate a 360-KB 51/4" disk
drive and is therefore not compatible with the Personal
System/2 (PS/2) Model 30. Instead, you may use
fASTdisk as a random access memory (RAM) disk.
B. How much conventional memory is in the computer?
Conventional memory is the memory up to 640 KB that
can be directiy addressed by DOS. You should have
640 KB installed in your computer before using expanded
memory.
c. How much expanded memory is in the computer?
Expanded memory Is memory above DOS's 640-KB limit.
The REMM and REX drivers included in tile SuperPak
software allow you to use this additional memory.
You can use expanded memory with programs that meet
EMS or EEMS specifications. Expanded memory can
also be used for RAM disks and print spoolers (such as
SuperDrive, fASTdisk and SuperSpool).
If tl1ere is not enougl1 expanded memory to support the
SuperDrive, fASTdisk or SuperSpool configuration you
want, you may use conventional memory. However, this
will cut into the amount of memory available for
applications.
1-3
SuperPak Installation Supplement
The SuperPak expanded memory drivers are only
compatible with AST expanded memory boards. They
are not compatible with boards from other
manufacturers.
D. Which board(s) do you have installed in your computer?
The type of boards you have in your computer will
determine which SuperPak utilities you would like to use.
If you have an AST expanded memory board (such as
Rampage/2 or Advantage/2), you must install the AST
Expanded Memory software. You may also install the
fASTdisk and SuperDrive (for PC and PC XT only) RAM
disks and the SuperS pool print spooler.
If you have an AST board with a Clock/Calendar (like
SixPakPremium™), you may install the ASTCLOCK utility.
Do not use ASTCLOCK with other manufacturer's
Clock/Calendars (including the PC AT's or PS/2's built-in
Clock/Calendar).
In order to use SuperSpool, your computer must have a
printer port (either serial or parallei). If you have a serial
printer, you must direct the output from a parallel to a
serial port. (See the SuperPak User's Manual.)
E. Which SuperPak utilities do you want to use?
If you have an AST expanded memory board, you must
run the SuperPak installation program to install the AST
Expanded Memory software that make expanded
memory available. You may also install some of the other
optional SuperPak accessories:
fASTdisk is a RAM disk that can run in expanded
memory. The size of your RAM disk depends on how
much memory you have installed.
1-4
Before You Begin ...
SuperDrive is a program that emulates in RAM a 5 1/4"
floppy disk drive. It is not available on the PC AT or
PS/2 Model 30. On the PC and PC XT, you must set your
system board switches to indicate the number of drives.
(See the AST board's user's manual.)
SuperSpoof is a print spooler that can run in expanded
memory. You will be able to install SuperSpool if you
have sufficient memory.
ASTCLOCK is a utility program that works wittl
Clock/Calendars on AST boards. Do not use it with other
manufacturer's Clock/Calendars.
F. Do you have RAM disks and print spoolers already installed
on your boot disk?
If so, you must remove them before installing SuperPak.
G. Do you have AUTOEXEC.BAT and CONFIG.SYS files on your
boot disk?
AUTOEXEC.BAT and CONFIG.SYS are files that set your
system's configuration upon booting up. If
AUTOEXEC.BAT and CONFIG.SYS files do not already
exist on your boot disk, the SuperPak INSTALL will create
them for you.
If those files do already exist on your boot disk, any
existing statements not changed by the new installation
will remain. INSTALL appends its statements to the end of
existing AUTOEXEC.BAT and CONFIG.SYS files For
example, if you have an AUTOEXEC.BAT file set up to log
you onto a local area network (LAN), INSTALL will add
the necessary SuperPak statements while leaving your
network commands alone.
If you run the INSTALL program more than once and
specify the same configuration, the CONFIG.SYS and
1-5
SuperPak Installation Supplement
AUTOEXEC. BAT files will contain duplicate entries. You
should delete the unwanted duplications using a text
editor such as EDLIN.
1.3.1 Configuration Checklist
A.
In what computer are you installing SuperPak?
PC 0 PC XT 0 PC AT 0 PS/2 Model 30
B.
How much conventional memory is in the computer?
_ _KB (640 KB maximum.)
C.
How mucl1 expanded memory is in the computer?
KB
o
D. Which board(s) do you have installed in your computer?
Expanded memory boards?
0
Yes 0 No
Name
Amount of Memory
AST Clock/Calendar installed?
Printer port installed?
0
0
Yes 0 No
Yes 0 No
Check which port(s) is used for the printer:
o LPTl
o LPT2
o LPT3
OCOMl
OCOM2
E. Which SuperPak utilities do you want to use?
o fASTdisk
o SuperDrive (not available for PS/2 Model 30 or PC AT)
o SuperSpool
o ASTCLOCK
1-6
Before You Begin ...
F.
Do you have RAM disks and print spoolers already
installed on your boot disk?
DYesDNo
G. Do you have AUTOEXEC.BAT and CONFIG.SYS files on
your boot disk?
DYes DNo
1.3.2 Memory Requirements
An important consideration in installing SuperPak is the amount
of memory in your computer. For example. if you wish to use the
following SuperPak utilities:
•
One 512-KB fASTdi3k.
•
One 360-KB SuperDrive.
•
One 64-KB SuperSpool.
You would need a minimum of 936 KB of memory available, not
counting memory needed for an application programs. You can
skip over creating a fASTdisk, SuperDrive, or SuperSpool, if you
wish. However, you must install REMM.SYS in order to let your
programs use the expanded memory of Rampage/2 or other AST
expanded memory card.
NOTE
Before you install fASTdisk, SuperDrive, or
SuperSpool on your boot disk, be sure to remove
any RAM disk or print spooler programs that you
might already have on your boot disk.
1-7
SuperPak Installation Supplement
NOTES
1-8
BASIC INSTALLATION
2
This section shows you how to run the SuperPak INSTALL
program. The configuration shown here should apply for most
users. If you need to modify your configuration or want more
detailed information, see Section 3 of this supplement. For
detailed information on each of the SuperPak programs, see the
SuperPak User's Manual.
NOTE
All SuperPak files may not pertain to your
particular AST product. Your SuperPak diskette
contains a README file that describes which files
are applicable to your product. To display this
file, enter the foil owing command at the DOS
prompt for the drive containing your SuperPak
diskette:
TYPE README<Enter>
For more information on SuperPak software, see
your SuperPak User's Manual. For more
information on AST expanded memory software,
see Section 3 of this supplement.
2.1 Starting the INSTALL Program
To start the INSTALL program, follow these steps:
STEP 1
Back up the SuperPak diskette: Make a backup copy of the
SuperPak diskette using the DOS COPY command. Store the
master diskette in a safe place. You can then use the master
diskette to back up your software if your working disk is lost or
damaged.
2-1
SuperPak Installation Supplement
If you are unsure about how to COpy a file, consult your DOS
Manual.
STEP 2
Prepare a DOS system disk: You can either install SuperPak
software on your existing DOS boot diskette or hard disk, or you
can create a new boot disk. To create a new boot diskette, format
a blank diskette by entering the following DOS command from a
disk or diskette drive where DOS files are present:
FORMAT n: / s < Enter>
where n: represents the diskette drive where the blank
diskette resides.
If you want to boot from your hard disk, make sure the file
COMMAND.COM is in your root directory.
STEP 3
Insert DOS system disk in drive B: or change to root directory
for hard disk: If you want to boot from a floppy diskette, insert the
DOS system disk you made in STEP 2 into drive B:. If you want to
boot from the hard disk, make sure the root directory is ttie
default.
STEP 4
Start the program: With the backup copy of your SuperPak
diskette in the default drive, enter this command after the DOS
prompt:
INSTALL<Enter>
NOTE
To ensure proper operation, run INSTALL from
DOS, not from another program.
2-2
Basic Installation
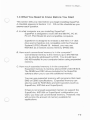
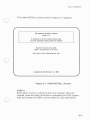
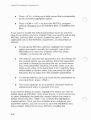
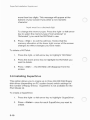
The Initial INSTALL screen shown in Figure 2-1 appears:
AST SuperPak Installation Program
Version X.1lI
II installalion is lor this machine please make
sure your expanded memory card(s) are installed
Type Ctrl-C 10 quil at any point.
Type F1 lor help while in the menu.
Enter leller of drive containing boot disk:
Copyright (C) AST Research, Inc. 1986
Figure 2-1. Initial INSTALL Screen.
STEP 5
Enter letter of drive containing the boot diskette: After the
prompt, enter the letter of the drive containing the DOS system
disk you created in STEP 2 (or the letter for your hard drive).
2-3
SuperPak Installation Supplement
STEP 6
Identify the type of display adapter you are using: You will be
asked which display adapter Is installed In your computer. This
question allows INSTALL to avoid conficts with the memory area
used by your video card.
If you are using INSTALL to configure a boot disk for a computer
other than tile one you are using now, identify the type of display
adapter for tl1at macl1ine.
Tile following question will then appear on your screen:
Is your video card one of tile following (Y/N)?
• IBM Monochrome Adapter or compatible
• Hercules Graphics Adapter or compatible
Press Y if you l1ave one of these video adapters in your PC,
PC XT, or PC AT, or if you l1ave a PS/2 Model 30 witl1 a
monochrome monitor. Otl1erwise, press Nand tl1is line will
appear:
• iBM Color Grapl1ics Adapter or compatible
Press Y if you have this adapter in your PC, PC XT, or PC AT, or if
you l1ave a PS/2 Model 30 witl1 a color monitor. Otl1erwise, press
Nand tl1is line will appear:
• IBM Enl1anced Grapl1ics Adapter or compatible
Press Y if this card is installed in your PC, PC XT, or PC AT.
Your screen will tl1en display this question:
Is instaliation for tl1is macl1ine (Y/N)?
2-4
Basic Installation
Press Y if you are installing SuperPak on this machine. If you are
installing for another machine, press N and proceed to Section
3.3.
When you press Y, this message is displayed on the screen:
Testing for expanded memory boards...
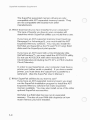
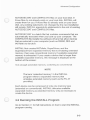
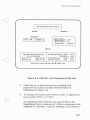
Next, the Main INSTALL menu shown in Figure 2-2 appears. (The
information shown on this screen is an example, and your actual
display may be different.)
AST SuperPak Installation Program
fASTdisk
SuperOrive
SuperS pool
AST Expanded Memory
REMM.SVS installed
Clock
ASTClock nol required
Expanded Memory Conliguralion
(lfO port addresses)
Board "1 uu
Board "3 uu
Board "2 uu
Board "4 uu
Convenlional Memory: TOTAL
REMAINING
Extended Memory:
TOTAL
Expanded Memory:
TOTAL
OK
OK
OK
OK
t, ENTER. INS
Valid keys: Fl=help. Esc=eXiI. . .
Figure 2-2. Main INSTALL Menu.
2-5
SuperPak Installation Supplement
The amounts of conventional and expanded memory configured
for your system automatically appear at the bottom of the screen.
For conventional memory, both the total amount and the
remaining amount that has not been allocated are shown.
The amount of extended memory shown refers to expanded
memory that emulates extended memory. As you progress, you
will notice that as extended memory is allocated, it may be
subtracted from expanded memory. This indicates that extended
memory is "borrowing" from expanded memory (that is,
expanded memory is emuiating extended memory).
2.2 Installing Options
A step-by-step procedure follows for installing the sample
configuration described above (one fASTdisk, one SuperDrive,
one SuperSpool, and expanded memory manager software). If
you do not wish to install a SuperPak utility, skip to the next step.
STEP 1
Install fASTdisk: (If you do not wish to install a 512-KB fASTdisk,
go directiy to STEP 2.) When the Main INSTALL menu appears,
the fASTdisk option is highlighted. To install one 512-KB fASTdisk
(the default memory size), press < Enter> once. The screen
changes to indicate you have installed one fASTdisk in its default
configuration.
NOTE
If you accidentally press < Enter> more than
once, you will install a second fASTdisk. To
delete the second fASTdisk, press the downarrow to highligilt the second fASTdisk listing and
press < Del> .
STEP 2
Install SuperOrive: (If you do not wish to create a SuperDrive, go
to STEP 3. SuperDrive is not available for the PC AT or
2-6
Basic Installation
PS/2 Model 30.) To install a 360-KB SuperDrive, press the
right-arrow to highlight the SuperDrive option. Press < Enter>
once. A line will appear describing the SuperDrive you have
created. It lists the memory size of the SuperDrive (which should
be 360 KB) and the letter designation of the SuperDrive.
The letter designation for the SuperDrive you have created should
be the next unused letter after your existing diskette and disk
drives. For example, If you have two floppy drives, A: and B:, then
your SuperDrive should be designated as C:. if you have two
floppy drives (A: and B:) and a hard drive C:, then your
SuperDrive should be designated as D:. If the letter provided by
INSTALL is not appropriate for your configuration, then you will
have to "edit" the SuperDrive you have created. To edit your
SuperDrive. highlight the SuperDrive you have created, then
press < Enter·> to invoke the INSTALL edit box. Select the
device letter parameter in the edit box by pressing the down
arrow key. Then press the right-or left-arrow key to select the
device letter you wish to use. Once the correct letter appears,
press < Esc> to exit the edit box, leaving your SuperDrive with
the new device letter you have selected.
STEP 3
Install SuperSpool: (If you do not wish to create a SuperSpool
buffer for a parallel printer, go to STEP 4). To create a 64-KB
SuperSpool buffer, press the right-arrow to highlight the
SuperSpool option. Press < Enter> once.
STEP 4
Install Expanded Memory Manager: The AST Expanded Memory
option lets you install the REMM.SYS and REX.SYS expanded
memory software. If the message "REMM.SYS installed" appears
below the AST Expanded Memory option, the REMM.SYS and
REX.SYS software will be installed. If the message "REMM.SYS
not installed" appears, you can change it to "REMM.SYS installed"
by pressing the right-arrow key to highlight "AST Expanded
Memory", then pressing < Enter>.
2-7
SuperPak Installation Supplement
2.3 Save the Installation
To save the installation on your boot disk, follow the procedure
below.
STEP 1
Save the configuration: Exit the Install program by pressing
< Esc>. This question appears at the bottom of your screen:
Do you want to quit (yin)?
Press Y. You will see this question:
Do you want to save configuration (yin)?
Press Y. These messages appear at the bottom of the screen:
Writing CONFIG.SYS to x:.
Writing AUTOEXEC.BAT to x: ..
where x: is the drive containing the boot disk.
STEP 2
Copy utifity files to boot disk: The screen clears, then shows this
message:
For the configuration process to be complete, the
following SuperPak utility files need to be present on your
boot disk:
The above message is followed by a list of files necessary to
install your SuperPak software, and this question is displayed:
Do you want these files copied to your boot disk (YIN)?:
2-8
Basic Installation
Press Y. Place your SuperPak diskette in drive A: if it is not
already there. The following message will appear:
Enter the letter of the disk drive containing your SuperPak
software:
Enter A.
This concludes the procedure for creating a sample SuperPak
boot disk. You will now want to copy your application software to
the disk. You must reboot the system wi1l1 your new boot diskette
before you can use expanded memory (and any fASTdisk,
SuperDrive RAM disks, or SuperSpool print spooler you have
created). If you a PC or PC XT and have added a SuperDrive RAM
disk, be sure that your system board switch is set for the total
number of diskette drives you have, including the new SuperDrive
you have created. (See the AST board's user's manual for
instructions on setting the system board switch.)
2-9
SuperPak Installation Supplement
NOTES
2-10
ADVANCED CONFIGURATION
3
This section provides more advanced information on how to use
the INSTALL program, including step-by-step details on how to
modify the default operating parameters for each SuperPak
program. You should read Section 2 of this supplement before
proceeding.
You will have to modify your AU·TOEXEC.BAT and/or
CONFIG.SYS files (using a text editor) after running INSTALL if
you want to send printer output to a serial (not parallel) port, or if
you want to use advanced parameters for the SuperPak software.
The SuperPak User's Manual discusses the SuperPak utilities in
greater detail.
3.1 Using INSTALL
For your convenience, INSTALL uses a screen and keyboard
interface design similar to popular spreadsheet programs:
The main SuperPak INSTALL menu offers several options
(including SuperDrive, SuperSpool, and fASTdisk). To install an
option on your boot disk (such as a SuperDrive), you must first
select that option by highlighting it, then create the highlighted
option by pressing the < Enter> or < Ins> key. When you exit
the INSTALL program, all the options you have created are saved
on your boot disk.
•
The currently selected option is highlighted In reverse
video. To move from one option to another, press the
right- or left-arrow keys on the numeric keypad to the
right of your keyboard.
•
Once you have selected (highlighted) an option, you
create that option by pressing the < Enter> or < Ins>
key.
3-1
SuperPak Installation Supplement
•
Press < F1 > to bring up a help screen that corresponds
to the currently highlighted option.
•
Press <Ctrl>-<C> to abort the INSTALL program
without changing your AUTOEXEC.BAT or CONFIG.SYS
files.
" you want to modify the default parameters (such as memory
size) for an option you have created, then you need to call up the
INSTALL edit box after you have created the option. This Is
applicable only to the fASTdisk, SuperDrive, and SuperSpool
options.
•
To call up the INSTALL edit box, highlight the created
option you want to modify (for example, one of two
fASTdisks you may have created). After this, press
< Enter> to invoke the edit box.
•
The edit box presents the parameters you can change for
the created option you are editing. Select the parameter
you want to change by pressing the up- or down-arrow
key. " the parameter requires a numeric value, you can
enter a new value. If the parameter Is for a memory type,
device letter or device name, you can press the right- or
left-arrow key to select from the available parameters.
•
To exit the edit box once you have set the parameters as
you want them, press < Esc> .
•
The cursor appears as an underline cllaracter when an
alphanumeric entry is required from you.
If you want to delete an option, highlight the option you wish to
delete (such as fASTdisk). Then press the up- or down-arrow key
to select (highlight) the particular created option you want to
delete. Next press the < Del> key to delete the highlighted
created option. Once you have installed and configured your
SuperPak options, you can choose to save the installation you
have created. When this is done, INSTALL modifies the
3-2
Advanced Configuration
AUTOEXEC.BAT and CONFIG.SYS files on your boot disk. If
those files do not already exist on your boot disk, INSTALL will
create them for you. If those files do already exist on your boot
disk, any existing statements not changed by the new installation
will remain. iNSTALL appends its statements to the end of existing
AUTOEXEC.BAT and CONFIG.SYS files.
AUTOEXEC.BAT is a batch file that contains commands that are
automatically executed when you boot lip your computer. The
CONFIG.SYS file installs the software drivers that allow devices
that are external to your computer (such as REMM, REX and
fASTdisk) to function.
INSTALL first creates fASTdisks, SuperDrives, and the
SuperSpool from expanded memory that is emulating extended
memory, then uses conventional memory if available expanded
memory is exhausted. If you create a device that is larger than
available expanded memory, this message is displayed at the
bottom of the screen:
Not enough extended memory--switching to conventional
NOTE
The term "extended memory" in the INSTALL
program refers to expanded memory that
emulates extended memory (such as the PC AT
proVides).
Each device can be composed of only one memory type
(extended or conventional). INSTALL allocates avaiiable
expanded memory as extended memory only as necessary to
create the device.
3.2 Running the INSTALL Program
Go to Section 2.1 for full instructions on how to start tile INSTALL
program running.
3-3
SuperPak Installation Supplement
3.3 Installing SuperPak Software for Another
System
After you have started running the INSTALL program (as
described in Section 2.1 of this supplement), you will be
presented with the following question:
Is installation for this machine (yin)?:
Press N if you are installing SuperPak software for another
computer. This causes INSTALL to display these questions about
the PC for which you are installing software:
Is your computer a PC AT or AT-compatible (YIN)?
Enter amount of conventional memory in K bytes:
Enter amount of extended memory in K bytes:
Enter amount of expanded memory In K bytes:
Enter number of floppies and RAM diskettes (1-4):
These amounts are automatically determined by the INSTALL
program if you answered "Y".
Is your computer a PC AT or AT-compatible (YIN)?: Press Y if
you are installing software for a PC AT or compatible (like the AST
Premium/286). Press N if you are Installing software for a PC that
is not a PC AT. The PS/2 Model 30 is not AT-compatible.
Enter amount of conventional memory in kilobytes: Conventional
memory (as opposed to expanded or extended memory) is the
memory between 0 and 640 KB.
Enter the number of kilobytes (from 0 to 640) of conventional
memory for the computer whose software you are installing
(including memory on other expansion boards). Pressing
< Enter> is equivalent to entering "0".
Enter amount of extended memory in kilobytes: "you are using
REMM, enter the number of kilobytes (from 0 to 15360) of actual,
3-4
Advanced Configuration
physical extended memory for the computer whose software you
are installing. Extended memory (not expanded memory) is the
non-paged memory in the 1 to 16 megabyte range. Pressing
< Enter> is equivalent to entering "0".
Enter amount 01 expanded memory in kilobytes: Enter the
number of kilobytes (from 0 to 8192 -- 8 megabytes of expanded
memory) for the computer whose software you are installing. The
amount of expanded memory is the total amount of memory on
your AST expanded memory product that is not allocated as
conventional or extended memory.
For example, if you have a 2-MB AST board and you have
allocated 384 KB of the board's memory as conventional
memory, enter "1664" (2048 minus 384) for the amount of
expanded memory.
Expanded memory (as opposed to conventional or extended
memory) is also known as "paged memory", and is available for
paging or extended memory emulation. Pressing < Enter> is
equivalent to entering "0".
EXAMPLES
Here are some examples of how you would supply the requested
memory amounts for several different configurations:
•
Your PC has 256 KB of system memory, a 384-KB
SixPakPlus board, and a 1-MB Rampage/2 board. You
have allocated all of Rampage/2's memory as expanded.
Enter these parameters:
Conventional memory: 640
Extended memory: 0
Expanded memory: 1024 (1 MB)
•
Your PC XT has 256 KB of system memory and a 2-MB
Rampage/2 board. You have allocated 384 KB as
3-5
SuperPak Installation Supplement
conventional memory and 512 KB as extended memory.
Enter these parameters:
Conventional memory: 640
Extended memory: 512
Expanded memory: 1152 -- (2048 minus 512 minus 384)
•
Your PS/2 Model 30 has 640 KB of system memory and a
2-MB Rampage/2 board. You have allocated 1024 KB as
conventional memory and all remaining Rampage/2
memory as expanded memory. Enter these parameters:
Conventional memory: 640
Extended memory: 1024
Expanded memory: 1024 -- (2048 minus 1024)
Enter number 01 floppies and RAM diskettes (1-4): Enter the
number (from 1 to 4) of floppy diskettes (including random
access memory (RAM) floppy diskettes, such as SuperDrive),
then press < Enter> .
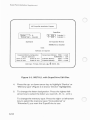
3.4 INSTALL Main Menu
Once you have installed all the questions in the initial INSTALL
screen (described in Section 2.1), the Main INSTALL menu shown
In Figure 3-1 appears.
3-6
Advanced Configuration
AST SuperPak Inslallalion Program
IASTdisk
Superorive
SuperSpool
AST Elpanded Memory
REMM.SVS installed
Clock
ASTClock nol required
Expanded Memory Configuration
(110 port addresses)
Board M1 xxu
Board N3 xxxx
Board 112 xxxx
Board M4 xxxx
Conventional Memory: TOTAL
REMAINING
Exlended Memory:
TOTAL
Expanded Memory:
TOTAL
OK
OK
OK
OK
t, ENTER. INS
Valid keys: F1=help. ESC=exit. . .
Figure 3-1. Main INSTALL Menu.
Notice that the amounts of conventional and expanded memory
you set with the PC system board and the Rampage/2 Smart
Switch software (or entered if you are preparing a boot disk for
another PC) appear at the bottom of the screen. For conventional
memory, both the total amount and the remaining amount that
has not been allocated are shown.
The amount of extended memory shown refers to expanded
memory that emulates extended memory.
3-7
SuperPak Installation Supplement
As you progress, you will notice that as extended memory is
allocated, it may be subtracted from expanded memory. This
indicates that extended memory is "borrowing" from expanded
memory (that is, expanded memory is emulating extended
memory). You can install the programs on the main menu using
the keys as described in Section 3.1. Detailed step-by-step
procedures follow for installing and modifying each SuperPak
program.
3.5 Installing fASTdisk
This option allows you to create up to two RAM fixed disk drives
(default size: 512 KB each).
To create a fASTdisk:
1.
Press the right- or left-arrow key to highlight "fASTdisk".
2.
Press < Enter> or < Ins> once for each fASTdisk you
want to create. If you press < Enter> more than twice,
this message will appear at the bottom of the screen:
Maximum of two fASTdisks allowed
If extended memory is exhausted. the memory totals in
the lower right corner of the screen (Figure 3-1) will show
512 KB subtracted from expanded memory, (and added
to extended memory) each time you create a fASTdisk.
This indicates that fASTdisk is using expanded memory
that is emulating extended memory.
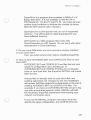
To change the size or memory type of a fASTdisk:
3-8
1.
Press the right- or left-arrow key to highlight "fASTdisk".
2.
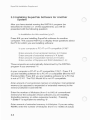
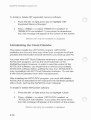
Press the down-arrow key to highlight the fASTdisk you
want to modify (Figure 3-2 shows fASTdisk "1"
highlighted) .
Advanced Configuration
Press < Enter> to invoke the edit box, shown in Figure
3-2.
3.
AST SuperPak Installation Program
IASTdisk Oplions
fASTdisk
OJ 512K
ISize in
( Exlended
2: 512K ( Extended
I(
byte_
Memory type
= 512
= EJ:lended
AST Expanded Memory
SuperSpool
REMM.SYS installed
Clotk
ASTClock nol required
Expanded Memory Configuralion
(110 pon addresses)
Board "'1 lUI
Board "'3 1111
Board "'2 nn
Board N4 1111
Valid keys:
F1=he~p.
Conventional Memory: TOTAL
REMAINING
Exlended Memory:
TOTAL
Expanded Memory:
TOTAL
ESC=eril,
~,t,
ENrER, INS
=
=
=
=
uuK
InK
nnK
unK
•
Figure 3-2. INSTALL with fASTdisk Edit Box.
4.
Press the up- or down-arrow key to highlight the
parameter you want to modify (Figure 3-2 shows the
fASTdisk size parameter highlighted).
5.
To change the size: Enter the new size (In KB) of the
fASTdisk (from a minimum of 1 KB to a maximum of all
available PC memory). Your PC will beep if you enter
3-9
SuperPak Installation Supplement
more than four digits. This message will appear at the
bottom of your screen if you enter a non-numeric
character:
Input must be a decimal digit
To change the memory type: Press the right- or left-arrow
key to select the memory type ("Conventional" or
"Extended") you want the fASTdisk to use.
6.
Press < Esc> to exit the edit box. Notice that the
memory allocation at the lower right corner of the screen
changes to reflect changes you have made.
To delete a fASTdisk:
·~ASTdisk".
1.
Press the right- or left-arrow key to Ilighiight
2.
Press the down-arrow key to highlight the fASTdisk you
want to deiete.
3.
Press < Del> -- the fASTdisk will disappear from the
screen.
3.6 Installing SuperDrive
This option allows you to create up to three 360-KB RAM floppy
disk drives (depending on PC system board switch settings for
the number of floppy drives). SuperDrive is not available for the
PS/2 Model 30.
To create a SuperDrive:
1.
Press the right- or left-arrow key to highlight "SuperDrive".
2.
Press < Enter> once for each SuperDrive you want to
create.
3-10
Advanced Configuration
Watch the memory totals at the lower right corner of the
screen (see Figure 3-3). 360 KB is subtracted from
expanded memory, and added to extended memory,
each time you create a SuperDrive.
INSTALL assumes your PC has one floppy diskette drive
installed (therefore the first SuperDrive will be B:). If you
told INSTALL that your PC has one floppy installed (see
the INSTALL initial screen shown in Figure 3-1) and you
try to create a SuperDrive, this message will be displayed
at the bottom of your screen:
Not enough disk devices to add SuperDrive
If, for example, you attempt to create two SuperDrives
wilen you l1ave entered "2" for tile total number of
floppies and RAM diskettes, tl1is message wouid be
displayed at the bottom of your screen:
Maximum of one SuperDrive allowed
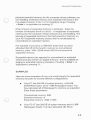
To cl1ange the letter designation or memory type of a SuperDrive:
1.
Press the rigl1t- or left-arrow key to higl1ligl1t "SuperDrive".
2.
Press the down-arrow key to l1igl1light tile SuperDrive you
want to modify (Figure 3-3 Sl10WS SuperDrive B:
l1ighlighted).
3.
Press < Enter> to invoke the edit box shown in.
Figure 3-3.
3-11
SuperPak Installation Supplement
AST SuperPak Installation Program
SuperOrive
I Device
1- B:
Memory 1ype - Ex1ended
B:
C:
Supe,Spool
360K
360K
II
Extended
( Extended
AST Expanded Memory
REMM.SYS not installed
Clock
ASTClock not required
Expanded Memory Conliguration
(lfO port addresses)
Board 61 nn
Board 13 nn
Board N2 nn
Board 1/4 nn
Conventional Memory: TOTAL
REMAINING
Extended Memory:
TOTAL
Expanded Memory:
TOTAL
=
=
=
=
xnxK
nxK
nnK
nnK
Valid keys: F1=help, Esc=exit.-..-,t, HlTER, ItlS
Figure 3-3. INSTALL with SuperDrive Edit Box.
4.
Press the up- or down-arrow key to highlight "Device" or
"Memory type" (Figure 3-3 shows "Device" highlighted).
5.
To change the letter designation: Press the rightor leftarrow key to select the letter you want (A:, B:, C:, or D:).
To change the memory type: Press the right- or left-arrow
key to select the memory type ("Conventional" or
"Extended") you want the SuperDrive to use.
3-12
Advanced Configuration
6.
Press < Esc> to exit the edit box. Notice that the
memory allocation at the lower right corner of the screen
now reflects changes you have made.
To delete a SuperDrive:
1.
Press the left- or right-arrow key to highlight "SuperDrive".
2.
Press the down-arrow key to highlight the SuperDrive you
want to delete.
3.
Press < Del> to delete the SuperDrive.
3.7 Installing the AST Expanded Memory Manager
This option automatically installs REMM.SYS and REX.SYS in
your CONFIG.SYS fiie REMM.SYS and REX.SYS are the software
drivers that make your expanded memory available for expanded
memory application programs and for emulation of extended
memory. You must install REMM.SYS in order to use expanded
memory with application programs, or to use memory beyond
640 KB for RAM disks and spoolers.
NOTE
The expanded memory manager software
installed by the INSTALL program is appropriate
for most applications. However, software
developers who want to edit the REMM and REX
command lines in the CONFIG.SYS file can use
the parameters described in Appendix B of the
Rampage/2 User's Manual. Make sure you're
using the version of REMM.SYS that came with
your board.
3-13
SuperPak Installation Supplement
To install or delete AST expanded memory software:
1.
Press the left- or right-arrow key to highlight "AST
Expanded Memory Manage~'.
2.
Press < Enter> to select "REMM.SYS installed" or
"REMM.SYS not installed". If you press the downarrow
key, this message will appear at the bottom of the screen:
Device can only be enabled or disabled
3.8 Installing the Clock/Calendar
This option installs the ASTCLOCK program. ASTCLOCK
maintains the time and date even when your computer is off and
provides that information to DOS whenever you boot up your PC.
You must have AST Clock/Calendar hardware in order to use the
ASTCLOCK program, such as the Clock/Calendar on the
SixPakPlus board. However, in order to use this version of the
ASTCLOCK software, you would have to remove your existing
ASTCLOCK software before adding the new one. ASTCLOCK is
only compatible with AST Clock/Calendar hardware. Do not use
it with Clock/Calendars from other manufacturers.
After Installing the ASTCLOCK program, you must still initialize
ASTCLOCK as described in the manual for the hardware product
with a clock, such as the SixPakPlus User's Manual.
To install or delete ASTCLOCK software:
1.
Press the left- or right-arrow key to highlight "Clock".
2.
Press < Enter> to select "ASTCLOCK installed" or
"ASTCLOCK not installed". If you press the down-arrow
key, this message will appear at the bottom of the screen:
Device can only be enabled or disabled
3-14
Advanced Configuration
3.9 Installing SuperSpool
This option allows you to create one RAM print spooler buffer.
Whether or not you use INSTALL, your computer can
accommodate only one SuperSpool.
You must edit the SUPERSPL command in the AUTOEXEC.BAT
file if you are spooling to a serial printer port or you are changing
any default parameter (see your SuperPak Users Manual for
more details).
INSTALL will first attempt to create a SuperSpool buffer from
available extended memory, then uses conventional memory. If
you create a SuperSpool that is larger than available extended
memory, INSTALL will create a buffer from the extended memory
that is available. If no extended memory is available, this message
is displayed at the bottom of the screen:
Not enough extended memory--switching to conventionai
If no extended or conventional memory is available, this message
is displayed at the bottom of the screen:
Not enough memory for spooler
The SuperSpool buffer is composed of only one memory type
(extended or conventional). INSTALL allocates available
expanded memory as extended memory to create a SuperSpool.
NOTE
The term extended memory here refers to
expanded memory emulating extended memory.
To create a SuperSpool:
1.
Press the left- or right-arrow key to highlight
"SuperSpool".
3-15
SuperPak Installation Supplement
2.
Press < Enter> to create a SuperSpool.
If you press < Enter> again, this message will be
displayed at the bottom of the screen:
Maximum of one spooler allowed
To change the device name, size, or memory type of the
SuperSpool buffer:
1.
Press the ieft· or right·arrow key to highlight
"SuperSpool".
2.
Press the down·arrow key to highlight the SuperSpool
buffer ("LPT1:" is highlighted in Figure 3-4).
3.
Press < Enter> to invoke the edit box shown in
Figure 3·4.
3-16
Advanced Configuration
AST SuperPak Installation PrografTl
fASTdisk
SuperDrive
SuperSpool
I
LPn:
64K
I Extended
)
I
I Device Name I
= LPT1:
Size in K bytes = 64
Memory Type
= Exlended
ASTClock
Expanded Memory Configuration
(110 port addresses)
Board N1 un
Board N3 uu
Board N2 uu
Board "4 xux
Valid keys: Fl=help,
Conventional Memory: TOTAL
REMAINING
Extended Memory:
TOTAL
Expanded Memory:
TOTAL
Esc=exit,~,t,
= unK
= InK
= nnK
= xuxK
ENTER, INS
Figure 3-4. INSTALL with SuperSpool Edit Box.
4.
Press the up- or down-arrow·key to highlight the
parameter you want to modify ("Device Name" is
highlighted in Figure 3-4).
5.
To change the device name: Press the left- or right-arrow
key to select "LPT1:" or "LPT2:".
To change the size: Enter the new size (in KB) of the
SuperSpool (from a minimum of 1 KB to a maximum of all
available PC memory). Your PC will beep if you enter too
3-17
SuperPak Installation Supplement
many digits. This message will appear at the bottom of
your screen if you enter a non-numeric character:
Input must be a decimal digit
To change the memory type: Press the left- or right-arrow
key to select extended or conventional memory.
6.
Press < Esc> to exit the edit box. Notice that the
memory allocation at the lower right corner of the screen
reflects any changes you have just made.
To delete SuperSpool:
1.
Press the left- or right-arrow key to highlight
"SuperSpool".
2.
Press the down-arrow key to highlight "LPTx:".
3.
Press < Del> to delete the SuperSpool.
3.10 Saving the Installation
1.
Press < Esc>. This question will appear at the bottom of
the screen:
Are you sure you want to quit (yin)?
Press Y to exit INSTALL Press N to return to the main
INSTALL menu.
2.
if you press Y, this question appears at the bottom of the
screen:
Do you want to save configuration (yin)?
3-18
Advanced Configuration
Press Y to save the SuperPak software you have just
configured using tile INSTALL program. Pressing N exits
INSTALL without making any changes.
3.
If you save the configuration, these messages flash at the
bottom of the screen:
Writing CONFIG.SYS to x:.
Writing AUTOEXEC.BAT to x:.
where x: is the drive containing the boot disk.
4.
The screen will then clear and show this message:
For the configuration process to be complete,
the foliowing SuperPak utility files need to be
present on your boot disk:
The above message is followed by a list of the files
necessary to instali your SuperPak software, and this
question is displayed:
Do you want these files copied to your boot disk (YIN)?:
5.
If you press Y, your screen wili display tilis message:
Enter the letter of the disk drive
containing your SuperPak software:
Enter the letter of the drive that currently contains your
SuperPak software. Your screen wili then list the
appropriate files as they are copied from the SuperPak
diskette to your boot disk.
If there is an error copying SuperPak software to your
boot disk, this message wili be displayed:
Error copying utility files to drive x:
3-19
SuperPak Installation Supplement
where x: is the letter of the drive containing the boot disk.
Check that the boot disk is not write-protected, that there
is enough room on the boot disk for SuperPak files, that
the SuperPak software is in the specified drive, and that
the disk drives are closed.
6.
If you press N (do not copy SuperPak files to the boot
disk), or once the SuperPak files have been copied, this
message appears on your screen:
Configuration is now complete.
You will need to reboot the system for your updated
configuration to take effect.
7.
Press < GIrl> - < All > - < Del> to reboot your PC. If you
have installed one fASTdisk, one SuperDrive B:, and one
SuperS pool buffer. and you Ilave enabled AST memory
manager software, your AUTOEXEC.BAT and
CONFIG.SYS files will contain the following lines at the
end of the file (assuming you did not change any default
parameters. If you did, your actual information may be
different.):
AUTOEXEC.BAT
CONFIGSYS
superdrv b: lexlm
superspllpl1: lextm
device;: remm.sys Ix = BOOO·BFFF
3-20
device = rex.sys 936
device;: fastdisk.sys lextm
000347-001 8