1
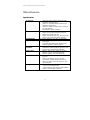
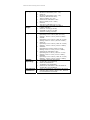
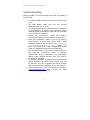
EPAD™
U S E R ’ S
G U I D E
P R O D U C T
F A M I L Y
R E F E R E N C E
P/N: 94-21488 Rev. B
ePad Product Family User’s Guide
ePad-POS, ePad II, ePad-i.d., ePad-i.d. Pro, ePad-ink, ePad-ink Pro
and ePad LS are trademarks, and ePadLink and the six dot logo are
registered trademarks of ePadLink All other trademarks are the property of
their respective owners.
1
NCR Patent information: This product was produced under the following
United States patents and their foreign equivalents: 5,195,133 and
5,297,202.
ePad Product Family User’s Guide P/N 94-21488 Rev. B
© 2009 EPadLink All rights reserved.
2
ePad Product Family User’s Guide
Table of contents
Part I
Introduction ...................................................................................5
About the ePad electronic signature product family .........................5
The standard ePad......................................................................5
The ePad-POS ............................................................................5
The ePad-ink..............................................................................6
The ePad-i.d. .............................................................................6
ePad II ......................................................................................6
ePad-ink Pro ..............................................................................6
ePad-i.d. Pro ..............................................................................7
ePad LS.....................................................................................7
The contents of your package ......................................................8
Installing your ePad ........................................................................9
System requirements for all ePad products: ...................................9
Installing the ePad Serial/USB and ePad II.....................................9
Installing the ePad Serial from CD-ROM ....................................9
Installing the ePad USB and ePad II from CD ........................... 10
Installing the ePad USB and ePad II device.............................. 10
Installing the ePad USB and ePad II drivers ............................. 10
Installing the ePad-i.d. and ePad-i.d. Pro ..................................... 11
Automatic software installation .............................................. 11
Manual ePad-i.d. software installation ..................................... 11
ePad-i.d. and ePad-i.d. Pro hardware installation...................... 12
Connecting the USB Cable ..................................................... 12
Power Supply....................................................................... 12
Capture Ready LED............................................................... 13
Installing the ePad-ink and ePad-ink Pro...................................... 14
ePad-ink and ePad-ink Pro Software Installation....................... 14
Installing the ePad-ink and ePad-ink Pro Device ....................... 14
Installing the ePad-ink and ePad-ink Pro drivers ....................... 14
Uninstalling ePadLink’ ePad Software .......................................... 15
Installing the ePad LS ............................................................... 16
Installing the ePad LS hardware ............................................. 16
Installing the ePad LS ........................................................... 17
Replacing the protective layer of the ePad LS........................... 17
Miscellaneous ............................................................................... 19
Specifications........................................................................... 19
Thin Client Support Matrix ......................................................... 22
Troubleshooting............................................................................ 23
Care and Maintenance ................................................................... 24
Technical Support ..................................................................... 26
Mailing Address ........................................................................ 26
3
ePad Product Family User’s Guide
Web........................................................................................ 26
ePad-ink FCC Certification.............................................................. 27
CE Conformity...................................................................... 28
CB Safety Certification .......................................................... 28
Part II
IntegriSign Desktop User Manual .................................................... 38
Copyright ................................................................................ 38
Disclaimer ............................................................................... 38
Trademarks ............................................................................. 38
1. Welcome ............................................................................. 39
2. Where to find information ...................................................... 39
2.1 IntegriSign Desktop Help ................................................. 39
3. Installing/Uninstalling IntegriSign Desktop............................... 40
3.1 Before you begin ............................................................ 40
3.2 Installing the ePad device ................................................ 40
3.3 Running IntegriSign Desktop Setup................................... 41
3.4 Known Installation issues................................................. 42
3.5 Uninstalling IntegriSign Desktop ....................................... 42
4. Preferences .......................................................................... 43
4.1 IntegriSign Desktop - Configuration .................................. 44
4.2 Creating User Profile ....................................................... 45
4.3 Setting other Preferences................................................. 46
5. IntegriSign Desktop Plug-ins .................................................. 46
5.1 Overview ....................................................................... 47
4
ePad Product Family User’s Guide
P A R T
I
Introduction
About the ePad electronic signature product family
ePadLink electronic signature pads (ePad) are pen input
devices that capture hand-written signatures for use in PC
applications. The ePad product family is by far, the most
durable and flexible in the market. Designed to mimic the
natural feel of signing on paper, the ePads can be used on
the desktop, yet are small and light enough to take on the
road. Forms requiring signature approvals can now be
completed and stored electronically. For secure transactions,
the details of a signature can be analyzed to confirm the
identity of a signer. With the ePad product family, it’s easy to
add signatures to electronic documents, anytime, anywhere!
The standard ePad
The standard ePad is designed for basic electronic signature
capture. It is light-weight and self-powered via a USB or a
Serial (RS232) port. This is ePadLink’s standard model and
has been implemented in hundreds of applications and
environments where electronic signature is necessary.
The ePad-POS
This Point of Sale version is fully equipped for retail
transactions and other receipt-signing applications. Like the
standard ePad, it uses the VersaPad Semiconductive
technology in its signing area. It is optimized for use with a
ballpoint pen tethered to the ePad or passive stylus. The
ePad-POS is the ideal pad for paper receipt signing. It comes
in Serial and USB versions.
5
ePad Product Family User’s Guide
The ePad-ink
The ePad-ink allows electronic signature capture with
interactive visual feedback via LCD. It is based on a ITO
resistive touchpad technology. The 3” x 2.2”, 300 d.p.i.
screen is stylish and allows for powerful integration flexibility
in any environment with its bi-directional communications
capability. USB and Serial (RS232) versions are available.
The ePad-i.d.
With the ePad-i.d. you can capture signatures and perform
fingerprint capture and verification. The fingerprint sensor is
a CMOS active capacitive pixel sensing technology that is
capable of 500 dpi image resolution and capture rate of 14
frames/seconds.
ePad II
The next generation of electronic signature technology from
ePadLink, Inc., ePad II provides increased security and
performance for mission critical applications. Integrating
ePadLink’s Semiconductive technology with advanced
features such as, user definable report rates (up to 400 RPS)
and unique serial ID, the ePad II provides higher signature
definition and biometric repeatability. Optimized for use with
a passive stylus, the ePad II is compatible with IntegriSign
Signature Software Suite and proprietary applications in
Windows 2000, XP and Vista.
ePad-ink Pro
Taking the legacy of the ePad-ink to the next level, this
latest addition to the ePad product family comes jam-packed
with features, such as Unique Serial ID, bi-directional
communications, replaceable protective screen film for
increased durability and USB connectivity for deployment
flexibility. The ePad-ink Pro comes with a powerful new
processor and a staggering 16 MB of flash.
6
ePad Product Family User’s Guide
ePad-i.d. Pro
This new addition to the ePad family combines the powerful
features of the ePad-ink with the biometric capability of the
ePad-i.d. Moreover, this ePad leverages the ePad-ink Pro’s
powerful hardware platform, which offers features such as
Unique Serial ID, replaceable protective screen film, and USB
connectivity.
ePad LS
ePad LS, with a best-in-class full color LCD display and
ergonomic design, is perfect for capturing handwritten
electronic signatures in high-volume customer applications.
Providing signature data encryption and increased pad
surface durability via a new fortified field-serviceable writing
surface, ePad LS includes a bi-directional pressure-sensitive
ITO display to present marketing messages to customers
while capturing signatures. ePad LS is the first enterprise
device to offer a fully programmable scrolling text window,
enabling display of Rich Text documents utilizing multiple
fonts and colors.
7
ePad Product Family User’s Guide
The contents of your package
Included in the box:
• ePad and tethered stylus.
• ePad-POS comes with only a tethered ballpoint pen
• ePad-i.d. comes with power adapter
• ePad-ink Pro and ePad-i.d. Pro products:
o USB cable
o Power adapter
o Complimentary replaceable screen film
• Software Installation CD-ROM
• User Guide
The ePad Software Installation CD-ROM includes:
• ePad product family Drivers and diagnostic utilities
• Documentation
• Optional signature software
8
ePad Product Family User’s Guide
Installing your ePad
System requirements for all ePad products:
• Microsoft 2000, XP and Vista*
• Available 9-pin serial port (for Serial version), or
USB port (for USB version)
• Optional:
o Microsoft Terminal Services
o Citrix ICA client (for use with Citrix
Metaframe; see Thin Client Support Matrix
section for more details)
* For more information on running your ePad on Vista, please
read the README.HTM file installed with the drivers.
Installing the ePad Serial/USB and ePad II
Installing the ePad Serial from CD-ROM
•
•
•
•
•
•
Turn off computer. Plug ePad into a serial port.
Turn on your computer and allow Windows
operating system to boot up.
Insert the ePadLink CD in the computer’s CD-ROM
drive and follow the instructions on the screen.
If the ePad installation doesn’t automatically start,
you can install the drivers manually, by clicking
the Windows Start button and clicking on Run.
Type d:\setup.exe (where “d” is the letter
representing your CD-ROM drive) in the Open text
box, and then click the OK button.
Follow the instructions on the screen to complete
the installation.
9
ePad Product Family User’s Guide
Installing the ePad USB and ePad II from CD
There are 2 steps to install ePad software:
• Install ePad device
• Install ePad software drivers
Installing the ePad USB and ePad II device
Plug ePad device into an available USB port.
Installing the ePad USB and ePad II drivers
Insert CD-ROM and follow the instruction to complete the
installation of ePad software drivers.
If the software installer does not automatically start,
please perform the following steps:
• Run setup.exe from the CD-ROM. To do this, click
START > RUN.
• Type d:\setup.exe (where “d” is the letter
representing your CD-ROM drive) in the Open text
box, and then click the OK button.
• Follow the instructions on the screen to complete
the installation.
After the installation of ePad-ink software drivers is
complete, the programs will be under START >
PROGRAMS > EPADLINK > EPAD.
10
ePad Product Family User’s Guide
Installing the ePad-i.d. and ePad-i.d. Pro
Automatic software installation
IMPORTANT: Do not plug in the ePad-i.d. or ePad-i.d. Pro to
the host computer until you have successfully installed the
software drivers.
To install the software to run your ePad-i.d, follow these
instructions:
•
•
•
Insert the ePadLink CD-ROM in the CD-ROM drive
on your computer.
Follow the instructions on the screen.
Click the Finish button to close the Wizard and
complete the installation.
Manual ePad-i.d. software installation
If the InstallShield Wizard does not begin automatically
when you insert the ePadLink CD-ROM, follow these
instructions:
•
•
•
•
Insert the EPadLink CD in the computer’s CD-ROM
drive.
Click the Windows Start button and click on Run.
Type d:\setup.exe (where “d” is the letter
representing your CD-ROM drive) in the Open text
box, and then click the OK button.
Follow the instructions on the screen to complete
the installation.
11
ePad Product Family User’s Guide
ePad-i.d. and ePad-i.d. Pro hardware
installation
IMPORTANT: You must install the required software drivers
before connecting the ePad-i.d.
Connecting the USB Cable
After installing the software drivers, follow these
instructions to connect the ePad-i.d. USB cable to an
available USB port on your computer.
•
•
Locate an available USB port on your computer
and connect the ePad-i.d. USB cable into it.
The necessary drivers for the ePad-i.d. should
automatically detect the ePad-i.d.
NOTE: If you have NOT installed the software, Windows will
not recognize the ePad-i.d.
•
•
During the installation, Windows may prompt you
to insert the original Windows installation CD. You
must insert the Windows installation disk to install
the ePad drivers properly.
Please review the readme.htm file found on the
ePadLink program menu for further information.
Power Supply
The ePad-i.d. is designed to draw all its power from your
computer’s USB port. In most cases, the USB cable will
provide sufficient power to operate the pad, but in some
cases the optional AC adapter power supply may need to
be attached to the pad.
12
ePad Product Family User’s Guide
With no accessories plugged into the rear USB ports, the
unit draws up to 300mA @5V. The USB host supplies this,
unless the power adapter is used. Accessories plugged in
to the rear USB ports can draw up to 500mA of current
each when the power adapter is used. If no power
adapter is used, the maximum allowable current
consumption by each accessory is 100mA.
WARNING: Only use the power adapter supplied with the
product.
For example, if you have more than one device connected
to the USB ports on your computer (e.g., a digital
camera, a printer, a scanner) OR if you have devices
attached to the USB port(s) on your ePad-i.d., your
computer may not be able to supply the ePad-i.d. with
enough power. In this case, the optional power supply
can be used provide enough power to operate ePad-i.d
and any devices connected to it.
To connect and use the optional power supply, follow
these instructions:
• Plug the AC adapter connecter into the ePadLink
power terminal.
• Plug the AC adapter power plug into a 90 –
264VAC, 47 - 63HZ wall outlet.
Capture Ready LED
The ePad-i.d. includes a Capture Ready LED (light
emitting diode). When the unit is ready to scan a person’s
thumb or fingerprint, the LED will blink with a green light.
The ePad-i.d. Pro requires the use of the external power
supply (included).
13
ePad Product Family User’s Guide
Installing the ePad-ink and ePad-ink Pro
ePad-ink and ePad-ink Pro Software Installation
There are 2 steps to install ePad-ink software:
• Install ePad-ink device
• Install ePad-ink software drivers
Installing the ePad-ink and ePad-ink Pro Device
Plug ePad into a free USB port. The ePad-ink Serial can be
connected to an available RS232 Serial port.
For the Serial version only, plug the power supply into the
DB-9 Serial connector or use the PS/2 adapter cable.
The ePad-ink Pro requires the use of the external power
supply (included).
CAUTION: USE ONLY THE POWER SUPPLY PROVIDED WITH
THE PRODUCT.
Power requirements:
• Voltage: 5VDC +/- 5%
• Current: 150 mA max.
The LCD display should indicate the manufacturer's name
and product name for approximately 3 seconds.
Installing the ePad-ink and ePad-ink Pro drivers
Insert CD ROM and follow the instruction to complete the
installation of ePad software drivers.
14
ePad Product Family User’s Guide
If the software installer does not automatically start,
please perform the following steps:
• Run setup.exe from the CD ROM. To do this, click
START > RUN.
• Type d:\setup.exe (where “d” is the letter
representing your CD-ROM drive) in the Open text
box, and then click the OK button.
• Follow the instructions on the screen to complete
the installation.
After the installation of ePad-ink software drivers is
complete, the programs will be under START >
PROGRAMS > EPADLINK > EPAD.
Uninstalling ePadLink’ ePad Software
To uninstall an ePadLink ePad, you should use the
Add/Remove Programs option found in the Windows
Control Panel.
For information about the Add/Remove Programs option,
refer to Windows Help.
Replacing the protective layer of the ePad-ink
Pro and ePad-i.d. Pro
In order to increase the lifespan of the ePad-ink Pro and
ePad-i.d Pro’s signature sensor and LCD, a replaceable
film is employed to protect the signing area. The film
protects the LCD and sensor (called ITO). The protective
film may, however become worn out after prolonged use.
To ensure continued reliable use of the ePad, it is
necessary to replace the protective film when it becomes
worn out. To replace the protective film, please follow
these steps:
15
ePad Product Family User’s Guide
•
•
•
•
Remove bezel by inserting a rigid wire through the
small pin hole in the lower mid section of the
housing and applying direct force to release bezel.
Use fingernail in lower mid window area to lift
bezel up while applying force to the wire.
Place thumb and finger on protective layer and
squeeze together to release the protective layer
and remove.
Install new protective layer making sure dovetails
align in their seats.
Snap bezel back in place.
Installing the ePad LS
There are 2 steps to install ePad LS in your system:
• Install ePad LS device
• Install ePad LS software drivers
Installing the ePad LS hardware
The ePad LS power and data cable uses a new design,
where only one cable reaches the ePad LS unit itself, a
USB connector for the host computer is at the other end
and a power supply adapter connects in between.
Assembling the data/power cable is easy:
• Plug the mini-D connector to the ePad LS port,
located in the receding bay (bottom) of the ePad.
• Plug the power supply to a power source and
attach the other end to the ePad LS data/power
cable, at the reception block.
• Plug the USB connector to the host computer.
Note: The ePad LS requires the use of the external power
supply (included) at all times.
16
ePad Product Family User’s Guide
CAUTION: USE ONLY THE POWER SUPPLY PROVIDED WITH
THE PRODUCT.
The LCD display should indicate the product name for
approximately 3 seconds.
Installing the ePad LS
Insert CD ROM and follow the instruction to complete the
installation of ePad software drivers.
If the software installer does not automatically start,
please perform the following steps:
• Run setup.exe from the CD-ROM. To do this, click
START > RUN.
• Type d:\setup.exe (where “d” is the letter
representing your CD-ROM drive) in the Open text
box, and then click the OK button.
• Follow the instructions on the screen to complete
the installation.
After the installation of ePad LS software drivers is
complete, the programs will be under START > ALL
PROGRAMS > EPADLINK > EPAD.
Replacing the protective layer of the ePad LS
In order to increase the lifespan of the ePad LS signature
sensor and LCD, a replaceable film is employed to protect
the signing area. The film protects the LCD and sensor
(called ITO). The protective film may, however become
worn out after prolonged use. To ensure continued
reliable use of the ePad, it is necessary to replace the
protective film when it becomes worn out. To replace the
protective film, please follow these steps:
17
ePad Product Family User’s Guide
•
•
•
•
Remove bezel by pushing on the button located
below the front area of the ePad LS. Apply direct
force to release bezel.
With your fingers and starting from the upper right
corner, peel off the old protective layer.
Install new protective layer making sure dovetails
align in their seats and the edges are secure. You
can run your finger around the edges of the
protective layer to ensure the protective layer is
not out of place.
Snap bezel back in place.
18
ePad Product Family User’s Guide
Miscellaneous
Specifications
Technology:
Models:
Compatibility:
Actuator Type:
Software
Included:
Report Rate:
Resolution:
Encryption:
•
ePad USB, Serial, ePad II and ePad-POS:
VersaPad Semiconductive
•
ePad-i.d.: VersaPad Semiconductive and
Capacitive Fingerprint
•
ePad-ink, ePad-ink, ePad-ink Pro, ePad-i.d.
Pro and ePad LS:
ITO resistive analog touchpad
Three package configurations available:
•
Single unit with IntegriSign and drivers
•
Single unit with drivers only
•
Single unit with drivers only, plus European
plug set (for units with power supplies)
All models: Windows 2000 SP4, XP and Vista.
•
ePad-POS: Optimized for ball point pen
over paper
•
All models USB and Serial: Optimized for
ordinary (passive), tethered stylus
•
Standard configuration: Drivers for entire
ePad family and IntegriSign signature suite.
•
Drivers-only configurations available.
•
EPad II, ePad-ink Pro, ePad-i.d. Pro and
ePad LS: 100 to 400 reports/second
•
All other models: 100 reports/second
•
Standard ePad and ePad-POS: 300 counts
per inch.
•
ePad-i.d. and ePad-i.d. Pro: 300 dpi
(touchpad)/ 500dpi (fingerprint sensor)
•
ePad-ink, ePad-ink Pro and ePad LS: 300
dpi (touchpad)
•
ePad-ink Pro, ePad-i.d. Pro:
- 125, 192 and 256-bit AES
- 64-bit DES and 192-bit triple DES (3DES)
•
ePad LS: 256-bit AES (optional)
19
ePad Product Family User’s Guide
Display Size/
Resolution:
Z-Axis/Levels of
pressure:
Hardware
Interface:
•
•
•
•
•
•
Power:
•
•
•
•
Dimensions:
•
•
•
•
•
•
ePad-ink, ePad-ink Pro and ePad-i.d. Pro:
320 (H) x 240 (V) pixels, 3.8" diagonal
screen and 300 dpi
ePad LS: Full Color 5.7’’ (diagonal) LCD
Signing area 4.5’’ x 3.5’’
ePad USB, Serial, ePad-POS and ePad-i.d.:
128 levels of pressure
RS232/Serial port or USB port for
respective models.
The ePad-i.d., ePad-i.d. Pro, ePad-ink,
ePad-ink Pro, ePad LS and ePad II are USB
only.
Standard ePad, ePad-POS, ePad II and
ePad-ink:
Self powered from standard RS232 or USB
port for the respective pads
ePad-i.d.:
Self-powered from USB port. Cameras or
other devices plugged into the ePad-i.d.’s
hub will need external power
ePad-ink Pro, ePad-i.d. Pro and ePad LS:
External power supply (provided)
IE ePad-ink Serial Euro version:
Power supply or PS/2 adapter cable
ePad Serial, USB and ePad-POS:
121mm x 138mm x 13mm
(6.94” x 5.45” x 0.51”)
ePad II:
146.04mm x 152.49mm x 13.97mm
(5.75” x 6.00” x .550”)
ePad-i.d.:
195mm x 155mm x 41mm
(7.7” x6.1” x1.6”)
ePad-ink USB and Serial:
151mm x 151mm x 41mm
(5.94" x 5.94" x 1.61")
ePad-ink Pro and ePad-i.d. Pro:
190mm x 155.45mm x 42.42mm
(7.68” x 6.12” x 1.67”)
ePad LS:
212.7mm x 187.3mm x 50mm
(8.4” x 7.4” x 2”)
20
ePad Product Family User’s Guide
Signing area:
•
•
•
•
•
Weight:
Temperature:
•
•
•
•
•
•
•
•
•
•
Humidity
(Operating):
•
•
•
Approvals and
Certifications:
•
•
ePad Serial & USB:
88.91mm x 38.15mm (3.5” x 1.5”)
ePad-i.d.:
88.91mm x 38.15mm (3.5” x 1.5”)
ePad-ink (Monochrome LCD):
76mm x 56mm (3" x 2.2")
ePad-ink Pro and ePad-i.d. Pro:
81mm x 6mm (3.19” x 2.40”)
ePad LS:
114.3mm x 88.9mm (4.5’’ x 3.5’’)
Standard ePad, ePad-POS and ePad II:
0.26kg (0.58 lbs.)
ePad-i.d.: 0.34 kg (0.75 lbs)
ePad-INK: 0.35 kg (0.75 lbs)
ePad LS: 0.65 kg (1.43 lbs)
ePad Serial & USB:
Operating: 0°C to +45°C (32°F to 113°F)
Storage: -40°C to +70°C (-40°F to 158°F)
ePad II:
Operating: 0°C to +50°C (+32°F to +113°F)
Storage -40°C to +70°C (-40°F to +158°F)
ePad-i.d.:
Operating: 0°C to +40°C (+32°F to +104°F)
Storage: -15°C to +70°C (+5°F to +158°F)
ePad-ink:
Operating 0°C to 45°C (32°F to 113°F)
Storage -15°C to +70°C (+5°F to +158°F)
ePad-ink Pro and ePad-i.d. Pro:
Operating 0°C to +40°C (+32°F to +113°F)
Storage -15°C to +70°C (+5°F to +158°F)
ePad LS:
Operating: 0°C to +40°C (+32°F to +113°F)
Storage: -15°C to +70°C (+5°F to +158°F)
ePad USB, ePad-POS and ePad II:
10-95% RH, non condensing
ePad-i.d. and ePad-ink:
10-85%RH, non-condensing
ePad-ink Pro and ePad-i.d. Pro and ePad LS:
10-80% RH, non-condensing
ePad-i.d. and ePad-ink: FCC part B, CB and CE
Standard ePad, ePad II, ePad-i.d. Pro, ePad-ink
Pro and ePad LS: FCC and CE
21
ePad Product Family User’s Guide
Thin Client Support Matrix
Thin Client
Microsoft Terminal
Services
Citrix ICA
WYSE 3125
(WinCE v4.0
w/optional CE.NET)
ePad USB, ePad-ink
Serial
ePad USB, ePad-ink
Serial
WYSE 3200
(WinCE 2.12)
--
ePad USB
WYSE 9000 (XPE)
All ePads, except ePad- All ePads, except ePadi.d and ePad-i.d. Pro* i.d and ePad-i.d. Pro*
Win32
(Win 2000 to Vista)
All ePads, except ePad- All ePads, except ePadi.d and ePad-i.d. Pro* i.d and ePad-i.d. Pro*
* The ePad-ink Serial is supported only by COM redirection, which is
available in all versions of Citrix ICA and Windows Server 2003.
22
ePad Product Family User’s Guide
Troubleshooting
Having trouble? Try the following tips to get your ePad up
and running:
•
•
•
•
•
•
•
•
For Serial ePads, make sure you are running 2000
or XP.
For USB ePads, make sure you are running
Windows 2000, XP or Vista.
Try restarting Windows; Windows can be sensitive
to its treatment of memory and resources. Often
restarting and /or powering computer off and back
on, will clear up problems.
Check your connections – make sure ePad is
securely connected to the serial port or USB port.
After the installation, check to see if the ePad is
functioning at a lower level (driver level): Start
Windows Explorer and browse to the C:\Program
Files\EPadLink\ePad\Diagnostic
folder.
In
there you should look in the corresponding ePad’s
folder for diagnostic tools for each ePad type.
For the serial ePad, if you have infrared devices on
the computer (sometimes found in laptops),
disable them prior to installation. You can always
enable these infrared devices after the ePad is
successfully installed.
It may be necessary to disable any serial devices
before installing the ePad Serial version. Like the
IR devices, you can re-enable the serial devices
after the successful installation of the ePad Serial.
More information can be found online by going to:
www.epadsupport.com and clicking on FAQs
(Frequently Asked Questions).
23
ePad Product Family User’s Guide
Care and Maintenance
ePadLink’ Signature ePads are durable and will last for
many years. Proper care and maintenance, however, will
better guarantee the reliability and performance of your
ePad over its lifetime.
The only periodic maintenance your ePadLink ePad
requires is to keep it clean. A dirty pad surface may
interfere with moving your stylus smoothly across the
surface and can make it hard to capture thumb- and
fingerprints.
Maintain the ePadLink’ Signature Pad properly by
following these guidelines:
1. Never leave the pad exposed to the sun for long
periods of time. If you keep the pad locked in a car on a
hot day, leave a window cracked to help with ventilation
and keep the pad in a carrying case or shaded area of the
vehicle.
2. To clean the pad, follow these guidelines:
a. Use any mild liquid household cleaner or rubbing
alcohol.
b. Apply a small amount of cleaner to a soft, non-abrasive
cloth and wipe the pad or sensor.
c. Be sure to wipe all cleaner residue from the device.
d. Allow the alcohol to evaporate normally.
24
ePad Product Family User’s Guide
CAUTION:
a. Do not pour cleaner or alcohol directly onto the device.
Apply the cleaner to a soft cloth first.
b. Do not use De-Natured Alcohol. This will damage the
plastic case.
c. Do not allow liquid to drip inside the unit.
d. Do not scratch the fingerprint sensor surface.
e. Do not expose the device to extreme cold or heat as per
the temperature and humidity specifications.
f. Do not put objects pressing against the signature pad
area when storing the device.
g. Do not use ballpoint pen or other sharp objects. Use only
the supplied stylus. ePad-POS is the only model that is built
to be used with a ballpoint pen.
h. Do not use other power adapters. Use only the power
adapter
module
supplied
with
the
unit.
25
ePad Product Family User’s Guide
Contact Information
Technical Support
If you have any difficulties installing or using your ePad,
please refer to the section of this User’s Guide that relates
to your problem. If you are still unable to resolve the
problem, please call our Product Support team for
assistance.
The toll free number for technical support is
800-520-3464.
Support FAQ available at www.epadlink.com. Technical
support and Live Chat is available Monday through Friday
from 8 a.m. – 5 p.m. Pacific Time.
Support via email: [email protected]
Developer support via email: [email protected]
When contacting support, please have the following
information available:
• Date and place of purchase
• Brand and model of computer
• Software you use with this product
Mailing Address
650 Cochran Street Suite 5
Simi Valley, CA 93065
800-520-3464
Fax: 805-520-0867
Web
www.epadlink.com
26
ePad Product Family User’s Guide
ePad-ink FCC Certification
This device complies with Part 15 of the FCC Rules.
Operation is subject to the following two conditions:
1. This device may not cause harmful interference, and
2. This device must accept any interference received,
including interference that may cause undesired
operation.
This equipment has been tested and found to comply with
the limits for a CLASS B digital device, pursuant to Part
15 of FCC Rules. These limits are designed to provide
reasonable protection against harmful interference when
the equipment is operated in a residential installation.
This equipment generates, uses, and can radiate radio
frequency energy and if not installed and used in
accordance with the instruction guide, may cause harmful
interference to radio communications. However, there is
no guarantee that this radio interference will not occur in
a particular installation. If this equipment does cause
harmful interference to radio or television reception,
which can be determined by turning the equipment on
and off, the user is encouraged to try to correct the
interference by one or more of the following measures:
•
•
•
•
Re-orient or relocate the receiving antenna.
Increase the separation between the equipment and
receiver.
Connect the equipment into an outlet on a circuit
different from that to which the receiver is connected.
Consult the dealer or an experienced radio-TV
technician for help.
27
ePad Product Family User’s Guide
Notice: Any changes or modifications not expressly
approved by the party responsible for compliance could
void the user’s authority to operate the equipment. This
product is equipped with shielded cable. Extension cables,
if used, must be shielded in order to comply with the
emission limits.
CE Conformity
This product has been designed to meet requirements of
CE radiated and conducted emissions, as well as all
related susceptibility standards. Tests confirm this
product meets these requirements.
CB Safety Certification
This product has been tested to
requirements of CB safety standard. *
and
meets
* Only for the products listed as such under “Approvals and certifications” section.
28
the
ePad Product Family User’s Guide
STANDARD END-USER LICENSE AGREEMENT
END USER SOFTWARE LICENSE
This legal document is an agreement (the “Agreement”)
between you, the end-user, and ePadLink. (“ePadLink”).
1.
Grant of License. The software on the accompanying
diskette, CD-ROM or which you have downloaded has been
developed by or licensed by ePadLink (the "Software"). The
Software is licensed, not sold, to you for your use only on
one (1) machine or on a computer file server at a single
location within your internal network for the exclusive
purpose of internal business use in accordance with the
Documentation (as defined below). This license is nonexclusive and ePadLink reserves all rights not expressly
granted to you in this Agreement. This license may be
transferred only in connection with the accompanying
ePadLink product.
2.
License Fee. In consideration of the licenses granted
herein, you must pay the license fee or other consideration
for the Software and the documentation for the Software
(“Documentation”) as set forth in Exhibit A attached hereto.
3.
Ownership of Software. Although you may own the
product in which the Software is originally recorded,
ePadLink retains all right, title and interest in and to the (a)
Software and the Documentation, including all future
enhancements, upgrades, updates and new releases; and
(b) any know-how or any intellectual property contained in
or associated with the foregoing. You acknowledge that the
Software is ePadLink’ property or is duly licensed by
ePadLink from third party developers (“Third Party
Developers”) and contains valuable confidential, unpublished
information developed, acquired or licensed by ePadLink at
29
ePad Product Family User’s Guide
great expense, including data processing algorithms,
innovations and concepts. The Software is protected by
copyright and other federal and state laws. You agree to use
your reasonable best efforts to protect the Software from
unauthorized reproduction, distribution, disclosure, use, or
publication.
4.
Copy Restrictions. You may make one (1) back-up
copy of the Software, provided that such back-up copy is not
installed on or used on any computer. Unauthorized copying
of the Software is expressly forbidden.
5.
Use Restrictions. You may not directly or indirectly (i)
reverse engineer, decompile, disassemble or otherwise
attempt to derive the source code of the Software; (ii)
encumber, time-share, rent or lease or assign the rights
granted by this Agreement; or (iii) adapt, translate, localize,
port or otherwise modify any Software or permit anyone to
engage in similar conduct.
6.
Termination. This License is effective until
terminated. This License will terminate automatically without
notice from ePadLink if you fail to comply with any provisions
of the License. Upon termination of this Agreement, all rights
granted to you under this Agreement shall immediately
terminate and revert to ePadLink and you will cease the use
of the Software.
7.
Warranty
7.1 Ownership. ePadLink represents and warrants that it has
obtained all necessary rights in and to the Software
necessary to grant the rights and licenses to you hereunder.
7.2 Performance. ePadLink represents and warrants that for
90 days from the date of sale of product (the “Warranty
Period”) to end-users consistent with the terms of this
30
ePad Product Family User’s Guide
Agreement, the Software will perform in accordance with the
specifications and documentation therefore, and that the
specifications and documentation accurately reflect the
operation and use of the most current version of the
ePadLink products, including Updates (as hereinafter
defined), provided to you hereunder.
7.3 Warranty Disclaimer.
EXCEPT FOR THE EXPRESS
WARRANTY SET FORTH ABOVE, EPADLINK AND ANY THIRD
PARTY DEVELOPERS MAKE NO OTHER WARRANTIES
RELATING TO THE PRODUCTS, EXPRESS, STATUTORY OR
IMPLIED, AND EXPRESSLY DISCLAIMS ANY WARRANTY,
INCLUDING, WITHOUT LIMITATION, NON-INFRINGEMENT,
FITNESS
FOR
A
PARTICULAR
PURPOSE
OR
MERCHANTABILITY EVEN IF EPADLINK HAS BEEN
INFORMED OF SUCH PURPOSE.
8.
Software Maintenance, Development and Support.
a.
Maintenance. In the event of the discovery of any
material failure of the Software to comply with the warranty
of Section 7.2, above, ePadLink’ sole liability and your sole
remedy shall be, at ePadLink’ Option, either: (i) return the
License Fee; or (ii) repair or replacement of the Software;
provided, however that ePadLink received written notice of
such failure within the Warranty Period.
b.
Upgrades, Bug Fixes and New Releases. ePadLink
shall make available to you updates, upgrades, bug fixes and
new versions of the ePadLink Software (collectively,
"Updates") which ePadLink generally releases to its
customers from time to time.
9.
Indemnification.
a.
Infringement Indemnification by ePadLink. ePadLink
shall indemnify, defend and hold you harmless from any
31
ePad Product Family User’s Guide
claims, demands, liabilities, losses, damages, judgments,
and all costs and expenses related thereto (including
reasonable attorneys' fees), to the extent resulting from any
claim that the Software, or any portion thereof, or your use
thereof, infringe or violate any copyright, patent, trade
secret, license, or other proprietary right of a third party. In
the event that the Software or any portion thereof is held to
constitute an infringement and its use is enjoined, ePadLink
shall have the obligation to, at its expense, (i) modify the
infringing portion of the Software without impairing in any
material respect the functionality or performance, so that it
is non-infringing, (ii) procure for you at ePadLink’ expense
the right to continue to use the infringing Software or (iii)
replace the Software or portions thereof with equally
suitable, non-infringing software. ePadLink shall have no
liability for any claim of infringement based on (i) use or
combination of any portion of the Software with any products
or software not supplied by ePadLink, if such infringement
would not have occurred without such use or combination,
(ii) use of the Software by you, after having received notice
from ePadLink that the Software infringes the proprietary
rights of a third party, and ePadLink has performed one of
the options in the preceding paragraph, or (iii) use of other
than the latest unmodified version of the Software provided
to you by ePadLink, if the infringement would have been
avoided by the use of such version.
b.
Indemnification
Procedures.
The
indemnification obligation of ePadLink under Section 9a is
conditioned upon the following: (i) you shall promptly notify
ePadLink in writing of any claim of infringement by any third
party; (ii) your giving ePadLink sole control over the defense
and settlement of such third party claim; (iii) you, to the
extent reasonable, cooperating with ePadLink in the defense
or settlement of such third party claim. Your failure to
promptly give notice shall affect ePadLink’ obligation to
32
ePad Product Family User’s Guide
indemnify you only to the extent ePadLink’ rights are
materially prejudiced by such failure.
c.
Indemnification of ePadLink. Except for the
foregoing infringement claims, you shall indemnify and hold
harmless ePadLink and any Third Party Developers, their
directors, shareholders, officers, agents and employees
harmless from and against any claims, demands or causes of
action whatsoever, including without limitation those arising
on account of your modification or enhancement of the
Software or otherwise caused by, or arising out of, or
resulting from, the exercise or practice of the license granted
hereunder.
10.
Limitation of Liability.
a.
Consequential
Damages
Waiver.
YOU
ACKNOWLEDGE AND AGREE THAT THE CONSIDERATION
WHICH EPADLINK IS CHARGING HEREUNDER DOES NOT
INCLUDE ANY CONSIDERATION FOR ASSUMPTION BY
EPADLINK OF THE RISK OF YOUR CONSEQUENTIAL OR
INCIDENTAL DAMAGES WHICH MAY ARISE IN CONNECTION
WITH
YOUR
USE
OF
THE
SOFTWARE
AND
DOCUMENTATION. ACCORDINGLY, EPADLINK AND ANY
THIRD PARTY DEVELOPERS SHALL NOT BE LIABLE FOR ANY
LOSS OF USE, INTERRUPTION OF BUSINESS, OR ANY
SPECIAL, INCIDENTAL, EXEMPLARY OR CONSEQUENTIAL
DAMAGES OF ANY KIND (INCLUDING LOST PROFITS)
REGARDLESS OF THE FORM OF ACTION WHETHER IN
CONTRACT, TORT (INCLUDING NEGLIGENCE), STRICT
PRODUCT LIABILITY OR OTHERWISE, EVEN IF IT HAS BEEN
ADVISED OF THE POSSIBILITY OF SUCH DAMAGES.
b.
Limitation
of
Liability.
SUBJECT
TO
THE
INFRINGEMENT INDEMNIFICATION PROVIDED FOR IN
SECTION 9a OF THIS AGREEMENT, EPADLINK' AND ANY
THIRD PARTY DEVELOPER’S AGGREGATE LIABILITY TO YOU
33
ePad Product Family User’s Guide
UNDER ANY CLAIMS ARISING OUT OF THIS AGREEMENT
SHALL NOT EXCEED THE LICENSE FEES PAID TO EPADLINK
PURSUANT TO THIS AGREEMENT.
11.
Software License Agreement (Europe, Africa And
Middle East) Important Notice To Customers. This product
contains copyrighted computer programs, which are the
inalienable intellectual property of ePadLink. This software is
both integrated within the product and also contained on the
accompanying data carrier. The purchase of this product
from your dealer does not include ePadLink’ Software or any
associated rights of usage. ePadLink grants you, the user,
the right to use the software solely in accordance with the
conditions of this Agreement. By purchasing this product you
agree to the terms of this license.
12.
Third Party Beneficiaries.
This Agreement is an
agreement made expressly for the benefit of any Third Party
Developers and any Third Party Developers shall be third
party beneficiaries to this Agreement. It is the express
intent of ePadLink and you, that each of you intends to
benefit such Third Party Developers by this Agreement to
enable such Third Party Developers to enforce the provisions
of this Agreement. In their enforcement of the provisions of
this Agreement, the Third Party Developers shall be entitled
to all rights, protections and remedies of ePadLink under this
Agreement.
13.
Miscellaneous. This License is governed by the laws
of the United States of America and the State of California.
Your rights and obligations under this Agreement may not be
assigned or assumed without the written consent of
ePadLink. If any of the provisions of this Agreement are
determined to be invalid, illegal, or unenforceable, such
provisions shall be modified to the minimum extent
necessary to make such provisions enforceable, and the
validity, legality, and enforceability of the remaining
34
ePad Product Family User’s Guide
provisions of this Agreement shall continue in full force and
effect. This Agreement shall be binding on, and shall inure to
the benefit of, the parties to it and their respective heirs,
legal representatives, and successors. No supplement,
modification, or amendment of this Agreement shall be
binding unless executed in writing by all the parties. This
Agreement and the other documents to be executed to
implement its provisions together constitute the entire
agreement between the parties pertaining to the subject
matter contained in them. No supplement, modification, or
amendment of this Agreement shall be binding unless
executed in writing by all the parties. Should any litigation or
arbitration be commenced between the parties concerning
the rights or obligations of the parties under this Agreement,
the party prevailing in such litigation or arbitration shall be
entitled, in addition to such other relief as may be granted,
to a reasonable sum as and for its attorneys’ fees in such
litigation or arbitration. This amount shall be determined by
the court in such litigation or arbitration or in a separate
action brought for that purpose.
35
ePad Product Family User’s Guide
THIS PAGE LEFT BLANK ON PURPOSE
36
ePad Product Family User’s Guide
INTEGRISIGN™
DESKTOP
U S E R
M A N U A L
C A P T U R E / B I N D
V E R S I O N
37
ePad Product Family User’s Guide
P A R T
I I
IntegriSign Desktop User Manual
Copyright
This manual is copyright ePadLink, with all rights
reserved. This manual may not be reproduced in any
form without prior written permission from ePadLink.
Disclaimer
The instructions and descriptions contained in this manual
were accurate for IntegriSign Desktop at the time of
publication. IntegriSign Desktop product contents, however,
are subject to change without notice. Therefore, ePadLink
assumes no liability for damage incurred directly or indirectly
from errors, omissions or discrepancies between the product
and the manual.
Trademarks
Windows is a trademark and MS and MS-DOS and
Microsoft are registered trademarks of Microsoft
Corporation. MS-Office, MS-Word and MS-Excel are
registered trademarks of Microsoft Corporation. All other
brands and product names are trademarks or registered
trademarks of their respective companies.
38
ePad Product Family User’s Guide
1. Welcome
Welcome to IntegriSign Desktop Electronic Signature
Authentication Software. IntegriSign Desktop is easy to use,
reliable and secure. This User Manual is intended to provide
you all the information you need to install and use this
product.
2. Where to find information
Whether you are new to IntegriSign Desktop or an
experienced user, the following resources can help you get
the most out of IntegriSign Desktop.
2.1 IntegriSign Desktop Help
IntegriSign Desktop Help is your principal source of
information about this product. It is always available by
way of IntegriSign Desktop Preferences Help. Pressing F1
in any of the screens in the IntegriSign Desktop
Preferences brings up the related IntegriSign Desktop
Help topic. Help describes how to perform a wide variety
of tasks related to the use of IntegriSign Desktop.
To open IntegriSign Desktop Help:
• Click the Start button, and click on Programs.
• Click the IntegriSign Desktop and log in.
• Click on the IntegriSign Desktop Help options and
the Help window appears.
Each tab helps you to locate information in a different
way. Use the Contents tab to locate topics, the Index tab
to lookup key words, and the Search tab to search for
text.
39
ePad Product Family User’s Guide
3. Installing/Uninstalling IntegriSign Desktop
Each IntegriSign Desktop Software package includes:
• IntegriSign Desktop Software
• IntegriSign Desktop User Manual (normally,
electronic copy)
If either of these items is missing, please contact
EPadLink.
3.1 Before you begin
•
•
•
•
IntegriSign Desktop runs on 32-bit Windows
operating system, i.e. Windows 98/2000/XP or
Win-NT 4.0 (Build 1381 with Service Pack 4 or
higher).
Your system should have a minimum of 20 MB free
space on the hard drive, in addition to the free
space requirements for Windows.
Before installing a new version of IntegriSign
Desktop, uninstall any older versions of IntegriSign
Desktop on your machine.
Close all the applications running on Windows.
3.2 Installing the ePad device
Refer to the ePad Product Family User’s Guide section for
instructions on installing the device. Check if your
computer recognizes the ePad.
40
ePad Product Family User’s Guide
3.3 Running IntegriSign Desktop Setup
The steps 1 & 2 below are specific to the IntegriSign
Desktop setup from a CD. If you have downloaded the
IntegriSign Desktop software from the Internet, please
check the notes associated with the download &
installation instructions.
1. The Auto Run program on the CD automatically
launches a menu screen, which lists installing
IntegriSign Desktop as one option.
2. In case the Setup does not start automatically, go
to the ‘IntegriSignDesktop’ folder on the CD
drive and double click on the file named
‘setup.exe’. Setup may also be started from the
‘Run’ option of the ‘Start’ menu by typing
“E:\IntegriSignDesktop\Setup.exe” (where E
is CD drive designation)
3. After completion of the installation, you will be
asked to restart the computer. Click ‘OK’ and restart the computer to enable proper registration of
the IntegriSign Desktop components.
41
ePad Product Family User’s Guide
3.4 Known Installation issues
•
•
•
To successfully install IntegriSign Desktop on Win
NT (4.0 and later), the system should be upgraded
with Win NT service pack 4 or later.
For MS Office: If MS Office is not loaded properly,
some files may not be installed properly. To rectify
this, load MS office properly, and then repair
IntegriSign Desktop by choosing the Repair option
in the IntegriSign Desktop installation.
If any other problem arises, please contact
EPadLink.
3.5 Uninstalling IntegriSign Desktop
To uninstall IntegriSign Desktop:
• Go to Start > Settings > Control Panel >
Add/Remove programs.
• You will find IntegriSign Desktop listed, select
IntegriSign Desktop and follow the instructions to
uninstall the software.
Signatures that have been placed into documents are not
removed.
Note: Deleting the IntegriSign Desktop folder directly will
not uninstall the software completely.
42
ePad Product Family User’s Guide
4. Preferences
The IntegriSign Desktop Preferences window can be invoked
from Start > Programs > IntegriSign Desktop > Preferences
Manager or by clicking ‘Preferences’ button from the sign pad
window. IntegriSign Desktop Preferences facilitates creation
of profiles using the ‘Create’ button.
43
ePad Product Family User’s Guide
The ‘Pen Color’ set is reflected only for the profile for which it
is set. You also can set the details (like Name, Date, Location
etc.) that can be shown along with the signature.
4.1 IntegriSign Desktop - Configuration
Pen Color and details to be displayed along with signature
like Date, Logo etc. can be preset before creating a profile in
IntegriSign Desktop - Desktop Configuration window. Start >
Programs > IntegriSign Desktop > Desktop Configuration.
Size of the signature placeholder can be preset using the
Custom Signature Size setting option from IntegriSign
Desktop - Desktop Configuration. Default signature
placeholder size is Width – 170 and Height – 110.
The ‘Auto select Signer Name from list’ option selects the
Signer Name automatically in the signing window when
checked. Required Information lets you make Signer Name,
Comments and Location fields mandatory.
44
ePad Product Family User’s Guide
4.2 Creating User Profile
User profiles can be created using ‘Create’ option available in
the IntegriSign Desktop Preferences window. Enter details
like Signer Name, Organization unit, Organization name, email etc. Only Signer Name field is mandatory.
4.2.1 Public Signing
In Public Signing (e.g. customer signing) signer can just
enter name in the Signer Name field and start signing using
an ePad device. The ‘Auto select Signer Name from list’
45
ePad Product Family User’s Guide
option in Desktop Configuration has to be unchecked for
public signing in case a profile already exists.
4.3 Setting other Preferences
Other IntegriSign Desktop preferences include signature
appearance and ‘Show with Signature’. You can select
signature details like Name, Date, Logo, etc. to be displayed
below the signature in a signed document, simply by
checking the respective boxes.
5. IntegriSign Desktop Plug-ins
The core utility of IntegriSign Desktop is to facilitate signing
of electronic documents for authentication.
IntegriSign
Desktop plug-ins are the add-on software modules installed
as part of the IntegriSign Desktop software installation. The
applications include MS Word, MS Excel, MS Outlook, and
Adobe Acrobat. The User documentation for IntegriSign
Desktop Plug-ins can be found in the IntegriSign Desktop
program group (Click on Start > Programs > IntegriSign
Desktop > Documentation.)
The reasons for using the IntegriSign Desktop plug-in in an
application are:
•
•
•
Facilitate signing of the document with your
personalized handwritten signature.
To protect the integrity of the document after
signing it.
Establish ‘who’ signed the document, along with
the place, date and time.
46
ePad Product Family User’s Guide
5.1 Overview
An IntegriSign Desktop plug-in allows you to create a
document and sign it electronically with your handwritten
signature using ePad device. The plug-in facilitates:
•
•
•
Signature Capture - The signature trace is
captured and stored on the electronic document in
a signature object.
Content Hashing - The signature object is bound
to the contents of the document such that any
alteration of the document after signing it would
render the signature invalid. Since the signature
object has been encrypted and bound to the
document, it is not possible to cut/copy and paste
this signature onto a different document.
Document Verification – The document can be
verified to ensure its integrity (i.e., confirming that
it has not been tampered) after the act of signing.
47
ePad Product Family User’s Guide
THIS PAGE LEFT BLANK ON PURPOSE
48
ePad Product Family User’s Guide
49
ePad Product Family User’s Guide
DO NOT PRINT THIS PAGE
This page is for document control purposes and to
provide printing instructions only.
Printing Instructions
Format: Book-bound style, two staples in the middle
Color: Color
Paper: 20+ weight, Laser paper (light gloss)
Special instructions
This manual uses a special page size in order to fit inside an
ePad product box (5.5w x 7.75h inches). Since this manual
will be a book-style manual it should be printed on 8.5 x 11
inch paper, which will then be folded in half. In order to
make the resulting folded paper the correct length, the edges
must be cut, lengthwise (top and bottom) to the required
size: 5.5”W x 7.75”H.
DO NOT PRINT THIS PAGE
50