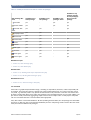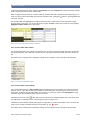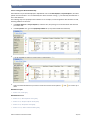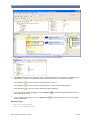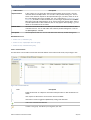
1
Visual Rules Suite - Modeler
Modeling Guide
Version 5.4
Bosch Software Innovations
Americas:
Bosch Software Innovations Corp.
161 N. Clark Street
Suite 3500
Chicago, Illinois 60601/USA
Tel. +1 312 368-2500
[email protected]
www.bosch-si.com
Asia:
Bosch Software Innovations
c/o Robert Bosch (SEA) Pte Ltd
11 Bishan Street 21
Singapore 573943
Tel. +65 6571 2220
[email protected]
www.bosch-si.com
Europe:
Bosch Software Innovations GmbH
Ziegelei 7
88090 Immenstaad/GERMANY
Tel. +49 7545 202-300
[email protected]
www.bosch-si.de
Modeling Guide: Version 5.4
Visual Rules Modeling Guide, Version 5.4
Copyright © 2004-2012 Bosch Software Innovations GmbH
© Bosch Software Innovations GmbH, 2004-2012. All rights reserved. Dissemination or reproduction of this publication or any
part of it for any purpose or in any form whatsoever is not permitted without the prior express written consent of Bosch Software
Innovations GmbH. Information contained in this publication may be subject to revision without advance notice. MLDS, Visual
Rules and Work Frame Relations are registered trademarks of Bosch Software Innovations GmbH. BOSCH and the symbol are
registered trademarks of Robert Bosch GmbH, Germany. Some of the product and company names used in this document are
trademarks and/or registered trademarks. They are used explicitly for reference purposes and are, independent of marking, property of their respective owners.
Modeling Guide
Table of Contents
1. Overview ................................................................................................................ 1
1.1. Organization of this Manual ........................................................................................................ 1
1.2. Support ................................................................................................................................... 1
1.3. Using the Visual Rules Online Help .............................................................................................. 1
1.3.1. Searching ............................................................................................................................. 2
1.3.2. Synchronizing ........................................................................................................................ 2
2. Getting Started ..................................................................................................... 3
2.1. Learning the Basics ................................................................................................................... 3
2.1.1. Layout of Visual Rules Modeler ................................................................................................. 3
2.1.2. Modeling Rules ...................................................................................................................... 4
2.2. Tutorial 1: Modeling Your First Simple Rule .................................................................................... 6
2.2.1. Task 1: Create a New Rule Project ............................................................................................ 6
2.2.2. Task 2: Create a New Flow Rule ............................................................................................... 7
2.2.3. Task 3: Draft Your First Flow Rule ............................................................................................. 8
2.2.3.1. Describing the Rule .............................................................................................................. 8
2.2.3.2. Adding a new Decision ......................................................................................................... 8
2.2.3.3. Adding a new Decision Condition ............................................................................................ 9
2.2.3.4. Adding a new Assignment .................................................................................................... 10
2.2.3.5. Adding a new Action ........................................................................................................... 12
2.2.4. Task 4: Finalize Your First Flow Rule ........................................................................................ 13
2.2.4.1. Enabling the Content .......................................................................................................... 13
2.2.4.2. Create new data elements ................................................................................................... 14
2.2.4.3. Edit Rule Elements ............................................................................................................. 15
2.2.4.4. Create a new Action ........................................................................................................... 17
2.2.4.5. Conclusion ........................................................................................................................ 17
2.3. Tutorial 2: Testing Your First Rule ............................................................................................... 18
2.3.1. Task 1: Create a Rule Test ..................................................................................................... 19
2.3.2. Task 2: Define Input Data for the Test Case ............................................................................... 20
2.3.3. Task 3: Define Expected Results for the Test Case ...................................................................... 20
2.3.4. Task 4: Specify a Second Test Case ........................................................................................ 21
2.3.5. Task 5: Execute the Rule ....................................................................................................... 22
2.3.6. Task 6: Inspect the Results of the Test Cases ............................................................................ 23
2.3.7. Task 7: Show Statistics of Tests .............................................................................................. 23
3. Concepts ............................................................................................................. 25
3.1. Rule Project ........................................................................................................................... 25
3.2. Rule Model ............................................................................................................................ 25
3.3. Rule Package ......................................................................................................................... 26
3.3.1. Rule Package Reuse ............................................................................................................. 28
© Bosch Software Innovations GmbH
iii/270
Modeling Guide
3.4. Flow Rule .............................................................................................................................. 29
3.4.1. Flow Rule Template .............................................................................................................. 30
3.5. Flow Rule Element .................................................................................................................. 31
3.5.1. Decision .............................................................................................................................. 33
3.5.1.1. Simple decision .................................................................................................................. 33
3.5.1.2. Multiple condition decisions .................................................................................................. 33
3.5.1.3. Common Condition Prefix .................................................................................................... 35
3.5.2. Assignments ........................................................................................................................ 35
3.5.2.1. ADD, REMOVE and CLEAR Assignments ............................................................................... 36
3.5.3. Fire Action ........................................................................................................................... 37
3.5.4. Call Flow Rule ..................................................................................................................... 38
3.5.5. Call Decision Table ............................................................................................................... 39
3.5.6. Call Service ......................................................................................................................... 40
3.5.7. Done & Return ..................................................................................................................... 40
3.5.8. Repeat ................................................................................................................................ 40
3.5.9. End Repeat ......................................................................................................................... 42
3.5.10. Return Exception ................................................................................................................ 42
3.5.11. Handle Exception ................................................................................................................ 43
3.5.12. Branch Description .............................................................................................................. 44
3.5.13. Notes ................................................................................................................................ 44
3.5.14. Rule Element Deactivation .................................................................................................... 45
3.6. Flow Rule Editor ..................................................................................................................... 45
3.6.1. Rule Editor Palette ................................................................................................................ 46
3.6.2. Rule Context Palette ............................................................................................................. 47
3.7. Decision Table ........................................................................................................................ 48
3.7.1. Condition Column/Row .......................................................................................................... 49
3.7.2. Assignment Column .............................................................................................................. 49
3.7.3. Action Column ...................................................................................................................... 49
3.7.4. Exception Column ................................................................................................................. 50
3.8. Decision Table Editor ............................................................................................................... 50
3.8.1. Decision Table Editor Palette .................................................................................................. 51
3.8.2. Decision Table Context Palette ................................................................................................ 51
3.9. State Flow ............................................................................................................................. 52
3.10. State Flow Element ................................................................................................................ 53
3.10.1. State ................................................................................................................................. 53
3.10.2. End State .......................................................................................................................... 53
3.10.3. Transition ........................................................................................................................... 53
3.10.4. Transition Rule ................................................................................................................... 53
3.10.5. Transition Target ................................................................................................................. 54
3.11. State Flow Editor ................................................................................................................... 54
3.11.1. State Flow Editor Palette ...................................................................................................... 54
© Bosch Software Innovations GmbH
iv/270
Modeling Guide
3.11.2. State Flow Context Palette .................................................................................................... 55
3.12. Expressions .......................................................................................................................... 55
3.12.1. Arithmetic Operators ............................................................................................................ 56
3.12.2. String Concatenation Operator & ............................................................................................ 57
3.12.3. Embedded Expressions in a String ......................................................................................... 57
3.12.4. Comparison Operators ......................................................................................................... 57
3.12.5. Logical Operators AND, OR, NOT ............................................................................................... 57
3.12.6. BETWEEN Operator ................................................................................................................. 58
3.12.7. Calling Functions ................................................................................................................ 58
3.12.8. Accessing Attributes ............................................................................................................ 58
3.12.9. Accessing List Elements ....................................................................................................... 59
3.12.10. NULL ................................................................................................................................ 59
3.12.11. IN Operator ...................................................................................................................... 60
3.12.12. AVAILABLE Operator ............................................................................................................ 60
3.12.13. NAMEOF Operator ................................................................................................................ 60
3.12.14. Collection Operators .......................................................................................................... 60
3.12.15. Collection Functions ........................................................................................................... 61
3.12.15.1. Sorting of Collections ....................................................................................................... 62
3.12.15.2. Searching Collections ...................................................................................................... 63
3.12.15.3. Searching for maximums and minimums .............................................................................. 63
3.12.15.4. Filtering Collections ......................................................................................................... 64
3.12.15.5. Converting Collections ..................................................................................................... 64
3.12.15.6. Ranking functions ........................................................................................................... 64
3.12.16. Map Operators .................................................................................................................. 64
3.12.17. Map Functions .................................................................................................................. 65
3.12.18. new Operator ..................................................................................................................... 65
3.12.19. isA and asA Operators ........................................................................................................ 66
3.12.20. Operator Precedence ......................................................................................................... 66
3.13. Data .................................................................................................................................... 67
3.13.1. Common Data Properties ..................................................................................................... 68
3.13.2. Input/Output Data ................................................................................................................ 69
3.13.3. Internal Data ...................................................................................................................... 69
3.13.4. Constant Data .................................................................................................................... 70
3.14. Data Type ............................................................................................................................ 71
3.14.1. Basic Data Type ................................................................................................................. 71
3.14.1.1. Any ................................................................................................................................ 72
3.14.1.2. String ............................................................................................................................. 72
3.14.1.3. Boolean .......................................................................................................................... 73
3.14.1.4. Date ............................................................................................................................... 73
3.14.1.5. Time ............................................................................................................................... 73
3.14.1.6. Timestamp ...................................................................................................................... 73
© Bosch Software Innovations GmbH
v/270
Modeling Guide
3.14.2. Type Alias ......................................................................................................................... 74
3.14.3. Structure ........................................................................................................................... 74
3.14.4. Super Types ....................................................................................................................... 75
3.14.5. Enumeration ....................................................................................................................... 76
3.14.6. Exception .......................................................................................................................... 76
3.14.7. Collection .......................................................................................................................... 76
3.14.8. Map .................................................................................................................................. 78
3.15. Description and Note .............................................................................................................. 78
3.16. Action .................................................................................................................................. 79
3.16.1. Action Settings ................................................................................................................... 80
3.17. Action Type .......................................................................................................................... 80
3.18. Function ............................................................................................................................... 81
3.19. Service ................................................................................................................................ 81
3.20. Service Type ........................................................................................................................ 82
3.21. Auto Creation ........................................................................................................................ 82
3.22. Rule Testing ......................................................................................................................... 82
3.22.1. Rule Test ........................................................................................................................... 83
3.22.2. Rule Test Editor .................................................................................................................. 83
3.22.3. Statistics ............................................................................................................................ 84
3.22.4. Test Suite .......................................................................................................................... 86
3.22.5. Test Suite Editor ................................................................................................................. 86
3.23. Rule Debugging .................................................................................................................... 87
3.23.1. Debugger .......................................................................................................................... 87
3.23.2. Breakpoint ......................................................................................................................... 88
4. Tasks .................................................................................................................... 89
4.1. Working with Rule Projects ....................................................................................................... 89
4.1.1. Creating a new Rule Project ................................................................................................... 89
4.1.2. Setting Rule Project Identifiers (Group Id, Artifact Id, Version) ........................................................ 89
4.1.3. Defining Rule Project Dependencies ......................................................................................... 90
4.1.4. Analyzing Rule Projects ......................................................................................................... 92
4.1.4.1. Visualizing Dependencies between the Elements within a Rule Project .......................................... 92
4.1.4.2. Visualizing the Usage of Elements within a Rule Project ............................................................ 93
4.2. Working with Rule Models ........................................................................................................ 93
4.2.1. Creating a new Rule Model .................................................................................................... 93
4.2.2. Opening a Rule Model ........................................................................................................... 94
4.2.3. Saving Changes in Rule Models .............................................................................................. 95
4.2.4. Creating a new Rule Package ................................................................................................. 95
4.2.5. Deleting a Rule Package ........................................................................................................ 96
4.2.6. Renaming a Rule Package ..................................................................................................... 96
4.2.7. Moving a Rule Package ......................................................................................................... 97
4.2.8. Creating a new Flow Rule ...................................................................................................... 97
© Bosch Software Innovations GmbH
vi/270
Modeling Guide
4.2.9. Deleting a Rule .................................................................................................................... 98
4.2.10. Renaming a Rule ................................................................................................................ 98
4.2.11. Finding a Rule .................................................................................................................... 98
4.2.12. Copying a Rule ................................................................................................................... 99
4.2.13. Moving a Rule .................................................................................................................... 99
4.2.14. Creating a new State Flow .................................................................................................... 99
4.2.15. Deleting a State Flow ......................................................................................................... 100
4.2.16. Renaming a State Flow ...................................................................................................... 100
4.2.17. Copying a State Flow ......................................................................................................... 101
4.2.18. Moving a State Flow .......................................................................................................... 101
4.2.19. Reusing Rule Packages ...................................................................................................... 101
4.2.19.1. Manually selecting Rule Packages to be reused .................................................................... 102
4.2.19.2. Executing an automatic Organization of Package Reuse (on Package Level) ............................... 102
4.2.19.3. Executing an automatic Organization of Package Reuse (on Rule Level) .................................... 102
4.2.20. Editing Descriptions ........................................................................................................... 103
4.2.21. Editing Notes .................................................................................................................... 103
4.2.22. Undoing Changes .............................................................................................................. 103
4.3. Working with Flow Rules ......................................................................................................... 103
4.3.1. Opening the Flow Rule Editor ................................................................................................ 103
4.3.2. Saving Changes ................................................................................................................. 104
4.3.3. Navigating in the Flow Rule Editor .......................................................................................... 104
4.3.3.1. Keyboard Navigation ......................................................................................................... 104
4.3.3.2. Scrolling .......................................................................................................................... 105
4.3.3.3. Zooming ......................................................................................................................... 105
4.3.3.4. Collapsing/Expanding Branches ........................................................................................... 105
4.3.4. Configuring the Appearance and Capabilities of the Flow Rule Editor ............................................. 105
4.3.5. Extracting a branch of a Flow Rule as a new Flow Rule .............................................................. 106
4.3.6. Extracting a branch of a Flow Rule as a new Decision Table ........................................................ 107
4.3.7. Adding New Flow Rule Elements ........................................................................................... 108
4.3.8. Editing Descriptions of Flow Rule Elements .............................................................................. 109
4.3.9. Collapsing Branches ............................................................................................................ 109
4.3.10. Editing a Decision Element .................................................................................................. 110
4.3.10.1. Editing a Decision Condition ............................................................................................. 110
4.3.10.2. Adding a Condition to a Decision ....................................................................................... 110
4.3.10.3. Deleting a Condition from a Decision .................................................................................. 111
4.3.10.4. Reordering Conditions in a Decision ................................................................................... 111
4.3.10.5. Editing the Common Condition Prefix .................................................................................. 111
4.3.11. Editing an Assignment Element ............................................................................................ 112
4.3.11.1. Editing an Assignment ..................................................................................................... 112
4.3.11.2. Adding an Assignment to an Assignment Element ................................................................. 113
4.3.11.3. Deleting an Assignment from an Assignment Element ............................................................ 114
© Bosch Software Innovations GmbH
vii/270
Modeling Guide
4.3.11.4. Reordering the Assignments in an Assignment Element .......................................................... 114
4.3.12. Editing a Fire Action Element ............................................................................................... 114
4.3.13. Editing a Repeat Element ................................................................................................... 115
4.3.14. Editing an End Repeat Element ........................................................................................... 115
4.3.15. Editing a Call Flow Rule Element ......................................................................................... 115
4.3.16. Editing a Call Decision Table Element ................................................................................... 116
4.3.17. Editing a Call Service Element ............................................................................................. 117
4.3.18. Editing a Return Exception Element ...................................................................................... 118
4.3.19. Editing a Handle Exception Element ...................................................................................... 119
4.3.20. Copying or Moving a Branch of a Flow Rule ........................................................................... 119
4.3.21. Copying or Moving a Single Rule Element .............................................................................. 120
4.3.22. Deleting a Branch of a Flow Rule ......................................................................................... 120
4.3.23. Deleting a Single Rule Element ............................................................................................ 120
4.3.24. Deleting Multiple Rule Elements ........................................................................................... 120
4.3.25. Adding a Branch Description ............................................................................................... 121
4.3.26. Deleting a Branch Description .............................................................................................. 121
4.3.27. Adding a Note .................................................................................................................. 121
4.3.28. Deleting a Note ................................................................................................................. 121
4.3.29. Activating/Deactivating a Rule Element .................................................................................. 122
4.3.30. Navigating to a Specific Rule Element ................................................................................... 122
4.3.31. Undoing Changes .............................................................................................................. 122
4.3.32. Displaying Statistics ........................................................................................................... 122
4.3.33. Displaying Externally Generated Statistics .............................................................................. 123
4.3.34. Changing Flow Rule Editor Preferences ................................................................................. 124
4.3.35. Exporting a Rule as an Image ............................................................................................. 124
4.4. Working with Decision Tables ................................................................................................... 125
4.4.1. Opening the Decision Table Editor .......................................................................................... 125
4.4.2. Adding a new Decision Column or Row ................................................................................... 125
4.4.3. Editing Conditions ............................................................................................................... 126
4.4.4. Adding a new Condition ....................................................................................................... 127
4.4.5. Adding an Else Condition ..................................................................................................... 127
4.4.6. Adding a new Assignment Column ......................................................................................... 128
4.4.7. Editing an Assignment ......................................................................................................... 129
4.4.8. Rearranging Condition Columns or Rows ................................................................................. 129
4.4.9. Describing Decision Table Elements ....................................................................................... 130
4.4.10. Navigating in Decision Tables .............................................................................................. 130
4.4.11. Configuring the Appearance of the Decision Table Editor ........................................................... 130
4.4.12. Adding a new Action Column ............................................................................................... 131
4.4.13. Editing an Action Column .................................................................................................... 132
4.4.14. Adding a new Exception Column .......................................................................................... 132
4.4.15. Editing Exception Columns .................................................................................................. 133
© Bosch Software Innovations GmbH
viii/270
Modeling Guide
4.4.16. Rearranging Assignment/Action/Exception Columns ................................................................. 133
4.4.17. Importing an Excel Sheet as a Decision Table ......................................................................... 133
4.4.18. Converting a Decision Table into a Flow Rule ......................................................................... 135
4.5. Working with State Flows ........................................................................................................ 136
4.5.1. Opening the State Flow Editor ............................................................................................... 136
4.5.2. Configuring the Appearance and Capabilities of the State Flow Editor ............................................ 136
4.5.3. Saving Changes ................................................................................................................. 137
4.5.4. Adding New States .............................................................................................................. 137
4.5.5. Creating Transitions ............................................................................................................. 137
4.5.6. Editing Descriptions of State Flow Elements ............................................................................. 138
4.5.7. Editing a Transition Rule ...................................................................................................... 138
4.5.8. Copying or Moving a State Flow Element ................................................................................ 138
4.5.9. Changing the Size of a State Flow Element ............................................................................. 139
4.5.10. Deleting a State Flow Element ............................................................................................. 139
4.5.11. Adding a Note ................................................................................................................... 139
4.5.12. Deleting a Note ................................................................................................................. 140
4.5.13. Undoing Changes .............................................................................................................. 140
4.6. Working with Data ................................................................................................................. 140
4.6.1. Defining Input/Output Data Elements ...................................................................................... 140
4.6.2. Defining Internal Data Elements ............................................................................................. 141
4.6.3. Defining Constant Data Elements ........................................................................................... 142
4.6.4. Importing a CSV file as a Constant Data Element ...................................................................... 142
4.6.5. Specifying the Data Type of a Data Element ............................................................................ 144
4.6.6. Specifying the Default Value of a Data Element ........................................................................ 145
4.6.7. Deleting Data Elements ........................................................................................................ 145
4.6.8. Copying Data Elements ........................................................................................................ 145
4.6.9. Convert Data Elements ........................................................................................................ 145
4.6.10. Moving Data Elements ....................................................................................................... 146
4.6.11. Sorting Data Elements Manually ........................................................................................... 147
4.6.12. Renaming Data Elements ................................................................................................... 148
4.6.13. Displaying Data Types ........................................................................................................ 148
4.6.14. Creating Groups ................................................................................................................ 149
4.6.15. Deleting Groups ................................................................................................................ 149
4.6.16. Editing Descriptions ........................................................................................................... 149
4.6.17. Editing Notes .................................................................................................................... 150
4.7. Working with Data Types ........................................................................................................ 150
4.7.1. Defining Structures .............................................................................................................. 150
4.7.2. Defining Attributes of a Structure ............................................................................................ 151
4.7.3. Defining Constants of a Structure ........................................................................................... 151
4.7.4. Defining Super Types of a Structure ....................................................................................... 152
4.7.5. Defining Type Aliases .......................................................................................................... 152
© Bosch Software Innovations GmbH
ix/270
Modeling Guide
4.7.6. Defining Enumerations ......................................................................................................... 152
4.7.7. Defining Literals of an Enumeration ........................................................................................ 153
4.7.8. Defining Exceptions ............................................................................................................. 153
4.8. Working with Actions .............................................................................................................. 154
4.8.1. Defining Actions .................................................................................................................. 154
4.8.2. Specify an Action Type for an Action ...................................................................................... 155
4.9. Working with Services ............................................................................................................ 156
4.9.1. Defining Services ................................................................................................................ 156
4.9.2. Specify a Service Type for a Service ...................................................................................... 157
4.10. Working with Expressions ...................................................................................................... 157
4.10.1. Using the Code Assist ........................................................................................................ 157
4.10.2. Hyperlinking ...................................................................................................................... 159
4.10.3. Working with Auto Creation ................................................................................................. 159
4.11. Testing Rules ...................................................................................................................... 160
4.11.1. Creating a Rule Test .......................................................................................................... 161
4.11.2. Opening a Rule Test .......................................................................................................... 161
4.11.3. Finding a Rule Test ............................................................................................................ 162
4.11.4. Copying a Test .................................................................................................................. 162
4.11.5. Moving a Test from one Rule to another ................................................................................. 163
4.11.6. Adding Test Cases ............................................................................................................. 163
4.11.7. Importing Test Cases .......................................................................................................... 164
4.11.8. Entering Test Data ............................................................................................................. 164
4.11.9. Copying and pasting values ................................................................................................. 164
4.11.10. Enabling/Disabling Test Cases ............................................................................................ 165
4.11.11. Duplicating Test Cases ...................................................................................................... 165
4.11.12. Deleting Test Cases ......................................................................................................... 165
4.11.13. Reordering Test Cases ...................................................................................................... 166
4.11.14. Selecting the relevant Output Data ...................................................................................... 166
4.11.15. Enabling/Disabling Actions ................................................................................................. 166
4.11.16. Defining Expected Results ................................................................................................. 166
4.11.17. Disabling Warnings for Missing Expected Results ................................................................... 167
4.11.18. Defining Expected Exceptions ............................................................................................ 167
4.11.19. Executing a Test .............................................................................................................. 167
4.11.20. Showing Results for a specific Execution of a Test ................................................................. 168
4.11.21. Inspecting Results ............................................................................................................ 168
4.11.22. Creating and Configuring Statistics ...................................................................................... 169
4.11.23. Selecting a Configuration for the Rule Execution .................................................................... 171
4.11.24. Initializing Static Internal Data Elements ............................................................................... 171
4.12. Organizing Rule Tests in Test Suites ........................................................................................ 172
4.12.1. Creating a Test Suite ......................................................................................................... 172
4.12.2. Opening or Finding a Test Suite ........................................................................................... 173
© Bosch Software Innovations GmbH
x/270
Modeling Guide
4.12.3. Adding Tests ..................................................................................................................... 173
4.12.4. Removing Tests ................................................................................................................ 174
4.12.5. Executing a Test Suite ........................................................................................................ 174
4.13. Debugging Rules ................................................................................................................. 175
4.13.1. Setting Breakpoints ............................................................................................................ 175
4.13.2. Debugging a Rule Test ....................................................................................................... 175
4.13.3. Stepping Through Rules ..................................................................................................... 176
4.14. Searching Rule Models ......................................................................................................... 178
4.14.1. Searching Elements ........................................................................................................... 178
4.14.2. Searching References to Elements ....................................................................................... 179
4.14.3. Working with the Search View ............................................................................................. 179
4.15. Highlighting a referenced Element in the Rule Explorer ............................................................... 179
4.16. Comparing Rules ................................................................................................................. 180
4.16.1. Comparing Rule Models and Rule Packages .......................................................................... 180
4.16.2. Comparing Rules ............................................................................................................... 181
4.16.3. Working with the Compare View ........................................................................................... 182
4.17. Import and Export ................................................................................................................ 183
4.17.1. Importing a Rule Model ...................................................................................................... 183
4.17.2. Exporting a Rule Model ...................................................................................................... 184
4.18. Generating Documentation ..................................................................................................... 184
4.18.1. Generating Documentation .................................................................................................. 184
4.18.2. Viewing the Documentation ................................................................................................. 185
4.19. Printing .............................................................................................................................. 186
4.19.1. Printing a Rule .................................................................................................................. 186
4.20. Working with the User Interface .............................................................................................. 187
4.20.1. Switching Perspectives ....................................................................................................... 187
4.20.2. Customizing Perspectives and Views .................................................................................... 187
4.20.3. Opening Views .................................................................................................................. 188
4.21. Sending a Support Request ................................................................................................... 188
4.22. Updating a new Version of Visual Rules ................................................................................... 190
4.23. Upgrading Visual Rules Models .............................................................................................. 196
5. Reference .......................................................................................................... 197
5.1. Perspectives ......................................................................................................................... 197
5.1.1. Rule Modeling Perspective .................................................................................................... 197
5.1.2. Rule Integration Perspective .................................................................................................. 198
5.1.3. Debug Perspective .............................................................................................................. 199
5.2. Wizards ............................................................................................................................... 200
5.2.1. New Rule Project Wizard ...................................................................................................... 200
5.2.2. New Rule Model Wizard ....................................................................................................... 201
5.2.3. New Rule Wizard ................................................................................................................ 201
5.2.4. New State Flow Wizard ........................................................................................................ 202
© Bosch Software Innovations GmbH
xi/270
Modeling Guide
5.2.5. New Service Wizard ............................................................................................................ 203
5.2.6. Generate Documentation Wizard ............................................................................................ 203
5.3. Editors ................................................................................................................................. 205
5.3.1. Flow Rule Editor ................................................................................................................. 205
5.3.1.1. Flow Rule Editor Palette .................................................................................................... 205
5.3.1.2. Rule Context Palette ......................................................................................................... 206
5.3.2. Decision Table Editor ........................................................................................................... 207
5.3.2.1. Decision Table Editor Palette .............................................................................................. 207
5.3.2.2. Rule Context Palette ......................................................................................................... 208
5.3.3. State Flow Editor ................................................................................................................ 209
5.3.3.1. State Flow Editor Palette .................................................................................................... 209
5.3.3.2. State Flow Context Palette ................................................................................................. 210
5.3.4. Rule Test Editor .................................................................................................................. 210
5.3.4.1. Test Cases ...................................................................................................................... 211
5.3.4.2. Input .............................................................................................................................. 212
5.3.4.3. Output ............................................................................................................................ 212
5.3.5. Test Suite Editor ................................................................................................................. 213
5.3.6. Rule Project Editor .............................................................................................................. 214
5.3.7. Dependency Diagram Editor .................................................................................................. 215
5.3.8. Usage Matrix Editor ............................................................................................................. 216
5.4. Dialogs ................................................................................................................................ 216
5.4.1. Open Rule Dialog ............................................................................................................... 216
5.4.2. Open Rule Test Dialog ......................................................................................................... 217
5.4.3. Auto Creation Dialog ............................................................................................................ 218
5.4.4. Select Dialog ...................................................................................................................... 218
5.4.5. Rule Search Dialog ............................................................................................................. 220
5.4.6. Compare Results Dialog ....................................................................................................... 221
5.4.7. Select Dependency Dialog .................................................................................................... 221
5.5. Views .................................................................................................................................. 222
5.5.1. Rule Explorer View .............................................................................................................. 223
5.5.2. Project Explorer View ........................................................................................................... 223
5.5.3. Problems View ................................................................................................................... 224
5.5.4. Outline View ....................................................................................................................... 225
5.5.5. Search View ....................................................................................................................... 225
5.5.6. Properties View .................................................................................................................. 226
5.5.7. Statistics View .................................................................................................................... 227
5.5.8. Debug View ....................................................................................................................... 227
5.5.9. Variables View .................................................................................................................... 228
5.5.10. Breakpoints View ............................................................................................................... 229
5.6. Properties Tabs ..................................................................................................................... 229
5.6.1. General ............................................................................................................................. 229
© Bosch Software Innovations GmbH
xii/270
Modeling Guide
5.6.1.1. Description Tab ................................................................................................................ 229
5.6.1.2. Notes Tab ....................................................................................................................... 230
5.6.2. Rule Elements .................................................................................................................... 230
5.6.2.1. Decision Overview Tab ...................................................................................................... 230
5.6.2.2. Decision Details Tab .......................................................................................................... 231
5.6.2.3. Assignments Tab .............................................................................................................. 232
5.6.2.4. Fire Action Tab ................................................................................................................. 234
5.6.2.5. Call Flow Rule ................................................................................................................. 234
5.6.2.6. Call Decision Table ........................................................................................................... 235
5.6.2.7. Call Service ..................................................................................................................... 236
5.6.2.8. Repeat Tab ...................................................................................................................... 237
5.6.2.9. Return Exception Tab ........................................................................................................ 239
5.6.2.10. Handle Exception Tab ...................................................................................................... 240
5.6.3. State Flow Elements ............................................................................................................ 240
5.6.3.1. State Tab ........................................................................................................................ 240
5.6.4. Rule Models ....................................................................................................................... 241
5.6.4.1. Extensions tab ................................................................................................................. 241
5.6.5. Rule Packages ................................................................................................................... 241
5.6.5.1. Reuse Packages Tab ........................................................................................................ 241
5.6.6. Data ................................................................................................................................. 242
5.6.6.1. Data Element ................................................................................................................... 242
5.6.6.2. Input/Output Data Tab ....................................................................................................... 244
5.6.6.3. Internal Data .................................................................................................................... 245
5.6.6.4. Constant Data .................................................................................................................. 247
5.6.7. Actions .............................................................................................................................. 248
5.6.7.1. Actions Tab ..................................................................................................................... 248
5.6.7.2. Action Settings Tab ........................................................................................................... 249
5.6.7.3. Output message Action Tabs .............................................................................................. 250
5.6.7.4. Log message Action Tab .................................................................................................... 251
5.6.7.5. Send e-mail Action Tabs .................................................................................................... 252
5.6.7.6. Write CSV File Action Tabs ................................................................................................ 253
5.6.7.7. Read CSV File Action Tabs ................................................................................................ 254
5.6.8. Data Types ........................................................................................................................ 255
5.6.8.1. Data Types Tab ................................................................................................................ 256
5.6.8.2. Type Alias Tab ................................................................................................................. 257
5.6.8.3. Attributes Tab ................................................................................................................... 257
5.6.8.4. Constant Data Tab ............................................................................................................ 258
5.6.8.5. Literals Tab ...................................................................................................................... 260
5.6.8.6. Super Types Tab .............................................................................................................. 260
5.6.9. Meta Data ......................................................................................................................... 261
5.6.9.1. Meta Data Tab ................................................................................................................. 261
© Bosch Software Innovations GmbH
xiii/270
Modeling Guide
5.7. Preferences .......................................................................................................................... 262
5.7.1. Expression Formatting Preferences ........................................................................................ 262
5.7.2. Flow Rule Editor Preferences ................................................................................................ 263
5.7.3. Auto Creation Preferences .................................................................................................... 264
5.7.4. Syntax Highlighting Preferences ............................................................................................. 265
5.7.5. Colors and Fonts Preferences ............................................................................................... 266
5.7.6. Test execution .................................................................................................................... 266
5.7.7. Validation ........................................................................................................................... 262
5.7.8. Notes Preferences ............................................................................................................... 268
5.8. Hotkeys ............................................................................................................................... 269
© Bosch Software Innovations GmbH
xiv/270
Chapter 1. Overview
Chapter 1. Overview
1.1. Organization of this Manual
This manual is the "Modeling Guide" for Visual Rules. It consists of four chapters:
• Getting started
• Concepts
• Tasks
• References
The "Getting started" chapter contains a simple step-by-step introduction into Visual Rules. If you are new to Visual Rules you should read this first. You will learn how to setup Visual Rules, create a rule project, write rules and
execute and test them. For users of previous versions of Visual Rules this may also be a good way to get accustomed to the new user interface of Visual Rules version 4.
The "Concepts" chapter explains and defines the concepts of Visual Rules rule models. Here you can learn for example what a rule is, what a rule package is, and how they relate to each other. You don't have to read this chapter
from beginning to end. It was organized to be usable as a reference with many links that help you to navigate from
one concept to other related concepts.
The "Tasks" chapter contains many step-by-step procedures for different tasks you may want to perform when using Visual Rules. For example, it tells you how to create a new rule, how to reuse other rules and how to enter rule
expressions and many things more. Again, this chapter was written and organized to be used as a reference for
when you want to do a specific task. So all the procedures that have to do with similar concepts are grouped together. That way it should be easier to find them.
The "References" chapter contains detailed information about all the wizards, dialogs, menus, properties tabs etc.
1.2. Support
For support visit http://www.visual-rules.com or send an email to [email protected].
For information about the built-in support request sending facility see Section 4.21, “Sending a Support Request” [188].
1.3. Using the Visual Rules Online Help
In Visual Rules Modeler select the menu entry Help > Help Contents to open the online help. All Visual Rules related information can be found in the Visual Rules section.
Browse topics in the Contents frame ( ) on the left. Click on a topic to have it displayed. Use the Back and Forward buttons to navigate within the history of viewed topics.
Icon
Description
This button directs you to the previous page. It is displayed both on the upper right and on the
bottom left corner of every page. In the bottom left corner the name of the previous page is displayed beneath the button if the current page is not the first page in the document.
This button directs you to the next page. It is displayed both on the upper right and on the bottom right corner of every page. In the bottom right corner the name of the next page is displayed
beneath the button if the current page is not the last page of the document.
This button directs you to the index page that is directly above the current page in the topic hierarchy. It is displayed on bottom of every page in the center but if the current page is not in the
highest level of the hierarchy.
This button directs you to the index of the manual you are currently reading. It is displayed on
the Bottom of every page in the center.
© Bosch Software Innovations GmbH
1/270
Chapter 1. Overview
1.3.1. Searching
To quickly locate topics on a particular subject in the documentation, enter a query in the Search field (you can
use * or ? wildcard characters). Use the Search frame ( ) to display the Search view. You can narrow the scope
of your search by selecting only the sections you are interested in.
To search only Visual Rules topics click on Search scope and select Search only the following topics. Now
press New.... In the dialog that appears enter a List name e.g. Visual Rules, tick Visual Rules in the Topics to
search list. Now press OK in both dialogs.
1.3.2. Synchronizing
After you run a search and find a topic you were looking for, click either the Refresh / Show Current Topic button
( ) or Show in Table of Contents button ( ) to match the navigation tree with the current topic. You might also
find it useful to synchronize after following in-topic links.
© Bosch Software Innovations GmbH
2/270
Chapter 2. Getting Started
Chapter 2. Getting Started
2.1. Learning the Basics
2.1.1. Layout of Visual Rules Modeler
The Visual Rules Modeler provides views and editors to model, execute and test rules. Figure 2.1, “Overview Visual Rules Modeler” [3] shows the main Visual Rules views and editors.
Each view is a window you can close, resize, minimize, or maximize. You can also change the location of views or
rearrange the set of views to fit the way you work.
Read the Eclipse Workbench User Guide for more information about working with views and perspectives.
Figure 2.1. Overview Visual Rules Modeler
Element
Description
Menu
The menu gives you access to many features of Visual Rules and the underlying Eclipse platform.
Toolbar
The toolbar contains icons for common tasks. Availability of icons depends on the selected
perspective and selected view or editor.
Rule Editor
The rule editor is used to view and edit a rule. Most of the rule authoring process takes place
here. It is a sophisticated graphical editor with a tools palette (left) and rule context palette
(right) (see Figure 2.2, “Visual Rules Rule Editor” [5]). You can open multiple rules at the
same time.
Rule Explorer
The Rule Explorer is the central view for working with projects. It lists all the projects and
their contents (data elements, files, models etc.). You can create, edit, delete or move resources in this view and organize the structure of your rule project.
© Bosch Software Innovations GmbH
3/270
Chapter 2. Getting Started
Element
Description
Outline
The Outline view displays a compact representation of the rule being edited. A blue box is
drawn around the currently visible part of the rule in the rule editor. You can navigate through
the rule by moving this box around. The rule editor will scroll its viewport accordingly.
Properties
The Properties view shows information and settings for the currently selected element.
Whenever you select an item in the Rule Explorer or in the rule editor, the Properties view
will be updated and shows the properties of this element. The properties of an element are
usually grouped on several tabs. Navigate to a specific tab by clicking on the tab name displayed on the left side.
Problems
The Problems view displays a list of all current errors and warnings that Visual Rules has detected in the rule projects. It describes the error, says which rule contains the error and provides the location of this rule. You navigate to the problem location by double-click on an entry
in the Problems view.
Perspectives
The perspectives define the initial set and layout of Visual Rules views. Each perspective provides a set of functionality and defines what appears in certain menus and toolbars. VisualRules offers different perspectives for different tasks. The Rule Modeling perspective is used
for rule modeling tasks. The Rule Integration perspective is meant for developers who integrate rules into an application, connect rules with existing object models or extend Visual
Rules with additional functions or actions.
2.1.2. Modeling Rules
Visual Rules provides an advanced collaboration platform between business analysts and IT.
The business analysts model and maintain the business rules on their own. They use the expressive and easy to
use graphical user interface of Visual Rules. It is possible to draft the rules in a first step using just the graphical elements and descriptions. This is very powerful for specifying the requirements and discussing what will be realized
in the business rules model.
In a second step the business analysts finalize the rules and insert expressions into the existing rule elements. Visual Rules supports this with the intuitive use of the rule editor. For example, inplace editing capabilities eliminate
the need to ever leave the visual environment.
The “rules first”-approach makes it easy for the business user to concentrate on the modeling of the business logic. It is not a prerequisite to define the data items first that will be used during rule modeling. Instead, data elements can be created automatically during rule authoring.
After finalizing the rule modeling, Visual Rules provides a powerful testing functionality to guarantee high rule quality.
When the business analysts complete the rule modeling process, the rules are handed over to IT. The technical
experts don't need to know about the modeled business rule logic and just have to deal with the integration of the
rule model.
For a start we focus on the Rule Modeling perspective and on working with the rule editor. For rule modeling tasks
most of the rule authoring process takes place in the rule editor and for basic modeling of rules it is sufficient to
see just this editor.
© Bosch Software Innovations GmbH
4/270
Chapter 2. Getting Started
Figure 2.2. Visual Rules Rule Editor
Element
Description
Rule Editor
The rule editor is used to view and edit a rule. Here you can model your rule graphically, insert
new rule elements from the palette and use data elements, actions and services from the rule
context palette.
Palette
The rule editor palette shows all the elements that you can use for rule modeling. You can
drag elements from the palette and drop them into the rule editor. The palette also contains
tools for zooming, adding notes and adding branch descriptions.
You find more information about the rule elements here: Section 3.5, “Flow Rule Element” [31]
Rule Context
Palette
The rule context palette displays and gives quick access to data that is available for this rule.
This includes data elements, actions and services and also a list of all rule tests. Data elements, actions, services and tests can be created, renamed or deleted and the Properties
can be opened (by double-clicking).
There are special toolbar icons for the rule editor where you can change the appearance of the so called flow rule.
The elements in the rule editor can be turned on/off in the drop down menu of the View icon ( ), which can be accessed by clicking the arrow next to the icon. Among other things, the display of descriptions ( ), contents ( ) or
notes ( ) can be toggled here.
You can also modify the maximum height and width of rule elements. This can be done via the increase and decrease buttons in the toolbar (
). These settings are also available in the Preferences (Window > Preferences > Visual Rules > Flow Rule Editor).
© Bosch Software Innovations GmbH
5/270
Chapter 2. Getting Started
You can change the zoom level of the rule with the corresponding icons
in the toolbar.
2.2. Tutorial 1: Modeling Your First Simple Rule
This section provides step-by-step instructions for building, drafting and modeling a new flow rule that calculates
the price for the rental of a car. After this first tutorial you will have a complete rule that can be executed and tested
in the next tutorial “Testing Your First Rule”.
In this tutorial, you perform the following tasks:
• Create a new rule project
• Create a new flow rule
• Draft your first flow rule
• Finalize your first flow rule
2.2.1. Task 1: Create a New Rule Project
1.
Select the menu item File > New and select the Rule Project entry from the list.
2.
The New Rule Project wizard appears.
3.
Enter the name Tutorial First Rule for the rule project.
© Bosch Software Innovations GmbH
6/270
Chapter 2. Getting Started
4.
Press Finish to create the new rule project.
When a new rule project is created, Visual Rules automatically creates a new rule model inside.
Per default the new rule model has the same name as the rule project.
2.2.2. Task 2: Create a New Flow Rule
1.
Right-click on the rule model included in the new rule project.
2.
Select New Element > Flow Rule from the context menu.
3.
The New Flow Rule wizard appears.
4.
Enter the Flow rule name EU Rent.
5.
Press Finish to create the new rule. The new flow rule will open automatically in the flow rule editor.
© Bosch Software Innovations GmbH
7/270
Chapter 2. Getting Started
2.2.3. Task 3: Draft Your First Flow Rule
In this task you will draft the rule logic. The graphical elements representing the logic will be created and descriptions will be added to them.
For drafting the rules in the first step, switch off the display of the rule element contents, so that just the descriptions are shown. In order to do this, open the drop down of the View ( ) toolbar button, then deselect Hide/Show
Contents ( ).
Now just the descriptions of the rule elements are shown.
2.2.3.1. Describing the Rule
Insert a description for your flow rule by double-clicking on the description field to edit its contents.
Use Alt+Enter to start a new line.
2.2.3.2. Adding a new Decision
The rental for the car depends on the car type, therefore you need to decide what the car type is.
Insert a new decision per drag&drop from the palette:
1.
2.
Select the rule element Decide in the palette by clicking on it.
Now, move the mouse over to the start element
where the new element will be added.
© Bosch Software Innovations GmbH
in the flow rule. A black arrow will appear to show you
8/270
Chapter 2. Getting Started
A stop (
3.
) icon indicates that the rule element cannot be added at this location.
When you see a black arrow, click again and the new rule element will be inserted.
2.2.3.3. Adding a new Decision Condition
In this example you will check three different car groups, compact, full-size or other. For this you need to insert a
new condition to your decision:
1.
Select again the Decide element on the palette.
2.
Move the mouse over the decision where you want to add another condition. A black arrow appears pointing
up or down to indicate where the new condition will be inserted.
3.
Click again. The condition is inserted.
4.
Describe the decision element by double-clicking on the description fields, like in the picture below.
© Bosch Software Innovations GmbH
9/270
Chapter 2. Getting Started
The car type is checked for the conditions compact, luxury and other.
2.2.3.4. Adding a new Assignment
Insert an assignment after the condition for compact car type to calculate the price for this type.
1.
Select the Assign element in the palette by clicking on it.
2.
Now, move the mouse over an existing element in the flow rule. A black arrow will appear to show you where
the new element will be added. This can be either before, after, above or below the existing rule elements. Accordingly, the black arrow will point to the left, to the right, up or down. Move the mouse until the arrow points
into the direction you want. Here to the right of the condition "Compact".
3.
When you see a black arrow, click again and the new assignment will be inserted.
4.
Insert a description for the assignment element to document that the price will be calculated here.
© Bosch Software Innovations GmbH
10/270
Chapter 2. Getting Started
5.
In the same way as before insert an assignment for calculating the price of the luxury car group.
6.
In the case of a luxury car there should be a discount granted for premium customers. In the first step insert
a decision to check if the customer is a premium customer. Insert the new decision like described above. You
don’t need to insert another decision condition this time.
7.
In the second step insert an assignment where the new price after the discount will be calculated.
© Bosch Software Innovations GmbH
11/270
Chapter 2. Getting Started
2.2.3.5. Adding a new Action
Finally, an action should be fired when a discount was granted. With this action you can see in the result if a discount is included in the calculated price.
1.
Select the Fire Action element in the palette by clicking on it.
2.
Now, move the mouse over an existing element in the flow rule. Move the mouse until the arrow points down
below the previously added assignment.
3.
When you see a black arrow, click again and the new flow rule element will be inserted.
4.
Insert the description Discount on rental granted for the action element.
The drafted flow rule should look like the picture below.
© Bosch Software Innovations GmbH
12/270
Chapter 2. Getting Started
Save your rule by clicking the Save button (
) in the toolbar. You can also press Ctrl+S.
2.2.4. Task 4: Finalize Your First Flow Rule
Now you have described a rule and defined what elements you need for the calculation.
It is time to finalize your rule and insert the expressions that should be executed during the rule execution.
2.2.4.1. Enabling the Content
Switch on the display of the flow rule element contents. Activate the Contents entry ( ) in the drop down menu of
the View toolbar button. Now the contents of the flow rule elements are also shown.
You will see error and warning markers that show where expressions have to be inserted.
© Bosch Software Innovations GmbH
13/270
Chapter 2. Getting Started
2.2.4.2. Create new data elements
Every rule in Visual Rules clearly specifies the data that goes into the rule (input data) and the data that comes out
of the rule as a result (output data). Create an input data element Car_Type that holds the value for the car type:
compact or luxury.
1.
You can create the data elements directly in the Rule Context palette of the rule editor. Expand the Rule Context palette by clicking on the small black arrow pointing left.
2.
Click on the green plus sign of Input/Output Data in the Rule Context palette to add a new input data element.
3.
The New Input/Output Data dialog appears.
4.
Enter the name Car_Type for the new data element.
5.
Select Input.
6.
Create the data element by clicking OK.
7.
The Car_Type data element is shown in the Rule Context palette under Input/Output Data.
© Bosch Software Innovations GmbH
14/270
Chapter 2. Getting Started
Create the input data elements Premium_Customer and Rental_Days in the same way as the Car_Type. These elements will be used for the calculation.
Create the output data element Price like the input data elements before. Since this is to act as an output, select t
Output in the New Input/Output Data dialog. This element will be the result of the calculation.
2.2.4.3. Edit Rule Elements
Insert the contents for the decision now and check which car type was rented.
1.
Type in the name of the input data element Car_Type as the decision criterion at the top of the decision element.
2.
Insert now the different cases for the car type.
For the first case use = "compact" and for the second case = "luxury" like in the picture below.
3.
The decision element is now complete and you should not have any error markers at your decision any more.
© Bosch Software Innovations GmbH
15/270
Chapter 2. Getting Started
Now insert the expressions for the price calculations into the assignment elements. Calculate the price by multiplying the value of the data element Rental_Days with the price for the car type per day that was defined in the rule element description.
1.
For compact car type use the expression:
Price := Rental_Days * 50
2.
For luxury car type use the expression:
Price := Rental_Days * 60
Now check if the customer is a premium customer. This is indicated by the input data element Premium_Customer
being true.
Complete the assignment for the calculation of the price – discount.
Use the expression:
Price := round(Price * 0.9)
By adding round() to the expression, the price is rounded to the next integer.
© Bosch Software Innovations GmbH
16/270
Chapter 2. Getting Started
2.2.4.4. Create a new Action
For the last step of finalizing the flow rule you need an action that holds the information if a discount was granted.
1.
Type in the name Discount_Granted in the content field of the Fire Action element in the flow rule editor.
2.
If you leave the content field, the Automatic Element Creation dialog appears.
3.
Confirm the creation of the action with Create. The new action is shown in the Rule Context palette under Actions.
For further information about the automatic element creation dialog see Section 5.4.3, “Auto Creation Dialog” [218]
2.2.4.5. Conclusion
The flow rule is now finalized and should look like the rule below. There should not be any error or warning markers any more. The result of this tutorial will now be used in the next tutorial about testing of rules.
© Bosch Software Innovations GmbH
17/270
Chapter 2. Getting Started
2.3. Tutorial 2: Testing Your First Rule
A rule test is a test for a specific rule. It tests the correctness of this rule by executing the rule with given input data
and inspecting the results that the rule produces. One such execution is called a test case. A rule test can consist
of any number of test cases and there can be multiple tests for the same rule.
Rule tests are defined, edited and executed with the rule test editor. It consists of two tabs. One named Test that
includes test cases, test data, reference data and the result of the rule execution and Configuration with settings
for the rule execution.
The rule test editor shows the test description at the top. On the left side there is a list of all test cases and on the
right side there are two sections that display the input and output data for each test case.
© Bosch Software Innovations GmbH
18/270
Chapter 2. Getting Started
This section provides step-by-step instructions for executing and testing a rule.
For this tutorial you need to have the flow rule modeled in tutorial 1. This will be the rule you test here. This tutorial
continues exactly at the point where tutorial 1 stopped.
When you finished this tutorial you will have defined test data and expected results for a rule, executed the rule
and understood how to analyze the results. In this tutorial, you perform the following tasks:
• Create a rule test
• Define input data for the test case
• Define expected results for the test case
• Specify a second test case
• Execute the rule
• Inspect the results of the test cases
• Display statistics about rule execution
2.3.1. Task 1: Create a Rule Test
1.
Add a new rule test by clicking on the green plus sign near Rule Tests in the Rule Context palette of the rule
editor.
2.
A dialog appears where you can specify the name of the test. Accept the default with OK.
3.
A new rule test is created and opened automatically in the rule test editor.
You can see the new rule test in the Rule Context palette of the rule editor if you go back to the
rule. A rule test can be opened by double-clicking on it.
© Bosch Software Innovations GmbH
19/270
Chapter 2. Getting Started
2.3.2. Task 2: Define Input Data for the Test Case
1.
In the Input area you see the defined input data elements from the rule.
2.
Insert the test data values that should be used for the rule execution by double-clicking in the value column.
3.
Insert the following test data values.
2.3.3. Task 3: Define Expected Results for the Test Case
It is easy to calculate what should be the result of the rule execution for the entered test data. For compact cars
the price is $50 per day and the car was rented three days. The price must be $150. For compact car types there
is no discount granted and the price stays $150.
It is possible to insert the expected result and Visual Rules tests if the result of the rule execution is the same as
you expect.
1.
In the Output area the price is listed. Insert the expected result of 150 in the corresponding column.
© Bosch Software Innovations GmbH
20/270
Chapter 2. Getting Started
2.
The price is not the only result that is expected from the rule execution. The rule also fires an action that
should be true if a discount was granted on the price. But for the first test case there should be no discount
granted and the action should have the value false. To see the results for actions you have to switch the view
of output data elements (
3.
) to actions (
). Click on the actions button in the toolbar of the Output area.
Now the actions are shown as output. Insert false as the expected result for the action Discount_Granted.
2.3.4. Task 4: Specify a Second Test Case
Create another test case for the rule where you test the calculation for luxury car and discount granted.
1.
Add a new test case to the test by clicking the green plus sign in the toolbar of the Test Cases area.
2.
A new test case is added.
You can insert a test case description if you expand the Test Case Description field at the top of
the list. Additionally, you can also rename the test case itself by double-clicking it.
3.
Insert the test data and the expected result values in the same way than for the first test case. Use the following values.
Test Data:
© Bosch Software Innovations GmbH
21/270
Chapter 2. Getting Started
Expected result for output data element:
Expected result for action:
2.3.5. Task 5: Execute the Rule
1.
Click on the icon for rule execution in the Test Cases area and the rule will be executed.
2.
If you have not saved the test a dialog will appear and ask you if you want to save resources.
3.
Accept with OK. You should check the Save always and don't ask again checkbox.
4.
A second dialog will appear and ask you if you want to generate code and continue.
5.
Accept with Proceed. Again you may check the Always proceed without asking checkbox.
6.
The rule is executed.
© Bosch Software Innovations GmbH
22/270
Chapter 2. Getting Started
In the Console view you see the output of the rule execution.
2.3.6. Task 6: Inspect the Results of the Test Cases
1.
The result of the rule execution is shown in the column Actual Result in the Output area. For the second test
case the rounded price is $108.
2.
On the left hand side of the test editor there is a marker on the test cases. This marker shows that the test
case was successful, which means the actual result is the same as the expected result.
If the test failed and the actual result differs from the expected result there is a red marker and
the expected result field is marked red.
2.3.7. Task 7: Show Statistics of Tests
During rule execution Visual Rules can collect statistical and tracing information for later use. This is especially
useful during testing and gives the user additional insight into the workings of the rules.
An important part of the statistical information is the execution counters for each rule element. These indicate how
often each rule element was executed. The rule editor can display these counters next to each rule element.
During test execution statistics are generated by default.
1.
Select a test case in the rule test editor.
2.
Switch from the test editor to the rule editor.
3.
Show the statistics in the rule editor by selecting the Hide/Show Statistics (
will change (
4.
) button in the toolbar. The icon
) to indicate statistics are shown
The statistics are shown for the test case that you selected in the rule test editor.
© Bosch Software Innovations GmbH
23/270
Chapter 2. Getting Started
The rule elements that have not been executed for this test case are grey.
The colored elements have been executed and the number indicating how often is displayed next to each rule
element.
5.
Show the statistics for another test case. In order to do that, select the other test case in the rule test editor.
The rule editor will now show the statistics for the selected test case.
© Bosch Software Innovations GmbH
24/270
Chapter 3. Concepts
Chapter 3. Concepts
3.1. Rule Project
The workspace of Visual Rules Modeler can contain multiple rule projects, which can be seen in the Rule Explorer (or Project Explorer). A rule project contains a rule model and the file ruleproject.vr. Rule projects are represented by this icon:
A rule project can define dependencies to other rule projects (or libraries) in order to reuse the rules, data types,
services or other elements defined there. All dependencies of a rule project are defined in the file ruleproject.vr.
The contents of the ruleproject.vr file can be viewed and edited with the rule project editor.
This file has two purposes:
• specify a unique identifier for the rule project itself, consisting of a Group Id, Artifact Id and a Version.
• specify the dependencies of the rule project, i.e. Group Ids, Artifact Ids and Versions of other rule projects (or
rule artifacts, or libraries) required by this rule project
Related Concepts.
• Section 3.2, “Rule Model” [25]
Related Tasks.
• Section 4.1.1, “Creating a new Rule Project” [89]
• Section 4.1.2, “Setting Rule Project Identifiers (Group Id, Artifact Id, Version)” [89]
• Section 4.1.3, “Defining Rule Project Dependencies” [90]
Related References.
• Section 5.5.2, “Project Explorer View” [223]
• Section 5.3.6, “Rule Project Editor” [214]
3.2. Rule Model
A rule project contains (at least) one rule model. Every rule you define is part of a rule model. A rule model can
contain only a few, or maybe hundreds or thousands of such rules. Rule models and their contents are shown in
the Rule Explorer or Project Explorer. Rule models are represented by this icon:
© Bosch Software Innovations GmbH
25/270
Chapter 3. Concepts
The contents of a rule model are usually subdivided into rule packages and sub packages. This is to help organize
all the different rule model parts, e.g. rules, data elements, actions, data types etc. However, it is also possible to
not have any rule packages. In that case all the elements are defined directly on the rule model, which is the top
level package.
Related Concepts.
• Section 3.3, “Rule Package” [26]
Related Tasks.
• Section 4.2.1, “Creating a new Rule Model” [93]
Related References.
• Section 5.5.1, “Rule Explorer View” [223]
• Section 5.5.2, “Project Explorer View” [223]
3.3. Rule Package
Rules, data elements, actions and all other parts of a rule model can be collected into packages to help organizing
large rule bases. Rule packages are represented by this icon:
A rule model can contain multiple rule packages, which again can have multiple sub packages each. Consequently
you can think of a rule model as a tree of rule packages with the rule model being the root. This tree is also called
the package hierarchy.
Organizing your rule model into packages also allows you to effectively manage dependencies within your model.
This is because rules from one package cannot call rules from another package (unless it is a sub package). However, it works when a package explicitely defines another package for reuse. So rule packages also represent the
level of granularity for reuse within Visual Rules.
Every package can contain data definitions, actions, data types and so on. Every such definition is automatically
shared among all the rules within that package or in any of its sub packages. This allows to make things commonly
accessible simply by putting them at the right level within the package hierarchy.
The rule model itself is the root of the package hierarchy. Any definitions that are made on the rule
model level (top level) are globally visible and usable by every rule in the model.
For example, let's assume there is a rule CustomerScoring with an input data element customer. The input data element customer is defined on the rule itself, so only the rule CustomerScoring can access the customer data. Maybe
© Bosch Software Innovations GmbH
26/270
Chapter 3. Concepts
that rule CustomerScoring has become too complex and you would like to split it into smaller rules. So you create
new rules Scoring1 and Scoring2 that both represent parts of the logic previously located in the CustomerScoring
rule. The CustomerScoring rule now calls the two new rules Scoring1 and Scoring2. These two also need the customer data to perform their task. Now you could either define an input data element customer on both new rules
and pass on the customer data from the CustomerScoring rule to the two sub rules, or you could simply remove
the customer input data element from rule CustomerScoring and define it on the rule package that contains all three
rules. In that case the customer input data element is automatically shared among all three rules.
The following elements can be defined in every package:
Flow Rules
Flow rules are the central and most important concept of Visual Rules. They define the behavior of the rule
system. Flow rules make decisions, perform calculations or trigger actions.
Decision Tables
Decision tables are another representation of rules in a tabular form. They are useful for rules that make many
decisions based on only few inputs.
Flow Rule Templates
Flow rule templates are blueprints for newly created flow rules. They are especially useful when you create a
lot of similar flow rules.
Data
Rules need data to perform their tasks. Therefore a rule package may also contain definitions about data
which is shared by all rules in this package or any of the sub packages. Data is divided into input data, output
data, internal data and constant data.
Actions
Rules can trigger actions. The rule package contains the definitions of all the actions that rules can trigger.
Depending on the type of action fired, specific things can happen. E.g. the action may send an email or trigger
another process or produce domain specific results.
Services
Rules can call services. A rule package contains the definitions of available services. Services are external to
Visual Rules, i.e. they enable rules to reuse functionality available elsewhere, e.g. in legacy systems. VisualRules can be extended by adding custom services and service types.
Data Types
Every data element has a specific data type that defines the possible values of the data element. There are
built-in data types like Integer, String, Date etc. Additionally, a rule model can define user defined data types,
e.g. a Customer type that defines the attributes of a customer: first_name, last_name, gender, birthdate and
address.
Functions
A rule package can define custom functions in addition to the built-in functions. These custom functions can
then be used within expressions. Functions usually perform specific calculations, but they could also do other
things like fetch data from an external source, e.g. a database.
Action Types
A rule package can also define custom action types. Every action has a type that specifies what it will do
when it is fired. Custom action types allow you to introduce action behavior specific to your domain.
Service Types
Every service is of a specific service type. Visual Rules can be extended with custom service types to interface with different systems or technologies, e.g. to connect to legacy systems.
Related Concepts.
• Section 3.3.1, “Rule Package Reuse” [28]
• Section 3.2, “Rule Model” [25]
• Section 3.4, “Flow Rule” [29]
© Bosch Software Innovations GmbH
27/270
Chapter 3. Concepts
• Section 3.7, “Decision Table” [48]
• Section 3.16, “Action” [79]
• Section 3.17, “Action Type” [80]
• Section 3.13, “Data” [67]
• Section 3.14, “Data Type” [71]
• Section 3.18, “Function” [81]
• Section 3.19, “Service” [81]
• Section 3.20, “Service Type” [82]
Related Tasks.
• Section 4.2.4, “Creating a new Rule Package” [95]
3.3.1. Rule Package Reuse
A rule package is a collection of interrelated rules. Rules in a package can always call other rules from the same
package or from sub packages thereof. But in order to be able to call rules from other packages, these other packages need to be explicitely defined for reuse. Every rule package can define several other packages for reuse.
These packages can be from the same rule model or from another rule model. You can find the reused packages
on the Reuse Packages tab in the Properties view of Visual Rules.
When a package reuses another package this does not only include rules, but also all the data types, action types,
functions and constant data defined there. The following table specifies which package elements can be accessed
from the same package, from any of its sub packages or from packages that reuse the package, respectively.
© Bosch Software Innovations GmbH
28/270
Chapter 3. Concepts
Table 3.1. Visibility of elements in the same or in other rule packages
Available in the
same package
Available in any
sub package
Available in any
packages above
Available in any
package (and all
its sub packages)
that reuses the
package
Flow Rules
yes
-
yes
yes
Decision Tables
yes
-
yes
yes
Flow Rule Templates
yes
yes
-
yes
Input/Output Data
yes
yes
-
-
Internal Data
yes
yes
-
-
Constant Data
yes
yes
-
yes
Actions
yes
yes
-
-
Services
yes
yes
-
yes
Data Types
yes
yes
-
yes
Functions
yes
yes
-
yes
Action Types
yes
yes
-
yes
Service Types
yes
yes
-
yes
Rule Package Element
Related Concepts.
• Section 3.3, “Rule Package” [26]
• Section 3.2, “Rule Model” [25]
Related Tasks.
• Section 4.1.3, “Defining Rule Project Dependencies” [90]
• Section 4.2.19, “Reusing Rule Packages” [101]
Related References.
• Section 5.6.5.1, “Reuse Packages Tab” [241]
3.4. Flow Rule
A flow rule is a graphical representation of logic, consisting of computations, decisions, actions and possibly other elements. Every flow rule captures a specific part of the overall business logic of a system. Flow rules can be
very small, e.g. when they make a very specific decision based on only a few facts. Flow rules can however also
be rather complex when they have to make many decisions and computations based on a lot of data. Writing complex rules is usually achieved by aggregating simpler rules into more complex rules. For this purpose every flow
rule can reuse other flow rules or decision tables when appropriate.
Every flow rule has a name that identifies it. All rules (including decision tables) in a rule package must have different names, so that each rule can be uniquely identified by its name and package. Rules can have the same name
if they are located in different rule packages.
© Bosch Software Innovations GmbH
29/270
Chapter 3. Concepts
Figure 3.1. Graphical representation of a flow rule in Visual Rules
Visual Rules lets you model your rules graphically. Every flow rule is composed of individual rule elements connected to each other. The start element at the top left indicates the start point of a flow rule. This is where execution of this rule always begins. Execution then continues to the right and to the bottom, just like you read a book.
Execution ends (at the latest) when all elements of a flow rule have been processed in this manner.
Every rule clearly specifies the data that goes into the rule (input data) and the data that comes out of the rule as
a result (output data). Additionally, a flow rule may define data that it uses internally only (internal data or constant
data).
The complete set of input, output and internal data of a rule is the sum of all data elements defined
for the rule plus all data elements defined for the rule package plus all data elements defined for
packages above that. In other words, a rule has access to all data elements that can be found by going up the package hierarchy starting from the rule up to the rule model (which is the top level rule
package). All available data is also called the "data context" of each rule.
Related Concepts.
• Section 3.5, “Flow Rule Element” [31]
• Section 3.3, “Rule Package” [26]
• Section 3.4.1, “Flow Rule Template” [30]
• Section 3.3.1, “Rule Package Reuse” [28]
Related Tasks.
• Section 4.2.8, “Creating a new Flow Rule” [97]
3.4.1. Flow Rule Template
Flow rule templates are blueprints for newly created flow rules. Flow rules that are newly added to your rule model
are usually empty. They do neither have any data definitions, nor any rule elements - except for the start element.
© Bosch Software Innovations GmbH
30/270
Chapter 3. Concepts
New rules have to be defined from scratch, unless you are using rule templates. Templates can contain any number of predefined rule elements, including input/output data, actions etc. Templates are especially useful when you
create a lot of similar rules, e.g. data validation rules that all should follow a specific pattern.
A flow rule template is very similar to any regular flow rule. They are defined within rule packages and have a
name that identifies them. You can use the same graphical editors to edit a flow rule or a flow rule template.
When a new flow rule is created, the New Flow Rule wizard allows you to select a template for it. The template
with all its contents (including data, actions, types, rule elements) is then copied into the newly created flow rule.
Related Tasks.
• Section 4.2.8, “Creating a new Flow Rule” [97]
3.5. Flow Rule Element
Every flow rule is composed of individual rule elements connected to each other. This is the list of all available rule
elements:
Start
The Start element denotes the beginning of each flow rule. Rule execution always starts from the start element and continues to the right and down, just like you are reading a book.
Decision
Decision elements are used to represent any kind of decision the rule has to make. Decisions have two or
more exits that may be followed by additional rule elements. Depending on the result of the decision, the rule
elements following the respective exit are executed or not executed.
Assignment
Assignment elements are used to define any kind of calculation the rule has to make. There are numerous operations and functions available for calculation. The assignment element stores the results for later use in other calculations as well as in decisions or actions.
Fire Action
The Fire Action element triggers a specific action. In the simplest case this merely sets the value of the fired
action to true. This status can then later be evaluated by any caller of the rule. Depending on the type of action fired, specific things can happen. E.g. the action may send an email or trigger another process or produce
domain specific results. Visual Rules can be extended by adding any number of custom action types.
Call Flow Rule
The Call Flow Rule element triggers the execution of some other flow rule. Once the other rule is finished, execution continues again in the original rule. Data can be forwarded to the rule being called and the results can
be evaluated by the calling rule. This concept allows to organize rules into fine granular pieces that can be
easily reused anywhere necessary.
Call Decision Table
The Call Decision Table element triggers the execution of a decision table. Once the decision table is finished,
execution continues again in the original rule. Data can be forwarded to the decision table being called and
the results can be evaluated by the calling rule.
© Bosch Software Innovations GmbH
31/270
Chapter 3. Concepts
Call Service
The Call Service element is used to call a service external to Visual Rules. This enables rules to reuse functionality available elsewhere, e.g. in legacy systems or anywhere else. Visual Rules can be extended by
adding custom services and service types.
Done & Return
The Done & Return element stops any further execution of the rule. This is often used when the rule has decided that any further processing is unnecessary, e.g. if some required preconditions are not met. Execution
then immediately continues where the rule was originally called.
Repeat
The Repeat element is used to execute parts of the rule multiple times. This is often useful if the rule must
process multiple data items, e.g. "all the items of an order".
End Repeat
The End Repeat element is used in cases when the rule has decided that it can end an ongoing Repeat prematurely, e.g. when the Repeat was used to search data and the matching data was found so the rest of the
data doesn't have to be looked at.
Return Exception
The Return Exception element can be used whenever the rule has detected an 'exceptional' situation where it
cannot execute any further, e.g. if necessary data is missing or validations have failed. In this case a message
describing the exception is generated with the Return Exception element and execution continues where exceptions are handled.
Handle Exception
The Handle Exception element is used to react to 'exceptional' situations. It defines the alternative rule elements that are executed when 'normal' rule execution triggered a Return Exception element or if some technical error has occured.
The color of each rule element does have a specific meaning and helps you to understand the rule logic:
• The color yellow is used for rule elements in which decisions are made.
• The color blue is used for rule elements that do computations or fire actions, i.e. they change data.
• The color green is used for rule elements that influence the order of rule execution. For example repeats and
call rule elements are green.
• The color red is used for rule elements that have to do with exceptions or errors.
Every rule element has a box next to it that displays a description and/or the contents of the element. There are
two icons ( and ) on the toolbar that let you toggle the display of the descriptions and contents respectively.
Descriptions for every rule element are very important for the collaboration between the business experts and the rule author (who may not necessarily be the same person). It should always be pos-
© Bosch Software Innovations GmbH
32/270
Chapter 3. Concepts
sible to understand a rule by looking at the descriptions only and not at the actual contents (rule expressions). Rules are often drafted using descriptions only and later on, in a second step, the rule is
refined by writing the corresponding rule expressions.
Related Concepts.
• Section 3.4, “Flow Rule” [29]
• Section 3.12, “Expressions” [55]
3.5.1. Decision
Decisions are the most important concept of many rules. They are used whenever a rule needs to make a distinction between two or more different situations, e.g. for a specific rule about customers it may be relevant to check
whether the customer is an adult or not. This is what such a decision looks like in Visual Rules (only descriptions
are shown).
A decision element is displayed as a vertical yellow box with a description on top. This box has one or more exits
displayed as yellow diamonds within the box, each with its own description. Every such diamond defines one condition. If that condition is true the rule elements attached to that exit are executed. If none of the conditions are true
then the "else" exit is executed. The "else" exit is a small grey diamond and is always the last exit of every decision.
Related Tasks.
• Section 4.3.10, “Editing a Decision Element” [110]
Related References.
• Section 5.6.2.1, “Decision Overview Tab” [230]
• Section 5.6.2.2, “Decision Details Tab” [231]
3.5.1.1. Simple decision
The smallest possible decision only has one condition. The following picture shows such a decision. Both the descriptions (bold font) and the contents of the decision (normal font) are displayed.
The meaning of the decision element shown above is as follows: "If the customer is an adult, then continue with
the first exit, otherwise continue with the else exit."
3.5.1.2. Multiple condition decisions
Decisions can have more than one condition. If you add another condition to the example above, you get a multiple condition decision:
© Bosch Software Innovations GmbH
33/270
Chapter 3. Concepts
This decision has two conditions and an else exit. It has the following meaning:
"If the customer is an adult, then continue with the first exit, or else, if the customer is older than 65, then continue
with the second exit, otherwise continue with the else exit."
The decision has a problem in this form, because if a customer is older than 65 years he or she is also an adult.
Consequently the first "is an adult" condition is already true and executed. The second exit would never be executed.
This problem can be solved by a simple modification of the first condition, e.g. by extending the criteria:
This results in a new meaning for the decision, which can be stated as:
"If the customer is an adult, but not yet older than 65, then continue with the first exit, or else, if the customer is
older than 65, then continue with the second exit, otherwise continue to the else exit."
Starting from the previous example, it is conceivable that both exits "is an adult" and "is older than 65" should be
executed. For this there is a decision setting that tells Visual Rules that it should not only execute the first exit
whose condition is true, but all exits whose conditions are true. This behavior is indicated by dashed lines that are
displayed when you activate the Allow multiple matches (not just the first one) checkbox in the decision properties.
This results in a different logic, formulated in full as:
"If the customer is an adult, then execute the first exit (and continue with the next condition). If the customer is older than 65, then execute the second exit. If neither the first nor the second exit were executed then execute the
else exit."
Note that the semantics for the else exit are not affected by the Allow multiple matches setting. The else exit is
always only executed if none of the conditions were true.
Related Tasks.
© Bosch Software Innovations GmbH
34/270
Chapter 3. Concepts
• Section 4.3.10, “Editing a Decision Element” [110]
3.5.1.3. Common Condition Prefix
The common condition prefix is placed in front of each condition and is helpful if all conditions refer to the same
data element. The prefix is optional and can be left empty.
The following example shows a logical use for the condition prefix:
Each condition refers to the same customer.age data element, so this was specified in the prefix, while the conditions themselves just read >=25 and >65.
Without the condition prefix, the decision looks as follows:
Here each condition is fully specified and refers to the customer.age data element itself.
Related Tasks.
• Section 4.3.10, “Editing a Decision Element” [110]
3.5.2. Assignments
The assignment element is used for any type of computation the rule has to make. Basically every assignment calculates some value using a given formula and assigns the result of this calculation to a data element. This is an
example for an assignment: total_amount := order_amount * item_price
The data element that receives the resulting value is referred to as the "left side" of the assignment, while the formula is called the "right side". For the assignment total_amount := order_amount * item_price the left side is
total_amount and the right side is order_amount * item_price. This is what this assignment looks like in VisualRules.
Sometimes you have multiple assignments that belong together. It is possible to group multiple assignments into
one element like in this example, which contains three assignments.
© Bosch Software Innovations GmbH
35/270
Chapter 3. Concepts
You can also have several assignment one after another. These might concern the same data element in each
case.
If so, one assignment is executed after another, such that in the above example the eventual value of the data element value would be 3.
When an assignment concerns a structured data element (i.e. a data element including multiple attributes), then
individual values can be assigned to each of these attributes.
Here it is possible not to assign a value to individual attributes, provided that at least to one attribute a value is assigned.
If so, then to those attributes, to which no values are explicitely assigned, type-specific default values will automatically be assigned instead. E.g. in the example below, the eventual value of the attribute 3 will be 0 instead of
1.2345.
Related Concepts.
• Section 3.12, “Expressions” [55]
Related Tasks.
• Section 4.3.11, “Editing an Assignment Element” [112]
Related References.
• Section 5.6.2.3, “Assignments Tab” [232]
3.5.2.1. ADD, REMOVE and CLEAR Assignments
The assignment element offers special operations for working with data elements that contain multiple values, so
called "collections". These operations are ADD, REMOVE and CLEAR which allow you to add values to a collec-
© Bosch Software Innovations GmbH
36/270
Chapter 3. Concepts
tion, to remove values from a collection or to empty a collection. These special operations are indicated by the
words ADD, REMOVE or CLEAR instead of the := operation.
With an ADD assignment you can either add a single element or another collection. In the latter case, all elements
of the collection are added. The same is true for a REMOVE assignment. Here you can remove a single element
or all elements in another collection.
This is an example of an ADD assignment which adds a customer to a list of preferred customers. In order for this
to work, the preferredCustomers element must be a collection, list or set, i.e. it must have the multiple setting activated.
Example 3.1. ADD and CLEAR assignments
The CLEAR operation does not have a right side, so it simply reads:
Collections can be defined to contain "unique" elements only, i.e. every element can appear only once within that
collection. Here are the exact semantics for the ADD and REMOVE operations depending on the unique setting of
the collection used on the left side.
Table 3.2. ADD and REMOVE assignment semantics
"Unique" setting of the collection
unique = false
ADD element
REMOVE element
The element is added to the end of
the collection.
The element is removed from the
collection.
This happens even if the element
already appeared somewhere within the collection.
If the element appears multiple
times within the collection, only the
first occurance of it will be removed.
If the element does not appear within the collection, nothing happens.
unique = true
The element is added to the end of
the collection unless the collection
already contains the element.
If the collection already contained
the element, nothing happens.
The element is removed from the
collection.
If the collection does not contain the
element, nothing happens.
Because every element can only appear once within a "unique" collection, the element is guaranteed to
not be contained in the collection afterwards.
For data and data types defined outside of Visual Rules the behavior of the ADD assignment may be
different. Especially it is possible that the element is not added to the end of the collection but somewhere else. The exact behavior is defined by the implementation of the collection within your business object model.
Related Concepts.
• Section 3.14.7, “Collection” [76]
3.5.3. Fire Action
© Bosch Software Innovations GmbH
37/270
Chapter 3. Concepts
Actions are used to define the "consequences" of a rule. The Fire Action element is used to trigger a specific action. The value of the fired action is set to true. This status can then later be evaluated by any caller of the rule.
Additionally, depending on the type of action fired, specific things can happen. E.g. the action may send an email
or trigger another process or produce other domain specific results. Visual Rules can be extended by adding any
number of custom action types.
The Fire Action element specifies which action it wants to fire. It can fire any action that is defined for the rule itself
or for the packages containing the rule. The name of the action is displayed next to the Fire Action element, e.g.
this fires the action named "EMail" (if today is the customer's birthday):
An action may require additional information to perform its task. For example, sending an email requires the email
addresses of the sender and the recipient, a subject line and the text for the email body. The exact data that is
needed for an action is determined by the type of action fired. When you double-click a Fire Action element in the
rule editor, you can view and modify that data on the Fire Action tab in the Properties.
Related Concepts.
• Section 3.16, “Action” [79]
Related Tasks.
• Section 4.3.12, “Editing a Fire Action Element” [114]
• Section 4.8, “Working with Actions” [154]
Related References.
• Section 5.6.2.4, “Fire Action Tab” [234]
3.5.4. Call Flow Rule
Call Flow Rule elements are used whenever a flow rule wants to reuse other flow rules. The called rule is executed and afterwards processing continues after the Call Flow Rule element. Rules are only allowed to call rules
from the same package, from any subpackage and from any package that is defined to be reused. So in order to
reuse a specific rule you may first have to setup the reused packages properly. See Section 3.3.1, “Rule Package
Reuse” [28] for details.
The Call Flow Rule element specifies the name of the rule being reused. This name is displayed next to the element, like this:
© Bosch Software Innovations GmbH
38/270
Chapter 3. Concepts
The values for any required input of the called rule are also specified within the Call Flow Rule element. This way
rules can forward data from one rule to another. In the same way, any results coming out of the called rule can
be assigned to data elements of the calling rule. This is also specified within the Call Flow Rule element. In other
words, the Call Flow Rule element calls another rule and handles all the data flowing to and from the called rule.
Input and output data is specified on the Call Flow Rule tab in the Properties view.
Related Concepts.
• Section 3.4, “Flow Rule” [29]
• Section 3.3.1, “Rule Package Reuse” [28]
Related Tasks.
• Section 4.3.15, “Editing a Call Flow Rule Element” [115]
Related References.
• Section 5.6.2.5, “Call Flow Rule” [234]
3.5.5. Call Decision Table
A Call Decision Table element is used to execute the decisions of a decision table. The decision table is executed and afterwards processing continues after the Call Decision Table element. A flow rule may only call decision
tables that are located in the same rule package, or in any subpackage or in rule packages that are defined to be
reused. See Section 3.3.1, “Rule Package Reuse” [28] for details about reusing packages.
The Call Decision Table elements specifies the name of the decision table being called. This name is displayed
next to the element, like this:
The values for any required input of the called decision table are also specified within the Call Decision Table element. This way rules can forward data to the decision table. In the same way, any results coming out of the decision table can be assigned to data elements of the calling rule. This is also specified within the Call Decision Table
element. In other words, the Call Decision Table element calls a decision table and handles all the data flowing to
and from the decision table.
Input and output data is specified on the Call Decision Table Rule tab in the Properties view.
Related Concepts.
• Section 3.7, “Decision Table” [48]
• Section 3.3.1, “Rule Package Reuse” [28]
Related Tasks.
• Section 4.4, “Working with Decision Tables” [125]
Related References.
• Section 5.6.2.6, “Call Decision Table” [235]
© Bosch Software Innovations GmbH
39/270
Chapter 3. Concepts
3.5.6. Call Service
Call Service elements are used whenever a rule wants to call a service. The service is called and afterwards processing continues after the Call Service element. Services are external to Visual Rules, so this element allows Visual Rules to reuse functionality available elsewhere.
The Call Service element specifies the name of the service to be called. This name is displayed next to the element, like this:
The values for any required input of the service are also specified within the Call Service element. This way rules
can forward data to the service. In the same way, any results coming out of the service can be assigned to data elements of the calling rule. This is also specified within the Call Service element. In other words, the Call Service element calls an external service and handles all the data flowing to and from that service.
Input data is specified on the Call Service - Input tab in the Properties. Accordingly, the use of any output data is
specified on the Call Service - Output tab.
Related Concepts.
• Section 3.19, “Service” [81]
• Section 3.20, “Service Type” [82]
Related Tasks.
• Section 4.3.17, “Editing a Call Service Element” [117]
Related References.
• Section 5.6.2.7, “Call Service” [236]
3.5.7. Done & Return
The Done & Return element stops any further execution of the rule. This is often useful when the rule has decided
that any further processing is unnecessary, e.g. if some required preconditions are not met. Execution then immediately continues where the rule was originally called.
Related Concepts.
• Section 3.4, “Flow Rule” [29]
3.5.8. Repeat
The Repeat element is used to execute a part of the rule multiple times. This is often useful if the rule must process multiple data items, e.g. "all the items of an order". The rule elements that should be executed multiple times
must be attached to the Repeat element which determines how often it will execute these.
© Bosch Software Innovations GmbH
40/270
Chapter 3. Concepts
There are three different types of Repeat:
Repeat for each of multiple elements
This is used to repeat execution for each one of multiple data elements specified in the Elements field. Every
time it executes, the next data element is assigned to the data element specified in the Assign each element
to field. If the number of data elements is zero, the Repeat is not executed at all.
Repeat while a condition holds
Execution repeats as long as the specified condition is true and ends when the condition is false. If the condition is false right from the beginning, the Repeat is not executed at all. The condition should be formulated
with care in order to prevent situations where the condition is always true. In that case the rule would remain
in an endless loop.
Repeat with counter
This kind of Repeat uses a counter that starts with a given start value (Start) and is incremented each time
by a given step value (Step) until it reaches (or passes) the given end value (End). The current value of the
counter is stored in the data element specified in the Counter field.
Related Tasks.
© Bosch Software Innovations GmbH
41/270
Chapter 3. Concepts
• Section 4.3.13, “Editing a Repeat Element” [115]
Related Reference.
• Section 5.6.2.8, “Repeat Tab” [237]
3.5.9. End Repeat
The End Repeat element is used in cases when the rule has decided that it can end an ongoing Repeat prematurely, e.g. when the Repeat was used to search data and the matching data was found so the rest of the data
doesn't have to be looked at. The End Repeat element must be placed somewhere within the branch attached to
the Repeat element. It will always end the nearest Repeat element. This is important to keep in mind when you
have multiple Repeat elements following each other.
This example illustrates how a Repeat End element is used to end a Repeat once a thousand gifts have been sent
to customers.
Related Concepts.
• Section 3.5.8, “Repeat” [40]
Related Tasks.
• Section 4.3.14, “Editing an End Repeat Element” [115]
3.5.10. Return Exception
The Return Exception element can be used whenever the rule has detected an 'exceptional' situation where it cannot execute any further, e.g. if necessary data is missing or validations have failed. In this case a message describing the exception is generated with the Return Exception element. Afterwards execution immediately continues at the "most recent" Handle Exception element at which rule execution came by before.
The "most recent" Handle Exception element is determined by going backwards from the Return Exception element towards the Start element of the rule and if no Handle Exception element was found this way, search continues in the calling rule backwards from the corresponding Call Flow Rule element. This goes on until the Start element of the initial rule is reached. If no Handle Exception element was found even then, rule execution terminates
and the exception is returned to whoever was calling the rule initially.
© Bosch Software Innovations GmbH
42/270
Chapter 3. Concepts
Related Concepts.
• Section 3.14.6, “Exception” [76]
Related Tasks.
• Section 4.3.18, “Editing a Return Exception Element” [118]
Related Reference.
• Section 5.6.2.9, “Return Exception Tab” [239]
3.5.11. Handle Exception
The Handle Exception element is used to react to 'exceptional' situations. It defines the alternative rule elements
that are executed when 'normal' rule execution within a rule branch triggered a Return Exception element or if
some technical error has occured.
The Handle Exception rule element is displayed differently to all the other elements. It is not attached to the right of
another element but it is shown at the bottom of a box that is drawn around a rule branch. A Handle Exception rule
element is executed if an exception occurs somewhere in this branch or in other rules being called from within that
branch. The Handle Exception element and all elements attached to it are shown on a red background to make it
easier to distinguish the 'normal' flow from the 'exceptional' flow.
This is an example for the use of the Handle Exception element. A customer rating is calculated by reusing an appropriate rule. If anything goes wrong there (e.g. an exception because of missing data or because of a division by
zero) the customer rating is set to a default of 1.
Every exception is handled by only one Handle Exception element (the "most recent" one). Once an exception is
handled, execution continues normally after the branch with the Handle Exception element.
The Handle Exception element can specify a data element to hold the exception that occurred. This way the Handle Exception branch can inspect the exception and its attributes. This is especially useful if you want to do different things depending e.g. on the exception type. If this field remains empty, all exceptions are catched, but a further estimation/evaluation is not possible.
If a data element is specified, only those exceptions are handled that match the type of that data element, i.e. they
must be of the same type or any subtype. Exceptions of other types will remain unhandled by this Handle Exception element.
It is possible to have a Return Exception element as part of the exception handling (on the red background). This
again will generate an exception message that can be handled by another Handle Exception element.
Related Concepts.
• Section 3.14.6, “Exception” [76]
Related Tasks.
• Section 4.3.19, “Editing a Handle Exception Element” [119]
© Bosch Software Innovations GmbH
43/270
Chapter 3. Concepts
Related Reference.
• Section 5.6.2.10, “Handle Exception Tab” [240]
3.5.12. Branch Description
Branch descriptions are used to describe a whole rule branch instead of just individual elements. This is often useful to structure and describe a rule on a larger scale. When a branch description is added to a rule element, a box
is drawn around the branch rooted at that element. The branch description itself is then written across the top of
that box.
It's very useful that when a branch is collapsed, the branch description remains visible.
Related Tasks.
• Section 4.3.25, “Adding a Branch Description” [121]
• Section 4.3.26, “Deleting a Branch Description” [121]
3.5.13. Notes
Rule elements can have notes attached to them. All notes are displayed to the right of the rule and a line connects
them to the rule element.
Notes are meant to be used to leave editorial remarks for yourself or for others involved in the rule authoring process. For that purpose every note shows the name of the user who created it. On the Notes properties tab you
can also see timestamps for every note indicating when it was created.
© Bosch Software Innovations GmbH
44/270
Chapter 3. Concepts
Related Concepts.
• Section 3.15, “Description and Note” [78]
Related Tasks.
• Section 4.3.27, “Adding a Note” [121]
• Section 4.3.28, “Deleting a Note” [121]
Related References.
• Section 5.6.1.2, “Notes Tab” [230]
3.5.14. Rule Element Deactivation
Individual rule elements can be deactivated, which means that they themselves and all elements attached to them
will not be executed. Deactivated rule elements are greyed out and a red icon is displayed ( ).
Deactivation has the same effect as deleting the element and all its successors. However, it is often convenient
during rule authoring and testing to not delete elements but to only temporarily deactivate them.
Related Tasks.
• Section 4.3.29, “Activating/Deactivating a Rule Element” [122]
3.6. Flow Rule Editor
The flow rule editor is used to view and edit a rule. Most of the flow rule authoring process takes place here. The
editor is opened whenever you double-click on a flow rule, e.g. in the Rule Explorer. Multiple rule editors can be
open at the same time.
© Bosch Software Innovations GmbH
45/270
Chapter 3. Concepts
Figure 3.2. Rule Editor
The flow rule editor is a sophisticated graphical editor with a tool palette, drag&drop capabilities, zoom and inplace
editing functionality. "Inplace editing" means that many things can be edited right within the graphical display, e.g.
all the descriptions and/or rule expressions shown next to each flow rule element can be edited simply by double-clicking on them. Some other settings for each flow rule element can be edited in the Properties view. The
Properties view always shows the settings for the currently selected rule element.
When changes have been made to a flow rule, the flow rule editor will indicate this by displaying an asterisk (*)
in front of the flow rule name shown in the editor's tab. Clicking the
changes.
button or pressing Ctrl+S will save these
Related Tasks.
• Section 4.3, “Working with Flow Rules” [103]
Related References.
• Section 5.3.1, “Flow Rule Editor” [205]
3.6.1. Rule Editor Palette
The rule editor has a palette from which the user can select new rule elements to be inserted into the rule. The
palette also contains tools for zooming, adding notes and adding branch descriptions.
The palette can be collapsed and expanded by clicking on the small black arrow in the title bar of the palette.
© Bosch Software Innovations GmbH
46/270
Chapter 3. Concepts
Figure 3.3. Rule Editor palette
Related Tasks.
• Section 4.3, “Working with Flow Rules” [103]
Related References.
• Section 5.3.1.1, “Flow Rule Editor Palette” [205]
3.6.2. Rule Context Palette
The rule editor has a Rule Context palette which displays the data elements, actions and services the rule can access. It also lists the rule tests available for the rule. The palette gives quick access to all these items, so that the
rule author does not have to continuously switch to the Project Explorer. This is especially useful when the rule
editor is maximized.
Depending on the state of the
toolbar button, the list only shows the elements defined and owned by the rule itself, or all elements in the rule package hierarchy or being reused.
All elements can be edited by double-clicking them. A single click on a selected item allows it to be renamed. Elements can be created and deleted using the corresponding
and
buttons.
The palette can be collapsed and expanded by clicking on the small black arrow in the title bar of the palette.
Figure 3.4. Rule Context palette
© Bosch Software Innovations GmbH
47/270
Chapter 3. Concepts
Related Tasks.
• Section 4.3, “Working with Flow Rules” [103]
Related References.
• Section 5.3.1.2, “Rule Context Palette” [206]
3.7. Decision Table
A decision table is a rule representation especially suited for rules with many decisions based on only a few inputs.
The following image shows a Visual Rules decision table that determines the number of bonus points a customer
receives, depending on the kind of bonus card he or she holds (either gold or silver) and the money spent for the
purchase.
According to the decision table, a "gold" card holder which has spent more than $8 will receive 50 points. A "silver"
card holder who has spent less than $8 will receive only 15 points.
Figure 3.5. Decision table
Conditions (yellow) can be either positioned at the left side of the decision table or at the top. For example, the
following picture shows the decision table with an additional condition row for the day of week. On Wednesday,
bonus points are doubled. On all other days (expressed by the empty condition) the normal bonus points apply.
Figure 3.6. Decision table with conditions to the left and at the top
Related Concepts.
• Section 3.4, “Flow Rule” [29]
Related Tasks.
© Bosch Software Innovations GmbH
48/270
Chapter 3. Concepts
• Section 4.4, “Working with Decision Tables” [125]
Related References.
• Section 5.3.2, “Decision Table Editor” [207]
3.7.1. Condition Column/Row
Condition columns or rows (yellow) define the conditions that are being checked by the decision table. Conditions
are always located at the left side or at the top of the decision table. Conditions at the left side are oriented in a column (vertically), while conditions at the top are oriented in rows (horizontally).
There can be any number of condition columns/rows next to each other. Each condition column/row consists of the
condition header and several conditions, one of which can be a special "else" condition.
Condition columns/rows are added to an existing decision table with the Decide tool in the palette or by dragging
an input data element from the Rule Context palette.
Related Concepts.
• Section 3.7, “Decision Table” [48]
Related Tasks.
• Section 4.4.2, “Adding a new Decision Column or Row” [125]
Related References.
• Section 5.3.2.1, “Decision Table Editor Palette” [207]
3.7.2. Assignment Column
An assignment column in a decision table is used to specify values in its cells that are being assigned to the data
element in the column header. In other words, the assignment column contains the values that are the output (or
one of several outputs) of the decision table. The selected cell is determined by the conditions specified in condition columns/rows.
Assignment columns are added to an existing decision table with the Assign tool in the palette or by dragging an
output data element from the Rule Context palette.
Related Concepts.
• Section 3.7, “Decision Table” [48]
Related Tasks.
• Section 4.4.6, “Adding a new Assignment Column” [128]
Related References.
• Section 5.3.2.1, “Decision Table Editor Palette” [207]
3.7.3. Action Column
An action column in a decision table is used to fire actions if specific conditions are true. The action column itself
specifies the action to be fired in its column header. The cells of the column either contain a cross (x) or a dash (-),
depending on whether the action should be fired or not under the conditions leading to that cell.
Action columns are added to an existing decision table with the Fire Action tool in the palette or by dragging an
action from the Rule Context palette.
Related Concepts.
© Bosch Software Innovations GmbH
49/270
Chapter 3. Concepts
• Section 3.7, “Decision Table” [48]
Related Tasks.
• Section 4.4.12, “Adding a new Action Column” [131]
Related References.
• Section 5.3.2.1, “Decision Table Editor Palette” [207]
3.7.4. Exception Column
An exception column in a decision table is used to signal exceptions if specific conditions are true. The exception
column itself specifies the exception to be returned in its column header. The cells of the column either contain a
cross (x) or a dash (-), depending on whether the exception should be returned or not under the conditions leading
to that cell.
Exception columns are added to an existing decision table with the Return Exception tool in the palette.
Related Concepts.
• Section 3.7, “Decision Table” [48]
Related Tasks.
• Section 4.4.14, “Adding a new Exception Column” [132]
Related References.
• Section 5.3.2.1, “Decision Table Editor Palette” [207]
3.8. Decision Table Editor
The decision table editor is used to view and edit a decision table. Most of the decision table authoring process
takes place here. The editor is opened whenever you double-click on a decision table, e.g. in the Rule Explorer.
Multiple decision table editors can be open at the same time.
Figure 3.7. Decision Table Editor
The decision table editor is a sophisticated graphical editor with a tool palette, drag&drop capabilities, zoom and
inplace editing functionality. "Inplace editing" means that the contents of the decision table can be edited right within the graphical display and can be edited simply by double-clicking on the specific cell. Some other settings for
© Bosch Software Innovations GmbH
50/270
Chapter 3. Concepts
each decision table element can be edited in the Properties view. The Properties view always shows the settings
for the currently selected cell of the decision table.
When changes have been made to a decision table, the decision table editor will indicate this by displaying an asterisk (*) in front of the decision table name shown in the editor's tab. Clicking the
save these changes.
button or pressing Ctrl+S will
The decision table editor highlights the conditions that lead to the currently selected cell. That makes navigating large tables much easier. You can turn this feature on/off in the View context menu or with the corresponding
Highlight Condition Path button in the toolbar.
Figure 3.8. Decision table with selected conditions
3.8.1. Decision Table Editor Palette
The decision table editor has a palette from which the user can select new decision table elements to be inserted
into the decision table. The palette also contains tools for zooming and selecting mulitple cells of the decision table.
The palette can be collapsed and expanded by clicking on the small black arrow in the title bar of the palette.
Figure 3.9. Decision Table Editor palette
3.8.2. Decision Table Context Palette
The decision table editor has a Rule Context palette which displays the data elements and actions the decision
table can access. It also lists the rule tests available for the decision table. The palette gives quick access to all
these items, so that the decision table author does not have to continuously switch to the Rule Explorer. This is
especially useful when the decision table editor is maximized.
Depending on the state of the
toolbar button, the list only shows the elements defined and owned by the decision table itself, or all elements in the rule package hierarchy or being reused.
All elements can be edited by double-clicking them. A single click on a selected item allows it to be renamed. Elements can be created and deleted using the corresponding
and
buttons.
The palette can be collapsed and expanded by clicking on the small black arrow in the title bar of the palette.
© Bosch Software Innovations GmbH
51/270
Chapter 3. Concepts
Figure 3.10. Decision Table Context palette
3.9. State Flow
A state flow is a graphical representation of the different states, which a system can adopt during runtime, and it
specifies the events, which may cause changeovers between individual states.
Every state flow has a name that identifies it. All state flows in a rule package must have different names, so that
each state flow can be uniquely identified by its name and package. State flows can have the same name if they
are located in different rule packages.
Figure 3.11. Graphical representation of a state flow in Visual Rules
Related Tasks.
• Section 4.2.14, “Creating a new State Flow” [99]
© Bosch Software Innovations GmbH
52/270
Chapter 3. Concepts
3.10. State Flow Element
3.10.1. State
The state element represents an intermediate state that a system can adopt.
Related Concepts.
• Section 3.9, “State Flow” [52]
3.10.2. End State
The end state element represents a final state that a system can adopt.
There may be several end states within a state flow.
Related Concepts.
• Section 3.9, “State Flow” [52]
3.10.3. Transition
The transition element represents a changeover between states. Within a state flow it is accompanied by a yellow
diamond
.
A transition can be based on a transition rule. If so, this is indicated by a rule symbol
the yellow diamond.
in
Related Concepts.
• Section 3.9, “State Flow” [52]
3.10.4. Transition Rule
A transition rule is a flow rule, which a transition in a state flow is based on.
Related Concepts.
• Section 3.9, “State Flow” [52]
© Bosch Software Innovations GmbH
53/270
Chapter 3. Concepts
3.10.5. Transition Target
A transition target is a flow rule element that represents the exit of a transition rule. Here a state is specified which
is adopted next.
Related Concepts.
• Section 3.9, “State Flow” [52]
3.11. State Flow Editor
The state flow editor is used to view and edit a state flow. The editor is opened whenever you double-click on a
state flow, e.g. in the Rule Explorer. Multiple state flow editors can be open at the same time.
Figure 3.12. State Flow Editor
The state flow editor is a sophisticated graphical editor with a tool palette, drag&drop capabilities, zoom and inplace editing functionality. "Inplace editing" means that many things can be edited right within the graphical display.
Some other settings for each state flow element can be edited in the Properties view. The Properties view always
shows the settings for the currently selected state flow element.
When changes have been made to a state flow, the state flow editor will indicate this by displaying an asterisk (*)
in front of the state flow name shown in the editor's tab. Clicking the
changes.
button or pressing Ctrl+S will save these
3.11.1. State Flow Editor Palette
The state flow editor has a palette from which the user can select new state flow elements to be inserted into the
state flow. The palette also contains tools for zooming and adding notes.
The palette can be collapsed and expanded by clicking on the small black arrow in the title bar of the palette.
© Bosch Software Innovations GmbH
54/270
Chapter 3. Concepts
Figure 3.13. State Flow Editor palette
3.11.2. State Flow Context Palette
The state flow editor has a palette which displays the data elements that the state flow can access. The palette
gives quick access to all these items, so that the state flow author does not have to continuously switch to the
Project Explorer. This is especially useful when the state flow editor is maximized.
Depending on the state of the
toolbar button, the list only shows the elements defined and owned by the state
flow itself, or all elements in the rule package hierarchy or being reused.
All elements can be edited by double-clicking them. A single click on a selected item allows it to be renamed. Elements can be created and deleted using the corresponding
and
buttons.
The palette can be collapsed and expanded by clicking on the small black arrow in the title bar of the palette.
Figure 3.14. State flow Context palette
3.12. Expressions
Expressions are at the core of all rules in Visual Rules. Expressions are used to define the conditions used for decisions and the formulas used for computations and for many other things. Almost every rule element requires one
or multiple expressions that define what exactly this rule element should do.
Expressions are the instructions that are evaluated by Visual Rules when processing a rule. Within such an expression you use operators, data elements and functions to access data, carry out arithmetic operations and make
decisions.
Example 3.2. Simple expressions
17
-1 + 5
(13.5 – 100)*9
Be aware that for floating points the decimal separator is always a period, regardless of regional settings.
Use parentheses to influence the order of evaluation. The (13.5 – 100)*9 example from above first calculates the
difference between 13.5 and 100 and then multiplies the result by 9. A different result occurs when the parentheses are left off. 13.5 – 100*9 results in 100 being multiplied by 9 and the result of this being subtracted from 13.5.
You can read more about the precedence of operators further down in this section.
Example 3.3. Further notations for numbers
8.3% (percent notation)
3e8 (exponential notation)
© Bosch Software Innovations GmbH
55/270
Chapter 3. Concepts
Numbers with a percent sign are automatically divided by 100, so. 8.3% = 0.083. Scientific notation is a short form
for the multiplication of a number with a power of ten, so 3e8 = 3 times 10 raised to the 8th power = 300000000
and 2e-3 = 0.002.
You can refer to the values of data elements (input/output, internal, constant) in expressions simply by writing the
name of the data element.
Example 3.4. Expressions with data elements
purchase_limit > 1000
disposal_limit + 100.0
deposit_value + amountOfShares * ExRateEURO
Share.ExRateEURO * 1.95583 < ThresholdValue
When using data elements be aware that their data types have to correspond. Data types can't be combined in just
any fashion. For example, a String cannot be multiplied by a Float, because there is no mathematical rule for doing so. Just like a Boolean can't be subtracted from a Date.
Example 3.5. Invalid expressions
"String" * 5
"A" – true
(10 - 1
Any expression you enter is validated by Visual Rules. Any errors are shown in the Problems view and the expression will get a marker indicating the problem. For example, the expression
"String" * 5
produces the following error message in the Problems view: Operator "*" is not defined for the types "String, Integer".
Related Concepts.
• Section 3.14, “Data Type” [71]
• Section 3.13, “Data” [67]
• Section 3.12.1, “Arithmetic Operators” [56]
• Section 3.12.4, “Comparison Operators” [57]
• Section 3.12.5, “Logical Operators AND, OR, NOT” [57]
• Section 3.12.7, “Calling Functions” [58]
• Section 3.12.20, “Operator Precedence” [66]
Related Tasks.
• Section 4.10, “Working with Expressions” [157]
• Section 4.10.1, “Using the Code Assist” [157]
3.12.1. Arithmetic Operators
The simple arithmetic operators are +, -, *, /. They carry out addition, subtraction, multiplication or division of both
operands.
11 + 2 = 13
64 - 14 = 40
3 * 6 = 18
11 / 2 = 5.5
© Bosch Software Innovations GmbH
56/270
Chapter 3. Concepts
The div operator divides both operands and delivers a whole number result.
11 DIV 2 = 5
11 DIV 3 = 3
The modulo operator divides both operands and delivers a whole number remainder.
11 MOD 2 = 1
11 MOD 3 = 2
3.12.2. String Concatenation Operator &
The & operator is used to concatenate individual strings into a larger string. This can be used to embed the values
of data elements into a text, like this:
outputText := "The price for the movie ticket is: $" & price & " including a weekend surcharge
of $" & weekend_surcharge
Data elements of a different basic data type (e.g. Float) will be automatically converted to strings before concatenated.
3.12.3. Embedded Expressions in a String
As a convenient alternative to concatenating strings with values using the & operator, the values may be embedded in a string using the ${...} notation. You can put any expression between the curly brackets.
outputText := "${bonus_points} bonus points have been calculated for card ${bonus_card}"
Strings cannot be used within a ${...} section, i.e. you cannot put quotes there.
Related Concepts.
• Section 3.12.2, “String Concatenation Operator &” [57]
3.12.4. Comparison Operators
The comparison operators are =, <>, <, >, <= and >=. They compare both operands and, depending upon the result,
deliver the result as true or false.
age > 10
age <= 65
age = 18
name <> "Peter"
"Anton" < "Beatrice"
(10 < 12) = true
Checks for equality (=) or inequality (<>) can be done with any data type.
Relative comparisons like "less than" (<), "greater than" (>), "less or equal than" (<=) or "greater or
equal than" (>=) can be done with Float, Integer, String, Date, Time and Timestamp values. Visual
Rules uses simple lexicographical ordering for strings.
3.12.5. Logical Operators AND, OR, NOT
The AND operator corresponds to a logical AND operator. It compares two Boolean values and returns true, if both
Boolean values are true.
© Bosch Software Innovations GmbH
57/270
Chapter 3. Concepts
true
true
false
false
AND
AND
AND
AND
true = true
false = false
true = false
false = false
age > 10 AND age < 18
The OR operator corresponds to a logical OR operator. It compares two Boolean values. If at least one of these
Boolean values is true, the OR operator returns true:
true
true
false
false
OR
OR
OR
OR
true = true
false = true
true = true
false = false
age < 18 OR age > 65
The NOT operator reverses a logical value.
NOT true = false
NOT false = true
(age > 18) AND NOT (age > 65)
3.12.6. BETWEEN Operator
The BETWEEN operator is used to determine if a value belongs to an interval.
5
5
5
13
BETWEEN
BETWEEN
BETWEEN
BETWEEN
[5,9]
]5,9]
[1,9]
[1,9]
=
=
=
=
true
false
true
false
Interval limits are put in square brackets. A closed interval (brackets turned inside) indicates that the value limit is
inclusive. An open interval (bracket turned to the outside) indicates that the value limit is exclusive. In the example
above, ]5,9] means that the value is greater than 5, but it does not equal 5.
3.12.7. Calling Functions
To call a function specify the function name followed by parentheses containing a list of parameters. Functions can
have one, multiple or no function parameters.
Example 3.6. Calling functions
currentDate() = #2007-12-24#
sqrt(2)
startsWith("String", "Characters")
The examples above show the currentDate() function call without function parameters and function calls with one
and two parameters.
Related Concepts.
• Section 3.18, “Function” [81]
3.12.8. Accessing Attributes
Data elements of a structured type have one or multiple attributes. In order to refer to the value of a specific attribute of a structured data element, you write the name of the data element, followed by a dot (.) and the attribute
name. E.g. customer.name refers to the value of the attribute name of the customer. If an attribute itself is a structure,
repeated use of the dot is used to navigate to the desired attribute.
© Bosch Software Innovations GmbH
58/270
Chapter 3. Concepts
Example 3.7. Accessing attributes of structures
Assuming there are two data elements, employee of type Employee and department of type Department:
employee.first_name
Value of the attribute first_name of employee
employee.schedule.appointments[3].date_of_appointment
Value of the attribute date_of_appointment in the 3rd element
employee = department.supervisor
Returns true, if the employee is
of appointments in the schedule of employee
the supervisor of department
Related Concepts.
• Section 3.14.3, “Structure” [74]
• Section 3.13, “Data” [67]
3.12.9. Accessing List Elements
Accessing a specific element of a list is accomplished by specifying the list, followed by an index enclosed in
square brackets. Any expression can be used as the index, as long as it returns a whole number result.
In Visual Rules the first element of a list has index 1.
Example 3.8. Accessing elements in a list
list[3]
customerList[index + 1]
Related Concepts.
• Section 3.14.7, “Collection” [76]
3.12.10. NULL
The literal NULL has a special meaning. It indicates a missing value. Input or internal data elements can have the
value NULL. It is possible to check if this is the case using this expression:
© Bosch Software Innovations GmbH
59/270
Chapter 3. Concepts
var = NULL
This expression returns true if the variable var does not have a value. Using a decision node you can thus, for example, query a non-initialized input data element and react accordingly.
3.12.11. IN Operator
The IN operator returns true if a value is present in a collection.
5 IN {1,2,3} = false
5 IN {1,5,3} = true
NOT (5 IN {1,2,3}) = true
Related Concepts.
• Section 3.14.7, “Collection” [76]
3.12.12. AVAILABLE Operator
The AVAILABLE operator can be used to check if an input data element was given a value. That is useful if the input
data element is not required. There is a shorthand for the AVAILABLE operator which is simply a question mark.
AVAILABLE optionalParameter
optionalParameter ?
The AVAILABLE operator can only be used for input data elements. You cannot specify other expressions.
Related Concepts.
• Section 3.13.2, “Input/Output Data” [69]
3.12.13. NAMEOF Operator
The NAMEOF operator returns the name of a data element. For example,
NAMEOF price
will return the string "price". The advantage of using the NAMEOF operator, instead of simply specifying the name as
a string, is that the NAMEOF expression will correctly be updated whenever the data element is renamed.
It is also possible to use more complex expressions with the NAMEOF operator. This will simply return the whole expression as a string. For example,
NAMEOF shoppingcart.product[5].price
will produce the string "shoppingcart.product[5].price". (Note: If the expression is enclosed in brackets, these
will not be included in the resulting string.)
3.12.14. Collection Operators
If a data element is a collection, it can hold multiple values of the same type (other terms you may be familiar with
for this kind of data element are "list" or "array"). A collection itself is defined by listing the desired elements in curly
brackets. The elements in a collection are separated by commas. An empty collection is simply written as {}.
Example 3.9. Collection values
{ 1, 2, 3 }
{ "RED", "GREEN", "YELLOW", "BLUE" }
{ customerA, customerB, customerC }
{}
© Bosch Software Innovations GmbH
60/270
Chapter 3. Concepts
Two collections are unified using the plus operator. The result is a collection that contains the elements of the first
collection and those of the other collection.
Example 3.10. Union of collections
collection1 + collection2
stringList + {"anotherString"}
The minus operator is used to produce a collection that is the "difference" between two other collections. The result is a collection that contains the elements from the first collection that are not in the second collection.
The operation takes into account the number of times an element is contained in the collections. Thus, if the first
collection contains an element 7 times and the second collections contains this element 3 times then the result will
contain that element 4 times.
Example 3.11. Difference of collections
collection1 - collection2
stringList - {"someString"}
The INTERSECT operator is used to determine the intersection of two collections. The result is a set that contains only those elements that are in both collections.
Example 3.12. Intersection of two sets
set1 INTERSECT set2
intersection := set1 INTERSECT set2 INTERSECT set3
Related Concepts.
• Section 3.14.7, “Collection” [76]
3.12.15. Collection Functions
There are special functions for collections available that can be used to easily sort, search, convert or filter the elements of collections. The first and second parameters of these functions are delimited by a colon instead of a comma. The second parameter is a special expression, because it is evaluated for each element of the collection and
provides the values for sorting, filtering or else. Within these expressions, it is possible to use the word THIS to refer to the element from the collection currently evaluated. However, the word THIS can be left out when accessing
attributes, unless it is needed to resolve ambiguity.
The following table lists all collection functions which are illustrated by examples further below.
© Bosch Software Innovations GmbH
61/270
Chapter 3. Concepts
Table 3.3. Collection functions
Collection function
Description
sortAsc( collection :
sortExpression )
Returns a list sorted ascendingly according to the given sort expression.
sortDesc( collection :
sortExpression )
Returns a list sorted descendingly according to the given sort expression
exists( collection :
condition )
Returns true, if at least one element of the given collection fulfills the conditional expression
forall( collection :
condition )
Returns true, if all elements of the given collection fulfill the conditional expresison.
count( collection : condition )
Returns the number of elements that fulfill the conditional expression
first( collection : condition )
Returns the first element in the collection that fulfills the conditional expression, or
null, if no element is found.
last( collection : condition )
Returns the last element in the collection that fulfills the condition specified by the
<THIS expression>, or null, if no element is found.
<THIS expression> must be a boolean expression, i.e. it must evaluate to either
true or false.
min( collection : expression )
Returns the element in the collection for which the expression evaluates to the lowest value.
max( collection : expression )
Returns the element in the collection for which the expression evaluates to the highest value.
filter( collection :
condition )
Returns a collection that contains those elements of the given collection that fulfill
the condition.
select( collection : expression )
Returns a collection whose elements are the result of the expression evaluated for
every element of the given collection.
rankAsc( list : sortExpression, element, max-
Inserts the element into the list at the right position so that the list remains correctly sorted ascendingly according to the sort expression. If the resulting list contains
more than maxElements elements, the exceeding elements at the end will be removed. The remaining list is returned as the result.
Elements )
Note: This requires the given list to be already sorted ascendingly according to the
sort expression.
rankDesc( list : sortExpression, element, maxElements )
Inserts the element into the list at the right position so that the list remains correctly sorted descendingly according to the sort expression. If the resulting list contains
more than maxElements elements, the exceeding elements at the end will be removed. The remaining list is returned as the result.
Note: This requires the given list to be already sorted descendingly according to the
sort expression.
3.12.15.1. Sorting of Collections
and sortDesc() sort a collection by a given criterion. The criterion is defined by an expression specified
as the second parameter. The result of the sortAsc() or sortDesc() function is the sorted collection. The original
collection is left unchanged.
sortAsc()
© Bosch Software Innovations GmbH
62/270
Chapter 3. Concepts
Example 3.13. Sorting collections
/* Sorting numbers by their value: THIS */
sortAsc( { 8.2, 4.3, 6} : THIS) = {4.3, 6, 8.2}
sortDesc( { 8.2, 4.3, 6 } : THIS) = {8.2, 6, 4.3}
/* Sorting strings by their length: length(THIS) */
sortAsc( { "longer", "very long", "tiny" } : length(THIS))
/* Sorting customers descendingly by their account balance. */
/* This will only work if the elements of the 'customers'
*/
/* collection have a 'balance' attribute.
*/
sortDesc( customres : THIS.balance )
/* In the last example we could also omit the keyword THIS
sortDesc( customers : balance )
*/
3.12.15.2. Searching Collections
The exists() and forall() functions test if a certain condition is fulfilled by at least one or all of the collection's elements, respectively. The condition is specified by an expression and must return a boolean value. exists() returns
true, if at least one element fulfills the condition. forall() only returns true, if all elements fulfill the condition. Similarly the count() function determines exactly how many elements fulfill the condition.
Example 3.14. Searching collections
/* Yes, there is one number greater than 5 ... */
exists( { 8.2, 4.3, 6} : THIS > 5) = true
/* ... but not all numbers are greater than 5
forall( { 8.2, 4.3, 6} : THIS > 5) = false
*/
/* Is there a customer with a balance greater than $10,000?
exists( customers : balance >= 10000 )
*/
/* Are all customer accounts unlocked? */
forall( customers : NOT account.locked )
/* How many customers have overdrawn their accounts? */
count( customers : balance < 0 )
The first() and last() functions find the first or last element of a collection that fulfills a condition. This is often
useful in connection with sorted collections.
/* The first/last customer with over 10000 dollars in his account */
first( customers : balance >= 10000 )
last( customers : balance >= 10000 )
/* The customer that has minimally overdrawn his account */
first( sortDesc( customers : balance ) : balance < 0 )
/* The customer that has *just* not overdrawn his account */
last( sortDesc( customers : balance ) : balance >= 0 )
3.12.15.3. Searching for maximums and minimums
The functions min() and max() search collections for the lowest or highest element according to a specific criterium.
Example 3.15. Searching for maximums and minimums
/* The customer with the shortest name */
min( customers : length(name) )
/* The wealthiest customer */
max( customers : balance )
© Bosch Software Innovations GmbH
63/270
Chapter 3. Concepts
3.12.15.4. Filtering Collections
The filter() function tests the elements of a collection whether they fulfill a certain condition. The resulting collection does only contain those elements that have fulfilled the condition. All other elements are not in the resulting
collection. The given <THIS expression> must have a boolean result. The filter() function leaves the original collection unchanged.
Example 3.16. Filtering collections
/* Returns the numbers greater than 5: THIS > 5 */
filter( { 8.2, 4.3, 6} : THIS > 5) = {8.2, 6}
/* Returns the strings shorter than 6 characters: length(THIS) < 6 */
filter( { "longer", "very long", "tiny" } : length(THIS) < 6)
/* Returns all customers with at least $10,000 on their accounts */
filter( customers : balance >= 10000 )
3.12.15.5. Converting Collections
The select() function is used to convert the elements of a collection into something else. The conversion is specified by the <THIS expression> which is evaluated for every element. The result of the select() function is a collection with the same number of elements as the original collection but every element is the result of the evaluation of
the <THIS expression>.
Example 3.17. Converting collections
/* Converts all numbers to strings */
select( { 8.2, 4.3, 6} : toString(THIS)) = { "8.2", "4.3", "6" }
/* Returns a collection of customer names */
select( customers : firstname + " " + name)
/* Returns the customer numbers of all customers with at least */
/* $10,000 on their accounts
*/
select( filter( customers : balance >= 10000 ) : customerno)
3.12.15.6. Ranking functions
The ranking functions are used to incrementally build sorted lists from single elements, e.g. a list of the best customers according to revenue. The rankAsc or rankDesc functions take an already sorted list and insert a new element at the right position according to a given sort expression. The functions also make sure that the list does not
exceed a given size.
The ranking functions are usually used within an Assignment element after a Repeat element, like in the following example. The assignment in the example would be positioned after a Repeat element that would go over the
complete customer base - let's assume a million customers - and assign each one to the currentCustomer data element. The bestCustomers list would then always contain the 10 best customers according to revenue found so far.
Example 3.18. Ranking functions
/* Determine 10 best customers (Assignment within a Repeat going over all customers) */
bestCustomers := rankDesc(bestCustomers : revenue, currentCustomer, 10)
The advantage of the ranking functions over a sort function is that it can work with elements that are available one
by one, while the sort function would require to have all customers available when it is called. All customers would
have to be loaded to the computer memory in order to perform the sort, which is not practical in many situations.
3.12.16. Map Operators
Visual Rules supports Map data elements. Maps contain multiple values that are not simply identified by their index, but by another value (called a key). Values and keys can be of any data type, including structured types. To
access and set values in a map, you use square brackets and put the key value inbetween. E.g. in a String ->
String Mapping, you can create an entry with the following assignment:
© Bosch Software Innovations GmbH
64/270
Chapter 3. Concepts
Example 3.19. Set map value
state["IN"] := "Indiana"
The key and value types can be any simple or complex type. E.g. it is possible to have a Customer -> Contract
mapping.
To merge two maps, you use the ADD assignment, like this. The result is a map that contains both the entries from
map1 and map2.
Example 3.20. Merge maps
map1 ADD map2
You can remove an entry by specifying its key in a REMOVE assignment:
Example 3.21. Remove element from map
map REMOVE key
And you can empty a map (remove all entries) with the CLEAR assignment:
Example 3.22. Clear map
map CLEAR
Related Concepts.
• Section 3.5.2.1, “ADD, REMOVE and CLEAR Assignments” [36]
3.12.17. Map Functions
There are some built-in functions specifically used for maps. The functions keys() and values() give access to only the keys or the values of a map, respectively. keys() returns a set of all the keys, while values() returns a collection of the values.
can now be used to count the number of entries/keys in a map. copy() creates a copy of a map and all its
elements. The copy() function performs a deep copy, i.e. the map and all contained elements are copied.
count()
The following table lists all map functions.
Table 3.4. Map functions
Map function
Description
copy (Any -> Any Mapping
from) : Any -> Any Map-
Returns a (deep) copy of the map and all contained elements.
count (Any -> Any Mapping map) : Integer
Returns an integer value with the number of elements (i.e. keys) of the map.
keys (Any -> Any Mapping
map) : Any Set
Returns a set of all keys of the map.
values (Any -> Any Mapping map) : Any Collec-
Returns a collection of all values of a map.
ping
tion
3.12.18. new Operator
The new operator creates a new instance of a structure (or exception). The syntax is new <name of structure>, e.g.
© Bosch Software Innovations GmbH
65/270
Chapter 3. Concepts
k := new Customer
The newly created object is initialized with the default values specified for the structure's attributes.
It is possible that there are structures that are not createable and you will get an error marker if you
use the new operator.
These structures are external and imported. You have to contact your technical expert to get a solution to this problem.
Related Concepts.
• Section 3.14.3, “Structure” [74]
• Section 3.14.6, “Exception” [76]
3.12.19. isA and asA Operators
The isA and asA operators are useful for working with structures that are sub types of each other. They allow to
check for the actual data type of a value and to convert a data type to a sub type thereof.
In order to test for the specific type of a structured value, you can use the isA operator. This will return true if the
value is of the specified data type or any sub type thereof, otherwise false.
person isA Customer
The asA operator can be used to tell Visual Rules that it should consider a value to be of the given sub type. This is
useful in order to access attributes that are defined on the sub type only.
For example, a data element of type Person may actually contain a value of a sub type. In this case it is a Customer.
In order to access the attribute customerId, which only a Customer has, but not a Person, you need to first use the
asA operator to change the type to Customer, and then access the attribute with the dot operator, like this:
(person asA Customer).customerId
The isA operator in Visual Rules is equivalent to the instanceof operator in Java. Also, the asA operator in Visual Rules is equivalent to a cast in Java.
Related Concepts.
• Section 3.14.3, “Structure” [74]
• Section 3.14.4, “Super Types” [75]
3.12.20. Operator Precedence
The following table shows all operators available in Visual Rules.
Operators with a higher priority are evaluated before operators with a lower one. Operators with the same priority
are evaluated from left to right in the expression. Parentheses have the highest priority and can be used to enforce
the exact order for evaluating an expression.
© Bosch Software Innovations GmbH
66/270
Chapter 3. Concepts
Table 3.5. Operators for expressions
Priority
Operator
Meaning
14
()
Highest precedence with parentheses
13
.
Attribute access
12
[]
List element access per index (first element has index 1)
11
THIS
Element access within collection functions
10
asA
Type conversion
9
-
9
NOT
9
AVAILABLE
9
NAMEOF
Returns the name of a data element
8
*
Multiplication (Any, Float, Integer)
8
/
Division (Any, Float, Integer)
8
DIV
Whole number division (Any, Float, Integer)
8
MOD
Remainder of whole number division (Any, Float, Integer)
7
+
Addition (Any, Float, Integer)
7
-
Subtraction (Any, Float, Integer)
7
INTERSECT
Intersection of collections
6
&
Concatenation (Any, String)
5
<
Less than (Float, Integer, String, Date, Time, Timestamp)
5
>
Greater than (Float, Integer, String, Date, Time, Timestamp)
5
<=
Less than or equal to (Float, Integer, String, Date, Time, Timestamp)
5
>=
Greater or equal to (Float, Integer, String, Date, Time, Timestamp)
5
BETWEEN
Checks whether a value lies within the specified interval (see below) (Number,
String, Date)
5
IN
Checks whether a value is present in a collection
4
isA
Checks whether a value is of a specific type
3
=
Equals operator
3
<>
Not equals operator
2
AND
Logical AND operation (Boolean)
1
OR
Logical OR operation (Boolean)
(unary)
Negation (Any, Float, Integer)
Logical negation (Any, Boolean)
or ?
Checks if an input data element has a value
3.13. Data
Rules need data to perform their tasks. Every rule in Visual Rules clearly specifies the data that goes into the rule
(input data) and the data that comes out of the rule as a result (output data). Additionally, a rule may define data
that it uses internally only (internal data and constant data).
Data can be defined in different locations within your rule model. The best way is to define data on the rule level, meaning that all data elements defined there are only visible to that specific rule. Input data and output data
© Bosch Software Innovations GmbH
67/270
Chapter 3. Concepts
defined on the rule level clearly indicate what data will go into that rule and what the results will be. When rule A
is called by another rule B, rule B will have to specify values for all input data defined for rule A. Rule B will afterwards be able to read any results from the defined output data of rule A.
Other possible locations for data definitions are rule packages or the rule model itself. Data defined on a rule package is shared by all the rules in that package and any of its sub packages. This is convenient if multiple rules need
the same data. In that case these rules go into the same package and the common data is defined on the package. For this reason you have to specify a unique name for each data element to clearly identify the data in the
rules.
The complete set of input, output and internal data of a rule is the sum of all data elements defined
for the rule plus all data elements defined for the rule package and all packages above that. In other
words, a rule has access to all data elements that can be found by going up the package hierarchy
starting from the rule up to the rule model (which is the top level rule package). The sum of all data
available to a rule is also called the "data context" of the rule.
Related Concepts.
• Section 3.14, “Data Type” [71]
• Section 3.4, “Flow Rule” [29]
• Section 3.3, “Rule Package” [26]
3.13.1. Common Data Properties
All different kinds of data definitions (input/output, internal, constant) have common properties, e.g. every data element has a name and a description. The following table lists all common data properties and their meanings.
Name
Every data element must have a name that is used in expressions to refer to the value of that data element.
Names can consist of letters and numbers but they must start with a letter. They cannot contain whitespace.
However, an underscore _ is a valid character. For example, valid names are: customer, CREDITLIMIT, preferredCustomers, this_is_a_valid_name.
It's a convention for all data elements to have a lowercase letter as first character, except for
constants which should have uppercase letters only. When the name contains multiple words,
then either the first letter of each word should be written in uppercase (e.g. preferredCustomers)
or the words should be separated by underscores (this_is_a_valid_name).
Two data elements cannot have the same name when they are defined on the same rule or the same rule
package. However, two data elements defined on different rules or different rule packages can have the same
name.
Description
Each data element can have a description. Descriptions should fully explain the meaning of the data element
and its value. Users can access descriptions from many other places in Visual Rules, e.g. from within the
Code Assistant when entering a rule expression.
Default Value
If a default value for a data element is specified, then this will be its initial value until it is set to a different value. If a default value is not specified, then implicit default values for the data type apply. For example, a data
element of type Float will have a default value of 0 (Zero) if not defined differently. A structure is created by
default. To suppress the creation of a structure specify null as the default value.
Default values can also be specified for structured data elements or data elements containing multiple values.
Type
All data elements have a data type. A data type specifies what kind of values that data element can contain.
There are several built-in data types like Date or String or Float. These data types can be extended by user-defined data types, especially also structured types with multiple attributes, e.g. a Customer type that defines the attributes of a customer: first_name, last_name, gender, birthdate and address.
There is also a built-in data type called Any. This is the default type of all newly created data elements and
means that this element can have any kind of value. This is convenient because it allows the rule author to initially ignore data types when writing rules.
© Bosch Software Innovations GmbH
68/270
Chapter 3. Concepts
Multiple
A data element can be multi-valued which means that it can hold multiple values of the same type. These are
called collections or maps. A data element is a collection or map when the Multiple attribute is set.
There are special assignment rule elements (ADD, REMOVE, CLEAR) for working with collections and maps.
Also, the Repeat element (more precisely: Repeat for each of multiple elements) is very useful when a rule
has to look at the individual elements of a collection.
Implementation
A data element which is multi-valued (see above) can be implemented in four different ways. It can be either a collection, a list, a set or a map. See the related concepts Section 3.14.7, “Collection” [76] and Section 3.14.8, “Map” [78] for details.
Related Concepts.
• Section 3.14, “Data Type” [71]
• Section 3.14.7, “Collection” [76]
• Section 3.14.8, “Map” [78]
3.13.2. Input/Output Data
Input/Output data is used to specify data that goes into rules and comes out of them as a result. Each data element in this category can be either input or output or both input and output. This is defined by the Input/Output
setting.
Additionally, input data elements can be defined to be required. That means that a value must always be specified
for this input element when the rule is called. When the input is not required, a value is optional.
Required input data will be indicated by a small red dot in the element's icon.
Input data can be defined both on the rule level or on the rule package level. Values for input data defined on the
rule level will always have to be specified when the rule is reused. Values for input data defined on the rule package level will have to be specified only if the rule reusing the other rule is not located in that same package or any
sub-package thereof. In other words, input data on the rule package will have to be initialized only when a rule of
that package is reused from outside of that package.
Related Tasks.
• Section 4.6.1, “Defining Input/Output Data Elements” [140]
• Section 4.6, “Working with Data” [140]
3.13.3. Internal Data
Internal data elements are used by rules internally only, e.g. to hold intermediate results. Internal data elements
should be defined on the rule level to ensure that they can only be used by that one rule. However, internal data el-
© Bosch Software Innovations GmbH
69/270
Chapter 3. Concepts
ements can also be defined on the package level and are then shared by all rules in this package or in any of its
sub-packages. In that fashion, rules can use internal data elements to exchange data.
Internal data elements can be static. In that case their value is initialized only once when the rules are executed
for the first time. Afterwards they retain their value between rule executions. Static data elements are ideal to hold
large amounts of reference data that does not change often or not at all.
The values of static data elements are shared across multiple rule executions. This includes rule executions that happen in parallel, i.e. at the same time. So care must be taken when values of static data elements are changed, because that change is immediately visible to all ongoing rule executions.
Related Tasks.
• Section 4.6.2, “Defining Internal Data Elements” [141]
• Section 4.6, “Working with Data” [140]
3.13.4. Constant Data
There is a third category of data called constant data. The values of constant data - as the name implies - cannot
be changed by any rule. Constants usually define values that parameterize rules, e.g. instead of defining a credit
limit within a rule, you can specify the limit as a constant and then refer to that constant from within your rule.
Related Tasks.
• Section 4.6.3, “Defining Constant Data Elements” [142]
© Bosch Software Innovations GmbH
70/270
Chapter 3. Concepts
• Section 4.6, “Working with Data” [140]
3.14. Data Type
All data elements have a data type. A data type specifies what kind of values the data element can contain. There
are several built-in data types like Date or String or Float. A data element of type Date can contain only date values. It can not contain a number or some text, only dates.
There is also a built-in data type called Any. This is the default type of all newly created data elements and means
that this element can have any kind of value. A data element of type Any can also contain a data value, but also a
number or some text. This is convenient because it allows the rule author to not have to consider data types initially when writing rules. However, it is also easier to make mistakes when using the Any type. E.g. it is perfectly fine to
multiply two Any values in a rule. However, if they are actually a date and a string, then multiplication doesn't make
any sense and will cause the rule to fail when it is executed. So it is always a good idea to not "overuse" the Any
type.
In addition to the built-in data types it is also possible to have user-defined data types. User-defined data types are
located in the Data Types folders. They can be defined on the rule level. On the other hand, it is advisable to defined them on the package or even rule model level, so that they are shared among all the rules in the model.
There are different kinds of user-defined data types. The most important one is a structure. Structures are a collection of multiple values (called attributes) that belong together, e.g. a Customer structure defines the attributes of
a customer: first_name, last_name, gender, birthdate and address. A data element of type Customer can contain a
value for each of these attributes.
Other kinds of user-defined data types are enumerations, type aliases and exceptions. These and all the other
kinds of data types will be explained in detail in the following sections.
It's a convention for data type names to have an uppercase letter as first character.
Related Concepts.
• Section 3.14.1, “Basic Data Type” [71]
• Section 3.14.2, “Type Alias” [74]
• Section 3.14.3, “Structure” [74]
• Section 3.14.5, “Enumeration” [76]
• Section 3.14.6, “Exception” [76]
• Section 3.14.7, “Collection” [76]
Related Tasks.
• Section 4.6, “Working with Data” [140]
• Section 4.7, “Working with Data Types” [150]
• Section 4.6.13, “Displaying Data Types” [148]
3.14.1. Basic Data Type
Visual Rules supports the following basic data types:
Any
The Any type is used to represent a value of, well, any type. It can be a String, a Date, a Float or any custom
data type. This is convenient because it allows the rule author to initially ignore data types when writing rules.
All operations can be applied to an Any value. However, the operation may fail if the Any value has an incompatible type. Default value: -
Float
The Float type is used to represent decimal numbers. Default value: 0.
© Bosch Software Innovations GmbH
71/270
Chapter 3. Concepts
Integer
The Integer type is used to represent whole numbers without a fractional part. Default value: 0.
String
A String contains a sequence of characters and can contain any kind of text. Default value: "" (empty string).
Boolean
A Boolean
Date
Time
value represents a logical result and can be either true or false. Default value: false
A Date consists of entries for year, month and day. Default value: current date.
A Time value refers to a specific time of day and consists of hour, minute, second and millisecond. Default value: current system time.
Timestamp
A Timestamp is a combination of a Date and a Time, thus defining a day and a time. Default value: current system time.
Related Tasks.
• Section 4.6, “Working with Data” [140]
• Section 4.6.13, “Displaying Data Types” [148]
3.14.1.1. Any
is the most general data type in Visual Rules. A data element of this type can hold values of any type, just like
the name indicates. It can be a String, a Date, a Float or any other built-in or custom data type. All operations can
be applied to Any values. For example it is possible to add, subtract, multiply, divide and compare two Any values.
This makes the Any data type a very convenient choice for many data elements. This is also the reason why Any is
the default type for every newly created data element.
Any
When the rule is executed, Visual Rules will look at the actual data types of the Any values and perform operations
accordingly. This may cause Visual Rules to convert a value from an incompatible type to a compatible one. For
example, if an Any value is added to another Any value, Visual Rules will check whether they are both numbers. If
one or both are not numbers, then Visual Rules will try to convert them to numbers and then add them accordingly. This way, it is possible to have numbers stored as Strings and still be able to do computations, because VisualRules will try to convert the string into a number whenever necessary.
Note however that these type conversions may fail, if e.g. the string does not contain a number. A string "Hello"
cannot successfully be converted to a number, thus an add operation will fail during rule execution and VisualRules will create an exception. So care must be taken that these situations do not arise when rules are using data
of type Any. Therefore, it is always a good idea to use more specific data types instead of Any wherever possible.
3.14.1.2. String
A String is a collection of characters, in other words some text. Strings in Visual Rules are always enclosed in double quotes.
Example 3.23. Strings
• "This is a string"
• "He said, \"Hello\""
• "1st line\n2nd line\n3rd line"
• "This is a string
that continues across
multiple lines"
A double quote in a string must be written as \". Strings can contain line breaks, like in the fourth example above.
© Bosch Software Innovations GmbH
72/270
Chapter 3. Concepts
The following character combinations (prefixed with a backslash) have special meanings in strings:
\"
\n
\t
\\
double quotes
new line
tab character
backslash
3.14.1.3. Boolean
Boolean values can take only two values. The words true or false are used for this in Visual Rules.
Example 3.24. Boolean values
• true
• false
Alternatively, Boolean values can also be written in capital letters only, like this: TRUE or FALSE.
3.14.1.4. Date
A Date value always starts and ends with a # character. The actual Date value begins with the number for the year,
followed by a hyphen, the number for the month (1 to 12), another hyphen and the day (1 to 28/29/30/31). Please
be aware that this format has to be adhered to, regardless of the regional settings made for your system.
Example 3.25. Date values
• #2000-1-1# (corresponds to January 1, 2000)
• #2008-12-31# (corresponds to December 31, 2008)
• #20-3-11# (corresponds to March 11 in the year 20)
The expression currentDate() = #2007-2-29# is true, if the current date is February 29, 2007.
3.14.1.5. Time
A Time value always starts and ends with a # character. The actual Time value begins with the hour (0 to 23), followed by a colon, the minute (0 to 59), followed by a colon, the second (0 to 59) optionally followed by a period
and the milliseconds (0 to 999). Please be aware that this format applies regardless of the regional settings made
for your system.
Example 3.26. Time values
• #10:25:30# (corresponds to 10 hours, 25 minutes and 30 seconds)
• #10:25:30.010# (corresponds to 10 hours 25 minutes 30 seconds and 10 milliseconds)
• #23:00:00.000# (corresponds to 23 hours)
3.14.1.6. Timestamp
A Timestamp is composed of a date and a time value. It always starts and ends with a # character. The actual
Timestamp begins with a date value, followed by a space and the time value. The time value consists of hours,
minutes and seconds (separated by colons) followed by a period and a value for nanoseconds with a maximum
length of 9 digits.
© Bosch Software Innovations GmbH
73/270
Chapter 3. Concepts
Example 3.27. Timestamp values
• #2000-1-1 10:25:30.0# (corresponds to January 1, 2000 at 10 o'clock, 25 minutes and 30 seconds)
• #2000-1-1 10:25:30.010# (corresponds to January 1, 2000 at 10 o'clock, 25 minutes, 30 seconds and 10 milliseconds)
• #2000-3-11 23:00:00.000123456# (corresponds to March 11 in the year 20 at 11 p.m. and 123456 nanoseconds)
3.14.2. Type Alias
Type aliases are user-defined data types that are basically synonyms for built-in data types. E.g. you may want to
have a data type called Amount or Rate instead of using the built-in type Float. A type alias can be used everywhere
the built-in type could be used, too.
In addition to the built-in types however, a type alias can have additional settings. These settings are different depending on the basic data type used, e.g. it would make sense to define fixed-point numbers for an alias data type
Amount.
These additional settings for the type alias can only be inserted in the Rule Integration perspective.
Maybe contact your technical expert if you need additional settings for an alias type.
Related Concepts.
• Section 3.14.1, “Basic Data Type” [71]
Related Tasks.
• Section 4.7, “Working with Data Types” [150]
Related References.
• Section 5.6.8.2, “Type Alias Tab” [257]
3.14.3. Structure
Structures are user-defined data types. Structures are a collection of multiple values (called attributes) that belong
together. A data element of a structured type can hold a value for each of these attributes.
Attributes can have a basic data type (e.g. Float, String, Boolean, Date, etc.) or in turn be a structure or any other
user-defined data type.
© Bosch Software Innovations GmbH
74/270
Chapter 3. Concepts
Example 3.28. Structures Department, Employee, Appointment and Schedule
Four data types are shown in the following picture: Department, Employee, Appointment and Schedule. The attributes for each data type are listed below it. The Employee data type, for example, has the attributes first_name,
last_name, gender, etc.
Access to the attributes is done using dot notation. If a variable, for example, is called employee and has the data
type Employee from the picture above, the expression employee.first_name designates the first name of the employee.
employee.schedule.appointment are similarly the appointments from the schedule of the employee.
Structures in Visual Rules can define a default value including default values for some or all of the attributes.
These default values are used whenever a data element of that type is initialized (and does not define different default values on its own).
Related Concepts.
• Section 3.14.1, “Basic Data Type” [71]
Related Tasks.
• Section 4.7, “Working with Data Types” [150]
Related References.
• Section 5.6.8.1, “Data Types Tab” [256]
3.14.4. Super Types
Structures can be derived from existing structures. The derived structure is called a "sub type" of the original type,
which itself is called the "super type" of the derived structure. For example, you may have a structure named Car
which is a sub type of Vehicle, or a structure named Customer, which is a sub type of Person. In Visual Rules it is
possible to specify the super types of a structure on the Super Types tab in the Properties view.
Every structure inherits the attributes of all its super types, but may also define additional attributes.
Related Concepts.
• Section 3.12.19, “isA and asA Operators” [66]
Related Tasks.
• Section 4.7, “Working with Data Types” [150]
Related References.
• Section 5.6.8.6, “Super Types Tab” [260]
© Bosch Software Innovations GmbH
75/270
Chapter 3. Concepts
3.14.5. Enumeration
An enumeration is a user-defined data type that explicitely lists all possible values it can have. These possible values are called literals.
Example 3.29. Enumeration Color
An enumeration Color defines the possible values (literals) BLUE, GREEN, RED and YELLOW. A data element of type
Color can thus only have one of these values. The value is referred to by specifying the enumeration name, followed by a dot and the literal name, e.g. Color.BLUE. Thus, a data element color of type Color can be assigned the
color "blue" like this:
color := Color.BLUE
Related Tasks.
• Section 4.7, “Working with Data Types” [150]
Related References.
• Section 5.6.8.5, “Literals Tab” [260]
3.14.6. Exception
An exception is a user-defined data type. Exceptions are used for Visual Rules' exception handling capabilities,
particularly the Return Exception and Handle Exception rule elements. As such, it should be considered a rather
technical concept and its use possibly be restricted to more technical rules.
An exception is a special kind of structure. Its attributes are used to hold information about the "exceptional" situation that occurred during rule execution.
Related Concepts.
• Section 3.14.3, “Structure” [74]
• Section 3.5.10, “Return Exception” [42]
• Section 3.5.11, “Handle Exception” [43]
Related Tasks.
• Section 4.7, “Working with Data Types” [150]
Related References.
• Section 5.6.8.1, “Data Types Tab” [256]
3.14.7. Collection
A data element can be a collection which means that it can hold multiple values of the same type (other terms you
may be familiar with for this kind of data element are "list" or "array"). A data element is a collection when the Multiple property is set.
There are three different kinds of collections available: List, Set and Collection.
List
A List contains multiple elements in a fixed order. As a consequence you can access the elements of a list using an index, e.g. customer[3] for the third element of the list customer.
Lists can be empty, i.e. they don't contain any elements. Lists can contain the same element multiple times.
Duplicates are not eliminated automatically as is the case with sets.
Lists are useful if the order of the elements is important. Two lists are equal if they contain the same elements
in the same order.
© Bosch Software Innovations GmbH
76/270
Chapter 3. Concepts
Set
A Set is a collection of multiple elements that automatically eliminates duplicates. If an element is added to a
set that is already contained in the set, nothing happens. This is very useful if duplicates are undesired.
The most important advantage of a set is the much higher performance of the IN operator (to check if a specific element is contained in the set) compared to a list or a collection. This is especially true if the set contains a
lot of elements.
The elements of a set don't have a specific order and indexed access is consequently not possible. Accessing
the elements is done via the Repeat rule element.
Two sets are equal if they contain the same elements.
Collection
If a data item is a Collection, the elements of this collection don't have a defined order and indexed access
with square brackets (e.g. customer[3]) is consequently not possible. The collection can contain the same element multiple times. Duplicates are not eliminated automatically as is the case with sets.
Accessing the elements is done via the Repeat rule element.
Two collections are considered equal if they contain the same elements the same number of times, independent of their order.
You cannot manually define a collection with Visual Rules Modeler. However, collections may
appear in imported data models (e.g. when importing JavaBeans).
The following table illustrates the most important differences between Collection, List and Set:
Indexed access allowed?
List
yes
© Bosch Software Innovations GmbH
Can contain duplicates?
yes
IN Operator
slow
77/270
Chapter 3. Concepts
Indexed access allowed?
Can contain duplicates?
IN Operator
Set
no
no
fast
Collection
no
yes
slow
Related Concepts.
• Section 3.12.14, “Collection Operators” [60]
• Section 3.12.15, “Collection Functions” [61]
• Section 3.5.8, “Repeat” [40]
3.14.8. Map
A Map is a collection of multiple elements that are each identified by a unique key. Values and keys can be of any
data type, including structured types. The elements of a map don't have a specific order and indexed access is
consequently not possible. Accessing the elements is done via the key only.
The following screenshot shows a data element named state, which is a simple String -> String Mapping. The
default value has three entries for the states CA, MA and NY.
To define a map, Multiple must be activated and the implementation has to be set to Map. You can then enter a
type for the keys (Key Type), in addition to the type for the values (Type).
Related Concepts.
• Section 3.12.16, “Map Operators” [64]
• Section 3.12.17, “Map Functions” [65]
• Section 3.14.7, “Collection” [76]
3.15. Description and Note
Almost all elements of a rule model can have a description or notes attached to them, e.g. rules, rule elements, data, actions, types and many more. Every element can have one description and/or multiple notes.
© Bosch Software Innovations GmbH
78/270
Chapter 3. Concepts
Element descriptions are shown in many places within the Visual Rules user interface to make it easy for the rule
author to quickly understand the rule model. Thus it is very important that descriptions contain concise information
about every element.
Notes are used to leave editorial comments about elements. For example, a rule author may attach notes to elements of the rule model that are still incomplete, so he or she doesn't forget. Every note is annotated with the information about who created it and when, so notes can also be used for the communication within the team. A business analyst may leave notes to explain what he or she would like to see changed and another member of the
team picks up these notes to actually do the changes.
Descriptions and notes of selected elements can be viewed and edited on the corresponding tabs in the Properties view. Additionally, there is an editable description column in many tables displayed on other tabs. For example, the descriptions for all input/output data elements are also visible on the Input/Output Data tab.
The rule editor displays descriptions right next to every rule element. Notes are displayed to the right of the rule
and connected to the corresponding rule element with a line.
Related Reference.
• Section 5.6.1.1, “Description Tab” [229]
• Section 5.6.1.2, “Notes Tab” [230]
• Section 3.3, “Rule Package” [26]
3.16. Action
Actions represent the consequences of rules. When a rule is executed it can fire actions as a consequence to decisions or computations. The Fire Action rule element is used to do this.
Actions can be defined on the rule level, so only that rule can fire that action. But actions can also be defined on
the rule package or rule model level. In that case they are shared by all rules in that package or rule model, respectively.
Actions are identified by their names. Accordingly, the Fire Action rule element specifies an action name to indicate
which action should be fired. The value of the action is set to true whenever this happens. Within expressions it is
possible to refer to that boolean value simply by using the action name.
A rule calling another rule using the Call Flow Rule or Call Decision Table elements can look at the values of all the
actions the called rule may have fired. This way, actions can be considered one kind of "output" of rules.
Actions have a type. The default type is "Standard" which is one of the built-in action types. Actions of type "Standard" do not have any special behavior when fired. See the section about action types to read about other built-in
and custom action types.
Related Concepts.
• Section 3.5.3, “Fire Action” [37]
© Bosch Software Innovations GmbH
79/270
Chapter 3. Concepts
• Section 3.17, “Action Type” [80]
Related Tasks.
• Section 4.3.12, “Editing a Fire Action Element” [114]
3.16.1. Action Settings
Depending on the action type additional action settings may be necessary that are used to initialize the action.
These are specified on the Action Settings tab. See the reference sections about the built-in action types for further details.
Figure 3.15. Action settings of a CSVWrite action
Related References.
• Section 5.6.7.3, “Output message Action Tabs” [250]
• Section 5.6.7.4, “Log message Action Tab” [251]
• Section 5.6.7.5, “Send e-mail Action Tabs” [252]
• Section 5.6.7.6, “Write CSV File Action Tabs” [253]
3.17. Action Type
The value of an action is set to true when it fires. This happens independently of the action type. However, additional things may happen depending on the type of the action. The action type of an action defines what exactly
happens when the associated action is fired. Visual Rules has some built-in action types but can also be extended
by any number of custom action types. See the Java Integration Guide for how to define custom action types.
The following action types are available by default:
Standard
An action of type Standard does nothing else when fired. Actions of this type are used to represent logical results only.
Output message
An action of type Output message prints a message to the screen (console) or to a file, depending on its settings.
Log message
An action of type Log message prints a message to a logging system. This is useful for tracing or debugging
purposes.
Send e-mail
An action of type Send e-mail sends an email. Sender, recipient, subject and email body can be defined dynamically.
© Bosch Software Innovations GmbH
80/270
Chapter 3. Concepts
Write CSV file
An action of type Write CSV file writes a record into a CSV file (comma separated values). This file can then
e.g. be read by Excel or other applications.
Read CSV file
An action of type Read CSV file reads records from a CSV file (comma separated values).
The Read CSV file action type is only available for rule models that have activated the Visual Rules 3.x compatibility function/actions. This can be done on the Extensions tab in the
Properties of the rule model.
Related Concepts.
• Section 3.16, “Action” [79]
Related References.
• Section 5.6.7.3, “Output message Action Tabs” [250]
• Section 5.6.7.4, “Log message Action Tab” [251]
• Section 5.6.7.5, “Send e-mail Action Tabs” [252]
• Section 5.6.7.6, “Write CSV File Action Tabs” [253]
3.18. Function
Functions are used within expressions. There are many pre-defined functions available in Visual Rules that do
computations, formatting and conversion of data and many things more. When you are editing an expression you
can press Ctrl+Space to show the content assist which lists all available functions.
Figure 3.16. Functions in the Content Asisst
A function can define zero, one or more parameters that need to be specified when the function is called. A function returns a result. All parameters and the result are of a specific data type. For example, the function addDays
shown above has two parameters, a Date and an Integer. The result is a Date.
Visual Rules can be extended with user-defined functions.
Related Concepts.
• Section 3.12.7, “Calling Functions” [58]
3.19. Service
A service is some functionality external to Visual Rules. Services can be called by rules using the Call Service element, e.g. to fetch additional data or to trigger external processes. A rule can pass data to a service and read any
results the service may produce. Therefore every service defines input and output parameters (and their types). A
service is identified by its name.
Services are in a way similar to actions. However, actions can only have input parameters and don't return data,
while services properly define both input and output data. As such, they much more resemble rules which also define input and output data. One way to think of services is as "external" rules.
© Bosch Software Innovations GmbH
81/270
Chapter 3. Concepts
Related Concepts.
• Section 3.5.6, “Call Service” [40]
• Section 3.20, “Service Type” [82]
3.20. Service Type
Every service has a service type. The service type is a technical definition that tells Visual Rules how a specific
service call is to be executed and what technical parameters are required to do that. Visual Rules can be extended
with custom service types. See the Java Integration Guide for more information.
Related Concepts.
• Section 3.19, “Service” [81]
3.21. Auto Creation
The Auto Creation dialog pops up whenever Visual Rules wants to automatically create new rule model elements.
For example, if the user enters an expression and refers to data elements that don't exist, the Auto Creation dialog
asks the user if these data elements should be automatically created.
If you enter the expression customer.age > 18 and there is no data element customer defined yet, then Auto Creation will suggest to create an internal data element customer and a structure named Customer with an attribute age.
Figure 3.17. Auto Creation dialog
Auto Creation can not only create data and data types, but also rules, actions, action types and services. The behavior of Auto Creation can be configured individually for each of these element types. You can choose if the elements should be created always or never or if the user should be prompted.
Click on Configure to bring up the user preferences for Auto Creation or open it with Window > Preferences ... >
Visual Rules > Auto Creation and set the elements that should be created automatically to Prompt.
Related Tasks.
• Section 4.10.3, “Working with Auto Creation” [159]
Related References.
• Section 5.4.3, “Auto Creation Dialog” [218]
• Section 5.7.3, “Auto Creation Preferences” [264]
3.22. Rule Testing
Rule testing is the process of ensuring the correctness and completeness of an individual rule or a set of rules.
This is achieved by defining tests and test cases for the rules and then by executing these test cases in an automated way.
© Bosch Software Innovations GmbH
82/270
Chapter 3. Concepts
The following sections describe rule tests and the test editor that is used to define and execute the tests in VisualRules.
3.22.1. Rule Test
A rule test is a test for a specific rule. It tests the correctness of this rule by executing the rule with some input data, inspecting the results the rule has produced and by verifying that these results correspond with the expected
results. One such execution is called a test case. A rule test can consist of any number of test cases. And there
can be multiple tests for the same rule, too.
Rule tests are defined, edited and executed with the rule test editor. The flow rule and decision table editors list the
tests of a rule on their Rule Context palettes.
Related Concepts.
• Section 3.22.2, “Rule Test Editor” [83]
• Section 3.6, “Flow Rule Editor” [45]
• Section 3.8, “Decision Table Editor” [50]
• Section 3.22.4, “Test Suite” [86]
3.22.2. Rule Test Editor
The rule test editor is used to define and edit rule tests.
It consists of two tabs named Test Cases and Configuration. The first tab shows the test description and on the
left side there is a list of all the test cases. On the right side there are two sections that display the input and output
data for each test case. The output data section also contains a column where expected results can be entered.
Figure 3.18. Rule Test Editor - Test Cases
© Bosch Software Innovations GmbH
83/270
Chapter 3. Concepts
Figure 3.19. Rule Test Editor - Configuration
Related Concepts.
• Section 3.22.1, “Rule Test” [83]
Related Tasks.
• Section 4.11, “Testing Rules” [160]
Related References.
• Section 5.3.4, “Rule Test Editor” [210]
3.22.3. Statistics
During rule execution Visual Rules can collect statistical and tracing information for later use. This is especially
useful during testing and provides the user an insight into the workings of the rules.
The display of statistics is turned on by activating the Hide/Show Statistics button (
) on the toolbar. The small
arrow to the right opens a drop-down which allows you to specify what statistical information should be displayed.
An important part of the statistical information are the execution counters for each rule element. These indicate
how often each rule element was executed. When statistics are activated, these counters are displayed next to
each rule element, like shown below.
© Bosch Software Innovations GmbH
84/270
Chapter 3. Concepts
Figure 3.20. Display of statistics in the flow rule editor
Little barcharts are added when you activate the Percentages option from the statistics drop-down. The percentages specify how often each individual element was executed in relation to how often the whole rule was executed.
Figure 3.21. Display of statistics with percentages
You can also look at execution times by activating the Times option from the statistics drop-down. This will show
execution times at each element. Please note that these times always specify how long it took to execute the
whole branch. So times are added up from right to left.
Figure 3.22. Display of statistics with percentages
© Bosch Software Innovations GmbH
85/270
Chapter 3. Concepts
Due to the nature of the Java virtual machine (JVM), individual execution times for the same rule
may differ largely. Most specifically, the first call to a rule is usually way slower than the second by
a magnitude of 1000 or more. This is because the JVM does additional things (incl. class loading)
when it executes code for the first time. The JVM further optimizes code when it is executed repeatedly (HotSpot compiler), so the performance increases over time.
The precision of time measurements possible with a specific Java VM can also have a great effect.
Most importantly, you should use a Java 1.5+ VM instead of a 1.4 VM because the 1.5+ API offers
nanosecond resolution, while 1.4 offers only milliseconds.
So the displayed execution times during tests should not be used to estimate execution times during
production.
3.22.4. Test Suite
A test suite is a collection of tests that can be executed together. A test suite can consist of any number of rule
tests and nested test suites. When the test suite is executed, all test failures of contained rule tests are displayed.
Test suites are defined, edited and executed with the test suite editor.
Related Concepts.
• Section 3.22.5, “Test Suite Editor” [86]
3.22.5. Test Suite Editor
The test suite editor is used to define and edit test suites.
It shows the description of the test suite and displays all contained rule tests and nested test suites. Actions for executing the test suite and for opening the contained tests in their respective editor are available as well as a bar
that shows the progress of the test suite execution and the overall success. Test failures are displayed in the table
on the right side.
Figure 3.23. Test Suite Editor
Related Concepts.
• Section 3.22.4, “Test Suite” [86]
• Section 3.22.1, “Rule Test” [83]
Related Tasks.
• Section 4.11, “Testing Rules” [160]
• Section 4.12, “Organizing Rule Tests in Test Suites” [172]
© Bosch Software Innovations GmbH
86/270
Chapter 3. Concepts
Related References.
• Section 5.3.5, “Test Suite Editor” [213]
3.23. Rule Debugging
When new rules are created, they sometimes do not work as they should right away. They may produce unexpected results or seem to make the wrong decisions. In these situations it is important to have a means to more closely
inspect what is going on during rule execution. This is what rule debugging is about. Rule debugging lets the user
step through the rule execution one step at a time, halt at specific locations in the rules and to inspect the state of
the data currently being processed.
3.23.1. Debugger
The debugger is a separate perspective built into Visual Rules Modeler. The perspective is named Debug and Visual Rules automatically switches to it when needed, e.g. when a breakpoint is reached. The debugger is used to
manually step through rule execution, inspect the data being processed and by doing so, identify errors ("bugs") in
the rules.
Figure 3.24. Debug perspective
The debugger can be used to debug rule tests or rules running inside a Java application (remote debugging).
Related Concepts.
• Section 3.22.1, “Rule Test” [83]
• Section 3.22.2, “Rule Test Editor” [83]
Related Tasks.
• Section 4.13.2, “Debugging a Rule Test” [175]
© Bosch Software Innovations GmbH
87/270
Chapter 3. Concepts
Related References.
• Section 5.5.8, “Debug View” [227]
• Section 5.5.9, “Variables View” [228]
• Section 5.5.10, “Breakpoints View” [229]
3.23.2. Breakpoint
A breakpoint represents a specific location in a rule model where execution should pause during a debug session.
When rules are executed in the debugger and a breakpoint is reached, execution will halt and present the current
position and currently processed data to the user for inspection.
Breakpoints can be set at every rule element in flow rules or in every (white) cell of decision tables. This can be
done with the Toggle Breakpoint entry from the context menu.
Figure 3.25. Breakpoint on a rule element
Figure 3.26. Breakpoint on a decision table cell
Breakpoints can be temporarily disabled with the Disable Breakpoint entry from the context menu. When a breakpoint is disabled, rule execution will not pause at that breakpoint.
The Breakpoints view lists all currently existing breakpoints.
Related Concepts.
• Section 3.23.1, “Debugger” [87]
• Section 3.6, “Flow Rule Editor” [45]
• Section 3.8, “Decision Table Editor” [50]
Related Tasks.
• Section 4.13.1, “Setting Breakpoints” [175]
Related References.
• Section 5.5.10, “Breakpoints View” [229]
© Bosch Software Innovations GmbH
88/270
Chapter 4. Tasks
Chapter 4. Tasks
4.1. Working with Rule Projects
4.1.1. Creating a new Rule Project
1.
Select the menu item File > New. Alternatively you can click on the arrow to the right of this icon (
toolbar.
2.
Select the Rule Project entry from the list.
) on the
If you are not in a Visual Rules perspective, you must select Other..., then select Rule Project from the list
and press Next >
3.
The New Rule Project wizard appears.
4.
Enter a name for the rule project.
5.
Press Finish to create the new rule project.
Related Concepts.
• Section 3.1, “Rule Project” [25]
Related References.
• Section 5.2.1, “New Rule Project Wizard” [200]
4.1.2. Setting Rule Project Identifiers (Group Id, Artifact Id, Version)
1.
Open the rule project editor by double-clicking the ruleproject.vr file.
2.
Change the Group Id, Artifact Id and Version fields in the Project Information section.
3.
Click on the Save button (
) in the toolbar. Alternatively you can press Ctrl+S.
Related Concepts.
• Section 3.1, “Rule Project” [25]
© Bosch Software Innovations GmbH
89/270
Chapter 4. Tasks
Related Tasks.
• Section 4.1.3, “Defining Rule Project Dependencies” [90]
4.1.3. Defining Rule Project Dependencies
1.
Open the rule project editor by double-clicking the ruleproject.vr file.
2.
The Required Dependencies section lists all the dependencies of the rule project.
Use the
3.
button to add a new dependency and the
button to remove a dependency.
When you add a dependency, the Select Libraries dialog lets you select rule projects and libraries
your workspace. Select a rule project or library and click OK to add it to the list of dependencies.
© Bosch Software Innovations GmbH
from
90/270
Chapter 4. Tasks
4.
If you want to add a dependency to a library or rule artifact which is neither in your workspace nor in a Maven
repository of the Visual Rules Team Severthat your rule project is connected to, click on Other....
In the Dependency dialog, specify the Group Id, Artifact Id and Version (e.g. commons-math / commons-math /
1.2). Click OK.
5.
Save the changes made to ruleproject.vr.
6.
Visual Rules Modeler will now try to resolve the newly defined dependencies. If some dependencies cannot
be resolved, you will see error markers at the ruleproject.vr file and in the rule project editor.
Related Concepts.
• Section 3.1, “Rule Project” [25]
Related Tasks.
• Section 4.1.2, “Setting Rule Project Identifiers (Group Id, Artifact Id, Version)” [89]
© Bosch Software Innovations GmbH
91/270
Chapter 4. Tasks
4.1.4. Analyzing Rule Projects
Large projects often contain lots of rules and rule packages. For a better understanding of the relationship and usage of the elements included, you have the following possibilities.
4.1.4.1. Visualizing Dependencies between the Elements within a Rule Project
Between the elements within a rule project there may be different kinds of dependencies like rule calls, rule package reuses, etc. These dependencies can be visualized in a dependency diagram.
To create a dependency diagram, do the following:
1.
In the Rule Explorer or Project Explorer, right-click on a rule project to open the contextual menu and select
New > Dependency Diagram ( ). The dialog New Diagram appears:
2.
Select a location in the workspace for the dependency diagram and enter a name.
3.
Press Finish. An empty diagram is created and it is added at the respective location in the Rule Explorer/
Project Explorer with the symbol . The diagram is automatically shown in the Dependency Diagram Editor.
4.
To show the dependencies within a rule project, move the rule project (or the relevant elements) into the diagram from the Rule Explorer/ Project Explorer per drag&drop.
To show an existing dependency diagram, do the following:
1.
In the Rule Explorer or Project Explorer, double-click on the respective symbol
2.
The dependency diagram is shown in the Dependency Diagram Editor.
.
Related References.
• Section 5.3.7, “Dependency Diagram Editor” [215]
© Bosch Software Innovations GmbH
92/270
Chapter 4. Tasks
4.1.4.2. Visualizing the Usage of Elements within a Rule Project
Each of the data elements, actions, etc. may be used in different contexts within a rule project, i.e. in different flow
rules, decision tables or stateflows. Which element is actually used in which context and how often it is used there,
can be visualized in a usage matrix.
To create a usage matrix, do the following:
1.
In the Rule Explorer or Project Explorer, right-click on a rule project to open the contextual menu and select
New > Usage Matrix ( ). The dialog New Usage Matrix appears:
2.
Select a location in the workspace for the usage matrix and enter a name.
3.
Press Finish. A usage matrix is created and added in the Rule Explorer/ Project Explorer with the icon
The matrix is automatically shown in the Usage Matrix Editor.
.
To show an existing usage matrix, do the following:
1.
In the Rule Explorer or Project Explorer, double-click on the respective icon
2.
The usage matrix is shown in the Usage Matrix Editor.
.
Related References.
• Section 5.3.8, “Usage Matrix Editor” [216]
4.2. Working with Rule Models
The following sections contain step-by-step procedures for different tasks you may want to perform with rule models, e.g. create new rules or rule packages.
4.2.1. Creating a new Rule Model
1.
Right-click on the rule project or a subfolder thereof in the Rule Explorer or Project Explorer.
2.
Select the item New > Rule Model from the context menu.
© Bosch Software Innovations GmbH
93/270
Chapter 4. Tasks
3.
The New Rule Model wizard appears.
4.
Specify the location and the name for the new rule model.
5.
Press Finish to create the new rule model.
Related Concepts.
• Section 3.2, “Rule Model” [25]
Related References.
• Section 5.2.2, “New Rule Model Wizard” [201]
4.2.2. Opening a Rule Model
1.
Double-click on the rule model in the Rule Explorer to open it.
Alternatively you can right-click on the rule model and select Open from the context menu.
With the Go Into menu entry available in the context menu of Rule Explorer, you can navigate into the treelike structure of projects, rule models and rule packages. Whenever you do that, the Rule Explorer contents
are limited to only that branch. A button in the toolbar (
2.
) lets you go up again one level.
When the rule model is open, the Rule Explorer displays the model contents as children of the rule model.
© Bosch Software Innovations GmbH
94/270
Chapter 4. Tasks
Related Concepts.
• Section 3.2, “Rule Model” [25]
Related References.
• Section 5.5.2, “Project Explorer View” [223]
4.2.3. Saving Changes in Rule Models
Whenever a rule model or a part of a rule model is changed, these changes need to be saved at some point. The
Rule Explorer indicates unsaved changes by an asterisk in front of the changed element and all the elements
higher up in the rule package hierarchy.
Figure 4.1. Unsaved changes in a rule model
1.
Select an element with unsaved changes in the Rule Explorer. The Save button (
vate.
2.
Click on the Save button (
item.
3.
The changes will be saved and the asterisk(s) will disappear.
) in the toolbar will acti-
) in the toolbar. Alternatively you can press Ctrl+S or use the File > Save menu
Visual Rules always saves all changes made in the selected element and in any element further
down in the package hierarchy. So if you save a rule package, it will also save all changes made in
sub packages or rules contained therein. So, in order to save all changes in a rule model, simply select the rule model and save.
If you want to save all changes in all rule models, you can press Ctrl+Shift+S or use the File > Save
All menu item.
Related References.
• Section 5.5.2, “Project Explorer View” [223]
4.2.4. Creating a new Rule Package
1.
Right-click on a rule model or on a rule package in the Rule Explorer where you want to create the new rule
package. A context menu will appear.
2.
Select the New Element > Rule Package entry from the context menu.
© Bosch Software Innovations GmbH
95/270
Chapter 4. Tasks
3.
The New Rule Package dialog opens. Enter the name of the package you want to create. This name must be
different from any other rule package or rule on the same level.
4.
Press OK to create the rule package.
Related Concepts.
• Section 3.2, “Rule Model” [25]
• Section 3.3, “Rule Package” [26]
Related References.
• Section 5.5.2, “Project Explorer View” [223]
4.2.5. Deleting a Rule Package
1.
To delete a rule package, right-click on the rule package you wish to delete and select Delete from the context
menu. Alternatively, press the Del key.
2.
Visual Rules will ask whether you are sure you want to delete the rule package. Click on Yes.
3.
The rule package and all its contents are deleted.
Related Concepts.
• Section 3.2, “Rule Model” [25]
• Section 3.3, “Rule Package” [26]
Related References.
• Section 5.5.2, “Project Explorer View” [223]
4.2.6. Renaming a Rule Package
1.
To rename a rule package, right-click on the rule package you wish to rename and select Rename from the
context menu. Alternatively, press the F2 key.
2.
A dialog will open where you can enter the new name. You must enter a name that is different from any other
rule package or rule on the same level.
3.
Click on Preview > to get a list of all the upcoming changes that the rename will cause (You can also uncheck
only some of the changes that you don't want to make, while leaving others checked). Click on Cancel if you
don't want to make the changes.
4.
Click on OK to perform the rename.
Related Concepts.
• Section 3.3, “Rule Package” [26]
Related References.
• Section 5.5.2, “Project Explorer View” [223]
© Bosch Software Innovations GmbH
96/270
Chapter 4. Tasks
4.2.7. Moving a Rule Package
1.
Moving a rule package from one rule model or rule package into another rule model or rule package is done
with drag&drop. Select the rule package you want to move, click it and hold down the left mouse button.
2.
Drag the rule package to the location you want to move it to.
3.
Let go of the mouse button to move the rule package and its contents.
If you want to create a copy of the rule package, press and hold the Ctrl key when you release the
mouse button.
Moving a rule package will also move the corresponding files and folders on the file system from one
folder into another. Depending on the version control system you are using, this may require additional steps when the updated rule model is delivered to the version control system.
There are also known restrictions with some version control systems (e.g. Subversion) that allow folders to be moved just once between checkins. In that case it may be helpful to commit the
changes immediately after the rule package was moved, and only then continue modeling.
4.2.8. Creating a new Flow Rule
1.
Right-click on the rule model, where you want to create the new flow rule, in the Rule Explorer or Project Explorer.
2.
Select New Element > Flow Rule from the context menu.
3.
The New Flow Rule wizard appears.
4.
Select the rule model and rule package where the new rule should be created. You can click on the corresponding Browse buttons to select the rule model and rule package from a list.
If a rule model or rule package was selected when the wizard was started, then the rule model
and rule package settings will already contain correct values. So the easiest way to create a new
rule is to select the rule package where the new rule should be created and then start the New
Flow Rule wizard.
You can also right-click on a rule model or rule package and select New Element > Flow Rule
from the context menu. That's the quickest way to create new rules.
5.
Enter a name for the rule.
6.
If you want to use a rule template as the basis for the new flow rule, check the Use template box and select
the desired rule template by clicking on the Browse button. Alternatively you can use the code assistant by
pressing Ctrl+Space.
7.
Press Finish to create the new flow rule. The flow rule editor will open automatically.
Related Concepts.
• Section 3.4, “Flow Rule” [29]
• Section 3.3, “Rule Package” [26]
• Section 3.2, “Rule Model” [25]
• Section 3.4.1, “Flow Rule Template” [30]
Related References.
• Section 5.2.3, “New Rule Wizard” [201]
• Section 5.5.2, “Project Explorer View” [223]
© Bosch Software Innovations GmbH
97/270
Chapter 4. Tasks
4.2.9. Deleting a Rule
1.
To delete a rule, right-click on the rule you wish to delete and select Delete from the context menu. Alternatively, press the Del key.
2.
Visual Rules will ask whether you are sure you want to delete the rule. Click on Yes.
3.
The rule is deleted.
When you delete a rule and save this change, you may see errors in other rules that have previously
used the rule that was deleted.
If you want to know up front whether there are other rules using the rule that you want to delete,
right-click on the rule and select the Search References menu entry in the context menu. The
Search view will open and list all the rules that will be impacted by the deletion.
Related Concepts.
• Section 3.4, “Flow Rule” [29]
4.2.10. Renaming a Rule
1.
To rename a rule, right-click on the rule you wish to rename and select Rename from the context menu. Alternatively, press the F2 key.
2.
A dialog will open where you can enter the new name. You must enter a name that is different from any other
rule or rule package on the same level.
3.
Leave the checkbox Update References checked. Otherwise all references to the rule will not be updated to
reflect the new name.
4.
Click on Preview > to get a list of all the upcoming changes that the rename will cause (You can also uncheck
only some of the changes that you don't want to make, while leaving others checked). Click on Cancel if you
don't want to make the changes.
5.
Click on OK to perform the rename.
Related Concepts.
• Section 3.4, “Flow Rule” [29]
4.2.11. Finding a Rule
1.
Open the Open Rule dialog by selecting the Navigate > Open Rule menu entry, clicking on the Open Rule
toolbar item (
) or by pressing Ctrl+Alt+R.
2.
A dialog will open that contains a list of all rules in all rule models in the workspace.
3.
Enter the beginning of the name of the rule you want to open. This will filter the list so that it only shows rules
with matching names. If nothing is entered, the list will show all rules. You can use asterisks * or question
marks ? as wildcard characters.
4.
Select a rule in the list and press OK to open that rule in the rule editor. Alternatively you can double-click an
entry in the list.
© Bosch Software Innovations GmbH
98/270
Chapter 4. Tasks
Instead of using the Open Rule dialog, you could also use the search capabilities of Visual Rules to
search for specific rules in your rule models.
Related Concepts.
• Section 3.4, “Flow Rule” [29]
Related Tasks.
• Section 4.14, “Searching Rule Models” [178]
Related References.
• Section 5.4.1, “Open Rule Dialog” [216]
4.2.12. Copying a Rule
1.
Copying a rule is done with drag&drop. Select the rule you want to copy, click on it and hold down the left
mouse button.
2.
Drag the rule to the location you want to copy it to. Press and hold the Ctrl key to create a copy.
3.
Let go of the mouse button to paste the copy.
If the Ctrl key is not held down when you release the mouse button, the rule is not copied to the new
location, but moved.
Related Concepts.
• Section 3.4, “Flow Rule” [29]
Related Tasks.
• Section 4.2.13, “Moving a Rule” [99]
4.2.13. Moving a Rule
1.
Moving a rule from one rule package into another rule package is done with drag&drop. Select the rule you
want to move, click it and hold down the left mouse button.
2.
Drag the rule to the location you want to move it to.
3.
Let go of the mouse button to move the rule.
If you want to create a copy of the rule, press and hold the Ctrl key when you release the mouse button.
Related Concepts.
• Section 3.4, “Flow Rule” [29]
Related Tasks.
• Section 4.2.12, “Copying a Rule” [99]
4.2.14. Creating a new State Flow
1.
Right-click on the rule model, where you want to create the new state flow, in the Rule Explorer or Project
Explorer.
2.
Select New Element > State Flow from the context menu.
© Bosch Software Innovations GmbH
99/270
Chapter 4. Tasks
3.
The New State Flow wizard appears.
4.
Select the rule model and rule package where the new state flow should be created. You can click on the corresponding Browse buttons to select the rule model and rule package from a list.
If a rule model or rule package was selected when the wizard was started, then the rule model and rule package settings will already contain correct values. So the easiest way to create a
new state flow is to select the rule package where the new state flow should be created and then
start the New State Flow wizard.
You can also right-click on a rule model or rule package and select New Element > Sate Flow
from the context menu. That's the quickest way to create new state flows.
5.
Enter a name for the state flow.
6.
Press Finish to create the new state flow. The state flow editor will open automatically.
Related Concepts.
• Section 3.9, “State Flow” [52]
• Section 3.3, “Rule Package” [26]
• Section 3.2, “Rule Model” [25]
Related References.
• Section 5.2.4, “New State Flow Wizard” [202]
• Section 5.5.2, “Project Explorer View” [223]
4.2.15. Deleting a State Flow
1.
To delete a state flow, right-click on the flow rule you wish to delete and select Delete from the context menu.
Alternatively, press the Del key.
2.
Visual Rules will ask whether you are sure you want to delete the state flow. Click on Yes.
3.
The state flow is deleted.
Related Concepts.
• Section 3.9, “State Flow” [52]
4.2.16. Renaming a State Flow
1.
To rename a state flow, right-click on the state flow you wish to rename and select Rename from the context
menu. Alternatively, press the F2 key.
2.
A dialog will open where you can enter the new name. You must enter a name that is different from any other
state flow or rule package on the same level.
The checkbox Update References is here irrelevant.
© Bosch Software Innovations GmbH
100/270
Chapter 4. Tasks
3.
Click on OK to perform the rename.
Related Concepts.
• Section 3.9, “State Flow” [52]
4.2.17. Copying a State Flow
1.
Copying a state flow is done with drag&drop. Select the state flow you want to copy, click on it and hold down
the left mouse button.
2.
Drag the rule to the location you want to copy it to. Press and hold the Ctrl key to create a copy.
3.
Let go of the mouse button to paste the copy.
If the Ctrl key is not held down when you release the mouse button, the state flow is not copied to
the new location, but moved.
Related Concepts.
• Section 3.9, “State Flow” [52]
Related Tasks.
• Section 4.2.18, “Moving a State Flow” [101]
4.2.18. Moving a State Flow
1.
Moving a state flow from one rule package into another rule package is done with drag&drop. Select the state
flow you want to move, click it and hold down the left mouse button.
2.
Drag the state flow to the location you want to move it to.
3.
Let go of the mouse button to move the state flow.
If you want to create a copy of the state flow, press and hold the Ctrl key when you release the
mouse button.
Related Concepts.
• Section 3.9, “State Flow” [52]
Related Tasks.
• Section 4.2.17, “Copying a State Flow” [101]
4.2.19. Reusing Rule Packages
You have the following possibilities to reuse rule packages:
• Section 4.2.19.1, “Manually selecting Rule Packages to be reused” [102]
• Section 4.2.19.2, “Executing an automatic Organization of Package Reuse (on Package Level)” [102]
• Section 4.2.19.3, “Executing an automatic Organization of Package Reuse (on Rule Level)” [102]
In specific cases an automatic organization of package reuse on package level is not possible. If so,
a corresponding message appears.
Related Concepts.
© Bosch Software Innovations GmbH
101/270
Chapter 4. Tasks
• Section 3.3.1, “Rule Package Reuse” [28]
Related References.
• Section 5.6.5.1, “Reuse Packages Tab” [241]
4.2.19.1. Manually selecting Rule Packages to be reused
If you want to manually select the rule packages to be reused, do the following:
1.
Select the rule package in the Rule Explorer that should reuse other rule packages.
2.
In the Properties view activate the Reuse Packages tab.
3.
Press the
4.
A dialog will appear that shows all rule models in the workspace and their rule packages. If you miss a rule
model, then the rule project containing the currently selected rule package does not declare a dependency to
this rule package's rule project. In order to declare such a dependency, follow the instructions given in Section 4.1.3, “Defining Rule Project Dependencies” [90].
5.
Activate the checkboxes in front of all the rule packages (or rule models) that you want to reuse. Click OK.
6.
The rule packages are added to the list of reused rule packages.
7.
Save the change.
button to add one or more packages to the list of reused packages.
If you no longer want to reuse a rule package, do the following:
1.
Do steps 1 and 2 like specified above.
2.
Select an entry in the list and press the
3.
Save the change.
button to remove a package from the list of reused packages.
4.2.19.2. Executing an automatic Organization of Package Reuse (on Package Level)
If you want to execute an automatic organization of package reuse on package level, do the following:
1.
Right-click on the rule package in the Rule Explorer that should reuse other rule packages.
2.
In the context menu select Organize Package Reuses.
3.
All required rule packages are now reused by the relevant rule package.
4.
Save the change.
4.2.19.3. Executing an automatic Organization of Package Reuse (on Rule Level)
If you want to execute an automatic organization of package reuse on rule level, do the following:
1.
Double-click on the flow rule or decision table that requires an element from other rule packages.
2.
Right-click anywhere in the Flow Rule Editor or Decision Table Editor, respectively.
3.
In the context menu select Organize Package Reuses.
4.
All required rule packages are reused by the rule package including the relevant flow rule or decision table.
If any of the elements required in the relevant rule or decision table is available in different
rule packages, then a dialog appears, that allows you to select the rule package to be actually
reused.
© Bosch Software Innovations GmbH
102/270
Chapter 4. Tasks
5.
Save the change.
4.2.20. Editing Descriptions
You can enter descriptions for rule models, rule packages and rules.
1.
In the Rule Explorer select the rule model, rule package or rule that you want to add a description to.
2.
In the Properties view activate the Description tab.
3.
Enter the description.
You can also specify hyperlinks to external documents within descriptions. These are automatically
underlined if the protocol (e.g. http://, resource:// or file://) is specified, marking them as links. Clicking on a link opens the associated application, displaying its contents.
Related Concepts.
• Section 3.15, “Description and Note” [78]
4.2.21. Editing Notes
You can enter notes for rule models, rule packages and rules.
1.
In the Rule Explorer select a rule model, rule package or rule that you want to add the note to.
2.
In the Properties view activate the Notes tab.
3.
Click on the
4.
Enter the text of the note.
button to add a new note or click on the corresponding
button to remove a note.
You can also specify hyperlinks to external documents within notes. These are automatically underlined if the protocol (e.g. http://, resource:// or file://) is specified, marking them as links. Clicking on
a link opens the associated application, displaying its contents.
Related Concepts.
• Section 3.15, “Description and Note” [78]
4.2.22. Undoing Changes
All changes to rule models can be undone.
1.
Activate the Rule Explorer and select the Edit > Undo menu item. Alternatively, you can also use the Ctrl+Z
key combination.
You can repeat this several times to undo previous changes.
2.
If you want to redo a change that was undone, select the Edit > Redo menu item. Alternatively, use the
Ctrl+Y key combination.
4.3. Working with Flow Rules
The following sections include detailed descriptions for working with flow rules and the flow rule editor.
4.3.1. Opening the Flow Rule Editor
•
In the Rule Explorer double-click on a flow rule ( ) to open the flow rule editor.
© Bosch Software Innovations GmbH
103/270
Chapter 4. Tasks
Alternatively, you can right-click on the flow rule and select Open.
You can also open the Flow Rule Editor for a flow rule that is referenced in a call flow rule element.
To do so, press the Ctrl key and click on the relevant reference in the Flow Rule Editor.
Related Concepts.
• Section 3.6, “Flow Rule Editor” [45]
• Section 3.4, “Flow Rule” [29]
Related References.
• Section 5.5.2, “Project Explorer View” [223]
4.3.2. Saving Changes
1.
When you do any changes to a flow rule, the tab of the flow rule editor will show an asterisk right in front of the
flow rule name.
2.
To save the changes made in the current editor, press the Save button (
enabled when changes were made.
) on the toolbar. This button is only
Alternatively you can press Ctrl+S or select the File > Save menu item.
If you want to save all unsaved changes and not just the changes made in the current editor, you can press
Ctrl+Shift+S or select the File > Save All menu item.
Related Concepts.
• Section 3.6, “Flow Rule Editor” [45]
Related References.
• Section 5.5.2, “Project Explorer View” [223]
4.3.3. Navigating in the Flow Rule Editor
4.3.3.1. Keyboard Navigation
• Use the arrow keys (up, down, left, right) to navigate from one rule element to the other.
© Bosch Software Innovations GmbH
104/270
Chapter 4. Tasks
• Press Alt+Cursor down and Alt+Cursor up to enter and navigate inside a rule element.
• Press F2 or simply start typing to start inplace editing.
4.3.3.2. Scrolling
There are several ways to navigate a larger flow rule within the flow rule editor.
• Click and hold the middle mouse button. Moving the mouse while holding the middle mouse button will move
the flow rule within the flow rule editor.
• Use the scrollbars to the right and at the bottom of the flow rule editor window.
• Click on a specific part of the flow rule in the Outline view to scroll to that location. You can also hold the left
mouse button and move the mouse within the Outline view.
• Use the arrow keys on your keyboard to navigate from one rule element to another.
• When dragging & dropping rule elements, you can hold still near the border of the flow rule editor. Shortly thereafter the flow rule editor will start scrolling into that direction. This way you can drag&drop between parts of the
flow rule that are not visible at the same time.
4.3.3.3. Zooming
There are several ways to zoom in and out of a rule in the flow rule editor.
• Use the zoom toolbar buttons
,
, and
to zoom in, zoom out and reset the zoom to 100%.
• Use the zoom drop-down on the toolbar.
• Press and hold the Ctrl key and use the mouse wheel to zoom in and out.
4.3.3.4. Collapsing/Expanding Branches
A branch of a flow rule can be collapsed or expanded either by
• clicking on the
or
boxes behind every rule element
• by pressing the Space key
4.3.4. Configuring the Appearance and Capabilities of the Flow Rule Editor
You can configure the appearance as well as the capabilities of the flow rule editor via the View (
toolbar button.
) dropdown
Alternatively, you can also right-click in the flow rule editor and select the according entries from the View context
menu. The following table shows the individual options.
© Bosch Software Innovations GmbH
105/270
Chapter 4. Tasks
Table 4.1. Individual options for configuring the appearance and capabilities of the flow rule editor
Option
Description
Descriptions
Show/hide descriptions of rule elements
Contents
Show/hide contents of rule elements
Notes
Show/hide notes of rule elements
Tooltips
Show/hide tooltips for rule elements
Empty Descriptions/Content
Show/hide empty descriptions or content of rule elements
Call/Assignment Details
Show/hide details for call and assignment elements
Hover Palette
Enable/disable hover palette
You can also modify the maximum height and width of rule elements. This can be done via the increase and decrease buttons in the toolbar (
). These settings are also available in the Preferences (Visual Rules >
Flow Rule Editor).
If your rule elements are rather small already (don't contain large descriptions), they may be far away
from the maximum width and height settings and you may need to click the red decrease buttons
several times in order to see an effect.
4.3.5. Extracting a branch of a Flow Rule as a new Flow Rule
You can extract a branch of a flow rule as a new flow rule. Instead of executing the respective branch the original
flow rule will call the newly created flow rule, such that the overall behavior remains unchanged. This way you can
split a large flow rule into pieces.
The new flow rule is automatically added all necessary elements like data elements, actions, etc..
Only if the new flow rule is placed in a different rule project, the file ruleproject.vr might need to be
adapted.
1.
Right-click on the first element of the branch. A context menu will appear.
2.
Select the Extract Branch as New Flow Rule entry from the context menu.
3.
The Extract Flow Rule wizard appears.
© Bosch Software Innovations GmbH
106/270
Chapter 4. Tasks
4.
Select the rule model and rule package where the new flow rule should be located. You can click on the corresponding Browse... buttons to select the rule model and rule package from a list.
5.
Enter a name for the new flow rule.
6.
Click on Next > to get a list of all the upcoming changes that the extraction will cause (You can also uncheck
only some of the changes that you don't want to make, while leaving others checked). Click on Cancel if you
don't want to make the changes.
7.
Press Finish to create the new flow rule. Unless you deactivated the corresponding checkbox, the flow rule
editor will automatically show the new flow rule.
Related Concepts.
• Section 3.4, “Flow Rule” [29]
• Section 3.3, “Rule Package” [26]
• Section 3.2, “Rule Model” [25]
• Section 3.4.1, “Flow Rule Template” [30]
Related References.
• Section 5.2.3, “New Rule Wizard” [201]
• Section 5.5.2, “Project Explorer View” [223]
4.3.6. Extracting a branch of a Flow Rule as a new Decision Table
You can extract a branch of a flow rule as a new decision table. Instead of executing the respective branch the
original flow rule will call the newly created decision table, such that the overall behavior remains unchanged. This
way you can split a large flow rule into pieces.
The new decision table is automatically added all necessary elements like data elements, actions,
etc.. Only if the new decision table is placed in a different rule project, the file ruleproject.vr might
need to be adapted.
© Bosch Software Innovations GmbH
107/270
Chapter 4. Tasks
1.
Right-click on the first element of the branch. A context menu will appear.
2.
Select the Extract Branch as New Decision Table entry from the context menu.
3.
The Extract Decision Table wizard appears.
4.
Select the rule model and rule package where the new decision table should be located. You can click on the
corresponding Browse... buttons to select the rule model and rule package from a list.
5.
Enter a name for the new decision table.
6.
Click on Next > to get a list of all the upcoming changes that the extraction will cause (You can also uncheck
only some of the changes that you don't want to make, while leaving others checked). Click on Cancel if you
don't want to make the changes.
7.
Press Finish to create the new decision table. Unless you deactivated the corresponding checkbox, the decision table editor will automatically show the new decision table.
Related Concepts.
• Section 3.4, “Flow Rule” [29]
• Section 3.3, “Rule Package” [26]
• Section 3.2, “Rule Model” [25]
• Section 3.4.1, “Flow Rule Template” [30]
Related References.
• Section 5.2.3, “New Rule Wizard” [201]
• Section 5.5.2, “Project Explorer View” [223]
4.3.7. Adding New Flow Rule Elements
1.
Select a rule element in the palette by clicking on it.
© Bosch Software Innovations GmbH
108/270
Chapter 4. Tasks
2.
Now, move the mouse over an existing element in the flow rule. A black arrow will appear to show you where
the new element will be added. This can be either before, after, above or below an existing rule element. Accordingly, the black arrow will point to the left, to the right, up or down. Move the mouse until the arrow points
into the direction you want.
A stop (
3.
) icon indicates that the rule element cannot be added at this location.
When you see a black arrow, click again and the new rule element will be inserted.
Related Concepts.
• Section 3.5, “Flow Rule Element” [31]
• Section 3.6, “Flow Rule Editor” [45]
Related References.
• Section 5.3.1.1, “Flow Rule Editor Palette” [205]
4.3.8. Editing Descriptions of Flow Rule Elements
Next to each flow rule element is a box that contains the description and/or content (rule expressions).
1.
Make sure descriptions are displayed by activating the Hide/Show Descriptions ( ) toolbar button.
2.
Double-click a description you want to edit. You can also just select it and start typing. The inplace editor will
open.
3.
Enter the description.
4.
Press Ctrl+Enter to close the editor or click with the mouse outside of the editor.
Related Concepts.
• Section 3.5, “Flow Rule Element” [31]
• Section 3.15, “Description and Note” [78]
4.3.9. Collapsing Branches
Individual branches of a flow rule can be collapsed and expanded to get a better overview. This is often helpful
when working with very large flow rules.
© Bosch Software Innovations GmbH
109/270
Chapter 4. Tasks
1.
To collapse individual branches of a flow rule, click on the minus sign ( ) next to a rule element. A collapsed
branch is represented by a grey rectangle.
2.
Click on the plus sign ( ) in front of the grey rectangle to expand the branch again. You can also press the
Space key to expand and collapse branches.
Expanding and collapsing branches is for visual purposes only. The rule is not changed in any way.
Related Concepts.
• Section 3.5.12, “Branch Description” [44]
4.3.10. Editing a Decision Element
A decision consists of one or more conditions, an else exit and an optional condition prefix. All parts can have their
own descriptions. The following sections describe how to add, remove and edit the different parts of a decision element.
Related Concepts.
• Section 3.5.1, “Decision” [33]
• Section 3.12, “Expressions” [55]
Related Tasks.
• Section 4.10.1, “Using the Code Assist” [157]
Related References.
• Section 5.6.2.1, “Decision Overview Tab” [230]
• Section 5.6.2.2, “Decision Details Tab” [231]
• Section 5.6.1.1, “Description Tab” [229]
4.3.10.1. Editing a Decision Condition
In the flow rule editor, do the following:
1.
Double-click on the description or expression of a condition. This will open the inplace editor.
2.
Enter the description or expression for the condition. Use Alt+Enter to start a new line.
3.
Press Enter to close the editor or click with the mouse outside of the editor.
In the Properties on the Decision Overview tab, do the following:
1.
Double-click in either the description or the condition column to open an inplace editor.
2.
Enter the description or expression for the condition. Use Alt+Enter to start a new line.
3.
Press Enter to close the editor or click with the mouse outside of the editor.
In the Properties on the Decision Details tab, do the following:
1.
Select the condition that you want to edit. To the right you see the description and the expression of the selected condition.
2.
Edit the description or expression.
4.3.10.2. Adding a Condition to a Decision
In the flow rule editor, do the following:
© Bosch Software Innovations GmbH
110/270
Chapter 4. Tasks
1.
Select the Decide element on the palette.
2.
Move the mouse over the decision where you want to add another condition. A black arrow appears pointing
up or down to indicate where the new condition will be inserted.
3.
Click again. The condition is inserted.
In the Properties on the Decision Overview or Decision Details tabs, do the following:
1.
Select the condition in the list where you want to insert the new condition.
2.
Click on the
button to insert the new condition.
4.3.10.3. Deleting a Condition from a Decision
In the flow rule editor, do the following:
1.
Select the condition you want to remove.
2.
Right-click and select Delete from the context menu. Alternatively, press the Del key.
In the Properties on the Decision Overview or Decision Details tabs, do the following:
1.
Select the condition in the list that you want to remove.
2.
Click on the
button to delete the condition. If the delete function is disabled either no condition is selected
or there is only one condition remaining in the decision. It cannot be removed because the decision must have
at least one.
4.3.10.4. Reordering Conditions in a Decision
The conditions within one decision are processed in order from top to bottom. To change this order, you can move
conditions up or down using drag&drop:
1.
Click on the condition you want to move and keep the left mouse button pressed.
2.
Move the condition up or down to where you want it. A black arrow indicates where it will be moved to.
3.
Let go of the mouse button and the condition is moved (or copied if you hold the Ctrl key).
4.3.10.5. Editing the Common Condition Prefix
If all conditions start with the same prefix, you can specify this as the condition prefix.
In the flow rule editor, do the following:
1.
Double-click on the condition prefix of the decision. This is the expression displayed above the first condition.
An inplace editor will open.
2.
Enter the expression to be used as the common condition prefix. Use Alt+Enter to start a new line.
3.
Press Enter to close the editor or click with the mouse outside of the editor.
In the Properties on the Decision Overview tab, do the following:
1.
Double-click in the condition column in the first row (the decision) to open an inplace editor.
2.
Enter the expression to be used as the common condition prefix. Use Alt+Enter to start a new line.
3.
Press Enter to close the editor or click with the mouse outside of the editor.
In the Properties on the Decision Details tab, do the following:
1.
Select the first row (the decision). To the right you see the common condition prefix.
2.
Enter the expression to be used as the common condition prefix.
© Bosch Software Innovations GmbH
111/270
Chapter 4. Tasks
4.3.11. Editing an Assignment Element
An assignment element can contain one or more individual assignments. The following sections describe how to
add, remove, sort and edit assignments in an assignment element.
Related Concepts.
• Section 3.5.2, “Assignments” [35]
• Section 3.12, “Expressions” [55]
Related Tasks.
• Section 4.10.1, “Using the Code Assist” [157]
Related References.
• Section 5.6.2.3, “Assignments Tab” [232]
4.3.11.1. Editing an Assignment
For each assignment within an assignment element you must specify a left side, an operation and a right side (except for the CLEAR assignment which only has a left side).
In the flow rule editor, do the following:
1.
Make sure the contents are displayed by activating the Hide/Show Contents ( ) toolbar button.
2.
Double-click the assignment to open an inplace editor.
3.
Enter the assignment expression. This includes the left side, the operation and the right side, all in one. The
operator can be either :=, ADD, REMOVE or CLEAR. See Section 3.5.2, “Assignments” [35] for a description of the
different operators of assignments. Use Alt+Enter to start a new line.
4.
Press Enter to close the editor or click with the mouse outside of the editor.
In the Properties on the Assignments tab, do the following:
1.
Double-click the left side of the assignment you want to edit. This will open an inplace editor.
2.
Enter the data element that you want to assign to. This can be just the name of a data element but also a
more complex expression, e.g. customer.address[3].city.
3.
Press Enter to close the inplace editor or click with the mouse outside of the inplace editor.
© Bosch Software Innovations GmbH
112/270
Chapter 4. Tasks
4.
If you want to change the default operation (:=) of the assignment, double-click it and choose the new operation from the drop-down list.
5.
Double-click the right side of the assignment. This will open an inplace editor.
6.
Enter the expression you want to use for the right side.
7.
Optionally you can also enter a description for the assignment.
If the left side is a collection which can hold multiple elements or a structure with multiple attributes,
there are alternative ways for entering the right side works. See below on how to enter the elements
of a collection or how to specify values for the attributes of a structure.
If the left side is a structure, you can either specify an expression for the right side just like described above, or
specify values for the individual attributes of the structure. In order to do that, do the following:
1.
Expand the structure by clicking the plus ( ) button in front of the left side. This will expand the list and show
the structure's attributes on individual lines.
2.
Enter right sides for some or all of the attributes. If attributes are themselves structures, they can also be expanded.
If the left side is a collection (or list or set) which can hold multiple values, you can create and specify the collection
elements individually. In order to do that, do the following:
1.
Select the collection.
2.
Click on the button (
) to add a new list element.
The new list element is added and shown indented underneath the collection. The element is indicated by a
number (index) in square brackets.
3.
Optionally double-click the index and change it to another value.
4.
Enter the right side for the element.
4.3.11.2. Adding an Assignment to an Assignment Element
In the flow rule editor, do the following:
1.
Make sure the contents are displayed by activating the Hide/Show Contents ( ) toolbar button.
2.
Select the Assign element on the palette.
3.
Move the mouse over the list of assignments shown next to the assignment element where you want to add
the new assignment. A black bar will appear to indicate where the assignment is inserted.
4.
Click again. The assignment is inserted.
Alternatively, you can simply use the Insert key and start typing, to substitute an Assignment in an Assignment Element.
In the Properties on the Assignments tab, do the following:
•
Click on the
button to insert a new assignment at the end of the list.
Alternatively, you can simply start editing the last entry in the list, indicated by this icon
new assignment automatically.
© Bosch Software Innovations GmbH
. This will create a
113/270
Chapter 4. Tasks
4.3.11.3. Deleting an Assignment from an Assignment Element
In the flow rule editor, do the following:
1.
Select the assignment that you want to delete.
2.
Right-click on the assignment and select the Delete menu entry. Alternatively, press the Del key.
In the Properties on the Assignments tab, do the following:
1.
In the list select the assignment you want to delete.
2.
Click on the
button to delete it.
4.3.11.4. Reordering the Assignments in an Assignment Element
If you want to reorder the assignments in your assignment element you do this by either:
1.
Selecting the particular assignment in your assignment element and use the
ties on the Assignments tab,
and
buttons in the Proper-
OR
2.
Use the drag & drop functionality of the flow rule editor by selecting an assignment in the particular assignment element and drag it to the correct position in the assignment list.
4.3.12. Editing a Fire Action Element
Different settings for an fire action element may be necessary, depending on the action type of the action.
In the Properties of the fire action element on the Fire Action tab, do the following:
1.
In the Fire Action field specify the action that should be fired. Press Ctrl+Space for content assist or click on
... to choose the action from a list of available actions.
2.
If you leave the Fire Action field, the view changes and the action specific settings appear.
3.
Insert the action specific settings. These settings apply only to the selected Fire Action element and are used
when the action is fired at this location in the rule.
For example, these are the Properties of a Fire Action element that fires the action price_output of action type
Output message.
Related Concepts.
• Section 3.5.3, “Fire Action” [37]
• Section 3.16, “Action” [79]
Related Tasks.
• Section 4.8.1, “Defining Actions” [154]
Related References.
• Section 5.6.7.3, “Output message Action Tabs” [250]
© Bosch Software Innovations GmbH
114/270
Chapter 4. Tasks
• Section 5.6.7.4, “Log message Action Tab” [251]
• Section 5.6.7.5, “Send e-mail Action Tabs” [252]
• Section 5.6.7.6, “Write CSV File Action Tabs” [253]
4.3.13. Editing a Repeat Element
Different settings for a repeat element may be necessary, depending on the type of repeat .
In the Properties of the repeat element on the Repeat tab, do the following:
1.
Select the type of repeat you want to use in the repeat element. You can choose between for each of multiple elements, while a condition holds and with counter.
2.
After the selection of a repeat type the view changes and the repeat type specific settings appear.
3.
Insert the repeat type specific settings.
For example, the properties of a repeat element from repeat type Repeat with counter.
Related Concepts.
• Section 3.5.8, “Repeat” [40]
• Section 3.14.7, “Collection” [76]
• Section 3.12, “Expressions” [55]
Related Tasks.
• Section 4.10.1, “Using the Code Assist” [157]
Related References.
• Section 5.6.2.8, “Repeat Tab” [237]
4.3.14. Editing an End Repeat Element
The end repeat element has no specific element settings.
You have the possibility to insert a description and a note to describe what happens if this element is reached.
If the end repeat element is reached the nearest repeat element will be ended.
Related Concepts.
• Section 3.5.9, “End Repeat” [42]
Related Tasks.
• Section 4.3.13, “Editing a Repeat Element” [115]
4.3.15. Editing a Call Flow Rule Element
In order to edit a Call Flow Rule element open its Properties and select the Call Flow Rule tab and do the following:
© Bosch Software Innovations GmbH
115/270
Chapter 4. Tasks
1.
Select in the field Call Flow Rule the rule that should be called. You can call rules from the same package or
from any package that is defined to be reused.
Press Ctrl+Space for content assist or click on ... to choose the rule from a list of available rules.
2.
The required input data elements of the called rule are displayed in the Input Data area. You have to specify
values for at least the required inputs.
Click on
to automatically insert data elements as input values, when they have matching name and type.
Only inputs still without a value will be affected.
3.
The output data elements of the called rule are displayed in the Output Data area. Assign the output values
to data elements of the calling flow rule.
Click on
to automatically insert data elements with matching names and types to assign the outputs to.
Only outputs not yet assigned will be affected.
The
button opens the specified flow rule in the flow rule editor.
Related Concepts.
• Section 3.5.4, “Call Flow Rule” [38]
• Section 3.4, “Flow Rule” [29]
Related Tasks.
• Section 4.10.1, “Using the Code Assist” [157]
• Section 4.11.9, “Copying and pasting values” [164]
Related References.
• Section 5.6.2.5, “Call Flow Rule” [234]
4.3.16. Editing a Call Decision Table Element
In order to edit a Call Decision element open its Properties and select the Call Decision Table tab and do the following:
1.
Select in the field Call Decision Table the decision table that should be called. You can call decision tables
from the same package or from any package that is defined to be reused.
Press Ctrl+Space for content assist or click on ... to choose the decision table from a list of available decision
tables.
2.
The required input data elements of the called decision table are displayed in the Input Data area. You have
to specify values for at least the required inputs.
© Bosch Software Innovations GmbH
116/270
Chapter 4. Tasks
Click on
to automatically insert data elements as input values, when they have matching name and type.
Only inputs still without a value will be affected.
3.
The output data elements of the called decision table are displayed in the Output Data area. Assign the output values to data elements of the calling flow rule.
Click on
to automatically insert data elements with matching names and types to assign the outputs to.
Only outputs not yet assigned will be affected.
The
button opens the specified decision table in the editor.
Related Concepts.
• Section 3.5.5, “Call Decision Table” [39]
• Section 3.7, “Decision Table” [48]
Related Tasks.
• Section 4.10.1, “Using the Code Assist” [157]
• Section 4.11.9, “Copying and pasting values” [164]
Related References.
• Section 5.6.2.6, “Call Decision Table” [235]
4.3.17. Editing a Call Service Element
In order to edit a call service element open its Properties and select the Call Service tab and do the following:
1.
Select in the field Call Service the service that should be called. You can call services from the same package
or from any package that is defined to be reused.
Press Ctrl+Space for content assist or click on ... to choose the service from a list of available services.
2.
The required input data elements of the service are displayed in the Input Data area. You have to specify values for at least the required inputs.
Click on
to automatically insert data elements as input values, when they have matching name and type.
Only inputs still without a value will be affected.
3.
The output data elements of the service are displayed in the Output Data area. Assign the output values to
data elements of the calling flow rule.
Click on
to automatically insert data elements with matching names and types to assign the outputs to.
Only outputs not yet assigned will be affected.
© Bosch Software Innovations GmbH
117/270
Chapter 4. Tasks
Related Concepts.
• Section 3.5.6, “Call Service” [40]
• Section 3.19, “Service” [81]
Related Tasks.
• Section 4.10.1, “Using the Code Assist” [157]
• Section 4.11.9, “Copying and pasting values” [164]
Related References.
• Section 5.6.2.7, “Call Service” [236]
4.3.18. Editing a Return Exception Element
In order to edit a Return Exception element open its Properties and select the Return Exception tab and do the
following:
1.
Either select the Exception Element option or the Create Exception Element option.
The first option lets you specify an expression defining the returned exception element. This is useful when
the exception element is already available, for example in a data element.
The second option is used when you want to create a new exception element.
2.
If you select Exception Element, enter an expression to specify the exception element.
If you select Create Exception Element, select an exception Type and then insert the values for the exception attributes.
Related Concepts.
• Section 3.5.10, “Return Exception” [42]
© Bosch Software Innovations GmbH
118/270
Chapter 4. Tasks
• Section 3.14.6, “Exception” [76]
Related References.
• Section 5.6.2.9, “Return Exception Tab” [239]
4.3.19. Editing a Handle Exception Element
In order to edit a Handle Exception element open its Properties and select the Handle Exception tab and do the
following:
•
In the Assign value of Exception Element to field, insert the name of the data element that should be assigned the value of the exception element that occurred.
The data element must have a suitable data type, i.e. it must be an exception element. The Handle Exception
element will only handle exception elements of this type (or subtypes thereof). Other exception elements will
remain unhandled.
You can also leave this empty. In that case all exception elements are handled, but you will not be able to inspect the exception element from within the Handle Exception branch.
Related Concepts.
• Section 3.5.11, “Handle Exception” [43]
• Section 3.5.10, “Return Exception” [42]
• Section 3.14.6, “Exception” [76]
Related References.
• Section 5.6.2.10, “Handle Exception Tab” [240]
4.3.20. Copying or Moving a Branch of a Flow Rule
To copy a branch of a flow rule, do the following:
1.
Select the rule element which is the root of the branch you want to copy.
2.
Right-click and select Copy from the context menu. You can also use the Ctrl+C key combination to copy it.
3.
Now, select the rule element after which you want to paste the previously copied branch.
4.
Right-click and select Paste from the context menu or press Ctrl+V to paste the branch.
5.
A copy of the previously copied rule element and its children is pasted.
A case in a decision can only be pasted within a decision.
Alternatively, you can copy or move a branch with drag&drop.
1.
Click on the rule element which is the root of the branch you want to copy or move and hold the mouse button
pressed down.
© Bosch Software Innovations GmbH
119/270
Chapter 4. Tasks
2.
Drag the branch to its destination. If you want to create a copy of the branch you must also press the Ctrl key.
Otherwise the branch is moved.
3.
Let go of the mouse button to drop the branch.
Related Tasks.
• Section 4.3.21, “Copying or Moving a Single Rule Element” [120]
4.3.21. Copying or Moving a Single Rule Element
1.
Copying and moving single rule elements is done using drag&drop. Select a rule element and hold down the
left mouse button.
2.
Press and hold the Alt key. This will only copy or move the selected element but not its successors.
3.
Drag the rule element to its destination. If you want to create a copy you must also press the Ctrl key in addition to the Alt key. Otherwise the rule element is moved.
4.
Let go of the mouse button to drop the rule element.
Related Tasks.
• Section 4.3.20, “Copying or Moving a Branch of a Flow Rule” [119]
4.3.22. Deleting a Branch of a Flow Rule
To remove a rule element and all its successors (a branch of a flow rule), do the following:
1.
Right-click on the rule element you would like to delete and select the Delete menu item. Alternatively you can
select the rule element and press the Del key.
2.
The rule element including all its successors are deleted.
Related Tasks.
• Section 4.3.23, “Deleting a Single Rule Element” [120]
4.3.23. Deleting a Single Rule Element
To remove a single rule element in a flow rule but keep its successors, do the following:
1.
Right-click on the rule element and select the Delete This Element Only menu item. Alternatively you can select the rule element and press Alt+Del.
2.
The rule element is deleted and its successors are attached to the element's predecessor.
Related Tasks.
• Section 4.3.22, “Deleting a Branch of a Flow Rule” [120]
• Section 4.3.24, “Deleting Multiple Rule Elements” [120]
4.3.24. Deleting Multiple Rule Elements
You can delete several rule elements simultaneously.
1.
Select multiple elements by holding down the Ctrl key while selecting them with the mouse.
2.
Then use the right mouse button to select the Delete menu item. Alternatively, press Del.
Be aware that this deletes all selected rule elements including their successors.
Related Tasks.
© Bosch Software Innovations GmbH
120/270
Chapter 4. Tasks
• Section 4.3.22, “Deleting a Branch of a Flow Rule” [120]
4.3.25. Adding a Branch Description
1.
Select the Describe Branch tool from the palette
2.
Click on the rule element which is the root of the branch that you want to describe.
3.
A box around the branch will appear with the branch description at the top.
4.
Double-click the empty branch description. This will open the inplace editor.
5.
Enter the description.
6.
Press Ctrl+Enter to close the editor or click with the mouse outside of the editor.
Related Concepts.
• Section 3.5.12, “Branch Description” [44]
4.3.26. Deleting a Branch Description
1.
Select the branch description shown at the top of the box around the branch.
2.
Then use the right mouse button to select the Delete menu item. Alternatively, press Del.
Related Concepts.
• Section 3.5.12, “Branch Description” [44]
4.3.27. Adding a Note
1.
Select the Add Note tool from the Palette
2.
Click on the rule element where you want to attach the note.
3.
A note will appear to the right of the flow rule.
4.
Double-click the empty note. This will open the inplace editor.
5.
Enter the text for the note.
6.
Press Ctrl+Enter to close the flow rule editor or click with the mouse outside of the editor.
Alternatively you can use the Properties view to enter notes.
1.
Select the rule element where you want to attach the note.
2.
In the Properties view activate the Notes tab.
3.
Click on the
4.
Enter the text of the note.
button to add a new note.
Related Concepts.
• Section 3.15, “Description and Note” [78]
Related References.
• Section 5.6.1.2, “Notes Tab” [230]
4.3.28. Deleting a Note
1.
Select the note you want to delete.
2.
Use the right mouse button to select the Delete menu item. Alternatively, press Del.
© Bosch Software Innovations GmbH
121/270
Chapter 4. Tasks
Alternatively you can use the Properties view to delete notes.
1.
Select the rule element whose notes you want to delete.
2.
In the Properties view activate the Notes tab.
3.
Click on the
button next to the note you want to delete .
Related Concepts.
• Section 3.15, “Description and Note” [78]
Related References.
• Section 5.6.1.2, “Notes Tab” [230]
4.3.29. Activating/Deactivating a Rule Element
1.
Right-click the rule element that you want to activate/deactivate and select the Activate or Deactivate menu
item, respectively.
2.
The element is activated/deactivated. Deactivated elements have a small icon attached ( ) and will be greyed
out including all its successors.
Related Concepts.
• Section 3.5.14, “Rule Element Deactivation” [45]
4.3.30. Navigating to a Specific Rule Element
Every rule element within a flow rule has an ID (a number) that uniquely identifies it.
To find the rule element with a specific ID, do the following:
1.
Make sure a flow rule editor is activated. Press Ctrl+L.
2.
A dialog appears where you can enter the ID of a rule element. A message is shown and OK is disabled when
the entered ID does not exist in the flow rule.
3.
Press OK. The rule element with the given ID is selected.
Related Concepts.
• Section 3.5, “Flow Rule Element” [31]
• Section 3.4, “Flow Rule” [29]
4.3.31. Undoing Changes
You can undo individual operations by selecting Edit > Undo [Operation] from the menu. The last operation you
carried out is shown in place of [Operation]. Alternatively, press the Ctrl+Z key combination to undo the last operation performed.
To redo undone operations, select Edit > Redo [Operation] from the menu. You can also use the Ctrl+Y key combination.
Related References.
• Section 5.8, “Hotkeys” [269]
4.3.32. Displaying Statistics
In order to display statistics, do the following:
1.
Open the flow rule or decision table in the editor for which you want to view the statistics.
© Bosch Software Innovations GmbH
122/270
Chapter 4. Tasks
2.
Click on the (
) icon itself in the toolbar to show or hide statistics. The icon will toggle between a white barchart and a colored barchart, indicating whether the display of statistics is turned off (white) or on (colored).
3.
Click on the small arrow to the right of the icon to open a drop-down which allows you to further specify what
statistical information should be displayed.
With the navigation in the statistics view, you can focus on the statistics for a specific test within
a test suite or a specific test case within a test.
Related Tasks.
• Section 4.11.22, “Creating and Configuring Statistics” [169]
• Section 4.3.33, “Displaying Externally Generated Statistics” [123]
Related References.
• Section 5.5.7, “Statistics View” [227]
4.3.33. Displaying Externally Generated Statistics
It is possible to display statistics files which are generated outside the Visual Rules Modeler. To display such a
statistics file, do the following:
1.
Open the Project Explorer and paste the statistics file directly into a project or any sub-folder you like. The
Project Explorer shows the name of the entry rule as well as the creation date and time of the statistics file.
Only statistics files with the file extension .vrstatistic are recognized as Visual Rules statistics
file.
2.
Double click on the statistics tree item to activate the statistics (activated statistics are marked red).
© Bosch Software Innovations GmbH
123/270
Chapter 4. Tasks
Related Tasks.
• Section 4.11.22, “Creating and Configuring Statistics” [169]
• Section 4.3.32, “Displaying Statistics” [122]
4.3.34. Changing Flow Rule Editor Preferences
1.
Select Window > Preferences to open the preferences dialog.
2.
Click on the plus sign to the left of the Visual Rules item.
3.
Click on the Flow Rule Editor item to view the preferences for the flow rule editor.
4.
Change the settings as desired.
5.
If you would like to reset the preferences to their default values, click on Restore Defaults.
6.
Click OK to confirm your changes.
Related References.
• Section 5.7.2, “Flow Rule Editor Preferences” [263]
4.3.35. Exporting a Rule as an Image
Visual Rules provides an option for exporting a rule as an image. You can either export the image to the clipboard
or to a file. The following file formats are supported:
• Portable Network Graphics (PNG) (Eclipse 3.3 only)
• Bitmap (BMP)
• JPEG (JPG)
To export a rule as an image to the clipboard, do the following:
1.
Open the rule to be exported in the rule editor.
2.
Right-click anywhere in the rule. Select Export Image -> To Clipboard from the context menu.
3.
The image is now in the clipboard and can be pasted in other applications.
To export a rule as an image to a file, do the following:
© Bosch Software Innovations GmbH
124/270
Chapter 4. Tasks
1.
Open the rule to be exported in the rule editor.
2.
Right-click anywhere in the rule. Select Export Image -> To File... from the context menu. A file selection box
appears.
3.
Specify the directory, name and extension (either .png, .bmp or .jpg) of the image file.
4.
Press Save to export the image.
The exported image shows the rule exactly as displayed in the rule editor. So you can e.g. collapse
unimportant branches before you export the image.
4.4. Working with Decision Tables
The following sections include detailed descriptions for working with decision tables and the decision table editor.
4.4.1. Opening the Decision Table Editor
•
In the Rule Explorer double-click on a decision table ( ) to open the decision table editor.
Alternatively, you can right-click on the decision table and select Open.
You can also open the Decision Table Editor for a decision table that is referenced in a call decision
table element. To do so, press the Ctrl key and click on the reference in the Decision Table Editor.
Related Concepts.
• Section 3.8, “Decision Table Editor” [50]
• Section 3.7, “Decision Table” [48]
Related References.
• Section 5.5.2, “Project Explorer View” [223]
4.4.2. Adding a new Decision Column or Row
In order to add a new decision column or row to the decision table, do the following:
Option 1:
1.
Select the Decide element in the palette by clicking on it.
2.
Now, move the mouse over an existing yellow condition header of the decision table. A black arrow will appear to show you where the new decision will be added. Depending on the existing decision columns and
rows, this can be either before, after, above or below an existing decision. Accordingly, the black arrow will
point to the left, to the right, up or down. Move the mouse until the arrow points into the direction you want.
© Bosch Software Innovations GmbH
125/270
Chapter 4. Tasks
A stop (
3.
) icon indicates that the decision table element cannot be added at this location.
When you see a black arrow, click again and the new decision column or row will be inserted.
Option 2:
1.
Select an input data element from the Rule Context palette and drag it.
2.
Now, move the mouse over an existing yellow condition header of the decision table. A black arrow will appear to show you where the new decision will be added. Depending on the exising decision columns and
rows, this can be either before, after, above or below an existing decision. Accordingly, the black arrow will
point to the left, to the right, up or down. Move the mouse until the arrow points into the direction you want.
A stop (
3.
) icon indicates that the decision table element cannot be added at this location.
When you see a black arrow, drop the input data element and the new condition column or row will be inserted. The input data element is automatically inserted in the condition header.
Alternatively, you can use the Insert key to add a new condition.
Related Concepts.
• Section 3.7.1, “Condition Column/Row” [49]
Related Tasks.
• Section 4.4.3, “Editing Conditions” [126]
• Section 4.4.4, “Adding a new Condition” [127]
• Section 4.4.5, “Adding an Else Condition” [127]
• Section 4.4.8, “Rearranging Condition Columns or Rows” [129]
4.4.3. Editing Conditions
In order to edit a condition header in the decision table, do the following:
1.
Double-click on the condition header in the decision table. This will open the inplace editor.
2.
Enter the input data element that should be checked.
3.
Press Enter to close the editor or click with the mouse outside of the editor.
In order to edit conditions in the decision table, do the following:
1.
Double-click on the condition in the decision table. This will open the inplace editor.
2.
Enter the expression for the condition.
3.
Press Enter to close the editor or click with the mouse outside of the editor.
Related Concepts.
© Bosch Software Innovations GmbH
126/270
Chapter 4. Tasks
• Section 3.7.1, “Condition Column/Row” [49]
Related Tasks.
• Section 4.4.2, “Adding a new Decision Column or Row” [125]
• Section 4.4.4, “Adding a new Condition” [127]
• Section 4.4.5, “Adding an Else Condition” [127]
• Section 4.4.8, “Rearranging Condition Columns or Rows” [129]
4.4.4. Adding a new Condition
In order to add a new condition in the decision table editor, do the following:
1.
Select the Decide element in the palette by clicking on it.
2.
Now, move the mouse over an existing condition of the decision table. A black arrow will appear to show you
where the new condition will be added. This can be for condition columns above or below or for condition rows
before or after an existing condition or condition header. Accordingly, the black arrow will point to the left, to
the right, up or down. Move the mouse until the arrow points into the direction you want.
A stop (
3.
) icon indicates that the decision table element cannot be added at this location.
When you see a black arrow, click again and the new condition will be inserted.
Alternatively, you can use the Insert key to add a new condition.
In order to add multiple new condition columns or rows to the decision table, do the following:
1.
Select the Decide element in the palette by clicking on it.
2.
Now, drag the mouse over an existing condition of the decision table. A black arrow will appear to show you
where the new decisions will be added. Depending on the exising decision columns and rows, this can be either before, after, above or below an existing condition. Accordingly, the black arrow will point to the left, to the
right, up or down. Move the mouse until the arrow points into the direction you want.
A stop (
3.
) icon indicates that the decision table element cannot be added at this location.
When you see a black arrow, press Ctrl and drop the element. A dialog appears to allow the entering of the
number of new condition columns or rows, which will be inserted. Enter the number as desired and press OK.
The conditon columns or rows are automatically inserted in the decision table.
Related Concepts.
• Section 3.7.1, “Condition Column/Row” [49]
Related Tasks.
• Section 4.4.2, “Adding a new Decision Column or Row” [125]
• Section 4.4.3, “Editing Conditions” [126]
• Section 4.4.5, “Adding an Else Condition” [127]
• Section 4.4.8, “Rearranging Condition Columns or Rows” [129]
4.4.5. Adding an Else Condition
In order to add an else condition to a decision table, do the following:
© Bosch Software Innovations GmbH
127/270
Chapter 4. Tasks
1.
Select the Else element in the palette by clicking on it.
2.
Move the mouse to the last condition of any decision. A black arrow will appear to show you where the else
condition will be added. This can be only after the last condition of a decision. Accordingly, the black arrow will
point to the right or down. Move the mouse until the arrow points into the direction you want.
A stop (
3.
) icon indicates that the decision table element cannot be added at this location.
When you see a black arrow, click again and the else condition will be inserted.
Related Concepts.
• Section 3.7.1, “Condition Column/Row” [49]
Related Tasks.
• Section 4.4.2, “Adding a new Decision Column or Row” [125]
• Section 4.4.3, “Editing Conditions” [126]
• Section 4.4.4, “Adding a new Condition” [127]
• Section 4.4.8, “Rearranging Condition Columns or Rows” [129]
4.4.6. Adding a new Assignment Column
In order to add a new assignment column to the decision table, do the following:
Option 1:
1.
Select the Assign element in the palette by clicking on it.
2.
Now, move the mouse over an existing blue column header. A black arrow will appear to show you where the
new assignment will be added. This can be either before or after an existing assignment, action or exception
column. Accordingly, the black arrow will point to the left or to the right. Move the mouse until the arrow points
into the direction you want.
A stop (
3.
) icon indicates that the decision table element cannot be added at this location.
When you see a black arrow, click again and the new assignment column will be inserted.
Option 2:
1.
Select an output data element from the Rule Context palette and drag it.
2.
Now, move the mouse over an existing blue column header. A black arrow will appear to show you where the
new assignment will be added. This can be either before or after an existing assignment, action or exception
column. Accordingly, the black arrow will point to the left or to the right. Move the mouse until the arrow points
into the direction you want.
A stop (
3.
) icon indicates that the decision table element cannot be added at this location.
When you see a black arrow, drop the output data element and the new assignment column will be inserted.
The output data element is automatically inserted in the assignment column header.
Related Concepts.
© Bosch Software Innovations GmbH
128/270
Chapter 4. Tasks
• Section 3.7.2, “Assignment Column” [49]
Related Tasks.
• Section 4.4.7, “Editing an Assignment” [129]
• Section 4.4.16, “Rearranging Assignment/Action/Exception Columns” [133]
4.4.7. Editing an Assignment
In order to edit the assignment column header in the decision table, do the following:
1.
Double-click on the column header. This will open the inplace editor.
2.
Enter the name of an output data element that will receive the corresponding value.
3.
Press Enter to close the editor or click with the mouse outside of the editor.
In order to enter values in cells of an assignment column, do the following:
1.
Double-click on the cell in the decision table. This will open the inplace editor. You can also simply start typing
when a cell is selected.
2.
Enter the value that should be assigned. This can be just a simple value or some expression. If left empty, the
decision table will simply not assign any value in that case.
3.
Press Enter to close the editor or click with the mouse outside of the editor.
Related Concepts.
• Section 3.7.2, “Assignment Column” [49]
Related Tasks.
• Section 4.4.6, “Adding a new Assignment Column” [128]
• Section 4.4.16, “Rearranging Assignment/Action/Exception Columns” [133]
4.4.8. Rearranging Condition Columns or Rows
In order to rearrange condition columns or rows, do the following:
1.
Select the condition header of the decision that should be moved and drag it.
2.
Now, move the mouse over an existing condition header of the decision table. A black arrow will appear to
show you where the new decision will be added. Depending on the exising decision columns and rows, this
can be either before, after, above or below an existing decision. Accordingly, the black arrow will point to the
left, to the right, up or down. Move the mouse until the arrow points into the direction you want.
A stop (
) icon indicates that the decision table element cannot be added at this location.
© Bosch Software Innovations GmbH
129/270
Chapter 4. Tasks
3.
When you see a black arrow, drop the decision and the whole column or row will be moved.
If you rearrange condition columns or rows like this, the decision table is restructured accordingly. This may introduce new cells which are initially empty.
Related Concepts.
• Section 3.7.1, “Condition Column/Row” [49]
Related Tasks.
• Section 4.4.2, “Adding a new Decision Column or Row” [125]
• Section 4.4.3, “Editing Conditions” [126]
• Section 4.4.4, “Adding a new Condition” [127]
• Section 4.4.5, “Adding an Else Condition” [127]
4.4.9. Describing Decision Table Elements
In order to insert a description to any decision table element, do the following:
1.
Activate the display of descriptions ( ) in the toolbar drop-down (
2.
Double-click on a description in the decision table to start the inplace editor.
3.
Enter the description.
).
Alternatively, you can use the Description tab:
1.
Select the cell of the decision table you want to describe.
2.
Go to the Properties view.
3.
Insert the description on the Description tab or add notes on the Notes tab
4.4.10. Navigating in Decision Tables
Navigate through the decision table cells with the following hot keys:
• Open inplace editor of cell with Enter or simply by starting to type
• Close inplace editor of cell with Enter
• Navigate through the cells of the decision table with the arrow keys
4.4.11. Configuring the Appearance of the Decision Table Editor
Via the View (
) dropdown toolbar button, you can configure what data should appear in the decision table editor. By activating the button, you can toggle highlighting of the cells for the conditions matching the selected cell.
The latter feature dramatically improves the readability of large decision tables.
© Bosch Software Innovations GmbH
130/270
Chapter 4. Tasks
Alternatively, you can also right-click in the decision table editor and select the according entries from the View
context menu. The following table shows the individual options.
Table 4.2. Individual options for configuring the appearance of the decision table editor
Option
Description
Descriptions
Show/hide descriptions of decision table cells
Contents
Show/hide contents of decision table cells
Empty Descriptions/Content
Show/hide empty descriptions or content of decision
table cells
Highlight Condition Path
Toggle highlighting of the cells for the conditions
matching the selected cell
4.4.12. Adding a new Action Column
In order to add a new action column to a decision table, do the following:
Option 1:
1.
Select the Fire Action element in the palette by clicking on it.
2.
Now, move the mouse over an existing blue column header. A black arrow will appear to show you where the
new action column will be added. This can be either before or after an existing assignment, action or exception column. Accordingly, the black arrow will point to the left or to the right. Move the mouse until the arrow
points into the direction you want.
A stop (
3.
) icon indicates that the decision table element cannot be added at this location.
When you see a black arrow, click again and the new action column will be inserted.
Option 2:
1.
Select an action from the Rule Context palette and drag it.
2.
Now, move the mouse over an existing column header. A black arrow will appear to show you where the new
action column will be added. This can be either before or after an existing assignment, action or exception column. Accordingly, the black arrow will point to the left or to the right. Move the mouse until the arrow points into the direction you want.
A stop (
3.
) icon indicates that the decision table element cannot be added at this location.
When you see a black arrow, drop the action and the new action column will be inserted. The action is automatically inserted in the action column header.
Related Concepts.
• Section 3.7.3, “Action Column” [49]
Related Tasks:
• Section 4.4.13, “Editing an Action Column” [132]
© Bosch Software Innovations GmbH
131/270
Chapter 4. Tasks
• Section 4.4.16, “Rearranging Assignment/Action/Exception Columns” [133]
4.4.13. Editing an Action Column
In order to edit an action column header, do the following:
1.
Double-click on the cell in the decision table. This will open the inplace editor.
2.
Specify the action that should be fired depending on conditions.
3.
Press Enter to close the editor or click with the mouse outside of the editor.
4.
Select the action column header and open the Properties view.
5.
Insert the action specific Fire Action settings.
In order to specify in which cases the action should fire or not, do the following:
•
Double-click on a cell in the action colum or press the Space key.
This will toggle between a small cross (x) and a dash (-). The action will be fired for those cells that contain a
cross.
Related Concepts.
• Section 3.7.3, “Action Column” [49]
Related Tasks.
• Section 4.4.12, “Adding a new Action Column” [131]
• Section 4.4.16, “Rearranging Assignment/Action/Exception Columns” [133]
4.4.14. Adding a new Exception Column
In order to add a new exception column in the decision table editor, do the following:
1.
Select the Return Exception element in the palette by clicking on it.
2.
Now, move the mouse over an existing blue column header. A black arrow will appear to show you where the
new exception will be added. This can be either before or after an existing assignment, action or exception
column. Accordingly, the black arrow will point to the left or to the right. Move the mouse until the arrow points
into the direction you want.
A stop (
3.
) icon indicates that the decision table element cannot be added at this location.
When you see a black arrow, click again and the new exception column will be inserted.
Related Concepts.
• Section 3.7.4, “Exception Column” [50]
© Bosch Software Innovations GmbH
132/270
Chapter 4. Tasks
Related Tasks.
• Section 4.4.15, “Editing Exception Columns” [133]
• Section 4.4.16, “Rearranging Assignment/Action/Exception Columns” [133]
4.4.15. Editing Exception Columns
In order to edit an exception column header, do the following:
1.
Double-click on the column header in the decision table. This will open the inplace editor.
2.
Enter an exception that should be returned depending on conditions.
3.
Press Enter to close the editor or click with the mouse outside of the editor.
4.
Select the exception column header and open the Properties view.
5.
Insert the exception specific Return Exception settings.
In order to specify in which cases the exception should occur or not, do the following:
•
Double-click on a cell in the exception column or press the Space key.
This will toggle between a small cross (x) and a dash (-). The exception will be returned for those cells that
contain a cross.
Related Concepts.
• Section 3.7.4, “Exception Column” [50]
Related Tasks.
• Section 4.4.14, “Adding a new Exception Column” [132]
• Section 4.4.16, “Rearranging Assignment/Action/Exception Columns” [133]
4.4.16. Rearranging Assignment/Action/Exception Columns
In order to change the order of assignment, action and exception columns, do the following:
1.
Select the column header of the column that should be moved and drag it.
2.
Now, move the mouse over an existing decision table element header. A black arrow will appear to show you
where the moved element will be inserted. This can be either after an existing decision or beside an assignment, action or exception. Accordingly, the black arrow will point to the left or to the right. Move the mouse until the arrow points into the direction you want.
A stop (
3.
) icon indicates that the decision table element cannot be added at this location.
When you see a black arrow, click again and the element will be moved.
4.4.17. Importing an Excel Sheet as a Decision Table
You can import an Excel sheet as a decision table.
1.
Select File > Import in the menu.
© Bosch Software Innovations GmbH
133/270
Chapter 4. Tasks
2.
The Import wizard appears.
3.
Open the folder Visual Rules.
4.
Select Excel Sheet As Decision Table.
5.
Click on Next >.
6.
The dialog Import Excel Sheet as Decision Table appears:
7.
Specify the relevant Excel file and sheet.
8.
Select the rule model and rule package where the new decision table should be located. You can click on the
corresponding Browse... buttons to select the rule model and rule package from a list.
© Bosch Software Innovations GmbH
134/270
Chapter 4. Tasks
9.
Enter a name for the new decision table.
10. Click on Next >.
11. The dialog shows the Excel sheet as a Decision Table in its preliminary form:
12. To specify a column/row as a condition column/row, click on the respective header.
13. To change the comparison operators in a decision column/row, click on in the respective header and select an
operator from the drop-down menu.
14. To specify a column as an assignment/action/exception column, right-click in the respective cell and select the
kind of column.
Further adjustments can be carried out once the table has been imported.
15. Press Finish to create the new decision table. The decision table editor will automatically show the new decision table.
Related Concepts.
• Section 3.7, “Decision Table” [48]
• Section 3.3, “Rule Package” [26]
• Section 3.2, “Rule Model” [25]
Related References.
• Section 5.2.3, “New Rule Wizard” [201]
• Section 5.5.2, “Project Explorer View” [223]
4.4.18. Converting a Decision Table into a Flow Rule
You can convert a decision table into a flow rule.
1.
In the Rule Explorer, right-click on the decision table. This will open a context menu.
© Bosch Software Innovations GmbH
135/270
Chapter 4. Tasks
2.
Select Convert to Flow Rule.
3.
The decision table is replaced by a corresponding flow rule.
Related Concepts.
• Section 3.7, “Decision Table” [48]
Related References.
• Section 5.5.2, “Project Explorer View” [223]
4.5. Working with State Flows
The following sections include detailed descriptions for working with state flows rules and the state flow editor.
4.5.1. Opening the State Flow Editor
•
In the Rule Explorer double-click on a state flow ( ) to open the state flow editor.
Alternatively, you can right-click on the state flow and select Open.
Related Concepts.
• Section 3.11, “State Flow Editor” [54]
• Section 3.9, “State Flow” [52]
Related References.
• Section 5.5.2, “Project Explorer View” [223]
4.5.2. Configuring the Appearance and Capabilities of the State Flow Editor
You can configure the appearance as well as the capabilities of the state flow editor via the View (
toolbar button.
) dropdown
Alternatively, you can also right-click in the state flow editor and select the according entries from the View context
menu. The following table shows the individual options.
© Bosch Software Innovations GmbH
136/270
Chapter 4. Tasks
Table 4.3. Individual options for configuring the appearance and capabilities of the state flow editor
Option
Description
Transition Rule Names
Show/hide names of transition rules
Descriptions
Show/hide description of the state flow
Notes
Show/hide notes of transition rules and states
You can also set the line style of the state flow, e.g. to either rectangular, oblique or rounded. This can be done via
the line style menu in the toolbar (button ). These settings are also available in the Preferences (Visual Rules >
State Flow Editor).
4.5.3. Saving Changes
1.
When you do any changes to a state flow, the tab of the state flow editor will show an asterisk right in front of
the state flow name.
2.
To save the changes made in the current editor, press the Save button (
enabled when changes were made.
) on the toolbar. This button is only
Alternatively you can press Ctrl+S or select the File > Save menu item.
If you want to save all unsaved changes and not just the changes made in the current editor, you can press
Ctrl+Shift+S or select the File > Save All menu item.
Related Concepts.
• Section 3.11, “State Flow Editor” [54]
Related References.
• Section 5.5.2, “Project Explorer View” [223]
4.5.4. Adding New States
1.
Select the respevctive element in the palette by clicking on it.
2.
Now, move the mouse into the state flow editor and click again. The new state will be added.
You can drag the state to any location within the editor. A state can be turned into an end state and
the other way round via the context menu.
Related Concepts.
• Section 3.10, “State Flow Element” [53]
• Section 3.11, “State Flow Editor” [54]
Related References.
• Section 5.3.3.1, “State Flow Editor Palette” [209]
4.5.5. Creating Transitions
1.
Select the transition element in the palette by clicking on it.
2.
Move the mouse into the state flow editor to the state from which the changeover starts and click again.
© Bosch Software Innovations GmbH
137/270
Chapter 4. Tasks
3.
Now, move the mouse to the state where the changeover ends and click again. A new simple transition will be
added.
4.
To turn the simple transition into a rule-based transition, double-click on the little yellow diamond
underlying transition rule is automatically created and added in the Rule Explorer.
. The
You can form a transition by selecting it and dragging its corners.
Related Concepts.
• Section 3.10, “State Flow Element” [53]
• Section 3.11, “State Flow Editor” [54]
Related References.
• Section 5.3.3.1, “State Flow Editor Palette” [209]
4.5.6. Editing Descriptions of State Flow Elements
Next to each state flow element is a box that contains the description.
1.
Double-click a description you want to edit. You can also just select it and start typing. The inplace editor will
open.
2.
Enter the description.
3.
Press Ctrl+Enter to close the editor or click with the mouse outside of the editor.
Related Concepts.
• Section 3.10, “State Flow Element” [53]
• Section 3.15, “Description and Note” [78]
4.5.7. Editing a Transition Rule
A transition rule, i.e. the flow rule which a rule-based transition is based on, can be edited in the same way as any
other flow rule.
A transition rule can be opened in the flow rule editor by double-clicking on the icon
the respective transition.
of
Related Concepts.
• Section 3.10.4, “Transition Rule” [53]
Related References.
• Section 5.6.3, “State Flow Elements” [240]
4.5.8. Copying or Moving a State Flow Element
1.
Copying and moving single state flow elements is done using drag&drop. Select a state flow element and hold
down the left mouse button.
© Bosch Software Innovations GmbH
138/270
Chapter 4. Tasks
2.
Drag the state flow element to its destination. If you want to create a copy you must press the Ctrl key. Otherwise the state flow element is moved.
3.
Let go of the mouse button to drop the state flow element.
4.5.9. Changing the Size of a State Flow Element
•
Select a state flow element and drag the frame into any direction.
There is a minimum size for a state flow element. You can also automatically set a state flow element to its optimal size via the context menu. Optimal here means just big enough to have the
related description fully displayed.
4.5.10. Deleting a State Flow Element
Deleting a state also deletes all incoming and outgoing transitions.
To remove a single state flow element in a state flow, do the following:
1.
Right-click on the state flow element and select the Delete menu item. Alternatively you can select the state
flow element and press Del.
2.
The state flow element is deleted.
4.5.11. Adding a Note
1.
Select the Add Note tool from the Palette
2.
Click on the state flow element where you want to attach the note.
3.
A note will appear to the right of the state flow.
You can move the note per drag&drop.
4.
Double-click the empty note. This will open the inplace editor.
5.
Enter the text for the note.
6.
Press Ctrl+Enter to close the state flow editor or click with the mouse outside of the editor.
Alternatively you can use the Properties view to enter notes.
1.
Select the state flow element where you want to attach the note.
2.
In the Properties view activate the Notes tab.
3.
Click on the
4.
Enter the text of the note.
button to add a new note.
Related Concepts.
• Section 3.15, “Description and Note” [78]
Related References.
• Section 5.6.1.2, “Notes Tab” [230]
© Bosch Software Innovations GmbH
139/270
Chapter 4. Tasks
4.5.12. Deleting a Note
1.
Select the note you want to delete.
2.
Use the right mouse button to select the Delete menu item. Alternatively, press Del.
Alternatively you can use the Properties view to delete notes.
1.
Select the state flow element whose notes you want to delete.
2.
In the Properties view activate the Notes tab.
3.
Click on the
button next to the note you want to delete .
Related Concepts.
• Section 3.15, “Description and Note” [78]
Related References.
• Section 5.6.1.2, “Notes Tab” [230]
4.5.13. Undoing Changes
You can undo individual operations by selecting Edit > Undo [Operation] from the menu. The last operation you
carried out is shown in place of [Operation]. Alternatively, press the Ctrl+Z key combination to undo the last operation performed.
To redo undone operations, select Edit > Redo [Operation] from the menu. You can also use the Ctrl+Y key combination.
Related References.
• Section 5.8, “Hotkeys” [269]
4.6. Working with Data
The following sections contain step-by-step procedures for different tasks with data elements.
Related Concepts.
• Section 3.13, “Data” [67]
• Section 3.13.2, “Input/Output Data” [69]
• Section 3.13.3, “Internal Data” [69]
• Section 3.13.4, “Constant Data” [70]
4.6.1. Defining Input/Output Data Elements
With respect to a transition rule (in a state flow) only input data elements can be defined.
To add an input/output data element to a rule, you can simply use the Rule Context palette in the flow rule editor:
1.
Click on the
2.
Specify the new element in the dialog that appears.
button in the Input/Output Data section to add a data element.
© Bosch Software Innovations GmbH
140/270
Chapter 4. Tasks
3.
Press Finish.
In order to add an input/output data element to a rule, a rule package or a rule model in the Rule Explorer, do the
following:
1.
Select the rule, rule package or rule model in the Rule Explorer where you want to define input/output data.
2.
In the Properties view activate the Input/Output Data tab.
3.
Click on the
button to add a data element.
It is possible to configure input/ouput data elements as input data element, output data element or as input and
output data element.
1.
Double-click the input/output data element to open its Properties.
2.
Configure the type of data element in the column Input/Output.
• Select in/out for an input and output data element
• Select in for an input data element
• Select out for an output data element
To configure an input/output data element as required, do the following:
1.
Double-click the input/output data element to open its Properties.
2.
Configure the data element as required in the Required column. Select Yes for required and No for not required data element.
Alternatively, you can use the context menu of the Properties view to add an input/output data element to a rule,
that contains the possible operations:
Related Concepts.
• Section 3.13.2, “Input/Output Data” [69]
4.6.2. Defining Internal Data Elements
To add an internal data element to a rule, you can simply use the Rule Context palette in the rule editor:
1.
Click on the
2.
Specify the new element in the dialog that appears.
3.
Press Finish.
button in the Internal Data section to add a data element.
In order to add an internal data element to a rule, a rule package or a rule model in the Rule Explorer, do the following:
1.
Select the rule, rule package or rule model in the Rule Explorer where you want to define internal data.
2.
In the Properties view activate the Internal Data tab.
3.
Click on the
button to add a data element.
© Bosch Software Innovations GmbH
141/270
Chapter 4. Tasks
Alternatively, you can use the context menu of the Properties view to add an internal data element to a rule, that
contains the possible operations:
Related Concepts.
• Section 3.13.3, “Internal Data” [69]
4.6.3. Defining Constant Data Elements
To add a constant data element to a rule, you can simply use the Rule Context palette in the rule editor:
1.
Click on the
2.
Specify the new element in the dialog that appears.
3.
Press Finish.
button in the Constant Data section to add a data element.
In order to add a constant data element to a rule, a rule package or a rule model in the Rule Explorer, do the following:
1.
Select the rule, rule package or rule model in the Rule Explorer where you want to define constant data.
2.
In the Properties view activate the Constant Data tab.
3.
Click on the
button to add a data element.
Alternatively, you can use the context menu of the Properties view to add a constant data element to a rule, that
contains the possible operations:
Related Concepts.
• Section 3.13.4, “Constant Data” [70]
4.6.4. Importing a CSV file as a Constant Data Element
You can import a CSV file as a constant data element of the kind List.
1.
Select File > Import in the menu.
2.
The Import wizard appears.
© Bosch Software Innovations GmbH
142/270
Chapter 4. Tasks
3.
Open the folder Visual Rules.
4.
Select CSV File as Constant Data Element.
5.
Click on Next >.
6.
The dialog Import CSV File as Constant Data Element appears:
7.
Specify the relevant CSV file.
8.
Select the rule model and rule package where the new decisi on table should be located. You can click on the
corresponding Browse... buttons to select the rule model and rule package from a list.
© Bosch Software Innovations GmbH
143/270
Chapter 4. Tasks
9.
Enter a name for the new data element.
10. Click on Next >.
11. The dialog shows the columns of an entry in the CSV file:
12. Select the columns to be imported.
The individual columns will be turned into attributes of the created data element.
13. Select the columns to be used as keys, if necessary.
If you select at least one column to be used as a key, then the CSV file will be imported as a
Map, otherwise as a List.
14. Specify the names and types of the respective attributes.
15. Press Finish.
4.6.5. Specifying the Data Type of a Data Element
Specify the type of a Data Element in the Properties of the data element.
1.
Double-click the data element to open its Properties.
2.
Select the data type in the column Type. You can select the standard data types or structures.
Related Concepts.
• Section 3.14.1, “Basic Data Type” [71]
• Section 3.14.3, “Structure” [74]
© Bosch Software Innovations GmbH
144/270
Chapter 4. Tasks
4.6.6. Specifying the Default Value of a Data Element
Insert a default value of a data element in the Properties of the data element.
1.
Double-click the data element to open its Properties.
2.
Insert the default value of the data element in the column Default Value.
4.6.7. Deleting Data Elements
On the Rule Context palette in the rule editor:
1.
Select the data element that you want to delete.
2.
Click on the
button in the corresponding section of the Rule Context palette.
In the Rule Explorer:
1.
Select the data element in the Rule Explorer.
2.
Right-click and select the Delete entry from the context menu or press the Del key.
On the Properties tabs (Input/Output Data, Internal Data, Constant Data tabs):
1.
Select the rule, rule package or rule model in the Rule Explorer where you want to delete data elements.
2.
In the Properties view activate the according tab (either Input/Output Data, Internal Data, or Constant Data).
3.
Select the data element in the list.
4.
Click on the
button to delete the data element.
Related Concepts.
• Section 3.13, “Data” [67]
4.6.8. Copying Data Elements
If you would like to copy a data element, do the following:
1.
Right-mouse click on the element to be copied and select Copy from the contextual menu that appears. Alternatively, you can select the element and use the Ctrl+C key combination.
2.
Right-mouse click on the target you want to paste the copy into and select Paste from the contextual menu.
Alternatively, you can also select the target and use the Ctrl+V key combination.
3.
The copy is pasted. Please be aware that the copy has a different name like the original.
When no copy can be pasted the Paste menu item is greyed out. This is because the copied
item cannot be pasted to this location. In this case, select a different, appropriate target.
4.
To give the copied item a meaningful name, rename it (using F2).
When copying you can also copy and paste multiple items at the same time. To do this, simply select all the elements you want. Keep the Ctrl key held down to select multiple items. Then carry out the procedure above.
Related Concepts.
• Section 3.13, “Data” [67]
4.6.9. Convert Data Elements
To convert data elements do the following:
© Bosch Software Innovations GmbH
145/270
Chapter 4. Tasks
1.
Select the data element in the Rule Explorer.
2.
Right-mouse click and select the Convert To entry from the context menu and select the new data element
type.
You can also convert data elements by moving them into another data element folder. This works only if there already exists a data element in the target folder, else the target data element folder is not displayed.
Please be aware that the properties of different element types can vary. When moving between data element types
information may be lost.
Related Concepts.
• Section 3.13, “Data” [67]
4.6.10. Moving Data Elements
If you would like to move a data elements in the Rule Explorer, you have two options:
Option 1: To move the element via drag & drop, do the following:
1.
Use the left mouse button to click once on the element to be moved.
2.
Keep the mouse button held down and move the mouse to the target.
3.
Now let go of the mouse button. The element is moved into the target.
If the item can't be moved to a specific location, this is indicated by the
icon.
Option 2: To move the element using the keyboard, do the following:
1.
Right-mouse click on the element to be moved and select Cut from the contextual menu that appears. Alternatively, you can select the data element and use the Ctrl+X key combination.
2.
Right-mouse click on the target you want to move the element into and select Paste from the contextual menu
that appears. Alternatively, you can also select the target and use the Ctrl+V key combination.
3.
The cut element is pasted.
When moving you can also copy and paste multiple elements at the same time. To do this, simply select all the data elements you want. Keep the Ctrl key held down to select multiple data elements. Then carry out the procedure
above.
When moving data elements you can also switch between different data element types. It is thus possible, for example, to make a internal data from a input/output data by moving the input/output data element into the internal
data folder. Please be aware that the properties of different element types can vary. When moving between item
types information may be lost.
If you move data elements under another rule, rule package or model, please note that the visibility
of this element changes depending on the target location.
For example:
If you move it in the package hierarchy up, the date element will be visible for all rules under the new
location.
If you move it in the package hierarchy down (maybe under another rule) the data element will
maybe not be available for rules in which you already used it. In this case, new error markers will appear at the rule elements in which you use the moved data element.
Related Concepts.
• Section 3.13, “Data” [67]
© Bosch Software Innovations GmbH
146/270
Chapter 4. Tasks
4.6.11. Sorting Data Elements Manually
Data elements are per default displayed in alphabetical order in the Rule Explorer, Project Explorer, rule editor
palette and rule test editor. You can individually turn off the automatic sorting (
der of data elements.
) and manually determine the or-
The following steps use input/output data elements as an example, but can be applied to other elements as well,
including attributes of structures.
1.
In the Rule Explorer or Project Explorer, select the rule, rule package or rule model whose data elements
you want to sort.
2.
In the Properties view, go to the Input/Output Data tab (or any other tab with data elements).
3.
Turn off alphabetical sorting by pressing the according button (
4.
Select each data element that you want to reorder and use the arrow symbols (
down.
).
and
) to move it up or
Related Concepts.
• Section 3.13, “Data” [67]
Related References.
• Section 5.5.1, “Rule Explorer View” [223]
• Section 5.5.2, “Project Explorer View” [223]
• Section 5.5.6, “Properties View” [226]
• Section 5.3.1.2, “Rule Context Palette” [206]
© Bosch Software Innovations GmbH
147/270
Chapter 4. Tasks
4.6.12. Renaming Data Elements
If you want to rename a data element in the Rule Context Palette, do the following:
1.
Double-click the data element that should be renamed to open its Properties.
2.
Replace the old name by the new one in the column Name.
3.
Confirm the new name with OK.
If you want to rename a data element in the Rule Explorer, do the following:
1.
Right-mouse click on the data element you want to rename. Select Rename in the context menu that appears.
Alternatively, select the data item and press the F2 key.
2.
A dialog appears for you to give the data element a new name. If the name you enter is invalid or already in
use, an alert message appears and OK is greyed out.
3.
Click on OK to confirm the process.
Related Concepts.
• Section 3.13, “Data” [67]
4.6.13. Displaying Data Types
On the Rule Explorer bar the icon Show Visual Rules Types provides detailed information for any Visual Rules
item.
1.
Enable this option by clicking on the (
2.
The type is now shown after the name of each item, separated by a colon. In the case of a input/output data
element, for example, this is the data type. In the case of an action element, the action type is shown.
3.
Deactivate this option by clicking on the (
© Bosch Software Innovations GmbH
) icon in the Rule Explorer.
) icon again.
148/270
Chapter 4. Tasks
Related Concepts.
• Section 3.14, “Data Type” [71]
• Section 3.17, “Action Type” [80]
4.6.14. Creating Groups
Groups can be created in any data element and action folders. These are not important for code generation and
are used only to make logical arrangements. They are not subject to the naming convention applying to other data
items and they can be created more than once using the same name.
New groups are created, deleted and modified in the Rule Explorer. To define a new group, do the following:
1.
Select the folder or the group you want to create the new group below, e.g. the Input/Ouput folder and rightmouse click on it.
2.
Select New > Group from the contextual menu that appears.
3.
A dialog appears for you to give the group a new name.
4.
Click on OK to create the group. It appears immediately in the Rule Explorer and is already selected.
4.6.15. Deleting Groups
If you would like to delete a group, do the following:
1.
Right-mouse click on the group you want to delete. Select Delete in the contextual menu that appears. Alternatively, you can also select the group and press the Del key.
2.
If you would like to delete several groups at the same time, first select the ones to delete while holding down
the Ctrl key and then select Delete from the contextual menu or press the Del key.
When you delete a group, all included items are also deleted. Make sure that you have made the
right selection.
4.6.16. Editing Descriptions
You can enter descriptions for data elements, data types, attributes, literals, groups etc.
1.
In the Rule Explorer select the element that you want to add a description to.
© Bosch Software Innovations GmbH
149/270
Chapter 4. Tasks
2.
In the Properties view activate the Description tab.
3.
Enter the description.
You can also specify hyperlinks to external documents within descriptions. These are automatically
underlined if the protocol (e.g. http://, resource:// or file://) is specified, marking them as links. Clicking on a link opens the associated application, displaying its contents.
Related Concepts.
• Section 3.15, “Description and Note” [78]
4.6.17. Editing Notes
You can enter notes for rule models, rule packages and rules.
1.
In the Rule Explorer select a rule model, rule package or rule that you want to add the note to.
2.
In the Properties view activate the Notes tab.
3.
Click on the
4.
Enter the text of the note.
button to add a new note or click on the corresponding
button to remove a note.
You can also specify hyperlinks to external documents within notes. These are automatically underlined if the protocol (e.g. http://, resource:// or file://) is specified, marking them as links. Clicking on
a link opens the associated application, displaying its contents.
Related Concepts.
• Section 3.15, “Description and Note” [78]
4.7. Working with Data Types
The following sections contain step-by-step procedures for different tasks with data types.
• Section 3.14.3, “Structure” [74]
• Section 3.14.2, “Type Alias” [74]
• Section 3.14.5, “Enumeration” [76]
• Section 3.14.6, “Exception” [76]
4.7.1. Defining Structures
In order to create a new Structure for a rule, a rule package or a rule model in the Rule Explorer, do the following:
1.
Select the rule, rule package or rule model in the Rule Explorer where you want to define a structure.
2.
Right-click the element and select New Element > Structure in the contextual menu that appears.
3.
A dialog appears for you to give the new structure a name.
4.
Click on OK to create the structure. It appears in the folder Data Types in the Rule Explorer.
Related Concepts.
• Section 3.14.3, “Structure” [74]
Related Tasks.
• Section 4.7.2, “Defining Attributes of a Structure” [151]
© Bosch Software Innovations GmbH
150/270
Chapter 4. Tasks
4.7.2. Defining Attributes of a Structure
To define Attributes of a structure in the Rule Explorer, do the following:
1.
Select an existing structure to which you want to add attributes.
2.
Right-click on the structure and select New Element > Attribute in the contextual menu that appears.
3.
A dialog appears for you to give the new attribute a name.
4.
Click on OK to create the attribute under the structure. It appears in the folder Attributes under the Structure
folder in the Rule Explorer.
5.
Insert the data element settings for the attribute.
In order to define Attributes on the Attributes tab in the Properties of the structure, do the following:
1.
Click on the
2.
Insert a new name for the inserted attribute.
3.
Insert the data element settings for the attribute.
button to add a new attribute to the structure.
For deleting an attribute, select it and click on the
button.
Related Concepts.
• Section 3.14.3, “Structure” [74]
Related Tasks.
• Section 4.7.1, “Defining Structures” [150]
Related References.
• Section 5.6.8.3, “Attributes Tab” [257]
4.7.3. Defining Constants of a Structure
To define constants of a structure, do the following:
1.
Select an existing structure for which you want to define constants.
2.
Right-click on the structure and select New Element > Constant Data.
3.
Enter the name of the new constant.
4.
Click on OK to create the constant under the structure. It appears in the folder Constant Data under the structure in the Rule Explorer.
5.
Insert the data element settings for the constant and insert a default value.
In order to define constants on the Constant Data tab in the Properties of the structure, do the following:
1.
Click on the
2.
Enter the name of the new constant.
3.
Insert the data element settings for the constant and insert a default value.
button to add a new constant to the structure.
For deleting a constant, select it and click on the
© Bosch Software Innovations GmbH
button.
151/270
Chapter 4. Tasks
Related Concepts.
• Section 3.14.3, “Structure” [74]
Related References.
• Section 5.6.8.4, “Constant Data Tab” [258]
4.7.4. Defining Super Types of a Structure
To define the super types of a structure, do the following:
1.
Select an existing structure (or exception) for which you want to set the super types.
2.
Switch to the Super Types tab in the Properties view.
3.
Click on the
4.
Select the structure which should become a super type and click OK.
5.
To remove a super type, select it and click on the
button to add a new super type to the structure.
button
A structure defined in Visual Rules can only have one super type. Structures that have been imported from a Java Type Library may have multiple super types.
Related Concepts.
• Section 3.14.3, “Structure” [74]
• Section 3.14.4, “Super Types” [75]
Related References.
• Section 5.6.8.6, “Super Types Tab” [260]
4.7.5. Defining Type Aliases
In order to create a new type alias for a rule, a rule package or a rule model in the Rule Explorer, do the following:
1.
Select the rule, rule package or rule model in the Rule Explorer where you want to define a new type alias.
2.
Right-click the element and select New Element > Type Alias.
3.
Enter the name of the new type alias.
4.
Click on OK to create the type alias. It appears in the folder Data Types in the Rule Explorer.
5.
Select the Primitive Type of the alias on the Type Alias tab in the type alias Properties.
Related Concepts.
• Section 3.14.2, “Type Alias” [74]
Related References.
• Section 5.6.8.2, “Type Alias Tab” [257]
4.7.6. Defining Enumerations
In order to create a new enumeration for a rule, a rule package or a rule model in the Rule Explorer, do the following:
1.
Select the rule, rule package or rule model in the Rule Explorer where you want to define a new enumeration.
© Bosch Software Innovations GmbH
152/270
Chapter 4. Tasks
2.
Right-click the element and select New Element > Enumeration.
3.
Enter the name of the new enumeration.
4.
Click on OK to create the enumeration. It appears in the folder Data Types in the Rule Explorer
Related Concepts.
• Section 3.14.5, “Enumeration” [76]
Related Tasks.
• Section 4.7.7, “Defining Literals of an Enumeration” [153]
4.7.7. Defining Literals of an Enumeration
To define literals of an enumeration in the Rule Explorer, do the following:
1.
Select an existing enumeration to which you want to add a literal.
2.
Right-click on the enumeration and select New Element > Literal.
3.
Enter the name of the new literal.
4.
Click on OK to create the literal under the enumeration. It appears in the folder Literals under the enumeration in the Rule Explorer.
5.
If you create attributes for the enumeration, you can define default values for these attributes for every literal.
In order to define literals on the Literals tab in the Properties of the enumeration, do the following:
1.
Click on the
2.
Insert a name for the inserted literal.
3.
Insert a default value for the literal.
4.
If you create attributes for the enumeration, you can define default values for these attributes for every literal.
button to add a new literal to the enumeration.
For deleting a literal, select it and click on the
button.
Related Concepts.
• Section 3.14.5, “Enumeration” [76]
Related Tasks.
• Section 4.7.6, “Defining Enumerations” [152]
Related References.
• Section 5.6.8.5, “Literals Tab” [260]
4.7.8. Defining Exceptions
In order to create a new exception for a rule, a rule package or a rule model in the Rule Explorer, do the following:
1.
Select the rule, rule package or rule model in the Rule Explorer where you want to define a new exception.
2.
Right-click the element and select New Element > Exception in the contextual menu that appears.
3.
Enter the name of the new exception.
© Bosch Software Innovations GmbH
153/270
Chapter 4. Tasks
4.
Click on OK to create the exception. It appears in the folder Data Types in the Rule Explorer.
5.
If you create attributes for the exception, these can hold information about the "exceptional" situation.
Related Concepts.
• Section 3.14.6, “Exception” [76]
4.8. Working with Actions
The following sections contain step-by-step procedures how to define actions.
• Section 3.16, “Action” [79]
• Section 3.5.3, “Fire Action” [37]
• Section 3.17, “Action Type” [80]
4.8.1. Defining Actions
To add an action to a rule, you can simply use the Rule Context palette in the rule editor:
1.
Click on the
2.
Enter a name for the new action in the dialog that appears.
3.
Press OK.
button in the Actions section to add a new action.
The action is created under the rule in which it was created and is shown in the Rule Context palette.
It is also displayed in the Rule Explorer in the Actions folder under the rule.
In order to create a new action for a rule, a rule package or a rule model in the Rule Explorer, you have two options:
Option 1:
1.
Select the rule, rule package or rule model in the Rule Explorer where you want to define a new action.
2.
Right-click the element and select New Element > Action in the contextual menu that appears.
3.
A dialog appears for you to give the new action a name.
4.
Click on OK to create the action. It appears in the folder Actions in the Rule Explorer.
Option 2:
1.
Select the rule, rule package or rule model in the Rule Explorer where you want to define a new action.
2.
In the Properties view activate the Actions tab.
3.
Click on the
button to add an action.
© Bosch Software Innovations GmbH
154/270
Chapter 4. Tasks
The new action is shown in the Rule Explorer in the Actions folder.
It is also displayed in the Rule Context of all rules in which it is available.
Related Concepts.
• Section 3.16, “Action” [79]
• Section 3.5.3, “Fire Action” [37]
• Section 3.17, “Action Type” [80]
Related Tasks.
• Section 4.8.2, “Specify an Action Type for an Action” [155]
• Section 4.3.12, “Editing a Fire Action Element” [114]
4.8.2. Specify an Action Type for an Action
In order to specify an action type for an action, do the following:
1.
Select an action in the Rule Context or in the Rule Explorer.
2.
Open the Properties by double-clicking it and navigate to the Action Settings tab.
3.
An action is per default created with Standard action type. If you want to use another action type use the ...
button of the Type field and choose an action type from the list.
4.
The view of the Action Settings tab will change its view depending on the choosen action type.
5.
Insert the action type specific settings for the action.
Related Concepts.
• Section 3.16, “Action” [79]
• Section 3.5.3, “Fire Action” [37]
• Section 3.17, “Action Type” [80]
Related Tasks.
• Section 4.3.12, “Editing a Fire Action Element” [114]
• Section 4.8.1, “Defining Actions” [154]
© Bosch Software Innovations GmbH
155/270
Chapter 4. Tasks
4.9. Working with Services
The following sections contain step-by-step procedures how to define services.
• Section 3.19, “Service” [81]
• Section 3.20, “Service Type” [82]
4.9.1. Defining Services
To add a service to a rule, you can simply use the Rule Context palette in the rule editor:
1.
Click on the
2.
Enter a name for the new service in the dialog that appears.
3.
Press OK.
button in the Services section to add a new service.
The service is created under the rule in which it was created and is shown in the Rule Context palette.
It is also displayed in the Rule Explorer in the Services folder under the rule.
In order to create a new service for a rule, a rule package or a rule model in the Rule Explorer, you have two options:
Option 1:
1.
Select the rule, rule package or rule model in the Rule Explorer where you want to define a new service.
2.
Right-click the element and select New Element > Service in the contextual menu that appears.
3.
A dialog appears for you to give the new service a name.
4.
Click on OK to create the service. It appears in the folder Services in the Rule Explorer.
Option 2:
1.
Select the rule, rule package or rule model in the Rule Explorer where you want to define a new service.
2.
In the Properties view activate the Servicess tab.
3.
Click on the
button to add an action.
The new service is shown in the Rule Explorer in the Services folder.
It is also displayed in the Rule Context of all rules in which it is available.
© Bosch Software Innovations GmbH
156/270
Chapter 4. Tasks
Related Concepts.
• Section 3.19, “Service” [81]
• Section 3.20, “Service Type” [82]
Related Tasks.
• Section 4.9.2, “Specify a Service Type for a Service” [157]
4.9.2. Specify a Service Type for a Service
In order to specify a service type for a service, do the following:
1.
Select a service in the Rule Context or in the Rule Explorer.
2.
Open the Properties by double-clicking it and navigate to the Service Settings tab.
3.
A service is per default created with Standard service type. If you want to use another service type use the ...
button of the Type field and choose a service type from the list.
4.
The view of the Service Settings tab will change its view depending on the choosen service type.
5.
Insert the service type specific settings for the service.
Related Concepts.
• Section 3.19, “Service” [81]
• Section 3.20, “Service Type” [82]
Related Tasks.
• Section 4.9.1, “Defining Services” [156]
4.10. Working with Expressions
The following sections contain step-by-step procedures for different tasks for working with the Visual Rules Modeler.
4.10.1. Using the Code Assist
Code assist helps you when entering expressions. You can activate the code assist in any field where a expression is expected as input.
You activate code assist via the Ctrl+Space key combination.
Code assist is context sensitive and displays all available data elements, actions, functions and operators with
their description at the current cursor position.
© Bosch Software Innovations GmbH
157/270
Chapter 4. Tasks
For example, if you insert the first character s of the searched item and then activate code assist, the following will
be displayed:
Insert a further character of the searched item, in this example an e. The number of code assist choices is reduced.
Select the searched item from the list. It is now inserted in the expression.
Code assist provides color syntax highlighting for specific, known parts of an expression (such as internal data, actions, etc.). Unknown words are not color highlighted. This is how you can recognize that the expression is faulty.
Code assist provides support for entering functions and their parameters. When selecting a function the description of the function with its function parameters are displayed automatically.
Example of code assist when using the function round(Number value):
If you activate code assist (Ctrl+Space) without first entering characters, a list of all available data elements, functions, etc. opens up. When you now begin to type, the selection is reduced to those items beginning with the letter typed. In the example above, the code assist selection is already unique after typing two letters ("ro"). Press the
Enter key to paste in the function round().
The function round() expects a number as its only parameter. At runtime this number is returned rounded off. If
you position the cursor between the two parenthesis of the function and then activate code assist only the possible
valid input/output data elements, internal data elements etc. are displayed. In this case, these are data elements
that are of type Number. Anything else that is not a number may not be passed to the round() function.
© Bosch Software Innovations GmbH
158/270
Chapter 4. Tasks
4.10.2. Hyperlinking
The data elements used in expressions are linked to the corresponding definition in the Rule Explorer.
You can show this link by pressing the Ctrl key while you are in an expression and move over a data element.
Click on the data element while holding Ctrl to navigate to the definition of this element in the Rule Explorer.
4.10.3. Working with Auto Creation
Data elements (and other elements like services, actions, rules etc.) can be created automatically via automatic element creation.
To use auto creation with expressions, do the following:
1.
Insert the name of the new element in the expression of the rule element in which the new data element
should be used. Use inplace editing or the Properties view of the rule element.
2.
Leave the expression field.
3.
The dialog for Automatic Element Creation appears.
4.
Any new element appears in blue, bold font. Visual Rules tries to determine the correct data type for the new
data element. If it is not able to do so, it uses the general purpose type Any. The type can still be edited in the
second column of the table.
5.
If you want to create a new element in a parent package instead of the current rule or rule package, you can
drag it with the mouse to the place where it should be created.
6.
If the new element is not an attribute of a data structure, you can choose to create input/output data or constant data instead of the default internal data. To do so, right-click the new element and choose the appropriate action from the context menu.
7.
Confirm the creation of the new element(s) with Create or click Don't Create if you do not want the new elements to be created but the editing of the expression text should still apply. Click Cancel to cancel everything.
© Bosch Software Innovations GmbH
159/270
Chapter 4. Tasks
8.
After confirmation, a new element can be used like any other manually created element.
9.
If you access an attribute of an undefined data element in an expression, the structure can be created, too.
See this example:
10. By default, a structure Customer with the attribute age is created as well as an internal data element customer
of type Customer. It's still possible to change the name of the new type Customer to another name, like a data
structure that already exists.
Auto creation also works for actions, services, flow rules and decision tables. Insert the name of the new item in
the rule element that calls it and confirm the Automatic Element Creation dialog with Create.
You can select the kind of elements that you want to be created automatically Window > Preferences... > Visual Rules > Auto Creation
Related Concepts.
• Section 3.21, “Auto Creation” [82]
Related References.
• Section 5.4.3, “Auto Creation Dialog” [218]
• Section 5.7.3, “Auto Creation Preferences” [264]
4.11. Testing Rules
The following sections contain step-by-step procedures for different tasks you may want to perform with rule tests
like the creation of a rule test or the adding of test data.
Related Concepts.
© Bosch Software Innovations GmbH
160/270
Chapter 4. Tasks
• Section 3.22, “Rule Testing” [82]
4.11.1. Creating a Rule Test
1.
The fastest way to create a test for a flow rule or a decision table is to use the Rule Context palette. By clicking the in the Rule Tests section the following dialog appears:
Alternatively, you can use also right-click on a rule and select New Element > Rule Test to create a new rule
test.
2.
After specifying a name for the new rule test click on Finish.
3.
Now the test editor appears and you are ready to add new test cases.
Related References.
• Section 5.3.4, “Rule Test Editor” [210]
4.11.2. Opening a Rule Test
•
To open an existing rule test in the test editor you double click on the particular test in the Rule Context
palette and the selected test will be opened in the test editor.
© Bosch Software Innovations GmbH
161/270
Chapter 4. Tasks
Alternatively, you can double-click a rule test in the Project Explorer or Rule Explorer.
4.11.3. Finding a Rule Test
1.
To find an existing rule test (or a test suite), you use the button
in the toolbar to open a short dialog for
searching an existing test. This dialog lists all the rule tests in your workspace. Whenever a rule test is selected, the name of the rule being tested (including rule model name and packages) is displayed at the bottom of
the list. Enter the beginning of the name of the rule test you want to open. This will filter the list so that it only shows rule tests with matching names. If nothing is entered, the list will show all rule tests. You can use an
asterisk * to represent any number of arbitary characters, e.g. *Score*Final will match all tests whose name
contains both the words Score and Final in that order. You can use a question mark ? to represent exactly one
character, e.g. ?Category will match all tests whose name starts with the word Category preceded by exactly
one character.
The same dialog is used for finding test suites. Switching between finding test suites and finding tests is done
by clicking the test suite icon or the rule test icon in the dialog's action bar.
4.11.4. Copying a Test
You can copy a test from one rule into another. If so, the latter will be subject to the copy.
1.
Copying a test is done with drag&drop. Select the test you want to copy, click on it and hold down the left
mouse button.
2.
Drag the test to the rule you want to be tested. Press and hold the Ctrl key to create a copy.
3.
Let go of the mouse button to paste the copy.
If the Ctrl key is not held down when you release the mouse button, the test is not copied to the new
rule, but moved.
Related Concepts.
• Section 3.22.1, “Rule Test” [83]
Related Tasks.
• Section 4.11.5, “Moving a Test from one Rule to another” [163]
© Bosch Software Innovations GmbH
162/270
Chapter 4. Tasks
4.11.5. Moving a Test from one Rule to another
You can move a test from one rule into another. If so, the latter will be subject to the test.
1.
Moving a test from one rule to another rule is done with drag&drop. Select the test you want to move, click it
and hold down the left mouse button.
2.
Drag the test to the rule you want to be tested.
3.
Let go of the mouse button to move the test.
If you want to create a copy of the test, press and hold the Ctrl key when you release the mouse button.
Related Concepts.
• Section 3.22.1, “Rule Test” [83]
Related Tasks.
• Section 4.11.4, “Copying a Test” [162]
4.11.6. Adding Test Cases
1.
After you have created a new test, the test editor already has generated a test case (#1). It is recommended
to give each test case a specific name and description. Both can be done using the inplace editing in the Test
Cases table.
2.
To create additional test cases click on the
at top of the table.
The icon of a test case is decorated with small glasses when the test case has a description. This
way it is easier to see which test cases have descriptions (see the last two test cases in the image
below).
Related Tasks.
• Section 4.11.7, “Importing Test Cases” [164]
© Bosch Software Innovations GmbH
163/270
Chapter 4. Tasks
4.11.7. Importing Test Cases
Test cases can be imported from XML. This is really useful in conjunction with automated saving of request data
for a rule call. It's possible to let the end user of your application press a button in order to save his data to a file
that can be sent to the modelers. This file can be imported into the test editor, resulting in the creation of new test
cases.
For technical details concerning the saving of the rule request data, consult the section Saving Request Data in
the Java Integration Guide.
In order to import test cases from an XML file, execute the following steps:
1.
Click the
2.
In the dialog that opens, specify the relevant source files, i.e. both the file to import the input data and the file
to import the output data from. If the file extension is not the usual vrdata, you have to change the file filter.
icon.
Input and output data may be imported from the same file.
Now from every rule call saved in the file, a test case has been created. If the file contains input data that does not
fit to the rule, it will still be visible in the test case, but error markers will have been created for it.
4.11.8. Entering Test Data
On the Input section of the test editor you can now enter your data for every single input defined for the rule. For
this, double-click on the value field for the data element you want to edit.
Related Tasks.
• Section 4.11.9, “Copying and pasting values” [164]
4.11.9. Copying and pasting values
In many places in the user interface, values of data elements displayed in cells can be copied and pasted to cells
of corresponding type. The copied value can have a complex structure consisting of many attribute and list values.
© Bosch Software Innovations GmbH
164/270
Chapter 4. Tasks
Because all values are copied with a single click, this can significantly reduce the amount of work, especially for
editing test data.
In order to copy a value from one cell to another, perform the following steps:
1.
Select the cell containing the value to copy.
2.
Press Ctrl-C or select the Copy Value command from the context menu.
3.
Select the cell to copy the value to.
4.
Press Ctrl-V or select the Paste Value command from the context menu.
Alternatively, you can use the mouse to drag a value from one cell to another. Usually the value will
be moved. By pressing the Ctrl key while dropping the value, it will be copied instead.
4.11.10. Enabling/Disabling Test Cases
Test cases can be disabled. When the test is executed, disabled test cases will be skipped. This helps to speed up
testing while you want to concentrate on one or several specific test case.
1.
Select one or multiple test cases (you can select multiple test cases by holding the Ctrl key).
2.
Right-click on the selected test case(s).
3.
From the context menu select the option Disable Test Cases. This will disable the test cases and they are
greyed out.
4.
In order to reenable test cases, right-click on it and select Enable Test Cases.
You can also choose the menu entries to enable/disable not the selected test cases, but all others. This way
you can for example easily disable all test cases except one.
4.11.11. Duplicating Test Cases
To duplicate an existing test case, do the following:
1.
Select the test case you want to duplicate and click the
in the list.
2.
Once again it's recommended to rename the test case and enter a specific description.
button. A copy of the selected test case appears
4.11.12. Deleting Test Cases
1.
Select the test case you want to remove.
2.
Click the
button.
© Bosch Software Innovations GmbH
165/270
Chapter 4. Tasks
4.11.13. Reordering Test Cases
1.
If you want to reorder your test cases you do this by selecting the particular test case in the list.
2.
Use the
and
buttons to send the test case to the right position in the list.
4.11.14. Selecting the relevant Output Data
1.
To select the data elements, for which results should be considered in the test, you have to switch to the Configuration tab of the test editor.
2.
In the Relevant Output Data section you have the possibility to de/select either all or every single data element separately or use the Select All and Deselect All buttons.
4.11.15. Enabling/Disabling Actions
1.
In some cases it might be useful to prevent certain actions from being executed during a test run. They are
"fired" and you can list them as a result in the test editor but the action that is not executed. An example for
this are "Send email" actions, for test you don´t want to send an email for every test execution and just want
the information that an email would had been send.
2.
This can be done by switching to the configuration tab of the test editor.
3.
At the Actions section you have the possibility to en/disable all actions at once or use the checkboxes to en/
disable particular actions separately.
4.11.16. Defining Expected Results
1.
On the Output section the test editor displays all output parameters defined in the settings on the configuration tab.
2.
By double-clicking on the Expected Result field in the Output section of the test editor you may enter your
expected result for the particular output data element.
© Bosch Software Innovations GmbH
166/270
Chapter 4. Tasks
Each category of results is represented by a separate tab on top of the Output section. By clicking
on the symbols you can switch between viewing the result for Output Data, Actions or Internal Data.
Related Tasks.
• Section 4.11.9, “Copying and pasting values” [164]
4.11.17. Disabling Warnings for Missing Expected Results
Visual Rules usually creates small warning markers for output data that does not have an expected result set. This
can be disabled for a rule test by checking Disable in the section Warnings For Missing Expected Results of
the configuration tab.
4.11.18. Defining Expected Exceptions
If a rule returns an exception, this is usually considered a test failure. However, it is possible to specify the exception as the "expected" result and the test to succeed if and only if the exception was returned.
1.
Click the
2.
Select an option:
icon in the test editor (Output section) to specify the exception.
Expect no exception
This is the default and will cause the test case to succeed only if no exception is returned.
Expect an exception
This will cause the test case to succeed only if an exception is returned and the exception is of the given
type.
Expect an exception with specific data
This will cause the test case to succeed only if an exception is returned and the exception if of the given
type and all attributes have the given expected values.
3.
In the Expected exception field specify the exception type. You can use ... to browse the existing exception
types.
4.
Optionally specify expected values for the attributes of the exception. This is only possible if you selected the
third option above.
4.11.19. Executing a Test
When executing a test, a corresponding result file with the same name is automatically generated. It
is represented by the icon and added to the test in the rule explorer.
© Bosch Software Innovations GmbH
167/270
Chapter 4. Tasks
1.
After you have entered all required test input data and the related expected results, click on the
run the rule test.
2.
During execution all system messages like execution time are displayed on the Console at the bottom of the
screen.
button to
4.11.20. Showing Results for a specific Execution of a Test
A test might have been executed individually or in the course of executing a test suite. At each time, a corresponding result file (represented by the icon ) has been added to the test or to the relevant test suite in the rule explorer.
To show the results of a specific execution of a test, do the following:
1.
Double-click on the corresponding result file in the rule explorer.
2.
Double-click on the relevant test in the test suite editor, if necessary.
The test editor opens with respect to the relevant test and result file.
4.11.21. Inspecting Results
The results shown in the test editor always correspond to a specific execution of the respective test.
To show the relevant result file in the rule explorer, click on the icon in the test suite editor.
1.
After running your test you can check if the test was successful. This is indicated by the symbol
in the Test
Cases section and tells you, that the rule logic related to the test case was correct and the expected results
match the actual values.
2.
In case the test fails this is indicated by the symbol in the Test Cases and Output sections. A test fails if
the expected results don't match with the actual results. This can happen if there is a problem in the rule logic
or there are wrong values in the expected results.
You may also get a warning symbol
sult was specified.
© Bosch Software Innovations GmbH
indicating that the rule has produced results for which no expected re-
168/270
Chapter 4. Tasks
3.
Please make sure you also check the other outputs (actions, internal data) for failures. The view can be
switched with the buttons at the top of the Output section.
4.
In case you want to update your expected result with the latest actual results you can use the inplace editing
or the copy buttons on the top panel of the Output section.
You can also use the Compare Results Dialog to compare the expected and actual result. This dialog is especially useful when comparing large strings, since it highlights the spots where the differences are. In order
to open the Compare Results Dialog, select one of the outputs and click on the Compare expected with actual result button ( ). In this dialog, you can also copy the actual result to the expected result ( ). Additionally you can navigate through the individual deviations with the navigation buttons (
) and copy
these to the expected result (
).
4.11.22. Creating and Configuring Statistics
1.
Before you start configuring your rule statistics in the test editor, make sure that the rule code generator settings enabled rule statistics. You can check that on the Java Code Generator tab of the rule project.
© Bosch Software Innovations GmbH
169/270
Chapter 4. Tasks
2.
On the Configuration tab of the test editor you have further options to tune your statistics. In the select box
Create Statistics you can select whether you want the statistic being generated for the entire test or for every
test case of your rule test separately. If you select Yes, for every test case then you can show the statistics
for a single test case that is selected in the test editor.
3.
To define the detail level of your statistics you can choose to either record the number of visits or to record
both the number of visits and the execution times.
4.
To see the current statistics for your test you have to open the related rule or decision table in the editor after
you run your test. Make sure you have activated the statistics view by clicking on the
icon.
5.
You can see now an additional box next to each rule element which tells you how many times this element
was passed during your last test run. Elements which were not passed are displayed in grey.
6.
You can change the display of statistics with the drop-down menu from the toolbar.
© Bosch Software Innovations GmbH
170/270
Chapter 4. Tasks
For example, the following picture includes the display of percentages.
Related Concepts.
• Section 3.22.3, “Statistics” [84]
4.11.23. Selecting a Configuration for the Rule Execution
In order to select the configuration for the rule execution, do the following:
1.
Open the Configuration tab of the test editor.
2.
In the drop down field Configuration for Rule Execution you can select a configuration for the rule execution. By default there exists just the Standard configuration but for example there could be a customer specific
configurations for test or production.
Configurations for the rule execution are created by the technical experts. Please contact your
technical expert to get information about your configurations.
4.11.24. Initializing Static Internal Data Elements
In order to define values of static internal data elements for the rule test, do the following:
1.
Open the Global Test Data area on the Test tab of the test editor.
2.
Click on Initial Data Setup to open the view for editing values of static internal data.
3.
All internal data elements that are defined as static are shown. Insert values for these elements in the column
Value. The internal data elements are initialized with these values at the beginning of the rule execution and
keep the values over the execution of test cases.
© Bosch Software Innovations GmbH
171/270
Chapter 4. Tasks
An internal data element that you have defined as static, inserted initial values for it and afterwards redefined it as non static, is still displayed with its values in the Initial Data Setup view. If
you define it as static again the initial values defined before are still available. If you really want
to delete the internal data element from the Initial Data Setup you have to delete it manually
4.12. Organizing Rule Tests in Test Suites
The following sections contain step-by-step procedures for creating, editing and running test suites.
Related Concepts.
• Section 3.22, “Rule Testing” [82]
4.12.1. Creating a Test Suite
1.
Right-click on a rule project or a subfolder thereof in the Rule Explorer or Project Explorer.
2.
Select the item New > Test Suite from the context menu.
3.
The New Test Suite wizard appears.
4.
Enter the name of the new test suite and click Finish. It's possible but not recommended to change the folder
where the file is created.
5.
Now the test suite editor appears and you are ready to add rule tests or other test suites to the new test suite.
© Bosch Software Innovations GmbH
172/270
Chapter 4. Tasks
Related References.
• Section 5.3.5, “Test Suite Editor” [213]
4.12.2. Opening or Finding a Test Suite
You can use the following methods to open an existing test suite.
• Double-click the test suite in the Project Explorer or Rule Explorer if you know its location.
• Use the Open Rule Test dialog:
1.
Click the button
2.
In the dialog that opens, click the button
3.
As described for rule tests in Section 4.11.3, “Finding a Rule Test” [162], you can type the first letters of the
test suite's name and then double click the corresponding list item.
in the toolbar.
to show test suites.
4.12.3. Adding Tests
The purpose of a test suite is to group related rule tests and other test suites so that they can be executed together. Here is how to add tests to a test suite:
1.
Click the add icon
2.
A dialog opens and initially displays all rule tests in the workspace.
in the test suite editor.
© Bosch Software Innovations GmbH
173/270
Chapter 4. Tasks
3.
Optionally you can click the button
4.
Optionally you can type the first letters of the test to add. This filters the tests being displayed.
5.
Select all tests to add and press OK.
to display test suites.
A rule test can be added to any number of test suites or to no test suite at all.
4.12.4. Removing Tests
Removing a test from a test suite does not delete the test. It simply means that the test will no longer be executed
with the suite.
1.
Select all tests you want to remove in the test suite editor.
2.
Click the
button either in the test suite editor's tool bar or in the context menu.
Only tests that are directly included in the edited test suite can be removed this way. If you want to
remove tests that are part of a test suite in the test suite, you have to open the nested test suite in
another editor (by double clicking it) and remove the test in this editor.
4.12.5. Executing a Test Suite
Execution of a test suite means the sequential execution of all included tests.
When executing a test suite, a corresponding result file with the same name is automatically generated. It is represented by the icon and added to the test suite in the rule explorer.
© Bosch Software Innovations GmbH
174/270
Chapter 4. Tasks
•
Click the
button in the test suite editor to execute all tests included in the suite.
Each test is selected in the tree view during its execution. If a test fails, then the selection does not change any
more. Failures are shown in the table on the right side of the editor. In order to retrieve more information about the
failures, a test can be opened in its editor by double clicking it.
4.13. Debugging Rules
The following sections contain step-by-step procedures related to rule debugging.
4.13.1. Setting Breakpoints
Breakpoints define the locations in rules where execution should halt during debugging.
1.
Right-click a rule element in a flow rule or a cell in a decision table where you want to set a breakpoint.
2.
Select the Toggle Breakpoint menu entry from the context menu. This will create a breakpoint (or remove an
already existing breakpoint).
3.
The breakpoint icon ( ) appears next to the rule element or decision table cell.
4.
Existing breakpoints can be disabled with the Disable Breakpoint entry from the context menu. A disabled
breakpoint has a white icon ( ).
5.
Disabled breakpoints can be reenabled using the Enable Breakpoint menu entry.
Visual Rules provides a Breakpoints view that lists all existing breakpoints. The view is part of the
Debug perspective, but can also be opened elsewhere with Window > Show View > Other.... Select
the Breakpoints view from the list and click OK.
Related Concepts.
• Section 3.23.2, “Breakpoint” [88]
Related Tasks.
• Section 4.13.3, “Stepping Through Rules” [176]
Related References.
• Section 5.5.10, “Breakpoints View” [229]
4.13.2. Debugging a Rule Test
In order to execute a rule test in the debugger, do the following:
© Bosch Software Innovations GmbH
175/270
Chapter 4. Tasks
1.
Open the rule test in the rule test editor.
2.
Set a breakpoint at the desired location where you want rule execution to halt. If you want to halt right at the
beginning, you should set the breakpoint on the start element of the rule being tested.
3.
Start the debugger by clicking on the Debug (
4.
Once execution hits the breakpoint, Visual Rules switches to the Debug perspective that lets you step through
the rules (see Section 4.13.3, “Stepping Through Rules” [176]).
) button shown above the list of test cases.
Related Concepts.
• Section 3.22.1, “Rule Test” [83]
• Section 3.22.2, “Rule Test Editor” [83]
• Section 3.23.1, “Debugger” [87]
• Section 3.23.2, “Breakpoint” [88]
Related Tasks.
• Section 4.13.1, “Setting Breakpoints” [175]
• Section 4.13.3, “Stepping Through Rules” [176]
Related References.
• Section 5.5.10, “Breakpoints View” [229]
4.13.3. Stepping Through Rules
1.
When rule execution reaches a breakpoint during a debug session, Visual Rules Modeler will switch to the Debug perspective and show the current position in the flow rule editor or the decision table editor.
© Bosch Software Innovations GmbH
176/270
Chapter 4. Tasks
2.
The Variables view allows you to inspect the current values of the data elements.
3.
The Debug view displays a list of the rules and rule elements that have been visited so far. The buttons in the
view toolbar are used to control the debug session. Most buttons also have a function key shortcut.
Press the F5 key (
) to step forward from one rule element to the next.
Press the F6 key (
) to step over the remaining elements in a rule branch and then halt again.
Press the F8 key (
) to resume execution until it hits another breakpoint.
4.
If you don't want to continue debugging, click on Terminate (
tion and the debug session.
5.
If you are debugging remotely, you can use Disconnect (
execution of the rules.
). This will immediately terminate rule execu-
) to end the debug session and resume normal
Related Concepts.
• Section 3.23.2, “Breakpoint” [88]
• Section 3.6, “Flow Rule Editor” [45]
© Bosch Software Innovations GmbH
177/270
Chapter 4. Tasks
• Section 3.8, “Decision Table Editor” [50]
Related References.
• Section 5.5.8, “Debug View” [227]
• Section 5.5.9, “Variables View” [228]
4.14. Searching Rule Models
Visual Rules allows you to search for individual data elements, actions, data types etc. This can be helpful, for example, for finding every occurrence of an input/output data element in a rule model.
4.14.1. Searching Elements
To search elements in rule models use the Search view and do the following:
1.
Select Search > Search from the menu. Alternatively, you can use the Ctrl+H key combination.
2.
Select the Rule Search tab in the dialog that appears.
3.
Enter the text you want to find in the Containing text field.
You can also use wildcard characters to increase the number of matches. Use * as the wildcard
for any string or ? to represent any character. To search explicitly for the * or ? characters, you
have to quote them using the \ character, e.g. \* is used to search for an asterisk.
4.
You can select Case sensitive if you want to search for text with notice of upper and lower cases.
5.
In the Search for box, you can select the kinds of elements to search for.
6.
The options in the Search box determine where the text must be found. You can search in Names, Descriptions, Expressions and Notes.
7.
Select the scope to be searched.
Select Workspace to search in all rule models in the workspace.
Select Selected elements to search in those rule models, rule packages or rules that you have selected before opening the search dialog.
Select Enclosing rule models to search in those rule models in which at least one element was selected.
© Bosch Software Innovations GmbH
178/270
Chapter 4. Tasks
8.
Finally, click on Search to start the search. The Search view appears automatically. The search now runs in
the background and updates the list of search results in the Search view.
Related Tasks.
• Section 4.14.2, “Searching References to Elements” [179]
Related References.
• Section 5.4.5, “Rule Search Dialog” [220]
4.14.2. Searching References to Elements
In order to search the references to a specific element, do the following:
1.
In the Rule Explorer select the specific element you want to search the references for.
2.
Right-click on the selected element.
3.
Select Search References from the context menu and select the scope of your search. The Search view appears automatically and displays all references to the element.
4.14.3. Working with the Search View
• Search offers two different views. Use the
button to switch between the different views:
Show as List- Shows all found elements in a list.
Show as Tree - Shows all found elements in a hierarchical view. It always starts out from the rule model. Use
this view if you have many matches in a workspace with many models or rules.
• If you double-click on a match in the Search view, the related rule editor or Rule Explorer opens automatically
and the correct item is selected.
• Use the
• With the
button to run the current search again.
button you can open previous searches.
• If you want to keep one search result shown, even if you search for another element, use the
button to pin
the search view. If you execute a new search, a second Search view will be opened and the new result will be
displayed in it.
4.15. Highlighting a referenced Element in the Rule Explorer
You can highlight an element, which is being referred to (e.g. in the Flow Rule Editor or in the Properties View),
in the Rule Explorer. This applies to data types, data elements, actions and services.
© Bosch Software Innovations GmbH
179/270
Chapter 4. Tasks
To highlight a referenced element, press the Ctrl key and click on the relevant reference.
If the reference is contained in an editable field (e.g. in a flow rule element), you first need to double-click on that field. The Inplace Editor will open and thus the reference will be accessible.
4.16. Comparing Rules
4.16.1. Comparing Rule Models and Rule Packages
There are two possibilities to compare rule models or rule packages:
Compare With History...
In order to compare one rule model or rule package with its history, do the following:
1.
Select the rule model or rule package you want to compare with its history.
2.
Right-click and select Compare With > History... from the context menu.
3.
A History view opens that shows the changes along with the date and time of each change.
Compare With Each Other
To compare two rule models or rule packages with each other, do the following:
1.
Select the two rule models or rule packages you want to compare with each other.
2.
Right-click and select Compare With > Each Other from the context menu.
3.
The Compare view opens and the changes between both rule models or rule packages are displayed.
© Bosch Software Innovations GmbH
180/270
Chapter 4. Tasks
4.16.2. Comparing Rules
There are two possibilities to compare rule models or rule packages:
Compare With History...
In order to compare a rule with its history, do the following:
1.
Select the rule you want to compare with its history.
2.
Right-click and select Compare With > History... from the context menu.
3.
A History view opens that shows the changes along with the date and time of change.
4.
Double-click on an entry in the history.
5.
The Compare view opens showing the differences between your current version and the selected version.
Compare With Each Other
To compare two rules with each other, do the following:
1.
Select the two rules you want to compare with each other.
© Bosch Software Innovations GmbH
181/270
Chapter 4. Tasks
2.
Right-click and select Compare With > Each Other from the context menu.
3.
The Compare view opens and the changes between both rules are displayed.
4.16.3. Working with the Compare View
• At the top of the Compare view the Structural differences are shown. If you double-click on a change, the rule
element that has been changed is shown below.
If you compare with history, the current rule version is shown on the left side and its earlier version on the right
side.
You can switch between the Structure and Data tabs at the bottom of the view. The Structure tab graphically
shows the rule structure and the Data tab shows data elements, actions, types etc. defined by the rule.
© Bosch Software Innovations GmbH
182/270
Chapter 4. Tasks
• Use the
and
buttons to navigate through the changes. Depending on the type of the selected change the
Structure or Data tab will be shown.
• It is possible to redo changes by copying changes from the history into the current rule element. That means
copy changes from right to left.
Use
to copy all changes from right to left.
Use
to copy the currently selected change from right to left.
4.17. Import and Export
4.17.1. Importing a Rule Model
You have the option of importing an existing rule project into your Visual Rules workspace. This can be useful for
transferring a rule project from another Visual Rules installation.
To import an existing rule project located outside your workspace, do the following:
1.
Select File > Import from the menu.
2.
Select the item Existing Project into Workspace from the list of import sources. Then click on the Next >
button.
3.
Choose if you want to import a rule project that is an archive file or not. Select root directory if it is not an
archive file and Select archive file if it is one.
4.
Now click on Browse... and select the rule project folder.
5.
Check the Copy projects into workspace checkbox if you want to copy the files into your workspace (recommended). Otherwise the files will remain at their location and your project will be linked to these.
6.
Complete the process by clicking on the Finish button.
© Bosch Software Innovations GmbH
183/270
Chapter 4. Tasks
4.17.2. Exporting a Rule Model
You can export a rule project and save it in the file system outside the workspace. Go through the following steps
to export a rule project:
1.
Select File > Export from the menu. An export wizard opens.
2.
Select File system as the destination to save all rule project files directly to the file system. Alternatively, you
can choose Archive file as the export destination to save all rule project files in a ZIP (or tar.gz) archive outside the workspace.
3.
Now select the rule project to export on the left side of the dialog.
4.
Define a destination directory or an archive file in the desired format to save the rule project into.
5.
Complete the process by clicking on the Finish button.
4.18. Generating Documentation
4.18.1. Generating Documentation
Visual Rules can generate documentation for rule models, rule packages, state flows or single rules.
1.
Select the rule model, rule package, state flow or rule you want to create the documentation for in the Rule
Explorer.
2.
Select File > Export... from the menu to start the Export wizard.
3.
Select the entry Documentation (in the Visual Rules folder) from the list.
4.
Press Next >.
5.
Select the Target Directory where the documentation should be saved. Click on the Browse button to open a
file browser and select the target for the documentation.
6.
Select the Format HTML, PDF or WORD in which you want the documentation to be generated.
The output as a Microsoft Word-document is fully supported with BIRT-Versions 2.6.2 and higher. Microsoft Word provides the possibility to have a table of contents created for the documentation. Due to the limited page width of Microsoft Word-documents it may be necessary to minimize the width of the images. This can for instance be achieved by decreasing the maximum element width in the preferences of the Flow Rule Editor.
7.
Select the Template to use. You can choose between two templates for specifying the detail level of the generated documentation. The first one generates documentation with All packages, rules and state flows with
detail pages the other one generates documentation with All packages, rules and state flows with detail
pages (without rule images).
If you have selected the option All packages and rules with detail pages, you can select which information
should be displayed in the images of rules. Here you can display rules with Descriptions, Contents, Call/Assignment Details, Notes, Statistics and Exception Handling.
For state flows statistics are not provided.
8.
Press Finish to generate the documentation. An index.html file will be generated. Depending on the size of
the rule model this may take several minutes to complete.
Related Tasks:
• Section 4.18.2, “Viewing the Documentation” [185]
© Bosch Software Innovations GmbH
184/270
Chapter 4. Tasks
4.18.2. Viewing the Documentation
In order to view the generated documentation, open the folder in which the documentation was saved. Open the
generated documentation (index.html file) with a web browser.
The documentation is divided in three parts.
• On the left side is the documentation displayed for the element that is selected.
• On top of the right side rule models and rule packages are shown. If you click on the name of a specific one the
documentation is displayed for it.
In the example this is the rule model Movie Ticket Pricing.
The documentation shows the Rule Package Name (in this case the model name), the Description and all data elements like Input/Output Data that are defined for this model.
• On the right side under the list with the packages and models are the rules shown. The rules for the currently
selected rule package or model are displayed. With the selection of one of the displayed rules the documentation on the left side switches to the documentation of this rule.
In the example is the rule Discounts displayed.
The documentation includes the Rule Name, its Description and the Rule in the graphical view.
© Bosch Software Innovations GmbH
185/270
Chapter 4. Tasks
Related Tasks:
• Section 4.18.1, “Generating Documentation” [184]
4.19. Printing
4.19.1. Printing a Rule
To print a rule, do the following:
1.
Open the rule editor with the rule you want to print.
If necessary, set preferences for things that may influence the appearance of the printout, such as the maximum element width or height.
2.
Now select File > Print... from the menu.
3.
Print options can be set in the dialog that appears:
Enter a scaling factor for the rule at the top left. This influences the number of pages required to print out the
rule in full. You can also insert the number of pages available to print the full rule on. The scaling factor will be
adjusted automatically to the maximum size possible for printing on the available number of pages.
A preview of the rule is displayed on the right, showing how the rule will look like on the printed pages.
Besides the scaling factor, another important thing that influences how the rule is printed across several pages
is the printer and page format selected. Both can be set via the Printer Options button.
The Fit to Pages button scales the rule to the current number of pages shown. The number of pages also depends on the scaling factor.
Click on the Fit to one Page button to print the rule on one page. The Reset button allows you to reset the
scale to the original value of 100%.
If needed, you can also set a margin in the margin settings or select that header or footer should be printed for
the rule.
© Bosch Software Innovations GmbH
186/270
Chapter 4. Tasks
4.
Select the desired printer and set the print options.
5.
Click on Print to start printing.
The exported image displays the rule exactly as displayed in the rule editor. This makes it possible, for example, to hide specific branches in the exported image.
Related References:
• Section 5.7.2, “Flow Rule Editor Preferences” [263]
4.20. Working with the User Interface
4.20.1. Switching Perspectives
A perspective is a pre-defined user interface layout. Visual Rules offers several different perspectives for different
tasks, e.g. general rule modeling should be done using the Rule Modeling perspective.
•
Currently open perspectives are displayed at the top right. Click on the corresponding icon to switch to either
the Rule Modeling or the Rule Integration perspective.
If the desired perspective is not available, add it by clicking on the ( ) icon. Select Other... from the menu
and then select the perspective from the list. Alternatively, you can add the perspectives via the following
menu: Window > Open Perspective > Other...
Related References.
• Section 5.1.1, “Rule Modeling Perspective” [197]
• Section 5.1.2, “Rule Integration Perspective” [198]
4.20.2. Customizing Perspectives and Views
A perspective consists of different views that are arranged in a specific way to make best use of the screen estate.
The views are surrounding an area where editors appear, like e.g. the rule editor or the test editor.
© Bosch Software Innovations GmbH
187/270
Chapter 4. Tasks
The individual views can be changed in size and position. Views can also be placed over each other, as for example, the lower right section in the picture above, where the Properties and Problems views are overlapping. Clicking on the name tab of a view at its top border brings it to the front.
The default state of a perspective can be restored by selecting Window > Reset Perspective from
the menu.
General information about perspectives can be found in the "Getting started" section of the Workbench User Guide.
4.20.3. Opening Views
1.
Use the Window > Show View menu entry to add views to the current perspective.
2.
Select a view from the sub menu or select the Other... menu entry to open a list of all available views. Select
the view from the list and click OK.
3.
The view is added to the perspective. You can now drag it to the desired position.
Visual Rules specific views can all be found in the Visual Rules category.
4.21. Sending a Support Request
If you encounter a problem while working with Visual Rules the product can aid you in submitting a support request.
1.
Use the Help > Visual Rules Support Request... menu entry to open the support request dialog.
© Bosch Software Innovations GmbH
188/270
Chapter 4. Tasks
2.
Enter a description of your problem or feature request. Try to include as many details as possible. When you
are done press Next >.
3.
Select the projects you'd like to include in the support request. When submitting bug reports you should include the projects that are affected whenever this is possible. After you have selected the projects press Next
>.
4.
You will receive an overview over the information that will be sent. If you want detailed information about one
of the items in the list click on it and press View Contents.... Press Next >.
© Bosch Software Innovations GmbH
189/270
Chapter 4. Tasks
5.
Select what to do with the generated report. You can either directly send it over the internet or save it locally.
After you have made your choice press Finish.
4.22. Updating a new Version of Visual Rules
If you wish to get a new version of Visual Rules, please apply Software Updates in the Help menu. There are two
ways to update Visual Rules, one way is to use Available Software and Install or the second way is to use Installed Software and Update. For the second way, there is the possibility to automatically get a notification about
new Software Updates by configuring this feature as shown below. The shown mechanism refers to Eclipse 3.4
and higher, for Eclipse 3.2 and 3.3 the mechanism is rather similar.
First way to update Visual Rules with Available Software:
1.
Use the Help > Software Updates... menu entry to update the current version of Visual Rules.
© Bosch Software Innovations GmbH
190/270
Chapter 4. Tasks
2.
Select from Available Software the following update location http://www.download-visual-rules.de/vr/update
with the current update version of Visual Rules and click on Install.
3.
You will see all packages, which will be installed for updating a new version and click on Next.
© Bosch Software Innovations GmbH
191/270
Chapter 4. Tasks
4.
For the new version of Visual Rules the Licenses must be reviewed. For this reason, you have to accept the
terms of the license agreements. Read the license agreements carefully and select I accept the terms in the
license agreements, if you consent to the agreements. Click on Finish.
© Bosch Software Innovations GmbH
192/270
Chapter 4. Tasks
5.
After downloading, the installation of the software starts. At the end of the installation the dialog Software Updates appears to request the restart of eclipse. Confirm the dialog by clicking on Yes and Eclipse restarts.
If you need a new license, please save the license file from our e-mail to your hard disk and import the new
license file with Visual Rules License Manager. A short dialog will prompt you to restart Visual Rules for the
changes to take effect. After that your installation is complete and you are able to work with Visual Rules.
Second way to update Visual Rules with Installed Software:
1.
Use the Help > Software Updates... menu entry to update the current version of Visual Rules.
© Bosch Software Innovations GmbH
193/270
Chapter 4. Tasks
2.
Select from Installed Software the preference page by clicking on "Automatic Update" at the bottom for
configuring an automatic notification for updates. Otherwise continue with clicking on Update.
3.
If you want to get an automatic notification for updates, please check Automatically find new updates and
notify me and press Apply for confirmation. Otherwise continue with step 4.
© Bosch Software Innovations GmbH
194/270
Chapter 4. Tasks
4.
Now you can review and confirm your updates by checking them and clicking on Next. For the new version
of Visual Rules the Licenses must be reviewed. For this reason, you have to accept the terms of the license
agreements. Read the license agreements carefully and select I accept the terms in the license agreements, if you consent to the agreements. Click on Finish.
5.
After downloading, the update of the software starts. At the end of the Update the dialog Software Updates
appears to request the restart of eclipse. Confirm the dialog by clicking on Yes and Eclipse restarts.
If you need a new license, please save the license file from our e-mail to your hard disk and import the new
license file with Visual Rules License Manager. A short dialog will prompt you to restart Visual Rules for the
changes to take effect.
© Bosch Software Innovations GmbH
195/270
Chapter 4. Tasks
4.23. Upgrading Visual Rules Models
Visual Rules introduces some enhancements to the rule model format, when you are upgrading to a higher version
of Visual Rules. A dialog will open whenever Visual Rules detects a rule model created with a previous version.
You can then choose to automatically upgrade the rule model on the fly. It is recommended to upgrade your rule
models all at once after upgrading to a higher version of Visual Rules Modeler (e.g. from 4.2 to 4.3). You should also make sure that all team members are using the same version of Visual Rules Modeler.
Once, you have successfully upgraded your rule models to a newer version, it is not possible to undo
this operation.
1.
You can also trigger a rule model upgrade manually using the Project > Upgrade Rule Projects... menu entry.
2.
Select the rule models you want to upgrade and click on OK. It is recommended to upgrade all your rule models.
If any dependencies between models and/or projects exist then it is required to upgrade these
models and/or projects all at once. Otherwise the dependency information will not be preserved
and models and projects possibly no longer work.
3.
After upgrading the rule models, you will get a message that the upgrade has successfully completed.
© Bosch Software Innovations GmbH
196/270
Chapter 5. Reference
Chapter 5. Reference
5.1. Perspectives
Perspectives are pre-defined user interface layouts. The following sections describe the perspectives specific to
Visual Rules.
5.1.1. Rule Modeling Perspective
The Rule Modeling perspective is used for rule modeling tasks. It is divided into four sections. The Rule Explorer on the left shows all the projects and the elements contained therein. There are several tabs like the Properties
view and the Problems view at the bottom. The Properties view always shows the properties and settings of the
currently selected element and the Problems view shows all the warnings and errors in the rule models. The central section shows the active editor. Most of the time the rule editor or the test data editor will be shown here.
Figure 5.1. Rule Modeling perspective
The Rule Modeling perspective focuses on the non-technical aspects of rules and rule models. Consequently, some properties tabs and specific settings relevant for technical users only, are hidden
from view.
Related Concepts.
• Section 3.6, “Flow Rule Editor” [45]
• Section 3.8, “Decision Table Editor” [50]
© Bosch Software Innovations GmbH
197/270
Chapter 5. Reference
Related References.
• Section 5.1.2, “Rule Integration Perspective” [198]
• Section 5.5.1, “Rule Explorer View” [223]
• Section 5.5.3, “Problems View” [224]
• Section 5.5.6, “Properties View” [226]
• Section 5.5.4, “Outline View” [225]
• Section 5.3.1, “Flow Rule Editor” [205]
• Section 5.3.2, “Decision Table Editor” [207]
5.1.2. Rule Integration Perspective
The Rule Integration perspective is meant for developers who integrate rules into an application, connect rules
with existing object models or extend Visual Rules with additional functions or actions. In other words, this perspective is used for all the technical tasks. All the technical properties tabs and settings are availabe here, but are
hidden from view in the Rule Modeling perspective.
Figure 5.2. Rule Integration perspective
Related Concepts.
• Section 3.6, “Flow Rule Editor” [45]
• Section 3.8, “Decision Table Editor” [50]
© Bosch Software Innovations GmbH
198/270
Chapter 5. Reference
Related References.
• Section 5.1.1, “Rule Modeling Perspective” [197]
• Section 5.5.2, “Project Explorer View” [223]
• Section 5.5.3, “Problems View” [224]
• Section 5.5.6, “Properties View” [226]
• Section 5.5.4, “Outline View” [225]
• Section 5.3.1, “Flow Rule Editor” [205]
• Section 5.3.2, “Decision Table Editor” [207]
5.1.3. Debug Perspective
The Debug perspective is used during rule debugging. It contains the views Debug, Variables and Breakpoints
and is activated automatically when rule execution hits a breakpoint during a debug session.
Figure 5.3. Debug perspective
Related Concepts.
• Section 3.23, “Rule Debugging” [87]
• Section 3.23.2, “Breakpoint” [88]
• Section 3.6, “Flow Rule Editor” [45]
• Section 3.8, “Decision Table Editor” [50]
Related Tasks.
© Bosch Software Innovations GmbH
199/270
Chapter 5. Reference
• Section 4.13, “Debugging Rules” [175]
• Section 3.8, “Decision Table Editor” [50]
Related References.
• Section 5.5.8, “Debug View” [227]
• Section 5.5.9, “Variables View” [228]
• Section 5.5.10, “Breakpoints View” [229]
• Section 5.3.1, “Flow Rule Editor” [205]
• Section 5.3.2, “Decision Table Editor” [207]
5.2. Wizards
The following sections describe the wizard dialogs to create rule projects, rule models, rules etc.
5.2.1. New Rule Project Wizard
Use this wizard to create a new rule project.
Figure 5.4. New Rule Project wizard
Option
Description
Project name
The name of the project to be created. The name must be different from any project that
already exists in the workspace.
Use default location
If checked, the project is created in the current workspace directory, else a different directory may be specified.
Location
This specifies the file system location where the project is created. This can be edited if
Use default location is unchecked.
Use default rule
model name
If checked, the rule model will have the default name, which is the same as the rule
project.
Rule model name
This specifies the name of the rule model created within the rule project. This can be edited if Use default rule model name is unchecked.
© Bosch Software Innovations GmbH
200/270
Chapter 5. Reference
Related tasks.
• Section 4.1.1, “Creating a new Rule Project” [89]
Related concepts.
• Section 3.1, “Rule Project” [25]
5.2.2. New Rule Model Wizard
Use this wizard to create a new rule model.
Figure 5.5. New Rule Model wizard
Option
Description
Parent folder
This is the folder within your workspace in which the new rule model will be created. You
can browse the workspace and select the parent folder in the navigator below this line.
File name
Enter the name of the rule model to be created. This name will be used both as a file
name (with an extension of .vrmodel) and for the name of the rule model stored in this
file.
Advanced >>
This section allows to link to an existing file somewhere else in your file system. This is
an advanced feature of the Eclipse platform and should not be used with Visual Rules.
Read more about it in the New File wizard section of the Workbench User Manual.
Related tasks.
• Section 4.2.1, “Creating a new Rule Model” [93]
Related concepts.
• Section 3.2, “Rule Model” [25]
5.2.3. New Rule Wizard
Use this wizard to create a new rule in an existing rule model or rule package.
© Bosch Software Innovations GmbH
201/270
Chapter 5. Reference
Figure 5.6. New Rule wizard
Option
Description
Rule model
Enter the rule model you want the rule to be added to. Click Browse to list all available
rule models.
Rule package
Enter the path of the rule package within that rule model you want the rule to be added to.
Click Browse to list all available rule packages. If this is left empty the rule will be created
in the top level rule package (the rule model itself).
Flow rule name
The name of the new flow rule to be created. This must be different from any other rule or
rule package in the rule package selected above.
Use a template
Check this to create the new flow rule from a template. Enter the template name, use
code assist (Ctrl+Space) or click Browse to list the available templates.
5.2.4. New State Flow Wizard
Use this wizard to create a new state flow in an existing rule model or rule package.
Figure 5.7. New State Flow wizard
© Bosch Software Innovations GmbH
202/270
Chapter 5. Reference
Option
Description
Rule model
Enter the rule model you want the state flow to be added to. Click Browse to list all available rule models.
Rule package
Enter the path of the rule package within that rule model you want the state flow to be
added to. Click Browse to list all available rule packages. If this is left empty the state
flow will be created in the top level rule package (the rule model itself).
State flow name
The name of the new state flow to be created. This must be different from any other state
flow or rule package in the rule package selected above.
5.2.5. New Service Wizard
Use this wizard to create a new service in an existing rule model.
Figure 5.8. New Service wizard
Option
Description
Service name
The name of the new service to be created. This must be different from any other service
in the rule and rule package.
Service Type Filter
Enter the beginning of the name of the service type you want to select. This will filter the
list so that it only shows elements with matching names. Initially the list will not be filtered.
You can use an asterisk * to represent any number of characters, e.g. *Service*Final will
match all names containing both the words Service and Final.
You can use a question mark ? to represent exactly one character, e.g. ?Service will
match all names containing the word Service preceded by exactly one character.
Check Show all to list all available services.
Service Type
Select from the list the Service Type for the Service to be created.
5.2.6. Generate Documentation Wizard
Use this wizard to generate an HTML documentation for a rule model, rule package, state flow or a single rule.
© Bosch Software Innovations GmbH
203/270
Chapter 5. Reference
Figure 5.9. Generate Documentation wizard
Option
Select the element
to generate the
documentation
Description
Here you select the rule model, the rule package, state flow or rule that you want to create the documentation for. If you select a rule model or a rule package, the documentation will include all the sub packages.
The selection will be set automatically when a rule model, package, state flow or rule was
already selected when the wizard was started.
The list only includes rule models that have been opened.
Target Directory
Enter the path of the directory where the generated documentation should go. Click
Browse to open a file browser.
Format
Either select HTML for display in a browser or PDF for display in a PDF viewer (for example Adobe Reader).
Template
The report template to use for the generated documentation. This determines what information will be included.
Language
The language of the generated documentation.
Image
Check all the informations that the images of rules should contain. You can select Descriptions, Contents, Call/Assignment Details, Notes, Statistics and Exception Handling.
© Bosch Software Innovations GmbH
204/270
Chapter 5. Reference
Option
Description
with Details of
Rule Elements
Whether the documentation should include detailed information about individual rule elements.
Overwrite existing
documentation
Check to automatically overwrite existing documentation files in the target directory. Otherwise you will get a warning message.
Open generated
documentation
Check to automatically open the documentation once generation is finished.
5.3. Editors
The following sections describe the editors for rules, state flows, tests, projects and dependencies between these.
5.3.1. Flow Rule Editor
The flow rule editor is used to view and edit flow rules.
5.3.1.1. Flow Rule Editor Palette
The flow rule editor palette contains all available rule elements that can be added to the rule. Additionally it contains tools for selection, zoom, notes and branch descriptions.
Figure 5.10. Rule Editor palette
Palette Item
Description
Select
This is the default tool. Use this to select, move and copy rule elements, descriptions,
contents and notes. Double-click on rule elements, descriptions, contents or notes to edit
them.
Zoom
This is the zoom tool. Click to zoom in. Press Shift and click to zoom out. Draw a rectangle to zoom the enclosed area.
Add Note
Click on a rule element to add another note to this element.
Describe Branch
Click on a rule element to add a description to the branch rooted at that element. This
does not work for the start element and for conditions within a decision element.
Decide
Insert a new Decision element or a new condition within an existing decision element.
© Bosch Software Innovations GmbH
205/270
Chapter 5. Reference
Palette Item
Description
Assign
Insert a new Assignment element or a new assignment within an existing assignment element.
Set Transition Target
Set a target state for a transition rule
Fire Action
Insert a new Fire Action element.
Call Flow Rule
Insert a new Call Flow Rule element.
Call Decision Table
Insert a new Call Decision Table element.
Call Service
Insert a new Call Service element.
Done & Return
Insert a new Done & Return element.
Repeat
Insert a new Repeat element.
End Repeat
Insert a new End Repeat element.
Return Exception
Insert a new Return Exception element.
Handle Exception
Click on a rule element to add a Handle Exception element to the branch rooted at that
element. This does not work for the start element and for conditions within a decision element.
This element is available only for transition rules in state flows.
5.3.1.2. Rule Context Palette
The rule context palette is shown on the right side of the rule editor. It displays and gives access to data elements,
actions, services and rule tests. These elements are shown within their respective sections. The sections can be
collapsed or expanded and pinned open with the little pin symbols.
Double-clicking on an element will open the Properties for this element or, in the case of rule tests, start the rule
test editor. Clicking on a selected element or pressing F2 will allow you to rename the element.
Figure 5.11. Rule Context palette
Palette Item
Description
This button enables/disables the display of type information for the elements in the
palette.
© Bosch Software Innovations GmbH
206/270
Chapter 5. Reference
Palette Item
Description
When this button is not pressed, the palette only shows elements that are defined by the
rule itself.
When the button is pressed, the palette will show all elements the rule has access to,
thus including elements that are defined on the rule packages above or - in the case of
services - defined on any reused rule packages.
Elements not defined by the rule itself are displayed with a grey background.
These buttons add a new element into the corresponding section, e.g. a new internal data
element or a new rule test.
These buttons delete the currently selected element. They only activate when an element
is selected.
Sections can be pinned open with these little pin buttons. This will prevent the section
from collapsing automatically to make room for others.
Input/Output Data
This section displays all the input/output data elements available to the rule.
Internal Data
This section displays all the internal data elements available to the rule.
Constant Data
This section displays all the constant data elements available to the rule.
Actions
This section displays all the actions available to the rule.
Services
This section displays all the services available to the rule.
Rule Tests
This section displays all the rule tests defined for the rule.
5.3.2. Decision Table Editor
The decision table editor is used to view and edit decision tables.
5.3.2.1. Decision Table Editor Palette
The decision table editor palette contains all available elements that can be added to the decision table. Additionally it contains tools for selections and zoom.
© Bosch Software Innovations GmbH
207/270
Chapter 5. Reference
Palette Item
Description
Select
This is the default tool. Use this to select, move and copy elements of the decision table.
Double-click on cells to edit them.
Zoom
This is the zoom tool. Click to zoom in. Press Shift and click to zoom out. Draw a rectangle to zoom the enclosed area.
Box Select
This allows to make rectangular selections of cells.
Decide
Inserts a new decision column or row. Decision columns are added at the left side of the
decision tables, while decision rows are at the top of the table.
Assign
Inserts a new assignment column. Assignment columns are used to assign values to output data elements. These are then the result of the decision table.
Fire Action
Inserts a new action column. These are used to fire Visual Rules actions of any type.
Return Exception
Inserts a new exception column. These are used to return exceptions to the caller of the
decision table to signal error conditions.
Figure 5.12. Decision Table Editor palette
5.3.2.2. Rule Context Palette
The rule context palette is shown on the right side of the decision table editor. It displays and gives access to data
elements, actions and rule tests. These elements are shown within their respective sections. The sections can be
collapsed or expanded and pinned open with the little pin symbols.
Double-clicking on an element will open the Properties for this element or, in the case of rule tests, start the rule
test editor. Clicking on a selected element or pressing F2 will allow you to rename the element.
Figure 5.13. Rule Context palette
Palette Item
Description
This button enables/disables the display of type information for the elements in the
palette.
© Bosch Software Innovations GmbH
208/270
Chapter 5. Reference
Palette Item
Description
When this button is not pressed, the palette only shows elements that are defined by the
decision table itself.
When the button is pressed, the palette will show all elements the decision table has access to, thus including elements that are defined on the rule packages above.
Elements not defined by the decision table itself are displayed with a grey background.
These buttons add a new element into the corresponding section, e.g. a new input data
element or a new rule test.
These buttons delete the currently selected element. They only activate when an element
is selected.
Sections can be pinned open with these little pin buttons. This will prevent the section
from collapsing automatically to make room for others.
Input/Output Data
This section displays all the input/output data elements available to the decision table.
Constant Data
This section displays all the constant data elements available to the decision table.
Actions
This section displays all the actions available to the decision table.
Rule Tests
This section displays all the tests defined for the decision table.
5.3.3. State Flow Editor
The state flow editor is used to view and edit state flows.
5.3.3.1. State Flow Editor Palette
The state flow editor palette contains all available state flow elements that can be added to the state flow. Additionally it contains tools for selection, zoom and notes.
Figure 5.14. State flow Editor palette
Palette Item
Description
Select
This is the default tool. Use this to select, move and copy state flow elements, descriptions, contents and notes. Double-click on state flow elements, descriptions, contents or
notes to edit them.
Zoom
This is the zoom tool. Click to zoom in. Press Shift and click to zoom out. Draw a rectangle to zoom the enclosed area.
Add Note
Click on a state flow element to add another note to this element.
State
Insert a new state element.
End State
Insert a new end state element.
Transition
Insert a new transition.
© Bosch Software Innovations GmbH
209/270
Chapter 5. Reference
5.3.3.2. State Flow Context Palette
The state flow context palette is shown on the right side of the state flow editor. It displays and gives access to all
the input/output data elements available to the state flow. It can be collapsed or expanded.
Double-clicking on an element will open the Properties for this element. Clicking on a selected element or pressing F2 will allow you to rename the element.
Figure 5.15. State flow Context palette
Palette Item
Description
This button enables/disables the display of type information for the elements in the
palette.
When this button is not pressed, the palette only shows elements that are defined by the
state flow itself.
When the button is pressed, the palette will show all elements the state flow has access
to, thus including elements that are defined on the rule packages above.
Elements not defined by the state flow itself are displayed with a grey background.
The button adds a new data element.
The button deletes the currently selected data element. It only activates when a data element is selected.
The section can be pinned open with this little pin button.
5.3.4. Rule Test Editor
The rule test editor allows you to set the input parameters for a rule execution and verify that the resulting output
data is what you expect. The editor has two pages that you can switch using the tab bar at the bottom. One for
configuring the rule execution and one for editing your actual test data.
The title of the rule editor always shows the name of the rule being tested and its path.
© Bosch Software Innovations GmbH
210/270
Chapter 5. Reference
Figure 5.16. Rule Test editor
Test editor element
Description
Toggles the alphabetical sorting of the data in Input and Output.
Determines, whether or not type information is displayed for the data in Input and Output.
Arranges the Test Cases, Input and Output panels next to each other. This is the default.
Arranges the Input and Output panels vertically on top of each other.
Hides the Output panel and shows only the Input panel.
Hides the Input panel and shows only the Output panel.
Description
Clicking here will open a text field where you can enter a description for this test.
Related Concepts.
• Section 3.22, “Rule Testing” [82]
5.3.4.1. Test Cases
This panel shows the test cases defined in this rule test.
Test editor element
Description
Add another test case.
Duplicate the selected test case including all its input data and expected values.
Import test cases.
Delete the selected test case.
Move the selected test case one position up.
© Bosch Software Innovations GmbH
211/270
Chapter 5. Reference
Test editor element
Description
Move the selected test case one position down.
Execute the test. This will start the whole test and execute all test cases defined in this
test. If code needs to be generated before execution or if errors exist in the rule model,
you will be asked how to proceed.
Execute the test in debug mode. Test execution will halt when a breakpoint is reached.
or
Opens the editor for the flow rule or decision table being tested
Shows the corresponding result file in the rule explorer
The number next to this icon indicates the number of successful test cases in this test for
the last execution.
The number next to this icon indicates the number of failed test cases in this test for the
last execution.
Test Case Description
This section contains a description for the currently selected test case. It can be expanded and collapsed.
Global Test Data
This section gives access to the initial data setup where static internal data elements can
be initialized before the test cases are executed.
5.3.4.2. Input
This panel shows all the input data possible for the rule and allows you to assign values to the input data for each
test case.
Test editor element
Description
Expands all elements that have children to show every element in the tree.
Hides the input parameters that are not used, i.e. don't have a value assigned to them in
the Input panel.
Inserts a new element into the list element selected in the Input panel.
Deletes the selected list element.
5.3.4.3. Output
This panel shows all the output data, actions and internal data for the rule and allows you to set expected results
for these. It also shows the actual results for the last test run right next to it so you can easily see the results of the
test execution.
Test editor element
Description
Pressing this button will show the input/output data elements in the Output panel.
Pressing this button will show the actions in the Output panel. You will be able to see
which actions fired and which did not.
Pressing this button will show the internal data elements in the Output panel.
Pressing this button will show the expected exception in the Output panel.
Expands all elements that have children to show every element in the tree.
© Bosch Software Innovations GmbH
212/270
Chapter 5. Reference
Test editor element
Description
Hides the input parameters that are not used i.e. don't have a value assigned to them in
the Output panel.
Inserts a new element into the list element selected in the Output panel.
Deletes the selected list element.
Copies the currently selected result values to the expected result column.
Copies all result values to the expected result column.
Opens the Compare Results Dialog.
5.3.5. Test Suite Editor
The test suite editor allows you to group and execute existing rule tests together in a test suite. It has a bar that visualizes the progression of the test execution. A green bar indicates that all tests passed while a red bar shows
that at least one of the executed rule tests failed.
Figure 5.17. Test Suite Editor
Test Suite editor element
Description
Add another test. This can either be a rule test or a nested test suite.
Delete the selected test. Only available for top level tests.
Move the selected test one position up. Only available for top level tests.
Move the selected test one position down. Only available for top level tests.
Execute the test suite. This will execute all tests one after another, updating the progress
bar and the failure messages table.
Execute the test suite in debug mode. Test execution will halt when a breakpoint is
reached.
Open an editor for the selected rule test.
© Bosch Software Innovations GmbH
213/270
Chapter 5. Reference
Test Suite editor element
Description
Shows the corresponding result file in the rule explorer
Description
Clicking here will open a text field where you can enter a description for this test suite.
Test Description
Clicking here will open a text field displaying the description for the selected test. In order
to edit it, the test's editor can be opened by double-clicking.
Related Concepts.
• Section 3.22, “Rule Testing” [82]
5.3.6. Rule Project Editor
The rule project editor is used to edit the contents of the ruleproject.vr file. Here you specify the rule project identifiers and the rule project dependencies.
Figure 5.18. Rule Project Editor
Rule Project
Editor element
Description
Opens the Dialog Select Dependency to add a dependency to the current rule project.
Removes the selected dependency from the rule project.
Related Concepts.
• Section 3.1, “Rule Project” [25]
Related Tasks.
• Section 4.1.2, “Setting Rule Project Identifiers (Group Id, Artifact Id, Version)” [89]
© Bosch Software Innovations GmbH
214/270
Chapter 5. Reference
• Section 4.1.3, “Defining Rule Project Dependencies” [90]
Related References.
• Section 5.4.7, “Select Dependency Dialog” [221]
5.3.7. Dependency Diagram Editor
The Dependency Diagram Editor is used to analyze dependencies within a rule project. These can be the following kinds of dependencies:
• Rule Package reuses
• Rule calls
• Enclosure of elements
• Testing and Test calls
Figure 5.19. Dependency Diagram Editor
Option
Description
Dependency Highlighting
Kind of dependencies, which are highlighted (with respect to a selected element)
Visible elements
Kinds of elements which are visible. Elements of all other kinds are hidden.
Visible dependencies
Kinds of dependencies is visible. Dependencies of all other kinds are hidden.
A detected cycle in the reuses of Rule Packages is marked with a warning icon (
).
For a clear view elements can be moved within the editor by drag&drop. Double-clicking on a rule or
test opens that element in the respective editor. Double-clickting on a rule call opens the calling rule
© Bosch Software Innovations GmbH
215/270
Chapter 5. Reference
in the Flowrule Editor and there selects the relevant rule element Call Flow Rule or Call Decision
Table, respectively. Deleting an element (via the conext menu) applies to the editor only.
Related Tasks.
• Section 4.1.4.1, “Visualizing Dependencies between the Elements within a Rule Project” [92]
5.3.8. Usage Matrix Editor
The Usage Matrix Editor is used to analyze the usage of elements within a rule project. For each data element,
action, etc. within a rule project it shows, in which context it is used and how many times it is used there. Here also
those elements can be considered, which are defined outside of the rule project (i.e. in other projects or libraries,
which the rule project depends upon).
Figure 5.20. Usage Matrix Editor
Related Tasks.
• Section 4.1.4.2, “Visualizing the Usage of Elements within a Rule Project” [93]
5.4. Dialogs
The following sections describe various dialogs within Visual Rules.
5.4.1. Open Rule Dialog
This dialog lists all the rules from all rule models in your workspace.
Figure 5.21. Open Rule dialog
© Bosch Software Innovations GmbH
216/270
Chapter 5. Reference
Option
Select a rule to
open
Description
Enter the beginning of the name of the rule you want to open. This will filter the list so that
it only shows rules with matching names. If nothing is entered, the list will show all rules.
You can use an asterisk * to represent any number of characters, e.g. *Score*Final will
match all rules whose name contains both the words Score and Final.
You can use a question mark ? to represent exactly one character, e.g. ?Category will
match all rules whose name contains the word Category preceded by exactly one character.
Related Concepts.
• Section 3.4, “Flow Rule” [29]
• Section 3.6, “Flow Rule Editor” [45]
5.4.2. Open Rule Test Dialog
This dialog makes it possible to quickly open a rule test or a test suite by it's name. After it has been opened, the
dialog shows all rule tests in the workspace. When a rule test is selected, the name of the rule being tested (including rule model name and packages) is displayed at the bottom of the dialog. This helps to distinguish between tests with the same name. In order to select from test suites instead of rule tests, the test suite icon must be
clicked.
Figure 5.22. Open Rule Test dialog
Option
Description
Select a rule test to Enter the beginning of the name of the rule test or test suite you want to open. This will
open
filter the list or the tree so that it only shows tests with matching names. If nothing is entered, the list will show all tests in the workspace.
You can use an asterisk * to represent any number of characters, e.g. *Score*Final will
match all tests whose name contains both the words Score and Final.
You can use a question mark ? to represent exactly one character, e.g. ?Category will
match all tests whose name contains the word Category preceded by exactly one character.
Icon
Description
Displays rule tests, no test suites.
© Bosch Software Innovations GmbH
217/270
Chapter 5. Reference
Icon
Description
Displays test suites, no rule tests.
Icon
Description
Displays the tests in a flat list, sorted alphabetically. Use this if you know the name of the
test.
Displays the tests within the rule model and rule package hierarchy. Use this if you know
where the test can be found.
Related Concepts.
• Section 3.22, “Rule Testing” [82]
5.4.3. Auto Creation Dialog
The Auto Creation dialog informs the user about new rule model elements that Visual Rules wants to create automatically because they don't exist yet.
Visual Rules tries to find the correct data type for the data element that should be created depending on the expression in which it is used. If no data type could be identified, the Any data type is used.
It is possible to configure for which elements this dialog for automatic creation should appear. Click on Configure
to bring up the user preferences for Auto Creation or open it with Window > Preferences ... > Visual Rules > Auto Creation and set the elements that should be created automatically to Prompt.
Figure 5.23. Auto Creation dialog
Decide if Visual Rules should create these elements for you and click Create, Don't Create or Cancel respectively.
Related Concepts.
• Section 3.21, “Auto Creation” [82]
Related Tasks.
• Section 4.10.3, “Working with Auto Creation” [159]
Related References.
• Section 5.7.3, “Auto Creation Preferences” [264]
5.4.4. Select Dialog
The Select dialog is used to select rule model elements. It appears whenever you click on any of the ... browse
buttons found in many places, e.g. when you select a data type for a data element, the action to fire in a Fire Ac-
© Bosch Software Innovations GmbH
218/270
Chapter 5. Reference
tion element or a rule in a Call Flow Rule element. The dialog is also available via the Select... context menu entry
wherever rule expressions are entered.
Figure 5.24. Select Dialog
Option
Description
Enter the beginning of the name of the element you want to select. This will filter the list
so that it only shows elements with matching names. Initially the list will not be filtered.
Select
You can use an asterisk * to represent any number of characters, e.g. *Score*Final will
match all names containing both the words Score and Final.
You can use a question mark ? to represent exactly one character, e.g. ?Category will
match all names containing the word Category preceded by exactly one character.
Show all
Initially the dialog will only show those elements that are accessible from the rule or rule
package you are currently editing. When you activate the Show all checkbox, the dialog will show all elements from all rule models in your workspace. When you now select
an element that was not previously visible, and click OK, the Select dialog will also add
the newly referenced rule package to the Reuse Packages tab of the current package.
This helps to save a lot of manual steps when reusing rules, types or else from other rule
packager or rule models.
The Show all checkbox will not be available when the type of element to be
selected cannot be reused, e.g. data elements and actions.
Icon
Description
Displays the elements in a flat list, sorted alphabetically. Use this if you know the name of
the element.
Displays the elements within the rule model and rule package hierarchy. Use this if you
know where the element can be found.
Related Tasks.
• Section 4.10, “Working with Expressions” [157]
© Bosch Software Innovations GmbH
219/270
Chapter 5. Reference
Related References.
• Section 5.6.2.4, “Fire Action Tab” [234]
• Section 5.6.2.5, “Call Flow Rule” [234]
• Section 5.6.2.6, “Call Decision Table” [235]
• Section 5.6.2.7, “Call Service” [236]
• Section 5.6.2.9, “Return Exception Tab” [239]
• Section 5.6.7.2, “Action Settings Tab” [249]
5.4.5. Rule Search Dialog
This dialog is used to search for specific elements of rule models.
Figure 5.25. Rule Search dialog
Option
Description
Containing text
The text to search for.
Case sensitive
When checked the search will only match if the text is found in exactly the same case.
Otherwise it doesn't matter if the text is using upper or lowercase letters.
Search for
Determines which types of rule model elements should be found.
• All occurrences will find any kind of element
• Select will find only those kinds of elements that have been checked
The checkbox Rules includes flow rules, decision tables and all their contents (rule elements, cells)
Search
Determines in which part of an element the text must be found to cause a match.
• Names will search in element names
• Descriptions will search in element descriptions
• Expressions will search in rule expressions
• Notes will also search in notes
© Bosch Software Innovations GmbH
220/270
Chapter 5. Reference
Option
Scope
Description
Determines which rule models or which parts of rule models are searched.
• Workspace will search all rule models in your workspace
• Selected elements will limit the search to those rule models, rule packages or rules
that are currently selected. This option is only available if a suitable selection was
done before the dialog was opened
• Enclosing rule models will search all of the rule models for which one element contained within was selected. This option is only available if a suitable selection was
done before the dialog was opened
5.4.6. Compare Results Dialog
This dialog allows to compare the expected with the actual result within the test editor.
Figure 5.26. Compare Results Dialog
Button
Description
Copy all changes from actual to expected result.
Copy currently highlighted changes from actual to expected result.
Jumps to the next different line.
Jumps to the previous different line.
Jumps to the next individual change.
Jumps to the previous individual change.
5.4.7. Select Dependency Dialog
The Select Dependency Dialog is used to select and add dependencies to a rule project. The dialog is accessible via the Rule Project Editor. The Select Dependeny Dialog lists all rule projects in the workspace and all libraries that are known by Visual Rules like the Visual Rules Runtime library. New (currently unknown) libraries can
be added by clicking the button Other....
© Bosch Software Innovations GmbH
221/270
Chapter 5. Reference
Figure 5.27. Select Dependency Dialog
Figure 5.28. Dialog to define a new Dependency
Select Dependency
Dialog element
Other...
Related References.
Beschreibung
Opens the dialog Dependency to define and a add new, currently unknown library as dependency.
Section 5.3.6, “Rule Project Editor” [214]
5.5. Views
The user interface of Visual Rules consists of several views that are arranged next to each other. The following
sections describe the different views available in Visual Rules.
© Bosch Software Innovations GmbH
222/270
Chapter 5. Reference
5.5.1. Rule Explorer View
The Rule Explorer lists all the projects in the workspace and their rule models. It hides away technical elements,
especially any Java specific elements. That is why the Rule Explorer is used in the non-technical Rule Modeling
perspective.
Figure 5.29. Rule Explorer view
Icon
Description
Collapses all expanded elements in the resource tree.
Determines if the view selection is linked to the active editor. When this option is selected,
changing the active editor will automatically update the Rule Explorer selection to the resource being edited.
Determines if data types of rule model elements are displayed or not.
This is used to toggle if data elements are displayed in alphabetically or manual order.
Related Concepts.
• Section 3.1, “Rule Project” [25]
• Section 3.2, “Rule Model” [25]
Related Tasks.
• Section 4.2, “Working with Rule Models” [93]
• Section 4.6.11, “Sorting Data Elements Manually” [147]
Related References.
• Section 5.1.1, “Rule Modeling Perspective” [197]
• Section 5.5.2, “Project Explorer View” [223]
• Section 5.5.6, “Properties View” [226]
5.5.2. Project Explorer View
The Project Explorer is the general purpose view for working with projects. It lists all the projects and their contents (files, models etc.), including different technical elements.
© Bosch Software Innovations GmbH
223/270
Chapter 5. Reference
Figure 5.30. Project Explorer view
The Project Explorer view is not specific to Visual Rules but part of the Eclipse platform underlying
Visual Rules. You can find more information in the Workbench User Guide (part of the documentation
for the Eclipse platform).
Icon
Description
Collapses all expanded elements in the resource tree.
Determines if the view selection is linked to the active editor. When this option is selected,
changing the active editor will automatically update the Rule Explorer selection to the resource being edited.
Triggers rule code generation for the selected rule model.
Determines if data types of rule model elements are displayed or not.
This is used to toggle if data elements are displayed in alphabetically or manual order.
Related Concepts.
• Section 3.1, “Rule Project” [25]
• Section 3.2, “Rule Model” [25]
Related Tasks.
• Section 4.2, “Working with Rule Models” [93]
• Section 4.6.11, “Sorting Data Elements Manually” [147]
Related References.
• Section 5.1.2, “Rule Integration Perspective” [198]
• Section 5.5.1, “Rule Explorer View” [223]
• Section 5.5.6, “Properties View” [226]
5.5.3. Problems View
The Problems view displays a list of all current errors and warnings that Visual Rules has detected. Double-click
on an entry to navigate to the problem location.
© Bosch Software Innovations GmbH
224/270
Chapter 5. Reference
Figure 5.31. Problems view
The Problems view is not specific to Visual Rules but part of the Eclipse platform underlying VisualRules. You can find more information in the Workbench User Guide (part of the documentation for
the Eclipse platform).
5.5.4. Outline View
The Outline view displays a compact representation of the rule being edited. A blue box is drawn around the currently visible part of the rule. You can use the mouse to move this box around. The rule editor will scroll its viewport
accordingly.
Figure 5.32. Outline view
Related Concepts.
• Section 3.6, “Flow Rule Editor” [45]
Related Tasks.
• Section 4.3.3, “Navigating in the Flow Rule Editor” [104]
5.5.5. Search View
The Search view displays search results and is automatically opened whenever the user performs a search. Double-click on an entry to navigate to the location where the search found that match.
© Bosch Software Innovations GmbH
225/270
Chapter 5. Reference
Figure 5.33. Search view
The Search view is not specific to Visual Rules but part of the Eclipse platform underlying VisualRules. You can find more information in the Workbench User Guide (part of the documentation for
the Eclipse platform).
Related Tasks.
• Section 4.14, “Searching Rule Models” [178]
5.5.6. Properties View
The Properties view shows informations and settings for the currently selected element. Whenever you select an
item in the Rule Explorer or in the rule editor, the Properties view will be updated and show the properties of that
element.
Figure 5.34. Properties view
Properties are usually displayed on several tabs. You can bring a tab to the front by clicking on the tab name displayed to the left. Detailed descriptions of the different tabs for specific rule model elements can be found in the
following sections.
The Properties view is not specific to Visual Rules but part of the Eclipse platform underlying Visual Rules. You can find more information in the Workbench User Guide (part of the documentation for
the Eclipse platform).
© Bosch Software Innovations GmbH
226/270
Chapter 5. Reference
5.5.7. Statistics View
The Statistics view shows information on the execution of the test suite or test covered by the statistic currently
active. Here the focus can be restricted to an individual test case with the navigation in the header.
The navigation also controls the focus in the flow rule editor or in the decision table editor, respectively.
Figure 5.35. Statistics view
.
Icon
Description
Hyperlink to the relevant statistics file or result file
or
Start:
Start time of the execution
End:
End time of the execution
Duration:
Time duration of the execution
Executed rules
Hyperlinks to the rules that have been part of the execution
Statistic Properties
Any additional information, e.g. identifiers of the relevant project
5.5.8. Debug View
The Debug view is used during debug sessions. When execution is halted, it shows the current execution trace
which lists the rules and rule elements that are currently being executed. The current position of execution is represented by the top most element.
The view toolbar contains buttons to control the debugger.
Figure 5.36. Debug view
© Bosch Software Innovations GmbH
227/270
Chapter 5. Reference
Icon
Shortcut
Description
Resumes rule execution when it was halted. Rule execution will continue
until it either hits another breakpoint or finishes.
F8
Terminates rule execution.
Disconnects the debugger. This button is only available during a remote
debug session when it is connected to a remote Java VM.
F5
Steps to the next rule element. This also enters Flow Rule Calls and Decision Table Calls.
F6
Steps over the remainder of the branch and then halts. Flow Rule Calls
and Decision Table Calls are not entered.
Related Tasks.
• Section 4.13, “Debugging Rules” [175]
Related References.
• Section 5.1.3, “Debug Perspective” [199]
5.5.9. Variables View
The Variables view is used during debug sessions. When execution halts at a breakpoint, it shows the current data elements and their values.
Figure 5.37. Variables view
There are several options that affect the contents and display of the Variables view. These options are available
from the menu ( ) in the view toolbar.
Option
Description
Show Input/Output
Data
When selected, input and output data elements are included in the view.
Show Internal Data
When selected, internal data elements are included in the view.
Show Actions
When selected, actions are included in the view.
Show Constant Da- When selected, constant data elements are included in the view.
ta
Show Groups
When selected, groups are included in the view.
Related Tasks.
• Section 4.13.3, “Stepping Through Rules” [176]
© Bosch Software Innovations GmbH
228/270
Chapter 5. Reference
Related References.
• Section 5.1.3, “Debug Perspective” [199]
5.5.10. Breakpoints View
The Breakpoints view shows all currently existing breakpoints in all projects and rule models. Breakpoints can be
temporarily disabled by unchecking the check box in front of it. Breakpoints can also be deleted here.
The Breakpoints view is not specific to Visual Rules but part of the underlying Eclipse platform. So it may not only
show breakpoints in rules but also breakpoints of other tools (e.g. breakpoints in Java code or else).
The view is normally shown as part of the Debug perspective.
Figure 5.38. Breakpoints view
Icon
Description
Removes the selected breakpoints
Removes all breakpoints
When pressed, only supported breakpoints are shown during a debug session
When pressed, all breakpoints are skipped as if they were disabled
Related Tasks.
• Section 4.13.1, “Setting Breakpoints” [175]
Related References.
• Section 5.1.3, “Debug Perspective” [199]
5.6. Properties Tabs
The following sections describe the tabs available in the Properties view. Most tabs are only available when specific rule model elements are selected, e.g. a Fire Action tab is only visible when you select a Fire Action element
in the rule editor.
5.6.1. General
The following properties tabs are available for all elements of a rule model.
5.6.1.1. Description Tab
This tab is used to view and edit the description of the selected element. Descriptions can contain hyperlinks to
reference external content.
© Bosch Software Innovations GmbH
229/270
Chapter 5. Reference
Figure 5.39. Description tab
5.6.1.2. Notes Tab
This tab is used to view and edit the notes attached to the currently selected element. Notes can contain hyperlinks to reference external content. Every note is listed along with the information who created it and when.
Figure 5.40. Notes tab
Icon
Description
Adds another note.
Removes the corresponding note.
5.6.2. Rule Elements
The following properties tabs are available when rule elements in the rule editor are selected.
5.6.2.1. Decision Overview Tab
This tab is shown when a decision is selected in the rule editor. It shows the descriptions and expressions for the
decision and for all its conditions.
© Bosch Software Innovations GmbH
230/270
Chapter 5. Reference
Figure 5.41. Decision Overview tab
Icon
Description
Adds another condition.
Removes the currently selected condition including all rule elements that may be attached to it.
Table Column
Description
Description
This column shows the description of the decision. You can edit cells in this column by
double-clicking them.
Condition
This column shows the condition under which this condition branch is executed. The first
row shows the condition prefix. You can edit cells in this column by double-clicking them.
Option
Allow multiple
matches (not just
the first one)
Description
When unchecked, only the branch of the first condition which evaluates to true is executed.
When checked, the decision will evaluate all conditions and execute the branches of all
conditions which evaluate to true.
Related References.
• Section 5.6.2.2, “Decision Details Tab” [231]
5.6.2.2. Decision Details Tab
This tab is shown when a decision is selected in the rule editor. It shows a list of all the different conditions, with
the condition prefix in the first line. To the right it shows the description and the expression of the currently selected
condition. This tab gives the user more room for editing the descriptions and expressions, but does not show everything at the same time like the Decision Overview tab.
© Bosch Software Innovations GmbH
231/270
Chapter 5. Reference
Figure 5.42. Decision Details tab
Icon
Description
Toggles between display of the descriptions and conditions.
Adds another condition.
Removes the currently selected condition including all rule elements that may be attached to it.
Option
Condition Prefix
Description
This input field is displayed when the first row in the list (the decision) is selected.
Enter the optional prefix for all the conditions here.
Condition
This input field is displayed when a condition in the list is selected.
Enter the expression for the condition here.
Description
Enter the description for the currently selected item (decision, conditions or else exit)
here.
Allow multiple
matches (not just
the first one)
When unchecked, only the branch of the first condition which evaluates to true is executed.
When checked, the decision will evaluate all conditions and execute the branches of all
conditions which evaluate to true.
Related References.
• Section 5.6.2.1, “Decision Overview Tab” [230]
5.6.2.3. Assignments Tab
This tab is shown when an assignment element is selected in the rule editor. It shows a list of all the different assignments within this assignment element.
© Bosch Software Innovations GmbH
232/270
Chapter 5. Reference
Figure 5.43. Assignments tab
Icon
Description
Initially all right sides of the elements are collapsed. This button will expand them so that
all entered values are visible.
This only has an effect if at least one element is available.
Adds another assignment.
Inserts another element to a collection, list or set. This is only available when the data element of the currently selected assignment is a collection, list or set.
Removes the currently selected assignment.
Moves the currently selected assignment up one position within the list.
Moves the currently selected assignment down one position within the list.
Table Column
Description
Data Element
This column shows the data element whose value is changed in the assignment. You can
edit cells in this column by double-clicking them.
Operation
This column shows the operation the assignment will perform. When you double-click a
cell in this column you can choose the type of assignment. The possible choices are
:=
Normal assignment (default). The data element will be assigned the result of the expression.
ADD
Collection addition. The result of the expression will be added to the collection specified as the data element. For example: {2,3} ADD 4 will produce {2,3,4}. The data
element must be a collection type. If the expression is also a collection type, the two
collections will be merged. For example: {2,3} ADD {4,5} produces {2,3,4,5}
REMOVE
Collection removal. The result of the expression will be removed from the collection
on the left side. For example: {2,3} REMOVE 3 produces {2}. The data element must
be a collection type. If the expression is also a collection type all elements from the
right collection are removed from the left collection. For example: {2,3,4} REMOVE
{2,3} produces {4}
CLEAR
Collection clearing. This removes all elements from the collection specified as the
data element. This operation does not have an expression on the right side.
Expression
This column shows the expression used to calculate the value which is then assigned to
the data element. You can edit cells in this column by double-clicking them.
© Bosch Software Innovations GmbH
233/270
Chapter 5. Reference
Table Column
Description
Type
This column shows the type of the data element to assign to. Cells in this column are
read-only.
Description
This column shows the description of the assignment. You can edit cells in this column by
double-clicking them.
5.6.2.4. Fire Action Tab
This tab is shown when a Fire Action element is selected in the rule editor. Here you specify what action should be
fired and optionally configure any input parameters the action may require.
Figure 5.44. Fire Action tab
Option
Fire Action
Description
Enter the name of the action that should be fired here. Code Assist (Ctrl+Space) is available.
5.6.2.5. Call Flow Rule
This tab is shown when a Call Flow Rule element is selected in the rule editor. Here you specify the rule to be
called and any necessary input data. Additionally, you specify which data elements the output of the rule should be
assigned to.
Figure 5.45. Call Flow Rule tab
Option
Call Flow Rule
Description
Enter the name of the flow rule that you want to call here. Press Ctrl+Space for content
assist or click on ... to select the rule from a list of available rules.
© Bosch Software Innovations GmbH
234/270
Chapter 5. Reference
Icon
Description
Opens the flow rule being called in the rule editor.
Initially all elements are collapsed. This button will expand them so that all elements are
visible.
This only has an effect if at least one ielement is available.
Inserts another element to a collection, list or set. This is only available when the selected
input data element is a collection, list or set.
Removes the currently selected value for a collection data element. If the input data element of the rule you are reusing does not exist anymore you can remove the value you
previously assigned to it with this button.
This button automatically inserts data elements as input data, when they have the same
name and type. Only inputs still without a value will be affected.
This button automatically inserts data elements to assign the outputs to, when they have
the same name and type. Only outputs not yet assigned will be affected.
Table Column
Description
Input Data
This column shows the name and type of the input data of the rule you are calling. Cells
in this column are read only.
Value
The value you want to assign to the input data. This can be any expression. You can edit
cells in this column by double-clicking them. Code Assist (Ctrl+Space) is available.
Description
The description for this row. You can edit cells in this column by double-clicking them.
Table Column
Description
Output Data
This column shows the name and type of the output data of the rule you are calling. Cells
in this column are read only.
Assign To
The data element you want to assign the value of this output element to. You can edit
cells in this column by double-clicking them. Code Assist (Ctrl+Space) is available.
Description
The description for this row. You can edit cells in this column by double-clicking them.
5.6.2.6. Call Decision Table
This tab is shown when a Call Decision Table element is selected in the rule editor. Here you specify the decision
table to be called and any necessary input data. Additionally, you specify which data elements the output of the decision table should be assigned to.
Figure 5.46. Call Decision Table tab
© Bosch Software Innovations GmbH
235/270
Chapter 5. Reference
Option
Description
Call Decision Table
Enter the name of the decision table that you want to call here. Code Assist (Ctrl+Space)
is available.
Icon
Description
Opens the editor for the decision table being called.
Initially all elements are collapsed. This button will expand them so that all elements are
visible.
This only has an effect if at least one element is available.
Inserts another element to a collection, list or set. This is only available when the selected
input data element is a collection, list or set.
Removes the currently selected value for a collection data element. If the input data element of the decision table you are calling does not exist anymore, this button removes
the value you previously assigned to it.
This button automatically inserts data elements as input data, when they have the same
name and type. Only inputs still without a value will be affected.
This button automatically inserts data elements to assign the outputs to, when they have
the same name and type. Only outputs not yet assigned will be affected.
Table Column
Description
Input Data
This column shows the name and type of the input data of the decision table you are calling. Cells in this column are read only.
Value
The expression you want to assign to the input data. You can edit cells in this column by
double-clicking them. Code Assist (Ctrl+Space) is available.
Description
The description for this row. You can edit cells in this column by double-clicking them.
Table Column
Description
Output Data
This column shows the name and type of the output data of the decision table you are
calling. Cells in this column are read only.
Assign To
The data element you want to assign the value of this output element to. You can edit
cells in this column by double-clicking them. Code Assist (Ctrl+Space) is available.
Description
The description for this row. You can edit cells in this column by double-clicking them.
5.6.2.7. Call Service
This tab is shown when a Call Service element is selected in the rule editor. Here you specify the service you want
to call including any necessary input data. Additionally, you specify what to do with the output data returned by the
service.
© Bosch Software Innovations GmbH
236/270
Chapter 5. Reference
Figure 5.47. Call Service tab
Option
Call Service
Description
Enter the name of the service that you want to call. Code Assist (Ctrl+Space) is available.
Icon
Description
Initially all elements are collapsed. This button will expand them so that all elements are
visible.
This only has an effect if at least one element is available.
Inserts another element to a collection, list or set. This is only available when the selected
input data element is a collection, list or set.
Removes the currently selected value for an input data element.
This button automatically inserts data elements as input data, when they have the same
name and type. Only inputs still without a value will be affected.
This button automatically inserts data elements to assign the outputs to, when they have
the same name and type. Only outputs not yet assigned will be affected.
Table Column
Description
Input Data
This column shows the name and type of the intput data elements of the service you are
calling. Cells in this column are read only.
Value
The data element you want to assign the value of the intput element to. You can edit cells
in this column by double-clicking them. Code Assist (Ctrl+Space) is available.
Description
The description for this row. You can edit cells in this column by double-clicking them.
Table Column
Description
Output Data
This column shows the name and type of the output data element of the service you are
calling. Cells in this column are read only.
Assign To
The data element you want to assign the value of the output element to. You can edit
cells in this column by double-clicking them. Code Assist (Ctrl+Space) is available.
Description
The description for this row. You can edit cells in this column by double-clicking them.
5.6.2.8. Repeat Tab
This tab is shown when a Repeat element is selected. It allows you to define how often or under what conditions
the successors will be repeated.
© Bosch Software Innovations GmbH
237/270
Chapter 5. Reference
Option
Description
for each of multiple elements
Select this if you want to repeat execution for each one of multple data elements in a collection.
while a condition
holds
Select this if you want to repeat execution as long as a specific condition is true.
with counter
Select this if you want to repeat execution a specific number of times.
Figure 5.48. Repeat tab - for each
Option
Description
Assign each element to
Enter an expression that specifies a data element that each element of the collection is
assigned to. Code Assist (Ctrl+Space) is available.
Elements
Enter an expression that specifies the collection of elements whose elements will be assigned to the data element specified above. Every time the Repeat executes, the next
data element is assigned to the data element specified in the Assign each element to
field. If the number of data elements is zero, the Repeat is not executed at all. Code Assist (Ctrl+Space) is available.
Figure 5.49. Repeat tab - condition
Option
Condition
Description
Enter an expression for the condition. Execution repeats as long as the specified condition is true and ends when the condition is false. If the condition is false right from the beginning, the Repeat is not executed at all. Code Assist (Ctrl+Space) is available.
© Bosch Software Innovations GmbH
238/270
Chapter 5. Reference
Figure 5.50. Repeat tab - counter
Option
Counter
Description
Enter an expression that specifies a data element for the counter. The current value of
the counter will be stored in the data element specified here. The counter starts with a
given start value (Start) and is incremented each time by a given step value (Step) until it
reaches (or passes) the given end value (End).
The counter is optional. Code Assist (Ctrl+Space) is available.
Start
Enter the start value for the counter. This can be any expression that evaluates to a number. Code Assist (Ctrl+Space) is available.
End
Enter the end value for the counter. This can be any expression that evaluates to a number. Code Assist (Ctrl+Space) is available.
Step
Enter the step value for the counter. This can be any expression that evaluates to a number. Code Assist (Ctrl+Space) is available.
5.6.2.9. Return Exception Tab
This tab is shown when a return exception node is selected in the rule editor. You can specify the exception that
should be returned here. You can either choose to return an previously created exception or create a new exception to return.
Figure 5.51. Return Exception tab
© Bosch Software Innovations GmbH
239/270
Chapter 5. Reference
Option
Description
Exception Element
Activate this and enter an expression which results in the exception element you want to
return. Code Assist (Ctrl+Space) is available.
Create Exception
Element
Activate this if you want to create a new exception element. Code Assist (Ctrl+Space) is
available.
Type
Enter the type of exception element you want to create.
Table Column
Description
Name
This column shows the name and type of the exception attributes. Cells in this column
are read only.
Value
The value you want to assign to this attribute. You can edit cells in this column by double-clicking them. Code Assist (Ctrl+Space) is available.
Description
The description for this row. You can edit cells in this column by double-clicking them.
Icon
Description
This button will expand all elements so that all elemtents are visible.
Removes the currently selected value.
Inserts another element to a collection, list or set. This is only available when the selected
attribute is a collection, list or set.
5.6.2.10. Handle Exception Tab
This tab is shown when a handle exception node is selected in the rule editor. You can specify a data element that
shall hold the exception for further processing.
Figure 5.52. Handle Exception tab
Option
Description
Assign value of
Exception Element
to
Enter an expression that specifies a data element to which the value of the exception element is assigned. Only exceptions of the data element's type are handled.
5.6.3. State Flow Elements
The following properties tabs are available when state flow elements in the state flow editor are selected.
5.6.3.1. State Tab
This tab is shown when a state flow element is selected in the state flow editor. It shows the name of the element
and whether or not it is an end state element.
© Bosch Software Innovations GmbH
240/270
Chapter 5. Reference
Figure 5.53. State tab
5.6.4. Rule Models
The following properties tabs are available for rule models.
5.6.4.1. Extensions tab
This tab allows to activate specific extensions for the rule models. Extensions provide specific functions, action
types or service types that can be used anywhere in the rule model once the extension is activated.
Figure 5.54. Extensions tab
Option
Description
Visual Rules 3.x
compatibility functions/actions
When activated, gives access to some functions and action types that were available in
Visual Rules 3.x. In particular, this includes the string list functions and the "Read CSV
file" action type.
DatabaseIntegrator
When activated, gives access to the action types for direct database access. See the
DatabaseIntegrator manual for more information.
The DatabaseIntegrator is an optional add-on for Visual Rules.
5.6.5. Rule Packages
The following properties tabs are available for rule packages (including rule models).
5.6.5.1. Reuse Packages Tab
This tab shows all the rule packages referenced for reuse.
© Bosch Software Innovations GmbH
241/270
Chapter 5. Reference
Figure 5.55. Reuse Packages tab
Icon
Description
Allows you to select which rule packages you want to reuse.
Removes the currently selected reused package from the list.
Moves the currently selected reused package up one position within the list.
Moves the currently selected reused package down one position within the list.
Table Column
Description
Name
This column shows the name and the rule model of the rule packages you are reusing.
Cells in this column are read only.
Description
The description for this row. You can edit cells in this column by double-clicking them.
Project
The Project this package is in. Cells in this column are read only.
Related Concepts.
• Section 3.3.1, “Rule Package Reuse” [28]
Related Tasks.
• Section 4.2.19, “Reusing Rule Packages” [101]
Related References.
• Section 5.4.4, “Select Dialog” [218]
5.6.6. Data
The following properties tabs are available where data elements can be defined, i.e. rule models, rule packages or
rules.
5.6.6.1. Data Element
This tab is activated, when one or multiple data elements are selected.
© Bosch Software Innovations GmbH
242/270
Chapter 5. Reference
Figure 5.56. Data Element tab for Input/Output data
Figure 5.57. Data Element tab for Internal data
Option
Description
Name
The name of the selected element. This only appears when one element is selected.
Type
This allows changing the type of all selected elements. The name of the type is displayed,
if all selected elements are of the same type, otherwise the field is empty.
Multiple
Controls if all selected data elements hold a single or multiple values. This is only available for Attributes, Input/Output, Internal and Constant Data.
Input/Output
Shows wether the selected elements are used for input, for output or for both. This is only
available for Input/Output Data.
Required
Controls if all selected data elements are required. This is only available for Input/Output
Data.
Static
Controls if all selected data elements are static. This is only available for Internal Data.
When selecting multiple data elements of different kinds, the tab will only show settings, which the elements have in common.
The following settings are only available when a single element is selected.
Icon
Description
Initially all elements are collapsed. This button will expand them so that all elements are
visible.
This only has an effect if there is at least one element available.
Removes the currently selected element or group.
© Bosch Software Innovations GmbH
243/270
Chapter 5. Reference
Icon
Description
Inserts another element to a collection, list or set. This is only available when the selected
attribute is a collection, list or set.
Table Column
Description
Name
This column shows the name of the element. You can edit cells in this column by double-clicking them.
Default Value
The default value which will be used when you access the data element when no other
value has been set. You can edit cells in this column by double-clicking them. Code Assist (Ctrl+Space) is available.
Description
The description for this row. You can edit cells in this column by double-clicking them.
5.6.6.2. Input/Output Data Tab
This tab shows a list of all the input/output data elements defined on the selected rule model, rule package or rule.
Figure 5.58. Input/Output Data tab
Icon
Description
Initially all elements are collapsed. This button will expand them so that all elements are
visible.
This only has an effect if there is at least one element available.
This button is used to toggle the alphabetically sorting of the elements.
Adds a new Input/Output Data element.
Creates a new group. This allows you to organize your data.
Removes the currently selected element or group.
Inserts another element to a collection, list or set. This is only available when the selected
attribute is a collection, list or set.
Allows manually changing the order of the elements. This is only applicable, if alphabetically sorting (
© Bosch Software Innovations GmbH
) is turned off.
244/270
Chapter 5. Reference
Icon
Description
Converts the selected element to either Constant Data or Internal Data.
Table Column
Description
Name
This column shows the name of the input/output data element. The first row shows the
name of the element they are attached to. You can edit cells in this column except for the
one in the first row by double-clicking them.
Input/Output
This column shows wether the data element is used for input, for output or for both. You
can edit cells in this column by double-clicking them.
Required
This column shows wether the data element is required. You can edit cells in this column
by double-clicking them. Only input and input/output parameters can be required.
Default Value
The default value which will be used when you access the data element when no other
value has been set. You can edit cells in this column by double-clicking them. Code Assist (Ctrl+Space) is available.
Type
The type of the data element. You can edit cells in this column by double-clicking them.
Multiple
This column shows wether the data element holds a single or multiple values of this type.
You can edit cells in this column by double-clicking them.
Implementation
In this column you can specify the collection implementation to be used for a data element that will have multiple entries. You can edit a cell by double-clicking on it. The behavior of the collection depends on the implementation type you select, which can be either of the following three types available: List, Set, or Map (refer to Section 3.14.7, “Collection” [76] for details on collection behaviors). If selecting an implementation the Multiple column value will automatically be set to 'Yes' if it hasn't been already. Note: There is
a fourth implementation called Collection, that can only appear after importing e.g. a JavaBean. It can neither be set nor edited.
Description
The description for this row. You can edit cells in this column by double-clicking them.
Related References.
• Section 3.14.7, “Collection” [76]
• Section 5.6.6.3, “Internal Data” [245]
• Section 5.6.6.4, “Constant Data” [247]
5.6.6.3. Internal Data
This tab shows a list of all the internal data elements defined on the selected rule model, rule package or rule.
© Bosch Software Innovations GmbH
245/270
Chapter 5. Reference
Figure 5.59. Internal Data tab
Icon
Description
Initially all elements are collapsed. This button will expand them so that all elements are
visible.
This only has an effect if there is at least one element available.
This button is used to toggle the alphabetically sorting of the elements.
Adds a new Internal Data element.
Creates a new group. This allows you to organize your data.
Removes the currently selected element or group.
Inserts another element to a collection, list or set. This is only available when the selected
attribute is a collection, list or set.
Allows manually changing the order of the elements. This is only applicable, if alphabetically sorting (
) is turned off.
Converts the selected element to either Constant Data or Input/Output Data.
Table Column
Description
Name
This column shows the name of the input/output data element. The first row shows the
name of the element they are attached to. You can edit cells in this column except for the
one in the first row by double-clicking them.
Type
The type of the data element. You can edit cells in this column by double-clicking them.
Static
This column shows wether the data element is static. You can edit cells in this column by
double-clicking them.
Multiple
This column shows wether the data element holds a single or multiple values of this type.
You can edit cells in this column by double-clicking them.
© Bosch Software Innovations GmbH
246/270
Chapter 5. Reference
Table Column
Description
Implementation
In this column you can specify the collection implementation to be used for a data element that will have multiple entries. You can edit a cell by double-clicking on it. The behavior of the collection depends on the implementation type you select, which can be either of the following three types available: List, Set, or Map (refer to Section 3.14.7, “Collection” [76] for details on collection behaviors). If selecting an implementation the Multiple column value will automatically be set to 'Yes' if it hasn't been already. Note: There is
a fourth implementation called Collection, that can only appear after importing e.g. a JavaBean. It can neither be set nor edited.
Default Value
The default value which will be used when you access the data element when no other
value has been set. You can edit cells in this column by double-clicking them. Code Assist (Ctrl+Space) is available.
Description
The description for this row. You can edit cells in this column by double-clicking them.
Related References.
• Section 3.14.7, “Collection” [76]
• Section 5.6.6.2, “Input/Output Data Tab” [244]
• Section 5.6.6.4, “Constant Data” [247]
5.6.6.4. Constant Data
This tab shows a list of all the constant data elements defined on the selected rule model, rule package or rule.
Figure 5.60. Constant Data tab
Icon
Description
Initially all elements are collapsed. This button will expand them so that all elements are
visible.
This only has an effect if there is at least one element available.
This button is used to toggle the alphabetically sorting of the elements.
Adds a new Constant Data element.
Creates a new group. This allows you to organize your data.
© Bosch Software Innovations GmbH
247/270
Chapter 5. Reference
Icon
Description
Removes the currently selected element or group.
Inserts another element to a collection, list or set. This is only available when the selected
attribute is a collection, list or set.
Allows manually changing the order of the elements. This is only applicable, if alphabetically sorting (
) is turned off.
Converts the selected element to either Internal Data or Input/Output Data.
Table Column
Description
Name
This column shows the name of the input/output data element. The first row shows the
name of the element they are attached to. You can edit cells in this column except for the
one in the first row by double-clicking them.
Type
The type of the data element. You can edit cells in this column by double-clicking them.
Multiple
This column shows wether the data element holds a single or multiple values of this type.
You can edit cells in this column by double-clicking them.
Implementation
In this column you can specify the collection implementation to be used for a data element that will have multiple entries. You can edit a cell by double-clicking on it. The behavior of the collection depends on the implementation type you select, which can be either of the following three types available: List, Set, or Map (refer to Section 3.14.7, “Collection” [76] for details on collection behaviors). If selecting an implementation the Multiple column value will automatically be set to 'Yes' if it hasn't been already. Note: There is
a fourth implementation called Collection, that can only appear after importing e.g. a JavaBean. It can neither be set nor edited.
Default Value
The default value which will be used when you access the data element when no other
value has been set. You can edit cells in this column by double-clicking them. Code Assist (Ctrl+Space) is available.
Description
The description for this row. You can edit cells in this column by double-clicking them.
Related References.
• Section 3.14.7, “Collection” [76]
• Section 5.6.6.2, “Input/Output Data Tab” [244]
• Section 5.6.6.3, “Internal Data” [245]
5.6.7. Actions
The following properties tabs are available for actions.
5.6.7.1. Actions Tab
This tab is shown when a rule model, a rule package, a rule or an actions group is selected in the Rule Explorer.
It allows you to specify the actions available for the given context.
© Bosch Software Innovations GmbH
248/270
Chapter 5. Reference
Figure 5.61. Actions tab
Icon
Description
Initially all elements are collapsed. This button will expand them so all elements are visible.
This only has an effect if there is atleast one element available.
Adds a new action.
Creates a new group. This allows you to organize your actions.
Removes the currently selected action or group.
Table Column
Description
Name
This column shows the name of the action element. The first row shows the name of the
element they are attached to. You can edit cells in this column except for the one in the
first row by double-clicking them.
Type
The type of the action element. You can edit cells in this column by double-clicking them.
Description
The description for this row. You can edit cells in this column by double-clicking them.
5.6.7.2. Action Settings Tab
This tab is shown when an action is selected in the Rule Explorer. It allows you to adjust settings specific to the
selected action type that are common for every invocation of the action.
Figure 5.62. Action Settings tab
Option
Action
Description
Enter the name of the action.
© Bosch Software Innovations GmbH
249/270
Chapter 5. Reference
Option
Description
Type
Enter the type of the action. Code Assist (Ctrl+Space) is available.
SMTP Server
Enter the host of the smtp server that should be used to send an e-mail.
Port
Enter the port of the smtp server.
Use Authentication
Check if you want to authenticate yourself.
User
Enter your username.
Password
Enter your password.
Use secure connection (SSL)
Check if you want your e-mails to be sent encrypted (via SSL).
5.6.7.3. Output message Action Tabs
This tab is shown when an "Output message" action is selected. Here you can specify where the output of the action should be written to.
Figure 5.63. Output message Action tab
Option
Description
Action
Enter the name of the action.
Type
Enter the type of the action. Code Assist (Ctrl+Space) is available.
Filename
When you select this option you must specify the filename to which the output should be
written to here.
Overwrite existing
File
Check this option if you want every output to overwrite the existing file. When this option
is not checked the output is appeneded.
Console
When you select this option the output is written to the console instead of a file.
The corresponding Fire Action tab is shown when an invocation of the action is selected in the rule editor. You can
specify the output text here.
© Bosch Software Innovations GmbH
250/270
Chapter 5. Reference
Figure 5.64. Fire Output message Action tab
Option
Description
Fire Action
Enter the name of the action that you want to fire. Code Assist (Ctrl+Space) is available.
Output expression
Enter the expression you want to output.
5.6.7.4. Log message Action Tab
This tab is shown when a "Log message" action is selected in the Rule Explorer or in the data ruler of the rule editor. In it you can specify which category the log messages belong to. Also
Figure 5.65. Log message Action tab
Option
Description
Action
Enter the name of the action.
Type
Enter the type of the action. Code Assist (Ctrl+Space) is available.
Category
Enter the category to which you want to log here.
Log rule name and
rule element ID
Check if you want information on the path to and name of the executed rule and the rule
element ID to be added in front of the log message.
The corresponding Fire Action tab is shown when an invocation of the action is selected in the rule editor. You can
specify the log priority and message here.
© Bosch Software Innovations GmbH
251/270
Chapter 5. Reference
Figure 5.66. Fire Log message Action tab
Option
Description
Fire Action
Enter the name of the action that you want to fire. Code Assist (Ctrl+Space) is available.
Priority
Select the priority for the log message.
Output expression
Enter the expression you want to log.
5.6.7.5. Send e-mail Action Tabs
This tab is shown when a "Send e-mail" action is selected. Here you can specify what server to use for sending the
e-mails.
Figure 5.67. Send e-mail Action tab
Option
Description
Action
Enter the name of the action.
Type
Enter the type of the action. Code Assist (Ctrl+Space) is available.
SMTP Server
Enter the host of the smtp server that should be used to send an e-mail.
Port
Enter the port of the smtp server.
Use Authentication
Check if you want to authenticate yourself.
User
Enter your username.
Password
Enter your password.
Use secure connection (SSL)
Check if you want your e-mails to be sent encrypted (via SSL).
The corresponding Fire Action tab is shown when an invocation of the action is selected in the rule editor. You can
configure the contents of the e-mail here.
© Bosch Software Innovations GmbH
252/270
Chapter 5. Reference
Figure 5.68. Fire Send e-mail Action tab
Option
Description
Fire Action
Enter the name of the action that you want to fire. Code Assist (Ctrl+Space) is available.
From
Enter the expression describing the from address of the e-mail.
To
Enter the expression describing the to address of the e-mail.
Subject
Enter the expression describing the subject of the e-mail.
Text
Enter the expression describing the text of the e-mail.
5.6.7.6. Write CSV File Action Tabs
This tab is shown when a "Write CSV File" action is selected. Here you can configure the layout of the CSV file
that will be written.
Figure 5.69. Write CSV File Action tab
Option
Description
Action
Enter the name of the action.
Type
Enter the type of the action. Code Assist (Ctrl+Space) is available.
File name
Enter the file name of the CSV file that will be written.
Overwrite existing
file
Check this option if you want every output to overwrite the existing file. When this option
is not checked the output is appended.
Field separator
Enter the separator that should be used between the columns.
© Bosch Software Innovations GmbH
253/270
Chapter 5. Reference
Option
Description
Quote character
Enter the character that will act as a quotation start/end identifier.
Line Separator
Choose the line separator. You can choose between CRLF which is the Windows line
separator, LF the Unix line separator and CR the Mac line separator.
Character set
Choose the character set that you want the file to be written with.
Write column
names
Check this if you want the column names to be written as the first row in the CSV file.
Table Column
Column name
Description
This column shows the column names. You can edit cells in this column by double-clicking them.
Icon
Description
Adds another column.
Removes the currently selected column.
Moves the currently selected column up one position within the list.
Moves the currently selected column down one position within the list.
The corresponding Fire Action tab is shown when an invocation of the action is selected in the rule editor. Here
you can define the values that will be written to each column.
Figure 5.70. Fire Write CSV File Action tab
Option
Description
Fire Action
Enter the name of the action that you want to fire. Code Assist (Ctrl+Space) is available.
Column name
This column shows the column names. Cells in the column are read-only. If you want to
change the column name please do it on the Action Settings tab.
Expression
This is the expression you are assigning to the specific column. You can edit cells in this
column by double-clicking them.
5.6.7.7. Read CSV File Action Tabs
This action type is only available when the Visual Rules 3.x compatibility functions/actions have
been activated for a rule model. See the Extensions tab of the rule model for this setting.
© Bosch Software Innovations GmbH
254/270
Chapter 5. Reference
The "Read CSV file" action does not have any settings. All settings are done on the Fire Action tab, which is
shown when an invocation of the action is selected in the rule editor.
Figure 5.71. Fire Read CSV File Action tab
Option
Description
Fire Action
Enter the name of the action that you want to fire. Code Assist (Ctrl+Space) is available.
Data source ID
Enter an ID representing the CSV file. This ID is used when calling the next() function in
order to repeatedly read the next record (line) from the file.
File name
Enter the file name of the CSV file that will be read. Click on Choose... to open a file
browser.
Field separator
Select the separator that is used between the columns. Click on Preview... to open a dialog showing the CSV file contents. This lets you check if the current settings for the separator and quote character work properly.
Quote character
Enter the character that acts as a quotation start/end identifier.
Character set
Select the character set of the file.
Use header line as
column names
Check this if the first line in the CSV file contains the column names.
Target object
Specify a data element that will hold each record (line) of the CSV file. This object must
have attributes whose names match with the column names. It is set to the next record
every time the next() function is called with the specified data source id (see above).
Click on Create... to automatically create both a data type and a data element to hold
each record. If the CSV file contains column names in the first line, these will be used as
the names for the attributes of the created data type.
Related References.
• Section 5.6.4.1, “Extensions tab” [241]
5.6.8. Data Types
The following sections describe the properties tabs available for the different kinds of data types like structures,
type aliases, enumerations and exceptions.
© Bosch Software Innovations GmbH
255/270
Chapter 5. Reference
5.6.8.1. Data Types Tab
This tab is shown when an element that contains data types like a rule model, a rule package or a rule is selected
in the Rule Explorer. You can edit the data types here.
Note that this tab has four sub tabs for Structures, Enumerations, Exceptions and Type Aliases.
Figure 5.72. Data Types tab
Icon
Description
Initially all elements are collapsed. This button will expand them so that all elements are
visible.
Adds a new data type. The data type created depends on the sub tab (at the bottom) you
are in.
Creates a new group. This allows you to organize your data types.
Removes the currently selected data type or group.
Inserts another element to a collection, list or set. This is only available when the selected
attribute of a data type is a collection, list or set.
Table Column
Description
Name
This column shows the name of the data types. The first row shows the name of the element containing the data types. The subsequent rows show child elements that also
contain data types but are not data types themselves. After that direct children of this element that are actually data types are shown. You can edit cells in this column by double-clicking them only if they are data types or groups - not elements that can also contain something else than data types like rule models, rule packages or rules.
Type
The type of the parameter. You can edit cells in this column by double-clicking them.
Multiple
This column shows whether the data element holds a single or multiple values of this
type. You can edit cells in this column by double-clicking them.
Implementation
In this column you can specify the collection implementation to be used for a data element that will have multiple entries. You can edit a cell by double-clicking on it. The behavior of the collection depends on the implementation type you select, which can be either of the following three types available: List, Set, or Map (refer to Section 3.14.7, “Collection” [76] for details on collection behaviors). If selecting an implementation the Multiple column value will automatically be set to 'Yes' if it hasn't been already. Note: There is
a fourth implementation called Collection, that can only appear after importing e.g. a JavaBean. It can neither be set nor edited.
© Bosch Software Innovations GmbH
256/270
Chapter 5. Reference
Table Column
Description
Default Value
The default value which will be used when you access the data element when no other
value has been set. You can edit cells in this column by double-clicking them. Code Assist (Ctrl+Space) is available.
Description
The description for this row. You can edit cells in this column by double-clicking them.
5.6.8.2. Type Alias Tab
This tab is shown when an alias is selected in the Rule Explorer.
Figure 5.73. Type Alias tab
Option
Description
Name
Enter the name of the alias.
Primitive Type
Enter the name of the primitive type the alias is for.
5.6.8.3. Attributes Tab
This tab is shown when an enumeration, exception or structure type is selected in the Rule Explorer.
Figure 5.74. Attributes tab
Icon
Description
Initially all elements are collapsed. This button will expand them so that all elements are
visible.
This only has an effect if there is at least one element available.
© Bosch Software Innovations GmbH
257/270
Chapter 5. Reference
Icon
Description
Adds another attribute.
Creates a new group. This allows you to organize your attributes.
Inserts another element to an attribute that is a collection, list or set. This is only available
when the currently selected attribute is a collection, list or set.
Removes the currently selected attribute or group.
Moves the currently selected attribute up one position within the list.
Moves the currently selected attribute down one position within the list.
Table Column
Description
Attribute
This column shows the attributes of the selected datatype. You can edit cells in this column by double-clicking them if the cell contains an attribute of the selected element. If
one of the attributes is another complex datatype like a structure, exception or enumeration and you want to edit the attributes of that datatype please do so in the respective
properties tab of that datatype.
Default Value
The default value which will be used when you access the data element when no other
value has been set. You can edit cells in this column by double-clicking them. Code Assist (Ctrl+Space) is available.
Type
The type of the data element. You can edit cells in this column by double-clicking them.
Multiple
This column shows whether the data element holds a single or multiple values of this
type. You can edit cells in this column by double-clicking them.
Implementation
In this column you can specify the collection implementation to be used for a data element that will have multiple entries. You can edit a cell by double-clicking on it. The behavior of the collection depends on the implementation type you select, which can be either of the following three types available: List, Set, or Map (refer to Section 3.14.7, “Collection” [76] for details on collection behaviors). If selecting an implementation the Multiple column value will automatically be set to 'Yes' if it hasn't been already. Note: There is
a fourth implementation called Collection, that can only appear after importing e.g. a JavaBean. It can neither be set nor edited.
Description
The description for this row. You can edit cells in this column by double-clicking them.
5.6.8.4. Constant Data Tab
This tab is shown when an element that has constant data elements like an enumeration, exception or structure
type is selected in the Rule Explorer.
© Bosch Software Innovations GmbH
258/270
Chapter 5. Reference
Figure 5.75. Constant Data tab
Icon
Description
Initially all elements are collapsed. This button will expand them so that all constant elements are visible.
This only has an effect if there is at least one element available.
Adds another constant data element.
Creates a new group. This allows you to organize your constant data elements.
Inserts another element to an constant data element that is a collection, list or set. This
is only available when the currently selected constant data element is a collection, list or
set.
Removes the currently selected attribute or group.
Moves the currently selected constant data element up one position within the list.
Moves the currently selected constant data element down one position within the list.
Table Column
Description
Name
This column shows the constant data elements available on the selected element. You
can edit cells in this column by double-clicking them.
Type
The type of the data element. You can edit cells in this column by double-clicking them.
Multiple
This column shows whether the data element holds a single or multiple values of this
type. You can edit cells in this column by double-clicking them.
Implementation
In this column you can specify the collection implementation to be used for a data element that will have multiple entries. You can edit a cell by double-clicking on it. The behavior of the collection depends on the implementation type you select, which can be either of the following three types available: List, Set, or Map (refer to Section 3.14.7, “Collection” [76] for details on collection behaviors). If selecting an implementation the Multiple column value will automatically be set to 'Yes' if it hasn't been already. Note: There is
a fourth implementation called Collection, that can only appear after importing e.g. a JavaBean. It can neither be set nor edited.
Default Value
The default value which will be used when you access the data element when no other
value has been set. You can edit cells in this column by double-clicking them. Code Assist (Ctrl+Space) is available.
Description
The description for this row. You can edit cells in this column by double-clicking them.
© Bosch Software Innovations GmbH
259/270
Chapter 5. Reference
5.6.8.5. Literals Tab
This tab is shown when an enumeration is selected in the Rule Explorer.
Figure 5.76. Literals tab
Icon
Description
Adds another literal.
Removes the currently selected literal.
Moves the currently selected literal up one position within the list.
Moves the currently selected literal down one position within the list.
Table Column
Description
Name
This column shows the constant data elements available on the selected element. You
can edit cells in this column by double-clicking them.
Type
The type of the data element. This column is readonly as literals are always the type of
the literal and the type of attributes has to be changed in the attributes tab.
Default Value
When your enumeration has attributes you can specify default values for an attribute for
the given literal here. You can edit cells in this column by double-clicking them.
Description
The description for this row. You can edit cells in this column by double-clicking them.
5.6.8.6. Super Types Tab
This tab is shown when a structure or an exception is selected.
© Bosch Software Innovations GmbH
260/270
Chapter 5. Reference
Figure 5.77. Super Types tab
Icon
Description
Adds another super type.
Removes the selected super type. Technical note: For imported data types this is only
possible if the selected super type is an interface.
5.6.9. Meta Data
Meta data can be used to extend Visual Rules domain-specifically. For more Information see the Java Integration Guide.
5.6.9.1. Meta Data Tab
This tab is shown when input/output data, constant data, data structures, attributes, rule models, rule packages or
rules are selected in the rule editor. This tab is used to view and edit meta data.
Figure 5.78. Meta Data tab
© Bosch Software Innovations GmbH
261/270
Chapter 5. Reference
Icon
Description
Adds more meta data.
Removes the corresponding meta data.
5.7. Preferences
The following sections describe the Visual Rules specific pages available in the Preferences dialog in the VisualRules section. The Preferences dialog can be opened with the menu Window > Preferences....
Figure 5.79. Preferences dialog
5.7.1. Expression Formatting Preferences
The expression formatting page contains the settings for the formatting of expressions in Visual Rules.
© Bosch Software Innovations GmbH
262/270
Chapter 5. Reference
Option
Maximum number
of characters before line break
Description
This is the maximum number of characters in an expression, after which automatically a
line break is inserted (if possible). To activate the automatic line break, you need to press
Ctrl-Shift-F.
5.7.2. Flow Rule Editor Preferences
This preferences page contains settings for the flow rule editor.
Figure 5.80. Flow Rule Editor preferences
Option
Maximum element
width
Description
This is the maximum width in pixels for all rule elements. If descriptions or contents are
longer than this, they will be wrapped.
© Bosch Software Innovations GmbH
263/270
Chapter 5. Reference
Option
Description
Maximum element
height
This is the maximum height in pixels for all rule elements. If descriptions or contents are
longer than this, they will not be fully displayed. An ellipsis (...) is displayed to indicate
this.
Text padding
This is the amount of padding (in pixels) done around descriptions and contents.
Show transparent
elements during
drag&drop
Enable this to display a transparent image of the rule element(s) being moved during
drag&drop. You may want to disable this if it slows down your computer considerably.
Open properties in
dialog (instead of
in Properties View)
When enabled, double-clicking a rule element in the flow rule editor will open the properties in a dialog. This is useful when working in a maximized flow rule editor. Otherwise the
properties will be displayed in the usual Properties view.
Related Concepts.
• Section 3.6, “Flow Rule Editor” [45]
5.7.3. Auto Creation Preferences
This preferences page contains settings for the auto generation of rule elements.
Figure 5.81. Auto Creation preferences
Option
Description
All
Enable this to let Visual Rules automatically create any elements you are referring to that
do not exist yet.
None
Enable this so Visual Rules will never automatically create any elements.
Custom
Enable this so you can specifically choose what elements should be auto created.
If you select Custom you can make the decision on the auto creation policy based on the element that would be
auto created.
Option
Description
Data Elements
Select the policy for auto creation of data elements.
Types
Select the policy for auto creation of types.
© Bosch Software Innovations GmbH
264/270
Chapter 5. Reference
Option
Description
Actions
Select the policy for auto creation of actions.
Rules
Select the policy for auto creation of rules.
Services
Select the policy for auto creation of services.
Option
Description
Prompt
Enable this so Visual Rules will ask you every time when an element of the specific element type should be created.
Always
Enable this to let Visual Rules automatically create any elements of this type you are referring to that do not exist yet.
Never
Enable this so Visual Rules will never automatically create any elements of this specific
type.
Related Concepts.
• Section 3.21, “Auto Creation” [82]
Related Tasks.
• Section 4.10.3, “Working with Auto Creation” [159]
Related References.
• Section 5.4.3, “Auto Creation Dialog” [218]
5.7.4. Syntax Highlighting Preferences
This preferences page contains settings for the colors used for syntax highlighting in expression editors.
Figure 5.82. Syntax Highlighting preferences
Option
Keywords
Description
Choose the color used for displaying keywords in an expression editor.
© Bosch Software Innovations GmbH
265/270
Chapter 5. Reference
Option
Description
Variables
Choose the color used for displaying variables in an expression editor.
Constants
Choose the color used for displaying constants in an expression editor.
Attributes
Choose the color used for displaying attributes in an expression editor.
Actions
Choose the color used for displaying actions in an expression editor.
Parameters
Choose the color used for displaying parameters in an expression editor.
Date/Time
Choose the color used for displaying date/time in an expression editor.
Functions
Choose the color used for displaying functions in an expression editor.
Strings
Choose the color used for displaying strings in an expression editor.
Numbers
Choose the color used for displaying numbers in an expression editor.
5.7.5. Colors and Fonts Preferences
This preference page is used to configure many of the colors and font settings for the user interface. The tree contains a Visual Rules section with the fonts used in the rule editor and the properties tabs.
Font settings can be changed either by selecting the font from the list and clicking Use System Font to choose the
default system font or by clicking Change to open up a font selection dialog. Reset can be used to return to the
default value.
Figure 5.83. Colors and Fonts preferences
5.7.6. Test execution
This preference page contains settings for the execution of tests.
© Bosch Software Innovations GmbH
266/270
Chapter 5. Reference
Figure 5.84. Test execution preferences
Option
Description
Do not ask for confirmation before
saving required resources.
Toggles a dialog which appears on test execution, showing the resources that need to be
saved in order to proceed.
Do not ask for confirmation before
generating rule
code.
This setting toggles if Visual Rules should show all resources that are required to be generated for the test execution.
When one of the mentioned popup dialogs appears on execution, the corresponding setting can be
directly set on the dialog.
5.7.7. Validation
The validation page contains the settings for the automatic validation of rule projects in Visual Rules.
© Bosch Software Innovations GmbH
267/270
Chapter 5. Reference
Figure 5.85. Validation preferences
Option
Validate Rule
Projects automatically during build
Description
If activated, rule projects are automatically validated during build.
You can manually start the validation of selected rule projects with the button
in the toolbar.
5.7.8. Notes Preferences
This preference page is used to define different categories of notes with different settings, e.g. whether or not for a
note a corresponding task is automatically created. Here some predefined categories are provided by default.
© Bosch Software Innovations GmbH
268/270
Chapter 5. Reference
Figure 5.86. Notes preferences
If the text of a note starts with the name of a defined category, then the note is automatically considered to be of that category and the related settings are applied.
5.8. Hotkeys
The following hotkeys can be used in the rule editor.
© Bosch Software Innovations GmbH
269/270
Chapter 5. Reference
Table 5.1. Rule Editor hotkeys
Key
Function
Cursor keys
Navigate between rule elements
Alt+Cursor down
Navigate into and down within a rule element
Space
Expand/collapse rule elements
+
Expand rule element
-
Collapse rule element
Del
Delete the branch rooted at the currently selected element
Alt+Del
Delete the currently selected element only
Ctrl+S
Save the rule
Ctrl+Z
Undo last change
Ctrl+Y
Redo last change undone with Ctrl+Z
A
Create Assignment Rule Element
R
Create Call Flow Rule Rule Element
S
Create Call Service Rule Element
D
Create Decide Rule Element
B
Create Describe Branch Rule Element
E
Create Done & Return Rule Element
N
Create End Repeat Rule Element
F
Create Fire Action Rule Element
H
Create Handle Exception Rule Element
Z
Create Note
T
Create Repeat Rule Element
X
Create Return Exception Rule Element
Ctrl+Up
Decrease max height of rule elements
Ctrl+Left
Decrease max width of rule elements
Ctrl+L
Go to Rule Element
Ctrl+Down
Increase max height of rule elements
Ctrl+Right
Increase max width of rule elements
Ctrl+Shift+Home
Reset size
Ctrl+Alt+R
Brings up the Open Rule Dialog
F2
Rename selected element
© Bosch Software Innovations GmbH
270/270