1
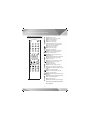
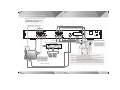
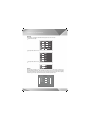
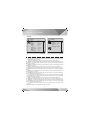
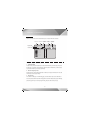
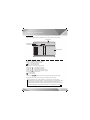
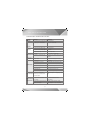
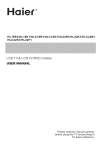
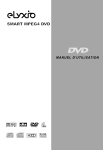
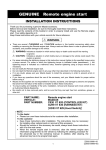
CONTENTS
POINTS OF ATTENTION................................1-3
OPERATION INTERFACE...............................4-7
BASIC PLAYBACK.........................................8-17
SYSTEM SETUP.............................................18-20
TROUBLE SHOOTING....................................21
SPECIFICATIONS..........................................22
ADDITIONAL INFORMATION.........................23
Thank you for choosing this AIRIS DVD-player. We strongly recommend that you carefully study the
instruction manual before attempting to operate the unit and keep it well for reference.
As the best source of signals, DVD player is much better than any former audio-video product at any
aspect. This latest digital technology condenses high quality video & audio on a disc, which is the
same size of a normal CD disc in size, providing clear picture and 5.1 channel Dolby digital decoder,
which can provide you a feeling of enjoying more distinct and stirring family theatre.
Points of Attention
WARNING:
To reduce the risk of fire or electric shock, do not expose this appliance to rain or moisture.
The apparatus shall not be exposed to dripping or splashing and that no objects filled with liquids,
such as vases, shall be placed on the apparatus.
CLASSILASER PRODUCT
The lightning flash with arrowhead symbol, within an equilateral triangle, is
intended to alert the user to the presence of uninsulated “dangerous voltage”
within the product’s enclosure that may be of sufficient magnitude to constitute
a risk of electric shock to persons.
The exclamation point within an equilateral triangle is intended to alert the user
to the presence of important operating and maintenance (servicing) instructions
in the literature accompanying the appliance.
CAUTION:
CLASSI:
Double insulation
This is class II apparatus
Please disconnect the unit under these conditions:
Do not overload wall outlets, extension cords or convenience receptacles beyond their capacity,
since this can result in fire or electric shock.
Do not use suitable outlet, it might be dangerous.
Check the connection regularly. If any rupture or failure in insulation, call for a maintenance man
to replace them.
To ensure reliable operation, and to protect it from overheating, the unit must be put in somewhere
well ventilated.
Do not use power-line operated sets near water •for example, near a bathtub, washbowl, kitchen
sink, or laundry tub, in a wet basement, or near a swimming pool, etc.
Do not place the unit on an unstable object. The set may fall, causing serious injury to a child or
an adult, and serious damage to the unit.
Never let any liquid spattered on the unit. It might cause electric shock or fire hazard.
Never place the unit near or over such objects: for example, radiator, heat register, stove or other
heat sources. (including amplifier)
Unplug the unit from the wall outlet before cleaning or polishing it. Do not use liquid cleaners or
aerosol cleaners. Use a cloth lightly dampened with water for cleaning the exterior of the unit.
Never place heavy object on the unit.
25
Points of Attention
Important Safety Instructions:
Read these instructions.
Keep these instructions.
Heed all warning.
Follow all instructions.
Do not use this apparatus near water.
Clean only with dry cloth.
Do not block any ventilation openings, Install in accordance with the manufacturer’s instructions.
Do not install near any heat sources such as radiators, heat registers, stoves, or other apparatus
(including amplifiers) that produce heat.
Do not defeat the safety purpose of the polarized or grounding-type plug. A polarized plug has
two blades with one wider than the other, A grounding type plug has two blades and a third grounding
prong. The wide blade or the third prong are provided for your safety. If the provided plug does not
fit into your outlet, consult an electrician for replacement of the obsolete outlet.
Protect the power cord from being walked on or pinched particularly at plugs, convenience
receptacles, and the point where they exit from the apparatus.
Only use attachments/accessories specified by the manufacturer.
Use only with the cart, stand, tripod, bracket, or table specified by the manufacturer, or sold with
the apparatus. When a cart is used, use caution when moving the cart/apparatus combination to
avoid injury from tip-over.
Unplug this apparatus during lightning storms or when unused for long periods of time.
Refer all servicing to qualified service personnel. Servicing is required when the apparatus has
been damaged in any way, such as power-supply cord or plug is damaged, liquid has been spilled
or objects have fallen into the apparatus, the apparatus has been exposed to rain or moisture, does
not operate normally, or has been dropped.
Read through this instruction manual before installation and use.
To disconnect the power cord, hold the plug instead of pulling on the cord.
Switch off the main power when the unit is not in use. (Disconnect the power plug from the
power outlet when you do not intend to use the unit for a prolonged period of time.) Before moving
the unit, remove the disc from the unit`s tray first.
Do not open the cover or touch any of the components inside the unit.
Do not operate or install the unit under direct sunlight or near objects that radiate heat. This
may lead to overheating of the unit.
Do not operate or install the unit in moist or humid conditions. This may affect the pick-up of
the unit.
IInstall the unit on a flat surface with good air circulation. Please ensure the ventilation holes
are not covered otherwise the unit will overheat and malfunction.
Wipe the panel and case with soft dry cloth only. Do not apply any kind of thinner, alcohol or
sprays when cleaning the unit.
26
Points of Attention
REMOTE CONTROL OPERATION:
1.remove battery cover
2.insert batteries
3.close the battery cover
CARE OF REMOTE CONTROL:
Aim remote control at remote sensor of DVD.
Do not drop the unit from a high position or cause high imct
Do not place the remote control in hot or moist environments
Do not splash water or any other liquid on remote control
Do not pull disassemble the remote control
Point remote control directly to the remote sensor
- 30
+30
within 7 meters
Distance:
the remote control works best within 7 metres from the DVD
player
Do not expose the remote control sensor directly to a heat
source or it will malfunction
is a trademark of DVD Format/Logo Licensing Corporation.
27
OPERATION INTERFACE
FRONT PANEL:
9
Skip backward
Skip forward
9.
Play/pause
REAR PANEL:
1 2 3
4 5 6 7
1.
2.
3.
4.
5.
6.
7.
8.
8 9 10
14
15
11 12 13
Component Video (Y) output
Component Video (PbCb) output
Component Video (PrCr) output
Composite Video Output
Right Audio Output
Left Audio Output
Digital Coaxial Output
(WHITE)
9.
10.
11.
12.
13.
14.
15. SCART
28
(ORANGE)
(GREEN)
(RED)
(BLUE)
(PURPLE)
OPERATION INTERFACE
REMOTE CONTROL:
ANGLE
RANDOM
STEP
ZOOM
VIDEO
PBC
ENTER
TITLE
REPEAT
A-B
SETUP
RETURN
P/N
SUBTITLE
MENU
LANGUAGE
STOP
DISPLAY
SEARCH
SLOW
MUTE
CHANNEL
Standby:power on or off.
Angle: select different viewing angles.
Random: random playback.
Step: play in a single frame.
ZOOM: zoom in the picture.
Video: select different video mode output
(this kind of unit do not hold this function).
PBC: open/close PBC playback.
Direction: move the cursor.
Enter: confirm the selection.
Title: enter to title playback.
Play/Pause: select pause or play the disc.
Volume: “-“decrease current volume “+”
increase the current volume.
PREV/NEXT: select the previous or next
chapter playback.
Repeat: repeat the playback of the current disc.
A-B: repeat the playback of the section.
Setup: setup menu.
Return: return to the PBC menu of thedisc.
Open/close: open or close the tray.
0-9\10+: number keys.
P/N: select PAL or NTSC.
Subtitle: select the caption of the disc.
Menu: press it to the disc menu playback.
Language: select different language or audio
output.
Stop: stop the current playback.
Display: show the information (time, title,
chapter) of the disc playing.
REW/FF: playback the disc fast forward or fast
backward.
Search: select expected playback-place directly.
Slow : press to slowly forward.
Mute: turn off the sound.
Channel: select different audio channel output.
Please refer to the detailed information on
“Basic playback”.
29
OPERATION INTERFACE
Illustration of system connection is only for reference.
NOTICE:Before connecting the cables,
please turn off the unit power
WHITE
Component Video Connecting Wire
ORANGE
GREEN
Green
Blue
Red
PURPLE
Red
Composite Video
Connecting Wire
Green Blue
Coaxial connection cable
BLUE
RED
Digital decoder amplifier
Stereo amplifier
If connected to TV or Stereo
amplifier , please connect the left
& right channel audio output on
the unit to left & right audio input
on the TV or stereo amplifier
correspondingly and separately.
If connected to Digital Decode
amplifier, please connect Coaxial
output on the unit to Coaxial input on
the amplifier correspondingly.
This unit has 4 Video output ways: Composite video output, SCART OUTPUT, YCbCr Video
output,Progressive Scan YPbPr Video output.
*Composite Video output: Connect Composite Video output (yellow) to Composite Video input on the
TV/monitor with a AV connecting wire (yellow jack).
*Component Video output: Connect Component Video output (Cb, Cr, Y) on the unit to Component
Video input on the TV/Monitor with component connecting wires.
*Progressive Scan Component Video output: Connect Component Video output (Pb, Pr, Y) on the unit
to Component Video input on the TV/Monitor with component connecting wires.
*SCART Output: Connect the special scart cable to scart output of the unit and scart input of TV/monitor.
SCART Connecting
30
31
BASIC PLAYBACK
Play CD disc
1. Place the CD disc in.
2.Show the contents of the disc play auto matically.
3.Choose the number key to play directly.
For example: when you want the No.8 track, you can just press the
number key "8".
when you want the No.12 track, you can just press the number key "10+", "2".
Play VCD or SVCD disc
1.place the disc in.
2.after reading the disc, the PBC menu will display on the TV screen.
3.Choose the chapter you want by number keys directly.
NOTICE: PBC indicates the disc hold the PBC signal which is a kind of
playing signal recorded on the VCD/SVCD disc. In the course of playing, recorded
information will show as the menu on the TV screen, which will be convenient to
choose the contents. But this function need disc support.
Play DVD disc
1.place DVD in.
2.read the DVD and play disc automatically.
3.Choose the desired contents you want by moving cursor.
32
BASIC PLAYBACK
Play MP3 disc
1.Place the MP3 disc in.
2.After the unit reading the contents of the MP3 disc, the TV
screen will show the menu as follows:
00:00 00:00
001/008
folder 01
folder 01
folder 01
folder 01
folder 01
folder 01
(1)
1.Choose the desired file you want by direction cursor, press “enter” to
confirm.
2.Then choose the desired MP3 track you want by moving cursor , press
"enter"to confirm, or you can choose it directly by number keys.
00:00 00:00
001/016
folder 01
.........
MP3
MP3
MP3
MP3
001......
002......
003......
004......
(2)
Play Kodak picture CD disc
1.Place Kodak picture CD in.
2.After reading the content , it will play automatically.
Play JPEG file
1.Place JPEG in.
2.After unit reading the contents , it will show the list of files on the TV
screen.
3.Choose the JPEG file you want by moving cursor, press “enter” to play,
or you can choose by the number keys.
33
BASIC PLAYBACK
Play MPEG4 disc
What is MPEG-4?
MPEG-4 refers to a kind of signal which authorized due to MPEG-4 compressed standard,
it can magnify the low bit rate to high quality image or recover the low bit rate, then decrease
the memory.
MPEG-4 discs making procedure:
Firstly, the operating computer should hold following function:
1.hold WINDOWS 98/2000/XP system;
2.128M memory and great hard disc memory;
3.with CD-ROM or DVD-ROM recoder;
4.can use internet and set up MPEG-4 download and recording software.
Once you enter into the MPEG-4 website, you search the desired MPEG-4 file, and download
the file to your discs, the download time should be subject to the speed of transmitting.
After download the file, put in a blank CD-R/RW OR DVD+R/RW, DVD+R/RW disc, then
download the MPEG-4 file and complete the whole procedure. If downloaded MPEG-4 file
hold subtitle file, please note that please make the same file name with recording name,
the suffixal name of MPEG-4 is AVI. The suffixal name should be same with the subtitle
format, for example:
MPEG-4
tianxiawuzei
tianxiawuzei
The unit can support subtitle format: SRT, SMI, ASS, SSA, TXT, SUB, so please note the
subtitle format name before you recording the MPEG-4 file, if the name is different from
the above format, the unit could not support.
34
BASIC PLAYBACK
[STANDBY]
Press this key in working status to turn the unit into standby status, or to wakeup the unit from standby
status. When in standby status, pressing OPEN/CLOSE, PLAY/PAUSE buttons on the front panel also
can turn on the unit.
[OPEN/CLOSE]
Press OPEN/CLOSE to open the tray, and then place the disc on it ,press this button again to close the
tray. When finishing loading the disc , the TV screen will display the disc type and the disc will be
automatically played .(MP3 and JPEG disc can not be automatically played)
[RETURN]
Press RETURN to return to the menu when playing the DVD disc. Press RETURN to return to the menu
and re-enter the menu-playing mode at the same time when playing S-VCD,VCD2.0 disc
[MENU]
In play DVD mode, press MENU key the first time back to submenu and press again back to the main
menu.
Displaying super VCD,VCD2.0 can playing menu. The disc can enter PBC menu automatically when
starting playback.
And then press number key selecting your desired song, if you want to cancel disc playback, please press
MENU key. TV screen display will show "PBC off", then press number keys to select desired song.
[PAUSE/STEP]
In play mode, press this key to pause; Every press next will move the picture one by one. Press "PLAY"
again to resume normal play.
[STOP]
Press STOP one time, memorizing the stopped position. When the unit continues playing. It will
play from the stopped position. Press STOP the second time, the unit stops play and gives up the
memorized position.
35
BASIC PLAYBACK
[PREV/NEXT]
When play DVD, VCD, CD, MP3, Press skipbackward to play last chapter.
To play DVD, press skipbackward to last chapter or title.press skipforward to next chapter or title.
[REW/FF]
When play DVD, SVCD, VCD, CD, MP3, press this key to play forward or backward speedily. The class
as bellows:
[TITLE]
Press this button to return to the first title playback.
[SUBTITLE]
when playing DVD disc with Multi-subtitle, press this key continuously to see the kinds of subtitle, you
can select your desired subtitle, detailed information will be introduced later (Page D4).
NOTE: this function need the support of discs.
[ZOOM]
Pressing this button, you can appreciate the zoom picture. Just only in the state of zoom-in, you can move
the picture by direction key.
[VOL]
Volume: Press this key to adjust the output volume.
Press “+” and the screen shows 0~20, press “–”and the screen shows 20~0.
[A-B]
A-B button can help you repeat playing any passage of the DVD, SVCD, VCD, CD disc. Operations
as following:
Press A-B button at the beginning of the desired passage, showing “repeat A-“ on TV screen
(memorizing the starting point A).
Press A-B button at the end of the desired passage, showing “repeat A-B” on TV screen (memorizing
the ending point B). The player will repeat your selected passage A-B.
Press A-B button the third times to clear the setting and return to normal status.
36
BASIC PLAYBACK
[PLAY/ENTER]
press to play or confirm all kinds operation and selection.
[P/N]
press this key can select PAL or NTSC mode.
[SLOW]
when playing VCD, SVCD, DVD, CD disc, press “SLOW”continuously to play forward with different speed.
[MUTE]
Press “ MUTE”to close the sound output, press it again to recover the sound.
[ANGLE]
If the DVD disc has multi-angle, you can switch observation angle. Press the angle mark to change as
follows when playing multi-angle.
1/3
Angle1/3
2/3
3/3
Angle2/3
Angle3/3
[REPEAT]
Press this key to repeat some title, some chapter ,some track or the full disc. press repeat key when
playing back DVD, the TV screen will show as follows: chapter Repeat--Title Repeat--- Repeat ALL off.
When playing back cd, VCD1.1 and VCD, VCD 2.0 disc in state of PBC off, the TV screen will show as
follows: Track Repeat--Repeat ALL--Repeat off.
37
BASIC PLAYBACK
[DISPLAY]
Press DISPLAY to display the information referring to the disc on the TV screen.
playback DVD disc state
play super VCD,VCD2.0 in the state of closeing PBC
play super VCD,VCD2.0 in the state of opening PBC
[VIDEO]
Press this key repeatedly to convert among Interleaving Scan chromatism YCbCr, Progressive Scan
chromatism YPbPr and SCART . When outputting in Progressive Scan mode, no Interleaving Scan signals
output; when outputting in Interleaving Scan mode, no Progressive Scan signals output. When outputting
in Interleaving Scan mode, compound video frequency terminal output all the time.
Video output*
TV screen display*
Interleaving
chromatism output
YCbCr
Progressing
chromatism output
YPbPr
Progressing
chromatism output
SCART
38
BASIC PLAYBACK
[SEARCH]
MENU
Title
Chapter
Audio
Subtitle
Angle
Title Time
Chapter Time
Repeat
Time Display
Bit rate
MENU
01/20
01/01
AC-3 5.1CH
CHINESE
1/4
0•06•58
0•06•58
OFF
Elapsed
VCD
Track
Disc Time
Track Time
Repeat
Time Display
01/16
1•16•28
0•03•58
OFF
Total Elapsed
SVCD
Bit rate
28 III Title Elapsed 0•03•28
(picture 1)
28 III Total Elapsed 0•03•28
(picture 2)
On playing DVD disc, press the [search] key, the unit will show search menu on TV screen (picture1)
Press direction key to choose the desired item, and press the select key to get into searching state.
The detailed introduction is as follows:
“Title”: in title searching state, press the number key to choose the desired title directly.
“Chapter”: in chapter searching state, press the number key to choose the desired chapter directly.
“Audio”: in sound selecting state, press the number key to choose the desired sound and press the
select key to confirm it.
“Subtitle”: in subtitle selecting state, press the number key to choose the desired subtitle and press
the select key to confirm it.
“Angle”: in angle searching state, press the number key to choose the desired angle directly.
“Title Time”: in title time searching state, press the number key to choose the desired time directly.
“Chapter Time”: in chapter time searching state, press the number key to choose the desired time
directly.
“Repeat”: in repeat selecting state, press the number key to choose the desired repeat state and
press the select key to confirm it.
“Time Display”: in time display selecting state, press the number key to choose the desired display
state and press the select key to confirm it.
On playing SVCD, VCD discs, press the search key and the screen will show search menu (picture2)
Press the direction key to choose the desired item, and press the select key to get into searching state.
The detailed introduction is as follows:
“Track”: in track searching state, press the number key to choose the desired track directly.
“Disc Time”: in disc time searching state, press the number key to choose the desired time directly.
“Track Time”: in track time searching state, press the number key to choose the desired time directly.
“Time Display”: in time display selecting state, press the number key to choose the desired display
state and press the select key to confirm it.
On playing CD disc, press the search key to search and play according to the information on the
TV screen.
Attention: it is ineffective if the input digits exceed the amount limit.
39
BASIC PLAYBACK
Play MP3 disc:
After the unit reads the contents of the MP3 disc, the TV screen will show as follows:
Play time Track time Volume
Working Dynamic
modulation state
frequency
03•18 05•28
Playing track
Tracks of disc
058/158
-------------------------------------
*
Press the program key to select play mode.
1. Folder Play Mode
In folder mode, press the direction key to select the desired folder you want to play, and press
the select key to enter the current catalogue, and then press the direction key to select to play.
Or press the number key to select to play directly.
2. Normal Listing Play mode
Normal play mode, the unit will read all tracks of the disc, and play in the folder turn. Press the
number key to select to play directly.
3. Program Play
In the mode of folder play or normal listing play, press the direction key to select the desired
track, and press bookmark each time will program the track in the listing. After program finishing,
press the program key to enter the program listing, and press the select key to play.
40
BASIC PLAYBACK
Play JPEG disc:
After the unit reading the content of e-album disc, the TV screen display shows as follows:
Working state
00•00 00•00
Playing track
Tracks of disc
058/158
JPEG - - - - - - JPEG - - - - - - JPEG - - - - - - JPEG - - - - - - -
Picture preview
JPEG - - - - - - JPEG - - - - - - -
Distinguishing rate
888 X 1200
Instruction of Function key:
Prog key -> select the switch mode of picture
Stop key -> enter mode of picture preview
key -> skip to the next picture.
key -> skip to the last picture.
Play/enter key -> enter mode of playing picture
Direction key “ “ -> move picture up and down
Direction key “ “ -> move picture left and right
Direction key “ “ -> rotate picture 90 degree in reverse
Direction key “ “ -> rotate picture 90 degree in sequence
Zoom key -> change the zoom mode
“ ” -> zoom in picture
“ ” -> zoom out picture
Direction keys • • • move the center point of the picture when zooming in the picture
When playing JPEG e-album, press prog key continuously to switch as follows:
Enter the picture from top -> enter from bottom -> enter from left -> enter from right ->
Enter from top left -> enter from top right -> enter from bottom left -> enter from bottom right ->
Extend from center towards up and down -> extend from center towards left and right ->
fold from up and down to center -> fold from left and right to center -> extend from up layered
-> extend from left layered -> fold from around to center -> cut-in from the top -> none
41
SYSTEM SETUP
When the unit is working, press the select key to enter setup menu (following picture):
* Please note that the instruction manual only for basic operation, that you can setup the menu
according to the real demand.
General
General setup
Audio
Audio setup
Video
Video setup
Preference
Preference setup
Press the direction key " " to move cursor to the desired setup page, and press the select key
to confirm.
Press the direction key " " " " to move cursor to the desired setup item, and press the select
key to confirm.
Press the direction key " " to return to last setup item.
1.
2.
3.
4.
Note:
Move cursor to the relevant item, the menu showed at the bottom of the screen accordingly.
Some menu setup is related with other set up and status, if it is gray, cannot setup.
The setup can be memorized continue though power off.
When the unit stops playing and opens the tray, it can enter the initial setup page.
General Setup introduction:
General Setup Page
TV Display
PS
Angle Mark
ON
OSD Lang
Eng
Captions
OFF
Screen saver
ON
Normal/PS
Normal/LB
Wide
ON
OFF
English
French
German
Spanish
ON
OFF
ON
OFF
TV Display
A. Normal/PS: When the unit connects with TV set,
wide image is showed on the whole screen, but a part
is cut.
B. Normal/LB: When the unit connects with TV set,
playing wide image, there are black bands showed
on the up and down screen.
C. Wide: Choose this when the unit connects with
wide screen TV set.
Angle Mark:
Select display angle, when playing multi-angle DVD
disc.
OSD Language:
Select operation language.
Captions:
This function is ineffective if no caption record in
the disc. If the caption is closed, press the caption
key on the remote control to open captions function
to select captions language.
Screen Saver:
When the unit is in stop mode, a moving picture will
appear several minutes later if screen saver is set
on. Screen saver will protect the TVscreen.
42
SYSTEM SETUP
DownMix:
In LT/RT or stereo output mode, the center speaker
and rear speaker on this page cannot setup, only
can if in 5.1 channel output mode.
Audio Setup Page:
HDCD
Downmix
Stereo
LT/RT
Stereo
5.1Ch
Front speaker
LRG
Center speaker
SML
Rear speaker
SML
Subwoofer
ON
Large
Small
Large
Small
Large
Small
Off
On
Off
Dynamic
------
Spdif Output
RAW
RAW
PCM
HDCD
1•
2•
OFF
1•
SPDIF output:
(SPDIF/RAW): when the unit and the amplifier are
connected by coaxial and optical cables, please
select this item; when it playbacks disc of Dolby
digital and MPEG, the coaxial or optical output will
output the corresponding digital signal, in this case,
the connected amplifier should have the function
of decoding Dolby digital and MPEG.
(SPDIF/PCM): when the unit is connected with 2
channel digital stereo amplifier, please select this
item; when it playbacks disc of Dolby digital, MPEG,
the coaxial or optical output will output in 2 channel
mode modulated by PCM.
FULL
3/4
1/2
1/4
OFF
Dynamic:
If watching large dynamic scope movie program
at night, select this mode to reduce the volume,
meantime keep the little minutia EQ high level,
thus it can avoid troubling neighbors without
detracting volume quality.
Video Setup Page
Sharpness
Low
High
Medium
Low
Brightness
Contrast
00
00
Brightness
Contrast
Sharpness:
Setup this item to control the sharpness of
image, available range as high – medium – low.
Brightness:
Setup this item to control the brightness of
image, available range from –20 to +20.
Contrast:
Setup this item to control the contrast of
image, available range from –16 to +16.
0
0
43
SYSTEM SETUP
Preference Setup Page:
Tv Type
Pal
Pal
Auto
Ntsc
Audio
Eng
English
French
German
Spanish
Others
Disc Menu
Eng
English
French
German
Spanish
Others
Subtitle
Eng
Parental
English
French
German
Spanish
Off
1. KID SAF
2. G
3. PG
4. PG13
5. PGR
6. R
7. NC17
8. ADULT
Password
Change
Default
Reset
TV TYPE:
The unit can correspond with erery type of TV all over
the world, Select your TV type on this item:
Auto: Select TV type according to the color system of
the playing disc automatically.
NTSC: Taiwan, Japan and USA use this type.
PAL: HongKong, China and Europe use this type,
When TV type is inconsistent with this setup, the
screen will be in black strip state.
Audio: Subtitle and disc menu language setup:
when the disc has correspondent subtitle, audio and
menu language supporting, menu is valid, if the playing
disc defaults preferred language, this setup will be
invalid.
Parental control:
Adjust parental control to control the playing rated
disc.
Default:
Return the player defaults to the original factory
settings.
Password Change:
Setting up this item, the TV screen will show as
following picture:
Old password
New password
Confirm PWD
OK
The initial password of the unit is 8806. After changing
the password, press the select key to finish.
44
TROUBLE SHOOTING
SYMPTOM AND SOLUTION:
Symptom
Reason(s)
No power
Do not connect power cord to the wall outlet Connect them well
No picture
No sound
Distorted picture
Solution(s)
Do not set up TV in correct setting
Set up TV in correct mode
Do not connect video cable securely
Connect them well
Do not connect audio cable securely
Connect them well
Do not power the audio connection system on
Power it on
The audio output setting is not correct.
Set it in correct mode
Disc is dirty.
Clean the disc or try another one.
In fastforward or fastbackward mode
Sometimes, the tiny distortion appears, itis normal
condition.
Luminance unsteady
or picture with noise
Unable to play
Key no function
Circuitry influence
Connect DVD video player to TV directly
Do not load disc in
Place disc in
The disc loaded in can not play
Place readable disc in(check the disc type)
The disc is loaded upside down
Replace the disc with the label side up
Do not load disc in guide slot
Load the disc correctly
Disc dirty
Clean the disc
TV screen has menu
Press Setup turning off the menu.
Parental lock function
Unlock it or change the rating
Power wave or other abnormal
Switch on/off power or unplug/replug the power
phenomeno (such as static) disturbs
cord.
the normal condition.
Remote control
does not work
Do not point remote control at the remote
Point remote control at the remote
sensor directly.
sensor directly.
Remote control is too far from DVD unit.
Operate remote control within 7 meters
Batteries are exhausted.
Replace the batteries and insert in correct polarities.
45
SPECIFICATIONS
DVD PLAYER/OUTPUT:
DVD Player
Power Supply
~110-240V 50/60Hz
Power Consumption
15W
Weight
2.5Kg
Dimension
360x232x33mm(L/W/H)
Video System
NTSC/PAL
Optical read-out system
Semiconductor AIGaAs Weam, wave length: 650nm,780nm
Audio Frequency Response
DVD audio: Fs 48KHz PCM 4 Hz~22KHz
Fs 96KHz PCM 4Hz~44KHz
Audio CD
Fs 44.1Hz 4Hz~20KHz
S/N Ratio
>80dB
Audio Dynamic Range
>80dB
Rotating Ratio
Within measurable range
Operation Condition
Temperature 0 c ~ 40 c; Operation status: horizotion
0
Output
Video Output
1.0 V(P-P), 75
S-video Output
(Y) 0.7V (P-P), 75
(C) 0.3 V (P-P), 75
Audio Output(Analog Audio)
2.0 V(rms)
46
0
ADDITIONAL INFORMATION
Care of disc:
Do not touch the signal surface.
Do not add labels or adhesive tapes on the discs.
Cleaning of discs:
Finger prints or stains on the surface of the disc
will directly affect signal recording and result in a poorer picture quality. Therefore, please use a
soft cloth and wipe in a radiating manner from the centre to the outer rims when cleaning the disc.
If the surface of your disc is very dirty, wipe the disc with a moist cloth. Finally use a dry soft cloth
to remove all the water stains.
Never use electrostatic prevention products as well as sloutions which contain benzene, thinner
or any other vaporizing substances, as they may damage the disc surface.
Storage of disc:
Do not keep the disc in the direct sunlight, near the heat source, in the dusty places or moisture
(kitchen, bathroom). Keep the disc vertically in the disc storage case. Heavy objects on the disc
case will cause deformation to the disc.
Copyright Attention:
Copy, broadcast, play or rent the disc is forbidden without legal permission.
TV System:
Please connect the unti to the TV compatible with
PAL/NTSC.
About this manual:
This manual explains the basic specifications of this unit. Some DVD disc may have special
requirement and the unit may not play such discs. Please refer to the disc instruction.
47