Download Crypt n - crypton
Transcript
Crypt
n
USER’S MANUAL OF CRYPTON MODEL OBMD-2
Congratulations for your choice!!!
You have in your posession the only real device for detection of treasures from a long
distance, result of more than 20 years of research and two years of experiments not in laboratory but in real conditions at random spots and by using a simple metal detector for confirmation
of the result.
The OBMD-2 is the natural evolution of OBMD-1, with lots of extra capabilities and improvements that happened with the guidance of our customers.
THEORY
Probably it is the only long range detector that works with the specific IR sensor MURATA,
which produces pulses when its surface is stroken from a particle or particles with sufficient
energy. The IR detector gives approximately one pulse 300 ms with a source of 1mR. This
sensitivity is sufficient to determine if the buried target is old or new. A typical old buried target
gives usually more than two pulses. Here we use a larger special IR sensor, which is the simplest way to improve the sensitivity under the limit of 1mR. The main difference that we’re interested in is that the IR sensor usually coverts all the energy of the old buried target in pulses, so
that the pulse height can be used to determine the original energy in the metal.
The special IR detector is extremely sensitive to the IR band and must work in a special
wooden space with a specific lens.
A source less than 1mR is sufficient to give this output signal. However, for this detection to
be possible, the simultaneous use of low frequency electromagnetic transmission with high duty
cycle and AM modulation is required, so that the receiver can “read” phenomenons that incure
in the area of nanometres at a frequency easier detectable.
At the Crypton OBMD-2 the interest is only in the direct conversion of the received energy
into DC voltage and in the height of this voltage, which can be used for determination of the
original energy. For this to be possible, the sensor must be in standard position and with a lens
(see back side of OBMD-2) of a special material. This is the main reason why in Crypton
OBMD-2 the use of a plastic or synthetic material box is not possible. Unfortunately the IR
sensor is sensitive to static fields created by plastic surfaces that surround it. This forces us to
use materials that unfortunately raise the production cost. This sensitivity specificity to static
fields created by plastic surfaces led us to use a box only of wood, without metallic screws,
hermetically closed, resulting in the increase of the cost and the calibration time of the device.
Also, another great advantage of the wood is the temperature stability inside the device, which
makes its function reliable in extreme high or low temperatures.
Crypt
n
Your device is very sensitive. It is capable of detecting Au, Ag, Cu, buried more than 40 years
and at a depth until 7 meters maximum.
The maximum detection distance depends only on how old the buried object is and cannot
be more than 90 meters, a distance feasible ONLY by night. By day the maximum detection
distance is reduced to the half (approximately 40-50 meters).
In any case, your device does not work like common metal detectors, which are considered direct stimulation target detectors, but as a detector that detects the phenomenon created on the earth surface by the buried target and not the target itself.
Appropriate filters and chips are used for maximum reception sensitivity and function stability of the device.
There is no similarity or relation with dowser devices. It is clearly an electronic transmission
and reception device, adjusted and tuned exclusively for the detection of noble metals and
always at detection order: gold, silver, copper.
With the appropriate using experience, you will have no unclear indication from the targets
or indication uncertainty at your working space.
The detection direction or the time of day or night you’re using the device play no role.
Theoretically, each field has a greater warp in the North-South direction. In this specific
case, we could say that we could have a greater detection range in this direction and use this
phenomenon to our benefit. However, experiments showed that the systematic research of
an area can give results without the utilization of the physical magnetic directions at the
research area.
For the correct usage of the device you must follow strictly the instructions which, in combination with the experience you’ll get, will give you the satisfactory result.
Crypt
n
BASIC DIFFERENCES BETWEEN OBMD-2 AND OBMD-1
Apart from the greater sensitivity at the preamplifier state, the basic difference is that the
OBMD-2 is free to be adjusted by the user at whatever place on earth. We have discovered
previously that the stable adjustment of the device from us may not function correctly in other
countries. For that, the different magnetic field of each area is responsible. In this case, extra
functions have been added:
Adjustment of the gain from the user. The device has a default gain adjustment from us. If the
user desires, he can increase more the sensitivity, with a maximum of x15. It is in the judgment of the user, if the area is free of electromagnetic parasites, to adjust the gain.
Setup adjustment. With this adjustment, the user can setup the detection sensitivity to the
ideal measure at his place on earth. After the adjustment, there is no need for this button to
be adjusted again; the user leaves in at the measure he has chosen.
Cooperation capability of OBMD-2 with a ground generator in case of very hard targets. In
that case, the OBMD-2 is tuned automatically to the frequency of the generator and has the
capability to detect a stimulating target very easily. For this function, you must have a generator with an output frequency of 10-3000Hz and an output power of more than 20W (rms).
Additionally, importance has been given to the size (the device is smaller than OBMD-1) and
to the weight (only 680g with the batteries), for a pleasant research.
GENERALLY
To be successive with a treasure detector you must:
1. Use a high-tech detector, designed for the type of treasure you’re looking for.
2. Learn how to use your detector correctly.
3. Perform a correct and methodic research at the area where there are possible hidden
treasures.
4. Be insistent.
The OBMD-2 is designed to find exclusively non-ferrous metals, gold-silver and, less,
copper, from a great distance and at a depth until 7 meters.
This device is very strong and easy to use. The usage manual is offered to help you understand better how to use the detectors of this technological kind. If you are a new user at
distance detectors, we suggest to read and follow the whole manual, to feel the sense of your
detector. It is also necessary to practice at home with a simple television. If you are an expert
user of distance metal detectors, go directly to the last part of the manual with the questions
and answers that analyze the capabilities of the device. Whatever your knowledge on detection is, though, the more experienced you become at the usage of this device, the more successful results you’ll have. If you are a new user at treasure hunting with distance detectors,
keep in mind that if there are no old buried objects where you’re searching, it won’t matter
how good your detector is or how experienced and insistent you are. To learn more on where
to search for valuable buried objects, perform a control, ask and study on places with possible interest for your research.
Crypt
n
Let’s start with the detection area.
The direction in which you’re moving has no importance. The only thing that’s important is
the slow scanning of the area and, in case you get any signal, to insist on checking it from
different spots, so as to make sure the exact spot of the target and if this target has any interest in digging. Remember, small target-small signal, big target-big signal. Also, the older the
target, the stronger the signal you receive and, of course, from a greater distance.
The scanning is done slowly from left to right or reverse, parallel to the ground. Always
control all the spots where you receive a signal, because none is random and they all need
their research.
Remember that in open spaces (mountain, field, woods), if you get a signal and there are
no high voltage cables or a generator around, at a distance of less than 70 meters, the signal
is real and comes from a buried object and is not a random interference.
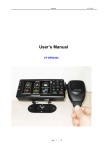
First of all you must know the use of the buttons (knobs) and trimmer.
Main Switch ON-OFF AND GAIN down left. It is the main function switch of the device and,
at the same time, it adjusts the gain of the device. When you have adjusted correctly your
device, use ONLY this knob for your research.
DC offset. The function of this knob is approximately the same with the corresponding
button that the pulse detectors have. Its ideal position lies within the “yellow zone”. If you
cannot position it in this “zone”, adjust the regulate trimmer (see below).
Setup knob. The most important knob. You adjust this only once and do not use it again
afterwards. Remember that if you move to an area further than 100km from the initial adjustment place, you then must re-adjust it.
Regulate trimmer. To the left of the Led (target lock) there is a hole, where you can see a
trimmer. The user can increase the gain with a small screwdriver at his will. It requires great
attention! NEVER MAKE FREQUENT ADJUSTMENTS, DANGER OF DESTRUCTION OF
THE TRIMMER!!! Leave it at the default position or adjust at your will, once.
Low bat Leds. To the Power’s right there are two Leds. One with “18V” and one with “9V”.
These two leds are used for detection of battery drop. When one of these turns on, we must
change our batteries (see “battery placement”).
Target lock led. Just beneath the buzzer there is the “lock” Led. This cooperates with the
buzzer, but of course with a faster reaction. Its usefulness is:
You can center exactly the target or, even better, use the function to detect very quick
signals. All kinds of speakers are incapable of reproducing a very quick signal, due to their
mechanical structure. In this case the LED is irreplaceable! It reproduces very quick signals
and our eyes, which have the capability of realizing sparkles with a duration of 1/24 of a
second, can see them. For any of the above cases, it is necessary to be included in the
device’s equipment.
The battery clips inscribe which batteries you have to change. Always use alkaline batteries for no liquid leakages inside your device. Second in preference are reloadable batteries.
For occasional use, it is better to use exclusively alkaline ones.
Crypt
n
BATTERY PLACEMENT
For the battery placement, open carefully their cover and you’ll see three clips, the two of
them writing 18V and the other one 9V. These labels have been put for only one reason.
Depending on which indication there is on the panel for battery drop, you know which batteries have to be replaced.
Because the space for the battery placement is limited, you must first put the two extreme
ones with their clips towards the screws of the cover, push them left and right respectively, so
as to leave enough space for the middle one, which is to be put last.
Attention!!! Order is required at them and at the cables, because their space is limited.
SETUP OF OBMD-2 IN YOUR COUNTRY
Before you start the experiments at home or go out for search, you must calibrate your
OBMD-2. If you don’t setup OBMD-2 you cannot use it. It is very easy, but very important.
What you need:
1.
A Tv-screen. Best one is an old Tvscreen but if you don’t have one, you can use an
LCD monitor.
2.
A small screwdriver.
Your OBMD-2 has now as a default setting the regulate trimmer (inside hole , left position led
target) at the full anticlockwise point.
Turn on the TV.
Put the OBMD-2 at a distance of 3 meters from the TV (vertically on a table and towards the
tv) and turn the main power switch on (Gain knob).
Turn the DC offset knob at “Setup position” and the Setup knob at the “Setup point”.
Now turn full clockwise the Gain-knob.
With a small screwdriver on the hole panel, turn very slowly clockwise the regulate trimmer.
At one point it will start beeps with pulses. At another point, the pulses stop and you have
consecutive beeps without interruptions.
Stop there and turn anticlockwise the Gain knob. If the beep stops with maximum 2 lines
anticlockwise of the Gain knob, you are ready.
If not, turn clockwise the setup knob. At a point you have beeps. Then try again with the
gain-knob to stop the beeps (same procedure). If moving anticlockwise (the gain knob) only
two lines and the beeps stop, you are ready.
Remember, the best position for DC-offest knob and setup-knob are within the yellow zone
Crypt
n
FAMILIARIZATION TEST WITH THE DEVICE AT HOME
For the tests, a turned on CRT television (the old ones with the glass screen, if you haven’t
got LCD-TV), your device and a free space of at least 3 meters between you and the television are required.
Don't touch the DC offset knob or Setup knob. Go far away from the television (which is
on) and turn the device on ON. Steadily turn right the Gain knob with your left hand and the
device, which you are holding with your right hand, must look down towards the floor. At
some position of the Gain knob you have a sound signal. You then remove your hand from
the Gain knob. If the sound signal doesn’t stop, turn a little bit left the Gain knob to stop it and
then again remove your hand from the Gain knob. You should know that: Because the device
has no armor, its setting is only affected with the hand that touches the Gain knob. The hand
that holds the handle of the device does not affect at all its function. This means that the real
threshold of complete sensitivity is usually one or two “clicks” above the setting point. Only
with the method of leaving and touching the button can you be sure for the correct placement
of the critical limit.
Now turn the device to look towards the television and approach it. At some distance near
it you get a sound signal. Go back very little. The sound stops. If you approach the television
slowly from far away with the device and you swing it left and right slowly, you can see that
only in the straight line during the movement you have again a sound signal and indeed at
the same distance. Inside the house, you can have various false alarms. All those are interferences from household devices. When the device is set to its limit, even the electrical power
board is a source of interferences. Perform tests and familiarize yourself with the detection
distances from the television and the setting point of the Gain and the DC Offset. Also familiarize yourself with the setting of the Gain knob to reduce the interferences, without reduction
of the detection distance of the turned on television. Nothing is critical, but it learns you how
to face the network and the transformers (the only interference enemy for your device).
Crypt
n
WAY OF USING YOUR DEVICE
Far enough from your research point and with the device looking straightforward, set the Gain
knob ON. The correct function of the device is indicated with a quick “beep”. Turn on slowly the
Gain knob until you get a sound signal. With the method of leaving and touching the Gain knob
with your hand, you make sure the correct limit setting. If it hasn’t been set correctly, repeat with
little settings of the DC offset. For all these settings, the device must look forward towards the
horizon, parallel to the ground, and never towards the detection area.
Perform a slow rotation around yourself. If you get a signal, turn the DC offset a little bit to
the left and perform the rotation again. After you’ve made sure the functioning stability of your
device, without any signal, set off towards the detection area while scanning very slowly the
area from left to right or reverse. If you get any signal, search the spot slowly from all directions,
for confirmation of a real target. You don’t need to scan with your device left and right at a long
path. Approach the target slowly following the sound signal or optical Led signal. Step a bit
backwards and just confirm the straight line in which you get the signal. Do this from another
direction too. At the intersection point of the two straight lines lies the target. After some time
you’ll understand that it is not necessary for your device to function at maximum sensitivity. If
you have a gold target, your device will “get mad” and the signal will be extended and continuous, always in the line of the target.
NOTE: Sometimes, as you walk, scanning the area, you get one and only signal at one and only
spot. Go a little bit backwards (2 to 5 meters) and pass again over the spot. If you get again a
signal, there is a very small nugget buried beneath you. If you get no signal, it means that the
nugget is so small that the device absorbed its energy and there is no more energy to stimulate
the device.
An important note: If in a research area you get no signal from the target you thought that exists
there, but you get nearby the unique recurrent signal, then you must take it seriously. It could be
a metal box at the spot of the unique signal which contains what you’re interested in. It hasn’t
been certified, but always a stable permanent signal and no other from a distance in the same
area must make you suspicious.
In areas free from “noble” garbage, it is possible for the Gain and DC offset to function
almost at the maximum of their width. Thus the initial setting of these potentiometers is relative
and depends exclusively on the purity and morphology of each specific area.
If you use your device slowly and methodically in an area where you have some target suspicion, the reality is one: very hard not to detect your target, if it really exists.
Remember, you must always search slowly and methodically the area of your research.
The scanning is done from left to right or reverse, horizontally, at an angle opening of 180
degrees and with a speed of counting in your head from 101 to 110 from far left to far right or
reverse.
Any failure of confirming the existence or not of a target burdens the user and not the device.
Your device always detects the real target, your research hurry though can easily lead you to
failure and false results.
If any of the Low bat leds turns on, you still have 15 minutes of research, to replace the batteries and have no reliability problem of your device.
Always make sure that the device is turned off after the research. For long periods of storage,
we recommend the removal of all the batteries from the device.
Crypt
n
CAPABILITIES OF YOUR DEVICE - FAQ
You don’t have a “magic” device that can do everything, but a real one that has the maximum detection limits and capabilities, always under appropriate conditions.
Here we’ll analyze all these parameters, for you to have a full image of the capabilities of
your device and of the facts you can use to your advantage for the most effective use.
All these observations have been certified by research. It would be good to inform us on
any extra observation you might possibly certify, for a possible improvement.
1. Is there any season of the year that is considered best for detection?
No. Throughout the year the detection phenomenon remains stable with minimal changes
in its volume.
2. Is the day or the night best for the research? Are there maybe some hours with better
performance?
No. The day or the night does not play any role for the research. Also, although the importance of a specific best hour for each area is referred by many people, we have concluded
that the hour has no importance, because the differentiation is minimal. Just, during the night
the research distance doubles.
3. Has the weather any particular importance during the research?
Yes, it has. We mentioned before that the season doesn’t matter. But the weather does.
We have the best results in good weather and dry earth. There is a slight performance
decline before and after rain. But while it’s raining there is a detection performance decline
that touches 70%. During storms with lightning at the research area we have zero detection
capability.
There is a strange phenomenon, the cloud-to-cloud and cloud-to-ground lightning absorbs
the phenomenon that’s created above the buried noble metals and thus the detection from
your device is not possible. Depending on the duration of this severe cloud-to-ground lightning, it is possible for the detection area to remain “dead” for more than a week.
On wet ground, on mud and near streaming water it is not good to perform any research.
We may catch the target, but we are not sure about the zero spot, because of the radiation
scattering caused by water.
4. What is the maximum depth we can have?
The device literally detects the phenomenon created on the earth surface from the object
itself, so it is completely normal that it is able to detect objects near 3 meters depth. If you get
a specific signal at a specific spot, regardless whether the metal detector detects anything,
you are obliged to dig. In this case the object is at a depth over the limit of the metal detector.
Crypt
n
5. Can the device detect other metals apart from gold?
Yes. It has the most sensitivity for gold. If there is a quantity of silver or copper though,
their mass can be easily detected. The device has always the tension to firstly “lock” on gold,
then on silver and last on copper. It is absolutely normal that it can’t make any difference
between 1kg of gold and 10kg of silver or copper in the same area. Simply, with the experience you’ll gain in using the device, you’ll be able to interpret the different duration of the
sound signal and understand what it really is. The fact is that it cannot detect old ferromagnetic materials, but only noble metals. At these, it gives a sound signal only if it is gold, silver
or copper.
6. If there is gold in a metal box buried for many years, can the device detect it?
Probably not. If, however, the metal box is eroded due to oldness, the gold’s detection is
relatively easy.
But the detection range is reduced to approximately 1/5 of the range when the same gold
quantity is buried freely at the same spot.
If the gold in the box is put inside an insulator, for example grease, tar or wax, its detection
in no longer possible. We only get some weak sound indications that do not offer us sure
confirmation.
7. If there is gold inside a jar buried for many years, can the device detect it?
If the jar is well roasted, it works as a porcelain insulator and the detection of its content is
not possible. If is it cracked or the ground humidity can somehow penetrate it with time, there
is no detection problem.
8. If there are noble metals in vacuum, inside a cave or inside an old prefabricated burial
place, always in vacuum, is their detection possible?
It hasn’t been tested… we don’t know about objects ageing until 150 years. For very old
ones, yes it can!!! It has been confirmed.
9. Can gold put in a wall and at quite some height above ground level be detected?
It hasn’t been tested… we don’t know.
10. We have a strong signal in the North-South direction. How can we be sure that it is a real
signal and not a signal from the earth’s magnetic field?
We just head parallel further from the spot where we’ve detected this signal. If we get no
sound signal from the North-South direction at the new spot, it means the initial signal was
real. This strange north detection signal can occur when the Gain knob is set near its minimum. It usually occurs when the Setup is set far right or at 9/10 of its maximum (red zone).
11. Is the test with fresh gold possible?
No. But the test with a quantity of copper over 10kg, buried over 25 years, is possible. In
this case you’ll get an intermittent signal from a distance of approximately 5 meters from the
target.
Crypt
n
20. Which emission sources does the device easily detect?
It has been tested and can detect very easily the portable police radars, which calculate
the speed with an IR laser at distances over 400 meters with visual contact. Also it detects tv
remotes, but at a very small distance (half a meter). In general, IR emission sources are
easier detectable than radio-frequency emission sources.
21. Does the device have a warranty?
Yes. The warranty duration is one year and for professional use it is limited to six months.
For the warranty to be valid, it must be accompanied by the purchase invoice from you or
from the initial purchaser. The show of the proof of purchase is enough.
The warranty covers malfunctions caused by manufacturing defects and in no case are we
obliged to replace the device.
The warranty does not cover malfunctions caused by bad use or bad maintenance of the
device.
The warranty is not valid if interventions happen to the device by others not authorized by
Crypton.
The warranty does not cover damages due to usage of plastic or metallic parts of the
device.
The repair does not extend the initial warranty duration. Any transport costs for the repair
of the device charge the purchaser.
22. In which case can I open the device without needing to use authorized service?
In no case. The device is hermetically sealed, so this will result in its destruction.
If, however, you wish to open it, do not change the settings. Any re-setting of the multi-turn
trimmers or movement of any part is strictly prohibited. In this case, the device is deregulated
and becomes useless.
TECHNICAL CHARACTERISTICS
Name: Crypton OBMD-2 Long range Gold detector
Size: Smaller than an A4 page 175mm x 235mm x 48mm
Detecting method: DSFMD Detector, emitting-receiving pulses of 90 degrees antiphase locator
Batteries: 3 x 9 Volts PP3 alkaline
Usage: Exclusively for noble buried metals detection at a distance until 60 meters
Auction S.A
104 Aiolou street
Omonoia-Athens-Greece


