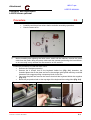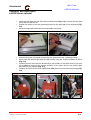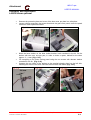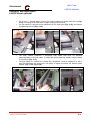
1
NEO LT NEOLT spa USER’S MANUAL GB NEOLT spa USER’S MANUAL Electro foam trim plus 160 / 250 / 310 USER’S MANUAL ENGLISH Cod. NLT.QW-D-S-MM-4-6S-GB USOGB-EFTP-6S.DOC VERSION: NLT-EFTP-06-04/2004 NEOLT NEOLT spa USER’S MANUAL CONTENTS θ SECTOR: ELECTRO FOAM TRIM PLUS θ VERSION: NLT-EFTP-06-04/2004 θ DATE: 10/06/2003 θ WRITTEN: POLENI P. Chapter 1 General information 1.1 Data of the manual ................................................................................... 1-1 1.2 Users......................................................................................................... 1-1 1.3 Property of the information........................................................................ 1-1 1.4 Conventions used..................................................................................... 1-2 1.4.1 Conventional terms used ............................................................... 1-2 1.4.2 Conventional symbols used............................................................ 1-2 1.5 Identification data of the manufacturer...................................................... 1-3 1.6 Identification data of the machine............................................................. 1-3 1.7 CE conformity certification........................................................................ 1-4 1.8 Warranty................................................................................................... 1-4 1.9 Assistance ................................................................................................ 1-4 1.10 Use of the manual .................................................................................. 1-5 1.11 Description of the machine .................................................................... 1-5 1.11.1 Correct use................................................................................... 1-5 1.11.2 Incorrect use................................................................................. 1-5 1.11.3 Structure of the machine model 160............................................ 1-6 1.11.4 Structure of the machine model 250 - 310................................... 1-7 Chapter 2 Safety information 2.1 Safety criteria............................................................................................ 2-1 2.1.1 Technical specifications of LASER module optional....................... 2-2 2.2 Qualifications of the personnel.................................................................. 2-2 2.3 Responsibility............................................................................................ 2-3 2.3.1 Protection........................................................................................ 2-3 2.3.2 Active safety devices...................................................................... 2-4 2.4 Danger zones and residual risks............................................................... 2-4 2.5 Noise......................................................................................................... 2-6 2.5.1 Information on noise hazards.......................................................... 2-6 Chapter 3 Characteristics of the machine 3.1 Tecnical information.................................................................................. 3-1 3.2 Power supply data ................................................................................... 3-4 3.3 Machine performances............................................................................. 3-4 Chapter 4 Operator interface 4.1 Operator interface..................................................................................... 4-1 Electro foam trim plus VERSION: NLT-EFTP-06-04/2004 i NEOLT spa USER’S MANUAL CONTENTS Chapter 5 Installation 5.1 Qualifications of the operator.................................................................... 5-1 5.2 Transportation........................................................................................... 5-1 5.2.1 Transportation conditions................................................................ 5-1 5.2.2 Assessment of damages during transportation............................... 5-2 5.3 Assembly.................................................................................................. 5-3 5.3.1 Assembly of lower stand................................................................. 5-3 5.3.2 Assembly of stand for model 160.................................................... 5-4 5.3.3 Wall installation model 160............................................................ 5-5 5.3.4 Wall installation model 250 - 310................................................... 5-6 5.3.5 Adjustment of inclination of cutting table models 250 - 310............ 5-8 5.4 Assembly and adjustment of side extensions .......................................... 5-10 5.4.1 Assembly of standard side extensions model 160.......................... 5-10 5.4.2 Assembly of standard side extensions model 250 - 310................. 5-13 5.5 Assembly of blade holder carriage ........................................................... 5-17 5.5.1 Assembly of “Special” blade holder carriage.................................. 5-20 5.6 Storage .................................................................................................... 5-21 5.6.1 Characteristics ............................................................................... 5-21 5.7 Placing of the machine ............................................................................. 5-22 5.7.1 Characteristics of the area the machine is placed in...................... 5-22 5.7.2 Electric connection.......................................................................... 5-23 5.7.3 Testing ........................................................................................... 5-23 Chapter 6 Use 6.1 Qualification of the operator ..................................................................... 6-1 6.1.1 Place of work.................................................................................. 6-1 6.1.2 Switching the machine on............................................................... 6-1 6.1.3 Feeding of the panel to cut............................................................. 6-1 6.1.4 Use of LASER tracer for cutting operations.................................... 6-4 6.1.5 Use of the “Special” blade carrier................................................... 6-5 6.1.6 Characteristics of the panel to cut................................................... 6-6 Chapter 7 Maintenance 7.1 Ordinary maintenance .............................................................................. 7-1 7.1.1 Qualifications of the operator ......................................................... 7-1 7.1.2 Procedures...................................................................................... 7-1 7.2 Extraordinary maintenance....................................................................... 7-3 Chapter 8 Demolition 8.1 Qualifications of the operator ................................................................... 8-1 8.2 Deactivation of the machine...................................................................... 8-1 8.2.1 Procedures ..................................................................................... 8-1 Electro foam trim plus VERSION: NLT-EFTP-06-04/2004 ii NEOLT spa USER’S MANUAL CONTENTS Chapter 9 Attachments 9.1 List of ATTACHMENTS ........................................................................... 9-1 Attachment A Assembly and adjustment. Lateral extension 2 model 160 – optional. A.1 Procedure ................................................................................................ A-1 Attachment B Assembly and adjustment. Lateral extension 3 model 250 - 310- optional. B.1 Procedure ................................................................................................ B-1 Attachment C Assembly and adjustment. LASER tracer – optional. C.1 Procedure ................................................................................................ C-1 C.1.1 Use of LASER tracer for cutting..................................................... C-5 Attachment D EC conformity declaration Electro foam trim plus VERSION: NLT-EFTP-06-04/2004 iii NEOLT spa USER’S MANUAL CONTENTS Electro foam trim plus VERSION: NLT-EFTP-06-04/2004 iv Chapter NEOLT spa USER’S MANUAL GENERAL INFORMATION Data of the manual 1.1 Instruction manual. Code of Manual ELECTRO FOAM TRIM PLUS NLT.QW-D-S-MM-4-6S-GB Users 1.2 Instruction manual. • Transporter. • Installer. • User. • Maintenance personnel. • Demolition squad. 4 For further details on the users of this manual, see 2.2 Qualifications of the personnel. Property of the information 1.3 The information contained in this manual is reserved property. All rights are reserved. This manual cannot be reproduced or copied, as a whole or in parts, without prior written consent of NEOLT S.p.A. These documents are provided only for the use of the client whom the manual has been supplied to with the machine, and can be used only for the installation, use and maintenance of the machine the manual refers to. NEOLT S.p.A. states that the information of this manual is congruent to the technical and safety requirements of the machine the manual refers to. The manufacturer cannot be held responsible for any direct or indirect damages to people, objects or animals due to the use of these documents or of the machine in conditions other than those authorized. NEOLT S.p.A. reserves the right to change or improve, without notice, these documents and these machines, and also other machines marketed of the same model as the one this manual refers to but with a different serial number. The information of this manual particularly refers to the machine specified in 1.6 Identification data of the machine. Electro foam trim plus VERSION: NLT-EFTP-06-04/2004 1-1 Chapter NEOLT spa USER’S MANUAL GENERAL INFORMATION Conventions used 1.4 Conventional terms 1.4.1 Machine: indicates the machine specified in 1.6. Identification data of the machine. Frame: bearing structure of the machine. Qualified personnel: people, who thanks to their knowledge and experience, as well as the knowledge of the relevant norms, safety requirements and service norms, are able to recognise and avoid any possible danger for the people, the material and the machine. The descriptions of direction, sense and position (on the right of the machine, on the left of the machine) refer to the position of the operator in front of the machine. Conventional symbols used 1.4.2 Text in italics: indicates the title of a chapter, a section, a sub-section, a paragraph, a table or an illustration of this manual, or another reference manual. 4 1 (generic number as an example): symbolic representation of a command device or signal. A (generic letter as an example):symbolic representation of a part of the machine. Notes contain important information, and are pointed out after the text they refer to.. The danger symbols indicate those procedures which, if not respected, could cause physical damages to the operator. The manufacturer cannot be held responsible for any damages to people due to non-compliance with these norms. The warning symbols indicate those procedures which, if not respected, could damage the machines or the devices connected to it. The manufacturer cannot be held responsible for any damages to objects due to the non-compliance with these norms. Electro foam trim plus VERSION: NLT-EFTP-06-04/2004 1-2 Chapter NEOLT spa USER’S MANUAL GENERAL INFORMATION Identification data of the manufacturer 1.5 Contact distributor for all maintenance interventions. Any non authorized maintenance interventions make the warranty void. neolt S.p.A. Via G. Galilei , 8 24036 Ponte San Pietro (BG) - ITALY Tel. 035/468811 Fax 035/468886 http://www.neolt.it E-mail.: [email protected] Identification data of the machine Type Model 1.6 TRIMMER El. fo. tr. plus XXX Serial Number Year of Construction The machine has an identification label and the CE mark on the right side of the machine, above the connection group. Whereas the laser label is above the Plexiglas above the keyboard. L A S E R D IO D E W a v e le n g th : 4 0 0 - 7 0 0 n m C E I E N 6 0 8 2 5 -1 : 1 9 9 5 M a x . O u tp u t: < 5 m W C la s s 3 A L A S E R P r o d u c t Electro foam trim plus VERSION: NLT-EFTP-06-04/2004 1-3 Chapter NEOLT spa USER’S MANUAL GENERAL INFORMATION CE conformity certification 1.7 Annex D CE Declaration of conformity includes a copy of the CE declaration of conformity of the machine. Warranty 1.8 NEOLT S.p.A. offers a one year warranty on the machine. The parts subject to normal wear and tear are not included in the warranty. The warranty is limited to the substitution or repair of the parts that should result damaged or defected. The assessment of the defects and causes is carried out by NEOLT S.p.A. The warranty is cancelled if the machine is used incorrectly, or in an improper or excessive way, if any non-original spare parts are used and for non-compliance with the norms of this manual. In no case can the purchaser demand the resolution of the contract, claim for damages or the extension of the warranty. The term "Original purchaser" refers to the person who had initially purchased the product covered by this warranty for purposes other that for retail sales. This warranty is applicable and valid only for the original purchaser and only for the period (during the warranty period) in which the original purchaser has the equipment. 4 4 NEOLT S.p.A. cannot be held responsible for any negative advertisement, or missed profits, due to malfunctioning, technical or mechanical, of the product being used or on display. The correct and safe operation of the machine is guaranteed only if it is used in compliance with what is outlined in the manual and the relevant documentation. NEOLT S.p.A. cannot be held responsible for damages to people or things caused by an improper use of the machine or by modifications not previously authorized by the manufacturer himself. Assistance 1.9 NEOLT S.p.A. provides, on request, assistance for the installation and the maintenance of the machine. Electro foam trim plus VERSION: NLT-EFTP-06-04/2004 1-4 Chapter NEOLT spa USER’S MANUAL GENERAL INFORMATION Use of the manual 1.10 Carefully read the chapters General information, Safety information, Characteristics of the machine and Operator interface. 4 For any transportation, installation, use and maintenance operation please refer to the relevant chapter. This manual and the attached documentation (Attachment A Assembly and adjustment Lateral extension 2 optional model 160 Attachment B Assembly and adjustment Lateral extension 3 optional model 250 – 310 Attachment C Assembly of laser tracer optional Attachment D EC conformity declaration), must be kept for the entire technical life of the machine in order to have them at hand when needed. If the machine is sold as second-hand, this manual and the enclosed documentation must be supplied along with the product. Description of the machine Correct use of the machine 1.11 1.11.1 The machine must be used only to cut the allowed media (FOAM and SEMI-HARDBOARD). The machine is made of physically independent and autonomous groups, therefore the proper use of the machine also refers to the correct functioning of only one part of it. Use of the machine The installation and the ordinary and extraordinary maintenance of the machine must be carried out by qualified personnel only. The machine was designed to be used in an area with the features indicated in the section PLACING OF THE MACHINE 5.5.1 and in the section SUPPLY DATA 3.2. Incorrect use of the machine 1.11.2 Any use other than that indicated in part 1.11.1 Correct use of the machine is to be considered incorrect, especially: • Using the machine in ways which differ from those which it has been designed for, represents an anomalous condition and could therefore damage the structure of the machine. • Using the machine without its protections and without the safety equipment it is provided with: particularly without the fixed protections that block access to the rotating parts. • Not observing the procedures of this manual and especially the maintenance and repair norms. • Using the machine in an area at risk of fire or explosions if the machine itself does not have the proper fire equipment. • Using the machine in areas containing explosive materials. • Using the machine in an inflammable area. Electro foam trim plus VERSION: NLT-EFTP-06-04/2004 1-5 Chapter NEOLT spa USER’S MANUAL GENERAL INFORMATION Structure of the machine model 160 1.11.3 The machine includes the following parts: A Power unit panel. B C D E F G H I L M N O P Q R1 R2 Upper panel. Sheet holder. Front View Plexiglas protection. B Right feeding table. Left feeding table. Feeding table. ON/OFF switch. Power outlet. R1 Keyboard. G Stop/Emergency switch. R2 C Front stand. Back stand. F Anti-overturning leg. D E A LASER label. Optional extension Left Optional extension Right Q Side view Keyboard O L M power socket N H P I Electro foam trim plus VERSION: NLT-EFTP-06-04/2004 1-6 Chapter NEOLT spa USER’S MANUAL GENERAL INFORMATION Structure of the machine model 250 - 310 1.11.4 The machine includes the following parts: A Power unit panel B C D1 D2 E F G H I L M N1 N2 O1 O2 P Front View Upper panel Sheet holder B Upper Plexiglas protection. Lower Plexiglas protection Right feeding table Left feeding table D1 Feeding table ON/OFF switch Power outlet G C Keyboard Stop/Emergency switch Left extension 2 Right extension 2 Optional extension 3 Left N1 Optional extension 3 Right D2 F E N2 LASER label. A optional Keyboard P power socket L O1 O2 Q M H I Electro foam trim plus VERSION: NLT-EFTP-06-04/2004 1-7 Chapter NEOLT spa USER’S MANUAL GENERAL INFORMATION Electro foam trim plus VERSION: NLT-EFTP-06-04/2004 1-8 Chapter NEOLT spa USER’S MANUAL SAFETY INFORMATION Safety criteria 2.1 The machine has been designed and made in compliance with the essential safety criteria and regulations indicated below, and following modifications and integrations and with the relevant national regulations: Low Tension Directive EMC Directive Machine Directive 73/23/CEE, 93/68/CEE 89/336/CEE, 92/31/CEE, 93/68/CEE 98/37/CE, 98/79/CE (see Attachment D CE conformity certification). Thanks to the accurate analysis carried out by the manufacturer, most of the risks depending on the conditions of use of the machine, both foreseeable and reasonably foreseeable, have been eliminated. The complete documentation including all the safety norms adopted are in the technical booklet of the machine, which is deposited at the manufacturer's premises. The manufacturer recommends strict compliance with the instructions, procedures and recommendations of this manual and with the laws in force on the safety in the work place. This also refers to the use of the protection devices foreseen, both those integrated in the machine and personal. 4 NEOLT S.p.A. cannot be held responsible for any damages to people, pets or objects due to non-compliance with the safety norms and recommendations of these documents. Laws and decrees on safety and security List of individual protection devices and safety equipment Presidential Decree no. 462/01, section 1, general regulations. Regulations to simplify procedure for reporting of installations and protective devices against atmospheric discharge, devices for grounding of electrical equipment and dangerous electrical equipment. Decree dated 2 May 2001 Criteria for identification and use of individual protection devices. Circular no. 3/2001 - Art. 2, par. 4 of decree no. 359/99 Verification of system of periodical checks for given work tools. Decree no. 626/94, Safety and health of workers. Decree no. 475/ 92 (updated as of 2 January 1997) Individual Protective Devices. Presidential Decree no. 303/56 (updated as of 18 March 1996) General industrial hygiene regulations. Electro foam trim plus VERSION: NLT-EFTP-06-04/2004 2-1 Chapter NEOLT spa USER’S MANUAL SAFETY INFORMATION Technical specifications of LASER module optional Laser classification Standard Emission 2.1.1 CEI,76-2 CEI EN 60825-1 laser classe 3 A. <5 mW Safety Class 3 A lasers, in a wave length interval between 400 and 700 nm., do not require particular safety locks or keys for operation. The opening of the beam through line generation glass is < 40°. Refer to the keyboard view and power cable pages 1.6 – 1.7 detail P and Q. L A S E R D IO D E W a v e l e n g th : 4 0 0 - 7 0 0 n m C E I E N 6 0 8 2 5 -1 : 1 9 9 5 M a x . O u tp u t: < 5 m W C la s s 3 A L A S E R P r o d u c t Qualifications of the personnel Stage of the technical life of the machine 2.2 Qualification of the operator in charge Transportation Qualified transportation Installation Qualified personnel Use Qualified personnel Ordinary maintenance Qualified personnel Extraordinary maintenance Technicians appointed by NEOLT S.p.A. Demolition Qualified personnel Electro foam trim plus VERSION: NLT-EFTP-06-04/2004 2-2 Chapter NEOLT spa USER’S MANUAL SAFETY INFORMATION Responsibility 4 4 2.3 NEOLT S.p.A. cannot be held responsible for any damages to people, pets or objects due to noncompliance with the safety standards and recommendations of these documents. Tampering with the protections and the safety devices is dangerous for the people using the machine and for those exposed to it. NEOLT S.p.A. cannot be held responsible for any damages to people, pets or objects due to tampering with the protections. Protection panels 2.3.1 The machine is fitted with the following protections. Model 160 Inter-locked moving protections: • Double magnetic Microswitch Plexiglas protection. Fixed protections: • Lower control panel protection. • Upper gear protection panel. Model 250-310 Inter-locked moving protections: • Double magnetic Microswitch lower Plexiglas protection. Fixed protection panels: • Lower control panel protection. • Upper gear protection panel. • Upper Plexiglas protection. Electro foam trim plus VERSION: NLT-EFTP-06-04/2004 2-3 Chapter NEOLT spa USER’S MANUAL SAFETY INFORMATION Active safety devices • • • • • • • 2.3.2 The machine is provided with a Stop/Emergency button on the keyboard. Interlocked protections (plexiglas for model 160, lower plexiglas for models 250-310). Double magnetic Microswitch for protection Plexiglas model 160 Double magnetic Microswitch for lower protection Plexiglas model 250-310 Indirect safety operation - Unipotential protection circuit. Roller sensor detecting media to cut. Two carriage end of stroke sensors. Fig. 2. 1 Microswitch protection Plexiglass Dangerous areas and residual risks 2.4 All the areas around the machine in which people are at risk of injuries or health problems are considered dangerous. Pay close attention to hands when the electric paper pressure bar is being lowered. During certain intervention procedures on the machine, which are pointed out each time in this manual, residual risks for the operator may arise. Residual risks can be avoided by carefully complying with the procedures of this manual and using the personal protection devices indicated, such as. Fig. 2. 2 Paper presser bar Electro foam trim plus VERSION: NLT-EFTP-06-04/2004 2-4 Chapter NEOLT spa USER’S MANUAL SAFETY INFORMATION • • • Pay attention to the warning labels applied to the trimmer. During operation, avoid direct exposition to the LASER beam,. Attention: performing procedures or operations on LASERS different from the specified ones can result in exposition to dangerous radiation levels Fig. 2. 3 warning labels 4 NEOLT S.p.A. cannot be held responsible for any damages to people, animals or objects due to noncompliance with the standards or avoidance in using the prescribed individual protection devices. Chapter 2.1 Safety criteria. Electro foam trim plus VERSION: NLT-EFTP-06-04/2004 2-5 Chapter NEOLT spa USER’S MANUAL SAFETY INFORMATION Noise 2.5 Figures on noises produced by a machine identical to the one described in this manual, measured according to the "Machine Directives " (98/37/CE and following modifications). Average level of continuous acoustic pressure equivalent A pondered, around the machine at a distance of one meter: • While it is running : inferior to 60 db. Information on noise hazards 2.5.1 The levels of acoustic emission indicated are not necessarily safe for the workers. The levels of exposure of the worker are obviously linked to the emission levels of the machine, however other factors affect the levels of exposure of the workers: duration of the exposure, characteristics of the area and the presence of other machines. The levels of emission of the machine, however, allow the users to assess the danger related to acoustic emissions. A continuous use of the machine and of other machinery present in the area of installation could lead to a high level of personal daily exposure to noise. When daily personal exposure is equal to or higher than 85 dB(A) the use of IPE is recommended (protective caps, protective ear plugs, ...). When daily personal exposure is equal to or higher than 90 dB(A) the use of IPE is obligatory (protective caps, protective ear plugs, ...). For information on other protection measurements that can be performed, in Italy refer to UNI EN458 of 1995 and EN457 Electro foam trim plus VERSION: NLT-EFTP-06-04/2004 2-6 Chapter NEOLT spa USER’S MANUAL CHARACTERISTICS OF THE MACHINE Technical specifications Model 160 Maximum cutting length (cm) Length (cm) Width (cm) Height with stand (cm) Weight (Kg) Allowed media Cutting speed Accessories 3.1 250 310 160 215 154 225 90 250 310 305 365 258 258 315 375 130 150 FOAM, SEMI-HARDBOARD From 0 to 20 cm/sec extension 2 right extension 3 right and/or left and/or left Laser tracer Mod. 160 Electro foam trim plus VERSION: NLT-EFTP-06-04/2004 3-1 Chapter NEOLT spa CHARACTERISTICS OF THE MACHINE USER’S MANUAL Mod. 250 Mod. 310 Electro foam trim plus VERSION: NLT-EFTP-06-04/2004 3-2 Chapter NEOLT spa CHARACTERISTICS OF THE MACHINE USER’S MANUAL Extension accessories 2 Extension accessories 3 Electro foam trim plus VERSION: NLT-EFTP-06-04/2004 3-3 Chapter NEOLT spa USER’S MANUAL CHARACTERISTICS OF THE MACHINE Power supply data 4 3.2 Voltage and single-phase frequency: Absorbed power: 230V/240V – 50Hz/60Hz – (110V/ 50-60Hz). max. 0,5A – (max. 1A). Responsibility NEOLT S.p.A. cannot be held responsible for any inconveniences, or breakdowns due to non-compliance with the power data provided. Machine performances θ θ 3.3 Max cutting thickness materials/panels FOAM 30 mm Max cutting thickness materials/panels PVC SEMI-HARDBOARD 10 mm Electro foam trim plus VERSION: NLT-EFTP-06-04/2004 3-4 Chapter NEOLT spa USER’S MANUAL OPERATOR INTERFACE Operator interface 4.1 The keyboard includes command and programming buttons which are easy to use. To use the operating buttons, turn on the machine and follow the steps below. Fig. 4.1 Keyboard 11 1 5 8 4 Key 1 2 3 6 7 9 10 Description Cut Key When the key is pressed the cutting phase begins. While the carriage is moving the green led lightens up 2 “Special” Key Press this key only if you are using the “Special Blade” blade holder. This key functions only if the paper presser is closed and the micro-switch for the detection of the sheet to cut is pressed. 3 Carriage Ascent Key When the key is pressed the blade-holder carriage starts to move upward and the green led of the button lightens up. 4 Stop/Emergency Button When the button is pressed all functions of the machine stop. Turn the button from left to right to release it. Electro foam trim plus VERSION: NLT-EFTP-06-04/2004 4-1 Chapter NEOLT spa USER’S MANUAL OPERATOR INTERFACE Key 5 6 7 8 Description Green Led The led lightens up when the machine is on, it flashes during the opening and closing movements of the paper presser. Yellow led The led switches on and flashes when a wrong command is given. The led flashes until you reset the command. The led switches on when the sheet holder is being closed when it is in position Reset or stop key Use this key to cancel the operation if you set a wrong command or to stop any movement underway Sheet holder close key When this key is pressed the sheet holder starts to close and when it is released it stops. The sheet holder is in position when the yellow led is on. You can’t carry out the cut if the sheet holder is not in position 9 Sheet holder open key When this key is pressed the sheet holder starts to open. The key offers two possibilities: if you press it once it automatically opens, up to the end of stroke, by pressing it again the travel of the sheet holder stops. If you keep it pressed for more than 3 seconds, when it is released even the sheet holder stops. 10 Potentiometer speed variator Adjust the potentiometer to change the upward and downward speed of the carriage. The cut will be cleaner and more precise, especially on harder media Optional 11 ON/OFF switch LASER tracing system When the switch is pressed a beam of light is activated to visualize the cutting position of the blade Electro foam trim plus VERSION: NLT-EFTP-06-04/2004 4-2 Chapter NEOLT spa USER’S MANUAL INSTALLATION Qualifications of the operator 5.1 The transportation, installation and connecting operations of the machine must be carried out by qualified personnel only, transporters and electricians. Transportation 5.2 Transportation conditions The trimmer is shipped with a carton box 5.2.1 1 to protect the panels on the end and a carton box 2 which holds everything. (Fig. 5.1) Transportation conditions. The standard lateral extensions, the lower stand, the stand for model 160 or the accessories for the wall installation of models 250-310, the tool bag needed to complete the very few installation operations of the machine and the user’s manual are all included in the packaging. The size of the packaging and its total weight (packaging and trimmer) are as follows Model Dimensions (cm) Weight (gross - kg) 160 250 310 219Lx72Px44H 312Lx72Px45H 370Lx72Px45H 120 182 204 Hoisting, transportation and machine handling operations must performed exclusively by competent and properly trained personnel. It is absolutely forbidden to pass under or stay under hanging loads. The means used to lift, transport and move the machine must be adequate for its weight and the shape of the elements to lift, transport and move and must comply with the laws applicable and in force in the place of installation. Protect the machine from external atmospherics. Characteristics of the are the machine is placed in 5.7.1. Electro foam trim plus VERSION: NLT-EFTP-06-04/2004 5-1 Chapter NEOLT spa USER’S MANUAL INSTALLATION Fig. 5.1 Transportation conditions 2 1 2 1 Assessment of damages during transportation 5.2.2 Check the conditions of the machine by visually inspecting it, after having removed it from the shipping box. Any defects on the visible parts of the machine indicate crashes during transportation, which could also affect the normal operation of the machine. Particularly, verify the good conditions of the following parts: • Stop/Emergency key and keyboard. • Potentiometer for carriage speed adjustment. • Keyboard. • Carriage Plexiglas protection for model 160 • Carriage Plexiglas protection, upper and lower for models 250-310. Verify that the screws and the nuts of the protection panels are tight. Electro foam trim plus VERSION: NLT-EFTP-06-04/2004 5-2 Chapter NEOLT spa USER’S MANUAL INSTALLATION Assembly 5.3 Assembly of lower stand 5.3.1 • Open the packaging box 2 which contains all parts (Fig. 5.1). • Remove the carton protections machine placing operations. 1 (Fig. 5.1). Remove all the objects that may hinder This operation must be carried out by minimum four people. • • Remove the trimmer and position it on a flat surface (Fig. 5.2). Assemble the lower stand (Fig. 5.3) by removing the screws on the machine and screwing them back in the same position. Fig. 5.2 Fig. 5.3 Electro foam trim plus VERSION: NLT-EFTP-06-04/2004 5-3 Chapter NEOLT spa USER’S MANUAL INSTALLATION Assembly of stand for model 160 • Fig. 5.4 • Fix the anti-overturning leg to the lower shoulder of the machine (Fig. 5.4) with the supplied screws Lift the trimmer and fix the tube of the support leg to the work table (Fig. 5.5 - 5.6) and tighten the two screws. Fig. 5.5 5.3.2 Fig. 5.6 Attention: the trimmer is still not stable. We suggest not leaving it before placing the stand in position. • Fix the cross beam that joins the work table with the tube of the support leg by using the appropriate screws and tighten (Fig. 5.7 - 5.8). Fig. 5.7 Fig. 5.8 Electro foam trim plus VERSION: NLT-EFTP-06-04/2004 5-4 Chapter NEOLT spa USER’S MANUAL INSTALLATION Wall installation model 160 • 5.3.3 Drill the relevant side by taking as reference the measurements, see the picture (Fig. 5.9). The holes must be made with a 9 mm diameter drill. Fig. 5.9 • Lift the trimmer from the horizontal surface, position it so that the holes of the top square match the top holes in the wall (Fig. 5.10) and screw it onto the wall itself by using the supplied screws. Mod. 160 Fig. 5.10 Electro foam trim plus VERSION: NLT-EFTP-06-04/2004 5-5 Chapter NEOLT spa USER’S MANUAL INSTALLATION Wall installation model 250 - 310 5.3.4 Only wall installation is foreseen for the models Electro foam trim 250 – 310 • Drill the relevant side by taking as reference the measurements, see the picture (Fig. 5.11 - 5.12). The holes must be made with a 9 mm diameter drill. Fig. 5.11 • Mod. 250 Fig. 5.12 Mod. 310 Fig. 5.13 Lift the trimmer from the horizontal surface, position it so that the holes of the top square match the top holes in the wall and screw it onto the wall itself by using the supplied screws (Fig. 5.13). Electro foam trim plus VERSION: NLT-EFTP-06-04/2004 5-6 Chapter NEOLT spa USER’S MANUAL INSTALLATION Fig. 5.14 • • Position the intermediate fixing ring (Fig. 5.13) (only in mod. 310) near the series of central holes in the wall and screw it on the wall itself by using the supplied screws. • Position the bottom fixing ring (Fig. 5.15) (both in mod. 250 and 310) near the series of bottom holes in the wall and screw it on the wall itself, by using the screws supplied. Fig. 5.15 Bring the trimmer near the wall so that the holes of the surface match the fixing holes of the intermediate ring (only in mod. 310) and the fixing holes of the bottom ring (both in mod. 250 and 310) and assemble everything by using the supplied screws (Fig. 5.16). The trimmer is securely fixed to the wall. Fig. 5.16 Electro foam trim plus VERSION: NLT-EFTP-06-04/2004 5-7 Chapter NEOLT spa USER’S MANUAL INSTALLATION Adjustment of inclination of cutting table models 250 - 310 • Fix the two tension rods A of the bottom ring of the trimmer by using the supplied screws and securing them well (Fig. 5.17). 5.3.5 Fig. 5.17 A • Connect the trimmer and trim a foam sheet about 2 mt. thick. Fig. 5.18 • Position the previously trimmed foam on the surface of the trimmer (Fig. 5.18). • Verify the parallelism between the surface and the foam sheet by following this procedure: 2mt. Electro foam trim plus VERSION: NLT-EFTP-06-04/2004 5-8 Chapter NEOLT spa USER’S MANUAL INSTALLATION Fig. 5.19 • For mod. 310 the adjustment is made on the intermediate ring (Fig. 5.19) by acting first on the adjustment rings A for bigger adjustments, and then, for more specific adjustments, on the dowels B until you reach the desired result.. • Afterwards, lock the nuts on the dowels so they don’t unscrew during use. A B • For mod. 250 the adjustment is made by acting on the bottom ring (Fig. 5.20) by adjusting the dowels B. After finishing secure the nuts to lock the dowels. B Fig. 5.20 B Electro foam trim plus VERSION: NLT-EFTP-06-04/2004 5-9 Chapter NEOLT spa USER’S MANUAL INSTALLATION Assembly and adjustment of lateral extensions 5.4 Assembly of standard lateral extensions model 160 5.4.1 Before installing and adjusting the extensions, switch off the machine, remove the power cable from the outlet. Bring the power cable near the operator performing the interventions, so he can verify in any moment the disconnection of the machine. • After putting the machine together, assemble the extensions 1 fixing them to the side of the table of the machine, one on each side and tighten the screws. A (Fig. 5.21). Fig. 5.21 A • Tighten the guide on both sides, fixing it with two screws to the work table and with three to the extension previously positioned. (Fig. 5.22). 1 Note: the left guide is the millimetre tube, which holds the media detection sensor in a slot on one end (Fig. 5.23). A Fig. 5.22 Fig. 5.23 Electro foam trim plus VERSION: NLT-EFTP-06-04/2004 5-10 Chapter NEOLT spa USER’S MANUAL INSTALLATION • • Plug in the machine. Make a 1.5 mt. cut in one panel, then place it on the extensions 1 (Fig. 5.24). Fig. 5.24 1 1 90° Follow this procedure to line up the guides with the panel. • Loosen the screws that fix the extension to the guide (Fig. 5.25). • Screw on or off the series of nuts that are under each extension until you reach the perfect parallelism with the panel above the two guides (Fig. 5.26). Fig. 5.25 Fig. 5.26 Electro foam trim plus VERSION: NLT-EFTP-06-04/2004 5-11 Chapter NEOLT spa USER’S MANUAL INSTALLATION Verify that the cutting angle is 90° • Perform two perpendicular cuts on a panel of about 1mt by 1mt. (Fig. 5.27). • Reposition the same panel on the right and verify that the vertical cut made previously is perfectly parallel with the cutting line. (Fig. 5.28). Fig. 5.27 Fig. 5.28 If the vertical cut is not parallel with the cutting line of the machine, screw on or off, the series of nuts that are under each extension until you reach the perfect parallelism (Fig. 5.26). And check again the cutting angle at 90°. • Position the reference brackets on the guide (Fig. 5.29) Fig. 5.29 Electro foam trim plus VERSION: NLT-EFTP-06-04/2004 5-12 Chapter NEOLT spa USER’S MANUAL INSTALLATION Assembly of standard lateral extensions model 250 - 310 5.4.2 Before installing and adjusting the extensions, switch off the machine, remove the power cable from the outlet. Bring the power cable near the operator performing the interventions, so he can verify in any moment the disconnection of the machine • After putting the machine together, assemble the extensions 1 fixing them to the side of the table of the machine, one on each side and tighten the screws. A (Fig. 5.30). Fig. 5.30 A • Tighten the guide on both sides, fixing it with two screws to the work table and with three to the extension previously positioned (Fig. 5.31). 1 Note: the left guide is the millimetric tube, which holds the media detection sensor in a slot on one end (Fig. 5.32) . A Fig. 5.31 Fig. 5.32 Electro foam trim plus VERSION: NLT-EFTP-06-04/2004 5-13 Chapter NEOLT spa USER’S MANUAL INSTALLATION • • Fix extension 10, for extension panel 2, both on the right and left, fixing them to the guide assembled previously. (Fig. 5.33). Put extensions 2 on the edge of the work table and fix with the supplied screws. (Fig. 5.34). Fig. 5.33 Fig. 5.34 10 • • 2 Put extension 2 on extension 10 previously assembled and fix with the two supplied screws (Fig. 5.35). Screw the foot to the extension with the supplied screws. (Fig. 5.36). Fig. 5.35 Fig. 5.36 2 10 Electro foam trim plus VERSION: NLT-EFTP-06-04/2004 5-14 Chapter NEOLT spa USER’S MANUAL INSTALLATION • • Connect the machine to the mains. Make a 1.5 mt. cut in one panel, then place it on the extensions 1 (Fig. 5.37). Fig. 5.37 1 1 90° Follow this procedure to line up the guides with the panel. • Loosen the screws that fix the extension to the guide (Fig. 5.38). • Screw on or off the series of nuts that are under each extension until you reach the perfect parallelism with the panel above the two guides (Fig. 5.39). Fig. 5.38 Fig. 5.39 Electro foam trim plus VERSION: NLT-EFTP-06-04/2004 5-15 Chapter NEOLT spa USER’S MANUAL INSTALLATION Verify that the cutting angle is 90° • Perform two perpendicular cuts on a panel of about 1mt by 1mt. (Fig. 5.40). • Reposition the same panel on the right and verify that the vertical cut made previously is perfectly parallel with the cutting line (Fig. 5.41). Fig. 5.40 Fig. 5.41 If the vertical cut is not parallel with the cutting line of the machine, screw on or off, the series of nuts that are under each extension until you reach the perfect parallelism (Fig. 5.39). And check again the cutting angle at 90°. • Position the reference brackets on the guide (Fig. 5.42) Fig. 5.42 Electro foam trim plus VERSION: NLT-EFTP-06-04/2004 5-16 Chapter NEOLT spa USER’S MANUAL INSTALLATION Assembly of blade holder carriage 5.5 Fig. 5.43 • By pressing the Ascent Key center the carriage (Fig. 5.43) right above the keyboard. • Remove the Plexiglas shield (Fig. 5.45) by using the screws (Fig. 5.44). Fig. 5.44 Fig. 5.45 Electro foam trim plus VERSION: NLT-EFTP-06-04/2004 5-17 Chapter NEOLT spa USER’S MANUAL INSTALLATION Wear protection gloves while assembling the blades because they are very sharp. • Assemble the blades (Fig. 5.46) on the desired carriage (2 types are supplied 20-30 mm plus 2 special of 5-10 mm.) (0,2” – 0,4” – 0,8” – 1,2”). Fig. 5.46 SPECIAL If you have to cut materials between 5 and 10 mm (0,2”-0,4”) thick, assemble the “Special” blade-holder. See procedure Assembly “Special” blade-holder carriage 5.5.1. Electro foam trim plus VERSION: NLT-EFTP-06-04/2004 5-18 Chapter NEOLT spa USER’S MANUAL INSTALLATION • Position the carriage in the proper seat, being very careful to put the blade in the cutting slot (Fig. 5.47) of the support surface and tightening the two screws (Fig. 5.48) supplied. Fig. 5.47 • • • Reassemble the plexiglas shield (Fig. 5.45) using the screws (Fig. 5.44). Then connect the trimmer to a socket with ground, and do not use any kind of adapter between the plug of the trimmer (Fig. 5.49) and the power socket. Position the ON/OFF switch on ON (Fig. 5.50). Fig. 5.49 4 Fig. 5.48 Fig. 5.50 No other adjustments are necessary because the machine is factory tested before shipment.. Electro foam trim plus VERSION: NLT-EFTP-06-04/2004 5-19 Chapter NEOLT spa USER’S MANUAL INSTALLATION Assembly of “Special” blade holder carriage 5.5.1 The installation and blade changing modalities are the same as those indicated in the section Assembly of blade-holder carriage 5.5. Only special blades can be assembled on these holders. The special blade-holder can act on the pressure of the blade thanks to an adjusting screw (Fig. 5.51) see paragraph “USE OF Special BLADE-HOLDER CARRIAGE 6.1.5” for the correct use of the blade-holder. Fig. 5.51 Electro foam trim plus VERSION: NLT-EFTP-06-04/2004 5-20 Chapter NEOLT spa USER’S MANUAL INSTALLATION Storage 5.6 The indications contained in this section must be followed during the periods of temporary storage of the machine which could take place in the following situations: • When the machine is not installed immediately after it is delivered. • When the machine is disconnected and stored while waiting for it to be relocated. As much as possible the machine must be stored in order to be inaccesible to unauthorized people, it must be protected from possible damages caused by dust, humidity, heat, cold, sun or any substances that can corrode and attack it. The storage areas must not be located near any dangerous areas. Characteristics 5.6.1 • Allowed temperature: from -5°C to +55°C, maximum temperature for short periods. • Admitted relative humidity interval: from 30% to 95% without condensate . Ideal humidity ~55%. • Proper natural and/or artificial illumination. • Proper protection from atmospherics • Adequate space to carry out the hoisting and transportation operations in a safe and easy way. • Horizontal surface with a capacity higher than the mass of the machine. • Adequate space to carry out the ordinary maintenance and technical operations. Electro foam trim plus VERSION: NLT-EFTP-06-04/2004 5-21 Chapter NEOLT spa USER’S MANUAL INSTALLATION Placing of the machine Characteristics of the area the machine is placed in 5.7 5.7.1 Power supply The area where the machine is installed must be equipped with the power supply connections described in 3.2 Power supply data. Space requirements For the normal use of the machine and the loading and unloading operations, it is important to have an area directly proportional to the size of the panels to cut. Protection from atmospherics The machine must be placed in an area that is covered and protected from direct contact with atmospheric agents. Floor requirements Prepare the horizontal support base of the machine keeping in mind the mass of the machine itself. Also take into account all extra accessories. Optimal stability and using conditions can be obtained with a maximum planarity error of ± … mm/m. Furthermore the machine must be made steady by blocking the back wheels. The maximum inclination of the floor must not exceed 10° of inclination Illumination A good illumination is necessary to safely use and carry out maintenance operations (approximately 200 - 600 lux) according to UNI10380:1994 standard Atmospheric characteristics of the area • Allowed Temperature: from 18°C to 35°C • Allowed humidity: from 30 % to 80 %.without condensate. Ideal humidity ~55%, with max temperature 40°C. General operating features • Do not use the machine in explosive atmospheres. • Do not use the machine near acids, corrosive substances, salt, etc. • Do not use the machine near ionizing and non ionizing radiations (X-rays, microwaves, ultra-violet rays). Electro foam trim plus VERSION: NLT-EFTP-06-04/2004 5-22 Chapter NEOLT spa USER’S MANUAL INSTALLATION Electric connection 5.7.2 Check that the electric line is able to carry the absorption of the machine. Electric hazards. Before making any connections to the mains make sure the system has been grounded. • • • Position the power cable so that it is not stepped on or ruined. Do not put the power cable where it can be damaged. Maintenance and service operations must be carried out only by the technical service authorized by the manufacturer. • • Disconnect the electric line that powers the machine. If the disconnection device is the power cable, the relating power outlet must be easy to access and near the equipment. Power the line that powers the machine. • The electric system of the machine must include: • Protection against overcurrent, throuh devices with intervention current, sized taking into account the maximum absorption of the machine. • An intervention device for insulation damages (differential) with label data properly sized for the type of machine. • An external equipotential protection circuit (ground connection) conpliant with the regualtions in force in the area the machine is installed in. Testing 5.7.3 Before using the machine continuously check the general operation of the machine by doing some sample cuttings. If you hear vibrations or unusual noises, immediately switch off the machine and contact the NEOLT techincal assistance see Data of manufacturer 1.5. Electro foam trim plus VERSION: NLT-EFTP-06-04/2004 5-23 Chapter NEOLT spa USER’S MANUAL INSTALLATION Electro foam trim plus VERSION: NLT-EFTP-06-04/2004 5-24 Chapter NEOLT spa USER’S MANUAL USE Qualifications of the operator 6.1 The machine must be used by qualified personnel only Place of work 6.1.1 Position of the operator: during the start up and cutting operations in front of the machine with the control panel in the center; during maintenance operations the position depends on the specific operation that needs to be carried out. Switching the machine on 6.1.2 The main switch is placed on the right back side of the power unit panel. After pressing the main switch ON, the trimmer is ready to perform the cutting operations. Feeding of the panel to cut 6.1.3 Follow the steps below to begin the process: • Lift the carriage by pressing the Carriage Ascent Button (Fig. 6.1 - 6.2). Fig. 6.1 4 Fig. 6.2 The cut is always made vertically from top to bottom (and not vice-versa) and only with the Cut Key. Before beginning the cutting operations, we recommend checking that the carriage used is fit for the thickness of the media to cut. This is useful to avoid low cuts or high cuts. Electro foam trim plus VERSION: NLT-EFTP-06-04/2004 6-1 Chapter NEOLT spa USER’S MANUAL USE • Position the media on the left wing and make sure the material detection roller sensor is pressed (Fig. 6.3). Select cutting sizes using the reference square (Fig. 6.4). Fig. 6.4 Fig. 6.3 • Lower the paper pressure bar by using the key (Fig. 6.5). Pay attention to the position of the hands (Fig. 6.6). Fig. 6.5 Fig. 6.6 Keep the key pressed to close the sheet holder until the yellow led turns on. If the yellow led is not on you cannot perform the cut. Electro foam trim plus VERSION: NLT-EFTP-06-04/2004 6-2 Chapter NEOLT spa USER’S MANUAL USE • • Before performing cutting operations, adjust the speed of the carriage (Fig. 6.7). We suggest keeping low speeds to cut very rigid and hard media. Cut the media using the Cut Key (Fig. 6.8) and lift the sheet holder bar using the key (Fig. 6.9). Press the key once to open the sheet holder in automatic mode, press the key for more than 3 seconds to block it when the key is released. Fig. 6.7 • • 4 Fig. 6.8 Fig. 6.9 Lift both the original sheet and the trimmed one from the support surface. Follow the above mentioned procedure to perform another cut. During the ascent phase of the carriage it is not necessary for the carriage to reach the end stroke, just press the Stop Button once the height of the panel to cut has been reached. Then press the Cut Button to perform the cut. It is highly recommended not to lean against or put any object on feeding wings. Electro foam trim plus VERSION: NLT-EFTP-06-04/2004 6-3 Chapter NEOLT spa USER’S MANUAL USE Use of LASER tracer for the cut (optional) 6.1.4 The laser tracer is mainly used when you need to precisely trim panels which already have squaring marks on them. Follow this procedure to use the tracer: • Switch on the laser tracer • Start cutting procedure, by following the procedure FEEDING THE MEDIA TO CUT, lining up the profile to cut with the LASER beam. Electro foam trim plus VERSION: NLT-EFTP-06-04/2004 6-4 Chapter NEOLT spa USER’S MANUAL USE Use of the “Special” blade carrier 6.1.5 Follow this procedure, if you have to cut “soft” materials: • Remove the plexiglas shield. Fig. 6.30 • Rotate the adjustment screw clockwise up to the end of (Fig. 6.31) so that the blade penetrates in the relevant slot of the feeding surface (Fig. 6.30). • Re-assemble the plexiglas shield. • Adjust the speed of the carriage and press the Cut Key to cut the media. Fig. 6.31 Follow this procedure, if you have to cut “hard” materials (SEMI-HARDBOARD): • Remove the plexiglas shield. • Rotate the adjustment screw counter-clockwise (Fig. 6.32) until the blade reaches the position indicated in the illustration (Fig. 6.33) – about 0,5 mm (0,02”) from the feeding surface. • Re-assemble the plexiglas shield • Adjust the speed of the carriage and press the Cut Key to carry out the first phase of the cut. • Press the “Special” Key (Fig. 6.34) to carry out the second phase of the cut and the final cut of the media. Fig. 6.33 Fig. 6.32 0,5 mm. Fig. 6.34 Electro foam trim plus VERSION: NLT-EFTP-06-04/2004 6-5 Chapter NEOLT spa USER’S MANUAL USE Characteristics of the media to cut 6.1.6 This trimmer was designed to cut the following media “FOAM” and SEMI-HARDBOARD. We recommend not trying to cut materials different form those which the machine has been designed for. They could seriously damage the machine. Electro foam trim plus VERSION: NLT-EFTP-06-04/2004 6-6 Chapter NEOLT spa USER’S MANUAL MAINTENANCE Ordinary maintenance 7.1 Risk of electric shocks and untimely movements during maintenance. Isolate the machine from power supply sources by unplugging the power cord. Ordinary maintenance includes all those periodical and preventive operations that allow the machine to be used safely. Qualifications of the operator 7.1.1 Ordinary maintenance of the machine must be carried out by qualified personnel only. Procedures 7.1.2 Please carry out the periodic operations listed in the table below. Operation to be carried out Frequency of execution Procedure Precautions General dusting. At user's discretion. • Clean the entire machine with a Do not use agressive products. damp cloth. • Unscrew the screws securing Wear a pair of protection gloves. the plexiglas. • Remove the plexiglas. Cleaning the scrap material. If there is a lot of scrap material. • Blade replacement. If the cut is not regular. Switch off the machine, disconnect Eliminate the scrap material with an aspirator and/or compressed power cable from outlet and bring the air. cable near the operator who is performing the intervention, so he can verify in any moment the disconnection of the machine. See procedure Assembly 5.5 Wear a pair of protection gloves. Electro foam trim plus VERSION: NLT-EFTP-06-04/2004 7-1 Chapter NEOLT spa USER’S MANUAL MAINTENANCE Operation to be carried out Frequency of execution Procedure Precautions Testing the safety microswitch. At user's discretion Remove the plexiglas protecting the After the testing carriage, press Cut Key and check operation, that the engine doesn't start. reassemble the carriage plexiglas shield Grease the chain. If there are noises • Unscrew the screws securing the and/or the carriage plexiglas. doesn't run • Remove the plexiglas. smoothly. • Grease the chain with a drop of oil. If the fuse is • Open the panel near the power burned. connector. Substitution of the fuses of the power socket. Motor block protection • Safety device for • direct protection of motor After carrying out the operation, reassemble the carriage plexiglas shield. Switch off the machine, disconnect power cable from Remove the burned fuse. outlet and bring the Replace it with a new one (T 2A). cable near the operator who is performing the intervention, so he can verify in any moment the disconnection of the machine. off the Verify the led on the left side of Switch machine, disconnect the control panel protection power cable from outlet and bring the cable near the operator who is performing the intervention, so he can verify in any moment the disconnection of the machine • If the led is red switch off the machine and find the reason which made the motor protection trip • After about 15” start the machine again only after the problem has been eliminated Electro foam trim plus VERSION: NLT-EFTP-06-04/2004 7-2 Chapter NEOLT spa USER’S MANUAL MAINTENANCE Extraordinary maintenance 7.2 Directly contact NEOLT S.p.A for any extraordinary maintenance operation non contained in this manual. Electro foam trim plus VERSION: NLT-EFTP-06-04/2004 7-3 Chapter NEOLT spa USER’S MANUAL MAINTENANCE Electro foam trim plus VERSION: NLT-EFTP-06-04/2004 7-4 Chapter NEOLT spa USER’S MANUAL DEMOLITION Qualifications of the operator 8.1 L The machine can be demolished by qualified personnel only. Deactivation of the machine 8.2 Once the machine has reached the end of its technical and operating life, it must be deactivated. The machine must be deactivated and put in the condition of not being used for the purposes which it had originally been designed for. However, it must allow the reuse of the raw materials which it was built with. 4 NEOLT S.p.A. cannot be held responsible for damages to people or pets due to the reutilization of single parts of the machine for purposes or in situations different from those which it has been designed for.. Procedures • • 8.2.1 Disconnect the power supply. In case the machine has to be moved, refer to 5.2 Transportation. The machine is made of non biodegradable materials. It must therefore be brought to an authorized center for its disposal. If for any reason you decide to put the laminating machine out of service, please comply with the main regulations for the protection of the environment. Aluminium, Iron, Plastic, generic electrical material and electronic cards must be disassembled and disposed of separately by qualified personnel Electro foam trim plus VERSION: NLT-EFTP-06-04/2004 8-1 Chapter NEOLT spa USER’S MANUAL DEMOLITION Electro foam trim plus VERSION: NLT-EFTP-06-04/2004 8-2 Chapter NEOLT spa USER’S MANUAL ATTACHMENTS List of ATTACHMENTS Attachment A Assembly and adjustment Lateral extension 2 optional model 160 Attachment B Assembly and adjustment Lateral extension 3 optional model 250 - 310 Attachment C Assembly of laser tracer optional Attachment D EC conformity declaration 9.1 Electro foam trim plus VERSION: NLT-EFTP-06-04/2004 9-1 Chapter NEOLT spa USER’S MANUAL ATTACHMENTS Electro foam trim plus VERSION: NLT-EFTP-06-04/2004 9-2 Attachment NEOLT spa USER’S MANUAL Assembly and adjustment Lateral extension 2 optional model 160 Procedure A.1 Before installing and adjusting the optional extensions 2, switch off the machine, remove the power cable from the outlet. Bring the power cable near the operator performing the interventions, so he can verify in any moment the disconnection of the machine • • • Remove on both sides the guide fixed with two screws to the work table and with three to extension 1 (Fig. A.1). Unscrew the 2 screws that fix the protection plate to the right guide support. Secure it with the screws you previously removed to the right guide support included in the optional kit (Fig. A.1). Screw back the guide included in the optional kit, using the screws removed previously. Note the left guide is the millimeter tube, which holds the media detection sensor in a slot on one end (Fig. A.3). Fig. A.1 Fig. A.2 Fig. A.3 1 Electro foam trim plus VERSION: NLT-EFTP-06-04/2004 A-1 Attachment NEOLT spa USER’S MANUAL Assembly and adjustment Lateral extension 2 optional model 160 • • Fix extension 10, for extension panel 2, both on the right and left, fixing them to the guide assembled previously (Fig. A.4). Put extensions 2 on the edge of the work table and fix with the supplied screws (Fig. A.5). Fig. A.4 Fig. A.5 10 • • 2 Put extension 2 on extension 10 previously assembled and fix with the two supplied screws (Fig. A.6). Screw the foot to the extension with the supplied screws (Fig. A.7). Fig. A.6 Fig. A.7 2 10 Electro foam trim plus VERSION: NLT-EFTP-06-04/2004 A-2 Attachment NEOLT spa USER’S MANUAL Assembly and adjustment Lateral extension 2 optional model 160 • • Connect the machine to the mains. Make a 1.5 mt. cut in one panel, then place it on the extensions 1 and 2 (Fig. A.8). Fig. A.8 1 1 90° Follow this procedure to line up the guides with the panel. • Loosen the screws that fix the extension to the guide (Fig. A.9). • Screw on or off the series of nuts that are under each extension until you reach the perfect parallelism with the panel above the two guides (Fig. A.10). Fig. A.9 Fig. A.10 Electro foam trim plus VERSION: NLT-EFTP-06-04/2004 A-3 Attachment NEOLT spa USER’S MANUAL Assembly and adjustment Lateral extension 2 optional model 160 Verify that the cutting angle is 90° • Perform two perpendicular cuts on a panel of about 1mt by 1mt. (Fig. A.11). • Reposition the same panel on the right and verify that the vertical cut made previously is perfectly parallel with the cutting line (Fig. A.12). Fig. A.11 Fig. A.12 If the vertical cut is not parallel with the cutting line of the machine, screw on or off, the series of nuts that are under each extension until you reach the perfect parallelism (Fig. A.10). And check again the cutting angle at 90°. Electro foam trim plus VERSION: NLT-EFTP-06-04/2004 A-4 Attachment NEOLT spa USER’S MANUAL Assembly and adjustment Lateral extension 3 optional model 250 - 310 Procedure B.1 Before installing and adjusting the optional extensions 3, switch off the machine, remove the power cable from the outlet. Bring the power cable near the operator performing the interventions, so he can verify in any moment the disconnection of the machine. • • • • Remove the two screws that fix extension 2 to the extension panel for extension 2 on both sides (Fig. B.1). Remove from both sides the guide fixed with two screws to the work table and with three to extension 1 and slide out both the guide and the extension panel 2 (Fig. B.2). Unscrew the 2 screws that fix the protection plate to the right guide support. Secure it with the screws you previously removed to the right guide support included in the optional kit (Fig. B.3). Screw on the guide included in the optional kit, using the screws removed previously. Note the left guide is the millimetric tube, which holds the media detection sensor in a slot on one end (Fig. B.4) . Do not remove the leg that supports lateral extension 2 . Fig. B.1 Fig. B.2 2 1 Fig. B.3 Fig. B.4 Electro foam trim plus VERSION: NLT-EFTP-06-04/2004 B-1 Attachment NEOLT spa USER’S MANUAL Assembly and adjustment Lateral extension 3 optional model 250 - 310 • • Fix extension 10, for extension panel 3, both on the right and left, fixing them to the guide assembled previously (Fig. B.5). Put extensions 3 on the edge of the work table and fix it with the supplied screws (Fig. B.6). Fig. B.5 Fig. B.6 10 • • 3 Put extension 2 and 3 on extension panel 10 assembled previously fixing it with the two supplied screws (Fig. B.7). Screw on the second foot to the extension with the supplied screws (Fig. B.8). Fig. B.7 Fig. B.8 2 3 10 Electro foam trim plus VERSION: NLT-EFTP-06-04/2004 B-2 Attachment NEOLT spa USER’S MANUAL Assembly and adjustment Lateral extension 3 optional model 250 - 310 • • Reconnect the machine to the mains. Make a 2.5 mt. cut in one panel, then place it on the extensions 1 2 and 3 (Fig. B.9). Fig. B.9 3 3 2 2 1 1 90° Follow this procedure to line up the guides with the panel. • Loosen the screws that fix the extension to the guide (Fig. B.10). • Screw on or off the series of nuts that are under each extension until you reach the perfect parallelism with the panel above the two guides (Fig. B.11). Fig. B.10 Fig. B.11 Electro foam trim plus VERSION: NLT-EFTP-06-04/2004 B-3 Attachment NEOLT spa USER’S MANUAL Assembly and adjustment Lateral extension 3 optional model 250 - 310 Verify that the cutting angle is 90° • Perform two perpendicular cuts on a panel of about 1mt by 1mt. (Fig. B.12). • Reposition the same panel on the right and verify that the vertical cut made previously is perfectly parallel with the cutting line (Fig. B.13). Fig. B.12 Fig. B.13 If the vertical cut is not parallel with the cutting line of the machine, screw on or off, the series of nuts that are under each extension until you reach the perfect parallelism (Fig. B.11). And check again the cutting angle at 90°. Electro foam trim plus VERSION: NLT-EFTP-06-04/2004 B-4 Attachment NEOLT spa USER’S MANUAL Assembly and adjustment LASER tracer optional Procedure • • C.1 Carefully read these instructions before and after assembly operations. Check contents of kit Before installing and adjusting the laser tracer, switch off the machine, remove the power cable from the outlet. Bring the power cable near the operator performing the interventions, so he can verify in any moment the disconnection of the machine. Follow this procedure to install the laser tracer: • Remove the Plexiglas protection. • Remove the 4 screws that fix the keyboard holder box (Fig. C.1). Attention: the threaded plates that fix the plate are free in the carriage guide profile and they could fall downward. We suggest putting a temporary block in the slot. • Turn over the plate and remove the screws that hold the keyboard holder box together (Fig. C.2). • Break the pre-punched tab on the top edge of the keyboard box using pliers (Fig. C.3). Fig. C.1 Fig. C.2 Fig. C.3 Electro foam trim plus VERSION: NLT-EFTP-06-04/2004 C-1 Attachment NEOLT spa USER’S MANUAL Assembly and adjustment LASER tracer optional • • • Inside the box there are two white wires already wired (Fig. C.4), connect the two wires to the switch inside the kit. Position the switch in the slot previously formed in the upper part of the keyboard. (Fig. C.5). Close the keyboard holder box and reassemble everything. Fig. C.4 • • • • Fig. C.5 Remove the power unit panel by removing the upper and lower fastening screws. Screw onto the internal right wall the laser feeder using the screws contained in the kit (Fig. C.6). Connect the two wires that are blocked by a wire holder on the sheet itself, to the wire are of different colors for the correct operation of the laser. Red for the positive pole and black for the negative (Fig. C.7). Connect the feeder to the wires labeled with 24V placed in front of the main relays (Fig. C.8). Fig. C.6 Fig. C.7 Fig. C.8 Electro foam trim plus VERSION: NLT-EFTP-06-04/2004 C-2 Attachment NEOLT spa USER’S MANUAL Assembly and adjustment LASER tracer optional • • Remove the protection plate and cover of the laser seat, put plate in a safe place. Loosen, without removing, the screws that block the gear cover panel, move the panel forward to make operations easier. Fig. C.9 • • • Fig. C.10 Block the laser emitter on the laser holder bracket, both contained in the kit. Fix the emitter with two nuts, one per part, in order to leave a space, behind for the wires approx. 3 – 4 mm. (Fig. C.11). Fix everything to the lower closing panel using the two screws with relevant washer contained in the kit. (Fig. C.12). Connect the two wires of the emitter to the terminal already wired on the left side, following the colors of the wire. Red with red and black with black. (Fig. C.13). Fig. C.11 Fig. C.12 Fig. C.13 3-4 mm. Electro foam trim plus VERSION: NLT-EFTP-06-04/2004 C-3 Attachment NEOLT spa USER’S MANUAL Assembly and adjustment LASER tracer optional • • Fix on the “L” shaped panel in front of the laser emitter the dowel with the nut (Fig. C.14), necessary to limit the beam of light coming from the laser. Fix the dowel so it projects a few millimeters in the upper part (Fig. C.15), and block it by tightening the nut. (Fig. C.16). Fig. C.14 • • Fig. C.15 Fig. C.16 The laser emitter produces a fan-shape light beam that must be adjusted perpendicularly to the work table. To direct this beam rotate the emitter, until the beam is in position. (Fig. C.17). The light beam, to visualize the cutting line, lengthwise, must be adjusted, so that it does not illuminate the upper part. Use pliers to adjust and direct the emitter holder bracket. (Fig. C.18 - Fig. C.19). Fig. C.17 Fig. C.18 Fig. C.19 Electro foam trim plus VERSION: NLT-EFTP-06-04/2004 C-4 Attachment NEOLT spa USER’S MANUAL Assembly and adjustment LASER tracer optional Use of the LASER tracer for cutting C.1.1 The laser tracer is mostly needed when you need to precisely trim panels that have already been marked for the cut. Follow this procedure to use the tracer: • Switch on the laser tracer (Fig. C.20). • Cut, following the procedure FEEDING PANEL TO CUT by lining up the profile to cut with the LASER beam (Fig. C.21). • Or follow the procedure 6.1.4 Cut with LASER tracer . Fig. C.20 Fig. C.21 Electro foam trim plus VERSION: NLT-EFTP-06-04/2004 C-5 Attachment NEOLT spa USER’S MANUAL Assembly and adjustment LASER tracer optional Electro foam trim plus VERSION: NLT-EFTP-06-04/2004 C-6 Attachment NEOLT spa USER’S MANUAL EC conformity certification Hereby: NEOLT S.p.A. Via Galileo Galilei, 8 24036 Ponte S. Pietro BERGAMO -ITALY- decl ares That the machine indicated complies with the main safety requirements and with the EC directives, complying with the concepts and the construction styles of NEOLT S.p.A. If any unauthorized modifications are performed on the machine this declaration is automatically void. • Name of machine: Trimmer • Type of machine: electro foam trim plus 160 / 250 / 310 • Serial number: see identification label • Compliance EC directive: EMC directive Low voltage directive Machine directive • Harmonized norms applied: 89/336/CEE, 92/31/CEE, 93/68/CEE, 93/97/CEE 73/23/CEE, 93/68/CEE 98/37/CE, 98/79/CE EN 60950:1992+A1:1993+A2:1993+A3:1995 EN 55014 EN 60204-1/1997 EN 292-1/1991 - EN 999 EN 292-2/1992 EN 292-2/A1/1995 EN 61000-3-3 EN 61000-3-2 Date and signature of manufacturer: January 2004 Position of signer: Eng. P. CACCIA Technical Director Electro foam trim plus VERSION: NLT-EFTP-06-04/2004 D-1 Regolazioni Estensioni laterali Estensioni 2 opzionali neolt Electro foam trim 160 B-4 NEOLT spa USER’S MANUAL NEOLT S.p.A Via G. Galilei, 8 24036 Ponte San Pietro (BG) – ITALY 035/468811 035/468886 NEOLT VERSION: NLT-EFTP-06-04/2004