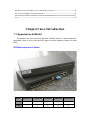
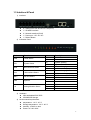
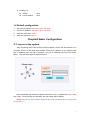
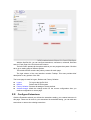
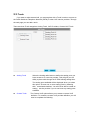
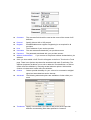
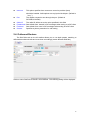
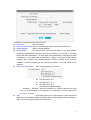
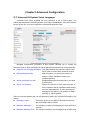
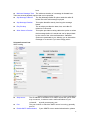
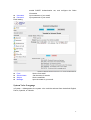
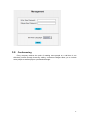
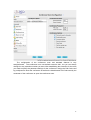
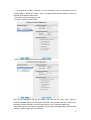
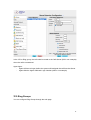
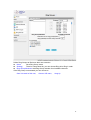
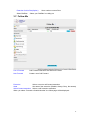
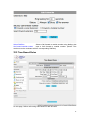
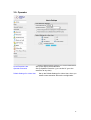
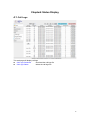
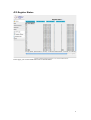
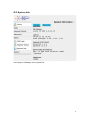
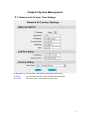
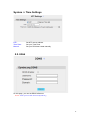
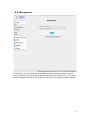
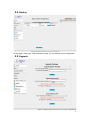
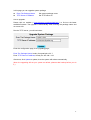
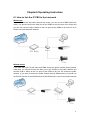
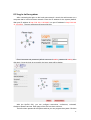
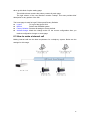
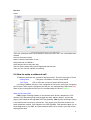
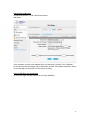
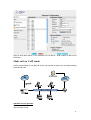
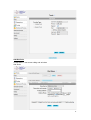
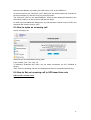
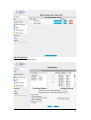
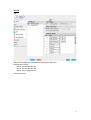
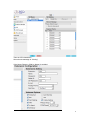
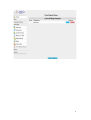
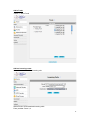
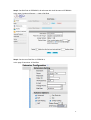
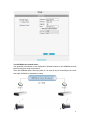
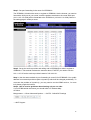
1
IPPBX User Manual version V1.2 V1.3 V1.4 V1.5 date 2009-7-07 2009-10-21 2010-1-21 2011-3-22 author Edward Ken Edward Steven description Ippbx08 Ippbx08 Ippbx08 Ippbx08 TABLE OF CONTENTS CHAPTER1 BRIEF INTRODUCTION ...........................................................................................2 1.1 APPEARANCE & MODEL ............................................................................................................................ 2 1.2 SYSTEM FEATURES ..................................................................................................................................... 3 1.3 INTERFACE & PANEL .................................................................................................................................. 4 1.4 DEFAULT CONFIGURATION ........................................................................................................................ 5 CHAPTER2 BASIC CONFIGURATION....................................................................................5 2.1. LOG ON TO THE SYSTEM ........................................................................................................................ 5 2.2. CONFIGURE EXTENSIONS...................................................................................................................... 6 2.3. TRUNK...................................................................................................................................................... 8 2.4. OUTBOUND ROUTERS ............................................................................................................................. 10 2.5.INBOUND ROUTERS.................................................................................................................................. 12 2.6.IVR (INTERACTIVE VOICE RESPONSE)................................................................................................ 12 2.7. RECORD ..................................................................................................................................................... 13 CHAPTER3 ADVANCED CONFIGURATION...................................................................... 15 3.1. VOICEMAIL & SYSTEM VOICE LANGUAGE ...................................................................................... 15 3.2. CONFERENCING ................................................................................................................................... 18 3.3. MUSIC ON HOLD ................................................................................................................................. 21 3.4. CALL PARKING & CALL QUEUE ........................................................................................................ 22 3.5. RING GROUPS....................................................................................................................................... 24 3.6. DISA SETTINGS .................................................................................................................................... 26 3.7. FOLLOW ME ......................................................................................................................................... 27 3.8. TIME BASED RULES ............................................................................................................................ 28 3.9. OPERATOR............................................................................................................................................ 29 CHAPTER4 STATUS DISPLAY............................................................................................... 30 4.1. CALL LOGS ............................................................................................................................................ 30 4.2. REGISTER STATUS............................................................................................................................... 31 4.3. SYSTEM INFO ....................................................................................................................................... 32 CHAPTER5 SYSTEM MANAGEMENT ................................................................................. 33 5.1. NETWORK AND COUNTRY; TIME SETTINGS .................................................................................. 33 5.2. DDNS.................................................................................................................................................... 34 5.3. MANAGEMENT ..................................................................................................................................... 35 5.4. BACKUP ................................................................................................................................................. 36 5.5. UPGRADE .............................................................................................................................................. 36 CHAPTER6 OPERATING INSTRUCTION ........................................................................... 38 6.1 HOW TO LINK THE IP PBX TO THE INTERWORK ............................................................................... 38 6.2 LOG IN TO THE SYSTEM ........................................................................................................................... 39 6.3 HOW TO MAKE A INTERNAL CALL ......................................................................................................... 40 6.4 HOW TO MAKE A OUTBOUND CALL ....................................................................................................... 41 Make call via PSTN trunk.........................................................................................................................42 Make call via VoIP trunk ..........................................................................................................................44 6.5 HOW TO MAKE AN INCOMING CALL ....................................................................................................... 46 1 6.6 HOW TO SET AN INCOMING CALL TO IVR BASED TIME RULE........................................................... 46 6.7 LINK TWO IPPBX IN THE SAME NETWORK ......................................................................................... 55 6.8 LINK TWO IPPBX IN DIFFERENT NETWORK & COMBINE SPOTEL WITH EXISTING TRADITIONAL PBX .................................................................................................................................................................... 58 Chapter1 Brief Introduction 1.1 Appearance & Model This article is the user manual for SPOTEL IPPBX08 product. It also includes the application notes for how to use SPOTEL ippbx to build a telephony system for small office. IPPBX08 Appearance & Model Model IPPBX08-08 IPPBX08-26 IPPBX0844 IPPBX08-62 IPPBX08-80 FXS 8 6 4 2 0 FXO 0 2 4 6 8 2 1.2 System Features SPOTEL's series of IPPBX is an embedded ippbx based on standard asterisk for Home & SMEs, which is not only a PBX, but also as a voice mail Server, IVR server, conferencing server. With 4 or 8 analog interface which can be configured as FXS or FXO ports (made in factory), and 1 Wan and 1Lan with router function. With excellent echo cancellation function, it can meet most of the customers’ requirement. Based on Asterisk Configuration by Web Built-in SIP/IAX Server Static/DHCP/PPPoE network access Codec: G.711-Ulaw, G.711-Alaw, G.726, G.729, GSM, SPEEX SIP/IAX Trunk(use with VoIP Trunk operator) Zap Trunk(Use with PSTN) SIP/IAX Extensions(connect with IP Phone) Zap Extensions(connect with Analog Phone) Voice Mail Server Flexible Dial Plan Remote backup / restore (through web browser from anywhere) RingGroup (both internal extensions & External numbers) Call Park Call Queue DISA (Direct Inward System Access) allow to use internal lines from outside Call Conference IVR Server FollowMe call forwarding IVR Name Directory Music On Hold BLF (Busy Line Field) to show who are on calls in other phones [your ip phone has to support this feature to work] Call Logs Support IP Phone with Key function FAX T.38 Other basic function: 1.Three way calling 2.Call Forward (on Busy or on Unanswered Call or on Unregistered Extension) 3.Call Hold 4.Call Transfer 5.Call Waiting 6.Caller ID 3 1.3 Interface & Panel 1) Interface 8 * Analog Ports can be FXO or FXS (RJ11) 1 * SD MMC Interface 2 * Network Interface (RJ45) 1 * Power port(DC 12V 2A) 1 * Reboot Button 2) Indication Panel Mark Function PWR Power Status SYS System Status WAN WAN interface Status LAN LAN Interface Status MMC SD card Status USB Optional 1-8 Analog Modules Status Status On Off On Off Wink Off Wink Off On Off Description Power On Power Off System working System Failed Data exchanging No Data exchanging Data exchanging No Data exchanging MMC connect successfully MMC connect failed Red Green Off FXO channel FXS channel Failed 3) Hardware 32bit embedded RISC DSP 2G MMC/SD Storage 4) environmental requirements: temperature: -10 °C -45 °C Storage temperature: -30 °C -65 °C humidity: 10-80% no dew Power: AC 100~240V 4 5) Packing List IPPBX Power Adapter 1 Unit 1 Unit 1.4 Default configuration 1. 2. 3. 4. Wan port IP address: http://192.168.1.100:9999 Lan port IP address: http://192.168.10.100:9999 Web GUI username: admin Web GUI password: admin Chapter2 Basic Configuration 2.1. Log on to the system After connecting the IP PBX to the local area network. Launch the web browser on a computer which is in this local area network. Enter the IP address for the system (Wan port IP address http://192.168.1.100:9999, Lan port IP address http://192.168.10.100: 9999 ) . The start web page will appear like this: Enter Username and password (default username is admin, password is admin), then click “login”. Once the login is successful, the home page will be display: Noted: you have to add a network segment same with the Wan ports if your PC is not at 192.168.1.***. 5 With the SpoTel GUI, you can configure extensions, conference, voicemail, Dial Plan and etc. Each page of the GUI has three columns: The left column present all the options tab that you can program the system. Click the tab to go to setting page of different options. The middle column contains the primary content for each page. The right column of the user interface contains Tooltips. This area provides brief description for any options of the GUI The home page is used for logout, Reboot and Factory Defaults. Logout: To log out the SpoTel GUI. Reboot: Reboot the IP PBX system Factory Defaults: Restore all settings to factory default. Activate change: Made the change active for the current configuration after you make a configuration on some page. 2.2. Configure Extensions Click the Extension tab and you will see the extensions setting, your created users are in this page. There are 30 users in your extensions list as default setting, you can add new extensions or remove the existing extensions. 6 Extensions Setting include: Extension The extension is assigned to the defined user. Name The full name of the individual assigned to this extension. Password The password is used to Extension registered VM Password The password is used to access voicemail for the specified Extension E-mail Set the user’s E-mail Caller ID Identifies the Caller ID presented when the listed extension dials out Analog Phone A drop-down menu is available to identify the analog phone port which this extension will access. Dial Plan You can choice dial plan based on the extensions’ need, this option references the Dial Rules option on the left tool bar. There are also several advanced extension options available. The advanced options establish the connections from the listed extension to other systems within the IPPBX system server. These advanced options include the following: Voicemail The extension support voicemail SIP The extension support SIP protocol IAX The extension support IAX protocol Call Waiting The extension support Call Waiting function 3-Way Calling The extension support 3-Way Calling functions Codecs Click here, you can set the extension’s codec (default support: alaw, ulaw and G.729). 7 2.3. Trunk If you want to make external call, you must register with a Trunk in order to connect to the Public Switched Telephone Network (PSTN) or other VoIP service provider. Through the web page you can add a trunk. There are three Trunk categories: Analog Trunk, VoIP Providers, Custom VoIP Trunk. Analog Trunk Custom Trunk Select the Analog radio button to define the analog ports you have access to as a service provider. This will give you the ability to place calls through the IP PBX utilizing analog lines. The analog ports available will be displayed when you select this option. Choose one or more analog ports by selecting their associated checkbox. You will not be able to create an analog service provider if you do not have any analog ports available. The Custom VoIP option allows you to create a custom VoIP definition. To create the custom VoIP provider definition you will need to complete the following: 8 Comment The comment field should be used as the name of the custom VoIP definition Protocol Specify either a IAX or SIP protocol Register Enable/Disable server register. Registering is not required for all providers Host The IP address of your service provider Username The user name associated with your provider account Password The password associated with your provider account Without Authentication if you connect to Voip server without Authentication, pls selected Once you have added a VoIP Trunk it will appear on the list of Trunk on the Trunk page. There is an Options drop-down list associated with each Trunk listing. The Options drop-down list allows you to edit or delete the Trunk definition, as well as further refine the definition by choosing several advance options. Select either Codecs or Advanced to further refine the definition. Codecs Codecs provide the ability for your voice to be converted to a digital signal and transmitted across the internet. Advanced The following advanced options are available to further refine your trunk. Trunkname Specify a trunk name if you want to refer to the service provider definition as something other than specified in Comment 9 Insecure This option specifies how connects to a service provider (host) should be handled. Valid options are very/yes/no/invite/port. (Default is “very”) Port The register request is sent through the port. (Default is SIP:5060,IAX:4569) Caller ID The caller ID will be set to the value specified in this field Fromdomain Sets default from: domain in SIP messages when acting as a SIP client. Fromuser Sets default from: user in SIP messages when acting as a SIP client Contact Specifies a primary extension for call routing 2.4. Outbound Routers The Dial Rules tab on the left toolbar allows you to use basic pattern matching to differentiate outbound calls and route them accordingly (create different DialPlan). Click on Add a Dial Rule to define a new DialPlan. The following dialog will be displayed. 10 A DialPlan is comprised of the following items: Rule Name Set a rule name Place this call through Select a Trunk through which the call should be made Analog fallback Select a Analog fallback Dialing Rules The Dialing Rule gives you the ability to use basic pattern matching to differentiate calls and route them accordingly. For instance, if a number begins with 9256 followed by 7 or more digits, that would define a call within the state of Alabama. If a call began with 9 followed by 7 digits, it would be a local call that probably didn’t require a long distance charge. Instead of adding a rule for every extension or phone number you call, specify the pattern in this rule similar to the example. Define a custom pattern Set a custom pattern by yourself. N Any digit from 2 to 9 Z Any digit from 1 to 9 X Any digit from 0 to 9 . Any number of additional digits Example: “_9ZNXXX.” mean first number is 9, second number is any digit from 1 to 9, third number is any digit from 2 to 9 and each “X” is any digit from 0 to 9. The “.” is more. Strip This option gives you the opportunity to remove specified digits from the call being dialed and replace them with the digits needed to make the call. You can also prepend digits to the beginning. 11 2.5.Inbound Routers The same pattern-matching logic used for processing outbound calls can also be employed for inbound calls. The two defaults define routing based on whether an incoming call matches or doesn’t match a pattern you define. There are only a few options you need to configure Route Make a selection from the drop-down list to choose how the calls will be routed. You can select from All Unmatched Calls or Calls which Match From Provider Select from the list of providers which you previously configuration To Extension The previously configuration extension which should receive the call. 2.6.IVR (Interactive Voice Response) Through the web page, you can create Interactive Voice Response (IVR). IVR are designed to allow for more efficient routing of calls from incoming callers. 12 Voice menus are constructed depending on your needs. Just like your business you need to create the solution best suited to your customers. Name Set a IVR name Extension Set a IVR connect number Welcome Massage Select a welcome massage voice from record Dial other Extensions Enable/Disable allow dial other extensions. 2.7. Record In the event that one wants to record custom menu prompts for the IP PBX, which can be used in a IVR, the Record may be used. 13 A list of previously recorded menus is displayed. Here, the user may modify several options Record Again Clicking this button allows the user to make another attempt at recording and replacing an existing custom sound file Play Clicking this button brings up a dialog entry box to allow the input of an extension that System will dial and play the prompt over Delete Clicking this button will delete the selected prompt There are two options under “Record a new voice” File Name This text entry box specifies the saved name of the file that is to be recorded. Extension Used for Recording This drop-down select box allows the user to choose which extension will dial to wait for the user to speak the prompt 14 Chapter3 Advanced Configuration 3.1. Voicemail & System Voice Language Voicemail is an option available for every extension in the IP PBX system. The relationship between the extension and the voice mail is established in the User Extension section of the GUI. You can configure the voicemail through this page. Standard configuration information is also present, allowing you to confirm the extension used to check messages as well as general parameters such as the following: Extension for Checking Messages This option defines the extension which Users call in order to access their voicemail account. Max greeting(Seconds) With this option, you specify the maximum amount of time available to record your voicemail greeting. Attach recordings to e-mail Enable/Disable send recording file to you email by attachment Dial “0” for Operator Callers who are sent to voice mail can press “0” for the operator and be transferred either during the voice mail salutation, or after recording the message. If this option is not enabled, a caller’s pressing “0” will be ignored. There are several options that can be specified to define the voicemail message in the system. Message Format This option gives you the ability to choose the format in which messages will be mailed. Maximum Messages The maximum number of messages per voice mail box is set here. Maximum Message Time The maximum duration of a message left by a caller is set 15 here Minimum Message Time The minimum duration of a message is dictated here. There are several playback options that can be specified. Say Message Caller-ID The Say Message Caller ID option reads the caller ID before the voice mail message is played Say Message Duration This option identifies exactly how long the message lasted. Play Envelop The envelope provides the date, time, and caller ID related to a voice mail. Allow Users to Review This option provides incoming callers the option to review their message before it is saved and can be played back by the owner of the voice mail extension. Standard options are presented to you, allowing you to discard the message or re-record it if you aren’t happy with it. Voicemail to email set: SMTP setting Smtp server The IP address or hostname of an SMTP server that your IP PBX may connect to, in order to send e-mail notifications of your voicemail; eg:mail.yourcompany.com Port The port number on which the SMTP server is running; generally port 25. Enable SMTP Authentication if your SSMTP server needs Authentication, please 16 Username Password Email setting From Sender Name Subject Massage enable SSMTP Authentication set, and configure the follow information input username of your email. input password of your email. Set the from email Set the name for sender Set the email title Input the matter in your email. System Voice Language In System -> Management, the system voice could be selected from the default English, French, Spanish, or Chinese. 17 3.2. Conferencing Every company reaches the point of needing more people on a call than it can effectively include through three-way calling. conference bridges allow you to include more people as well as project a professional image. 18 The configuration of the conference room and standard features is very straightforward. The conference room use default extension 900 , but you can always change it to any extension number you want. After establishing the extension for the room, you need to specify the password settings for the conference. Assign the PIN Code used by participants to enter the conference as well as the Administrator PIN Code used by the moderator of the conference to open the conference room. 19 A conference “Leader” could be set. The conference will not commence until the “Leader” dials in. Before the “leader” calls in, all participants will hear Music-on-Hold. An example is illustrated as the below: - The default conference bridge is 900 - Check the “Wait for marked user” - Add a Leader (802900) and check “Set Marked user” Now, all the participants will join the bridge “900” with the Pin code “1234”, while he conference leader will join the conference “802900” with the admin pin code “2345” Note: the leader number “802900” should be only known to the conference leader only In a similar manner, we could set up another set of conference bridge 902 & the associate arbitrary Leader number (such as 842902). 20 3.3. Music On Hold List of Music On Hold Class Music Display Music On Hold class list Set Music On Hold class name Select music. (you can replace music file through the update page.) Enter The Music File Name Set you want upgrade music file name TFTP Server IP address Set the TFTP server IP Select Music directory Select directory that you want saved music file. 21 3.4. Call Parking & Call Queue Call Park Extension to Dial for Parking Calls: Set Call Parking number What extensions to park call on: Set the Call Parking get number (eg: 701-720) Number of seconds a call can be parked for: Set the second call time Pickup Extension: Set Pickup Extension Timeout for answer on attended transfer: Set the answer timeout value. Call Queue - Tick the “Is Agent” in the extensions setting - Set an “Agent Call back Extension” in Advanced->Options - Set a Call Queue number in Advance-> Call Queue 22 23 In the IVR or Ring group, the call could be routed to the Call Queue (555 in our example) when the call is unanswered. Agent logon: - Agent will have to logon before the system will assigned the call from the Queue. - Agent dials the Agent Callbcack Login Number (666 in our example) 3.5. Ring Groups You can configure Ring Groups through the web page 24 Define Ring Groups to Dial more than one extension Name Set a Ring Group name Strategy There is a drop-down list, you can choose Ring all or Ring in order. Ring Group Members Add Ring Group member from Available channels. If the Ring Group no answered you can choose to Goto Voicemail of this user, Goto an IVR menu, HangUp 25 3.6. Disa Settings List of Disa New Disa Disa name are listed in the table. Create a new Disa. DISA Name PIN Response Timeout(s) Digit Timeout(s) digits that you need dial. Set a name for Disa Set a password for Disa Set effective time for imputing a password After you input the right password, the interval between 26 Extension for this Disa(Option) Set a number connect Disa Select DialPlan Select your DialPlan for calling out 3.7. Follow Me List of Forward New Forward Call Forward extensions are listed in the table. Create a new Call Forward Extension Select a need to call forward extension State Set state of the extension.(Disable, Always, Busy, No answer) Select forward extension Select a call forward to extension When you select “Forward a Outside Number” the follow page will be displayed. 27 Select DialPlan Select a Call forward to outside number using dialing rules Set forward outside number Input a Call forward to outside number. (Notice: This number must be consistent with the corresponding DialPlan) 3.8. Time Based Rules On this page, Define call routing rules based on date and time 28 3.9. Operator Local Extensions are Operator Extension Set up the digit of local extensions Set up Operator Extension. (you can dial “0” go to the extension at any time) Default Settings for a New User Set up the Default Settings for a New User, when you create a new extension will use the configuration. 29 Chapter4 Status Display 4.1. Call Logs This web page will display call logs Call Logs Download download the call logs file Call Logs Delete delete the call logs file 30 4.2. Register Status In this page, you can check SIP/IAX Users or Trunks Status. 31 4.3. System Info In this page it will display nonce system info 32 Chapter5 System Management 5.1. Network and Country; Time Settings On this page you can set WAN, LAN interface information and country. IP Assign: you can select STATIC, DHCP and PPPoE three mode Tone Zone: Set your Country, and use the Country Tone 33 System -> Time Settings NTP: Time Zone: Manual: Set NTP server address. Set your Time Zone Set your PBX time & date manually 5.2. DDNS On this page, you can set DDNS reference. Notice: Enter your account info from dyndns.org 34 5.3. Management On this page, you can change the administrator password (Default password: admin) And you can also set the advanced options about SIP and IAX2 protocol in the "Show Advanced Options" list,that is useful when you set connect two ippbx in different network. 35 5.4. Backup On this page, clicking the “Take a Backup” button, you can backup nonce configuration 5.5. Upgrade 36 In this page you can upgrade system package Enter The Package Name Set system package name TFTP Server IP address Set TFTP server IP How to upgrade: Please visit our website ( www.nicherons.com/download.html ) to find out the latest available firmware. The upgrade is automatically when entering the package name and our server info. Run the TFTP server, you will see below: Enter the configuration page, then upgrading page; Enter The Package Name, hereby it’s spotel-pbx-v3.0.7 Enter TFTP Server IP address, hereby it’s 192.168.1.132 After done, click Update to update, then the system will reboot automatically. (Note: the upgrading will set your system as default, please make backup before you do it.) 37 Chapter6 Operating Instruction 6.1 How to link the IP PBX to the interwork With Router If your office access the public network with router, you can put the IPPBX behind the router. You should connect the Wan port of the IPPBX to the Lan ports of the router,and you also can connect HUB or Switch to the Lan ports of the IPPBX to let some PC or IP Phone to access the public network.. Without Router If you have the public IP and want the IPPBX access the public network directly without router,then you should connect the Wan port of the IPPBX to the public network and connect HUB or Switch to the Lan ports of the IPPBX to let your PC access the public network..(If you want to access the public network through Modem,then you should use the PPPOE function of the IPPBX and let the IPPBX dial-up to connect the public network) 38 6.2 Log in to the system After connecting the ippbx to the local area network. Launch the web browser on a computer that is in this local area network. Enter the IP address for the system (default: Wan port IP address is http://192.168.1.100:9999, Lan port IP address is http://192.168. 10.100:9999) . The start web page will appear like this: Enter Username and password (default username is admin, password is admin), then click login. Once the login is successful, the home page will be display: With the SpoTel GUI, you can configure extensions, conference, voicemail, Outbound Routers and etc. Each page of the GUI has three columns: The left column present all the options tab that you can program the system. Click the 39 tab to go this kind of option setting page. The middle column contains the primary content for each page. The right column of the user interface contains Tooltips. This area provides brief description for any options of the GUI The home page is used for logoff, Reboot and Factory Defaults. Logout: To log out the SpoTel GUI. Reboot: Reboot the IPPBX08 system Factory Defaults: Restore all settings to factory default. Activate change: Made the change active for the current configuration after you make a configuration change on some page. 6.3 How to make a internal call Making internal calls are the base requirement for a telephony system. Below are the settings for this usage. 40 Set User Users: There are 30 default users, the extensions number are 801~830. You could add more if needed. Set user, Extension is 803 Name, Password and Caller ID, etc…… Select Dial Plan is DialPlan1 Set Extension 804 as the same way Use a IP Phone based SIP protocol registered with the user. Then you can use 803 call 804 successfully. 6.4 How to make a outbound call To make an outbound call, we need to add a trunk first. There are two types of Trunk: Analog Ports: FXO ports of IPPBX08, connect to local PSTN VoIP Trunk: SIP or IAX trunk, connect to remote SIP/IAX server I am using IPPBX08, the port1-4 are configured as FXO ports, port5-8 are configured as FXS ports. When a port is configured as FXO port, the corresponding LED shows RED. When a port is configured as FXS port, the corresponding LED shows GREEN. What are FXO and FXS? FXS (Foreign eXchange Station) is an interface which drives a telephone or FAX machine. FXS interfaces get phones plugged into them, delivery battery, and provide ringing. FXS interfaces are signalled with FXO signalling. FXO (Foreign eXchange Office) is an interface that connects to a phone line. They supply your PBX with access to the public telephone network. FXO interfaces use FXS signalling. FXS interfaces allow you to hook telephones to your PBX, and FXO interfaces allow you to connect your PBX to real analog phone lines. 41 Make call via PSTN trunk You can use the FXO trunking to make outgoing call via your local PSTN line. The set up is as per below: Add Analog Trunk Trunks -> Add a Trunk: 42 Add Outbound Routers In Outbound Routers -> add a Dial rule as below Dial Rules In the example, we have now added a Dial rule “Nicherons_Outcall” in the “DialPlan1”. As we can see from the dialing rule of ”Nicherons_Outcall”, all numbers start with 9 will be cut the first digit (‘9’) and sent to PSTN (port3 or port4). Choose Dial Plan for extensions: On the User page, edit the extensions to choose DialPlan1. 43 After we have done above, in the extension we can dial 9 + local number to dial out via PSTN line. Make call via VoIP trunk Via the voip trunking we can dial call via the voip service to reduce our cost when making international calls. Add VoIP service provider Trunk -> Add a Trunk: Add a Custom Trunk. 44 Add Dial Rule In Dial Rules -> add a new calling rule as below Dial Rules 45 Now we have added a new calling rule “Nicherons_VoIP” in the “DialPlan1”. As we can see from the “Nicherons_VoIP” dialing rule, all numbers start with 0 will be cut the first one digits (‘0’) and sent to my sip service provider. The “Nicherons_Out” is in the same DialPlan1. Since we have added this dial plan to the extensions in above, we don’t need to add dial plan again. So when we have added two calling rules, any call start with 9 will be route to PSTN, and call starts with 0 will be route to VoIP. 6.5 How to make an incoming call Add an Incoming call. Select Route “All Unmatched incoming calls” From provider “Port 1,2,3,4,5,6,7,8” To extension “Extension 802” (here, you can select a extension, an IVR, TimeRule or others) Then, if there is incoming call from any analog phone lines, the extension 802 will ring. 6.6 How to Set an incoming call to IVR based time rule Add record a custom voice Record -> Record a new voice 46 Set the record name is “Welcome” Choose a extension used for recording, here we use EXT 801 Click Record button Then, the extension 801 will ring Pick up the phone record “Welcome” message Then hangup and finish the record . Use the same way to record “Closing” message 47 Add a Ring Group Ring Group -> New Ring Group 48 Example: Name the ring group “tech” Choose the group members whose extensions are “801. 802, 803, 804” “if no answered”, choose “goto IVR”-- “working time” Click “Save” button 49 Set IVR IVR Select IVR-working time, Set welcome massage is “Welcome” Set keypress’ Events Dial “0” go to extension 805 Dial “1” go to extension 806 Dial “2” go to ringgroup tech Click Save button 50 Then set IVR-closed time Set welcome massage is “Closing” If the Name Directory (Dial-by-Name) is enabled, 51 Add a Time Rule Time Based Rules -> New Time Rule Set a Rule Name, eg: incoming Set the Time & Date Conditions “If time matches” --- go to “working time” “If time not match” --- go to “closed time” Click the save button, saved the configuration 52 53 Add a Trunk Trunks -> add a Trunk Add an incoming router Inbound routers -> add an incoming rule Select Route: All Unmatched incoming calls From provider: Ports 3, 4 54 To extension: incoming—Time Based Rule Then click Activate Changes, Made the change active for the current configuration 6.7 Link two IPPBX in the same network The simplest case to link two IPPBX together in the same network. We start from this and then try to expand to different network. Below is the structure of how to link two IPPBX in the same LAN: 55 The method of connecting two IPPBX08 in different location is: 1) Register the IPPBX08-A as an extension in IPPBX08-B(via IAX2 trunk),so the extensions in IPPBX08-A can make calls to IPPBX08-B’s extensions via this “special” trunk. 2) Use the reverse method in IPPBX08-B to register to IPPBX08-A. In above structure: 1) An ip phone registers to IPPBX08-A as an extension 601. 2) An ip phone registers to IPPBX08-B as an extension 801. 3) All the extensions under IPPBX08-A are in the format 6XX. 4) All the extensions under IPPBX08-B are in the format 8XX 5) Extensions under IPPBX08-A can make calls to extension under IPPBX08-B use format 8XX. 6) Extensions under IPPBX08-B can make calls to extension under IPPBX08-A use format 6XX. 7) The two IPPBX08 links each other via IAX2 trunk. Step 1: Set up a extension 699 in IPPBX08-A Extension: 699 ; Phone number of this extension Name: IPPBX08B_Users ; Password: 699 ;IAX2 Log on password Caller ID: 699 ; Caller ID Advance Options: Select IAX protocol Step 2: Set up an IAX trunk in IPPBX08-B to link to IPPBX08-A via this IPPBX08B_Users extension. In the page Trunks--> Add a Trunk 56 Step 3: Set Dial Rule in IPPBX08-B, all calls start with 6 will be sent to IPPBX08-A. In the page: Outbound Routers --> Add a Dial Rule Step 4: Set the user Dial Plan in IPPBX08-A, In the page: Extensions Dial Plan 57 Active the change and apply the test: 1. Register an IP phoneB to IPPBX08-B with 801 extension. 2. Register an IP phoneA to IPPBX08-A with 601 extension. 3. Use 801 to dial 601. And you can see 601 will ring and you can pick up the calls. Above is the way to router IPPBX08-B’s call to IPPBX08-A, the method to link IPPBX08-A to IPPBX08-B is the same as above. 6.8 Link two IPPBX in different network Two IPPBX08 are in internet The generally environment for two IPPBX08 in different location is: two IPPBX08 are both in the internet and using the public IP. The configuration is same with “Link two IPPBX08 in the same network”. But when you set the trunk, you must use the public ip. Like the follow: Set up an IAX trunk in IPPBX08-B to link to IPPBX08-A via this IPPBX08B_Users extension. In the page Trunks--> Add a Trunk 58 Two IPPBX08s are behind router. The generally environment for two IPPBX08 in different location is: two IPPBX08 are both behind router and using the private IP. Since the IPPBX08 doesn’t have the public IP, we need to do port forwarding in the router and make IPPBX08 is reachable to others. 59 Step 1: Set port forwarding in the router for IPPBX08-A The IPPBX08-A is behind the router, to register to IPPBX08-A via the internet, you need to forward the IAX2 port in your router, so all the packets received on the router WAN port (210.11.25.127:4569) will be forwarded to the IPPBX08-A (192.168.1.21:4569). Below is the setting page in a linksys router: Step 2. Set up the service provider and calling rule in IPPBX08-B to make it register to IPPBX08-A. This method is almost the same as above, EXCEPT you need to use the 210.11.25.127 as the service provider instead of 192.168.1.21. Step 3. Use the same method do port forwarding in router-B for IPPBX08-B. Your public address from network provider maybe a dynamic ip which will be changed periodically. To overcome the problem of dynamic ip, you may need to use the DDNS service , for more info please google the internet. Step 4. How to resolve problems about hearing only on one side: If your IPPBX behind the Router,you should build a IP Address Map: As follow: Mangerment---->Show Advanced Options ---->GOTO : Golbal SIP Settings --->NAT Support 60 Extern ip Replace with your external ip address this your public IP or domain Extern Host Replace with your external ip address this your public IP or domain Extern Refresh Set time for fresh,default 10 Local Network Address NAT mode Replace with your local network address and mask If your IPPBX behind the Router, set default yes Combine SpoTel with existing traditional PBX Assume there is already existed a traditional PBX (3 FXO, 8 Extensions) in your office, how can you add more PSTN lines/extensions or use VOIP solution in the exist solution? SpoTel will give you a favor, which can combine with exist PBX solution as below structure: Flowchart: Application: 1. Connect PBX’s CO port (FXO Ports) to SpoTel’s FXS port. PBX will be one of the SPOTEL's extensions and all the extensions under PBX can use the FXS functions from SpoTel. The functions include: 1) Make calls to the SpoTel’s other extensions. 2) Make calls use the SpoTel’s voip trunk. 3) Make PSTN via SpoTel’s PSTN trunk. 2. Connect PBX’s FXS port to SpoTel's FXO port. SpoTel will be one of the PBX extensions and all the extensions under PBX can 61 use all the FXS functions from PBX. The functions include: 1) Make calls to the PBX's other extensions. 62