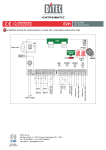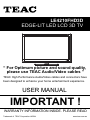
1
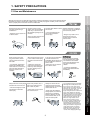
LE4210FHD3D EDGE-LIT LED LCD 3D TV “ For Optimum picture and sound quality, please use TEAC Audio/Video cables ” TEAC High Performance Audio/Video cables and connectors have been designed to enhance your home entertainment experience. USER MANUAL IMPORTANT ! WARRANTY INFORMATION INSIDE. PLEASE READ Trademark of TEAC Corporation JAPAN www.teac.com.au WARRANTY PROCEDURE v1.5.2: DEC 2011 Please read the owner’s manual carefully and ensure that you have followed the correct installation and operating procedures. 1. 2. 3. Please read this warranty card. Keep your purchase receipt to enable you to proceed quickly in the event of a Warranty Service. If you require Warranty Service, please contact the TEAC Customer Support Hotline at 1300 553 315 for assistance. Please ensure that you have the model number, serial number and purchase receipt ready when you call. Please complete the section below and keep this information for your own records. Owner’s Name Owner’s Address Postcode Model Name/No. Serial No. Dealer’s Name Dealer’s Address Postcode Authorised Service Centres in Major Australian Cities NSW 151 Arthur Street Homebush West, NSW 2140 Queensland Unit 1, 320 Curtin Ave West Eagle Farm, QLD 4009 South Australia 11 McInnes Street Ridleyton, SA 5008 Victoria 282 Normanby Road South Melbourne, VIC 3205 Western Australia Unit 2, 50 Pilbara Street Welshpool, WA 6106 Thank you for selecting a TEAC product . If you should require assistance with your product regarding its setup or operation, or if any difficulties arise, please call us directly for advice between Monday to Friday at 8.30AM – 6PM AEST at the TEAC Customer Support Hotline 1300 553 315 [email protected] www.teac.com.au WARRANTY INFORMATION v1.5.2: DEC 2011 Our goods come w ith guarantees that cannot be excluded under the Australian Consumer Law . You are entitled to a replacement or refund for a major failure and for compensation for any other reasonably foreseeable loss or damage. You are also entitled to have the goods repaired or replaced if the goods fail to be of acceptable quality and the failure does not amount to a major failure. Warranty Terms & Conditions 1. TEAC warrants that this product is free from defects in material and workmanship under normal domestic use with reasonable care and skill. Maintenance and cleaning (i.e. laser head) is not covered by this warranty. The TEAC warranty only applies to TEAC products purchased, used and serviced in Australia. 2. The benefits to the consumer given by this Warranty are in addition to other rights and remedies of the consumer under a law in relation to goods or services to which the warranty relates, being the Australian Consumer Law. 3. Refund or replacement via your retailer is available for a period of 14 days after purchase for goods that have been inspected and determined to have a major failure. Refund and exchange is not applicable for change of mind. 4. Subject to the terms herein, this warranty effectively covers the equipment as specified in the Warranty Periods Table below from the date of purchase. TEAC PRODUCT LED/LCD TV 32” (80 cm) and above All other TEAC products 5. WARRANTY PERIOD 1 Year (In-Home Service/ Pick up Available)* 1 Year (Carry-in Service) In Home Service/Pick up* Service This service will only be provided as part of this warranty if all the following conditions are met; a) The product is indicated in the Warranty Period Table. b) The product is within the warranty period. c) The product is located within the normal service area of the local TEAC Authorised Service Centre. If TEAC determines that the product is not repairable on site, TEAC can complete the repair by taking the product to a TEAC Authorised Service Centre. Carry-in Service Where In-Home service/Pick up* is not available, the purchaser is required to send the product to the nearest TEAC Authorised Service Centre for repair. In this event, proof of purchase is required to support a warranty claim. After the repair, the product will be available for collection by or return to the purchaser at a fee upon request. TEAC inhome service can be made available at a fee upon request. 6. A 12-month replacement warranty is applicable to all Accessories such as Remote, Power Adaptors and Cables. 7. TEAC will ensure to the best of its abilities that all required parts are made available for any required service/repair. 8. TEAC Australia Pty Ltd and its Authorised Service Centres will use their best endeavours to complete product repairs within a reasonable period based on available resources and workload during the time when service is requested and performed. 9. Refurbished parts may be used to repair the product. In the case of a replacement, the product may be replaced, with a refurbished unit of the same type or, if one is unavailable, a similar refurbished model with equal or better features & specifications. 10. Please be advised that if the product presented for repair is capable of retaining user-generated data, the data may be lost during servicing. Customers are strongly encouraged to back up all important information/data before sending the product in for service/repair. 11. Service will be provided only during normal business hours and under safety conditions and circumstances. TEAC and its authorised service agents can refuse any repair if safety, in relation to OH&S, becomes a concern to its staff or authorised service agents’ personnel. 12. The warranty is void and warranty claims may be refused, subject to the Australian Consumer Law, if: a) The product was not transported, installed, operated or maintained according to manufacturer instruction, or b) The product was abused, damaged, tampered, altered or repaired by any unauthorised persons, or c) Product failure is due to accidents during use, installation or transit, power surges, use of defective or incompatible external devices, exposure to abnormal conditions such as excessive temperatures or humidity, or entry of liquids, objects or creatures into the product. 13. No one is authorised to assume any liability on behalf of TEAC or impose any obligation on it, in connection with the sale of any equipment other than as stated in this warranty and outlined above. 14. TEAC reserves the right to inspect and verify whether the product is exhibiting a major failure as claimed by customers/retailers. 15. LCD dead pixel policy, please contact TEAC Customer Support Hotline on 1300 553 315 for assistance. TABLE OF CONTENTS 1 Safety Precautions 1.1 1.2 1.3 1.4 2 10 11 Remote Control Buttons and Functions Battery Installation 12 13 OSD Menu Overview Menu Map 14 13-15 ATV/DTV Mode Electronic Programme Guide (EPG) Channel Customisation Channel List and Favourite List Password Lock for Channels and Programmes 16 16 17 18 19 Digital Video Recording (DVR) 8.1 8.2 8.3 8.4 8.5 9 Initial Power On Selecting an Input Source TV & Electronic Programme Guide 7.1 7.2 7.3 7.4 7.5 8 8 9 On-Screen Display (OSD) Menu 6.1 6.2 7 Front View Back View Remote Control 5.1 5.2 6 5 5-7 Initial Setup & Input Sources 4.1 4.2 5 Accessories TV Stand/Wall Mounting Assembly Parts & Connections 3.1 3.2 4 1 2 3 4 TV Placement Setup 2.1 2.2 3 Power Supply Installation Use and Maintenance Important Safety Instructions Setting up for USB Recording Instant Recording Time Shift (Pause Live TV) Scheduled Recording/Viewing Reminder Using the Recorded File List 21 22 23 24 25 3D Video Playback 9.1 9.2 9.3 Watching 3D TV 3D Glasses 3D Settings 26 27 27 10 USB Multimedia Playback 10.1 10.2 Connecting the USB Storage Device Playing Multimedia Files 29 29 11 Reference 11.1 11.2 Troubleshooting Specifications 33 34-35 1. SAFETY PRECAUTIONS 'RLQJVRPD\UHVXOWLQ electric shock. 'RLQJVRPD\UHVXOWLQ fire or electric shock. DO NOT plug several devices into the same outlet. $FRQJHVWHGRXWOHWPD\FDXVH the outlet to overheat and start a fire. Insert the power plug fully into the outlet. $ loose or improperly inserted power plug may result in fire. Parts & Connections DO NOT use a damaged power cord or plug or a loose outlet. Initial Setup & Input Sources DO NOT touch the power plug with wet hands. TV Placement Setup Safety Precautions 1.1 Power Supply Remote Control DO NOT bend the power cord excessively or place heavy objects on it. TV & Electronic Reference It is the responsibility of the user to make sure all precautions and warnings are heeded and followed. Programme Guide 3XOOLQJRQWKHFRUG can damage the internal wire and may result in a fire. Digital Video 1RWGRLQJVRPD\UHVXOWLQ fire or electric shock. 3D Video Playback $OZD\VXQSOXJWKHXQLWEHIRUH cleaning. USB Multimedia Playback When disconnecting the power cord from an $& outlet, always grasp it by the plug. Recording (DVR) On-Screen Display (OSD) Menu 'RLQJVRPD\UHVXOWLQ fire or electric shock. 1 6$)(7<35(&$87,216 TV Placement Setup Safety Precautions ,QVWDOODWLRQ DO NOT place containers with liquids such as vases, drink cans, bottles or small metallic objects on top of the unit. 'RLQJVRPD\UHVXOWLQILUH electric shock, malfunction, or deformation. DO NOT place a burning candle, DO NOT place the unit in a poorly burning incense, or lighted ventilated enclosure, such as a cigarette on top of the unit. cabinet. DO NOT place the unit near any heat source such as a fire'RLQJVRSRVHVDVHULRXVULVN place or space heater. of overheating and a possible fire outbreak. 'RLQJVRSRVHVDVHULRXVULVN of overheating and a possible fire outbreak. DO NOT use or store flammable DO NOT place the unit on an unstable surface, such as a sloped table, or any or combustible materials near stand with a contact area smaller than the unit. the bottom surface of the unit stand. 'RLQJVRPD\UHVXOWLQILUH or explosion. 3ODFLQJWKHXQLWRQDIODWVWDEOHVXUIDFH can prevent accidents from happening. Ignoring this precaution may result in the unit toppling over and causing injury. . DO NOT run power cords near Install the antenna away from heat-producing appliances such high-voltage power lines and as radiators, stoves, or irons. communication cables. Make sure it is installed securely. The excessive heat can melt ,IWKHDQWHQQDWRXFKHVDSRZHUOLQH the insulation and expose live contact with the antenna may result wires, resulting in fire or electric in fire, electric shock, or serious injury. shock. TV & Electronic Digital Video Install the unit at an adequate distance from the wall to ensure sufficient ventilation. Insufficient ventilation may result in the unit overheating, which may cause a possible fire outbreak. Do not cover the unit with a tablecloth, curtain, or other material. ,QVXIILFLHQWYHQWLODWLRQPD\ result in the unit overheating, which may cause a possible fire outbreak. Be sure to place the unit on a level surface. The following precautions are divided into "Warnings" and "Cautions". Disconnect this device from power by turning the power off at the AC power outlet and unplugging the AC plug. Warning : Ignoring this precaution may result in death or serious injury. Caution : Ignoring this precaution may result in injury or property damage. Reference USB Multimedia Playback 3D Video Playback Recording (DVR) Programme Guide On-Screen Display (OSD) Menu Remote Control Initial Setup & Input Sources Parts & Connections ,IOLTXLGHQWHUVWKHXQLWRUDQ\ metal object falls into the unit, it may result in a shortcircuit, fire, or electric shock. DO NOT place the unit where it is exposed to rain, excessive moisture or grease. 2 6$)(7<35(&$87,216 • Not doing so may result in fire or electric shock. DO NOT insert any metal objects, such as a screwdriver, paper clip, or a bent wire into the ventilation openings or A/V terminals. DO NOT allow children to climb onto the unit. • The unit could topple over onto a child and result in serious injury. • Doing so may result in fire or electric shock. If the unit requires repair, contact the service center. • If the unit is dropped, it could get damaged or otherwise cause injury. • Failure to do so may result in fire or electric shock. • Never clean with industrial strength polish, wax, benzene, paint thinner, air freshener, lubricant, detergent, or other such chemicals. Also, do not clean with a damp cloth. 3 Do not display still images and partially still images on the LED panel for more than 2 hours as it can cause screen image retention. This image retention is also known as “screen burn”. To avoid such image retention, reduce the degree of brightness and contrast of the screen when displaying a still image. Watching the LED TV in 4:3 format for a long period of time may leave traces of borders displayed on the left, right and centre of the screen caused by the difference of light emission on the screen. Playing a DVD or a game console may cause a similar effect to the screen. Damages caused by the above effect are not covered by the Warranty. Displaying still images from Video games and PC for longer than a certain period of time may produce partial after-images. To prevent this effect, reduce the ‘brightness’ and ‘contrast’ when displaying still images. On-Screen Display (OSD) Menu TV & Electronic Always turn off the unit and unplug the power cord when cleaning the unit. Use a soft dry cloth to clean the unit. Programme Guide Wipe off any moisture, dirt, or dust on the power plug pins with a clean, dry cloth. Digital Video Always have two or more people at hand to lift or move the unit. • If a child has swallowed a battery, seek medical attention immediately. Recording (DVR) • Moving the unit with the power cord connected to the outlet may cause damage to the cord, resulting in fire or electric shock. When removing the batteries from the remote control, make sure children do not swallow them. Keep the batteries out of the reach of infants and children. 3D Video Playback • If not cleaned, clogged dust particles at ventilation holes could cause the unit to heat up, and ignite when switched on, which may result in a fire outbreak. If you notice any unusual odors or smoke around the unit, immediately disconnect the unit from the outlet and contact the service center. • Failure to do so may result in fire or electric shock. USB Multimedia Playback When moving the unit, be sure to turn off the unit and unplug the power cord from the wall outlet. Reference When not using the unit for long periods of time, disconnect the power cord from the wall outlet. Remote Control Initial Setup & Input Sources • Doing so poses a serious risk of fire or electric shock. DO NOT dismantle or modify the unit in any way. Do not attempt to service the unit yourself. TV Placement Setup Disconnect the power cord from the power source during a thunderstorm. Parts & Connections Although the LCD screen is made with high-precision technology and 99.99% or more of the pixels are effective, black dots may appear or bright points of light (red, blue, or green) may appear constantly on the LCD screen. Thisis a property of the LCD screen and is not a malfunction. Safety Precautions 8VHDQG0DLQWHQDQFH 6$)(7<35(&$87,216 ,PSRUWDQWVDIHW\,QVWUXFWLRQV TV & Electronic Programme Guide Digital Video 7RSUHYHQWDQ\LQMXULHVWKHIROORZLQJVDIHW\SUHFDXWLRQVVKRXOGEHREVHUYHGLQWKH LQVWDOODWLRQXVHVHUYLFLQJDQGPDLQWHQDQFHRIWKLVGHYLFH3OHDVHUHDGWKLVPDQXDOFDUHIXOO\ DQGNHHSLWIRUIXWXUHUHIHUHQFH 5HDGWKHVHLQVWUXFWLRQV .HHSWKHVHLQVWUXFWLRQV +HHGDOOZDUQLQJV )ROORZDOOLQVWUXFWLRQV &OHDQRQO\ZLWKDGU\FORWK 'RQRWEORFNDQ\RIWKHYHQWLODWLRQRSHQLQJV,QVWDOOLQDFFRUGDQFHZLWKWKH PDQXIDFWXUHU¶VLQVWUXFWLRQV 'RQRWLQVWDOOQHDUDQ\KHDWVRXUFHVVXFKDVUDGLDWRUVKHDWUHJLVWHUVVWRYHVRURWKHU GHYLFHVLQFOXGLQJDPSOLILHUVWKDWSURGXFHKHDW 'RQRWGHIHDWWKHSXUSRVHRIWKHSRODUL]HGRUJURXQGLQJW\SHSOXJ$SRODUL]HGSOXJ KDVWZREODGHVZLWKRQHZLGHUWKDQWKHRWKHU$JURXQGLQJW\SHSOXJKDVWZREODGHV DQGDWKLUGJURXQGLQJSURQJ7KHZLGHEODGHRUWKHWKLUGSURQJLVSURYLGHGIRU\RXU VDIHW\,IWKHSURYLGHGSOXJGRHVQRWILWLQWR\RXUSRZHURXWOHWFRQVXOWDQHOHFWULFLDQWR UHSODFHWKHSRZHUVRFNHW 'RQRWEHQGWKHSRZHUFRUGH[FHVVLYHO\3UHYHQWWKHFRUGIURPEHLQJZDONHGRQRU SLQFKHGE\ZHLJKWVSODFHGRQLW 2QO\XVHWKHDWWDFKPHQWVDFFHVVRULHVVSHFLILHGE\WKHPDQXIDFWXUHU 8VHRQO\ZLWKDFDUWVWDQGWULSRGEUDFNHWRUWDEOHVSHFLILHGE\WKH PDQXIDFWXUHURUVROGZLWKWKHGHYLFH:KHQDFDUWLVXVHGXVH FDXWLRQZKHQPRYLQJWKHFDUWDQGGHYLFH 8QSOXJWKLVDSSDUDWXVGXULQJOLJKWQLQJVWRUPVRUZKHQXQXVHGIRU ORQJSHULRGVRIWLPH 5HIHUDOOVHUYLFLQJWRTXDOLILHGVHUYLFHSHUVRQQHO6HUYLFLQJLVUHTXLUHGZKHQWKH DSSDUDWXVKDVEHHQGDPDJHGLQDQ\ZD\ 7KLVV\PEROLQGLFDWHVWKDWGDQJHURXVYROWDJHLQVWLWXWLQJDULVNRIHOHFWULF VKRFNLVSUHVHQWZLWKLQWKLVGHYLFH 7KLVV\PEROLQGLFDWHVWKDWWKHUHDUHLPSRUWDQWRSHUDWLRQDQGPDLQWHQDQFH LQVWUXFWLRQVLQWKHGRFXPHQWDWLRQDFFRPSDQ\LQJWKLVGHYLFH L127( 7RSUHYHQWGDPDJHZKLFKPD\UHVXOWLQILUHRUKD]DUGVGRQRWH[SRVHWKHGHYLFHWR UDLQRUOLTXLGV 'RQRWSODFHREMHFWVFRQWDLQLQJOLTXLGVVXFKDVYDVHVRQWKHGHYLFH,IGULQNVDQG OLTXLGVKDYHEHHQVSLOOHGRQWKHGHYLFHXQSOXJWKHGHYLFHIURP$&SRZHU LPPHGLDWHO\DQGFRQWDFWWKH7($&&XVWRPHU+RWOLQHIRUDVVLVWDQFH 6HUYLFLQJRIWKLVGHYLFHVKRXOGEHFRQGXFWHGE\TXDOLILHGDQGFHUWLILHG7($&VHUYLFH SHUVRQQHO 7KHPDQXIDFWXUHUZLOOQRWEHKHOGUHVSRQVLEOHIRUDQ\GDPDJHFDXVHGE\ PRGLILFDWLRQVGRQHRQWKHGHYLFHZLWKRXWDXWKRULVDWLRQIURPWKHPDQXIDFWXUHU¶V DXWKRULVHGVHUYLFHDJHQW Reference USB Multimedia Playback 3D Video Playback Recording (DVR) On-Screen Display (OSD) Menu Remote Control Initial Setup & Input Sources Parts & Connections TV Placement Setup Safety Precautions :DUQLQJVDQG3UHFDXWLRQV 4 793/$&(0(176(783 $FFHVVRULHV TV Placement Setup 7KHDSSHDUDQFHRIWKHFRPSRQHQWVPD\ORRNGLIIHUHQWIURPWKHIROORZLQJILJXUHV &$87,21 Initial Setup & Input Sources USB Multimedia Playback 0DNHVXUHWKH79LVFRPSOHWHO\GLVFRQQHFWHGDQGXQSOXJJHGIURPSRZHU 7RSUHYHQWGDPDJHWRWKH79VFUHHQDYRLGWRXFKLQJRUSUHVVLQJRQWKH VFUHHQZLWKKDQGVRUREMHFWVDWDQ\WLPH'RQRWSUHVVRQWKHIURQWSDQHODV LWPD\GDPDJHWKHVFUHHQ 7RSURWHFWWKH79IURPGDPDJHRUVFUDWFKLQJRQO\SODFHWKH79RQDVRIWIODW VXUIDFHOLNHDWDEOHFRYHUHGZLWKDFRWWRQWRZHORUIRDPPDW $VVHPEO\OLIWLQJDQGPRYLQJRIWKH79PXVWEHGRQHE\DWOHDVWSHRSOHWR SUHYHQWXQLWGDPDJHRUSK\VLFDOLQMXU\IURPDFFLGHQWV (QVXUHWKDWDOOVFUHZVDUHWLJKWDQGVHFXUHDIWHUDVVHPEO\VRWKDWWKHVWDQG RUPRXQWLQJEUDFNHWLVVWDEOHHQRXJKWRSUHYHQWWKH79IURPIDOOLQJDQG FDXVLQJSHUVRQDOLQMXU\RUSURSHUW\GDPDJH 0DNHVXUHWKDWWKH79LVQRWNQRFNHGRUSXOOHGGRZQIURPLWVSRVLWLRQ 3UHYHQWFKLOGUHQDQGSHWVIURPSOD\LQJZLWKRUFOLPELQJRQWKH79,IWKH79 IDOOVLWPD\FDXVHSHUVRQDOLQMXU\RUSURSHUW\GDPDJH ,IWKH79VWDQGRUZDOOPRXQWLQJEUDFNHWLVGDPDJHGGRQRWXVHLWWRVXSSRUW WKH79&RQWDFW\RXUGHDOHULPPHGLDWHO\ Remote Control 7KLV79FRPHVUHDG\WREHVHWXSZLWKWKHSURYLGHG79VWDQG$OWHUQDWLYHO\RSWWRPRXQWWKH 79RQWKHZDOOE\REWDLQLQJDZDOOPRXQWEUDFNHWDQGPRXQWLQJH\HEROWVVFUHZVWKUHDGVL]H 0[IURP\RXUORFDOKDUGZDUHVWRUH)RUEHVWUHVXOWVZHUHFRPPHQGWKDWZDOOPRXQWLQJ VKRXOGEHSHUIRUPHGE\DSURIHVVLRQDOLQVWDOOHU L127( 7KH79VKRXOGEHOHYHOOHGRUDQJOHGGLUHFWO\DWWKHYLHZHU¶VH\H $OORZDVSDFHRIFPDURXQGWKH79WRUHGXFHULVNRIRYHUKHDWLQJ 7KH79VWDQGDOORZVVLGHZD\VWXUQLQJRIWKH79WRDOLPLWHGGHJUHH'RQRWIRUFHLWWR WXUQPRUHWKDQLWFDQDV\RXZLOOGDPDJHWKHVWDQG On-Screen Display (OSD) Menu 796WDQG:DOO0RXQWLQJ$VVHPEO\ Parts & Connections Contact Card TV & Electronic Quick Start Guide Programme Guide 2 x AAA Battery Digital Video Remote Control Recording (DVR) Mains cable 3D Video Playback User’s Guide Reference 5 2.TV PLACEMENT SETUP TV Stand Installation/Removal 4. Place the unit face down on a soft surface. Gently position the glass base to the leg at the bottom of the TV. Fasten the 4 provided screws (screw size B4x16F) to secure the stand to the TV according to the diagram. To remove the stand, reverse the steps above. Parts & Connections TV Placement Setup 1. 2. 3. TV & Electronic Programme Guide Digital Video Fall Prevention To prevent the TV from tilting forward and falling over to cause damage or injury, please secure the TV to your table or wall using screws or eyebolts and strong cord (not provided). An example on fixing the TV to a table is shown below 1. 2. 3. Install a wood screw or eyebolt into the table that is supporting the TV. Fix a machine screw into a screw hole near the base in the back of the TV. Tie the wood screw or eyebolt to the machine screw with a strong cord. Reference USB Multimedia Playback 3D Video Playback Recording (DVR) On-Screen Display (OSD) Menu Remote Control Initial Setup & Input Sources Screws (4xB4X16F) Screw holes Alternatively, secure the TV to the wall directly behind it by fixing eyebolts to the wall and tying them to screws fixed on the centre of the TV back panel. 6 2. TV PLACEMENT SETUP 1. 2. 3. 4. 100mm 100mm TV & Electronic Programme Guide Digital Video Recording (DVR) 3D Video Playback 100mm USB Multimedia Playback 7. 8. 9. Fasten 4 eyebolts LQWRWKHIRXUVFUHZKROHVRQWKH79¶VUHDUpanel according to the diagram. Fasten the wall mounting bracket using screws onto the wall. Connect the eyebolts and the wall bracket securely with strong rope Carefully check that all fastenings are secure before releasing the TV. 100mm Thread hole size ± M4 x 10 depth (TV Mounting Screw Size) on the TV. 7 Reference 6. On-Screen Display (OSD) Menu Remote Control Initial Setup & Input Sources Parts & Connections 5. Ensure that the selected wall is made of appropriate material and can support the weight of the TV. Make sure there are no pipes or cables inside the wall on your chosen position. Obtain a suitable wall mounting bracket and mounting eyebolts (thread size M4x10) and screws from your local hardware store. Place the unit face down on a soft surface. Remove the attached leg at the bottom of the TV by removing the 5 screws on the leg cover. Refit the cover securely by replacing the 5 screws into their original positions. TV Placement Setup Wall Mounting 3$576&211(&7,216 )URQW9LHZ MENU CH+ CHVOL+ VOL- Initial Setup & Input Sources Parts & Connections INPUT TV & Electronic Programme Guide Digital Video Reference USB Multimedia Playback 3D Video Playback Recording (DVR) On-Screen Display (OSD) Menu Remote Control POWER INPUT: Display the input source menu. MENU: Display/exit the OSD menu. CH+/-: Scan through channels. VOL+/-: Adjust the volume. POWER: Turn on/standby the TV set. 8 3$576&211(&7,216 Initial Setup & Input Sources Parts & Connections TV Placement Setup %DFN9LHZ AC POWER IN &$87,21 0DNHVXUHWKDWWKH79LVFRPSOHWHO\GLVFRQQHFWHGDQGXQSOXJJHGIURP SRZHUEHIRUHPDNLQJRUFKDQJLQJFDEOHFRQQHFWLRQV 0DNHVXUHWKDWWKHSRZHURXWSXWIURP\RXUSRZHUVRXUFHPDWFKHVWKHSRZHU LQSXWODEHOOHGRQWKH79DGDSWHU 9 TV & Electronic Programme Guide Digital Video Recording (DVR) HDMI 1/2/3 YPbPr PC IN VGA Video Audio L/R In COAX Headphone RF 3D Video Playback USB Function Turn on/off the power supply. Connect to the AC power supply Connect to a USB storage device for DVR (Recording) and USB Multimedia Playback Connect to the HDMI socket of your DVD or satellite box Connect to the component YPbPr output of external devices PC audio input Connect to the PC VGA output to display PC graphics Connect to the composite video output of external devices Audio signal input for AV (shared with YPbPr) Digital output to AV receiver Connect to headphones Connect to antenna or cable source USB Multimedia Playback Part Name Power Switch AC Power In Reference PC-IN On-Screen Display (OSD) Menu Remote Control SWITCH ,1,7,$/6(783,13876285&(6 ,QLWLDO3RZHU2Q :KHQWKH79LVWXUQHGRQWKHILUVWWLPHRXWRIWKHER[RUDIWHUDIDFWRU\VHWWLQJVUHVHWLWZLOO SURPSW\RXWRUXQDXWRFKDQQHOWXQLQJ &RQQHFWWKH79WR\RXUDQWHQQDZDOOVRFNHWXVLQJDFRD[LDO79FDEOH $IWHUPDNLQJVXUHDOOFRQQHFWLRQVDUHVHFXUHSOXJLQWKHSRZHUFRUGDQGWXUQRQ$& SRZHU 3UHVV RQWKHUHPRWHFRQWUROWRWXUQRQWKH79 7KH79ZLOOLQLWLDOLVHDQGSURPSW\RXWRFKRRVHEHWZHHQ+RPH0RGHDQG6KRS 0RGH+RPH0RGHLVUHFRPPHQGHGIRURSWLPDOHQHUJ\VDYLQJ&KRRVHZLWK DQGSUHVV WRSURFHHG 1H[WDWXQLQJPHQXZLOOGLVSOD\$GMXVWWKHVHWWLQJVZLWKDQGSUHVV WR VWDUWWXQLQJ $IWHUWXQLQJLVFRPSOHWHWKH79ZLOOGLVSOD\SURJUDPPHVIURPGHWHFWHGFKDQQHOV Remote Control Initial Setup & Input Sources L127(,IQRFKDQQHOVDUHGHWHFWHGSOHDVHFKHFNWKHFRQQHFWLRQDQGFRQGLWLRQRI\RXU H[WHUQDODQWHQQD 6HOHFWLQJDQ,QSXW6RXUFH TV & Electronic Programme Guide Digital Video Input Source 3UHVV WRGLVSOD\WKHOLVWRILQSXWVRXUFHV 3UHVVWRFKRRVHDQLQSXWVRXUFH 3UHVV WRFRQILUP '7986%DQG+'0,FDQDOVREHDFFHVVHGXVLQJWKH VKRUWFXWEXWWRQV DQG 7KLV79VWDUWVLQ'79PRGHE\GHIDXOWZKHQLWLVVZLWFKHG RQIRUWKHILUVWWLPH6XEVHTXHQWO\LWZLOOVWDUWLQWKHPRVW UHFHQWO\VHOHFWHGLQSXWPRGH L127(3OHDVHPDNHVXUHWKHGHYLFHLVFRQQHFWHG EHIRUHVHOHFWLQJWKHLQSXWVRXUFH Reference USB Multimedia Playback 3D Video Playback Recording (DVR) On-Screen Display (OSD) Menu 7RSOD\GLIIHUHQWPHGLDW\SHVDQGIURPDQ\FRQQHFWHG H[WHUQDOGHYLFHFKDQJHLQSXWVRXUFHVWRDFWLYDWHWKH GHVLUHGFRQQHFWLRQ 10 AV YPbPr Move OK Select EXIT Quit 5(027(&21752/ 7KHUHPRWHFRQWUROXVHV,QIUDUHGVLJQDOV3RLQWLWDWWKH,QIUDUHGVHQVRUDWWKHIURQWRIWKH79 L127(7KHUHPRWHFRQWUROPD\QRWZRUNFRUUHFWO\LILWLVRSHUDWHGRXWRIUDQJHRUDQJOH RILIWKHUHDUHREMHFWVEORFNLQJWKHVLJQDO 5HPRWH&RQWURO%XWWRQVDQG)XQFWLRQV On-Screen Display (OSD) Menu TV & Electronic Programme Guide Digital Video Recording (DVR) Reference USB Multimedia Playback MENU: Switch the TV on or off Standby mode. SUBTITLE: Choose from available subtitles. AUDIO: Choose from available audio tracks. EPG: Access the Electronic Programme Guide. DISPLAY: Display detailed information or controls. : Directional navigation buttons. OK: Confirm a setting. CH+/-: Browse next/previous channel. VOL+/-: Adjust volume level. EXIT: Exit menu or return to last level. MUTE: Toggle audio output muting. Number Buttons: Key in numbers to view channels or other option inputs. : Return to the most recently viewed TV channel. CH.FAV: Show Channel List, then Favourite Channels List. 3D Video Playback DELETE: Delete files from the Recorded File List. REC. LIST: Display the Recorded File List. SCH.LIST: Display the Schedule List. SCREEN: 1. While playing music, turn off the screen. 2. In HDMI Mode, change between Video and PC Modes. 3. In VGA Mode, auto-align the screen. Remote Control POWER: Switch the TV on or off Standby mode. DTV/USB: Switch to DTV/USB Mode. 3D: Access the 3D Setup Menu. INPUT: Access the Input Source Menu. HDMI: Cycle through HDMI Modes 1-3. P MODE: Cycle through preset picture profiles. S MODE: Cycle through preset sound profiles. MEDIA CENTER: Function not available. 11 5(027(&21752/ (REC): Start recording when in DTV Mode. REPEAT: Toggle Repeat options in USB Mode. : No Function. : Play/Pause playback, or toggle DTV Time Shift. : Stop playback. : Fast Rewind/Fast Forward up to 16x. : Previous/next chapter/track. : Function not available. D.MENU: Function not available. D.TOPTITLE: Function not available. Teletext operation: Teletext is an information system broadcasted by certain channels providing news, weather forecasts, puzzles as well as subtitles. Subject to availability. Remote Control SUBPAGE: Toggle subpage. HOLD: Hold or resume browsing the subpage. SIZE: Cycle through page zoom-in views. INDEX: Go to Index. CANCEL: Cancel the Teletext Display. REVEAL: Reveal any hidden text. TV/TXT: Toggle Teletext viewing modes. Colour buttons: Shortcut keys per on-screen hints. TV & Electronic Programme Guide Digital Video %DWWHU\,QVWDOODWLRQ &$87,21 Reference USB Multimedia Playback 3D Video Playback Recording (DVR) On-Screen Display (OSD) Menu D.SETUP: Function not available. 2nd AUDIO: Function not available. BONUS VIEW: Function not available. GOTO: Jump to a specific point during playback. A-B: Define Points A and B for looping playback. RANDOM: Function not available. ASPECT: Cycle through different picture aspect settings. ANGLE: Choose alternative camera angles if available. SLEEP: Cycle through and set Timer Sleep settings. 7RSUHYHQWGDPDJHWRWKHUHPRWHFRQWUROPDNHVXUHWRLQVWDOOEDWWHULHV FRUUHFWO\'RQRWPL[ROGDQGQHZEDWWHULHV 'LVSRVHRIEDWWHULHVVDIHO\DQGDSSURSULDWHO\&RQWDFW\RXUORFDODXWKRULWLHV RUGHDOHUIRUDGYLFHRQEDWWHU\GLVSRVDO .HHSEDWWHULHVRXWRIUHDFKRIFKLOGUHQ 7RRSHQWKHEDWWHU\FRPSDUWPHQWSUHVVRQWKHEDWWHU\FRYHUDQGVOLGHLWRXW ,QVHUW $$ EDWWHULHV PDNLQJ VXUH WR PDWFK SRODULWLHV DV PDUNHG FRPSDUWPHQW &ORVHWKHEDWWHU\FRYHU 12 LQ WKH 216&5((1',63/$<26'0(18 26'0HQX2YHUYLHZ 7KH26'PHQXV\VWHPDFWVDVWKH0DLQ0HQXDQGDOORZVDFFHVVWRPDLQIHDWXUHFRQWUROV DVZHOODVRSWLRQDOXVHUVHWWLQJV L127(&HUWDLQPHQXVDUHDYDLODEOHRQO\LQWKHLUUHOHYDQWLQSXWPRGHV Main menu CHANNEL PICTURE SOUND TIME OPTION LOCK Channel Edit Submenu (Channel menu for example) Hint---you should operate the OSD menu according to the hint. DJDLQWRH[LWWKHPHQXRU WRH[LWWKH26'FRPSOHWHO\ TV & Electronic 3UHVV Programme Guide HQWHUHGDVXEPHQXSOHDVHIROORZWKHKLQWVDWWKHERWWRPRIWKHVFUHHQRUUHIHUWRWKH UHOHYDQWVHFWLRQVLQWKLVXVHUPDQXDOIRURSHUDWLRQGHWDLOV Digital Video 3UHVV WRGLVSOD\WKH26' 8VHWRQDYLJDWHWRGLIIHUHQWPHQXVYLDWKHWDEVDWWKHWRS 8VHWRHQWHUDPHQXDQGVHOHFWDYDLODEOHVHWWLQJVRUVXEPHQXV 8VHRUSUHVV RQDVHOHFWHGLWHPWRDGMXVWVHWWLQJVRUHQWHUDVXEPHQX 3UHVV RUWRFRQILUPDVHWWLQJDQGFRQWLQXHEURZVLQJWKHPHQX,I\RXKDYH Recording (DVR) On-Screen Display (OSD) Menu 1DYLJDWLQJWKH26' 26'0HQX &KDQQHO 3LFWXUH 6RXQG 7LPH 2SWLRQ /RFN Reference USB Multimedia Playback 3D Video Playback 0HQX0DS 13 216&5((1',63/$<26'0(18 PICTURE TV & Electronic Programme Guide Digital Video Option Auto Scan DTV Manual Tuning ATV Manual Tuning Channel Edit Signal Information Record Start Recorded List Record Mode Schedule List Free Record Limit DVR File System Select Disk Check DVR File System USB Disk Format Time Shift Size USB Speed Picture Mode Contrast Brightness Colour Sharpness Tint Colour Temperature Red Green Blue Aspect Ratio Noise Reduction SCREEN Over Scan 3D Setup 3D Detect 3D Type Exchange 3D L/R 3D to 2D Description Tune channels automatically. This will overwrite any previously saved channels and channel settings. Tune digital TV channels manually. Tune analogue channels manually. Customize channel list display and channel access. Display detailed channel signal information. Start recording the current DTV channel at once. Display the Recorded File List. Schedule a future recording. Display the Schedule List. Set a recording limit between 1 ± 6 hours. Access the DVR File System Menu. Select a connected USB storage device. Check if the selected USB storage device is compatible. Show if the selected USB storage device is compatible. Format the selected USB storage device. Available data storage space for Time Shift recording Shows the speed of the selected USB storage device. &KRRVHIURPSUHVHWSLFWXUHVHWWLQJVSURILOHV&KRRVHµ8VHU¶ for manual customisation. Adjust picture contrast. Adjust picture brightness. Adjust picture colour. Adjust picture sharpness. Adjust picture tint. (NTSC format only) Adjust colour temperature. Adjust Red colour level. Adjust Green colour level. Adjust Blue colour level. Adjust picture aspect ratio. Adjust noise reduction settings. PC Mode: Access the submenu to adjust the Horizontal/Vertical position, Size or Phase of the picture. HDMI Mode: Choose between Video and PC. Access the 3D Setup Menu. Auto detect 3D for 3D Blu-ray discs. Off, Side by Side, Top Bottom, Frame Packing, Line by Line Adjust this if the 3D depth is reversed. Toggle 3D to 2D video conversion. Reference USB Multimedia Playback 3D Video Playback Recording (DVR) On-Screen Display (OSD) Menu CHANNEL Menu 14 6HOHFWEHWZHHQ2II3&0DQG$XWR 6HWWKHFXUUHQWWLPH,Q'790RGHWKHWLPHLVVHWDFFRUGLQJ WREURDGFDVWHUVLJQDOVDQGFDQQRWEHFKDQJHG 6HWDWLPHRIGD\DQGIUHTXHQF\IRUWKH79WRWXUQRII 6HWDWLPHRIGD\DQGIUHTXHQF\IRUWKH79WRWXUQRQ 6HWWKH79WRWXUQRIIDIWHUDFHUWDLQDPRXQWRIWLPH 6HWWKH79WRWXUQRIIDIWHULWKDVQRWUHFHLYHGDQ\FRQWURO VLJQDOVIRUDFHUWDLQDPRXQWRIWLPH 6HOHFWWKHWLPH]RQH 6HWWKHODQJXDJHIRUWKH26'0HQXV 6HOHFWWKHVWQGSUHIHUUHGODQJXDJHWUDFNWREHVHOHFWHGLILW LVDYDLODEOHIURPWKHEURDGFDVWHU 6HOHFWWKHVWQGSUHIHUUHGODQJXDJHWUDFNWREHVHOHFWHGLILW LVDYDLODEOHIURPWKHEURDGFDVWHU $GMXVWWKHWLPHQHHGHGEHIRUHWKH26'0HQXDXWRKLGHV %OXH6FUHHQ &RXQWU\ $XWR6RIWZDUH 8SGDWH 5HVWRUH)DFWRU\ 'HIDXOW %DFNOLJKW /RFN&KDQQHO 6HW3DVVZRUG %ORFN3URJUDP 3DUHQWDO*XLGDQFH 7XUQRQRIIWKHEOXHVFUHHQGLVSOD\GXULQJµ1R6LJQDO¶ 6KRZVFXUUHQWFRXQWU\WKDWZDVVHWGXULQJ$XWR7XQLQJ 7XUQDXWRPDWLFVRIWZDUHXSGDWHRQLI\RXZLVKWKH79WR DXWRPDWLFDOO\VFDQIRUQHZILUPZDUHXSGDWHVDWQLJKW 5HVHWDOOVHWWLQJVWRIDFWRU\GHIDXOWV$OOFKDQQHOVDQG SHUVRQDOLVHGVHWWLQJVZLOOEHHUDVHG $GMXVWEDFNOLJKWVHWWLQJV 6HWFKDQQHOSURJUDPPHORFNLQJRQRIIZLWKDSDVVZRUG &KDQJHWKHSDVVZRUG 3DVVZRUGORFNDOOSURJUDPPHVIURPFKRVHQ79FKDQQHOV 3DVVZRUGORFNDOOSURJUDPPHVDWDQGEH\RQGDFKRVHQ SURJUDPPHUDWLQJ 3D Video Playback 7LPH=RQH 26'/DQJXDJH $XGLR/DQJXDJHVW QG 6XEWLWOH/DQJXDJH VWQG 26''XUDWLRQ USB Multimedia Playback 2II7LPH 2Q7LPH 6OHHS7LPHU $XWR6OHHS TV & Electronic 63',)0RGH &ORFN Programme Guide $GMXVWWKHEDODQFHRIWKH/HIWDQG5LJKWDXGLRWUDFNV 7XUQRQRIIDXWRPDWLFSURJUDPPHYROXPHFRQWURO 7XUQ6XUURXQG6RXQGRIIRQ Digital Video %DODQFH $XWR9ROXPH 6XUURXQG6RXQG Recording (DVR) 7UHEOH %DVV &KRRVHIURPSUHVHWVRXQGVHWWLQJSURILOHV&KRRVHµ8VHU¶ IRUPDQXDOFXVWRPLVDWLRQRI7UHEOHDQG%DVV $GMXVWWKHUHODWLYHLQWHQVLW\RIKLJKHUSLWFKHGVRXQGV $GMXVWWKHUHODWLYHLQWHQVLW\RISRZHUSLWFKHGVRXQGV Reference /2&. 237,21 7,0( 6281' 6RXQG0RGH On-Screen Display (OSD) Menu 216&5((1',63/$<26'0(18 15 79(/(&7521,&352*5$00(*8,'((3* $79'790RGH 6WDUWZDWFKLQJ79E\SUHVVLQJ WRVZLWFKWRWKH$79$QDORJXH79RU'79'LJLWDO 79LQSXWVRXUFH)RUGHWDLOHGVWHSVRQFKDQJLQJLQSXWVSOHDVHVHHWKH,QSXW6RXUFH VHFWLRQ $79DQG'79GHSHQGVRQWKHEURDGFDVWLQJVHUYLFHVDYDLODEOHLQ\RXUORFDOLW\7KHTXDOLW\RI UHFHLYHGFKDQQHOVGHSHQGVRQWKHVWUHQJWKRIWKHVLJQDOUHFHSWLRQLQ\RXUORFDWLRQ:H UHFRPPHQGXVLQJDQH[WHUQDODQWHQQDFRQQHFWLRQWRUHFHLYHFKDQQHOV 7XQHWR79FKDQQHOVXVLQJ$XWR6FDQRU0DQXDO7XQLQJ $XWR7XQLQJ 5XQDFRPSOHWHVFDQIRUFKDQQHOVDQGVDYHDOOGHWHFWHGFKDQQHOVLQWRWKH&KDQQHO/LVW 3UHVV DQGQDYLJDWHWR WKH&+$11(/0HQX 8VHDQG WRVHOHFWWKH $XWR7XQLQJRSWLRQ 8VHWRDGMXVW&RXQWU\ DQG7XQH7\SHRSWLRQV 3UHVV WRVWDUWVFDQQLQJ L127( $XWR7XQLQJZLOORYHUZULWHDOOSUHYLRXVO\VDYHGFKDQQHOVDQGFKDQQHOVHWWLQJV ,IWKH$79'79RSWLRQLVVHOHFWHGWKHILUVWRIWKHVFDQUHSUHVHQWV$79WXQLQJ ZKLOHWKHRWKHUUHSUHVHQWV'79WXQLQJ 3UHVV LI\RXZLVKWRVWRSWXQLQJKDOIZD\WKURXJKWKHSURFHVV TV & Electronic Programme Guide Digital Video Reference USB Multimedia Playback 3D Video Playback Recording (DVR) '790DQXDO7XQLQJ 6FDQDVSHFLILF'79IUHTXHQF\DQGVDYHGHWHFWHGFKDQQHOVLQWRWKH&KDQQHO/LVW 3UHVV DQGQDYLJDWHWRWKH&+$11(/ 0HQX 8VHDQG WRVHOHFWWKH'790DQXDO 7XQLQJRSWLRQ 8VHWRVHOHFWD'79FKDQQHO 3UHVV WRVWDUWVFDQQLQJ $790DQXDO7XQLQJ 6FDQDVSHFLILF$79IUHTXHQF\DQGVDYHGHWHFWHG FKDQQHOVLQWRWKH&KDQQHO/LVW 3UHVV DQGQDYLJDWHWRWKH &+$11(/0HQX 8VHDQG WRVHOHFWWKH$790DQXDO 7XQLQJRSWLRQ 8VHWRDGMXVWVFDQQLQJRSWLRQV 3UHVV WRVWDUWVFDQQLQJ 3UHVV WRVDYHDQ\FKDQJHV 16 79(/(&7521,&352*5$00(*8,'((3* (OHFWURQLF3URJUDPPH*XLGH(3* :KLOHXVLQJ'790RGHSUHVV WRGLVSOD\WKH(3*(3*LVQRWDYDLODEOHLQ$790RGH %URZVLQJWKH(3* &KDQJHFKDQQHOVXVLQJWRQDYLJDWHDQGSUHVV WRWXQHLQWRDKLJKOLJKWHG FKDQQHO 9LHZFKDQQHOJXLGHVZKHQWXQHGLQWRWKHUHOHYDQWFKDQQHOVE\XVLQJ %URZVHFKDQQHOVFKHGXOHVXSWRGD\VLQDGYDQFHZLWK 3UHVV RU DQG WRH[LWWKH(3* L127( <RXQHHGWRWXQHLQWRDFKDQQHOEHIRUHLWVVFKHGXOHLVGLVSOD\HG (3*VFKHGXOHVDUHDYDLODEOHXSWRGD\VLQDGYDQFHIURPWKHEURDGFDVWHU :KLOHDIXWXUHSURJUDPPHLVKLJKOLJKWHGSUHVV 3UHVV WRGLVSOD\WKH26' 8VHWRQDYLJDWHWR&+$11(/0HQXÎ&KDQQHO(GLWDQGSUHVV ,ISDVVZRUGORFNVDUHHQDEOHGNH\LQWKHSDVVZRUGWRHQWHUWKH&KDQQHO(GLWPHQX &XVWRPLVH\RXUFKDQQHOVDFFRUGLQJWRWKHLQVWUXFWLRQVEHORZ 5. 3UHVV WRH[LWWKH26'FRPSOHWHO\ Reference USB Multimedia Playback DJDLQWRH[LWWKHPHQXRU TV & Electronic 1. 2. 3. 4. Programme Guide 0DNHSHUVRQDOFKDQJHVWRWKHFKDQQHOOLVWLQWKH&KDQQHO(GLWPHQX'LIIHUHQWRSWLRQVDUH DYDLODEOHIRU$79DQG'79FKDQQHOV Digital Video 7.3 Channel Customisation Recording (DVR) WRVFKHGXOHDYLHZLQJ3OHDVHVHHWKH'95VHFWLRQIRU 3D Video Playback UHFRUGLQJRUSUHVV GHWDLOHGLQVWUXFWLRQV WRVFKHGXOHDXWRPDWLFWLPHG 17 79(/(&7521,&352*5$00(*8,'((3* )DYRXULWH&KDQQHOV 8VHWRKLJKOLJKWDGHVLUHGFKDQQHO 3UHVV WRPDUNLWDVD)DYRXULWH&KDQQHO7KLVFKDQQHOZLOOQRZEHOLVWHGLQWKH )DYRXULWH&KDQQHO/LVW 7RUHPRYHLWIURPWKHOLVWSUHVV DJDLQWRUHPRYHWKHµ)DYRXULWH¶PDUN 6NLS&KDQQHOV 8VHWRKLJKOLJKWDGHVLUHGFKDQQHO 3UHVV WRPDUNLWWREHVNLSSHG7KLVFKDQQHOZLOOQRZEHVNLSSHGZKHQ\RX EURZVH79FKDQQHOVZLWK ,WZLOOVWLOOEHDFFHVVLEOHIURPWKH&KDQQHO/LVWDQG(3* 7RUHPRYHWKHFKDQQHO¶V6NLSVWDWXVSUHVV DJDLQWRUHPRYHWKHµ6NLS¶PDUN 'HOHWH&KDQQHOV 8VHWRKLJKOLJKWDGHVLUHGFKDQQHO 3UHVV WRGHOHWHLW 3UHVVWRFRQILUPRUWRFDQFHOWKHGHOHWLRQ L127(7RDGGDGHOHWHGFKDQQHOLQWRWKHOLVWDJDLQ\RXZLOOKDYHWRVFDQIRULWYLD$XWR RU0DQXDO7XQLQJ6HHWKH7XQLQJVHFWLRQIRUGHWDLOHGLQVWUXFWLRQV 5HQDPH&KDQQHOV TV & Electronic WRVWDUWUHQDPLQJDQGXVHWRHQWHUWKHQHZFKDQQHOQDPH 0RYH&KDQQHOV 8VHWRKLJKOLJKWDGHVLUHGFKDQQHO 3UHVV WRPDUNLWWREHPRYHGWKHQXVHWRPRYHLWWRDGHVLUHGSRVLWLRQ 3UHVV DJDLQWRFRQILUPWKHQHZSRVLWLRQ &KDQQHO/LVWDQG)DYRXULWH/LVW 8VHWKH&KDQQHO/LVWDQG)DYRXULWH&KDQQHO/LVWWRFKDQJHFKDQQHOVZLWKHDVH 3UHVV WRGLVSOD\WKH&KDQQHO/LVW 3UHVV DVHFRQGWLPHWRGLVSOD\WKH)DYRXULWH&KDQQHO/LVW 8VHWRVHOHFWDFKDQQHODQG WRWXQHLQWRWKHFKDQQHO Reference USB Multimedia Playback 3D Video Playback Digital Video 3UHVV Recording (DVR) Programme Guide 7KLVIHDWXUHLVRQO\DYDLODEOHIRU$79FKDQQHOV'79FKDQQHOVFDQQRWEHGHOHWHG 8VHWRKLJKOLJKWDGHVLUHGFKDQQHO 18 79(/(&7521,&352*5$00(*8,'((3* 3DVVZRUG/RFNIRU&KDQQHOVDQG3URJUDPPHV 8VHWKH/2&.0HQXLQWKH26'IRUSDVVZRUGVHWWLQJV7KLVPHQXUHTXLUHVSDVVZRUG DFFHVV7KHGHIDXOWSDVVZRUGLV,I\RXKDYHIRUJRWWHQ\RXUSDVVZRUGXVHWKHPDVWHU SDVVZRUG Enable Locks Block Channel (QDEOH/RFNV 7KLVRSWLRQ0867EHWXUQHGRQWRXVHDQ\SDVVZRUGORFNVIRUFKDQQHOVDQGRWKHUVHWWLQJV 3UHVV WRGLVSOD\WKH26' 8VHWRQDYLJDWHWR/2&.0HQX<RXZLOOQHHGWKHSDVVZRUGIRUDFFHVV 6HOHFW(QDEOH/RFNVDQGXVHWRWXUQLW2QRU2IIDVGHVLUHG 3DVVZRUG&XVWRPLVDWLRQ 3UHVV WRGLVSOD\WKH26' 8VHWRQDYLJDWHWR/2&.0HQX<RX ZLOOQHHGWKHSDVVZRUGIRUDFFHVV 6HOHFW(QDEOH/RFNVDQGVHWLWWRµ2Q¶ 6HOHFWWKH%ORFN&KDQQHORSWLRQDQGSUHVV 7KH&KDQQHO/RFNOLVWZLOOGLVSOD\ +LJKOLJKWDGHVLUHGFKDQQHOZLWKDQGSUHVV WRORFNLW3UHVVDJDLQWRXQORFN WRH[LW Reference 3UHVV TV & Electronic /RFNVSHFLILF79FKDQQHOVVRWKDWWKH\FDQRQO\EHYLHZHGDIWHUXVLQJWKHULJKWSDVVZRUG Programme Guide &KDQQHO/RFNLQJ Digital Video 7KHGHIDXOWSDVVZRUGLV,I\RXKDYHIRUJRWWHQ\RXUSDVVZRUGDWDQ\WLPHXVH WKHPDVWHUSDVVZRUGWRUHVHW\RXUSHUVRQDOSDVVZRUG Recording (DVR) L127( 3D Video Playback USB Multimedia Playback 3UHVV WRGLVSOD\WKH26' 8VHWRQDYLJDWHWR/2&.0HQX<RXZLOOQHHGWKHSDVVZRUGIRUDFFHVV 1DYLJDWHWR6HW3DVVZRUGDQGSUHVV .H\LQWKHFXUUHQWSDVVZRUGWKHGHIDXOWSDVVZRUGLV .H\LQWKHQHZSDVVZRUGFDUHIXOO\ .H\LQWKHQHZSDVVZRUGRQFHPRUHWRFRQILUPDQGVDYHWKHQHZSDVVZRUG On-Screen Display (OSD) Menu 6HW\RXUSHUVRQDOSDVVZRUGZLWKWKHIROORZLQJVWHSV 19 79(/(&7521,&352*5$00(*8,'((3* 3DUHQWDO&RQWUROIRU5DWHG3URJUDPPHV /RFNVSHFLILF79SURJUDPPHVE\UDWLQJVRWKDWWKH\FDQRQO\EHYLHZHGDIWHUXVLQJWKHULJKW SDVVZRUG 3UHVV WRGLVSOD\WKH26' 8VHWRQDYLJDWHWR/2&.0HQXÎ/RFN&KDQQHODQGVHWLWWRµ2Q¶$ SDVVZRUGZLOOEHUHTXLUHGWRFKDQJHWKLVVHWWLQJ6HHWKH3DVVZRUG&XVWRPLVDWLRQ VHFWLRQIRUGHWDLOV 8VHWRVHOHFW3DUHQWDO&RQWURODQGFKRRVHDUDWLQJOLPLW3URJUDPPHVZLWK WKHFKRVHQUDWLQJDQGDQ\UDWLQJVEH\RQGLWZLOOEHORFNHG L127( TV & Electronic Programme Guide Digital Video Reference USB Multimedia Playback 3D Video Playback Recording (DVR) 3URJUDPPHUDWLQJVGHSHQGRQDYDLODELOLW\IURPWKHEURDGFDVWLQJVHUYLFH /RFNHGSURJUDPPHVRUFKDQQHOVFDQQRWEHUHFRUGHGXQOHVVWKH\DUHDOUHDG\EHLQJ DFFHVVHGXVLQJWKHSDVVZRUG3OHDVHNHHSWKLVLQPLQGZKHQVFKHGXOLQJUHFRUGLQJV 20 ',*,7$/9,'(25(&25',1*'95 7KLVIHDWXUHDOORZVWKHUHFRUGLQJRI79SURJUDPPHVWRDFRPSDWLEOH86%VWRUDJHGHYLFHOLNH DKDUGGLVNGULYHRUWKXPEGULYH:KLOHUHFRUGLQJLVLQSURJUHVVWKHIURQWSDQHO/('OLJKWZLOO IODVKUHGDQGJUHHQ L127( 86%GHYLFHVVXFKDVPRELOHSKRQHV03SOD\HUVDQGFDPHUDVGR127VXSSRUWILOH UHFRUGLQJ 5HFRUGHGILOHVL]HVGHSHQGRQWKHEURDGFDVWFRQWHQWXSWRVHYHUDO*%SHUKRXU )RUEHVWUHFRUGLQJDQGSOD\EDFNUHVXOWVZHUHFRPPHQGXVLQJD86%VWRUDJHGHYLFHZLWK $ 'DWDVWRUDJHFDSDFLW\XSWR7% % 0D[LPXPGLVNSDUWLWLRQVL]H*% & $QH[WHUQDOSRZHUVXSSO\ ' 0D[LPXP86%H[WHQVLRQFDEOHOHQJWKFP 6HWWLQJXSIRU86%5HFRUGLQJ &RQQHFWWKH86%VWRUDJHGHYLFHWRWKH 86%SRUWRQWKHEDFNSDQHORIWKH79 ,IWKH86%VWRUDJHGHYLFHXVHVLWVRZQ SRZHUVXSSO\PDNHVXUHLWLVWXUQHGRQ 3UHVV WRGLVSOD\WKH26' 8VHWRQDYLJDWHWR&+$11(/ 0HQXÎ'95)LOH6\VWHPDQGSUHVV WRDFFHVVWKHVHWXSRSWLRQVLQWKH '95)LOH6\VWHP0HQXDVGHVFULEHG EHORZ 6HOHFWLQJD'LVN'ULYHDQG&KHFNLQJ&RPSDWLELOLW\ 6HOHFWDGHVLUHG86%VWRUDJHGHYLFHIRUUHFRUGLQJLIPXOWLSOHGHYLFHVDUHFRQQHFWHG7KHQ FKHFNLIWKHFRQQHFWHG86%VWRUDJHGHYLFHLVFRPSDWLEOHDQGUHDG\IRUUHFRUGLQJ )RUPDWWLQJD'LVN <RXPD\QHHGWRIRUPDWWKH86%VWRUDJHGHYLFHIRUUHDVRQVVXFKDV $ 7KHGHYLFHLVFXUUHQWO\LQDQLQFRPSDWLEOHIRUPDW % 7KHGHYLFH¶VILOHV\VWHPLVGDPDJHGDQGQHHGVWREHUHZULWWHQYLDIRUPDWWLQJ & <RXZLVKWRZLSHDOOGDWDIURPWKHGHYLFHWREHJLQDJDLQZLWKDQHPSW\GULYH 21 3D Video Playback USB Multimedia Playback 7KLV79ZLOODOZD\VXVHWKHILUVWSDUWLWLRQ&?IRUUHFRUGLQJSXUSRVHV,I\RXUKDUG GLVNFRQWDLQVPRUHWKDQRQHSDUWLWLRQSOHDVHXVHWKHILUVWSDUWLWLRQIRUUHFRUGLQJ SXUSRVHV )DLOXUHWRLGHQWLI\WKH)LOH6\VWHPPD\DOVREHGXHWRLQVXIILFLHQWPHPRU\VSDFHRQ WKHVWRUDJHGHYLFHRUDIDXOW\86%FDEOH7U\DQRWKHU86%VWRUDJHGHYLFHZLWKD ODUJHUFDSDFLW\RUDQRWKHU86%FDEOH ,IQRGHYLFHLVFRQQHFWHGWKLVGHWDLOZLOOEHJUH\HGRXW Reference L127( Digital Video µ)$,/¶IRUDQLQFRPSDWLEOHGHYLFH Recording (DVR) 6HOHFWDGLVNGULYHXVLQJWKH6HOHFW'LVNRSWLRQ 6HOHFW&KHFN'95)LOH6\VWHPLQWKH'95)LOH6\VWHP0HQXDQGSUHVV 2QHRIWKHIROORZLQJPHVVDJHVZLOODSSHDUµ68&&(66¶IRUDFRPSDWLEOHGHYLFHDQG ',*,7$/9,'(25(&25',1*'95 )RUPDWWLQJZLOOHQVXUHWKDWWKH86%VWRUDJHGHYLFHLVLQWKH)$7ILOHV\VWHPDQGWKDWWKHUH LVHQRXJKVWRUDJHVSDFHDYDLODEOHIRUUHFRUGLQJSURJUDPV &$87,21 )RUPDWWLQJZLOOHUDVH$//GDWDRQWKHVWRUDJHGHYLFH3OHDVHEDFNXSDOO YDOXDEOHGDWDEHIRUHSURFHHGLQJWRIRUPDW7($&LVQRWUHVSRQVLEOHIRUDQ\ ORVWGDWDGXHWRIRUPDWWLQJ 6HOHFWWKHGLVNGULYHWREHIRUPDWWHG 6HOHFWWKH)RUPDWRSWLRQLQWKH'95)LOH6\VWHP 0HQXDQGSUHVV 6HOHFWWKH)$7RSWLRQDQGSUHVV WRVWDUW IRUPDWWLQJ L127( 7KH)$7ILOHV\VWHPLVEHVWIRUKLJKVSHHG VWRUDJHGHYLFHV+LJK6SHHG)6LVEHVWIRUORZ VSHHGVWRUDJHGHYLFHV $IWHUIRUPDWWLQJLQWRWKH)$7ILOHV\VWHP\RX ZLOOVWLOOEHDEOHWRVWRUHDQGVKDUHRWKHUPHGLD ILOHVRQWKHVDPHVWRUDJHGHYLFH 6WRUDJHGHYLFHVIRUPDWWHGLQ+LJK6SHHG)6 V\VWHPFDQRQO\EHXVHGWRUHFRUGIURPWKLV79 DQGFDQQRWVWRUHRWKHUPHGLDILOHV 7LPH6KLIW6L]H $IWHUWKH86%VWRUDJHGHYLFHLVIRUPDWWHGLQWRWKH)$7ILOHV\VWHP7LPH6KLIWFDQQRWEH DOWHUHG'XULQJµ'95)LOH6\VWHP&KHFN¶WKHGLVSOD\ZLOOVKRZWKDWWKHZKROHVWRUDJHGHYLFH VSDFHZLOOEHXVHGIRU7LPH6KLIW+RZHYHU,QVWDQWDQG6FKHGXOHG5HFRUGLQJZLOOVWLOOKDYH SULRULW\RYHUDYDLODEOHVWRUDJHVSDFH :KHQDFRPSDWLEOH86%VWRUDJHGHYLFHLVFRQQHFWHG\RXFDQUHFRUG79SURJUDPPHVDWZLOO ZLWKWKHSUHVVRIDEXWWRQ:KLOHUHFRUGLQJLVLQSURJUHVVWKH79¶V/('OLJKWZLOOIODVK 3D Video Playback Digital Video ,QVWDQW5HFRUGLQJ 3UHVV USB Multimedia Playback Recording (DVR) )RUGHWDLOVRQXVLQJ7LPH6KLIWSOHDVHVHHWKH7LPH6KLIWVHFWLRQ 3UHVV ZKLOHZDWFKLQJ79WRVWDUWUHFRUGLQJ$OWHUQDWLYHO\ 0HQXÎ5HFRUG6WDUW 3UHVV Î&+$11(/ LI\RXZLVKWRGLVSOD\WKH5HFRUGLQJSURJUHVVEDUGXULQJUHFRUGLQJ3UHVV DJDLQWRFORVH Reference WRVWRSUHFRUGLQJ 22 ',*,7$/9,'(25(&25',1*'95 L127( 3UHVV WRYLHZWKHFXUUHQWO\UHFRUGLQJILOHZKLOHUHFRUGLQJ 3UHVV WRSOD\DQ\RWKHUUHFRUGHGILOHVIURPWKH5HFRUGHG)LOH/LVW ,WLVQRWSRVVLEOHWRYLHZFKDQQHOVRQRWKHUIUHTXHQFLHVZKLOHUHFRUGLQJLVRQJRLQJ 7KHUHFRUGHGILOHVL]HGHSHQGVRQWKHEURDGFDVWHGFRQWHQW3OHDVHPDNHVXUH\RXU 86%VWRUDJHGHYLFHKDVDPSOHVSDFHIRUUHFRUGLQJ 3OHDVHGRQRWWXUQRIIRUXQSOXJWKH86%VWRUDJHGHYLFHGXULQJUHFRUGLQJ7KLVPD\ GDPDJHWKH86%VWRUDJHGHYLFHRUFDXVHGDWDFRUUXSWLRQ 5HFRUGLQJLQ6WDQGE\0RGH &RQWLQXHUHFRUGLQJDIWHUWXUQLQJRIIWKH796LPLODUO\VFKHGXOHGUHFRUGLQJFDQEHGRQH ZKLOHWKH79LVWXUQHGRIILQ6WDQGE\0RGH 3UHVV ZKLOHZDWFKLQJ79WRVWDUW UHFRUGLQJ$OWHUQDWLYHO\ Î &+$11(/0HQXÎ5HFRUG6WDUW 3UHVV WRWXUQWKH79RIILQWR6WDQGE\ 0RGH $SURPSWZLOODSSHDU&KRRVHZKHWKHUWR FRQWLQXHUHFRUGLQJDIWHUWXUQLQJWKH79RII WKHQSUHVV 6HWWLQJD5HFRUG/LPLW 6HWDWLPHOLPLWIRU,QVWDQW5HFRUGLQJ:KHQWKH WLPHOLPLWLVXSUHFRUGLQJZLOOVWRSDXWRPDWLFDOO\ 3UHVV WRGLVSOD\WKH26' 8VHWRQDYLJDWHWR&+$11(/0HQX Î)UHH5HFRUG/LPLWDQGDGMXVWWKHVHWWLQJ EHWZHHQ±KRXUV 3UHVV WRUHVXPHZDWFKLQJ79IURPZKHUHLWZDVSDXVHG7KH79ZLOOFRQWLQXH UHFRUGLQJOLYH79 :KHQD7LPH6KLIWHGSURJUDPPHLVSOD\LQJDZVLJQLVGLVSOD\HGRQWKHVFUHHQ 3UHVV LI\RXZLVKWRGLVSOD\WKH7LPH6KLIWSURJUHVVEDUGXULQJ7LPH6KLIW UHFRUGLQJ3UHVVDJDLQWRFORVH 3UHVV WRVWRSUHFRUGLQJDQGUHWXUQWROLYH79EURDGFDVW L127( )DVW)RUZDUG5HZLQGFDQEHGRQHZLWK EXWLI\RXUHDFKWKHHQGRIWKH7LPH 6KLIWUHFRUGLQJWKH79ZLOOVWRSUHFRUGLQJDQGUHWXUQWRWKHOLYH79EURDGFDVW 23 Digital Video 3D Video Playback ZKLOHZDWFKLQJ79WRSDXVHOLYH79DQGVWDUW7LPH6KLIW USB Multimedia Playback 3UHVV Reference 3DXVHOLYH79WHPSRUDULO\DQGDYRLGPLVVLQJSDUWRIWKH79VKRZHYHQLI\RXDUHLQWHUUXSWHG Recording (DVR) 7LPH6KLIW3DXVH/LYH79 ',*,7$/9,'(25(&25',1*'95 7KHPD[UHFRUGLQJWLPHIRU7LPH6KLIWGHSHQGVRQWKHDYDLODEOHGDWDVWRUDJHVSDFH DQGWKHVL]HRIWKHEURDGFDVW'79FRQWHQW 7LPHVKLIWUHFRUGLQJVGRQRWUHPDLQVDYHGRQWKH86%VWRUDJHGHYLFH The name and number of the program The current state of the program The process of the program A-B mark The current time 6FKHGXOHG5HFRUGLQJ9LHZLQJ5HPLQGHU 6FKHGXOHDQDXWRPDWLFSURJUDPPHUHFRUGLQJRUYLHZLQJHYHQWE\GLUHFWO\VHOHFWLQJD SURJUDPPHIURPWKH(3* $ 6FKHGXOHGUHFRUGLQJ5HFRUGDSURJUDPPHLQWRDFRQQHFWHG86%VWRUDJHGHYLFH % 9LHZLQJUHPLQGHU6KRZDVFKHGXOHGSURJUDPPHRQWLPH L127(/RFNHGFKDQQHOVDQGSURJUDPPHVFDQQRWEHUHFRUGHGLQVFKHGXOHGUHFRUGLQJ 6FKHGXOHD1HZ5HFRUGLQJ9LHZLQJ(YHQW 7KLVIHDWXUHFDQEHXVHGLQ'790RGH 3UHVV DQGXVHWRKLJKOLJKWD GHVLUHGSURJUDPPHLQWKHSURJUDPPHJXLGH 3UHVV 3UHVV Recording (DVR) WRVDYH,IWKHQHZHYHQWFODVKHVZLWK DQH[LVWLQJHYHQW\RXZLOOEHDVNHGZKHWKHUWR FDQFHOWKHVFKHGXOLQJRURYHUZULWHWKHROGHYHQW 7KH6FKHGXOH/LVWZLOOGLVSOD\DQGOLVWWKHQHZ HYHQW 3UHVV WRUHWXUQWR79YLHZLQJ:KHQWKHWLPHLVUHDFKHGDFRXQWGRZQZLOOEH GLVSOD\HGEHIRUHUHFRUGLQJRUVKRZLQJVWDUWV L127( ,IWKH79LVLQ6WDQGE\0RGH6FKHGXOHG5HFRUGLQJZLOOSURFHHGZLWKRXWQHHGLQJWR WXUQRQ $WOHDVWHYHQWVFDQEHVFKHGXOHG,IWKHPD[LPXPLVUHDFKHGH[LVWLQJHYHQWV PXVWEHGHOHWHGEHIRUHQHZRQHVFDQEHVFKHGXOHG /RFNHGSURJUDPPHVRUFKDQQHOVFDQQRWEHUHFRUGHGXQOHVVWKH\DUHDOUHDG\EHLQJ DFFHVVHGXVLQJWKHSDVVZRUG3OHDVHNHHSWKLVLQPLQGZKHQVFKHGXOLQJUHFRUGLQJV Reference USB Multimedia Playback 3D Video Playback Digital Video WRVFKHGXOHDUHFRUGLQJRU WRVFKHGXOHDYLHZLQJUHPLQGHU $VFKHGXOLQJPHQXZLOODSSHDU7KHGHVLUHG SURJUDPPHGHWDLOVZLOODOUHDG\EHDXWRPDWLFDOO\ VHW3UHVVWRFKDQJHDQ\GHWDLOVLI GHVLUHG 24 ',*,7$/9,'(25(&25',1*'95 9LHZLQJWKH6FKHGXOH/LVW 3UHVV WRGLVSOD\WKH6FKHGXOH/LVW 3UHVVWRVFUROOXSDQGGRZQWKHOLVW6FKHGXOHGUHFRUGLQJVZLOOEHPDUNHGZLWKD FDPHUDLFRQDQGYLHZLQJUHPLQGHUVZLWKDFORFNLFRQ 3UHVV WRUHWXUQWR79YLHZLQJ 'HOHWLQJD6FKHGXOHG5HFRUGLQJ9LHZLQJ(YHQW :KLOHYLHZLQJWKH6FKHGXOH/LVWXVHWRVHOHFWWKHHYHQWWREHGHOHWHG 3UHVV WRGHOHWHWKHKLJKOLJKWHGHYHQW 3UHVVWRFRQILUPRUWRFDQFHOWKHGHOHWLRQ 8VLQJWKH5HFRUGHG)LOH/LVW Press to access the Recorded File List. Any recorded TV programmes will be listed if a USB storage device is connected and powered on. Viewing and Playing Recorded Files 4. 5. Press Press to show an on-screen control bar. to start playing the selected file. L NOTE: If playback is stopped, the track position is remembered and playback will resume from there. If the recorded programme is locked because of parental control settings, key in the correct password to view it. Deleting Recorded Files Press to view the Recorded File List, then use to select a file. 2. Press to delete a file. Reference 1. Digital Video Press to display detailed information on the highlighted file. 25 Recording (DVR) 3. 3D Video Playback 2. Press to view the Recorded File List. Press repeatedly to sort the files by Programme, Channel and Time. Use to browse the list and select a file. USB Multimedia Playback 1. 9. 3D VIDEO PLAYBACK You can watch 3D TV when: A. The TV receives 3D broadcasting (subject to availability from the broadcaster), or is connected to a compatible 3D video player, and B. The 3D format of the video is Side by Side, Top Bottom, Frame Packing or Line by Line. CAUTION Do not watch 3D TV for too long as it may harm your eyesight or cause you to experience fatigue, headaches and nausea. Take frequent breaks from watching 3D TV. If you feel unwell while watching 3D TV, stop and take a rest. If symptoms persist, consult a doctor. Stop and consult a doctor immediately if you experience the following symptoms, as you may be at risk of or experiencing seizure or epilepsy: dizziness, altered vision, eye or muscle twitching, involuntary movements, convulsion, loss of consciousness, loss of direction and confusion, cramps and nausea. Children and teenagers should be monitored while watching 3D TV in case they show any discomfort. If they feel unwell, have them take a break. If symptoms persist, consult a doctor. The following people are not recommended to watch 3D TV: Young children under 5 years of age Pregnant women, seniors, people with heart problems, oversensitivity to light and other medical conditions People who are sick or tired People with a history of epilepsy or seizures 9.1 Watching 3D TV For optimal 3D video viewing experience, please make sure that your viewing position is within the recommended distance and angle. : Recommended angles to view 3D Top View Side View USB Multimedia Playback 3D Video Playback 35° 10° 10° 35° 150cm - 200cm 150cm - 200cm 1. 2. 3. Reference 4. Start a 3D video playback from a Blu-ray disc, USB multimedia playback or 3D TV broadcasting, or turn on the 2D 3D function. For USB playback instructions, please see the relevant sections. Put on compatible 3D glasses. Turn on 3D Mode by pressing . The default 3D Type is Side by Side. Adjust the 3D Type setting if necessary to match the 3D video format. If the 3D picture layers look reversed or otherwise incorrect, adjust the Exchange 3D L/R setting. Press again to close the 3D Setup Menu. 26 '9,'(23/$<%$&. L127( ,I\RXKDYHH\HVLJKWFRQGLWLRQVOLNHVKRUWVLJKWHGQHVVDQGDVWLJPDWLVPSOHDVHSXWRQ \RXUFRUUHFWLYHOHQVHVEHIRUHXVLQJWKH'JODVVHV 0DLQWDLQDGLVWDQFHRIDWOHDVWWLPHVWKHVFUHHQZLGWKRUWLPHVWKHVFUHHQKHLJKW 0DLQWDLQDSRVLWLRQZKHUH\RXUH\HVDUHRQWKHVDPHOHYHODVWKH79VFUHHQDQG ORRNLQJVWUDLJKWDWWKHVFUHHQ '*ODVVHV 8VHWKHSURYLGHG'*ODVVHVZKHQZDWFKLQJ'793OHDVHXVH\RXUFRUUHFWLYHOHQVHV WRJHWKHUZLWKWKH'*ODVVHVWRZDWFK'797KH'*ODVVHVGRQRWKDYHH\HVLJKW FRUUHFWLQJSURSHUWLHVE\WKHPVHOYHV &$87,21 - - - - - - 3OHDVHXVHWKH'*ODVVHVRQO\ZKHQZDWFKLQJ'79'RQRWPRYHDURXQG ZKLOHZHDULQJWKH'*ODVVHVDVWKH\PD\DOWHU\RXUVHQVHRIVLJKWEDODQFH DQGGLVWDQFHOHDGLQJWRSRVVLEOHSK\VLFDOLQMXU\RUSURSHUW\GDPDJH $IWHUZDWFKLQJ'79UHPRYHWKH'*ODVVHVDQG IURPSRVVLEOHGLVRULHQWDWLRQGXHWRWKHFKDQJH EDODQFHDQGGLVWDQFHEHIRUHPRYLQJDURXQG +DQGOHWKH'*ODVVHVZLWKFDUHZKLOHSXWWLQJWKHPRQRUWDNLQJWKHPRIIWR DYRLGFDXVLQJLQMXU\ZLWKWKHJODVVHV¶IUDPHRUKLQJHV &OHDQWKH'OHQVHVRQO\ZLWKDFOHDQVRIWFORWKWRDYRLGVFUDWFKLQJWKHP $YRLGWRXFKLQJWKHGHOLFDWH'OHQVHVWRDYRLGVFUDWFKLQJWKHP $YRLGGURSSLQJRUEHQGLQJWKH'JODVVHVWRSUHYHQWGDPDJH '6HWWLQJV '$XWR'HWHFW Reference 7KLVVHWWLQJFDQDXWRGHWHFW'YLGHRSOD\EDFNIURPD'79EURDGFDVWRUD'%OXUD\GLVF LQDQLQWHJUDWHG%OXUD\SOD\HURU+'0,%OXUD\YLGHRSOD\HU L127('$XWR'HWHFWPD\QRWZRUNZLWK'9'DQG86%'YLGHRSOD\EDFN USB Multimedia Playback 3D Video Playback Guide 3UHVV WRGLVSOD\WKH'6HWXS0HQXDQGXVHWRDGMXVWWKHRSWLRQV6RPH RSWLRQVPD\EHGLVDEOHGGHSHQGLQJRQWKHLQSXWPRGH 27 '9,'(23/$<%$&. 3D Type Choose a suitable 3D playback mode by matching the format of your 3D video to the available choices: Off, Side by Side Top Bottom Frame Packing Line by Line. Exchange 3D Left/Right Adjust this setting for the best 3D picture visibility. 3Dt2D Mode Reference USB Multimedia Playback 3D Video Playback This TV can downscale 3D video or TV into 2D. Turn this option On or Off as desired. 28 86%08/7,0(',$3/$<%$&. 7KLV79FDQSOD\PRYLHDXGLRLPDJHDQGWH[WILOHVIURPDFRQQHFWHG86%GHYLFH)RU LQIRUPDWLRQRQVXSSRUWHGILOHIRUPDWVVHHWKH5HIHUHQFHVHFWLRQ &RQQHFWLQJWKH86%6WRUDJH'HYLFH 8VHD86%VWRUDJHGHYLFHVXFKDVDKDUGGLVNGULYHRUIODVKGULYH86%GHYLFHVVXFKDV PRELOHSKRQHV03SOD\HUVDQGFDPHUDVDUH127VXSSRUWHG &RQQHFWWKH86%VWRUDJHGHYLFHWRWKH86%SRUWRQWKHEDFNSDQHORIWKH79 ,IWKH86%VWRUDJHGHYLFHXVHVLWVRZQSRZHUVXSSO\PDNHVXUHLWLVWXUQHGRQ :KHQWKHGHYLFHLVGHWHFWHGLWZLOOEHOLVWHGLQWKH0XOWLPHGLD0HQX7KH79PD\ WDNHDZKLOHWRUHDGWKHGDWDGHSHQGLQJRQWKHGHYLFH¶VVWRUDJHVL]HDQGFRQWHQW L127()RUEHVWUHVXOWVZHUHFRPPHQGXVLQJD86%VWRUDJHGHYLFHZLWK 'DWDVWRUDJHFDSDFLW\XSWR7% $QH[WHUQDOSRZHUVXSSO\ 0D[LPXP86%H[WHQVLRQFDEOHOHQJWKFP 3OD\LQJ0XOWLPHGLD)LOHV 3UHVV RU DQGVZLWFKWRWKH86%LQSXWVRXUFH:KHQLQ86%,QSXW0RGHWKH 86%0HQXZLOOEHVKRZQ%URZVHDQGSOD\ILOHVXVLQJVSHFLILFPHQXVIRUGLIIHUHQWILOHW\SHV Return to device list Preview Up Folder Information ,QWKH86%0HQXSUHVVWRFKRRVHWKHGHVLUHGPXOWLPHGLDW\SH3KRWRIRU LPDJHV0XVLFIRUDXGLR0RYLHIRUYLGHRVDQG7H[WIRUWH[WILOHV 8VHLQWKHOLVWWRVHOHFWWKHGHYLFH\RXZLVKWRSOD\IURPDQGSUHVV &KRRVH WKHµ5HWXUQ¶LFRQWRUHWXUQWRWKHPDLQ86% 8VHWRQDYLJDWHWRGHVLUHGILOHVDQGIROGHUV3UHVV RQKLJKOLJKWHG IROGHUVWRYLHZIROGHUFRQWHQWVDQGFKRRVHWKHµ8S)ROGHU¶LFRQWRUHWXUQWRWKH SUHYLRXVIROGHUOHYHO 3UHVV 3UHVV RU GXULQJ3KRWRDQG0RYLHILOHSOD\EDFNWRGLVSOD\DFRQWUROEDUIRU PRUHSOD\EDFNFRQWUROV L127('HSHQGLQJRQWKHILOHFRQWHQWVRPHILOHVPD\QRWSOD\HYHQLIWKH\DUHLQD Reference VXSSRUWHGIRUPDW USB Multimedia Playback WRVWDUWSOD\LQJWKHFXUUHQWKLJKOLJKWHGILOH1RUPDOSOD\EDFNFRQWUROV VXFKDV3DXVH)DVW)RUZDUGDQG)DVW5HZLQGDUHDYDLODEOH 29 86%08/7,0(',$3/$<%$&. 0DNLQJD3OD\OLVW :KLOHEURZVLQJILOHVIROORZWKHRQVFUHHQKLQWVIRUEXWWRQFRQWUROV$GGDILOHWRD SOD\OLVWE\SUHVVLQJ RQDKLJKOLJKWHGILOHDQGFKHFNLQJLWVFKHFNER[5HSHDWWKLV DFWLRQRQRWKHUILOHVWRDGGWKHPWRWKHSOD\OLVW 5HPRYHLQGLYLGXDOILOHVIURPWKHSOD\OLVWE\XQPDUNLQJWKHFKHFNER[HVZLWK $OWHUQDWLYHO\SUHVV 3UHVV WRVHOHFWRUXQVHOHFWDOOILOHVLQWKHIROGHU WRVWDUWSOD\LQJWKHKLJKOLJKWHGILOH 3KRWR3OD\EDFN ,QWKH86%0HQXFKRRVH3KRWR3OD\EDFNZLWKDQGSUHVV $GGLPDJHILOHVWRDSOD\OLVWE\IROORZLQJRQVFUHHQKLQWVIRUEXWWRQFRQWUROV 3UHVV WRYLHZLQIXOOVFUHHQ3UHVV WRVHHWKH3KRWR3OD\EDFNFRQWUROEDU 3UHVVDQG WRXVHWKHEXWWRQVRQWKHEDU &RQWURO 5HSHDW 0XVLF 'HVFULSWLRQ 6HOHFWEHWZHHQ5HSHDW$OO5HSHDW2QH5HSHDW1RQH 3OD\3DXVHPXVLFLQWKHFXUUHQWSOD\OLVWLIDQ\KDVEHHQVHOHFWHG 6KRZWKHFXUUHQWSOD\OLVW8VHDQG WRGLVSOD\DVSHFLILFLPDJH 3OD\OLVW 3UHVV ,QIR 5RWDWH =RRP2XW,Q 0RYH9LHZ DOOILOHV3UHVV WRUHWXUQWRWKHFRQWUROSDQHO 'LVSOD\GHWDLOHGLPDJHLQIRUPDWLRQ 5RWDWHFXUUHQWLPDJH =RRPRXWLQRQFXUUHQWLPDJH 0RYHDURXQGLQD]RRPHGLQLPDJH Reference USB Multimedia Playback WRUHPRYHDKLJKOLJKWHGILOHIURPWKHOLVWRU 30 WRUHPRYH 86%08/7,0(',$3/$<%$&. 0XVLF3OD\EDFN ,QWKH86%0HQXFKRRVH0XVLF3OD\EDFNZLWKDQGSUHVV $GGPXVLFILOHVWRDSOD\OLVWE\IROORZLQJRQVFUHHQKLQWVIRUEXWWRQFRQWUROV 3UHVV EDU &RQWURO 5HSHDW *R7R WRVWDUWSOD\EDFN3UHVVDQG WRXVHWKH0XVLF3OD\EDFNFRQWURO 'HVFULSWLRQ 6HOHFWEHWZHHQ5HSHDW$OO5HSHDW2QH5HSHDW1RQH -XPSWRDVSHFLILFWLPHLQWKHWUDFNE\NH\LQJLQWKHIRUPDW++0066 3UHVVWRQDYLJDWHLQWRWKHFXUUHQWSOD\OLVW8VHDQG 3OD\OLVW VSHFLILFLPDJH3UHVV WRUHPRYHDKLJKOLJKWHGILOHIURPWKHOLVWRU WRUHPRYHDOOILOHV3UHVV 6FUHHQ0XWH 3UHVV WRFKRRVHD WRUHWXUQWRWKHFRQWUROSDQHO WRWXUQRIIWKHVFUHHQZKLOHFRQWLQXLQJWRSOD\PXVLF 7H[W'LVSOD\ ,QWKH86%0HQXFKRRVH7H[W3OD\EDFNZLWKDQGSUHVV $GGWH[WILOHVW[WWRDSOD\OLVWE\IROORZLQJRQVFUHHQKLQWVIRUEXWWRQFRQWUROV 3UHVV WRGLVSOD\WH[WILOHVLQIXOOVFUHHQ3UHVVDQG 3OD\EDFNFRQWUROEDU 'HVFULSWLRQ 3UHYLRXVQH[W3DJH 3UHYLRXVQH[WWH[WGRFXPHQW 6WRSYLHZLQJWKHWH[WGRFXPHQW USB Multimedia Playback &RQWURO WRXVHWKH7H[W Reference 31 86%08/7,0(',$3/$<%$&. 0RYLH3OD\EDFN ,QWKH86%0HQXFKRRVH0RYLH3OD\EDFNZLWKDQGSUHVV $GGPRYLHILOHVWRDSOD\OLVWE\IROORZLQJRQVFUHHQKLQWVIRUEXWWRQFRQWUROV 3UHVV WRVWDUWSOD\EDFN3UHVV WRVHHWKH0RYLH3OD\EDFNFRQWUROEDU 3UHVVDQG WRXVHWKHEXWWRQVRQWKHEDU L NOTE: If playback is stopped, the track position is remembered and playback will resume from there. &RQWURO 5HSHDW $% 'HVFULSWLRQ 6HOHFWEHWZHHQ5HSHDW$OO5HSHDW2QH5HSHDW1RQH 3UHVVRQFHWRVHW3RLQW$DQGDJDLQWRVHW3RLQW%IRUORRSLQJSOD\EDFN 3UHVVDJDLQWRUHVXPHQRUPDOSOD\EDFN 3UHVVWRQDYLJDWHLQWRWKHFXUUHQWSOD\OLVW8VHDQG WRFKRRVHD 3OD\OLVW VSHFLILFLPDJH3UHVV ,QIR WRUHPRYHDOOILOHV3UHVV WRUHWXUQWRWKHFRQWUROSDQHO 'LVSOD\GHWDLOHGYLGHRLQIRUPDWLRQ 6ORZ)ZG 8VHWKHRQVFUHHQ WRUHPRYHDKLJKOLJKWHGILOHIURPWKHOLVWRU EXWWRQWRWRJJOHVORZPRWLRQSOD\EDFNDWGLIIHUHQW VSHHGV7RUHVXPHQRUPDOSOD\EDFNSUHVV 6WHS)ZG *272 8VHWKHRQVFUHHQ EXWWRQWRVWHSIRUZDUGZLWKLQWKHWUDFNLQVPDOOWLPH LQFUHPHQWV .H\LQDVSHFLILFSRLQWWRMXPSWRXVLQJWKH++0066IRUPDW 0XVLFDO3KRWR7H[W6OLGHVKRZ Reference USB Multimedia Playback 3OD\PXVLFZKLOHYLHZLQJLPDJHVRUWH[W ,QWKH86%0HQXFKRRVH0XVLF3OD\EDFNZLWKDQGSUHVV $GGPXVLFILOHVWRDSOD\OLVWE\SUHVVLQJ RQDKLJKOLJKWHGILOH)RUGHWDLOVRQ DGGLQJILOHVWRSOD\OLVWVSOHDVHVHHWKH0DNLQJD3OD\OLVWVHFWLRQ $IWHUWKHPXVLFSOD\OLVWLVGRQHSUHVV WRUHWXUQWRWKH86%0HQX &KRRVH3KRWRRU7H[W3OD\EDFNZLWKDQGSUHVV $GGWKHGHVLUHGLPDJHWH[WILOHVWRDSOD\OLVW 3UHVV 3UHVV WRGLVSOD\WKHRQVFUHHQFRQWUROEDU 6WDUWVLPXOWDQHRXVPXVLFSOD\EDFNE\FKRRVLQJWKH0XVLFEXWWRQLQWKHFRQWUROEDU WRVWDUWGLVSOD\LQJWKHLPDJHVWH[W 32 5()(5(1&( 7URXEOHVKRRWLQJ 3OHDVHGRQRWXVHIXQFWLRQVQRWPHQWLRQHGLQWKLVXVHUPDQXDO,IDSUREOHPRFFXUVZLWK\RXU 79SOHDVHUHIHUWRWKHWDEOHEHORZ,IWKHSUREOHPSHUVLVWVSOHDVHWXUQWKH79RIIDQG FRQVXOWWKH7($&&XVWRPHU6HUYLFH+RWOLQH 3UREOHP $FWLRQ 1RSLFWXUH ,VWKHSRZHUSOXJJHGLQ" ,QVHUWWKHSRZHUSOXJ 7KHSLFWXUHDSSHDUVWRRVORZO\ DIWHUWKHSRZHULVWXUQHGRQ /LNH\RXUFRPSXWHUWKH79UXQVGLDJQRVWLFDQGVRIWZDUH FKHFNVEHIRUHLWFDQGLVSOD\EURDGFDVWFKDQQHOV7KHSLFWXUH VKRXOGDSSHDULQDSSUR[LPDWHO\VHFRQGV 3LFWXUHLVWRREULJKWRUWRRGDUN $GMXVWSLFWXUHEULJKWQHVVRUFRQWUDVWVHWWLQJV 3LFWXUHLVWRRODUJHRUWRRVPDOO $GMXVWWKHDVSHFWVHWWLQJV 3LFWXUHVKDNHVDQGVWULSHV DSSHDU .HHSDSSOLDQFHVWKDWHPLWPDJQHWLFUDGLDWLRQDZD\IURPWKH 79 3LFWXUHGRHVQRWPRYH 3UHVVWKH3$86(EXWWRQ&KHFNLISOD\EDFNLVRQ3DXVH WKURXJKDQ\RWKHUHTXLSPHQW +DVSLFWXUHEXWQRVRXQG &KHFNLIWKH087(IXQFWLRQLVRQ $GMXVWWKHYROXPHOHYHO &KHFNWKHFRQQHFWLRQRIWKHDXGLRLQSXWFDEOHV &KHFNDOORWKHULQSXWFRQQHFWLRQV 5HPRWHFRQWUROGRHVQRWZRUN &KHFNLIWKH$&SRZHUFRQQHFWLRQLVVZLWFKHGRQ &KHFNWKDWWKHEDWWHU\LQVWDOODWLRQLVFRUUHFW 5HPRYHDQ\REVWDFOHVEHWZHHQWKH79DQGWKHUHPRWH FRQWURO ,IWKHEDWWHULHVDUHIODWUHSODFHWKHPZLWKQHZRQHV 'LVWRUWHGSLFWXUH 9LGHRFRPSUHVVLRQPD\FDXVHGLVWRUWLRQHVSHFLDOO\LQVFHQHV ZLWKIDVWDFWLRQ:HDNUHFHSWLRQPD\FDXVHGLVWRUWLRQDQGLV QRWD79LVVXH±SOHDVHKDYHWKHDQWHQQDDVVHVVHG 86%GHYLFHQRWGHWHFWHG &KHFNWKHFRQQHFWLRQWRWKH86%GHYLFH 3OHDVHHQVXUHWKDWWKHGHYLFHLVFRPSDWLEOHDQGWKHPXOWLPHGLD GDWDIRUPDWVDUHVXSSRUWHGIRUGHWDLOVVHHWKH6SHFLILFDWLRQV VHFWLRQ 79WXUQVRIIE\LWVHOI &KHFNWKH7LPHU6OHHSDQG$XWR6OHHSVHWWLQJVLQWKH7,0( 0HQX 79WXUQVRQE\LWVHOIDWQLJKW 7KH79PD\KDYHEHHQVHWWRVFDQIRUQHZILUPZDUHDWQLJKW 3OHDVHFKHFNWKH$XWR6RIWZDUH8SGDWHVHWWLQJLQWKH237,21 0HQX Reference 33 11. REFERENCE 11.2 Specifications Panel Size LCD Panel Max. Resolution 1920x1080 Input Connector Output Connector VIDEO 1 YPbPr 1 AUDIO (L/R) 1 VGA 1 PC/AUDIO 1 HDMI 3 The HDMI support 1.3, the HDCP support 1.1) RF 1 HEADPHONE 1 COAX 1 100-240V Power Consumption 100W Standby Power Consumption <1W Contrast Ratio 800:1 Brightness 350cd/m 2 TV receive system PAL BG/DK/I SECAM BG/DK L/L' Frequency range 48.25 - 863.25 MHz Speaker output power 2×8W Antenna impedance 75 ohm Supported file system DVR Recording: FAT32 USB Multimedia Playback: FAT32 and NTFS Maximum hard disk partition size: 400GB Recommended USB standard USB2.0 Supported Multimedia Player formats See the table on next page PC Input supported resolution WUXGA (Maximum supported resolution: 1360X768 @ 60Hz) (With stand) (Without stand) USB 50/60Hz Power Source Dimensions Reference 42” 1019x260x689 mm 1019x49x635 mm Weight 15.5kg Wall mounting dimensions 200x200mm Wall mounting screw size M4X10 Operating temperature range 0~40 C Specifications are subject to change without notice. Weight and dimensions are approximate. 34 5()(5(1&( 6XSSRUWHG)LOH)RUPDWV 029,( $9, 3,&785( 086,& 0D[ELWUDWH0ESV 0D[UHVROXWLRQ[SL[HOV 0RQRFRORXUFRORXUFRORXUELWELWELW 0D[UHVROXWLRQ[SL[HOV0LQUHVROXWLRQ[SL[HOV 6DPSOHUDWH.±. %LWUDWH.±. Reference USB 6SHFLDO1RWHV 7KH0HGLD8QLWFDQRQO\VXSSRUW86%PHPRU\GHYLFHVVXFKDVKDUGGLVNGULYHVDQG IODVKGULYHVDQGZLOOQRWVXSSRUWPXOWLPHGLDGHYLFHVVXFKDVPRELOHSKRQHVDQG FDPHUDVIRUUHFRUGLQJSXUSRVHV 7KHXQLWZLOORQO\VXSSRUWKDUGGLVNGULYHVZLWKDGGLWLRQDOSRZHUVXSSO\DPD[LPXP GLVNSDUWLWLRQVL]HRI*%DQGDPD[LPXPFDSDFLW\RI7%)RUEHVW SHUIRUPDQFHZHKLJKO\UHFRPPHQGWKDWDKDUGGLVNGULYHZLWKDQH[WHUQDOSRZHU VXSSO\EHXVHGIRUODUJHUFDSDFLWLHV 7KHPD[LPXPQXPEHURIILOHVWKDWHDFKIROGHUFDQXVHLVILOHV :KHQXVLQJH[WHUQDO86%LWLVVXJJHVWHGWKDWKLJKTXDOLW\RI86%H[WHQVLRQFDEOHV VXSSRUWHGP+]EHXVHGWRHQVXUHVPRRWKYLGHRILOHSOD\EDFN 7KH79XQLWFDQRQO\VXSSRUWDXGLRIRUPDWVRIVLQJOHDQGELQDU\FKDQQHOV <CT1011> 35 TEAC CUSTOMER SUPPORT HOTLINE (TCS) 1300 553 315 Between Monday to Friday – AEST 8.30AM to 6PM