1
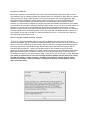
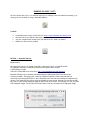
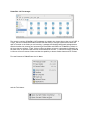
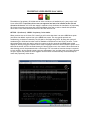
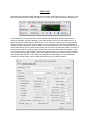
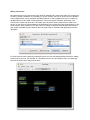
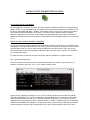
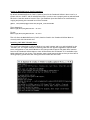
AV LINUX 5.0.3 USER MANUAL A Guide to Get Acquainted with AV Linux Prepared by Glen MacArthur, January 22/2012 Legal Disclaimer: Debian/GNU Linux comes with no guarantee so neither does AV Linux. I accept no responsibility for any hardware/software malfunctions or data loss resulting from it's use. It is important to note that the AV Linux ISO contains software that is non-free and is distributed under a special licensing arrangement with the original developers, re-distributing the AV Linux ISO with the non-free content included is a violation of these licenses. AV Linux also contains Multimedia Codecs that may be under patent in certain countries, it is the users responsibility to know the law as it applies to their own respective country before downloading or installing. TABLE OF CONTENTS: • • • • • • • • • • • • • • • • • • • • • • • • Page Page Page Page Page Page Page Page Page Page Page Page Page Page Page Page Page Page Page Page Page Page Page Page 3. - PREFACE – NEW TO LINUX? 4. - HISTORY BLURB 5. - CREDITS & CONTACT 6. - 5 'NEED-TO-KNOWS' ABOUT AV LINUX 8. - RUNNING AV LINUX LIVE 11. - AV LINUX BASIC BOOTING BIBLE 12. - INSTALLING AV LINUX 13. - GETTING AROUND IN AV LINUX 19. - SliM LOGIN MANAGER 20. - MOUSE CURSOR THEMES 21. - PERFORMANCE SETTINGS 23. - PROPRIETARY VIDEO DRIVERS IN AV LINUX 25. - COMPIZ WINDOW MANAGER 26. - AV LINUX KERNELS 27. - KERNEL CHEATCODES 28. - AV LINUX SOFTWARE 30. - INSTALLING SOFTWARE IN AV LINUX 33. - NETWORKING WITH AV LINUX 36. - PRINTING WITH AV LINUX 37. - USING JACK 39 - M-AUDIO 1010LT PCM_MULTI WITH AV LINUX 41. - DEBIAN REFERENCE 44. - HANDY TERMINAL COMMANDS 45. - HELP SUPPORT THIS PROJECT PREFACE – NEW TO LINUX ?: Realistic Expectations of what AV Linux Can Offer: AV Linux is an ISO Image created with Debian/GNU Linux. Despite it's critics Linux continues to grow it's user base year after year and has seen great strides in both the quality and number of Software Applications. There are many positive attributes to Linux and 'FLOSS' (Free Libre Open Source Software) and the grassroots community-based development model is completely unique when compared to the Apple and Windows corporate paradigms. To be blunt the notion that Linux of any kind is either better or worse than any other computer Operating System is to miss the point somewhat and serves to set the user up for unrealistic expectations and encourages pointless comparisons that fuel endless and futile debates. An Operating System that allows you to freely create in a streamlined and productive workflow is an individual ideal to be pursued and there is no question that this is truly an attainable goal on all three major platforms. Some things to keep in mind when considering Linux as an OS Platform: ➢ Linux blurs the line somewhat between the end-user and the developer and therefore doesn't shy away from featuring it's basic operational face known as the Console or Terminal. Certainly efforts over the past several years have molded Desktop Linux into as user-friendly a platform as any but to fully enjoy all Linux has to offer it is somewhat incumbent on the user to have at least a casual interest in what happens on both sides of the computer screen. ➢ Although Linux at it's core is a curious symbiotic mixture of Community and Corporate interests for the most part the Linux Multimedia applications within AV Linux are developed by volunteer developers from all over the world. Many of these generous and talented people are doing their work out of the purest motive...the love of doing it. Because the motivation is not primarily financial end-users sometimes have a problem differentiating their personal expectations from those that would be usual when looking at things from a 'paying customer' perspective. FLOSS developers are giving the end user something much greater than software, they are sharing their most vital asset...time. It is very easy to take this fact for granted and certainly someone who is showing such generosity should be equally paid back with patience and respect. 'Free' doesn't indicate an absence of financial support, many projects are in dire need of financial support to encourage and enable their developers to continue. 'Free' should be seen as 'politically free' and the user's choice to decide what projects they wish to support and how they wish to do it. ➢ The primary method of hardware support on the Linux platform is through that magical bundle of code known as the Kernel. It is truly amazing the sheer total number of various pieces of computer hardware that are natively supported without ANY outside or 3 rd party drivers. Having said that it is certainly not reasonable to expect that Linux will 100% support ALL available hardware or even have an equal degree of stability with all hardware that is supported. The ground rules for building an effective Audio/Video Workstation with Linux are really no different than on any other platform. All PC's are not created equal and certainly not all are suited to professional level multimedia content creation. If you are serious about optimizing your success with AV Linux then some care should be taken to select well supported Audio/Video hardware for Linux. **These guidelines are informed by a mixture of opinion and experience and are offered as such. HISTORY BLURB: A Brief (Well OK, Maybe Not So Brief) History: A few years back I was a forum member at Videohelp.com following a long and acrimonious thread on switching to Linux which I knew virtually nothing about. Like most of the planet I had been using Windows XP for a few years and was getting quite bored of using it. I decided to download a Linux LiveCD and see what the fuss was about. I tried a MEPIS 6.5 LiveCD and was blown away by the hardware detection, the little bouncing KDE cursor and the fact that this Linux thing actually worked! I started to become curious about using Linux for multimedia creation since like many people my interest in using a PC in the first place was multitrack audio recording and video editing. I soon discovered that MEPIS 6.5 despite all it's charm was not a Multimedia centered Distro so I started looking elsewhere and stumbled upon Ubuntu 7.04 (Feisty). I continued using 7.04 and learning more about Linux and it's different programs but still wasn't very satisfied with the multimedia offerings and how to get them set up and working. When the next Ubuntu (7.10 Gutsy) came out I read an article on a new variant called 'Ubuntu Studio', I eagerly installed it and was properly introduced to Linux as a multimedia OS. I have to admit to being overwhelmed at the sheer number of applications and underwhelmed at how few of them were actually ready for prime time. JACK, Ardour, Hydrogen and Rosegarden stood out as being the most usable and mature at the time and got me hooked. Around that time the JackLab project also started and had a finer tuned package list and an eager development team. I used JackLab for a few months as well but was not as familiar or comfortable with it's openSUSE base. I finally settled on a plain Ubuntu 7.10 install with Ubuntu Studio's -rt Kernel and noticed that development of the actual applications I was interested in was far outpacing the ability of the package repositories to keep up. I discovered to keep my favorite applications current I was going to have to familiarize myself with Compiling and after the obligatory awkward and fumbling attempts and initial trips through “dependency hell” I found I could enjoy all the latest and greatest programs. At this time Ubuntu released 8.04 (Hardy) and there were initial problems with the -rt Kernel and some IDE chipset issues which prevented me from installing and using it, I continued with my existing 7.10 and kept it up with my own packages. I read somewhere about the Remastersys project and was very interested in the potential of backing up my existing system with the many hours of extra work I had put into keeping it current. I found using Remastersys to be very straightforward and in no time had a working customized Ubuntu 7.10 Remaster. I started spending some time on the Ardour forum and noticed a recurrent number of issues with new users and audio recording. I decided on a whim to use some extra web space from my wife's website hosting and share an ISO of my own setup for people trying to get started with Linux Audio. I called it AV Linux 1.0 and although it certainly didn't have Ubuntu Studio or 64Studio quaking in their boots it generated a fair bit of interest. Since AV Linux was already one Ubuntu version old when I uploaded it I learned quickly the that Ubuntu's 6 month release schedule was not working in my favor and quickly ran into too many problems keeping the support libraries to build the software updates current and regrettably had to leave Ubuntu 7.10 and it's rock solid -rt Kernel. Looking forward to other options I saw that things were going from bad to worse for Ubuntu's subsequent 8.10 and 9.04 -rt Kernels due to a prolonged issue with the -rt patch in Linux kernels from 2.6.25 – 2.6.27 so I found myself trying out Debian 5.0 (Lenny) and a new leaner desktop environment called LXDE. I was very excited by how lean and efficient LXDE was but had concerns about it's newbie potential since it was missing many of the extra amenities of Gnome or KDE. Fortunately Tony Brijeski whom I had already met through Remastersys had created a Remastersys Control Panel for LXDE to use in a distribution of his own so I included his 'RCP' to use in AV Linux 2.0 development and it nicely filled in the missing pieces of 'convenience' from LXDE. The last piece of the puzzle was a good -rt Kernel and I realized I was going to have to build my own to get what I wanted, as I read up on how to compile a Kernel I decided that using the PAE (Physical Address Extension) ability of the Linux Kernel would be a good way to get the most notable 64bit benefit out of a 32bit OS and also allow RAM handling from older PC's all the way up to the latest new multi-core systems with 8Gb+. The AV Linux ISO Image has continued to grow and increases it's user base with each release and is now at it's 5.0.3 milestone, I am extremely grateful to have met so many new and interesting software developers, packagers and of course Linux Audio users along the way. Glen MacArthur a.k.a GMaq CREDITS & CONTACT: Thanks to: My wonderful wife and kids for their infinite patience and encouragement. Debian/GNU Linux, Debian pkg-multimedia team, LXDE, Tony Brijeski (Remastersys), RevLinux (geekconnection.org), Trulan Martin (Firewire guru, AV Linux Kernel Dev.), Allen Tate (Torrent and tracker), Mike Start (linuxDSP), damentz (Liquorix Kernels), Dan MacDonald (Complaints Dept.) Michael Bohle (BEAT Magazine), Christian Marillat (Debian-Multimedia.org) Paul Davis and development team (Ardour), Ben Loftis (Harrison Mixbus), Rui Nuno Capela (Qjackctl, Qsampler, Qsynth, Qtractor), Matt Weatherford (WinFF), Jonathan Thomas, Andy Finch (Openshot), Hermann Meyer, James Warden, Andreas Degert (Guitarix), salsaman (LiVES), Dan Dennedy (MLT), i2productions (Linux in Review), Dave Phillips (Linux Journal), falkTX (KXStudio) Applications using the AV Linux ISO Image as a Demo LiveDVD: Cinelerra - http://cinelerra.org/getting_cinelerra.php Openshot Video Editor - http://www.openshotvideo.com/2008/04/download.html LiVES Video Editor - http://lives.sourceforge.net/index.php?do=downloads Guitarix - http://guitarix.sourceforge.net/ Commercial Software Demo Permissions Provided by: Mike Start - linuxDSP Audio Plugins Julien Pommier - Pianoteq George Reales - discoDSP Discovery Colin Barry - Loomer Plugins Andy Robinson – Transcribe! Edouard Muller - Renoise Graphic Credits: Default Theme 'Murrine-Unity' by celticmusicguy Default Openbox Theme 'Murrine-Unity' by celticmusicguy Icon Theme - Faenza Icons by tiheum including Faenza-Fresh by funnyguy Optional Icons – Instruments by starcycle Cursor Themes – Pulse Glass by Kuduk, Picks by starcycle Wbar background Image modified from 'osxbarback' by trevelyn AV Linux Resources: Manual – http://www.bandshed.net/pdf/AV503Manual.pdf Website – http://www.bandshed.net/AVLinux.html Forum - http://geekconnection.org/remastersys/forums/index.php#7 Email – [email protected] Updated Packages - http://www.remastersys.com/forums/index.php?topic=1550.0 5 “NEED-TO-KNOWS” ABOUT AV LINUX On the surface AV Linux looks like any Debian-based Distribution, however it has some key differences in approach when compared to larger mainstream Distributions. These differences are intended to be presented here in a non-qualitative manner and not as a 'better than' or 'worse than' comparison to the various methods employed by other Linux OS's. AV Linux is an ISO Image, not a Distro. AV Linux comes as a complete ready-to-use OS within a bootable and installable ISO Image. This differs from most distros that come as a small net-boot or a CD sized image format with a core of applications that require further configuration and package downloads after installing. AV Linux works with established Debian repositories however it does not require repositories to be used, in fact AV Linux is complete enough in it's broad range of applications to not need an internet connection at all to be of use for it's intended mandate of multimedia content creation. The only way of updating to new complete ISO's (ie version 5-6) of AV Linux is to install from the updated ISO Image. Package updates are provided from an optional packages FTP within incremental ISO releases (ie 5.0 - 5.0.X).There is no upgrade path via repositories. AV Linux is based on Debian's Stable Distribution. Debian GNU/Linux is one of the best established and longest standing pillars of the Linux community, along the way it has created an amazing infrastructure and branch system that serves both it's users and developers very well. AV Linux 5.0.3 is based on Debian's 'Stable' branch currently known as 6.0 or perhaps better known by it's code name 'Squeeze'. The stable base affords a rock solid platform to base the core of AV Linux on and enjoy the reliability of fully tested software. In automotive terms Squeeze can be looked on as the chassis and wheels of AV Linux. A marked difference in AV Linux is in it's custom packaging of recent versions of the applications suited to it's multimedia focus. Traditionally Debian 'Stable' maintains software in a fairly static environment without a lot of updates or introduction of new versions during it's service life, while this is a favorable attribute when it comes to lending stability to the core libraries of the OS it can result in some of the software applications becoming stale and outdated. In AV Linux the commonly used applications for Multimedia Creation are kept current and updated far more regularly than would be normal in a stock Debian 'Stable' scenario. AV Linux can be looked at as a two-tiered system with a solid, reliable base and a heavily-customized second layer. AV Linux - “If it Ain't Broke Don't Fix It”. AV Linux strives to provide an out-of-the-box pre-tested and pre-configured OS. While many Linux desktop OS's encourage their users to apply daily full updates to the system this can lead to unexpected instability and introduce new bugs to an otherwise functional system. This accepted practice is largely unnecessary in a system with a stable core like AV Linux, To go back to automotive terms it doesn't make sense to take your car to the local garage for new spark plugs and have the mechanic replace the entire engine, the computer parallel to this is if you want an updated application why update several unrelated core libraries..? The 'Squeeze' base of AV Linux can be regularly updated with the Synaptic Package Manager like any other distro, however AV Linux does not use an 'Update-Manager' and leaves system updates to the user's own perceived need and discretion. Truthfully very few Squeeze updates will have an impact on AV Linux as a Multimedia creation OS and it is not mandatory at all for the user to do ANY updates they don't want. As mentioned above AV Linux is Image-based and has only a Kernel Repository, however those wishing to update certain individual applications can do so by checking the packages FTP in a Web Browser with this link: http://www.bandshed.net/custom/?C=M;O=D AV Linux is a 32bit OS Most recent computers come with 64bit processors and understandably people often wish to utilize their hardware with an operating system that matches their CPU architecture. While there is certainly nothing wrong with using a 64bit OS there are often misconceptions and even exaggerations about performance when compared to a 32bit system. 64Bit looks great on a technical whitepaper and certainly it's increased handling of available memory is an advantage when compared to 32bit. However on a Linux Desktop computer the actual noticeable performance improvements are so subtle as to be almost unnoticeable. Generally speaking a 64bit system will not run any more audio tracks in a sequencer or encode video at more frames per second than an equivalent 32bit system. AV Linux provides an optional post-install PAE (Physical Address Extension) Kernel that will allow it to utilize up to 64 Gb of RAM thus accommodating user's want to overcome the 4 Gb RAM bottleneck inherent in a 32 bit system. At the end of the day how useful and productive an OS is can be far more important than which CPU architecture it uses. The AV Linux ISO contains 'non-free' software AV Linux is created from Debian GNU Linux and inherits Debian's GNU GPL license in all content derived from Debian. Also all customized content and tweaks within AV Linux (ie the AV Linux Control Panel etc.) are also covered by the GPL license. The AV Linux ISO is a unique entity which bundles a few select commercial software demos that are not open-source and therefore 'non-free' and not licensed under the GNU GPL. These non-free applications all are included on the ISO with the permission of the individual developers however the AV Linux ISO cannot be re-distributed with these applications included since it would be a violation of their distribution licenses. These licenses are conveniently located in a 'Non-Free Licenses' folder in your user's home for the user to read. If an enduser wishes to redistribute AV Linux the following software packages must be removed to comply: linuxdsp-jack-demos, linuxdsp-lv2-demos, linuxdsp-linuxvst-demos, linuxdsp-guitarfx-demos, loomer-linuxvst-demos, loomer-jack-demos, discodsp-linuxvst-demo, pianoteq-demo, renoisedemo, transcribe-demo. RUNNING AV LINUX “LIVE”: AV Linux can be used “Live” in 2 different ways with no changes to the host machine operating it, by running it from a LiveDVD or using a Bootable USB Key. LiveDVD: ➢ Download the AV Linux 5.0.3 ISO file from http://www.bandshed.net/AVLinux.html ➢ ➢ ➢ Burn the ISO file to a DVD-R or RW using your existing Burning Software Set your Computer BIOS to Boot from your DVD Drive if it doesn't by default Reboot into the AV Linux LiveDVD METHOD 1 - Bootable USB Key: Requirements: An existing AV Linux 5.0 or greater install OR a running AV Linux 5.0.3 LiveDVD session PC Capable of booting from USB Key with block sizes greater than 1024mb A 2GB USB Key or larger avlinux5.0.3-lxde-i386-en.iso from here: http://www.bandshed.net/AVLinux.html Bootable USB Keys can be created with the Remastersys USB Startup Disk Tool found in the 'Preferences' Menu. This unique tool creates an 'ISOhybrid' USB Key. Please note that this tool overwrites any existing USB FAT32 or other filesystem and writes the actual ISOhybrid image itself to the key. This means the Key will no longer be useable for Data storage, however you can use the USB Key Tool to overwrite the ISOhybrid image as many times as you want. This USB Key Tool will only work with ISOhybrid images. The AV Linux ISO comes ready to use as a formatted as an ISOhybrid image. METHOD 2 - Unetbootin Method: Requirements: PC Capable of booting from USB Key At least 2GB USB Key (4GB Recommended) Latest AV Linux ISO image from here: http://www.bandshed.net/AVLinux.html This guide is written assuming you are using an existing AV Linux install, however any current distro with GParted and Unetbootin will work. This operation will utilize the entire USB Key so use a key you don't want to share data on other computers with and remove any important data from the key. I would also suggest you use a clean key without any U3 or other proprietary launching software on it, most manufacturers provide utilities to remove this. STEP 1. Insert your USB Key into the USB Port but don't mount it in PCManFM. From the menu go to 'Preferences'-->GParted and launch GParted. STEP 2. Using the drop down dialog in the upper right corner of GParted select your USB Key. MAKE SURE YOU KNOW WHICH DRIVE YOUR USB KEY IS!! STEP 3. (DO WITH CAUTION) Select any existing Partitions on the Key, Right Click on them and delete them until the Key is completely unallocated space. STEP 4. Create a new FAT32 partition on the USB Key at least 2.0 Gigabytes (2048 mb). In the remaining unpartitioned space create an ext2 or ext3 partition and in the 'label' field enter 'live-rw'. STEP 5. Click on the checkmark icon at the top of GParted and apply the partitions you have created to the key. STEP 6. Once GParted has finished creating your new partitions right click on the FAT32 Partition and select 'Manage Flags' and from the list select 'boot'. When you close the Flags dialog Gparted should quickly rescan and display the boot flag on your FAT32 Partition. Close Gparted. STEP 7. Remove your USB Key and then plug it back in. Then open PCManFM...you should see 2 partitions available to mount relating to your USB Key, you can mount them both but you only need to mount the FAT32 one. Hint... it is the one not called 'live-rw'. STEP 8. From the menu open 'System Tools'--->Unetbootin. Select the Diskimage option and navigate to where you have downloaded or placed the avlinux502-lxde-i386-en.iso file and Click OK. Unetbootin will take several minutes to copy the image and bootloader to your Key. If you simply want AV Linux on a USB Key without persistent storage you can stop here. This will give you the partition AV Linux runs from and a small additional partition to store files on while you are running it. For persistence there are a few more steps and a few things to consider: 1. Persistence will dramatically slow bootup time. 2. Persistence causes the system response to be a little slower than a non-persistent Key but faster than a DVD ROM 3. Installing AV Linux from a persistent Key is NOT advised. 4. System shutdown is kind of kludgy and displays several harmless errors, do not remove your key when prompted until it stops flashing. NOT SCARED OFF? STEP 9. Mount the FAT 32 Partition of your Key (if it isn't already) in PCManFM and navigate to the 'syslinux.cfg' file. Right click on it and open it in gedit and modify it's text in line 9 like the example below, once done save the edited syslinux.cfg file and you are ready to boot into your new Key. Enjoy! append initrd=/ubninit boot=live config threadirqs quiet splash persistent AV LINUX BASIC BOOTING BIBLE: When booting an AV Linux ISO: 1. Be patient...it can take several seconds to start the boot especially on LiveDVD media. 2. Watch for disk activity, if you see nothing immediately on the monitor but there is disk activity it is still working on the boot. 3. Closely observe the Kernel console text output for red text errors, warnings and even many regular console colored errors are normally harmless. The reason AV Linux doesn't use a pretty bootsplash is so the user can monitor what the Kernel is doing at boot. 4. If the console output completes and the SLiM login window appears wait for it to auto-login which will take several seconds on the LiveDVD and may not appear at all when booting from a Unetbootin USB Key. 5. If the desktop partially loads OR the display resolution is wrong or corrupted it is most likely a Kernel Modesetting/Video Driver issue which is covered in more detail below. Failure to boot can be caused by several issues: 1. A corrupted or broken ISO image on the Project ftp server. This is extremely unlikely and rare and is easily ruled out by a single successful install by an end-user, AV Linux is pre-tested by a third party before any release is made public to make sure the ftp ISO images are intact and functional. 2. A bad download of the ISO image. This is not common, but quite possible and can be verified by using the accompanying ISO.md5 file from the ftp download folder. Another simple indication is if the file sizes on both the ftp and the downloaded file match perfectly. 3. A bad burn of the ISO to disk media This is usually the most likely cause of boot failure and is generally evident when the disk does nothing at all or freezes after displaying a few lines of console text which may be accompanied by numerous console red error messages. Always burn any compressed filesystem media like ISO images at low burn speeds (i.e. 4X or less) and make sure to use good disk media. If a LiveDVD fails try it on a different computer, this is the number one way to discern if your media is bad or not or whether your computer has a specific hardware issue with the LiveDVD. 4. Incompatible Video Hardware and Kernel Mode Setting (KMS) This issue is generally evidenced by the Kernel completing it's console output and dying at the login or unsuccessfully trying to load the Desktop and/or displaying the Desktop at a very low or garbled resolution. AV Linux 5.0 can be booted to disable KMS by selecting the 'Failsafe' option from the ISOlinux LiveDVD boot splash screen. INSTALLING AV LINUX: WARNING! - The following section involves major system changes like hard drive partitioning etc. There is always a risk of Data loss or corruption when installing a new or different Operating System. ALWAYS back up any important Data before making changes to your existing Hard Drive. If you are completely unfamiliar with the concept of drive partitioning, or terms like “Master Boot Record” it is recommended that you don’t attempt to install AV Linux. Installation Info: Launch the Remastersys Installer from the desktop by double clicking the “Install AV Linux” icon. AV Linux uses 'GParted' to perform disk partitioning, you can choose to set up partitions before running the Installer or do it as part of the installation process. The Installer is laid out in a very simple step by step manner, take your time and carefully read the Installer prompts to ensure a successful install. Please also take time to read the rest of this section before installing. PLEASE NOTE! AV Linux does not use 'sudo' it uses the pure Debian Root Superuser and User method. When installing and setting up AV Linux you will need to have a separate and unique password for your Root Superuser to administrate the system and a regular User password for normal system use. IMPORTANT! NEW INSTALLER FEATURES The Remastersys Installer in AV Linux 5.0.3 has some new features to make installing easier and more convenient than before. Users can now choose ext2, ext3 OR ext4 partitions and GRUB2 is now the default bootloader. PLEASE NOTE! The 'noformat' option in the AV Linux Remastersys Installer is still under development and not recommended for use at this time. Message Dialogs During Installation: AV Linux employs a special script to mount all partitions at boot. During the installation process as the new partitions are created the Removable Drive mounting dialog may appear. You can safely hit the 'Cancel' button and close these dialogs as the installation takes place. GETTING AROUND IN AV LINUX: About LXDE: LXDE is a relatively new Desktop Environment with it’s 0.5.X release included in AV Linux, it was chosen for it’s unique modular mix and match of existing individual software components. It provides a good balance between resource efficient performance and GUI attractiveness with the ability to utilize different Window Managers and gtk-2.0 themes common to other Desktop Environments like Gnome and XFCE4. Custom AV Linux Menu: The AV Linux Custom Menu has been prepared to help users get to the applications they are looking for quickly and differs significantly from the stock LXDE menu. It’s simple two-tiered interface doesn’t have numerous sub-menus to confuse and obscure where applications can be found. The Menu contains a number of custom launchers so even applications that normally have a CLI interface only can be easily found and launched from the Menu. Some examples are JACK Capture, JACK Meterbridge, WineASIO, Realtime Config Scan, linuxDSP and Loomer JACK Plugins etc. Managing Misplaced or Missing Launchers: Occasionally you may install a program and have it appear in the wrong menu category since the AV Linux menu differs from the stock LXDE one, additionally in rare cases you my install a program with a launcher that doesn't appear in the menu at all. This will usually affect only the separate Audio and Video menus. Fixing this is quite simple, first find the misplaced or missing launcher in /usr/share/applications or /usr/local/share/applications, then use the 'Tool' menu in PCManFM to 'open the current folder as root' and then right click on the launcher you want to fix and 'open with gedit'. Scroll down to the line that says 'Categories=' and delete any text that is following the '=' and replace it with 'AudioEditing' to make the launcher appear in the Audio menu or 'VideoEditing' to make it appear in the Video menu. An Example from a “Floola” launcher: [Desktop Entry] Encoding=UTF-8 Version=1.0 Type=Application Categories=AudioEditing Terminal=false Icon=floola Name=Floola Exec=/opt/Floola-linux/Floola Comment=iPod Management Tool and More! Creating Custom Launchers: If you have installed or compiled a program that does not have a launcher you can easily create one using the launcher creation tools found in the AV Linux Control Panel in the 'System Customization' tab. You have a choice of creating a launcher for your user only or a system-wide launcher for all users. Read and follow the prompts carefully. Filetype Preferences: AV Linux 5.0.3 no longer guesses what application should open respective filetypes because in some cases undesirable programs were setting themselves up as defaults (ie GIMP opening PDF files, Xarchiver opening .deb packages). To give maximum flexibility for diverse filetypes AV Linux now requires users to initially select the application they desire for each filetype. This is quite simple and once set prevents unwanted applications opening your filetypes by default. When you go to open a file for the first time in the PCmanFM file manager it will open a dialog like the screenshot below which will provide a listing of all available programs. A couple of common scenarios are to find Gdebi Package Installer and the Wine Program Loader in the 'System Tools' menu for opening .deb packages or installing a Windows program respectively. When you tick off the 'set as default' checkbox then the file will either be opened by the Application you chose when double clicked or the application will appear in the menu when you right click on the file. The AV Linux Control Panel: The AV Linux Control Panel is a three-tabbed Administration Tool adapted from Tony Brijeski's Remastersys Control Panel. The Control Panel is a vital part of AV Linux and addresses many of the features missing from LXDE when compared to Gnome or KDE. Tabs/Features: System Management ➢ ➢ ➢ ➢ ➢ ➢ Open a Root Terminal Use xkill to terminate a misbehaving program Run the QPS task manager as user or Root to monitor system resources View your system info with hardinfo Set partition mounting options ISOhybrid USB Tool System Administration ➢ ➢ ➢ Set time, date and timezone Add and manage users and groups Manage system passwords System Customization ➢ ➢ ➢ ➢ ➢ ➢ SGFXI proprietary graphics driver installer RT performance analysis scan Fontconfig font display settings System/Console Keyboard settings Rcconf boot scripts utility Custom menu launcher creation tools Ncurses Terminal Interface: dpkg-reconfigure functions like setting the keyboard configuration and boot scripts use the ncurses terminal interface. To navigate the options use the arrow keys on your keyboard and to select or deselect an option use your keyboard space bar. The Remastersys Backup Utility: The Remastersys Backup Utility is very easy to use and will create a bootable ISO image of your running system that you can use to reinstall in case of major problems. There is a limit of 4.0Gb for an ISO image so it is not recommended to keep large files or stored data in your User's home. To use it set up your remastersys config file and select either 'Backup' which will back up your User's home as well or 'Dist' mode which will not retain your personal settings and customizations. It is also important to use the 'Clean' utility between uses to ensure a fresh ISO is created. PCManFM 0.9.8 File Manager: The recently rewritten PCManFM 0.9.8 File Manager is probably the closest thing to the core of LXDE. It is light, fast and is loaded with hidden features like the ability to navigate system files as Root and open a Terminal in the folder you are browsing. It manages the Desktop background and appearance and also handles the mounting and unmounting of Removable and USB Drives. PCManFM by default in AV Linux does not utilize a “Trash” folder so when you delete an item it is permanently deleted from the hard drive. An optional trash function can be enabled in the 'Edit' → 'Preferences' menu. PCManFM 0.9.8 now will access remote folders and has the capability to browse Samba shares and FTP Folders. Two useful menus in PCManFM are the 'Go' Menu: and the 'Tools' Menu: Changing the Keyboard Layout for Other Languages: To set the keyboard for a different language during a LiveDVD session open a Terminal and use the 'setxkbmap' command with the accompanying 2 letter code for your language. The screenshot below shows the command for French (setxkbmap fr). To permanently change the keyboard setting in an AV Linux install use the Keyboard setting utilities found in the 'System Customization' tab of the AV Linux Control Panel. You can also change the System keyboard manually by opening a Root Terminal from the Accessories menu and editing the configuration file in /etc/default/keyboard with this command: gedit /etc/default/keyboard Change the Model and Country codes within the quotes to the correct ones for your Country and save the changes. XKBMODEL="pc104" XKBLAYOUT="us" XKBVARIANT="" XKBOPTIONS="" Using the Wbar Dock: AV Linux uses the Wbar Dock for an attractive way to quickly launch apps from the Desktop. Wbar is set up to be launched from the LXPanel so the user can choose to have it on or not after startup, to have it launch automatically at startup simply copy the 'wbar.desktop' file from /usr/share/applications to /home/USERNAME/.config/autostart . The Dock is configured by editing it's 'dot.wbar' config file in your user's home. The config file is very straightforward to edit... “i”=Icon, “c”=command and “t”=title SliM LOGIN MANAGER: Setting SliM For Autologin: AV Linux 5.0.3 features a new and much lighter Login Manager...'SLiM'. Although not as fully featured and familiar as GDM, SliM has a very light system footprint and is still quite configurable by editing it's configuration file in /etc/slim.conf. The example below will cover the most popular configuration request...autologin. First open a Root Terminal from the 'Accessories' Menu and enter: gedit /etc/slim.conf To enable autologin two separate variables must be changed in slim.conf. Scroll down the file to find the following line: # default_user To set yourself as the default user remove the '#' comment from the beginning of the line and then add your username, USERNAME is used here as an example: default_user USERNAME If we leave the file like this then on next login it will automatically enter your username but still require your password, to have autologin work fully you need to edit the autologin line: # auto_login no Once again remove the '#' comment and change the 'no' to a 'yes' like this: auto_login yes When you have completed editing the slim.conf file click 'Save' in the Gedit Text Editor and autologin should be active on your next login. Setting SliM Default Session Using Other Desktop Environments: Open a Root Terminal from the 'Accessories' Menu and enter: gedit /etc/slim.conf Scroll down the file to find the following line: login_cmd exec /bin/bash -login /etc/X11/Xsession %session Change '%session' to the start command of your desired other default Desktop Environment. Command Examples For Some Other Common Light Desktops: default,startxfce4,openbox,ion3,icewm,wmaker,blackbox,awesome MOUSE CURSOR THEMES: Changing the Mouse Cursor Theme: AV Linux 5.0.3 comes without a custom mouse cursor theme as the default. Two optional custom cursor themes are included 'Pick' featuring guitar picks as the cursor and 'Pulse Glass' with a glossy pulsating cursor. To change the cursor theme open 'Accessories' → 'Root Terminal' and copy and paste or enter: gedit /usr/share/icons/default/index.theme To change to the 'Pick' theme change the 'Inherits=' line like this: [icon theme] Inherits=Pick To change to the 'Pulse-Glass' theme change the 'Inherits=' line like this: [icon theme] Inherits=Pulse-Glass To have no cursor theme and use the system default cursor edit the 'Inherits=' like this: [icon theme] Inherits=neutral When you have finished editing the 'index.theme' file click 'Save' in gedit and log out and log back in. PERFORMANCE SETTINGS: CPU Governor Settings: Governing the CPU in AV Linux is handled by a small light GTK-based tray utility known as 'Trayfreq'. Simply click and right-click on the LXPanel applet and select your desired governor. Trayfreq can be further configured and have it's defaults changed by editing it's 'trayfreq.config' file found in /usr/share/trayfreq. To do this use 'Accessories' → Root Terminal and this command: gedit /usr/share/trayfreq/trayfreq.config Trayfreq example default settings in AV Linux using the 'ondemand' governor on battery power and 'performance' governor on AC power: [battery] show=1 governor=ondemand [ac] governor=performance #[events] #activate=/usr/bin/xterm [governor] default=performance #[frequency] #default=800000 Monitor Display DPMS: AV Linux does not use a Screensaver due to the unnecessary diversion of resources during recording or editing operations. DPMS (Display Power Management Signaling) is used to turn off the Monitor with the system defaults of 60mins to blank the display, 120mins to suspend the display and powering off the display disabled. To edit the /etc/xdg/autostart/dpms-settings.desktop configuration file run this command in a Root Terminal: gedit /etc/xdg/autostart/dpms-settings.desktop This will open a text file to edit containing the following: [Desktop Entry] Categories=Application;System Comment=Monitor DPMS Settings Encoding=UTF-8 Exec=xset s off dpms 3600 7200 0 Hidden=false Name=Monitor DPMS Settings Terminal=false Type=Application Version=1.0 Icon= To change the DPMS duration settings edit the highlighted line “Exec=xset s off dpms 3600 7200 0”. The durations are in seconds not minutes so multiply your desired minutes by 60. The first number (3600) is the blank time, the second (7200) is the suspend time and the third number (0) is to disable monitor shutdown. Entering a third number greater than the first or second will enable shutdown mode. When you have made your changes they will not become effective until a reboot. Setting Audio Group Permissions on the Real Time Clock (rtc): AV Linux 5.0.3 has rtc permissions set by default, this information is for reference only. Many audio applications benefit from the user and 'audio' group permissions being set on the system Real Time Clock. This can be done easily using the 'Accessories' → Root Terminal like this: Create a blank text file called '40-rtc-permissions.rules' in the /lib/udev/rules.d directory with this command: gedit /lib/udev/rules.d/40-rtc-permissions.rules Now copy and paste this text into the blank text file you just created and click 'Save' in the gedit Text Editor: KERNEL=="rtc0", GROUP="audio" On the next boot the rtc will automatically belong to the audio group. Adding usbfs to /etc/fstab to use USB audio devices (only necessary for older optional 2.6.31 and 2.6.33 RT Kernels): If you are using an optional realtime (-rt) Kernel and want to use a USB Audio device you will need to mount a 'usbfs' filesystem in the /etc/fstab file. To open the fstab file for editing enter the following command into 'Accessories' → Root Terminal: gedit /etc/fstab Copy and paste the following lines to the bottom of the /etc/fstab file and then save it in the text editor: # USBFS File System none /proc/bus/usb usbfs defaults 0 0 PROPRIETARY VIDEO DRIVERS IN AV LINUX: The addition of proprietary 3D nVidia and Ati video card drivers is handled by a 3 rd party script in AV Linux called SGFXI. Proprietary drivers are not supported and are to be installed at the risk and discretion of the user. AV Linux does supply 2 methods to help facilitate the installation of proprietary 3D drivers since many users want this option and Debian Linux has no tools to handle this operation other than for the stock Debian Kernel which AV Linux does not use. METHOD 1 (Preferred) – GRUB2 Proprietary Driver Mode: When you boot into an AV Linux 5.0.3 install you will notice that there is an extra GRUB boot option just below the default top boot line in the GRUB2 boot menu. This is a special optional nonmodesetting workaround created by Tony Brijeski to facilitate using SGFXI. By using this option all modesetting for nVidia and Ati video cards is disabled so SGFXI does not have to be run twice. To use this optional boot mode you need to select this option in the few seconds the GRUB2 menu splash displays at boot by using your keyboard arrow keys to highlight and select the second boot option. Once selected the kernel will boot as usual showing the boot progress text in the console. When the kernel is done booting you will be presented with a console login. For this mode to function the user is required to login as Root. At the console prompt type your username as 'root' and then enter your Root password not your regular user password. Once logged in as Root SGFXI will automatically run and attempt to install the proprietary video drivers. METHOD 2 – Run SGFXI from the AV Linux Control Panel You can also install proprietary 3D video drivers from the AV Linux Control Panel. The installer is found in the 'System Customization' tab. This method is a little more time consuming and difficult because it does not automatically turn off modesetting in the running video driver. For example the Debian default Xorg nouveau nVidia driver works with KMS (Kernel Mode Setting) in the Kernel. In order to install the proprietary nVidia driver SGFXI has to be run twice, once to remove the nouveau Kernel module and create a modesetting blacklist file in /etc/modprobe.d and add a 'nomodeset' GRUB command and a second time to actually install the nVidia proprietary driver. For this reason it is preferable to use Method 1. *IMPORTANT KMS MODESETTING INFO FOR ATI GRAPHICS USERS* This is only recommended if you are certain your hardware supports KMS or if you are experiencing Xorg ATI driver issues! ATI Graphics Cards have a wide-ranging variety of chipsets and accompanying Xorg drivers including ati, radeon and radeonhd. Generally speaking ATI Proprietary drivers do not use KMS (Kernel Mode Setting) and only some ATI chipsets support using KMS with Xorg drivers. For this reason and for maximum ATI support with the AV Linux LiveDVD KMS is enabled in the Kernel but is switched off in the /etc/modprobe.d/radeon-kms.conf configuration file. In order to have fully functional KMS with Xorg ATI drivers users need to enable the option in the 'radeon-kms.conf' file. To accomplish this go to 'Accessories' → 'Root Terminal' and copy and paste this command: gedit /etc/modprobe.d/radeon-kms.conf This will open the gedit text editor so you can modify the 'radeon-kms.conf' file. To enable KMS edit the file to look like this: options radeon modeset=1 Once edited click 'Save' in the gedit text editor and reboot your computer to allow KMS to take effect. COMPIZ WINDOW MANAGER: By default AV Linux comes with the light and efficient Openbox Window Manager. LXDE is also capable of utilizing the Compiz Window Manager which gives an assortment of 3D desktop effects. It is important to note that LXDE does not yet have the full abilities of Gnome or KDE to implement all possible effect plugins. In particular the Lxpanel does not have multiple desktop viewports which prevents having more than one desktop workspace when using Compiz. Other than that caveat Compiz is a great way to add some visual bling to your system. The first prerequisite to using Compiz is having 3D Video Drivers installed. Intel graphics cards have out of the box 3D support for the most part. Most Ati cards have varying degrees of 3D support through using the Xorg radeon/radeonhd driver and full support using the proprietary video drivers detailed in the previous section. Nvidia 3D support is only available currently by installing the proprietary nVidia drivers also detailed in the previous section. To use Compiz it is necessary to first select your options using the Compiz Settings Manager and use the included Emerald Theme Manager to select one of the pre-installed Emerald themes or any you have installed. All setup for Compiz can be easily done by using the Fusion Icon found in the System Tools menu which puts all the Compiz related programs into one application. Autostarting Compiz: To have Compiz start at login it is necessary to copy the 'Autostart Compiz' launcher found in the Extra Goodies → Autostart Launchers folder to one of two possible system autostart folders. To have the launcher work only for your user copy the Autostart Compiz launcher to /home/YOURUSERNAME/.config/autostart. To have the launcher work system-wide for all users copy the launcher as Root to /etc/xdg/autostart. AV LINUX KERNELS: Default 3.0.16 Kernel: AV Linux offers a range of choices for post-install Kernels, by default it features the performance advantages of a stock 3.0.16-i686 Kernel. This Kernel features the best of both worlds by having -rt IRQ Threading in a mainline Kernel. This Kernel offers rtirq-init capabilities on the new Juju FireWire stack making it an optimum choice for low-latency audio application. There is also a selection of older but viable Kernels in the AV Linux Kernel FTP in the link below. AV Linux Kernels are built by Trulan Martin. Updated AV Linux Kernels can be installed from the AV Linux Kernel Repository which is enabled by default in the AV Linux 5.0.3 Software Sources. It is strongly recommended to only change or update your Kernel if absolutely necessary. http://www.bandshed.net/kernels/ Optional Kernels and FireWire Audio Devices: The default Kernel in AV Linux features the new 'Juju' FireWire stack with IRQ Threading which provides plug and play support for FFADO supported FireWire audio devices, in most cases this should work as desired. Very rarely FireWire devices and hardware setups may perform better using one of the older optional AV Linux realtime (-rt) kernels in conjunction with the 'rtirq' boot script. In order to use a FireWire audio device with either the optional 2.6.31.12-rt21 or 2.6.33.7-rt30 some extra configuration is required post-install as detailed in the instructions below: First you need to use the 'Accessories' → Root Terminal to add your user the the 'disk' group by using this command – note that 'USERNAME' is your actual username: adduser USERNAME disk Next it is necessary to have the FireWire libraw1394 module load at boot time, to do this it must have the comment (#) removed from the 'libraw1394 line in /etc/modules file as shown in the example below by again using the Root Terminal to open the file for editing: gedit /etc/modules Modify the /etc/modules file like in the highlighted example below: # # # # # /etc/modules: kernel modules to load at boot time. This file contains the names of kernel modules that should be loaded at boot time, one per line. Lines beginning with "#" are ignored. Parameters can be specified after the module name. libraw1394 acpi-cpufreq loop KERNEL CHEATCODES: Enabled By Default in AV Linux 5.0.3: threadirqs - force-threaded irq handlers (realtime preemption) - Threaded irq's have long been a major part of the RT_PREEMPT patchset, and can offer significant benefits for low latency audio uses. Use this parameter unless you have a really good reason not to. transparent_hugepage=never - turn off hugepages (a new memory management feature) - Transparent hugepages should be useful in memory intensive applications, such as virtual machines, databases, and possibly video editing. If ultra-low latency is desired, it seems to be best to disable them. Use this parameter if you want to squeeze the lowest latency possible out of your audio chain. To Be Enabled/Disabled Optionally: noautogroup - disable auto cgroup scheduling - The famous "200 line patch that does wonders", aka SCHED_AUTOGROUP, is useful when cpuintensive tasks, such as make, are being done in a terminal, while the desktop is in use. Use this parameter to disable it if you think it is causing problems. Example grub kernel command line: threadirqs transparent_hugepage=never quiet Making grub add the boot flags automatically: Grub-legacy (AVLinux 4.2 and older): 1. As root, edit /boot/grub/menu.lst 2. Add the desired boot flags to the defoptions line: # defoptions=threadirqs transparent_hugepage=never 3. As root, run: update-grub 4. Reboot Grub2 (AV Linux 5.0): 1. As root, edit: /etc/default/grub 2. Add the desired boot flags to the GRUB_CMDLINE_LINUX_DEFAULT line, like this: GRUB_CMDLINE_LINUX_DEFAULT="threadirqs transparent_hugepage=never" 3. Then run: (also as root) update-grub 4. Reboot AV LINUX 5.0.3 SOFTWARE: Included Software Applications (Subject to Minor Changes, Support Libs Not Shown) APPLICATION DESCRIPTION A2JMIDID JACK/ALSA MIDI Bridge Ardour-i686 Digital Audio Workstation ArdourVST Ardour DAW with Windows VST Support Arpage MIDI Sync'd JACK Arpeggiator Asunder Audio CD Ripper Audacity Soundfile Editor Avidemux Video Processor and Converter Blender 3D Animation Modeler Brasero CD/DVD Authoring and Burning Bombono DVD DVD Authoring Application Bristol Classic Synth Emulation Bristol-Launcher Gtkdialog UI to Launch Bristol Calf Plugins LV2 Audio Plugins and JACK Host Chordata Analyze Chords in Audio Files Cinelerra Non-Linear Video Editor Clementine QT4 Amarok based Music Player Desktop Record Records Desktop Into A Video File (GTK Version) DeVeDe Video DVD Authoring Discovery LinuxVST Synthesizer Plugin (Demo Version) Disk Utility Analyses and Troubleshoots Hard Disks Evince PDF Document Viewer Festige JACK Host For WindowsVST Plugins FFADO FireWire Audio Drivers ffmpeg CLI Audio/Video Converter FFMultiplex Audio Video Stream Muxer GUI FileZilla FTP Client Fontforge Create and Edit Fonts Gedit Text Editor with Syntax Highlighting GIMP Advanced Image File Editor Gnome Photo Print Photo Printing Utility GParted Hard Drive Partition Editor Gthumb Image File Viewer Guitarix Guitar Effects Processor GUVCView Webcam Utility GXTuner Breakout Tuner Module From Guitarix Handbrake DVD Ripper and H.264 Video Encoder Hydrogen Advanced Drum Sequencer and Programmer Iceweasel Mozilla Web Browser Inkscape SVG Graphics Editor Invada Plugins Assorted LV2 Plugins JACK Low Latency Audio Server+Session Support JACK Control Qt GUI for JACK JACK Capture Capture Output of JACK into an Audio File Jamin Audio Mastering Suite of Plugins JC_gui Frontend GUI for jconvolver JOST LADSPA, DSSI and LinuxVST Host Kdenlive KDE4-based NLE Video Editor Kompozer WYSIWYG Web Page Editor LADSPA Plugins ambisonic, autotalent, calf, caps, cmt, csa, fil, guitarix, Invada, leet, swh, rev, tap, vlevel VERSION 7-2 2.8.12SVN 2.8.12SVN 0.3.3 2.1 1.3.12 2.5.4 2.61 2.30.3 1.0.0 0.60.9 0.4 0.0.19GIT 1.0SVN 2.2CV 1.0 0.3.8 3.16.9 R3 2.30.1 2.30.3 1.0.2 2.0.99SVN1995 0.7.10SVN 0.1 3.3.1 20100501 2.30.3 2.6.10 0.7.0 0.7.0 0.2.14.1 0.21 1.4.1 1.8 0.9.4 0.9.6b1 9.0 0.47-2b1 1.2.0 0.121.3SVN 0.3.7 0.9.61 0.97CVS .07 0.5.5 0.8.2.1GIT 0.8b3 Continued: APPLICATION DESCRIPTION LibreOffice Lingot linuxDSP Plugins LiVES LMMS Loomer Plugins LV2Rack MediaInfo Meterbridge Mixxx Mudita24 Control Musecore Mypaint Openshot Oomidi Patchage PCManFM Pianoteq Qsynth Qsampler Qtractor Renoise Realtime Scan Rosegarden Seq24 SGFXI Simple Scan Shutter Sooperlooper Swami Synaptic Transcribe! Totem Transmission VMPK Wbar Whysynth WINE WineASIO WinFF XArchiver XineUI XJadeo Yoshimi Zita-AT1 Zita-Rev1 Zonage Zynjacku Full Office Productivity Suite Guitar Tuner JACK Client Plugins, LinuxVST and LV2 Plugins (Demos) Non-Linear Video Editor Linux MultiMedia Studio JACK and LinuxVST Audio Plugins (Demo Versions) JACK LV2 Plugin Host Utility to Identify Audio and Video Codecs JACK Meter Suite DJ Focused Music Player Updated Mixer for ice1712 Soundcards Music Score Editing Painting Program Non-Linear Video Editor QT4-based Audio/MIDI Sequencer JACK Patchbay/Routing Default File Manager Piano Modeling Software (Demo Version) Qt Frontend for Fluidsynth LinuxSampler QT4 GUI Audio/MIDI Sequencer Tracker Style Audio Sequencer (Demo Version) Realtime Configuration Scan Script Audio/MIDI Sequencer and Score Editor Pattern-based MIDI Sequencer Automated Install Script for ATI/nVidia 3D Graphics Drivers Easy Scanner Utility Screenshot Capturing and Editing Live Looping Sampler Soundfont/Instrument Editor Software Package Manager Song Transcribing/Learning Tool (Demo Version) Gstreamer based Movie/Media Player Bittorrent Client Virtual Midi Piano Keyboard Light Application Launch Bar DSSI Synthesizer Windows Compatibility Layer ASIO Driver for JACK ffmpeg based Audio/Video Converter Compression and Unzip Utility Media Player based on Xine Video Player with JACK Transport Real Time Synthesizer Autotune JACK Plugin Reverb JACK Plugin Create Multiple MIDI Zones JACK LV2 Synthesizer Host VERSION 3.4.4 0.9.1 1.4.9 0.4.12 6 0.7.41 0.9.2+b1 1.10.0 1.0.3 1.1 0.9.0 1.4.1a1BZR 2.0-2011.3 0.4.4-1.2b1 0.9.8 3.6.6 0.3.6 0.2.2.28CVS 0.5.3 2.7 11.11.42 0.9.2 4.15 2.31.1 0.85.1 1.6.14 2.0.0 0.70.1 8.10 2.30 2.03 0.4.0 1.3.3 20100922 1.3.24+rt 0.9.0 1.3.0 0.5.2 0.99.6 0.6.1 0.060.12 0.2.1 0.1.1 0.3.3 6 INSTALLING SOFTWARE IN AV LINUX: There are 3 main methods of installing software in AV Linux. For Repository-based software packages the Synaptic Package Manager is used, for independently downloaded Debian '.deb' files the Gdebi Package Installer is used and finally for AV Linux 'Package Bundle' Zips the Terminal and 'dpkg' command are used. WARNING! – It is not advised to use 'apt-get upgrade' or 'apt-get dist-upgrade' in AV Linux as is common in other Debian-based Distributions. AV Linux contains many specially customized, pinned and held packages that would potentially get overwritten by a dist-upgrade and break the system. In addition AV Linux is to be used with the Debian Squeeze repositories ONLY, using the Testing (Wheezy) and Unstable (Sid) repositories is unsupported and will cause conflicts with the existing custom 'avlinux' Packages. By default AV Linux has the repositories recommended for daily use enabled so unless you are certain about what you are doing do not make changes to the Software Sources. Synaptic Package Manager: The Synaptic Package Manager is found in the 'Preferences' Menu and serves as a graphical means to keep inventory of all installed Debian '.deb' software packages and also to remove any installed packages and is the primary way of installing repository-based packages. Which packages appear as installable is determined by whatever Repositories are checked off in the 'Software Sources' utility (also found in the Preferences Menu. Updated packages appear by selecting the 'Installed (Upgradeable)' in the list in the left-hand pane. In AV Linux it is preferable to manually select the packages you wish to upgrade by clicking on them until they are highlighted (use the Ctrl or Shift key to select multiple packages). Once you have selected the packages you wish to upgrade right click on them and select 'Mark for Upgrade'. This method is preferable to using the 'Mark All Upgrades' button at the top of the Synaptic window. The Software Sources Utility: Gdebi Package Installer: For single packages downloaded from the web(ie the AV Linux package ftp) the Gdebi Package Installer is used. Simply download the package to your home folder and double click on it. The Gdebi Package Installer will automatically launch and ask for your Root password and install the package. Installing Zipped Package Bundles with dpkg: Occasionally optional packages for AV Linux may be be adapted from other Debian-based distros or Ubuntu. Since the dependencies for these packages may not be available in the usual Debian repositories to accommodate installation a 'Package Bundle' containing the necessary dependencies will be provided in a Zip file available in the AV Linux Packages FTP. Since many times the dependencies have to be installed in a specific order it is a better practice to install these bundled packages via the terminal with 'dpkg'. To do this download the Package Bundle from the AV Linux Packages FTP folder to your home folder, once downloaded right-click on the Zip file and select 'Extract Here' to unzip it. Now double-click on the folder to open it and you will see a series of '.deb' packages and a 'README' text file. Take time to browse the README file for any special additional instructions. Go to the 'Tools' menu in the PCManFM File Manager and select 'Open Current Folder In Terminal'. In the newly opened terminal type 'su' which will prompt you for your Root Password so you can administrate installing the series of packages with dpkg. Once you have entered your password and are returned to the terminal prompt enter or copy and paste this command: dpkg -i *.deb Watch the terminal output for any errors and once the packages are installed successfully close the terminal. NETWORKING ON AV LINUX: Out-of-the-box LAN and Wireless Support: For most users with reasonably common networking hardware AV Linux should provide out-of-the-box Internet connectivity. Upon login to the Desktop the Network Manager should automatically look after connecting a LAN connection and Wireless should prompt the user to connect to available networks. You can access the network settings by clicking on the Network Manager icon found to the far right on the LXPanel. If you left-click on the icon it will open a menu displaying all available connections like this: If you right-click on the icon it will open a menu allowing you the option to edit your connections: From here you can add, set up and edit Wired LAN, Wireless, Mobile Broadband USB, VPN and DSL connections. Specifics for each kind of setup are beyond the scope of this manual but generally speaking Wired LAN and Wireless connections shouldn't need manual setup. Many mobile broadband USB key devices are supported by AV Linux but most of them need manual configuration to work. Networking with Windows Computers: The PCManFM File Manager can be used to network with Windows PC's using Samba. To browse a Windows network use the 'Go' menu and then select 'Network Drives': PCManFM will open a new window with a network URL and any available windows machines should appear as being able to browse: Connection to an FTP Folder: PCManFM can also be used to move files to and from a remote FTP folder, to do this simply enter the web address into the URL bar at the top. You will be prompted to enter your FTP username and password in order to access your FTP folder. PRINTING WITH AV LINUX: Getting Started: Printing with Linux can either be 'Plug and Play' heaven or software dependency hell, a lot depends on what Printer you have, how old (or new) it is and how serious the manufacturer is about providing open-source friendly Linux drivers. If you don't already have a printer I strongly recommend Hewlett Packard products, they seem to be the only manufacturer taking printing on Linux seriously and have their own Linux 'HPLIP' project to support their hardware. There is no possible way for this manual to cover printing in any specific detail and many users may prefer to not use a printer at all on a streamlined Audio recording system like AV Linux. Nonetheless here are a few key points for those who wish to set up their printer. Printer Group Permissions: In order to administrate and use the CUPS print server the user will need to be a member of two main system groups that deal with printing...'lp' and 'lpadmin'. The quickest way to do this is with the Root Terminal and the 'adduser' command. Go to Accessories → Root Terminal and copy or enter these commands, 'USERNAME' is your actual regular username on the system: adduser USERNAME lp adduser USERNAME lpadmin Printer Drivers and Software: Many printer models will have driver support within the CUPS print server, if you have a HP printer that is a couple of years old you will want to install the 'hplip' package with the 'Synaptic Package Manager' for the best support and graphical user tools. If you have a newer HP printer you will be best advised to go to the HPLIP website and follow the instructions on installing the latest HPLIP version with their easy to use '.run' scripts. For other makes of printers configuration is done with the printer configuration utility found in 'Preferences' → 'Printing'. Printer drivers come in a 'PPD' (PostScript Printer Description) format which is key to getting your printer to work properly. PPD files can be found for some Printer manufacturers on their websites or in some cases on the driver disk that came with your printer. If you are having difficulty getting your particular printer working then the only advice I can offer is do a Google search on your printer make and model followed by the word 'linux' . There are quite a few specialized blogs or forum posts dealing with specific printer issues. Many times the Ubuntu user forums will have some good information as well. USING JACK: The easiest way to setup the JACK Audio server is to use the JACK Control app (a.k.a. Qjackctl). It can easily be launched from the LXPanel or Wbar Dock. To setup your Audio card click the 'Setup' button. In the example below the system has a default onboard Intel HDA which has been selected in the 'Interface' dropdown. Generally speaking if your Audio interface shows up in the dropdown list it is supported by ALSA and therefore by JACK as well. To use a firewire interface you will need to select 'firewire' instead of 'alsa' in the 'Driver' dropdown. It is very important to make sure that 'Realtime' is checked off under 'Parameters'. Another number to look at during setup is the 'Frames/Period' figure. If you are experiencing 'Xruns' or audio dropouts then you will need to increase this number, conversely if you want to decrease the 'Latency' figure then decrease the Frames/Period until Xruns appear. If you are recording directly to a Recording Track then low latency numbers are really not terribly necessary, if you are recording through a plugin or other audio application en route to the Recording Track then lower latencies are required. To use JACK with Synthesizer and MIDI Plugins it is recommended to increase the 'Timeout (msec)' value to 3000 miliiseconds or more for better stability. Making Connections: Most applications once up and running with JACK will manage their connections within the program you are using, however sometimes it is necessary to use the 'Connect' function in JACK Control to manually connect applications or even hardware like MIDI Keyboards. In the example below we are connecting the MIDI Outputs of the 'VMPK' Virtual Keyboard to control the Qsynth Soundfont Synthesizer. The 'Connections' window has three tabs. The 'Audio' tab is where the Audio connections are made from the mic or line inputs of the soundcard to the application you are using and from the application to the actual outputs of the soundcard. The 'MIDI' tab is for making connections with hardware and software that utilizes 'JACK MIDI' and the ALSA tab does the same thing for hardware and applications that use 'ALSA MIDI'. For those who are more graphically oriented there are also two alternate patchbay utilities for making connections in AV Linux, the linuxDSP JP-1 Patchbay found in the 'JACK Plugins' menu, and 'Patchage' found in the 'Audio' menu and pictured below. M-AUDIO 1010LT PCM MULTI WITH AV LINUX: Lots of Audio I/O for Little Money: AV Linux supports a number of Pro-Audio interfaces with PCI, FireWire and USB I/O, of special note MAudio's 1010LT is a very affordable and well supported PCI Card interface supplying 10 channels of I/O. By using a customized PCM_Multi '.asoundrc' file multiple 1010LT's can be run on AV Linux providing a lot of channels without spending a lot of money. AV Linux comes by default with the necessary software components to set up two 1010LT's easily providing funtionality either with or without an additional onboard Sound Card on the system. The default AV Linux PCM_Multi setup is for 16 Channels of I/O. How to Use the Provided '.asoundrc' Config Files: To start you will need to decide whether you are using the 1010LT's by themselves or in addition to an onboard Sound Chip and then make sure both 1010LT cards are installed in the system PCI slots and the the SPDIF Out of the first card is connected to the SPDIF In on the second card. Next, look in your User's home folder for the 'Extra Goodies/'PCM Multi' folder and select which 'asoundrc' file is needed for your particular setup. To check out how you cards are set up on the system use this command in a regular terminal: cat /proc/asound/cards Here is a screenshot of a system with an onboard Intel HDA and two 1010LT's, note that the 0,1,2 numbers correlate to the 'hw:0', 'hw:1', 'hw:2' numbers used by JACK. Use this file by copying the 'asoundrc.txt' (for 2 ice1712 cards with NO onboard sound card) OR the 'asoundrc+onboard.txt' (for 2 ice1712 cards AND an onboard sound card) into your users home folder and renaming whichever file you use to '.asoundrc' (without the quotes). It is normal for the file to disappear from view when you rename it because the dot (.) makes it viewable only with 'show hidden' enabled in the PCManFM file manager. It is important to note if you are using 2 cards plus an onboard you should have the onboard chip as the default or first sound card followed by the ice1712 cards. Setting up Mudita24Control (Card2) Launchers: By default the Mudita24Control (Card 2) launcher found in the 'Soundcard Utilities' Menu is set for a system with two 1010LT's and no onboard Sound Chip. In order to use it properly with an onboard Sound Device the launcher needs to have it's 'Exec=' line modified. Open the launcher for modification by copying and pasting this command into a Root Terminal: gedit /usr/share/applications/envy24_controlcard2 Then change this: Exec=/opt/bin/envy24control -D hw:1 To this: Exec=/opt/bin/envy24control -D hw:2 This will allow the Mudita24Control (Card 2) launcher found in the 'Soundcard Utilities' Menu to correctly work with the second card. Launching JACK With 'PCM Multi Start': The 1010LTs are identified to JACK and ALSA as 'pcm_multi capture' and 'pcm_multi playback' by the '.asoundrc' file. The regular method of launching JACK with the 'Qjackctl' application requires some extra configuration to work with PCM Multi so AV Linux provides a special 'PCM_Multi Start' launcher found in the 'Soundcard Utilities' Menu to start JACK and have the 16 Channels of I/O available to the Audio applications of your choice. This launcher opens a small xterm window to show you that JACK is running properly, please note that closing the xterm window also kills JACK. DEBIAN REFERENCE: Many people who are new to Linux are reluctant to use the terminal and sometimes consider it to be either a primitive means of using the computer or too complicated. After some time to adjust to using it most Linux users come to appreciate the facility and speed afforded by using the CLI. The following section can be utilized by experienced Linux users and demonstrate some fundamentals to new Linux users. The apt and dpkg articles are modified from an excellent article by Matthew Danish. WARNING! - Please remember it is not advised to use either 'apt-get upgrade' or 'apt-get distupgrade with AV Linux. If you don't understand what a Terminal Command is actually going to do to your system it is advised not to use it. Common APT usage : apt-get install <package> Downloads <package> and all of its dependencies, and installs or upgrades them. This will also take a package off of hold if it was put on. See below for more info on hold. apt-get remove [--purge] <package> Removes <package> and any packages that depend on it. --purge specifies that packages should be purged, see dpkg -P for more information. apt-get update Updates packages listings from Debian mirrors, should be run at least once a day if you install anything that day, and every time after /etc/apt/sources.list is changed. apt-get upgrade [-u] Upgrades all packages installed to newest versions available. Will not install new or remove old packages. If a package changes dependencies and requires installation of a new package, it will not be upgraded, it will be put on hold instead. apt-get upgrade will not upgrade packages put on hold (that is the meaning of hold). See below for how to manually put packages on hold. I suggest the `-u' option as well, because then you can see what packages are going to be upgraded. apt-get dist-upgrade [-u] Similar to apt-get upgrade, except that dist-upgrade will install or remove packages to satisfy dependencies. apt-cache search <pattern> Searches packages and descriptions for <pattern>. apt-cache show <package> Shows the full description of <package>. apt-cache showpkg <package> Shows a lot more detail about <package>, and its relationships to other packages. Common Dpkg usage : dpkg -i <package.deb> Installs a Debian package file; one that you downloaded manually, for example. dpkg -c <package.deb> Lists the contents of <package.deb>, a .deb file. dpkg -I <package.deb> Extracts package information from <package.deb>, a .deb file. dpkg -r <package> Removes an installed package named <package> dpkg -P <package> Purges an installed package named <package>. The difference between remove and purge is that while remove only deletes data and executables, purge also deletes all configuration files in addition. dpkg -L <package> Gives a listing of all the files installed by <package>. See also dpkg -c for checking the contents of a .deb file. dpkg -s <package> Shows information on the installed package <package>. See also apt-cache show for viewing package information in the Debian archive and dpkg -I for viewing package information extracted from a .deb file. dpkg-reconfigure <package> Reconfigures an installed package, if it uses debconf (debconf provides that consistent configuration interface for package installation). You can reconfigure debconf itself if you want to change the front-end or priority of questions asked. For example, to reconfigure debconf with the dialog front-end, you simply run: dpkg-reconfigure --frontend=dialog debconf echo ``<package> hold'' | dpkg --set-selections Put <package> on hold (command line method) dpkg --get-selections ``<package>'' Get the current status of <package> (command line method) dpkg -S <file> Searches for <file> in package database, telling you which packages have that file in them. Building Debian packages from Source: apt-get source [-b] <package> Download the source Debian package for <package> and extract it. You must have deb-src lines in your /etc/apt/sources.list for this to work. If you supply the `-b' option and you are currently root, then the package will be automatically built if possible. apt-get build-dep <package> Download and install the packages necessary to build the source Debian package <package>. This feature is only present in apt version 0.5 and up. Currently this means that woody and above contain this functionality. If you have an older version of apt then the easiest way to find out the build dependencies is to look in the debian/control file in the source package directory. A common usage of this command is in conjunction with apt-get source -b. For example (as root): apt-get build-dep <package> apt-get source -b <package> Will download the source package, all of its build dependencies, and attempt to compile the source package. dpkg-source -x <package.dsc> If you have downloaded the source package for a program manually, which includes several files such as a .orig.tar.gz (or .tar.gz if it is Debian native), a .dsc, and a .diff.gz (if it is not Debian native), then you can unpack the source package using this command on the .dsc file. dpkg-buildpackage Builds a Debian package from a Debian source tree. You must be in the main directory of the source tree for this to work. Sample usage: dpkg-buildpackage -rfakeroot -uc -b Where `-rfakeroot' instructs it to use the fakeroot program to simulate root privileges (for ownership purposes), `-uc' stands for ``Don't cryptographically sign the changelog'', and `-b' stands for ``Build the binary package only'' debuild A handy wrapper script around dpkg-buildpackage that will automatically take care of using fakeroot or not, as well as running lintian and gpg for you. Fixing dependencies : dpkg --configure --pending If dpkg quits with an error while apt-get install, upgrade, or dist-upgrading try running this to configure the packages that were already unpacked. Then try apt-get install, upgrade, or dist-upgrade -f, and then try apt-get install, upgrade, or dist-upgrade again. Repeat as needed. This usually resolves most dependency problems (also, if it mentions a specific package for some reason, you might want to try installing or removing that package) apt-get install -f apt-get upgrade -f apt-get dist-upgrade -f Attempt to fix dependencies while doing one of the above. Note that apt-get install -f does not require a <package> argument. HANDY TERMINAL COMMANDS: SYMLINK TO A FILE OR FOLDER ELSEWHERE ON SYSTEM (AS ROOT) : ln -s /path/file/exists /path/link/placed REBUILD FONT CACHE (AS ROOT) : fc-cache -f -v FONT ANTIALIASING AND HINTING SETUP: dpkg-reconfigure fontconfig-config DVD RIPPING WITH MPLAYER : *Creates a file called "dump.vob" in your home folder assuming movie is title 1. mplayer dvd://1 -dumpstream -dumpfile dump.vob VIRTUALBOX MODULE SETUP (AS ROOT) : *Make sure linux-headers are installed and linked /etc/init.d/vboxdrv setup PRINT A 'selections.txt' FILE TO DESIGNATE HELD PACKAGES (AS ROOT) dpkg --get-selections \* > selections.txt *Then edit selections.txt as Root SAVE THE 'selections.txt' FILE TO DPKG (AS ROOT) dpkg --set-selections < selections.txt BUILD DEBIAN PACKAGE WITH GIT-BUILDPACKAGE: git-buildpackage --git-upstream-branch=origin/upstream BUILD DEBIAN PACKAGE WITH DPKG: dpkg-buildpackage -rfakeroot -uc -b LINKING KERNEL HEADERS FOR MODULE BUILDING: ln -s /usr/src/linux-headers-$(uname -r) /lib/modules/$(uname -r)/build SET A DIFFFERENT C COMPILER THAN DEFAULT *Replace X.X with desired gcc version export CC=/usr/bin/gcc-X.X APPLY A PATCH TO SOURCE CODE OR KERNEL patch -p1 < PATCHFILENAME GRAB SOURCE CODE FROM LAUNCHPAD WITH BZR *Openshot Video Editor as an example bzr branch lp:openshot CHECK SOUND DEVICES INSTALLED ON SYSTEM cat /proc/asound/cards CHECK AUDIO PLAYBACK DEVICES ON SYSTEM aplay -l HELP SUPPORT THIS PROJECT: The AV Linux ISO Image promotes 'Software Freedom' over 'Free Software'. Although on the surface AV Linux may appear to be a slightly modified Debian “spin-off” under the surface it is far more than that. A great deal of time, effort and attention have been put into creating it and making it convenient to use. Hosting the project and it's website have an actual financial cost and supporting users takes valuable time away from other pursuits. The only way for this project to continue being produced is through free-will donations from those who benefit from it's use. Even a donation of $10.00 can help this project continue. To donate use the PayPal link on the AV Linux Website.