1
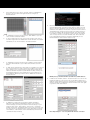
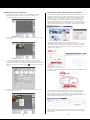
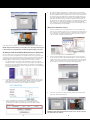
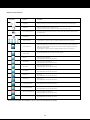
IPcam-SD Quick Start Guide
WiFi Security Camera for Smartphone, Tablet, and Computer
Step 1: Hardware Installation
1.
Wireless antenna: Attach the wireless antenna (included) to the ANT
port located at the back of the IPCam-SD.
4.
Input the user name and company name. Then click “Next” to
continue as illustrated above.
2.
Ethernet cable: Plug the Ethernet cable (included) into the network
port of the IPCam-SD and then plug the other end of the Ethernet
cable into your router’s network port.
5.
The default Install CMS directory is C:\Program Files\CMS, click
“Change” to select a different destination folder, or click “Next” to
continue (recommended).
3.
AC adapter: Plug one end of power adapter (5VDC, 2000mA,
included) into the power socket of the IPCam-SD and then plug the
other end of the AC adapter into an electric power outlet.
6.
The default shortcut icon folder is CMS. Click the drop-down menu
for more selections, or click “Next” to start installing the CMS to your
computer (recommended) as illustrated above.
7.
Click “Finish” to complete the CMS software installation as shown below.
8.
After the installation is complete, a “CMS” short-cut icon will
automatically be created on your desktop as shown above. Doubleclick on the “CMS” icon to open the CMS software for IPCam-SD.
Network Port
Microphone
Antenna Mount
Speaker
Micro SD Slot
Alarm In/Out
Power Socket
Step 2: Software Installation
1.
Insert the Installation CD into the CD-ROM drive, and double click the
“Open folder to view files” option from the the AutoPlay window.
2.
Next, double-click on the “CMS_ENG_V3-1.0.9.9.T.20121206.exe”
file to start the software installation process as shown above.
3.
The CMS (Central Management Software) Setup screen will appear
as shown below. Select a desired language if the language window
appeared and then click “Next” to continue or “Cancel” to cancel
the installation.
Step 3: IP Address Setup (CMS)
1.
Double-click on the “CMS” short-cut icon on your desktop. Select
“English” or other languages and then click “OK” to advanced to
“Device list is empty, please add device...” prompt. Next, input the
User Name and Password at the login window as illustrated below. The
default User Name is “super” and the default Password is empty. Click
the “Login” button to login to CMS. A “Device list is empty, add your...”
window will appear as shown below, click on “OK” to continue.
Note: The default User Name is “super”, password leave blank.
1
2
2.
At the CMS main screen, click on “System”, and then “Add/Remove
IPCam” to open the device manager window to configure as
illustrated below.
8.
3.
In “Add/Remove IPCam” window, click on “ADD AREA” to open the
“Zone” window as illustrated above.
4.
In “Zone” window, please enter a zone name, and then click “OK” to
confirm and go back to the Add/Remove IPCam window. In this Quick
Start Guide, we use “Demonstration” as illustrated below.
5.
In “Add/Remove IPCam” window, click to highlight “Demonstration”
then click “ADD DEVICE” to open “Edit” device window as shown
below.
6.
In “Edit” device window, put a check mark on “IP Address” then click on
the “IP Search” button to start searching for IP address of IP camera.
After clicking on the “IP Search” button, it will detect and list two IP
addresses: 192.168.1.10 (Ethernet) and 192.168.1.11 (Wifi), and they are
the default IP addresses of the IPCam-SD. Put a check mark on the
first IP address (Ethernet), and then click on “EditDevice” button as
illustrated below.
Go back to the “EditDevice” window to change the “Subnet Mask”
and “Default Gateway” to what you wrote down on Step 7. The final
step is to assign an IP address to the IPCam-SD. There are 4 sets of
numbers in an IP address. The first three sets have to be the same as
“Default Gateway” and then assign the 4th set of numbers between
100~200 (for example 189) as illustrated below. Then click “Modify”
to confirm the changes. If everything is setup correctly, you will get
“Save Config to device successful” window, click “OK” to advance
to the “ADD DEVICE” window. In this Quick Start Guide, we use
192.168.248.189 for demonstration purpose only.
NOTE: please jot down the HTTP Port, Media Port, and Media Port.
9.
7.
In “EditDevice” window, please modify the default IP Address
(Ethernet), Subnet Mask, and Gateway to match your local area
network settings. [To find your local area network settings; on your
computer click “Start”→“All Programs”→”Accessories”→”Command
Prompt”. At the DOS “command Prompt” screen, type “ipconfig”, and
then press “Enter” as illustrated below. Please write down your local
“IPv4 Address”, “Subnet Mask” and “Default Gateway”. Exit from the
“Command Prompt” window.]
3
In “Edit” device window, click the “IP Search” button to re-scan for the
IPCam-SD addresses. Then click on the new IP address (Ethernet) to
make the change and then click the “OK” button to confirm the change
and to go back to the “Add/Remove IPCam” window. Click “OK” again
to go back to main CMS window.
Note: Repeat Steps 2 ~ 9 to setup IPCam-SD wireless connection.
4
CMS Remote Access (Intranet)
P2P (Point to Point) Remote Access (Internet)
1.
In the main CMS screen, double-click on the IP address, and then
double-click on CAM01 to connect to the IPCam-SD and the
camera image should appear on your screen.
Open the Internet Explorer Browser and type http://www.xmeye.net in
the URL to register for a user name and a password or select connect
“By Device”. Connect “By Device” requires the Serial ID number of the
IPCam-SD which is located under the IPCam Config/Info/Version of
the CMS software. Then input the 4 digit on-screen code to verify the
login attempt as illustrated below. Finally click on the “Login” button to
initiate remote monitoring. Select the default “Connect all video (Extra
Steam)” and “Auto Prompt”, then click on the “OK” button to view the
IPCam-SD footages.
2.
To record video files to your computer, click “System”, and then click
“PC Config”.
To Register for a P2P remote access account, please go to
http://www.xmeye.net and click on “Register”. Click on the “OK” button
after inputting all the fields and an email will be send to the specified
email address as illustrated below. To retrieve the password, login to the
email account specified.
3.
In “PC Config” window, make sure “Overwrite” is checked. Next
select the disk/partition you want to save the video files, and then
click “Browse” to choose the destination folder as shown below. Click
“Apply” to confirm the changes, and click
to go back to main CMS
screen.
Then use the password provided in the email to login to www.xmeye.net as
illustrated below.
4.
To start recording, right-click on camera image and choose “Local
record” as illustrated below.
After logging in, click “Device Manager” and then “Add” as illustrated
below. Input the Serial ID number in place of the MAC address which
can be found under IPCam Config/Info/Version of the CMS, give it a
Device Name (ie. Sales Floor), IPCam-SD Username (default: admin), and
Password (default: blank). Click “OK” to confirm.
Next, click on “My Devices” in the upper left corner of the screen then
double-click on the device name in blue below and click “OK” to login to
the IPCam-SD.
5
6
4.
For static IP address subscribers (recommended), you should have
been given a static IP address by your ISP (Internet Service Provider),
this is the WAN IP address you will need to access the IPCam-SD over
the Internet using the IE Browser and Smartphone Applications. For
those with dynamic IP address subscribers, use third party software
that can be used to detect the changes in dynamic IP and send out
the IP changes to email address, software such as IPWatcher, Dynamic
IP Monitor, etc. Or, register for a DDNS account with www.dyndns.
com , www.no-ip.com , www.dnsdynamic.org , www.changeIP.com or
any free/paid DDNS servicing website.
IE Browser Remote Access
1.
Open the IE Browser, in this demonstration we are using IE 9.0. Go
into the “Tool” and then click on the “Internet Options”. Next, click on
the “Custom Level” and browse down to “ActiveX controls and plugins” to “Enable” everything under the ActiveX controls, then click
“OK” to confirm settings as shown below.
2.
Type the static IP address given by your Internet Service Provider
in the URL (for example, http://67.56.122.232) or use the registered
DDNS service name to remote access the IPCam-SD. Use the default
“admin” as the User Name and no password for the password. Then
click “Login” to login to the IPCam-SD as illustrated below.
3.
Click “OK” to accept the setting and the graphic user interface will
appear as demonstrated below.
Login successful! The graphic user interface will display as demonstrated above.
NOTE: Using the P2P features does not require you to open any ports from your
router, however, it is required that you enable the UPnP setting in your router.
IE Browser and SmartPhone Remote Access (Internet)
Prior to remote access using Internet IE Browser, Smartphone, and CMS,
there are a few ports designated to the IPCam-SD have to be opened in your
router. Since there are many varieties of routers out in the market today, here
we would like to demonstrate with a Netgear WGT624 wireless router. Port
34567~34569 are required to be opened in your local router as follow:
1.
The administrator’s username and password are required to login to
manage the router. To login to your router, please type in the URL of the
IE browser http://gateway and then Enter, the gateway is an IP address
found in step 7 above. Next, click on “Advanced”, then “Port Forwarding”,
and “Add Custom Service”
2.
In custom service, input the Service Name (ie. IPCamera), Service Type
=TCP, Starting Port=34567, Ending Port=34569, and Server IP Address
(input your local area network IP address that was assigned to the
IPCam-SD in Step 8 above). Click on “Apply” to confirm.
3.
After confirmation, the following result will be displayed to
demonstrate that the ports have been successfully opened as
shown below. IP address “192.168.0.33” is used for demonstration
purposes only.
NOTE: For Safari and Firefox browsers remote access, please reference
the IPCam-SD user’s manual.
7
8
Smartphone Remote Access (iPhone)
1.
Open the App Store and search for “vMEyeV2” as shown in IMAGE #1
and then select the “vmeyev2” application from the list. Then tap on
“FREE” to initiate the download [IMAGE #2].
NOTE: Although the app is free, an Apple ID is required in order to
download and install the application. To obtain an Apple ID account,
please register with apple.com.
2.
3.
Tap on the “Install App” option from the app description screen
[IMAGE #3] and then enter your Apple ID “User Name” and
“Password” when prompted as shown in IMAGE #4 to begin the
installation process.
5.
The “Device List” screen [IMAGE #10] consist of the following
configuration options:
•
DeviceName – the device name does not need to match any specific setting
and is used solely to identify your camera from the applications Device
List screen. For example, if you are using the app to remotely monitor 2
x IPcam-SD (one at home and one at work), the device name for the first
camera could be “HOME” and the second camera could be “WORK”.
•
Address – IP address of the IP camera or static IP address given by your
ISP. This depends on whether you are accessing the IP camera from within
your local area network or the wide area network (static IP address).
NOTE: DDNS users can simply input the domain name here.
•
Port – the mobile port number assigned to the IP camera. The default
port is 34568.
•
User ID – the user name used to login to the camera. The default is admin.
•
Password – the password associated with the user name. The default is
blank (no password).
•
MaxChannel – change 16 to 1 so that it matches the number of channels
available on the camera (1).
6.
When finished, tap the “SAVE” button located at the top right corner
of the screen [IMAGE #11] and your device will now be displayed in the
Device List as shown in IMAGE #12 above.
7.
There are two ways to initiate the live view. The first way is to tap on the
Device Name from the Device List screen as shown in IMAGE #13 and then
select channel 1 from the drop down [red arrow in IMAGE #13] or simply
tap on channel #1 from the “Live View” screen as shown in IMAGE #14.
Once the application has been successfully installed, select “Open”
[IMAGE#5] or simply click on the vMEyeV2 icon that was created
[IMAGE #6] to begin configuring the application to access the
IPcam-SD. Next, tap on the “Address Mode” when prompted as
shown in IMAGE #7.
NOTE: To enlarge the live view screen double-tap on the live view image.
4.
Tap on the “Device Management” icon [IMAGE #8] and then select
“Add” located at the top right corner of the screen [IMAGE #9] to
add the IPCam-SD camera to the list.
9
10
Buttons and Actions
BUTTON
NAME
ACTION
Play/Stop
Starts and Stops the live view feed from the selected live view display box.
Snapshot
Takes a snap shot of the current screen.
*Images are saved in the “snapshot” folder of the root directory.
Device Management
Opens the “Device List” page where you can add, edit or delete devices from
the application.
Information
Displays vMEyeV2 application features and contact info.
Channel Select
Used to select which channel to display on the live view screen.
*Only applies to devices that are equipped with more than one channel.
Channel Group
Changes the “Channel Select” numeric values. Pressing the channel group
button will change the values from 1-8 to 9-16. Pressing this option again will
split the numeric values into groups of 4 which will then display the group in
quad view as selected.
*Only applies to devices that are equipped with more than one channel.
PTZ Control
Opens and hides the 10 icon PTZ shortcut options.
Tilt UP
Tilts the camera upward.
*Not applicable with IPcam-SD model.
Tilt DOWN
Tilts the camera downward.
*Not applicable with IPcam-SD model.
Pan LEFT
Pans the camera to the left.
*Not applicable with IPcam-SD model.
Pan RIGHT
Pans the camera to the right.
*Not applicable with IPcam-SD model.
Zoom IN
Zooms in.
*Not applicable with IPcam-SD model.
Zoom OUT
Zooms out.
*Not applicable with IPcam-SD model.
Focus adjustment
Used to focus the image after zooming in/out.
*Not applicable with IPcam-SD model.
Focus adjustment
Used to focus the image after zooming in/out.
*Not applicable with IPcam-SD model.
Aperture adjustment
Lets you adjust the light level.
*Not applicable with IPcam-SD model.
Aperture adjustment
Lets you adjust the light level.
*Not applicable with IPcam-SD model.
NOTE: For Android and other SmartPhones please reference the IPCam-SD user’s manual.
11