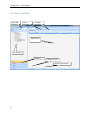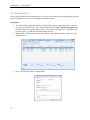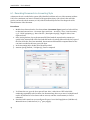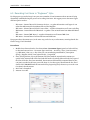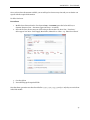
1
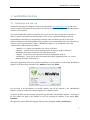
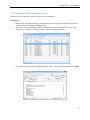
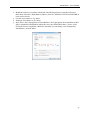
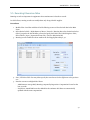
AutoWinWin User’s Manual Copyright © 2010 Navaltik Management Lda Navaltik Management, Rev: 01 – 09/08/2010 [Mn_Aww01_E.docx] AutoWinWin – User’s Manual Contents 1. ManWinWin Software solutions .............................................................. 4 2. AutoWinWin interface ............................................................................. 5 2.1. Installation and Start up ....................................................................................... 5 2.2. User’s interface .................................................................................................... 6 2.3. Symbols and Icons ............................................................................................... 7 2.4. Interface Features and Resources ....................................................................... 9 2.4.1. Visit and Choose ................................................................................................................................. 9 2.4.2. Context Menus ................................................................................................................................... 9 2.4.3. Load Data in the Main Screen ........................................................................................................... 9 2.4.4. Set ....................................................................................................................................................... 9 2.4.5. Search ... In... ....................................................................................................................................11 2.4.6. Clean Filter ........................................................................................................................................11 2.4.7. Filtering Rules ...................................................................................................................................11 2.4.8. Selection Form ..................................................................................................................................11 2.4.9. Open, Edit, and See Records One by One ...................................................................................... 12 2.4.10. Print ................................................................................................................................................ 13 3. Configuration of the fleet management system ..................................... 14 3.1. Functional Organization ..................................................................................... 14 3.2. Cost Centre / Clients .......................................................................................... 15 3.3. Personnel Organization...................................................................................... 16 3.4. Personnel ........................................................................................................... 17 3.5. Accounts ............................................................................................................ 18 4. Building your vehicle database ............................................................. 19 4.1. Preparing the information ................................................................................... 19 4.2. Contents of the vehicle datasheet ...................................................................... 21 4.3. Associate Information to a Vehicle - General ..................................................... 23 4.4. Associate Documents ........................................................................................ 24 4.5. Associate Parts and Materials to an Equipment ................................................. 25 4.6. Associate Required Time and Operating Time Scenarios .................................. 26 4.7. Preparing the Maintenance Plan for a Vehicle ................................................... 27 4.8. Work Orders. Your day to day management tool ............................................... 32 1 AutoWinWin – User’s Manual 5. Managing your maintenance ................................................................. 34 5.1. Presenting your fleet and vehicle particulars ...................................................... 34 5.2. Presenting your maintenance plan ..................................................................... 35 5.3. Work programming and deciding ....................................................................... 36 5.4. Reporting work done, effort, resources and costing ........................................... 36 5.4.1. Recording MH .................................................................................................................................. 36 5.4.2. Recording Materials Used ...............................................................................................................38 5.4.3. Recording Third Party Costs ...........................................................................................................38 5.4.4. Terminating a Work Order .............................................................................................................. 39 5.4.5. Reprogram a WO to a New Cycle ................................................................................................... 40 5.5. Recording Kilometres/Miles ............................................................................... 41 5.6. Recording Fuel ................................................................................................... 42 6. Managing Maintenance Costs ............................................................... 43 6.1. Recording Documents in Accounting Style ........................................................ 44 6.2. Recording Cost Items in “Engineers” Style ........................................................ 46 Bibliography .............................................................................................. 48 2 AutoWinWin – User’s Manual AutoWinWin – User’s Manual This Manual guides the User to organize fleet maintenance in accordance with the good practices, using the applications of ManWinWin Software. ManWinWin Software includes three reference CMMS applications: - AutoWinWin – specifically directed to the technical management of one or more fleet of vehicles, either own or third party. - InnWinWin – for the technical management of facilities - ManWinWin 5G – for the management of industrial maintenance in general. 5G stands for 5th generation. All the applications share the same structure so they can co-exist in a single application in any organization and you can easily migrate, with free of charge Navaltik support, after you obtain the appropriate license, from one application to another. This Manual concentrates on AutoWinWin for a fleet and is illustrated with one private car. Methodologies are easily transposed to any other type of vehicle or fleet of any size and type. Conceptual framework, maintenance definitions and the like is covered in the paper by José Paulo Cabral, Practical Guide to Facilities Maintenance Management – Maintenance of Buildings (about 54 pages) that is supplied along with the AutoWinWin software license. Reference to this paper is shortly abbreviated as PGuide followed by the paragraph number. Please send your comments to [email protected] as to the overall quality and usefulness of this Manual to help us in improving it. 3 AutoWinWin – User’s Manual 1. ManWinWin Software solutions We say: ManWinWin Software applications: - Transform maintenance problems into management solutions. - Conciliate the virtues of software with the hard facts of engineering - Recognize that there can be no technical management without technical know how - Observe maintenance management good practices and proposes solutions that work - The User can adjust to his particular case but should not ignore the hard rules of maintenance management. But want YOUR opinion... A quick way to set up AutoWinWin can be shortly described as: Start using it as it is and if you want improve it later AutoWinWin is configured according to commonly accepted management philosophy and can be incorporated in other maintenance management situations, such as facilities, industrial, etc. The User, however, is totally free to adjust and incorporate his ideas, once he dominates the features of the program. The software is licensed with one model vehicle (Honda) that fully exemplifies the methodology of work. This model can be either deleted or turn into Inactive status once it has accomplished its steering function. 4 AutoWinWin – User’s Manual 2. AutoWinWin interface 2.1. Installation and Start up Installation with MS Access database is made by download from www.manwinwin.com. No MS Access license is required. Just follow the instructions. For SQL Server version you require Navaltik Management assistance or IT expertise. If you start AutoWinWin with Access database it is easy to convert it later for SQL Server should you prefer to operate in this platform. Starting with Access is, in fact, a good methodology to start up. On installation some folders are automatically created in order to facilitate your day-to-day work, technical assistance by Navaltik and data safety procedures. We recommend that you do not change these locations: In the <My Documents> folder / <ManWinWin Software> is created and inside it the <AutoWinWin> folder with the sub-folders: - <Database> - to contain your database (one or more .mdb files) <Reports> - contains all the software printing reports. It takes 3 to 4 Mb of disk space. (Remember that it may contain also your tailor made reports) <Images> - for the User to place pictures associated to equipments, WOs, etc. <Documents> - for the User to place documents associated to equipments, WOs, etc. such as manuals, drawings, certificates, etc.) Start up the application in the Icon created at installation in your Desktop or in the folder ManWinWin Software of the Start menu. Introduce User: DEMO and Password: demo For the safety of the information you should regularly copy all the contents of the <ManWinWin Software> folder to another PC or data storage device in another location. To operate in multi-user environment you should copy the folder <ManWinWin Software> to the Server PC and redirect the path to the database in each PC accessing the database in the option File / Database. The application runs in different languages. Select preferred language in File / Preferences. 5 AutoWinWin – User’s Manual 2.2. User’s interface Menu Bar Filter Tool Bar Main Screen Tree Display Modules Software License Main Screen Counter 6 AutoWinWin – User’s Manual 2.3. Symbols and Icons Along the application you will find the following symbols and icons in tool bars and menus. Icon Function Description New To add a new record to the database Maintenance Item Maintenance object individually considered for maintenance. WO Work Order: Document specifying the planned or performed maintenance work Stock Item Item in the Materials Master File that can be used in WOs and related to maintenance items. Cost Document Document containing cost information, either an official accounting document or an internal one. Each line is a cost item. Cost Item A line in a Cost Document allocated to a Maintenance Item, WO, Cost Centre or Client. Fuel Supply Fuel Supply Record to a maintenance item (Vehicle) Man Hours MH Record in a WO; Item; Cost Centre or Client Stock Item Record Stock Item Record in a WO; Item; Cost Centre or Client Other Other Costs in a WO; Item; Cost Centre or Client Database Change the database in use. Print Print Records exhibited in the Main Screen Open Open a Record in the Main Screen and Edit, if necessary Repeat Copy a complete Record in the Main Screen, if necessary Edit, to generate a New identical Record Delete Delete a Record in the Main Screen Go To After selecting a given Record transfers the Record to the working area Close Closes a form a returns to the previous form 7 AutoWinWin – User’s Manual Icon 8 Function Description Search User defines what he is looking for. May use strings and wildcards * or %. In User specifies where the above search should be made Execute Executes the search in accordance with the above specified criteria. Set Prepares a set of items satisfying a given criteria specified in a form Clean Filter Cleans all filtering and searching criteria specified above AutoWinWin – User’s Manual 2.4. Interface Features and Resources Get acquainted with the resources described along next paragraphs using the information included in the model database. Test all the operations. 2.4.1. Visit and Choose Any field requiring the selection of given record or configuration feature can be reached in one, or more, of the following ways: - Pressing the Title Button of the Field Pressing the adjacent [...] Using F4 Key Actual selection with command Go To. 2.4.2. Context Menus Selecting any record – Maintenance Item, WO, Stock Item, etc. – press the Mouse Right Button to get the available options and choose with the Mouse Left Button. Alternatively, the same resources can be reached through: - Menu at MN line Tool Bar at TB line 2.4.3. Load Data in the Main Screen You use it to load a set of information satisfying a given criteria into the Main Screen. Typical Procedure (example): 1. 2. 3. 4. 5. Module: Fleet Tree on the left side of the screen: open successively: 01 Facility Fleet / 01.41 Car Fleet. Load Data See the result. You get all maintenance items recorded in that system. You can superimpose another Set Filter (see #2.4.4.) to get only one Item Type, for example, VI = Private car; LY = Lorry / Truck. Try. NB: Load Data operation cleans all previous filters. 2.4.4. Set You use it to prepare a set of records – Maintenance Items, WOs, Stock Items; Costs; etc. – satisfying a given criteria composed in a specific form. It is a very useful resource in many situations, namely when you want to isolate a set of items satisfying complex criteria. 9 AutoWinWin – User’s Manual Typical Procedure (in the Fleet Module): 1. Fleet Module 2. Set 3. (Suggestion: as a rule, before composing a Filter, Clean Filter to ensure that there is no field unduly filled with unwanted information. ) 4. Fill up the form, pressing the field title buttons or visiting with F4, whenever necessary 5. NB: You can use a combined criterion. Try the following exercises among many possible ones: Note that you have only one model vehicle so your result will either be that vehicle or none. Once you have more information in your database you will get relevant results! 10 - All items in your Rented Fleet: Select Cost Centre / F4 / 07.020 – Rented Fleet / Go To / Execute: Returns all maintenance items in the cost centre. - All Trucks in your fleet: Select Item Type / LY – Lorry / Truck / Go To / Execute: Returns all trucks in your database. - All private cars HONDA: Select Item Type / VI – Vehicle Private Car / In adjacent separator Particulars 01-20 / MAKERS: write HONDA (or simply HON*) / Execute: Returns all vehicles recorded in the database whose Makers is HONDA. - What vehicle is driven by James Bond: Select Operator / 09142 – James Bond / Go To / Execute: Returns all vehicles whose driver is Mr. Bond, James. - Equipments under Maintenance Contract; Guarantee; Inactive, etc. can be isolated in the same way, just marking the appropriate box in the filtering form. AutoWinWin – User’s Manual 2.4.5. Search ... In... Builds up a set of items answering to a given criterion specified thus: Search: What? You specify for example: “Filter”; “*fluid*”; etc.. In: Where? You specify for example: In the field Description It is ideal to search strings (groupings of characters). To search for a filter, for example, in the Materials module you could specify just “*filter*” to be searched in the description (noting that it would also bring anything containing the string filter). Try it. Find a vehicle where ID plate contains the letters ZB. The filtering rules # 2.4.7. apply. Typical Procedure (Plant Module): 1. Module Plant 2. In the Tool Bar line: in the Search field, specify the string you are looking; In: visit and select the available locations for the search; press the Magnifier to execute the search. 3. Clean Filter removes the contents of the Search field. Note that this resource is a particular case of the operation Set: if you visit the Set just after you have done a Search you will find the filter fields dully filled. 2.4.6. Clean Filter In the Tool Bar line: Clean Filter removes the contents of the Search field In the Set form: Clean Filter removes the contents of all the fields in that form. 2.4.7. Filtering Rules In all search operations available in ManWinWin Software applications the following wildcard rules apply. The asterisk * or the percentage % symbols can be indistinctively used. Examples: filter – returns all items beginning with that string: Filter frame, Filter support, Filtering Device *filter – returns all items whose description terminates with that string: Oil Filter; Fuel Filter; Air Filter. *filter* – returns all items whose description contains the word “filter”: Primary Filter Element; plus all the cases above. 2.4.8. Selection Form The Selection Form shows up when it is necessary to find structured information, such as an Equipment, a Stock Item, a Maintenance Schedule, to bring it to the working area, for example, when you are planning a WO and want to plan the materials. 11 AutoWinWin – User’s Manual The search criterion can be established with the aid of the Structure Tree at the left hand side: Load Data / Select / Go To, or, alternatively, at top left side of form: Search *Filter* In Description. Magnifier Button to return all items containing the word “Filter” 2.4.9. Open, Edit, and See Records One by One Once you open a record you can edit it and navigate along the full active set using the Navigation Buttons at bottom left of the form. Try, for example, seeing the Maintenance Plan Instructions for the model vehicle: Typical Procedure: 1. Fleet Module 2. In the Tree on left section of window, Select Car Fleet, with mouse right button Load Data 3. Select Vehicle, then, to see the Preventive Maintenance Plan, mouse right button, Select Maintenance Plans 4. Select the first Maintenance Schedule A01, mouse right button, Open. You find the complete MS Instructions, as in figure below 5. With the Cursor Buttons at bottom left corner of form, ► ◄ you can see, one by one, the contents of each MS. 6. You can Edit, if required, saving afterwards. This resource is available in many other situations. 12 AutoWinWin – User’s Manual 2.4.10. Print All printings in ManWinWin Software applications have a common pattern: 1. Accessed through the Context Menu / Print, OR through the Printer Icon in the Tool Bar. 2. Printing operation is incident over all the active items in the working area 3. By default, the selected item is the one to be printed but the User may change to all the items of the working area (whose quantity is indicated in the figure counter) 4. Standard options are: Datasheet, to obtain full information of the contents of each item; Simple, to obtain the selected set or; Grouped By, to obtain the full set organized by some available criterion. 5. All prints can be Previewed with the option Preview (default) 6. Reports can be complemented with some description by the User, included in the option Text. 7. After previewing a given report it can be exported to “PDF” file or other file formats (Word, Excel, etc.), using the Icon Export Report, on upper left corner of the preview form. 13 AutoWinWin – User’s Manual 3. Configuration of the fleet management system We suggest you adopt the proposed pre-configured structure to start with. Once you are acquainted with the organization philosophy you may adapt it to your requirements. 3.1. Functional Organization Review concepts in the Practical Guide # 5.3.1.. ManWinWin Software copes for a tree structure up to 5 levels. We normally use 2 or 3. To visit or change functional organization: Procedure 1. Menu: Configuration / Company / Functional Organization. 2. Expand Tree with + sign. With Right Button Of Mouse select operation New, Open, etc. at the required level and proceed. 3. Required Time and Operating Time are important if you want to compute maintenance indicators. In the Fleet you normally have other indicators. Down times are automatically computed by the program. So you may not need to specify OPT and RQT for your fleet. 4. OPT independent from hierarchy means that the Operating Time specified to the upper hierarchy does NOT apply to this branch. 5. RQT independent from hierarchy means that the Required Time specified to the upper hierarchy does NOT apply to this branch. 6. To specify RQT and OPT in any branch, select that branch, Right Button of Mouse / Times, Proceed. 7. Note: By default specified OPT and RQT propagate to the descendents. Suggestion: At the start go only up to step 5. 14 AutoWinWin – User’s Manual 3.2. Cost Centre / Clients Review concepts in the Practical Guide # 5.2.1. The Cost Centre is the entity to aggregate the maintenance costs in the Organization. If you are a fleet management services supplier you aggregate costs in the entity Client. Explore the configuration of Cost Centres in AutoWinWin: Procedures 1. Menu: Configuration / Company / Cost Centres 2. Expand Tree with + sign. With Right Button of Mouse select operation New, Open, etc. at the required level and proceed. Explore the resource Clients Procedures 1. 2. 3. 4. Menu: Configuration / Company / Clients to obtain the list of all registered Clients Select one Client, Right Button of Mouse / Open, to visit all information about that Client To add a new one: New / Fill in the form. Red fields are compulsory. Code: 12345 (NB: we suggest that you use exactly the same coding as that used in the Accounting Department) 5. Short Name: e.g. Navaltik 6. Description: e.g. Navaltik Management – Organização da Manutenção Lda 7. Fill in the form to the possible extent, including contacts, coordinates, etc. 15 AutoWinWin – User’s Manual 3.3. Personnel Organization The Personnel Organization should be able to register all personnel relevant to your operation and maintenance. To have access to AutoWinWin you need to be registered. Review concepts in the Practical Guide # 5.1.1. Explore and apprehend the philosophy of the organization for the personnel: Procedures 1. Menu: Configuration / Company / Organization 2. Expand Tree with + sign. With Right Button of Mouse select operation New, Open, etc. at the required level and proceed. 3. Open e.g. Driver 16 AutoWinWin – User’s Manual 3.4. Personnel Personnel involved in the operation and maintenance of the Fleet need to be registered in the structures designed in # 3.3. Review concepts in the Practical Guide # 5.1.3. Procedures 1. 2. 3. 4. 5. 6. Menu: Configuration / Company / Personnel or Configuration / Users Administration to obtain the list of all registered personnel Note: DO NOT YET delete Mr. DEMO as he is the only one that can, so far, access AutoWinWin. You should do that only after you assign to someone with System Administrator rights to access the application! To add a person: Right Button of Mouse / New. Red fields are compulsory Code: We suggest you use the actual Company ID Number of the Person To add a photo: first, ensure that the photo of the person, in portrait format, is in the directory <Images> (by default in <My Documents> / <ManWinWin Software> / <AutoWinWin> / <Images>) and then proceed: Place cursor in the photo area of the form. Right Button of Mouse / New, select the photo in the <Images> directory. 17 AutoWinWin – User’s Manual 3.5. Accounts Accounts are used to systematize the nature of the costs involved. Each organization has its own ideas. Ours are included in the pre-configured structure of AutoWinWin. You can adjust or change to suit your requirements. Procedures 1. Menu: Configuration / Costs / Accounts to obtain the list of all registered personnel 2. Right Button of Mouse / Expand All to see the full structure 3. Manipulate as required. 18 AutoWinWin – User’s Manual 4. Building your vehicle database 4.1. Preparing the information Before starting to build your vehicle database you should prepare all the information and have it available in the right places. Check list: 1. Official ID of vehicle and Registration Document in digitalised format (e.g. Car1234_Register.pdf) 2. Full set of particulars of the vehicle with as much information as possible. Check the model technical datasheet following the sequence: Fleet Module / Organization / Right Button of Mouse / Load Data / Select Model Vehicle / Right Button of Mouse / Open / Tab Particulars / Look at particulars 01-20 and 21 to 40. Or, otherwise, after selecting the Model Vehicle, Print / Datasheet 3. All the technical information necessary to prepare the preventive maintenance plan, namely, the Maintenance Manual. 4. Last information about vehicle: a. Running register: Date / Km or Miles b. Last Service Maintenance: Date / Running Register c. Current Driver 5. Digitalized documents of the information you want to link to the vehicle register a. Vehicle Photo b. Photos of the drivers c. Vehicle Official Registration Document d. Updated Insurance Policy (Green Card) e. Updated Inspection Certificate f. Last Tax Document. 6. Remember that if you have a number of similar vehicles you can gain great productivity by Repeating a well done register – not only the technical datasheet but also the maintenance plans, applicable parts and documents - just changing the variable parameters. For this resource to be productive, the source information should be very accurate and complete. We recommend that you take good note of this. 7. Finally, ensure that you have the directories structure to place information you may want to link and that if you are using a multi-user platform all PCs are pointing at the same places. We suggest that you respect the default. Note that in the directory <AutoWinWin> you have all the valuable information: 19 AutoWinWin – User’s Manual <My Documents> <ManWinWin Software> <Manual> - Contain the application manual. Should it have a new version it should be placed here. <AutoWinWin> <Database> - Contain the “mdb” database. If you are using SQL Server this directory will not be used <Documents> - Contain all documents in digitalized format such as Official Registration Document, scanned Insurance Policy, Roadworthiness Certificate, Tax, and the like. We suggest you rename documents in a logical manner, e.g. 0123456_Registration.pdf, 0123456_Insurance2010.pdf, etc. where 0123456 is the ID of the vehicle <Images> - Contain all photos of vehicles, personnel, etc. Use suggestive names. <Reports> - Contain the AutoWinWin reports. Should you have any problem printing a report or acquire a tailor made one, it should be placed here. 20 AutoWinWin – User’s Manual 4.2. Contents of the vehicle datasheet NB: The fields in red are compulsory. They need to be filled either with actual figures or reasonably approximate ones. All others are optional and can be filled at any time. Structure Number Code Description System Cost Centre OR Client Operator Supplier Date Record Investment Picture File Particulars Tab Choose from table visiting either with F4 or [...] Automatic sequential. Specify the Vehicle plate ID, eg.08-D-15488. Note that a structured code is also produced and can be seen in the Tab Complementary Info Specify clear and complete: HONDA ACCORD 2.2I-CTDI 98-JI-03. This is the most preeminent interface with the User. Visit by pressing button [System] or F4. Select in the Tree and Go To With [] choose either Cost Centre OR Client. Press in field or F4 and select. NB: Use the Cost Centre when you are the Fleet Owner; use Client when you are managing someone else’s fleet. Specify the Driver plus the date/hour he has taken up that function Visit by pressing button [Supplier] or F4. Select and Go To Specify purchasing date Specify record at acquisition. Note that the Record Unit is specified in the Tab Operational Data Specify acquisition Investment Before linking a picture you need to have placed it in the directory <ManWinWin Software> \ <AutoWinWin> \ <Images>, as described in the previous paragraph. In a network operation you should Map the Directory AutoWinWin with the same letter in all PCs to ensure that all users see the same information, e.g. M\: Suggestion: Name photos consistently, e.g. DSCN00245_VI0004: the first group the original photo number, the second, the structured code of the item. We find quite practical to have minimized in a directory all photos as raw material. We choose the one we are interested in, rename it , e.g . DSCN00245_VI0004, and copy it to the directory <Images>. We thus ensure that in that directory there are only photos that are relevant to our database. Before linking a file you need to have placed it in the directory <ManWinWin Software> \ <AutoWinWin> \ <Documents>, as described in the previous paragraph. In a network operation you should Map the Directory AutoWinWin with the same letter in all PCs to ensure that all users see the same information, e.g. M\: Suggestion: Use this to link generic type documents, such as technical description, manual and the like. You have a proper place to associate management documents such as certificates, registration, insurance, etc., as described in # 4.3. You have available a set of up to 40 particular that you have previously designed for that item type. Fill the form to the possible extent. You can always enrich it later. If some feature does not fit in the datasheet design you should state it in the Notes Tab. 21 AutoWinWin – User’s Manual Operational Data Tab RQT = Required Time OPT = Operating Time Unit Compute Based on Records? Average Daily Running (ADR) Date / Last Record Inactive? Since Guarantee Maintenance Contract Complementary Info Tab Coding Identification Family Fleet Card Green Card Fuel Notes Tab 22 NB: time and running parameters are essential to compute consistent maintenance indicators. You need not to worry much if you are not interested in computing such indicators. Expressed in calendar time. If you do not mark this option it assumes that the RQT of the equipment is that of the System where it is coordinated. Here you only specify whether the RQT is dependent or not from hierarchy. You specify the RQT rule in the Times option: Select Item / Right Button of Mouse / Times Expressed in calendar time. If you do not mark this option it assumes that the OPT of the equipment is that of the System where it is coordinated. In most cases you mark this option only when the OPT is based in Running Hour Meter. Here you only specify whether OPT is dependent or not from hierarchy. You specify the OPT rule in the Times option: Select Item / Right Button of Mouse / Times. Running Unit. For a vehicle, KM or MI; for a compressor H, etc.. If selected, the software automatically computes ADR by regression analysis based on the last 4 records. You have a value only after you have 4 records. The value is shown with title ADR-R, the latter “R” to express that it is computed by Regression. If you do not mark this option, which is always the case when you have no meter, you can specify an estimate for ADR. If you marked previous box, FMD-R shows, as soon as you have 4 or more records; otherwise you should specify an estimate ADR to be used for maintenance indicator computations. NB: The Average Daily Running (ADR) refers to Running Units and NOT calendar time. These are exhibited in accordance with records. You cannot change in this form. Marking this option states that the item is no longer active, like if it did not exist in the database. You keep it just to keep track of past history. Date when the item has been turned into Inactive State. Specify if applicable; you may add a note in the box below. Specify if applicable; you may add a note in the box below. All items registered in the Program shall have a Structure Code. However, for identification purposes in the User’s interface you may choose here another one ticking the desired box. Optional field, if you have configured items families. Only for vehicles. If applicable, identify: e.g. Shell Fleet Card 123456, etc. Only for vehicles. Automatic identifier for Toll paying used in some Countries, namely Portugal, its inventor. If applicable, identify it here. For vehicles. Specify ONE stock Item of the Materials Master File. We did not yet work out a solution for hybrid or mixed fuel vehicles. Free text field available to include information that is not structured in the designed Item Type Datasheet. AutoWinWin – User’s Manual 4.3. Associate Information to a Vehicle - General Further to a photo or a file, you can optionally associate to any Vehicle: - Documents – Such as Certificates, Official Taxes, Insurance and the like, with or without validity dates, as the case may be. Stock Items – Parts contained in the Materials Master File that are used in the vehicle: what, how much or how many; e.g. quantity of engine oil, number of air filters. Times – Define time scenarios: Required Time (RQT) and Operating Time (OPT). These parameters are essential for Maintenance Indicator computation. They can be inherited from the System where the equipment is coordinated or otherwise specified in the equipment. Procedures 1. Module Fleet / Organization / Load Data / Select Equipment / Right Button of Mouse: 2. Select: Documents OR Applied Stock Items OR Times 3. Check, for example, what you have in the Documents Note that when you Repeat a vehicle, further to the Equipment Datasheet and optionally the Maintenance Plans you may choose to repeat also the links to: - Documents Stock Items Times 23 AutoWinWin – User’s Manual 4.4. Associate Documents In a vehicle you use it typically for: - Official Registration Document Certificates of Inspection Insurance Policy Tax stamps, etc. The documents may have validity dates. When that date is overcome a traffic sign becomes Red. You can keep outdated documents without seeing them by just marking them as Inactive Document. Procedures 1. In the Module Fleet have the Equipment selected / Right Button of Mouse / Documents 2. New. Successively fill in the required fields. 3. To link a digitalised file you should have it previously placed in the directory <Documents> as described in # 4.1. Press the visiting paper clip and pick the desired document. To see the documents associated to one particular equipment you just complete step 1. A special resource enables you to see All documents associated to the Fleet, or satisfying a given criteria. Procedures 1. In the above Form select Set and compose the filtering criteria as desired. Remember the features of the wild cards % or * that may be useful 2. Execute. 3. You can also see the documents one by one with the aid of the ►◄ in the tool bar line. 24 AutoWinWin – User’s Manual 4.5. Associate Parts and Materials to an Equipment In a vehicle you use this resource typically to specify strategic items for maintenance, such as: - Engine oil, specification and quantity Oil, air, fuel and particles filters Tyres, braking pads, etc. These materials need to be registered in the Materials Master File. Procedures 1. 2. 3. 4. In the Module Fleet have the Equipment selected / Right Button of Mouse / Applied Stock Items New / Stock Item / Select / Go To Place: Specify, if applicable, e.g. Engine, Braking Circuit, etc. Quantity: specify quantity (it assumes the units of the stock item in the Materials Master File) To see the parts and materials associated to one particular equipment you just complete step 1. A special resource enables you to see All materials associated to the fleet, or satisfying a given criteria. Procedures 1. In the above Form select Set and compose the filtering criteria as desired. Remember the features of the wildcards % or * that may be useful. If you tick the box Vehicles List the set of vehicles considered is the one in the main form. 2. Execute. You can also see the items one by one with the aid of the ►◄ in the tool bar line. 25 AutoWinWin – User’s Manual 4.6. Associate Required Time and Operating Time Scenarios Review concepts of Required Time and Operating Time. Remember that they refer to calendar time. Note that in a vehicle the theoretical maintenance indicators are not especially relevant so you may discard this issue. In AutoWinWin Required Time is expressed on a weekly average time basis: if, for example, an equipment is required from Monday to Friday from 08:00 to 24:00 – 16 H/working day, the weekly average Required Time = 16 x 5/7 = 11.43 h/day.week. The Required Time intervenes in long period analysis, so this approximation works quite well. In what concerns the Operating Time in a Vehicle, since you normally record distance (Km or Miles) rather than Time, you have two possible approaches as shown in the form below: 1. Assume that Operating Time is the Required Time minus Down Time Related to Maintenance, i.e. OPT = RQT – DTRM, OR 2. Accept an approximation to convert distance into time, assuming, for example, that your vehicle runs on average 80 km/h, i.e. 0.0125 H/Km. Incorporate either option as indicated in the operating time form below, remembering that the important issue for management analysis is consistency of the data: 26 AutoWinWin – User’s Manual 4.7. Preparing the Maintenance Plan for a Vehicle Concept of maintenance plan: structured set of tasks that include the activities, procedures, resources and the time scale required to carry out maintenance. The correct strategy to record a maintenance item and its maintenance plan in AutoWinWin involves: 1. Record vehicle with its technical particulars and associated information, as described along # 4.2. to 4.6. 2. Prepare the maintenance plan. 3. Prepare the corresponding Work Orders. We recommend: 1. Accomplish fully the above cycle to avoid forgetting anything or leaving something incomplete. 2. To the possible extent, use a previously made maintenance instructions library made in Word, and use the Copy and Paste resource to transcribe instructions to AutoWinWin. 3. Always check if there is already a suitable Maintenance Schedule in the system that you can repeat, from identical vehicles. The style you use to prepare the maintenance plan of a vehicle is very important to the success of maintenance management. In most cases, as the vehicle maintenance is carried out by outside contractors, work instructions need not be very detailed, instead, they should just specify synthetically the tasks, parts, effort required and expected cost. The first thing you have to do is to study the Manufacturer Maintenance Manual and transcribe its information into a form that you can easily understand and transfer to the AutoWinWin structure. AutoWinWin works like this: 1. For vehicle X you prepare a systematic maintenance plan made up of Work Schedules A-01, A02, A-03, etc., each one with appropriate description of tasks, effort, materials and costs covering the expected life cycle of the equipment. 2. You then program your work by generating one Work Order (WO) that picks up the appropriate Work Schedule and programs it in actual calendar time: in a new vehicle A-01 will be programmed for, say, 20,000 km after purchase date or one year, whichever occurs first; in an existing vehicle your maintenance cycle may start at a higher level Work Schedule. 3. Once you report completion of the first WO, AutoWinWin automatically programs the date for the next WO and the process goes on automatically along the life cycle of the equipment. 4. If you have more vehicles like the X you can repeat the same maintenance plan, undertaking just step 2 to obtain all maintenance of all vehicles programmed in the time line. Very practical! But, please, be careful and prepare a 1st class maintenance plan, to start with! 5. Non systematic and corrective WO have to be prepared one by one. Consider a typical Systematic Maintenance Plan as the one presented on next page. To obtain such an outline you may have to study the Manual to transcribe it to that form. 27 AutoWinWin – User’s Manual MAINTENANCE PLAN TASKS X X X X X X X X X X X X X X X X X X X X X X X X X X X X X X X X X X X X X X X X X X X X X X X X X X X X X X X X X X X X X X X X X X X X X X X X X X X X X X X X X X X X X X X X X X Based on this draft outline you can prepare the maintenance schedules, using for each one the marked tasks thus: 28 X X X X X X X X X X X X X X X X X X X X X X X X 250000km/120m X X X X X X X X X X X 200000km/96m X X X X X X X X X 225000km/108m X X X X X X X X X X X X X X X X X X X X X X X X X X X X X X X X X X X X X X X X 175000km/84m 150000km/72m 125000km/60m 75000km/36m 100000km/48m PARTS & MATERIALS REPLACEMENTS: Engine oil 6.5 l Oil filter Fuel filter Air filter Combined filter Braking fluid Automatic gearbox oil Cooling fluid Braking pads – When necessary Tyres – When necessary 50000km/24m Maintenance Assistant on instrument panel – reset Screen washing system – check level and top up fluid Water deflector – clean Braking system – check and top up Braking system – replace brake fluid (2-yearly) Braking pads – check thickness, replace if necessary Brakes – test on testing bank Wheels and tyres – check condition; measure depths Engine compartment – check for leaks and damage Engine – change oil (6.5 l) and oil filter Engine – check condition of visible part of driving belt Engine – replace air filter (75,000 km or 4 years) Engine – replace fuel filter (75,000 km or 4 years) Engine – replace cooling fluid (250,000 km or 15 years) Car body underneath – overall check for leaks, damage and corrosion Car body outside – check overall condition of paint (2 yearly) Clear view sliding top – clean and lubricate guides (50,000 km or 3 years) Steering system – check fluid level and top up Combined filter – replace Transmission shaft – check condition Transmission – check gap on forward shaft with rubber sleeves Steering gear – check gap of the steering rods with the rubber sleeves Automatic gear box – replace oil and filter (50,000 km or 3 years) 25000km/12m TASKS Maintenance cycle Km/months AutoWinWin – User’s Manual A-01 – Service 25,000 km / 12 months - Maintenance Assistant on instrument panel – reset - Screen washing system – check level and top up fluid - Water deflector – clean - Braking system – check and top up - Braking pads – check thickness, replace if necessary - Engine – change oil (6.5 l) and oil filter Next Work Schedule in the cycle A-02. A-02 – Service 50,000 km / 24 months - Maintenance Assistant on instrument panel – reset - Screen washing system – check level and top up fluid - Water deflector – clean - Braking system – replace brake fluid (2-yearly) - Braking pads – check thickness, replace if necessary - Brakes – test on testing bank - Wheels and tyres – check condition; measure depths - Engine compartment – check for leaks and damage - Engine – change oil (6.5 l) and oil filter - Engine – check condition of visible part of driving belt - Car body underneath – overall check for leaks, damage and corrosion - Car body outside – check overall condition of paint (2 yearly) - Clear view sliding top – clean and lubricate guides (50,000 km or 3 years) - Steering system – check fluid level and top up - Combined filter - replace - Transmission shaft – check condition - Transmission – check gap on forward shaft with rubber sleeves - Steering gear – check gap of the steering rods with the rubber sleeves - Automatic gear box – replace oil and filter (50,000 km or 3 years) Next Work Schedule in the cycle A-03. And go on for all work schedules in the life cycle of the vehicle. Note that after A-10 250,000 km / 10 years, next Work Schedule will be again A-01 and the cycle repeated. Let us exemplify registering in AutoWinWin the systematic 50,000 km / 24 Months Schedule. 29 AutoWinWin – User’s Manual Procedures 1. 2. 3. 4. 5. 6. 7. 8. Module Fleet. Select branch including desired equipment / Load data Select Equipment / Right Button of Mouse / Maintenance Plans New. Fill in successively the fields in the form: Work Type /Press box or F4 / Select / A – Systematic Service / Go To Code: AutoWinWin fills in sequentially within the selected work type, e.g. A-02 Description: Service 50,000 km/24M. Title, synthetic and consistent Plan TM: Planned Maintenance Time: estimate or ask guidance from Supplier Periodicity: Calendar: 12 / Open box for units / Months / Records / 25,000 Km. NB periodicity is reported to NEXT Maintenance Schedule (MSch). 9. Next MSch: By default it suggests the MSch you are preparing, A-02. If you want to specify the next one, A-03, leave A-02 now and Edit afterwards, after you have created A-03 10. Tasks: Observe good practices: I. Preparation; II. Reference to Manufacturer Recommendations; III. Telegraphic check list. You may Copy and Paste from a Word or Excel document that you may have previously prepared 11. Man-Hours Tab: If the work is to be made by a Contractor you do not fill; if it is to be performed by your organization you plan MH: New /Position / Select / specify amount of planned MH / Account / Expand / Select 12. Stock Items Tab: New. 13. Press button Stock Item or F4 to visit the Materials Master File. Ensure that in the Tool Bar: All Items message is exhibited; otherwise, the message Applied Stock Items, shows only the items that are already linked to the equipment. 30 AutoWinWin – User’s Manual 14. Select Item / specify Quantity / visit table and select Account (that needs to be last order account, shown in black). 15. Other Tab: enables you to specify Contractor planned costs. You use it whenever maintenance is to be carried out by third party. Fill in successively: Supplier / Description e.g. 50,000km service / specify cost estimate / select Account. You need to repeat the above procedure for all Maintenance Schedules in the maintenance cycle. But you can gain great productivity if, at step 3, instead of New you use the resource Repeat to obtain a nearly complete Schedule, just requiring some editing to become final. Try it. But, please, work with care, as it is quite easy to make mistakes with great productivity! You probably need to build up a new cycle for the official inspections. See it the Honda. Here the cycle is much easier: I-o1 is at year 4 followed by I-02, which repeats itself every two years thereafter for the life of the vehicle. 31 AutoWinWin – User’s Manual OK! When you are done with the complete maintenance plan, you can take now full benefit of the work you have done. 4.8. Work Orders. Your day to day management tool WOs project in the calendar the maintenance requirements of the plan. Prepare the first Work Order and let AutoWinWin program dynamically all systematic maintenance activities for the lifetime of the vehicle! Procedures 1. Module Fleet. Select branch including desired equipment / Load data 2. Select Equipment / Right Button of Mouse / Work Orders 3. New. Fill in successively the fields in the form, observing its contents as described in the table below: WO No. Work Type MSch Description Work Request Performer If Internal: If External: Periodicity Fixed Dates 32 AutoWinWin numbers it automatically Jump to this field. Select A-Systematic Select e.g. A-01. This operation transcribes the whole content of Schedule A-01 into the WO, including the title description. Leave it as it is. Transcribed from Maintenance Schedule. You need not to use it. Only if someone has made a Work Request in the appropriate module. Select Internal, if that maintenance is to be carried out by your Organisation; External, if it is to be performed by a Contractor. In Position, Select what Trade will be in charge of the overall work (other trades may contribute but there will be only one in charge). In Manager, optionally, select person in charge. In Supplier, Select what Supplier will be the contractor for this work. In Manager, optionally, select person in charge. Defines time scale for next Maintenance Schedule Means that independently of the date that the previous Maintenance Schedule was carried out AutoWinWin programs date as if the previous Schedule was performed in the due date. E.g. Previous 12 month MSch was due on 10Jan2008 but was actually performed on 16Feb2008. Fixed Date programs next MSch to 10Jan2009. If that option was unmarked, the date would be 16Feb2009 AutoWinWin – User’s Manual Fixed Records Management Tab Scheduled Tasks Tab Man-Hours Tab Materials Tab Other Tab Costs Tab Documents Tab Means that independently of the record that the previous Maintenance Schedule was carried out AutoWinWin programs the new record as if the previous Schedule was performed exactly on the due record. E.g. Previous 20,000 km MSch was actually performed when vehicle had 19,200 km. Fixed Record programs next MSch to 40,000 km. If that option was unmarked, the record would be 39,200 km. Shows the initial parameters for the work and reports its evolution Date: Specify date / time. Record: Specify due Record Planned Section (upper): Shows the contents of the Planned Maintenance Schedule. Performed Section (lower): It is for reporting purposes. Leave blank Planned Section (upper): Shows the contents of the Planned Maintenance Schedule. Performed Section (lower): It is for reporting purposes. Leave blank Planned Section (upper): Shows the contents of the Planned Maintenance Schedule. Performed Section (lower): It is for reporting purposes. Leave blank Planned Section (upper): Shows the contents of the Planned Maintenance Schedule. Performed Section (lower): It is for reporting purposes. Leave blank It is just an information tab that compares planned and actual costs and exhibits deviations Planned Section (upper): You can optionally associate a number of files to the planned WO such as, readings datasheet to be used, detailed instructions check list, damaged equipment photo, etc. Performed Section (lower): On reporting, if required, you can optionally associate a number of files to the report such as, readings datasheet, certificate, equipment photos, etc. 33 AutoWinWin – User’s Manual 5. Managing your maintenance So far we have prepared AutoWinWin to manage maintenance and in the process we got well acquainted with the User interfaces, so we are now in a position to start our day-to-day tasks. And the good thing about AutoWinWin is that you perform your day to day duties in a much more efficient manner and, at the same time, without the need of any further effort, you get a lot of very useful reports to manage your fleet at top level. You need to be acquainted with the key concepts of maintenance management. We suggest that you review these concepts in the Practical Guide to Facilities Maintenance. 5.1. Presenting your fleet and vehicle particulars You may need it to update your files, to present to your boss or to an Auditor. Procedures 1. Module Fleet. Load data with the aid of the filtering resources. Explore what resources you have available. Place desired data in Main Form. 2. Select any vehicle / Right Button of Mouse / Print / Choose all vehicles / Preview Print (default). 34 AutoWinWin – User’s Manual 5.2. Presenting your maintenance plan You may need it to yourself, to present to your boss or to an Auditor. Procedures 1. Module Fleet. Load data with the aid of the filtering resources. Explore what resources you have available. Place desired data in the Main Form. 2. Select any vehicle / Right Button of Mouse / Maintenance Plans / at Form Tool Bar Set / Box Vehicles List (or whatever criteria you want) /Execute to obtain form below. 3. If you want to see contents of any schedule: Select / Open / see one by one using the cursors ◄► 35 AutoWinWin – User’s Manual 5.3. Work programming and deciding Let us understand programming as the way you learn what has to be done and when. Procedures 1. Module Work Orders. Load data with the aid of the filtering resources. Explore what resources you have available 2. You will find a number of WO with traffic sign colours: Green = due date is far away; Yellow = due date is approaching (you specify in Preferences the anticipation you want); Red = due date has been overcome. Ok, if you are a disciplined manager you shan’t have reds! 3. Decide what to do and when: Select WO / Issue / Decide and Specify Issued Date. The WO turns into In Progress State. 5.4. Reporting work done, effort, resources and costing Any WO can receive allocations of effort, materials and costs. The process normally initiates after the WO is In Progress State. 5.4.1. Recording MH Procedures 1. 36 You need to have prepared previously an Internal Document to support Internal MH Records and costs; if you did not, do it now: Module Costs / Tree / Ensure that Tree shows Cost – Document Types (press bar below title bar, to alternate between Costs – Document Types and Costs – Accounts) / New / Cost Document / e.g. IRP-0000 AutoWinWin – User’s Manual 2. Module Work Orders. Load data with the aid of the filtering resources (normally In Progress State WOs). Select WO / Right Button of Mouse / Records / MH Record. Fill in Performed MH in lower section of form: 3. Cost Doc: Press Button or F4 / Select 4. Employee: Press Button or F4 / Select 5. Date: Select / Start, Specify time in format HH:mm / End: Specify time in format HH:mm /MH Effort, computed by AutoWinWin, (taking due care of pre-defined lunch time) / Factor: select increased cost rate, if applicable / MH Cost: Automatic, you can change / Cost: Computed by AutoWinWin / Account: Select. 37 AutoWinWin – User’s Manual 5.4.2. Recording Materials Used Procedures 1. You need to have prepared previously an Internal Document to support Materials Records (only from the Materials Master File); if you did not, do it now: Module Costs / Tree / Ensure that Tree shows Cost – Document Types (press bar below title bar, to alternate between Costs – Document Types and Costs – Accounts) / New / Cost Document / e.g. IRM-0000. 2. Module Work Orders. Load data with the aid of the filtering resources (normally In Progress State WOs) / Select WO / Right Button of Mouse / Records / Materials Record. Fill in Performed Materials usage in lower section of form: 3. Proceed as required 5.4.3. Recording Third Party Costs Please read the discussion at the introduction of # 6. If you are working in an Accounting Style, follow the method described in # 6.1. If you are working on an Engineers Style: Procedures 1. You need to have prepared previously an Internal Document to support Other Costs; if you did not, do it now: Module Costs / Tree / Ensure that Tree shows Cost – Document Types (press bar below title bar, to alternate between Costs – Document Types and Costs – Accounts) / New / Cost Document / e.g. IRC-000 Internal Record Contractor Costs. 2. Module Work Orders. Load data with the aid of the filtering resources (normally In Progress State WOs). Select WO / Right Button of Mouse / Records / Other. Fill in Performed Other Cots in lower section of form. 38 AutoWinWin – User’s Manual 5.4.4. Terminating a Work Order You can only terminate a WO that is In Progress. Procedures 1. Module Work Orders. Load data with the aid of the filtering resources (normally In Progress State WOs). Select WO / Right Button of Mouse / Terminate. You are invited to Management Tab: Fill in date / Times as they have happened. Note that if you made MH records, there are already some suggestions. 2. If you did not already do so, fill in information in the other WO Tabs as required: Tasks / ManHours / Materials / Other. If you need, you may attach Documents to the WO (in the Performed Section in lower area of form.) 3. Back to WO Management Tab. On the right side of the form you have a resource to help you recording maintenance times (important to indicators). Compute. Look critically at the figures computed by AutoWinWin and adjust, if necessary: - WT – Waiting Time. Occurs only if you had a Work Request originating the WO TP – Time Period = time difference between Star and End of WO (may be different from TM if there were interruptions) TM – Maintenance Time. Check definition. RT – Repair Time. I.e. maintenance time involved in Repair (=Corrective Maintenance) 4. Press Downtime. Check and adjust AutoWinWin suggestions as required. See in the form below: - The Vehicle gathered a downtime of 1.50 H. Yes? Leave the tick in the box. If it was more than that, specify actual figure. 39 AutoWinWin – User’s Manual - 5. Did that repair induce downtime in the Car Fleet system as a whole? No. Do not tick the box. Did that repair induce downtime in the Facility Fleet as a whole? No. Do not tick the box. Did that repair induce downtime in the Organization as a whole? No. Do not tick the box. NB: Ensure consistency in the way you fill these fields as they interfere decisively in the computation of the Maintenance Indicators. 5.4.5. Reprogram a WO to a New Cycle This is a special operation that should be avoided. The operation, abbreviated by RNC, just reprograms your maintenance as if the WO was actually performed. 40 AutoWinWin – User’s Manual 5.5. Recording Kilometres/Miles Running records are important in equipments where maintenance is based on records. In vehicle fleets, running records are usually taken only along with fuel supplies. Procedures 1. Module Fleet. Load data with the aid of the filtering resources. Place desired data in the Main Form. 2. Select desired vehicle / Right Button of Mouse / Records / Running Record to obtain form below. (NB: if you prefer the unit in Miles you need to specify that Unit in the Vehicle Register: Fleet / Select Vehicle / Open / Operational Data Tab / Unit for ADR, Select MI) 3. Running records include also those made in the Fuel Supply Recording # 5.6. 4. New / Fill in the fields. You may either specify the actual record or the difference to the previous one. 5. Note the resources on Right Side of Form: - ADR-R means Average Daily Running computed by Regression. Computation is based on the last 4 records. Projections: AutoWinWin uses the ADR-R for the estimates. WO dates are automatically updated with the same computations. 41 AutoWinWin – User’s Manual 5.6. Recording Fuel Please read the discussion at the introduction of # 6. If you are working in an Accounting Style, follow the method described in # 6.1. If you are working on an Engineers Style: Procedures 1. You need to have prepared previously an Internal Document to support Fuel Costs; if you did not, do it now: Module Costs / Tree / Ensure that Tree shows Cost – Document Types (press bar below title bar, to alternate between Costs – Document Types and Costs – Accounts) / New / Cost Document / e.g. IRF-000 Internal Record Fuel Costs. 2. Module Fleet. Load data as necessary. Select Vehicle/ Right Button of Mouse / Records / Fuel Supply Record. 3. New / Cost Doc Select. Fill in required fields 42 AutoWinWin – User’s Manual 6. Managing Maintenance Costs Costs recording and management has two possible approaches in all ManWinWin Software applications: Accounting Style Costs are recorded as in the Accounting Department with full identification of the Origin Document, Date, Supplier, Amount, Tax, etc.. and allocation to Maintenance Cost Centre and Account. Accounting rules apply. Advantages: - Easier interface with the Accounting Department and information interchange with ERP Simplifying Accountant’s job Disadvantages: - People not qualified in accounting making accounting tasks Much more clerical work required, making maintenance costing an heavier task Potential for mistakes and errors, namely, in VAT computations, round up figures and the like Potential for responsibility conflicts. Engineering Style Costs are recorded as a set of Cost Items, gathered in well organised Internal Costs Reports, but the actual Cost Documents are not identified and managed as such. The reports serve as check lists for the Accounting Department Advantages: - More intuitive process to engineers Higher productivity in recording Costing is always updated Disadvantages: - Divorce People Accounting people and Maintenance people More difficult integration of maintenance in overall Company cost control. For Maintenance’s sake we prefer the Engineering Style. But between these two styles there are a number of variations that may recommend the introduction of some hybrid system aiming at being the best compromise. We leave it to YOU. 43 AutoWinWin – User’s Manual 6.1. Recording Documents in Accounting Style A Document Cost is recorded in the system, fully identified, and then each one of the amounts (without VAT) of its constituent cost items is allocated to the appropriate item or job so that in the end of the process you have the whole amount (ex-VAT) of the document fully allocated. You keep track of the allocation status of the document. Procedures 1. Module Costs. Ensure that the Tree shows Cost – Document Types (press bar below title bar, to alternate between Costs – Document Types and Costs – Accounts) / New / Cost Document / e.g. F- FAOF-3090400313 / Date of Invoice / Description: Specify / Supplier: Select, from registered ones. 2. Note: Leaving the Box close to the Amount field Fixed marked, means that the amount you specify in the Amount field will be fixed and shall need to be totally allocated in the lower part of the form; If the box Fixed was unmarked, the amount would instead be computed based on the cost items recorded in the lower part of the form. 3. In the Accounting Style, the Box Fixed should be ticked 4. Amount: Specify Amount / VAT Specify / Total is computed. 5. To allocate the cost, go to the lower part of Form: New / Other Record. Fill in the fields, numbering sequentially each Cost Item. One document may have one or more Cost Items but all need to be allocated to a Cost Centre and an Account, until the overall amount (ex.VAT) is exhausted. 6. Note that in this same form you can allocate all types of cost: Fuel Supply Record; MH Record; Materials Record; Other Record (i.e. 3rd party supply). 44 AutoWinWin – User’s Manual 45 AutoWinWin – User’s Manual 6.2. Recording Cost Items in “Engineers” Style For his purpose you need to keep in an open state a number of Cost Documents whose amount is being dynamically established along the process of recording Cost Items. We suggest you use Document Types and Descriptions such as: - IRC-0000 – Internal Record of Contractor Services – to gather information on all types of cost other than MH, materials from Master File and Fuel Supplies. IRF-0000 – Internal Record of Fuel Costs to Fleet – to gather information on all costs on fuelling IRM-0000 – Internal Record of Materials – to gather costs on Stock Items from Materials Master File IRP-0000 – Internal MH Record – to gather information on all internal MH Costs IRX-0000 – Internal Record of External Personnel MH Costs You prepare these documents once, in the same way you do for any cost document, ensuring that the box Fixed in step 3 is left Unmarked. Procedures 1. Module Costs. Ensure that the Tree shows Cost – Document Types (press bar below title bar, to alternate between Costs – Document Types and Costs – Accounts) / New / Cost Document / e.g. IRP-0000 / Date, say, 1st day of the year you started using AutoWinWin / Description: Specify / Supplier: Select, from registered ones - Unspecified. 2. Note: Leaving the Box close to the Amount field Fixed marked, means that the amount you specify in the Amount field will be fixed and shall need to be totally allocated in the lower part of the form; If the box Fixed was unmarked, the amount would instead be computed based on the cost items recorded in the lower part of the form. So, for these type of documents the box Fixed shall be left UNMARKED and the amount shall be progressing freely whenever you record a new Cost Item in that document. 3. Box Fixed is Unmarked 4. Amount: Leave Nil. 46 AutoWinWin – User’s Manual Once you have these documents available you can add up Cost Items at any time and you can obtain cost reports with the required information. To add a Cost Item: Procedures 1. Module Costs. Ensure that the Tree shows Costs – Accounts (press bar below title bar, to alternate between Costs – Document Types and Costs – Accounts) 2. Select in the Tree, the Account you will be using to allocate the Cost Item. New / Cost Item / Select type of cost Item – Fuel Supply, Man-Hours, Materials or Other – e.g. Man-Hour Record 3. Cost Doc. Select 4. Proceed filling up the required fields. Note that these operations are those described in # 5.4.1, 5.4.2, 5.4.3, 5.5 and 5.6. only they are carried out in the WO module. 47 AutoWinWin – User’s Manual Bibliography - 48 [1] J. P. S. Cabral, Practical Guide to Facilities Maintenance Management, Navaltik Management Lda. 2010.