1
User Manual for MEGAN V3.8
Daniel H. Huson and Stephan C. Schuster
with contributions from Alexander F. Auch, Daniel C. Richter, Suparna Mitra and Qi Ji
February 4, 2010
Contents
Contents
1
1 Introduction
3
2 Getting Started
5
3 Obtaining and Installing the Program
5
4 Program Overview
6
5 Importing, Reading and Writing Files
6
6 The NCBI Taxonomy
7
7 The NCBI-NR and NCBI-NT Databases
7
8 Identification of COGs
7
9 Assigning Reads to Taxa
8
10 Assigning Reads to Gene Ontology Terms
8
11 Main Window
9
11.1 File Menu . . . . . . . . . . . . . . . . . . . . . . . . . . . . . . . . . . . . . . . . . . . . . . .
9
11.2 Edit Menu . . . . . . . . . . . . . . . . . . . . . . . . . . . . . . . . . . . . . . . . . . . . . . .
11
11.3 Select Menu . . . . . . . . . . . . . . . . . . . . . . . . . . . . . . . . . . . . . . . . . . . . . .
11
11.4 Layout Menu . . . . . . . . . . . . . . . . . . . . . . . . . . . . . . . . . . . . . . . . . . . . .
12
11.5 Options Menu . . . . . . . . . . . . . . . . . . . . . . . . . . . . . . . . . . . . . . . . . . . . .
13
11.6 Tree Menu . . . . . . . . . . . . . . . . . . . . . . . . . . . . . . . . . . . . . . . . . . . . . . .
14
1
11.7 Window Menu . . . . . . . . . . . . . . . . . . . . . . . . . . . . . . . . . . . . . . . . . . . .
15
11.8 MEGAN Menu . . . . . . . . . . . . . . . . . . . . . . . . . . . . . . . . . . . . . . . . . . . .
16
11.9 Tool Bar . . . . . . . . . . . . . . . . . . . . . . . . . . . . . . . . . . . . . . . . . . . . . . . .
16
11.10Popup Menus . . . . . . . . . . . . . . . . . . . . . . . . . . . . . . . . . . . . . . . . . . . . .
16
11.11Wheel Mouse and Special Keys . . . . . . . . . . . . . . . . . . . . . . . . . . . . . . . . . . .
17
12 Import Dialog
17
13 Inspector Window
18
13.1 Inspector Menus . . . . . . . . . . . . . . . . . . . . . . . . . . . . . . . . . . . . . . . . . . .
18
14 Find Window
19
15 GOAnalyzer Window
20
15.1 Exploring the Read Assignments . . . . . . . . . . . . . . . . . . . . . . . . . . . . . . . . . .
20
15.2 File Menu . . . . . . . . . . . . . . . . . . . . . . . . . . . . . . . . . . . . . . . . . . . . . . .
21
15.3 Edit Menu . . . . . . . . . . . . . . . . . . . . . . . . . . . . . . . . . . . . . . . . . . . . . . .
22
15.4 Options Menu . . . . . . . . . . . . . . . . . . . . . . . . . . . . . . . . . . . . . . . . . . . . .
22
15.5 View Menu . . . . . . . . . . . . . . . . . . . . . . . . . . . . . . . . . . . . . . . . . . . . . .
23
15.6 Window Menu . . . . . . . . . . . . . . . . . . . . . . . . . . . . . . . . . . . . . . . . . . . .
23
15.7 Tool Bar . . . . . . . . . . . . . . . . . . . . . . . . . . . . . . . . . . . . . . . . . . . . . . . .
23
15.8 Popup Menus . . . . . . . . . . . . . . . . . . . . . . . . . . . . . . . . . . . . . . . . . . . . .
23
15.9 Wheel Mouse and Special Keys . . . . . . . . . . . . . . . . . . . . . . . . . . . . . . . . . . .
24
16 Format Dialog
24
17 Message Window
24
18 Parameters Dialog
24
19 Compare Dialog
25
20 Extractor Dialog
25
21 Export Image Dialog
25
22 About Window
26
23 File Formats
26
23.1 The MEGAN Text File Format . . . . . . . . . . . . . . . . . . . . . . . . . . . . . . . . . . .
26
23.2 Full, Summary and Comparison MEGAN Files . . . . . . . . . . . . . . . . . . . . . . . . . .
28
2
23.3 Required Syntax of BLAST Files . . . . . . . . . . . . . . . . . . . . . . . . . . . . . . . . . .
28
23.4 Required Format of Read Files . . . . . . . . . . . . . . . . . . . . . . . . . . . . . . . . . . .
28
23.5 Graphics Formats . . . . . . . . . . . . . . . . . . . . . . . . . . . . . . . . . . . . . . . . . . .
28
23.6 CSV Files . . . . . . . . . . . . . . . . . . . . . . . . . . . . . . . . . . . . . . . . . . . . . . .
31
23.7 Tree and Map Format . . . . . . . . . . . . . . . . . . . . . . . . . . . . . . . . . . . . . . . .
32
24 Command-Line Options and Mode
32
25 Examples
35
26 Using More Memory
35
27 Acknowledgments
35
References
35
Index
37
1
Introduction
Disclaimer: This software is provided ”AS IS” without warranty of any kind. This is developmental code, and we make no pretension as to it being bug-free and totally reliable. Use at your
own risk. We will accept no liability for any damages incurred through the use of this software.
Use of the MEGAN is free, however the program is not open source.
Type-setting conventions: In this manual we use e.g. Edit→Find to indicate the Find menu
item in the Edit menu.
How to cite: If you publish results obtained in part by using MEGAN , then we require that you
acknowledge this by citing the program as follows:
• D.H. Huson, A. Auch, Ji Qi and S.C. Schuster, MEGAN analysis of metagenome data,
Genome Research. 17:377-386, 2007, software freely available for academic purposes from
www-ab.informatik.uni-tuebingen.de/software/megan.
The term metagenomics has been defined as “The study of DNA from uncultured organisms”
(Jo Handelsman), and an approximately 99% of all microbes are believed to be unculturable. A
genome is the entire genetic information of one organism, whereas a metagenome is the
entire genetic information of an ensemble of organisms. Metagenome projects can be as complex
as large-scale vertebrate projects in terms of sequencing, assembly and analysis.
The aim of MEGAN is to provide a tool for studying the taxonomical content of a set of DNA reads,
typically collected in a metagenomics project. In a preprocessing step, a sequence comparison of
all reads with a suitable database of reference DNA or protein sequences must be performed to
produce an input file for the program.
3
At start-up, MEGAN first reads in the current NCBI taxonomy (consisting of around 460,000 taxa).
A first application of the program is that it facilitates interactive exploration of the NCBI taxonomy.
However, the main application of the program is to parse and analyze a the result of a BLAST
comparison of a set of reads against one or more reference databases, typically using BLASTN,
BLASTX or BLASTP to compare against NCBI-NT, NCBI-NR or genome specific databases. The
result of a such an analysis is an estimation of the taxonomical content (“species profile”) of the
sample from which the reads were collected. The program uses a number of different algorithms
to “place” reads into the taxonomy by assigning each read to a taxon at some level in the NCBI
hierarchy, based on their hits to known sequences, as recorded in the BLAST file.
MEGAN2 introduces many new functionalities, including the ability to open multiple documents
and to compute a comparative view of multiple datasets, to extract reads from a set of FastA files
by taxon, to compute an analysis of COGs discovered in the dataset, to use accession numbers to
help identify reads and some basic charting capabilities. as from version 3.0 onward, MEGAN uses
a binary format to save information rather than a text file.
For an example of its application, see [4], where an early version of this software (called GenomeTaxonomyBrowser) was used to analyze the taxonomical content of a collection of DNA reads sampled
from a mammoth.
This document provides both an introduction and a reference manual for MEGAN .
4
2
Getting Started
This section describes how to get started.
First, download an installer for the program from
www-ab.informatik.uni-tuebingen.de/software/megan, see Section 3 for details.
Upon startup, the program will automatically load its own version of the NCBI-taxonomy and will
then display the first three levels of the taxonomy. To explore the NCBI taxonomy further, leaves
of this overview tree can be uncollapsed. To do so, first click on a node to select it. Then, use
the Tree→Uncollapse item to show all nodes on the next level of the taxonomy, and use the
Tree→Uncollapse Subtree item to show all nodes in the complete subtree below the selected
node (or nodes). To explore the NCBI taxonomy in a more directed fashion, open the Edit→Find
dialog, type in (a part of) the name of a taxon of interest and then press the Collapsed taxa
target button. This will request MEGAN to search for all matches to the given input and will
un-collapse all nodes in the tree necessary to show the matching taxa.
To analyze a data set of reads, first BLAST the reads against a database of reference sequences,
such as NCBI-NR [2] using BLASTX [1] or BLASTP, NCBI-NT [2] using BLASTN [1], or against
one or more genome sequences using BLASTZ [5], say.
Then import the BLAST file into MEGAN using the File→Import BLAST menu item. The
Import wizard will ask you to enter the name of the BLAST file, a reads file containing all the
read sequences in multi-FastA format (if available), and the name of the new output RMA file.
Some implementations or output formats of BLAST suppress those reads for which no alignments
were found. In this case, use the Options→Set Number of Reads menu item to set the total
number of reads in the analysis.
Clicking on a node will cause the program to display the exact number of hits of any given node,
and the number of hits in the subtree rooted at the node. Right-clicking on a node will show a
popup-menu and selecting the first item there, Inspect , will open the Inspector window which
is used to explore the hits associated with any given taxon. A node is selected by clicking on it.
Double-clciking on a node will select the node and the whole subtree below it. Double-clicking on
the label of a node will open the node in the Inspector window.
Example files are provided with the program. They are contained in the examples subdirectory
of the installation directory. The precise location of the installation directory depends upon your
operating system.
3
Obtaining and Installing the Program
MEGAN is written in Java and requires a Java runtime environment version 1.5 or newer, freely
available from www.java.org.
MEGAN is installed using an installer program that is freely available from
www-ab.informatik.uni-tuebingen.de/software/megan. There are four different installers, targeting
different operating systems:
• MEGAN windows 3.8.exe provides an installer for Windows.
5
• MEGAN macos 3.8.dmg provides an installer for MacOS.
• MEGAN unix 3.8.sh provides a shell installer for Linux and Unix.
4
Program Overview
In this section, we give an overview over the main design goals and features of this program. Basic
knowledge of the underlying design of the program should make it easier to use the program.
MEGAN is written in the programming language Java. The advantages of this is that we can provide
versions that run under the Linux, MacOS, Windows and Unix operating systems.
Typically, after generating a RMA file (read-match archive) from a BLAST file, the user will
then interact with the program, using the Find window to determine the presence of key species,
collapsing or un-collapsing nodes to produce summary statistics and using the Inspector window
to look at the details of the matches that are the basis of the assignment of reads to taxa. The
assignment of reads to taxa is computed using the LCA-assignment algorithm, see [3] for details.
The program is designed to operate in two different modes: in a GUI mode, the program provides
a GUI for the user to interact with the program. In command-line mode, the program reads
commands from a file or from standard input and writes output to files or to standard output.
5
Importing, Reading and Writing Files
To open an existing RMA file or MEGAN file, select the File→Open menu item and then browse
to the desired file. Alternatively, if the file was recently opened by the program, then it may be
contained in the File→Open Recent submenu.
New input to the program is usually provided as a BLAST file obtained from a BLAST comparison
of the given set of reads to a database such as NCBI-NR or NCBI-NT, see Section 23 for details
of the file formats used. MEGAN supports BLASTN, BLASTX and BLASTP standard textformat, and BLAST XML format. MEGAN can read gzipped BLAST files directly, so there is no
need to un-gzip them (although at present MEGAN processes uncompressed files much faster than
compressed ones).
MEGAN can also parse tabular BLAST output (generated using BLAST option -m 8, however
as this form of output does not contain the subject line for sequences matched, it is unsuitable
for MEGAN because MEGAN cannot determine the taxon or gene associated with the database
sequence. However, if you add an additional column to this format containing a numerical NCBI
taxon id for each line then MEGAN will parse these and use them as input.
Note that the reads file should be given to use the full potential of the program.
The BLAST file and reads file are supplied to MEGAN when setting up a new MEGAN project.
Both files are parsed and all information is stored in the project file. The input data is then
analyzed and can be interactively explored. All reads and BLAST matches are contained in the
project file and MEGAN provides different mechanisms for extracting them again. A MEGAN
project file contains all reads and all significant BLAST matches (by default, up to 100 matches per
6
read) in a binary and incrementally compressed format. The size of such a project file is around
20% of the size of the original input files and is thus usually smaller than the file that one obtains
by simply compressing the BLAST file.
MEGAN also provides the option of saving an analysis as a summary only. A summary contains
only information on how many reads were assigned to each taxon. The analysis can not be changed
or queried. The corresponding file is very small.
MEGAN supports import of data from other programs in a comma-separated format from a CSV
file.
6
The NCBI Taxonomy
The NCBI taxonomy provides unique names and IDs for over 350,000 taxa, including approximately 25,000 prokaryotes, 84,000 animals, 65,000 plants, and 17,000 viruses. The individual
species are hierarchically grouped into clades at the levels of: Superkingdom, Kingdom, Phylum,
Class, Order, Family, Genus, and Species (and some unofficial clades in between).
At startup, MEGAN automatically loads a copy of the complete NCBI and then displays the taxonomy as a rooted tree. The taxonomy is stored in an NCBI tree file and an NCBI mapping file,
which are supplied with the program.
7
The NCBI-NR and NCBI-NT Databases
The NCBI-NR (“non-redundant”) protein sequence database is available from the NCBI website.
It contains entries from GenPept, Swissprot, PIR, PDF, PDB and RefSeq. It is non-redundant in
the sense that identical sequences are merged into a single entry.
The NCBI-NT nucleotide sequence database is available from the NCBI website. It contains
entries from GenBank and is not non-redundant. It contains untranslated gene coding sequences
and also mRNA sequences.
8
Identification of COGs
The program will attempt to map any read to a COG , that is, to cluster of orthologous
groups of proteins, see http://www.ncbi.nlm.nih.gov/COG/.
At present, this is done simply by looking for COG identifiers in the header line of the BLAST
hits, e.g. COG009 will be intrepreted as COG number 009. Some entries in the NR database contain
such COG identifiers.
We assume that only references sequences of COGs are contained in the NR database, but have not
checked this. Hence, it may be necessary to run a separate BLAST comparison against the COG
database (after modifying the headers there appropriately so that they contain COG identifiers as
described above).
7
9
Assigning Reads to Taxa
The main problem addressed by MEGAN is to compute a “species profile” by assigning the reads
from a metagenomics sequencing experiment to appropriate taxa in the NCBI taxonomy. At
present, this program implements the following naive approach to this problem:
1. Compare a given set of DNA reads to a database of known sequences, such as NCBI-NR or
NCBI-NT [2], using a sequence comparison tool such as BLAST [1].
2. Process this data to determine all hits of taxa by reads.
3. For each read r, let H be the set of all taxa that r hits.
4. Find the lowest node v in the NCBI taxonomy that encompasses the set of hit taxa H and
assign the read r to the taxon represented by v.
We call this the LCA-assignment algorithm (LCA = “lowest common ancestor”). In this approach,
every read is assigned to some taxon. If the read aligns very specifically only to a single taxon, then
it is assigned to that taxon. The less specifically a read hits taxa, the higher up in the taxonomy
it is placed. Reads that hit ubiquitously may even be assigned to the root node of the NCBI
taxonomy.
The program provides a threshold for the bit score of hits. Any hit that falls below the threshold
is discarded. Secondly, a threshold can be set to discard any hit whose score falls below a given
percentage of the best hit. Finally, a third threshold can be used to report only taxa that are hit
by a minimal number of reads. By default, the program requires at least two reads to hit a taxon,
before the taxon is deemed present.
Taxa in the NCBI taxonomy can be excluded from this analysis. For example, taxa listed under root
- unclassified sequences - metagenomes may give rise to matches that force the algorithm to
place reads on the root node of the taxonomy. This feature is controlled by Options→Taxon
Disabling menu. At present, the set of disabled taxa is saved as a program property and not as
part of the Megan document.
10
Assigning Reads to Gene Ontology Terms
Besides the taxonomical analysis, MEGAN provides functionality to obtain information about the
functional content of a metagenomic data set. Therefore, a module, named GOAnalyzer, assigns
read matches derived from a BLASTX comparison against the NCBI-NR database to terms of the
Gene Ontology (GO), see http://www.geneontology.org/.
GO provides three sets of structured vocabularies that describe biological processes, molecular
functions and cellular components. Each of these three ontologies is represented by a directed
acyclic graph (DAG) that contains uniquely defined GO terms (as nodes) and the relationships
among them (as edges). GO is hierarchically structured, i.e. GO terms can be parent of child
terms (e.g., taxis” is a child term of behavior”) and child terms may have more than one parent
term.
8
The GOAnalyzer uses the header information of BLAST hits and a pre-computed mapping file to
assign environmental reads to GO terms. The mapping is based on RefSeq identifiers http://www.
ncbi.nlm.nih.gov/RefSeq/ and uses the associations provided in ftp://ftp.pir.georgetown.
edu/databases/idmapping/idmapping.tb.gz. To reduce complexity, we use a variant of the LCA
algorithm to modify the mapping such that each RefSeq identifier maps to at most three GO terms,
one for each of the three ontologies. When blasting reads against a database, most reads that have
hits usually map to multiple entries. These often correspond to different RefSeq identifiers and
thus different GO terms. By applying the LCA algorithm, each read is mapped to at most one GO
term in each of the three ontologies. This reduction greatly simplifies the problem of analyzing and
navigating the large numbers of reads contained in typical metagenomic data sets.
11
Main Window
The Main window is used to display the taxonomy and to control the program via the main
menus. Initially, at startup, before reopening or creating a new RMA file, the Main window
displays the NCBI taxonomy. By default, the taxonomy is only drawn to its second level. Parts of
the taxonomy, or the full taxonomy, can be explored using the menu items of the window.
Once a data set has been read in, the full NCBI taxonomy is replaced by the taxonomy that is
induced by the data set. The size of nodes indicates the number of reads that have been assigned
to the nodes using the algorithm described in Section 9.
Double-clicking on a node will produce a textual report stating how many reads have been assigned
to the corresponding taxon and how many reads have been assigned in total to the taxon and to
any of the taxa below the given node in summary.
Subtrees can be collapsed and expanded, as described below.
We now discuss all menus of the Main window.
11.1
The
File Menu
File menu contains the following file-related items:
• The
File→New
item opens a new, empty MEGAN window.
• The File→Open item provides an
containing input data.
Open File
dialog to open one or more RMA files
• The File→Open Recent
item can be used to re-open a recently opened files. The
File→Save As
item can be used to to save comparison files or summary files. A RMA
file is kept sycronized with the program and thus need not be saved.
• The File→Import BLAST
item is used to import new data into MEGAN. The user is
presented with a Import wizard panel which can be used to specify the BLAST file and
reads file to import and the name of the new RMA file to create. The Import wizard contains
additional tabbed panes for advanced users to set additional options. reads file and BLAST
file back out of the project.
9
– The File→Export→Assignments
menu is used to export a summary of the read
assignments in “comma-separated-values” (CSV) format. There are a number of possible
listings to export:
∗ Select read-id,taxon-name to list read identifiers and the names of the taxa that
they have been assigned to.
∗ Select read-id,taxon-id to list read identifiers and the ids of the taxa that they
have been assigned to.
∗ Select taxon-id,count(s) to list taxon ids and the number of reads that have been
assigned to each taxon. If applied to a comparison file, the first line of the output
will contain all file names and then the subsequent lines will contain the numbers
for each file. The numbers return reflect the number of reads assigned to a node,
unless the node is a leaf of the currently visible taxonomy, in which case the number
of reads summarized by the node is returned.
∗ Select taxon-name,count(s) to obtain the same output as for the previous item,
but using taxon names instead of ids.
∗ Select taxon-id,read-id(s) to list taxon ids and the ids of all reads assigned to
each taxon.
∗ Select taxon-name,read-id(s) to obtain the same output as for the previous item,
but using taxon names instead of ids.
– The File→Export→Reads menu item is used to export all reads from the project.
If any nodes are selected, then only the reads assigned to those nodes are exported.
– The File→Export→Blast
menu item is used to extract all BLAST matches from
the project. If any nodes are selected, then only the BLAST matches of reads assigned
to those nodes are exported.
– The File→Export→Summary
menu item can be used to generate a summary file
from a given project. A summary contains only information on how many read where
assigned to each taxon. The analysis can not be changed or queried. The corresponding
file is very small.
• The File→Export Image item opens the Export Image dialog which is used to save the
current tree in a number of different graphics formats, see Section 23.5. The File→Page
Setup item is used to setup the page for printing.
• The
File→Print
item is used to print the current tree.
• The File→Compare item is used to open the Compare dialog which is used to setup a
comparative analysis of multiple datasets.
• The File→Extract Reads by Taxa item is used to open the Extractor dialog, which
is used to extract all reads assigned to a given part of the taxonomy.
• The File→Extract Reads by COG
COG.
• The
File→Import CSV
item is used to extract all reads assigned to a given
item is used to import data from a comma-separated CSV file.
10
• The File→Tools
files.
submenu contains menu items for loading alternative tree and mapping
• The File→Properties item displays a summary of the current data. This window also
shows which versions of the NCBI taxonomy , NCBI microbial attributes and COGs are used
by the program.
• The
item is used to close a window.
File→Close
• The File→Quit
MEGAN menu.
11.2
The
item quits the program. Under MacOS, this item is contained in the
Edit Menu
Edit menu contains the usual edit-related items:
• The
Edit→Cut
• The
Edit→Copy
• The
Edit→Paste
• The
Edit→Edit Node Label
item is used edit the labels of nodes.
• The
Edit→Edit Edge Label
item is used to edit the labels of edges.
item is used to cut text, e.g. when editing the label of a node.
item is used to copy text or to copy the current tree as an image.
item is used to paste text.
• The Edit→Format menu item opens the Format window that can be used to change the
font, size, line width and color of nodes and edges.
• The Edit→Find
reads.
item opens the Find window which can be used to search for taxa and
• The
Edit→Find Again
• The
Edit→Preferences
finds the next occurrence of a search string.
submenu contains items for setting preferences:
– The Edit→Preferences→Show Legend
item determines whether to show or hide
the data sets legend in the main window. By default, this is off for single datasets and
on for comparisons. The Edit→Preferences→Edit Comparison Colors item can
be used to change the colors used in a comparison of datasets.
11.3
The
Select Menu
Select menu contains items for selecting different sets of nodes in the taxonomy.
• The
Select→All Nodes
• The
Select→None
item is used to select all nodes.
item is used to deselect all nodes.
11
• The Select→From Previous Window
item applies the selection in window previously
on top to the window currently on top. This feature is useful for comparing the contents of
different windows.
• The
Select→All Leaves
• The
Select→All Internal Nodes
item is used to select all leaves.
item is used to select all internal nodes.
• The Select→All Intermediate Nodes
item is used to select all intermediate nodes,
that is, nodes with exactly one in-edge and one out-edge.
• The Select→Subtree
• The
Select→Invert
item is used to select all nodes below any currently selected node.
item is used to invert the current node selection.
• The Select→Level
item opens a sub menu that can be used to selecte taxa by their
taxonomical level such as Kingdom, Phyla, Class, Order, Family etc.
11.4
The
Layout Menu
Layout menu contains items that control aspects of the visualization of the tree.
• The Layout→Expand/Contract item provides a submenu for expanding or contracting
the picture of the tree, to a certain degree:
– The Layout→Expand/Contract→Expand Horizontal
the tree horizontally.
item expands the picture of
– The Layout→Expand/Contract→Contract Horizontal
of the tree horizontally.
– The Layout→Expand/Contract→Expand Vertical
vertically.
– The Layout→Expand/Contract→Contract Vertical
tree vertically.
• The
Layout→Font Size
item contracts the picture
expands the picture of the tree
contracts the picture of the
item is used to set the font size of all labels on the tree.
• If the Layout→Layout Labels item is checked, then the program will attempt to layout
node labels in a none-overlapping fashion.
• If the Layout→Scale Nodes By Assigned item is selected, then the size of every node
is scaled by the number of reads assigned to the corresponding taxon.
• If the Layout→Scale Nodes By Summarized item is selected, then the size of every node
is scaled by the number of reads assigned to the corresponding taxon, or assigned to any
taxon below the node.
• The Layout→Set Max Node Radius
pixels) a node can obtain.
allows the user to specify the maximum size (in
12
• The Layout→Zoom to Selection
in the tree.
• The Layout→Fully Contract
smallest size.
• The Layout→Fully Expand
size.
item is used to zoom to all selected nodes and edges
item is used to contract the picture of the tree to its
item is used to expand the picture of the tree to its largest
• The Layout→Draw Circles
item ensures that nodes are drawn as circles. Please note
that the size of circles is scaled logarithmically.
• The Layout→Draw Pie Charts item ensures that nodes are drawn as pie charts. Please
note that the size of each pie chart is scaled logarithmically to indicate the total number of
reads assigned to the node, but the proportions of the pie assigned to different datasets is
scaled linearly by the number of reads.
• The Layout→Draw Heat Maps item ensures that nodes are drawn as heat maps. Please
note that colors are scaled logarithmically.
• The Layout→Draw Heat Maps 2 shows a pairwise comparison of two or more datasets
as a heat map for each node. Please note that colors are scaled logarithmically.
• The Layout→Draw Meters
item ensures that nodes are drawn as meters. Please note
that the meters are scaled logarithmically.
• The
Layout→Draw Leaves Only
item ensures that only leaves are drawn.
• The Layout→Highlight Differences item turns on a simple statistical test that highlights significantly different nodes in a comparison of two datasets.
11.5
The
Options Menu
Options menu contains the following items:
• The Options→Change LCA Parameters item opens the Parameters dialog that allows
one to change the parameters used by the LCA algorithm and to then rerun the analysis.
• The Options→Taxon Disabling
sub menu contains menu items for disabling taxa or
enabling taxa. Disabled taxa are ignored by the algorithms used to place reads into the
taxonomy. The main viewer shows disabled taxa in grey. By default, all environmental
samples and similar taxa are disabled. There are three items:
– the Options→Taxon Disabling→Enable All
item enables all taxa.
– the Options→Taxon Disabling→Disable Selected
lected taxa.
item disables all currently se-
– the Options→Taxon Disabling→Enable Selected
lected taxa.
item enables all currently se-
13
– the Options→Taxon Disabling→List Disabled
items.
item lists all currently disabled
• Use the Options→Set Number of Reads
item to set the total number of reads in the
analysis. By default, this number is set to the number of different reads encountered in the
input file.
• The Options→List Summary item produces a textual report on how many reads hit each
of the nodes in the taxonomy. To format is readid taxon-name, where the two are separated
by a tab.
• The Options→List Microbial Attributes
represented by the selected node.
• The Options→List COGs
which COG.
produces a textual summary of the taxon
item produces a textual report on which reads are assigned to
• The Options→Open NCBI Web Page
taxon.
shows the NCBI taxonomy web page for the selected
• The
Options→Inspect
item is used to display the currently selected taxa in the
Inspector window. Double-clicking on the label of a node has the same effect.
11.6
The
Tree Menu
Tree menu contains the following items:
• The Tree→Collapse
can be used to collapse the subtree below a selected node, thus
summarizing the subtree by the node.
• The Tree→Collapse Nodes at Level prompts the user for the input of a level and then
collapses all nodes whose distance (number of edges) to the root of the tree equals the given
level. By default, if no data is given, the program displays the full NCBI taxonomy, collapsed
at level 2.
• The Tree→Collapse Nodes at Taxonomical Level provides a submenu which allows
the user to collapse nodes at the level of Kingdom, Phyla, Class, Order, Family etc.
• The Tree→Uncollapse
the children of the node.
item “un-collapses” a selected collapsed node by displaying all
• The Tree→Uncollapse Subtree
of nodes.
• If the Tree→Show Taxon Names
• If the
Tree→Show Taxon IDs
item “un-collapses” the whole subtree below a selection
item is selected, nodes are labeled by NCBI taxon names.
item is selected, nodes are labeled by NCBI IDs.
• If the Tree→Show Number Of Reads Assigned item is selected, nodes are labeled by the
number of reads assigned to the corresponding taxa.
14
• If the Tree→Show Number Of Reads Summarized
item is selected, nodes are labeled
by the number of reads assigned to the corresponding taxa, or to any that contained in the
subtree.
• The
Tree→Labels On
• The
Tree→Labels Off
item sets the label of selected nodes to visible.
item sets the label of selected nodes to invisible.
• If the Tree→Show Intermediate Labels item is selected, the labels of all “intermediate
nodes” of degree two in the induced taxonomy are shown. By default, this is turned off.
11.7
The
Window Menu
Window menu contains the following items:
• The Window→About
item shows information about the version of MEGAN . When the
program is run under MacOS, this menu item appears in the MEGAN menu.
• The
Window→How to cite
• The
Window→Website
item gives instructions on how to cite the program.
item opens the programs website in a browser.
• The Window→Register item allows the user to register their copy of the program using
a key obtained from the program website.
• The Window→Message Window
front.
item opens the Message window and brings it to the
• The Window→Inspector Window item opens the Inspector window that can be used
to inspect the alignments that are the basis of the assignment of reads to taxa.
• The Window→Microbial Attributes Window items opens a new window showing various physiological features associated with a each read-assigned microbial organism. The
classification is adapted from the NCBI microbial attributes table.
• The Window→Chart Taxa
item opens a window that provides different types of charts
summarizing taxon assignments.
• The Window→Chart COGs
item opens a window that provides different types of charts
summarizing COG assignments.
• The Window→Chart Microbial Attributes item opens a window that provides different
types of charts summarizing attributes of the taxa.
• The
Window→Command syntax
• The
Window→Enter a command
item lists all valid commands.
item can be used to execute a command.
The bottom of the Window menu contains a list of all open windows.
15
11.8
MEGAN Menu
Under MacOS, there is an additional, standard menu associated with the program, called the
MEGAN menu. As usual, this contains the Window→About and File→Quit menu items.
11.9
Tool Bar
The
Main window provides a tool bar containing buttons that provide short
cuts to some of the menu items associated with the window.
These are the
File→Open
,
File→Print
,
Layout→Expand/Contract→Expand Vertical,
Layout→Expand/Contract→Contract Vertical,
Layout→Expand/Contract→Expand
Horizontal, Layout→Expand/Contract→Contract Horizontal, Layout→Fully Contract ,
Layout→Fully Expand and Edit→Find items.
11.10
Popup Menus
The Main window provides three different popup menus, that are activated by right-clicking on a
node, an edge or the background in the Main window. (If are using a single button mouse under
MacOS, then please control-click to access these menus.)
The popup menu that is opened when a node is right-clicked on has the following items:
• The Inspect
if necessary.
adds the selected node to the Inspector window and opens that window,
• The
Edit Node Label
opens a dialog to change the label of the selected node.
• The
Copy Node Label
copies the node label to the system clipboard.
• The
Collapse
• The
Uncollapse
• The
Uncollapse Subtree
item collapses (hides) the subtree below the selected node.
item un-collapses the children of the selected node.
item un-collapses the subtree below the selected node.
• The List Microbial Attributes
by the selected node.
produces a textual summary of the taxon represented
• The Extract Reads By Taxa stores the reads assigned to selected taxa into one or more
FASTA files. A dialog window allows the user to choose output directory as well as file names.
• The
Labels On
• The
Labels Off
• The
Open NCBI Web Page
is used to make the label of a node visible.
is used to make the label of a node invisible.
shows the NCBI taxonomy web page for the selected taxon.
The popup menu that is opened when an edge is right-clicked on has the following items:
16
• The
Copy Edge Label
copies the node label to the system clipboard.
• The
Edit Edge Label
opens a dialog to change the label of the selected edge.
If the shift-key is pressed when using the popup menu for either an edge or a node, then the
chosen item is applied to all currently selected edges or nodes, and not just to the one hit by the
mouse-clicks.
11.11
Wheel Mouse and Special Keys
Use of a wheel mouse is recommended for zooming of the Main window. The default is
zoom . For horizontal zoom , additionally press the alt key.
vertical
To scroll the graph, either press and drag the mouse (using the right mouse button), or use the
arrow keys. To zoom the graph in verticial or horizontal direct, press the shift-key while using the
arrow keys. To increase the zoom factor, additionally press the alt key or the control key.
To select a region of nodes using the mouse, while pressing the shift key, click and then drag the
mouse in the window.
12
Import Dialog
The Import dialog is used to import new data from BLAST and to create a new RMA file.
The dialog has five tabbed panes.
The first tabbed pane titled the Wizard pane provides an Import wizard for creating a new
RMA file. The user is first asked to specify a BLAST file, then a reads file and finally, the name
of the new RMA file to be created. Once this information has been collected, the user can press
the Apply button to import the data.
The other four panes are for advanced users.
The second tabbed pane titled the Content pane can be used to specify whether the COG content
shall be analyzed, additional to an analysis of the taxonomical content.
The third tabbed pane titled the Files pane can be used to setup the location of files. The
first two items are used to specify the location of the input files to be read, namely the BLAST
file and the reads file. The third item is used to specify the location of the new RMA file. This
pane provides two options. The Max number of matches per read file specifies how many matches
per read to save in the RMA file. A small value will reduce the size of the RMA file, but may
exclude some important matches. By default, the 100 highest scoring matches per read are save. If
the Save As Summary Only check box is selected, then the data will be saved in a small summary
file rather than a full RMA file. A summary contains only information on how many read where
assigned to each taxon. The analysis can not be changed or queried. The corresponding file is very
small.
The fourh tabbed pane titled the LCA Parameters pane contains all items of the Parameters
dialog which allows one to set the parameters used by the LCA algorithm. Because re-computation
17
of an analysis can take quite long on a very large dataset, it is recommended to set these values at
this stage.
The last tabbed pane titled the Advanced Options pane controls how MEGAN attempts to
identify the taxon associated with a given BLAST hit. By default, MEGAN looks for the name of
a taxon in the header line of the subject sequence, which is the fastest option.
The Parse taxon names checkbox specifies that the program first attempts to obtain the taxon
name from the BLAST hit header lines. The Load Accession Lookup opens a menu that can be
used to load the accession lookup directory. This directory contains a number of binary format
files used by MEGAN to map accession numbers to taxon ids and taxon names. This directory is
very large and thus not part of the MEGAN distribution. It can be downloaded from http://wwwab.informatik.uni-tuebingen.de/software/megan. The Use Accession Lookup check box item is
used to turn the use of accession lookup on and off. Please note that identifying taxa using
accession lookup is much slower than just using name parsing and thus should only be used when
really needed. The Load Synonyms File can be used to load a file of customized synonyms to help
identify taxa, e.g. human for homo sapiens. Each line of a synonyms file should contain two
strings, separated by a tab, the synonym followed by the taxon name. The Use Synonyms check
box item is used to turn use of Synonyms on and off.
13
Inspector Window
The Inspector Window can be used to inspect the alignments that are the basis of the assignment
of reads to taxa. It can be opened either using the Window→Inspector Window menu item or by
right-clicking on a taxon and then selecting the Inspect
popup item. This window displays
data hierarchically using a data tree. The root node of this tree represents the current input file.
This window can only be opened when data has been loaded into the program.
Any taxon added to the window, either by right-clicking a taxon and then selecting the Inspect
popup item in the main viewer, or by using the Options→Show Taxon item, is shown at a second
level below the root. Clicking on such a taxon node will open a new level of nodes, each read
node representing a read that has been assigned to the named taxon. Clicking on a read node
will then open a new level of nodes, each such read hit node representing an alignment of the
given read to a sequence associated with some taxon. Finally, double-clicking on a read hit node
will display the actual BLAST alignment provided to deduce the relationship.
13.1
Inspector Menus
The Inspector window has three menus. The File
• The File→Save As
menu contains the following items:
saves the currently displayed data to a file, not implemented.
• The File→Print
prints the currently displayed data, not implemented.
• The File→Close
item closes the Inspector window.
The Edit
menu contains the following items:
18
• The Edit→Select All
• The Edit→Cut
• The Edit→Copy
item is used to select the whole text.
item is used to cut text.
item is used to copy text.
• The Edit→Paste
item is used to paste text.
• The Edit→Clear
item is used to clear all displayed data.
The Options
menu contains the following items:
• The Options→Show Taxon item prompts the user for a taxon name or ID and then adds
the named taxon to the list of displayed data, if at least one read has been assigned to the
taxon.
• The Options→Show Read item prompts the user for a read ID and then adds the named
read to the list of displayed data.
• If the Options→Collapse
collapsed.
• If the Options→Expand
item is clicked, the subnodes of the highlighted entry are
item is clicked, the subnodes of the highlighted entry are displayed.
• If the Options→Ignore Hit item is clicked, then all currently selected hits are given the
status “to be ignored”. Such hits are ignored by all algorithms and are not used to decide
where to place a given read. All hits that have been marked in this way are shown in red.
This item is also available via right clicking in the window.
• The Options→Use Hit item is used to remove the “to be ignored” status from all selected
hits. This item is also available via right clicking in the window.
• The Options→Use All Hits
hits.
item is used to remove the “to be ignored” status from all
• The Options→Apply Ignore/Use Changes item is used to rerun the taxonomical analysis
of the dataset, taking the change of the “to be ignored” status of hits into account.
14
Find Window
The Find window can be opened using the Edit→Find item. It’s purpose is to find taxa or
reads. Enter a query specifying a name or ID of a taxon in the top text region. Use the following
check boxes to parameterize the search:
• If the Whole words only item is selected, then only taxa or reads matching the complete
query string will be returned.
• If the Case sensitive
parisons.
item is selected, then the case of letters is distinguished in com-
19
• If the Regular Expression item is selected, then the query is interpreted as a Java regular
expression.
Press the Close, Find First or Find Next buttons to close the dialog, or find the first, or next
occurrence of the query, respectively. Press the Find All button to find all occurrences of the
query.
The direction in which the next match is searched for can be selected using the Forward and
Backward buttons.
The search can be applied to different targets:
• Nodes - search all node labels
• Collapsed Nodes - search among the collapsed nodes and then uncollapse any found nodes
• Edges - search among edge labels
• Reads - search among the set of reads. Here, the whole header line of each read is searched.
• BLAST hits - search among the set of BLAST hits. Here, the whole text of each match is
searched.
• Messages - search among text in the Messages window.
Press the From File button to load a set of queries, one per line, from a file.
If no data has been loaded into the program, then it can be used to explore the NCBI taxonomy.
15
GOAnalyzer Window
The GOAnalyzer window enables to analyze the functional content of a metagenome using the
classification structure of the Gene Ontology (GO). Nodes represent the GO terms whereas edges
represent the relationships. The read assignment to GO terms are visualized in an interactive graph
view displaying all GO terms found in the data set and, additionally, all nodes that lie on the path
towards the root node. The amount of read hits per GO term in the DAG is represented with a
color gradient.
The comparison views are the same that MEGAN uses for the taxonomical analysis (pie chart,
heatmap, meters). The GO terms are organized in an interactive graph view that lets you zoom
and inspect the data (inspector and chart tool are available). The panel on the left shows exactly
how many reads are assigned to a certain GO term. Double-clicking on a node will highlight its
path in the graph. A triple-click will additionally, highlight its child terms in the list. The mousewheel can be used to zoom into or out of the graph. Clicking the right button and, at the same
time, moving the mouse will scroll the graph view in the corresponding direction.
15.1
Exploring the Read Assignments
Besides the displayed graph view, the GOAnalyzer window contains an information panel (on
the left) to explore GO terms of the read assignment. By default, a tabular listing provides a
20
comprehensive overview of all GO terms that have been assigned with read sequences. In addition
to the number of the assigned reads for each data set, the following columns are listed:
• GO Term: the full name of the GO term
• Specificity: The specificty score of each GO term is computed as follows: This value is based
on the Shannon Information Content (IC) and on the number of annotated genes for each term
as listed here: http://www.geneontology.org/GO.current.annotations.shtml#filter.
The IC of a term reflects the frequency of gene annotations to that term (or to descendants in the sub graph of that term). Terms often used for annotated gene products
are assigned with a lower specificity than infrequently used terms. Formulas adapted
from http://www.ploscompbiol.org/article/info%3Adoi%2F10.1371%2Fjournal.pcbi.
1000431#s3 and http://nar.oxfordjournals.org/cgi/content/full/35/suppl_1/D322
• Level: The graph level of a term indicates the maximum path length to this term node
starting at the root node. If a term can be reached via multiple paths, only the maximum
path length is considered.
• Divergence: (only for the comparative analysis): The divergence of each GO term represents the maximum difference in read assignments between the compared data sets. Large
divergences likely indicate GO terms of interest.
• Reads Total: (only for the comparative analysis): The sum of reads for all data sets assigned
to each GO term.
We now discuss all menus of the GOAnalyzer window.
15.2
The
File Menu
File menu contains the following file-related items:
• The
File→Export
– The
submenu contains items for data export:
File→Export Graph View
– The File→Export Table View
of the GO terms as .jpg file.
is used to save the current GO graph as .jpg file.
item is used export an image of the tabular listing
– The File→Export Read Assignment
tab-delimited text file.
item is used to export the tabular listing as
• The
File→Page Setup
• The
File→Print
item is used to print the current GO graph visualization.
• The
File→Close
item is used to close a window.
item is used to setup the page for printing.
21
15.3
Edit Menu
• The Edit→Copy GO ID(s)
nodes.
item is used to copy the GO term identifiers of the selected
• The Edit→Copy GO Name(s)
nodes.
• The Edit→Find
names or IDs.
• The
item is used to copy the GO term names of the selected
item opens the Find window which can be used to search for GO term
Edit→Preferences
submenu contains items for setting preferences:
– The Edit→Preferences→Optimize View For Large Data Sets
item draws the
GO graph in a more optimzed way to save computation time: Edges are no longer
round-shaped and anti-aliasing is turned off.
– The Edit→Preferences→Show Colored Read Assignment Table item can be used
to turn on and off the heat-map-like coloring of the tabular listing.
– The Edit→Preferences→Antialiased Painting item can be used to turn on and
off anti-aliasing.
– The Edit→Preferences→Set Label Font Size
item can be used to change the
font size of the node labels.
– The Edit→Preferences→Synchronize GO Term Selection
item can be used to
turn on and off the automatic focussing of nodes in the view when the user clicks on an
entry in the list.
– The Edit→Preferences→Node Coloring
item can be used to change node color
scheme (blue/red).
– The Edit→Preferences→Show Node Labels
item can be used to choose whether
the node labels should be visible.
15.4
Options Menu
• The Options→Select Subgraph
nodes.
item is used to select all child nodes of currently selected
• The Options→Highlight Paths of Selected Nodes
of the currently selected nodes.
item is used to highlight all paths
• The Options→Highlight Incident Nodes of Selected Edges
all incident nodes of currently selected edges.
item is used to select
• The Options→Show GO Term in List item is used select and focus the GO terms in the
list of the corresponding selected nodes in the graph view.
• The Options→Inspect GO
the Inspector window.
item is used to display the currently selected GO terms in
• The Options→Extract Reads By GOs
to the selected GO terms.
item is used to extract all read sequences assigned
22
15.5
View Menu
• The View→Show All 3 ontologies
GO graph).
• The
View→Fit Content
• The
View→Generic GO Slim
item is used to fit the view to the window size.
item is used switch to the Generic GO Slim .
• The View→GOA and Proteome GO Slim
GO Slim.
• The
View→Plant GO Slim
View→Yeast GO Slim
• The View→Full View
versions).
15.6
item to switch to the Prokaryotic Subset of GO terms.
item is used to switch to the yeast GO Slim.
item is used display the full Gene Ontology (instead of slim
Window Menu
• The Window→Chart GO
terms as bar or pie chart.
15.7
item is used to switch to the GOA and Proteome
item is used to switch to the Plant GO Slim.
• The View→Prokaryotic Subset
• The
item is used to display all three ontologies (whole
item is used to open a chart window displaying the selected GO
Tool Bar
The GOAnalyzer window provides a tool bar containing buttons that provide short cuts to some
of the menu items associated with the window. These are the Zoom in and out button, View→Fit
Content , Edit→Find , Options→Inspect GO , Options→Chart GO , Options→Extract
Reads By GOs , Draw Nodes As Rectangles, Draw Nodes As Pie Charts, Draw Nodes As Heatmaps,
Draw Nodes As Pairwise Comparison Heatmaps, Draw Nodes As Meters, and a drop-down list
providing quick access to the View→Full View or the GO slims.
15.8
Popup Menus
The GOAnalyzer window provides two different popup menus, that are activated by right-clicking
on a node or an edge. (If are using a single button mouse under MacOS, then please control-click
to access these menus.)
The popup menu that is opened when a node is right-clicked on has the following items:
• The
Copy GO ID(s)
copies the GO ID(s) of all selected nodes.
• The
Copy GO Names
copies the GO term names of all selected nodes.
• The
Select Subgraph
item is used to select all child nodes of currently selected nodes.
23
• The Highlight Paths of Selected Nodes
currently selected nodes.
item is used to highlight all paths of the
• The Options→Show GO Term in List item is used select and focus the GO terms in the
list of the corresponding selected nodes in the graph view.
The popup menu that is opened when an edge is right-clicked on has the following items:
• The Options→Highlight Incident Nodes of Selected Edges
incident nodes of currently selected edges.
15.9
item is used select all
Wheel Mouse and Special Keys
Use of a wheel mouse is recommended for zooming of the GOAnalyzer window. To scroll the graph,
either press and drag the mouse (using the right mouse button), or use the arrow keys.
16
Format Dialog
The Format dialog is opened using the Edit→Format item. This is used to change the font,
color, size and line width of all selected nodes and edges. Also, it can be used to turn labels on and
off.
17
Message Window
The Message window is opened using the Window→Message Window item. The program writes
all messages to this window. The window contains the usual File and Edit menu items.
18
Parameters Dialog
The Parameters dialog is used to control the parameters of the LCA-assignment algorithm. It
can be invoked by selecting Options→Change LCA Parameters . The dialog options are:
• The Min Support item can be used to set a threshold for the minimum support that a taxon
requires, that is, the number of reads that must be assigned to it so that it appears in the
result. Any read that is assigned to a taxon that does not have the required support is counted
as unassigned. By default, the minimum number of reads required for a taxon to appear in
the result is 5.
• The Min Score item can be used to set a minimum threshold for the bit score of hits. Any
hit in the input data set that scores less than the given threshold is ignored.
• The Min Score/Length item can be used to set a minimum threshold for the bit score divided
by the read length, of hits. Any hit in the input data set that scores less than the given
threshold is ignored. This is useful when the reads have widely varying lengths.
24
• The Top Percentage item can be used to set a threshold for the maximum percentage by
which the score of a hit may fall below the best score achieved for a given read. Any hit that
falls below this threshold is discarded.
• The Win Score item can be used to try and separate matches due to sequence identity and
ones due to homology. If a win score is set, then, for a given read, if any match exceeds
the win score, only matches exceeding the win score (“winners”) are used to place the given
read. The hope is that secondary, homology-induced matches are discarded in the presence
of stronger primary matches.
19
Compare Dialog
The Compare dialog is opened using the File→Compare item. This dialog provides a list
of currently open datasets. To construct a comparison, select at least two different datasets and
then press “ok”. Select Use absolute counts , if you want the comparison the original counts
of reads for each dataset. Select Normalize over all reads , if you want all counts to be
normalized such that each dataset has 100,000 reads. Select Ignore ’Not Assigned’ and ’No
Hits’ , if you want all reads assigned to the two special nodes labeled ’Not Assigned’ and ’No
Hits’ to be ignored.
20
Extractor Dialog
The Extractor dialog is opened using the File→Export→Reads item. The dialog is used to
extract all reads assigned to selected taxa. For any selected taxon, all reads assigned to it, or to
any taxon below it in the hierarchy, are saved to a file.
Use the top Browse button to add specify a file containing DNA reads in FastA format. Use the
button multiple times to specify multiple files. Use the lower Browse button to specify the output
directory. Specify the file name for output in the File name field. If the name contains %t, then the
program will produce one output file per taxon, and the name of the file is generated by replacing
%t by the taxon name. Otherwise, all reads are written to one file.
If Preserve existing files is selected, the program will not overwrite existing files.
21
Export Image Dialog
The Export Image dialog is opened using the File→Export Image item. This dialog is used
to save a picture of the current tree in a number of different formats, see Section 23.5.
The format is chosen from a menu. There are two radio buttons Save whole image to save
the whole image, and Save visible image to save only the part of the image that is currently
visible in the main viewer. If the chosen format is EPS, then selecting the Convert text to
graphics check box will request the program to render all text as graphics, rather than fonts.
25
Pressing the apply button will open a standard file save dialog to determine where to save the
graphics file.
22
About Window
The About
program.
23
Window is opened using the Window→About item. It reports the version of the
File Formats
MEGAN uses its own file formats to store the data describing the result of a sequence comparison
computation between a file of DNA reads and a database of reference sequences, such as computed
by BLASTX, BLASTP or BLASTN [1]. Files ending in .rma are in a compressed binary format
called RMA (read-match archive), which is a new open format that we will describe in a separate
document. MEGAN 1 used a text format (files ending on .megan or .meg), which are now deprecated and will not be supported by futher versions of the program. By convention, we use the
suffix .megan for MEGAN text files and .rma for binary read-match archive files.
A RMA file is generated using the File→Import BLAST menu item from a BLAST file and a
read file . A RMA file contains all reads and all significant BLAST matches (by default, up to 100
matches per read) in a compressed format, which we call read-match archive (RMA) format. The
size of such a file is around 10-20% of the size of the original input files and is thus usually smaller
than the file that one obtains by simply compressing the BLAST file. The file is indexed and thus
provides MEGAN with fast access to data stored in it. The reads and matches can be extracted
from the file and so the MEGAN file provides a means of keeping all reads, BLAST matches and
analysis in one document.
RMA is an open format which we will describe in a separate document.
23.1
The MEGAN Text File Format
MEGAN also supports a line-based format and each line defines either a global variable or a read
hit. A line starting with a ’#’ is treated as a comment and is ignored.
Global variables should appear at the top of the file, although this is not enforced. Any line starting
with a ’@’ is expected to contain the definition of a global variable in the format @name=value, where
name can be any word starting with a letter and not containing a ’=’, and value is terminated by
the end of line. The following global variables are generated by the parsers implemented in MEGAN
:
26
Source
CreationDate
Creator
Format
Algorithm
Parameters
ContentType
TotalReads
contains the location of the source comparison file. This is required by
the Inspector window to look-up and to display the text of BLAST
hits.
contains the date that the data was generated.
contains information on the program used to generate the data.
defines the format of all subsequent read hit lines.
contains the name of the algorithm used to assigned reads.
contains the parameters used by the algorithm.
is either Full Dataset (the default) or Summary.
contains the total number of reads.
Any line not starting with a ’@’ or ’#’ describes one read hit and consists of a list of values that are
assigned to variables, as specified by the format string.
By convention, the names of variables should be three letters long. A typical format string will
contain some of the following variables.
Name
rid
rln
tid
hit
bit
exp
idy
fra
sfa
sfb
sum
type
string
long
string
long
double
double
double
long
long
long
int
interpretation
Read ID
Read length
NCBI taxon ID
Number of hits between this read and this taxon
bit score of alignment
expected score
percent identity
frame used in BLASTX hit
start position of hit in source file
end position of hit in source file
number of reads summarized by this line
A read hit definition may contain less values than there are variables in the format line. In this
case, all trialing variables are assigned a null value. To assign a null value to in variable that is not
at the end of a read hit definition, use the character ’.’.
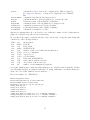
Here is an example of a MEGAN file :
@Source=megan/data.blast
@CreationDate=Wed Mar 29 03:19:54 CEST 2006
@Creator=MEGAN (built 10 March 2006)
@Format=rid rln tid bit exp fra sfa sfb psc
001015_0656_2350 93
003500_0107_1715 103
005388_0322_3089 101
006569_0422_3302 107
008915_0625_2885 105 235909 32.7 4.1 -2 19612521 19612874 1
004296_0382_2957 113 316273 36.2 0.37 -1 11739468 11739958 1
009643_0558_2904 92 7460 45.4 6.0E-4 +2 19781905 19782258 1
27
23.2
Full, Summary and Comparison MEGAN Files
MEGAN currently destinguishes between three types of text files. The @ContentType field may
take on one of the three values Full Dataset, Summary or Comparison. In a full dataset file,
each line is assumed to contain a description of one read or read-hit. In a summary file, each
line is assumed to contain the a taxon and the number of reads that have been assigned to it. In
a comparison file, each line is assume to contain a taon and the number of reads that have been
assigned to it, for two or more datasets which are specified further in the @Format line.
(Future versions of MEGAN might not support the full dataset format.)
23.3
Required Syntax of BLAST Files
MEGAN imports data from a BLAST file . MEGAN can parse BLAST files in standard or XML
format obtained using the BLAST output option -m 0 or -m 7, respectively. MEGAN can also
parse tabular format (BLAST output option -m 8), however this format is generally not suitable
for MEGAN because it doesn’t contain the information required to determine the taxon or COG
associated with a matched sequence. MEGAN can read gzipped BLAST files .
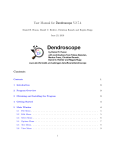
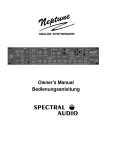
For human readable format, any
format shown in Figure 1. Any
Figure 2.
23.4
BLASTX file or BLASTP file is expected to adhere to the
BLASTN file is expected to adhere to the format shown in
Required Format of Read Files
Reads from sequencing are assume to be provided in multi-FastA format in a reads file . The
first word of a FastA header is assumed to be the read-id. The remaining text of the FastA header
must contain the length of the read either as length=number, or as |length|length—.
23.5
Graphics Formats
The following graphics formats are supported:
• BMP, “Bitmap”.
• EPS, “Encapsulated PostScript”, vector format.
• GIF, “Graphics Interchange Format”.
• JPEG, “Joint Photographic Experts Group”.
• PDF, “Portable Document Format”, vector format.
• PNG, “Portable Network Graphics”.
• SVG, “Scalable Vector Graphics”, vector format.
28
BLASTX text
text...
followed by 0 or more blocks of the following type:
Query= hquery-idi text length=hlengthi text
or
Query= hquery-idi text|length|hlengthi|text
text...
followed by 0 or more blocks of the following type:
> text [hNCBI-taxon-namei] text
(line breaks ok)
Score = hscorei bits (hbitsi ) Expect = he-valuei
Identities = text (hpercent-identitiesi%)
Positives = text (hpercent-positivesi%), Gaps = text (hpercent-gapsi%)
Frame = hframei
followed by 0 or more blocks of the following type:
Query text
text
Sbjct text
Figure 1: The required structure of a BLASTX file. Labels shown as label are tokens that must
occur verbatim in the file. Labels shown as hlabeli are values that are read into the program. The
first word in the file must be BLASTX. The header line starting with Query =, which is taken from
the Fasta header of the query sequence (a read), must start with a one word unique identifier
for the read and must also contain a statement containing the length of the read, in the format
length=hlengthi, or as |length|hlengthi|. Another important feature is that the comment line
of the database sequence must contain a NCBI-taxon name. If names are not contained in the
comment lines, then the accession lookup support must be used. Finally, the Gaps= statement is
optimal.
29
BLASTN text
text...
followed by 0 or more blocks of the following type:
Query= hquery-idi text length=hlengthi text
or
Query= hquery-idi text|length|hlengthi|text
text...
followed by 0 or more blocks of the following type:
> text hNCBI-taxon-namei text
(line breaks ok)
Score =hscorei bits (hbitsi ) Expect =he-valuei
Identities = text (hpercent-identitiesi%) Gaps = text (hpercent-gapsi%)
Strand= hstrandi / hstrandi
followed by 0 or more blocks of the following type:
Query text
text
Sbjct text
Figure 2: The required structure of a BLASTN file. Labels shown as label are tokens that must
occur verbatim in the file. Labels shown as hlabeli are values that are read into the program. The
first word in the file must be BLASTN. The header line starting with Query=, which is taken from
the Fasta header of the query sequence (a read), must start with a one word unique identifier
for the read and must also contain a statement containing the length of the read, in the format
length=hlengthi. Another important feature is that the comment line of the database sequence
must contain a NCBI-taxon name. If names are not contained in the comment lines, then the
accession lookup support must be used.
30
23.6
CSV Files
MEGAN supports importing data from other programs in a comma-separated format from a CSV
file , using the File→Import CSV menu item. The input file must be a text file in which either
all lines each contain two strings that are separated by a comma. or all lines each contain three
strings separated by commas.
Importing read assignments If each line of the CSV file contains two strings separated by
a comma, then the first string will be intepreted as a taxon name or taxon id and the second
string will be intepreted as an integer specifying the number of reads assigned to the named taxon.
MEGAN will assume that this is the result of some analysis and thus will produce a summary file
from it and will simply display it on the NCBI taxonomy with no further analysis.
For example, assume that you have done a metagenome analysis using some other method and
have obtained the following result:
• Gammaproteobacteria: 55 reads
• Mollicutes: 400 reads
• Escherichia coli K12: 42 reads
• Unknown: 100 reads
To import this data into MEGAN so as to visualize the taxonomical assignments, produce the
following CSV file:
Gammaproteobacteria, 55
Mollicutes, 400
Escherichia coli K12, 42
Unassigned, 100
MEGAN will draw a tree with four nodes, one for each of the named taxa.
Importing read matches Otherwise, if each line of the CSV file contains three strings separated
by a comma, the first string will be interpreted as a read id, the second one as a taxon name or id
and the third one will be interpreted as a bit score for this assignment. MEGAN will assume that
this data describes a collection of reads and their matches. This data will be analysed using the
LCA algorithm and the result will be displayed on the NCBI taxonomy.
For example, assume that you have done a database search using some other method than BLAST
and have obtained the following result:
• The read r01 matches Escherichia coli CFT073 with a bitscore of 100,
• The read r01 matches Escherichia coli K12 with a bitscore of 110, and
• The read r01 matches Salmonella enterica subsp. enterica serovar Choleraesuis str. SC-B67
with a bitscore of 120.
31
• The read r02 matches Caldicellulosiruptor saccharolyticus DSM 8903 with a bitscore of 90.
To import this data into MEGAN so as to analyze is using the LCA algorithm, produce the following
CSV file:
r01, Escherichia coli CFT073, 100
r01, Escherichia coli K12, 110
r01, Salmonella enterica subsp. enterica serovar Choleraesuis str. SC-B67,120
r02, Caldicellulosiruptor saccharolyticus DSM 8903, 90.
23.7
Tree and Map Format
The NCBI taxonomy is loaded by MEGAN at startup. It is contained in a NCBI tree file in the
standard Newick tree format. The mapping from taxon-IDs to taxon names is loaded by MEGAN
at startup. It is contained contained in a NCBI mapping file in a line based format in which
each has three entries: taxon-ID, taxon name and then a number indicating the size of the genome,
or -1, if the size is unknown.
24
Command-Line Options and Mode
MEGAN has the following command-line options:
-t <String>
-i <String>
-fc <String>
-f <String>
-fs <String>
-ld <String>
-p <String>
-m <int>
+g <switch>
+w <switch>
-x <String>
-V <switch>
-S <switch>
-d <switch>
+s <switch>
-h <switch>
(default=""): tree file
(default=""): ID to name mapping file
(default=""): COGS definition file
(default=""): MEGAN file
(default=""): Synonyms file
(default=""): Accession lookup directory
(default="Megan.def"): Properties file
(default=0): minimum score
(default=true): gui mode
(default=true): show message window
(default=""): Execute this command at startup (non-gui mode only)
(default=false): show version string
(default=false): silent mode
(default=false): debug mode
(default=true): show startup splash screen
(default=false): Show usage
Launching the program with option +g will make the program run in non-GUI command-line mode
, first excuting any command given with the -x option and then reading additional commands from
standard input.
Please be aware that the command-line version of the program uses the same properties file as
the interactive version. So, any preferences set using the interactive version of the program will
32
also apply to the command-line version of the program. It this is not desired, then please use the
-p option to supply a different properties file.
Another important thing to note is that the command-parser operates in a line-by-line fashion.
When processing commands in a given line, the parser makes note of required updates to the
taxonomy and data-structures. These updates are not executed until all commands in the current
input line have been processed. For example, if you want to open and MEGAN file and then to
save a picture of the taxonomical analysis in a PDF file, then the two commands should be entered
on separate lines because otherwise the taxonomy will be drawn before the data from the MEGAN
file has been processed. Here is an example of the correct way to produce a picture of a dataset:
open meganfile=myfile.rma
exportgraphics format=PDF file=myfile.pdf
Alternatively, the update command can be used to explicitly force MEGAN to update all datastructures, e.g.:
open meganfile=myfile.rma; update; exportgraphics format=PDF file=myfile.pdf
As described below, the update command takes a number of different parameters that can be used
to determine exactly what type of update is required.
All commands supplied using the -x command-line option are parsed as if they were contained in
one line. So, here the update command must be used to ensure that commands are completed
when necessary. To open a file, print the taxonomical analysis and then close the file using the -x
option, enter the following:
-x "open meganfile=myfile.rma; update;exportgraphics format=PDF file=myfile.pdf;quit"
Here is a summary of the commands available in command-line mode:
Creating a new MEGAN project and reopening projects:
import blastfile=name [readfile=name] meganfile=name maxmatches=num [minscore=num] [minscorebylength] [toppercent=num] [winscore=num] [minsupport=num];
Import BLAST and reads file and create a new MEGAN file
open meganfile=name;
save meganfile=name [summary=bool];
Open the named MEGAN file
Save summary or comparison to a file.
export data={reads|blast} file=name [taxid=num];
Export all reads or matches. If taxid!=0, only those assigned to the givent taxon
export data=CSV file=name format={readid_taxonname|taxonname_count|taxonname_readid|readid_taxonid|taxonid_count|taxonid_readid};
Export reads or counts in CSV (comma separated values) format
Setting thresholds and options:
set minscore=num;
Set the minimum bit score
set minscorebylength=num; Set the minimum bit score divided by read length
set toppercent=num;
Set the percentage win against top score
set winscore=num;
Set the win score
set minsupport=num;
Set the minimum number of reads that must support a taxon
enable labels=selected;
Enable all selected taxa
enable all;
Enable all taxa
disable labels=selected;
Disable all selected taxa (i.e. don’t use them when placing reads
set ignore_duplicate_matches=bool; ignore duplicate matches in data
set ignore_nohits=bool;
ignore reads with no hits in data
set useparsetext=bool ;
option for import command: parse text embedded in BLAST file to identify taxa
set usesynonyms=bool [open lookupdir=dir];
option for import command: use synonyms imported from the given directory
set useaccessionlookup=bool [open lookupdir=dir];
option for import command: use accession-number lookup tables imported from the given directory
Comparison of multiple datasets:
compare mode={absolute|relative} pid=num pid=num...;
Show comparison of different datasets in new window (GUI mode)
compare mode={absolute|relative} meganfile=name meganfile=name...; Compute comparison of different datasets (command-line mode)
Listing information:
list summary=all;
Summarize assignment of reads to all nodes
list summary=selected;
Summarize assignment of reads to selected nodes
list summary=assigned;
Summarize assignments
33
list COGs=all;
Summarize COGs for all nodes
list COGs=all;
Summarize COGs for all selected nodes
list reads2hits;
Lists all reads and hits, use only for small datasets
list key=name [label=name];List for each key how many reads hit the key
list strong threshold=num; List the number of ’strong’ nodes for given threshold
list disabled;
; List all disabled taxa
Collapsing and uncollapsing nodes:
collapse all;
Collapse all nodes
collapse selection;
Collapse all selected nodes
collapse level=number;
Collapse taxonomy at the given numerical level
collapse level=name;
Collapse taxonomy at the named taxonomical level
collapse taxa=t1 t2...;
Collapse all named taxa
uncollapse all;
Uncollapse all nodes
uncollapse selection;
Uncollapse all selected nodes
uncollapse subtrees;
Uncollapse whole subtree for selected nodes
uncollapse taxa=t1 t2...; Uncollapse all named taxa
show tree=full;
Show the full taxonomy
show tree=induced;
Show the induced taxonomy
Visualization:
set nodedrawer=name;
Sets the node drawer: circle, piechart, heatmap, heatmap2 or meters
set drawleavesonly=boolean;
Draw leaves only?
set fontsize=number;
Set font size
set autolayoutlabels=boolean; Set auto-layout of labels on/off
set margin [left=num] [right=num] [top=num] [bottom=num]; Set the margin around the tree
show labels=selected;
Display labels for all selected nodes
hide labels=selected;
Hide labels for all selected nodes
hide labels=intermediate;
Hide labels for all intermediate nodes
nodelabels names=bool ids=bool assigned=bool summarized=bool;
Set what to label nodes by
nodesize scaleby={summary|assigned};
Set whether to scale nodes by summary or assigned reads
set highlightdifferences=bool; In a comparison of two datasets, turn difference hightlighting on or off
Scaling:
expand direction=horizontal;
Expand image horizontally
contract direction=horizontal; Contract image horizontally
expand direction=vertical;
Expand image vertically
contract direction=vertical;
Contract image vertically
zoom selection;
Zoom to current selection of nodes
Selection:
select all;
Select all nodes
select none;
Deselect all nodes
select leaves;
Select all leaves
select internal;
Select all internal nodes
select subtree;
Select all nodes in subtrees below selected
select intermediate; Select all intermediate nodes
select level=name;
Select all nodes at named taxonomical level
Searching:
find searchtext=text target={Nodes|Collapsed|Edges|ReadIDs} [all=bool] [regex=bool] [wholeword=bool] [respectcase=bool];
Find and select the next label matching the given search text
replace searchtext=text replacetext=text [target={Nodes|Collapsed|Edges|ReadIDs}] [all=bool]
[regex=bool] [wholeword=bool] [respectcase=bool];
Find and select the next label matching the given search text
Reading, writing and parsing synonyms and taxonomy files:
open synonymsfile=name; Open and load the named synonyms file
set usesynonyms=bool;
Use loaded taxon-name synonyms when importing data
load lookupdir=name;
Load accession lookup files from the named directory
set useaccessionlookup=bool; Use the loaded accession lookup data when importing data
open mappingfile=name;
Open the named mapping file
open taxonomyfile=name; Open the named taxonomy file
open cogsfile=name;
Open the named COGs definition ’whog.txt’ file
save taxonomyfile=name; Save the taxonomy to the named file
parse ncbifile=name;
Extract taxonomy from NCBI dump file
Charting:
chart taxa;
Chart taxonomical analysis
chart go;
Chart all occurrences of GO terms
chart cogs [summy=bool]; Chart all occurrences of COGs
chart attributes;
Chart all microbial attributes
Additional computations:
extract outdir=outDir outfile=outFileNameTemplate [summarized=bool] {taxa={taxon names}|cogs={COG-ids}|gos={GO-ids}};
Extract all reads that are assigned to any named taxon, COG ids or GO-ids
When extracting by taxa, report all reads on or below taxon, if summarized=true
In outFileNameTemplate every occurrence of %t is replaced by the corresponding taxon name
subsample percent=num; Randomly select a subset of reads
Other:
exportgraphics [format={EPS|PNG|GIF|JPG|SVG|PDF}] [replace=bool] [textasshapes=bool] [title=title] file=filename;
Export a picture of the current tree
recompute [minsupport=num] [minscore=num] [minscorebylength=num] [toppercent=num] [winscore=num;
Rerun the LCA analsyis with different parameters
dump file=name;
Dump the complete contents of an RMA file to a human readable file
update [reprocess=bool] [reset=bool] [reinduce=bool];
Update the computation
set window [width=num] [height=num] [x=num] [y=num];
Size and location of main window
show vint=bool;
Show version string in title of windows
help;
List this help
about;
List information about MEGAN
version;
List version info
34
quit ;
25
Quit the program
Examples
Example files can be downloaded from the MEGAN website.
26
Using More Memory
To run MEGAN with more than 2GB under MacOS X on an intel Mac, edit the file
/Applications/MEGAN/MEGAN.app/Contents/Info.plist as follows: Find the lines
<key>VMOptions</key>
<string>-server -Xmx1600M</string><!-- I4J_INSERT_VMOPTIONS -->
and replace then by:
<key>VMOptions</key>
<string>-server -d64 -Xmx4000M</string><!-- I4J_INSERT_VMOPTIONS -->
to run using 4GB (for example).
To run MEGAN with more than 2GB on a 64-bit unix/linux system, open the file
/Applications/megan/MEGAN in a text editor.
Find the current memory specification
(e.g. -Xmx1600M) and replace it by the following -d64 -Xmx4G to run with 4 gigabytes of memory, say. Note that the flag -d64 is necessary to specify 64 Bit Java.
27
Acknowledgments
This product includes software developed by the Apache Software Foundation (http://www.
apache.org/), namely the batik library for generating image files. It also contains JFreeChart
to construct charts, BrowserLauncher2 for opening browser windows, iText for generating
pdf files and MRJAdapter , a Java package used to help construct user interfaces for the Apple
Macintosh. Licenses can be found in the installation directory.
References
[1] S.F. Altschul, T.L. Madden, A.A. Schaffer, J. Zhang, Z. Zhang, W. Miller, and D.J. Lipman.
Gapped BLAST and PSI-BLAST: a new generation of protein database search programs. Nucleic Acids Res., 25:3389–3402, 1997.
[2] D.A. Benson, I. Karsch-Mizrachi, D.J. Lipman, J. Ostell, and D.L. Wheeler. Genbank. Nucleic
Acids Res, 1(33 (Database issue)):D34–38, 2005.
35
[3] D. H. Huson, A. F. Auch, J. Qi, and S. C. Schuster. MEGAN analysis of metagenomic data.
Genome Res, 17(3):377–386, March 2007.
[4] Hendrik N Poinar, Carsten Schwarz, Ji Qi, Beth Shapiro, Ross D E Macphee, Bernard Buigues,
Alexei Tikhonov, Daniel H Huson, Lynn P Tomsho, Alexander Auch, Markus Rampp, Webb
Miller, and Stephan C Schuster. Metagenomics to paleogenomics: large-scale sequencing of
mammoth dna. Science, 311(5759):392–394, Jan 2006.
[5] S. Schwartz, W.J. Kent, A. Smit, Z. Zhang, R. Baertsch, R. C. Hardison, D. Haussler, and
W. Miller. Human-mouse alignments with BLASTZ. Genome Res., 13:103 – 107, 2003.
36
Index
-m 0, 28
-m 7, 28
-m 8, 28
.meg, 26
.megan, 26
.rma, 26
About, 15, 16, 26
accession lookup directory, 18
Advanced Options pane, 18
Algorithm, 27
All Intermediate Nodes, 12
All Internal Nodes, 12
All Leaves, 12
All Nodes, 11
Antialiased Painting, 22
Apply Ignore/Use Changes, 19
Assignments, 10
Backward, 20
batik, 35
Blast, 10
BLAST file, 28
BLAST hits, 20
BLASTN file, 28
BLASTP file, 28
BLASTX file, 28
BMP, 28
BrowserLauncher2, 35
Case sensitive, 19
Change LCA Parameters, 13, 24
Chart COGs, 15
Chart GO, 23
Chart Microbial Attributes, 15
Chart Taxa, 15
Class, 12, 14
Clear, 19
Close, 11, 18, 20, 21
cluster of orthologous groups, 7
COG, 7
Collapse, 14, 16, 19
Collapse Nodes at Level, 14
Collapse Nodes at Taxonomical Level, 14
Collapsed Nodes, 20
Collapsed taxa, 5
color, change, 24
Command syntax, 15
command-line, 32
command-line mode, 32
commands, 33
Compare, 10, 25
comparison, 28
Content pane, 17
ContentType, 27
Contract Horizontal, 12, 16
Contract Vertical, 12, 16
control-click, 16, 23
Convert text to graphics, 25
Copy, 11, 19
Copy Edge Label, 17
Copy GO ID(s), 22, 23
Copy GO Name(s), 22
Copy GO Names, 23
Copy Node Label, 16
CreationDate, 27
Creator, 27
CSV file, 31
Cut, 11, 19
Disable Selected, 13
disabling taxa, 13
Disclaimer, 3
Draw Circles, 13
Draw Heat Maps, 13
Draw Heat Maps 2, 13
Draw Leaves Only, 13
Draw Meters, 13
Draw Pie Charts, 13
Edges, 20
Edit, 11, 18
Edit Comparison Colors, 11
Edit Edge Label, 11, 17
Edit Node Label, 11, 16
Edit→Clear, 19
Edit→Copy, 11, 19
Edit→Copy GO ID(s), 22
Edit→Copy GO Name(s), 22
Edit→Cut, 11, 19
37
Edit→Edit Edge Label, 11
Edit→Edit Node Label, 11
Edit→Find, 5, 11, 16, 19, 22, 23
Edit→Find Again, 11
Edit→Format, 11, 24
Edit→Paste, 11, 19
Edit→Preferences, 11, 22
Edit→Preferences→Antialiased Painting, 22
Edit→Preferences→Edit Comparison Colors, 11
Edit→Preferences→Node Coloring, 22
Edit→Preferences→Optimize View For Large
Data Sets, 22
Edit→Preferences→Set Label Font Size, 22
Edit→Preferences→Show Colored Read Assignment Table, 22
Edit→Preferences→Show Legend, 11
Edit→Preferences→Show Node Labels, 22
Edit→Preferences→Synchronize GO Term Selection, 22
Edit→Select All, 19
Enable All, 13
Enable Selected, 13
enabling taxa, 13
Enter a command, 15
environmental samples, 13
EPS, 28
examples, 5
Expand, 19
Expand Horizontal, 12, 16
Expand Vertical, 12, 16
Expand/Contract, 12
Export, 21
Export Graph View, 21
Export Image, 10, 25
Export Read Assignment, 21
Export Table View, 21
Extract Reads by COG, 10
Extract Reads By GOs, 22, 23
Extract Reads By Taxa, 16
Extract Reads by Taxa, 10
Extractor, 25
Family, 12, 14
File, 9, 18, 21
File→Close, 11, 18, 21
File→Compare, 10, 25
File→Export, 21
File→Export Graph View, 21
File→Export Image, 10, 25
File→Export Read Assignment, 21
File→Export Table View, 21
File→Export→Assignments, 10
File→Export→Blast, 10
File→Export→Reads, 10, 25
File→Export→Summary, 10
File→Extract Reads by COG, 10
File→Extract Reads by Taxa, 10
File→Import BLAST, 5, 9, 26
File→Import CSV, 10, 31
File→New, 9
File→Open, 6, 9, 16
File→Open Recent, 6, 9
File→Page Setup, 10, 21
File→Print, 10, 16, 18, 21
File→Properties, 11
File→Quit, 11, 16
File→Save As, 9, 18
File→Tools, 11
Files pane, 17
Find, 5, 11, 16, 19, 22, 23
Find Again, 11
Find All, 20
Find First, 20
Find Next, 20
Fit Content, 23
Font Size, 12
font, change, 24
Format, 11, 24, 27
Forward, 20
From File, 20
From Previous Window, 12
Full Dataset, 27
full dataset, 28
Full View, 23
Fully Contract, 13, 16
Fully Expand, 13, 16
Generic GO Slim, 23
genome, 3
GIF, 28
GOA and Proteome GO Slim, 23
gzipped BLAST files, 28
38
Layout→Highlight Differences, 13
Highlight Differences, 13
Highlight Incident Nodes of Selected Edges, 22, Layout→Layout Labels, 12
Layout→Scale Nodes By Assigned, 12
24
Layout→Scale Nodes By Summarized, 12
Highlight Paths of Selected Nodes, 22, 24
Layout→Set Max Node Radius, 12
horizontal zoom, 17
Layout→Zoom to Selection, 13
How to cite, 3, 15
LCA Parameters pane, 17
Ignore ’Not Assigned’ and ’No Hits’, 25
Level, 12
Ignore Hit, 19
line width, change, 24
Import, 17
Linux, 6
Import BLAST, 5, 9, 26
List COGs, 14
Import CSV, 10, 31
List Disabled, 14
Import wizard, 17
List Microbial Attributes, 14, 16
Inspect, 5, 14, 16, 18
List Summary, 14
Inspect GO, 22, 23
Load Accession Lookup, 18
Inspector, 18
Load Synonyms File, 18
Inspector Window, 15, 18
Invert, 12
MacOS, 6
iText, 35
Main, 9
Max number of matches per read, 17
JFreeChart, 35
MEGAN, 16
JPEG, 28
MEGAN file, 27
MEGAN macos 3.8.dmg, 6
Kingdom, 12, 14
MEGAN unix 3.8.sh, 6
MEGAN windows 3.8.exe, 5
Labels Off, 15, 16
Message, 24
Labels On, 15, 16
Message Window, 15, 24
Layout, 12
Messages, 20
Layout Labels, 12
metagenome, 3
Layout→Draw Circles, 13
metagenomics, 3
Layout→Draw Heat Maps, 13
Microbial Attributes Window, 15
Layout→Draw Heat Maps 2, 13
Min Score, 24
Layout→Draw Leaves Only, 13
Min Score/Length, 24
Layout→Draw Meters, 13
Min Support, 24
Layout→Draw Pie Charts, 13
MRJAdapter, 35
Layout→Expand/Contract, 12
Layout→Expand/Contract→Contract HorizonNCBI mapping file, 32
tal, 12, 16
Layout→Expand/Contract→Contract Vertical, NCBI taxonomy, 7
NCBI tree file, 32
12, 16
Layout→Expand/Contract→Expand Horizon- NCBI-NR, 7
NCBI-NT, 7
tal, 12, 16
Layout→Expand/Contract→Expand Vertical, New, 9
Node Coloring, 22
12, 16
node size, change, 24
Layout→Font Size, 12
Node→Inspect, 5, 18
Layout→Fully Contract, 13, 16
Nodes, 20
Layout→Fully Expand, 13, 16
39
Options→Show Taxon, 18, 19
Options→Taxon Disabling, 8, 13
Options→Taxon Disabling→Disable Selected,
13
Options→Taxon Disabling→Enable All, 13
Options→Taxon Disabling→Enable Selected, 13
Options→Taxon Disabling→List Disabled, 14
Options→Use All Hits, 19
Options→Use Hit, 19
Order, 12, 14
Nodes→Collapse, 16
Nodes→Copy Edge Label, 17
Nodes→Copy GO ID(s), 23
Nodes→Copy GO Names, 23
Nodes→Copy Node Label, 16
Nodes→Edit Edge Label, 17
Nodes→Edit Node Label, 16
Nodes→Extract Reads By Taxa, 16
Nodes→Highlight Paths of Selected Nodes, 24
Nodes→Inspect, 16
Nodes→Labels Off, 16
Nodes→Labels On, 16
Nodes→List Microbial Attributes, 16
Nodes→Open NCBI Web Page, 16
Nodes→Select Subgraph, 23
Nodes→Uncollapse, 16
Nodes→Uncollapse Subtree, 16
None, 11
Normalize over all reads, 25
Open, 6, 9, 16
Open File, 9
Open NCBI Web Page, 14, 16
Open Recent, 6, 9
Optimize View For Large Data Sets, 22
Options, 13, 19
Options→Apply Ignore/Use Changes, 19
Options→Change LCA Parameters, 13, 24
Options→Chart GO, 23
Options→Collapse, 19
Options→Expand, 19
Options→Extract Reads By GOs, 22, 23
Options→Highlight Incident Nodes of Selected
Edges, 22, 24
Options→Highlight Paths of Selected Nodes, 22
Options→Ignore Hit, 19
Options→Inspect, 14
Options→Inspect GO, 22, 23
Options→List COGs, 14
Options→List Microbial Attributes, 14
Options→List Summary, 14
Options→Open NCBI Web Page, 14
Options→Select Subgraph, 22
Options→Set Number of Reads, 5, 14
Options→Show GO Term in List, 22, 24
Options→Show Read, 19
Page Setup, 10, 21
Parameters, 24, 27
Parse taxon names, 18
Paste, 11, 19
PDF, 28
Phyla, 12, 14
Plant GO Slim, 23
PNG, 28
popup menu, 16, 23, 24
Preferences, 11, 22
preferences, 32
Preserve existing files, 25
Print, 10, 16, 18, 21
Prokaryotic Subset, 23
Properties, 11
properties file, 32
Quit, 11, 16
read file, 26
read hit node, 18
read node, 18
read-id,taxon-id, 10
read-id,taxon-name, 10
read-match archive, 26
Reads, 10, 20, 25
reads file, 28
Register, 15
Regular Expression, 20
RMA, 26
RMA file, 26
Save
Save
Save
Save
40
As, 9, 18
As Summary Only, 17
visible image, 25
whole image, 25
Scale Nodes By Assigned, 12
Scale Nodes By Summarized, 12
Select, 11
Select All, 19
Select Subgraph, 22, 23
Select→All Intermediate Nodes, 12
Select→All Internal Nodes, 12
Select→All Leaves, 12
Select→All Nodes, 11
Select→From Previous Window, 12
Select→Invert, 12
Select→Level, 12
Select→None, 11
Select→Subtree, 12
Set Label Font Size, 22
Set Max Node Radius, 12
Set Number of Reads, 5, 14
Show All 3 ontologies, 23
Show Colored Read Assignment Table, 22
Show GO Term in List, 22, 24
Show Intermediate Labels, 15
Show Legend, 11
Show Node Labels, 22
Show Number Of Reads Assigned, 14
Show Number Of Reads Summarized, 15
Show Read, 19
Show Taxon, 18, 19
Show Taxon IDs, 14
Show Taxon Names, 14
Source, 27
Subtree, 12
Summary, 10, 27
summary, 7, 28
summary file, 10, 17
SVG, 28
Synchronize GO Term Selection, 22
synonyms file, 18
Taxon Disabling, 8, 13
taxon node, 18
taxon-id,count(s), 10
taxon-id,read-id(s), 10
taxon-name,count(s), 10
taxon-name,read-id(s), 10
Tools, 11
Top Percentage, 25
TotalReads, 27
Tree, 14
Tree→Collapse, 14
Tree→Collapse Nodes at Level, 14
Tree→Collapse Nodes at Taxonomical Level, 14
Tree→Labels Off, 15
Tree→Labels On, 15
Tree→Show Intermediate Labels, 15
Tree→Show Number Of Reads Assigned, 14
Tree→Show Number Of Reads Summarized, 15
Tree→Show Taxon IDs, 14
Tree→Show Taxon Names, 14
Tree→Uncollapse, 5, 14
Tree→Uncollapse Subtree, 5, 14
Type-setting conventions, 3
unassigned, 24
Uncollapse, 5, 14, 16
Uncollapse Subtree, 5, 14, 16
Unix, 6
update, 33
Use absolute counts, 25
Use Accession Lookup, 18
Use All Hits, 19
Use Hit, 19
Use Synonyms, 18
version, COGs, 11
version, NCBI microbial attributes, 11
version, NCBI taxonomy, 11
vertical zoom, 17
View→Fit Content, 23
View→Full View, 23
View→Generic GO Slim, 23
View→GOA and Proteome GO Slim, 23
View→Plant GO Slim, 23
View→Prokaryotic Subset, 23
View→Show All 3 ontologies, 23
View→Yeast GO Slim, 23
Website, 15
Whole words only, 19
Win Score, 25
Window, 15
Window→About, 15, 16, 26
Window→Chart COGs, 15
41
Window→Chart GO, 23
Window→Chart Microbial Attributes, 15
Window→Chart Taxa, 15
Window→Command syntax, 15
Window→Enter a command, 15
Window→How to cite, 15
Window→Inspector Window, 15, 18
Window→Message Window, 15, 24
Window→Microbial Attributes Window, 15
Window→Register, 15
Window→Website, 15
Windows, 5, 6
Wizard pane, 17
Yeast GO Slim, 23
Zoom to Selection, 13
42