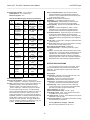
1
Series 151T Smart Two-Wire Temperature Transmitter mV/TC/RTD Input USER’S MANUAL ACROMAG INCORPORATED 30765 South Wixom Road P.O. BOX 437 Wixom, MI 48393-7037 U.S.A. Tel: (248) 624-1541 Fax: (248) 624-9234 Copyright 1999, Acromag, Inc., Printed in the USA. Data and specifications are subject to change without notice. 8500-611-A99H000 Series 151T Two-Wire Transmitter User’s Manual mV/TC/RTD Input ___________________________________________________________________________________________ The information contained in this manual is subject to change without notice. Acromag, Inc., makes no warranty of any kind with regard to this material, including, but not limited to, the implied warranties of merchantability and fitness for a particular purpose. Further, Acromag, Inc., assumes no responsibility for any errors that may appear in this manual and makes no commitment to update, or keep current, the information contained in this manual. No part of this manual may be copied or reproduced in any form, without the prior written consent of Acromag, Inc. Table of Contents Page 1.0 INTRODUCTION ………………………………..….…. DESCRIPTION ………………………………………… Key 151T Features………………………................ ACCESSORY ITEMS …………………………………. DIN Rail Mounting Kit............................................. LCD Display & Field Configurator................……… Explosion Proof Housing............…………………… Pipe Mounting Kit................................................... Software Interface Package…..……….................. 2.0 PREPARATION FOR USE ….……………………….. UNPACKING AND INSPECTION …………………… INSTALLATION ……………………………………….. Mounting ……………………………………………… Electrical Connections ……………………………… 3.0 MODULE CONFIGURATION ……………………….. FIELD CALIBRATION/CONFIGURATION.…………. General Display Mode Program Procedure………. 4.0 THEORY OF OPERATION ………………………….. 5.0 SERVICE AND REPAIR ……………………………… SERVICE AND REPAIR ASSISTANCE ……………. PRELIMINARY SERVICE PROCEDURE ..…………. 6.0 SPECIFICATIONS ……………………………………. MODEL NUMBER DEFINITION……………………… INPUT SPECIFICATIONS ……………………………. OUTPUT SPECIFICATIONS…….................……..… ENCLOSURE/PHYSICAL SPECIFICATIONS..…….. APPROVALS ………………………………………….. ENVIRONMENTAL SPECIFICATIONS….………….. CONFIGURATION……………………………...……... ACCESSORIES………………………………………… List of Drawings 151T Simplified Schematic (4501-772)….…………….…. 151T Computer to Module Connections (4501-771)……. Electrical Connections (4501-764, Figure A)….…………. Electrical Connections (4501-764, Figure B)....…………. ATW-TLD Display Dimensions (4501-765).……..………. Enclosure Dimensions (4501-766)…………………….….. ATW-XPW Housing Dimensions (4501-767)……………. ATW-DIN DIN Rail Mounting Details (4501-770).........…. ATW-PM2 Pipe Mounting Details (4501-768)…….......…. 2 2 3 3 3 3 3 4 4 4 4 4 4 5 5 5 6 9 9 9 10 10 10 10 11 12 12 12 12 12 1.0 INTRODUCTION These instructions cover the hardware functionality of the transmitter model listed in Table 1. See Specifications for specific model details. Refer to Accessories to add functionality to this model. Supplementary sheets are attached for units with special options or features not covered in this manual. Table 1: Model Covered in This Manual Series/ -Approvals1/Output/ -Factory Input/Type Mounting/Power Configuration2 151T -0600 -C Notes (Table 1): 1. Agency approvals include CE, CSA, and FM. 2. Each module is shipped with a default factory configuration that can be easily reconfigured to suit your needs. To receive modules with a specific configuration to match your application, consult the factory or your local representative. Information regarding the HockeyPuck Configuration Software and PC/151T Serial Interface Adapter can be found in the Transmitter Configuration Manual 8500-612. Note that Acromag also offers this transmitter with HART support. Refer to Acromag Model 155H Transmitters for more information. DESCRIPTION Series 151T Two-Wire Transmitters are members of the popular Acromag transmitter, isolator, and alarm family. These compact “puck style” transmitters will condition a DC voltage, thermocouple, or RTD input, and provide an isolated 4-20mA process current output signal for two-wire process loops. The 151T models are programmable via our user-friendly Windows 95/98 or NT HockeyPuck Configuration Software, or via the push-buttons of the optional ATW-TLD display. Each module provides a single input for either DC millivolts, thermocouple, or RTD signals. RTD sensor excitation, linearization, lead-wire compensation, and lead break detection are included. Thermocouple reference-junction compensation, linearization, and open circuit or TC break detection is also provided. This transmitter also includes a built-in 22-point linearizer function. Page 14 15 16 17 18 19 20 21 22 Following basic two-wire design, the output and DC power share the same pair of twisted copper wires. The transmitter connected in series with a load and DC supply provides an output loop current proportional to the input signal. Communication with this model is done via an interface converter that plugs directly into the top of the module. Field programmability of the unit in the absence of a host computer and interface converter may also be accomplished via the optional LCD display (ATW-TLD). IMPORTANT SAFETY CONSIDERATIONS It is very important for the user to consider the possible adverse effects of power, wiring, component, sensor, or software failures in designing any type of control or monitoring system. This is especially important where economic property loss or human life is involved. It is important that the user employ satisfactory overall system design. It is agreed between the Buyer and Acromag, that this is the Buyer's responsibility. The lightweight construction and compact size of this transmitter permits a variety of mounting options. The standard model includes integrated mounting holes with captive screws for simple surface mount applications. A DIN-rail mounting clip may be ordered separately. An optional explosion proof aluminum enclosure is also available and includes a display window for viewing a module equipped with the display option. A pipe mounting kit may also be ordered for mounting the optional enclosure to common 2 inch pipe for improved stability. Windows 95/98/NT are registered trademarks of Microsoft Corp. -2- Series 151T Two-Wire Transmitter User's Manual mV/TC/RTD Input ___________________________________________________________________________________________ An optional 4-1/2 digit LCD display provides visual indication of the transmitter’s output. The display also has two push-buttons to facilitate in-field configuration of the transmitter. The display may indicate in °C, °F, °R, or °K and includes an 11 segment bar graph that indicates input measurement in percent of calibrated span. A second line of information on the display indicates tag information, diagnostic messages, configuration prompts, and configuration menu selections. Key 151T Features…continued • • • Series 151T modules are designed to withstand harsh industrial environments. They feature RFI, CRFI, EMI, ESD, and EFT, plus low temperature drift, wide ambient temperature operation, and isolation from input to output. They also have low radiated emissions per CE requirements. ACCESSORY ITEMS The safe, compact, rugged, reconfigurable, and reliable design of this transmitter make it an ideal choice for control room and field applications. Acromag also offers a broad range of other transmitter, isolator, and alarm models to reliably serve almost any application--please consult the factory. The following accessories are available from Acromag. Acromag also offers other standard and custom transmitter, isolator, and alarm types to serve a wide range of applications (please consult the factory). Key 151T Features • • • • • • • • • • • Convenient Mounting - The integrated surface mount or optional DIN-rail mount make module installation fast and easy. The compact size of this transmitter and optional display permit installation in very tight spaces. Built-In Linearizer Function - The input signal can be optionally linearized with up to 22 break points defined. Flexible Filtering - Three user-programmable input filter modes can be applied to help increase noise immunity: Input Line Frequency and Filter, Smart Smoothing, and Validation Time. Output damping may also be configured. These parameters require the HockeyPuck Configuration Software to select. DIN-Rail Mounting Kit (Model ATW-DIN) Agency Approvals - CE, CSA, and FM. Easy Windows Configuration - Fully reconfigurable via our user-friendly Windows 95/98 or NT HockeyPuck Configuration Software and PC/151T Serial Interface Adapter. Multi-Function LCD Display - The optional 4-1/2 digit LCD display provides local indication of the transmitter output in °C, °F, °R, or °K units, graphical indication in percent of calibrated span (bar graph), plus tag, diagnostic, and configuration information. Supports In-Field Reprogrammability - The push-buttons of the optional display provide support for reconfiguring the transmitter directly, without use of an interface adapter and host computer. Fully Isolated - The input and output circuits are isolated from each other for safety and increased noise immunity. Automatic Self Calibration - Increases accuracy over wide ambient variations and simplifies input module calibration. Transmitter zero and full-scale are non-interlaced. Flexible DC Millivolt, Thermocouple, or RTD Inputs Accepts either DC millivolt, thermocouple, or RTD input signals. Linearization, lead break detection, and TC reference junction compensation are included. True 4-Wire Kelvin Measurement - Improves performance of 4-wire RTD measurements. Wide Ambient Operation - The unit is designed for reliable operation over a wide ambient temperature range. Automatic Built-In Self Diagnostics - This transmitter automatically checks for zero, span, cold-junction temperature, open T/C, open or shorted RTD element, and open RTD lead, or other transmitter malfunction every 3 seconds. The HockeyPuck Configuration Software also includes software diagnostic routines to aid in trouble-shooting. Hardened For Harsh Environments - The unit will operate reliably in harsh industrial environments and includes protection from RFI, CRFI, EMI, ESD, and EFT, plus low radiated emissions per CE requirements. This kit contains a back plate with DIN rail clips installed for convenient “T Type” DIN rail mounting of Model 151T and 155H transmitters. The backplate is threaded for attachment to the module via the captive mounting screws of the transmitter’s enclosure. Refer to Drawing 4501-766 to view this item. LCD Display & Field Configurator (Model ATW-TLD) This is a 4-1/2 digit, plug-in, Liquid Crystal Display for Model 151T and 155H Transmitters. The first line of the display includes six digits plus a polarity sign for sensor measurement indication in °C, °F, °R, or K. The second line includes seven alphanumeric characters for display of tag number information, sensor and display fault messages, plus configuration prompts and menu selections. The display also includes an 11 segment bar graph indicator that displays input readings in percent of calibrated range, plus two push-buttons labeled NEXT and ENTER for in-field transmitter reconfiguration in the absence of a host computer and interface adapter. A single indicator/configurator can be used for several transmitters as it can be easily “hot-plugged” into, or removed from, the top of installed transmitters. This offers an economical approach for allowing personnel to take local readings, diagnose faults, and make adjustments to transmitter configuration parameters “on the fly”. Refer to Drawing 4501-765 for display dimensions and details. Explosion Proof Housing w/Window & Mounting Kit (Model ATW-XPW) This aluminum enclosure is explosion proof and includes a clear window for viewing 151T or 155H transmitters equipped with the optional display. It is a NEMA 4X, IP66/68 housing and is CSA and FM approved for Class I, Div 2, Groups B, C, and D, Class II, Div 2, Groups E, F, and G, and Class III, Div 2. A mounting plate and screws are pre-installed for easy transmitter mounting within the enclosure. An optional pipe mount bracket is also available for attaching this enclosure to common 2 inch pipe for improved mechanical stability (see ATW-PM2 below). Refer to Drawing 4501767 for dimensions and details of this enclosure. -3- Series 151T Two-Wire Transmitter User's Manual mV/TC/RTD Input ___________________________________________________________________________________________ Pipe Mounting Bracket For Housing (Model ATW-PM2) INSTALLATION This stainless steel bracket allows ATW-XPW enclosures to be mounted to 2-inch diameter, horizontal or vertical pipe, for improved mechanical stability. Refer to Drawing 4501-768 to view details of this accessory. The transmitter module is encapsulated in a general purpose plastic enclosure. Use an auxiliary enclosure to protect the unit in unfavorable environments or vulnerable locations, or to maintain conformance to applicable safety standards. Stay within the specified operating temperature range of the unit. As shipped from the factory, the unit is already factory calibrated for all valid input ranges and has the default configuration shown in Table 2 below: Software Interface Package (Model 151C-SIP) PC/151T Interface Adapter, Configuration Software, & Manual WARNING: Applicable IEC Safety Standards may require that this device be mounted within an approved metal enclosure or subsystem, particularly for applications with voltages greater than or equal to 75VDC or 50VAC. The 151T Transmitter is fully configurable via the PC/151T Serial Interface Adapter and user-friendly Windows 95/98/NT HockeyPuck Configuration Software included in this kit. The interface adapter serves as an isolated interface converter between the EIA232 serial port of the host computer and the FSK interface of the 151T module. It is used in conjunction with the configuration software to program and configure 151T transmitters. The interface adapter requires no user adjustment, no external power, and operates transparent to the user. It receives its power from the RS232 interface. The interface converter has a DB9S connector on one end that mates to the common DB9P serial port connector of a host computer. The other end has an adapter at the end of 6 feet of cable that plugs directly into the top of 151T transmitters (with optional display removed). The configuration software is supplied on CDROM and requires 40MB of free hard drive space to install. All transmitter functions are programmable and downloadable to the modules via this software and interface adapter. The software also allows a configuration to be printed for documentation purposes. Transmitter Configuration Manual 8500-612 is included with this kit and has additional information regarding software configuration. Refer to Drawing 4501-771 for computer, interface adapter, and module connection details. Table 2: 151T Default Factory Configuration PARAMETER CONFIGURATION/CALIBRATION Input Type T/C J Connection Thermocouple Engineering Units °F Cold Junction Comp. Actual CJ Temperature Sensor Offset Curve OFF Linearization w/PV Unit ON Input Zero (LRV) 40°F @4mA Input Full-Scale (URV) 200°F @20mA Damping 0 seconds Fail-Safe Detection ON Failsafe Reporting High (Upscale, 23.0mA) Filtering Line Frequency 60Hz High Filter Smart Smoothing 10.0 seconds Validation Time 0.5 seconds Local Display Keys Enabled Local Display Language English Display Label ACROMAG Display Variable Setting Display PV * Shaded entries cannot be adjusted via the Display program Mode and require the use of the HockeyPuck Configuration Software to make adjustments. Refer to the Transmitter Configuration Manual for complete definitions of these terms. 2.0 PREPARATION FOR USE UNPACKING AND INSPECTION Your application may differ from the default configuration and will require that the transmitter be reconfigured to suit your needs. This is accomplished with Acromag’s user-friendly Windows 95/98 or NT Configuration Program and PC/151T Serial Interface Adapter (Model 151C-SIP), or via the push-buttons of the optional display (Model ATW-TLD). Configuration is normally done prior to field installation. Upon receipt of this product, inspect the shipping carton for evidence of mishandling during transit. If the shipping carton is badly damaged or water stained, request that the carrier's agent be present when the carton is opened. If the carrier's agent is absent when the carton is opened and the contents of the carton are damaged, keep the carton and packing material for the agent's inspection. For repairs to a product damaged in shipment, refer to the Acromag Service Policy to obtain return instructions. It is suggested that salvageable shipping cartons and packing material be saved for future use in the event the product must be shipped. Mounting Refer to Enclosure Dimensions Drawing 4501-766 for mounting and clearance dimensions. Make allowances in determining clearance for the optional display (ATW-TLD), or DIN rail mount (ATW-DIN). This module is physically protected with packing material and electrically protected with an anti-static bag during shipment. However, it is recommended that the module and any accessories be visually inspected for evidence of mishandling prior to applying power. Surface Mounting: The standard transmitter has two integrated mounting holes with 8-32 captive screws for surface mount applications. DIN Rail Mounting: The optional ATW-DIN backplate and mounting clips allow the module to be mounted to "T" type DIN rails by simply snapping the unit in place. Always use suitable fastening hardware to secure the DIN rail to the mounting surface. Refer to Drawing 4501-766 for DIN mounting details. This circuit utilizes static sensitive components and should only be handled at a static-safe workstation. -4- Series 151T Two-Wire Transmitter User's Manual mV/TC/RTD Input ___________________________________________________________________________________________ Optional Enclosure Mounting: This module may be mounted in an optional aluminum housing (ATW-XPW). This housing has a backplate installed that allows the transmitter and optional display to be mounted inside. It includes a clear window for easy view of the display. An optional bracket (ATW-PM2) allows the housing to be mounted to 2 inch horizontal or vertical pipe for increased mechanical stability. See Accessories for more details. WARNING: For compliance to applicable safety and performance standards, the use of shielded cable is recommended as shown in Drawing 4501-764. Further, the application of earth ground must be in place as shown in Drawing 4501-764. Failure to adhere to sound wiring and grounding practices may compromise safety & performance. 3.0 MODULE CONFIGURATION Electrical Connections This transmitter module needs to be configured for your application. Complete configuration is normally accomplished using Acromag’s Windows 95/98/NT HockeyPuck Configuration Software and PC/151T Serial Interface Adapter (Kit Model 151CSIP). Configuration of key parameters may also be accomplished via the push-buttons on the optional ATW-TLD display. Complete transmitter calibration and configuration details using the Configuration Software is included in Transmitter Configuration Manual. Field configuration of the transmitter via the optional display is covered in the following paragraphs. Terminals of this unit may accommodate wire from 10-24 AWG, stranded or solid copper. Strip back wire insulation at least 1/4-inch before installing into terminal screws. Input wiring should ideally be shielded twisted-pair. Since common mode voltages can exist on signal wiring, adequate wire insulation should be used and proper wiring practices followed. It is further recommended that transmitter output and power wiring be separated from the input signal wiring for safety, as well as for low noise pickup. Note that the optional plug-in display can be easily removed to provide access to terminal wires, with or without power applied. Be sure to remove power and/or disable the load before disconnecting wires to uninstall the module, or before attempting service. All wired connections must be made with power removed. Exercise caution when tightening down input connections as threads may be damaged if too much torque is applied. Note that the display push-buttons can be disabled via the HockeyPuck Configuration Software to help prevent tampering or inadvertent reconfiguration in the field. If you cannot achieve configuration via the optional display, then you will need to use the Configuration Software and Interface Adapter to unlock the display push-buttons first. CAUTION: Risk of Electric Shock - More than one disconnect switch may be required to de-energize the equipment before servicing. FIELD CALIBRATION/CONFIGURATION (Optional ATW-TLD Display Required) 1. Output/Power: Connect a DC power supply and load per Electrical Connections Drawing 4501-764. This transmitter operates from DC power only. Power supply voltage is not critical and should be from 12 to 42V DC. The power supply voltage must be adequate to furnish full-scale current to the load (about 23mA), plus transmission line drop, plus 12VDC minimum terminal voltage to the transmitter. Variation in power supply voltage or load resistance within rated limits has negligible effect on module accuracy. The optional display includes a second line of display information, plus two push-buttons for configuring the module. The display is ordered separately (Model ATW-TLD) and allows adjustment to key transmitter calibration and configuration parameters in the field, without having to connect to a host computer running configuration software and without the use of an interface converter. The display is inserted directly into the top of the transmitter and may be hot-plugged into the transmitter without removing transmitter power. A single display may be used for several transmitters to accomplish local measurement and diagnosis, as well as in-field reconfiguration. The display includes two push-buttons labeled NEXT and ENTER for configuring the transmitter. In the following procedure, these buttons are activated with a slow deliberate push to help prevent casual or inadvertent activation of program mode. 2. Input: Connect the input per Connection Drawing 4501-764. Observe proper polarity when making connections. 3. PC/151T Serial Interface Adapter Connections (Optional): The PC/151T Serial Interface Adapter included in Acromag kit 151C-SIP plugs directly into the top of the module with the optional ATW-TLD display removed. A DB9S connector at one end of the interface converter plugs directly into the common DB9P serial port connector of a host computer. Refer to Drawing 4501-771 for connection details. Within Display Mode, press the NEXT button to answer “No” when required, or press “ENTER” to answer “Yes”. When more than 7 characters are required to complete a prompt message, the module will alternately sequence through two or more screens to complete the message and will also use common abbreviations where appropriate. Additionally, some of the Display Program Mode functions may use both lines of the display, with a numeric value or measurement on the top line and the corresponding prompt message on the bottom line. In the following procedure, a displayed prompt message is indicated in [brackets]. Several display messages in sequence may be used to complete a single prompt message. 4. Grounding: This two-wire transmitter is potted in a general purpose plastic enclosure and does not require an earth ground connection. If this transmitter is mounted in a metal housing, a ground wire connection is typically required. The optional aluminum housing (ATW-XPW) also includes provisions for grounding. Connect the ground terminal of this enclosure (Green Screw) to earth ground using suitable wire per applicable codes. -5- Series 151T Two-Wire Transmitter User's Manual mV/TC/RTD Input ___________________________________________________________________________________________ The NEXT button is typically used to scroll through and wrap around available choices, while the ENTER button is used to make a selection and return to the menu prompt. General Transmitter Display Mode Program Procedure 1. Display Program Mode allows the following key configuration parameters to be adjusted (in sequence): • • • • • • • • • If you are going to be trimming zero and full-scale output limit values, you will also need to connect a precise current milliampmeter in series with the load, or a voltmeter across a precision output load resistance, in order to precisely read the output signal of the transmitter. SELECT INPUT - Select a sensor input type. SELECT UNITS - Select temperature units. CHANGE ZERO - Change 4mA lower range input value. CHANGE FULL SCALE - Change 20mA full-scale input value. SELECT SENSOR FAIL SAFE - Enable/Disable fail-safe indication. SELECT FAIL SAFE REPORT - Change the output fail-safe reporting mechanism (upscale, downscale, or none). TRIM 4MA - Trim the 4mA output current limit. TRIM 20MA - Trim the 20mA output current limit. TRIM DISPLAY - Trim the display offset value. A transmitter with the standard default factory configuration and no sensor connected to the input will alternately display the message [FAIL] [SAFE] on the second line of the display, since no sensor is connected to the input and fail safe indication is enabled by default. Use of the PC/151T Serial Interface Adapter and HockeyPuck Configuration Software allows access to additional transmitter configuration parameters shown below. The following items cannot be adjusted in Display Program Mode: • • • • • • Connect the transmitter to an appropriate power supply and load and apply power (Refer to Electrical Connections Drawing 4501-764). No input signal source is required. Further, the bar graph of the display will indicate an upscale output measurement greater than 100% (about 23mA) as this is the default failsafe reporting mechanism configured. Input Setup - Some sensor types can only be selected via the software. Cold Junction Compensation and optional fixed cold junction temperature options cannot be configured. Configuration of a sensor offset curve (optional 22 point linearization). Linearization disable. Failsafe Setup - Failsafe “Other” report with programmed Failsafe mA Value selection. Transmitter Filtering Setup - Line frequency, smart smoothing, or validation time parameters. Output Setup - Damping parameter. Local Display Setup - Local Keys enable/disable, label, and display variable setting. Tag Setup - Tag, descriptor, message, sensor serial number, and date information. 2. Press the NEXT button and the display will ask if you wish to return to Operating Mode by alternately displaying the following words: [RETURN] [TO] [OPERATE] [MODE?]. 3. Answer “NO” by pressing the NEXT button a second time and you will enter the Display Program Mode and the [SELECT] [INPUT?] prompt will be displayed. 4. At the [SELECT] [INPUT?] prompt, press ENTER to answer YES, or NEXT to answer NO and skip to the next step. After pressing ENTER, the display will sequence through all valid input types starting with the current input type already set and in the order shown below. Press NEXT to skip to the next input type and press ENTER when your desired input type is displayed. Input type menu selection prompts are displayed as follows: Refer to Transmitter Configuration Manual for more information regarding configuration using the HockeyPuck Configuration Software and PC/151T Serial Interface Adapter. [T/C J] [T/C K] [T/C L] [T/C N] [T/C R] [T/C S] [T/C T] [T/C U] [T/CSPEC] - NOTE: The Acromag 151T Transmitter includes automatic self calibration of the input. These transmitters will automatically check the NIST traceable zero and full-scale calibration reference standards every three seconds and make corrections as required, without disturbing the 4-20mA loop current. As such, no method for recalibration of the input signal is provided. This helps simplify calibration as no input source or calibrator is required to complete configuration. [2W [2W [2W Equipment Required An accurate current or voltage meter is required to monitor the output signal if you intend to trim the output limits (steps 11 and 12 below). This meter must be accurate beyond the module specifications for best results. No input sensor or source is required to complete configuration. [2W [3W [3W [3W [3W -6- Type “J” thermocouple. Type “K” thermocouple. Type “L” thermocouple. Type “N” thermocouple. Type “R” thermocouple. Type “S” thermocouple. Type “T” thermocouple. Type “U” thermocouple. Reserved for a special thermocouple type (custom order required). OHMS] - Two-wire resistance (ohms). DINP] - 100Ω Pt RTD DIN Curve alpha = 0.00385. SAMP] - 100Ω Pt RTD SAMA Curve (SAMA RC21-4), 98.13Ω at 0°C, alpha = 0.003923. SPEC] - Reserved for a special 2-wire RTD input (custom order required). OHMS] - Three-wire resistance (ohms). DINP] - 100Ω Pt RTD DIN Curve alpha = 0.00385. SAMP] - 100Ω Pt RTD SAMA Curve (SAMA RC21-4), 98.13Ω at 0°C, alpha = 0.003923. SPEC] - Reserved for a special 3-wire RTD input (custom order required). Series 151T Two-Wire Transmitter User's Manual mV/TC/RTD Input ___________________________________________________________________________________________ Transmitter Display Mode Program Procedure...continued Transmitter Display Mode Program Procedure...continued [4W OHMS] - Four-wire resistance connection (ohms). [4W DINP] - 100Ω Pt RTD DIN Curve alpha = 0.00385. [4W SAMP] - 100Ω Pt RTD SAMA Curve (SAMA RC21-4), 98.13Ω at 0°C, alpha = 0.003923. [4W SPEC] - Reserved for a special 4-wire RTD input (custom order required). [MV] Millivoltage input. [HHTONLY] - Hand Held Setup - Factory use only. [T/C B] Type “B” thermocouple. [T/C C] Type “C” thermocouple. [T/C E] Type “E” thermocouple. Pressing NEXT cycles between the plus and minus selections until ENTER is pressed to make a selection. Again, the numeric value on the top line above [PLUS?] and [MINUS?] represents the current zero value. Press ENTER to select PLUS or MINUS as desired and the display will then allow each digit of the zero value to be changed in sequence beginning with the leftmost digit. The digit that may be modified will blink (indicated in underlined italics below). Pressing NEXT will increment the blinking digit from the current setting through 1 2 3 4 5 6 7 8 9 0. Note that pressing NEXT will continue to wrap through the menu selections until ENTER is pressed at a desired input type selection. When the correct digit is displayed, press ENTER to accept the digit and move one digit to the right. Repeat the selection process moving left to right until all available zero value digits have been adjusted or confirmed. For example, if +0040.0°F is our zero value, the transmitter display will sequence as follows: If no sensor change is desired, simply press ENTER at the current sensor type to confirm the selection. After pressing ENTER, the display returns to the [SELECT] [INPUT?] prompt. 5. [0040.0°F] [THOUSN?] At the [SELECT] [INPUT?] prompt, press NEXT to move onto the next menu selection. [0040.0°F] [HUNDRD?] If the selected input type is a thermocouple or RTD (from Step 4), then [SELECT] [UNITS?] will be displayed. [0040.0°F] [TENS?] [0040.0°F] [ONES?] Otherwise [CHANGE] [ZERO?] will be displayed if the transmitter is not an RTD or thermocouple type and you should skip step 6 and go to step 7. 6. [0040.0°F] [TENTHS?] (RTD or Thermocouple Inputs Only) Press ENTER at the [SELECT] [UNITS?] prompt and the display will indicate the current unit selection, followed by the optional unit selections similar to that shown below each time NEXT is pressed to scroll through the selections (selections will vary with input type selection). After the tenths digit has been changed as required, pressing ENTER returns to the alternating display of the [CHANGE] [ZERO?] prompt. The new zero value is indicated on the line above [CHANGE] and [ZERO?]. Press NEXT to proceed to the next menu selection and the [CHANGE] [FULL] [SCALE?] prompt will be displayed. [DEG F] - Set units to degrees Fahrenheit. [DEG R] - Set units to degrees Rankine. [DEG K] - Set units to degrees Kelvin. [DEG C] - Set units to degrees Celsius. Change Full-Scale allows the full-scale or 20mA output point of the input signal to be changed. This is referred to as the FullScale or Upper Range Value (URV). Press ENTER when your desired units are displayed. The transmitter will be set to those units and you will be returned to the [SELECT] [UNITS?] prompt. 8. At the [SELECT] [UNITS?] prompt, press NEXT to move onto the next menu selection and the [CHANGE] [ZERO?] prompt will be displayed. Once the full-scale changes have been completed and the ENTER button is pressed, you will be returned to the [CHANGE] [FULL] [SCALE?] prompt. Change Zero allows the zero or 4mA output point of the input signal to be changed. This is referred to as the Zero or Lower Range Value (LRV). 7. At the [CHANGE] [FULL] [SCALE?] prompt, the numerical sign and value selection is done the same as described in step 7 for zero and will not be repeated here. Change the full-scale value as required using step 7 as your guide. Press NEXT to proceed to the next menu selection and the [SELECT] [SENSOR] [FAIL] [SAFE?] prompt is displayed. At the [CHANGE] [ZERO?] prompt, the current zero value of the input signal is displayed on the line above [CHANGE] and [ZERO?]. This allows you to enable or disable fail-safe indication as was demonstrated in Step 1. That is, the display alternated the words [FAIL] [SAFE] when no sensor was connected to the input in operating mode. Press ENTER at the [CHANGE] [ZERO?] prompt and the transmitter will indicate the sign of the zero value with [PLUS?] or [MINUS?]. -7- Series 151T Two-Wire Transmitter User's Manual mV/TC/RTD Input ___________________________________________________________________________________________ Transmitter Display Mode Program Procedure...continued 9. Transmitter Display Mode Program Procedure...continued At the prompt [SELECT] [SENSOR] [FAIL] [SAFE?], press ENTER if you wish to enable/disable the sensor fail-safe detection system. After pushing ENTER, the transmitter will output a current equal to its internally set 4mA limit. This value should be precisely monitored with a very accurate meter. If the meter does not precisely read 4.0mA, then adjustments may be made. You may adjust this current up to ±0.05mA. The present fail-safe status is displayed first followed by the opposite selection, [ON] or [OFF], when you press NEXT. When your desired failsafe condition is displayed, ON or OFF, press ENTER and the transmitter will change to the new setting and the screen will return to the [SELECT] [SENSOR] [FAIL] [SAFE?] prompt. At this point, the display will alternately display the following messages each time the NEXT key is pressed: [RAISE] [MA OUT?] [LOWER] [MA OUT?] NOTE: Disable the sensor fail safe feature when attempting to calibrate the unit with an external thermocouple or RTD calibrator, or calibration errors may result. This feature can be safely re-enabled after calibration is complete. Press ENTER at your desired action and the display will indicate [NEXT=+] or [NEXT=-], depending on whether RAISE or LOWER was selected. Press NEXT to proceed to the next menu selection and the [SELECT] [FAIL] [SAFE] [REPORT?] prompt will be displayed. Now each time NEXT is pressed, the display will blink and the 4.0mA output level will decrease (-), or increase (+), by approximately 3.5uA for each press of the NEXT button. This will allow you to configure the output response to a failsafe condition at the input. Once the output reads precisely 4.0mA, press ENTER to accept the new zero limit and you will be returned to the [TRIM] [4 MA?] prompt. 10. At the [SELECT] [FAIL] [SAFE] [REPORT?] prompt, press ENTER to change the fail-safe reporting mechanism, or NEXT to skip to the next menu selection. Press NEXT to go to the next menu selection and the [TRIM] [20 MA?] prompt will be displayed. Fail-safe reporting determines the process loop response to a failure condition. You can select HIGH for upscale detection (loop driven to 23.0mA), LOW for downscale detection (loop driven to 3.8mA), or OFF to disable reporting. Selecting OFF does not disable fail-safe indication, only the output response to the fail-safe condition. Trim 20MA allows you to make minor adjustments to the output full-scale or 20mA signal. 12. At the [TRIM] [20 MA?] prompt, adjustment of the full-scale output value is done exactly as described for 4MA in step 11 and will not be repeated here. Trim the 20.0mA limit as required using step 11 as your guide. Note that the same precautions apply. Press ENTER at the [SELECT] [FAIL] [SAFE] [REPORT?] prompt and the display will indicate the current setting first, followed by the optional settings upon pressing NEXT. After trimming the 20.0mA output limit, press NEXT at the [TRIM] [20 MA?] prompt to move to the next step and the [TRIM] [DISPLAY?] prompt will be indicated. Choose [HIGH?], [OFF?], or [LOW?] by pressing ENTER at your desired setting and you will then be returned to the [SELECT] [FAIL] [SAFE] [REPORT?] prompt. Trim display allows the display to be trimmed by a desired offset amount. It can be used to make the display agree with another external instrument at some critical measurement point. Press NEXT to proceed to the next menu selection and the [TRIM] [4 MA?] prompt will be displayed. Trim 4MA allows you to make minor adjustments to the output zero or 4mA signal. Display trim operates as a zero shift, shifting all the display readings by the same amount. 11. If you wish to trim the 4.00mA output limit, press ENTER at the [TRIM] [4 MA?] prompt. Note that multiple point corrections of up to 22 points are possible using the configuration software to configure the builtin linearizer function, but the display mode programmer Trim Display function differs as it applies the same offset shift to all points. WARNING: The 4.00mA limit is already factory calibrated to a precision standard traceable to NIST. Trimming the output limit voids traceability of calibration to NIST. Do not arbitrarily trim the output unless a precise method of measuring the output current is available. Further, the 4.0mA limit should not be trimmed more than ±0.05mA, or transmitter operation may be impaired. 13. Press ENTER at the [TRIM] [DISPLY?] prompt and you will be allowed to enter a display offset value. The first line above the [TRIM] and [DISPLY?] prompt indicates the current display offset value. This value is adjusted in the same manner as was done for Change Zero (step 7) where the sign and each digit is modified in sequence until the desired offset is entered. -8- Series 151T Two-Wire Transmitter User's Manual mV/TC/RTD Input ___________________________________________________________________________________________ Transmitter Display Mode Program Procedure...continued Transmitter Display Mode Program Procedure...continued Note that this value is changed independent of the Zero/Lower Range Value and Full-Scale/Upper Range Value, without the use of calibrators or external sensor inputs, and only affects the display. Press ENTER when your desired language is displayed to change to that language and the [RETURN] [TO] [OPERATE] [MODE?] prompt will be displayed. 15. Press ENTER at the [RETURN] [TO] [OPERATE] [MODE?] prompt and the transmitter will return to the normal operating mode. Configuration is now complete. If you press NEXT instead, then you will re-enter the Display Program Mode and the configuration process will be repeated. The display will then alternately indicate [PLUS?] or [MINUS?], each time the NEXT button is pressed, with the current offset value noted on the first line above [PLUS?] or [MINUS?]. Press ENTER to select PLUS or MINUS as desired. The display will now allow each digit of the display trim value to be changed in sequence beginning with the leftmost digit. In operating mode, the second line of the display will indicate the tag number (normal operation), or the fault indications [FAIL] [SAFE] (broken sensor lead or open sensor) or [DFAULT] (a display fault has occurred due to ambient temperatures exceeding the temperature rating of the display). A bar graph also indicates signal measurement in percent of calibrated span. The digit that may be modified will blink (indicated in underlined italics below). Pressing NEXT will increment the blinking digit from the current setting through 1 2 3 4 5 6 7 8 9 0. When the correct digit is displayed, press ENTER to accept the digit and move one digit to the right. Repeat the selection process moving left to right until all available display trim value digits have been adjusted or confirmed. Note that in Display Program Mode, if no buttons are pushed for 2.5 minutes, then the transmitter will automatically return to the operate mode. You can also return to operating mode at any point in Display Program Mode by removing power to the transmitter for about 10 seconds, then reapplying power. For example, if -0005.0°F is our display trim value, the transmitter will sequence as follows: [-0000.0°F] [THOUSN?] 4.0 THEORY OF OPERATION [-0000.0°F] [HUNDRD?] Refer to Simplified Schematic 4501-772 to gain a better understanding of the circuit. Note that these transmitters will accept a thermocouple, an RTD sensor, or a voltage input, and condition it to a voltage signal for A/D conversion. A multiplexer is used to drive the A/D converter stage and switch between the various input signals. The A/D converter applies appropriate gain to the signal, performs analog-to-digital conversion, and filters the signal. The digitized A/D signal is then transmitted serially to an optically isolated microcontroller. The microcontroller completes the transfer function according to the configuration and sends a corresponding output signal to a Digital-to-Analog Converter (DAC). The DAC then updates its current output in response. The embedded configuration and calibration parameters are stored in non-volatile memory within the module. [-0000.0°F] [TENS?] [-0005.0°F] [ONES?] [-0005.0°F] [TENTHS?] After the tenths digit has been changed as required, press ENTER to return to the [TRIM] [DISPLY?] prompt. The new trim value will be indicated on the line above [TRIM] and [DISPLY?]. Press NEXT to go to the next menu selection and the [SELECT] [LANGU-] [AGE?] prompt will be displayed. Information regarding the HockeyPuck Configuration Software and PC/151T Serial Interface Adapter can be found in Transmitter Configuration Manual . The Select Language function allows the transmitter to be configured in any one of four available display languages: English, German, French, and Spanish. 14. At the [SELECT] [LANGU-] [AGE?] prompt, press ENTER and the current language setting will be displayed first, followed by optional choices each time NEXT is pressed. The display will alternately indicate: [ENGLISH], [DEUTSCH], [FRENCH], or [ESPANOL]. Continually pressing NEXT will wrap through the available selections. -9- Series 151T Two-Wire Transmitter User's Manual mV/TC/RTD Input ___________________________________________________________________________________________ -0600: The four digits of this model suffix represent the following options, respectively: 5.0 SERVICE AND REPAIR 0 = Without Display (Display Ordered Separately); 6 = Output: Two-Wire Current; 0 = Enclosure: 0=Standard Surface Mount; 0 = Approvals: CE, FM, & CSA. CSA & FM rated for nonincendive hazardous location applications in Class I, Div 2, Groups A, B, C, & D, Class II, Div 2, Groups F & G, and Class III, Div 2. CAUTION: Risk of Electric Shock - More than one disconnect switch may be required to de-energize the equipment before servicing. SERVICE AND REPAIR ASSISTANCE There are no user-serviceable components inside this transmitter and any attempts to open the enclosure will void the warranty. This module requires no maintenance, except for periodic cleaning and transmitter configuration parameter (zero, full-scale, etc) verification. A non-functioning module may be returned to Acromag for inspection or replacement. Acromag has automated test and diagnostic equipment that thoroughly checks and calibrates the performance of a module. Please refer to Acromag’s Service Policy Bulletin or contact Acromag for complete details on how to obtain replacement or repair. INPUT SPECIFICATIONS The unit must be wired and configured for the intended input type and range (see Installation Section for details). See Table 4A and 4B for supported input types and ranges. RTD: User configurable for one of five RTD types noted in Table 4A. Module provides sensor excitation, linearization, lead-wire compensation, and sensor fail-safe break detection. Input Configuration: Two, three, or four-wire (Kelvin). Excitation Current: 0.3mA DC nominal, all types. Input Impedance: 1MΩ, RTD and Resistance inputs. Lead-Wire Compensation: Inherent for 3 wire and 4 wire RTD’s. All lead wires must be of equal size and length. Maximum Lead Resistance: 50Ω (any lead). Minimum Input Span: 10°C for all types except copper, 100°C for Cu RTD. PRELIMINARY SERVICE PROCEDURE Before beginning repair, be sure that all installation and configuration procedures have been followed. Reconfiguring a failed module will sometimes restore operation. If diagnostics continue to indicate a problem, or if other evidence points to a problem with the unit, an effective and convenient fault diagnosis method is to exchange the questionable module with a known good unit. Acromag’s Application Engineers can provide further technical assistance if required. When needed, complete repair services are available from Acromag. Table 4A: RTD Types, Ranges, and Input Accuracy Temp Range RTD Type (2, 3, 4 Wire) Typ Acc2 Pt 100Ω (DIN curve, -200 to +850°C ±0.14°C 1 (-328 to 1562°F) (±0.25°F) α=0.00385 ) Pt 100Ω (SAMA curve, -200 to +850°C ±0.14°C 1 (-328 to 1202°F) (±0.25°F) α=0.003923 ) Ni 120Ω (MINCO) - 80 to +320°C ±0.14°C (-112 to 608°F) (±0.25°F) Ni 100Ω - 60 to +250°C ±0.14°C (-76 to 482°F) (±0.25°F) Cu 10Ω -70 to +150°C ±0.14°C (-94 to 302°F) (±0.25°F) Resistance (Linear)2 0-500Ω2 ±0.06Ω Notes (Table 4A): 1. Alpha (α) is used to identify the particular RTD curve. The value of alpha is derived by dividing the resistance of the sensor at 100°C by the resistance at 0°C (α = R100°C/R0°C). For Pt 100Ω, this is 138.5Ω/100.0Ω, or 1.385 (also shown as 0.00385Ω/Ω/°C). 2. Includes the transmitters’s absolute digital accuracy and ambient temperature effect over the entire operating range. Does not include sensor accuracy. 3. Shaded entries cannot be selected in the Display Program Mode of the optional ATW-TLD display and require the PC/151T Serial Interface Adapter and HockeyPuck Configuration Software to select. 6.0 SPECIFICATIONS General: The Model 151T-0600 is a two-wire transmitter which conditions either a single thermocouple, RTD, millivolt, or resistance input, and provides an isolated 4-20mA process current output. The standard unit includes 8-32 captive mounting screws for surface mount applications and other mounting options are available including DIN rail. The unit is configured and calibrated with our user-friendly Window 95/98/NT HockeyPuck Configuration Software and PC/151T Interface Adapter. Alternately, when equipped with the optional display, the module may be reconfigured via push-buttons on the display. Non-volatile reprogrammable memory in the module stores calibration and configuration information. MODEL NUMBER DEFINITION Transmitters are color coded with a white label. The prefix “15” denotes the Series 1500, while the “T” suffix specifies that this device is primarily a process transmitter. Thermocouple: User configurable for each of eleven types of thermocouples shown in Table 4B. Linearization, cold-junction compensation (CJC), and fail-safe open circuit or lead break detection is included. Cold Junction Compensation: Digital self-correcting over ambient temperature range to within ±0.5°C (±0.9°F). Input Impedance: 0.2MΩ for T/C inputs. Maximum Lead Resistance: 1KΩ (non-grounded junction), 10Ω (grounded junction). 151T: Transmits and isolates a single DC millivoltage, Thermocouple (T/C), or Resistance Temperature Detector (RTD) for two-wire process loops. - 10 - Series 151T Two-Wire Transmitter User's Manual mV/TC/RTD Input ___________________________________________________________________________________________ DC Voltage (See Table 4B): -15 to +115mV DC. Input Impedance: 1MΩ for millivolt input. Minimum Input Span: 3mV. Ambient Temperature Effect: Self-correcting over the full operating temperature range for temperature changes up to 20°C/Hour. Error is less than half the reference accuracy plus 0.1°C per 28°C (50°F) change. Ranging: Zero and span are non-interactive. Repeatability: To one half of the transmitter accuracy. Long Term Stability: Stability deviation per year is less than 0.025% of output span, plus 0.05% of the input reading. Interchangeability: Units are fully interchangeable without field calibration. Linearization: TC & RTD linearization to ±0.05°C. Custom linearization for up to 22 break points is possible for units programmed via the HockeyPuck Configuration Software. Sensor Break Detection: Sensor break or open circuit failure can be configured for failsafe detection with upscale (23mA), downscale (3.6mA), or no output response. Alternately, a userdefined failsafe level may be programmed via the Configuration Software. Start-Up Time: 7 seconds typical. Operation to specification within 30 seconds typical. Response Time: 250ms typical, for an analog output to reach 98% of the final value for a step change in input. Noise Rejection (Common Mode): 120dB typical. Input Conversion Rate: 7 conversions per second or 150ms typical. Input Filter: Three input filter modes are provided to help increase noise immunity: Line Frequency & Filter, Smart Smoothing, and Validation Time. Filter parameters require the HockeyPuck Configuration Software to select and cannot be configured in Display Program Mode. Refer to the Transmitter Configuration Manual 8500-612 for more information regarding these filters. Table 4B: TC & Millivolt Types, Ranges, & Input Accuracy NBS ISA/ TC ANSI Temp Range/ Acc Type TC Material Color Min Span (Typ) B +Pt/10%Rh, gray +260..1820°C ±0.8°C -Pt/6%Rh red (109..3272°F) (±1.5°F) /100°C C +Tungsten/ white 0..2320°C ±0.8°C 5% Rhenium red (+32..4208°F) (±1.5°F) -Tungsten/ (EXT) /100°C 20% Rhen. E +Chromel, purple -270..+1000°C ±0.3°C -Constantan red (-454..1832°F) (±0.5°F) /20°C J +Iron, white -210..1200°C ±0.3°C -Constantan red (-346..2192°F) (±0.5°F) /20°C K +Chromel, yellow -270..1372°C ±0.3°C -Alumel black (-454..2502°F) (±0.5°F) /20°C L NA -200..+900°C ±0.3°C (-328..1652°F) (±0.5°F) /20°C N +Nicrosil, orange +270..1300°C ±0.3°C -NISIL red (518..2372°F) (±0.5°F) /20°C R +Pt/13%Rh, black +50..1768°C ±0.8°C -Constantan red (122..3214°F) (±1.5°F) /25°C S +Pt/10%Rh, black -50..+1768°C ±0.8°C -Constantan red (-58..3214°F) (±1.5°F) /25°C T +Copper, blue -270..+400°C ±0.3°C -Constantan red (-454..+752°F) (±0.5°F) /20°C U +Copper, black -200..+600°C ±0.8°C -Copper/ red (-328..1112°F) (±1.5°F) Nickel (EXT) /40°C mV NA NA -15 to 115mV /3mV OUTPUT SPECIFICATIONS This unit employs a two-wire process current output. Output zero and full-scale limits may be trimmed (see Configuration & Calibration). The module supports output upscale or down-scale failsafe indication. Analog Output Output Range: 4-20mA DC, 3.6 to 23mA with over-range. Zero and span adjustments are non-interacting. Analog Zero: Any value up to 100% of sensor range. Output Action: Normal or reverse-acting response. Failsafe Limits: Configurable for 3.6mA (downscale), 23.0mA (upscale), or other user-specified level (software required). Output Accuracy: Output conversion accuracy is better than ±0.05% of output span. See Accuracy of Input Specifications and Tables 4A and 4B to compute overall accuracy. Output Compliance: 12V Typical. Output Load Resistance Range: 0 to 500Ω, typical. Under-Range Current: 3.8mA. This is different from the downscale failsafe limit of 3.6mA by design. Over-Range Current: 20.75mA. This is different from the upscale failsafe limit of 23mA by design. Output Load Limitations: The maximum loop resistance including the optional display is computed as: ±.01mV General Input Specifications Reference Test Conditions: Output is 4-20mA into 500Ω; Ambient Temperature = 77°F (25°C); Power Supply = 24V DC. Accuracy: Digital input accuracy is ±0.05% of the millivolt or ohm equivalent input reading, or the value indicated in Table 4, whichever is greater. D/A output conversion accuracy is ±0.05% of output span. Overall I/O accuracy is the effective sum of the input and output accuracy. The optional display does not include the small DAC error present in the output. For thermocouple units, include up to ±0.5°C (±0.9°F) of cold junction compensation error. Accuracy includes the effects of repeatability, hysteresis, non-linearity, ambient temperature and humidity effects, reference junction error (TC inputs), A/D conversion error, D/A output error, and supply voltage effects, under non-condensing conditions and vibration up to 2g’s at up to 500Hz. Accuracy does not include sensor error. R-Load (Ω Maximum) = (Vsupply - 12V)/0.023. With 24V DC Supply, Maximum R-Load = 521.7Ω. - 11 - Series 151T Two-Wire Transmitter User's Manual mV/TC/RTD Input ___________________________________________________________________________________________ Electrostatic Discharge (ESD) Immunity: Complies with IEC1000-4-2 Level 3 (8KV/4KV air/direct discharge). Radiated Field Immunity (RFI): Complies with IEC1000-4-3 at 10V/M, 1KHz w/80% AM, 80 to 1000MHz; 200Hz w/100% AM, 895-905MHz. Electrical Fast Transient Immunity (EFT): Complies with IEC1000-4-4 Level 3 (2KV DC power; 2KV cables). Conducted Radio Frequency Immunity (CRFI): Complies with IEC 1000-4-6 at 3V, 1KHz w/80% AM, 0.15-80MHz. Output Damping: Damping can be set anywhere between 0 and 32 seconds and is used to set the amount of exponential damping (filtering) to be applied to the input signal. Damping will increase the response time of the transmitter to help smooth the output when the input signal contains rapid variations. Damping is programmable via the HockeyPuck Configuration Software. ENCLOSURE/PHYSICAL SPECIFICATIONS CONFIGURATION See Enclosure Dimensions Drawing 4501-766. Units are encapsulated in a general purpose plastic enclosure that supports a variety of mounting options. This transmitter may be configured via the following two methods: Dimensions: See Drawing 4501-766. Housing: Sealed Lexan plastic with waterproof potting. Connectors: Wire Range: AWG #10-24, stranded or solid copper. Printed Circuit Boards: Military grade FR-4 epoxy glass. Mounting: See Accessories for mounting options. Variations of surface and DIN rail mounting are supported. Mounting Position: No effect on measurement value. Display: See Accessories for display option. Refer to Drawing 4501-765 for display dimensions. Shipping Weight: 1 pound (0.45 Kg) packed. Software Interface Package (Model 151C-SIP): Provides full PC reconfiguration of all transmitter parameters. Kit includes a PC/151T Serial Interface Adapter, HockeyPuck Configuration Software, and Transmitter Configuration Manual 8500-612. Refer to Transmitter Configuration Manual for configuration using this software. Display/Configurator Option (Model ATW-TLD): Field program of key transmitter configuration parameters can be accomplished with the push-buttons of this display. Some exceptions apply—see Transmitter Configuration Manual 8500612 for more information. Refer to the Configuration section of this manual for a configuration procedure using the display option. APPROVALS (-xxx0) 0: Agency Approvals - CE, CSA, & FM approvals apply. ACCESSORIES This product is CSA & FM rated for nonincendive hazardous location applications in Class I, Div 2, Groups A, B, C, & D, Class II, Div 2, Groups F & G, and Class III, Div 2. The functionality and applications of the basic 151T-0600 transmitter can be expanded with the following accessories. DIN-Rail Mounting Kit (Model ATW-DIN): A back plate with DIN rail clips installed for convenient “T Type” DIN rail mounting of 151T transmitters. Backplate is threaded (8-32) for attachment to the module via the two captive mounting screws of the transmitter enclosure. Dimensions: Refer to Drawing 4501-766. Shipping Weight: 0.5lbs (0.23Kg). Pipe Mounting Bracket For Housing (Model ATW-PM2): This steel bracket allows ATW-XPW enclosures to be mounted to 2inch diameter, horizontal or vertical pipe, for improved mechanical stability. Bracket Dimensions: See Drawing 4501-768. Shipping Weight: 1lbs (0.45Kg). LCD Display & Field Programmer (Model ATW-TLD): A twoline, 4-1/2 digit, plug-in type, Liquid Crystal Display. First line of display has six 8mm (0.31 inch) digits, plus polarity (negative sign only), that indicates the input measurement in °C, °F, °R, or °K. Note that the optional display measurement does not include the small DAC error present in the output signal. The second line of the display has seven 6mm (0.25 inch) alphanumeric characters used to display a configurable tag number, fault messages (FAIL SAFE, DFAULT), configuration prompts, and configuration selections. An eleven segment bar graph is also included which indicates the input measurement in percent of calibrated range. The second line of display information is used for tag number, fail-safe fault indication, and display fault indication in operating mode. ENVIRONMENTAL SPECIFICATIONS Operating Temperature: -40°C to +85°C (-40°F to +185°F) without display installed, -20°C to +70°C (-4°F to +158°F) with optional ATW-TLD display installed. Storage Temperature: -40°C to +85°C (-40°F to +185°F). Relative Humidity: 5 to 100% (operating), 0-100% noncondensing (storage). Power Requirements: An external loop power supply is required. Terminal voltage is +12V DC minimum, to +42V DC maximum. Reverse polarity protection is included. Maximum allowable ripple is 0.2Vp-p, 47-125Hz. Maximum noise is 0.6mV rms. Power Supply Effect: Less than ±0.005% of output span change per volt DC for rated power supply variations. Isolation: The input circuit is electrically isolated from the output/power circuit for common-mode voltages up to 250VAC, or 354V DC off DC power ground, on a continuous basis. Vibration Effect: 2g’s maximum from 0 to 500Hz on any axis. Radiated Emissions (EMC): Meets or exceeds requirements of European Norm EN55011:1991 Group 1, for Class A equipment. - 12 - Series 151T Two-Wire Transmitter User's Manual mV/TC/RTD Input ___________________________________________________________________________________________ It is also used for in-field reconfiguration messages and menu selections in Display Program Mode. Two push-buttons labeled NEXT and ENTER are included and used to configure the transmitter. These buttons may be locked out via the HockeyPuck Configuration Software. Refer to Drawing 4501765 for display details. Key transmitter configuration parameters can be programmed via this display, except for entering a custom linearization curve and selecting Ni and Cu RTD types. Other exceptions apply—see Transmitter Configuration Manual for more information. Refer to the Configuration section of this manual for a configuration procedure using the display option. Fail-Safe Indication: Display alternates the message [FAIL] [SAFE] in response to the following input conditions: open thermocouple, open RTD, short-circuited RTD, or RTD lead break (any lead). A fail-safe indication may also occur if the lead wire resistance is too great (see Specifications). Display Dimensions: Refer to Drawing 4501-765. Shipping Weight: 0.5lbs (0.23Kg). NOTES: Explosion Proof Housing w/Window (Model ATW-XPW): This cast aluminum, explosion-proof enclosure includes a clear window for viewing 151T or 155H transmitters equipped with the optional display. Enclosure is CSA and FM approved for Class I, Div 2, Groups B, C, and D, Class II, Div 2, Groups E, F, and G, and Class III, Div 2. Housing has back plate already installed for easily mounting 151T/155H transmitters within the enclosure. An optional pipe mounting bracket is also available for attaching this enclosure to common 2 inch pipe (see ATWPM2 below). Housing Dimensions: See Drawing 4501-767. Housing Material: Cast Aluminum, NEMA 4X, IP66/68. Conduit Entrances: Two ¾ NPT threads with two ½-14 NPT reducers installed. Shipping Weight: 2.7lbs (1.2Kg). Software Interface Package Model 151C-SIP: This software interface package includes the PC/151T Serial Interface Adapter, Windows 95/98/NT HockeyPuck Configuration Software, and Transmitter Configuration Manual (8500-612). This package is used to fully configure Series 151T Transmitters. The interface adapter is an isolated interface converter between the PC and the 151T. The adapter is powered from the RS232 interface and has a DB9S connector that mates to the common DB9P serial port connector of a host computer. The interface converter has an adapter at the end of 6 feet of cable that plugs directly into the top of the 151T transmitter (with the optional display removed) The configuration software is supplied on CDROM and requires 40MB of free hard drive space to install. The software also allows a module configuration to be printed in summary form for convenient documentation. Transmitter Configuration Manual 8500-612 includes additional information regarding software configuration. Refer to Drawing 4501-771 for computer, interface adapter, and module connection details. Electrical Connections: See Drawing 4501-771. Shipping Weight: 1lbs (0.45Kg). - 13 - OPTIONAL LCD INDICATOR & PUSH-BUTTON CONFIGURATOR 0.3mA RTD SENSOR EXCITATION INPUT 4 DC VOLTAGE A 3 TC RTD INPUT SIGNAL MULTIPLEXER INPUT A/D CONVERTER TEST POINT I/O ISOLATION 2 B MICROCONTROLLER A/D CONVERTER + 4-20mA 1 RTN REFERENCE - 14 - COLD JUNCTION COMPENSATION R-LOAD NON-VOLATILE MEMORY OUTPUT MODEM INTERFACE 4-20mA Two-Wire TEST POINT I/O ISOLATION SERIES 151T SIMPLIFIED SCHEMATIC 4501-772A Series 151T Two-Wire Transmitter User's Manual mV/TC/RTD Input ___________________________________________________________________________________________ I/O ISOLATION ATTACH ADAPTER TO COM PORT ON THE PC. COM PORTS ARE SOFTWARE CONFIGURED. PC RUNNING ACROMAG HOCKEYPUCK CONFIGURATION SOFTWARE RS232 151T-0600 TRANSMITTER - 15 - PLUG INTO TOP OF TRANSMITTER INTERFACE ADAPTER + + 4 3 4-20mA RL -- 1 V-LOAD + 2 -T/C, mV+ 3 & 4 Wire RTD 1 STATIC (NO TRANSFER): BOTH LED's ON. RECEIVE: GREEN LED BLINKS, YELLOW LED OFF. TRANSMIT: YELLOW LED BLINKS, GREEN LED OFF. 2 LED FUNCTIONS: Acromag MODEL 5032-787 YELLOW LED 4 TOP VIEW Acromag MODEL 5032-787 9 PIN CONNECTOR (DB9S) MATES TO THE DB9P CONNECTOR AT THE SERIAL PORT OF THE HOST COMPUTER 6 FOOT OF CABLE Plug into top of 151T Temperature Transmitter GREEN LED DC POWER 12 TO 42VDC EARTH GROUND TOP VIEW DISPLAY ATW-TLD MUST BE REMOVED TO INSTALL INTERFACE ADAPTER SERIES 151T COMPUTER CONNECTIONS 4501-771A Series 151T Two-Wire Transmitter User's Manual mV/TC/RTD Input ___________________________________________________________________________________________ PERSONAL COMPUTER WITH WINDOWS 95/98 OR NT 4 4 4-WIRE RTD (KELVIN) JUMPER 3 TO 4 3 2 TC INPUT 1 EARTH GROUND 3 2 + - 1 TERMINAL CONNECTIONS PER INPUT TYPE TERM mV/TC 2-WIRE RTD 3-WIRE RTD (-) (-), JUMP 1 & 2 (-), RTD COM 1 2 (+) JUMP 1 & 2 (-), RTD COM 3 JUMP (+), JUMP 3 & 4 (+), JUMP 3 & 4 4 JUMP JUMP 3 & 4 JUMP 3 & 4 SEE INPUT CONNECTIONS AT LEFT NOTE 1 JUMPER 3 TO 4 4 1 2 4 4 3 3-WIRE RTD 2 1 JUMPER 3 TO 4 -15mV to +115mV VOLTAGE SOURCE 4-WIRE RTD (-), COM LEAD B (-), COM LEAD B (+), COM LEAD A (+), COM LEAD A THERMOCOUPLE, RTD, or MILLIVOLT INPUT 3 3 & 4 Wire RTD + 2 + - 1 1 2 3 4 -T/C, mV+ - EARTH GROUND -- NOTE 1 + - 16 - ANALOG OUTPUT 4-20mA JUMPER 3 TO 4 3 + 2-WIRE RTD 2 - + JUMPER 3 TO 4 4 4 + RESISTANCE DECADE BOX 1 EARTH GROUND V-LOAD 3 2 - RL - 1 + DC POWER 12 TO 42VDC V-SUPPLY = V-TRANSMITTER + V-LOAD = 12VDC MIN + (0.023A x R-LOAD) = 17.75V MIN w/R-LOAD = 250 ohms JUMPER 1 TO 2 JUMPER 1 TO 2 EARTH GROUND NOTE 1: THIS GROUND CONNECTION IS RECOMMENDED FOR BEST RESULTS. IF SENSORS ARE INHERENTLY CONNECTED TO GROUND, USE CAUTION AND AVOID MAKING ADDITIONAL GROUND CONNECTIONS WHICH COULD GENERATE GROUND LOOPS AND MEASUREMENT ERROR. WARNING: FOR COMPLIANCE TO APPLICABLE SAFETY AND PERFORMANCE STANDARDS, THE USE OF SHIELDED CABLE IS RECOMMENDED AS SHOWN. ADDITIONALLY, THE APPLICATION OF EARTH GROUND MUST BE IN PLACE AS SHOWN IN THIS DRAWING. FAILURE TO ADHERE TO SOUND WIRING AND GROUNDING PRACTICES MAY COMPROMISE SAFETY AND PERFORMANCE. SAFETY GUIDELINES MAY REQUIRE THAT THIS DEVICE BE HOUSED IN AN APPROVED METAL ENCLOSURE OR SUB-SYSTEM, PARTICULARLY FOR APPLICATIONS WITH VOLTAGES GREATER THAN OR EQUAL TO 75VDC/50VAC. ELECTRICAL CONNECTIONS MODEL 151T-0600 or 155H-0600 TRANSMITTER FIGURE A 4501-764A Series 151T Two-Wire Transmitter User's Manual mV/TC/RTD Input ___________________________________________________________________________________________ NO JUMPERS PRESENT DUAL 2-WIRE RTD T/C CONNECTION WITH EXTERNAL CJ SENSING T/C DIFFERENTIAL CONNECTION JUMPER 3 TO 4 JUMPER 3 TO 4 JUMPER 3 TO 4 * NEGATIVE LEADS TIED + TOGETHER EXTERNALLY NEAR TRANSMITTER 4 3 RTD B - 17 - 1 RTD A + T/C B 2 + 4 DO NOT GROUND * + 4 Ni100 RTD AT TERMINALS 3 2 3 2 + 1 T/C - 1 T/C A - NOTE 1 NOTE 1 OUTPUT AND DISPLAY REPRESENT THE DIFFERENCE T/C A - T/C B CONNECTION TYPES: Dual 2-Wire Independent Dual 2-Wire Secure Dual 2-Wire Average Dual 2-Wire RTD Differential EARTH GROUND ELECTRICAL CONNECTIONS MODEL 151T-0600 or 155H-0600 TRANSMITTER NOTE 1: THIS GROUND CONNECTION IS RECOMMENDED FOR BEST RESULTS. IF SENSORS ARE INHERENTLY CONNECTED TO GROUND, USE CAUTION AND AVOID MAKING ADDITIONAL GROUND CONNECTIONS WHICH COULD GENERATE GROUND LOOPS AND MEASUREMENT ERROR. FIGURE B 4501-764A Series 151T Two-Wire Transmitter User's Manual mV/TC/RTD Input ___________________________________________________________________________________________ ALTERNATE CONNECTION METHODS OPTIONAL ATW-TLD DISPLAY DIMENSIONS AND FEATURES DISPLAY CONTAINS TWO LINES OF INFORMATION, PLUS AN ELEVEN SEGMENT BAR GRAPH 1.70" (43.18mm) LCD DISPLAY WINDOW 2.30" (58.42mm) NEXT 0.85" (21.59mm) ENTER DISPLAY MAY BE HOT-PLUGGED INTO TOP OF MODULE - 18 - A SINGLE DISPLAY MAY BE USED TO PROGRAM MULTIPLE TRANSMITTERS 2.50" (63.5mm) RECESSED PUSH-BUTTONS FOR MODULE RECONFIGURATION MODEL ATW-TLD PLUG-IN DISPLAY AND IN-FIELD CONFIGURATOR 0.45" (11.43mm) TOP OF DISPLAY 2.00" (50.8mm) 155H-0600 151T-0600 TRANSMITTER NOTE: ALL DIMENSION ARE IN INCHES (MILLIMETERS) 1.55" (40mm) 4501-765A Series 151T Two-Wire Transmitter User's Manual mV/TC/RTD Input ___________________________________________________________________________________________ ATW-TLD DISPLAY 151T/155H WITH ATW-TLD DISPLAY 4 1 1.70" (43.18mm) 2 2.14" (54.36mm) 2.30" (58.42mm) 3 & 4 Wire RTD 1 2 3 4 -T/C, mV+ -- 1.12" (28.4mm) 0.85" (21.59mm) NEXT ENTER + 2.50" (63.5mm) - 19 - 1.3" (33mm) 0.45" (11.43mm) 2.00" (50.8mm) 1.55" (40mm) 2.35" (60mm) 151T/155H TRANSMITTER ENCLOSURE DIMENSIONS NOTE: ALL DIMENSION ARE IN INCHES (MILLIMETERS) 4501-766A Series 151T Two-Wire Transmitter User's Manual mV/TC/RTD Input ___________________________________________________________________________________________ 151T/155H WITHOUT DISPLAY SET SCREW (2 PLACES) 5/16 DIA (2 PLACES) 151T/155H TRANSMITTER W/ ATW-TLD DISPLAY 5.0" (127mm) NEXT 5.25" (133mm) ENTER - 20 - GROUND SCREW 0.80" (20.3mm) 0.76" (19mm) 4.65" (118.1mm) 2.5" (63.5mm) 5.0" (127mm) ALLOW 5.65" FOR COVER REMOVAL MODEL ATW-XPW ENCLOSURE DIMENSIONS 151T/155H TRANSMITTER SHOWN INSTALLED IS NOT INCLUDED WITH ATW-XPW ENCLOSURE 4501-767A Series 151T Two-Wire Transmitter User's Manual mV/TC/RTD Input ___________________________________________________________________________________________ 3/4" NPT HOUSING 1/2" NPT NIPPLE (2 PLACES) 4 1 2 2.14" (54.36mm) 3 & 4 Wire RTD 1 2 3 4 -T/C, mV+ -- + MODEL ATW-DIN DIN-RAIL MOUNT 155H-0600 or 151T-0600 TRANSMITTER 1.13" (28.7mm) - 21 - 2.35" (60mm) 1.55" (40mm) 0.86" (21.84mm) 8-32 THREAD (2 PLACES) ATW-DIN DIN CLIPS 0.86" (21.84mm) 1.81" (45.97mm) BOTTOM VIEW SIDE VIEW NOTE: ALL DIMENSION ARE IN INCHES (MILLIMETERS) 4501-770A Series 151T Two-Wire Transmitter User's Manual mV/TC/RTD Input ___________________________________________________________________________________________ 151T/155H WITH ATW-DIN DIN-RAIL MOUNTING CLIPS ATW-PM2 PIPE MOUNT BRACKET (FASTENERS INCLUDED) 2" ID PIPE 5/16-18 THREAD 3/4" SQUARE STEEL TUBING 1/4-20 x 1.5" BOLT - 22 - 151T/155H TRANSMITTER W/ ATW-TLD DISPLAY NEXT ENTER 5.25" (133mm) ATW-PM2 PIPE MOUNT BRACKET SHOWN WITH FASTENERS INCLUDED. ATW-XPW ALUMINUM HOUSING A MODEL 151T/155H TRANSMITTER WITH ATW-TLD DISPLAY INSTALLED AND MOUNTED IN OPTIONAL ATW-XPW EXPLOSION-PROOF ENCLOSURE AND SECURED WITH AN ATW-PM2 PIPE MOUNT BRACKET TO 2 INCH PIPE. 1/4-20 x 1.5" BOLT 5/16 DIA HOLE (5 PLACES, ALL FOUR SIDES) 4501-768A Series 151T Two-Wire Transmitter User's Manual mV/TC/RTD Input ___________________________________________________________________________________________ PIPE CLAMP FOR 2-INCH PIPE 1/2" NPT PIPE