1
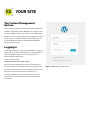
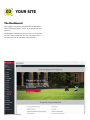
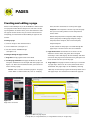
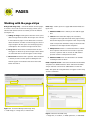
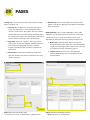
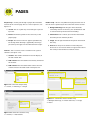
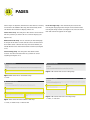
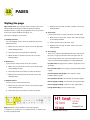
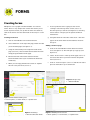
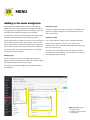
Somerville College
WordPress user manual
7th October 2015
01
INDEX
YOUR SITE
2
PAGES
4
IMAGES
13
FORMS
14
THE MENU
15
02 YOUR SITE
The Content Management
System
The Somerville website has been built using the WordPress
content management system. WordPress is an open-source
content management tool, and is free to use and distribute.
WordPress uses the PHP programming language, and stores
all site content in a MySQL database. When editing the site,
you are editing the content of this database. WordPress
makes it easy to do this.
Logging in
To manage the site, you must log in to WordPress using your
web browser - Chrome, Safari, Firefox or Internet Explorer.
Note that WordPress does not fully support the use of
Internet Explorer V8 or lower.
To log in, visit this URL:
http://www.some.ox.ac.uk/wp-admin/
You should log in to WordPress using the username and
password that have already been issued to you. Enter your
username and your password in the appropriate boxes, and
then press the blue “Log In” button (see figure 1.1).
If you have forgotten your password, click on the “Lost
your password” link below the log in box and follow the
instructions.
Figure 1.1 WordPress Login screen
03 YOUR SITE
The Dashboard
Once logged in you will be presented with the WordPress
admin system homepage – known as the Dashboard (see
figure 2.1).
The WordPress Dashboard gives you access to all the tools
you will need to manage the site. You access these tools
using the menu on the left-hand side of the page.
Figure 2.1 The Dashboard
04 PAGES
Creating and editing a page
Almost all the editing that you do in WordPress will be done
on a page that looks like this (Figure 3.2). The site is made
up using blocks of content. Once you’ve learned how to edit
one type of content on the site, you’ll have learned almost
everything you need to know about editing all types of site
content.
Creating a page:
1) Click on “Page” in the left-hand menu.
2) Select “Add new” (see figure 3.1).
here‘, then this should be set as the parent page.
Template - The templates sets the layout of the page
that you are creating. There are nine templates to
choose from:
Default template, Events template, FAQs template,
Gallery template, Landing page template, Lingo
template, News template, Past events template,
People template.
As the content for the pages is created through the
page strips it is best to leave this set on default.
3)You will see the “Add New Page”
(see figure 3.2).
Creating & editing the page content:
1) Page title. Simply type the title in this field.
2)
Set the page attributes. The page attributes can be set
using the attributes tile on the right side of the page (see
figure 3.2). There are two attributes that you need to set
when creating a page.
Parent - This is used to create the page url. If a page
exists within a section of the site, such as ‘studying
3)
Page theme colour. Somerville has 4 colours on the
website to choose from, red, green, blue and gold.
Selecting a colour will display all text headings and other
content on the page in the selected colour, giving the user
more control over the style of the page.
4) Page strips. Each page content is made up of a selection
of page strips. These are all visually referenced on the
dashboard. The page strips can be added by selecting
‘Add strip’ and choosing a type from the drop down menu.
The page strips are covered in more detail on page 06.
1
3
2
4
Figure 3.1
Page menu structure
Figure 3.2 Add new page layout
1 = Page title, 2 = Page attributes, 3 = Page theme colour, 4 = Page strip
05 PAGES
Publishing a page: Once you have created and populated
your page you will need to publish it. This is done by
clicking the publish button in the publish tile (see figure
3.2.2) on the right hand side of the page. Once a page has
been published it will appear on the site.
If you do not wish to publish a page there is an option to
save it as a draft so that you can come back to it at a later
date and edit the page.
This panel also contains a preview button that allows
you to preview any changes that you have made to the
page and a move to bin button - so that you can delete the
page.
Figure 3.2.2 Publish panel
06 PAGES
Working with the page strips
Background image strip - used at the bottom of most pages,
it creates a visual call to action for the page, allows you to
add text and link the banner to another part of the website
(see figure 3.3).
1)
Adding an image. Clicking this button will allow you to
add an image into the banner. The images are covered
in more detail on page 13. The dimensions are listed
above the button so make sure the image you select is
large enough to fill the space or it will display poorly
as Wordpress will stretch the image to fit the area.
2)
Image text. If these boxes are filled in then the text
will appear in white on top of the image. If these boxes
are left blank then no text will appear on the image.
3)
Button link. The button link is optional. If the checkbox
is ticked you will have the option of adding the text
that will appear in the button and select where the
button will link to.
FAQs strip - used if you have a page dedicated to FAQs (see
figure 3.4).
1)
Additional FAQs. This is where you will add the page
title.
2)
Subnav. The tick box will display the secondary
navigation on the right hand side of the page. Ticking
the box will display the navigation. If this strip is being
used in conjunction with other strips it should remain
unticked as it will duplicate the navigation.
3)
FAQ questions. There is a content block for a subtitle
this is optional. This block also includes a separate
area for a question and an answer. To add another
question click the “add question” button.
4)
Additional FAQs. This will add another set of FAQs
including the title for them.
FAQS strip with content - this looks and works like the FAQs
strip but has 2 additional boxes above and below the FAQs
strip to allow for content to be added before or after the
FAQs. The option for navigation does not appear on this strip
as this is automatic.
1
2
1
2
3
3
Figure 3.3 Somerville Background Image Strip
1 = Add image, 2 = Image text, 3 = Button link
4
Figure 3.4 Somerville FAQs strip
1 = Page title, 2 = Subnav, 3 = FAQs questions, 4 = Add FAQs
07 PAGES
Course main content strip - used for creating a course page
(see figure 3.5).
Image header strip - add a main banner image to the top
of the page (see figure 3.6).
1)
Adding an image. By default this box is unticked. When
selected the option to add an image to the top of the
page will appear along with dimensions.
1)
Image. The image for this strip is mandatory and will
not allow the page to save without an image inserted.
2)
Adding Media. This will allow you to select an image,
video or document and insert it into the body of the
page.
3)
Formidable. This will allow you to add a formidable
form to the body of the page. How to create forms is
explained in detail on page 13.
4)
Text styling. The styling is very similar to word and
allows you to style the copy on the page. Styling is
featured in more detail on page 12.
5)
External links. Selecting the button will give you the
option of entering a url that is related to the course.
2)
Text. If the box is ticked it will allow you to enter a
header and sub text that will appear on top of the
banner image.
3)
Button link. If the button is selected the options
appear for adding what the button should say
and where it should link to. This is used if you are
using the banner tactically to direct people to other
promoted or relevant content.
Header carousel strip - this works in the same way as the
image header strip. The only difference is this should only be
used on the homepage.
6)
Related content. Here you select which subject the
course relates to. This aids the functionality in the
website to pull out related content.
1
1
2
3
4
3
5
6
Figure 3.5 Somerville Course Main Content Strip
1 = Add image, 2 = Add media, 3 = Formidable, 4 = Page
styling, 5 = External links, 6 = Related category
Figure 3.6 Somerville FAQs strip
1 = Banner image, 2 = Banner text , 3 = Banner button
2
08 PAGES
Listing strip - used for tactical strips and sectional landing
pages (see figure 3.7).
1)
Grid size. This is where you select the type of grid
to use. A 3 item grid has a grey background and is
used as a tactical slice. The 9 items will have a white
background which is used for sectional landing pages.
By selecting one of these it is defining what the styling
will be not how many boxes are to be displayed.
2)
Page links. There are 3 options - link to an internal
page, link to an external webpage and PDF download.
On a sectional landing page the links should be
internal and linking to the secondary navigation for
that section.
3)
Read more. Selecting this will display a read more
after the content of the box. This should only be used
on the 3 list items.
4)
Add list item. This will add another tile with the same
options as displayed, giving you the ability to add further
boxes to the grid.
Media grid Strip - this is used to highlight 3 areas of the
website or as a promotional tool. It can house 1 video and
2 tactical areas or it can be used with 3 tactical areas
depending on what needs to be promoted (see figure 3.8).
1)
Media type. Selecting either video or image will
change the dimensions and button in the “Main Media
Image” box. Selecting a video is done in the same way
as selecting an image. Covered on page 13.
2)
Content area. Each tile needs a title and some
subtext added. Images are not mandatory but are
recommended.
1
1
2
2
3
4
Figure 3.7 Somerville Listing Strip
1 = Grid type, 2 = Links, 3 = Read more, 4 = Add list item,
Figure 3.8 Somerville Media Grid strip
1 = Media selection, 2 = Content area
09 PAGES
People strip - used to pull through 3 people that would be
relevant to the current page. This is a manual process (see
figure 3.9).
Header strip - this has very different styling from the rest of
the site and is specifically for the Somerville stories section.
1)
Search. This is a quick way of searching for a person
by name.
1)
Background image. The image in here should be
something relevant to the story. It is darkened out and
is used to break up the black in the heading.
2)
Filters. The filtering works in the same way as the
people page.
2)
Information. This is where you enter the information
about the person and their job title.
3)
People. The names in the list appear alphabetically
but change when filtering is applied. By selecting a
person they will appear in the white box to the right.
3)
Image. This image should be of the person featured in
the story.
Statistic - this is used to create a selection of at a glance
statistics (see figure 3.10).
4)
Facts. Each story must contain an interesting fact.
There are no set rules for what can appear here due to
the variety of Somervillians and their stories.
1)
Statistic. The number entered in here will display in
the red statistic box.
2)
Add statistic. This will add the exclamatory text below
the statistic.
2)
Add statistic. This will add another row for the next
statistic. Theses should be used in multiples of 4.
1
2
1
2
3
Figure 3.9 Somerville People Strip
1 = Search, 2 = Filtering, 3 = People
4
Figure 3.11 Somerville Stories Header Strip
1 = Background image, 2 = Information text, 3 = Image,
4 = Facts
1
2
Figure 3.10 Somerville Statistic Strip
1 = Statistic, 2 = Add statistic
3
10
PAGES
Stories - this strip is used to promote the Somerville Stories
(see figure 3.12).
1)
Image. The image in here should match the image
used on the story page.
Main content strip - this strip is used for basic text pages.
There is a selector box for an image a block content area for
text with the basic editing functions.
1)
Page header image. By default this box is unticked.
When selected the option to add an image to the top
of the page will appear along with dimensions. This
image will appear at the top of the page.
2)
Link. This is a dropbown box that lists every page in
the site and should link to the relevant story.
Half Text half image strip - this is used as a tactical area
that can promote other parts of the site (see figure 3.13).
1)
Text area. This slice needs to have a title and a section
of sub text this is entered in the boxes.
2)
Button link. This button is mandatory so must include
text and link to another area of the site.
2)
Display title. By default this is ticked. If this strip is
being used alongside other strips then you may not
want the title to appear.
3)
Text styling. The styling is very similar to word and
allows you to style the copy on the page. Styling is
featured in more detail on page 12.
Quote strip - this is used to create an introduction section of
text for the page and has title and sub text fields. There is no
styling needed for this as it has built in styling. It is best to
keep the length of the text to a small paragraph.
1
2
1
Figure 3.14 Somerville Stories Header Strip
1 = Background image, 2 = Information text, 3 = Image,
4 = Facts
3
2
Figure 3.12 Somerville Stories Strip
1 = Image, 2 = Link
1
Figure 3.14 Somerville Main Content Strip
1 = Page header image, 2 = Display title, 3 = Text styling
2
Figure 3.13 Somerville Half Text Half Image Strip
1 = Text area, 2 = Button link
11
PAGES
Some strips are dynamic, which means that there is virtually
no content to be added to the strip, the functionality of the
site knows what content to display. These are:
Latest news strip - this will pull in the latest 3 news articles.
The only content you have to fill in is a title to display (see
figure 3.15).
Learn the lingo strip - this should only be used on the
learning the lingo page. This will pull in the content of the
learning the Lingo section (see figure 3.18). You can enter a
title and sub text to appear on the page.
News/events tab strip - this is used only on the homepage.
It will pull in the latest 3 news articles and 3 current events.
You need to enter a title for the strip and select where you
would like the news and events buttons to link to (see figure
3.16).
Course listing strip - this will pull in the details of the
courses. You do not need to enter any content or select
anything (see figure 3.17).
1
Figure 3.17 Somerville Course Listing Strip
Figure 3.15 Somerville Latest News Strip
1 = Title
1
2
1
2
Figure 3.16 Somerville News/Events Tab Strip
1 = Title, 2 = News link, 3 = Events link
3
Figure 3.18 Somerville Learn the Lingo Strip
1 = Title, 2 = Sub text
12 PAGES
Styling the page
Main content area. You enter the article content in the main
editing window (the big box under the title). The editing
window contains a range of styling options that can be found
in the main content window (see figure 4.1).
The styles available to you include:
1)Making text bold.
You can highlight a piece of text by making it bold, as in
Word. To do this:
a.Make sure you select the “Visual” tab at the top-right
of the editing window.
b.Select the text you would like to make bold.
c.While the text is selected, click the “B” icon in the
editing toolbar.
2)Bullet lists.
If you want to make a bullet list in your content:
a.Make sure you select the “Visual” tab at the top-right
of the editing window.
b.Select the text that you’d like to make into bullets.
c.With the text selected, click the “bullet” icon in the
editing toolbar.
c.With the text selected, click the “number” icon in the
editing toolbar.
4)Quote style.
Can be used to pull out copy to promote it on the page.
a.Make sure you select the “Visual” tab at the top-right
of the editing window.
b.Select the text that you’d like to style.
c.With the text selected, click the “quote” icon in the
editing toolbar.
5)Text styling.
There are a number of predefined text sizes and colours
that you can apply to the main text (see figure 4.2). To
make sure that these are used consistently across the
site we recommend following these simple guidelines:
H1: Main titles. All pages have a built in page title so use
sparingly.
H2: Secondary title. Use to signal a major headline within
a page.
H3: Introduction paragraph. Use to signal a major
headline within a page.
H4: Styled text header. Use to break up long text pages.
3)Numbered lists.
These are very similar to bullet lists:
a.Make sure you select the “Visual” tab at the top-right
of the editing window.
H5: Paragraph heading. Use to break up long text pages.
H6: Paragraph heading. Used for in copy sub headers.
Paragraph heading. Use for all body copy.
b.Select the text that you’d like to make into bullets.
1
2
3
4
5
Figure 4.1 Main content window - text styling options
1 = Bold icon, 2 = Bullet icon, 3 = Numbered icon, 4 = Quote style,
5 = Text style drop-down
Figure 4.2 Text Styling
13 IMAGES
Adding and using images
All images, videos and documents for the website live in
the media library. This is not to be mistaken with a storage
area, as having lots of images and files stored in the library
can slow down the website. It is always best to delete an
image or document if it is out of date and being replaced with
another image or file.
Adding an image to a strip
a.Make a note of the image dimensions in the box on
the strip and click on “Add Image” (see figure 5.2).
b.The media library will open up (see figure 5.3).
If the image is already in the library select it.
If the image is not yet uploaded to the library then
select the upload media tab (see no. 1). This will
change to a window similar to figure 5.1 where you
can select the file to upload or drag and drop the
image.
c.Select the image and check the dimensions fit to
the place you are adding it (see no. 2).
d.You can rename the title and even edit the alt tag
for the image - which appears on roll-over of the
image (see no. 3).
e.Click on “select” this will add the image to your
Adding a photo to the website:
There are several ways of adding a photo into the website.
Adding them through the media library or adding them from
a slice on the page, however, they both use the same process.
When adding an image it is always best to check the image
dimensions for the area to make sure the chosen image will
fit. This information can be found on each slice containing
and image or video.
Adding through the media library
This is a good way of uploading multiple images at one
time without assigning them to a page (see figure 5.1).
a.Click on “Media” in the left-hand menu and select
“Add New”.
b.You will see the “Upload New Media page”. Here
you can either select the files from your computer
or drag and drop them onto the box.
page (see no. 4).
1
2
1
2
3
Figure 5.1 Media library upload window
1 = Media area, 2 = Adding files
1
4
Figure 5.2 Adding images from a strip
1 = Add image
Figure 5.3 Media library
1 = Upload tab, 2 = Image details, 3 = Image title, 4 = Select
14 FORMS
Creating forms
Wordpress uses a plugin called Formidable to create its
forms. This is a very simple form creator that allows you to
create any time of form, set up who the form will submit to,
view all the entries and also download all the entrys in a CSV
file.
f.To set up who the form is going to click on the
“settings” tab at the top of the screen (see no. 1).
This will open up a new tab (see figure 6.2). Selecting
“Form Actions” will give you the options for Email
notifications.
Creating a new form
g.Using the fields fill in the title of the email - what will
appear in the email inbox and the address the form
will go to.
a. Click on “Formidable” in the left-hand menu.
b.Select “Add new” at the top of the page, which will take
you to the build page (see figure 6.1).
c.Using the functionality on the right hand side of the
page (see no. 2), choose which field to add to the form.
Simply drag the field onto the page.
d.Rename the title of the fields and from the bar
below the field select if you would like the field to be
mandatory.
e.When you are happy with the form click on “Update”
this will save your form( see no. 3).
Adding a form to a page
a.Click on the “Formidable” button above the content
area (see figure 6.3). This will open up a pop up (see
figure 6.4).
b.Select “Insert a form” at the top of the page (see no: 1)
and select the title of your form from the drop down
menu (see no. 2).
c.Click on “Insert into post” (see no. 3) and this will add a
piece of shortcode to your content box.
1
1
2
Figure 6.3 Page strip
1 = Add formidable
1
2
3
Figure 6.1 Formidable editing area
1 = Form options, 2 = Form fields, 3 = Update form
1
3
Figure 6.2 Settings
1 = Email notification fields
Figure 6.4 Adding Form selector
1 = Form options, 2 = Form fields, 3 = Update form
15 MENU
Adding to the main navigation
Every page that is added to the website is automatically
added to the secondary navigation on the right hand side of
the page but it is not added to the main navigation. This is to
avoid the main navigation becoming over cluttered.
The site menu can be accessed by going to the “appearance”
tab in the left hand side menu and selecting “menus”.
On this page (shown in Figure 5.1) there are two main panels.
On the left is the pages panel. This contains a list of all the
pages that have been created in the CMS. On the right is the
menu structure panel. This shows how the site navigation is
structured. Some of the pages are indented - this signifies
that the pages are child pages.
Adding a page
Removing a page
To remove a page click on the page arrow to the right of the
page entry (shown in Figure 5.1) to expand the panel and
then click ‘remove’.
Renaming a page
It is also possible for a page to have a different title when
used in the navigation so you can use a shorter, more
immediate title in the navigation while keeping the full page
title on the actual page.
To do this click on the page arrow to the right of the title in
the page entry to expand the panel and enter the new title in
the ‘navigation label‘ text field.
To add a page first select it in the pages panel (shown in
Figure 5.1) then click add to menu. The page will then appear
at the bottom of the menu structure panel.
The page will need to be dragged to the desired location in
the navigation.
1
2
3
Figure 5.1 Menu page
1 = Pages panel,
2 = Menu structure panel,
3 = Page entry