1
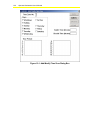
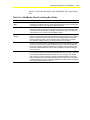
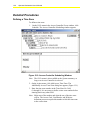
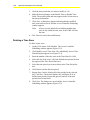
Operator Workstation User’s Manual
12-1
Chapter 12
Defining Time Zones
Introduction
Time zones are database records the Access Controller object
maintains that control certain aspects of access card, Card Reader, and
Binary Input operation. Specify the time zone that controls each
operation when defining the object or item.
This chapter describes how to:
•
define a time zone
•
modify a time zone
•
delete a time zone
•
print a time zone schedule
© November 1, 2001 Johnson Controls, Inc.
Code No. LIT-120154
www.johnsoncontrols.com
12-2
Operator Workstation User’s Manual
Key Concepts
Card Reader Time Zones
There are three fields in the Card Reader Definition window that time
zones can control: Reader Active, Override, and Personal
Identification Number (PIN) Suppress. These fields control certain
aspects of Card Reader operation according to the times specified for
each day for the time zone.
For more information on Card Reader definition, refer to the Defining
Objects chapter (LIT-120149).
Reader Active
The time zone number entered in this field specifies the times when a
valid card allows access to that door. Enabled time periods allow entry
with valid cards. Disabled time periods only allow entry with cards
that have Executive Privilege. After defining a time zone, enter the
time zone number in the Reader Active field in the Card Reader
Definition window.
Override
The time zone number entered in this field specifies the times when
the Card Reader is in the Access mode. Effectively, the door will be
unlocked during the enabled time period. After defining a time zone,
enter the time zone number in the Override field in the Card Reader
Definition window.
PIN Suppress
The time zone number entered in this field specifies the time periods
when card readers do not require PIN codes to access a building or
area. The enabled time periods are the periods when the reader does
not require a PIN. After defining a time zone, enter the time zone
number in the PIN Suppress field in the Card Reader Definition
window.
Operator Workstation User’s Manual
12-3
Binary Input Time Zone
The time zone number entered in this field specifies the time periods
when the OWS does not report Binary Input alarms. Disabled time
periods are periods when alarm reporting is suppressed. For example,
use this feature to disable motion detectors during normal business
hours to prevent unnecessary alarms. After defining a time zone, enter
the number in the Time Zone field in the Binary Input Definition
window.
For more information on Binary Input definition, refer to the Defining
Objects chapter (LIT-120149).
Access Card Time Zone
The time zone number entered in this field specifies the time period
when an individual’s access card is valid. Enabled time periods are the
periods in which the individual’s card is valid. After defining the time
zone, enter the time zone number in the Time Zone Used field in the
Add Card dialog box.
For more information on access card definition, refer to the Defining
Access Cards chapter (LIT-120153).
Time Zone Definition
Define up to eight time zones per Access Controller. The time zones
are unique to the controller they are defined for. Each time zone can
have up to eight days (including one holiday) with up to sixteen time
periods defined per day.
Define time zones using the Add/Modify Time Zone dialog box
(Figure 12-1), accessed from the Access Controller Scheduling
window.
12-4
Operator Workstation User’s Manual
Figure 12-1: Add/Modify Time Zone Dialog Box
Operator Workstation User’s Manual
12-5
Table 12-1 describes the fields in the Add/Modify Time Zone dialog
box.
Table 12-1: Add/Modify Time Zone Dialog Box Fields
Field
Description
Time Zone Number
(No.)
The identification number for the time zone (1 through 8). Each Access Controller
can have up to eight time zones. This number appears in the time zone field in the
Card Reader, Access Card, or BI object Definition window.
Days
The days of the week affected by the defined time periods of the time zone. Select
Weekdays to add a time period for Monday through Friday. Select Sat/Sun to add
a time period for both Saturday and Sunday. More than one day can be defined at
a time; however, only one day can be modified at a time.
Time Period (list
boxes)
The time period, consisting of an enable time and a disable time. For each day,
define up to eight Enable Time and eight Disable Time periods for a total of sixteen
periods. Time Period list boxes appear with one predefined Disable time period
starting at 00:00 (midnight). This time period can be modified (that is, changed
from disable to enable); however, the time itself must remain at 00:00.
Enable Time
The time of day that a function is enabled. Enter the time in the Enable Time field
in a 24 hour format (hh:mm). Define a disable time period after each Enable time
period before defining another Enable time. For example, if the first Enable time is
00:00, and another Enable time is 05:00, define a Disable time that falls between
00:01 and 05:59.
Disable Time
The time of day that a function is disabled. Enter the time in the Disable Time field
in a 24 hour format (hh:mm). When first defining a time zone, each day of the week
has a predefined Disable time period of 00:00. You may change it to an Enable
time; however, the time must remain set at 00:00. Define an Enable time period
after each Disable time period before defining another Disable time. For example, if
the first Disable time is 00:00, and another Disable time is 05:00, define an Enable
time that falls between 00:01 and 04:59.
12-6
Operator Workstation User’s Manual
Detailed Procedures
Defining a Time Zone
To define a time zone:
1.
On the GoTo menu in the Access Controller Focus window, click
Schedule. The Access Controller Scheduling window appears.
Figure 12-2: Access Controller Scheduling Window
Note
The GoTo menu is also available at the System summary, as
long as an Access Controller is selected.
2. On the Action menu, click Add Access Time Zone. The
Add/Modify Access Time Zone dialog box appears (Figure 12-1).
3. Enter the time zone number in the Time Zone No. field
(1 through 8). It is necessary to define a time zone number before
entering data in any other field.
Note: Make note of the number and what the use of the time zone
will be. The Access Card, Card Reader, and BI object
definition processes require this number to link the time zone
to the correct item.
Operator Workstation User’s Manual
12-7
4. Select the days of the week that the defined time periods affect.
You may select multiple days. The Time Period list box shows a
predefined Disable time period of 00:00. You may change the
command to Enabled; however, leave the time set to 00:00.
Otherwise, an error message appears when you attempt to save the
information.
5. Click inside one of the Time Period list boxes to select one of the
time periods (1-16).
6. Enter an Enable Time or a Disable Time in the appropriate field.
The time appears in the Time Period field selected in Step 5.
Repeat Steps 5 and 6 to define any other time periods for the
selected days.
Notes:
Any two enable times on one day must have a disable
time falling between them, or vice versa. This means that,
for each day, you can define up to eight Enable Times
and eight Disable Times, for a total of sixteen time
periods.
For example, if a particular day has an Enable Time
defined for 08:30 and a Disable Time defined as 10:30,
you cannot define another Enable Time between
08:30 and 10:30. The same applies for Disable Time.
7. Click Save. A dialog box appears indicating that the time zone has
been saved, and the Access Controller Scheduling window appears
(Figure 12-2).
Note:
Always save the data before defining another day for the
time zone, or the OWS will lose the data.
Modifying a Time Zone
Note:
You can modify only one day at a time, even if they were
added as a group (that is, weekdays).
To modify a time zone:
1.
On the GoTo menu, click Schedule. The Access Controller
Scheduling window appears (Figure 12-2).
Note:
The GoTo menu is also available at the System summary,
as long as an Access Controller is selected.
2.
On the Action menu, clickModify Access Time Zone. The
Add/Modify Access Time Zone dialog box appears (Figure 12-1).
3.
Enter the time zone number in the Time Zone No. field.
4.
Click the day of the week you want to modify. The Time Period
list boxes list the time periods currently defined for the selected
time zone and day.
12-8
Operator Workstation User’s Manual
5.
Click the time period that you want to modify (1-16).
6.
Make the desired changes in the Enable Time or Disable Time
fields. The modified time and state appears in the list box next to
the time period number.
7.
Click Save. A dialog box appears indicating that the modified
time zone has been saved, and the Access Controller Scheduling
window appears.
Note:
Always save the data before modifying another time
zone or day within the time zone, or the OWS will lose
the data.
8. Click Cancel to cancel the modifications.
Deleting a Time Zone
To delete a time zone:
1.
On the GoTo menu, click Schedule. The Access Controller
Scheduling window appears (Figure 12-2).
2.
Click Modify Access Time Zone. The Add/Modify Access Time
Zone dialog box appears (see Figure 12-1).
3.
Enter the number of the time zone in the Time Zone No. field.
4.
Select the day of the week. All of the defined time periods for that
day appear in the Time Period list boxes.
5.
Select the time period you want to delete in the Time Period list
box.
6.
Click Delete to delete the time period.
7.
Repeat Steps 5 and 6, deleting all of the periods for the selected
day. Click Save. Then select another day, and delete all of its
defined time periods. Repeat this process until all of the time
periods have been deleted.
8.
Click Save. The changes are saved and the Access Controller
Scheduling window appears (Figure 12-2).
Operator Workstation User’s Manual
12-9
Printing a Time Zone Schedule
To print a time zone schedule:
1.
On the GoTo menu, click Schedule. The Access Controller
Scheduling window appears (Figure 12-2).
2.
On the Action menu, click Add or Modify Time Zone. The
Add/Modify Time Zone dialog box appears (see Figure 12-1).
3.
Enter the time zone number in the Time Zone No. field.
4.
Click Print. The selected Time Zone Schedule is printed, and the
OWS returns to the Access Controller Scheduling window.
Note:
If a time zone is being added or modified when a Print
command is issued, the new or modified time zone will
not print unless it was saved before the Print command
was issued.