1
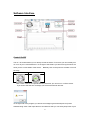
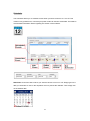
USB Power 8800Pro Manual Release Date: 11/09/2012 Manual Version:1.0 1 Table of Contents Welcome ....................................................................................................................... 3 Introduction........................................................................................................... 3 Minimum System Requirements ....................................................................... 3 Product Overview ..................................................................................................... 4 Features ................................................................................................................ 4 Specifications ....................................................................................................... 4 Package Contents ............................................................................................... 5 Product Interface ......................................................................................................... 6 Hardware Interface.............................................................................................. 6 Front View .................................................................................................... 6 Back View ..................................................................................................... 6 Hardware ...................................................................................................................... 7 Install ..................................................................................................................... 7 Software ........................................................................................................................ 7 Installation Instructions ....................................................................................... 7 Software Interface ............................................................................................... 9 Control On/Off .............................................................................................. 9 Information : ............................................................................................... 10 Graph .......................................................................................................... 11 Limit setup .................................................................................................. 12 Date & Time................................................................................................ 12 Scheduler.................................................................................................... 13 Advanced Setting: ..................................................................................... 15 Local network control ........................................................................................ 17 USB CDC serial port emulation mode ................................................................... 18 SDK User Manual...................................................................................................... 20 Customer Feedback.................................................................................................. 21 2 Welcome Introduction The USB Power 8800Pro is an economical device for power control & calculate meter consume. Simply plug in the device, install driver and run the software and now anyone can turn on turn off their devices via the USB 8800Pro . With current meter , user can know the power consumption and record in PC. 8800Pro also support " USB CDC serial port emulation mode " for more application and control solution. With a scheduler function , 8800Pro can easily become automated to turn on and turn off anything device connected. All you need is a PC and a power jack and you can control anything. Minimum System Requirements Minimum Requirements Operating Systems: WINDOWS XP or higher USB 1.0 or above Power cable - Standard power cable for PC (0.75mm ) . Ethernet Network : For remote access under same segment 3 Product Overview Features * USB power control on / off * Current Meter - up to 8A. * Over current protection. * Timer Scheduler * USB CDC serial port emulation mode * Temperature detection of internal device * Local LAN control * SDK Available for development & system Integration * User friendly, compact, and simply just plug & play. Specifications Model: USB Power 8800Pro Input Voltage Range: 100V ~ 240V Maximum Current: 8A Weight: 300 grams Dimensions: 95mm x 85mm x 50mm Operation Temp: 0℃~50℃, (32℉ ~120℉) 4 Package Contents 8800Pro Device x 1 There are 7 models with different plug (un switchable). USB Cable USB cable that is used to connect the 8800Pro to the computer that will be controlling the device. Installation CD Comes with drivers, manual, and software. * Models : * 8800Pro US : Type B – Canada, Mexico , Taiwan, by different plugs styles Japan and USA * 8800Pro UK : Type G – Hong Kong, Malaysia, Singapore and Unite Kingdom. * 8800Pro FR : Type E – France and others * 8800Pro GE : Type F – Pan European countries * 8800Pro AU : Type I – Australia and New Zealand * 8800Pro SW : Type J – Swiss * 8800Pro DK : Type K – Denmark 5 Product Interface Hardware Interface Front View The front view of the 8800Pro consists of a USB port that allows you to connect the 8800 to the computer. Back View On the back of the device there is Power Input cord that will be connected to your power source. 6 Hardware Install 1.) Connect the power source cable to 8800Pro power input . 2.) Plug the device power you would like to control the power on off 3.) Connect 8800Pro to PC with attached USB cable. Note : Each PC can only connect to one 8800Pro. Software Installation Instructions The software for the device is located on the CD that came with the device. IP Family Pack is located on the main page of the CD. Please follow the directions carefully and install the necessary files 1.) First place the CD that came with your device into your CD/DVD Rom drive. The CD should auto run but if it does not go to the CD/DVD Rom drive and select the file “autorun.html”. 7 2.) Select the USB Power 8800Pro in the USB Series section. 3.) Download the following software and save them to the appropriate locations. a. USB Power Pro – The USB Power Pro software is specifically used to control this device, set a schedule, and setup remote control b. USB Power Driver – The driver must be installed for the device to work correctly when connected to a computer. 4.) Once installation is complete please double click on the USB Power Pro the program. 8 Icon to start Software Interface Control On/Off The on / off controls allows you to directly control the device. From here you can instantly turn on / turn off your connected device. To the right of this feature you will see a log file which will show you the current status of the device. Basically click on the picture to activate or turn off the relay. Off On Note: There is a 5 second period between each time you can turn on or off the device. If you click to fast the error message you will receive will look like this. To the right side of the program you will see a message log that will keep track of power statuses being used. It will report the time and status so that you can easily keep track of your 9 power status. Information : Temperature & Current Status The temperature and current status will automatically showed the internal temperature degree at Celsius & Fahrenheit and the consume current at AMP . The tolerance of the current measurement is plus or minus at 10% degree. The temperature sensor is build inside the box and senses the temperature in 8800Pro box. Mac Address This " Mac address " is from the PC connect with 8800Pro. Note : One PC can only use one 8800Pro . The COM showed in software is just for information the number of available COM in this PC Celsius & Fahrenheit change The switch button and change the display temperature degree in Information and Graph section . 10 Graph The Graph show the value of detected temperature, the value of consumed current and the value of maximum current limit set by customer . The Black number " 0~100 " at the left side of Graph means Celsius Temperature value , The Blue number The Black number " 0~10 " at the left side of Graph means the consume value of ampere " 5~60 " at the button side of Graph means the seconds. The latest detect value will update from the left side of Graph . Black line : Show Temperature value 8800Pro detected. Blue line : Show current value at ampere 8800Pro detected . Red line : Show the value of the maximum current customer set . 11 Limit setup User can setup the value of maximum current to protection your device. The maximum current AMP value from 1.0 amp to 9.9 amp(there is only 1 digit after the decimal point of the setting range) . As the detected current value over the setting or over 10amp for few seconds , the power output of 8800Pro will turn off automatically. As setup the maximum current value, there is red line show in Graph. EX : Setup 8.0Amp in current limit Limit line in red show in Graph Date & Time The date and time section will automatically synchronize the time and date with the computer that is being used. This time will be used to setup the scheduler for the device so that it can correctly turn on and off devices at the desired times. 12 Scheduler The scheduler allows you to schedule events when your device will turn on / turn off. This creates a very powerful tool, in that all your power needs can become automated. There will be more detailed information below regarding this section of the software. Start Date: Choose the date of when you want the device to turn on or off. Simply type in the date you would like or click on the dropdown menu to present the calendar. Then simply click on the desired date. 13 End Date: Choose the date when you want the event to stop happening. Time: Select the time when the device will activate. Command: The action that is desired during the specified date and time. Create Event To create a new event, follow the following steps: 1.) Select a Start date of when you would like to activate the command. 2.) Then select an end date. If you select a end date a few days later this means the device will turn on everyday at the desired time until the end date has been reached. 3.) Then select a Time and for the command choose on or off 4.) Once everything has been set make sure to hit the New button to add this new event to your scheduler Edit Event To edit an existing event, follow the following steps: 1.) Click on the event located in your scheduled events section that you would like to edit 2.) Then you change the values the different fields for the Start date, End date, Time, & Command. 3.) Once you have edited the event click on the Edit Event button to save the settings Delete Event To delete an existing event, follow the follow steps: 1.) Select the event that you would like to remove from your scheduled events section 2.) Then hit the delete event button to delete the event. Delete All To delete all scheduled events, follow the follow steps: 1.) Click on the delete all button to delete all the fields in the scheduler. 2.) The program will ask you to reconfirm before deleting all scheduled events. 14 Advanced Setting: In advance setting, user can adjust the value of temperature , the value of current , username and password(as work with software IP POWER Center) * 8800Pro had been adjust as shipment. User can work directly as receive. * To adjust the current , please use current meter instrument. * For remote control in LAN by our software " IP Power Center " , user can setup "username & password " for security concern. Temperature : There is temperature sensor is build inside the device . User can change / correct the temperature value by press " Set ". Current : There is current meter build inside 8800Pro. To adjust the current value , user need to have a external current meter instrument. Like ammeter , clamp multi-meter or any current meter ( as following pictures). Please select a device with current consume over 1 amp ( range 9 amp to do the adjustment ) . 15 1~ Current Correction procedure: During the procedure , the controlled device ( like HUB or lamp ) need to connect with 8800pro and the output on 8800Pro keep at ON status. 1. Please click to enable the advanced setting, and you will see the message remind that the currect setting need to use the current meter instrument . 2. Please use the external meter to get the current value of the controlled device . then type the amp value ( value format support to one digit after decimal point , like s 1.5 or 2.3 ) into the setting . After 5 second , you will see the current value change to your setting at the Information section which mean the correction successful . Username & Password The default Username and password is admin /12345678 . The username and password is for the purpose that user can control 8800Pro remotely through software " 8800Pro SDK.exe " & SDK. Username : user can change own username. The maximum word is 8 digits , please do not use special sign like~!@#$%^&*() . Password : user can change own password. The maximum word is 8 digits , please do not use special sign like~!@#$%^&*() . 16 Local network control To control the 8800Pro in LAN , user need to use our software " 8800Pro SDK.exe " . Please download this software in the SDK section of our attached CD. Please refer the setting example as following : User would like to use PC #2 to control the 8800Pro connected with PC#1 . PC#1 & PC#2 are in same LAN network. * For PC #1 : Execute software "USB Power Pro.exe " in PC #1 and PC #1 need to be always on ( can not in sleep status). * For PC #2 : Use software " 8800Pro SDK .exe " to do the 8800Pro ON/OFF control . Please type the username and password set in software "USB Power Pro.exe " . Then " 8800Pro SDK .exe " will auto search the 8800Pro in LAN and user can control the 8800Pro connect with PC#1. Please refer as following . 17 USB CDC serial port emulation mode 8800Pro support USB CDC serial port emulation mode . Please refer the setting as following : 1. Please check there is 8800Pro device connected with your PC . You can go to "system" --> "device manager" and found Communications Port " under 2. After confirm, please execute " Aviosys Port " or " USB Ports (COM&LPT) section. "Hyperterminal " to communicate with 8800Pro from From " Start"--> " All programs"-->" Accessories" --> "Communications" --> “Hyperterminal" . * WIN 7 do not support "Hyperterminal, please use other serial port command tool. Like : putty 18 Choose the COM that 8800Pro used and enter into the program. 3. Set the “Bits per second” as 19200 at COM 3. As enter into the program , press "enter" button to get the command list as following : 19 SDK User Manual For more application , user can develop own software by our SDK : 1. Environment : VB.NET 2008 Microsoft NET. Framework Version 3.5 Microsoft office access 2007 2. Reference: 3. Database column : 4.Parameter Getpower() inquire all the 8800Pro in LAN to report message back thrListener() open a new threads and monitor if the status change in LAN addlistview() add new search device ( in LAN) in listview Print_user_select() Show the device information customer reselect 20 in interface Customer Feedback Your Feedback is definitely important for us to continue providing the great quality products and service that we have to offer. We definitely would like to know what you think about our products and how we can make our product even better. We are happy to serve you to the best of our ability and to provide an ongoing positive experience with us. Thank you for your support. 21