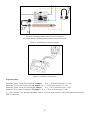
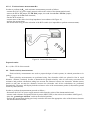
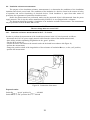
1
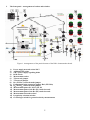
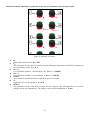
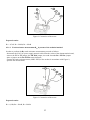
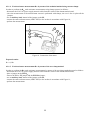
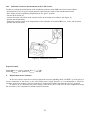
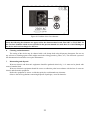
OPERATING MANUAL
DEMONSTRATION BOARD
DB-1
Revision 1.1
Juli 15, 2009
TABLE OF CONTENTS
1.
Introduction ............................................................................................................................................... 3
2.
Safety......................................................................................................................................................... 4
3.
The front panel – arrangement of sockets and switches. ............................................................................ 5
4.
Measurements. ........................................................................................................................................... 7
4.1.
Measurement of the short circuit loop impedance................................................................................ 7
4.1.1.
Measurement of the short circuit loop impedance in the L-PE circuit. ........................................... 7
4.1.2.
Measurement of the short circuit loop impedance in the L-N circuit.............................................. 9
4.2.
Measurement of the parameters of the RCD switch. ............................................................................ 9
4.2.1.
Realisation of measurements of the RCD switch parameters. ..................................................... 10
4.3.
Measurements of the earth resistance................................................................................................. 11
4.3.1.
Measurement of the earth electrode resistance using meters of the MRU series. ......................... 12
4.3.1.1.
Earth resistance measurement RE. .......................................................................................... 12
4.3.1.2.
Earth resistance measurement RE1. ......................................................................................... 12
4.3.1.3.
Earth resistance measurement RE2 by means of the technical method. ................................... 13
4.3.1.4.
Earth resistance measurement RE2 by means of the technical method using current clamps... 14
4.3.1.5.
Earth resistance measurement RE2 by means of the two-clamp method.................................. 14
4.3.2.
Measurement of the earth resistance using meters for measuring loop impedance...................... 15
4.3.2.1.
Earth resistance measurement RE. .......................................................................................... 15
4.3.2.2.
Earth resistance measurement RE1. ......................................................................................... 16
4.3.2.3.
Earth resistance measurement RE2. ......................................................................................... 17
4.4.
Earth resistivity measurements........................................................................................................... 17
4.5.
Measurements of the continuity of equipotential bondings. ............................................................... 18
4.5.1.
Measurement of the resistance of the equipotential bonding between P1 and P2. ........................ 18
4.5.2.
Measurement of the resistance of equipotential bonding between P1 and P3............................... 19
4.6.
Insulation resistance measurement. .................................................................................................... 20
4.6.1.
Insulation resistance measurements in the L - N circuits.............................................................. 20
4.6.2.
Insulation resistance measurements in the L-PE circuits. ............................................................. 21
5.
Replacement of fuse elements.................................................................................................................. 21
6.
Cleaning and maintenance. ...................................................................................................................... 22
7.
Dismantling and disposal. ........................................................................................................................ 22
8.
Technical data.......................................................................................................................................... 23
9.
Accessories .............................................................................................................................................. 23
10.
Manufacturer...................................................................................................................................... 23
2
1.
Introduction
The DB-1 demonstration board is an indispensable element of training courses regarding realisation of
electric measurements. It may be applied in schools, distribution centres of meters used in the power industry as
well as in training centres.
The board may be used for the purpose of simulation of the following measurements:
- measurement of the short circuit loop impedance in the L-N circuit for the TT and TN networks
- measurement of the short circuit loop impedance in the L-PE circuit for the TT and TN networks
- measurement of the parameters of the RCD switch type AC
- insulation resistance measurement in the L-N circuit
- insulation resistance measurement in the L-PE circuit
- measurement of the earth resistance by means of the technical method
- earth resistance measurement using clamps
- earth resistance measurement by means of the two-clamp method
- earth resistance measurements by means of the impulse method
- earth resistance measurements using meters for short-circuit loop measurements
- resistivity measurements of three kinds of ground
- measurement of the resistance of equipotential bondings
- measurement of alternating voltage
The demonstration board makes it possible to cause irregularities in the installation under scrutiny. This is
possible thanks to the panel switches.
Note:
WARNING:
Before you proceed to operate the device, read thoroughly the present manual and observe the safety
regulations and instructions specified by the manufacturer.
WARNING:
The demonstration board has been designed for the purpose of simulation measurements of alternating
voltage, impedance, short circuit, earth resistance, parameters of the RCD switch, ground resistivity,
insulation resistance, resistance of equipotential bondings. Any application that differs from those
specified in the present manual may cause damage of the device and be a source of a serious danger for
the user.
WARNING:
The DB-1 demonstration board may be used solely by qualified personnel who have appropriate
certificates that entitle them to work on electric installations, or by persons working under their
supervision. Using the board by unauthorised personnel or without supervision of such personnel may
cause damage of the device and be a source of a serious danger for the user.
WARNING:
Before and during measurements of ground resistivity, insulation resistance, resistance of equipotential
bondings, earth resistance (by means of the technical methods) disconnect the power cable of the device
from the power supply socket and turn the RCD switch off. The power supply of the board is signalled by
the „POWER ON” diode.
3
2.
Safety
The DB-1 demonstration board has been designed for the purpose of simulation of measurements, whose
results determine the safety conditions of a virtual installation. Therefore, in order to guarantee appropriate
operation and correctness of the obtained results, the following recommendations must be followed:
o
Before you proceed to operate the device read thoroughly the present manual and observe the safety
regulations and instructions specified by the manufacturer.
o
The device has been designed for operation at the nominal voltage of 230V 50Hz.
o
The device cannot be used in the grid and with other devices in special interiors, for example those of
a dangerous atmosphere regarding the risk of explosion or fire.
o
It is unacceptable to operate the following:
1. a damaged device which is completely or partially out of order
2. a device with damaged power cable insulation,
3. a device stored for an excessive period of time in disadvantageous conditions (e.g.
excessive humidity). If the meter has been transferred from a cool to a warm
environment of a high level of relative humidity, do not perform the measurements
until the meter has been warmed up to the ambient temperature (approximately 30
minutes).
4. a device with damaged housing.
o
Before measurement of connection resistance or insulation resistance, make sure the measured object
has been disconnected from the power supply. Disconnect the power cable of the device from the
power supply contact and turn the RCD off.
o
Repairs may be performed solely by an authorised service point. Before the device is connected to the
power supply network, make sure the power supply socket is equipped with a properly connected
earth pin. The board will not function if it is powered from a socket without an additional PE
connection.
o
The board is equipped with a protection constituted by two F 4A 250V fuses (T 3,14A 250V fuse are
acceptable). The fuses are located in the device power supply socket. Should the fuse elements be
damaged, they must be replaced.
It is unacceptable to use other fuses..
WARNING:
Before the fuses are replaced, the device must be disconnected from the 230V power supply network.
4
3.
The front panel – arrangement of sockets and switches.
Figure 1. Arrangements of the panel elements of the DB-1 demonstration board.
1)
2)
3)
4)
5)
6)
7)
8)
9)
10)
11)
12)
13)
14)
15)
16)
Power supply network socket 230 V
Additional PE socket
230 V power supply signalling diode
RCD switch
Measurement socket
TN network jumper
TT network jumper
RE1 (ZW RE1) earth electrode jumper
Equipotential pipe connection jumper H2O (ZW H2O)
RE2 (ZW RE2) earth electrode jumper
Measurement points P1, P2, P3, P4, P5
Measurement point of the RE1 (E1) earth electrode
Measurement point of the RE2 (E2) earth electrode
Measurement electrode sockets
Irregularity selection switches
Ground type switch for ground resistivity measurements
5
Position of switches simulating irregularities in the electric installation of the measured object.
Figure 2. Positions of switches.
1)
2)
3)
4)
5)
6)
7)
RE
High earth resistance at P2. RE = 1kΩ
UB
The acceptable voltage value UB has been exceeded during measurements of the RCD parameters in
the measurement socket. UB > 25 V
RISO(L-PE)
Low insulation resistance – measurement L-PE. RISO(L-PE) = 200 kΩ
RISO(L-N)
Low insulation resistance – measurement L-N. RISO(L-N) = 100 kΩ
RCD-TA
The acceptable disconnection time of the RCD has been exceeded.
ZL
High short circuit loop impedance. ZL ≈ 6 Ω
RCD-IA
The activation current of the RCD is lower than the required value (damaged RCD or excessive
leakage current of the installation). The leakage current of the installation IA ≈ 15 mA
6
4.
Measurements.
4.1.
Measurement of the short circuit loop impedance.
A reliable and the most commonly used method of protection from electric shock consists in protection
from indirect touch in circuits equipped with circuit breakers. The method consists in a automatic disconnection
in the case of fault.
Conductive elements of the device are connected to the protective conductor of the power supply network.
At the moment a hazardous touch voltage appears, which is caused by a metallic short circuit with the phase
conductor of the power supply network, the current will flow in the phase – protective conductor circuit. The
current is called short-circuit current. The passage of the short circuit current will cause activation of the circuit
breakers and the power supply system will be turned off. The condition that must be met to have the protection
level specified for the device as sufficient approved is that the elements must not be under a dangerous touch
voltage for an excessive period of time. Therefore the safety device must respond quickly, and within the period
of time specified in the relevant norms. The condition of appropriate protection may be expressed by the
following equation:
Z
S
≤
U
I
O
A
ZS - short circuit loop impedance.
IA – current activating the circuit breaker within the required period of time.
UO – power supply network nominal voltage in relation to earth.
4.1.1. Measurement of the short circuit loop impedance in the L-PE circuit.
Measurement of the short circuit loop impedance in the L-PE circuit may be performed using the MPI5XX meter in the ZL-PE[RCD] function. Should another meter or function be used, the RCD switch of the
demonstration board may be trigged.
In order to perform the measurement proceed as follows:
- connect the 230 VAC power supply network cable to the socket of the demonstration board,
- select the kind of TT or TN network using a jumper in the appropriate position (Figure 3),
- all the switches simulating irregularities must be in the „green” position,
- turn the RCD switch on,
- connect the meter to the power network socket of the board using leads, in accordance with Figure 4,
- perform the measurement.
The demonstration board permits to perform measurements of a short circuit loop, whose value may be
artificially overstated (simulation of irregularities). In order to do so, before you proceed to perform the
measurement place the ZL switch in the „red” position. Having finished the measurement, place the ZL switch again
in the „green” position.
7
1) Jumper simulating measurements in the TN network.
2) Jumper placed simulating measurements in the TT network.
Figure 3. Network type selection jumpers.
Figure 4. Connection of the meter.
Expected results:
Switch ZL „green” for the TN network (TN jumper): ZL-PE = ZL-N of the network + 1,4 Ω
Switch ZL „red” for the TN network (TN jumper): ZL-PE = ZL-N of the network + 5,5 Ω
ZL-PE = ZL-N of the network + 5,5 Ω
Switch ZL „green” for the TT network (TT jumper):
Switch ZL „red” for the TT network (TT jumper): ZL-PE = ZL-N of the network + 10 Ω
ZL-N of the network – the network impedance in the L-N circuit of the socket to which the demonstration board
cable is connected.
8
4.1.2. Measurement of the short circuit loop impedance in the L-N circuit.
Measurements may be performed with any meter for measurements of the short circuit loop whose short
circuit current does not exceed 25 A, and whose measurement time does not exceed 60 ms, e.g. MZC-30X,
MZC-20X, MPI-5XX.
In order to perform the measurement proceed as follows:
- connect the 230 VAC power supply network cable to the socket of the demonstration board,
- select the kind of network, TT or TN, using the jumper in the appropriate position (Figure 3),
- all the switches simulating irregularities must be in the „green” position,
- turn the RCD switch on,
- connect the meter to the power network socket of the board using leads, in accordance with Figure 4,
- perform the measurement.
The demonstration board permits to perform measurements of a short circuit loop, whose value may be
artificially overstated (simulation of irregularities). In order to do so, before you proceed to perform the
measurement place the ZL switch in the „red” position. Having finished the measurement, place the ZL switch again
in the „green” position.
Figure 5. Connection of the meter.
Expected results
Switch ZL „green” for the TN network (TN jumper): ZL-N = ZL-N of the network + 1,1 Ω
Switch ZL „red” for the TN network (TN jumper): ZL-N = ZL-N of the network + 5,5 Ω
Switch ZL „green” for the TT network (TT jumper):
ZL-N = ZL-N of the network + 1,1 Ω
Switch ZL „red” for the TT network (TT jumper): ZL-N = ZL-N of the network + 5,5 Ω
ZL-N of the network – the network impedance in the L-N circuit of the socket to which the demonstration board
cable is connected.
4.2.
Measurement of the parameters of the RCD switch.
The principal function of the RCD switch (Residual Current Device) is to provide additional protection
against electric shock. The purpose the RCD switch is to disconnect the protected circuit in the case of an
excessive leakage current in the circuit in question.
The measurement section of the RCD switch measures constantly the differential current I∆ and causes
disconnection of the protected circuit from the power supply source, if the differential current exceeds the
characteristic value for the given switch. The value in question is the nominal differential current, which is
indicated by the symbol I∆n. The voltage on the housing of the protected device, in accordance with the Ohm’s
law, is:
9
U = I *R
B
∆
E
where RE is the resistance between the earth terminal of the protected device and the earth.
4.2.1. Realisation of measurements of the RCD switch parameters.
In order to perform the measurement proceed as follows :
- connect the 230 VAC power supply network cable to the socket of the demonstration board,
- select the kind of network, TT or TN, using the jumper in the appropriate position (Figure 3),
- all the switches simulating irregularities must be in the „green” position,
- turn the RCD switch on,
- connect the meter to the power network socket of the board using leads, in accordance with Figure 6,
- perform the measurement.
The demonstration board permits to simulate irregularities in an installation equipped with a RCD switch:
- The RCD switch-TA in the in the „red” position simulates an error consisting in shunting of the N PE lead with
the RCD switch. During a measurement with this error, the RCD switch will not function, and the meter will
display an adequate message, e.g. RCD.
- The RCD switch-IA in the „red” position causes an additional current leakage in the PE lead. During a
measurement with this error the RCD switch will be activated at an incorrect moment (the TA and IA
measurements will not be possible). The meter will display an adequate message, e.g. Err.
- Switch UB in the „red” position simulates a hazardous touch voltage during a measurement of the RCD
parameters. Meter will display an adequate message, e.g. UB > 25 V. If the meter is supposed to block the
measurements and display this message, the acceptable touch voltage UL set for the meter must not exceed 25 V.
Should the acceptable touch voltage UL during measurement be set at 50V, the meter will perform the
measurements and display the results.
Figure 6. Connection of the meter.
10
Expected results:
Switches „green” RCD-TA, RCD-IA and UB for the TN and TT network: IA = 15…. 30 mA, TA < 300 ms, UB ≈
0,2 V, RE ≈ 0,00 kΩ
The RCD switch-TA „red” for the TN and TT network: message „RCD”
The RCD switch-IA „red” for the TN and TT network: IA < 15 mA , or the message „Err”, „RCD activated
during the measurement”
Switch UB „red” for the TN and TT network : IA = 15…. 30 mA, TA < 300 ms, UB ≈ 31 V, RE ≈ 1 kΩ or
„excessive UL voltage”
4.3.
Measurements of the earth resistance.
The quality of the earth systems significantly influence the safety of operation of electric installations and
devices, and particularly the reliability of the protection from electric shock and lightning protection. Earth
systems have also other functions related to safety, namely they are used to carry off electric charge where there
is a risk of explosion (e.g. at petrol stations). In order to revise electric installations and fulfil the requirements
related to the protection from electric shock, it is necessary to perform the measurements of earth resistance. The
resistance in question permits to determine the value of touch voltage, which may be generated between different
conductive elements of the protective lead.
In the case of measurements of a single earth system, the most common method is the 3-pole potential drop
method. It consists in driving measurement electrodes into the ground near the earth system under test and
forcing the passage of current in the following circuit: meter-the earth system in question-current electrodemeter.
Measurements of multiple earth systems may be performed using the aforementioned method,
disconnecting subsequent earth electrodes during the measurement. Since it is an arduous task, the meters which
are equipped with clamps may perform the measurement without the necessity to disconnect the measured earth
system. In the case of this method the current and voltage electrodes are placed in a similar manner to the 3-pole
method, but the current is measured with clamps which are fastened to the earth system under test. The meter
calculates the resistance „knowing” the current flowing through the tested earth electrode, and ignoring the
current flowing through the adjacent earth electrodes. However the measurement method with clamps cannot be
applied in those multiple systems in which individual earth electrodes are interconnected below the ground.
Measurements of multiple earth systems may be performed by means of the two-clamp method. This
measurement is performed with two pairs of clamps – apart from the measurement clamps also transmission
clamps must be used (whose internal structure is different). The transmission clamps induce current in the tested
circuit. The value of the current is measured with measurement clamps. The result of the measurement is the
resistance of the whole circuit through which the measurement current is flowing. Using this method, remember
of the requirements: this function is excellent for the purpose of measurements of multiple earth systems of low
and medium resistance values. In order to obtain a correct measurement the resistance of the earth electrode must
be significantly higher than the resultant resistance value for the whole earth electrode system (the two-clamp
measurement measures the sum of the resistance of the tested earthing resistance and the resultant value of the
other earth resistances). The principal and considerable advantage of this measurement is the fact that there is no
necessity to drive auxiliary electrodes into the ground.
There is also another method of an earth resistance measurements. This is the measurement of the surge
earth resistance. The purpose of this measurement is to diagnose the dynamic parameters of lightning protection
earth system. The surge measurement is performed at an excitation whose shape corresponds to a lightning
pulse. The parameters of the pulse are defined by two values: the duration of the pulse leading edge t1 and the
duration of the semi-peak t2 .
The DB-1 demonstration board permits to perform measurements of the earth resistance of three distinct
earth electrodes, namely RE, RE1, RE2. Earth resistance measurement RE2 is also possible using the clamp
method. In order to perform such a measurement, instead of a jumper at the E2, it is necessary to use an
auxiliary lead, which is included in the board delivery package and fasten the clamps on the lead. In order to
perform the measurements it is also possible to use the meters of the MRU-10X and MRU-20X series. It is also
allowed to use meters dedicated to measurements of the short circuit loop. However, using such a meter may
activate the RCD switch.
11
4.3.1. Measurement of the earth electrode resistance using meters of the MRU series.
4.3.1.1. Earth resistance measurement RE.
In order to perform the RE earth resistance measurement proceed as follows:
- disconnect the 230 VAC power supply network cable from the socket of the demonstration board,
- remove the TN or TT jumper, the ZW H2O jumper, the earth electrode RE1: ZW RE1 jumper
- a jumper may be fastened on the RE2 earth electrode,
- connect the earth resistance meter (MRU-XXX) to the sockets in accordance with Figure 7,
- perform the measurement.
Figure 7. Connection of the meter.
Expected results:
RE = 100Ω, RH = 200 Ω, RS = 200 Ω
4.3.1.2. Earth resistance measurement RE1.
In order to perform the RE1 earth resistance measurement proceed as follows:
- disconnect the 230 VAC power supply network cable from the socket of the demonstration board,
- remove the TN or TT jumper, the ZW H2O jumper, the earth electrode RE1: ZW RE1 jumper
- a jumper may be fastened on the RE2 earth electrode,
- connect the earth resistance meter (MRU-XXX) to the sockets in accordance with Figure 8,
- perform the measurement.
12
Figure 8. Connection of the meter.
Expected results:
RE1 = 4,7 Ω, RH = 200 Ω, RS = 200 Ω
4.3.1.3. Earth resistance measurement RE2 by means of the technical method.
In order to perform the RE2 earth resistance measurement proceed as follows:
- disconnect the 230 VAC power supply network cable from the socket of the demonstration board,
- remove the TN or TT jumper, the ZW H2O jumper, the earth electrode RE1: ZW RE1 jumper
- place a jumper on the RE2 ZW RE2 earth electrode,
- connect the earth resistance meter (MRU-XXX) to the sockets in accordance with Figure 9,
- perform the measurement.
Figure 9. Connection of the meter.
Expected results:
RE = 6,8 Ω, RH = 200 Ω, RS = 200 Ω
13
4.3.1.4. Earth resistance measurement RE2 by means of the technical method using current clamps.
In order to perform the RE2 earth resistance measurement using clamps proceed as follows:
- disconnect the 230 VAC power supply network cable from the socket of the demonstration board,
- since the measurement of the measurement current is performed with clamps, the user is free to place all the
jumpers,
- use an auxiliary lead, instead of the jumper on the E2,
- connect the earth resistance meter (MRU-XXX) to the sockets in accordance with Figure 10,
- perform the measurement.
Figure 10. Connection of the meter.
Expected results:
RE = 6,8 Ω
4.3.1.5. Earth resistance measurement RE2 by means of the two-clamp method.
In order to perform the RE2 earth resistance measurement by means of the two-clamp method proceed as follows:
- disconnect the 230 VAC power supply network cable from the socket of the demonstration board,
- place a jumper on the ZW RE1,
- remove the TN or TT jumper and the ZW H2O jumper,
- use an auxiliary lead, instead of the jumper on the E2,
- connect the earth resistance meter (MRU-XXX) to the sockets in accordance with Figure 11,
- perform the measurement.
14
Figure 11. Connection of the meter.
Expected results:
RE = 11,5 Ω
4.3.2. Measurement of the earth resistance using meters for measuring loop impedance.
Measurements of the earth resistance may also be performed with meters for measuring the short circuit
loop impedance. In order to perform such measurements, the phase conductor of the power supply network is
used as an auxiliary source of voltage which permits to generate the measurement current.
The result of the measurement is a sum of the impedance of the tested earth resistance, the working earth system,
the source and the phase conductor, and thus it is burdened with a positive error. However if it does not exceed
the acceptable value for the tested earth system, it may be assumed the earth system is properly constructed and
there is no need to apply more precise measurement methods. Certain meters used for the purpose of
measurements of the short circuit loop impedance may activate the differential RCD switch. This may influence
the maximum measurement current and the time of generating such current by the meter. In order to avoid
activation of the RCD switch, it is recommended to use the measurement of the short circuit loop impedance in
the ZL-PE[RCD] function.
4.3.2.1. Earth resistance measurement RE.
In order to perform the RE earth resistance measurement proceed as follows:
- connect the 230 VAC power supply network cable to the socket of the demonstration board,
- remove the TN or TT jumper, the ZW H2O jumper, the earth electrode RE1: ZW RE1 jumper,
- place a jumper on the RE2 earth electrode,
- turn the RCD switch on,
- connect meter of the short circuit loop impedance in accordance with Figure 12,
- perform the measurement,
- the measurement may provoke activation of the RCD switch (it is impossible to perform a measurement).
15
PE
Figure 12. Connection of the meter.
Expected results:
RE = 100 Ω + ZL-N of the network
4.3.2.2. Earth resistance measurement RE1.
In order to perform the RE1 earth resistance measurement proceed as follows:
- connect the 230 VAC power supply network cable to the socket of the demonstration board,
- remove the TN or TT jumper, the ZW H2O jumper, the earth electrode RE1: ZW RE1 jumper,
- turn the RCD switch on,
- connect meter of the short circuit loop impedance in accordance with Figure 13,
- perform the measurement,
- the measurement may provoke activation of the RCD switch (it is impossible to perform a measurement).
PE
Figure 13. Connection of the meter.
Expected results:
RE = 4,5 Ω + ZL-N of the network
16
4.3.2.3. Earth resistance measurement RE2.
In order to perform the RE2 earth resistance measurement proceed as follows:
- connect the 230 VAC power supply network cable to the socket of the demonstration board,
- remove the TN or TT jumper, the ZW H2O jumper, the earth electrode RE1: ZW RE1 jumper,
- place a jumper on the RE2 earth electrode,
- turn the RCD switch on,
- connect meter of the short circuit loop impedance in accordance with Figure 14,
- perform the measurement,
- the measurement may provoke activation of the RCD switch (it is impossible to perform a measurement).
PE
Figure 14. Connection of the meter.
Expected results:
RE = 6,8 Ω + ZL-N of the network
4.4. Earth resistivity measurements.
Earth resistivity measurements are used to prepare designs of earth systems, in cathode protection or in
geology.
Earth resistivity measurements are performed using four electrodes which are placed in line in equal
distances (Wenner’s method). In order to determine the ground resistivity value it is necessary to measure the
resistance and perform calculations taking into account the distances between the electrodes. Modern meters
permit to take into account the distances between the electrodes and all the calculations are performed
automatically. The meter will display both the resistance value of the measurement probes (in Ω) and the ground
resistivity value (in Ωm).
In order to perform the measurement proceed as follows :
- disconnect the 230 VAC power supply network cable from the socket of the demonstration board,
- connect earth resistance and ground resistivity meter (MRU-XXX) to the sockets in accordance with Figure 5,
- place the „ground type selection” switch at the selected position,
- perform the measurement having previously entered to the meter the appropriate value of the distances between
the measurement electrodes.
17
Figure 15. Connection of the meter.
Expected results:
Switch in the position 5 m : ρ = 31 Ωm
Switch in the position 10 m : ρ = 295 Ωm
Switch in the position 20 m : ρ = 5,9 kΩm
4.5. Measurements of the continuity of equipotential bondings.
Using the demonstration board it is possible to simulate a measurement of the resistance the equipotential
bonding of an electric installation. The measurement may be performed between point P1 of the equipotential
bonding and point P2 or P3. It is also possible to simulate irregularities related to the resistance of the
equipotential bonding of point P2 and point P1.
In order to activate this function the RE switch simulating the irregularity must be placed in the „red”
position.
4.5.1. Measurement of the resistance of the equipotential bonding between P1 and P2.
In order to perform a measurement of the resistance of equipotential bonding between P1 and P2 proceed
as follows:
- disconnect the 230 VAC power supply network cable from the socket of the demonstration board,
- place all the switches simulating irregularities in the „green” position,
- turn the RCD switch off,
- connect the meter with cables to the network socket of the board in accordance with Figure 16,
- perform the measurement,
- change the position of the irregularities switch RE to the „red” position,
- perform the measurement.
18
Figure 16. Connection of the meter.
Expected results:
Switch RE in the “green” position: Rcont (P1-P2) = 0,4 Ω
Switch RE in the “red” position: Rcont (P1-P2) = 1 kΩ
4.5.2. Measurement of the resistance of equipotential bonding between P1 and P3.
In order to perform a measurement of the resistance of equipotential bonding between P1 and P3 proceed
as follows:
- disconnect the 230 VAC power supply network cable from the socket of the demonstration board,
- place all the switches simulating irregularities in the „green” position,
- turn the RCD switch off,
- insert the ZWH2O jumper,
- connect the meter with cables to the network socket of the board in accordance with Figure 17,
- perform the measurement,
Figure 17. Connection of the meter.
Expected results:
Rcont (P1-P3) = 0,4 Ω
19
4.6. Insulation resistance measurement.
The purpose of the insulation resistance measurements is to determine the conditions of the installation
insulation and electric power loads. The conditions of the insulation is a decisive factor in the context of safety
of operation and correct functioning of electrical devices. Good insulation is, apart from other means of
protection, also a guarantee of protection from direct touch.
Before the measurements are performed, make sure the measured object is disconnected from the power
supply network. This is why the meters manufactured by SONEL S.A. are equipped with a voltmeter.
The demonstration board permits a simulation of an insulation resistance measurement. The measurement
may be performed in the L-N and L-PE circuits.
NOTE:
The test voltage must not exceed 1kV.
4.6.1. Insulation resistance measurements in the L - N circuits.
In order to perform the measurement of the insulation resistance in the L-N circuit proceed as follows:
- disconnect the 230 VAC power supply network cable from the socket of the demonstration board,
- place all the switches simulating irregularities in the „green” position,
- turn the RCD switch off,
- connect the meter with cables to the network socket in the board in accordance with Figure 18,
- perform the measurement,
- change the position switch of the irregularities of the resistance of insulation RISO(L-N) to the „red” position,
- perform the measurement.
Figure 18. Connection of the meter.
Expected results:
Switch RISO(L-N) “green” position: RISO(L-N ) = 100 MΩ
Switch RISO(L-N) “red” position: RISO(L-N) = 100 kΩ
20
4.6.2. Insulation resistance measurements in the L-PE circuits.
In order to perform the measurement of the insulation resistance in the L-PE circuit proceed as follows:
- disconnect the 230 VAC power supply network cable from the socket of the demonstration board,
- place all the switches simulating irregularities in the „green” position,
- turn the RCD switch off,
- connect the meter with cables to the network socket in the board in accordance with Figure 19,
- perform the measurement,
- change the position switch of the irregularities of the resistance of insulation RISO(L-PE) to the „red” position,
- perform the measurement.
Figure 19. Connection of the meter.
Expected results:
Switch RISO(L-PE) “green” position: RISO(L-PE) ≥ 3 GΩ
Switch RISO(L-PE) “red” position: RISO(L-PE) = 200 kΩ
5.
Replacement of fuse elements.
In the case a defect of the device has been detected, when the signalling diode „POWER” is off in spite of a
correct connection of the device to the 230V/50Hz power supply network, it is recommended to check the
condition of the fuse elements. The fuse elements are in the mains socket from which the device is powered.
In order to do so, disconnect the power supply cord from the device and raise the fuse compartment using
flat screwdriver. The compartment contains two fuse elements.
21
Figure 20. Position of the fuse elements.
NOTE:
Solely the following fuse elements are approved for the demonstration board: F4A 250V or T3,15 250V. In
the case fuse elements which are not specified in the present manual are used, there is a risk of damage to
the device and a serious danger for the user.
6.
Cleaning and maintenance.
The casing of the device may be cleaned with a soft, damp cloth using all-purpose detergents. Do not use
any solvents or cleaning agents which might scratch the casing (powders, pastes, etc.). The electronic system of
the demonstration board does not require maintenance.
7.
Dismantling and disposal.
Worn-out electric and electronic equipment should be gathered selectively, i.e. it must not be placed with
waste of another kind.
Worn-out electronic equipment should be sent to a collection point in accordance with the law of worn-out
electric and electronic equipment.
Before the equipment is sent to a collection point, do not dismantle any elements.
Observe the local regulations concerning disposal of packages, worn-out batteries .
22
8.
Technical data
a)
b)
c)
d)
e)
f)
g)
h)
i)
j)
k)
l)
9.
Type of insulation………………………………………….single, in accordance with PN-EN 61010-1
Measurement category.......................................................II 300 V in accordance with PN-EN 61010-1
Protection grade of the casing in accordance with PN-EN............................................................... IP40
Power supply of the meter ..............................................................................................................230 V
Dimensions ..............................................................................................................405 x 300 x 140 mm
Mass of the device ..................................................................................................approximately 3,6 kg
Storage temperature..............................................................................................................–20...+60 °C
Working temperature..............................................................................................................10...+40 °C
Quality standard...............................development, design and production in accordance with ISO 9001
Protection................................................................................ fuses 2 x T3,14A 250V or 2xF4A 250 V
Power consumption...............................................................................................approximately 15 mW
Type of RCD switch.........................................................................................................30 mA type AC
Accessories
a)
b)
c)
d)
e)
Power supply cord – 1 piece
Auxiliary cable, banana plug – banana plug 0.7m – 1 piece
Configuration jumpers – 4 pieces
Operating manual
Guarantee card
10. Manufacturer
The manufacturer of the board providing the guarantee and post-guarantee service is:
SONEL S. A.
ul. Wokulskiego 11
58-100 Świdnica
Poland
Fax (0-74) 858 38 08
E-mail: [email protected]
Web site: www.sonel.pl
Note:
Solely the manufacturer is authorised to repair the device
23