1
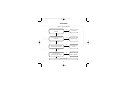
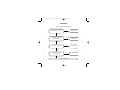
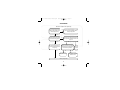
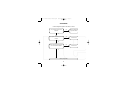
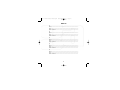
Brio-R manual:Cursa manual.qxd
08/04/2011
09:25
Page 1
Brio-R manual:Cursa manual.qxd
08/04/2011
09:25
Page 2
CONTENTS
INTRODUCTION, FEATURES AND TECHNOLOGY
1-3
INSTALLATION
3
CONNECTIVITY
4-6
LOUDSPEAKER CONNECTIONS
6-7
IN USE / INPUT SELECTION
7
MUTE / REMOTE CONTROL
8
TECHNICAL SPECIFICATION
9
TROUBLESHOOTING
OWNERS LOG
10-13
14
Brio-R manual:Cursa manual.qxd
08/04/2011
09:25
Page 3
INTRODUCTION, FEATURES AND TECHNOLOGY
Thank you for purchasing the Brio-R the latest version of Rega’s best
selling amplifier.
Housed in a brand new case the Brio-R draws on the pedigree of the
previous three incarnations of this model. The sonic recipe for the Brio
embodies the best in traditional audio circuits with excellent engineering
practice.
A newly designed output amplifier in the Brio-R was born after extensive
research by our engineers to develop a low source impedance emitter follower
Class A driver stage. This is based around a complementary pair of 150w
Sanken Darlington output transistors. The technical and sonic improvement
gained by the use of low impedance drivers is well known, however it can
feature high standing currents in the driver stage when using standard
transistor configurations. By combining the low impedance driver with the
Sanken Darlington transistors (with their imbedded thermal bias network
running at a lower standing current) this combination forms a complementary
emitter follower emulating Class A conditions with good thermal stability with
lower standing currents in the driver stage.
1
Brio-R manual:Cursa manual.qxd
08/04/2011
09:25
Page 4
Other notable improvements include the input switches (relays) and rotary
volume control. The input relays are in the optimum position, being placed
directly between the input sockets and the amplifier input, shortening the signal
path at this critical stage.
Remote control has been added to the Brio-R for the first time without
compromising the sonic design of the amplifier. This was achieved by keeping
the remote circuit separate to the audio circuit and having its own dedicated
power supply (via a separate winding on the mains transformer). There is no
direct contact between the microcontroller and the signal path, as the
microcontroller controls the relays and volume control motor is using DC
control voltages.
During the Brio-R design process Rega reviewed the circuit and improved
the low and high current power supplies, coupling and bypass capacitors,
(where film capacitors are used throughout the signal path). The phono stage
has been improved to reflect the current improvements in the Rega Planar
turntables, where the input sensitivity has been increased along with a revision
of the sub 100Hz part of the phono frequency response.
2
Brio-R manual:Cursa manual.qxd
08/04/2011
09:25
Page 5
The output amplifier is capable of driving awkward loads as low as 1.7Ω, below
this the amplifier is protected against shorted speakers and reactive loads.
The power supply uses a low noise generously rated toroidal transformer and
10,000µF smoothing capacitors that provide enough current to drive the most
awkward of loads.
We have avoided superfluous gadgets such as tone controls and headphone
sockets as they obstruct the signal path and degrade sound quality. The Rega
Ear (sold seperately) is a dedicated headphone amplifier designed specifically
for this purpose offering far greater performance than an in built socket.
The Brio-R is utilising the highest quality components and all of our
engineers’ experience to achieve the best sonic performance and ensuring it is
the most advanced and feature packed Brio to date.
INSTALLATION
The Brio-R will work well on most surfaces, such as a shelf or table,
provided there is sufficient air around the amplifier to prevent overheating. If
using a turntable, magnetic interference can be avoided by positioning the
amplifier as far away from the cartridge as the tonearm lead will allow. Never
stack other hi-fi equipment directly on top of the amplifier. The heat produced
by the Brio-R is dispersed to the air by the case itself. Ensure that the case
has an unobstructed air passage around it. Never place it directly on fabric or
carpets.
3
Brio-R manual:Cursa manual.qxd
08/04/2011
09:25
Page 6
CONNECTIVITY
All the line level inputs and the line level output are made via RCA (Phono)
connectors. The sockets on Rega amplifiers are identified as follows:
Left: Always the upper row and marked in WHITE
Right: Always the lower row and marked in RED
IMPORTANT: ALWAYS TURN OFF THE AMPLIFIER WHEN CHANGING
LEADS & SPEAKER CABLES.
Rear Panel Connections
Input 1 – Phono stage for use with a turntable only.
The Phono input can be used with moving magnet (MM) or HIGH OUTPUT moving coil
(MC) cartridges.
4
Brio-R manual:Cursa manual.qxd
08/04/2011
09:25
Page 7
Earthing: For Rega turntables earthing is achieved via the Phono lead ground
therefore a separate earth is not necessary. If your tonearm has a separate earth
lead it will need to be connected to the grounding nut located on the underside of
the amplifier.
Tonearm earthing nut
5
Brio-R manual:Cursa manual.qxd
08/04/2011
09:25
Page 8
Input 2-5 – Standard “Line level” Line inputs enable the connection of any
additional sources such as CD players DVD, TUNER etc. Note the record output
is disabled when input 5 is selected.
Input 5 – Record input “line level” We advise if a recording device with the
ability to monitor the recording signal is connected to the amplifier, its output
is connected to input 5 to stop possible feedback issues.
Record output For connection to any recordable device (such as a CD
recorder). The output is a ‘record signal’ as selected by the main input selector
1-4. Note the record output is disabled when input 5 is selected. This output is
not affected by the volume control.
Mains Power lead The supplied power lead should be connected to the ‘Power
in’ socket also located on the rear of the unit.
LOUDSPEAKER CONNECTIONS
The Brio-R is capable of driving all normal Hi-Fi loudspeakers, Rega
recommends using loudspeakers with a nominal impedance of 8Ω. It is possible
to run speakers as low as 4Ω however such units may cause the case to exceed
40° C above the ambient temperature.
Top row RED and BLACK left speaker
Bottom row RED and BLACK right speaker
6
Brio-R manual:Cursa manual.qxd
08/04/2011
09:25
Page 9
IN USE
Switch the Brio-R on by pressing the power button located on the left hand
side of the front panel above the Rega Logo. After a few seconds you will hear
a gentle click indicating the switch on relay has been released and the amplifier
is ready for use.
INPUT SELECTION
To change between inputs simply press the button marked ‘input’ to cycle
through from 1 to 5.(This button can be held down to cycle quickly).
The selected input is highlighted by the corresponding red LED. Input selection
can also be changed via the supplied remote control handset.
7
Brio-R manual:Cursa manual.qxd
08/04/2011
09:25
Page 10
MUTE
The mute function is available only via the remote control. This function mutes
the power amplifier outputs. When selected a red LED is illuminated on the
front panel, press again to deselect.
REMOTE CONTROL
The Brio-R is supplied with a dedicated remote control handset which
allows you to select inputs 1 through 5, mute the unit and adjust the volume.
(Batteries included 2 x AAA Alkaline).
8
Brio-R manual:Cursa manual.qxd
08/04/2011
09:25
Page 11
Brio-R SPECIFICATIONS
Input sensitivities for rated output level:
Input 1 (Phono) input sensitivity = 2.1mV at 47KΩ In p a ra lle l w ith 2 2 0p F .
Maximum Input 1 (Phono) input level = 100mV.
Input 2 to 5 (Line) input sensitivity = 210mV at 47K.
Maximum Input 2 to 5 (Line) input level = 10.25V
Power outputs at 230/115V supply voltage:
50Watts RMS both channels driven into the rated load of 8Ω .
58Watts RMS one channel driven into the rated load of 8Ω .
73Watts RMS both channels driven into the rated load of 4Ω .
93Watts RMS one channel driven into the rated load of 4Ω .
Continued high level use into 4Ω may cause the case to exceed 40° C above the ambient
temperature.
Power consumption:
195Watts at 230/115V into the rated load of 8Ω .
Record output level:
Record output level (with rated input levels) = 210mV.
Record output impedance = 470Ω .
Frequency response:
Phono 15Hz to 40KHz (-3dB points) / 27Hz to 20.5KHz (-1dB points).
RIAA accuracy (100Hz to 10KHz) ± 0.4dB typically better than ± 0.3dB
Line 12Hz (-1dB points) to 43KHz (-3dB points).
9
Brio-R manual:Cursa manual.qxd
08/04/2011
09:25
Page 12
TROUBLESHOOTING
No power - logo not illuminated
No
Is the mains supply connected and the socket
switched on?
Correct the fault
Yes
No
Is the front panel on/off switch fully
depressed?
Switch the unit on (contact
Rega dealer if faulty)
Yes
Yes
Check the fuse on the back panel and
the mains plug, Have either blown?
Replace with the same
rated fuse
No
No
In the mains socket live?
(Plug in another appliance to check)
Yes
Contact your Rega dealer
10
Check household fuse or
contact an electrician
Brio-R manual:Cursa manual.qxd
08/04/2011
09:25
Page 13
TROUBLESHOOTING
Power ON - Logo illuminated but no output
No
Is the amplifier connected to the desired
input and the correct input selected?
Correct the fault
Yes
No
Are the speakers connected
correctly to the amplifier?
Correct the fault
Yes
Yes
Is the volume set to the minimum?
Correct the fault
No
Yes
Is the CD player selected with no
disc in the machine?
No
Contact your Rega dealer
11
Correct the fault
Brio-R manual:Cursa manual.qxd
08/04/2011
09:25
Page 14
TROUBLESHOOTING
Power ON - sound from one speaker only
Are the connections between the
speakers and the amplifier secure
and functioning correctly?
No
Correct the fault by plugging them in. If the
wires are loose or not correctly soldered,
contact your Rega dealer.
No
Check the source component for faults. Swap
the output leads and check to see if the fault
swaps over
Yes
Are both channels of the speaker
connected and working properly?
Yes
No
Are the cartridge connections at
the head shell functioning? Check
cartridge tags
Yes
There may be a fault in the amplifier/
speaker chain. Swap speaker cables.
Does the fault swap channels?
Yes
No
The speaker is at fault
Contact your Rega dealer
12
The source
is at fault
Yes
The amplifier or speaker
cables are at fault
Brio-R manual:Cursa manual.qxd
08/04/2011
09:25
Page 15
TROUBLESHOOTING
Loud hum through both speakers when ‘Phono’ is selected
Yes
Has your tonearm a seperate earth
connection?
Connect as described on
page 5 of this manual.
No
Yes
Is the amplifier situated directly below the
cartridge?
Correct the fault
No
Yes
Are there other pieces of HI-FI equipment
close to the turntable or amplifier?
No
Contact your Rega dealer
13
Correct the fault
Brio-R manual:Cursa manual.qxd
08/04/2011
09:25
Page 16
OWNERS LOG
(1)
Owner.......................................................................................................................................................
Date...........................................................................................................................................................
Where Purchased.................................................................................................................................
(2)
Owner.......................................................................................................................................................
Date...........................................................................................................................................................
Where Purchased................................................................................................................................
(3)
Owner.......................................................................................................................................................
Date...........................................................................................................................................................
Where Purchased................................................................................................................................
(4)
Owner.......................................................................................................................................................
Date...........................................................................................................................................................
Where Purchased................................................................................................................................
(5)
Owner.......................................................................................................................................................
Date...........................................................................................................................................................
Where Purchased................................................................................................................................
14
Brio-R manual:Cursa manual.qxd
08/04/2011
09:25
Page 17


![CURSA [1ex] Catalogue and Table Manipulation](http://vs1.manualzilla.com/store/data/005911996_1-56034bbec42ed74359b0b23f04aae37f-150x150.png)