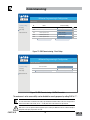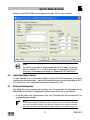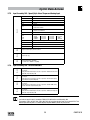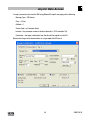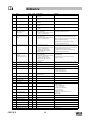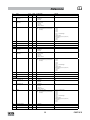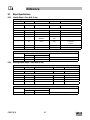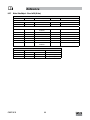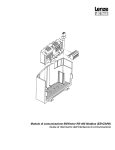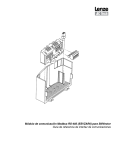
1
SMVector EtherNet/IP Communication Module
Communications Interface Reference Guide
About These Instructions
This documentation applies to the optional EtherNet/IP communications module for the SMVector inverter and
should be used in conjunction with the SMVector Operating Instructions (Document SV01) that shipped with the
drive. These documents should be read in their entirety as they contain important technical data and describe the
installation and operation of the drive.
© 2009 Lenze AC Tech Corporation
All rights reserved. No part of this manual may be reproduced or transmitted in any form without written permission
from Lenze AC Tech Corporation. The information and technical data in this manual are subject to change without
notice. Lenze AC Tech Corporation makes no warranty of any kind with respect to this material, including, but not
limited to, the implied warranties of its merchantability and fitness for a given purpose. Lenze AC Tech Corporation
assumes no responsibility for any errors that may appear in this manual and makes no commitment to update or
to keep current the information in this manual.
CompoNet™, DeviceNet™, CIP™, CIP Safety™, CIP Sync™, CIP Motion™, DeviceNet Safety™ and EtherNet/IP
Safety™ and all related indicia are trademarks of the ODVA (Open DeviceNet Vendors Association). EtherNet/IP™
is a trademark used under license by ODVA.
RSLogix™, RSLogix™ 5000, CompactLogix, CompactLogix 5000, ControlLogix®, MicroLogix™, SoftLogix,
Allen Bradley® and all related indicia are either registered trademarks or trademarks of Rockwell Automation®
Corporation.
Contents
1 Safety Information..............................................................................................................1
1.1
Warnings, Cautions and Notes.......................................................................................... 1
1.1.1
General............................................................................................................... 1
1.1.2
Application.......................................................................................................... 1
1.1.3
Installation.......................................................................................................... 1
1.1.4
Electrical Connection.......................................................................................... 2
1.1.5
Operation............................................................................................................ 2
2 Introduction........................................................................................................................3
2.1
EtherNet/IP Overview........................................................................................................ 3
2.2
Ethernet TCP/IP Configuration........................................................................................... 4
2.2.1
MultiCast Configuration....................................................................................... 4
2.2.2
IGMP Implementation.......................................................................................... 4
2.2.3
TCP/IP Sockets................................................................................................... 5
2.2.4
CIP Connections.................................................................................................. 5
2.3
Module Specification........................................................................................................ 5
2.4
Module Identification Label............................................................................................... 5
3 Installation.........................................................................................................................6
3.1
Mechanical Installation..................................................................................................... 6
3.2
Electrical Installation......................................................................................................... 7
3.2.1
Ethernet RJ-45 Socket........................................................................................ 7
3.2.2
Grounding........................................................................................................... 7
3.2.3
Cabling............................................................................................................... 8
3.2.4
Maximum Network Length.................................................................................. 8
3.2.5
Minimum Node to Node Cable Length................................................................. 8
3.2.6
Network Topology............................................................................................... 9
3.2.7
Example Networks.............................................................................................. 10
i
CMVETH01B
Contents
4 Commissioning..................................................................................................................11
4.1
4.2
Connect to the Drive......................................................................................................... 11
4.1.1
Configuring the PC IP Address (Windows XP)....................................................... 11
4.1.2
Configuring the SMVector Drive.......................................................................... 15
Configuring the SMV EtherNet/IP Module.......................................................................... 17
4.2.1
Connecting......................................................................................................... 17
4.2.2
Setting the Network Protocol............................................................................... 17
4.2.3
IP Address.......................................................................................................... 17
4.2.4
Network Mask.................................................................................................... 17
4.2.5
Gateway Address................................................................................................ 17
4.2.6
Multicast Address............................................................................................... 17
4.2.7
TTL Value........................................................................................................... 18
4.2.8
Configuration Control.......................................................................................... 18
4.2.9
Duplex Control.................................................................................................... 18
4.2.10 Interface Speed Control...................................................................................... 18
4.2.11 Non-Module Parameter Settings......................................................................... 18
4.3
Configuring the Network Master....................................................................................... 19
4.3.1
Master Support Files........................................................................................... 19
4.3.2
Configuring a Scanner or Bridge......................................................................... 19
4.3.3
Adding a Bridge or Scanner to the I/O Configuration............................................ 19
5 Cyclic Data Access.............................................................................................................23
5.1
Implicit (I/O) Messaging.................................................................................................... 23
5.2
Implicit Messaging Timeout.............................................................................................. 27
5.3
Saving the Configuration................................................................................................... 27
5.4
I/O Assemblies................................................................................................................. 28
5.4.1
Important Note on Input Assemblies.................................................................... 28
5.4.2
Important Note on Output Assemblies................................................................. 28
5.5
Using Assemblies for Control and Status/Data Monitoring................................................. 28
5.6
Output Assemblies........................................................................................................... 29
CMVETH01B
5.6.1
Output Assembly 20 - Basic Speed Control......................................................... 29
5.6.2
Output Assembly 21 - Extended Speed Control................................................... 29
5.6.3
Output Assembly 100 - Speed (Hz) & Digital and Analog Output.......................... 30
5.6.4
Output Assembly 102 - PID Setpoint & Digital and Analog Output........................ 31
5.6.5
Output Assembly 104 - Torque Setpoint & Digital and Analog Output.................. 32
5.6.6
Output Assembly 107 - Custom Selectable......................................................... 32
ii
Contents
5.7
Input Assemblies.............................................................................................................. 37
5.7.1
Input Assembly 70 - Basic Speed Control............................................................ 37
5.7.2
Input Assembly 71 - Extended Speed Control...................................................... 37
5.7.3
Input Assembly 101 - Speed (Hz) & Digital and Analog Input............................... 38
5.7.4
Input Assembly 103 - Speed (Hz) & Actual PID Setpoint and Feedback................ 38
5.7.5
Input Assembly 105 - Speed (Hz) & Actual Torque and Analog Input.................... 39
5.7.6
Input Assembly 106 - Custom Selectable............................................................ 39
6 Acyclic Data Access...........................................................................................................47
6.1
What is Acyclic Data?....................................................................................................... 47
6.2
Explicit Messaging............................................................................................................ 47
6.3
Explicit Messaging Timeout.............................................................................................. 54
7 Advanced Features.............................................................................................................55
7.1
Option Module Advanced Parameters............................................................................... 55
7.1.1
Module Revision................................................................................................. 55
7.1.2
Module Status..................................................................................................... 55
7.1.4
Module Time-out Action...................................................................................... 55
7.1.5
Initialize Ethernet/IP Settings............................................................................... 55
7.1.6
Module Firmware................................................................................................ 55
8 Diagnostics........................................................................................................................56
8.1
Faults............................................................................................................................... 56
8.2
Troubleshooting................................................................................................................ 56
9 Reference..........................................................................................................................57
9.1
Parameter Reference........................................................................................................ 57
9.2
Object Specifications........................................................................................................ 62
9.2.1
Identity Object - Class 0x01 (1 dec)..................................................................... 62
9.2.2
Message Router Object - Class 0x02 (2 dec)....................................................... 62
9.2.3
Assembly Object - Class 0x04 (4 dec)................................................................. 63
9.2.4
Connection Manager Object - Class 0x06 (6 dec)................................................ 64
9.2.5
Parameter Object - Class 0x0F (15 dec).............................................................. 65
9.2.6
Parameter Group Object - Class 0x10 (16 dec).................................................... 65
9.2.7
Motor Data Object - Class 0x28 (40 dec)............................................................. 66
9.2.8
Control Supervisor Object - Class 0x29 (41 dec).................................................. 67
9.2.9
AC/DC Drive Object - Class 0x2A (42 dec)........................................................... 68
9.2.10 TCP/IP Interface Object - Class 0xF5 (245 dec)................................................... 69
9.2.11 Ethernet Link Object - Class 0xF6 (246 dec)........................................................ 70
iii
CMVETH01B
Safety Information
1
Safety Information
1.1
Warnings, Cautions and Notes
1.1.1 General
Some parts of Lenze controllers (frequency inverters, servo inverters, DC controllers) can be live, moving
and rotating. Some surfaces can be hot.
Non-authorized removal of the required cover, inappropriate use, and incorrect installation or operation
creates the risk of severe injury to personnel or damage to equipment.
All operations concerning transport, installation, and commissioning as well as maintenance must be
carried out by qualified, skilled personnel (IEC 364 and CENELEC HD 384 or DIN VDE 0100 and IEC report
664 or DIN VDE0110 and national regulations for the prevention of accidents must be observed).
According to this basic safety information, qualified skilled personnel are persons who are familiar with
the installation, assembly, commissioning, and operation of the product and who have the qualifications
necessary for their occupation.
1.1.2 Application
Drive controllers are components designed for installation in electrical systems or machinery. They are
not to be used as appliances. They are intended exclusively for professional and commercial purposes
according to EN 61000-3-2. The documentation includes information on compliance with EN 61000-3-2.
When installing the drive controllers in machines, commissioning (i.e. the starting of operation as directed)
is prohibited until it is proven that the machine complies with the regulations of the EC Directive 98/37/EC
(Machinery Directive); EN 60204 must be observed.
Commissioning (i.e. starting drive as directed) is only allowed when there is compliance to the EMC Directive
(89/336/EEC).
The drive controllers meet the requirements of the Low Voltage Directive 73/23/EEC. The harmonised
standards of the series EN 50178/DIN VDE 0160 apply to the controllers.
The availability of controllers is restricted according to EN 61800-3. These products can cause
radio interference in residential areas. In the case of radio interference, special measures may be
necessary for drive controllers.
1.1.3 Installation
Ensure proper handling and avoid excessive mechanical stress. Do not bend any components and do not
change any insulation distances during transport or handling. Do not touch any electronic components
and contacts. Controllers contain electrostatically sensitive components, which can easily be damaged by
inappropriate handling. Do not damage or destroy any electrical components since this might endanger
your health! When installing the drive ensure optimal airflow by observing all clearance distances in the
drive's user manual. Do not expose the drive to excessive: vibration, temperature, humidity, sunlight, dust,
pollutants, corrosive chemicals or other hazardous environments.
1
CMVETH01B
Safety Information
1.1.4 Electrical Connection
When working on live drive controllers, applicable national regulations for the prevention of accidents (e.g.
VBG 4) must be observed.
The electrical installation must be carried out in accordance with the appropriate regulations (e.g.
cable cross-sections, fuses, PE connection). Additional information can be obtained from the regulatory
documentation.
The regulatory documentation contains information about installation in compliance with EMC (shielding,
grounding, filters and cables). These notes must also be observed for CE-marked controllers.
The manufacturer of the system or machine is responsible for compliance with the required limit values
demanded by EMC legislation.
1.1.5 Operation
Systems including controllers must be equipped with additional monitoring and protection devices according
to the corresponding standards (e.g. technical equipment, regulations for prevention of accidents, etc.).
You are allowed to adapt the controller to your application as described in the documentation.
DANGER!
• After the controller has been disconnected from the supply voltage, do not touch the live
components and power connection until the capacitors have discharged. Please observe the
corresponding notes on the controller.
• Do not continuously cycle input power to the controller more than once every three minutes.
• Close all protective covers and doors during operation.
WARNING!
Network control permits automatic starting and stopping of the inverter drive. The system design
must incorporate adequate protection to prevent personnel from accessing moving equipment
while power is applied to the drive system.
Table 1: Pictographs used in these instructions
Pictograph
CMVETH01B
Signal word
Meaning
Consequences if ignored
DANGER!
Warning of Hazardous Electrical
Voltage.
Reference to an imminent
danger that may result in death
or serious personal injury if the
corresponding measures are not
taken.
WARNING!
Impending or possible danger
for persons
Death or injury
STOP!
Possible damage to equipment
Damage to drive system or its
surroundings
NOTE
Useful tip: If observed, it will
make using the drive easier
2
Introduction
2
Introduction
EtherNet/IP just like its close siblings DeviceNet and ControlNet, uses CIP (Common Industrial Protocol
a.k.a. Control and Information Protocol) to exchange data between devices on an Ethernet network. AC
Tech implementation of CIP follows the standard supported by the ODVA (governing organization) and
supports the two main types of EtherNet/IP communication: Explicit Messaging and I/O Messaging.
The purpose of this document is to describe the EtherNet/IP implementation specifics for the SMV drive
as well as provide the necessary information and examples for users and network programmers. This
document assumes the reader is familiar with the general concept of CIP and has a basic knowledge of
Ethernet TCP/IP communication principles.
2.1
EtherNet/IP Overview
EtherNet/IP implements network protocol using the seven layer Open Systems Interconnection (OSI) model
as illustrated in Figure 1. Ethernet has an active infrastructure and as such EtherNet/IP can support an
almost unlimited number of point-to-point nodes. The EtherNet/IP system requires just one connection for
configuration and control. An EtherNet/IP system uses peer-to-peer communication and can be setup to
operate in a master/slave or distributed control configuration.
Layer
7
Application
CIP: Application Layer - Object Library
6
Presentation
CIP: Data Management - Explicit Messages, I/O Messages
5
Session
4
Transport
3
Network
2
Data Link
CAN
CSMA/NBA
ControlNet
CTDMA
Ethernet
CSMA/CD
1
Physical
DeviceNet
Physical Layer
ControlNet
Physical Layer
Ethernet
Physical Layer
CIP: Connection Management - Message Routing
DeviceNet
Transport
ControlNet
Transport
Encapsulation
TCP
UDP
IP
Figure 1: OSI Model
3
CMVETH01B
Introduction
2.2
Ethernet TCP/IP Configuration
Typically, an EtherNet/IP network is made up of segments containing point-to-point connections in a star
configuration as illustrated in Figure 2. At the center of this star topology is a bank of Ethernet 2 & 3
switches that can support a great number of point-to-point nodes.
Application-Specific
Object
Parameter
Object
Identity
Object
Assembly
Object
Message Router
Object
TCP/IP Interface
Object
Explicit
Messages
I/O
Messages
Connection Manager
Object
UCMM
Ethernet Interface
Object
TCP/IP Ethernet
Network
Figure 2: EtherNet/IP Star Configuration
2.2.1 MultiCast Configuration
By default the SMVector drive automatically generates the multicast address used for I/O messaging.
The default multicast TTL (time to leave) value is 1 which means that the multicast I/O packets will be
propagated over the local subnet only.
The user is allowed to explicitly set the drive’s multicast address and TTL values but this feature should
be used carefully. The TTL and Mcast Config attributes in the TCP/IP object are also implemented. Note
that the Num Mcast value in the Mcast Config attribute must always be 1. The user configurable SMVector
system variables for multicast are:
Variable ID
Meaning
426
TTL
422-425
Multicast address (default 239.64.2.224)
2.2.2 IGMP Implementation
The IGMP v2 version of the IGMP (Internet Group Management Protocol) is used.
0
15 16
7 8
Type
Max Response Time
23 24
Checksum
Group Address
Message Type
0x11 General Query
0x12 v1 Report
0x16 v2 Report
0x17 v2 Leave
0x22 v3 Report
Max Response Time
Maximum time the Querier
waits for report in response
to a membership query
Checksum
The 1’s complement
of the entire IGMP message
Group Address
In a general query it is the multicast group address
In other cases it is a specific multicast address
Figure 3: IGMP v2 Message Format
CMVETH01B
4
31
Introduction
2.2.3 TCP/IP Sockets
The SMVector drive supports up to 2 TCP/IP socket connections.
2.2.4 CIP Connections
The SMVector drive supports up to 6 CIP connections.
2.3
Module Specification
• Auto detection of data rates
• Supported baudrates: 10 BaseT, 100 BaseT
• Scalable amount of input and output process data words (4 output, 4 input).
• Parameter access data channel
• To simplify setup and operation, implemented classes and behavior conform to the AC DRIVE profile as
specified in the ODVA Common Industrial Protocol (CIP) Specification.
2.4
Module Identification Label
Figure 4 illustrates the labels on the SMV EtherNet/IP communications module. The SMVector EtherNet/IP
module is identifiable by:
• Two labels affixed to either side of the module.
• The color coded identifier label in the center of the module.
Right-hand Label:
Ratings & Certifications
COMM I/O ONLY
S/N: 123456789
LISTED
ESVZAE0-000XX1A10
Fieldbus Identifier:
E = EtherNet/IP
Left-hand Label:
Module Data
E0
SMV ETH
TYPE: ESVZAE0
ID-NO: 12345678
ESVZAC0-000XX1A10
A
B
C
D
E
A: Fieldbus Protocol
B: Model Number
C: Lenze Order Number
D: Firmware Revision
E: Hardware Revision
Figure 4: EtherNet/IP Module Labels
5
CMVETH01B
Installation
3
Installation
3.1
Mechanical Installation
1. Ensure that the AC supply has been disconnected before opening the terminal cover.
2. Insert the EtherNet/IP option module in the terminal cover and securely “click” into position as illustrated
in Figure 5.
3. Wire the network cables as detailed in paragraph 3.2, Electrical Installation to the connector provided
and plug the connector into the option module.
4. Align terminal cover for re-fitting, connect the module umbilical cord to the drive then close the cover
and secure, as shown in Figure 6.
NEMA 1
NEMA 1
NEMA 4
NEMA 4
Figure 5: Installing the EtherNet/IP Communications Module
Figure 6: Re-Installing the Terminal Cover
CMVETH01B
6
Installation
3.2
Electrical Installation
3.2.1 Ethernet RJ-45 Socket
The ethernet interface on the SMV is an RJ-45 Ethernet socket used to communicate with a host via
Ethernet TCP/IP. Table 2 identifies the terminals and describes the function of each.
Table 2: P2 Pin Assignments (Communications)
Name
Function
1
+ TX
Transmit Port (+) Data Terminal
2
- TX
Transmit Port (-) Data Terminal
3
+ RX
Receive Port (+) Data Terminal
4
N.C.
5
N.C.
6
- RX
7
N.C.
8
N.C.
RJ45 Connector
P2
ETHERNET
Pin
1
8
Receive Port (-) Data Terminal
The status LEDs integrated in the RJ-45 socket indicate link and activity. The green LED indicates whether
a link is established with another network device. The yellow LED indicates link activity and flashes when
data is received by the EtherNet/IP module.
3.2.2 Grounding
The SMV EtherNet/IP module must be gounded. Attach the ground wire/lug from the module to one of the
the chassis ground screws on the drive as illustrated in Figure 7.
Figure 7: Wiring the EtherNet/IP Module Ground Harness
7
CMVETH01B
Installation
3.2.3 Cabling
To ensure long-term reliability it is recommended that any cables used to connect a system together are
tested using a suitable Ethernet cable tester, this is of particular importance when cables are made up on
site. It is recommended that a minimum specification of CAT5e is installed on new installations, as this
gives a good cost performance ratio. If you are using existing cabling this may limit the maximum data
rate depending on the cable ratings. In noisy environments the use of STP or fiber optic cable will offer
additional noise immunity.
3.2.4 Maximum Network Length
The main restriction imposed on Ethernet cabling is the length of a single section of cable as detailed
in Table 3. If distances greater than this are required it may be possible to extend the network with
additional switches or by using a fiber optic converter. Cabling issues are the single biggest cause of
network downtime. Ensure cabling is correctly routed, wiring is correct, connectors are properly fitted and
any switches or routers used are rated for industrial use. Office grade Ethernet equipment does not offer
the same degree of noise immunity as equipment intended for industrial use.
Table 3: Maximum Network Length
Type of Cable
Data Rate (bits/sec)
Maximum Trunk Length (m)
Copper - UTP/STP CAT 5
10M
100
Copper - UTP/STP CAT 5
100M
100
Fiber Optic - Multi-mode
10M
2000
Fiber Optic - Multi-mode
100M
3000
Fiber Optic - Single-mode
10M
no standard
Fiber Optic - Single-mode
100M
up to 100000
NOTE
The distances specified are absolute recommended maximums for reliable transmission of data.
The distances for the fiber optic sections will be dependent on the equipment used on the network.
The use of wireless networking products is not recommended for control systems, as performance
may be affected by many external influences.
3.2.5 Minimum Node to Node Cable Length
There is no minimum length of cable recommended in the Ethernet standards for UTP or STP. For
consistency across fieldbus modules, a minimum network device-to-device distance equal to 1 meter of
cable is recommended. This minimum length helps to ensure a good bend radius on cables and avoids
unnecessary strain on connectors.
CMVETH01B
8
Installation
3.2.6 Network Topology
Given its universal connectivity, an ethernet network may contain varied connection devices including hubs,
switches and routers. Mixing commercial and industrial ethernet networks is possible but care should be
taken to ensure clean data transmission. A large, high performance industrial Ethernet network is best
served by managed switches that permit data control and monitoring capability.
3.2.6.1
Hubs
A hub provides a basic connection between network devices. Each device is connected to one port on
the hub. Any data sent by a device is then sent to all ports (floods) on the hub. The use of hubs is not
recommended for use within control systems due to the increased possibility of collisions. Collisions can
cause delays in data transmission and are best avoided, in severe cases a single node can prevent other
nodes on the same hub (or collision domain) from accessing the network. If using hubs or repeaters you
must ensure that the path variability value and propagation equivalent values are checked. This is beyond
the scope of this manual.
3.2.6.2
Switches
Switches offer a better solution to hubs because after initially learning the addresses of connected devices
the switch will only send data to the port that has the addressed device connected to it. This prevents
excessive traffic. Some managed switches allow the switching of data to be controlled and monitored which
may be of particular importance on large or high performance systems. The word “switch” is sometimes
used interchangeably with the terms scanner, matrix and bridge.
3.2.6.3
Routers
A router is used to communicate between two physical networks (or subnets) and provides some degree of
security by allowing only defined connections between the two networks. A typical use would be connecting
the office and manufacturing networks or connecting a network to an I.S.P (Internet Service Provider). A
router is sometimes known as a gateway as it provides a “gateway” between two networks.
3.2.6.4
Firewalls
A firewall allows separate networks to be connected together similar to a router, however the firewall offers
more security features and control. Typical features include address translation, port filtering, protocol
filtering, URL filtering, port mapping, service attack prevention, monitoring and virus scanning. A firewall is
the preferred method of allowing traffic from a manufacturing network to the business network.
3.2.6.5
VPN (Virtual Private Network)
A VPN is a method of using a non-secure or public network that allows devices to be connected together
as if they were connected on a private network. A typical example would be the connection of two remote
offices such as London and New York. Each office would require a high speed Internet connection and a
Firewall (or VPN device). In order to configure the VPN, encryption keys are exchanged so that both offices
can communicate. The data is then sent across the Internet (or shared network) in an encrypted form,
giving the illusion of a single connected network (speed limitations may apply).
9
CMVETH01B
Installation
3.2.7 Example Networks
3.2.7.1
Single PC to Single SMVector Drive
Crossover cable
SMV Drive
Figure 8: PC to SMV Drive
3.2.7.2
Single PC to Multiple SMVector Drives and Single Switch
Switch
Non crossover cable
(Drives to Switch)
Non crossover cable
(PC to Switch)
PC/Laptop
SMV Drives
Figure 9: PC to Multiple SMV Drives
3.2.7.3
Single PC to Multiple SMVector Drives and Multiple Switches
(Switch to Switch)
Non crossover or crossover cable depends on switch
Switch 1
Switch 2
Non crossover cable
(Drives to Switch)
Non crossover cable
(Drives to Switch)
Non crossover cable
(PC to Switch)
PC/Laptop
SMV Drives
Figure 10: PC to Multiple SMV Drives and Multiple Switches
CMVETH01B
10
SMV Drives
Commissioning
4
Commissioning
To setup an Ethernet/IP network, the ethernet port on each device that will be part of the network must be
configured. For the example illustrated in section 4.3 of this manual, the devices on the network include
an Allen-Bradley 1769-L32E CompactLogix controller, a PC and an SMVector drive with the EtherNet/IP
option module.
4.1
Connect to the Drive
The SMVector has an OnBoard web server which can be used to setup the module and for troubleshooting
purposes. It can be accessed from a standard web browser. The built-in webserver allows any parameter
to be read or written to the drive and provides access to the drive's diagnostic parameters.
STOP
In order for the drive to accept any writes from the webserver or the network in general, one
of the programmable inputs (TB-13A, TB-13B or TB-13C must be (manually) configured as
Network Enable (i.e., P121, P122 or P123 = 9). Also, the configured input must be asserted
via wiring such as a jumper between the input (TB-13A, TB-13B or TB-13C) and pin 4 on the
SMV control terminal strip.
To access the drive's webserver first set your PC's IP address to be on the same subnet as the drive (the
first three octets of the IP matching, with the final octet being unique). Refer to section 4.1.1.
4.1.1 Configuring the PC IP Address (Windows XP)
NOTE
This section of the manual gives some guidance on how to configure the Ethernet
communications setting on a PC to communicate with an SMV drive. Additional material for
other operating systems/platforms may be available from the website or as an appendix to
existing drive documentation.
If the drive and PC are both assigned automatic IP addresses from a DHCP enabled server
then configuration of the PC port should not be necessary.
However, in an industrial automation network it is recommended to use fixed IP addresses to
ensure the reliability and control of the network.
The following is a step by step guide to configure the PC IP address in Windows XP using either the classic
or category viewing mode.
To access the network settings on a Windows XP based PC:
Category (Default) View:
Classic View:
[Start]
[Start]
[Control Panel]
[Settings]
[Network & Internet Connections]
[Control Panel]
[Network Connections]
[Network Connections]
11
CMVETH01B
Commissioning
Start Menus - Windows XP
Category (Default) View
Classic View
One of the following screens will be displayed, depending on the user’s configuration of Windows XP
software.
Control Panel Displays - Windows XP
Category (Default) View
CMVETH01B
Classic View
12
Commissioning
Regardless of the Windows XP viewing mode the following [Network Connections] screen will appear.
Hereafter all configuration screens are the same regardless of selected Windows XP viewing mode.
Select the connection you wish configure. [Local Area Connection] is typically the standard or local Ethernet
port on the PC (the port supplied with the PC), with any additional hardwire ports displayed as [Local Area
Connection x] (with x being a numerical value). Double-click the icon for the port you wish to configure. The
[Local Area Connection Properties] screen will appear.
Use the vertical scroll bar on the right hand side of the screen to scroll down to the [Internet Protocol
(TCP/IP)] option in the selection window. Select this option and click the [Properties] button. The [Internet
Protocol (TCP/IP) Properties] screen will appear.
13
CMVETH01B
Commissioning
Select [Use the following IP address]. The IP address and Subnet mask text boxes can now be edited.
Enter an IP address for the PC. This IP address will need to be unique to the PC (different to any other device
on the network) but still allow communication on the same subnet that the drive is set to. To set up the PC
IP address in this way enter the first three values of the IP address box to be identical to those set in IP_1,
IP_2, and IP_3 parameters on the SMV drive. For the last value (IP_4) pick a unique value different to any
other device on that network.
If the drive IP address has been left at its factory default value (192.168.124.16) then a logical IP address
to assign to the PC might be 192.168.124.1
When exiting the IP address box the value in the subnet mask text box should default to 255.255.255.0.
This value tells the PC that all other devices on the network share the same values for the first 3 Octets of
their IP addresses with the last octet beginning unique to those devices. Typically the default value can be
left unchanged unless a larger network needs to be specified.
NOTE
If the PC and drive need to obtain an IP address from a DHCP enabled server then the
[Obtain an IP address automatically] option should remain ticked and no values should
be present for either the IP address or subnet mask.
CMVETH01B
14
Commissioning
4.1.2 Configuring the SMVector Drive
Once the PC's IP address is configured, open up a standard web browser and enter the drive's IP address
(default: 192.168.124.16) into the Address field. If the drive has been given a new IP address, then that
IP address must be the one entered in the web browser. Press [Enter]. The SMVector Programming and
Configuration page will open. The Commissioning menu on the left-hand side allows the user to navigate
through and configure the drive setup and diagnostic parameters.
Table 4: Commissioning Menu Folders
Configurable
Parameters
Folder
IP Settings
Basic Setup
Get/Set Parameter
MAC Address
P100 (Start Control Source)
Parameter Number
IP Address
P112 (Rotation)
Parameter Value
Network Mask
P121 (TB-13A Input Function)
Gateway Address
P122 (TB-13B Input Function)
Multicast Address
P123 (TB-13C Input Function)
In the [IP Settings] window, to select a new IP address, click [Write]. Type a value in the IP address octet
windows. Then click [Apply Settings]. Power cycle the drive in order for the new IP address to take effect.
SMVector Programming & Configuration
IP Settings
Commissioning
MAC Address
00-0c-61-80-00-00
IP Settings
IP Address
192
.
168
.
124
.
16
Basic Setup
Network Mask
255
.
255
.
255
.
0
Gateway Address
192
.
168
.
124
.
1
Multicast Address
239
.
64
.
2
.
224
Get/Set Parameter
Read
Write
Apply Settings
Figure 11: SMV Commissioning - IP Settings
WARNING!
Make sure it is safe to operate the driven equipment prior to starting the SMV drive from
the network. Damage to equipment and/or injury to personnel can result.
15
CMVETH01B
Commissioning
SMVector Programming & Configuration
Basic Setup
Commissioning
No.
Name
IP Settings
P100
Start Control Source
Basic Setup
P112
Rotation
Get/Set Parameter
P121
TB-13A Input Function
9 - Network Enable
P122
TB-13B Input Function
10 - Reverse Rotation
P123
TB-13C Input Function
8 - Control Select
Read
Selection / Setting
0 - Local Keypad
1 - Forward and Reverse
Write
Figure 12: SMV Commissioning - Basic Setup
SMVector Programming & Configuration
Get/Set Parameter
Parameter Number
0
IP Settings
Parameter Value
0
Basic Setup
Read
Write
Commissioning
Get/Set Parameter
Figure 13: SMV Commissioning - Get/Set Parameter
The web server's write access ability can be disabled for security purposes by setting P492 to "1".
TIP!
To ensure that the drive is network control ready, open the Get/Set Parameter. Write a value of 97 to register 65 to
start the drive. Write a value to P61 (ex 212 = 21.2Hz).Then write a value of 0 to 65 to stop the drive.
WARNING!
Make sure it is safe to operate the driven equipment prior to starting the SMV drive from the network. Damage to
equipment and/or injury to personnel can result.
CMVETH01B
16
Commissioning
4.2
Configuring the SMV EtherNet/IP Module
4.2.1 Connecting
With the drive power disconnected install the EtherNet/IP module and connect the network cable as
instructed in the preceeding sections. Ensure the drive Run / Enable terminal is disabled then apply the
correct voltage to the drive (refer to the drive's user manual for voltage supply details).
4.2.2 Setting the Network Protocol
P400 - Network Protocol
Default: 0
Access: RW
Range: 0 to 5
Type: Integer
Set P400 = 5 (Ethernet)
Some SMV option modules are capable of supporting multiple protocols; therefore it is necessary to set the
required protocol. The option module is only initialised after a protocol has been selected.
4.2.3 IP Address
P410 - P413 IP Address
Default: 192 168 124 16
Access: RW
Range: 0 - 255
Type: Integer
Set P410 - P413 to the required value. The default address is 192.168.124.16.
Each node on the network must have an individual address, if two of more nodes have duplicate addresses
the network will not function correctly. After changing this setting, the drive must be power cycled in order
for the new IP address to take effect.
4.2.4 Network Mask
P414 - P417 Network Mask
Default: 255 255 255 0
Access: RW
Range: 0 - 255
Type: Integer
Set P414 - P417 to the required value. The default address is 255.255.255.0.
4.2.5 Gateway Address
P418 - P421 Gateway Address
Default: 192 168 124 1
Access: RW
Range: 0 - 255
Type: Integer
Set P418 - P421 to the required value. The default address is 192.168.124.1.
4.2.6 Multicast Address
P422 - P425 Multicast Address
Default: 239 64 2 224
Access: RW
Range: 0 - 255
Type: Integer
The EtherNet/IP Master sets the multicast address. If desired, this can be set manually using parameters
P422 - P425. The default address is 239.64.2.224.
17
CMVETH01B
Commissioning
4.2.7 TTL Value
P426 TTL Value
Default: 1
Access: RW
Range: 1 - 255
Type: Integer
Set P426 to the required value. The default TTL value is 1. The TTL value defines the number of hops the
multicast message is allowed to propigate across routes. Consult your IT department for the proper setting
for your particular network installation.
4.2.8 Configuration Control
P427 Configuration Control
Default: 0
Access: RW
Range: 0, 1
Type: Integer
Set P427 to the required value. The default value is 0 (stored). A value of 1 = DHCP control.
4.2.9 Duplex Control
P428 Duplex Control
Default: 1
Access: RW
Range: 0 - 1
Type: Integer
Set P428 to the required value. The default value is 1 (full duplex). A value of 0 = half duplex control.
4.2.10 Interface Speed Control
P429 - Interface Speed Control
Default: 1
Access: RW
Range: 0 or 1
Type: Integer
The SMV EtherNet/IP module automatically detects and synchronises to the speed of the network to which
it has been connected. The P429 value represents the detected speed: 1 = 100Mbps, 0 = 10Mbps speed.
4.2.11 Non-Module Parameter Settings
In addition to configuring the EtherNet/IP option module there are several drive based parameters that may
need to be set. Such as:
• P100 - Start Control Source; network control is possible in any of the modes except mode 2 - “Remote
Keypad Only”.
• P112 - Rotation; Used to enable either uni or bi direction rotation of the motor.
• P121, 122 or 123 = 9. One of the digital inputs MUST be assigned to mode 9 - “Network Control” and
have the corresponding input closed to enable write access to the drive parameters and to perform any
network control of the unit.
CMVETH01B
18
Commissioning
4.3
Configuring the Network Master
4.3.1 Master Support Files
Some EtherNet/IP master configuration software utilises Electronic Data Sheet (eds) files to configure
the network profile and communications with the relevant devices. Some use this file for automatic tag
generation. The SMV eds file is available on the CD ROM that ships with the module and on the Lenze-AC
Tech website.
4.3.2 Configuring a Scanner or Bridge
To configure a simple network like the network illustrated in Figure 14, follow the steps in section 4.3.3.
This example uses an Allen-Bradley 1769-L32E CompactLogix controller to communicate with SMV drives
using implicit I/O messaging over an ethernet network. The controller has a scanner (bridge) that needs to
be configured. The I/O assembly object instances will be used for status, input and output data and to map
them in the controller memory.
Logic Controller
Network
Switch
Laptop
Figure 14: Example Network
4.3.3 Adding a Bridge or Scanner to the I/O Configuration
To establish communications over an EtherNet/IP network, add the controller and its scanner or bridge to
the I/O configuration.
1.
Start RSLogix 5000
The RSLogix 5000 window opens as illustrated in Figure 14. For the CompactLogix L32E controller,
the I/O configuration already includes a local Ethernet port.
If a SoftLogic controller or ControlLogix controller is used then an Ethernet port scanner needs to
be added as illustrated in Figure 15.
NOTE
The PLC must be Offline as shown in Figure 15, otherwise it is not possible to add
the new module.
19
CMVETH01B
Commissioning
Figure 15: RSLogix 5000 Window (CompactLogix L32E)
CMVETH01B
20
Commissioning
Figure 16: RSLogix 5000 Window (SoftLogix 5800)
2.
For CompactLogix and SoftLogix only:
Right click on [Backplane, 1789-A17/A Virtual Chassis] to choose the Ethernet adapter.
Select [New module] and the “Select Module” dialog box will open.
Under the “By Category” tab, click the [+] icon to expand the [Communications] folder
Select the EtherNet/IP scanner or bridge used by your controller. (Ex SoftLogix5800 EtherNet/IP)
Then select the major revision of your controller’s firmware in the Major Revision box.
Figure 17: Ethernet Adapter selection (SoftLogix 5800)
21
CMVETH01B
Commissioning
3.
Click [OK].
The Module Properties dialog box opens. For the CompactLogix controller, right click on [1769L32E EthernetPort LocalENB] in I/O folder and then select “Properties”.
Figure 18: Ethernet Scanner Properties Setup (SoftLogix 5800)
4.
Set the “New Module” properties using the information in Table 5.
Table 5: “New Module” Fields
5.
Box
Type
Name
A name to identify the scanner or bridge.
Slot
The slot # of the EtherNet/IP scanner or bridge in the rack.
Revision
The minor revision of the firmware in the scanner. (You have already set the major revision in the
Select Module Type dialog box)
IP Address
The IP address of the EtherNet/IP scanner or bridge.
Electronic Keying
Compatible Module. This setting for Electronic Keying ensures the physical module is consistent
with the software configuration before the controller and scanner or bridge make a connection.
Therefore, ensure that you have set the correct revision in this dialog box. Refer to the online Help if
the controller and scanner have problems making a connection and you want to change this setting.
Click [OK] to finish.
The scanner (or bridge) is now configured for the EtherNet/IP network. Its name is now listed in the
I/O Configuration folder.
CMVETH01B
22
Cyclic Data Access
5
Cyclic Data Access
5.1
Implicit (I/O) Messaging
To map the drive to an Ethernet IP scanner in RSLogix 5000 for implicit messaging:
Click the [I/O Configuration] folder in the left-hand navigation window
Click the appropriate Ethernet Port folder, [1769-L32E Ethernet Port] in this example.
Right click on the [Ethernet] network icon and select [New Module].
Expand “Communications” and select [ETHERNET-MODULE Generic Ethernet Module].
23
CMVETH01B
Cyclic Data Access
Enter a name for the drive -usually relating to the process (i.e. booster_pump_4, or an equipment tag
number such as PP105).
Enter the IP address of the SMV drive. Ensure that it is on the same subnet as the PLC (the first 3 octets of
the IP address match).
CMVETH01B
24
Cyclic Data Access
For basic applications enter “Data – INT” for the Comm format.
Enter the desired Input and Output Assembly numbers and their corresponding lengths. Remember the
size must be set to the number of words that actually make up the assembly you want to use.
TIP! For most applications use Assemblies 101 (Input) and 100 (Output).
For Configuration enter assembly instance 1 and a size of 0. This value is required.
Under the connection tag enter the desired RPI rate. This is how frequently the drive will be polled by the
PLC. The minimum recommended value is 5.0 milliseconds.
From this screen you can also optionally set the controller to fault if the Ethernet IP connection is lost to
the drive while the controller is running. This selection is the [Major Fault On Controller If Connection Fails
While in Run Mode].
The corresponding tags will then be created in the controller tags of the project as shown herein.
25
CMVETH01B
Cyclic Data Access
To understand this from the above configuration we named the drive “My_SMVector_Drive”. There are
three sets of tags labeled “My_SMVector_Drive”:
[:C] for the Configuration assembly (1)
[:I] for the Input Assembly (101 in this example)
[:O] for the Output assembly (100 in this example)
Click on the [+] and expand the [My_SMVector_Drive:O] data to reveal all four words that make up the
Output assembly.
To get more data from the drive, the user can optionally map the drive as “Data – INT- With Status” and
map a second input assembly as Status Input (i.e. Assembly 106 shown in the following screenshot).
CMVETH01B
26
Cyclic Data Access
When this is done Status Output must be mapped to Assembly 109. This value is required
STOP!
The Status Input Assembly is limited to supporting two 16-bit words. The user can
either use assembly 70, 71 or 106 for this purpose. If using Assembly 106 as the
status input, the user must set the length to 2 and must set P452 and P453 to 0.
5.2
Implicit Messaging Timeout
It is often desirable to set a fault timeout condition to prevent the drive from operating in a runaway
condition or loss of communications. To do this while controlling the drive via implicit messaging, set P431,
P432 and P434 to 0. Set the timeout period desired (in milliseconds) in P435.
5.3
Saving the Configuration
After adding the scanner (or bridge) and the adapter to the I/O configuration, the configuration must be
downloaded to the controller. The configuration should also be saved to a file on your computer.
1. On the top toolbar, click [Communications] then select [Download] from the pull down menu. The
Download dialog box will open.
NOTE
If a message box reports that RSLogix is unable to go online, then select ‘Communications Who
Active’ to try and find your controller in the ‘Who Active’ dialog box. If the controller is not shown,
then the Ethernet/IP driver needs to be added or configured in RSLinx. Refer to the RSLinx online help.
27
CMVETH01B
Cyclic Data Access
2. Click [Download] to download the configuration to the controller. When the download is successfully
completed, RSLogix enters online mode and the I/O OK box in the upper-left part of the screen is green.
3. On the top toolbar, click [File] then select [Save] from the pull down menu. If this is the first time the
project is saved, then the [Save As] dialog box will open. Navigate to a folder, type a file name and then
click [Save] to save the configuration to a file on your computer.
5.4
I/O Assemblies
SMV Ethernet/IP implementation supports the I/O assembly object class 0x04. SMV assemblies are static.
There are several Input and Output pre-defined assemblies (assembly object instances) that can be used
for data exchange. The terms Input and Output refer to the point of view of the scanner. Output data
is produced by the scanner and consumed by the adapter. Input data is produced by the adapter and
consumed by the scanner. The SMV is always an adapter device. Depending on the assembly number the
memory map of the data can have a different size and meaning.
5.4.1 Important Note on Input Assemblies
Input assemblies (adapter to scanner) are mapped to the adapter memory from byte 0. There is no preceding
4 byte header like that found in most Allen-Bradley equipment. The SMVector does not use preceding
header functionality for real time status. So the start address in the assembly memory map is the actual
start of the 1st assembly data item. The user should supply the actual assembly length when mapping the
input assembly to the controller memory.
5.4.2 Important Note on Output Assemblies
Output assemblies (scanner to adapter) are assumed to have the preceding 4 byte header. When mapping
the assembly this header will automatically be added to the data stream by most AB PLC/CLC equipment.
If you use equipment other than AB for the scanner, configure it to send the 4 byte header preceding the
actual assembly data. The data in the header should be set to 0.
5.5
Using Assemblies for Control and Status/Data Monitoring
Output assemblies are commonly used for controlling the enable/disable state of the drive and for supplying
the velocity or torque reference. Input assemblies are commonly used to monitor the drive status and runtime quantities such as current velocity, current, actual position and position error. The recommended
configurations for I/O assemblies are:
Configuration assembly:
Status Output assembly:
Status Input assembly:
CMVETH01B
use assembly 1 with size 0
use assembly 109
use assembly 70, 71 or 106; size of assembly must match the actual size
of the assembly. In case of CompactLogix it must be 2 x 16bit.
28
Cyclic Data Access
5.6
Output Assemblies
5.6.1 Output Assembly 20 - Basic Speed Control
Word 1
Word 0
Bit 0
0 = NOT Run Forward
1 = Run Forward
Bit 1
Reserved
Bit 2
Fault reset on transition from 0 to 1
Bit 3
Reserved
Bit 4
Reserved
Bit 5
Reserved
Bit 6
Reserved
Bit 7
Reserved
Bit 8
Reserved
Bit 9
Reserved
Bit 10
Reserved
Bit 11
Reserved
Bit 12
Reserved
Bit 13
Reserved
Bit 14
Reserved
Bit 15
Reserved
Speed in RPMs (max 32767)
• RPM is calculated based on P305 and P304
• Example 1 (P305 = 1750 RPM, P304 = 60 Hz):
Requested speed command 25.0 Hz = 25.0 x 1750/60 = 729 = 0x02D9
NOTE
To use this Output assembly (20) Network Control and Network Reference must be set using explicit
communication by writing into the control word at NetId 65 – the bit configuration of this word matches the
WORD 0 of output assembly 100.
5.6.2 Output Assembly 21 - Extended Speed Control
Word 1
Word 0
Bit 0
0 = NOT Run Forward
1 = Run Forward
Bit 1
0 = NOT Run Reverse
1 = Run Reverse
Bit 2
Fault reset on transition from 0 to 1
Bit 3
Reserved
Bit 4
Reserved
Bit 5
0 = Local Control
1 = Network Control
Bit 6
0 = Local Speed reference
1 = Network Speed reference
Bit 7
Reserved
Bit 8
Reserved
Bit 9
Reserved
Bit 10
Reserved
Bit 11
Reserved
Bit 12
Reserved
Bit 13
Reserved
Bit 14
Reserved
Bit 15
Reserved
Speed in RPMs (max 32767)
• RPM is calculated based on P305 and P304
• Example 1 (P305 = 1750 RPM, P304 = 60 Hz):
Requested speed command 25.0 Hz = 25.0 x 1750/60 = 729 = 0x02D9
NOTE
In order to Start/Stop the drive via network control, bit 5 of Word 0 must be set in this assembly.
In order to control the speed via network communications, bit 6 of Word 0 must be set in this assembly.
29
CMVETH01B
Cyclic Data Access
5.6.3 Output Assembly 100 - Speed (Hz) & Digital and Analog Output
Bit 0
Bit 1
Bit 2
Bit 3
Bit 4
Bit 5
Word 0
Bit 6
Bit 7
Bit 8
Bit 9
Bit 10
Bit 11
Bit 12
Bit 13
Bit 14
Word 1
Unsigned speed 0.1Hz resolution
• received value = 0x01F0 = 49.6Hz
Word 2
Digital Output + Relay – Active when parameter P140, P142 = 25 Network Control
Bit 9 – Open Collector
Bit 10 - Relay
Others – reserved for future use
Word 3
Bit 15
0 = NOT Run Forward
1 = Run Forward
0 = NOT Run Reverse
1 = Run Reverse
Fault reset on transition from 0 to 1
Reserved
Reserved
0 = Local Control
1 = Network Control
0 = Local Speed reference
1 = Network Speed reference
Reserved
Network Speed reference (valid when bit 6 set)
0 – Network
3 – 4-20mA
6 – Preset #3
9 – Preset #6
1 – keypad
4 – Preset #1
7 – Preset #4
10 – Preset #7
2 – 0-10VDC
5 – Preset #2
8 – Preset #5
11 – MOP
0 = No Action
1 = Inhibit (Coast to STOP)
0 = No Action
1 = Activate Quick STOP
0 = No Action
1 = Force Manual Mode (active only in Network Control, in PID mode will force open loop)
0 = DC brake active
1 = DC brake NOT active
Analog Output [0.01VDC] – Active when parameter P150 = 9 Network Control
• received value = 0x024B = 5.87[VDC]
NOTE
In order to Start/Stop the drive via network control, bit 5 of Word 0 must be set in this assembly.
In order to control the speed via network communications, bit 6 of Word 0 must be set in this assembly.
CMVETH01B
30
Cyclic Data Access
5.6.4 Output Assembly 102 - PID Setpoint & Digital and Analog Output
Bit 0
Bit 1
Bit 2
Bit 3
Bit 4
Bit 5
Word 0
Bit 6
Bit 7
Bit 8
Bit 9
Bit 10
Bit 11
Bit 12
Bit 13
Bit 14
Word 1
Network PID setpoint
Signed value -999 … 31000
Word 2
Digital Output + Relay – Active when parameter P140,P142 = 25 Network Control
Bit 9 – Open Collector
Bit 10 - Relay
Others – reserved for future use
Word 3
Bit 15
0 = NOT Run Forward
1 = Run Forward
0 = NOT Run Reverse
1 = Run Reverse
Fault reset on transition from 0 to 1
Reserved
Reserved
0 = Local Control
1 = Network Control
0 = Local Speed reference
1 = Network Speed reference
Reserved
Network Speed reference (valid when bit 6 set)
0 – Network
3 – 4-20mA
6 – Preset #3
9 – Preset #6
1 – keypad
4 – Preset #1
7 – Preset #4
10 – Preset #7
2 – 0-10VDC
5 – Preset #2
8 – Preset #5
11 – MOP
0 = No Action
1 = Inhibit (Coast to STOP)
0 = No Action
1 = Activate Quick STOP
0 = No Action
1 = Force Manual Mode (active only in Network Control, in PID mode will force open loop)
0 = DC brake active
1 = DC brake NOT active
Analog Output [0.01VDC] – Active when parameter P150 = 9 Network Control
• received value = 0x024B = 5.87[VDC]
NOTE
In order to Start/Stop the drive via network control, bit 5 of Word 0 must be set in this assembly.
In order to control the speed via network communications, bit 6 of Word 0 must be set in this assembly.
31
CMVETH01B
Cyclic Data Access
5.6.5 Output Assembly 104 - Torque Setpoint & Digital and Analog Output
Bit 0
Bit 1
Bit 2
Bit 3
Bit 4
Bit 5
Word 0
Bit 6
Bit 7
Bit 8
Bit 9
Bit 10
Bit 11
Bit 12
Bit 13
Bit 14
Word 1
Unsigned Torque Setpoint
0 – 400% limited by parameter P330 Torque Limit
Word 2
Digital Output + Relay – Active when parameter P140,P142 = 25 Network Control
Bit 9 – Open Collector
Bit 10 - Relay
Others – reserved for future use
Word 3
Bit 15
0 = NOT Run Forward
1 = Run Forward
0 = NOT Run Reverse
1 = Run Reverse
Fault reset on transition from 0 to 1
Reserved
Reserved
0 = Local Control
1 = Network Control
0 = Local Speed reference
1 = Network Speed reference
Reserved
Network Speed reference (valid when bit 6 set)
0 – Network
3 – 4-20mA
6 – Preset #3
9 – Preset #6
1 – keypad
4 – Preset #1
7 – Preset #4
10 – Preset #7
2 – 0-10VDC
5 – Preset #2
8 – Preset #5
11 – MOP
0 = No Action
1 = Inhibit (Coast to STOP)
0 = No Action
1 = Activate Quick STOP
0 = No Action
1 = Force Manual Mode (active only in Network Control, in PID mode will force open loop)
0 = DC brake active
1 = DC brake NOT active
Analog Output [0.01VDC] – Active when parameter P150 = 9 Network Control
• received value = 0x024B = 5.87[VDC]
NOTE
In order to Start/Stop the drive via network control, bit 5 of Word 0 must be set in this assembly.
In order to control the speed via network communications, bit 6 of Word 0 must be set in this assembly.
Word 0
Data transferred to register/Id specified in parameter P440
Word 1
Data transferred to register/Id specified in parameter P441
Word 2
Data transferred to register/Id specified in parameter P442
Word 3
5.6.6 Output Assembly 107 - Custom Selectable
Data transferred to register/Id specified in parameter P443
Valid selections:
0 – Disabled/Not evaluated.
1 – SMV Control Word
2 – Network command Frequency
3 – Lenze C135 Control Word
4 – Network Speed in unsigned RPM
5 – Network PID Setpoint
6 – Network Torque Setpoint
7 – Network Speed in signed RPMs (control direction)
8 – Digital Outputs
9 – Analog Output
FOR EXAMPLE: Setting the P440 to 1 will place the value of received output assembly WORD 0 into the
SMV control Word.
CMVETH01B
32
Cyclic Data Access
NOTE
Last value not equal to zero in parameters P440 to P443 defines the end of Assembly 107.
For example: P440 = 0; P441=2; P442=4; P443=0. Last value not equal zero is in parameter P442. That
defines output assembly 107 as a 3 words (6 bytes) long with WORD 0 (P440 = 0) not being evaluated
Output Assembly 107 options
•
•
•
•
•
•
•
•
P44x = 1, SMV Control Word
P44x = 2, Network Frequency Setpoint
P44x = 3, Lenze C135 Control Word
P44x = 4 or 7, Network Speed Setpoint
P44x = 5, Network PID Setpoint
P44x = 6, Network Torque Setpoint
P44x = 8, Network Digital I/O Control Word
P44x = 9, Network Analog I/O Control Value
5.6.6.1
P44x = 1, SMV Control Word
The SMV Control Word consists of 16 control bits some of which are reserved.
Table 6: SMV Control Word
b15
b14
b13
b12
DC
Braking
PID
Disable
Quick
Stop
Controller
Inhibit
b11
b10
b9
b8
b7
b6
b5
b4
b3
b2
b1
b0
Reserved
Network
Reference
Enable
Network
Control
Enable
Reserved
Reserved
Fault
Reset
Run
Reverse
Run
Forward
Network Setpoint Reference Source
Table 7: SMV Control Word BIT Functions
BIT
Function
0
Run Forward
1
Run Reverse
Set to 1 to run the motor in the REVERSE direction.
2
Fault Reset
A 0-to-1 transition will reset the drive from a trip condition.
3
Reserved
4
Reserved
5
Network Control
Enable
6
Network Reference
Enable
7
Reserved
8
9
10
11
Description
Set to 1 to run the motor in the FORWARD direction.
Network
Setpoint
Reference
Source
0 = Local Control
1 = Network Control
0 = Local Speed Reference
1 = Network Speed Reference
0 = Network
4 = Preset #1
8 = Preset #5
1 = Keypad
5 = Preset #2
9 = Preset #6
2 = 0-10VDC
6 = Preset #3
10 = Preset #7
3 = 4-20mA
7 = Preset #4
11 = MOP
12
Controller Inhibit
13
Quick Stop
Set to 1 to disable the drive and stop the ramp time defined in P127
Set to 1 to disable the drive and allow the motor to coast to a stop
14
PID Disable
When using PID mode, setting this bit (14) to 1 will disable PID control. (Active only in Network Control)
15
DC Braking
Set to 1 to activate DC injection braking. Refer to P174 for details.
33
CMVETH01B
Cyclic Data Access
If the SMV Control Word is used, the RUN and STOP commands are controlled as listed in Table 8.
Table 8: SMV Control Word RUN and STOP Events
BIT 0 - RUN FWD
0
0 -> 1
0
0 -> 1
1
1 -> 0
1
BIT 1 - RUN REV
0
0
0 -> 1
0 -> 1
1
1
1 -> 0
Action
STOP Method (Refer to P111)
RUN FORWARD
RUN REVERSE
NO ACTION / remains in last state
NO ACTION / remains in last state
RUN REVERSE
RUN FORWARD
NOTE
If P112 (ROTATION) is set to FORWARD ONLY, the drive will not be able to run in the reverse direction.
For absolute clarity: "0 -> 1" is the transition from 0 to 1 and "1 -> 0" is the transition from 1 to 0
5.6.6.2
P44x = 2, Network Frequency Setpoint
The Network Frequency Setpoint is represented as an unsigned Hz value. This mapping along with the use
of the correct Control Word Bits allows the drive frequency setpoint to be controlled from the network. This
mapping function uses unsigned scaled integer values. Example:
• Frequency Setpoint value to be transmitted from the network master = 33.5Hz.
• The actual value transmitted to the drive must be 335 (0x014F).
5.6.6.3
P44x = 3, Lenze C135 Control Word
The Lenze C135 Control Word consists of 16 control bits some of which are reserved.
Table 9: Lenze C135 Control Word
b15
Network Ref
Enable
b7
Reserved
b14
DC
Braking
b6
Reserved
b13
Reserved
b12
Reserved
b5
Reserved
b4
Reserved
b11
Fault
Reset
b3
Quick
Stop
b10
Reserved
b2
Direction
of Rotation
b9
Controller
Inhibit
b1
b8
Network CTRL
Enable
b0
Network Setpoint Reference
Table 10: Lenze C135 Control Word BIT Functions
BIT
0
1
2
3
4-7
8
9
10
11
Function
Network Setpoint
Reference Source
Direction of Rotation
Quick Stop
Reserved
Network Control Enable
Controller Inhibit
Reserved
Fault Reset
12 - 13
14
15
CMVETH01B
Reserved
DC Braking
Network Reference Enable
0 = Network
1 = Preset #1
2 = Preset #2
3 = Preset #3
Description
(Active only when Network Reference
is Enabled)
0 = CW (FORWARD)
1 = CCW (REVERSE)
Set to 1 to disable the drive and stop the ramp time defined in P127
0 = Local Control
1 = Network Control
Set to 1 to disable the drive and allow the motor to coast to a stop
A 0-to-1 transition will reset the drive from a trip condition.
If the reason for the trip is still present or another fault condition has been detected, the
drive will immediately trip again. When resetting the drive, it is recommended to check the
status word to ensure that the reset was successful, before attempting to restart the drive.
Set to 1 to activate DC injection braking. Refer tp P174 & 175 for details.
0 = Local Speed Reference
1 = Network Speed Reference
34
Cyclic Data Access
5.6.6.4
P44x = 4 or 7, Network Speed Setpoint
When P44x = 4, the Network Speed Setpoint is represented as an unsigned rpm value.
When P44x = 7, the Network Speed Setpoint is represented as a signed rpm value, Direction Control
Using one of these mappings along with the use of the correct Control Word Bits allows the drive speed
setpoint to be controlled from the network.
NOTE
While the values used do not have to be scaled for data transmission, RPM scaling is based
on P304 Motor Rated Frequency and P305 Motor Rated Speed.
Example: If P304 = 60Hz; P305 = 1750 RPM,
then request setpoint forward (CW) at 25.0 HZ = 25.0 x 1750/60 = 729 = 0x02D9
Example 1:
• P44x = 4
• Speed Setpoint value to be transmitted from the network master = 750rpm.
• The actual value transmitted to the drive must be 750 (0x02EE).
Example 2:
• P44x = 7
• Speed Setpoint value to be transmitted from the network master = +750rpm.
• The actual value transmitted to the drive must be 750 (0x02EE).
• Speed Setpoint value to be transmitted from the network master = -333rpm.
• The actual value transmitted to the drive must be -333 (0xFEB3).
• If Reverse Direction is enabled, the drive will reverse as appropriate.
5.6.6.5
P44x = 5, Network PID Setpoint
The Network PID Setpoint is represented as a signed PID value in the range from -999 to 31000.
This mapping along with the use of the correct Control Word Bits allows the drive PID setpoint (when in PID
mode) to be controlled from the network.
5.6.6.6
P44x = 6, Network Torque Setpoint
The Network Torque Setpoint is represented as an unsigned percent value in the range from 0 to 400%.
This mapping along with the use of the correct Control Word Bits allows the drive torque setpoint (when in
torque mode) to be controlled from the network. The maximum torque value is 400%, however P330 can
be used to apply an overriding torque limit.
35
CMVETH01B
Cyclic Data Access
5.6.6.7
P44x = 8, Network Digital I/O Control Word
To utilise the drive's digital output and relay functions directly from the network master, set:
• P140 = 25 - Relay Network Controlled
• P142 = 25 - Digital Output Network Controlled
The Digital I/O Control Word consists of 16 control bits some of which are reserved.
Table 11: Digital I/O Control Word
b15
b14
b13
b12
b11
b10
b9
b8
Reserved
Reserved
Reserved
Reserved
Reserved
Activate
Relay
Activate
Digital Output
Reserved
b7
b6
b5
b4
b3
b2
b1
b0
Reserved
Reserved
Reserved
Reserved
Reserved
Reserved
Reserved
Reserved
5.6.6.8
P44x = 9, Network Analog I/O Control Value
To utilise the drive's analog output directly from the network master set:
• P150 = 9 - Analog Output Network Controlled
This mapping function uses an unsigned scaled integer value.
Example:
• Analog value to be transmitted from the network master = 5.78V.
• The actual value transmitted to the drive must be 578 (0x024B).
CMVETH01B
36
Cyclic Data Access
5.7
Input Assemblies
Word 1
Word 0
5.7.1 Input Assembly 70 - Basic Speed Control
Bit 0
1 = Faulted
Bit 1
Reserved
Bit 2
1 = Running Forward
Bit 3
Reserved
Bit 4
Reserved
Bit 5
Reserved
Bit 6
Reserved
Bit 7
Reserved
Bit 8
Reserved
Bit 9
Reserved
Bit 10
Reserved
Bit 11
Reserved
Bit 12
Reserved
Bit 13
Reserved
Bit 14
Reserved
Bit 15
Reserved
• Actual Speed in RPMs
• RPM is calculated based on P305 and P304
• Example 1 (P305 = 1750 RPM, P304 = 60 Hz): Frequency at 25.0 Hz = 25.0 x 1750/60.0 = 729 = 0x02D9
Word 1
Word 0
5.7.2 Input Assembly 71 - Extended Speed Control
Bit 0
1 = Faulted
Bit 1
Reserved
Bit 2
1 = Running Forward
Bit 3
1 = Running Reverse
Bit 4
1 = Ready
Bit 5
0 = Local Control
1 = Control from Network
Bit 6
0 = Local reference
1 = Reference from Network
Bit 7
1 = At reference
Bit 8
Reserved
Bit 9
Reserved
Bit 10
Reserved
Bit 11
Reserved
Bit 12
Reserved
Bit 13
Reserved
Bit 14
Reserved
Bit 15
Reserved
• Actual Speed in RPMs
• RPM is calculated based on P305 and P304
• Example 1 (P305 = 1750 RPM, P304 = 60 Hz): Frequency at 40.0 Hz = 40.0 x 1750/60.0 = 1166 = 0x048E
37
CMVETH01B
Cyclic Data Access
5.7.3 Input Assembly 101 - Speed (Hz) & Digital and Analog Input
Bit 0
Bit 1
Bit 2
Bit 3
Bit 4
Word 0
Bit 5
Bit 6
Bit 7
Bit 8
Bit 9
Bit 10
Bit 11
Word 1
Unsigned actual frequency 0.1Hz resolution.
Word 2
Digital Input/Output states ( See Note 1 for details)
Word 3
Bit 12
Bit 13
Bit 14
Bit 15
1 = Faulted
Reserved
1 = Running Forward
1= Running Reverse
1 = Ready
0 = Local Control
1 = Control from Network
0 = Local reference
1 = Reference from Network
1 = At reference
Actual set point source:
0 – keypad
3 – Preset #1
1 – 0-10VDC
4 – Preset #2
2 – 4-20mA
5 – Preset #3
1 = PID Active (closed loop)
1 = Torque mode active
1 = Current limit
1 = DC Braking
Analog Input 0-10V TB [0.01VDC]
• received value = 0x024B = 5.87[VDC]
6 – Preset #4
7 – Preset #5
8 – Preset #6
9 – Preset #7
10 – MOP
11 – Network
5.7.4 Input Assembly 103 - Speed (Hz) & Actual PID Setpoint and Feedback
Bit 0
Bit 1
Bit 2
Bit 3
Bit 4
Word 0
Bit 5
Bit 6
Bit 7
Bit 8
Bit 9
Bit 10
Bit 11
CMVETH01B
Word 1
Unsigned actual frequency 0.1Hz resolution.
Word 2
Actual PID setpoint; Signed value -999 … 31000
Word 3
Bit 12
Bit 13
Bit 14
Bit 15
1 = Faulted
Reserved
1 = Running Forward
1= Running Reverse
1 = Ready
0 = Local Control
1 = Control from Network
0 = Local reference
1 = Reference from Network
1 = At reference
Actual set point source:
0 – keypad
3 – Preset #1
1 – 0-10VDC
4 – Preset #2
2 – 4-20mA
5 – Preset #3
1 = PID Active (closed loop)
1 = Torque mode active
1 = Current limit
1 = DC Braking
Actual PID feedback; Signed value -999 … 31000
6 – Preset #4
7 – Preset #5
8 – Preset #6
38
9 – Preset #7
10 – MOP
11 – Network
Cyclic Data Access
Bit 0
1 = Faulted
Bit 1
Reserved
Bit 2
1 = Running Forward
Bit 3
1= Running Reverse
Bit 4
1 = Ready
Bit 5
0 = Local Control
1 = Control from Network
Bit 6
0 = Local reference
1 = Reference from Network
Bit 7
1 = At reference
Bit 8
Bit 9
Bit 10
Bit 11
Actual set point source:
Bit 12
1 = PID Active (closed loop)
Bit 13
1 = Torque mode active
Bit 14
1 = Current limit
Bit 15
1 = DC Braking
Word 1
3 – Preset #1
4 – Preset #2
5 – Preset #3
Unsigned actual frequency 0.1Hz resolution.
Word 2
0 – keypad
1 – 0-10VDC
2 – 4-20mA
Actual Torque [%]
Word 3
Word 0
5.7.5 Input Assembly 105 - Speed (Hz) & Actual Torque and Analog Input
Analog Input 0-10V TB [0.01VDC]
• received value = 0x024B = 5.87[VDC]
6 – Preset #4
7 – Preset #5
8 – Preset #6
9 – Preset #7
10 – MOP
11 – Network
Word 0
Data from parameter/Id specified in parameter P450
For example:
Setting the P450 to 508 will place the value of parameter P508 Motor Current into
the Word0 of Input Assembly 106
Word 1
Data from parameter/Id specified in parameter P451
For example:
Setting the P541 to 527 will place the value of parameter P527 Actual Frequency
into the Word1 of Input Assembly 106
Word 2
Data from parameter/Id specified in parameter P452
For example:
Setting the P452 to 520 will place the value of parameter P520 0-10VDC analog
Input into the Word2 of Input Assembly 106
Word 3
5.7.6 Input Assembly 106 - Custom Selectable
Data from parameter/Id specified in parameter P453
For example:
Setting the P453 to 506 will place the value of parameter P506 Motor Voltage into
the Word3 of Input Assembly 106
NOTE
Last value not equal to zero in parameters P450 to P453 defines the end of Assembly 106.
For example: P450 = 0; P451=504; P452=104; P453=0. Last value not equal zero is in parameter P452. That
defines input assembly 106 as a 3 words (6bytes) long with WORD 0 (P450 = 0) fixed at zero.
39
CMVETH01B
Cyclic Data Access
NOTE 1: Digital Input/Output State
Bit 0
Word – Digital Input/Output State
Bit 1
Bit 2
Output Fault
Bit 3
Fast Current Limit State
Bit 4
TB1 ON
Bit 5
Bit 6
TB13A
Bit 7
TB13B
Bit 8
TB13C
Bit 9
TB14 Out State
Bit 10
Relay State
Bit 11
Charge Relay
Bit 12
Assertion level
Bit 13
Bit 14
Bit 15
Input Assembly 106 Options
In addition to all drive parameters that can be specified in Parameters P450 ... P453, there are additional
status and real-time values (range 1-12) that can be specified.
• P45x = 1, SMV Status Word
• P45x = 2, Actual Frequency
• P45x = 3, Lenze C150 Status Word
• P45x = 4, Actual Speed in RPMs
• P45x = 5, Auxiliary Status
• P45x = 6, Drive RUN Status
• P45x = 7, Drive Fault Status
• P45x = 8, Digital I/O Status
• P45x = 9, Analog 0-10V Input
• P45x = 10, Analog 4-20mA Input
• P45x = 11, Actual PID Setpoint
• P45x = 12, Actual PID Feedback
CMVETH01B
40
Cyclic Data Access
5.7.6.1
P45x = 1, SMV Status Word
The SMV Status Word consists of 16 control bits some of which are reserved.
Table 12: SMV Status Word
b15
b14
b13
b12
DC Braking
Status
Current Limit
Status
Operating
Mode
PID Mode
Status
b11
b10
b9
b8
Actual Setpoint Reference Source
b7
b6
b5
b4
b3
b2
b1
b0
At Setpoint
Speed
Setpoint
Status
Network
Control Status
Drive
Ready
Running
Reverse
Running
Forward
Reserved
Drive
Faulted
Table 13: SMV Status Word BIT Functions
BIT
Function
0
Drive Faulted
1
Reserved
0 = No Fault
1 = Drive Faulted
2
Running Forward
1 = Indicates that the drive is running in the FORWARD direction
3
Running Reverse
1 = Indicates that the drive is running in the REVERSE direction
4
Drive Ready
5
Network Control Status
6
Setpoint Status
7
At Setpoint Speed
8
1 = Drive ready
0 = Local Control
1 = Network Control
0 = Local Speed Reference
1 = Network Speed Reference
0 = Actual output frequency <> Setpoint value
1 = Actual output frequency = Setpoint value
0 = Keypad
4 = Preset #2
8 = Preset #6
1 = 0-10VDC
5 = Preset #3
9 = Preset #7
2 = 4-20mA
6 = Preset #4
10 = MOP
3 = Preset #1
7 = Preset #5
11 = Network
11
Actual
Setpoint
Reference
Source
12
PID Mode Status
0 = PID off - open loop
1 = PID on - closed loop
13
Operating Mode
0 = Drive is in Speed control mode
1 = Drive is in Torque control mode
14
Current Limit Status
15
DC Braking Status
9
10
5.7.6.2
Description
1 = Current limit reached
0 = DC injection braking is OFF
1 = DC injection braking is active (ON)
P45x = 2, Actual Frequency
Unsigned actual frequency in Hz with 0.1Hz resolution.
41
CMVETH01B
Cyclic Data Access
5.7.6.3
P45x = 3, Lenze C150 Status Word
The Lenze C150 Status Word consists of 16 control bits some of which are reserved.
Table 14: Lenze C150 Status Word
b15
b14
b13
b12
b11
b10
Drive
Healthy
Direction
of Rotation
Over
Voltage
Over Temp
Warning
b7
b6
b5
b4
b3
b2
b1
b0
Controller
Inhibit
At
Zero Speed
Above
Speed
At Setpoint
Speed
Reserved
Current Limit
Status
Pulse
Inhibit
Reserved
BIT
Function
0
Reserved
1
Pulse Inhibit
2
Current Limit Status
3
Reserved
4
At Setpoint Speed
5
Above Speed
0 = Actual output frequency <= P136 value
1 = Actual output frequency > P136 value
6
At Zero Speed
0 = Actual output frequency <> 0 Hz
1 = Actual output frequency = 0 Hz
7
Controller Inhibit
Description
0 = Pulse outputs enabled
1 = Pulse outputs inhibited
0 = Current limit not reached
1 = Current limit reached
0 = Actual output frequency <> Setpoint value
1 = Actual output frequency = Setpoint value
0 = Controller Enabled
1 = Controller Inhibited
8
10
Controller
Status
0 = No Fault
8 = Fault Present
11
5.7.6.4
12
Over Temp Warning
0 = No over-temperature fault
1 = Over-temperature fault
13
Over Voltage
14
Direction of Rotation
0 = CW (FORWARD)
1 = CCW (REVERSE)
15
Drive Ready
0 = Not ready
1 = Ready (No Faults)
0 = No DC bus over-voltage
1 = DC bus over-voltage
P45x = 4, Actual Speed in RPMs
Unsigned Actual Speed in RPMs. Range: 0 - 65535.
CMVETH01B
42
b8
Controller Status
Table 15: Lenze C150 Status Word BIT Functions
9
b9
Cyclic Data Access
5.7.6.5
P45x = 5, Auxiliary Status
The Auxiliary Status Word consists of 16 control bits some of which are reserved.
Table 16: Auxiliary Status Word
b15
b14
b13
DC Braking
Status
Network
Control
b12
b11
b10
Control Mode
b9
b8
Actual Network Setpoint Reference
b7
b6
b5
b4
b3
b2
b1
b0
Drive Status
Mode
PID Mode
Status
Operating
Mode
Setpoint
Status
Actual
Direction
Cmd
Direction
Quick Stop
Status
Run
Status
Table 17: Auxiliary Status Word BIT Functions
BIT
Function
0
Run Status
1
Quick Stop Status
2
Cmd Direction
0 = Commanded direction is FORWARD
1 = Commanded direction is REVERSE
3
Actual Direction
0 = Actual direction is FORWARD
1 = Actual direction is REVERSE
4
Setpoint Status
0 = Setpoint source is local
1 = Setpoint source control is from network
5
Operating Mode
0 = Drive in Speed control mode
1 = Drive in Torque control mode
6
PID Mode Status
0 = PID off - open loop
1 = PID on - closed loop
7
Drive Status
Mode
8
9
10
11
Actual
Network
Setpoint
Reference
Source
12
13
Control
Mode
14
Network Control Status
15
DC Braking Status
Description
0 = Drive is Stop mode
1 = Drive is Run mode
0 = Quick Stop is Not Active
1 = Quick Stop is Active
0 = Manual Mode
1 = Auto Mode
0 = Keypad
4 = Preset #2
8 = Preset #6
1 = 0-10VDC
5 = Preset #3
9 = Preset #7
2 = 4-20mA
6 = Preset #4
10 = MOP
3 = Preset #1
7 = Preset #5
11 = Network
0 = Keypad
1 = Terminal
2 = Remote Keypad
3 = Network
0 = Disabled
1 = Enabled
0 = DC injection braking is OFF
1 = DC injection braking is active (ON)
43
CMVETH01B
Cyclic Data Access
5.7.6.6
P45x = 6, Drive RUN Status
The Drive RUN status indicates the run status the drive is currently in.
Table 18: Drive RUN Status
RUN Status Value Description
5.7.6.7
0
Drive Faulted, attempted restart & locked; Requires manual reset
1
Drive Faulted; Check P500 Fault History and correct fault condition
2
Drive has tripped into a fault and will automatically restart
3
Identification not complete
4
Forced Coast Stop
5
Drive is Stopped
6
Drive is Preparing to Run
7
Drive is in Identification State
8
Drive is in Run State
9
Drive is Accelerating
10
Drive is Decelerating
11
Drive stopped decelerating to avoid tripping HF fault, due to excessive motor regen (2 s max)
12
DC Injection brake activated
13
Flying Restart Attempt after Fault
14
Current Limit Reached
15
Fast Current Limit Overload
16
Drive is in Sleep Mode
P45x = 7, Drive Fault Status
The Drive Fault Status indicates the drive’s present fault condition.
Table 19: Drive Fault Status
Fault Codes
Fault Number
Display
Fault Description
1
F.AF
Temperature Output Fault
2
F.OF
Over Current Fault
3
F.OF1
Ground (Short to Earth) Fault
4
F.AF
Excess Drive Temperature Fault
0
CMVETH01B
NO FAULT
5
F.rF
Fly Start Fault
6
F.hF
High Bus Voltage (Over Voltage) Fault
7
F.LF
Low Bus Voltage (Under Voltage) Fault
8
F.PF
Motor Overload Fault
9
F.JF
OEM Defaults Corrupted Fault
10
F.IL
Illegal Setup Fault
11
F.dbF
Dynamic Brake Overheated Fault
12
F.SF
Single Phase Voltage Ripple to High Fault
13
F.EF
External Fault
14
F.CF
Control EEPROM Fault
15
F.UF
Start Power Loss Fault
44
Cyclic Data Access
Fault Codes
Fault Number
Display
Fault Description
16
F.cF
Incompatibility Fault
17
F.F1
EEPROM Hardware Failure
18
F.F2
Edge Over Run; Soft Intr Re-entry
19
F.F3
PWM Over Run
20
F.F5
Stack Over Voltage Fault
21
F.F5
Stack Under Voltage Fault
22
F.F6
BGD Missing Fault
23
F.F7
Watchdog Timed Out Fault
24
F.F8
Illegal OPCO Fault
25
F.F9
Illegal Address Fault
26
F.bF
Drive Hardware Fault
27
F.F12
AD Offset Fault
28
F.JF
RKPD Lost Fault
29
F.AL
Assertion Level switched during Operation Fault
30
F.F4
FGD Missing Fault
PW Missing Fault
31
F.F0
32
F.FOL
Follower Loss
33
F.F11
Internal Communication from JK1 Lost Fault
34
F.ntF
Module Communication (SPI) Timeout Fault
35
F.fnr
FNR (Invalid Message Received)Fault
36
F.nF1
Network Fault #1
37
F.nF2
Network Fault #2
38
F.nF3
Network Fault #3
39
F.nF4
Network Fault #4
40
F.nF5
Network Fault #5
41
F.nF6
Network Fault #6
42
F.nF7
Network Fault #7
43
F.nF8
Network Fault #8
44
F.nF9
Network Fault #9
46 - 50
5.7.6.8
RESERVED
P45x = 8, Digital I/O Status
The Digital I/O Status Word consists of 16 control bits some of which are reserved.
Table 20: Digital I/O Status Word
b15
b14
b13
b12
b11
b10
b9
b8
Reserved
Reserved
Reserved
Reserved
Reserved
Relay
Active
TB14
Output Active
TB13C
Input Active
b7
b6
b5
b4
b3
b2
b1
b0
TB13B
Input Active
TB13A
Input Active
Reserved
TB1
Active
Reserved
Reserved
Reserved
Reserved
45
CMVETH01B
Cyclic Data Access
5.7.6.9
P45x = 9, Analog 0-10V Input
Analog Input: 0 - 10V in 0.1 VDC increments
Received Value = 0x3A = 5.8 VDC
5.7.6.10
P45x = 10, Analog 4-20mA Input
Analog Input: 4 - 20mA in 0.1 mA increments
Received Value = 0xA5 = 16.5 mA
5.7.6.11
P45x = 11, Actual PID Setpoint
Signed value: -999 to 31000
5.7.6.12
P45x = 12, Actual PID Feedback
Signed value: -999 to 31000
CMVETH01B
46
Acyclic Data Access
6
Acyclic Data Access
6.1
What is Acyclic Data?
• Acyclic / non-cyclic / Service access provides a method for the network master to access any drive or
module parameter.
• This kind of parameter access is typically used for monitoring or low priority non-scheduled parameter
access. However it can also be used to control the drive by writing assembly data.
• The SMV EtherNet/IP module supports several different methods of doing this.
6.2
Explicit Messaging
An explicit message is a logical instruction in the PLC's program used for messaging. It can be used to
read/write to either a parameter setting or an assembly's data. In the case of CompactLogix, ControlLogix
and SoftLogix the MSG instruction provides the capabilities described in this section. For other PLC types,
consult that PLC's programming documentation.
47
CMVETH01B
Acyclic Data Access
To write a parameter value to the SMV using EtherNet/IP explicit messaging set the following:
Message Type = CIP Generic
Class = F (Hex)
Attribute = 1
Service Code = 10 (Parameter Write)
Instance = the parameter number in the drive desired (i.e. P100 would be 100)
Source Element = the variable in the PLC used as the source of the data for a write
For a write of a parameter value set the source length = 2
CMVETH01B
48
Acyclic Data Access
To read a parameter value from the SMV using Ethernet IP explicit messaging set the following:
Message Type = CIP Generic
Class = F (Hex)
Attribute = 1
Service Code = e (Parameter Read)
Instance = the parameter number in the drive desired (i.e. P100 would be 100)
Destination = the target variable data from the drive will be copied to in the PLC
Make sure the tag used as the destination is a single word with INT format.
49
CMVETH01B
Acyclic Data Access
To write assembly data to the SMV using Ethernet IP explicit messaging set the following:
Message Type = CIP Generic
Class = 4 (Hex)
Attribute = 3
Service Code = 10 (Set Attribute Single)
Instance = the assembly number in the drive desired (i.e. Assembly 100 would be 100)
Source Element = variable in the PLC used as the source of the data for a write (must be in INT format)
When writing an Assembly, set the source length equal to the same number of bytes contained in the
desired assembly (i.e., Assembly 100 contains 4 words which equals 8 bytes).
CMVETH01B
50
Acyclic Data Access
To read assembly data from the SMV using Ethernet IP explicit messaging set the following:
Message Type = CIP Generic
Class = 4 (Hex)
Attribute = 3
Service Code = e (Get Attribute Single)
Instance = the assembly number in the drive desired (i.e. Assembly 100 would be 100)
Destination = the target variable data from the drive will be copied to in the PLC
Make sure the tag used as the destination is an array in INT format with the same length as the desired
assembly.
51
CMVETH01B
Acyclic Data Access
When creating the tag for the data create an array of type INT. Dimension 0 MUST BE SET TO AS MANY
WORDS ARE REQUIRED FOR THE PARTICULAR ASSEMBLY YOU ARE USING (i.e., 4 for Input Assembly 101).
Dimension 1 should be set = 1.
Tag array creation for an assembly for explicit messaging.
CMVETH01B
52
Acyclic Data Access
To write to an assembly to the SMV using Ethernet IP explicit messaging set the following:
Message Type = CIP Generic
Class = 4 (Hex)
Attribute = 3
Service Code = 10 (Set Attribute Single)
Instance = the assembly number in the drive desired
Source Element = the variable in the PLC used as the source of the data for a write
Make sure the tag used as the destination is an array INT format.
When creating the tag for the data create an array of type INT. Dimension 0 MUST BE SET TO AS MANY
WORDS ARE REQUIRED FOR THE PARTICULAR ASSEMBLY YOU ARE USING (i.e., 4 for Input Assembly 100).
Dimension 1 should be set = 1.
53
CMVETH01B
Acyclic Data Access
For any explicit message the path will need to be set to route the message out the controller’s Ethernet port
to the IP address of the Drive. This path will differ with the PLC used. Consult the PLC manufacturer for
assistance with determining how to set this path if needed.
6.3
Explicit Messaging Timeout
It is often desirable to set a fault timeout condition to prevent the drive from operating in a runaway
condition. To do this while controlling the drive via explicit messaging, set P431, P433 and P435 to 0. Set
the timeout period desired (in milliseconds) in P435.
CMVETH01B
54
Advanced Features
7
Advanced Features
7.1
Option Module Advanced Parameters
7.1.1 Module Revision
P401 - Module Revision
Default: 5.x.x
Access: RO
Range: 5.0.0 - 5.9.9
Type: Integer
Display reads 5.x.x where: 5 = EtherNet/IP Module and x.x = Module Revision
7.1.2 Module Status
P402 - Module Status
Default: N/A
Access: RO
Range: 0 - 7
Type: Integer
Table 21: Module Status
P402 Value
Description
P402 Value
0
Not Initialised
4
Description
Error: Failed Initialisation
1
Initialisation: Module to EPM
5
Error: Time Out
2
Initialisation: EPM to Module
6
Error: Module Mismatch (P401)
3
Online
7
Error: Protocol Mismatch (P400)
7.1.4 Module Time-out Action
P404 - Module Time-out Action
Default: 3
Access: RW
Range: 0 - 3
Type: Integer
This parameter controls the action to be taken in the event of a Module-to-Drive time out. The Time-out
period is fixed at 200 ms.
Table 22: Module Time-out Action
P404 Value
0
1
2
3
Description
No Action
Stop (controlled by P111)
Quick Stop
Fault F.ntf
7.1.5 Initialize Ethernet/IP Settings
P408 - Initialize Ethernet/IP Settings
Default: 0
Access: RW
Range: 0 - 1
Type: Integer
This parameter reinitializes the Ethernet/IP network parameters. 0 = No action. 1 = Reset communication.
7.1.6 Module Firmware
P494 - Module Firmware
Default: N/A
Access: RO
Range: 1.00 - 99.99
Type: Integer
Displays the module firmware revision in the format of xx.yy, where: xx = Major version and yy = Minor
version
55
CMVETH01B
Diagnostics
8
Diagnostics
8.1
Faults
In addition to the normal drive fault codes, the additional codes listed in Table 23 may be generated by the
option module during a fault condition.
Table 23: Fault Codes
8.2
Fault Code
Definition
Remedy
F.ntF
Module Time-out
Module to drive communications time out.
Check cable and connection between drive and option module.
F.nF1
NetIdleMode
(Idle event received in I/O message header)
Refer to section 9.1, Parameter P431
F.nF2
NetFaultMode
(Loss of I/O connection Exclusive Owner)
Refer to section 9.1, Parameter P432
F.nF3
Network Fault triggered via Control
Supervisor Object 0x29-1-17
Refer to Section 9.2.8, Control Supervisor Object
F.nF4
Explicit message timeout reaction
Triggered by Explicit message expected packet rate time-out, 'F.nF4'
Refer to section 9.1, Parameter P433
F.nF5
Action on overall Ethernet timeout
(no explicit or I/O messages received or Web
Server access)
Trigger by expiration of timer monitoring all messages received by the
module (refer to P435 for setup)
Refer to section 9.1, Parameter P434
F.nF6
Explicit message timeout reaction
Expiration of overall explicit message timer 'F.nF6'.
Refer to section 9.1, Parameter P433
F.nF7
Overall I/O Message Timeout
Expiration of overall I/O message timer 'F.nF7'.
Refer to section 9.1, Parameter P432
Troubleshooting
Table 24: Troubleshooting
Symptom
Possible Cause
Remedy
No communications
from the option
module
Module is not initialised
•
•
Check the drive to module connection.
Check P400 and P402.
Incorrect EtherNet/IP settings
•
•
Check P410 - P421.
If unsure of setting, reset EtherNet/IP parameters to
factory default using P403.
Power cycle drive after changing IP address setting
or use P408.
•
Improper wiring
•
•
•
CMVETH01B
Check wiring between the EtherNet/IP network and
communication module.
Ensure that the terminal block is properly seated.
Check connection between module and drive.
EtherNet/IP write
commands are
ignore or return
exceptions
"Network enabled" terminal is
either open or not configured
Configure one of the input terminals (P121, P122 or P123)
to "Network Enabled" function (selection 9) and close the
corresponding contact.
Drive does not
change direction to
REVERSE
Parameter P112 is set to 0
(Forward Only)
Set drive parameter P112 to 1 to enable Forward &
Reverse direction
56
Reference
9
Reference
9.1
Parameter Reference
Table 25 lists the EtherNet/IP related parameters and settings for the SMVector Drive. The table includes
parameter number, name, access rights, default value, settings and comments.
Table 25: SMV EtherNet/IP Communication Parameters
No
Name
Access
Default
Possible Settings
5
0 – Not Active
5 – Ethernet IP
Comments
EtherNet/IP Module Specific Parameters
400
Network Protocol
R/W
401
Module Revision
RO
402
Module Status
RO
0
0…7
0 - Not Initialized
1 – Initialization: Module to EPM
2 – Initialization: EPM to Module
3 – Online
4 – Failed Initialization Error
5 – Time-out Error
6 – Initialization Failed (Module type mismatch P401)
7 – Initialization Error (Protocol selection mismatch P400)
403
Module Reset
R/W
0
0 – No Action
1 – Reset Module Parameters values to default
Returns module parameters 401…499 to the default values shown
in the manual
404
Module Time-out action
R/W
0
0 – No Fault
1 – STOP (see P111)
2 – Quick Stop
3 – Fault (F_ntF)
Action to be taken in the event of a Module/Drive Time-out.
Time is fixed at 200ms
Selection 1 (STOP) is by the method selected in P111
405
Current Network Fault
RO
0 – No Fault
1 – F.nF1
2 – F.nF2
3 – F.nF3
4 – F.nF4
5 – F.nF5
6 – F.nF6
7 – F.nF7
0 – No Fault
1 – F.nF1 – NetIdle Mode
2 – F.nF2 – Loss of Ethernet I/O connection
3 – F.nF3 – Network Fault triggered via Control Supervisor Object
0x29-1-17
4 – F.nF4 – Explicit Message Timeout
5 – F.nF5 – Overall Network Timeout
6 – F.nF6 – Overall Explicit Timeout
7 – F.nF7 – Overall I/O Message Timeout
406
Proprietary
RO
Display reads 06.x.x where:
06 = Ethernet IP Module
x.x = Module Revision
Manufacturer specific
EtherNet/IP Configuration Parameters
408
Initialize Ethernet/IP settings
R/W
IP Address
R/W
410
Digit 1
192
411
Digit 2
168
412
Digit 3
124
413
Digit 4
Network Mask
Re-initialize Ethernet/IP
Highest quarter
16
Lowest quarter
Highest quarter
Digit 1
255
415
Digit 2
255
416
Digit 3
255
417
Digit 4
0
Lowest quarter
Highest quarter
R/W
418
Digit 1
192
419
Digit 2
168
420
Digit 3
124
421
Digit 4
Multicast Address
0 – No action
1 – reset communication
R/W
414
Gateway Address
0
1
Lowest quarter
Highest quarter
R/W
422
Digit 1
239
423
Digit 2
64
424
Digit 3
2
425
Digit 4
224
Lowest quarter
57
CMVETH01B
Reference
No
Name
Access
Default
Possible Settings
Comments
426
TTL Value
R/W
1
1 minimum
255 maximum
Time-to-live value for IP multicast packets
427
Configuration Control
R/W
0
0 – stored
1 - DHCP
Source of configuration values
428
Duplex Control
R/W
1
0 – half duplex
1 – full duplex
429
Interface Speed Control
R/W
1
0 – 10Mbps
1 - 100Mbps
430
Interface Speed Actual
RO
431
NetIdleMode
(Idle event received in I/O
message header)
R/W
0
0 – Network Fault 'F.nF1'
1 – Ignore Fault Condition
2 – Vendor specific (switch off network control and
reference - no drive fault or stop!)
Mode on reception of CIP communication IDLE event
*Only active in Drive Network Control (n.xxx)
432
NetFaultMode
(Loss of I/O connection Exclusive
Owner)
R/W
0
0 – Network Fault 'F.nF2' or 'F.nF7'
1 – Ignore Fault Condition
2 – Vendor specific (switch off network control and
reference - no drive fault or stop!)
Action on loss of CIP network I/O - expected packet timeout. Timeout
period = 4*Expected packet rate (Requested Packet Interval, RPI)
or
Expiration of overall I/O message timer 'F.nF7'. The timeout value for
'overall I/O message timer is set by P435.
100 – 100Mbps
10 - 10Mbps
*Armed after at least 1 successful reception of I/O message.
*Only active in Drive Network Control (n.xxx)
433
434
Explicit message timeout reaction
R/W
1
0 – Network Fault 'F.nF4' or 'F.nF6'
1 – Ignore Fault Condition
2 – Vendor specific (switch off network control and
reference - no drive fault or stop!)
3 – Trigger drive STOP (type set by P111)
4 – Trigger inhibit the drive (Coast to Stop)
5 – Trigger Quick Stop
Triggered by Explicit message expected packet rate time-out, 'F.nF4'
or
Expiration of overall explicit message timer 'F.nF6'. The timeout value
for 'overall explicit message timer' is set by P435.
0 – Network Fault 'F.nF5'
1 – Ignore Fault Condition
2 – Vendor specific (switch off network control and
reference - no drive fault or stop!)
3 – Trigger drive STOP (type set by P111)
4 – Trigger inhibit the drive (Coast to Stop)
5 – Trigger Quick Stop
Trigger by expiration of timer monitoring all messages received by the
module (P435 for setup)
0 – 65535 [ms]
Parameter used to monitor all explicit and I/O messages received by
the module
*Armed after at least 1 successful reception of explicit message.
*Only active in Drive Network Control (n.xxx)
Action on overall Ethernet
timeout
(no explicit or I/O messages
received or Web Server access)
R/W
435
Message timeout – monitoring
time
R/W
436
Network Status
RO
4 Digit
Power, Control and Network Status
RO
0…3
0 – Local Control and reference
1 – Network Control, Local reference
2 – Local Control, Network reference
3 – Network Control, Network reference
1
2000
*Armed after at least 1 successful reception of any message
addressed to this module.
Digit 1: Power Status
Digit 2: Control Status
Digit 3: Network Status
0
0 – Network not connected
1 – Network connected
Digit 4: Reserved
437
Frames Transmitted OK
RO
0
438
Frames Received OK
RO
0
439
Collision Count
RO
0
440
Par. ID of word 0 Output
R/W
2
0…9
441
Par. ID of word 1 Output
R/W
0
0…9
442
Par. ID of word 2 Output
R/W
0
0…9
443
Par. ID of word 3 Output
R/W
0
0…9
448
Last Accessed Output Assembly
RO
1
20, 21, 100 etc.
449
Output Assembly Access Counter
RO
1
0…9999
450
Par. ID of word 0 - Input
R/W
1
0…550
451
Par. ID of word 1 – Input
R/W
2
0…550
452
Par. ID of word 2 – Input
R/W
0
0…550
453
Par. ID of word 3 - Input
R/W
0
0…550
458
Last Accessed Input Assembly
RO
1
70, 71, 101 etc
459
Input Assembly Access Counter
RO
1
0…9999
CMVETH01B
0 – Disabled / Not evaluated
1 – SMV Control Word
2 – Network Command Frequency
3 – Lenze C135 Control Word
4 – Network Speed in unsigned RPM
5 – Network PID Setpoint
6 – Network Torque Setpoint
7 – Network Speed in signed RPM (control direction)
8 – Digital Outputs
9 – Analog Output
Overflow above 9999 to 0
Overflow above 9999 to 0
58
Reference
No
Name
Access
Default
Possible Settings
Comments
Display Digit 1 (hex)
(low nibble)
RO
0
0 – Nonexistent
3 – Established
4 – Timed out
State
Display Digit 2 (hex)
(high nibble)
RO
0
0 – nonexistent
1 – Exclusive Owner
2 – Input Only
3 – Listen Only
4 – Explicit Connection
Type
461
Trigger
RO
0x01 – Class 1 cyclic client
0xA3 – Class 3 application object server (Explicit
Connection)
Bits 0, 1, 2, 3 – transport class
0 – Class 0
1 – Class 1
2 – Class 2
3 – Class 3
Bits 4, 5, 6 – production trigger
0 – Cyclic
1 – Change of state
2 – Application Object (use as polled conn)
Bit 7 – direction
0 – Client
1 – Server
462
Expected Packet Rate
RO
0
463
Transmission Counter
RO
0
Overflow over 255
464
Reception Counter
RO
0
Overflow over 255
Display Digit 1 (hex)
(low nibble)
RO
0
0 – Nonexistent
3 – Established
4 – Timed out
State
Display Digit 2 (hex)
(high nibble)
RO
0
0 – nonexistent
1 – Exclusive Owner
2 – Input Only
3 – Listen Only
4 – Explicit Connection
Type
466
Trigger
RO
0x01 – Class 1 cyclic client
0xA3 – Class 3 application object server (Explicit
Connection)
Bits 0, 1, 2, 3 – transport class
0 – Class 0
1 – Class 1
2 – Class 2
3 – Class 3
Bits 4, 5, 6 – production trigger
0 – Cyclic
1 – Change of state
2 – Application Object (use as polled conn)
Bit 7 – direction
0 – Client
1 – Server
467
Expected Packet Rate
RO
0
468
Transmission Counter
RO
0
Overflow over 255
469
Reception Counter
RO
0
Overflow over 255
Display Digit 1 (hex)
(low nibble)
RO
0
0 – Nonexistent
3 – Established
4 – Timed out
State
Display Digit 2 (hex)
(high nibble)
RO
0
0 – nonexistent
1 – Exclusive Owner
2 – Input Only
3 – Listen Only
4 – Explicit Connection
Type
471
Trigger
RO
0x01 – Class 1 cyclic client
0xA3 – Class 3 application object server (Explicit
Connection)
Bits 0, 1, 2, 3 – transport class
0 – Class 0
1 – Class 1
2 – Class 2
3 – Class 3
Bits 4, 5, 6 – production trigger
0 – Cyclic
1 – Change of state
2 – Application Object (use as polled conn)
Bit 7 – direction
0 – Client
1 – Server
472
Expected Packet Rate
RO
0
473
Transmission Counter
RO
0
Overflow over 255
474
Reception Counter
RO
0
Overflow over 255
Connection1
460
0…65535 (ms)
Connection2
465
0…65535 (ms)
Connection3
470
0…65535 (ms)
59
CMVETH01B
Reference
No
Name
Access
Default
Possible Settings
Comments
Display Digit 1 (hex)
(low nibble)
RO
0
0 – Nonexistent
3 – Established
4 – Timed out
State
Display Digit 2 (hex)
(high nibble)
RO
0
0 – nonexistent
1 – Exclusive Owner
2 – Input Only
3 – Listen Only
4 – Explicit Connection
Type
476
Trigger
RO
0x01 – Class 1 cyclic client
0xA3 – Class 3 application object server (Explicit
Connection)
Bits 0, 1, 2, 3 – transport class
0 – Class 0
1 – Class 1
2 – Class 2
3 – Class 3
Bits 4, 5, 6 – production trigger
0 – Cyclic
1 – Change of state
2 – Application Object (use as polled conn)
Bit 7 – direction
0 – Client
1 – Server
477
Expected Packet Rate
RO
0
478
Transmission Counter
RO
0
Overflow over 255
479
Reception Counter
RO
0
Overflow over 255
Display Digit 1 (hex)
(low nibble)
RO
0
0 – Nonexistent
3 – Established
4 – Timed out
State
Display Digit 2 (hex)
(high nibble)
RO
0
0 – nonexistent
1 – Exclusive Owner
2 – Input Only
3 – Listen Only
4 – Explicit Connection
Type
481
Trigger
RO
0x01 – Class 1 cyclic client
0xA3 – Class 3 application object server (Explicit
Connection)
Bits 0, 1, 2, 3 – transport class
0 – Class 0
1 – Class 1
2 – Class 2
3 – Class 3
Bits 4, 5, 6 – production trigger
0 – Cyclic
1 – Change of state
2 – Application Object (use as polled conn)
Bit 7 – direction
0 – Client
1 – Server
482
Expected Packet Rate
RO
0
483
Transmission Counter
RO
0
Overflow over 255
484
Reception Counter
RO
0
Overflow over 255
Display Digit 1 (hex)
(low nibble)
RO
0
0 – Nonexistent
3 – Established
4 – Timed out
State
Display Digit 2 (hex)
(high nibble)
RO
0
0 – nonexistent
1 – Exclusive Owner
2 – Input Only
3 – Listen Only
4 – Explicit Connection
Type
486
Trigger
RO
0x01 – Class 1 cyclic client
0xA3 – Class 3 application object server (Explicit
Connection)
Bits 0, 1, 2, 3 – transport class
0 – Class 0
1 – Class 1
2 – Class 2
3 – Class 3
Bits 4, 5, 6 – production trigger
0 – Cyclic
1 – Change of state
2 – Application Object (use as polled conn)
Bit 7 – direction
0 – Client
1 – Server
487
Expected Packet Rate
RO
0
488
Transmission Counter
RO
0
Overflow over 255
489
Reception Counter
RO
0
Overflow over 255
Connection4
475
0…65535 (ms)
Connection5
480
0…65535 (ms)
Connection6
485
CMVETH01B
0…65535 (ms)
60
Reference
No
Name
Access
Default
Possible Settings
490
Motor Type
R/W
7
0…7
492
Write Access Disabled via Web
Server
R/W
0
0, 1
Comments
0 – Write Access Enabled
1 – Write Access Disabled
Module Specific Parameters
494
Communication Module Software
Version
RO
Format: x.yz
495
Internal Code
RO
Alternating Display: xxx-; -yy
498
Missed Messages: Drive to
Module
RO
499
Missed Messages: Module
to Drive
RO
61
CMVETH01B
Reference
9.2
Object Specifications
9.2.1 Identity Object - Class 0x01 (1 dec)
IDENTITY CLASS ATTRIBUTES
ATTRIBUTE ID
ACCESS RULE
NAME
1
GET
REVISION
DATA TYPE
VALUE
UINT
1
INSTANCE 0
INSTANCE 1
1
GET
VENDOR ID
UINT
587
2
GET
DEVICE TYPE
UINT
2 (AC drive)
3
GET
PRODUCT CODE
UINT
_ (SMV EtherNet/IP Module)
4
GET
MAJOR REV.
USINT
1
MINOR REV.
USINT
1
5
GET
STATUS
USINT
0 = Net Configured
4 = Configured
5 = Owned
6
GET
SERIAL NUMBER
UDINT
Unique 32-bit number
7
GET
PRODUCT NAME
ASCII String
“AC Technology Corp, SMV AC Drive”
IDENTITY CLASS SERVICES
SERVICE CODE
SERVICE NAME
IMPLEMENTED FOR
CLASS
INSTANCE
0x0E
YES
YES
Get_Attribute_Single
0x05
NO
YES
RESET
9.2.2 Message Router Object - Class 0x02 (2 dec)
MESSAGE ROUTER CLASS ATTRIBUTES
ATTRIBUTE ID
ACCESS RULE
NAME
DATA TYPE
VALUE
UINT
1
INSTANCE 0
1
GET
REVISION
INSTANCE 1
1
GET
CLASS LIST
ARRAY
List of Implemented Classes
2
GET
MAXIMUM NUMBER OF CONNECTIONS
UINT
1
3
GET
CURRENTLY USED CONNECTIONS
UINT
1
4
GET
CURRENTLY USED ID’s
Array of UINT
List of Connection ID
MESSAGE ROUTER CLASS SERVICES
SERVICE CODE
0x0E
CMVETH01B
IMPLEMENTED FOR
SERVICE NAME
CLASS
INSTANCE
YES
YES
Get_Attribute_Single
62
Reference
9.2.3 Assembly Object - Class 0x04 (4 dec)
ASSEMBLY CLASS ATTRIBUTES
ATTRIBUTE ID
ACCESS RULE
NAME
DATA TYPE
VALUE
1
GET
REVISION
UINT
2
2
GET
MAXIMUM NUMBER OF INSTANCES
USINT
107
1
GET
NUMBER OF MEMBER
USINT
1
3
GET/SET
DATA
INSTANCE
INSTANCE 0
INSTANCES (See Below)
INSTANCE NUMBER AND NAME
ACCESS RULE FOR ATTRIBUTE #3 DATA
INSTANCE 20 = BASIC SPEED CONTROL
GET / SET
INSTANCE 21 = EXTENDED SPEED CONTROL
GET / SET
INSTANCE 100 = EXTENDED SPEED HZ + DIGITAL AND ANALOG OUTPUT
GET / SET
INSTANCE 102 = PID SETPOINT + DIGITAL AND ANALOG OUTPUT
GET / SET
INSTANCE 104 = TORQUE SETPOINT + DIGITAL AND ANALOG OUTPUT
GET / SET
INSTANCE 107 = CUSTOM: SELECTABLE WITH PARAMETERS P440 - P443
GET / SET
INSTANCE 70 = BASIC SPEED CONTROL
GET
INSTANCE 71 = EXTENDED SPEED CONTROL
GET
INSTANCE 101 = EXTENDED SPEED HZ + ANALOG AND DIGITAL I/O
GET
INSTANCE 103 = CUSTOM: SPEED, PID SETPOINT, FEEDBACK
GET
INSTANCE 105 = CUSTOM: SPEED, ACTUAL TORQUE, ANALOG INPUT
GET
INSTANCE 106 = CUSTOM: DATA WORDS SELECTABLE WITH PARAMETERS P450 - P453
GET
ASSEMBLY CLASS SERVICES
SERVICE CODE
0x0E
IMPLEMETED FOR
SERVICE NAME
CLASS
INSTANCE
YES
YES
63
Get_Attribute_Single
CMVETH01B
Reference
9.2.4 Connection Manager Object - Class 0x06 (6 dec)
CONNECTION MANAGER INSTANCE ATTRIBUTES
ATTRIBUTE ID
ACCESS RULE
NAME
DATA TYPE
1
SET
OPEN REQUESTS
UINT
2
SET
OPEN FORMAT REQUESTS
UINT
3
SET
OPEN RESOURCE REJECTS
UINT
4
SET
OPEN OTHER REJECTS
UINT
5
SET
CLOSE REQUESTS
UINT
VALUE
INSTANCE 0
6
SET
CLOSE FORMAT REQUESTS
UINT
7
SET
CLOSE OTHER REQUESTS
UINT
8
SET
9
UINT
STRUCT of:
NUM COMM ENTRIES
UINT
# of bits in ConnOpenBits attribute
COMM OPEN BITS
ARRAY OF BOOL
0 = Connection Instance Non-Existent
1 = Connection Instance Exists. Query
for more information
CPU_UTILIZATION
UINT
0 - 1000 (0-100%)
GET
10
11
CONNECTION TIMEOUTS
CONNECTION ENTRY LIST
RESERVED
GET
12
GET
MAX BUFF SIZE
UDINT
size in Bytes
13
GET
BUFF SIZE REMAINING
UDINT
size in Bytes
CONNECTION MANAGER CLASS SERVICES
SERVICE CODE
IMPLEMENTED FOR
CLASS
01hex
CMVETH01B
SERVICE NAME
INSTANCE
YES
Get_Attributes_All
0Ehex
YES
Get_Attribute_Single
10hex
YES
Set_Attribute_Single
64
Reference
9.2.5 Parameter Object - Class 0x0F (15 dec)
PARAMETER CLASS ATTRIBUTES - NUMBER OF INSTANCES (PARAMETERS): 550
ATTRIBUTE ID
ACCESS RULE
NAME
DATA TYPE
VALUE
1
GET
REVISION
UINT
2
2
GET
NUMBER OF INSTANCES
UINT
550
8
GET
PARAMETER CLASS
WORD
0x03
UINT
0
UINT
0 = English
0 to 2
INSTANCE 0
DESCRIPTOR
9
GET
CONFIGURATION
10
GET
NATIVE LANGUAGE
1
GET / SET
PARAMETER VALUE
2
GET
LINK PATH SIZE
USINT
3
GET
LINK PATH
DNET PATH
4
GET
DESCRIPTOR
WORD
5
GET
DATA TYPE
USINT
6
GET
DATA SIZE
USINT
ASSEMBLY #
INSTANCE 1 - 550
PARAMETER CLASS SERVICES
SERVICE CODE
IMPLEMENTED FOR
SERVICE NAME
CLASS
INSTANCE
0x0E
YES
YES
Get_Attribute_Single
0x10
NO
YES
Set_Attribute_Single
9.2.6 Parameter Group Object - Class 0x10 (16 dec)
PARAMETER GROUP CLASS ATTRIBUTES
ATTRIBUTE ID
ACCESS RULE
NAME
DATA TYPE
VALUE
INSTANCE 0
1
GET
REVISION
UINT
1
2
GET
NUMBER OF INSTANCES
UINT
8
8
GET
NATIVE LANGUAGE
UINT
0 = English
1
GET
GROUP NAME
SHORT STRING
2
GET
NUMBER OF MEMBERS
IN THE GROUP
UINT
3
GET
1st PARAMETER
IN THE GROUP
UINT
4
GET
2nd PARAMETER
IN THE GROUP
UINT
n
GET
(n-2) th PARAMETER
IN THE GROUP
UINT
INSTANCE 1 - 8
65
CMVETH01B
Reference
9.2.7 Motor Data Object - Class 0x28 (40 dec)
MOTOR GROUP CLASS ATTRIBUTES
ATTRIBUTE ID
ACCESS RULE
NAME
DATA TYPE
VALUE
1
GET
REVISION
2
UINT
1
GET
NUMBER OF INSTANCES
UINT
1
1
GET
NUMBER OF SUPPORTED
ATTRIBUTES
USINT
7
2
GET
ATTRIBUTE LIST
ARRAY
3
GET/SET
MOTOR TYPE
USINT
0 - 10
6
GET/SET
RATED CURRENT
UINT
RATED STATOR CURRENT (0.1A)
7
GET/SET
RATED VOLTAGE
UINT
RATED BASE VOLTAGE (V)
9
GET/SET
RATED FREQUENCY
UNIT
RATED FREQUENCY (Hz)
11
GET/SET
NOMINAL SPEED AT RATED
FREQUENCY
UNIT
NOMINAL SPEED (RPM)
INSTANCE 0
INSTANCE 1
MOTOR DATA CLASS SERVICES
SERVICE CODE
CMVETH01B
IMPLEMENTED FOR
SERVICE NAME
CLASS
INSTANCE
0x0E
YES
YES
GET_ATTRIBUTE_SINGLE
0x10
NO
YES
SET_ATTRIBUTE_SINGLE
66
Reference
9.2.8 Control Supervisor Object - Class 0x29 (41 dec)
CONTROL CLASS ATTRIBUTES
ATTRIBUTE ID
ACCESS RULE
NAME
DATA TYPE
VALUE
1
GET
REVISION
2
UINT
1
GET
NUMBER OF INSTANCES
UINT
1
GET
NUMBER OF SUPPORTED
ATTRIBUTES
USINT
16
2
GET
ATTRIBUTE LIST
ARRAY
3
GET/SET
RUNFWD
BOOL
0 to 1
4
GET/SET
RUNREV
BOOL
0 to 1
5
GET/SET
NETCTRL
BOOL
0 to 1
INSTANCE 0
INSTANCE 1
1
6
GET
STATE
UNIT
3 = READY
4 = ENABLED
5 = FAULTED
7
GET
RUNNINGFWD
BOOL
0 to 1
8
GET
RUNNINGREV
BOOL
0 to 1
9
GET
READY
BOOL
0 to 1
10
GET
FAULTED
BOOL
0 to 1
11
GET
WARNING
UNIT
0 (Not Supported)
12
GET/SET
FAULTRST
BOOL
0 to 1
13
GET
FAULT CODE
UNIT
0 to 65535
15
GET
CTRLFROMNET
US INT
0 to 1
16
GET/SET
ACTION ON LOSS OF
ETHERNET/IP
US INT
0 = FAULT
1 = IGNORE COMM FAULT
2 = AC TECH SPECIFIC
17
GET/SET
FORCE TRIP
BOOL
0 to 1
The drive shows the "nF" fault on the LED display.
If Attribute #5 NET CONTROL is set to 1, the RUN and STOP events are triggered according to the following
event table:
ATTRIBUTE RUN FWD
ATTRIBUTE RUN REV
TRIGGER EVENT
RUN TYPE
0
0
STOP
N/A
0 -> 1
0
RUN
RUN FORWARD
0
0 -> 1
RUN
RUN REVERSE
0 -> 1
0 -> 1
NO ACTION
N/A
1
1
NO ACTION
N/A
1 -> 0
1
RUN
RUN REVERSE
1
1 -> 0
RUN
RUN FORWARD
67
CMVETH01B
Reference
9.2.9 AC/DC Drive Object - Class 0x2A (42 dec)
AC/DC DRIVE CLASS ATTRIBUTES
Attribute ID
Access Rule
Name
Data Type
Value
1
GET
REVISION
2
UINT
1
GET
NUMBER OF INSTANCES
UINT
1
1
GET
NO. OF SUPPORTED ATTRIBUTES
USINT
12
2
GET
ATTRIBUTE LIST
ARRAY
3
GET
AT REFERENCE
BOOL
Speed AtRef
BOOL
0 = Local SpdRef
1 = Net SpdRef
DRIVE MODE
USINT
1 = Open Loop Spd Control
2 = Vector Mode
3 = Torque Mode
4 = PID Mode
INSTANCE 0
INSTANCE 1
4
6
GET/SET
NET REFERENCE
GET
7
GET
ACTUAL SPEED
INT
Actual Speed (RPM)
8
GET/SET
SPEED REFERENCE
INT
Speed Reference (RPM)
9
GET
MOTOR PHASE CURRENT
INT
Actual Current (0.1A)
15
GET
MOTOR PHASE CURRENT
INT
Actual Power (W)
16
GET
INPUT VOLTAGE
INT
(V)
17
GET
OUTPUT VOLTAGE
IN
(V)
29
GET
STATUS OF SPEED REFERENCE
INT
0 = Local Spd Ref
1 = Net Spd Ref
AC DRIVE CLASS SERVICES
Service Code
CMVETH01B
Implemented For
Service Name
Class
Instance
0x0E
YES
YES
Get_Attribute_Single
0x10
NO
YES
Set_Attribute_Single
68
Reference
9.2.10 TCP/IP Interface Object - Class 0xF5 (245 dec)
TCP/IP INSTANCE ATTRIBUTES
Attribute ID
Access Rule
Name
Data Type
Value
1
GET
STATUS
DWORD
2
GET
CONFIGURATION CAPABILITY
DWORD
3
SET
CONFIGURATION CONTROL
DWORD
PHYSICAL LINK OBJECT
STRUCT of:
PATH SIZE
UINT
# 16-bit words in path
12 Bytes maximum
INSTANCE 1
4
5
GET
GET / SET
6
GET / SET
8
GET
9
GET
PATH
Padded EPATH
INTERFACE CONFIGURATION
STRUCT of:
IP ADDRESS
UDINT
0 = No IP address configured
NETWORK MASK
UDINT
0 = No network mask configured
GATEWAY ADDRESS
UDINT
0 = No IP address configured
NAME SERVER
UDINT
0 = No name server address configured
NAME SERVER 2
UDINT
0 = No 2nd name server address configured
DOMAIN NAME
STRING
48 ASCII characters maximum
0 = No domain name configured
HOST NAME
STRING
64 ASCII characters maximum
0 = No host name configured
1 - 255
TTL VALUE
USINT
MCAST CONFIG
STRUCT of:
ALLOC CONTROL
USINT
RESERVED
USINT
0
NUM MCAST
UINT
# of allocated IP addresses
MCAST START ADDR
UDINT
TCP/IP INTERFACE CLASS SERVICES
SERVICE CODE
IMPLEMENTED FOR
SERVICE NAME
CLASS
INSTANCE
0x0E
YES
YES
Get_Attribute_Single
0x10
NO
YES
Set_Attribute_Single
69
CMVETH01B
Reference
9.2.11 Ethernet Link Object - Class 0xF6 (246 dec)
ETHERNET LINK CLASS ATTRIBUTES
Attribute ID
Access Rule
Name
Data Type
Value
1
GET
REVISION
UINT
2
Attribute ID
Access Rule
Name
Data Type
Value
1
GET
INTERFACE SPEED
2
GET
UDINT
speed in Mbps
INTERFACE FLAGS
DWORD
3
GET
INSTANCE 0
ETHERNET LINK INSTANCE ATTRIBUTES
INSTANCE 1
6
PHYSICAL ADDRESS
ARRAY of 6 USINT
INTERFACE CONTROL
STRUCT of:
CONTROL BITS
WORD
FORCED INTERFACE SPEED
UINT
SET
speed in Mbps
ETHERNET LINK CLASS SERVICES
SERVICE CODE
CMVETH01B
IMPLEMENTED FOR
SERVICE NAME
CLASS
INSTANCE
0x0E
YES
YES
Get_Attribute_Single
0x10
NO
YES
Set_Attribute_Single
70
MAC layer address
Lenze AC Tech Corporation
630 Douglas Street • Uxbridge MA 01569 • USA
Sales: 800-217-9100 • Service: 508-278-9100
www.lenze-actech.com
CMVETH01B