1
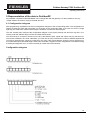
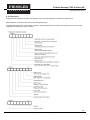
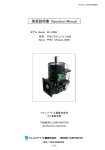
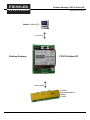
FIESSLER
Feldbus-Gateway FPSC-Profibus-DP
ELEKTRONIK
Operating Instructions
↔
Master Profibus DP
Profibus DP
Feldbus-Gateway
↔
FPSC-Profibus-DP
Modbus ASCII
Fiessler
Parametrierbares
Safety
Center
Fiessler Elektronik Gmbh & Co. KG Kastellstr. 9 73734 Esslingen Tel.: 0711/919697-0 email:[email protected] web:www.fiessler.de Doku.Nr.:1058 vom 14.05.08
FIESSLER
Feldbus-Gateway FPSC-Profibus-DP
ELEKTRONIK
Index
1 Information on CE marking of the module ......................................................3
2
3
4
5
1.1
EU Directive EMC ...........................................................................................3
1.2
Scope of application .......................................................................................3
1.3
Note installation guidelines ............................................................................3
1.4
Installation of the unit .....................................................................................3
1.5
Working on switch cabinets ...........................................................................3
Information for the machine manufacturers ...................................................3
2.1
Introduction ....................................................................................................3
2.2
EU Machinery Directive .................................................................................3
Introduction .............................................................................................................4
Mode of operation of the system .......................................................................4
4.1
General explanation .......................................................................................4
4.2
Interfaces .......................................................................................................4
4.3
Data exchange ...............................................................................................4
4.4
Possible data lengths .....................................................................................5
4.5
Run-up phase ................................................................................................5
4.6 The trigger byte - only at FPSC-Profibus-DP........................................................5
4.7 The length byte - only at FPSC-Profibus-DP .......................................................5
Implemented protocols in FPSC-Profibus-DP ................................................5
5.1 FPSC-Profibus-DP as MODBUS-Master ...............................................................5
5.2 Data structure ..........................................................................................................6
5.3 Communication sequence ......................................................................................6
5.4 Connection and communication of the Profi-Bus master via gateway to the FPSC ........7
6 Hardware ports, switches and LEDs .................................................................8
6.1 Profibus ..................................................................................................................................8
6.2 Connectors ..................................................................................................................8
6.2.1 Connector to the external device/FPSC (RS-Schnittstelle) .........................................8
6.2.2 ProfibusDP connector ...............................................................................................8
6.2.3 Power supply .............................................................................................................9
6.2.4 Shield terminal lead ..................................................................................................9
6.3 LEDs .............................................................................................................................9
6.3.1 LED “Bus Error“ ............................................................................................................................................ 9
6.3.2 LED “Bus Power“ ......................................................................................................................................... 9
6.3.3 LED “Bus State“
...........................................................................................................................................
9
“
“ ..................................................................................................................................................
9
“
“ ....................................................................................................................................................
9
6.3.4 LED Power
6.3.5 LED State
“
6.3.6 LED Error No / Select ID“ at FPSC-Profibus-DP ...................................................9
6.4 Switches .......................................................................................................................10
6.4.1 Rotary coding switch (Profibus-ID) .............................................................................10
6.4.2 Slide switch Termination Profibus ..............................................................................10
6.4.3Rotary coding switches S4 + S5 (RS485 ID) ...............................................................10
6.4.4 Slide switch (RS485/RS232 Interface) .......................................................................10
6.4.5 Slide switch (RS485/RS422 Termination) ..................................................................10
1
Fiessler Elektronik Gmbh & Co. KG Kastellstr. 9 73734 Esslingen Tel.: 0711/919697-0 email:[email protected] web:www.fiessler.de Doku.Nr.:1058 vom 14.05.08
FIESSLER
Feldbus-Gateway FPSC-Profibus-DP
ELEKTRONIK
Index
7 Error handling ..............................................................................................11
7.1 Error handling at FPSC-Profibus-DP ......................................................................11
8 Installation guidelines ..................................................................................11
8.1 Installation of the module .........................................................................................11
8.1.1 Mounting ..................................................................................................................11
8.1.2 Removal ...................................................................................................................12
8.2 Wiring ..........................................................................................................................12
8.2.1 Connection systems .................................................................................................12
8.2.2 ProfibusDP communication interface ........................................................................12
8.2.2.1 Bus line with copper cable .................................................................................12
8.2.2.2 Power supply .....................................................................................................12
8.2.2.3 Shield connection ...............................................................................................13
8.2.2.4 Equipotential bonding connection ......................................................................13
8.2.3 Line routing, shield and measures to combat interference voltage ............................13
8.2.4 General information on line routing ...........................................................................13
8.2.4.1 Shielding of lines ................................................................................................14
9 Representation of the data in ProfibusDP ..................................................15
9.1 Configuration telegram .............................................................................................15
9.2 Diagnosis ....................................................................................................................16
9.2.1 Diagnosis in DPV1 ...................................................................................................................17
9.3 Data exchange .................................................................................................17
10 Technical data ......................................................................................................18
10.1 Device data ....................................................................................................18
10.1.1 Interface data .....................................................................................................................20
11 Commissioning guide ........................................................................................21
11.1 Note ................................................................................................................21
11.2 Components ..................................................................................................21
11.3 Installation .....................................................................................................21
11.4 Dimensional drawing DIN-rail mounting .........................................................21
11.5 Commissioning ...............................................................................................21
11.6 Setting the Profibus address ..........................................................................22
11.7 Profibus connection ........................................................................................22
11.8 Connection to the process device ...................................................................22
11.9 Connecting the supply voltage .......................................................................22
11.10 Shield connection .........................................................................................22
11.11 Project planning ............................................................................................22
11.12 Project planning tipps ....................................................................................22
2
Fiessler Elektronik Gmbh & Co. KG Kastellstr. 9 73734 Esslingen Tel.: 0711/919697-0 email:[email protected] web:www.fiessler.de Doku.Nr.:1058 vom 14.05.08
FIESSLER
Feldbus-Gateway FPSC-Profibus-DP
ELEKTRONIK
Operating instructions
1 Information on CE marking of the module
1.1
EU Directive EMC
The following applies to the module described in this User Manual:
Products which bear the CE mark comply with the requirements of EU Directive „Electromagnetic Compatibility“ and
the harmonized European Standards (EN) listed therein.
1.2 Scope of application
The modules are designed for use in the industrial sector and comply with the following requirements.
1.3 Note installation guidelines
The module complies with the requirements if you
1.1. comply with the installation guidelines described in the User Manual when installing and operating the module.
2.2. also follow the rules below on installation of the equipment and on working on switch cabinets.
1.4 Installation of the unit
Modules must be installed in electrical equipment rooms/areas or in enclosed housings (e.g. switch boxes made of
metal or plastic).
Moreover, you must earth the unit and the switch box (metal box) or at least the top-hat rail (plastic box) onto which the
module has been snapped.
1.5 Working on switch cabinets
In order to protect the modules against static electrical discharge, the personnel must discharge themselves electrostatically before opening switch cabinets or switch boxes.
2 Information for the machine manufacturers
2.1
Introduction
The FPSC-Profibus-DP module does not constitute a machine as defined by the EU "Machinery“ Directive. Consequently, the module does not have a Declaration of Conformity in relation to the EU Machinery Directive .
2.2 EU Machinery Directive
The EU Machinery Directive stipulates the requirements applicable to a machine. The term "machine" is taken to
mean a totality of connected parts or fixtures
The module is a part of the electrical equipment of the machine and must thus be included by the machine manufacturer in the Declaration of Conformity process.
3
Fiessler Elektronik Gmbh & Co. KG Kastellstr. 9 73734 Esslingen Tel.: 0711/919697-0 email:[email protected] web:www.fiessler.de Doku.Nr.:1058 vom 14.05.08
FIESSLER
Feldbus-Gateway FPSC-Profibus-DP
ELEKTRONIK
Operating instructions
3 Introduction
The FPSC-Profibus-DP module serves to adapt a serial port to the ProfibusDP to EN 50 170. In this application, it
functions as a gateway and operates as the ProfibusDP Slave. It can be operated by any standard-compliant Master.
FPSC-Profibus-DP supported the folowing transmission protocols at the serial port:
-Modbus-ASCII(FPSC)
4 Mode of operation of the system
4.1 General explanation
Communication can be split into seven layers, Layer 1 to Layer 7, in accordance with the ISO/OSI model.
The Fiessler gateway convert Layers 1 and 2 of the customized bus system (RS485 / RS232) to the corresponding
fieldbus system. Layers 3 to 6 are blank, and Layer 7 is forwarded transparently on the standard gateways.
4.2 Interfaces
The gateway features the RS232 and RS485 interfaces. Switchover is performed by means of a slide switch accessible for the customer. The Profibus gateway thus allows access to all devices connected to the RS485 bus via one single Profibus address resp. access to the device connected to the RS232 interface. Attention do not change selector
switch from basic position RS232!!
4.3 Data exchange
The Profibus Master sends the output data cyclically to the gateway. The data received from the Master is sent in the
gateway to the external device in accordance with the selected protocol. The external device responds in accordance
with the protocol conventions.
The data received from the external device is written by the gateway into the internal RAM of the SPC3. The updated
data is then transferred on the next poll cycle with the gateway.
At the FPSC-Profibus-DP the data exchange via the RS interface can be programmed as follows:
• if trigger byte changes
All data is transferred consistently by the gateway in both directions. The maximum data length of consistent data must
be noted in the case of data exchange between Master and CPU(FPSC). This is generally dependent on the Master
interface connection and the CPU(FPSC) used.
Structure of the data:
4
Fiessler Elektronik Gmbh & Co. KG Kastellstr. 9 73734 Esslingen Tel.: 0711/919697-0 email:[email protected] web:www.fiessler.de Doku.Nr.:1058 vom 14.05.08
FIESSLER
Feldbus-Gateway FPSC-Profibus-DP
ELEKTRONIK
Operating instructions
4.4 Possible data lengths
The table below shows the maximum transferable data:
4.5 Run-up phase
The Master programs and configures the gateway in the run-up phase. Data exchange with the external device does
not occur until after the run-up phase has been completed with no errors.
4.6 The trigger byte at the FPSC-Profibus-DP
Since the data is always transferred cyclically on Profibus, the gateway must detect when the user wishes to send new
data via the serial interface. This is normally done by the gateway comparing the data to be transferred via the Profibus
with the old data stored internally (data exchange on change). In many cases however, this cannot be used as the criterion, e.g. whenever the same data is to be sent. For this reason, the user can set control of transmission via a trigger
byte. In this mode, the gateway always sends (and only sends) when the trigger byte is changed.
Accordingly, the application program in the control in Normal mode cannot detect whether the gateway has received
several identical telegrams. If Trigger-Byte mode is activated, the gateway increments the trigger byte each time a telegram has been received.
The first byte in the Profibus input/output data buffer is used as the trigger byte if this mode is activated.
4.7 The length byte at the FPSC-Profibus-DP
The user can configure whether the transmit length is also to be stored as a byte in the input/output data area. In transmit direction, as many bytes as specified in this byte are sent. On reception of a telegram, the gateway enters the number of characters received.
5 Implemented protocols in FPSC-Profibus-DP
5.1 FPSC-Profibus-DP as MODBUS-Master
Since the Modbus operates with a variable data format - dependent on the required function and data length - but since the fieldbus requires a fixed data length, this must be preset by means of a selection in the GSD file (input and output are identical). This length should be selected by the user such that the longest Modbus request resp. response can
be processed. If a Modbus response is longer than the preset fieldbus length, the gateway signals an "Rx buffer overflow“.
The mode (Modus request on request) necessitates the first byte in the fieldbus containing a trigger byte (see chapter 4.6). This byte is not transferred to the Modbus and serves only to start a Modbus transmission. For this purpose,
the gateway constantly monitors this trigger byte and sends data to the Modbus only when this byte has changed. In
the reverse direction (to the fieldbus), the gateway transfers the number of received Modbus data records in this
byte, i.e. this byte is incremented by the gateway after each data record.
If the "Length byte“ is activated (see chapter 4.7), the gateway transfers only the number of bytes specified there.
The number of received Modbus data items is saved in the direction of the fieldbus Master. The length always refers
to bytes "Address" to "Dat n" (inclusive in each case), always without CRC checksum.
5
Fiessler Elektronik Gmbh & Co. KG Kastellstr. 9 73734 Esslingen Tel.: 0711/919697-0 email:[email protected] web:www.fiessler.de Doku.Nr.:1058 vom 14.05.08
FIESSLER
Feldbus-Gateway FPSC-Profibus-DP
ELEKTRONIK
Operating instructions
5.2 Data structure
5.3 Communication sequence
The gateway always acts as the Slave with respect to the fieldbus and always acts as the Master at the Modbus
end. Thus, data exchange must always be started by the fieldbus Master. The gateway fetches this data which must
be structured in accordance with chapter "Data structure“, from the fieldbus Master, determines the valid length of
the Modbus data if the length byte is not activated, adds the CRC checksum and sends this data record as a request on the Modbus.
6
Fiessler Elektronik Gmbh & Co. KG Kastellstr. 9 73734 Esslingen Tel.: 0711/919697-0 email:[email protected] web:www.fiessler.de Doku.Nr.:1058 vom 14.05.08
FIESSLER
Feldbus-Gateway FPSC-Profibus-DP
ELEKTRONIK
Operating instructions
Connection and communication of the Profi-Bus master via gateway to the FPSC
Profi-Bus interface
Note! Port "RS232 PC" use
Note! Voltage supply of the gateway FPSC
Profibus DP: Pin1(+10,8... 30VDC) Pin2(0 V)
Connection diagramm of the FPSC for your application, take a look to the FPSC manual.
The professional bus
address of the gateway can
be changed to the HEX
schwitches(Profibus ID High
and Low). A Termination of
the gateway necessarily to
place it the switch Termination on ON
Profi-Bus communication:
As professional bus simulator in this example a Dongle of the
company Bihl and Wiedemann is used. Select they as in this
example the GSD file DAGW2079.GSD and use them e.g. the
entry "8 byte I/O (consistent)" selecting you the size that the answer of the FPSC in each case into the number of bytes in such a
way fit! When Slave address here 3 used, which should be identical to the attitudes of the High and Low byte switch at the gateway. Afterwards the individual bytes of the minutes example specified down are entered into the range Ausgangsdaten(Siehe picture)! Now the original data lie cyclically on your professional
bus!! Gateway reacted however only on this request if we the first
Byte(Triggerbyte to 01) aendern(Z.B. in the input mask of the original data of 01 to 02 by hand set) thereafter by the gateway assistance length byte here the relevant data is recognized and to
the Modbus side of the gateway spent. The FPSC finished and
answers the received data, the period of reply depends on the
range of the program in the FPSC! The answer is given of the
FPSC on the Modbus to the gateway, this recognizes and processes the answer and gives on the professional bus side the
answer out those to answer on the professional bus side is from
Prinzip(der data area can be larger) just as developed as the Anfrage(Siehe structure of minutes down) the trigger byte around 1
was incremented.
Example of a Profi-Bus data structure:
The total data length from the Profi-Bus master to the gateway you specify by the selection in the GSD file gateway
These 6 bytes are the data, which are passed on
to the FPSC. The structure is explained in the
FPSC manual appendix chapter 8. Here as ex.
an inquiry is used by diagnose interfaces the
macro.
01 06 01 03 17 72 00 02 00 00 00 00 00.....
0002 These 2 bytes indicate the number of registers
1772 are the 2 bytes for the register 6002
03 means the function "read of the FPSC" is selected
01 is the Modbusadresse of the FPSC, so it`s always 1
Length byte indicates the number of following bytes. Attention these data necessarily only the gateway.
Trigger byte changes this byte, starts that for gateway the passing on of the data to the FPSC.
Attention these data necessarily only gateway.
7
Fiessler Elektronik Gmbh & Co. KG Kastellstr. 9 73734 Esslingen Tel.: 0711/919697-0 Fax.: 0711/919697-50 email:[email protected] web:www.fiessler.de Doku.Nr.:1057
FIESSLER
Feldbus-Gateway FPSC-Profibus-DP
ELEKTRONIK
Operating instructions
6 Hardware ports, switches and LEDs
6.1 Profibus
6.2 Connectors
6.2.1 Connector to the external device(FPSC)
The connection cable to the external device must be plugged in at the connector accessible on the underside of the device.
Pin allocation (5pol. Screwing plug-in connection) - in the case of use provided cable connection from the FPSC Profibus
DP to the FPSC, must be only attached supply voltage to pin 1 and 2! Note!: The RS interface is not potential is „GND
“and „supply 0V “internally connected!
6.2.2 ProfibusDP connector
The connector (labelled: ProfibusDP) for connection to Profibus is located on the upper side of the device
8
Fiessler Elektronik Gmbh & Co. KG Kastellstr. 9 73734 Esslingen Tel.: 0711/919697-0 email:[email protected] web:www.fiessler.de Doku.Nr.:1058 vom 14.05.08
FIESSLER
Feldbus-Gateway FPSC-Profibus-DP
ELEKTRONIK
Operating instructions
6.2.3 Power supply
The device must be powered with 10.8-30 VDC.
Please note that the devices of the series FPSC Profibus-DP can not be operated with AC voltage.
6.2.4 Shield terminal lead
The shield signal for the electronic circuitry is connected to the top-hat rail via the connector provided. The shield signal for
the Profibus cable shield is not electrically connected to the shield signal of the electronic circuitry for reasons relating to
interference immunity.
6.3 LEDs
The gateway FPSC Profibus-DP features 9 LEDs with the following significance:
6.3.1 LED “Bus Error“
This LED is activated directly by the Profibus ASIC and signals that the Profibus is not in “DATA EXCHANGE” status.
6.3.2 LED “Bus Power“
This LED is connected directly to the electrically isolated supply voltage of the Profibus end.
6.3.3 LED “Bus State“
6.3.4 LED “Power“
This LED is connected directly to the (optionally also electrically isolated) supply voltage of the RS485/RS232 end.
6.3.5 LED “State“
6.3.6 LEDs “Error No. / Select ID“ at FPSC-Profibus-DP
If these 4 LEDs flash and LED “State“ simultaneously lights red, the error number is displayed in binary notation (conversion table, see Annex) in accordance with the table in chapter "Error handling". Otherwise, the address with which
communication is currently running via the RS485 interface is displayed, also in binary notation.
9
Fiessler Elektronik Gmbh & Co. KG Kastellstr. 9 73734 Esslingen Tel.: 0711/919697-0 email:[email protected] web:www.fiessler.de Doku.Nr.:1058 vom 14.05.08
FIESSLER
Feldbus-Gateway FPSC-Profibus-DP
ELEKTRONIK
Operating instructions
6.4 Switches
The gateway features 7 switches with the following functions:
6.4.1 Rotary coding switch (Profibus ID)
These two switches are used to set the Profibus ID (00..7D) of the gateway in hexadecimal notation. This value is read
in only once when the gateway in activated and cannot be changed via the Profibus
6.4.2 Slide switch Termination Profibus
If the gateway is operated as the first or last physical device in the ProfibusDP, there must be a bus termination at
this gateway. In order to do this, either a bus terminating resistor must be activated in the connector or the resistor
(220 :) integrated in the gateway must be activated. In order to do this, slide the slide switch to position ON. In all
other cases, the slide switch must remain in position OFF. Please refer to the general Profibus literature for further
information on the subject of bus termination.
6.4.3 Rotary coding switches S4 + S5 (RS485 ID)-!!Attention on basic adjustment leave!!
These two switches are used to set the RS485 ID of the gateway in hexadecimal notation provided an ID is required
for the bus. This value is read in only once when the gateway is activated.
6.4.4 Slide switch (RS485/RS232 interface)-!!Attention on basic adjustment leave!
This slide switch is used to select whether an RS485 interface or an RS232 interface is connected at the connector
to the external device.
6.4.5 Slide switch (RS485/RS422 Termination)
If the gateway is operated as the first or last physical device in the RS485 bus, there must be a bus termination at
this gateway. In order to do this, either a bus terminating resistor in the connector or the resistor (150 :) integrated in
the gateway must be activated. In order to do this, slide the slide switch to position ON. In all other cases, the slide
switch must remain in position OFF. Please refer to the general RS485 literature for further information on the subject of bus terminations.
If the integrated resistor is used, please allow for the fact that this also activates a pull-down resistor (390 :) to
ground and a pull-up resistor (390 :) to VCC.
At the RS422-interface the transmission line is terminated. The receive line is always firmly terminated.
10
Fiessler Elektronik Gmbh & Co. KG Kastellstr. 9 73734 Esslingen Tel.: 0711/919697-0 email:[email protected] web:www.fiessler.de Doku.Nr.:1058 vom 14.05.08
FIESSLER
Feldbus-Gateway FPSC-Profibus-DP
ELEKTRONIK
Operating instructions
7 Error handling
7.1 Error handling at FPSC-Profibus-DP
If the gateway detects an error, the error is signalled by the “State“ LED lighting red and, simultaneously, the error
number being indicated by means of LEDs “Error No.“ as shown in the table below. In addition, this error number is
transferred as an external diagnostic byte via the Profibus to the Master. A distinction can be made between two error
categories:
Serious errors (1-5): In this case, the gateway must be switched off and switched back on again. If the error occurs
again, the gateway must be exchanged and returned for repair.
Warnings (6-15): These warnings are displayed for one minute simply for information purposes and are then automatically reset. If such warnings occur frequently, please inform After-Sales Service.
For user-defined errors the flash frequency is 1 hertz.
Tabelle 1: Error handling at FPSC-Profibus-DP
8 Installation guidelines
8.1 Installation of the module
The module of size (90 x 127 x 55 mm W x H x D) has been developed for switch cabinet use (IP 20) and can thus
be mounted only on a standard mounting channel (deep top-hat rail to EN 50022).
8.1.1 Mounting
Engage the module from the top in the top-hat rail and swivel it down so that the module engages in position.
Other modules may be rowed up to the left and right of the module.
There must be at least 5 cm clearance for heat dissipation above and below the module.
The standard mounting channel must be connected to the equipotential bonding strip of the
switch cabinet. The connection wire must feature a cross-section of at least 10 mm².
An earthing terminal must be positioned next to the module so as to allow the shield connection
on the device to be implemented as short as possible with a flexible wire (1.5 mm² ).
11
Fiessler Elektronik Gmbh & Co. KG Kastellstr. 9 73734 Esslingen Tel.: 0711/919697-0 email:[email protected] web:www.fiessler.de Doku.Nr.:1058 vom 14.05.08
FIESSLER
Feldbus-Gateway FPSC-Profibus-DP
ELEKTRONIK
Operating instructions
8.1.2 Removal
• First disconnect the power supply and signal lines.
• Then push the module up and swivel it out of the top-hat rail.
Vertical installation
The standard mounting channel may also be mounted vertically so that the module is mounted turned through 90°.
8.2 Wiring
8.2.1 Connection systems
The following connection systems must resp. may be used when wiring the module:
•Standard screw-type/plug connection (power supply + RS)
•Push-lock terminals (connection terminals for earthing)
•9-pin SUB-D plug connectors (ProfibusDP and RS232 connection)
a) In the case of standard screw-type terminals, one lead can be clamped per connection point. It is best to then use
a screwdriver with a blade width of 3.5 mm to firmly tighten the screw.
Permitted cross-sections of the line:
•Flexible line with wire-end ferrule:
1 x 0.25 ... 1.5 mm²
•Solid conductor:
1 x 0.25 ... 1.5 mm²
•Tightening torque:
0.5 ... 0.8 Nm
b)The plug-in connection terminal strip is a combination of standard screw-type terminal and plug connector. The
plug connection section is coded and can thus not be plugged on the wrong way round.
c)The 9-pin SUB-D plug connectors are secured with two screws with "4-40-UNC" thread. It is best to use a screwdriver with a blade width of 3.5 mm to screw the screw tight. Tightening torque: 0.2... 0.4 Nm
8.2.2 ProfibusDP commun ication interface
8.2.2.1 Bus line with copper cable
This interface is located on the module in the form of a 9-pin SUB-D socket on the front side of the housing.
•Plug the Profibus connector onto the SUB-D socket labelled "ProfibusDP".
•Firmly screw the securing screws of the plug connector tight using a screwdriver.
•If the module is located at the start or end of the Profibus line, you must connect the bus terminating resistor integrated in the gateway. In order to do this, slide the slide switch to the position labelled . ..on...
•If the module is not located at the start or at the end, you must set the slide switch to position "off" .
8.2.2.2 Power supply
The device must be powered with 10.8...30 V DC.
•Connect the supply voltage to the 5-pin or optional 2-pin plug-in screw terminal in accordance with the labelling on
the front panel of the device.
12
Fiessler Elektronik Gmbh & Co. KG Kastellstr. 9 73734 Esslingen Tel.: 0711/919697-0 email:[email protected] web:www.fiessler.de Doku.Nr.:1058 vom 14.05.08
FIESSLER
Feldbus-Gateway FPSC-Profibus-DP
ELEKTRONIK
Operating instructions
8.2.2.3 Schirmanschluß
The module features two contact points for equipotential bonding and the shield of the RS end. The shield of the
Profibus cable is connected to the equipotential bonding system via an RC snubber circuit. This means that there
are two electrically isolated shields in the device. This guarantees higher interference immunity of the module since
the "cable shield current" which may be up to a few Amperes owing to potential differences between two bus users
is not discharged via the device.
If the device is subject to high mechanical or chemical stress, it is advisable to use a tin-plated top-hat rail in order
to ensure greater contact stability of the shield connection!
8.2.2.4 Equipotential bonding connection
• Fit an earthing terminal to the top-hat rail directly next to the module. The earthing terminal automatically establishes an electrical connection to the top-hat rail.
• Connect the shield connection terminal to the earthing terminal using a flexible wire with a diameter of 1.5 mm²
which should be as short as possible.
• Connect the top-hat rail to the equipotential bonding rail with as low an impedance as possible. Use a flexible
earthing wire with a cross-section of at least 10 mm² for this.
8.2.3 Line routing, shield and measures to combat interference voltage
This Chapter deals with line routing in the case of bus, signal and power supply lines, with the aim of ensuring an
EMC-compliant design of your system.
8.2.4 General information on line routing
- Inside and outside of cabinets
In order to achieve EMC-compliant routing of the lines, it is advisable to split the lines into the following line groups
and to lay these groups separately.
13
Fiessler Elektronik Gmbh & Co. KG Kastellstr. 9 73734 Esslingen Tel.: 0711/919697-0 email:[email protected] web:www.fiessler.de Doku.Nr.:1058 vom 14.05.08
FIESSLER
Feldbus-Gateway FPSC-Profibus-DP
ELEKTRONIK
Operating instructions
8.2.4.1 Shielding of lines
Shielding is intended to weaken (attenuate) magnetic, electrical or electromagnetic interference fields.
Interference currents on cable shields are discharged to earth via the shielding bus which is connected conductively to
the chassis or housing. A low-impedance connection to the PE wire is particularly important in order to prevent these
interference currents themselves becoming an interference source.
Wherever possible, use only lines with braided shield. The coverage density of the shield should exceed 80 %. Avoid lines with foil shield since the foil can be damaged very easily as the result of tensile and compressive stress on attachment. The consequence is a reduction in the shielding effect.
In general, you should always connect the shields of cables at both ends. The only way of achieving good interference
suppression in the higher frequency band is by connecting the shields at both ends.
The shield may also be connected at one end only in exceptional cases. However, this then achieves only an attenuation of the lower frequencies. Connecting the shield at one end may be more favorable if
•it is not possible to lay an equipotential bonding line
•analogue signals (a few mV resp. mA) are to be transmitted
•foil shields (static shields) are used.
In the case of data lines for serial couplings, always use metallic or metallized plugs and connectors. Attach the shield
of the data line to the plug or connector housing.
14
Fiessler Elektronik Gmbh & Co. KG Kastellstr. 9 73734 Esslingen Tel.: 0711/919697-0 email:[email protected] web:www.fiessler.de Doku.Nr.:1058 vom 14.05.08
FIESSLER
Feldbus-Gateway FPSC-Profibus-DP
ELEKTRONIK
Operating instructions
9 Representation of the data in ProfibusDP
Any standard-compliant ProfibusDP Master can exchange data with the gateway. It is also possible to use very
"simple" Master connections owing to the data structure.
9.1 Configuration telegram
After programming, the Master must send a configuration telegram to the corresponding Slave. The configuration telegram provides the Slave with information on the length of the input/output data. If the user has set the ’Length
byte’ flag, this means the maximum data lengths. Otherwise, it means the actual lengths.
The user normally also configures the configuration telegram in the project planning tool where he may also, if necessary, enter the address range in which the useful data is stored.
You can write up to 16 bytes or words in one octet of the DataUnit (DU). Inputs and outputs hav¬ing the same format can be combined in one octet. Otherwise, you must use as many octets as the number of different bytes/words
you wish to use and which cannot be combined in one octet. If the module detects, during the check, that the maximum permitted input/output data lengths have been exceeded, it signals incorrect configuration to the Master during
a subsequent diagnostic scan. It is then not ready for useful data communication.
Configuration telegram
15
Fiessler Elektronik Gmbh & Co. KG Kastellstr. 9 73734 Esslingen Tel.: 0711/919697-0 email:[email protected] web:www.fiessler.de Doku.Nr.:1058 vom 14.05.08
FIESSLER
Feldbus-Gateway FPSC-Profibus-DP
ELEKTRONIK
Operating instructions
9.2 Diagnosis
Diagnostic data is high-priority data. The gateway runs an external diagnostic if it detects an internal error.
Representation of the information in the external diagnostic byte:
The diagnostic information of a DP Slave consists of standard diagnostic information items (6 bytes) and a user-specific
diagnostic information item. (Error number)
16
Fiessler Elektronik Gmbh & Co. KG Kastellstr. 9 73734 Esslingen Tel.: 0711/919697-0 email:[email protected] web:www.fiessler.de Doku.Nr.:1058 vom 14.05.08
FIESSLER
Feldbus-Gateway FPSC-Profibus-DP
ELEKTRONIK
Operating instructions
9.2.1 Diagnosis in DPV1
The "external diagnosis" of DPV0 (old PB) is used differently at DPV1. At DPV1 the alarms and the status messages
are transfered there. Since the gateway’s error numbers have been transfered in the external diagnosis it became necessary then to carry out an adaptation at DPV1. Now the 3 bytes "0x81, 0x00, 0x00" have been inserted in front of
the actual error message in order to be compatible with DPV1-masters. With it a DPV1-master identifies our gateway’s error as status message now.
This results in a different representation of our gateway error in Profibus. At DPV0 the error number is transmitted in
unmodified form as 1 byte external diagnosis. In case DPV1 has been activated in the gateway through the GSD-file,
the error number occurs as 1 byte status message. Supposing the DPV1 is activated and a master (which does not
support the alarms and status messages) is connected, then our gateway error number is presented as "external diagnosis" with 4 bytes (see above), at which point the 4th byte contains the error number and the preceding 3 bytes
(0x81, 0x00, 0x00) can be ignored.
9.3 Data exchange
After the Master, in the diagnostic, detects that the Slave is ready for data exchange, it sends data exchange telegrams. Either the Master stores the data in the input/output direction in the address area specified during project planning or the control program must fetch or retrieve the data using specific function blocks.
17
Fiessler Elektronik Gmbh & Co. KG Kastellstr. 9 73734 Esslingen Tel.: 0711/919697-0 email:[email protected] web:www.fiessler.de Doku.Nr.:1058 vom 14.05.08
FIESSLER
Feldbus-Gateway FPSC-Profibus-DP
ELEKTRONIK
Operating instructions
10 Technical data
10.1 Device data
The technical data of the module is given in the table below.
18
Fiessler Elektronik Gmbh & Co. KG Kastellstr. 9 73734 Esslingen Tel.: 0711/919697-0 email:[email protected] web:www.fiessler.de Doku.Nr.:1058 vom 14.05.08
FIESSLER
Feldbus-Gateway FPSC-Profibus-DP
ELEKTRONIK
Operating instructions
The table below lists all tests, standards and regulations on the basis of which the module has been tested.
19
Fiessler Elektronik Gmbh & Co. KG Kastellstr. 9 73734 Esslingen Tel.: 0711/919697-0 email:[email protected] web:www.fiessler.de Doku.Nr.:1058 vom 14.05.08
FIESSLER
Feldbus-Gateway FPSC-Profibus-DP
ELEKTRONIK
Operating instructions
10.1.1 Interface data
The table below lists the technical data of the interfaces and ports on the device. The data has been taken from the
corresponding Standards.
20
Fiessler Elektronik Gmbh & Co. KG Kastellstr. 9 73734 Esslingen Tel.: 0711/919697-0 email:[email protected] web:www.fiessler.de Doku.Nr.:1058 vom 14.05.08
FIESSLER
Feldbus-Gateway FPSC-Profibus-DP
ELEKTRONIK
Operating instructions
11 Commissioning guide
11.1 Note
Only trained personnel following the safety regulations may commission the FPSC-Profibus-DP
11.2 Components
You will require the following components to commission the FPSC-Profibus-DP:
• FPSC-Profibus-DP
• Connection cable from gateway to the FPSC
• Connector for Profibus connection to the gateway
• Profibus cable (this cable is generally already installed on site!)
• 10.8..30 V DC power supply (DIN 19240)
• Type fileresp. GSD file and User Manual (the GSD file as well as the user manual can be ordered separately or
downloaded free of charge from our homepage at www.fiessler .de)
11.3 Installation
The FPSC-Profibus-DP module features enclosure IP 20 and is thus suitable for switch cabinet use. The device is
designed for snapping onto a 35 mm top-hat rail.
11.4 Dimensional drawing DIN-rail mounting
11.5 Commissioning
It is essential that you perform the following steps during commissioning in order to ensure that the module operates
correctly:
21
Fiessler Elektronik Gmbh & Co. KG Kastellstr. 9 73734 Esslingen Tel.: 0711/919697-0 email:[email protected] web:www.fiessler.de Doku.Nr.:1058 vom 14.05.08
FIESSLER
Feldbus-Gateway FPSC-Profibus-DP
ELEKTRONIK
Operating instructions
11.6 Setting the Profibus address
Set the Profibus address at the fieldbus end of the module on the two rotary switches designated "Profibus-ID High"
and "Profibus-ID Low" This adjustment is carried out in a hexadecimal way.
Example:
The Profibus-ID is 26 decimal = 1A hexadecimal
The switch "Profibus-ID High" has to be set to 1 and the switch "Profibus-ID Low has to be set to A.
In case the rotary switch is set to a value between 0...125, the gateway operates - with this Profibus-ID and a change
via the master is not possible.
Attention:
The Pro fibus address set must correspond to the planned address under COM Pro fibus !
It is read in only on power-up of the gateway!
11.7 Profibus connection
Connect the device to the Profibus at the interface labelled "ProfibusDP".
11.8 Connection to the process device(FPSC)
Please also read the User Manual provided for the process device(FPSC) when commissioning the process device.
Please you note that for communication on side of the FPSC the macro is to be inserted “diagnose interface” into
the user program!
11.9 Connecting the supply voltage
Please connect 10.8...30 DC voltage to the terminals provided for this.
11.10 Shield connection
Connect the PE wire at the terminal provided for this. Earth the top-hat rail onto which the module has been snapped.
11.11 Project planning
Use any project planning tool for project planning.
If the required GSD file was not supplied with your project planning tool, please copy this file from the enclosed
diskette or download this file from the Internet (www.fiessler.de).
11.12 Project planning-Tipps
Projektierungstools for Siemens Step7: Consider to respond the FPSC Profibus DP over profibus SFC14/15 to be
used must, since those is larger word width 4!
22
Fiessler Elektronik Gmbh & Co. KG Kastellstr. 9 73734 Esslingen Tel.: 0711/919697-0 email:[email protected] web:www.fiessler.de Doku.Nr.:1058 vom 14.05.08