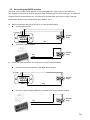
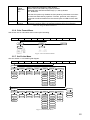
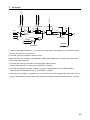
1
ADE-MAK Body-Mass-Index Battery-Power Indicator User Manual Instructions Version 1.17.00 DOC: ADE-MAK Manual 1.17.00.doc ADE (GmbH & Co.) 1 Table of Contents 1. Introduction……………………………………………………………………………… 3 1.1. Description……………………………………………………………………………….. 3 1.2. Features …..…………………………………………………………………………….. 3 1.3. Safety Precaution……………………………………………………………………… 4 1.3.1. Relay Option Safety Precaution ………………………………………………… 4 1.4. Operation Modes ……………………………………………………………………… 5 1.5. Front Panel Keypad ……………………………………………………………………… 6 1.6. LCD Annunciators ……………………………………………………………………… 8 1.7. Indicator Operations ……………………………………………………………………… 9 1.7.1. Weighing Mode Operations ……………………………………………………… 9 1.7.2. Panel Mode Operations 11 ……………………………………………………… 2. Installation……………………….………………………………………………………… 12 2.1. Unpacking and Assembly………………..………………………………………………… 12 2.2. Enclosure and Connectors………………………………………………………………… 12 2.3. Connecting the indicator to load cell……………………………………………………… 14 2.4. Connecting power ……………………………………………………………………… 14 2.4.1. AC Adapter ……………………………………………………………………… 14 2.4.2. Battery installation …………………………………………………………… 15 2.4.3. Battery tips………………………………………………………………………… 15 2.5. Connecting the RS232 interface ……………………………………………………… 16 2.6. Connecting option IO interface ……………………………………………………… 18 3. Configuration…………………….………………………………………………………… 19 3.1. Configuration Methods ………………..………………………………………………… 19 3.1.1. EDP Command Configuration …………………..……………………………… 19 3.1.2. Front Panel Configuration ………………………………………………..……… 19 3.2. Menu Structures and Parameter Descriptions …………….………………………….…… 20 3.2.1. Configuration Menu …………..………………………………………………… 20 3.2.2. Format Menu ………………..………………………………………………… 23 3.2.3. Calibration Menu …….…………..………………………………………………… 24 3.2.4. Serial Menu ………….…………..………………………………………………… 25 3.2.5. Program Menu …….…………..………………………………………………… 26 3.2.6. Print Format Menu …….……..………………………………………………… 27 3.2.7. Set Points Menu …….…………..………………………………………………… 28 3.2.8. Time Menu .….…………..………………………..……………………………… 30 3.2.9. Date Menu ………….…………..………………………………………………… 30 3.2.10. Version Menu …….…………..………………………………………………… 31 4. Calibration …….………………….………………………………………………………… 32 4.1. Front Panel Calibration ………..…………………………………………………… 32 4.2. EDP Command Calibration ………….……………………………………….………… 33 5. EDP Command.………………….………………………………………………………… 5.1. The EDP Command Set..……………………….………………………………………… 5.1.1. Key Press Commands..…………………………………………………………… 5.1.2. Reporting Commands..……………….…………………………………………… 5.1.3. Default Command..…………………….………………………………………… 5.1.4. Parameter Setting Command..……………………………………………………… 5.2. Saving and Transferring Data..…………………….……………………………………… 5.2.1. Saving Indicator Data to a Personal Computer. ………………………………… 5.2.2. Download Configuration Data from Personal Computer to Indicator. ……….…… 34 34 34 34 34 34 37 37 37 6. Print Format. …………………………………………………………………………… 6.1. Print Formatting Command..………………….………………………………………… 6.2. Customizing Print Formats. …………..…………………..…………………………… 6.2.1. Using the EDP Port. …………………………………………………………… 6.2.2. Using the Front Panel. …………………………………………………………… 38 38 38 38 39 7. Set Points. ………………………………………………………………………………… 40 8. Appendix……………….……….…………………………………………………….…… 41 8.1. Error Messages ……………………………………………………………………… 41 8.2. Continuous Output (Stream) Format. ………………………………………………… 42 8.3. Front Panel Display Characters ……………………………………………………… 43 8.4. ASCII Character Chart ………………………………………………………………… 44 8.5. Calibration Examples ………………………………………………………………… 46 8.6. Units Convert Table ……………………………………………………………………… 47 8.7. Digital Filtering ……………………………………………………………………… 48 8.7.1. DIGIFLTRx Parameters. ……………………………………………………… 48 8.7.2. DFSENS and DFTHRH Parameters. …………………………………………… 48 8.7.3. Setting the Digital Filter Parameters. …………………………………………… 48 8.8. Test Mode. ……………………………………………………………………… 49 8.9. Tare, Zero Key and REGULAT Parameter………………………………………………… 50 8.10. Hold function……………………………….…………………………………………… 51 8.11. Specification. …………………………………………………………………………… 53 1. Introduction This manual contains installation, operation and maintenance instructions for the ADE-MAK Indicator. Please read this manual completely before installation and operation. 1.1. Description The ADE-MAK is precision digital weight indicator, which has been designed for medical use in hospitals, by doctors or medical specialists and pediatricians. The ADE-MAK digital weight indicator takes portability to a new level. Running on rechargeable battery Pack, this handy indicator allows operation in practically any location imaginable! Topping rivals in ease of use and performance, it features battery life up to 200 hours* and a configurable shunt-down mode that conserves battery power when not in use. The ADE-MAK is precision digital indicators using the latest Sigma-Delta A/D technology to ensure extremely fast and accurate weight readings. The setup and calibration are digital, with a non-volatile security store for all setup parameters. The instrument may be operated from rechargeable battery pack or a DC power source. There is a soft power on/off function that retains memory of its state. Once an instrument is turned on it will automatically start up again if the external power is interrupted. 1.2. Features Large 0.82", six-digit LCD display Powered by rechargeable battery for portability or Wall Adapter Charge circuit inside. Power for four 350Ω load cells or eight 700Ω load cells One full duplex, RS-232 communications (with Configurable Address) One half duplex RS232 /Current Port for Printer or for remote display. One 500-character print ticket formats Configurable shut-down mode and back light mode to prolong battery life Auto units convert. Flexible unit switching-lb/kg/oz/g Superior battery life of over 200 hours in Power saving mode. Up to 100 hours continuous battery operation with one 350 load cell. Simple calibration, Test and Setting via HyperTerminal program. Tare weight setting with keys One Pseudo Clock for print formats. Easy meet all kind of regulation. Suitable for 0.5mV/V to 4mV/V load cell with no jumper Overload/Underload display indication Battery Level Indication. Animal weighing function Three mode of Hold function BMI calculation and Configurable auto judge indication OPTION set point and remote switch 5 1.3. Safety Precaution For safe and dependable operation of this equipment, please comply with the following safety precautions: Verify that the input voltage range printed on the data label matches the local AC power to be used. Make sure that the power cord does not pose a potential obstacle or tripping hazard. Use only approved accessories and peripherals. Operate the equipment only under ambient conditions specified in these instructions. Disconnect the equipment from the power supply when cleaning equipment . Do not operate the equipment in hazardous or unstable environments. Do not immerse the equipment in water or other liquids. Service should only be performed by authorized personnel. This equipment is supplied with a grounded power cable. Use only with a compatible grounded power outlet. The use of accessory equipment not complying with the equipment safety requirements of this equipment may lead to a reduced level of safety of the resulting system. Locate this product away from other equipments that will generate electromagnetic or other interference. Before use the high-frequency surgical equipment, cardiac defibrillators and cardiac defibrillatormonitors, refer to the manufacturers’ instructions for them. To avoid the risk of fire and electric shock, use only the AC/DC adapter of Group West, Model TRC-05-2000-M. Clean with dry cloth only. Do not use phenolics, which may cause patient skin burns if skin burns if inadequately rinsed off, or alcohol, which does not have sufficient cleaning/disinfection properties. RS232 port must be connected to SELV equipment. SELV equipments are those with low DC voltage. type B applied part 1.3.1. Relay Option Safety Precaution This equipment may have an optional DC Relay Option board installed. This option allows external device control to be coordinated to the Indicator’s set point 1 & 2. CAUTION: ELECTRICAL SHOCK HAZARD. REMOVE ALL POWER CONNECTIONS TO THE INDICATOR BEFORE SERVICING OR MAKING INTERNAL CONNECTIONS. THE HOUSING SHOULD ONLY BE OPENED BY AUTHORIZED AND QUALIFIED PERSONNEL, SUCH AS AN ELECTRICAL TECHNICIAN. Before making connections to the Relay terminals, remove power from the system. If the system contains an optional rechargeable battery system, be sure that the POWER/ZERO button is used to fully turn off the system after removing the AC power plug. 1.4. Operating Modes The ADE-MAK supports the following modes of operation: z Normal (weighing) mode Normal mode is the “production” mode of the indicator. The indicator displays gross or net weights as required, using the LCD annunciator described in Section 1.6 to indicate scale status and the type of weight value displayed. Once configuration is complete and a legal seal is affixed to the back of the indicator, this is the only mode in which the ADE-MAK can operate. See Section 1.7.1 for more information about normal mode operations. z Panel mode Panel mode allows the time, date, consecutive number, and consecutive number start-up value to be set without entering configuration mode. To enter panel mode, press and hold the GROSS/NET key until the TIME menu is shown. See Section 1.7.2 for more information about panel mode. z Configuration mode Most of the procedures described in this manual require the indicator to be in configuration mode, including configuration and calibration. To enter configuration mode, remove the large fillister head screw from the enclosure back-plate. Insert a screwdriver or a similar tool into the access hole and press the setup switch once. The indicator display changes to show the word CONFIG. z Test mode Test mode provides a number of diagnostic functions for the ADE-MAK indicator. Like setup mode, test mode is entered using the setup switch. See Section 8.7 for more information about entering and using test mode. 1.5. Front Panel Keypad Figure 1-1 shows the ADE-MAK keypad, LCD annunciator and Display. The symbols shown blue color under the keys (representing up, down, enter, left, right) describe the key functions assigned in configuration and panel modes. In these modes, the keys are used to navigate through menus, select digits within numeric values, and increment/decrement values. See Section 3.1.2 for information about using the front panel keys in configuration mode. 1 18 2 17 3 4 16 5 15 6 14 7 8 9 10 11 12 13 Figure 1-1 Front Panel and Display NO. 1 Designation Display Function LCD Display indicates weight, mode and configuration information. 2 Battery Level Annunciator, indicate the batter‘s level. 3 Set point 1 ,2 Annunciator, indicate the status of set point 1 &2. 4 BMI judge Annunciator, Automatic judge BMI 5 Net Annunciator, The displayed weight is a net weight if light on otherwise is a gross weight. 6 Center of Zero Annunciator, Gross weight is within 0.25 graduations of zero. This annunciator lights when the scale is zeroed. 7 Hold Press active hold function. 8 Power/Zero Turn indicator on or off. Secondary use, provides zero function. 9 Tare Press the TARE key to acquire the weight of the scale as tare. 10 Preset Tare Short press; Recall tare data. Long press; Enter tare value into memory. 11 BMI Press, into BMI mod and enter height , Press again back to weighting mode. 12 Units Press, toggle user definer’s units. 13 Number Key Clear Number key 0~9,Clear,Enter; for user enter number Clear the value. Except in weighing mode: “6” key represent “RIGHT” “4” key represent “LEFT” “8” Key represent “DOWN” “2” Key represent “UP” Gross/Net In weight mode “0” key represent toggle gross or net weigh if tared in memory. Enter/PRINT In weighing mode represent “PRINT” In other mode represent “DOWN” or “ENTER” 14 Standstill Annunciator, scale is at standstill or within the specified motion band. Some operations, including zero, tare, and printing functions, can only be done when the standstill symbol is shown. 15 Hold Annunciator, indicate display hold is active. 16 lb Annunciator, the displayed weight is in pounds. 17 oz Annunciator, the displayed weight is in ounces. 18 kg g Annunciator, the displayed weight is in kilograms. Annunciator, the displayed weight is in grams. 1.6. LCD Annunciator The ADE-MAK display uses a set of LCD annunciator to provide information about the value being displayed: z Net (5) annunciator is lit to show the displayed weight is net weight. Otherwise is gross weight. z Center Of Zero (6): Gross weight is within ±0.25 graduations of zero. This annunciator lights when the scale is zeroed. z Standstill ( ): Scale is at standstill or within the specified motion band. Some operations, including tare functions and printing, can only be done when the standstill symbol is shown. z lb, kg, oz, and g (16, 17, and 18) annunciator indicate the units associated with the displayed value: lb=pounds, kg=kilograms, oz=ounces, g=grams. The displayed units can set with primary unit and secondary unit; both units can be defining by user. In weighting mode be toggle while Units key (12) press. For example: • If the primary unit is pounds (lb) and the secondary unit is kilograms (kg), the lb LCD is lit for primary units, kg for secondary units. • If the primary unit is kilograms (kg) and the secondary unit is pounds (lb), the kg LCD is lit for primary units, lb for secondary units. 1.7. Indicator Operations 1.7.1. Weighing Mode Operations Basic ADE-MAK operations are summarized below: z Toggle Units Press the UNITS key to switch between primary and secondary units. The unit annunciator (16, 17, and 18) of the display is lit. z Zero Scale 1. In gross mode, remove all weight from the scale and wait for the standstill annunciator ( ). 2. Press the ZERO key (8). The center of zero (6) annunciator lights to indicate the scale is zeroed. z Acquire Tare 1. Place container on scale and wait for the standstill annunciator ( ). 2. Press the TARE key (9) to acquire the tare weight of the container. The indicator switches to net mode. z Remove Stored Tare Value 1. Remove all weight from the scale and wait for the standstill annunciator ( ). 2. Press the TARE key (9) (or, in OIML mode, the ZERO key). The indicator switches to gross mode, indicating the tare value has been removed. z Keyed Tare 1. Using the numeric keypad, enter the desired tare weight. Remember the weight is one of pounds/ Kilograms/ grams/ ounce whatever were set previously. If the number is not entered, the display indicates an “ER TOUT ”; this is normal. The Indicator returns to a weighing mode automatically. If entered correctly, the tare weight is stored in the Indicator. Note: The Keyed Tare must be >0, and No limited on max. 2. Press <ENTER>(or <TARE> ) button, Indicator is now ready for weighing. The display shifts to net weight and shows the letters <NET> on the display. z Displaying Gross, Net, Tare Pressing the <0> key successively displays the Tare, the Gross, and the Net weights. If a tare value has been entered or acquired, the net value is the gross weight minus the tare. If no tare has been entered or acquired, the display remains in gross mode. Net mode is indicated by the letters <NET> . The display tare weight is in flash digital ,and after one seconds the display shifts to gross weight. 11 z Hold Display 1. Wait for the standstill annunciator ( ). (May be not need wait depend on selectable parameter) 2. Press the Hold key (7) to frozen the display. The Hold annunciator (15) of the display is lit. 3. Press the Hold key (7) again to back to weighing mode. See Hold function section for detail. z BMI Display 1. Press the BMI key (11) to enter BMI mode, the display should show the last entered value, 2. The operator could put body height (in cm) in a new value (13) or use the old value and press the Enter key (13). Or clear the value by Press the Clear Key (13). 3. After press the Enter key, 4. During the time (3 Min.) or Press the BMI key (11) to abort. The display will toggle between weight value and BMI value “b xx.x”, in toggle a fixed time of 2 seconds. z Recall Preset Tare 1. Press "Preset Tare" key the unit will display “Pt x” and wait for entering a number (0-9). If after 5 seconds no number was entered - return to normal weighing mode. 2. After entering the number the ADE-MAK will recall the preset tare, display it for 5 seconds and switch to NET mode using the recalled PT value. z Preset Tare 1. In order to program a tare value hold the Preset Tare key for 2 seconds. Then the ADE-MAK will show "ProPt x" and wait for entering a number (0-9). 2. Press a number key (0-9). This is the memory to be programmed. 3. The ADE-MAK will recall the preset tare, display it. Then enter the preset tare value and press "Enter”, Note: the format depend on PRI.DECPNT and SEC.DECPNT define, the units depend on display units,( may press Units key changed it) 4. The ADE-MAK will store the new value in the memory designated. z Print Ticket 1. Wait for the standstill annunciator ( ). 2. Press the ENTER key (13) to send data to the serial port. Note: a. Zero net weight not allows printing. b. The print function allows only one print, If without going through zero return point. 1.7.2. Panel Mode Operations The following operations are available by placing the indicator in panel mode: z Set serial port, non-metrological parameter z Set time, date, consecutive number z Set print format z Set Set-points z Test items To enter panel mode, press and hold the CLEAR key (13) until the TIME menu is displayed. Use the navigation keys to move around the menu; to change a value, use the navigation keys to select the digit and increment or decrement its value. Press the Enter key to set the value and return to the menu level above. The structure of the panel mode menu show on below. Note: To enter a 2 digit month, the lower digit must be a “1” then the upper digit is incremented to “1”. The lower digit can then be changed to 0, 1 or 2 as required. FILTER SERIAL PROGRM PFORMT SETPTS See Section 3.2.6 See Section 3.2.4 TEST TIME See Section 3.2.7 VERS See Section 3.2.9 See Section 8.8 See Section 3.2.5 DATE See Section 3.2.8 See Section 3.2.10 See Section 3.1 DIGFL1 DIGFL2 DIGFL3 DFSENS DFTHRH 1 1 1 2OUT NONE 2 2 2 4OUT 2DD 4 4 4 8OUT 5DD 8 8 8 16OUT 10DD 16 16 16 32OUT 20DD 32 32 32 64OUT 100DD 128OUT 200DD 64 64 64 128 128 128 250DD 13 2. Installation This section provides information for connecting load cell and serial communications cables to the ADE-MAK indicator. 2.1. Unpacking and Assembly Immediately after unpacking, visually inspect the ADE-MAK to ensure all components are included and undamaged. The shipping carton should contain the indicator with attached tilt stand, this manual, and a parts kit. If any parts were damaged in shipment, notify Vishay and the shipper immediately. The parts kit contains the items listed below: • Capacity and identification labels • Load cell connector • Rechargeable battery (option) • Power supply adapter 2.2. Enclosure and Connectors The back of the ADE-MAK enclosure provides a 3-pin power connection, 15-pin HDB-sub connector for communications/IO, and an available 6-pin connector or load cell cord grip connector for load cell connection (see Figure 2-1). The setup switch, used for placing the indicator into configuration mode, is located in the recess on the underside of the enclosure. The setup switch is protected by a cover plate and secured with a fillister head screw (not shown in Figure 2-1).Pin Assign showing in Figure 2-2. HDB15-F for communication and IO Load Cell 6-pin Power 3-pin Setup Switch Figure 2-1 Back View of ADE-MAK Enclosure, Showing Load Cell Connector, Communications Connectors and Setup Switch Location 14 The female HDB15 connector provides connections for the EDP (Electronic Data Processing) port, the printer port and digital input/output. Pin 1 2 3 4 5 6 7 8 9 10 11 12 13 14 15 Port Printer EDP N/C OUT1/2 COM OUT2 EDP RSW1/2/3 N/C N/C OUT1 Printer EDP/Printer RSW1 RSW2 RSW3 Function RS-232 TxD RS-232 TxD not used Set Point 1 &2 Common Set Point 2 RS-232 RxD Remote Switcher 1&2&3 Ground not used not used Set Point 1 TxD 20 mA RS-232 Ground / –20 mA OUT Remote Switcher 1 Remote Switcher 2 Remote Switcher 3 Table 2-1 HDB15-F for EDP/Printer/Remote 6 2 3 5 Power Input 5V DC 1 10 HDB15-F 2 1 Load Cell 6 3 15 1 11 4 5 Figure 2-2 back View of ADE-MAK Enclosure, Showing Pin number configuration 2.3. Connecting the indicator to load cell Load cell wires can be wired up indicator. Refer to the 6-pin connector instructions or the load cell cord grip plug instructions to connect to the load cell wires. Load Cell Connector Pin Name 1 EXC- 2 SEN- 3 SIG- 4 SIG+ 5 SEN+ 6 EXC+ For 4-wire connections, short pin1 &2, short pin 5&6. Refer to the color code of the load cell cable and connect the wires to “Load Cell Connector”. The connections are shown for a 6 wire cable. When a 4 wire cable is used, the Pin 1 &2 and Pin 5&6 must be short. z Load Cell Connection To 6-Wires Load Cell SignalSenseExcitation2 1 Load Cell 3 4 6 5 Sense+ Excitation+ Signal+ To 4-Wires Load Cell SignalSense2 1 Load Cell 3 4 6 5 Excitation- Sense+ Excitation+ Signal+ For obtaining better performance, it is recommended to keep both short points as close to load cell as possible. 2.4. Connecting power The ADE-MAK indicator may operate using the AC adapter, or a rechargeable Lithium Ion pack (Option). 2.4.1. AC adapter Connect the AC adapter connector to the receptacle located at right-hand side of the indicator and plug the adapter into a convenient outlet. Notice the outlet/socket must be installed near the equipment and shall be easily accessibly. And must be used the dedicated AC adapter only. Power Input pin assign Pin Name 1 DC+ 2 DC- 3 Earth 16 2.4.2. Battery installation Open the battery on the front of the housing. Slightly pull out battery wires from housing, connect the wire with red-to-red, black-to-black. Insert the rechargeable batter into housing. Close the cover. Notice: Always use Vishay Original batteries and chargers. The warranty does not cover damage caused by using non-Vishay batteries and/or chargers. 2.4.3. Battery tips Battery life depends on the load, use frequency, temperature, setting, and accessories you use. Always use Vishay Original batteries and chargers. The warranty does not cover damage caused by using non- Vishay batteries and/or chargers. New batteries or batteries stored for a long time may take more time to charge. When charging your battery, keep it near room temperature. When storing your battery, keep it uncharged in a cool, dark, dry place, such as a refrigerator. Never expose batteries to temperatures below -10°C (14°F) or above 45°C (113°F). It is normal for batteries to gradually wear down and require longer charging times. If you notice a change in your battery life, it is probably time to purchase a new battery. New batteries are shipped partially charged. Some batteries perform best after several full charge/discharge cycles. Do not dispose of used batteries in normal trash. Follow the proper disposal or recycling requirements in accordance with local laws and regulations. Warning: Never dispose of batteries in a fire because they may explode. 2.5. Connecting the RS232 interface The serial communications cable attaches to the female HDB-Sub 15 pin connector (see Table 2-1). That provides connections for the EDP (Electronic Data Processing) port and the printer port. The EDP port supports RS-232 communications only; the printer port provides either active 20 mA output or RS-232 transmission. Both ports are configured using the SERIAL menu. z EDP Port (RS232C, May be connect to PC, Printer, Remote Display) To Personal Computer 5 RxD 2 3 TxD TxD RxD PC COM1 2 6 ADE-MAK HDB15 12 GND DB9-F To Printer or Remote Display TxD 2 ADE-MAK HDB15 RxD 12 GND z Printer Port (TxD 20mA, May be connect to PC, Printer, Remote Display) To Personal Computer (RS232C, ADE-MAK Stream Output) 2 TxD RxD PC COM1 1 5 ADE-MAK HDB15 12 GND DB9-F To Printer / Remote Display (RS232C, ADE-MAK Print Function/Stream Output) TxD 1 ADE-MAK HDB15 RxD GND 12 18 To Printer / Remote Display (+20mA, ADE-MAK Print Function/Stream Output) ADE-MAK HDB15 GND RxD 20mA 12 TxD 20mA 11 2.6. Connecting option IO interface The option IO board provides three digital inputs and two solider digital relay out. z Remote Switcher The ADE-MAK Indicator has provisions to connect an external input device such as a press switch (purchased separately) to provide a membrane function. The membrane function can be set in the SETPNT menu; the external device must provide a normally open (N.O.) momentary switch contact. The remote switch input requires a voltage free contact between RSW and GND. ADE-MAK RSW1 HDB15 RSW2 7 RSW3 15 13 14 z WARNING The remote input is a voltage free contact (eg. button, mechanical relay). Connection of any active circuitry may damage the instrument. Set Points Output Output drivers for the ADE-MAK are isolated open emitter transistor drives that are capable of driving up to a total of 800mA. This configuration allows for the direct connection of the ADE-MAK outputs to most types of PLC. The voltage applied to the COM terminal appears on the output lines (ie. OUT1 and OUT2) when the outputs are active (eg. To connect to a PLC connect +24V to the common terminal). The outputs can then be connected directly to PLC inputs so when the outputs are active the PLC will see a 24V signal. To drive external loads (eg. relays), connect the relay coil positive supply to the output common and the output line directly to one side of the relay coil. Connect the other end of the relay coil to the negative supply. It is recommended that fly-back diodes or transient suppressors be fitted across relay coils to limit switching noise. Outputs to Drive Relay Power +12~24V DC (Max. 50V) ADE-MAK 4 OUT1 10 5 HDB15 OUT2 Negative Supply Outputs to Drive PLC Power +12~24V DC (Max. 50V) 10 PLC Input 1 Input 2 ADE-MAK 4 5 HDB15 OUT1 OUT2 COM Negative Supply 20 3. Configuration To configure the ADE-MAK indicator, the indicator must be placed in Setup mode. The setup switch is accessed by removing the left fillister head screw on underside of the enclosure and removing the rectangular switch cover plate. Switch position is changed by inserting a screwdriver into the access hole and pressing the switch. When the indicator is placed in setup mode, the word CONFIG is shown on the display. The CONFIG menu is the first of nine main Menus used to configure the indicator. Detailed descriptions of these Menus are given in Section 3.2. When configuration is complete, return to the CONFIG menu and presses the key to exit setup mode, then replace the setup switch access screw. 3.1. Configuration Methods The ADE-MAK indicator can be configured by using the front panel keys to navigate through a series of configuration menus or by sending commands or configuration data to the EDP port. Configuration using the menus is described in Section 3.1.2. Configuration using the EDP port can be accomplished using the EDP command set described in Section 5.0. 3.1.1. EDP Command Configuration The EDP command set can be used to configure the ADE-MAK indicator using a personal computer, terminal, or remote keyboard. EDP command configuration sends commands to the indicator EDP port; EDP commands can be sent using any external device capable of sending ASCII characters over a serial connection. EDP commands duplicate the functions available using the indicator front panel and provide some functions not otherwise available. EDP commands can be used to simulate pressing front panel keys, to configure the indicator, or to dump lists of parameter settings. See Section 5.0 for more information about using the EDP command set. 3.1.2. Front Panel Configuration The ADE-MAK indicator can be configured using a series of menus accessed through the indicator front panel when the indicator is in setup mode. Table 3-1 summarizes the functions of each of the main menus. CONFIG Menu Configuration FORMAT CALIBR SERIAL PROGRM Format Calibration Serial Program PFORMT Print Format SETPTS TIME DATE VERSION Set Points Time Date Version Menu Function Configure grads, zero tracking, zero range, motion band, overload, initial zero and digital filtering parameters. Set format of primary and secondary units, display rate. Calibrate indicator. See Section 4.0 for calibration procedures. Configure EDP and printer serial ports. Set power-up mode, regulatory mode, shunt down method, back light, BMI judge, keyboard lock and consecutive number values. Set print format used for gross and net tickets. See Section 5.0 for more information. Set two Set points Display and set time Display and set date Display installed software version number. Table 3-1. ADE-MAK Menu Summary 21 Four front panel keys are used as directional keys to navigate through the menus in setup mode. The (13) and 6 (13) keys scroll left and right (horizontally) on the same menu level; the move up and down (vertically) to different menu levels. The 2 (13) and 4 8 (13) ENTER key (13) serves as an Enter key for selecting parameter values within the menus. To select a parameter, press display, then press 4 or 6 to scroll left or right until the desired menu group appears on the ENTER to move down to the submenu or parameter you want. When moving through the menu parameters, the default or previously selected value appears first on the display. To change a parameter value, scroll left or right to view the values for that parameter. When the desired value appears on the display, press to select the value and move back up one level. NOTE: You must press to save the selected value. The ADE-MAK does not automatically save the last- displayed value. To edit numerical values, press ENTER (rightmost digit will flash), then use the 0~9 keys and CLEAR key to edit the value. When done, press ENTER again to save the edited value. 3.2. Menu Structures and Parameter Descriptions The following sections provide graphic representations of the ADE-MAK menu structures. In the actual menu structure, the settings you choose under each parameter are arranged horizontally. To save page space, menu choices are shown in vertical columns. The factory default setting appears at the top of each column. Most menu diagrams are accompanied by a table that describes all parameters and parameter values associated with that menu. Default parameter values are shown in bold type. 3.2.1. Configuration Menu CONFIG GRADS FORMAT CALIBR ZTRKBN SERIAL PROGRM PFORMT SETPTS TIME DATE VERS ZRANGE MOTBAN OVRLOA DIGFL1 2500 OFF 1.9% 1D FS+2% 1 number 0.5D 100% 2D FS+1D 2 1D 3D FS+9D 4 3D 5D FS 8 10D 16 20D 32 50D 64 OFF 128 DIGFL2 DIGFL3 DFSENS DFTHRH INIZR 1 1 2OUT NONE OFF USA 2 2 4OUT 2DD 8% EUROPE 4 4 8OUT 5DD 20% CANADA 8 8 16OUT 10DD 50% NONE 16 16 32OUT 20DD 100% 32 32 64OUT 100DD 64 64 128OUT 200DD 128 128 REGULA 250DD Figure 3-1. Configuration Menu 22 CONFIG MENU Parameter Choices Level 2 submenus GRADS 2500 number Description Graduations. Specifies the number of full scale graduations. The value entered must be in the range 1–100000 and should be consistent with legal requirements and environmental limits on system resolution. To calculate GRADS, use the formula, GRADS = Capacity / Min.Weight. Where Min.Weight = PRI.DSPDIV / PRI.DECPNT PRI.DECPNT 888888 ---1 88888.8---10 8888.88---100 888.888---1000 88.8888---10000 8.88888---100000 PRI.DSPDIV 1D---1 2D---2 5D---5 10D---10 20D---20 50D---50 100D---100 200D---200 500D---500 ZTRKBN ZRANGE MOTBAN OVRLOA DIGFL1 DIGFL2 DIGFL3 OFF 0.5D 1D 3D 1.9% 100% 1D 2D 3D 5D 10D 20D 50D OFF FS+2% FS+1D FS+9D FS 1 2 4 8 16 32 64 128 For Examples GRADS=3000, PRI.DSPDIV =2D, PRI.DSPDIV =88888.8 Then Capacity = 6,000, Min.Weight =2/10=0.2,and display with xxxxx.x Automatically zeroes the scale when within the range specified, as long as the input is within the ZRANGE and scale is at standstill. Selections are ± display divisions. Maximum legal value varies depending on local regulations. Selects the range within which the scale can be zeroed. The 1.9% selection is ± 1.9% around the calibrated zero point, for a total range of 3.8%. Indicator must be at standstill to zero the scale. Use 1.9% for Legal-for-Trade applications. Motion band. Sets the level, in display divisions, at which scale motion is detected. If motion is not detected for 1 second or more, the standstill symbol lights. Some operations, including print, tare, and zero, require the scale to be at standstill. Maximum legal value varies depending on local regulations. If OFF is selected, ZTRKBN should also be set to OFF. Determines the point at which the display blanks and an out-of-range error message are displayed. Maximum legal value varies depending on local regulations. Digital filtering. Selects the digital filtering rate used to reduce the effects of mechanical vibration from the immediate area of the scale. Choices indicate the number of A/D conversions that are averaged to obtain the displayed reading. A higher number gives a more accurate display by minimizing the effect of a few noisy readings, but slows down the settling rate of the indicator. See Section 8.7 for more information on digital filtering. 23 DFSENS 2OUT 4UT 8OUT 16OUT 32OUT 64OUT 128OUT Digital filter cutout sensitivity. Specifies the number of consecutive readings that must fall outside the filter threshold (DFTHRH parameter) before digital filtering is suspended DFTHRH NONE 2DD 5DD 10DD 20DD 50DD 100DD 200DD 250DD OFF 8% 20% 50% 100% Digital filter cutout threshold. Specifies the filter threshold, in display divisions. When a specified number of consecutive scale readings (DFSENS parameter) fall outside of this threshold, digital filtering is suspended. If NONE is selected, the filter is always enabled. INIZR REGULA USA EUROPE CANADA NONE Initial Zero Range. Define the range within which the scale can be zeroed while power on. The 8% means ± 8% around the calibrated zero point, for a total range of 16%. If power on while setting not ‘OFF’, ADE-MAK will wait until in the range of zero. And with a message “init”. Regulatory mode. Specifies the regulatory agency having jurisdiction over the scale site. •EUROPE, USA, and CANADA modes allow a tare to be acquired at any weight greater than zero. NONE allows tares to be acquired at any weight value. •EUROPE, USA, and CANADA modes allow a tare to be cleared only if the gross weight is at no load. NONE allows tares to be cleared at any weight value. •USA and EUROPE modes allow a new tare to be acquired even if a tare is already present. In CANADA mode, the previous tare must be cleared before a new tare can be acquired. • NONE, USA and CANADA modes allow the scale to be zeroed in either gross or net mode as long as the current weight is within the specified ZRANGE. In EUROPE mode, the scale must be in gross mode before it can be zeroed; pressing the ZERO key in net mode clears the tare. Table 3-2. Configuration Menu Parameters 24 3.2.2. Format Menu CONFIG FORMAT CALIBR PRIMAR SERIAL PROGRM PFORMT SETPTS SECNDR DECPNT DSPDIV UNITS DECPNT DSPDIV UNITS TIME DATE DSPRAT HIRES 888888 1D KG 888888 1D KG 250MS OFF 8.88888 2D LB 8.88888 2D LB 500MS ON 88.8888 5D G 88.8888 5D G 1SEC 888.888 10D OZ 888.888 10D OZ 2SEC 8888.88 20D T 8888.88 20D T 88888.8 50D 88888.8 VERS 50D 100D 100D 200D 200D 500D 500D Figure 3-2. Format Menu FORMAT MENU Parameter Choices Level 2 submenus PRIMAR DECPNT DSPDIV UNITS SECNDR DECPNT DSPDIV UNITS DSPRAT 250MS 500MS 1SEC 2SEC HIRES OFF ON Description Specifies the decimal position, display divisions, and units used for the primary units. See Level 3 submenu parameter descriptions. Specifies the decimal position, display divisions, units. See Level 3 submenu parameter descriptions. Display rate. Sets the update rate for displayed values. Values are in milliseconds (MS) or seconds (SEC). Sets (ON) the instrument to display weight at 10 times resolution. This is intended for test purposes but may be used for non-trade weighing. Note: Don’t using this parameter ON, if PRI.DECPNT=’8.88888’ or SEC.DECPNT=’8.888888’ Level 3 submenus Primary Units (PRIMAR Parameter) DECPNT 888888 Decimal point location. Specifies the location of the decimal point or dummy 8.88888 zeroes in the primary unit display. Value should be consistent with local legal 88.8888 requirements. 888.888 8888.88 88888.8 DSPDIV Display divisions. Selects the minimum division size for the primary units 1D 2D displayed weight. 5D 10D 20D 50D UNITS LB Specifies primary units for displayed and printed weight. Values are: LB=pound; KG=kilogram; OZ=ounce; G=gram ; T=metric tons KG OZ G T Secondary Units (SECNDR Parameter) DECPNT Decimal point location. Specifies the location of the decimal point or dummy 888888 8.88888 zeroes in the secondary unit display. Value should be consistent with local 88.8888 legal requirements. 888.888 25 8888.88 88888.8 1D 2D 5D 10D 20D 50D LB KG OZ G T DSPDIV UNITS Display divisions. Selects the minimum division size for the secondary units displayed weight. Specifies secondary units for displayed and printed weight. Values are: LB=pound; KG=kilogram; OZ=ounce; G=gram ; T=metric tons Table 3-3. Format Menu Parameters 3.2.3. Calibration Menu Also see Section 4.0 for calibration procedures. CONFIG FORMAT CALIBR SERIAL PROGRM PFORMT WZERO WVAL *CAL* Press Enter to Acquire zero calibration A/D count value Acquire weight value 250 SETPTS TIME WSPAN *CAL* Press Enter to Acquire span calibration A/D count value DATE VERS REZERO *CAL* Press Enter to remove offset from zero and span calibration Figure 3-3. Calibration Menu CALIBR MENU Parameter Choices Level 2 submenus WZERO WVAL WSPAN REZERO 250 test_weight - Description Press Enter to Acquire the zero calibration A/D count value. DO NOT adjust this value after WSPAN has been set! Acquire the test weight value. Press Enter to Acquire the span calibration A/D count value. Press Enter to remove an offset value from the zero and span calibrations. Use this parameter only after WZERO and WSPAN have been set. See Section 4.1 for more information about using this parameter. Table 3-4. Calibration Menu Parameters 26 3.2.4. Serial Menu CONFIG FORMAT CALIBR SERIAL PROGRM PFORMT EDP SETPTS TIME DATE VERS PRINT BAUDS BITS TERM ECHO ADDRES BAUDS BITS TERM 1200 8NONE CR/LF ON 00 1200 8NONE CR/LF 2400 7ODD CR OFF number 2400 7ODD CR 4800 7SPACE 4800 7SPACE 9600 7EVEN 9600 7EVEN 19200 38400 PRNDES STREAM STMDLY CINSTR MONBAT PROTECT EDP OFF 250MS OFF OFF DISABLE PRN PRN 500MS ON ON ENABLE EDP 1SEC 2SEC 4SEC 8SEC 15SEC Figure 3-4 Serial Menu SERIAL MENU Parameter Choices Level 2 submenus EDP BAUD BITS TERM ECHO ADDRES PRINT BAUD BITS TERM PRNDES EDP PRN STREAM OFF EDP PRN STMDLY 250MS 500MS 1SEC 2SEC 4SEC 8SEC 15SEC CINSTR ON OFF MONBAT ON OFF PROTCT ENABLE DISABL Level 3 submenus Description Specifies settings for baud rate, data bits, termination characters, and RS485 address used by the EDP port. Specifies settings for baud rate, data bits, and termination characters used by the printer port. Print destination. Selects the port for data transmission when the PRINT key is pressed or the KPRINT EDP command is sent. Selects the serial port used for continuous transmission. See Section 8.2 for information about the ADE-MAK continuous data format. Stream delay. Specifies the delay, seconds (SEC) or milliseconds (MS), inserted between stream frames. Stream addition information with Raw data and time. Stream addition information with battery data. EDP port protection. Select ENABLE to secure the EDP port from configuration changes. EDP Port 27 BAUD BITS TERM ECHO ADDRES 1200 2400 4800 9600 19200 38400 8NONE 7ODD 7EVEN 7SPACE CR/LF CR ON OFF 00 hh number in hex Level 3 submenus BAUD 1200 2400 4800 9600 19200 38400 BITS 8NONE 7ODD 7EVEN 7SPACE TERM CR/LF CR LNGUGE ENGLIS GERMAN Baud rate. Selects the transmission speed for the EDP port. Selects number of data bits and parity of data transmitted from the EDP port. Termination character. Selects termination character for data sent from the EDP port. Echo. Specify whether serial commands sent to the indicator are echoed. Specifies the node address of RS485. The value is in hex format. 00 represent disable this function. Printer Port Baud rate. Selects the transmission speed for the printer port. Selects number of data bits and parity of data transmitted from the printer port. Termination character. Selects termination character for data sent from the printer port. Ticket language. Selects the language for the printer ticket. English/ German GROSS/ BRUTTO NET/NETTO TARE/TARA HEIGHT/ GROESSE Table 3-5. Serial Menu Parameters 3.2.5. Program Menu CONFIG FORMAT CALIBR PWRUPM RPNBAN SHUTDN GO OFF DELAY 1D 2D SERIAL PROGRM PFORMT SETPTS TIME DATE HOLDMD BMIJUD KYLOCK OFF DISABL OFF NONE 1 ON TOGGLE ON UNIT number BAKLIT BUZZER NONE OFF 1MIN 15SEC 2MIN 30SEC AVERAG PRN 3D 5MIN 1MIN AUTO HOLD 5D 10MIN ON CONSNU BMI 10D ZOTA 20D UNPR 50D BMUNPR Figure 3-5. Program Menu PROGRM MENU Parameter Choices Level 2 submenus PWRUPM GO DELAY VERS ALL Description Power up mode. In GO mode, the indicator goes into operation immediately after a brief power up display test. 28 In DELAY mode, the indicator performs a power up display test, and then enters a 60-second warm up period. If no motion is detected during the warm up period, the indicator becomes operational when the warm up period ends; if motion is detected, the delay timer is reset and the warm up period repeated. RPNBAN SHUTDN BAKLIT BUZZER HOLDMD OFF 1D 2D 3D 5D 10D 20D 50D NONE 1MIN 2MIN 5MIN 10MIN OFF 15SEC 30SEC 1MIN ON OFF ON DISABL TOGGLE AVERAG AUTO Reprint Zero Band. Specifies a band around gross zero in which the scale must pass in order to re-set the print function Function for automatic switch off if the instrument in not needed. Function for automatic switch off LCD back light if the instrument in not needed. A sound of key press. Hold function TOGGLE: After press the HOLD key the weight will be frozen if no motion and bigger than zero. Press HOLD again, back to weighing mode. AVERAG: After press the HOLD key if bigger than zero and not increase weight, then start to take the average value in 3 seconds, the average weight will be frozen. Press HOLD again or after 2 minutes, back to weighing mode. AVGTM HOLDTM BMIJUD KYLOCK 2SEC 3SEC 4SEC 5SEC 6SEC 8SEC 12SEC 14SEC 16SEC 1MIN 2MIN 3MIN 4MIN 5MIN 6MIN 8MIN 10MIN OFF ON NONE UNIT PRN HOLD BMI AUTO: when no motion and bigger than zero, the weight will be frozen. Press HOLD again or after 2 minutes, back to weighing modus. Timer for hold function to average raw data or time limited depend HOLDMD setting. See Hold function section in detail Timer for hold function to limited the time of freeze. See Hold function section in detail BMI automatic judge function. BMI>18.5 LO not enough weight. 18.5 BMI>20.0 LO&OK slightly under weighed. 18.5 BMI>25.0 OK normal weight. 25.0 BMI>30.0 OK&HI slightly overweighed. 30.0 BMI HI overweighed Front Panel Key Lockout Option. In some applications it is desirable that the front panel keys cannot be accessed while operating in normal mode. NONE: no lock any keys. UNIT: UNITS keys (12) disable. PRN: PRINT keys (13) disable. HOLD: HOLD keys (7) disable. 29 CONSNU ZOTA UNPR BMUNPR ALL BMI: BMI keys (11) disable. ZOTA: ZERO and TARE keys (8&9) disable. UNPR: UNITS and PRINT keys (12&13) disable. BMUNPR: BMI, UNITS and PRINT keys (11,12&13) disable. ALL: disable all. 1 number Note that this option only disables the front panel keys and does not lockout the functions that these keys perform. The zero, gross/net, tare, and print command are still accessible from the remote inputs on HDB14 of the ADEMAK Consecutive numbering. Allows sequential numbering for print operations. The consecutive number value is incremented following each print operation. Table 3-6. Program Menu Parameters 3.2.6. Print Format Menu See Section 6.0 for information about custom print formatting. CONFIG FORMAT CALIBR SERIAL PROGRM PFORMT EDIT INSERT 00_@40 00 SETPTS TIME DATE VERS DELETE Figure 3-6. Print Format Menu 3.2.7. Set Points Menu Also see Section 7.0 for detail logical diagram. CONFIG FORMAT CALIBR SERIAL PROGRM PFORMT SETPTS TIME DELAY HYSTER DATE VERS SETPT1 KIND COTACT CONDIT WVAL TIMER OFF N.OPEN NORMAL 100 NONE NONE 0% GROSS N.CLOSE STABLE number 250MS 250MS 2% NET 500MS 500MS 5% DISPLA 750MS 750MS 10% 1,5SEC 1,5SEC 3,0SEC 3,0SEC 4.0SEC 4.0SEC 5.0SEC 5.0SEC SETPT2 KIND RSWDEF COTACT CONDIT WVAL TIMER DELAY HYSTER OFF N.OPEN NORMAL 100 NONE NONE 0% GROSS N.CLOSE STABLE number 250MS 250MS 2% NET 500MS 500MS 5% DISPLA 750MS 750MS 10% 1,5SEC 1,5SEC 3,0SEC 3,0SEC 4.0SEC 4.0SEC 5.0SEC 5.0SEC OF.OF.OF PR.TA.ZO UN.TA.ZO Figure 3-7 Set Points Menu 30 SETPTS MENU Parameter Choices Level 2 submenus SETPT1 KIND CONTACT CONDIT WVAL TIMER DELAY HYSTER SETPT2 KIND CONTACT CONDIT WVAL TIMER DELAY HYSTER RSWDEF OF.OF.OF PR.TA.ZO UN.TA.ZO Level 3 submenus KIND OFF GROSS NET DISPLA ABSNET CONTACT CONDIT WVAL TIMER DELAY HYSTER N.OPEN N.CLOSE NORMAL STABLE 10 number NONE 250MS 500MS 750MS 1.5SEC 3.0SEC 4.0SEC 5.0SEC NONE 250MS 500MS 750MS 1.5SEC 3.0SEC 4.0SEC 5.0SEC 0% 2% 5% 10% Description Specifies settings for mode, contact type, stable, weight valve, timer, delay, and hysteresis used by the set point 1. Specifies settings for mode, contact type, stable, weight valve, timer, delay, and hysteresis used by the set point 2. Specifies the function activated by remote switch inputs 1, 2 and 3. OF.OF.OF disable all remote switches PR.TA.ZO provides the same functions as the front panel keys. Remote switch 1 be ZERO key Remote switch 2 be TARE key Remote switch 3 be PRINT(ENTER) key UN.TA.ZO provides the same functions as the front panel keys. Remote switch 1 be ZERO key Remote switch 2 be TARE key Remote switch 3 be UNITS key SETPT1 ,SETPT2 Kinds of Operation mode, comparator source. OFF: Disable set points. GROSS: Source of Setpoint uses gross weight data. NET: Source of Setpoint uses net weight data. DISPLAY: Source of Setpoint uses display weight data. ABSNET: Source of Setpoint uses absolute value of net weight data. Contact type, Contact status below the set point value, Output of comparator to be normal open or normal close. Output enabled only after the weight reading has stabilized. Set weight thresholds for set point. Output active if load over this weight.(load >=wval) The output is disabled after the time period has expired. Time delay before the output is enabled. Set weight thresholds for setpoint. Output deactivate if load under this weight.(load<wval x hysteresis) Table 3-7. Set Ponits Menu Parameters 31 3.2.8. Time Menu The operator in panel mode can set time. CONFIG FORMAT CALIBR SERIAL SHOW PROGRM PFORMT HOUR SETPTS TIME DATE MINUTE SECOND 00.00.00 00 00 00 Display time 00-23 00-59 00-59 VERS Figure 3-8. Time Menu TIME MENU Parameter Choices Level 2 submenus SHOW HH.MM.SS HOUR hour (HH) MINUTE minute (MM) SECOND second (SS) Description Display current time in HH.MM.SS format. Set hour using 24-hour format. Set minute. Set second. Table 3-8. Time Menu Parameters 3.2.9. Date Menu The operator in panel mode can set date. CONFIG FORMAT SERIAL CALIBR PROGRM PFORMT SETPTS TIME DATE VERS SHOW YEAR MONTH DAY DATFRM 06.08.01 06 01 01 YYMMDD Display date 00-99 01-12 01-31 DDMMYY Figure 3-9.Date Menu DATE MENU Parameter Choices Level 2 submenus SHOW YY.MM.DD YEAR year (YY) MONTH month (MM) DAY day (DD) DATFRM YYMMDD DDMMYY Description Display current date in YY.MM.DD or DD.MM.YY format. Set year (two digitals 00-99). Set month. Set day. Specifies the date format. YYMMDD: Years, Month, Date, DDMMYY: Date, Month, Years Table 3-9. Date Menu Parameters 32 3.2.10. Version Menu The VERS menu is used to check the software version installed in the indicator. There are no parameters associated with the Version menu: when selected, the indicator displays the installed software version number. CONFIG FORMAT CALIBR SERIAL PROGRM PFORMT SETPTS TIME DATE VERS Software version Figure 3-10. Version Menu 33 4. Calibration The ADE-MAK can be calibrated using the front panel, or EDP commands. Each method consists of the following steps: • Zero calibration • Entering the test weight value • Span calibration • Optional rezero calibration for test weights using hooks or chains. The following sections describe the calibration procedure for each of the calibration methods. CONFIG FORMAT CALIBR SERIAL PROGRM PFORMT SETPTS TIME DATE VERS WZERO WVAL WSPAN REZERO *CAL* Press Enter to Acquire zero calibration A/D count value 250 Acquire weight value *CAL* Press Enter to Acquire span calibration A/D count value *CAL* Press Enter to remove offset from zero and span calibration Figure 4-1. Calibration Menu 4.1. Front Panel Calibration To calibrate the indicator using the front panel, do the following: 1. Place the indicator in configuration mode (display reads CONFIG) and remove all weight from the scale platform. If your test weights require hooks or chains, place the hooks or chains on the scale for zero calibration. 2. Press until the display reads CALIBR (see Figure 4-1). Press to go to zero calibration (WZERO). 3. With WZERO displayed, press to calibrate zero. The indicator displays *CAL* while calibration is in progress then the display goes to (WVAL). 4. With WVAL displayed, place test weights on the scale and press to show the test weight value. Use the procedure shown in Figure 4-2 to enter the actual test weight, then press to save the value and go to span calibration (WSPAN). 5. With WSPAN displayed, press to calibrate span. The indicator displays *CAL* while calibration is in progress, then the display goes to (REZERO). 6. The REZERO function is used to remove a calibration offset when hooks or chains are used to hang the test weights. Note: If no other apparatus was used to hang the test weights during calibration, remove the test weights and go to Step 7. • If hooks or chains were used during calibration, remove these and the test weights from the scale. With all weight removed, press to rezero the scale. This function adjusts the zero and span calibration values. The indicator displays *CAL* while the zero and span calibrations are adjusted. 7. Press until the display reads EXIT Y, then press to exit configuration mode. When editing numeric values, press to allow numeric mode change entry, and then press CLEAR to change clear value. Press number key (0~9) to entry the value. Press to save the value entered and return to the level above. Figure 4-2. Editing Procedure for Numeri Values 34 4.2. EDP Command Calibration To calibrate the indicator using EDP commands, the NOTE: During EDP command calibration, the *CAL* message indicator EDP port must be connected to a terminal remains on the display. The OK response is returned when or personal computer. See Section 2.5 for EDP port calibration is complete. pin assignments; see Section 5.0 for more 3. Place test weights on the scale and use the information about using EDP commands. WVAL command to enter the test weight value Once the indicator is connected to the sending in the following format: device, do the following: WVAL=nnnnnn<CR> 1. Place the indicator in configuration mode 4. Send the WSPAN command to calibrate span. (display reads CONFIG) and remove all weight The indicator displays *CAL* while calibration is from the scale platform. If your test weights in progress. require hooks or chains, place the hooks or chains on the scale for zero calibration. 2. Send the WZERO command to calibrate zero. 5. To remove an offset value, clear all weight from the scale, including hooks or chains used to hang test weights, and then send the REZERO The indicator displays *CAL* while calibration is command. The indicator displays *CAL* while in progress. the zero and span calibrations are adjusted. 35 5. EDP Command The ADE-MAK indicator can be controlled by a personal computer or remote keyboard connected to the indicator EDP port. Control is provided by a set of EDP commands that can simulate front panel key press functions, display and change setup parameters, and perform reporting functions. The EDP port provides the capability to print configuration data or to save that data to an attached personal computer. This section describes the EDP command set and procedures for saving and transferring data using the EDP port. 5.1. The EDP Command Set The EDP command set includes key press commands, mode commands, reporting commands, the default special function command, and parameter setting commands. The indicator responds to most EDP commands by sending the message OK. The OK response verifies that the command was received and has been executed. (Pressing ENTER after processing a valid EDP command repeats the previous command.) If the command is unrecognized or cannot be executed, the indicator responds with ?. The following sections list the commands and command syntax used for each of these groups. 5.1.1. Key Press Commands Key press EDP commands (see Table 5-1) simulate pressing the front panel indicator keys. These commands can be used in both configuration and weighing mode. COMMAND Function KZERO KGROSSNET In weighing mode, press the ZERO key In weighing mode, press the GROSS/NET key In weighing mode, press the TARE key In weighing mode, press the UNITS key Force to primary unit Force to secandary unit In weighing mode, press the PRINT key KTARE KUNITS KPRIUNIT KSECUNIT KPRINT Table 5-1. Key Press Command 5.1.2. Reporting Commands Reporting commands (Table 5-2) send specific information to the EDP port. These commands can be used in both configuration mode and normal mode. COMMAND DUMPALL VERSION P ZZ Function List all Parameters values. ADE-MAK Software version. Current displayed weight with units Identifier Format: wwwwwww uu wwwwwww : the current displayed weight value &&&&&& (overload), :::::: (underrange) uu: the current displayed unit Current displayed weight with units Identifier and status. Format: swwwwwww uu zzz s: positive “ “,nagative “-“ wwwwwww : the current displayed weight value &&&&&& (overload), :::::: (underrange) uu: the current displayed unit BAT ADS EEx IO zzz: the annunciator status value b2,b1,b0: 000: 0: kg on Annunciator 001: 1: lb on Annunciator 010: 2: g on Annunciator 011: 3: oz on Annunciator 100: 4: t on Annunciator b3: Spare b4:16: Hold on Annunciator b5:32: Net on Annunciator b6:64: Center of zero on Annunciator b7:128: Standstill on Annunciator For example, if the annunciator status value returned on the ZZ command is 161, the net, standstill, and kg annunciator are lit: 161represents the sum of the values for the standstill annunciator (128), net mode annunciator (32), and the kg units Annunciator(1). Battery voltage and charging current. A/D converter memory map. EEPROM page x (x=0~3) List status of digital input (Remote Switch) and output (Set Point). Table 5-2. Reporting Command 5.1.3. Default Commands The DEFAULT (reset configuration) command can be used to restore all configuration parameters to their default values. Before issuing this command, the indicator must be placed in test mode (press and hold setup switch for approximately three seconds to enter test mode). This command is equivalent to using the DEFLT function on the TEST menu. See Section 8.8 for more information about test mode and using the TEST menu. NOTE: All load cell calibration settings are lost when the DEFAULT command is run. 5.1.4. Parameter Setting Commands Parameter setting commands allow you to display or change the current value for a particular configuration parameter (Tables 5-3 through 5-9). Current configuration parameter settings can be displayed in either configuration mode or normal mode using the following syntax: 36 command<ENTER> Most parameter values can be changed in configuration mode only. Use the following command syntax when changing parameter values: command=value<ENTER> Where value is a number or a parameter value. Use no spaces before or after the equal (=) sign. If you type an incorrect command or value, the display reads ??. Changes to the parameters are saved as they are entered but typically do not take effect until you exit configuration mode. For example, to set the motion band parameter to 5, type the following: MOTBAND=5D<ENTER> Command GRADS ZTRKBND ZRANGE MOTBAND OVRLOAD DIGFLTR1 DIGFLTR2 DIGFLTR3 DFSENS DFTHRH Description Graduations Zero track band Zero range Motion band Overload Digital filtering Values 1–100 000 OFF, 0.5D, 1D, 3D 1.9%, 100% 1D, 2D, 3D, 5D, 10D, 20D, 50D, OFF FS+2%, FS+1D, FS+9D, FS 1, 2, 4, 8, 16, 32, 64, 128 Digital filter cutout sensitivity Digital filter cutout threshold INIZR Initial Zero Range 2OUT, 4OUT, 8OUT, 16OUT, 32OUT, 64OUT, 128OUT NONE, 1DD, 2DD, 5DD, 10DD, 20DD, 50DD, 100DD, 200DD, 250DD 8%,20%,50%,100%,OFF Table 5-3. CONFIG Commands Command PRI.DECPNT Description Primary units decimal position PRI.DSPDIV PRI.UNITS SEC.DECPNT Primary units display divisions Primary units Secondary units decimal position Secondary units display divisions Secondary units Display rate x10 resolution Date format SEC.DSPDIV SEC.UNITS DSPRATE HIRES DATFRM Values 8.88888, 88.8888, 888.888, 8888.88, 88888.8, 888888 1D, 2D, 5D, 10D, 20D, 50D LB, KG, OZ, G, T 8.88888, 88.8888, 888.888, 8888.88, 88888.8, 888888 1D, 2D, 5D, 10D, 20D, 50D LB, KG, OZ, G, T 250MS, 500MS, 1SEC, 2SEC OFF,ON YYMMDD,DDMMYY Table 5-4. FORMAT Commands Command WZERO WVAL WSPAN REZERO LC.CD LC.CW Description Zero calibration Test weight value Span calibration Rezero Set deadload coefficient Set span coefficient Values test_weight_value value value Table 5-5. CALIBR Commands Command EDP.BAUD EDP.BITS EDP.TERMIN EDP.ADDRESS EDP.ECHO Description EDP port baud rate EDP port data bits/parity EDP port termination character EDP port RS-485 address EDP port echo input Values 1200, 2400, 4800, 9600, 19200, 38400 8NONE, 7EVEN, 7ODD, 7SPACE CR/LF, CR Value in hex (00~ffh) ON,OFF 37 PRN.BAUD PRN.BITS PRN.TERMIN PRN. LNGUGE STREAM STMDLY PRNDEST PROTCT Printer port baud rate Printer port data bits/parity Printer port termination character Ticket language Streaming port Stream output delay period Print destination Protection access from EDP 1200, 2400, 4800, 9600 8NONE, 7EVEN, 7ODD, 7SPACE CR/LF, CR ENGLIS,GERMAN OFF, EDP, PRN 250ms,500ms, 1Sec, 2Sec,2Sec, 4Sec, 8Sec, 15Sec PRN, EDP DISABLE, ENABLE Table 5-6. SERIAL Commands Command PWRUPMD SHUTDN BAKLIT BUZZER HOLDMD AVGTM Description Power up mode Power shunt down mode Back light of LCD Sound of key press Hold mode Average timer for hold function HOLDTM BMIJUD KYLOCK Hold timer for hold function Automatic judge BMI Lock the keypad REGULAT CONSNU DATE TIME RPNBAND Regulatory Compliance Consecutive number Date Time Reprint Zero Band Values GO, DELAY NONE,1MIN,2MIN,5MIN,10MIN OFF,15SEC,30SEC,1MIN,ON OFF,ON DISABL, TOGGLE, AVERAG,AUTO 2SEC,3SEC,4SEC,5SEC,6SEC,8SEC,12SEC,14SEC ,16SEC 1MIN,2MIN,3MIN,4MIN,5MIN,6MIN,8MIN,10MIN OFF,ON NONE, UNIT, PRN,HOLD,BMI,ZOTA,UMPR,BMUNPR,ALL USA, EUROPE, CANADA, NONE 1 - 999999 20yy/mm/dd hh:mm:ss 1D, 2D, 3D, 5D, 10D, 20D, 50D, OFF Table 5-7. PROGRM Commands Command WWPF WPF Description Print format strings in visible ASCII characters Print format strings in ASCII Hex code Values See Section 6.0 for detailed information Table 5-8. PFROMT Commands Command S1.KIND S1.CONTACT S1.CONDITI S1.WAVL S1.HYSTER S1.TIMER S1.DELAY S2.KIND S2.CONTACT Description Kinds of Operation mode for setpoint 1 Contact status below the setpoint 1 value Output enabled only after the weight reading has stabilized. Set weight thresholds for setpoint 1. Output 1 active if load over this weight.(load >=wval) Set weight thresholds for setpoint 1. Output 1 deactive if load under this weight.(load<wval x hysteresis) The output is disabled after the time period has expired. Time delay before the output is enabled. Kinds of Operation mode for setpoint 2 Contact status below the Values OFF, GROSS, NET, DISPLA, ABSNET N.CLOSE, N.OPEN NORMAL, STABLE 0 - 999999 0%,2%,10%,5% None, 250ms,500ms, 750ms, 1.5Sec,3.0Sec, 4.0Sec, 5.0Sec None, 250ms,500ms, 750ms, 1.5Sec,3.0Sec, 4.0Sec, 5.0Sec OFF, GROSS, NET, DISPLA, ABSNET N.CLOSE, N.OPEN 38 S2.CONDITI S2.WAVL S2.HYSTER S2.TIMER S2.DELAY setpoint 2 value Output enabled only after the weight reading has stabilized. Set weight thresholds for setpoint 2. Output 2 active if load over this weight.(load >=wval) Set weight thresholds for setpoint 2. Output 2 deactive if load under this weight.(load<wval x hysteresis ) The output is disabled after The time period has expired. Time delay before the output Is enabled. NORMAL, STABLE 0 - 999999 0%,2%,10%,5% None, 250ms,500ms, 750ms, 1.5Sec,3.0Sec, 4.0Sec, 5.0Sec None, 250ms,500ms, 750ms, 1.5Sec,3.0Sec, 4.0Sec, 5.0Sec Table 5-9. SETPTS Commands 5.2. Saving and Transferring Data Connecting a personal computer to the ADE-MAK EDP port allows you to save indicator configuration data to the PC or to download configuration data from the PC to an indicator. The following sections describe the procedures for these save and transfer operations. 5.2.1. Saving Indicator Data to a Personal Computer Configuration data can be saved to a personal computer connected to the EDP port. The PC must be running a communications program such as HYPERTERMINAL®. See Section 2.5 for information about serial communications wiring and EDP port pin assignments. When configuring the indicator, ensure that the values set for the BAUD and BITS parameters on the SERIAL menu match the baud rate, bits, and parity settings configured for the serial port on the PC. To save all configuration data, place the indicator in configuration mode and send the DUMPALL EDP command to the indicator. The ADE-MAK responds by sending all configuration parameters to the PC as ASCII-formatted text. 5.2.2. Download Configuration Data from Personal Computer to Indicator Configuration data saved on a PC or floppy disk can be downloaded from the PC to an indicator. This procedure is useful when a number of indicators with similar configurations are set up or when an indicator is replaced. To download configuration data, connect the PC to the EDP port as described in Section 5.2. Place the indicator in configuration mode and use the PC communications software to send the saved configuration data to the indicator. When transfer is complete, calibrate the indicator as described in Section 4.0. NOTES: z Calibration settings are included in the configuration data downloaded to the indicator. If the receiving indicator is a direct replacement for another ADE-MAK and the attached scale is not changed, recalibration is not required. z When downloading configurations that include changed serial communications settings, edit the data file to place the serial communications changes at the end of the file. Communication between the PC and indicator will be lost once the indicator receives settings for baud rate (BAUD parameter) or data bits and parity (BITS parameter) that do not match those configured for the PC. 39 6. Print Formatting The ADE-MAK print format can be edited to specify the format of the printed output when the PRINT key is pressed or when a KPRINT EDP command is received. Each print format can be customized to include up to 500 characters of information, such as company name and address, on printed tickets. You can use the indicator front panel (PFORMT menu), or EDP commands to customize the print format. 6.1. Print Formatting Command Table 6-1 lists commands you can use to format the print format. Text included in the format string must be enclosed in quotation marks (hex 22). Text characters can include any ASCII character that can be printed by the output device. COMMAND @G @T @N @C @Ln @t @d @Sn @M @H @B Function Gross weight in displayed units Tare weight in displayed units Net weight in displayed units Consecutive number New line, n specifies number of termination Time Date Space, n specifies number of space Conditional net and tare weights. Use the @M command in pairs to enclose the @N and @T commands. If no tare is in the system, net and tare weights are not printed. User Height User BMI Table 6-1. Print Format Command The default ADE-MAK print format is shown below: @G <CR> @M @T <CR> @N @M <CR>@H <CR>@B <CR>@t @d <CR> NOTE: The 500-character limit of the print format string includes the output field length of the print formatting commands, not the command length. For example, if the indicator is configured to show a decimal point, the @G command generates an output field of 13 characters: the 10-character weight value (including decimal point), one space, and a two-digit units identifier. 6.2. Customizing Print Formats The following sections describe procedures for customizing the print format using the EDP port or the front panel (PFORMT menu). 6.2.1. Using the EDP Port With a personal computer, terminal, or remote keyboard attached to the ADE-MAK EDP port, you can use the EDP command set to customize the print format string. To view the current setting of the print format, type WWPF (to enter ASCII text) or WPF (to enter hex values) then press ENTER. The indicator responds by sending the current configuration for the print format: Use the WWPF or WPF EDP command followed by an equals sign (=) and zero (0) to edit the print format string. The following example shows the commands used to define a print format string for an Eltron LP-2742 printer. NOTE: The N, AxxxxxxN, Bx, and P1 commands used in the example are Eltron printer-specific commands . Example (using visible ASCII characters) Wwpf = 0 N A0,0,0,3,1,2,N,"Vishay @d @t @C" A8,50,0,5,1,1,N,"@G" @MA8,120,0,5,1,1,N,"@T" A8,190,0,5,1,1,N,"@N"@M B8,260,0,3,3,7,100,B,"@G" P1 Example (using Hex format) wpf=0 4E 0D 41 30 2C 30 2C 30 2C 33 2C 31 2C 32 2C 4E 2C 22 43 65 6C 74 72 6F 6E 20 54 65 63 68 6E 6F 6C 6F 67 69 65 73 20 49 6E 63 2E 20 40 64 20 40 74 20 40 43 22 0D 41 38 2C 35 30 2C 30 2C 35 2C 31 2C 31 2C 4E 2C 22 40 47 22 0D 40 4D 41 38 2C 31 32 30 2C 30 2C 35 2C 31 2C 31 2C 4E 2C 22 40 54 22 0D 41 38 2C 31 39 30 2C 30 2C 35 2C 31 2C 31 2C 4E 2C 22 40 4E 22 40 4D 0D 42 38 2C 32 36 30 2C 30 2C 33 2C 33 2C 37 2C 31 30 30 2C 42 2C 22 40 47 22 0D 50 31 0D NOTE: After entering the WWPF=0 or WPF=0 command, you must begin entering the print format. If no data is entered, the command times out, resulting in a blank format. 6.2.2. Using the Front Panel If you have no access to equipment for communication through the EDP port or are working at a site where 40 such equipment cannot be used, you can use the PFORMT menu (see Figure 6-1) to customize the print format. Using the PFORMT menu, you can edit the print format string by changing the hex values of the ASCII characters in the format string. To edit a print format, do the following: 1. In setup mode, use the navigation keys to go to the PFORMT menu. Press to show the EDIT submenu. 2. Press again to show the print format string. Use the and keys to scroll through the format. The number position of each character is shown in the two digits at the left of the display, hex 00–BF. 3. To edit a character, press while the character is displayed. The rightmost digit flashes, indicating that it can be changed. Use the and keys to increment or decrement the value, or use the to move to the next digit. Press to save any changes and advance to the next character in the key string. 4. If done, press to return to the EDIT submenu. 5. To insert one or more characters, display the character position after which characters are to be inserted. Press Press to return to the EDIT submenu, and then press to show the INSERT parameter. to insert one character; repeat presses to add more characters. Each press of the key adds a character at the location last shown under EDIT submenu and shifts all subsequent characters to the right. Inserted characters are assigned hex value 00 (null). To edit inserted characters, return to the EDIT submenu and make changes as described under step 3. 6. To delete one or more characters, display the character to be deleted. Press EDIT submenu, and then press twice to show the DELETE parameter. Press character; repeat presses to delete more characters. Each press of the to return to the to delete one key deletes a character, starting at the location last shown under EDIT submenu, and then moving left to preceding characters. Each deletion shifts all subsequent characters to the left. NOTE: Some characters cannot be displayed on the ADE-MAK front panel (see the ASCII character chart on Section 8.4.) and are shown as blanks. The ADE-MAK can send or receive any ASCII character; the character printed depends on the particular ASCII character set implemented for the receiving device. CONFIG FORMAT CALIBR SERIAL PROGRM PFORMT EDIT INSERT 00_@40 00 SETPTS TIME DATE VERS DELETE Figure 6-1. PFORMT Menu, Showing Alphanumeric Character Entry Procedure 41 7. Set Ponits Power On 1 SW2 Consant Load SW1 CPU - |Net| Gross XRL + NET Display Sn.TIMER Sn.DELAY Sn.WVAL Sn.WVAL x (1-Sx.Hyster) 0 1 0 Comparetor KIND ↑ Timer SET Q N.O N.C AND 0 NORMAL STABLE R COIL 0V Toggle F-F Sn.CONTACT Standstill 1 +5V OR ADE-MAK Sn.CONDITI 1. Power on the Toggle Flip-Flop Q =1, The CPU output may high or low depend on Sn.CONTACT select. Also the XRL gate became a inverter. 2. Joint XRL gate and comparator behavior will as: If load (may be gross or display weight depend on KIND select) bigger than Sn.WAVL, the output of XRL gate is high, otherwise is low. 3. The timer will counting if the load is continuing bigger than Sn.WVAL. If not, the timer will load from SW2 (now is load from Sn.TIMER). 4. The Output of AND gate will high, if output of OR gate is high. (Depend on Sn.CONDITI select). Otherwise wait until Standstill is high. (If Sn.CONDITI = STABLE). 5. Output (Q) of the Toggle F-F changed from 1 to 0.and The COIL also changed State. (NO to NC, or NC to NO) and SW1 & SW2 switchover other side, respective changed Comparator BASE and Timer constant. 42 8. Appendix 8.1. Error Messages Error Message AD LOW AD HI EE SUM EE WR PM SUM Description Solution Overload Weight value exceeds scale capacity Display overflow (negative) Negative weight value too large to be displayed (< –99999) Display overflow (positive) Positive weight value too large to be displayed (> 999999) A/D over negative range Check scale for binding or damage. A/D over positive range Check scale for binding or damage. Parameter or calibration checksum error Recalibration, Call Vishay service. EEPROM write error Call Vishay service. Internal program checksum error Call Vishay service. HOFSET Load > calibrated zero +capacity x INIZR, while Check weight and INIZR power on. LOFSET Load < calibrated zero + capacity x INIZR, while power on. Check weight and INIZR Un Stable within 2 sec, while power on. Check weight and INIZR UOFSET Table 8-1.ADE-MAK Error Messages 43 8.2. Continuous Output (Stream) Format Figure 8-1 shows the continuous output format sent to the ADE-MAK EDP or printer port when the STREAM parameter (SERIAL menu) is set to either EDP or PRN. <STX> <POL> <wwwwww> <UNIT> <G/N> <S> <Extend1> G = Gross N = Net ASCII 02 (Decimal ) Polarity: <Space> = Positive <–> = Negative L = pounds K = kilogram G = grams O = ounces T = metric tons Weight data: 7 digits, right-justified, with decimal point, leading zero suppression. Error = - - - - - Status: <space> = valid I = Invalid M = In motion H=In Hold <TERM> <CR> <LF> or <CR> ASCII 13, 10 (Decimal) IF CINSTR=ON < SP> <Extend2> <TIME> <VOLTAGE> Time: 8 digits, hh:mm:ss hh: 00–24 mm: 00–59 ss: 00–59 <SP> <CURRENT> ASCII 32 (decimal) Battery Voltage 8 digits, d.dddddV 0.00000V~4.50000V <DATE> ASCII 32 (Decimal) ASCII 32 (Decimal ) IF MONBAT=ON <SP> Date: 10 digits, yyyy/mm/dd if DATFRM= YYMMDD dd/mm/yyyy if DATFRM= DDMMYY yyyy: 2000–2099 mm: 01–12 dd: 01–31 <SP> ASCII 32 (decimal) Battery Charging Current 8 digits, d.dddddA 0.00000A~1.00000A Figure 8-1. Continuous Output Data Fromat 44 8.3. Front Panel Display Characters Figure 8-2 shows the 7-segment LCD character set used to display alphanumeric characters on the ADEMAK front panel. Figure 8-2. ADE-MAK Display Characters 45 8.4. ASCII Character Chart Use the decimal values for ASCII characters listed The ADE-MAK can send or receive any ASCII in Tables 8-2 and 8-3 when specifying print format character value (decimal 0–255), but the indicator strings on the ADE-MAK PFORMT menus. The display is limited to numbers, upper-case, actual character printed depends on the character unaccented letters, and a few special characters. mapping used by the output device. Table 8-2. ASCII Character Chart (Part I) 46 Table 8-3. ASCII Character Chart (Part 2) 47 8.5. Calibration Examples The ADE-MAK has the capability to automatically convert a weight into many different types of units and instantly display those results with a press of the UNITS key. (Or KUNIT, KPRIUNIT, KSECUNIT) Press the UNITS key to switch between primary and secondary units. Note: 1.) The primary unit is for calibration and power on default. 2.) After Calibration, any changed of PRI.DSPDIV, PRI.DECPNT, GRADS, WVAL will affect the results. For example: primary unit : 600 ± 0.2 lb ,secondary unit : ± 0.1 kg Then setting PRI.DSPDIV=2D (0.2lb=2/0.1) PRI.DECPNT=88888.8 GRADS=3000 (600lb / 0.2lb = 3, 000, Capacity=GRADS* Min.Weight =600lb) PRI.UNITS=LB SEC.DSPDIV=1D SEC.DECPNT=88888.8 (0.1kg=1/0.1) SEC.UNITS=KG Calibration WZERO (Empty scale) WVAL=300 (If you have 300 lb standard load) WSPAN (Put 300 lb on scale) EDP Operation ZZ KUNITS (show:”xxxxx.2LB”, where 2 may be 0/2/4/6/8) (show:”OK”, toggle units, now to secondary unit) ZZ (show:”xxxxx.1KG”, where 1 may be 0~9) KPRIUNIT (show:”OK”, force to primary secondary unit) ZZ (show:”xxxxx.2LB”, where 2 may be 0/2/4/6/8) For example: primary unit : 500 ± 0.2 kg ,secondary unit : ± 0.5 lb Then setting PRI.DSPDIV=2D (0.2kg=2/0.1) PRI.DECPNT=88888.8 GRADS=2500 (500kg / 0.2kg = 2, 500, Capacity=GRADS* Min.Weight =500kg) PRI.UNITS=KG SEC.DSPDIV=5D SEC.DECPNT=88888.8 (0.5kg=5/0.1) SEC.UNITS=LB Calibration WZERO (Zero load) 48 WVAL=500 (If you have 500kg standard load) WSPAN (Put 500kg on scale) EDP Operation ZZ (show:”xxxxx.2KG”, where 2 may be 0/2/4/6/8) KSECUNIT (show:”OK”, force to secondary unit) ZZ (show:”xxxxx.5LB”, where 1 may be 0/5) KPRIUNIT (show:”OK”, force to primary secondary unit) ZZ (show:”xxxxx.2KG”, where 2 may be 0/2/4/6/8) 8.6. Units Covert Table Internal program of ADE-MAK Convert primary to/from secondary units used following table as factors. Conversion Factors Primary Unit x Multiplier or / divisor Secondary Unit kg kg kg kg lb lb lb lb g g g g oz oz oz oz t t t t x 2.20462262184878 x 1000 x 35.2739619495804 / 1000 / 2.20462262184878 x 453.59237 x 16 / 2204.62 / 1000 / 453.59237 lb g oz t kg g oz t kg lb oz t kg lb g t kg lb g oz x 0.00228571428571429 / 1000000 / 35.2739619495804 / 16 / 0.00228571428571429 / 35273.9619495804 * 1000 * 2204.62262184878 * 1000000 * 35273.9619495804 Table 8-4. Units Conversion Factors 49 8.7. Digital Filtering The ADE-MAK uses averaged digital filtering to reduce the effect of vibration on weight readings. Adjustable threshold and sensitivity functions allow quick settling by suspending filter averaging, allowing the weight reading to jump to the new value. Digital filtering parameters are set using the CONFIG menu. 8.7.1. DIGFLTRx Parameters The first three digital filtering parameters, DIGFL1, DIGFL2, and DIGFL3, are configurable filter stages that control the effect of a single A/D reading on the displayed weight. The value assigned to each parameter sets the number of readings received from the preceding filter stage before averaging. The overall filtering effect can be expressed by adding the values assigned to the three filter stages: DIGFL1 + DIGFL2 + DIGFL3 For example, if the filters are configured as DIGFL1=4, DIGFL2=8, DIGFL3=8, the overall filtering effect is 20 (4 + 8 + 8). With this configuration, each A/D reading has a 1-in-20 effect on the displayed weight value. Setting the filters to 1 effectively disables digital filtering. 8.7.2. DFSENS and DFTHRH Parameters The three digital filters can be used by themselves to eliminate vibration effects, but heavy filtering also increases settling time. The DFSENS (digital filter sensitivity) and DFTHRH (digital filter threshold) parameters can be used to temporarily override filter averaging and improve settling time: z DFSENS specifies the number of consecutive scale readings that must fall outside the filter threshold (DFTHRH) before digital filtering is suspended. z DFTHRH sets a threshold value, in display divisions. When a specified number of consecutive scale readings (DFSENS) fall outside of this threshold, digital filtering is suspended. Set DFTHRH to NONE to turn off the filter override. 8.7.3. Setting the Digital Filters Parameters Fine-tuning the digital filter parameters greatly improves indicator performance in heavy-vibration environments. Use the following procedure to determine vibration effects on the scale and optimize the digital filtering configuration. 1. In setup mode, set all three digital filters (DIGFL1, DIGFL2, DIGFL3) to 1. Set DFTHRH to NONE. Return indicator to normal mode. 2. Remove all weight from the scale, then watch the indicator display to determine the magnitude of vibration effects on the scale. Record the weight below which all but a few readings fall. This value is used to calculate the DFTHRH parameter value in Step 4. For example, if a high-capacity scale produces vibration-related readings of up to 50 lb, with occasional spikes to 75 lb, record 50 lb as the threshold weight value. 3. Place the indicator in setup mode and set the digital filters (DIGFLx) to eliminate the vibration effects on the scale. (Leave DFTHRH set to NONE.) Reconfigure as necessary to find the lowest effective values for the DIGFLx parameters. 4. With optimum values assigned to the DIGFLx parameters, calculate the DFTHRH parameter value by converting the weight value recorded in Step 2 to display divisions: threshold_weight_value / DSPDIV In the example in Step 2, with a threshold weight value of 50 lb and a display division value of 5lb: 50 / 5lb = 10DD. DFTHRH should be set to 10DD for this example. 5. Finally, set the DFSENS parameter high enough to ignore transient peaks. Longer transients (typically caused by lower vibration frequencies) will cause more consecutive outof-band readings, so DFSENS should be set higher to counter low frequency transients. Reconfigure as necessary to find the lowest effective value for the DFSENS parameter. 50 8.8. Test Mode z Display characters received by serial port To enter test mode, press and hold the setup switch. After about three seconds, the test mode display automatically shifts to the first test menu function, A/DTST. Figure 8-3 shows the Test Menu structure. Note that, because the Test Menu functions are all on a single menu level, Press the key to execution the function. Press the key to exit test mode. Table 8-5 summarizes the test menu functions. In addition to normal and setup modes, test mode provides a number of diagnostic functions for the ADE-MAK, including: z Display raw A/D count z LCD test z Digital input and output monitor z Battery voltage monitor z Batter charging current monitor z Display digital filter raw counts z Reset configuration parameters to default values z Transmit test character (“U”) from serial port A/DTST TLCD IO BATV FILTR3 BATC DEFLT XMT U ECHO R Figure 8-3. Test Menu TEST Menu Function Description Display raw count from A/D converter. A/DTST Lit on all LCD segment for test LCD. TLCD Display digital input (Remote Switch) and output (Set Point) status IO 00000 RSW3 RSW2 RSW1 OUT1 OUT2 BATV BATC FILTR3 Display battery voltage in V Display battery charging current in A Display filtered raw count for digital filters 3 DEFLT Default parameters Press setup switch and Enter key at the same time to reset configuration and calibration parameters to factory default values. Load cells must be recalibrated before using the indicator (see Section 5.1.3. ). Transmit “U” Press and hold Enter key to send ASCII “U” characters (decimal 85) from the serial port. Echo received characters When Ready is displayed, press the Enter key to view characters received at serial port. The first two digits show the order of the character received (see diagram). XMT U ECHO R Table 8-5. Test Menu Function 51 8.9. Tare, Zero key and REGULAT parameter The function of the TARE and ZERO keys depends on the value specified for the REGULAT parameter. Table below describes the function of these keys for each of the regulatory modes. REGULAT Parameter Value Key Press Function Weight on Scale zero or negative USA positive zero or negative CANADA positive zero or negative EUROPE positive zero or negative NONE positive Tare in System no yes no yes no yes no yes no yes no yes no yes no yes KTARE no active CLEAR TARE TARE TARE no active CLEAR TARE TARE no active no active CLEAR TARE TARE TARE TARE CLEAR TARE TARE CLEAR TARE KZERO ZERO ZERO ZERO ZERO and CLEAR TARE ZERO ZERO and CLEAR TARE ZERO Note: b.) ZERO if must be in Standstill. c.) ZERO if Weight is within ZRANGE. No action if weight is outside of ZRANGE d.) CLEAR TARE or ZERO force indicators goes into gross mode. e.) TARE force indicator goes into net mode. 52 8.10. Hold Function Hold Function: With the hold weighing function, it is possible to weigh restless weighing samples such as live animals, moving objects, liquids. The instrument provides special mode settings to accommodate sample’s movements. Base operation of HOLD key: Toggle Hold Mode: implements a manual Hold function. To perform the Toggle Hold function does the following: The weighing sample must be heavier than zero 'dead' band. 1. Press the <HOLD> key once, the instrument wait stable signal then hold the current displayed weight with the symbol <HOLD>. During waiting stable current weight appear and the symbol <HOLD> flash.If the weight readings remain unstable for longer than AVGTM seconds, the operation is cancelled and the <ER STB> message is displayed. 2. Press the manual <HOLD> key again to return the display to normal weighing. Or wait until HOLDTM minute. Average Hold Mode: The <HOLD> key is used to enable live weight averaging. With this feature, it is possible To determine the weight of a continually moving mass (e.g. livestock). The weighing sample must be heavier than zero 'dead' band. 1. Place the weighing sample on the scale and wait until it has stabilized. 2. Press the <HOLD> key to start dynamic weighing. During dynamic weighing, current average weight appear in the display, and the dynamic result is then displayed with the symbol <HOLD>. The scale calculates the mean value from a hundred weighing operations within AVGTM seconds. 3. Press the <HOLD> again to back to weighing mode (symbol <HOLD> will off).or wait until HOLDTM minute. Note: When first <HOLD> key press, program don’t wait stable signal, It is possible to press the <HOLD> key at the beginning. Then place weighing sample on the scale and wait until it has stabilized (via setting MOTBAND ). Start dynamic weighing. During dynamic weighing, current average weight appear in the display and the <HOLD> annunciator flashes. The scale calculates the mean value from a hundred weighing operations within AVGTM seconds. The dynamic result is then displayed with the symbol <HOLD>. Auto Hold Mode: When the AUTO function is set ON, different subjects can be weighed one after another without pressing any buttons. When the Indicator displays < READY > message, simply place subject on pan. In Auto mode the following sequence is followed: 1. While the net weight is within the zero 'dead' band, the instrument shows the current weight. 2. Press the <TARE> or <ZERO> key to clear any residual weight and return the scale to the zero state. 3. Press the < HOLD > key to entry auto hold mode. The display show current weight and 53 <READY>Message in alternately and Flash <HOLD> symbol ,if the weight inside the zero 'dead' band. 4. Place the mass to be weighed on the scale. 5. Once the weight moves outside the zero 'dead' band and stable signal, the instrument begins to calculate a long term average (selectable time, AVGTM) that compensates for any movement in the mass. During the selectable time the signal must be stable, if not, time starts again.The instrument flashes the <HOLD> symbol and shows the current average value. 6. The <HOLD> symbol is steady when the final sample weight is shown on the display. 7. Press the < HOLD > key to force the sample to be re-calculated. Press any other key to back to weighing Mode. 8. Once the weight is returned to the zero 'dead' band, the cycle can be repeated without press any key. * zero 'dead' band define is 5 Min.weights.(5 DD or 5 scale divisions) 54 8.11. Specification Power Wall Adapter: Line Voltage 115 or 230VAC Frequency 50 or 60HZ Power Consumption 11W in-charger, 2W off-charger Main Circuit: Input Voltage 5.0VDC Max. Current (in-charger) 1000mA Battery Requirement: Rechargeable Lithium Ion Cylindrical (18650x2) Cell 3.7V 4000mAH Battery Operation: Charger 7~10 Hours Full Active (350ohm, Backlight-ON) 63 Hours Full Active (87.5ohm, Backlight-ON) 46 Hours Saving (350ohm, Backlight-ON 30Sec, Shutdown 5Min) 200Hours Analog Specifications Full Scale Input Signal Up to Excitation Voltage 18.5 mV 5 ± 0.3 VDC, 4 x 350Ω or 8 x 700Ω load cells Sense Amplifier Differential amplifier with 4- and 6-wire sensing Analog Signal Sensitivity 0.15 μV/graduation minimum, 1.0 μV/grad recommended Input Impedance 1011 Ω, typical Noise (ref to input) 0.3 μV p-p with digital filters at 4-4-4 Internal Resolution 1 6770 000 counts Display Resolution 999 999 dd Measurement Rate 15 measurements/sec Input Sensitivity 0.6 nV per internal count System Linearity Within 0.01% of full scale Zero Stability 150 nV/°C, maximum Span Stability 3.5 ppm/°C, maximum Calibration Method Software, constants stored in EEPROM Common Mode Voltage +1.5 to +3.5 V, referred to zero voltage Common Mode Rejection 130 dB minimum @ 50 or 60 Hz Normal Mode Rejection 90 dB minimum @ 50 or 60 Hz RFI Protection Signal, excitation, and sense lines protected by Capacitor bypass 55 Digital Specifications Microcomputer Digital Inputs (Option) Setpoint Control Outputs (Option) Digital Filters AT89C51RD2 with 64K EEPROM @ 18.432 MHz 3 inputs, TTL or switch closure, active-low 2 Outputs, Photo Relay Single Pole, Normal Open, max output current 1A. 3 filters, software selectable Serial Communications EDP Port Printer Port Both Ports Full duplex RS-232 38400,19200,9600, 4800, 2400, 1200 bps Output-only RS-232 or active 20 mA current loop, 9600, 4800, 2400, 1200 bps 7 or 8 data bits; even, odd, or no parity Operator Interface Display LCD annunciator Keyboard 6-digit LCD display. 7-segment, 0.815 in (21.2 mm) digits net, center of zero, standstill, kg/lb/g/oz/ units, , Battery, Set points, Hold, HI/OK/LO 24-key flat membrane panel Environmental Operating Temperature Storage Temperature Humidity Altitude –10 to +40°C (legal); –10 to +50°C (industrial) –25 to +70°C 0–95% relative humidity 2000 m (6500 ft) maximum Enclosure Enclosure Dimensions Weight Rating/Material 18.6 cm x 9.5 cm x 10 cm 0.4 Kg (without battery) White ABS 56