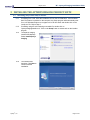
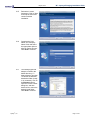
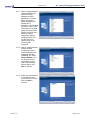
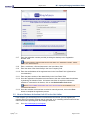
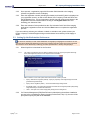
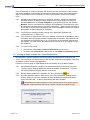
1
Apteryx Inc. 313 S. High St. Suite 200 Akron, OH 44308 330-376-0889 voice 330-376-0788 fax [email protected] www.apteryx.com Apteryx® Imaging (XrayVision®, XVLite™) Installation Guide Abstract Abstract Abstract A guide to assist dental care facilities with the install of the Apteryx Imaging product suite (XrayVision® and XVLite™) on a local computer or network. Copyright © 2004-2014 Apteryx, Inc. Apteryx® is a registered trademark of Apteryx, Inc. All rights reserved. All other trademarks and tradenames are the property of their respective owners. Controlled Document: Printed or downloaded copies are considered uncontrolled and are for reference only. QMS_WI_TS_AI_InstallGuide Rev 2.1 Apteryx®, Inc. Page 1 of 30 WI – Apteryx® Imaging Installation Guide May 28, 2014 REVISION HISTORY DRAFT 05/18/2011 Draft NA Revision Author (Initials) SN 1.0 07/13/2011 Initial Release 07/13/2011 SN PW 2.0 10/10/2011 10/11/2011 SN PW 85 2.1 02/26/2013 02/28/2013 SN PW 224 2.2 05/18/2014 Doc Name changed and doc formatting updated to comply with new doc control conventions Windows 8 and Server 2012 added to system requirements. Updated the guide for the new XV4 Interface. 05/28/2014 HL / MS BT 279 Revision Level Apteryx®, Inc. Revision Date Description of Revision Effective Date Approver(s) (Initials) NA Doc Change Task# Page 2 of 30 May 28, 2014 WI – Apteryx® Imaging Installation Guide TABLE OF CONTENTS Revision History ............................................................................................................................................ 2 Table of contents ........................................................................................................................................... 3 1 Introduction............................................................................................................................................ 4 1.1 Overview ....................................................................................................................................... 4 1.2 System Requirements ................................................................................................................... 4 1.3 Quick Notes Before Beginning ...................................................................................................... 5 2 Installing The Apteryx Imaging Product Suite ....................................................................................... 6 2.1 Installing XrayVision and/or XVLite ............................................................................................... 6 3 Setting Up and registering the Software ............................................................................................. 11 3.1 Registering the Software ............................................................................................................. 11 3.2 How to Obtain an Activation Code if You Are Not Online ........................................................... 12 3.3 Setting Up the Workstation Preferences ..................................................................................... 13 3.4 Creating Shortcuts on Client Workstations ................................................................................. 14 3.5 Setting up Name Grabber on a Client Workstation ..................................................................... 15 4 Upgrading the Apteryx Imaging Product Suite .................................................................................... 17 4.1 Accessing and Running Upgraders ............................................................................................ 17 5 Getting Started: XrayVision ................................................................................................................. 20 5.1 Overview ..................................................................................................................................... 20 5.2 Getting Started: Adding Patients ................................................................................................. 20 5.3 Getting Started: Setting up Your Imaging Device ....................................................................... 20 6 License Tracking ................................................................................................................................. 23 6.1 Track by Computer Name ........................................................................................................... 23 6.2 Track by Client Name .................................................................................................................. 24 6.3 Track by User Name ................................................................................................................... 25 7 Getting Started: XVLite ....................................................................................................................... 26 7.1 Overview ..................................................................................................................................... 26 7.2 Getting Started: Adding Patients ................................................................................................. 26 7.3 Getting Started: Setting up Your Imaging Device ....................................................................... 27 Apteryx®, Inc. Page 3 of 30 May 28, 2014 WI – Apteryx® Imaging Installation Guide 1 INTRODUCTION 1.1 Overview XrayVision and XVLite capture, enhance and display all of your dental images. Both programs are compatible with most digital x-ray sensors; phosphor plate systems; panoramic/cephalometric systems; and even 3D imaging systems. All of your full color images from intra-oral and extra-oral cameras and most other digital sources (including video) are organized into a single patient database. Visit http://www.apteryx.com/supported-hardware for a comprehensive list of devices Apteryx Imaging supports. Apteryx Imaging incorporates the latest advancements in imaging technology and Apteryx’s patented STB (Secure Tagged Block) file format, an unmodifiable, secure and “loss-less” imaging format. While the STB file format guarantees image security and authenticity, Apteryx Imaging is flexible, allowing data storage in the standard JPEG format. Apteryx Imaging also exports to all common image formats (TIFF, JPEG, etc.) including the global medical standard DICOM (XrayVision Only) for universal viewing. The DICOM Extension is an additional add-on that can be included with the installation of XrayVision to enable the application to communicate with a DICOM-compliant PACS Server. Although it can run in trial mode for 30 days, a license must be purchased to register and activate the extension. Visit our online store at http://www.apteryx.com/store/ or contact Apteryx Sales Support at 1-877-APTERYX (278-3799). 1.2 System Requirements The Apteryx Imaging Product Suite (XrayVision® and XVLite™) and its related tools; components; and plug-ins are designed for Windows Vista® SP2 or above, Windows® 7, Windows® 8, Windows Server® 2003 R2, Windows Server® 2008, and Windows Server® 2012 operating systems including Terminal Services and Citrix®. Apteryx recommends XrayVision 3.12 build 40 or above; and XVLite 3.12 build 15 or above for Windows® 8 and Windows Server® 2012 operating systems. 1.2.1 Recommended System Recommendations 1.2.2 Intel / AMD multi-core processor 1.0 GHz or higher 1 GB of RAM or higher40GB or higer available hard drive space (depending on expected database growth) Name-brand video capture card* (ATI, Hauppauge) for analog intraoral camera support Powered USB 2.0 port(s) for USB capture support CD-R drive 100Mbps or higher Local Area Network (TCP/IP preferred) Keyboard and a computer mouse device, or some other compatible pointing device Video adapter and monitor with 1024 x 768 or higher resolution Sound card Speakers Minimum System Requirements The system must conform to the minimum requirements specified by Microsoft® for the operating system installed. The following are suggested minimum system requirements for Apteryx Imaging: Apteryx®, Inc. Pentium 4 1.30 GHz / AMD Athlon XP 1.33 GHz At least 64 megabytes (MB) of RAM CD-ROM or DVD-ROM drive Keyboard and a computer mouse device, or some other compatible pointing device Page 4 of 30 May 28, 2014 WI – Apteryx® Imaging Installation Guide Video adapter and monitor with 1024 x 768 or higher resolution 1.3 Quick Notes Before Beginning 1.3.1 1.3.2 If you have a Server It is highly recommended that Apteryx Imaging be installed on a shared drive of the Server (even if installing a trial version of the product). Apteryx Imaging has built-in functionality that optimizes the use of the application on a network, and enables the software to be run from all the workstations in that network, even though it is only installed in ONE (server) location. When installing to a Server, be sure that the software is installed on a shared drive where other workstations can access it with FULL READ/WRITE PERMISSIONS. It is not necessary run the installer directly on the server. As long as the installer has full read/write permissions, it can be installed in the server’s share from any client workstation. Installing to a Directory other than the Default Directory 1.3.3 Installing on a Network 1.3.4 Due to Apteryx's unique Single Installation, Multiple Use (SIMU) technology, the software can be installed in one location, on a network, for client workstations to access. To install the software on a server/network, create the destination folder on the server and share the folder with full read/write permissions for 'Everyone' before running the installation program. Windows Vista, Windows 7, 8 or Windows Server 2008 Installs Apteryx®, Inc. Create the destination folder first before running the installation. To avoid issues with the Vista/Win7/Win8 Server 2008 User Access Control (UAC) feature, Apteryx recommends running the installer programs as an Administrator by right-clicking the installer's .exe file and selecting -Run as Administrator-. Additionally, Apteryx recommends users avoid installing the application in the default C:\Program Files\ directory, to avoid possible issues with the Windows VirtualStore feature. Page 5 of 30 May 28, 2014 WI – Apteryx® Imaging Installation Guide 2 INSTALLING THE APTERYX IMAGING PRODUCT SUITE 2.1 Installing XrayVision and/or XVLite 2.1.1 If installing from a CD, insert the installation CD into the CD-ROM drive. If the Windows Auto Play feature is enabled on the computer, the Setup program will automatically start. If not, use Windows Explorer to navigate to the CD drive letter and double-click on the “setup.exe” file. Skip to Step 3. 2.1.2 If installing using the self-extracting executable file, double-click on “ApteryxImagingInstaller.exe”. Click on the Setup button to extract and run the installer program. 2.1.3 The Apteryx Imaging install wizard displays. Select Install Apteryx Imaging. 2.1.4 The install wizard launches. Click Next to continue with the installation. Apteryx®, Inc. Page 6 of 30 May 28, 2014 2.1.5 Review the License Agreement. Click on Yes to accept the terms and continue with the installation. 2.1.6 Complete the 'User Name' and 'Company Name' fields and select the appropriate option to allow or restrict all users. Click Next to continue. 2.1.7 The install program will attempt to install to the default directory, C:\ Apteryx\Apteryx Imaging\. To choose an alternate destination folder (locally or on a network), click on the Browse button to open the 'Choose Folder' dialog box, and then double-click to select the desired install folder. Click Next to continue. Apteryx®, Inc. WI – Apteryx® Imaging Installation Guide Page 7 of 30 May 28, 2014 2.1.8 Select the desired imaging software (XrayVision; XVLite; or both). To bridge from a practice management (PM) application, add Name Grabber as an additional application to install. Select any additional components if desired. Click Next to continue. 2.1.9 Select any desired addons or extensions and then click Next to continue. WI – Apteryx® Imaging Installation Guide 2.1.10 Apteryx imaging software supports multiple digital x-ray systems and imaging devices. Select the appropriate hardware options and then click Next to continue. Note: If your hardware is not listed, please download the necessary plugin from Apteryx’s Updates page (http://www.apteryx.com/ apteryx-updates-site). Apteryx®, Inc. Page 8 of 30 May 28, 2014 WI – Apteryx® Imaging Installation Guide 2.1.11 Apteryx imaging software supports bridging from common Practice Management (PM) applications to retrieve patient information. Select the appropriate PM data drill, if applicable, and click Next to continue. Note: If your PM software is not listed, please contact your PM support provider to see if they have a direct integration to Apteryx Imaging products. You can also check our updates page for the necessary PM integration. 2.1.12 Apteryx imaging software includes transfer mechanisms useful in creating/sending email, integrating with NEA FastAttach, etc. Select General Emailer if you use Outlook on local workstations to send email. After selecting desired options, click Next to continue. 2.1.13 Select any extra features or components on the screen shown below and then click Next to continue. Apteryx®, Inc. Page 9 of 30 May 28, 2014 WI – Apteryx® Imaging Installation Guide 2.1.14 Click Next to continue and Next again to start the installation process. When complete, the screen shown below will display. Click Finish to exit the setup program. 2.1.15 Once the installation is complete, an 'Apteryx Imaging' folder is created locally in the Windows START > Programs menu and an icon is placed on the desktop. 2.1.16 To ensure that the latest version of the software and additional components are used, an upgrade is highly recommended. Follow the steps below to upgrade Apteryx Imaging and additional applications, components, sensor/imaging device extensions, and add-ons. Apteryx®, Inc. Page 10 of 30 May 28, 2014 WI – Apteryx® Imaging Installation Guide 3 SETTING UP AND REGISTERING THE SOFTWARE 3.1 Registering the Software Once the installation has been completed, the Apteryx Imaging installer places the appropriate icons on the desktop from which the installation was run. Since the software has not been registered yet, upon first launch, the software will prompt the user to register the software or run as a trial. If purchased, Apteryx provides a 24-character, alpha-numeric -registration- number that can be used to activate the software on one or more workstations. If not, the software can be run for 30 days as a Trial Version and registered at any time. 3.1.1 Double-click on the appropriate icon to launch XrayVision or XVLite. 3.1.2 XrayVision - 3.1.3 XVLite - 3.1.4 The Trial Version Licensing Information screen displays. 3.1.5 To run the software as a trial, select the I Agree button. 3.1.6 To register the software, select the Register button. The ‘Register’ dialog box displays. Apteryx®, Inc. Page 11 of 30 May 28, 2014 3.1.7 WI – Apteryx® Imaging Installation Guide Enter the registration number provided (including the dashes) in the ‘Registration Number’ field. To avoid confusion, Apteryx avoids the use of the letter “O” in registration numbers. Always enter a “0” in these instances. 3.1.8 Enter, at minimum, a first and last name in the ‘User Name’ field. 3.1.9 Enter the name of the dental facility in the ‘User Company’ field. 3.1.10 Enter the email address of the registered user in the ‘User Email’ field. (Optional but recommended.) 3.1.11 Enter the phone number of the dental facility in the ‘User Phone’ field. 3.1.12 Once the registration information has been entered, the user must activate the software by obtaining an Activation Code. An internet connection is required to activate the software. If connected to the internet, click on the Get Activation Code button. Refer to How to Obtain an Activation Code if You Are not Online if the workstation is not connected to the internet. 3.1.13 Once the activation code has been received or manually entered, click on the Done button to complete the registration process. 3.2 How to Obtain an Activation Code if You Are Not Online If the computer you are working from is not connected to the internet, you may register your software either from another computer that is connected, or by contacting someone else who has internet access and providing them the following instructions. 3.2.1 Apteryx®, Inc. Go to http://www.apteryx.com/register Page 12 of 30 May 28, 2014 WI – Apteryx® Imaging Installation Guide 3.2.2 Once opened, a registration page with information fields identical to the imaging software’s registration screen will display. 3.2.3 Enter the registration number (including the dashes) and install ID (which is displayed on your registration screen), as well as User Name, User Company, Email and Phone into the Registration form. It is very important to double check all numbers and letters in the Registration Code and Install ID before clicking on the Register Now button and obtaining your Activation Code. 3.2.4 Enter the Activation Code provided into the ‘Get Activation Code’ field of the imaging application’s registration screen and click the Done button to complete the registration process. If you are unable to activate your software or obtain an activation code, please contact your Dealer or Apteryx Technical Support during normal business hours and they will be happy to assist. 3.3 Setting Up the Workstation Preferences A license is necessary for each client workstation running Apteryx Imagingfrom the network. An error message will be displayed if attempting to setup more computers than the number of licenses purchased. More licenses can be obtained by contacting your sales representative or directly through Apteryx. 3.3.1 When XrayVision is launched for the first time: 3.3.1.1 The ‘Select Image Storage Scheme’ dialog box displays for the user to specify the preferred storage format that images will be saved in when captured on the workstation. Make a selection on one of the options shown below and click on OK to proceed: 3.3.2 Apteryx®, Inc. Apteryx 16 Bit Secure Tag Block (STB16) – Apteryx’s proprietary 16-bit image storage format that guarantees image authenticity. Apteryx Secure Tag Block (STB 8) – The recommended image storage format. High Quality JPEG – The space-saving storage format that uses the highest possible quality setting. Image authenticity is sacrificed with this format. JPEG – This option uses a lower image quality setting than the setting above. If a Practice Management (PM) Data Drill was included during the software installation process (refer to Installing the Apteryx Imaging Product Suite, Step 11), the user will be prompted to specify the path of the database. Page 13 of 30 May 28, 2014 WI – Apteryx® Imaging Installation Guide 3.3.2.1 Click on the Browse button shown in red above. 3.3.2.2 On the ‘Open’ dialog box, navigate to the database location of the PM application. The folder selected must include the file specified in the ‘File name’ field. Click OK when done. 3.3.2.3 Verify that the Data Drill Options dialog box specifies a valid database path and reflects the number of patients in the database. Click OK to proceed. 3.3.3 The imaging software will then launch and display on the desktop. 3.4 Creating Shortcuts on Client Workstations Due to Apteryx's unique SIMU technology (Single Installation, Multiple Use), Apteryx Imaging only requires one install on a company's network. Once installed, any client workstation can automatically run the application without performing additional installations on each computer. A license is needed for each client workstation running Apteryx Imaging applications from the network. An error message will be displayed if attempting to setup more computers than the number of licenses purchased. More licenses can be obtained by contacting your sales representative or Apteryx directly. Apteryx®, Inc. Page 14 of 30 May 28, 2014 WI – Apteryx® Imaging Installation Guide Once an installation is complete, shortcuts and desktop icons are only created on the computer that ran the installation. If the software is installed on a networked server, perform the following steps on each additional client workstation to create local Start Menu shortcuts and desktop icons. 3.4.1 Navigate to the installation directory on the server computer. Typically on a standard Windows Network, the Apteryx imaging install location can be found by selecting the Windows Start button; clicking My Computer to open Windows Explorer and selecting Network. A listing of all networked computers will be displayed. Select the server name and navigate to the install directory typically located under …\Apteryx\Apteryx Imaging\. If unsure how to access the server directory from a client workstation, contact your network administrator or Apteryx Support for assistance. 3.4.2 Launch Apteryx Imaging by double-clicking on the appropriate application file (“XVassistant.exe” or “XVLite.exe”). 3.4.3 If the software is registered and a license is available, a license will be allocated to client workstation when the imaging software is launched for the first time. If the software was not registered, the application will run as a Trial Version each workstation that launches the software. As a trial version, the software allows a maximum of 15 computers to use the application. 3.4.4 To create local shortcuts: In XrayVision, select Help > Create Local Shortcuts from the menu. In XVLite, select Preferences and then click on the Create Local Shortcuts button. 3.5 Setting up Name Grabber on a Client Workstation NameGrabber is typically installed automatically with the XrayVision/XVLite software on the server. Since the server is a shared resource with all of the computers on the network, each client workstation will have access to the application. Perform the following steps on each additional client workstation to set up Name Grabber. 3.5.1 Using Windows Explorer, navigate to the installation directory on the server computer. Typically, Apteryx imaging applications and Name Grabber are installed in ...\Program Files\Apteryx\Apteryx Imaging\ directory on the server. 3.5.2 Run the “Name Grabber.exe” application file, which will have the 3.5.3 Once the application starts for the first time on the client workstation, a dialog box will display, offering the choice to start Name Grabber automatically whenever Windows starts. Select the Yes … button to automatically start Name Grabber. icon. Selecting Yes inserts a Name Grabber icon in the Windows Start Up menu, thereby assuring the application is always launched whenever the computer is booted up and Windows starts. Apteryx®, Inc. Page 15 of 30 May 28, 2014 3.5.4 Apteryx®, Inc. WI – Apteryx® Imaging Installation Guide Once the application launches on the client workstation, a Name Grabber icon will appear in the Window's System Tray (at the bottom-right of the screen, next to the clock) indicating the application is running. Page 16 of 30 May 28, 2014 WI – Apteryx® Imaging Installation Guide 4 UPGRADING THE APTERYX IMAGING PRODUCT SUITE 4.1 Accessing and Running Upgraders The latest updates for the Apteryx Imaging Product Suite, its related components, add-ons, and additional applications are available online at http://www.apteryx.com/apteryx-updates-site. Follow the directions below to upgrade Apteryx Imaging Software (XrayVision or XVLite); additional applications (e.g. Name Grabber); add-ons and components; hardware device extensions; etc. included in the initial install. 4.1.1 Close all instances of Apteryx imaging software and Name Grabber running on any workstation. 4.1.2 Select the appropriate links on the site above to find and download updates for the following: 4.1.3 Apteryx Imaging Software (XrayVision, XVLite, and OEM versions) Updates: Find and download the appropriate upgrader (e.g. XV Update or XVLite Update). Sensors & Imaging Device Updates: Find the appropriate link(s) for the manufacturer of the digital x-ray system(s) and device(s) utilized to download the appropriate extensions. Some hardware may require the user to visit the company’s website for the appropriate extension upgrader. Name Grabber Update: If Name Grabber was included in the initial install, download the Name Grabber Application Updater to a known location on the computer. PM Data Drills Updates: If a Data Drill for a specific PM application was included in the initial install, find and download the appropriate Data Drill updater. Updates for Additional Components, Add-ons & Extensions: If additional components (e.g. Apteryx INI); extensions (e.g. WhitenIT, Comestic Imaging, etc.); and add-ons (e.g. General Emailer, FastAttach NEA, etc.) were included in the install, find and download the appropriate updaters. Follow the steps below to run each downloaded updater. To avoid issues with the Vista/Win7/Win8/Server 2008 User Access Control (UAC) feature, Apteryx, Inc. recommends running installer programs as an Administrator by right-clicking the installer's .exe file and selecting Run as Administrator. 4.1.3.1 Apteryx®, Inc. Run the downloaded upgrader to launch the Apteryx Application Upgrader. Click Next to continue with the upgrade. Page 17 of 30 May 28, 2014 WI – Apteryx® Imaging Installation Guide 4.1.3.2 The upgrader will automatically locate the application, whether locally or on a network, and begin the upgrade process immediately. Click Yes to All, whenever prompted, to replace any existing files. 4.1.3.3 Click on Finish, when complete, to exit the upgrader. 4.1.4 The latest versions of the Apteryx Imaging (XrayVision® 4.0 and XVLite™ 3.12) are available as upgraders on Apteryx.com’s Updates page. Unlike previous upgrades, upgrading from 3.11 or prior versions to 3.12 or higher WILL require ALL hardware extensions, components, and add-ons to be updated for compliance with the new version of the software. 4.1.5 Apteryx®, Inc. After upgrading Apteryx Imaging and related applications, components, and add-ons, the software automatically checks the computer environment to try to detect incompatible DLLs and extension components when the software is launched. If any are detected, the following dialog box will display indicating which components are conflicting. Page 18 of 30 May 28, 2014 Apteryx®, Inc. WI – Apteryx® Imaging Installation Guide Make note of the conflicting components and then click on Stop - Close the program. Repeat Steps 2 and 3 to find the applicable updaters and upgrade each incompatible component specified. Page 19 of 30 May 28, 2014 WI – Apteryx® Imaging Installation Guide 5 GETTING STARTED: XRAYVISION 5.1 Overview This section provides a brief explanation of how to get started using XrayVision. More extensive help is available in the help file installed with the software. To access the installed help file, go to Windows Start > Programs menu and find Apteryx Imaging menu group. An extensive user manual is also available online at the http://www.apteryx.com/edocs . For troubleshooting tips and answers to frequently asked questions, search the knowledgebase online at http://www.apteryx.com/knowledgebase . If desired, training is also available through your Dealer or Apteryx, Inc. 5.2 Getting Started: Adding Patients Patient information can be added manually or directly from your Patient Management application by using Name Grabber. 5.2.1 Manually adding a patient in XrayVision 5.2.1.1 Double-click on the XrayVision icon on the desktop to launch the application. 5.2.1.2 Click on the Open Patient button on the toolbar, then the Add Patient button. In the new window fill out all of the patient information then click the Add button. 5.2.2 Adding a Patient via Name Grabber Name Grabber and Data Drills are used in tandem to grab patient information from other applications and automatically open or create the patient in XrayVision. If it is running, an NG icon will display in the System Tray as shown below. 5.2.2.1 Open the Practice Management screen that contains the patient information and then click on the NG icon in the System Tray once with the left-mouse button. The Patient Information screen that NameGrabber grabs information from varies from one PM application to another. If needed, contact Apteryx Technical Support for assistance. 5.2.2.2 Once a name has been detected, NameGrabber launches the imaging application and a patient record is automatically created or opened (if it already existed). 5.3 Getting Started: Setting up Your Imaging Device XrayVision has the capability to capture images from a wide range of imaging sources. Please refer to product details on http://www.apteryx.com/. Apteryx®, Inc. Page 20 of 30 May 28, 2014 5.3.1 Intraoral Digital X-ray Sensors 5.3.1.1 Attach the imaging device(s) to the computer and install the hardware drivers following the manufacturer’s instructions. 5.3.1.2 Install/update the required device extension(s) for your hardware from Apteryx’s update website. Refer to Accessing and Running Upgraders for details. 5.3.1.3 Double-click on the XrayVision icon on the desktop to launch the application and test the acquisition of an image. 5.3.1.4 Depending on the manufacturer’s specifications, a configuration file (calibration, correction, or Gain file) may need to be added for the digital x-ray system. Select Tools > Hardware Options > Sensors >Add X-ray Sensor. If more than one sensor extension was added in Step 2, make sure to click on the appropriate sensor extension and click Options. If the selected sensor requires a configuration file, the software will prompt the user to locate it. Follow the prompts to locate the file (on the computer, network, or other media such as a CD-Rom drive) and add the configuration file. If the selected sensor does not require a configuration file, a dialog box will display to notify the user that one is not required. 5.3.1.5 Open a patient record and select the Capture Sensor Image icon ( 5.3.1.6 The ‘Capture Sensor Image’ selection screen displays. Select the applicable sensor and then click on OK. 5.3.1.7 A ‘Sensor Tooth Selection’ screen will appear. Select the appropriate teeth to associate to the image. Click OK to continue. 5.3.1.8 A ‘Select Modality’ window will open. Select the appropriate modality for the image being taken. 5.3.1.9 A sensor indicator will display and turn green when the sensor is ready to capture an image. 5.3.1.10 Proceed to shoot the x-ray following safety guidelines provided by the hardware manufacturer. The new image from the sensor will soon appear on the application’s desktop. 5.3.2 ) on the toolbar. Analog Intraoral Camera Devices; Digital Intraoral Cameras via USB or FireWire; Digital Video Cameras 5.3.2.1 Apteryx®, Inc. WI – Apteryx® Imaging Installation Guide Attach hardware to appropriate port (USB, Firewire, or video capture). Page 21 of 30 May 28, 2014 5.3.2.2 WI – Apteryx® Imaging Installation Guide Install/update the proper extension for your device. (Refer to Accessing and Running Upgraders for details.): DirectVideo captures video via DirectX / DirectShow / WDM video sources. This is the recommended video capture selection for Windows, XP, Vista, 7 and 8 operating systems. Real-Time Video captures video via Video-For-Windows (VFW) video sources. This is an older method of video capture and is not typically supported by newer generation video capture cards. Some of Hauppauge’s newer video capture cards are VFW and require the Real-Time Video extension. 5.3.2.3 Double-click on the XrayVision icon on the desktop to launch the application and test the acquisition of an image. 5.3.2.4 Open a patient record and select the Capture Video icon ( either select ‘Direct video’ or ‘Real-Time Video’. ) on the toolbar. From there you can Note that a live video feed displays on the ‘DirectVideo’ or ‘Real Time Video’ interface. 5.3.2.5 Capture the image using one of the following methods: Press the button on the camera DirectVideo comes equipped with different capture button configurations designed to interact with various cameras. Select Camera Buttons from the menu to change the configuration to one that applies if the camera button does not trigger the capture. 5.3.2.6 5.3.3 Step on the foot pedal (if configured) Select the Capture button on the ‘DirectVideo’ interface Press the space bar on the keyboard Once captured, a thumbnail of the image will appear on the interface. When finished, click the Done button. The image will then be acquired and displayed in the imaging application. Digital Pan/Ceph Imaging Systems; Phosphor Plate Devices; Transparency/ Flatbed scanners and other TWAIN devices 5.3.3.1 Apteryx®, Inc. Attach the imaging device(s) to the computer and install the hardware drivers following the manufacturer’s instructions. Transparency and Flatbed Scanners, and other TWAIN devices require the installation of the manufacturer’s TWAIN driver. Page 22 of 30 May 28, 2014 WI – Apteryx® Imaging Installation Guide 5.3.3.2 Digital Pan/Ceph Imaging Systems or Phosphor Plate Devices Only: Install/update the required device extension(s) for your hardware from Apteryx’s update website. Refer to Accessing and Running Upgraders for details. 5.3.3.3 Double-click on the XrayVision icon on the desktop to launch the application and test the acquisition of an image. 5.3.3.4 Open a patient record and select the Capture Single Image icon ( Image’ device selection screen will display. 5.3.3.5 The imaging device’s extension will be available for selection under all tabs. If a TWAIN driver was installed, it will be available for selection under TWAIN and Other Devices and Auto-Acquire Devices. 5.3.3.6 Select the hardware that will be used during the capture. 5.3.3.7 Click OK and follow any additional prompts to capture an image. When complete the image will be acquired and displayed on the application desktop. ) on the toolbar. The ‘Capture . 6 LICENSE TRACKING 6.1 Track by Computer Name 6.1.1 To track licenses by Computer Name, select Tools> Advanced Options> License Tracking> Track by Computer. 6.1.2 With this option enabled, the program will automatically allocate a license to the client computer the first time it launches XrayVision from the network shared location. To view the client computer names that have licenses allocated to them, select Help> Display Licensing Information. 6.1.3 The Licensing Information window will appear. The left side displays the number of licenses the office is using and how many remain. Every computer that is currently using a license will be displayed on the right side of this window. The computer accessing this information will show an asterisk (*) next to the name, if it is in the list of licensed computers. Apteryx®, Inc. Page 23 of 30 May 28, 2014 WI – Apteryx® Imaging Installation Guide 6.1.4 In the licensing information window, the user has the option to remove a license. To do this, the first step would be to highlight the computer name that will be removed. Next step will be to click “Reallocate License”. Once you click yes on both pop-up windows our software will free up the license for another computer to use. 6.1.5 To add more licenses, click on the “Add Licenses” button. The Additional Registration Numbers window will appear. Select “Add New RegNUM” and enter in the new registration number. Click on “Get Activation Code” and then “Done.” 6.2 Track by Client Name Apteryx®, Inc. Page 24 of 30 May 28, 2014 WI – Apteryx® Imaging Installation Guide 6.2.1 To Track by Client Name, select Tools>Advanced Options> License Tracking> Track by Client Name. 6.2.2 This option is used by offices that log into a server remotely through a remote desktop service such as Terminal Services, or Citrix to use the program. With a situation like this, an office can have multiple users simultaneously launching the program from a shared folder on a server. Either way, the Client Name will be the local client computer's name. 6.3 Track by User Name 6.3.1 To Track by User Name, select Tools>Advanced Options> License Tracking>Track by User Name. 6.3.2 For an office or organization In order to utilize this option, each user would require his/her own unique username on the domain. This scenario would be most useful when there are more computers than users. For example, if there were 20 workstations, but only 5 domain users, a license could be assigned to each domain user, and they would be able to access the program from each of the workstations by logging into the computer with their username. Apteryx®, Inc. Page 25 of 30 May 28, 2014 WI – Apteryx® Imaging Installation Guide 7 GETTING STARTED: XVLITE 7.1 Overview This section provides a brief explanation of how to get started using XVLite. More extensive help is available in the help file installed with the software. To access the installed help file go to Windows Start > Programs menu and find Apteryx Imaging menu group. For troubleshooting tips and answers to frequently asked questions, search the knowledgebase online at http://www.apteryx.com/knowledgebase . If desired, training is also available through your Dealer or Apteryx, Inc. 7.2 Getting Started: Adding Patients Patient information can be added manually or directly from your Patient Management application by using Name Grabber. 7.2.1 Manually Adding a Patient in XVLite 7.2.1.1 Double-click on the XVLite icon on the desktop to launch the application. 7.2.1.2 Enter the patient information into the ‘Search Criteria’ fields and then click on the Create Patient button. 7.2.2 Adding a Patient via Name Grabber Name Grabber and Data Drills are used in tandem to grab patient information from other applications and automatically open or create the patient in XVLite. If it is running, an NG icon will display in the System Tray as shown below. 7.2.2.1 By default Name Grabber is configured to launch XrayVision. To change the launched application to XVLite right click on NG icon and select Options from the popup menu. Modify the ‘Application To Launch’ path and change it to point to the application file “XVLite.exe”. 7.2.2.2 Open the Practice Management screen that contains the patient information and then click on the NG icon in the System Tray once with the left-mouse button. The Patient Information screen that NameGrabber grabs information from varies from one PM application to another. If needed, contact Apteryx Technical Support for assistance. Apteryx®, Inc. Page 26 of 30 May 28, 2014 7.2.2.3 WI – Apteryx® Imaging Installation Guide Once a name has been detected, NameGrabber launches the imaging application and a patient record is automatically created or selected on the Patient List (if it already exists). 7.3 Getting Started: Setting up Your Imaging Device XVlite has the capability to capture images from a wide range of imaging sources. Please refer to product details on http://www.apteryx.com/. 7.3.1 7.3.1.1 Attach the imaging device(s) to the computer and install the hardware drivers following the manufacturer’s instructions. 7.3.1.2 Install/update the required device extension(s) for your hardware from Apteryx’s update website. Refer to Accessing and Running Upgraders for details. 7.3.1.3 Double-click on the XVLite icon on the desktop to launch the application and test the acquisition of an image. 7.3.1.4 Depending on the manufacturer’s specifications, a configuration file (calibration, correction, or Gain file) may need to be added for the digital x-ray system. Select the Preferences on the main screen. Click on Sensor on the ‘Preferences’ screen and then select the Add Sensor button. If more than one sensor extension was added in Step 2 a ‘Select Sensor Device’ dialog box will display. Click on the appropriate sensor extension and click OK. If the selected sensor requires a configuration file, the software will prompt the user to locate it. Follow the prompts to locate the (on the computer, network, or other media such as a CD-Rom drive) and add the configuration file. 7.3.1.5 If the selected sensor does not require a configuration file, a dialog box will display to notify the user that one is not required. Select a patient record on the Patient List and click on the Take X-Ray button. 7.3.1.6 Select the appropriate teeth to associate to the image. 7.3.1.7 If more than one sensor extension has been added to the installation, select Switch Digital X-Ray Unit or Sensor and proceed to select the applicable sensor from the ‘Capture Sensor Image’ selection screen and then click on OK. 7.3.1.8 Select the Activate Selected Unit button. A sensor indicator will display and turn green when the sensor is ready to capture an image. 7.3.1.9 Proceed to shoot the x-ray following any safety guidelines provided by the hardware manufacturer. The new image from the sensor will soon appear on the application’s desktop. 7.3.2 Apteryx®, Inc. Intraoral Digital X-ray Sensors Analog Intraoral Camera Devices; Digital Intraoral Cameras via USB or FireWire; Digital Video Cameras Page 27 of 30 May 28, 2014 WI – Apteryx® Imaging Installation Guide 7.3.2.1 Attach hardware to appropriate port (USB, Firewire, or video capture). 7.3.2.2 Install/update the proper extension for your device. (Refer to Accessing and Running Upgraders for details.): DirectVideo captures video via DirectX / DirectShow / WDM video sources. This is the recommended video capture selection for Windows, XP, Vista, 7 and 8 operating systems. Real-Time Video captures video via Video-For-Windows (VFW) video sources. This is an older method of video capture and is not typically supported by newer generation video capture cards. Some of Hauppauge’s newer video capture cards are VFW and require the Real-Time Video extension. 7.3.2.3 Double-click on the XVLite icon on the desktop to launch the application and test the acquisition of an image. 7.3.2.4 Select a patient record on the Patient List and click on the Acquire Image button and then select the appropriate teeth to associate to the image. 7.3.2.5 The ‘Capture Image’ device selection screen will display. Select the Digital Image tab; select DirectVideo Capture OR Real Time Video Capture as the ‘Image Source; and then click OK. The ‘DirectVideo’ interface will display. 7.3.2.6 Depending on the selection above, the ‘DirectVideo’ or ‘Real Time Video’ interface will display. Note that a live video feed displays on the ‘DirectVideo’ or ‘Real Time Video’ interface. Apteryx®, Inc. Page 28 of 30 May 28, 2014 7.3.2.7 WI – Apteryx® Imaging Installation Guide Capture the image using one of the following methods: Press the button on the camera DirectVideo comes equipped with different capture button configurations designed to interact with various cameras. Select Camera Buttons from the menu to change the configuration to one that applies if the camera button does not trigger the capture. 7.3.2.8 7.3.3 Apteryx®, Inc. Step on the foot pedal (if configured). Select the Capture button on the ‘DirectVideo’ interface. Press the space bar on the keyboard. Once captured, a thumbnail of the image will appear on the interface. When finished, click the Done button. The image will then be acquired and displayed in the application. Digital Pan/Ceph Imaging Systems; Phosphor Plate Devices; Transparency/ Flatbed scanners and other TWAIN devices 7.3.3.1 Attach the imaging device(s) to the computer and install the hardware drivers following the manufacturer’s instructions. Transparency and Flatbed Scanners, and other TWAIN devices require the installation of the manufacturer’s TWAIN driver. 7.3.3.2 Digital Pan/Ceph Imaging Systems or Phosphor Plate Devices Only: Install/update the required device extension(s) for your hardware from Apteryx’s update website. Refer to Accessing and Running Upgraders for details. 7.3.3.3 Double-click on the XVLite icon on the desktop to launch the application and test the acquisition of an image. 7.3.3.4 Select a patient record on the Patient List and click on the Acquire Image button and then select the appropriate teeth to associate to the image. The ‘Capture Image’ device selection screen will display. 7.3.3.5 The imaging device’s extension will be available for selection under all tabs except Digital X-ray. The installed TWAIN driver will be available for selection under all available tabs except Digital X-ray and Imaging Device. 7.3.3.6 Depending on the media being acquired, select the appropriate tab so that the captured image is appropriately categorized for identity. For example, if scanning from a phosphor plate scanner, select the phosphor plate’s imaging extension from the ‘Image Source’ drop-down list on the Scanned X-ray tab; if scanning in a document from a flatbed scanner, make the TWAIN selection from the ‘Scanned Document’ tab. 7.3.3.7 Click OK and follow any additional prompts to capture an image. When complete the image will be acquired and displayed in the application. Page 29 of 30 May 28, 2014 WI – Apteryx® Imaging Installation Guide *** END OF DOCUMENT *** Apteryx®, Inc. Page 30 of 30