1
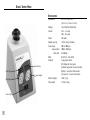
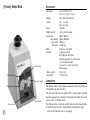
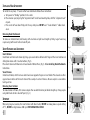
Instruction Manual TABLE OF CONTENTS Package Contents . . . . Inspection . . . . Installation . . . . Maintenance & Servicing . . . Environmental Conditions . . . Safety Instructions . . . . Fixed speed/Analog Vortex Mixers Digital Vortex Mixer . . . . Pulsing Vortex Mixer . . . . Installing Head Attachments . . PACKAGE CONTENTS Vortex Mixer (1) cup head (1) 3" cup head (1) 3" rubber head cover Instruction manual Warranty card 1 . . . . . . . . . . . . . . . . . . . . . . . . . . . . . . . . . . . . . . . . . . . . . . . . . . . . . . . . . . . . . . . . . . . . . 1 2 2 2 2 2 3-4 5-6 7-8 9 INSPECTION After unpacking your VWR Vortex Mixer, check immediately for shipping damages. It is important that any damage that occurred in transport is detected at the time of unpacking. If you do find such damage, the carrier must be notified immediately. INSTALLATION The 115v and 230v units are supplied with a 3-prong power cord that should be plugged into a standard 3-prong grounded outlet. If the cord supplied does not meet your needs, please use an approved power cord that suits local codes and electric supply. Replacement of the plug must be made by a qualified electrician. Always place Vortex Mixer on a sturdy work surface. MAINTENANCE & SERVICING Your VWR Vortex Mixer is built for long, trouble-free, dependable service. It needs no user maintenance beyond keeping the surface of the top and the control panel clean. Your Vortex Mixer should be given the care normally required for any electrical appliance. Avoid wetting or unnecessary exposure to fumes. Spills should be removed promptly. The finish can be washed with water and soap or detergents, using a cloth or sponge. Do not use any cleaning agent or solvent on the front panel which is abrasive or harmful to plastics, nor one which is flammable. If the unit ever requires service, contact your VWR International representative. ENVIRONMENTAL CONDITIONS Operating Conditions: Indoor use only Temperature: 18 to 33oC (64 to 91oF) Humidity: 20% to 85% RH, non-condensing Altitude: 0 to 6,562 ft. (2000 M) above sea level Installation Category II and Pollution Degree 2 in accordance with IEC 664. Non-Operating Storage: Temperature: -20 to 65oC (-4 to 149oF) Humidity: 20% to 85% RH, non-condensing SAFETY INSTRUCTIONS Please read the entire instruction manual before operating the Vortex Mixer. Failure to follow operating instructions can compromise user’s safety. DO NOT lift your Vortex Mixer by its head. All heads, including the cup, are removable. They can pop off if you lift them. Unplug from power before cleaning. DO NOT immerse. DO NOT use Vortex Mixer in a hazardous atmosphere or with hazardous materials for which the unit was not designed. Also, the user should be aware that the protection provided by the equipment may be impaired if used with accessories not provided or recommended by manufacturer, or used in a manner not specified by the manufacturer. DO NOT operate the unit if it shows signs of electrical or mechanical damage. 2 FIXED SPEED VORTEXER MIXER SPECIFICATIONS Dimensions: ANALOG 4.8"H x 6.8"W x 4.8"D (12.2cm x 17.3cm x 12.2cm) Voltage: 115v/230v AC, 50/60 hertz Current: 115v - 1.2 amps 230v - 0.6 amps Power: 150 watts Weight capacity: .65 lbs (294g) maximum Speed range fixed speed: 3200rpm analog: 100 to 3200 rpm 230v units: 2500rpm Orbit: 0.190" dia., .095 offset Controls - fixed speed: None analog: 3-way power switch Speed knob, variable 1 to 10 dial markings Product weight: 11lbs (5kg) Ship weight: 11.7lbs (5.3kg) VORTEXER MIXER INTRODUCTION Speed knob Power switch 3 The Vortexer mixer is used to prepare samples for testing. It operates by mixing tubes just prior to testing. The 115v and 230v units are supplied with a 3-prong power cord that should be plugged into a standard 3-prong grounded outlet. The unit is now on and in a "standby" mode. Your Vortexer mixer is ready for use for most one-handed applications. To install the cup head or 3" head attachment, follow these steps: a. Be sure the Vortexer mixer is un-plugged. b. Place cup-head on post, aligning the "flat" inside of the head mounting hole, with "flat" on post. c. Press center of head down firmly until it snaps into place. d. To remove an installed head, hold housing with one hand and pull head straight up firmly. FIXED SPEED INSTRUCTIONS The Fixed Speed Vortexer runs at only 3200 rpms. 1. The vessel you are using must be pushed down to achieve motion. To get the desired mix, vary the angle of contact and pressure against the mixing head. 2. The Fixed Speed Vortexer will return to standby when the tube is lifted off the cuphead. 3. Your Fixed Speed Vortexer can become warm to the touch with constant use. There is nothing wrong with it. At high performance settings the motor (UL recognized component) simply puts out more heat. Operating notes: DO NOT use large accessories on this unit. This unit is designed for use with cuphead or 3" head only. To Disconnect the Fixed Speed Vortexer from power mains, unplug the line cord. ANALOG INSTRUCTIONS 1. For intermittent operation, push switch to "Auto" position. For continuous operation, push switch to "On" position. 2. In either case, turn speed control to "1". In the "On" position, you will see the head in motion immediately. In the "Auto" position, the vessel you are using must be pushed down to achieve motion. To get the desired mix, vary the speed of the motor and/or the angle of contact and pressure against the mixing head. 3. When finished with either continuous or intermittent operation, return switch to "Off" position in the center. 4. The continuous "On" mode is for the larger accessories. In continuous "On" mode, DO NOT run above 900 rpm (analog speed setting of "5"). 5. The intermittent "Auto" mode is intended for short mixing times of one minute or less at full speed. A rest period of 2 minutes is recommended to minimize the possibility of overheating the motor. Your Vortex Mixer can become warm to the touch with constant use. There is nothing wrong with it. At high performance settings the motor (UL recognized component) simply puts out more heat. Operating notes: IMPORTANT: When using larger accessories (insert retainer with foam inserts or ampule tube holders), DO NOT run analog above a 900 rpm, (analog speed setting of "5"). UNIT DAMAGE WILL OCCUR. 4 DIGITAL VORTEX MIXER SPECIFICATIONS Dimensions: 4.8"H x 6.8"W x 4.8"D (12.2cm x 17.3cm x 12.2cm) Voltage: Current: 115v/230v AC, 50/60 hertz 115v - 1.2 amps 230v - 0.6 amps 150 watts .65 lbs (294g) maximum 500 to 3000 rpm 1000 to 3000 rpm to 2500rpm 0.190" dia., .095 offset 3-way power switch LED display for time/speed Up/Down keypad for set-point control Digital, 1 second to 9999 minutes (increased in 1 second increments) 11lbs (5 kg) 11.7lbs (5.3kg) Power: Weight capacity: Speed range: auto position: 230v units: Orbit: Controls: Speed display Time display Speed keypad Time keypad Power switch 5 Product weight: Ship weight: INTRODUCTION The Vortexer mixer is used to prepare samples for testing. It operates by mixing tubes just prior to testing. The 115v and 230v units are supplied with a 3-prong power cord that should be plugged into a standard 3-prong grounded outlet. The unit is now on and in a "standby" mode. Your Vortexer mixer is ready for use for most one-handed applications. To install the cup head or 3" head attachment, follow these steps: a. Be sure the Vortexer mixer is un-plugged. b. Place cup-head on post, aligning the "flat" inside of the head mounting hole, with "flat" on post. c. Press center of head down firmly until it snaps into place. d. To remove an installed head, hold housing with one hand and pull head straight up firmly. For intermittent operation, push switch to "Auto" position. For continuous operation, push switch to "On" position. In the "Auto" position, the vessel you are using must be pushed down to achieve motion. To get the desired mix, vary the speed of the motor and/or the angle of contact and pressure against the mixing head. OPERATING INSTRUCTIONS 1. Set speed by pressing the Up/Down arrows below the speed display until you reach the desired speed. O Speed while running the "On" position is 500 – 3000 rpm O Speed while running in the "Auto" position is 1000 – 3000 rpm 2. Set time by pressing the rocker switch to the "Auto" position. Press the Up/Down arrows below the Time display until you reach the desired time. Times operation works in both "Auto" and "On" positions. O While running unit in timed mode, the Timer LED will display time remaining. O To run in continuous mode, reset the timer to zero (0) before running. Timer LED will display the accumulated time and run until you press the rocker switch to the "Standby" position in the center. 3. When finished with either continuous or intermittent operation, return switch to "Standby" position in the center. 4. The continuous "On" mode is for the larger accessories (insert retainer with foam inserts or ampule tube holders). In continuous "On" mode do not run above 900 rpm. 5. The intermittent "Auto" mode is intended for short mixing times of one minute or less at full speed. A rest period of 2 minutes is recommended to minimize the possibility of overheating the motor. Your Vortex Mixer can become warm to the touch with constant use. There is nothing wrong with it. At high performance settings the motor (UL recognized component) simply puts out more heat. IMPORTANT - When using larger accessories, DO NOT run above 900 rpm. UNIT DAMAGE WILL OCCUR. 6 (PULSING) VORTEX MIXER SPECIFICATIONS Dimensions: Voltage: Current: Power: Weight capacity: Speed range: auto position: pulse mode: 230v units: Orbit: Controls: Speed display Product weight: Ship weight: Time display Speed keypad Time keypad Pulse keypad Power switch 7 4.8"H x 6.8"W x 4.8"D (12.2cm x 17.3cm x 12.2cm) 115v/230v AC, 50/60 hertz 115v - 1.2 amps 230v - 0.6 amps 150 watts .65 lbs (294g) maximum 500 to 3000 rpm 1000 to 3000 rpm 3000 rpm to 2500 rpm 0.190" dia., .095 offset 3-way power switch LED display for time/speed Up/Down keypad for set-point control 1 second to 9999 minutes (increased in 1 second increments) Pulsing keypad 11lbs (5 kg) 11.7lbs (5.3kg) INTRODUCTION The Vortexer mixer is used to prepare samples for testing. It operates by mixing tubes just prior to testing. The 115v and 230v units are supplied with a 3-prong power cord that should be plugged into a standard 3-prong grounded outlet. The unit is now on and in a "standby" mode. Your Vortexer mixer is ready for use for most one-handed applications. To install the cup head or 3" head attachment, follow these steps: a. Be sure the Vortexer mixer is un-plugged. INTRODUCTION (CONT.) b. Place cup-head on post, aligning the "flat" inside of the head mounting hole, with "flat" on post. c. Press center of head down firmly until it snaps into place. d. To remove an installed head, hold housing with one hand and pull head straight up firmly. For intermittent operation, push switch to "Auto" position. For continuous operation, push switch to "On" position. In the "Auto" position, the vessel you are using must be pushed down to achieve motion. To get the desired mix, vary the speed of the motor and/or the angle of contact and pressure against the mixing head. OPERATING INSTRUCTIONS 1. Set speed by pressing the Up/Down arrows below the speed display until you reach the desired speed. O Speed while running the "On" position is 500 – 3000 rpm O Speed while running in the "Auto" position is 1000 – 3000 rpm O Speed while running in "Pulse" mode is 3000 rpm running for 30 seconds resting 10 seconds. 2. Set time by pressing the rocker switch to the "Auto" position. Press the Up/Down arrows below the Time display until you reach the desired time. Times operation works in both "Auto" and "On" positions. O While running unit in timed mode, the Timer LED will display time remaining. O To run in continuous mode, reset the timer to zero (0) before running. Timer LED will display the accumulated time and run until you press the rocker switch to the "Standby" position in the center. 3. The continuous "On" mode is for the larger accessories (insert retainer with foam inserts or ampule tube holders) In continuous "On" mode do not run above 900 rpm. 4. When finished with either continuous, or pulse operation, return switch to "Standby" position in the center. 5. Pulse operation - Set the time if desired. Move the rocker switch to the "On"position, press the "Pulse" button. The Speed display will show "PULS". The unit will run at 3000 rpm, cycling a run time of 30 seconds followed by a resting time of 10 seconds. The unit will continue until the timer reaches zero or you stop the unit by moving the rocker switch to the "Standby" position in the center. If you are not running in "Timed" mode, the unit will run until you move the rocker switch to the "Standby" position in the center. 6. The intermittent "Auto" mode is intended for short mixing times of one minute or less at full speed. A rest period of 2 minutes is recommended to minimize the possibility of overheating the motor. Your Vortex Mixer can become warm to the touch with constant use. There is nothing wrong with it. At high performance settings the motor (UL recognized component) simply puts out more heat. IMPORTANT - When using larger accessories (insert retainer with foam inserts or ampule tube holders), DO NOT run above 900 rpm. UNIT DAMAGE WILL OCCUR. 8 INSTALLING HEAD ATTACHMENTS Fig. 1 To install the cup head, 3" head or other head attachments follow these instructions: a. Turn power to "Standby" position in the center. b. Place head on post, aligning flat "alignment mark" inside head mounting hole, with flat "alignment mark" on post. c. Press center of head down firmly until it snaps into place. DO NOT use 3" head without 3" rubber head cover. Removing Head Attachments To remove an installed head, hold housing with one hand and pull head straight up firmly. Larger heads may require using both hands to force head off post. INSERT RETAINER AND ACCESSORIES Insert Retainer Insert foam rack into insert retainer by lining up recessed notches of foam with fingers of the insert retainer and sliding foam down until it reaches bottom. (Fig.1) Place insert retainer with foam rack on head mount of Vortex Mixer. (Fig.2) Follow Installing Head Attachments instructions. Vessel Harness Install insert holder, stretch harness elastic bands over opposite fingers on insert holder. Place bands on either upper or lower notches of the insert retainer. Place sample in center of harness. Be sure sample is secure before turning unit on. Removing Insert retainer To remove holder with foam, first remove samples then use both hands to pull holder straight up. It may require using both hands to force head off post. (fig. 3) IMPORTANT When using larger accessories, the insert retainer with foam inserts; DO NOT run analog above a speed setting of "5", DO NOT run digital above 900 rpm. UNIT DAMAGE WILL OCCUR. 9 Fig. 2 Fig. 3 MANUFACTURED BY: HENRY TROEMNER LLC 201 Wolf Drive O PO Box 87 O Thorofare, NJ 08086-0087 Phone: 856-686-1600 O Fax: 856-686-1601 www.troemner.com O email: [email protected] 715026-00 4-017-BRO Rev (12/04)