1
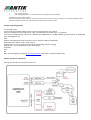
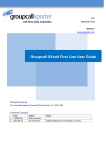
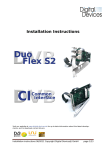
ANTIK JUICE IPTV DEMO KIT MANUAL
Thank you for purchasing the Juice IPTV Demo Kit (IDK). We have put together the Juice IDK to offer our client a good
insight about IPTV, and to give you a hand-on experience on managing an IPTV system. We hope you will enjoy it, and find
it useful.
Part #1 – Package Content
The Juice IDK comprises of the following parts:
* 2x STB Juice Mini
* 1x HDD 500GB with full IPTV environment (Live TV, TV Archive, VOD, IMS,etc..)
system requirement : CPU i3 and above, 4GB RAM
* 2x USB ETH external adapter (ETH#1 for internet, ETH#2 for streaming to mobile devices)
* 1x Gigabit switch (5 ports)
* 1x Wifi Access point for multiscreen demo
* 1x TV anywhere (personal encoder)
* 1x 16GB USB Flash Drive (for time shift, PVR and media center demo)
* 3x RJ45 ETH cables
* 1x RF IPTV Wireless Keyboard
* 1x Juice Debug cable (with USB to RS232 adapter)
* 2x power adapter (need confirmation about plug)
Part #2 – Setting the IPTV System
1)
2)
3)
4)
5)
Install the Demo HDD into the system, this is the IPTV media server ,
Connect Gigabit Switch (at least 4-port) to the onboard RJ-45 ethernet port,
Connect the USB Ethernet Adapter to the PC Server, and connect it to Internet via RJ45 cable (ie. ETH1),
Power ON the system, the Linux OS will boot-up in min.3 minutes,
Connect the STB to the Gigabit Switch + connect the STB to the TV set, and turn the STB on.
Note:
(a) make sure server is fully started before turning STBs on.
(b) the USB RJ-45 Ethernet Adapter needs to be connected to LAN, for Internet access and online support by Antik,
(c) the USB-to-RS232 Debug Cable will be used later when necessary, please keep it safely.
Part #3 – Entering IPTV Management Server (IMS)
http://172.24.0.12:81 (user: admin, password: admin123)
IMS short guide: brief instructions about adding channel to IMS.
How to create Packages:
1.
Click on the add package write package name and save it.
2.
Click on the details of the created package.
3.
Choose channels which you want in the package and click add (see below).
How to add channel:
1.
Click to add the channel, write channel name and save channel.
1.
Find added channel in all channels and click details of the channel where you can add address of the stream (HLS/HTTP for unicast and
UDP/RTP for multicast) and choose video or audio codecs.
2.
Created channels must be added to the package in the menu Packages on the left side of the Channels menu.
How to add the package to the box:
1.
In the STB menu find your box (for example using MAC)
2.
3.
Click on details of the box.
In the channel package menu on the left side find your package and click add package.
Updating the box with created channels:
After the channels are created on IMS, you need to press Menu button on remote control, go to Settings, move to “About application” and on
right side click Reload Sources “Yes”. New channel is now visible in the channel list on STB.
Part #4 – Operating the STB
It is possible to test:
Live Streaming (from demo HDD), Picture in Picture- see page 64 in User manual
Archive streaming (archived programs for 1 day, marked channel by yellow mark - e.g. Markiza)
Local PVR or DVR (Recording + Pause TV) – USB flash drive/HDD with min. 20 MB/s, 8GB (e.g. Patriot Xporter XT RAGE 8GB)
Time Shifting (Pause TV)
VOD
Browser (using Keyboard, best would be to use our IPTV Juice Wireless Keyboard)
Media Player and DLNA – music, video, picture
BitTorrent client – music, video, picture (not for downloading, only for viewing)
Mediaportal – various applications under development
Hospitality
EPG
PiP
IMS – IPTV Management System (http://172.24.0.12:81 (user: admin, password: admin123))
Part #5 : Setup for TV Anywhere
Setting up TV Anywhere in Demo Kit Version 3.0
1) Connect TV Anywhere (USB Dongle) and Access Point (AP) to the Demo Kit as shown in the above diagram.
2) The system will detect it, and take about 30-50 seconds to initialize the TV Anywhere dongle.
3) Next, setup TV Anywhere by going into [Menu]>> [Setup] >> [??] . At the TV Anywhere section, setup the login and
password. (default login and password: aaaa)
4) Connect your PC or Connected Device (IOS or Android) to the Access Point. The STB has internal web server (DHCP),
you will get IP Address with range 172.25.0.xx .
5) ... Open the page with your Connected Device, select login and password (??). Reload acutal channels and play it.
Part #6 – Troubleshooting & FAQ
Q: Channel list not visible/empty.
A: Make sure server is started and restart the STB = disconnect and connect again the power supply.
Q: If I connect the STB to public internet, will it work?
A: The STB is prepared to work on public IP address, too. After connecting the STB, it is needed to get right channel list, it
means to - “Reload sources” (press Menu button on remote control, go to Settings, move to “About application” and on
right side click Reload Sources “Yes”. New channel is now visible in the channel list on STB). The STB will be then connected
to Antik Demo server, where you can watch our demo channel package.
If any additional question, please contact [email protected]