1
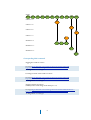
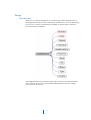
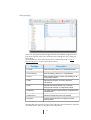
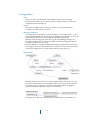
MacTrek Developer Guide
Chris Lukassen
June 2007
1
Table of contents
Introduction
.......................................................................................................... 3
What is Netrek?
........................................................................................................... 3
History
.......................................................................................................................... 3
Basics
............................................................................................................................. 3
Document structure
.................................................................................................... 4
Design Principles
.................................................................................................. 5
Frameworks
.................................................................................................................. 5
MVC
.............................................................................................................................. 5
Factory
...........................................................................................................................5
Notifications
................................................................................................................ 6
State machine
............................................................................................................... 6
Repository
.....................................................................................................................7
Design
................................................................................................................... 9
Class derivation
............................................................................................................ 9
Class grouping
............................................................................................................. 11
Coding guidelines
....................................................................................................... 14
Networking
................................................................................................................. 15
Development enviroment
.................................................................................. 21
Setting up subversion source version control for Mac OS X
..................................21
Subversion and XCode
............................................................................................... 22
Checking the installation
........................................................................................... 23
Adding RSA code to your client
................................................................................ 23
Miscellaneous
..............................................................................................................25
Credits
................................................................................................................. 26
Appendix A
..........................................................................................................27
Importing Projects Into a Subversion Repository
...................................................27
Configuring your SSH environment
......................................................................... 27
Appendix B
..........................................................................................................29
Releasing a new MacTrek Version
............................................................................ 29
2
Introduction
What is Netrek?
Netrek is a free to play open source software cross platform multiplayer hybrid
multi-directional shooter and real time strategy game for up to 16 players. The goal
of the game is to capture all the opposing team’s planets. It combines “twitch” style
reflexive dogfighting with extensive team play and strategy.
History
Netrek has a development history beginning as far back as 1972 (Alto Trek). It was
also heavily influenced by the PLATO game Empire, written in 1978. It
substantially reached its current form and its peak player-base in the early 1990s as
a contemporary of XPilot but has dwindled steadily since then as more newbie
friendly games became available. It is no longer under active development, but its
client and server code still contain many design features that would be of interest to
amateur or professional network games developers.
Basics
The graphics of Netrek are simple top-down format. You have an external view of
your ship from above and the game map is laid out on a 2-D plane.
Two teams face off, each controlling an equal number of planets. Planets slowly
generate armies, which may be picked up by players. Enemy planets may be taken
over (or retaken) by dropping enough armies on them. Armies annihilate each other
on a 1 to 1 basis, so to take over a planet with 4 armies, you need to drop at least 5.
A planet with 0 armies is considered to be neutral and does nothing until someone
puts an army on it to claim it.
Planets can be bombed to kill off armies, but cannot be bombed if the army count
is 4 or less. Also, you can only pick up excess armies from your team’s planets,
where “excess” is defined as over 4. Some ships have the ability to randomly bomb 2
armies at a time instead of 1, so it would be possible to bomb an army down to a
population of 3 but never less than that.
Before you can pick up armies, however, you need a kill. You can obtain kills either
by killing an enemy ship or by bombing enemy armies. Your kill count resets back
to 0 every time you die. Consequently, people with 2 or more kills are generally
targeted for ogging just to remove the threat of them carrying armies around.
3
Document structure
Noter: This document serves as guide how to work with the MacTrek source code.
It will not describe how Netrek works, nor how the source code works, for the
latter i suggest you either download the code or take a look at the doxygen
description
In Chapter 2 the Design principles are explained. Chapter 3 explains how to get and
setup the perquisites to start working on MacTrek. Chapter 4 tells how to obtain
the client code, how install and work with it. Chapter 5 tells something about the
credits of this Manual and in Chapter 6 holds some appendixes which have no
direct bearing on MacTrek but may be very usefull.
4
Design Principles
Currently MacTrek uses a number of design patterns and different design
principles. If at first glance the structure may not seem directly related to a single
design pattern, the matter at hand is probably related to two or more patterns
applied simultaneously.
Frameworks
MacTrek makes heavily use of frameworks. Most operations that can be abstracted
and reused have been moved into the Luky framework branch. Currently this code
is directly accessible from XCode but when this framework has reached maturity it
can be moved to a separate project and managed separately. (as with the current
Java version of Luky) The same is true for Libgmp which handles the RSA
encryption.
MVC
The Model View Control pattern is at the very hart of the design.
The (data) Model that represents the current state of the MacTrek data is located in
classes in the folder “Data”. It consists of the MacTrek Universe class that is
populated with various planets, players, teams and weapons.
The View part is implemented in the NIB file. It holds most logic related to the
presentation of the MacTrek Universe. Most, but not all. In the folder Gui are
other classes that handle the response of View events and see to the population of
the various lists, or generate a (Tactical) Map picture.
The Control layer is scattered over many classes but mainly acts on the layer of the
“App” classes. They intermediate between data collection and presentation. Good
examples are the classes that store dynamic keymaps or handle MetaServer data.
Factory
Another pattern that emerges is that of the factory. The gui layer does not paint its
own view but uses a PainterFactory. This factory processes the datalayer and
produces a frame that represents the current data layer at a given time. There are
extentions on the PainterFactory that use the same logic but paint differently. This
way the Netrek Painter will draw netrek artwork and the MacTrek painter will draw
MacTrek graphics. Analogue to this principle is also the SoundPlayer.
5
Threading
MacTrek is multi threaded. Its communication is isolated to a single thread that
updates the universe and can be locked. The drawing is done in another thread and
the playing of sounds is done in dozens of threads. (at least 1 per sound)
Notifications
The core of MacTrek is the NotificationCenter. Since the design in threads leads to
isolated bits of code there is a need for communication between the parts of the
code. The communication thread may learn to know new information about the
player that results in a new galactic picture, and update of the speed or hull meters
in the dashboard or maybe the presentation label.
MacTrek uses a notificationCenter to generate events. An event consists of a key
and user data. Everywhere in the code, the programmer can subscribe to events and
connect his methods to the event. Causing specific bits of code to be called when
an event occurs, without knowing, where the event occurred.
State machine
MacTrek uses an internal state machine to know if a game can begin or not.
Whether the user will login first or if a ship still needs to be selected.
6
Repository
MacTrek is stored in an SVN repository with the structure based on its release
numbers. The version numbers should be read as:
a.b.c
Where a is a major revision meaning the structure of the code changed
considerable. The b indicates a minor release that has new functionality and c
means bug release This is reflected in the way the repository is managed.
The repository looks like this:
/trunk
/releases
/branches
(main development trunk)
(holds a copy of the source at each release)
(working branches of the main trunk)
In the main trunk development is based on release numbers, so in time it will look
like:
/trunk:
revision: 10 - 11 -12 -13 -14 -15 -16 -17 -18 - 19 - 20 - 21 - 22 -23
Whenever a release is made the code is freezed in the releases repository so:
/releases/1.1.0
/releases/1.2.0
/releases/2.0.0
/releases/1.1.1
revision 1 (identical to /mactrek revision 16)
revision 1 (identical to /mactrek revision 19)
revision 1 (identical to /mactrek revision 20)
revision 1 (identical to .....)
Besides a release also a branch is made for each major and minor release. So to
continue our example:
/branches/1.1.0
revision 1 (identical to /mactrek revision 16)
/branches/1.2.0
revision 1 (identical to /mactrek revision 19)
/branches/2.0.0
revision 1 (identical to /mactrek revision 20)
But not for bug fixes. They are related to work in a branch of a release, so:
/releases/1.1.1
revision 1 (identical to /branches/1.1.0 revision 3)
So in short trunk holds “latest greatest” releases are snapshots and should not be
committed upon, branches are for bug fixing releases. This means that bug fixes need
to be done also in the main trunk as well as in all active release branches.
See also the following figure.
7
/trunk
10
11
12
13
14
15
16
17
18
19
20
/releases/1.1.0
1
/releases/1.2.0
/releases/2.0.0
/releases/1.1.1
/branches/1.1.0
/branches/1.2.0
/branches/2.0.0
1
1
1
1
2
3
1
Corresponding SVN commands
Tagging the trunk for release:
svn copy https://mactrek.svn.sourceforge.net/svnroot/mactrek/trunk
https://mactrek.svn.sourceforge.net/svnroot/mactrek/releases/1.1.0
-m “Bug release 1.1.1 (rel 34)”
Creating a branch of the trunk for release:
svn copy https://mactrek.svn.sourceforge.net/svnroot/mactrek/trunk
https://mactrek.svn.sourceforge.net/svnroot/mactrek/branches/1.1.0
-m “Bug release 1.1.1 (rel 34)”
Tagging a branch for release:
(assumes you have made changes in the branch for 1.1.0)
svn copy https://mactrek.svn.sourceforge.net/svnroot/mactrek/branches/1.1.0
https://mactrek.svn.sourceforge.net/svnroot/mactrek/releases/1.1.1
-m “Bug release 1.1.1 (rel 34)”
8
1
Design
Class derivation
Objective – C software usually leads to very flat design. This is mostly because of
the delegate pattern that is used extensively in the Gui classes. It avoids sub classing
in most cases. In order to maintain the possibility to expand easily to all classes,
base classes have been defined.
The SimpleBaseClass has currently no logic and is a skeleton class. The BaseClass
derived classed share access to the default notificationCenter and have a single
access point to the universe.
9
The Classes in the universe are very well represent able using an hierarchy of
classes. All elements are entities and share parameters as speed and position.
Weapons and projectiles share other elements.
As of MacTrek 1.1.0 A Tracker is closely related to the entity class and allows for the
prediction of position based on the timestamp of the last received update. At the
time of writing it is best left off since the prediction is not smoothed out and causes
the the display to wobble with a sawtooth pattern.
The figure above shows the universe population hierarchy
10
Class grouping
Classes are also grouped by their logical function. This implies a logical reason to
keep them together (in Java they would become a package) but now coding rule
binds them.
General Libraries. These will in the future be released under LGL on http://
luky.sourceforge.net as their current Java brethern.
Package
Description
LLComm
Communication classes e.g. NotificationCenter
LLConcurrency
Multi-Threading classes e.g. ThreadWorker
LLCore
Base classes holding common functionality for all
Luky based classes
LLGeo
Geometrical classes, for vector and other
calculations
LLGui
Special GUI based classes e.g. full screen
background windows or transparent panels
LLNetwork
Complete network implementation compatible with
OmniNetwork
LLResources
Resources required by the Luky classes
LLSystem
System based classes to manage processes
among others.
The MacTrek classes heavily depend on these libraries and are themselves organised
in a similar matter. (Need to be refactored to MT classes)
11
Package
Description
App
All control classes. These classes know nothing
about the visual layer but do know how to
manipulate internal data or events. Like te
LoginManager or KeyMap
Comm
Communication based classes read and write
UDP or TCP messages and translate them into
events. The class Communication is the centre
point and controls the separate communication
thread.
Data
It holds the universe and more. All classes related
to what happens out there. The status of the
players, planets etc.
Generic
BaseClasses as explained before
Gui
The control classes that know about the visual
layer. The are instantiated in the Interface builder
and added to the NIB. You will find separate
controllers for all menus and the centre of
operations in this group is the GuiController. It
contains the state diagram that makes the
application switch states.
Message
Netrek supports RCM messaging. However, this is
only partly implemented in MacTrek. There
classes should convert normal messages in RCM
and vice versa.
Other
Required classes for any Objective-C project like
main.c (duh)
Painter
The painters do the actual drawing based on the
resources they may have. The root class draws
simple shapes, it’s children use images to create
fancier output. It also holds the logic to switch
frames in more advanced drawing like explosions.
RSA
All encryption based classes. Note that there are 4
classes missing from svn that hold the actual
decryption key. Use res-rsa-2.9.2 from http://
sourceforge.net/projects/netrek to generate these.
Sound
The soundplayer family and support classes. A
multithreaded entity that plays many sounds
simultaneously inherit to create additional FX
schemes
Tracker
Experimental class to see if TCP lag can be
compensated with tracking. Not very successful
with alpha tracking, may switch to Lagrange
polynoms in the future
12
Package
Views
Description
This is where in and output is handled. Every 1/
FRAME_RATE seconds a new view is generated
and it also handles the keys that are pressed. It
uses the painter to actual generate the image to
be drawn to the screen.
13
Coding guidelines
SCM
Only code that is checked in/out using SCM is accepted as a valid change.
Descriptions should be precise and every file you check in must be verified and
compile-able before checking in.
Syntax
We follow the Apple style of coding (e.g. setVar, var (not getVar)) with one
exception: Java style brackets are used.
Manager/Controller
Controller classes control parts of the code that have no user interaction. e.g. the
LoginController handles the control logic in communication with the server. It uses
the Communication class to abstract the actual traffic encapsulation.
Manager classes manage part of the Gui. e.g. the LoginManager manages the
interaction with the user. It tells the controller class what has happened and the
controller will find the proper reply.
The Gui Manager is a special manager that manages the game state based on the
state diagram. It is the central spider that acts mainly on events in the system and
controls for example the state of the display (menus, outfit, game etc)
Theme ability
MacTrek makes it easy to add new sound or graphic themes. All you need to to is
override the PainterFactory or SoundPlayer classes and add your custom artwork.
For sound you are required to override the loadSounds method. For graphics
specific methods like drawPlayer need to be overridden.
The figure above shows the class hierarchy for PainterFactory in MacTrek 1.1.x
14
Networking
Working with LLNetwork
You can use the LLNetwork classes to setup both TCP and UDP connections.
Or even mix them. The classes contain also streaming variants of the
sockets that catch more or less data in the background and which can be
fetched by your software asynchronisly. Direct use of the sockets can be
blocking or non-blocking.
Additional care is to be taken in a threading enviroment. LLNetwork is
thread safe, but accessing a blocking socket from multiple threads may
lead to failure if the first thread blocks the socket, then the second
thread may return with a failure code.
As TCP Server:
- create a LLTCPSocket
- call listenOnPort to start listening for connections
- call acceptConnection to wait for an incomming request (or
acceptConnectionAndKeepListening)
- read data or write data
As TCP Client:
- create a LLTCPSocket
- call connectToHost to establish a connection
- read data or write data
As UDP Server:
- create a LLUDPSocket
- call listenOnPort to start listening for connections
- read data (this will set the remoteHost upon reception)
- write data (wil use this remote host)
As UDP Client:
- create a LLUDPSocket
- call connectToHost to establish a connection
- write data to tell the host who you are
- read data
Netrek UDP/TCP networking explained
Extended send & receive
For increased reliability, the client has extended send and receive options.
In the client, commands which don’t appear to have been accepted can be
repeated automatically. This is called “forced UDP”. In the server,
semi-critical information can be resent automatically in a separate packet or
at the end of a short packet (which increases traffic and CPU load but
increases the probability that the information will get through).
Another extended receive option is “fat UDP”, in which packets under 500
bytes are padded with an extra 90-100 bytes of semi-critical state info.
The info will be added on a “least recently sent” basis, adjusted by how many
times that particular packet has been sent since it was last modified. The
extra load on the network and CPU should be minimal.
When all else fails, an “update all” request is provided. Issuing this
15
request will cause all semi-critical and some non-critical data to be sent as
part of the next update. This also causes fat UDP to reset itself.
Critical/non-critical packets
There are three levels:
0 - critical, must get through
1 - semi-critical, will confuse player if it doesn’t arrive
2 - non-critical
For the server, two criteria were used:
- will bad things happen if the packet doesn’t get through?
- is it something which ought to be reliable and doesn’t happen very often?
(ex: SP_MOTD)
For the client, the semi-critical packets were chosen based on which could
be detected or at least repeated without undue side-effects. For example,
“det torps” is impossible to detect, and “fire torp” would often result in
firing more torpedos than was desired. Some options (change speed, change
direction) are simply repeated twice for good measure because there’s no
harm in doing so (besides sending more packets than necessary, that is).
Server critical:
1 SP_MESSAGE
2 SP_PLAYER_INFO
10 SP_WARNING
11 SP_MOTD
13 SP_QUEUE
16 SP_PICKOK
17 SP_LOGIN
19 SP_MASK
20 SP_PSTATUS
21 SP_BADVERSION
24 SP_PL_LOGIN
25 SP_RESERVED
26 SP_PLANET_LOC
Server semi-critical:
3 SP_KILLS
<-- not important, but semi-confusing if this is lost
5 SP_TORP_INFO
7 SP_PHASER
8 SP_PLASMA_INFO
12 SP_YOU
<-- sometimes this is non-critical or critical
14 SP_STATUS
15 SP_PLANET
18 SP_FLAGS
22 SP_HOSTILE
Server non-critical:
4 SP_PLAYER
6 SP_TORP
9 SP_PLASMA
16
23 SP_STATS
27 SP_SCAN
(Amdahl scanning beams)
28 SP_UDP_REPLY
(UDP packet; only kind sent in UDP mode is VERIFY
packet)
29 SP_SEQUENCE
Client critical:
1 CP_MESSAGE
8 CP_LOGIN
9 CP_OUTFIT
10 CP_WAR
22 CP_COPILOT
27 CP_SOCKET
28 CP_OPTIONS
29 CP_BYE
31 CP_UPDATES
32 CP_RESETSTATS
33 CP_RESERVED
35 CP_UDP_REQ
(uses a special case to send the VERIFY packet through
UDP)
Client semi-critical (forced mode):
2 CP_SPEED
3 CP_DIRECTION
4 CP_PHASER
5 CP_PLASMA
12 CP_SHIELD
13 CP_REPAIR
14 CP_ORBIT
15 CP_PLANLOCK
16 CP_PLAYLOCK
17 CP_BOMB
18 CP_BEAM
19 CP_CLOAK
23 CP_REFIT
24 CP_TRACTOR
25 CP_REPRESS
30 CP_DOCKPERM
Client non-critical:
6 CP_TORP
7 CP_QUIT
11 CP_PRACTR
20 CP_DET_TORPS
21 CP_DET_MYTORP
26 CP_COUP
34 CP_SCAN
(Amdahl scanning beams)
36 CP_SEQUENCE
(not used)
17
UDP performance and side effects
It should be noted that setting the update rate to 5 frames/second does NOT
mean that the server only sends five transmissions per second. It specifies
a MINIMUM transmission frequency; the server will send regardless when its
buffer fills. Under TCP this is about 16K, so even at 1 update/second you
are unlikely to receive any information early.
Under UDP the buffer size is 960 bytes, so you may receive smaller packets
more often. It is quite possible to have the frame rate appear to increase
when you move into the thick of a battle. This does NOT mean that the server
is sending more data; it’s merely spreading the same data over several
packets. It also does not mean that your display will suddenly speed up; in
fact, most people used to 5 updates/second say that the display appears to
slow down at 9 updates/second. The smoother display which (accidentally)
results will most likely be beneficial to most people.
Some quick tests showed that, even on a busy system, packets rarely exceed
700 bytes.
(in case I’ve managed to hopelessly confuse you, think of it this way: the
server will still be sending updates at the same rate, but some will arrive
a few milliseconds earlier than the others. Your client will get some data,
redraw, get more data, redraw, ... In most cases, I wouldn’t expect to
receive more than two packets per update, so it shouldn’t be a major issue.
That remains to be seen, however.)
Socket details
A typical way to connect is:
- server opens a port with bind(), and passes the number to the client via TCP
- client opens the UDP port, does a connect(), and sends some data via UDP
- server does a recvfrom(), which supplies the client address and port
- server does a connect()
A two-way UDP connection is now established.
Under UTS 2.1 however, recvfrom() is broken, and doesn’t always fill in the
“from” parameter (the whole reason for the client sending data to ther server
before the server connects is so that the server can identify the client’s
host and port). Since I’m writing and debugging this under UTS, the client
packet must contain the client’s UDP port number. (note that UTS product
support has been made aware of the problem, and is working to fix it.)
So, the connection actually works like this:
- client opens a port with bind(), and passes the port number to the server
- the server does a connect(), and passes it’s port number back to the client
- the client does a connect() to the server’s port
Explanation of UDP connection process
This is somewhat involved, because there are some nasty failure states:
- ntserv using UDP, client ignoring updates
- client using UDP, server ignoring messages
- ntserv and client both decide to use UDP, but server can’t connect
- client stutters and sends a second request, causing server to reroute data
...
18
Most failures end up with server and client ignoring each other, forcing the
player to disconnect. Might be worthwhile to add a “force reset” to make
the server switch back to the TCP line. If this protocol does its job, then
that shouldn’t be necessary.
(A state diagram would be better, but harder to interpret. This is woefully
incomplete, but should impart a reasonable understanding of what’s going on.)
COMM_XXX indicates where the client or server expects to send/receive data
STAT_XXX indicates the “state” of the client
Initial state:
Client:
COMM_TCP, STAT_CONNECTED
Server:
COMM_TCP
C finds a free port and bind()s it
C sends a CP_UDP_REQ(COMM_UDP, client_port)
Client: COMM_TCP, STAT_SWITCH_UDP
Server: COMM_TCP
(if the server doesn’t send a response within 25 updates, figure the server
doesn’t know about UDP and reset to STAT_CONNECTED.)
S checks it’s current mode:
if already UDP, drop current connection and proceed below
if S isn’t allowing UDP connections, it sends SP_UDP_REPLY
(SWITCH_UDP_DENIED,0)
S opens a UDP socket, connect()s to the client and sends a
REPLY(SWITCH_UDP_OK, server_port) over TCP
Client: COMM_TCP, STAT_SWITCH_UDP
Server: COMM_TCP
C tries to connect() to UDP port (from message)
if it fails, it resets state and sends REQ(COMM_TCP,0)
C sends REQ(COMM_VERIFY, 0) through UDP connection
if it times out, C will reset state and send REQ(COMM_TCP,0)
Client: COMM_UDP, STAT_VERIFY_UDP
Server: COMM_TCP
S gets the verification message and begins sending data down the UDP link
First packet is a REPLY(SWITCH_VERIFY,0) (to guarantee that something does
in fact get sent across the UDP connection). If the reply gets lost, and
nothing else gets sent via UDP for a while, the client will time out and
reset.
Client: COMM_UDP, STAT_VERIFY_UDP
Server: COMM_UDP
C gets an update on the UDP line
Client: COMM_UDP, STAT_CONNECTED
19
Server: COMM_UDP
[C can now begin sending data on the UDP line]
--- now switch back to TCP --C sends a REQ(COMM_TCP,0) [and stops sending data on the UDP line]
Client: COMM_UDP, STAT_SWITCH_TCP
Server: COMM_UDP
S checks it’s current mode:
if it’s already TCP, send REPLY(SWITCH_TCP_OK,0) and do nothing further
S closes its UDP socket, resets its mode to COMM_TCP, and sends a
REPLY(SWITCH_TCP_OK, 0)
Client: COMM_UDP, STAT_SWITCH_TCP
Server: COMM_TCP
C closes its UDP socket, and changes mode
Client: COMM_TCP, STAT_CONNECTED
Server: COMM_TCP
20
Development enviroment
Setting up subversion source version control for Mac OS X
MacTrek’s source base is located in the subversion repository. Changes must be
made on this repository in order to propagate to the client. The server is managed
ad-hoc outside SCM since it is the mere generation of the official server which is
under SCM at http://sourceforge.net/projects/netrek.
Installing XCode
First install XCode from your OS X cd or download it from the Mac OS X
developersite.
Installing the Subversion Software
This section shows how to install the server and client software of the Subversion
version control system in a computer, using DarwinPorts. DarwinPorts is an opensource project that simplifies the installation of UNIX software in several
platforms, including Mac OS X. To install DarwinPorts on your computer, go to
http://darwinports.opendarwin.org and follow the download instructions.
After installing DarwinPorts on your computer, you should add several
DarwinPorts paths to your environment. Adding these paths makes it easy to use
the DarwinPorts command-line tools. If you’re using bash, you need to edit (or
create) a file named .bash_profile at the root of your home directory. This is an
example .bash_profile file that adds the appropriate paths to your environment:
export PATH=$PATH:/opt/local/bin
export MANPATH=$MANPATH:/opt/local/share/man
export INFOPATH=$INFOPATH:/opt/local/share/info
After modifying your .bash_profile, you must start a new shell session to pick up
the changes. If you’re using Terminal, choose File > New Shell.
You should ensure that you have the latest version of DarwinPorts installed. To get
the latest version of the software, execute this command in Terminal:
% sudo port -d selfupdate
To install the Subversion software, execute this command in Terminal:
> sudo port install subversion
---> Fetching apr
---> Attempting to fetch httpd-2.0.53.tar.bz2 from http://www.apache.org/dist/httpd
---> Verifying checksum(s) for apr
---> Extracting apr
...
---> Installing subversion 1.1.4_0
---> Activating subversion 1.1.4_0
---> Cleaning subversion
Accessing the Subversion Repository
21
Subversion uses URLs (Uniform Resource Locators) to identify repositories. Using
URLs, you can work with several Subversion repositories at a time.
For repositories located on remote computers, Subversion offers a variety of
options; one of them is SSH. To access a repository on a remote computer using
SSH, use a URL such as the following:
svn+ssh://<computer_name>/<repository_root>/<project_path>
Before you can access a remote repository using SSH, you have to configure your
SSH environment.See “Configuring Your SSH Environment” for details.
Subversion and XCode
Configuring Repository Access
A managed project is one whose root directory is stored in a repository and whose
access is controlled by a version control system. Before you can work on a managed
project, you must check it out of the repository into a local copy.
After you check out a project directory, you must open the project in Xcode and
configure your repository-access settings. These include the name of the version
control system that manages the repository, the path to the client tool,
authentication information, and whether version control is active. Follow these
steps to configure your repository-access settings for a project:
1.
2.
3.
Open the project in Xcode.
Choose your version control system from the SCM System pop-up menu in the
General pane in the Project Info window
Tell Xcode how to use your client tool:
Click Edit and enter the path to the client program in the client configuration
dialog.
Note: Your client tool can be located anywhere in your file system. But you must
enter the appropriate pathname in the Tool Path text field.
4.
Activate version control for your copy of the project. Select Enable SCM in the
General pane in the Project Info window.
If you use SSH to access a Subversion repository, Xcode may ask you to enter your
passphrase in the Authentication dialog,
If Xcode is unable to talk to your client, a dialog describing the problem appears.
5.
Commit your user file to the repository.
22
Checking Out MacTrek From a Subversion Repository
To check out a project in a Subversion repository, use the svn checkout command.
Its syntax is:
svn checkout <repository> <target>
e.g.:
svn checkout https://mactrek.svn.sourceforge.net/svnroot/mactrek/trunk mactrek/
trunk
to work on a bugfix in the branch 1.1.0 try.
svn co https://mactrek.svn.sourceforge.net/svnroot/mactrek/branches/1.1.0 mactrek/
branches/1.1.0
Commiting your work
When ready commit your work using:
svn commit -m “I did good things mommy”
Sensible comments are greatly appreciated.
Checking the installation
Press build ?
Adding RSA code to your client
The first time you press build it will generate some warnings in old code (probably
LLSystemInformation.m) which is ok. It will also generate a warning, possibly an
error on RSAWrapper.m this is not ok, but cannot be helped.
By default MacTrek sourcecode is delivered without the RSA encryption
files. This is to avoid reverse enginering of the key or worse :-) So you will
either have to remove the RSA related files and comment out the
decoding in RSAWrapper.m or add your own RSA keys to MacTrek. This
paragraph describes how.
Generating a key
The hard way to generate a key is to get the RES-RSA package from http://
sourceforge.net/projects/netrek (MacTrek uses version 2.9.2) and in order to build it
you will need GMP (MacTrek uses 4.2) The easy way is to download the mkkey
utility from http://sourceforge.net/projects/mactrek
Then use the following command to generate the encryption box:
./mkkey key.mactrek-1.2.0.macosx “MacTrek 1.2.0” “Mac OS X (x86/PPC Universal)”
“[email protected]“ “http://sourceforge.net/projects/mactrek“
The tool will report something like:
23
mkkey version [RES-RSA 2.9.2: Mar. 13, 2000][GMP]
Source basename: “rsa_box”
Number of shells: 3
Number of steps between swaps: 2
Number of files: 5
Ratio of computation in files to main file: 0.8
Making new key, hold on....
Testing key .................................................. key seems OK
Writing...
128 bits left, 5 files left, 21 bits in rsa_box_0.c
106 bits left, 4 files left, 4 bits in main file
101 bits left, 4 files left, 21 bits in rsa_box_1.c
79 bits left, 3 files left, 5 bits in main file
73 bits left, 3 files left, 16 bits in rsa_box_2.c
56 bits left, 2 files left, 6 bits in main file
49 bits left, 2 files left, 18 bits in rsa_box_3.c
30 bits left, 1 files left, 5 bits in main file
24 bits left, 1 files left, 17 bits in rsa_box_4.c
The following files will have been added to your directory:
key.mactrek-1.2.0.macosx
key.mactrek-1.2.0.macosx.secret
rsa_box.c
rsa_box_0.c
rsa_box_1.c
rsa_box_2.c
rsa_box_3.c
rsa_box_4.c
The file key.mactrek-1.2.0.macosx contains your public key and is what you
should install on the server in order to get your client authenticated. The file
key.mactrek-1.2.0.macosx.secret should remain secret and you will probably
never need it.
The other files rsa_box* contain the logic that can give a proper response to a
RSA key challenge. You remember these files since the compiler already complained
to you about their absense. Copy them to the right place in order to get the
compiler satisfied, and your RSA decryption in place.
When your code is in e.g. ~/netrek/mactrek/trunk/ copy the rsa files in ~/
netrek/RSA-SECRET/
Now press compile and done. Send your key to [email protected] to
get it in the main key list. (check with: telnet clientkeys.netrek.org 3530)
24
Miscellaneous
Debugging (auto)release errors
It’s quite easy to release an object twice, causing MacTrek to crash somewhere else.
Quite difficult to detect, therefore create the following .gdbinit file in your home
folder:
1 -[NSException raise]
1 objc_exception_throw()
1 -[_NSZombie release]
1 szone_error
It will trigger the debugger with some very handy breakpoints. Now add a variable
to the startup enviroment in Xcode. Double click on MacTrek under executables.
Set the following var:
NSZombie=YES
Don’t forget to remove when ready, it’s quite a memory/performance hog.
25
Credits
For MacTrek and this guide:
• Chris Lukassen
This guide uses extensively parts from:
•
•
•
•
Cocoa Dev Centre
Apple XCode 2.4 user guide
SVN user manual
UDP explained by Andy McFadden
For MacTrek too many people were involved, see the User Manual for an attempt at
a complete list.
26
Appendix A
Importing Projects Into a Subversion Repository
To add a project directory to a Subversion repository, use the svn import command.
Important: Before adding a project directory to a repository, you should move or
delete the build
directory if it resides in the project directory. You should also move or delete any
other directories you don’t want to add to the repository. Otherwise, changes to
files in those directories are tracked by your version control system and added to
the repository.
The svn import command syntax is:
svn import -m “<import_comment>” <source> <repository>
For example, to import the project directory /Developer/Examples/Networking/
Echo into a local repository, issue the following commands in Terminal:
> svn import -m “Echo added to repository” /Developer/Examples/Networking/
Echo
file:///svnrep/Echo
Adding /Developer/Examples/Networking/Echo/EchoContext.c
Adding /Developer/Examples/Networking/Echo/main.c
...
Committed revision 1.
Configuring your SSH environment
This appendix explains how to configure SSH access from one computer (the
server) to another (the client) for a single user. This allows you to connect securely
from your workstation to the computer where your repository is located.
The server’s administrator must create a user account for you on that computer.
Make sure you can log in to the server.
% ssh [email protected]
[email protected]‘s password:
Last login: Thu Sep 30 15:56:52 2004 from xx.xx.xx.xx
Welcome to Darwin!
If it doesn’t already exist, create the .ssh directory in your home directory in the
server computer.
% mkdir ~/.ssh
% exit
Using the ssh-keygen command, create a public and private key pair and store it in
your home directory in the client computer:
% ssh-keygen -t dsa
Generating public/private dsa key pair.
Enter file in which to save the key (/Volumes/Athene/ernest/.ssh/id_dsa:
27
Enter passphrase (empty for no passphrase):
Enter same passphrase again:
Your identification has ben saved in /Volumes/Athene/ernest/.ssh/id_dsa.
Your public key has been saved in /Volumes/Athene/ernest/.ssh/id_dsa.pub.
The key fingerprint is:
##:##:##:##:##:##:##:##:##:##:##:##:##:##:##:##
[email protected]
% cd ~/.ssh
% ls
id_dsa id_dsa.pub known_hosts
Using the scp command, copy the public key file (id_dsa.pub) to your home
directory in the server as authorized_keys (unless the authorized_keys file already
exists there):
% scp id_dsa.pub [email protected]:~/.ssh/authorized_keys
[email protected]‘s password:
id_dsa.pub 100% 613 1.2MB/s 00:00
If the authorized_keys file already exists, add your public key to it using a text
editor.
Make sure you can connect to the server using your passphrase:
28
Appendix B
Releasing a new MacTrek Version
The release of a new version consists of several steps, and because there is
frequently something forgotten, a small procedure is established.
1. create a unique key for a release, patch versions can use the same
key (see chapter on RSA keys)
2. distribute this key, and verify it’s reception (otherwise the release is pretty
useless)
3. verify the release number in info.plist
4. update the user manual
a. change log
i. based on svn log -v
ii. based on bugtracker at sourceforge
b. describe new functionality
c. update screenshots
d. create a pdf
e. make sure the NSZombie var for the executable is disabled
(double click executables/mactrek in Xcode)
5. build the code as a release executable
6. verify the executable works
a. on intel
b. on ppc
c. on a clean mac
7. commit the code to the trunk of svn and create release branches (see
chapter on versioning)
8. update the release notes.txt if needed
9. create a suitable sized dmg (read-write)
10. set the background image
11. drag fonts, executable, user manual and release notes to the dmg
12. use disktool to create a read only copy
13. verify it works
14. upload to sourceforge:
a. make sure all files are unique and have no spaces in name
b. ftp -a upload.sourceforge.net
c. mput diskimage, usermanual
15. login to sourceforge create a new file release from package mactrek
16. add files, changelog and release notes
17. update website of mactrek
a. version number
b. changes
c. news
d. screenshots
18. upload website to sourceforge
19. trigger the maintainer of www.netrek.org
20. update the page at www.apple.com
21. go to sleep
29