1
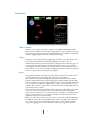
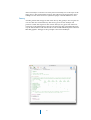
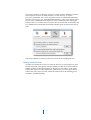
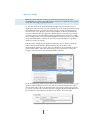
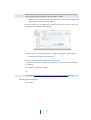
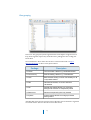
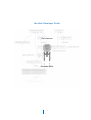
MacTrek Developer Guide
Chris Lukassen
December 2006
1
Table of contents
Introduction
.......................................................................................................... 3
What is Netrek?
........................................................................................................... 3
History
.......................................................................................................................... 3
Basics
............................................................................................................................. 3
Document structure
.................................................................................................... 4
Design Principles
.................................................................................................. 5
Frameworks
.................................................................................................................. 5
MVC
.............................................................................................................................. 5
Factory
.......................................................................................................................... 6
Notifications
................................................................................................................. 7
State machine
............................................................................................................... 7
Frameworks
........................................................................................................... 8
Getting the frameworks
.............................................................................................. 8
Setting up the frameworks
........................................................................................ 10
MacTrek Client
....................................................................................................12
Setting up subversion
................................................................................................. 12
Subversion for Mac OS X
.......................................................................................... 12
Subversion and XCode
............................................................................................... 13
Checking the installation
...........................................................................................14
Design
.................................................................................................................. 15
Class derivation
........................................................................................................... 15
Class grouping
............................................................................................................. 17
Coding guidelines
...................................................................................................... 20
Credits
.................................................................................................................. 21
Appendix A
..........................................................................................................22
Importing Projects Into a Subversion Repository
...................................................22
Configuring your SSH environment
......................................................................... 22
2
Introduction
What is Netrek?
Netrek is a free to play open source software cross platform multiplayer hybrid
multi-directional shooter and real time strategy game for up to 16 players. The goal
of the game is to capture all the opposing team’s planets. It combines “twitch” style
reflexive dogfighting with extensive team play and strategy.
History
Netrek has a development history beginning as far back as 1972 (Alto Trek). It was
also heavily influenced by the PLATO game Empire, written in 1978. It
substantially reached its current form and its peak player-base in the early 1990s as
a contemporary of XPilot but has dwindled steadily since then as more newbie
friendly games became available. It is no longer under active development, but its
client and server code still contain many design features that would be of interest to
amateur or professional network games developers.
Basics
The graphics of Netrek are simple top-down format. You have an external view of
your ship from above and the game map is laid out on a 2-D plane.
Two teams face off, each controlling an equal number of planets. Planets slowly
generate armies, which may be picked up by players. Enemy planets may be taken
over (or retaken) by dropping enough armies on them. Armies annihilate each other
on a 1 to 1 basis, so to take over a planet with 4 armies, you need to drop at least 5.
A planet with 0 armies is considered to be neutral and does nothing until someone
puts an army on it to claim it.
Planets can be bombed to kill off armies, but cannot be bombed if the army count
is 4 or less. Also, you can only pick up excess armies from your team’s planets,
where “excess” is defined as over 4. Some ships have the ability to randomly bomb 2
armies at a time instead of 1, so it would be possible to bomb an army down to a
population of 3 but never less than that.
Before you can pick up armies, however, you need a kill. You can obtain kills either
by killing an enemy ship or by bombing enemy armies. Your kill count resets back
to 0 every time you die. Consequently, people with 2 or more kills are generally
targeted for ogging just to remove the threat of them carrying armies around.
3
Document structure
Noter: This document serves as guide how to work with the MacTrek source code.
It will not describe how Netrek works, nor how the source code works, for the
latter i suggest you either download the code or take a look at the doxygen
description
In Chapter 2 the Design principles are explained. Chapter 3 explains how to get and
setup the perquisites to start working on MacTrek. Chapter 4 tells how to obtain
the client code, how install and work with it. Chapter 5 tells something about the
credits of this Manual and in Chapter 6 holds some appendixes which have no
direct bearing on MacTrek but may be very usefull.
4
Design Principles
Currently MacTrek uses a number of design patterns and different design
principles. If at first glance the structure may not seem directly related to a single
design pattern, the matter at hand is probably related to two or more patterns
applied simultaneously.
Frameworks
MacTrek makes heavily use of frameworks. Most operations that can be abstracted
and reused have been moved into the Luky framework branch. Currently this code
is directly accessible from XCode but when this framework has reached maturity it
can be moved to a separate project and managed separately. (as with the current
Java version of Luky) The same is true for Libgmp which handles the RSA
encryption.
MVC
The Model View Control pattern is at the very hart of the design.
The (data) Model that represents the current state of the MacTrek data is located in
classes in the folder “Data”. It consists of the MacTrek Universe class that is
populated with various planets, players, teams and weapons.
The View part is implemented in the NIB file. It holds most logic related to the
presentation of the MacTrek Universe. Most, but not all. In the folder Gui are
other classes that handle the response of View events and see to the population of
the various lists, or generate a (Tactical) Map picture.
5
The Control layer is scattered over many classes but mainly acts on the layer of the
“App” classes. They intermediate between data collection and presentation. Good
examples are the classes that store dynamic keymaps or handle MetaServer data.
Factory
Another pattern that emerges is that of the factory. The gui layer does not paint its
own view but uses a PainterFactory. This factory processes the datalayer and
produces a frame that represents the current data layer at a given time. There are
extentions on the PainterFactory that use the same logic but paint differently. This
way the Netrek Painter will draw netrek artwork and the MacTrek painter will draw
MacTrek graphics. Analogue to this principle is also the SoundPlayer.
6
Threading
MacTrek is multi threaded. Its communication is isolated to a single thread that
updates the universe and can be locked. The drawing is done in another thread and
the playing of sounds is done in dozens of threads. (at least 1 per sound)
Notifications
The core of MacTrek is the NotificationCenter. Since the design in threads leads to
isolated bits of code there is a need for communication between the parts of the
code. The communication thread may learn to know new information about the
player that results in a new galactic picture, and update of the speed or hull meters
in the dashboard or maybe the presentation label.
MacTrek uses a notificationCenter to generate events. An event consists of a key
and user data. Everywhere in the code, the programmer can subscribe to events and
connect his methods to the event. Causing specific bits of code to be called when
an event occurs, without knowing, where the event occurred.
State machine
MacTrek uses an internal state machine to know if a game can begin or not.
Whether the user will login first or if a ship still needs to be selected.
7
Frameworks
This chapter describes how you can setup the non-apple frameworks in order to be
used in MacTrek.
Design
Currently MacTrek requires the following build in frameworks: (come with 10.4)
•
•
•
•
•
•
Quartz
Quicktime
QT
Cocoa
IO
Carbon
and the following external frameworks:
•
•
OmniBase
OmniNetwork
The external frameworks are required for the classes ONTCPSocket (and UDP
too) which are in OmniNetwork, which in it’s place require OmniBase.
Getting the frameworks
A description of each framework can be found here: http://www.omnigroup.com/
community/developer/sourcecode/. These frameworks are free of charge and
covered by the Omni Source License.
Getting and Preparing to Build OmniFrameworks
The frameworks can be downloaded from Omni Group’s ftp server. Grab all the
compressed (.tar.gz) files in this directory: ftp.omnigroup.com/pub/software/Source/
MacOSX/Frameworks. I suggest placing them all in a temporary directory in your
home folder. Then uncompress the files using an app like OpenUp or from the
command line.
The files we have just downloaded contain the source code of the frameworks.
Before we can actually use the frameworks in our applications we must build the
frameworks. To make this easier we will need to make a few temporary changes to
the Project Builder (or XCode) preferences.
8
Open Project Builder (or XCode)’s preferences window. Select “Building” and then
select “Seperate location for build products”. Set the directory to “/Users/
your_user_name/Build”. Also select “Seperate location for intermediate build files”
and enter “/Users/your_user_name/Build/Intermediates”. These steps must be taken
because some OmniFrameworks depend on other OmniFrameworks. Placing the
build products in a common directory means that the frameworks we build first will
be available when we build later frameworks which depend on frameworks already
built.
Your Project Builder (or XCode) preferences should look something like this.
Building OmniFrameworks
To build each framework you have to enter the directory you uncompressed, open
the file framework_name.pbproj in Project Builder (or XCode), and then click the
hammer (build) icon in Project Builder (or XCode). As stated above, some of the
frameworks depend on other frameworks, which means you cannot just build the
frameworks in any order you wish. I built the frameworks in the following order:
OmniBase, OmniNetworking.
9
Setting up the frameworks
Framework Settings
First off, we need to make some changes in your framework’s build settings. Open
your framework project file in Project Builder (or XCode) and switch to the
“Targets” tab in the left-hand pane. Select the target from the resulting list on the
left to edit its settings. On the right, you’ll see several tabs for the different settings.
Click on the “Build Settings” tab and scroll down to the “Installation Location”
heading. As you can see in Figure 2, we need to change the path field to
@executable_path/../Frameworks. This lets the framework know that it will be
placed inside an application bundle. (Note that in reality the executable is located
in MyApp.app/Contents/MacOS/MyApp, so @executable_path/../Frameworks
translates into MyApp.app/Contents/Frameworks.)
Now, continue to scroll down to “Linker Settings.” Make sure the “Prebind”
checkbox is selected, as this will enable your application to launch faster. To make
sure that prebinding actually works, we’ll need to change the preferred address of
our framework. By default, it’s set to 0x00000000, which means it will overlap
with the application you want to use it with, since all executables start at that
address. To avoid this problem, you need to add a linker flag called -seg1addr
my_address_here. In place of my_address_here, you need to specify an address in
the range of 0x00000000 to 0x3FFFFFFF, as well as anything above
0x900000000 (the remaining addresses are reserved by Apple). Obviously using
0x00000000 would be pointless, so you should try something like -seg1addr
0x10000000 or above.
Well, that’s it for this part. Don’t forget to build the framework when you’re
finished. I also recommend you take a look at the notes about prebinding over on
Apple’s developer site if you want to know more about it.
10
Application Settings
Note: By default MacTrek includes the frameworks automatically. And the
resulting files are copied to the right location. However to explain how the system
works. The following paragraph is included.
So, now that we have the framework built the right way, you can add it to your
application. Add it the same way you would add any of the Apple frameworks (using
the “Add Frameworks...” item located in the “Project” menu). Unfortunately, that
isn’t the end of it yet. We need to have Project Builder (or XCode) automatically
copy our framework into the application bundle when it’s built (more specifically,
we want it placed in the MyApplicationHere.app/Frameworks directory). Luckily,
this isn’t all that hard to do, since Project Builder (or XCode) provides a very handy
“Copy Files Build Phase.” This will do is exactly as the name implies: copy files to
whatever location you specify.
Edit the target settings of your application (the same way we did above with the
framework) and click the “Files & Build Phases” tab. Scroll down to the
“Frameworks & Libraries” section. There you should see the framework we added
earlier, among others. Select that framework, go up to the “Project” menu, and
navigate your way down to the “New Build Phase” submenu.
In the resulting “Copy Files” section, choose “Frameworks” from the “Where:” popup menu. The last thing we need to do is add the actual framework to the “Files:”
list. Click the “Files” tab on the left-hand pane of the project window (to get back
to your list of project files) and then proceed to drag the MyFramework.framework
file (or whatever your framework is called) to the “Files:” list on the right.
11
MacTrek Client
Setting up subversion
MacTrek’s source base is located in the subversion repository. Changes must be
made on this repository in order to propagate to the client. The server is managed
ad-hoc outside SCM since it is the mere generation of the official server which is
under SCM at http://sourceforge.net/projects/netrek.
Subversion for Mac OS X
Installing XCode
First install XCode from your OS X cd or download it from the Mac OS X
developersite.
Installing the Subversion Software
This section shows how to install the server and client software of the Subversion
version control system in a computer, using DarwinPorts. DarwinPorts is an opensource project that simplifies the installation of UNIX software in several
platforms, including Mac OS X. To install DarwinPorts on your computer, go to
http://darwinports.opendarwin.org and follow the download instructions.
After installing DarwinPorts on your computer, you should add several
DarwinPorts paths to your environment. Adding these paths makes it easy to use
the DarwinPorts command-line tools. If you’re using bash, you need to edit (or
create) a file named .bash_profile at the root of your home directory. This is an
example .bash_profile file that adds the appropriate paths to your environment:
export PATH=$PATH:/opt/local/bin
export MANPATH=$MANPATH:/opt/local/share/man
export INFOPATH=$INFOPATH:/opt/local/share/info
12
After modifying your .bash_profile, you must start a new shell session to pick up
the changes. If you’re using Terminal, choose File > New Shell.
You should ensure that you have the latest version of DarwinPorts installed. To get
the latest version of the software, execute this command in Terminal:
% sudo port -d selfupdate
To install the Subversion software, execute this command in Terminal:
> sudo port install subversion
---> Fetching apr
---> Attempting to fetch httpd-2.0.53.tar.bz2 from http://www.apache.org/dist/httpd
---> Verifying checksum(s) for apr
---> Extracting apr
...
---> Installing subversion 1.1.4_0
---> Activating subversion 1.1.4_0
---> Cleaning subversion
Accessing the Subversion Repository
Subversion uses URLs (Uniform Resource Locators) to identify repositories. Using
URLs, you can work with several Subversion repositories at a time.
For repositories located on remote computers, Subversion offers a variety of
options; one of them is SSH. To access a repository on a remote computer using
SSH, use a URL such as the following:
svn+ssh://<computer_name>/<repository_root>/<project_path>
Before you can access a remote repository using SSH, you have to configure your
SSH environment.See “Configuring Your SSH Environment” for details.
Subversion and XCode
Configuring Repository Access
A managed project is one whose root directory is stored in a repository and whose
access is controlled by a version control system. Before you can work on a managed
project, you must check it out of the repository into a local copy.
After you check out a project directory, you must open the project in Xcode and
configure your repository-access settings. These include the name of the version
control system that manages the repository, the path to the client tool,
authentication information, and whether version control is active. Follow these
steps to configure your repository-access settings for a project:
1.
2.
3.
Open the project in Xcode.
Choose your version control system from the SCM System pop-up menu in the
General pane in the Project Info window
Tell Xcode how to use your client tool:
Click Edit and enter the path to the client program in the client configuration
dialog.
13
Note: Your client tool can be located anywhere in your file system. But you must
enter the appropriate pathname in the Tool Path text field.
4.
Activate version control for your copy of the project. Select Enable SCM in the
General pane in the Project Info window.
If you use SSH to access a Subversion repository, Xcode may ask you to enter your
passphrase in the Authentication dialog,
If Xcode is unable to talk to your client, a dialog describing the problem appears.
5.
Commit your user file to the repository.
Checking Out MacTrek From a Subversion Repository
To check out a project in a Subversion repository, use the svn checkout command.
Its syntax is:
svn checkout <repository> <target>
e.g.:
svn checkout https://mactrek.svn.sourceforge.net/svnroot/mactrek mactrek
Checking the installation
Press build ?
14
Design
Class derivation
Objective – C software usually leads to very flat design. This is mostly because of
the delegate pattern that is used extensively in the Gui classes. It avoids sub classing
in most cases. In order to maintain the possibility to expand easily to all classes,
base classes have been defined.
The SimpleBaseClass has currently no logic and is a skeleton class. The BaseClass
derived classed share access to the default notificationCenter and have a single
access point to the universe.
15
The Classes in the universe are very well represent able using an hierarchy of
classes. All elements are entities and share parameters as speed and position.
Weapons and projectiles share other elements.
As of MacTrek 1.1.0 A Tracker is closely related to the entity class and allows for the
prediction of position based on the timestamp of the last received update. At the
time of writing it is best left off since the prediction is not smoothed out and causes
the the display to wobble with a sawtooth pattern.
The figure above shows the universe population hierarchy
16
Class grouping
Classes are also grouped by their logical function. This implies a logical reason to
keep them together (in Java they would become a package) but now coding rule
binds them.
General Libraries. These will in the future be released under LGL on http://
luky.sourceforge.net as their current Java brethern.
Package
Description
LLComm
Communication classes e.g. NotificationCenter
LLConcurrency
Multi-Threading classes e.g. ThreadWorker
LLCore
Base classes holding common functionality for all
Luky based classes
LLGeo
Geometrical classes, for vector and other
calculations
LLGui
Special GUI based classes e.g. full screen
background windows or transparent panels
LLResources
Resources required by the Luky classes
LLSystem
System based classes to manage processes
among others.
The MacTrek classes heavily depend on these libraries and are themselves organised
in a similar matter. (Need to be refactored to MT classes)
17
Package
Description
App
All control classes. These classes know nothing
about the visual layer but do know how to
manipulate internal data or events. Like te
LoginManager or KeyMap
Comm
Communication based classes read and write
UDP or TCP messages and translate them into
events. The class Communication is the centre
point and controls the separate communication
thread.
Data
It holds the universe and more. All classes related
to what happens out there. The status of the
players, planets etc.
Generic
BaseClasses as explained before
Gui
The control classes that know about the visual
layer. The are instantiated in the Interface builder
and added to the NIB. You will find separate
controllers for all menus and the centre of
operations in this group is the GuiController. It
contains the state diagram that makes the
application switch states.
Message
Netrek supports RCM messaging. However, this is
only partly implemented in MacTrek. There
classes should convert normal messages in RCM
and vice versa.
Other
Required classes for any Objective-C project like
main.c (duh)
Painter
The painters do the actual drawing based on the
resources they may have. The root class draws
simple shapes, it’s children use images to create
fancier output. It also holds the logic to switch
frames in more advanced drawing like explosions.
RSA
All encryption based classes. Note that there are 4
classes missing from svn that hold the actual
decryption key. Use res-rsa-2.9.2 from http://
sourceforge.net/projects/netrek to generate these.
Sound
The soundplayer family and support classes. A
multithreaded entity that plays many sounds
simultaneously inherit to create additional FX
schemes
Tracker
Experimental class to see if TCP lag can be
compensated with tracking. Not very successful
with alpha tracking, may switch to Lagrange
polynoms in the future
18
Package
Views
Description
This is where in and output is handled. Every 1/
FRAME_RATE seconds a new view is generated
and it also handles the keys that are pressed. It
uses the painter to actual generate the image to
be drawn to the screen.
19
Coding guidelines
SCM
Only code that is checked in/out using SCM is accepted as a valid change.
Descriptions should be precise and every file you check in must be verified and
compile-able before checking in.
Syntax
We follow the Apple style of coding (e.g. setVar, var (not getVar)) with one
exception: Java style brackets are used.
Manager/Controller
Controller classes control parts of the code that have no user interaction. e.g. the
LoginController handles the control logic in communication with the server. It uses
the Communication class to abstract the actual traffic encapsulation.
Manager classes manage part of the Gui. e.g. the LoginManager manages the
interaction with the user. It tells the controller class what has happened and the
controller will find the proper reply.
The Gui Manager is a special manager that manages the game state based on the
state diagram. It is the central spider that acts mainly on events in the system and
controls for example the state of the display (menus, outfit, game etc)
Theme ability
MacTrek makes it easy to add new sound or graphic themes. All you need to to is
override the PainterFactory or SoundPlayer classes and add your custom artwork.
For sound you are required to override the loadSounds method. For graphics
specific methods like drawPlayer need to be overridden.
The figure above shows the class hierarchy for PainterFactory in MacTrek 1.1.x
20
Credits
This guide uses extensively parts from:
•
•
Cocoa Dev Centre
Apple XCode 2.4 user guide
For MacTrek too many people were involved, see the User Manual for an attempt at
a complete list.
21
Appendix A
Importing Projects Into a Subversion Repository
To add a project directory to a Subversion repository, use the svn import command.
Important: Before adding a project directory to a repository, you should move or
delete the build
directory if it resides in the project directory. You should also move or delete any
other directories you don’t want to add to the repository. Otherwise, changes to
files in those directories are tracked by your version control system and added to
the repository.
The svn import command syntax is:
svn import -m “<import_comment>” <source> <repository>
For example, to import the project directory /Developer/Examples/Networking/
Echo into a local repository, issue the following commands in Terminal:
> svn import -m “Echo added to repository” /Developer/Examples/Networking/
Echo
file:///svnrep/Echo
Adding /Developer/Examples/Networking/Echo/EchoContext.c
Adding /Developer/Examples/Networking/Echo/main.c
...
Committed revision 1.
Configuring your SSH environment
This appendix explains how to configure SSH access from one computer (the
server) to another (the client) for a single user. This allows you to connect securely
from your workstation to the computer where your repository is located.
The server’s administrator must create a user account for you on that computer.
Make sure you can log in to the server.
% ssh [email protected]
[email protected]‘s password:
Last login: Thu Sep 30 15:56:52 2004 from xx.xx.xx.xx
Welcome to Darwin!
If it doesn’t already exist, create the .ssh directory in your home directory in the
server computer.
% mkdir ~/.ssh
% exit
Using the ssh-keygen command, create a public and private key pair and store it in
your home directory in the client computer:
% ssh-keygen -t dsa
Generating public/private dsa key pair.
Enter file in which to save the key (/Volumes/Athene/ernest/.ssh/id_dsa:
22
Enter passphrase (empty for no passphrase):
Enter same passphrase again:
Your identification has ben saved in /Volumes/Athene/ernest/.ssh/id_dsa.
Your public key has been saved in /Volumes/Athene/ernest/.ssh/id_dsa.pub.
The key fingerprint is:
##:##:##:##:##:##:##:##:##:##:##:##:##:##:##:##
[email protected]
% cd ~/.ssh
% ls
id_dsa id_dsa.pub known_hosts
Using the scp command, copy the public key file (id_dsa.pub) to your home
directory in the server as authorized_keys (unless the authorized_keys file already
exists there):
% scp id_dsa.pub [email protected]:~/.ssh/authorized_keys
[email protected]‘s password:
id_dsa.pub 100% 613 1.2MB/s 00:00
If the authorized_keys file already exists, add your public key to it using a text
editor.
Make sure you can connect to the server using your passphrase:
23