1
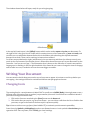
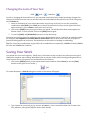
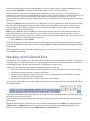
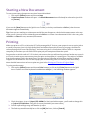
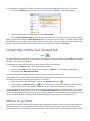
IT Services Microsoft Word 2007™ An Essential Guide (Level 1) Contents Introduction ..............................................................................................................1 Logging on to an IT Services Managed Computer ......................................1 Using the Mouse, Keyboard and Windows ....................................................1 Starting Microsoft Word .......................................................................................1 Writing Your Document .......................................................................................2 Changing Fonts ........................................................................................2 Changing Font Size .................................................................................3 Entering Your Text ..................................................................................3 Correcting Mistakes ...............................................................................3 Aligning Text on the Page ....................................................................4 Altering Line Spacing .............................................................................4 Changing the Look of Your Text ........................................................5 Saving Your Work ....................................................................................................5 Working with Selected Text ................................................................................6 Selecting the Text ...................................................................................7 Cut, Copy and Paste ................................................................................7 Making Multiple Copies and the Clipboard ..................................8 Drag and Drop ..........................................................................................8 Further Formatting ..................................................................................................9 Bulleted and Numbered Lists .............................................................9 Correcting Spelling and Grammar ....................................................................9 Closing a Document ............................................................................................ 10 Opening an Existing Document ...................................................................... 11 Starting a New Document ................................................................................. 12 Printing ..................................................................................................................... 12 Using Help and the Get Started Tab .............................................................. 13 Where to go Next ................................................................................................. 13 Leaving Microsoft Word ..................................................................................... 14 Logging Out ............................................................................................................ 14 Introduction These notes are designed to cover the essential features of Microsoft Word. It covers everything which all users should know, whether they are complete beginners or are already reasonably familiar with Word. Once you have made sure you know the fundamentals, take a look at the intermediate level guide, Microsoft Word 2007: An Intermediate Guide. Logging on to an IT Services Managed Computer If you are using an IT Services PC running Windows XP, you will first need to start up the computer. Even if the screen is black, the computer should be running. 1. Press any key to activate the computer 2. If the screen still remains black, check the last user hasn't turned off the monitor or PC 3. Next press <Ctrl Alt Delete> - ie hold down both the <Ctrl> and <Alt> keys and press <Delete> You should now be able to login: 4. Enter your username and password into the boxes on the screen (the <Tab> key - the key immediately above <Caps Lock> on the far left of the keyboard – can be used to move between the boxes) 5. Press <Enter> or click on [OK] Using the Mouse, Keyboard and Windows The mouse has two buttons separated by a central scrolling wheel. Throughout this course, always press the left mouse button when told to click on a tab or command button (unless explicitly told to right click, in which case press the right mouse button). If you haven't used a keyboard before you may think the order of keys is confusing. Don't worry about this you soon get used to it. It is in fact designed for touch typing (using all fingers), with the most frequently-used keys in convenient positions. If you need an introduction to the keyboard or would like to learn how to type properly, go to Accu-Type training under Teach Yourself via the Start menu and All Programs. For further details see the Using the Keyboard Quick Guide. To get CAPITAL LETTERS you can use the <Caps Lock> key but this is only really used for typing everything in upper case. If you require just a single letter (or a character above the numbers on the top row) then hold down the <Shift> key (immediately above <Ctrl> on both the left and right) as you press the relevant key. If you are not familiar with the Microsoft Windows XP then have a look at the Microsoft Windows XP Beginners’ Guide. Starting Microsoft Word To load Microsoft Word: 1. Click on the Start menu in the bottom left corner of the screen 2. Choose All Programs then Microsoft Office (from the sub-menu which appears) 3. Finally click on Microsoft Office Word 2007 Tip: You'll probably be using Word quite frequently in the future, so it's worth putting it as an icon on the Desktop. To do this, repeat the above steps, but at the last step, right click (ie press the right mouse button) and choose Send To followed by Desktop (create shortcut). To load Word in future, simply double click on the Desktop icon. 1 The window shown below will open, ready for you to begin typing. Office Button In the top left-hand corner is the [Office] button which can be used to open and print your document. To the right of this is the Quick Access Toolbar which contains icons to a few commands, eg save and undo, and to which you can add further buttons. Below this is the Ribbon, with tabs along the top and command buttons on each tab. These can be used to give instructions to Word. Scroll bars are provided on the right (and bottom) to let you move up and down (or sideways across) your work. At the very bottom of the window, there is information about where you are in your document on the Status Bar - here you are on Page 1. The information that is shown on the Status Bar is a word count and the language you’re working in. On the right-hand side of the Status Bar are icons to change the view of the page, and to zoom in or out, ie make the text on the screen bigger or smaller. Writing Your Document You next need to decide how you want the rest of your text to appear. It's easiest to set this up before you start typing - the settings will then be carried forward from one paragraph to the next. Changing Fonts Font The starting font for a new document in Word 2007 is usually set to Calibri (Body). You might want to use a different style of lettering (font or typeface) to personalise your work. Several fonts are available in Word. If you want to change the current font: 1. Click on the list arrow attached to the [Font] button on the Home tab 2. Click on the font you require, eg Times New Roman – you can either scroll down the list to find the font you want, or type in the name of the font to pick it up more quickly Tip: It's best to stick to true-type fonts (those labelled TT) to maintain your document's portability. Some fonts (eg Symbol and Wingdings) produce non-Roman letters or iconic symbols. Courier New gives a typewriter font. Sans-serif fonts, such as Ariel, give clear headings. 2 Changing Font Size Font Size Generally a point size of 10, 11 or 12 is used for the body of the text while point sizes of 13 to 16 are used for headings. The current size (11) is shown in the font size box. To alter this: 1. Click on the list arrow attached to the [Font Size] button on the Home tab 2. Click on the size you require - for example, 12 Tip: You can also type the number directly into the font size box (press <Enter> to set it). This allows you to select a font size not in the list, for example 13 or a bigger number if you want very large characters. Entering Your Text 1. Type in a few words, pressing the <spacebar> once after each word to separate them (the spacebar is the long key along the bottom of the keyboard) If you are not very fast at typing just type some imaginary words, pressing keys at random, but remember to include spaces between your words. Remember that if you want to improve your typing, there is an AccuType training tutorial on the IT Services PCs (you can also buy a copy for a personal computer). 2. Continue typing across the screen - the words will automatically spill onto a new line when you reach the right-hand side (this is known as wraparound) 3. Continue typing until you have at least three lines of words then press <Enter> to mark the end of the paragraph (this is the upside-down L-shaped key on the right of the main keyboard – it is also located on the far right of the keyboard, in the numeric keypad, with the word Enter written on it) IMPORTANT: When using a word processor, do NOT press the <Enter> key at the end of each line. If you need your work double spaced (each line followed by a blank line) then you simply change the paragraph's line spacing - this is covered later on. Press <Enter> only when you want to start a new paragraph. A jagged red (or occasionally green) line may appear beneath your text. Don't worry about this - Word is telling you that what you typed is not recognised (the words are not in the dictionary) or that the grammar may be incorrect. You learn more about this later. Tip: Never press the <spacebar> or <Enter> key more than twice in succession. In particular, do not use spaces to centre a heading or line up words in columns, or to add extra blank lines to force a heading onto a new page. There are special key presses that do this for you (tabs and hard page breaks) that are covered in our Microsoft Word Intermediate Guide. 4. Practice typing a couple of extra paragraphs, pressing <Enter> at the end of each Correcting Mistakes Don't worry if you go wrong, as it is very easy to correct your work. The <Backspace> key (immediately above <Enter> in the main section of the keyboard) can be used to delete the last character(s) typed. 1. Press <Backspace> a few times and note what happens You should have noticed a flashing vertical bar on the screen at the end of your work. This marks the insertion point. Anything that you type will always appear at the insertion point. You can move the insertion point around your work by using the arrow keys to the right of the main keyboard. You can also change its position by moving the mouse pointer on the screen and clicking where you want the insertion point to be. 2. Press the <arrow> keys to move the insertion point around - note that you can hold down a key to move more rapidly 3. Move the mouse to position the pointer in the middle of a paragraph and click on the mouse button the insertion point should have moved to where you clicked 3 4. Type in some more words - watch how the text which follows moves sideways to make room for the new words As the text moves, the following lines of the paragraph are redrawn automatically. Within a paragraph, the <Backspace> key works as before but you can also remove characters forwards: 5. Press the <Delete> key (immediately to the right of <Enter>) a few times and note what happens Here you are only practicing on text you do not need to keep, but you may accidentally delete words that you needed. Do not panic! If you ever make a mistake when using Word then you can undo your error by using the [Undo] button. Undo This can be found on the Quick Access Bar in the top left-hand corner. The undo button can be used more than once, to undo a series of actions, one at a time. 6. Click on the [Undo] button several times to see its effect Note: There's also a [Redo] button (to the right of [Undo]) if you accidentally undo too much! Tip: Word lets you use control key combinations to issue commands from the keyboard. The combination <Ctrl z>(hold down <Ctrl> and press <z>) can be used to undo something. <Ctrl y> can be used for redo. Aligning Text on the Page Align Left - Centre - Align Right - Justify - With Microsoft Word, it's easy to change the appearance of your work. Changes to the way a paragraph is laid out can be made by first moving the insertion point into that paragraph (anywhere will do). You can then decide how you want your paragraph to look. 1. Move the insertion point into the paragraph you want to change When typing a document you normally want text to align on the left-hand side of the page. Some people prefer text to be fully justified - this is where text aligns both left and right. You can also align text to the right (eg for an address) or to the centre (eg for a title or heading). You can use the buttons shown above (they are on the Home tab in the Paragraph group) to control how text is aligned on the page. 2. Try out all four justification buttons (or use <Ctrl l>, <Ctrl e>, <Ctrl r> and <Ctrl j>) - note that only the current paragraph is affected; each paragraph has its own justification setting Tip: If you like justified text, consider turning on hyphenation. This automatically splits a long word at the end of a line in two, improving the layout considerably. To turn this on, click the Page Layout tab, then the [Hyphenation] button in the Page Setup group and choose Automatic. Altering Line Spacing Line Spacing Sometimes you might be asked to double space your work (or use some other spacing). You might even choose to have a quotation (for example) one-and-a-half spaced, with the rest of your text double spaced. You should still be in the paragraph where you tested the different justification settings. 1. Click on the list arrow attached to the [Line Spacing] button in the Paragraph group 2. Select 2.0 for double spacing Tip: You can also use <Ctrl 2> (hold down <Ctrl> and press <2>) for double, <Ctrl 1> for single and <Ctrl 5> for one-and-a-half spacing. <Ctrl 0> adds a blank line before a paragraph. 4 Changing the Look of Your Text Bold - Italic - Underline - As well as changing the font and font size, you can make some other fairly simple formatting changes that change the look of your text. Here try out the bold, italic and underline buttons which are in the Font group on the Home tab. 1. Move to the bottom of your current document. A quick way to do this is to use the control key combination <Ctrl End> (the <End> key is located in the block of six keys to the right of the main keyboard letters). Press <Enter> until you’re on a new line 2. Click on the [Bold] button and type in some new words. You will find that these words appear in a blacker colour. To turn off bold, click on the [Bold] button again 3. Try out the [Italic] and [Underline] buttons as in the above step Note that you can have your text with more than one of these options set on - bold italic or underlined italic, for example. For emphasis, it is usually best to stick to bold. Italic is often used in the title of a paper or journal in bibliographies or references, and underline can be used for a heading or subheading. Tip: The control key combinations to get bold, italic or underline are respectively, <Ctrl b> for bold, <Ctrl i> for italic and <Ctrl u> for underline. Saving Your Work You should save your work regularly - ideally every 10 minutes so that you don't lose what you have typed should the computer stop working. Word does have an autosave facility which should guard against loss of work; however this is not a proper save and should not be relied on. 1. Click on the [Office] button in the top left-hand corner and then choose Save (or use the [Save] button on the Quick Access Toolbar ) For a new document, a Save As dialog box similar to that below will appear: 2. Type a name for your work (eg my first document) - there's no need to clear the File name: box first; whatever you type will replace what's there already 5 Note: you should mainly use letters and numbers for your file names (spaces, hyphens and underscores are also permitted); DO NOT use any other punctuation marks as they can cause problems. Your work will be saved to My Documents, which has been set up to be on drive N: on the computers on campus. This is an area on the network where you can save your own work, known as your home directory. No one else has access to your home directory; you connect to it whenever you logon to an IT Services computer. Backup copies of the files in your home directory are made hourly, so you should never lose any of your work. Though the [Save] button shows a picture of a floppy disk, it is NOT a good idea to work directly from floppy. They can easily be damaged (or lost) and work can be corrupted if they become full. We recommend you only use floppy disks to move your files from one computer to another (this also applies to more modern media such as memory sticks and CDs). Note: By using Save As rather than Save, you can save your work as a Word 97-2003 document so that it is compatible with earlier versions of Word. This will make it easier for anyone who has an older version of Word to open the document. However, any features that are only available in Word 2007 may not be saved (a warning will come up to say which features these are). 3. Press <Enter> or click on [Save] Once you have given your document a name, this will appear (instead of the original name, eg Document1) at the top of the Word window. Note that the extension .docx (or .doc for Word 2003 documents) is added automatically. Tip: It is a good idea to save your work regularly (eg every 10 minutes or so). The easiest way to do this is to press <Ctrl s> periodically. Working with Selected Text Selecting text is very important as it identifies which section of text you want Word to modify. It can be used to change how some text looks, to move or copy text within a document, between documents or between different applications (eg Word and PowerPoint), and to delete or replace text. A simple way to select part of your text is by dragging through it as follows: 1. Move the mouse so that the pointer on the screen is at the start of the text that you want to change 2. Hold down the mouse button, and keep it held down 3. Drag the mouse sideways to move the pointer to the end of the text that you would like to change – the selected text now has a blue background 4. When you are happy with your selection, release the mouse button You may have noticed that a set of option buttons have appeared just to the right of your selected text like in the example below: These different buttons immediately allow you to change the look of the selected text, eg make it bold, alter the font or size, turn it into a list etc. If you accidentally go wrong and select the wrong text, click the mouse once (this will release the selection) and try again. Tip: Minor adjustments to a selected area can be made by holding down the <Shift> key and pressing the <left arrow> or <right arrow> key. This method can also be used instead of dragging through the text. Rows of text can be selected using the <down arrow> or <up arrow> keys. 6 Tip: If ever you want to replace some words with something different, simply select the words to be replaced and then type the new ones (the selected text automatically disappears). You can also delete a section of text by first selecting it and then pressing the <Backspace> or <Delete> key. Selecting the Text Selecting can be done in several different ways, depending on how much text is involved. Any selected text can be de-selected by clicking on the mouse button once. Try out the following: A single word - point to it using the mouse then double click on the mouse button - your selected word should be highlighted. Click once on the mouse to de-select it A single line - position the mouse pointer in the left-hand margin (where its shape changes to an arrow pointing inwards) and click once A whole paragraph - either double click in the left margin or click three times within the text The whole document - either click three times in the left margin or press <Ctrl a> A sentence - hold down <Ctrl> and click anywhere within the sentence A short piece of text - drag through the text to be selected A long piece of text - click at the start of the text to be selected then move down, using the scroll bars, and hold down <Shift> as you click at the end of the selection To modify an existing selection - hold down <Shift> and use the arrow keys Cut, Copy and Paste Cut - Copy - Paste - Format Painter - The above buttons are visible on the far left of the Home tab in the Clipboard group. Moving text around a document is done by: i. Selecting it ii. Cutting or copying it from its present position iii. Pasting it back to its new one You can copy information within the same document, from one document to another, or from one program to another (for example, text on a web page can be copied into your Word document). 1. Move to the top of your document (pressing <Ctrl Home> takes you straight there) and select the first paragraph of text (double click at the left or three times within the paragraph) 2. Click on the [Cut] button and the paragraph will disappear - do not be alarmed, it has not been lost, but has been copied onto the clipboard 3. Move the insertion point down to the end of your text (pressing <Ctrl End> moves you straight there) – add a new line if necessary by pressing <Enter> 4. Click on the [Paste] button - your original paragraph will be pasted into its new position Tip: You can also use <Ctrl x> to issue a cut command - <Ctrl c> gives copy; <Ctrl v> paste. You’ll find that a paste options icon appears next to the pasted text – clicking on this will give further options to how you want the pasted text to look (leave it as Keep Source Formatting - it won’t disappear until you do something else like adding some more text). 7 Note: You can also use right click on selected text and choose Cut or Copy from the shortcut menu, then move to the new position and finally right click there and choose Paste from the shortcut menu. Note also the [Format Painter] button. This is used to copy the format (font and/or paragraph settings) from one piece of text to another: 5. Select the text (or paragraph) whose format you wish to copy - try the text you made bold earlier 6. Click on the [Format Painter] button (the pointer becomes a paintbrush) 7. Drag through another piece of text - release the mouse button and it too becomes bold This can be especially useful in the case where you notice that a paragraph looks different from the rest of the paragraphs on that page, maybe because it is in a different font. You can use the [Format Painter] button to quickly correct this problem. Making Multiple Copies and the Clipboard When making multiple copies of text, you normally Copy rather than Cut it to the clipboard: 1. Select some text (a few words will do) and click on the [Copy] button (or press <Ctrl c> or right click and choose Copy) 2. Your original text will remain where it is, but a copy of it has been placed on the clipboard 3. Move the insertion point to where you want to paste the text 4. Click on the [Paste] button (or press <Ctrl v> or right click and choose Paste) 5. Repeat the above step and a second copy of the text will appear The clipboard, which is normally hidden, will only store the last item that you cut or copied but, after displaying it, up to 24 items can be stored on it. To display the clipboard: 6. Click on the Clipboard group arrow just below the [Format Painter] button – this will open the Office Clipboard in a Task Pane on the left 7. Select another part of your text and [Copy] it - watch it appear on the clipboard 8. Move the insertion point then click on the new clipboard entry to paste it into your text 9. Repeat the above step but click on the original clipboard entry You won't need to paste any of the text again, so it's a good idea to empty the clipboard: 10. Click on the [Clear All] button in the Clipboard pane 11. Close the Task Pane by clicking on its [Close] button (the little x in the top right corner) Drag and Drop If you wish to move text a short way then you can use the drag and drop technique: 1. Select some text - a few words is sufficient 2. Move the mouse pointer into the highlighted area then hold down the mouse button (the pointer becomes an arrow with a box attached and in the left-hand corner of the Status Bar at the bottom of your Word window it says Move to where?) 3. Keeping the mouse button held down, drag the text to a new place in your document (as you move the cursor a faint dotted line appears - this is where the selected text will be dropped) 4. Release the button - the text will be moved to its new position 5. Practice moving selected text to other positions Tip: The key combination <Alt Shift> with the <up/down arrow >key moves a selected paragraph up or down the page one paragraph at a time. 8 Further Formatting Most of your text will be with the same layout of paragraphs. However, sometimes you will need to change the layout for other special sections (eg for a list). Bulleted and Numbered Lists Bullets - Numbering - It is often useful to create lists using either bullets or numbers. The [Bullets] button gives you a bulleted list: 1. Move to the end of the text (press <Ctrl End>) and make sure you are on a blank line 2. Click on the [Bullets] button (on the Home tab in the Paragraph group) – a bullet point should appear 3. Type a couple of words against each bullet point, pressing <Enter> once after each one 4. Press <Enter> twice at the end to turn the bullets off Numbers are applied in a similar fashion using the [Numbering] button: 5. Click on the [Numbering] button - a number 1. appears 6. Type in two short paragraphs (one a couple of lines long), pressing <Enter> once after each one Note that each paragraph is numbered and that the first line of text is indented slightly to allow for the number. The second line of text is also indented, to line up with the words of the first line. 7. Move to the end of the paragraph numbered 1 and press <Enter> - a new number will be inserted in the correct sequence with later lines re-numbered 8. Press <Tab> (the button to the left of the letter Q) and the numbering changes to a and is indented further – type a few characters 9. Press <Enter> (the letter b appears) then <Shift Tab> (the letter changes to the number 2) 10. Press <Delete> and the extra line will disappear 11. Move to the last line in the numbered list (which should be empty) and press <Enter> - this should turn numbering off Tip: Sometimes you might want more than one paragraph under a bulleted or numbered point. To achieve this, hold down <Shift> as you press <Enter> to end a paragraph (it’s best to have the text left-aligned – justified text doesn’t look good). Correcting Spelling and Grammar Spelling and Grammar Word checks the spelling and grammar as you type. A red squiggly line under a word denotes that Word thinks it has been spelt incorrectly; if the line is green then the grammar may be incorrect. You can check the whole or part of the text for mistakes using the [Spelling and Grammar] button. 1. Press <Ctrl End> to move to the end of your text then <Enter> for a new line 2. Type the following misspelt text: howe mamy speling andother erors is there on thsi sentance? There was 10. Note that as you type the words, Word automatically corrects certain mistakes: it capitalises the first word in a sentence (Howe) it corrects certain misspellings (eg erors to errors, thsi to this and sentance to sentence) 9 3. Select the line of misspelt text (eg click 3 times on it) - Word can spell-check just a selected area 4. Move to the Review tab and click on the [Spelling and Grammar] button on the left of the Ribbon 5. Choose the correct spelling of many in the Suggestions: box – press <Enter> for [Change] 6. Continue in the same manner with the other corrections 7. Always check the correction is what you want - with andother choose and other If Word gives you no suggestions (or doesn't show the correct one in the list) you can edit the text in the Not in Dictionary: box. Also if a spelling is correct but not in the dictionary, you can either choose to [Ignore] a suggested correction or [Add] the word to your own dictionary. Choose [Ignore All] if you don't want to be asked about the same spelling again (similarly [Change All] will change all occurrences of a misspelt word). You can also [Close] or [Cancel] the check at any time. Once the spelling check is complete, the grammar checker is run. This isn't foolproof, but it does pick up some common grammatical mistakes. At the end of the grammar check: 8. Click on [No] - you don't want the rest of the document checked 9. Press <End> to deselect the highlighted text then <Enter> to start a new paragraph Tip: If you just have one word that is misspelt (or a phrase with bad grammar), move the mouse pointer over the error and click on the right mouse button. A list of likely correct spellings appears. If the spelling you want isn't in the list, choose Spelling... (or Grammar...) to start the checker. Note that you will still need to proof read your work to pick up, for example, correctly spelt words used in the wrong context. Here, Howe was not corrected because it was recognised as a surname - it would have been picked up had it not been capitalised (by Word itself!). Similarly, on needs manual correction to in. Also, though was was corrected to were in the second sentence, the grammar checker failed to notice that is in the first sentence had a plural subject and should be are. Closing a Document Although you can have more than one document open in Word, if you have finished working on a file, it is a good idea to close it. Before closing it, remember to save it: 1. The quickest way is to press <Ctrl s> As you’ve already saved your document previously, this time it won’t come up with any Save As window, but will automatically save the latest version of your document overwriting the previous version. If you did want to save your document under a different name, into a different place or in a different format then you should choose one of the options under Save As. 10 To close the current document without exiting from Word: 2. Click on the [Office] button in the top left-hand corner and then choose [Close] Tip: You can close a document from the keyboard using the key combination <Ctrl F4>. Opening an Existing Document You may want to do some further work on an existing document. In this next exercise you will be opening the file you have just closed. The notes which follow assume that your work was saved to My Documents on drive N: (your home directory). If your file is on a USB memory stick or a floppy disk, then you should first copy it to My Documents (see Microsoft Windows XP Beginners' Guide for details of copying/moving files between different media). IMPORTANT: If you open a file direct from a USB memory stick or floppy disk then you must not remove the pen or disk until you have properly closed the file (or disconnected the memory stick). If you don’t do this, it can result in your files being corrupted and you may lose your work. Never swap pens or disks or you may corrupt them both. 1. Click on the [Office] button and choose Open Note the list of Recent Documents on the right-hand side – from here you can open up your latest documents and can pin documents permanently to the list. The [Open] button on the Quick Access Toolbar (or the key combination <Ctrl o>) can be used to open a file but you then don’t see the list of Recent Documents. You will see a dialog box similar to the following, showing any folders and Word files in My Documents: 2. Click on the name of your file you want to work on, eg my first document.docx 3. Press <Enter> or click on [Open] Use the <Page Down> key (above the arrow keys) to move down your document or <Ctrl End> to go to the end of your document. Note: You can have more than one document open at a time in Microsoft Word. This allows you to copy text from one document to another. You can move between documents by clicking on the View tab and then the [Switch Windows] button (or the buttons on the Taskbar, normally located at the bottom of your screen). 11 Starting a New Document To start a new empty document at any time from within Word: 1. Click on the [Office] button and choose New 2. A New Document window will open – the Blank document icon will already be selected so just click on [Create] If you use the [New] button on the Quick Access Toolbar (or the key combination <Ctrl n>) then the new document appears immediately Tip: If ever you are working on a document and all the text disappears, check the document name at the top of the screen. You may have accidentally pressed <Ctrl n> to create a new document! If this is the case, press <Ctrl F4> to Close the new, unwanted, document. Printing When you print on a PC in a University PC Facility managed by IT Services, your output is sent as a print job to a central print queue (one is for high quality black and white output which costs 5p per page, the other for colour printing which costs 30p per page). You have to log in to a Print Release Station (which is a separate computer) from where you can select which print job you want printed from the queue. Everyone has an initial credit of £1.50 in their print account, but you will need to purchase further top-up cards at £3 each in order to put more money into your print account when it is running low. The cards are available from the Reception Desk in the Main Library, the Agriculture Coffee Bar at Earley Gate and the Technical Support Unit at Bulmershe. You can also top up your account using cash via a facility in the Main Library. More detailed instructions on how to print are given in the Printing on IT Services PCs Quick Guide. To print your document: 1. Click on the [Office] button and choose Print button (or click on the [Print] button on the Quick Access Toolbar or use the keyboard combination <Ctrl p>) – the following window appears: 2. Check that Name: is set to \\viprn1\ITS-A4BW (for black and white output - you'll need to change this to \\viprn1\ITS-A4Colour using the list arrow provided if you want colour) 3. Set the required Page range and Number of copies: 4. The final step would normally be to click on [OK] but here, click on [Cancel] 12 It's a good idea to preview your work to check it fits neatly on the page before you print it. To do this: 5. Click on the [Office] button then move the mouse cursor over Print – a sub-menu appears: 6. From the further options that appear, choose Print Preview 7. Click on [Close print Preview] on the far right of the new Print Preview tab to return to normal typing Tip: It’s a good idea to add the [Print Preview] button to your Quick Access Toolbar. To do this, simply click on the down arrow on the right of the toolbar and turn Print Preview on. You may wish to add some of the other buttons. Incidentally, the keyboard combination to turn on/off Print Preview is <Ctrl Alt i>! Using Help and the Get Started Tab Help Microsoft Word has its own built-in help system. This can be accessed by clicking on the [Help] button on the far right of the Word window (just under the x to close Word). If you get used to using help then you should be able to solve your own problems. To demonstrate how the system works, look up how to make your text bold: 1. Click on the [Help] button – a Word Help window appears 2. Type the word bold into the Search help box and press <Enter> - a list of topics should appear 3. Click on the topic Make the text bold The instructions given should be similar to what you learnt earlier in these notes. Some people like to keep the Word Help window open while they carry out the instructions, but part of your document is covered by the Word Help window. To solve this: 4. At the top of the Word Help window, click on the [Keep On Top] icon 5. This changes to a [Not On Top] icon and now if you click in your Word document, the Word Help window closes, but is still available as a button on the Taskbar at the bottom of your screen If you have used a previous version of Microsoft Word and are having trouble with Word 2007, have a look at the Get Started tab on the Ribbon. This features an [Interactive Guide] button, which will show you how to issue a command in Word 2007 if you first carry out that command in a simulated version of Word 2003. The tab also has links to online training and can be downloaded from Microsoft if you have your own PC. Where to go Next You now have the basic skills to safely produce work using Word. However, there are many more features in Word that you have yet to explore and which will make word processing much easier. It's a good idea to practice what you have learnt so far and to seek further training before you start doing serious work. As usual, 13 you can book on a taught course, drop-in-and-learn, or work through the notes yourself (paper copies are held in the S@iL area or download them from the Web). Microsoft Word - An Intermediate Guide - this teaches you how to use many of the other features available in Word. It is highly recommended that you work through this next Microsoft Word: Starting a Thesis - this looks at how to make the best use of Microsoft Word when starting to write a thesis (or other long document). You need to be familiar with what's covered in the Essential and Intermediate Guides before attempting this. There’s also a Finishing a Thesis guide Advanced Wordprocessing Topics Using Microsoft Word - there are more than a dozen guides in all. Some are intended mainly for secretaries; others are of more general interest Microsoft Word Help - don't forget that the built-in help system is there to answer any questions you may have about Word Google or similar web search engines often give you better help than Microsoft’s own site The Get Started tab if this is installed Please feel free to use the computers to practice your word processing. Only by using the system will you become confident and competent. Leaving Microsoft Word When you have finished typing and want to exit Word: 1. Make sure you’ve saved the latest version of your document (press <Ctrl s>) 2. Click on the [Office] button then on the [Exit Word] button (bottom right-hand corner) or you can click on the [x] in the top right-hand corner of the Word window Tip: The keyboard combinations <Ctrl w> and <Alt F4> can also be used to close Word. Logging Out If you have completely finished using the computer: 1. Click on the [Start] button (bottom left-hand corner of screen) 2. Choose Log Off 3. Press <Enter> again (or click on [Log Off]) to confirm this Tip: A quick way to log off is to press the <Windows> key (between <Ctrl> and <Alt>) then the letter <l> for Logout followed by <Enter>. ™ Trademark owned by Microsoft Corporation. © Screen shot(s) reprinted by permission from Microsoft Corporation. Copyright © 2008: The University of Reading Last Revised: July 2010 14