1
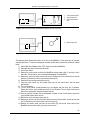
User Manual MediaDice™ Optical Media Destroyer Do not attempt to operate or maintain this machine until you have read thoroughly and understand completely all operating instructions and safety rules contained in this manual. © Phiston Technologies, Inc. 2012 MediaDice Optical Media Destroyer User Manual Important Safety Highlights and Information DANGER! STOP! Do not attempt to operate or maintain this machine until you have read thoroughly and understand completely all operating instructions and safety rules contained in this manual. Failure to comply can result in accidents involving serious personal injury, fire, electric shock, and/or irreparable damage to the machine. This machine weighs approximately 126 lbs. (151 lbs. crated). It requires at least two persons capable of lifting this weight, to lift, move or relocate the machine. The machine should only be placed on a sturdy, level surface capable of bearing this weight plus any other objects or forces that might be placed on the surface. This machine has rapidly rotating sharp steel blades thatcould cause serious bodily harm. NEVER repeat NEVER attempt to bypass the safety features of the MediaDice. Never insert body parts, extraneous tools, or any other objects in the machine, except as provided in this manual. Never attempt to open this machine, unless you are an authorized, qualified service professional. This machine is a potential source of electric shock if it is not properly set up and operated. Do not allow the machine to get wet, including exposure to moisture, rain, snow, or any forms of liquids such as beverages. This machine must only be plugged into a properly grounded outlet that can supply the power needed to safely run the machine. Failure to do so may present electrical and/or fire hazards. CAUTION! This machine should ONLY be opened or serviced by qualified service personnel. When servicing this machine, or if you are an observing bystander, you must wear the appropriate personal protective equipment (eye and/or hand protection) recommended in this manual. Safe operation of this machine requires that you read and understand this user manual and all labels affixed to the machine. You should keep this user manual handy, and review it frequently for continued safe operation. It must be made available to anyone who is authorized to use the machine. ATTENTION! The information and specifications included in this manual were those in effect at the time of publication. Notwithstanding, Phiston Technologies, Inc. (also referred to herein as Phiston), reserves the right to discontinue or change specifications or design at any time without notice and without incurring any obligation whatsoever, provided such changes are with the intent of improving the safety, operation and functionality of the machine. 1 Phiston Technologies, Inc. • 305-517-1744 • www.Phiston.com MediaDice Optical Media Destroyer User Manual Thank You Dear MediaDice Owner, Congratulations and thank you forselecting Phiston Technologies, Inc.'s state of the art MediaDice Optical Media Destroyer for your optical media destruction needs! Your MediaDice has been engineered and manufactured to Phiston's high standards for quality, dependability, ease of operation, and safety, and to meet the rigorous testing, regulatory and certification standards required in the industry. Your MediaDice utilizes high-tensile, sharpened steel blades to effectively shred and disintegrate optical media, rendering them unreadable. The destruction process takes about 5-7 seconds per disc, after which the disintegrated particles are collected by an attached vacuum. This user manual is your guide and first step toward what we are confident will be years of rugged, reliable, troublefree performance. And, you have the confidence of knowing that our products are backed by first class engineering and technical support teamsthat stand ready to assist you in any way we can. Your User Manual We would like to help you to get the best possible results from your MediaDice, and to operate it safely. We therefore urge you to take the time to review this user manual completely, and familiarize yourself thoroughly with the operational, maintenance and safety guidelines provided BEFORE attempting to set up or operate your MediaDice. Pay close attention to the rules for safe operation, warnings, and cautions. If you use your machine properly and only for the purpose for which it is intended, you will enjoy years of safe, reliable service. Warning Symbols As you read this manual, please be alert to sections preceded by notice and warning symbols such as and . These symbols are intended to direct your attention to information that is important, and in some cases critical, to the safe, effective, and reliable operation of your MediaDice. Warranty Please familiarize yourself with the warranty policy that covers your MediaDice to fully understand the coverage provided, any limitations, as well as your responsibilities as an owner in ensuring that your MediaDice does not fall out of warranty. Pay attention to things that an owner should NOT do so as not to void the warranty. Scheduled Maintenance When your MediaDice needs scheduled maintenance, please keep in mind that your dealer is plugged in to a network of service personnel who are qualified and authorized to service your machine. Staff at your dealership will be pleased to answer any questions or concerns you may have in this regard. Thank you for entrusting us with your data destruction needs. Sincerely, Phiston Technologies, Inc. 2 Phiston Technologies, Inc. • 305-517-1744 • www.Phiston.com MediaDice Optical Media Destroyer User Manual 1 A Few Words About Safety Your safety and the safety of others are a paramount concern, and using this machine safely is an important responsibility. Do not attempt to operate or maintain this machine until you have read thoroughly and understand completely all operating instructions and safety rules contained in this manual. Failure to comply can result in accidents involving serious personal injury, fire, electric shock, and/or irreparable damage to the machine, and will void your warranty. Some safety instructions apply to more than one section of this manual and may be repeated for ease of reference or to emphasize importance. 1.1 Key Safety Symbols The following safety symbols are used throughout this manual, and in some instances on the machine, to attract your attention to possible dangers, or specific actions that need to be taken. The safety symbols, and the explanations with them, deserve your careful attention and understanding. They do not by themselves eliminate any danger. The instructions or warnings they give should not be substitutes for proper accident prevention protocols and common sense. DANGER: This symbol highlights hazardous situations that could arise and would result in serious bodily injury, death or extensive property damage if warnings are ignored and proper safety precautions are not taken. WARNING: This symbol alerts users to specific actions that must be taken to prevent possible bodily injury, and/or irreparable property and equipment damage if instructions are not followed. CAUTION: This symbol alerts users to follow instructions to prevent bodily injury or damage to property or equipment. REMINDER: This symbol directs users’ attention to important information, instructions, or actions that need to be taken. The following may also be used to indicate specific risks, hazards or protective measures that should be taken. Fire Hazard Explosion Hazard Electrical Shock Hazard Entanglement hazard. Keep hands, loose clothing, and long hair away from moving parts. Sharp Object Hazard Eye Protection Required Heavy Object – Minimum 2 Person Lift Required Hand Protection Required 3 Phiston Technologies, Inc. • 305-517-1744 • www.Phiston.com MediaDice Optical Media Destroyer User Manual Table of Contents 1 A FEW WORDS ABOUT SAFETY ......................................................................................................................................... 3 1.1 2 KEY SAFETY SYMBOLS ..................................................................................................................................................... 3 ELECTRICAL SAFETY INSTRUCTIONS .............................................................................................................................. 6 2.1 2.2 2.3 2.4 GROUNDING .................................................................................................................................................................... 6 WHY IS GROUNDING NECESSARY? .................................................................................................................................... 6 USE OF AN EXTENSION CORD OR POWER STRIP ................................................................................................................ 6 OTHER ELECTRICAL SAFETY GUIDELINES .......................................................................................................................... 7 3 GENERAL AND PERSONAL SAFETY INSTRUCTIONS ...................................................................................................... 7 4 DESCRIPTION AND SPECIFICATIONS ................................................................................................................................ 8 4.1 4.2 4.3 4.4 5 GUARANTEED TO DESTROY CDS, DVDS, AND BLU-RAY DISCS .......................................................................................... 8 OTHER MEDIA THAT CAN BE DESTROYED BY THE MEDIADICE ............................................................................................. 8 SPECIFICATIONS .............................................................................................................................................................. 9 MEDIADICE DIAGRAMS ................................................................................................................................................... 10 PACKING LIST AND UNPACKING INSTRUCTIONS ......................................................................................................... 11 5.1 PACKING LIST ................................................................................................................................................................ 11 5.2 UNPACKING INSTRUCTIONS ............................................................................................................................................ 12 5.3 INSTALLATION INSTRUCTIONS ......................................................................................................................................... 12 5.3.1 Inspect Your MediaDice .......................................................................................................................................... 12 5.3.2 Where to Install Your MediaDice ............................................................................................................................ 13 5.3.3 Connecting the Vacuum ......................................................................................................................................... 13 5.3.4 Installing the Hopper Rods ..................................................................................................................................... 14 5.3.5 Connecting Your MediaDice ................................................................................................................................... 15 6 OPERATING INSTRUCTIONS ............................................................................................................................................. 16 6.1 6.2 6.2.1 6.2.2 6.3 6.3.1 6.3.2 6.3.3 6.3.4 6.3.5 6.3.6 6.3.7 6.4 6.4.1 6.4.2 7 TURNING ON THE MEDIADICE.......................................................................................................................................... 16 USING THE LOADER ....................................................................................................................................................... 16 Loading Optical Media into the MediaDice ............................................................................................................. 16 Loading Other Media types into the MediaDice ...................................................................................................... 17 OPERATING THE MEDIADICE: CONTROL PANEL................................................................................................................ 17 Starting and Stopping the MediaDice; Pause/Continue .......................................................................................... 17 LED Status Indicators on the Control Panel ........................................................................................................... 18 Running the MediaDice - Destroying Optical Media ............................................................................................... 18 Normal Shutdown of the MediaDice ....................................................................................................................... 19 Emergency Shutdown of the MediaDice ................................................................................................................. 20 Power Saver, Automatic Shut Down ....................................................................................................................... 20 Pausing the MediaDice Loader ............................................................................................................................... 20 OTHER FEATURES ......................................................................................................................................................... 21 Controlled Data Destruction .................................................................................................................................... 21 Automatic Data Destruction .................................................................................................................................... 21 IF THE MACHINE JAMS OR STOPS UNEXPECTEDLY .................................................................................................... 22 7.1 HOW TO IDENTIFY A JAM................................................................................................................................................. 22 7.2 WHAT CAUSES A JAM AND HOW TO PREVENT IT .............................................................................................................. 22 7.2.1 Debris Build-up in the MediaDice Disintegration Chamber ..................................................................................... 22 7.2.2 Attempting to Destroy Unapproved Materials in the MediaDice ............................................................................. 22 7.2.3 Power Outage / Interruption .................................................................................................................................... 23 7.3 HOW TO CLEAR A JAM .................................................................................................................................................... 23 4 Phiston Technologies, Inc. • 305-517-1744 • www.Phiston.com MediaDice Optical Media Destroyer User Manual 8 DISPOSING OF WASTE ...................................................................................................................................................... 26 9 THE MEDIADICE VACUUM ACCESSORY ......................................................................................................................... 26 10 MAINTENANCE & SERVICE ............................................................................................................................................... 27 11 TROUBLESHOOTING .......................................................................................................................................................... 29 12 WARRANTY ......................................................................................................................................................................... 30 13 CUSTOMER SERVICE ......................................................................................................................................................... 30 5 Phiston Technologies, Inc. • 305-517-1744 • www.Phiston.com MediaDice Optical Media Destroyer User Manual 2 Electrical Safety Instructions Your MediaDice has been designed and engineered with safety features that allow it to be operated safely. Ignoring or circumventing safety procedures and mechanisms are the leading cause of electrical hazards in the workplace. To reduce the risk of electric shock, fire, injuries, and/or damage to your MediaDice, please follow these safety instructions. 2.1 Grounding For your protection, your MediaDice is equipped with a power cord with a grounded, 120 volt, NEMA 5-15 three-prong electrical plug. It should only be plugged into a matching 120 volt outlet that is properly installed and grounded in accordance with all local codes and ordinances. Where possible, the MediaDice should be plugged into an outlet on a dedicated circuit rated at least 20 Amps. If the MediaDice will be sharing a circuit with other loads (e.g. computer equipment, appliances, lighting, etc.), then to avoid an overload condition that will trip the circuit breaker, please ensure that the circuit is sufficiently rated to meet the total peak current requirements of the MediaDice plus all additional loads. Under no circumstances should the grounding prong be removed or modified in any way that would defeat this safety mechanism. In addition, the power cord that comes with your MediaDice must not be replaced with one that does not provide grounding protection. 2.2 Why is grounding necessary? If an electrical connector inside the machine were to come lose, or if a liquid were accidentally spilled and came in contact with the electrical circuits inside the machine, the body or frame of the MediaDice could become electrically charged and present an electrocution hazard. To safeguard against this condition, the body and frame of the MediaDice are grounded so as to provide a low resistance pathway to redirect electricity away from any person who may touch the machine. 2.3 Use of an Extension Cord or Power Strip The use of extension cords (including power strips) will inherently result in a voltage drop and loss of power delivered to the machine. Low voltage may cause the motor in the machine to struggle, stall, overheat and even burn out. Furthermore, an extension cord that is not adequately rated to supply power to the MediaDice can quickly overheat and start a fire. As far as possible, the use of extension cords for power equipment should be avoided or minimized. If an extension cord must be used, voltage and power losses (and fire risk) can be minimized by using a heavy duty cord designed for power equipment, and keeping its length as short as possible. Use only 3conductor extension cords that have a 3-prong grounded plug at one end, and a grounded receptacle at the other end in to which the MediaDice is plugged. The maximum current that the MediaDice draws is approximately 15 amps at 120 volts. To determine the minimum American Wire Gauge (AWG) size for the length of the extension cord needed for your application, please refer to an AWG Rating Chart for Extension Cords, or consult a qualified Electrician. As a temporary measure, you may use a 10 AWG (or heavier duty) grounded extension cord for distances up to 25 feet. Bear in mind that an extension cord should never be used as a permanent means to connect your MediaDice, but only until the machine can be relocated closer to a wall receptacle, or until a new receptacle can be installed closer to the machine. 6 Phiston Technologies, Inc. • 305-517-1744 • www.Phiston.com MediaDice Optical Media Destroyer User Manual 2.4 Other Electrical Safety Guidelines Periodically check power cords for any signs of overheating. If the plugs, receptacles or power cords being used with your MediaDice feel hot to the touch, immediately turn off the machine, disconnect from the wall receptacle, and contact a qualified electrician to determine the cause of overheating. Always take appropriate steps to ensure that power cords and/or extension cords do not present a trip or fall hazard. Replace damaged or frayed cords immediately. Damaged cords increase the risk of electrical shock and fire. This machine is a potential source of electric shock if it is not properly set up and operated. Do not allow the machine to get wet, including exposure to moisture, rain, snow, or any forms of liquids such as beverages. It is good practice to turn off all power switches before plugging or unplugging the machine. In particular, make sure that the power switch on the machine is in the “OFF” position before plugging it into a receptacle. This will prevent accidental starting. When unplugging an electrical power cord, do not pull on the cord; grasp firmly and pull on the plug. 3 General and Personal Safety Instructions Failure to follow the instructions listed below may result in electrical shock, fire, and/or serious personal injury. 1. Know how to quickly stop the machine in case of an emergency using the power switch on the front panel and/or the rear of the machine, or unplugging the power cord from the rear of the machine or from the wall outlet. 2. Do not use the machine if the “ON/OFF” switch is not working. Operating a machine that cannot be controlled by you is dangerous and must be repaired before use. 3. Keep your work area clear and well lit. Cluttered work surfaces and dark areas invite accidents. 4. Do not operate the machine in an unsafe environment such as those containing explosive atmospheres, flammable liquids, gases and/or dust. 5. Do not operate the machine while under the influence of alcohol, drugs, and/or medications that can affect you motor skills. Do not operate the machine while drowsy, tired and/or distracted. 6. Keep people not involved with the work area, especially children, away from the work area while operating a machine. 7. Dress appropriately. Do not wear loose fitting clothing or jewelry. Keep long hairin place and contained. Keep clothing, hair and other body parts away from moving parts of the machine. Loose clothing, jewelry and hair can become snagged in moving parts. 8. Remove any tools, adjusting instruments or keys from the machine before turning it on. Extraneous objects left attached to a rotating part could cause personal injury. 9. Always wear appropriate safety equipment such as eye protection and gloves while operating or servicing power equipment. Use appropriate dust respirators, hearing protection, hard-hat, face shield or safety shoes as dictated by the work environment. 7 Phiston Technologies, Inc. • 305-517-1744 • www.Phiston.com MediaDice Optical Media Destroyer User Manual 4 Description and Specifications The Phiston MediaDice uses a knife mill with sharpened blades to effectively shred anddisintegrate optical media, rendering them unreadable. The destruction process takes about 5-7 seconds per disc, after which the disintegrated particles are collected by an attached vacuum. 4.1 Guaranteed to Destroy CDs, DVDs, and Blu-Ray Discs The Phiston MediaDice Optical Media Destroyer is guaranteed to destroy 4.75” (120 mm) CDs, DVDs, and Blu-Ray discs. For optical media disintegration, the U.S. Department of Defense’s National Security Agency (NSA) requires that discs be reduced to particles that have nominal edge dimensions of 5 mm or less and surface area of 25 mm2 or less (Ref: NSA/CSS Storage Device Declassification Manual, Rev 9-12). The MediaDice disintegrates discs to nominal edge dimensions of 1.5 mm or less and surface area of 2.25 mm 2 or less, exceeding NSA standards. NOTE: The Maximum Media Size that the MediaDice will accept is 4.75” diameter and 0.05” thickness. 4.2 Other Media that can be Destroyed by the MediaDice The MediaDice will also disintegrate other data storing plastic cardsthat may contain sensitive or personally identifiable information, such asdriver licenses, identification badges, credit cards andother magnetic stripe cards, ICC smart cards, and RFID cards.However, data destruction to NSA specifications for these media is NOT guaranteed. WARNING: Do not insert in the MediaDice any unapproved materials such as paper, metallic objects, magnetic tapes, or any media other than those listed in sections 4.1and 4.2 above. Unapproved materials will clog the disintegration chamber and cause permanent damage to your machine. This WILL void your warranty. 8 Phiston Technologies, Inc. • 305-517-1744 • www.Phiston.com MediaDice Optical Media Destroyer User Manual 4.3 Specifications Actual Weight 126 lbs. Product Dimensions without Hopper Rods Installed 10” x 21” x 14.5” (H x W x D) Product Dimensions with Hopper Rods Installed 16.5” x 21” x 14.5” (H x W x D) Shipping Weight* 151 lbs. Shipping Dimensions* 18” x 25” x 18.5” (H x W x D) Voltage 120 Volts A.C. ±10%, 60Hz Maximum Current (Including Vacuum) 15 Amps @ 120 Volts Cord Specifications 6’ @ 15 Amps Maximum Media Size 4.75” Diameter; 0.05” Thick Maximum Particle Size 0.06” x .0.06” (1.5mm x 1.5mm) Process Time 500-700 discs/hour; 5-7 sec/disc Hopper Capacity without Hopper Rods Installed 50-75 discs Hopper Capacity with Hopper Rods Installed 200 discs Operating Temperature 40-100 °F * Shipping weight and dimensions does not include the vacuum. The vacuum ships separately. Vacuum Weight 5.4 lbs. Vacuum Dimensions 15.25” x 10” x 9.5” (H x W x D) Vacuum Hose Dimensions 1.25” Diameter; 4’ Length Vacuum Power 1.5 hp Vacuum Waste Capacity 1 gal (40 disintegrated discs) Vacuum Voltage 120 Volts A.C., 60Hz Vacuum Maximum Current 5 Amps @ 120 Volts Vacuum Cord Specifications 6’ Vacuum Airflow 60 cfm Vacuum Pressure 15 kPa Vacuum Operating Temperature 40-100 °F 9 Phiston Technologies, Inc. • 305-517-1744 • www.Phiston.com MediaDice Optical Media Destroyer User Manual 4.4 MediaDice Diagrams 5 7 5 7 6 2 9 8 10 6 4 12 11 Figure 1: MediaDice Front View Diagram 1. 2. 3. 4. 5. 6. 7. 8. 9. 10. 11. 12. 13. 14. 14 1 3 13 Figure 2: MediaDice Rear View Diagram Start/Stop Button Pause/ContinueButton Green Power Indicator Red Status Indicator Loader Hopper Hopper Rod Manual Unjam Port Main Circuit Breaker (Power ON/OFF) Power Receptacle Secondary Circuit Breaker Vacuum Power Outlet Vacuum Hose Port Unjam Vacuum Hose Port 10 Phiston Technologies, Inc. • 305-517-1744 • www.Phiston.com MediaDice Optical Media Destroyer User Manual 5 Packing List and Unpacking Instructions Careful attention has been paid to packaging your MediaDice to minimize any risk of damage during shipping. Your package and its contents will be insured against damage or loss; however, Phiston's and the shipping company's responsibilities for safe delivery ends the minute you take possession of your shipment. The following alert and instruction will be sent to you via email to ensure that you take the necessary actions when your shipment is delivered. ATTENTION: Before accepting your MediaDice package, inspect the shipment for any signs of damage, improper handling and/or tampering. Note the orientation in which the unit was delivered. The shipment should be delivered in the upright position. If there is significant damage to the crating or packaging of your shipment, decline delivery and immediately contact Phiston Technologies. If the shipment appears to have been mishandled or tampered with in any way, DO NOT sign for or accept delivery of the shipment until you have had an opportunity to open and inspect your shipment. If there is damage to the contents of your shipment, or if any parts are missing, decline delivery and immediately contact Phiston Technologies. 5.1 Packing List When you receive your MediaDice shipment, a copy of the Packing List will be included with the shipping documents as a means of verifying the package contents. It also serves to inform all parties, including transport agencies, government authorities, and customers, about the contents of the package. Your package will contain the following: . Phiston MediaDice Optical Media Destroyer Phiston MediaDice Optical Media Destroyer User Manual Phiston MediaDice Optical Media Destroyer Limited Warranty 3 Hopper Rods 6 ft. Power Cable (rated for 15 A @ 120 V) Unjam Handle (manual unjamming tool) Portable Wet/Dry Vacuum Vacuum Hose Crevice Tool Utility Nozzle Reusable Cloth Filter and Clamp Ring Foam Filter ATTENTION: If after unpacking your MediaDice you discover that any of the above items is missing or damaged, immediately contact your dealer or Phiston Technologies. 11 Phiston Technologies, Inc. • 305-517-1744 • www.Phiston.com MediaDice Optical Media Destroyer User Manual 5.2 Unpacking Instructions CAUTION: This machine weighs approximately 126lbs. and its shipping weight is approximately 151 lbs. This machine cannot and should not be moved by one person. It requires at least two persons capable of lifting this weight, to lift, move or relocate the machine. The machine should only be placed on a sturdy, level surface capable of bearing this weight plus any other objects or forces that might be placed on the surface. Failure to observe these safety precautions could cause serious bodily harm to you and/or others in the work area, as well as property and equipment damage. After the shipment has been inspected and accepted, use a screwdriver to remove the screws from the top and front of the crate. Remove the top and front panels. Remove the protective foam to expose the MediaDice. ATTENTION: Please save all crating, packaging and insulation materials in case the unit has to be returned or re-shipped. With one capable person standing on each side of the MediaDice, use the bottom surface of the unit to lift and move it out of the crate. The machine should only be placed on a sturdy, level surface capable of bearing its weight plus any other objects or forces that might be placed on the surface. For the MediaDice alone, we recommend a table, desk or other sturdy surface capable of safely supporting at least 150 lbs. on a continuous basis. In case the MediaDice must be repacked for shipping, carefully place the unit back into the crate, and replace the protective foam around the unit. Close the crate by replacing the front and top panels and securely fastening them with screws. 5.3 Installation Instructions 5.3.1 Inspect Your MediaDice Your MediaDice was thoroughly inspected and tested before leaving our factory. Before Installing the MediaDice, inspect the unit for any parts that might have been damaged during shipping. If there are any damaged or loose parts, please immediately contact your dealer or Phiston Technologies Customer Service. For more information, refer to section 13, “Customer Service,” on page 30. 12 Phiston Technologies, Inc. • 305-517-1744 • www.Phiston.com MediaDice Optical Media Destroyer User Manual 5.3.2 Where to Install Your MediaDice After the inspection is completed, place the MediaDice in a location where it will have a minimum clearance of 3” in the back and on its sides. No objects should obstruct the airflow through the sides or the back of the unit. Your MediaDice weighs approximately 126 lbs. It should only be placed on a sturdy, level surface capable of bearing this weight plus any other objects or forces that might be placed on the surface. For the MediaDice alone, we recommend a table, desk or other sturdy surface capable of safely supporting at least 150 lbs. on a continuous basis. Locate your MediaDice close to a grounded 120 Volt NEMA 5-15 outlet capable of delivering at least 20 Amps. The maximum current required by the MediaDice is 15 Amps. Where possible, the MediaDice should be plugged into an outlet on a dedicated circuit rated at least 20 Amps. If the MediaDice will be sharing a circuit with other loads (e.g. computer equipment, appliances, lighting, etc.), then to avoid an overload condition that will trip the circuit breaker, please ensure that the circuit is sufficiently rated to meet the total peak current requirements of the MediaDice plus all additional loads. 5.3.3 Connecting the Vacuum Your MediaDice includes a portable, 1 gallon vacuum to collect the shredded optical media debris from its disintegration chamber. This prevents the chamber from becoming clogged with debris and is therefore required for your MediaDice to function correctly. Prior to initiating the MediaDice, follow the instructions in your vacuum’s manual to prepare and set-up the vacuum for use. Once the vacuum is ready, ensure that the vacuum is properly connected to the MediaDice by performing the following steps: Insert the vacuum hose into the vacuum hose port on the left side of the MediaDice. Plug the vacuum power cord into the vacuum power outlet on the left side of the MediaDice. Turn “ON” the vacuum. The diagram below illustrates the location of the Vacuum Power Outlet and the Vacuum Hose Port. 2 1 Figure 3: Side View of the left side of the MediaDice showing Vacuum Connections. 13 Phiston Technologies, Inc. • 305-517-1744 • www.Phiston.com 1. 2. Vacuum Power Outlet Vacuum Hose Port MediaDice Optical Media Destroyer User Manual WARNING: NEVER operate the MediaDice without the debris collection vacuum properly installed and running. Do not disable the vacuum while the MediaDice is operating. If the MediaDice is running and shredding media, DO NOT unplug the vacuum power cord; DO NOT turn off the vacuum; DO NOT remove the vacuum hose. Doing so will cause debris build-up in the machine and will result in a jam. This situation could also damage the machine and WILL void your warranty. CAUTION: DO NOT operate the MediaDice with a full vacuum as it will result in a jam. The included vacuum is capable of holding debris for up to 40 disintegrated discs after which the vacuum container must be emptied. Using the vacuum further without emptying it risks the possibility of a jam occurring. Users must be attentive and should regularly inspect the vacuum to ensure that it is NEVER filled. NOTE: When plugged into the MediaDice, the vacuum will not turn on until activated by the MediaDice. The MediaDice will actively enable and disable the vacuum depending on the state of the machine. When the MediaDice begins to operate, the vacuum will be automatically turned “ON.” When the MediaDice stops operating, the vacuum will be automatically turned “OFF.” 5.3.4 Installing the Hopper Rods Your MediaDice comes with a built-in continuous feed hopper that holds between 50 and 75 optical discs. This capacity can be expanded to up to 200 discs by installing the included Hopper Rods (x3). To install the hopper rods, simply screw and hand tighten each of the three rods into the three threaded openings on the hopper assembly.The diagram below illustrates the location of each threaded opening. 1 3 1. 2 2. 3. Threaded Openings for Hopper Rods Hopper Assembly Optical Media Loader/ Conveyor 1 1 Figure 4: Top view of MediaDice showing the Hopper into which Optical Discs are loaded. 14 Phiston Technologies, Inc. • 305-517-1744 • www.Phiston.com MediaDice Optical Media Destroyer User Manual 1 1. Installed Hopper Rod Figure 5: Elevation view of MediaDice showing the three Hopper Rods installed. 5.3.5 Connecting Your MediaDice STOP! Do not attempt to connect your MediaDice machine until you have read thoroughly and understand completely all operating instructions and safety rules contained in this manual. Before plugging your MediaDice into an electrical outlet, make sure that the Main Circuit Breaker on the rear of the unit is in the “OFF” position. Failure to comply can result in accidents involving serious personal injury, fire, electric shock, and/or irreparable damage to the machine. After you have taken the above precautions, connect the power cord that was supplied with your MediaDice to the power receptacle at the rear of the machine, and plug the other end into the power outlet. 15 Phiston Technologies, Inc. • 305-517-1744 • www.Phiston.com MediaDice Optical Media Destroyer User Manual 6 Operating Instructions 6.1 Turning on the MediaDice To turn on the MediaDice, proceed as follows: Confirm that the vacuum is properly installed and the MediaDice is plugged into an appropriate power outlet. Place the Main Circuit Breaker in the back of the unit to the “Reset” position to supply electrical power to the MediaDice. The red Main Circuit Breaker light in the rear and the green power indicator LED on the front control panel will illuminate. At this time, the MediaDice is on standby; you may begin loading optical media into the hopper. WARNING: Immediately turn off the machine if the vacuum has not been properly connected as specified in section 5.3.3, “Connecting the Vacuum.” Failure to do so may cause the MediaDice to jam during operation. 6.2 Using the Loader The MediaDice is designed to be an industrial capacity optical media destroyer. Caution must always be taken when feeding optical discs and other media into the machine to be destroyed. Section 4, “Description and Specifications,” describes the types of optical discs and other media that can be destroyed with the MediaDice. DANGER: NEVER attempt to bypass the safety features of the MediaDice. Never insert body parts, extraneous tools, or any other objects in the machine. Do not attempt to open this machine, unless you are an authorized, qualified service professional. CAUTION: Always use caution when loading and unloading any items into the MediaDice. 6.2.1 Loading Optical Media into the MediaDice To load optical discs into the hopper: Carefully and orderly stack up to 200 CDs, DVDs and/or Blu-ray discs into the hopper. Ensure that all discs loaded into the hopper are stacked horizontally and not at an angle. 16 Phiston Technologies, Inc. • 305-517-1744 • www.Phiston.com MediaDice Optical Media Destroyer User Manual 6.2.2 Press the “Start” button to initiate the loader/conveyor that will begin to transport the discs one at a time into the disintegrator where they will be destroyed. Loading Other Media types into the MediaDice To load credit cards, drivers licenses, and other data storing plastic cards into the hopper: Carefully and orderly stack up to 10 cards into the hopper. Ensure that all cards loaded into the hopper are stacked horizontally and not at an angle. Press the “Start” button to initiate the loader/conveyor that will begin to transport the cards one at a time into the disintegrator where they will be destroyed. WARNING: Do not insert in the MediaDice any unapproved materials such as paper, metallic objects, magnetic tapes, or any media other than those listed in section 4, “Description and Specifications.” Unapproved materials will clog the disintegration chamber and cause permanent damage to your machine. This WILL void your warranty. CAUTION: DO NOT operate the MediaDice with a full vacuum as it will result in a jam. The included vacuum is capable of holding debris for up to 40 disintegrated discs after which the vacuum container must be emptied. Using the vacuum further without emptying it risks the possibility of a jam occurring. Users must be attentive and should regularly inspect the vacuum to ensure that it is NEVER filled. CAUTION: Optical media should be fed separately from data storing plastic cards. When feeding media into the MediaDice, do not mix different media types as it could result in a jam in the loader/conveyor mechanism that feeds the media one at a time into the disintegrator. NOTE: Once the loader has fed your media into the machine, it is impossible to retrieve the media. As such, before placing any media into the hopper, the user must be absolutely certain that the correct media has been chosen for destruction. 6.3 Operating the MediaDice: Control Panel The MediaDice control panel contains two LED indicators and one multi-function switch. 6.3.1 Starting and Stopping the MediaDice; Pause/Continue The multi-function switch performs different functions depending on the direction in which it is pressed. 17 Phiston Technologies, Inc. • 305-517-1744 • www.Phiston.com MediaDice Optical Media Destroyer User Manual If the switch is pressed downwards, it functions as the “Start/Stop” button. If it the switch is pressed upwards, it functions as the “Pause/Continue” button. Figure 6 illustrates the location of each LED indicator and the multi-function switch. 1. 2. 3. 4 1 4. 2 3 Green Power Indicator Red Status Indicator Switch: Press downward Start/Stop Button Switch - Press upward Pause/Continue Button Figure 6: Control Panel on the front of the MediaDice showing LED indicators and multifunction switch. 6.3.2 LED Status Indicators on the Control Panel The green LED indicates the status of the power to the MediaDice as follows: Solid green – indicates that the MediaDice is on standby. After a shutdown sequence, the MediaDice will remain on standby. Blinking green – indicates that the MediaDice is executing a shutdown sequence. Blinking green in unison with the blinking red LED – indicates a jam in the MediaDice (see section 7, “If the Machine Jams or Stops Unexpectedly”). The red LED indicates the status of the loader/conveyor that transports the media one at a time into the disintegrator as follows: 6.3.3 Solid red – LED will illuminate when the “Start” button is pressed. It indicates that the MediaDice and the vacuum are on, and that the loader is on standby. Blinking red – indicates that the loader has begun feeding media one at a time into the disintegrator. Blinking red in unison with the blinking green LED – indicates a jam in the MediaDice (see section 7, “If the Machine Jams or Stops Unexpectedly”). Running the MediaDice - Destroying Optical Media Turn on the Main Circuit Breaker on the rear of the MediaDice. The green LED on the front control panel will illuminate solid green. Load the media to be destroyed into the MediaDice hopper per instructions in section 6.2above. Pressthe multi-function switch on the control panel downward. This will start the MediaDice and the vacuum simultaneously. The red LED on the control panel will illuminate solid red. 18 Phiston Technologies, Inc. • 305-517-1744 • www.Phiston.com MediaDice Optical Media Destroyer User Manual In a few seconds, the solid red LED will begin blinking indicating that the loader has begun to feed the media in the hopper into the disintegration chamber one at a time. Shortly after the last disc is destroyed, the blinking red LED will again illuminate solid, and the MediaDice and vacuum will turn off automatically and the system will return to wait mode. If the MediaDice remains inactive for more than 15 seconds, the system will automatically shut down. CAUTION: DO NOT operate the MediaDice with a full vacuum as it will result in a jam. The included vacuum is capable of holding debris for up to 40 disintegrated discs after which the vacuum container must be emptied. Using the vacuum further without emptying it risks the possibility of a jam occurring. Users must be attentive and should regularly inspect the vacuum to ensure that it is NEVER filled. NOTE: If upon pressing the “Start” button, both the green power indicator and the red status indicator begin blinking in unison, thenthe MediaDice has jammed and stopped feeding discs into the disintegrator. To unjam the machine, follow the steps outlined in Section 7, “If the Machine Jams or Stops Unexpectedly”. 6.3.4 Normal Shutdown of the MediaDice If it is necessary to shut down the MediaDice while the system is running, press downward on the multifunction switch on the control panel. This will initiate the shutdown sequence as follows: The green power indicator will begin to blink to indicate that the unit is shutting down. The loader will stop feeding media into the MediaDice. The red status indicator will stop blinking and become solid indicating that the loader is turned off. The MediaDice disintegrator and the vacuum will continue to run for 15 seconds until all remaining debris in the chamber is destroyed and evacuated by the vacuum. Once the disintegration chamber is clear, the MediaDice and vacuum will be turned off automatically and the red status indicator will turn off. The green LED power indicator will stop blinking and illuminate solid indicating that the unit is currently shutdown, but power is still present. WARNING: Except in an emergency, DO NOT attempt to prematurely power off the machine during operation by turning off the Main Circuit Breaker on the back of the unit, or by unplugging the power cord from the machine. Bypassing the normal shut down procedures may result in severe jamming that may require a service technician to clear. 19 Phiston Technologies, Inc. • 305-517-1744 • www.Phiston.com MediaDice Optical Media Destroyer User Manual 6.3.5 Emergency Shutdown of the MediaDice If it is ever becomes necessary to shut down the MediaDice in an emergency, then immediately turn off the Main Circuit Breaker at the back of the machine, and/or unplug the power cord from the back of the machine or from the wall outlet. Situations that may warrant an emergency shutdown include those that could cause harm to the operator of the MediaDice (for example, if loose clothing, long hair or fingers are accidentally ensnared in the machine). Such circumstances can be avoided if the proper safety and precautionary measures outlined in this manual are read, understood and followed. 6.3.6 Power Saver, Automatic Shut Down After completing the destruction of a batch of discs, the MediaDice will enter wait mode, waiting for additional media to be loaded in the hopper. If the MediaDice remains inactive for more than 15 seconds, the system will automatically shut down. 6.3.7 Pausing the MediaDice Loader Should it be necessary to pause the MediaDice while it is running: Press the multi-function switch on the front control panel upwards. The loader will pause. The red LED status indicator will stop blinking and illuminate solid red indicating that the loader is currently on standby. While in pause mode, you may add or remove media from the MediaDice hopper. WARNING: DO NOT use the pause function to clear media or debris from the loader/conveyer inside the MediaDice as the machine could accidentally re-start resulting in damage or injury to the operator. Refer to section 7, “If the Machine Jams or Stops Unexpectedly,” for instructions on how to clear debris inside the MediaDice. To resume operation of the MediaDice: Press the multi-function switch upwards again and the destruction process will continue. The red status indicator will change from solid to blinking, indicating that the loader has resumed feeding media into the disintegration chamber. 20 Phiston Technologies, Inc. • 305-517-1744 • www.Phiston.com MediaDice Optical Media Destroyer User Manual NOTE: Once the loader has fed your media into the machine, it is impossible to retrieve the media. As such, before placing any media into the hopper, the user must be absolutely certain that the correct media has been chosen for destruction. 6.4 Other Features Your MediaDice comes equipped with additional features that allow it to operate automatically, smoothly and efficiently, making it as easy as possible for you to destroy your optical media. 6.4.1 Controlled Data Destruction In order to regulate the amount of debris in the disintegration chamber, the MediaDice uses sensors that automatically control the loader’s feed rate as necessary to prevent a jam. When the disintegration chamberin the MediaDice is overloaded, the loader will automatically stop feeding until the MediaDice is ready to continue. The red status indicator will stop blinking and become solid to indicate that the loader is currently on standby. Once the MediaDice is ready to continue again, the loader will automatically continue. The red status indicator will resume blinking to indicate that the loader is feeding again. 6.4.2 Automatic Data Destruction The MediaDice will automatically shut down after 15 seconds of inactivity. This allows an operator to insert any media they need destroyed into the hopper, press the “Start” button, and leave the MediaDice to do its work. The MediaDice will automatically destroy all of the media and then, after 15 seconds of inactivity, shut itself down. 21 Phiston Technologies, Inc. • 305-517-1744 • www.Phiston.com MediaDice Optical Media Destroyer User Manual 7 If the Machine Jams or Stops Unexpectedly 7.1 How to Identify a Jam The MediaDice has several built-in safety measures designed to prevent injury to the operator, damage to the machine, or diminish performance. When a jam or abnormal condition is detected: 7.2 The MediaDice and the vacuum will immediately turn off. The green and red indicators will both begin to blink in unison. If power to the machine is interrupted or turned off during an error condition, when the power is restored, if the Operator attempts to restart the MediaDice, the machine will return to the error condition mode that existed before the power down/re-start. The Jam error must be resolved using the procedures outlined below before the system will return to normal operating mode. What Causes a Jam and How to Prevent It The following are some of the more common causes of jams, and steps that the operator can take to prevent them: 7.2.1 Debris Build-up in the MediaDice Disintegration Chamber Occasionally, while destroying a large amount of media, debris may congest the disintegration chamber and may not be readily vacuumed. If too much debris builds up inside the disintegration chamber, a jam may occur. If this happens: The MediaDice and the vacuum will immediately turn off. The green and red indicator LEDs will both begin to blink in unison. Follow procedures in section 7.3, “How to Clear a Jam.” How to prevent 7.2.2 Ensure that the vacuum is properly installed and connected per instructions in section 5.3, “Installation Instructions.” Do not turn off or in any way disable the Vacuum while the MediaDice is operating. Regularly inspect vacuum collection bucket and empty after processing of each 40-disc batch. Periodically clean or replace filter. Attempting to Destroy Unapproved Materials in the MediaDice Sections 4.1 and 4.2 of the manual specifically outline media that can be destroyed in the MediaDice. DO NOT, repeat DO NOT insert any other materials that may jam and/or damage the machine permanently as this canpossibly cause harm to the operator, and will void your warranty. How to prevent Only insert approved media described in sections 4.1 and 4.2. These include CDs, DVDs, and Blu-ray discs, or data storing plastic cards, such as driver licenses, identification badges, credit cards and other magnetic stripe cards, ICC smart cards, and RFID cards. 22 Phiston Technologies, Inc. • 305-517-1744 • www.Phiston.com MediaDice Optical Media Destroyer User Manual 7.2.3 Never insert any other materials including but not limited to any metallic or ceramic objects, paper, paper clips, staples, circuit boards, glass, wires, magnetic tape, floppy discs, etc. When in doubt, please contact Phiston Technologies. Power Outage / Interruption If the MediaDice loses power unexpectedly (e.g. power outage, unplugging, tripped breaker or fuse) while destroying media, when power is restored, the machine will automatically enter standby mode: The red Main Circuit Breaker light in the rear and the green power indicator LED on the front control panel will illuminate. The MediaDice and the Vacuum will not resume until the Start button is pushed. When the Start button is pushed, the system should resume normal operation. If it does not, then there could be a jam due to debris trapped in the disintegration chamber when the power was interrupted. If this condition exists: The MediaDice and the vacuum will not turn on. The green and red indicator LEDs will both begin to blink in unison. Follow procedures in section 7.3, “How to Clear a Jam.” How to prevent 7.3 To prevent circuit overload and unexpected tripping of the main circuit breaker, ensure that the MediaDice and Vacuum are properly connected and plugged into a suitable electrical outlet per instruction outlined in the installation instructions in section 5.3, “Installation Instructions.” Follow proper safety precautions to ensure that power cords do not present a trip and fall hazard, or cannot be accidentally unplugged. Power outages are unavoidable. Plugging the MediaDice into an uninterrupted power supply of appropriate capacity can minimize the effects of brief outages. How to Clear a Jam To clear a jam, the unjam handle supplied with your MediaDice will be required. The unjam handle is illustrated in the figure below. Figure 7: Unjam Handle 23 Phiston Technologies, Inc. • 305-517-1744 • www.Phiston.com MediaDice Optical Media Destroyer User Manual 2 3 1. 2. 3. Vacuum Power Outlet Vacuum Hose Port Unjam Vacuum Hose Port 4. Manual Unjam Port 1 Figure 8: Side View of the left side of the MediaDice showing Vacuum Connections. 4 Figure 9: Front View of the MediaDice showing the Manual Unjam Port. The diagrams above illustrate the location on the front of the MediaDice, of the access port for manually clearing a debris jam. To clear the disintegration chamber of stuck debris, perform the procedures outlined below: 1) 2) 3) 4) 5) 6) 7) 8) 9) 10) 11) 12) 13) Set the Main Circuit Breaker to the “OFF” position to turn off the MediaDice. Disconnect the power cord from the wall outlet. Shut off the vacuum Remove the vacuum power cord from the MediaDice vacuum power outlet (1), and plug it into a wall outlet. The vacuum can now be powered independently of the MediaDice. Remove the cap for the unjam vacuum hose port (3). Remove the vacuum hose from the vacuum hose port (2) and insert it into the unjam vacuum hose port (3). Remove the cap from the manual unjam port (4). Insert the unjam handle into the manual unjam port (4) and ensure that it sets into place appropriately. Turn on the vacuum. Turn the unjam handle counter-clockwise up to 90 degrees and then firmly turn it clockwise. Repeat this until the unjam handle spins freely in both directions. This will signify that the stuck debris in the disintegration chamber has been removed. Once the operator is certain that the disintegration chamber is clear of stuck debris, remove the unjam handle and turn off the vacuum. Reinsert the cap for the manual unjam port (4). Remove the vacuum hose from the unjam vacuum hose port (3) and insert it into the vacuum hose port (2). Reinsert the cap into the unjam vacuum hose port (3). Remove the vacuum power cord from the wall outlet. Plug the vacuum power cord into the MediaDice vacuum power outlet (1) and turn on the vacuum. 24 Phiston Technologies, Inc. • 305-517-1744 • www.Phiston.com MediaDice Optical Media Destroyer User Manual 14) Reconnect the power cord for the MediaDice. Turn the Main CircuitBreaker to the “Reset” position to turn on the MediaDice. WARNING: NEVER operate the MediaDice without the debris collection vacuum properly installed and running as specified in section 5.3.3, “Connecting the Vacuum,” on page 13. Failure to replace the vacuum hose back into the Vacuum Hose Port will cause debris build-up in the machine and WILL result in a jam. This could inflict permanent damage to the machine and WILL void your warranty. WARNING: The manual unjam port cap covers a rapidly rotating internal component during operation. Failure to replace the cap for the manual unjam port will expose the component and can therefore cause serious injury to an unsuspecting user. CAUTION: Failure to replace the cap into the Unjam Vacuum Hose Port can cause a loss of pressure inside the disintegration chamber. This will reduce the vacuum’s effectiveness in removing debris and may slow down the feed rate or possibly result in a jam. 25 Phiston Technologies, Inc. • 305-517-1744 • www.Phiston.com MediaDice Optical Media Destroyer User Manual 8 Disposing of Waste The included one-gallon vacuum has the capacity to hold the debris generated by up to 40 discs destroyed in the MediaDice. Once the vacuum debris container has reached capacity, the operator should empty the debris from the container. Debris collected from the MediaDice is recyclable and can be disposed of in any local waste receptacle. When disposing of the disintegrated debris, the user should handle the debris with care. Particles evacuated by the vacuum from the MediaDice will be less than 1.5 mm on any edge, or a surface area of 2.25 mm2. Some of these particles could have sharp edges or points. Before opening the vacuum, the operator should wear appropriate protective gear including protective gloves, eye protection, and a dust mask to prevent inhalation. Do not attempt to open or clean the vacuum in a location where the air movement could cause the particles to become airborne, such as in front of a fan, air vent or in a windy location. CAUTION: The fine disintegrated debris collected by the vacuum may contain sharp edges and points, and could become airborne when the vacuum is being cleaned. The operator should always wear appropriate protective gloves, and dust mask when emptying debris or cleaning the vacuum. 9 The MediaDice Vacuum Accessory The vacuum supplied with your MediaDice is a wet/dry vacuum capable of collecting up to 1 gallon of disintegrated media from the MediaDice, or about 40 disintegrated discs. The specifications for the vacuum are available in section 4.3, “Specifications,” on page 9. The vacuum is supplied with a foam sleeve, a reusable dry filter, and several accessories. To prepare the vacuum for use with the MediaDice, follow instructions in the vacuum user manual to install the foam sleeve and the reusable dry filter. Depending on use, the filter should be regularly cleaned and inspected for wear. Refer the Vacuum user manual for further information on maintenance, and troubleshooting any problems that may arise with the vacuum. For information on how to upgrade your vacuum to a compatible, higher capacity vacuum, contact your dealer or vendor and ask about our MediaDice accessories, or call Phiston Technologies Customer Service at 305-517-1744. Please visit us at www.Phiston.com to learn more about the MediaDice and its accessories. 26 Phiston Technologies, Inc. • 305-517-1744 • www.Phiston.com MediaDice Optical Media Destroyer User Manual 10 Maintenance & Service WARNING: Never attempt to open or remove the outer casing of the MediaDice. Never attempt to work on the unit while it is in operation. The MediaDice does not contain any user-serviceable parts. Please refer any servicing (mechanical and/or electrical) to qualified service personnel authorized by your dealer or Phiston Technologies to perform such work. Service performed by unauthorized personnel may result in injury or damage to property, and will void your warranty. Perform a self-maintenance routine after every 5,000 discs in order to verify the product’s functionality. In order to do a self-maintenance routine, complete the following steps without placing any media inside the MediaDice: 1) Ensure that the vacuum is properly connected to the MediaDice by following the steps outlined in section 5.3.3, “Connecting the Vacuum.” 2) Initiate the MediaDice by setting the Main Circuit Breaker in the back of the unit to the “Reset” position. Ensure that the green power indicator illuminates. 3) Confirm that there is no media resting on the loader and press the “Start” button to start the MediaDice. Ensure that the red status indicator illuminates solidly, and then changes from solid to blinking once the loader starts feeding. 4) Allow the MediaDice to run until it automatically shuts down. 5) Remove the cap for the unjam vacuum hose port. 6) Remove the vacuum hose from the vacuum hose port and insert it into the unjam vacuum hose port. 7) Confirm that there is no media resting on the loader and press the “Start” button to start the MediaDice. 8) Press the “Pause” button. Ensure that the loader stops feeding and that the red status indicator changes from blinking to solid. 9) Press the “Continue” button. Ensure that the loader starts feeding and that the red status indicator changes from solid to blinking. 10) Press the “Stop” button to shut down the MediaDice. Ensure that the green power indicator changes from solid to blinking as it shuts down, and back to solid once the MediaDice is shut down. 11) Remove the vacuum hose from the unjam vacuum hose port and insert it into the vacuum hose port. Reinsert the cap into the unjam vacuum hose port. 12) Turn off the MediaDice by setting the Main Circuit Breaker in the back of the unit to the “OFF” position. 13) Dispose of all debris in the vacuum cleaner. WARNING: NEVER operate the MediaDice without the debris collection vacuum properly installed and running as specified in section 5.3.3, “Connecting the Vacuum”. Failure to replace the vacuum hose into the Vacuum Hose Port will cause debris build-up in the machine and will result in a jam. This could inflict permanent damage to the machine and possibly void your warranty. 27 Phiston Technologies, Inc. • 305-517-1744 • www.Phiston.com MediaDice Optical Media Destroyer User Manual CAUTION: Failure to replace the cap into the Unjam Vacuum Hose Port can cause a loss of pressure inside the disintegration chamber. This will reduce the vacuum’s effectiveness in removing debris and may slow down the feed rate or possibly result in a jam. CAUTION: The fine disintegrated debris collected by the vacuum may contain sharp edges and points, and could become airborne when the vacuum is being cleaned. The operator should always wear appropriate protective gloves, and dust mask when emptying debris or cleaning the vacuum. Check the MediaDice for excessive debris buildup before and after every use. Clean the MediaDice when necessary. To clean the MediaDice, unplug it and clean with a clean cloth. Never use flammable liquids or solvents to clean the MediaDice. Should you find any issues with your machine that will not allow you to complete the self-check routine, refer to section 11, “Troubleshooting.” If serious issues become apparent such as a permanently jammed machine, non-functioning indicators, unresponsive components, or any other similar defects, immediately report themto your dealer or Phiston Technologies Customer Service. If the issues cannot be resolved, you will be directed to a service representative in your area/region for servicing or repair. If none are available, Phiston will provide further instructions on how to obtain service. For more information, refer to section13, “Customer Service.” Refer the Vacuum user manual for further information on maintenance, and troubleshooting any problems that may arise with the vacuum. 28 Phiston Technologies, Inc. • 305-517-1744 • www.Phiston.com MediaDice Optical Media Destroyer User Manual 11 Troubleshooting # 1 Issue Solution My MediaDice is making odd noises The MediaDice will often produce different sounds depending on the stage of operation that it is in. A constant noise similar to a motor will denote the sound that the MediaDice’s rotary blades make during operation and before any media has been inserted into the machine. If, during operation, a user inserts optical media into the hopper and starts the loader, a shredding sound similar to a food blender will be audible. It is normal to hear these sounds throughout the unit’s disintegrating process. If sounds are heard that are different from what is described above or if you feel the MediaDice is making sounds that are not normal, call Phiston Customer Service to assess the issue. The MediaDice’s disc loader automatically feeds in discs when the machine is turned on and when the start button is pressed down to begin the feed cycle. If the unit does not feed in discs after performing these steps, follow these procedures: 2 My MediaDice isn’t feeding discs 3 4 5 My MediaDice feeds discs inconsistently My MediaDice keeps jamming The vacuum will not turn on Check inside the hopper to see if any optical media have been improperly lodged in. DO NOT PUT YOUR FINGERS IN THE HOPPER TO RETRIEVE MEDIA Check the light indicators to ensure the machine is not jammed and preventing the feed cycle from occurring as is specified in section 7.1, “How to Identify a Jam.” Ensure that only specified optical media found in section 4, “Description and Specifications,” is being inserted into the machine. Check whether the optical media have been properly stacked inside the hopper. The MediaDice is designed to turn off the loader momentarily when the machine senses a pre-mature jamming is taking place. If this occurs, refer to the Section 7, “If the Machine Jams or Stops Unexpectedly,” on page 22 and troubleshooting item # 4 to ensure proper care and to prevent this inconsistency from occurring. Refer to section 7, “If the Machine Jams or Stops Unexpectedly,” on page 22 to properly unjam the unit. If jamming continues to occur after having successfully recovered the unit, follow these procedures: Check whether the unjam vacuum port cap is properly inserted. Check whether the vacuum container is empty of debris and is properly working. Ensure that only specified optical media found in section 4, “Description and Specifications,” on page 8 is being inserted into the machine. The MediaDice is designed to automatically turn on the vacuum when the rotary blades turn on. If the vacuum does not turn on during this cycle, check to see whether the vacuum’s power cord has been properly plugged into the machine. Also ensure that the vacuum unit’s own power switch is left on the “ON” position. Follow the steps outlined in section 5.3.3, “Connecting the Vacuum,” on page 13. If the MediaDice does not turn on, follow these procedures: 6 MyMediaDice will not turn on. Check that the Main Circuit Breaker, located to the left of the power receptacle on the back of the unit, is set to the “Reset” position. Make sure that the unit is properly plugged in. Ensure that the Secondary Circuit Breaker, located to the right of the power 29 Phiston Technologies, Inc. • 305-517-1744 • www.Phiston.com MediaDice Optical Media Destroyer User Manual receptacle on the back of the unit, has not been ejected from its seated position. If the Secondary Circuit Breaker has been ejected, then the MediaDice has experienced a power surge or a short circuit. Make sure the Main Circuit Breaker is set to “OFF” and disconnect the power cable. Then, push the Secondary Circuit Breaker back into its original position. Ensure that the Main Circuit Breaker, located to the left of the power receptacle on the back of the unit, is set to the “Reset” position and is still illuminated. If the Main Circuit Breaker is not illuminated, then it has been tripped and the MediaDice has experienced a power surge or a short circuit. Manually reset the Main Circuit Breaker by switching it to the “OFF” position and then back to the “Reset” position. Check the power cable and the outlet for any defects. If you are in doubt as to the status of your outlet, test the outlet with a lamp or other appliance, or try another outlet. If you are still uncertain as to the status of your outlet, consult a qualified electrician. Refer to section 13, “Customer Service,” on page 30 for any issues that cannot be resolved by following the solutions outlined in this section. 12 Warranty Please refer to the supplied Phiston MediaDice Optical Media Destroyer Limited Warranty document for further information on warranty for the Phiston MediaDice Optical Media Destroyer. 13 Customer Service To obtain service, technical support, or general information about the product and/or accessories, please contact your dealer or vendor, or contact Phiston Technologies Customer Service at 305-517-1744 or e-mail us at [email protected]. 30 Phiston Technologies, Inc. • 305-517-1744 • www.Phiston.com Phiston Technologies®, Inc. 3300 N.W. 112th Ave. Suite #3 Miami, FL, 33172 (305) 517-1744 www.Phiston.com The information and specifications included in this manual were those in effect at the time of publication. Notwithstanding, Phiston Technologies, Inc. reserves the right to discontinue or change specifications or design at any time without notice and without incurring any obligation whatsoever, provided such changes are with the intent of improving the safety, operation and functionality of the machine. © Phiston Technologies, Inc. 2012. Rev. 09.02.08.13


![[1]StorageTek Linear Tape File System, Open Edition](http://vs1.manualzilla.com/store/data/005641506_1-83def2383162ce3771fdbc891794971f-150x150.png)