1
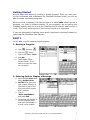
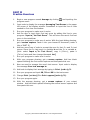
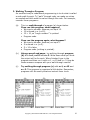
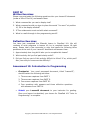
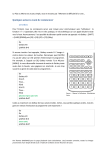
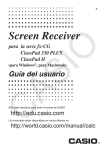
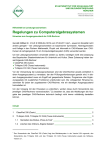
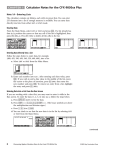
for Version 3 Basic Edition
Lesson 15
Introduction to Programming
Welcome
There are many different types of programming languages. Each
programming language has its own syntax or style for entering
instructions. To program in a particular language you must learn the
syntax of the language. In any programming language, we are writing
instructions for the computer or device to follow. Programming is
logical and fun!
Lesson Goals
•
•
•
•
To
To
To
To
gain a general understanding of programming
write a simple program showing output
write a simple program asking for input
write a program that averages three numbers
In Lesson 15, you will learn how to:
•
•
•
Write a program to display output
Write a program to accept input
Use an If Then statement
Upon completion of this lesson, you will be able to
answer the following questions:
1. What command do you use to display text?
2. What command do we use to clear the display window?
3. What command would you type to place the words “You won!” at
position 10, 50 in the display window?
4. If Then statements must end with what command?
5. What is a walk through in the programming world?
Time required
About 60 minutes.
Getting Started
We will begin this lesson by creating a simple program. Once you learn how
to find commands and understand the ClassPad’s syntax (style) you will be
able to create interesting programs.
When we write a program, the text we type in is called code. When we run a
program, our code is followed exactly. In our programs, we are telling the
ClassPad exactly what to do and the ClassPad will do exactly what we tell it
to do. This is why entering text in the correct format is so important.
If you are interested in learning more about a particular command, please try
searching the ClassPad’s User Manual.
PART I
In this part, we will create a simple program.
1. Naming a Program
m and then p
Click the O button
a. Click
b.
c. Type in the name: Hello
d. Click OK
e. The Program Editor
window opens. This is
where we input the code
for a program.
2. Entering Code to Display a Message
a. Open the I/O menu and
select Output/Print
b. NOTICE Print was input
with a space following it.
The space is part of the
Print command’s syntax
and is needed.
c. Type in
“Hello ClassPadder”
and press EXE
d. The quotes are needed to
let the ClassPad know
that Hello ClassPadder is
a word, not a variable
Copyright (c) 2008 CASIO COMPUTER CO., LTD. All Rights Reserved.
2
3. Running a Program
a. Click the
) button
b. Click Yes to save your
changes
to run your
c. Click
program
d. Click OK
e. Click in the upper
window
f.
to run your
Click
program again (Our 1st
Hello still shows!)
g. Click OK
h. Run Hello a few more
times
4. Editing a Program
a. Click in the upper
window
b. Select P to return to
the Program Editor
c. Click (place focus) below
the Print line
d. Input ClrText
*You can type it in or select
I/O /Clear/ClrText
e. Run the program again
*Click ), Yes and then
f.
Well, what happened?
Our program did exactly what we told it to do!
First it printed Hello ClassPadder and then it cleared the window.
But, we would like it to first clear the window and then print Hello
ClassPadder. Hmmm…
Copyright (c) 2008 CASIO COMPUTER CO., LTD. All Rights Reserved.
3
5. Editing a Program (Continued)
a. Click in the upper
window and select
P
b. Delete ClrText
c. Put an empty line above
Print “Hello ClassPadder”
d. Click in the empty line
e. Type in ClrText or select
I/O /Clear/ClrText
f.
Click the
) button
g. Click Yes
h. Click
to run your
program and click OK
i.
Click in the upper
window
j.
to run your
Click
program again (Only one
Hello ClassPadder!)
6. Using the Locate command to Print
The Locate command lets us place output at a specific (x,y) location on
the screen. For example, Locate 10, 20, “abc” places abc over 10 and
down 20 from the upper left corner. We can go as high as 290 for each
location (horizontal and vertical).
a. Let’s try to print “Hello”
near the center of the
display window!
b. Open the program editor
(select P)
c. Place the cursor below
the Print line
d. Open the I/O menu and
select Output/Locate
e. Notice a space following
Locate (This is part of the
syntax!)
f.
Following Locate, type in
80, 50, “Hello”
g. Click
) and Yes
to run your
h. Click
program and click OK
i.
Not quite centered; try
changing the location
and run again
Copyright (c) 2008 CASIO COMPUTER CO., LTD. All Rights Reserved.
4
Button Review
•
Click
to create a new program.
•
Click
to return to the program editor and edit a window.
•
Click
to save changes and exit the program editor.
•
Click
to run a program.
PART I
Practice Exercises
Before beginning the practice exercises, open a word
document, type in the following information and then save it
as Lesson15 in your CASIO folder within My Documents:
•
Date: (enter today's date)
•
To: (put your instructor’s name here)
•
From: (put your name here)
•
Re: Lesson 15
1.
Begin a new program named Today by clicking
program name.
and inputting the
2.
Input code to display the word Today in the upper left corner of the
display window. Remember to input the line of code needed to first clear
the window.
3.
Run your program. With Today displaying in the output window, get a
screen capture. Paste it into your Lesson15 document (under a title of
PART I).
4.
Add a line of code to display is Tuesday (or whatever day of the week it
is for you) on the next output line to be displayed.
5.
Run your program. With your new output showing, get a screen
capture. Add two blank spaces following the first screen capture and
then paste this one.
6.
Add a line of code to display Today is Tuesday (or some other day
name) so that it is centered in the output window. Try to center it, but it
does not have to be perfect!
7.
Once you are happy with your centering, get a screen capture of your
output window. Add two blank spaces following the second screen
capture and then paste this one.
Copyright (c) 2008 CASIO COMPUTER CO., LTD. All Rights Reserved.
5
PART II
In this part, we will ask the user for input and then display a message using
their input.
1. Getting Input from the User
a. Open your Hello
program again
b. Select P to edit the
program
c. Delete the line
containing Locate
d. Select I/O and then
Output/Print
e. Type in “What is your
name?” and press EXE
f.
Select I/O and then
Input/InputStr
g. Type in Name and press
EXE
h. Type in Print Name and
press EXE
i.
Run your program
2. More Input from User
a. Return to the Program
Editor
b. Type in Print “How old
are you?” and press
EXE
c. Type in Input Age and
press EXE
d. Type in Print “In 5
years you will be:” and
press EXE
e. Type in Print Age+5
and press EXE
f.
Run your program
What is the difference between Input and InputStr?
•
•
InputStr treats what we input as a string. In programming we call text
strings (text is made up of a string of characters).
Input treats what we input as a value that we can perform calculations
on.
Copyright (c) 2008 CASIO COMPUTER CO., LTD. All Rights Reserved.
6
3. Viewing a Variable’s Contents
a. When we ran our
program, values were
stored in the variables
Name and Age
b. To view their contents
select O/ Variable
Manager
c. Double click on the
main folder to open it
d. Double click on the
variable Name to view
its contents
STR stands for String. STR indicates a
variable type that is used to store a
word or words (a string of letters).
e. Notice the variable
Name is of type STR
4. Viewing a Variable’s Contents (Continued)
a. Next, double click on
the variable Age
b. I am so old!
c. Notice the variable Age
is of type EXPR
d. Also, notice our
programs are listed here
e. Double click on one of
your program names to
see what happens ☺
EXPR stands for Expression. EXPR
indicates a variable type that is used to
store a value that can be used in
calculations.
How do we average numbers?
In the Part II practice exercises you will write a program to find the average
of three grades. Remember, to find an average, we add the values and then
divide by the number of values we added. For example, to average 80, 92
and 88 we find (80+92+88)/3.
In general, to average grades a, b and c we find (a+b+c)/3.
Copyright (c) 2008 CASIO COMPUTER CO., LTD. All Rights Reserved.
7
PART II
Practice Exercises
1.
Begin a new program named Average by clicking
program name.
and inputting the
2.
Input code to display the message Averaging Test Scores in the upper
left corner of the display window. Remember to input the line of code
needed to first clear the window.
3.
Run your program to make sure it works.
4.
Ask the user to input their first test score by adding this line to your
program: Input a,”1st Test Score”. This will store the user’s first test
score in the variable a.
5.
Run your program to make sure it works. With the input dialog showing,
get a screen capture. Paste it into your Lesson15 document (under a
title of PART II).
6.
Add two more lines of code to prompt the user for their 2nd and 3rd test
scores. Store the 2nd test score in variable b and the 3rd in variable c.
[Hint: select Input a,”1st Test Score”, copy it (Ctrl+c), paste it
(Ctrl+v) twice and then change the a and 1st.]
7.
Run your program to make sure it works.
8.
With your program showing, get a screen capture. Add two blank
spaces following the first screen capture and then paste this one.
9.
Now we need to average the user’s test scores. Input code to display
the message Your test average is:
10. Add code to display their average by typing in Print (a+b+c)/3.
11. Run your program and input 90, 78 and 98 for the test scores.
12. Change Print (a+b+c)/3 to Print approx((a+b+c)/3).
13. Run your program again.
14. With the average showing, get a screen capture of your output
window. Add two blank spaces following the second screen capture and
then paste this one.
Copyright (c) 2008 CASIO COMPUTER CO., LTD. All Rights Reserved.
8
PART III
A very important part of writing programs is to be able to do something
based on a particular value. For example, checking to make sure the user is
inputting valid values. Would it be reasonable for a user to input a test score
of -20 or 152? Well, 152 might be reasonable if the test was based on 200
points, but -20 is not reasonable!
1. The Ctrl Menu
a. Click the
O button
b. Type in the name: Temp
c. Click OK
d. Open the Ctrl menu and
look around. The Ctrl
menu contains command
statements that let us
control what happens
based on conditions.
2. Using an If Then Statement
We can use an If Then statement to check for valid input or perform
different actions based on input. The “syntax” of an If Then statement is
as follows:
If something is true
Then
Do this…
Else
Do this…
IfEnd
a. Type in the program
exactly as shown
b. Run the program a
few times
c. Input at least one
number greater than
10 and one number
less than ten
d. Does the logic of the
If Then statement
make sense?
Copyright (c) 2008 CASIO COMPUTER CO., LTD. All Rights Reserved.
9
3. Walking Through a Program
An excellent way to understand programming is to do what is called
a code walk through. To “walk” through code, we make up values
as needed and then walk the value through the code. For example,
consider these programs:
(a)
This is a walk through of program (a) shown below.
If we run this program, what happens?
o We input a number. Assume you input 12.
o 12 is stored in n (n=12).
o 12 > 10, so “Large number!” is printed.
o Program ends.
If
o
o
o
o
we run the program again, what happens?
We input a number. Assume you input 5.
5 is stored in n (n=5).
5 > 10 is false.
Program ends (nothing is printed).
(b)
Using a pencil and paper, try walking through program
(b) with n=1, n=15 and n=-3. Write down what you think
the output will be for each. When finished, type in the
program and then run it with n=1, n=15 and n=-3. How do
these answers compare with your walk through results?
(c)
Try walking through program (c) with n=1, n=15 and
n=-3. This program is organized a little better. Remember,
programs will do exactly what we instruct them to do.
(a)
(b)
Copyright (c) 2008 CASIO COMPUTER CO., LTD. All Rights Reserved.
(c)
10
PART III
Practice Exercises
1.
Begin a new program named Drive by clicking
program name.
2.
Write a program (using an If Then Else statement) that will do the
following:
•
Ask the user what their name is.
•
Ask the user their age.
•
Display the user’s name.
•
On the next output line:
and inputting the
o
If they are 15 years or older, display the message: You can
drive the car.
o
If they are between 5 years and 14 years of age, display the
message: You can ride the bicycle.
o
If they are under 5 years of age, display the message: Ask
your mother or father for a ride.
o
If they are less than 0 years old, display the message: You are
not born yet!
3.
Run your program and input an age of 15. With the output window
showing, get a screen capture. Paste it into your Lesson15 document
(under a title of PART III).
4.
Run your program and input an age of 8. With the output window
showing, get a screen capture. Add two blank spaces following the first
screen capture and then paste this one.
5.
Run your program and input an age of 3. With the output window
showing, get a screen capture. Add two blank spaces following the last
screen capture and then paste this one.
6.
Run your program and input an age of -43. With the output window
showing, get a screen capture and then paste it on the next line.
Copyright (c) 2008 CASIO COMPUTER CO., LTD. All Rights Reserved.
11
PART IV
Written Exercises
Please copy and paste the following questions into your Lesson15 document
(under a title of Part IV) and answer them.
1. What command do you use to display text?
2. What command would you type to place the words “You won!” at position
10, 50 in the display window?
3. If Then statements must end with what command?
4. What is a walk through in the programming world?
Reflection Exercises
You have just completed the fifteenth lesson in ClassPad 101. We will
continue to write programs in Lesson 16; try to complete Lesson 16 right
away. Please take a few moments to copy and paste the following three
questions at the end of your Lesson15 document and answer them.
1. Approximately how long did it take you to complete this lesson?
2. Which activity did you find particularly useful?
3. Did you find any part of this activity difficult to follow? If so, which part?
Also, how did you overcome the difficulty?
Assessment 15: Introduction to Programming
•
Checkpoint: Your word processed document, titled "Lesson15",
should contain the following activities:
1. Three screen captures from PART I.
2. Three screen captures from PART II.
3. Four screen captures from PART III.
4. Four questions with answers and three reflection questions
with answers from PART IV.
•
Submit your Lesson15 document to your instructor for grading.
Once your lesson is submitted, your lesson for ClassPad 101 “Intro to
Programming” is complete.
Copyright (c) 2008 CASIO COMPUTER CO., LTD. All Rights Reserved.
12