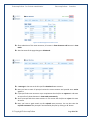
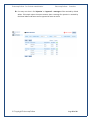
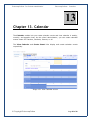
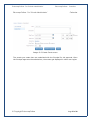
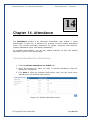
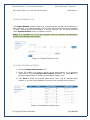
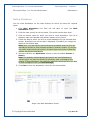
1
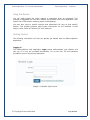
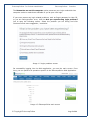
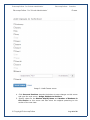
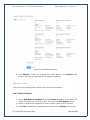
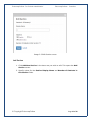
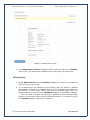
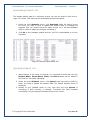
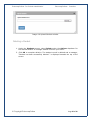
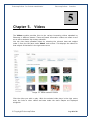
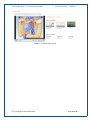
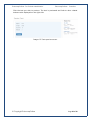
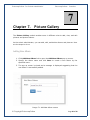
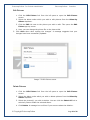
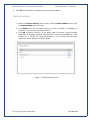
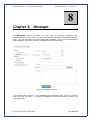
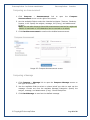
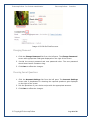
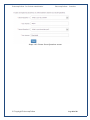
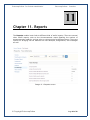
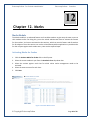
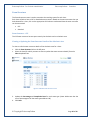
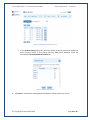
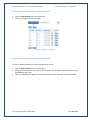
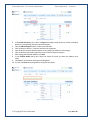
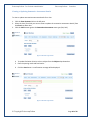
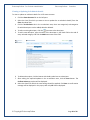
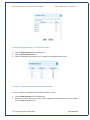
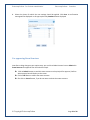
User Manual - For ‘School Administrator’ Table of Contents Chapter 1. EducompOnline – Overview.......................................................4 Introduction to EducompOnline ....................................................................... 4 User Roles .................................................................................................. 5 Best Configuration ........................................................................................ 6 Using this Manual ......................................................................................... 6 Getting Started ............................................................................................ 6 Logging In .................................................................................................6 Major Features ...........................................................................................8 Chapter 2. Classes .............................................................................. 9 Adding a New Class ...................................................................................... Editing a Class ............................................................................................ Add / Remove Subjects ............................................................................... Add Section ............................................................................................. Delete Section.......................................................................................... Deleting a Class........................................................................................... 10 11 11 12 13 14 Chapter 3. Teachers ............................................................................ 15 Viewing Teacher Details ................................................................................ Adding a Teacher ........................................................................................ Adding / Removing Classes ............................................................................. Resetting the Teacher Password...................................................................... Deleting a Teacher ...................................................................................... 15 16 17 18 18 Chapter 4. Students ............................................................................ 19 Viewing Students......................................................................................... 20 Adding New Students.................................................................................... 20 Editing Student Details ................................................................................. 21 Viewing Parent Details .................................................................................. 22 Changing Student Password............................................................................ 22 Changing Parent Password ............................................................................. 23 Downloading Students’ List ............................................................................ 24 Uploading Students’ List................................................................................ 24 Deleting a Student ....................................................................................... 25 Chapter 5. Videos ............................................................................... 26 Chapter 6. Tests ................................................................................. 28 Chapter 7. Picture Gallery .................................................................... 30 Adding New Album....................................................................................... Adding Pictures to an Album .......................................................................... Editing Pictures .......................................................................................... Edit Pictures ............................................................................................ Delete Pictures......................................................................................... Deleting an Album ....................................................................................... 30 31 31 32 32 33 Chapter 8. Messages ............................................................................ 34 Composing an Announcement ......................................................................... 35 Composing a Message ................................................................................... 35 Chapter 9. Settings ............................................................................. 37 Adding a New Category ................................................................................. 37 Changing Access Level .................................................................................. 38 Chapter 10. Account ............................................................................. 39 Editing School Profile ................................................................................... Editing Self Profile ....................................................................................... Changing Password ...................................................................................... Choosing Secret Questions ............................................................................. 40 40 41 41 Chapter 11. Reports.............................................................................. 43 Chapter 12. Marks ................................................................................ 44 Activating Marks for Grades ........................................................................... 44 Exam Structure ………..…................................................................................. 45 Chapter 13. Calendar ............................................................................ 56 Chapter 14. Attendance ......................................................................... 57 Activating Attendance for Class Sections ........................................................... Updating Students List .................................................................................. Granting Attendance Rights............................................................................ Marking Attendance ..................................................................................... Viewing Reports .......................................................................................... 57 58 59 60 61 Chapter 15. School Website .................................................................... 62 Chapter 16. Add Principal Login ............................................................... 64 1 Chapter 1. EducompOnline – Overview Introduction to EducompOnline EducompOnline is a virtual school for Educomp Smartclass schools. As part of Educomp Smartclass schools, EducompOnline gives schools an institutional online presence to schools where they can perform a dynamic range of activities that empower them to deliver more value to students, parents, teachers, and principals. With activities like send a message and, send an important announcement, the schools can inform the teachers, parents, and students about the upcoming events or updates. They can customize their website to match the identity of the school with a logo and use several services offered by EducompOnline. From a single access point, the schools can manage the accounts of teachers and students accounts by adding them into the system, tracking their activities, and viewing content and tests. They can share photos and videos of all the school events by uploading them on the website. For each school, these activities are performed by a school administrator. The administrator enters the system through a user name and password, which are assigned when a school enrolls for the EducompOnline program. EducompOnline - For ‘School Administrator’ EducompOnline – Overview User Roles There are 5 levels of access to the EducompOnline website: • System Administrator • Principal • Teacher • Student • Parent The broad difference between the above access levels is that the System Administrator can use all functionality available in all modules, whereas the other roles can use the functionality provided in their relevant modules. For example, a Teacher can add/ remove/ edit the information pertaining to Teacher module only. Similar is the case with Students and Parents. The Principal user, however, has a distinct privilege to accept/ reject the changes submitted to the school website by the System Administrator. Best Configuration The EducompOnline Web application is best used on Internet Explorer versions higher than 7.0 or Firefox versions 4.x or above, with a resolution of 1024 X 768 and colour depth of 16 bit or higher. The browser settings should be set to default for best performance. These settings ensure optimum user-friendliness of the user interface as well as easy maintenance of the application. © Copyright EducompOnline Page 5 of 64 EducompOnline - For ‘School Administrator’ EducompOnline – Overview Using this Manual You can read through the entire manual in sequential order as presented. This method is suggested for first time readers and presents the entire application with logical flow of information enabling easier understanding. You may also jump to specific sections and subsections for help on that specific feature. This manual presents step-by-step instructions for the workflow in that section. Refer ‘Table of Contents’ for such selection. Getting Started The following information will help you quickly get started with the EducompOnline application. Logging In The EducompOnline web application Login screen authenticates your identity and lets you in to use the provided functionality. Fill up the User ID and Password provided to you to log into the application. Image 1.1 Member Login screen © Copyright EducompOnline Page 6 of 64 EducompOnline - For ‘School Administrator’ EducompOnline – Overview The Remember me on this computer option preserves your login credentials into computer cache to make them available to you at your next login. If you come across any login related problems, such as forgot password or User ID, or you are facing another error, click the Are you experiencing login problem? link to open the following screen. Select the problem you are facing and click Continue to find some suggestion / resolution. Image 1.2 Login problems screen On successfully logging into the Web application, you see the main screen. From here, you can perform all operations specific to the EducompOnline Web Application. Image 1.3 EducompOnline main screen © Copyright EducompOnline Page 7 of 64 EducompOnline - For ‘School Administrator’ EducompOnline – Overview Major Features A school administrator can use the following major features offered by the EducompOnline website: • Update school profile • Add / Edit / Delete Classes • Add / Edit / Delete Class Sections • Create/Delete IDs of Students, Teachers and Parents • View Videos • View Tests • Upload / Edit / Delete Pictures • Create / Edit Message Categories • Send Messages / Announcements • View Reports • Activate Marks for Grades • View / Create Calendar Events • Mark Attendance of Students • Manage School Website CMS • Add / Edit Principal Details © Copyright EducompOnline Page 8 of 64 EducompOnline - For ‘School Administrator’ EducompOnline – Overview 2 Chapter 2. Classes Adding a New Class 1. Click Add New Class to open the Add Classes to Educomp School screen. This screen lists the predefined class categories that you need to use as templates. Such categories can be selected or deselected using the given checkboxes. All other classes added to the school so far are also listed and shown as grayed and selected on this screen. 2. Select the class(es) you need to base your new class definition on using the checkbox(es). The fields, Display Name and No. of Sections, drop down just below the selected class(es). 3. Specify the Display Name and No. of Sections for your new class(es). © Copyright EducompOnline Page 9 of 64 EducompOnline - For ‘School Administrator’ EducompOnline – Overview EducompOnline - For ‘School Administrator’ Classes Image 2.1 Add Classes screen 4. Click Save and Continue towards the bottom to save changes on this screen and open the next screen, Assign Subjects to Sections. 5. Specify values for the Section Display Name and Number of Students in this Section on this screen and also select the subjects pertaining to this section of the new class. © Copyright EducompOnline Page 10 of 64 EducompOnline - For ‘School Administrator’ EducompOnline – Overview Image 2.2 Add Subjects screen 6. Click Submit to save the changes and come back to the Classes main screen. The class you just added now appears in the list. Editing a Class You can edit the details of an existing class in the following ways: Add / Remove Subjects 1. Select Add/Remove Subjects from the Actions dropdown in a section row under the class entry you wish to edit. This opens the Edit Section screen. 2. Select or deselect the subjects you wish to add or remove on this screen. 3. Click Save to effect the changes and come back to the Classes main screen. © Copyright EducompOnline Page 11 of 64 EducompOnline - For ‘School Administrator’ EducompOnline – Overview Image 2.3 Edit Section screen Add Section 1. Click Add New Section in the class row you wish to edit. This opens the Add Section screen. 2. Specify values for the Section Display Name and Number of Students in this Section fields. © Copyright EducompOnline Page 12 of 64 EducompOnline - For ‘School Administrator’ EducompOnline – Overview Image 2.4 Add Section screen 3. Click Add Section to Class to add the section and come back to the Classes main screen. The new section is added to the class entry you had chosen. Delete Section 1. Select Delete Section from the Actions dropdown in a section row under the class entry you wish to edit. 2. If no students are yet assigned to this section, then the section is deleted straightaway. Otherwise, a message pops us asking to assign the students for this section to some other section and then try deletion again. Such reassignments can be done from the Students module, as explained in Chapter 4. You also need to assign the teacher(s) assigned to this particular class section to some other section before deleting the section. You can do so from the Teachers module, explained in Chapter 3. © Copyright EducompOnline Page 13 of 64 EducompOnline - For ‘School Administrator’ EducompOnline – Overview Deleting a Class 1. Click Delete Class link on the top right area for the class entry you wish to delete. 2. Before deleting a class, you must have assigned the students under its sections to some other sections of another class. Once you have done that, the class gets deleted and the entry is cleared from the Classes main screen. © Copyright EducompOnline Page 14 of 64 EducompOnline - For ‘School Administrator’ EducompOnline – Overview 3 Chapter 3. Teachers The Teachers module lets you create teachers IDs and link the teachers with proper classes, sections and subjects they teach. From the Teachers main screen, you can add a teacher, view list of teachers, download teachers’ list, view particular teacher details, add / remove classes from a teacher’s profile, reset the teacher account password, and delete a teacher. The Filter By alphabet links let you filter the teachers’ list below based upon the initial alphabet. Image 3.1 Teachers main screen Viewing Teacher Details 1. Click the Details link next to the teacher name you wish to view details for. The row for this particular teacher expands in the area below to show some © Copyright EducompOnline Page 15 of 64 EducompOnline - For ‘School Administrator’ EducompOnline – Overview important details about the teacher, like email ID, classes, sections, and subjects that the teacher is associated with. 2. Click the Hide link to get back to the normal list view. Image 3.2 Teachers main screen Adding a Teacher 1. Click Add Teacher to open the Add New Teachers screen. 2. Specify the names of the teachers you wish to add. 3. Click Add Teachers to add the teachers and come to the Teachers main screen. The new teachers are added to the teachers’ list. Image 3.3 Add Teacher screen © Copyright EducompOnline Page 16 of 64 EducompOnline - For ‘School Administrator’ EducompOnline – Overview Adding / Removing Classes 1. Select Add/Remove Classes from the Actions dropdown in a teacher row where you wish to add or remove classes. This opens the Assign Classes To Teacher screen, which lists down all classes for the school. 2. Select or deselect the classes for which you wish to add or remove subjects for the teacher. When you select a class, the list of sections drops down. You must ensure assiging a teacher the appropriate class section(s) and subjects. 3. Select or deselect the sections you wish to add or remove for the particular teacher using the available checkboxes. When you select a class, the list of subjects drops down. 4. Select or deselect the subjects you wish to add or remove for the particular teacher using the available checkboxes. 5. Click Assign Classes to associate the selected subjects with the particular teacher to return to the Teachers main screen. A message on the main screen suggests that the subjects are added to the teacher successfully. Image 3.4 Assign Classes To Teacher screen © Copyright EducompOnline Page 17 of 64 EducompOnline - For ‘School Administrator’ EducompOnline – Overview Resetting the Teacher Password 1. Select Reset Password from the Actions dropdown in a teacher row where you wish to reset password. This opens the Reset Password screen. 2. Specify the new password and confirm password on this screen. 3. Click Save to reset password and return to the Teachers main screen. Image 3.5 Reset Password screen Deleting a Teacher 1. Select Delete from the Actions dropdown in the teacher row, which you wish to delete. A message window to confirm your action pops up. 2. Affirm your action by clicking OK and the teacher is deleted from the school records. A message on the top of the main screen informs about the deletion. © Copyright EducompOnline Page 18 of 64 EducompOnline - For ‘School Administrator’ EducompOnline – Overview 4 Chapter 4. Students The Students module lets you manage student details, such as the number of students per section, and their account details. From the Students main screen, you can add students, view list of students in each section, download / upload students’ list, edit particular student’s details, view parent details, reset the student and parent passwords, and delete a student record. The Students main screen lists various classes in your school, the sections under each class, and number of students in each section of the class. The Actions dropdown enables to perform most of the different features available under the Students module. Image 4.1 Students main screen © Copyright EducompOnline Page 19 of 64 EducompOnline - For ‘School Administrator’ EducompOnline – Overview Viewing Students Click View Students from the Actions dropdown for the class section whose students you wish to view. This opens the Students of <Class> <Section> screen displaying the students under the selected class section. Image 4.2 View Student Details Adding New Students 1. Under the Students of <Class> <Section> screen, click Add Students to open the Add More Students window. Alternatively, from the main Students screen, you can select Add New Students from the Actions dropdown for the class section under which you wish to add new students. 2. Specify the number of students you want to add to the selected section of the class. 3. Click Add to close created and added message, “Student creation would take this window and the selected number of student IDs are to the list of students under the selected section. The IDs have been successfully generated. Your Parent ID 12 hours.”, is displayed towards the top of the screen. © Copyright EducompOnline Page 20 of 64 EducompOnline - For ‘School Administrator’ EducompOnline – Overview Image 4.3 Add More Students screen Editing Student Details 1. Under the Students screen, select Edit Student Details under the Actions dropdown for the student record you wish to edit. This opens the Edit Class Section screen. 2. Here, you can edit the student name and the section he/she belongs to by making the required changes. 3. Click Save to effect the changes made. You are returned to the Students screen and the changes are updated. Image 4.4 Add More Students screen © Copyright EducompOnline Page 21 of 64 EducompOnline - For ‘School Administrator’ EducompOnline – Overview Viewing Parent Details 1. Under the Students screen, select Parent Details under the Actions dropdown for the desired student. This opens the Parent Details screen. Image 4.5 Parent Details screen Changing Student Password 1. Under the Students screen, select Change Student Password under the Actions dropdown for the desired student. This opens the Reset Password screen. 2. Specify the new password and confirm password on this screen. 3. Click Save to reset password and return to the Students main screen. © Copyright EducompOnline Page 22 of 64 EducompOnline - For ‘School Administrator’ EducompOnline – Overview Image 4.6 Reset Password screen Changing Parent Password 1. Under the Students screen, select Change Parent Password under the Actions dropdown for the desired student. This opens the Reset Parent Password screen. 2. Specify the new password and confirm password on this screen. 3. Click Save to reset password and return to the Students main screen. Image 4.7 Reset Parent Password screen © Copyright EducompOnline Page 23 of 64 EducompOnline - For ‘School Administrator’ EducompOnline – Overview Downloading Students’ List The student details data for a particular section can also be edited in bulk from a single .XLS sheet. This sheet can be downloaded as described below. 1. Under the main Students screen, click Download under the section group for which you need to view or update the student data. A message box suggests that you should follow the same format as in the downloadable sheet in order to update the changes successfully. 2. Click Ok on this message window and the .XLS file is downloaded on to your computer. Image 4.8 Sample Downloaded XLS Uploading Students’ List 1. Make changes to the sheet as required. It is important to know that only the Student Name, Parent Name, Email, and Phone details can be edited in this sheet for successful uploading. 2. Under the main Students screen, click Upload under the section group for which you need to update the student data. The Upload Student screen is displayed. 3. Browse to your updated sheet on your local disk and click Upload. If everything is done correctly, a message, “Document has been uploaded successfully” will get displayed towards the top of the screen. © Copyright EducompOnline Page 24 of 64 EducompOnline - For ‘School Administrator’ EducompOnline – Overview Image 4.9 Upload Student window Deleting a Student 1. Under the Students screen, select Delete under the Actions dropdown for the desired student. A message window confirms your action. 2. Click OK to complete deletion. The student record is deleted and a message, “Student has been successfully deleted.” is displayed towards the top of the screen. © Copyright EducompOnline Page 25 of 64 EducompOnline - For ‘School Administrator’ EducompOnline – Overview 5 Chapter 5. Videos The Videos module provides links to the various interesting videos uploaded by Educomp or different classes. These self-paced informative videos are meant to act as an aid to students’ day-to-day education. You can view these uploaded videos by selecting the relevant class and subject under it from the left pane under Videos main screen. This displays the videos for that subject of that class in the right centre area. Image 5.1 Videos selection screen Click the video you wish to play. While the selected video plays in the right centre area, the links to other videos and tests under the same chapter are displayed alongside. © Copyright EducompOnline Page 26 of 64 EducompOnline - For ‘School Administrator’ EducompOnline – Overview Image 5.2 Videos play screen © Copyright EducompOnline Page 27 of 64 EducompOnline - For ‘School Administrator’ EducompOnline – Overview 6 Chapter 6. Tests The Tests module provides links to the various interactive practice tests for different subjects under various classes. These tests are created by the subject teachers for the sake of giving their students the practice for their preparations on different chapters/ topics. You can preview these uploaded tests by selecting the relevant class and subject under it from the left pane under Tests main screen. This displays the tests for that subject of that class in the right centre area. Image 6.1 Tests selection screen © Copyright EducompOnline Page 28 of 64 EducompOnline - For ‘School Administrator’ EducompOnline – Overview Click the test you wish to preview. The test is previewed and links to other related tests are also displayed on the right side. Image 6.2 Tests preview screen © Copyright EducompOnline Page 29 of 64 EducompOnline - For ‘School Administrator’ EducompOnline – Overview 7 Chapter 7. Picture Gallery The Picture Gallery module enables users in different roles to add, view, and edit pictures and picture albums. As the school administrator, you can add, edit, and delete albums and pictures. Here are the steps to do so: Adding New Album 1. Click Add New Album link to open the Add New Album pop up screen. 2. Specify the album name and click Save to create a new album by the specified name. 3. The pop up screen is closed and a message is displayed suggesting that the new album is successfully added. Image 7.1 Add New Album screen © Copyright EducompOnline Page 30 of 64 EducompOnline - For ‘School Administrator’ EducompOnline – Overview Adding Pictures to an Album 1. Click the Add Picture link from the left pane to open the Add Picture screen. 2. Select the album to which you wish to add pictures from the Album: dropdown. 3. Click Browse… and choose the picture files to be uploaded to the selected album. 4. Specify a title for the picture to be uploaded in the Title: field. 5. Click Add Picture to add the selected picture to the chosen album. A message suggests that you have successfully uploaded one photo. Editing Pictures You can change the caption or the picture files for individual picture files added to an album or you can delete one or more pictures from an album in this section. © Copyright EducompOnline Page 31 of 64 EducompOnline - For ‘School Administrator’ EducompOnline – Overview Edit Pictures 1. Click the Edit Picture link from the left pane to open the Edit Picture screen. 2. Select the album under which you wish to edit pictures from the Select by Album dropdown. 3. Click the Edit link next to the picture you wish to edit. This opens the Edit Picture pop up screen. 4. Here, you can change the picture file or the picture title. 5. Click Save when done making the changes. A message suggests that your changes have been successfully updated. Image 7.2 Edit Picture screen Delete Pictures 1. Click the Edit Picture link from the left pane to open the Edit Picture screen. 2. Select the album under which you wish to delete pictures from the Select by Album dropdown. 3. Select the picture(s) you wish to delete. You can click the Select All link to select all pictures under the selected album. 4. Click Delete. A message box confirms if you are sure about the deletion. © Copyright EducompOnline Page 32 of 64 EducompOnline - For ‘School Administrator’ EducompOnline – Overview 5. Click OK and the picture is deleted from the selected album. Deleting an Album 1. Under the Picture Gallery main screen, click the Delete Album link to open the Delete Album pop up screen. 2. Click Delete next to the album record you wish to delete. A message box confirms if you are sure about the deletion. 3. Click OK to confirm deletion. If the album had no pictures, it gets deleted. Otherwise, a message suggests that the album could not be deleted as it had pictures in it. Delete the contained pictures in the second case and then repeat the above steps to delete an album. Image 7.2 Delete Album screen © Copyright EducompOnline Page 33 of 64 EducompOnline - For ‘School Administrator’ EducompOnline – Overview 8 Chapter 8. Messages The Messages section provides you the links to compose messages and announcements. It also stores the sent and received messages and announcements. Here, you can compose announcements and messages, view sent announcements and messages, and check received messages and announcements. Image 8.1 Messages screen For checking the received / sent messages and announcements, click the relevant links from the left pane. To compose messages and announcements, perform the following steps: © Copyright EducompOnline Page 34 of 64 EducompOnline - For ‘School Administrator’ EducompOnline – Overview Composing an Announcement 1. Click Compose – Announcement link to Announcement screen on the right of the screen. open the Compose 2. Use the available fields to select the intended recipients: Teachers, Students, Parents, or All. Specify the subject, message, link (if any), and attachments (if any). Note: You can also choose to have this announcement received on registered mobiles. A maximum of 125 characters can be received on a mobile. 3. Click Send Announcement to send out the drafted announcement. Image 8.2 Compose Announcement screen Composing a Message 1. Click Compose – Message link to open the Compose Message screen on the right of the screen. 2. Use the available fields to select on whose behalf you wish to send out the message. Choose one from the available Message Categories. Specify the subject, message, and attachments (if any). Choose Recipients. 3. Click Send Message to send out the drafted message. © Copyright EducompOnline Page 35 of 64 EducompOnline - For ‘School Administrator’ EducompOnline – Overview Image 8.3 Compose Message screen © Copyright EducompOnline Page 36 of 64 EducompOnline - For ‘School Administrator’ EducompOnline – Overview 9 Chapter 9. Settings The privilege to send out messages lies with the Teachers and School Admin users only. As a school administrator user, you can manage the message categories and also control their access levels. The Settings tab lets you do so. Here are the steps: Adding a New Category 1. Click the Add New Category link to open the Add New Category screen. 2. Here, specify the Category Access and Category Name values. 3. Click Save to add category. Image 9.1 Add New Category screen © Copyright EducompOnline Page 37 of 64 EducompOnline - For ‘School Administrator’ EducompOnline – Overview Changing Access Level 1. Click the Change Access link next to the message category. This opens the Change Access pop up screen. 2. Change the Category Access settings as desired. 3. Click Save to submit the changes. A message suggests that the category access level has been successfully changed. Image 9.2 Change Access screen © Copyright EducompOnline Page 38 of 64 EducompOnline - For ‘School Administrator’ EducompOnline – Overview 10 Chapter 10. Account The Account module enables you to update profile settings for the school as well as the school administrator. In this module, you as school administrator can edit school profile, your profile, change password, and choose your secret questions in case you forget your password. Image 10.1 School Profile screen © Copyright EducompOnline Page 39 of 64 EducompOnline - For ‘School Administrator’ EducompOnline – Overview Editing School Profile 1. Click the School Profile link from the left pane. Your school’s account details, such as logo, title, and contact info are displayed on the right of the screen. 2. Click the appropriate edit links to edit the required information. Image 10.2 Edit School Profile screen Editing Self Profile 1. Click the My Profile link from the left pane. Your account details, such as basic info, profile picture, and contact info, are displayed on the right of the screen. You can also change your email id and phone no from here. 2. Click the appropriate edit links to edit the required information. © Copyright EducompOnline Page 40 of 64 EducompOnline - For ‘School Administrator’ EducompOnline – Overview Image 10.3 Edit Self Profile screen Changing Password 1. Click the Change Password link from the left pane. The Change Password screen with appropriate fields gets displayed on the right of the screen. 2. Provide the current password and new password twice. The new password should be at least 6 characters long. 3. Click Save to effect the changes. Choosing Secret Questions 1. Click the Account Settings link from the left pane. The Account Settings screen with 2 dropdowns for choosing the required questions gets displayed on the right of the screen. 2. Pick the questions of your choice and provide the appropriate answers. 3. Click Save to effect the changes. © Copyright EducompOnline Page 41 of 64 EducompOnline - For ‘School Administrator’ EducompOnline – Overview Image 10.3 Choose Secret Questions screen © Copyright EducompOnline Page 42 of 64 EducompOnline - For ‘School Administrator’ EducompOnline – Overview 11 Chapter 11. Reports The Reports module hosts links to different kind of useful reports. There are several other useful reports, such as the Announcements report detailing the number of announcements made by various roles on various topics at different times. There are reports for bringing out the statistics for test attempts, assignments, and messages as well. Image 11.1 Reports screen © Copyright EducompOnline Page 43 of 64 EducompOnline - For ‘School Administrator’ EducompOnline – Overview 12 Chapter 12. Marks Marks Module The Marks module is an advanced feature and it enables teachers to give away the exam scores to their students online. For doing this, you as the school administrator have to activate this feature for the teachers. You have to activate the class sections, which can use this feature and all teachers for all subjects of that class section can use the online EducompOnline application to provide marks for their subjects against each student entry. Here are the required steps: Activating Marks for Grades 1. Click the Activate Marks for Grades link on the left pane. 2. Select the current academic year from the Academic Year drop-down box. 3. Select the sections against each class for which online marks management needs to be activated. 4. Select the exam structure for each class. 5. Click Save. Figure 1: Activate Marks screen © Copyright EducompOnline Page 44 of 64 EducompOnline - For ‘School Administrator’ EducompOnline – Overview Exam Structure The Exam Structure screen is used to customize the marking system for each class. Each class will either have a CCE or Standard exam structure. Based on the exam structure that you had selected for a class, click on the appropriate link below to understand how the exam structure can be customized: CCE Standard Exam Structure – CCE The CCE exam structure has two parts namely the scholastic and co-scholastic area. Viewing or Updating the Exam Structure Details of the Scholastic Area To view or edit the exam structure details of the scholastic area for a class: 1. Click the Exam Structure link on the left pane. 2. Select the class (for which you want to view or update the exam structure details) from the Class drop-down box. Figure 2: Scholastic Exam Structure screen 3. Update the Percentage and Completion Date for each exam type. (Note: Make sure that the sum of percentages of all the exam types adds to 100.) 4. Click Save. © Copyright EducompOnline Page 45 of 64 EducompOnline - For ‘School Administrator’ EducompOnline – Overview Figure 3: Scholastic Exam Structure screen 5. In the Confirm Action pop-up box, select the classes for which you want to update the exam structure details. In this pop-up box only CCE classes displayed, which are activated from Activate Marks for Grades tab. Figure 4: Confirm Action screen 6. Click Save. A confirmation message will be displayed on the top of the main screen. © Copyright EducompOnline Page 46 of 64 EducompOnline - For ‘School Administrator’ EducompOnline – Overview Viewing the Grading Structure of Scholastic Exams 1. Click the Exam Structure link on the left pane. 2. Click on Grading Structure button (A+). Figure 5: Grading structure button Viewing or Updating Formative Assessment Details To view or update the formative assessment details for a class: 1. Click the Exam Structure link on the left pane. 2. Select the class (for which you want to view or update the formative assessment details) from the Class drop-down box. 3. Click on the View button against a Formative Assessment exam type (FA1, FA2, FA3 and FA4). © Copyright EducompOnline Page 47 of 64 EducompOnline - For ‘School Administrator’ EducompOnline – Overview Figure 6: FA Exam Type screen 4. In the Exam Structure screen, select a subject from Subject drop-down box. All the techniques with their corresponding sub topics will be displayed. 3. Click on Add Techniques button to add a new technique. 4. Click on button with the ‘+’ symbol to add new sub-categories. 5. Click the button with the X symbol against a sub category to delete the sub category. 6. Click the buttons with the X symbol in the last column to delete techniques. 7. After making the required updates, click Save. 8. In the Confirm Action pop-up box, select the classes for which you want the updates to be made. 9. Click Save. A confirmation message will be displayed. 10. You can also Reset the settings before saving the techniques. Figure 7: FA Exam Type screen © Copyright EducompOnline Page 48 of 64 EducompOnline - For ‘School Administrator’ EducompOnline – Overview Viewing or Updating Summative Assessment Details To view or update summative assessment details for a class: 1. Click the Exam Structure link on the left pane. 2. Select the class (for which you want to view or update the summative assessment details) from the Class drop-down box. 3. Click the View button against the Summative Assessment exam type (SA1, SA2). Figure 8: SA Exam Type screen 4. To update Evaluation Criteria, select a subject from the Subject drop-down box. 5. Enter the passing marks and total marks. 6. Click the Save button. A confirmation message will be displayed. Figure 9: SA Exam Type screen © Copyright EducompOnline Page 49 of 64 EducompOnline - For ‘School Administrator’ EducompOnline – Overview Viewing or Updating Co-Scholastic details To view or update co-scholastic details for a CCE exam structure: 1. Click the Exam Structure link on the left pane. 2. Select the class (for which you want to view or update the co-scholastic details) from the Class drop-down box. 3. Click the Co-Scholastic tab. In the co-scholastic area, there are categories/ sub-categories for which descriptors can be added, edited or deleted. 4. To edit an existing descriptor, click the icon next to the descriptor. 5. To add a new descriptor, type the name of the descriptor in the blank field at the end of every selected category and click the Add button next to the field. 6. To delete a descriptor, click the button with the X symbol next to a descriptor. 7. After making the required updates in the co-scholastic area, click the Save button. The Confirm Action pop-up box will be displayed. 8. Select the classes for which the new settings should be applied. Click Save. A confirmation message will be displayed. In this pop-up box only CCE classes displayed. © Copyright EducompOnline Page 50 of 64 EducompOnline - For ‘School Administrator’ EducompOnline – Overview Viewing Grading Structure of Co-Scholastic Exams 1. Click the Exam Structure link on the left pane. 2. Click the Co-Scholastic Area tab. 3. Click on Grading Structure button (A+). This opens the grading structure screen. Viewing or Updating Standard Exam Structure Details To view or update the standard exam structure details for a class: 1. Click the Exam Structure link on the left pane. 2. Select the class (for which you want to view or update the standard exam structure details) from the Class drop-down box. © Copyright EducompOnline Page 51 of 64 EducompOnline - For ‘School Administrator’ EducompOnline – Overview Figure 10: Standard Exam Structure screen 4. Select the Marks radio button if you want the exam structure to have a marking system. Select the Grades radio button if you want the exam structure to have a grading system. 5. Irrespective of the system you have selected, to add a new exam to an exam type, click the button with the + symbol against the exam type. This will add a new exam to the exam type. Specify the details of the new exam and click Save. 6. To delete an exam from an exam type, click the button with the X symbol next to the exam that you want to delete. Figure 11: Standard Exam Structure screen 7. After making the required updates in the standard exam structure area, click the Save button. The Confirm Action pop-up box will be displayed. © Copyright EducompOnline Page 52 of 64 EducompOnline - For ‘School Administrator’ EducompOnline – Overview 8. Select the classes for which the new settings should be applied. Click Save. A confirmation message will be displayed. In this pop-up box only Standard classes displayed. For approving Exam Structure Now after making changes as per requirement, you as a School Administrator have to Submit this Exam Structure for approval from the School Principal. Click on Submit button to send this exam structure to the principal for approval, Confirm Action pop-up box will display on the screen. Click on Ok button to submit the exam structure. Else click on Cancel button, if you do not want to submit the exam structure. © Copyright EducompOnline Page 53 of 64 EducompOnline - For ‘School Administrator’ EducompOnline – Overview Figure 12: Submitting Exam Structure screen After submission of this exam structure, all screens in Exam Structure tab become in view mode. Also the status of the page changes to Submitted. A message is also sent to the Principal for submitted exam structure. Now you have to wait till principal review the exam structure and provide some action against it. If principal finds exam structure as per requirement then he/she can approve it and exam structure for all classes becomes in view mode permanently. And if principal finds that exam structure is not correct then he/she can reject this exam structure. Now, you have to again rework on this rejected exam structure. You can also view the rejection comment from principal if commented by him/her by clicking on ‘X’ button. © Copyright EducompOnline Page 54 of 64 EducompOnline - For ‘School Administrator’ EducompOnline – Overview For every case that is for ‘Rejection’ or ‘Approval’ a message will be received by School Admin. If Principal rejects the exam structure then a message for rejection is received by the School Admin and same case for approval of exam structure. © Copyright EducompOnline Page 55 of 64 EducompOnline - For ‘School Administrator’ EducompOnline – Overview 13 Chapter 13. Calendar The Calendar module lets you create calendar events and view calendar in weekly, monthly, and agenda views. As the school administrator, you can create calendar events meant for Teachers, Students, Parents, or all. The View Calendar and Create Event links display and create calendar events respectively. Image 13.1 View Calendar screen © Copyright EducompOnline Page 56 of 64 EducompOnline - For ‘School Administrator’ EducompOnline – Overview EducompOnline - For ‘School Administrator’ Calendar Image 13.2 Create Event screen The events you create here are submitted with the Principal for his approval. Once the Principal approves the submissions, the events get displayed in other user logins. © Copyright EducompOnline Page 57 of 64 EducompOnline - For ‘School Administrator’ EducompOnline – Overview 14 Chapter 14. Attendance The Attendance module is an advanced functionality that enables a school administrator to give him or teachers the privilege to mark student attendance online. This involves activating attendance for grades, assigning class teachers, granting attendance rights, and marking attendance. As a student administrator, you can also update students’ list and view student attendance reports. Here are the steps: Activating Attendance for Class Sections 1. Click the Activate Attendance for Grades link. 2. Select the sections for which you wish to activate attendance using the appropriate checkboxes. 3. Click Save to effect the changes made above. Now, you can mark online attendance for the selected class sections. Image 14.1 Activate Attendance screen © Copyright EducompOnline Page 58 of 64 EducompOnline - For ‘School Administrator’ EducompOnline – Overview EducompOnline - For ‘School Administrator’ Attendance Updating Students List The Update Student screen enables you to download and upload list of students for easy reference. You must download a list first and use the same format to upload the file after making appropriate changes, if and as required. Use the fields available under Update Student screen to maintain this file. Note: It is mandatory to fill all the students’ name to activate the attendance process of a particular class-section. Image 14.2 Update Student screen Granting Attendance Rights 1. Click the Assign Class Teacher link. 2. Select the teacher you need to assign as the class teacher for a particular class section using the Assign Class Teacher dropdown. Or, select RC for a particular class section to assign the attendance rights to you. 3. Click Save to effect the changes made above. Now, only the selected class teacher or you can mark attendance online for the selected class section(s). Image 14.3 Attendance Rights screen © Copyright EducompOnline Page 59 of 64 EducompOnline - For ‘School Administrator’ EducompOnline – Overview EducompOnline - For ‘School Administrator’ Attendance Marking Attendance You can mark attendance for the class sections for which you have the required rights. 1. Click Mark Attendance Attendance screen. link from the left pane to open the Mark 2. Click the class name from the top panel. The section names drop down. 3. Click the section name for which you wish to mark attendance. The list of students under the selected class section appears at the centre. 4. Select the date for which you wish to mark attendance for the selected class section. By default, the current date is displayed. Click Go if you change the date from the default date. Note: Here, you can click the View link next to a student record to view the attendance records for that particular student in another window. It’s a small but useful report that shows number of school days and number of days the student was present and absent. 5. Select P or A from the Attendance column to mark a student Present or Absent. Note: The students marked absent get listed in the list of absentees in extreme right. You have the facility to selectively send a message to the parents of these absentees. Just select the absentees whose parents you wish to send messages to and click Send Message. 6. Click Save to save the attendance record for the selected date. Image 14.4 Mark Attendance screen © Copyright EducompOnline Page 60 of 64 EducompOnline - For ‘School Administrator’ EducompOnline – Overview EducompOnline - For ‘School Administrator’ Attendance Viewing Reports You can view attendance report per class from the Reports screen. To do so: 1. Click the Reports link in the left pane. 2. Select class and the date range from the fields available in the right pane. 3. Click Go to bring results in the area below. Image 14.5 Attendance Report screen © Copyright EducompOnline Page 61 of 64 EducompOnline - For ‘School Administrator’ EducompOnline – Overview 15 Chapter 15. School Website The School Website module is an advanced functionality for the privileged schools who wish to subscribe to it. It basically lets the school administrator create, update and maintain the school website on its own. The module provides controls to enable updating the design templates, upload various images, and edit content on the website. Broadly, you can choose what template should be used for your website, what sections (also referred to as features) should the website contain, choose the appropriate font styles, theme, change images, and create/ edit the website content. The Principal user needs to approve the changes in website made by you. He can also reject the changes if he needs improvements. © Copyright EducompOnline Page 62 of 64 EducompOnline - For ‘School Administrator’ School Website Image 15.1 School Website screen To effect the desired changes, use the controls provided and click Save. You can also preview the changes before and after submission on the live server, using the available buttons. 16 Chapter 16. Add Principal Login The Add Principal Login module lets you manage principal login details. Image 16.1 Add Principal Login screen