1
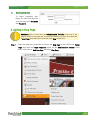
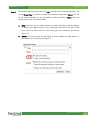
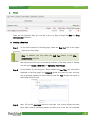
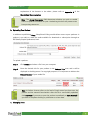
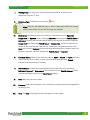
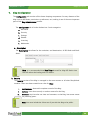
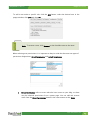
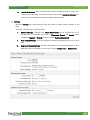
SharpSchool User Manual
Chapter 9 Blogs
SHARPSCHOOL
USER MANUAL
CHAPTER 9
BLOGS
For more information, please visit:
www.customernet.sharpschool.com
www.sharpschool.com
0
SharpSchool User Manual
Chapter 1 Site Publish
TABLE OF
CONTENTS
1.
INTRODUCTION ...................................................................................................................................................1
I.
II.
BLOGS AND SECURITY: SOMETHING TO CONSIDER .................................................................. 1
GETTING STARTED................................................................................................................. 2
2.
ADDING A BLOG PAGE ......................................................................................................................................2
3.
BLOG ADMINISTRATION ....................................................................................................................................5
I.
II.
III.
IV.
V.
VI.
EDIT ...................................................................................................................................... 5
POSTS................................................................................................................................... 6
MANAGING COMMENTS ........................................................................................................ 10
POST CATEGORIES .............................................................................................................. 11
BLOG CONFIGURATION ......................................................................................................... 12
VIEW BLOG .......................................................................................................................... 17
www.sharpschool.com
Chapter 9 Blogs
SharpSchool User Manual
1. Introduction
Over the years, Blogs have risen in popularity. By offering a robust
communication method to exchange stories, news, opinion, and
more. Blogs enable users to engage and receive feedback from an
audience. With the introduction of Rich Site Summary (RSS) feeds,
audiences can now subscribe to blogs and receive real-time updates
whenever there is a new entry. There are a number of ways to utilize
SharpSchool’s Blogs for an educational setting. They include:
I.
District-to-Community Communication: Faculty and Administrators can create blog
pages to discuss school, or class, related activities with the community.
II.
Internal Discussions: Teachers can set up blogs to carry out internal discussions with
colleagues and students.
III.
Student Blogs: Students can participate in moderated blogs to discuss activities and
class related projects.
IV.
Event Blogs: School committees can set up blogs to discuss past or upcoming
events.
This User guide will take you through the process of creating a blog, managing the
database, and exploring some of the handier options available.
I.
Blogs and Security: Something to Consider
SharpSchool`s Blogs offer a safe and easy way for teachers and students to
communicate with each other and the community. As such, understanding a blog’s
security protocols is a necessary step in getting the most out of the module. The most
prevalent challenge for this kind of social medium is ensuring content is appropriate,
filtered, and tracked.
By offering the tools teachers and administrators need to guarantee student safety,
SharpSchool’s blogging module facilitates constructive communication. Some of the
most important security tools include user-based authentication, comment approvals,
and the ability to filter comments by IP address. This manual will take you through each
of these tools, serving as a valuable resource for blog authors to familiarize themselves
with the security features.
www.sharpschool.com
1
Chapter 1 Site Publish
SharpSchool User Manual
II.
Getting Started
To
begin
managing
your
blogs, you must first log onto
your site using your Username
and Password.
2. Adding a Blog Page
Reminder: Keep in mind that the Administrative Tool Bar at the top of the
page is unique to the page you are currently viewing. You must first select the
Parent Page from which you would like your Blog to link from.
Step 1
Select the page you would like to connect the Blog Page to (this will be the Parent
Page) and select the Page Properties option on the Administrative Toolbar. From
here, scroll down to Add New Page and select Blog Page.
www.sharpschool.com
2
SharpSchool User Manual
Step 2
Chapter 1 Site Publish
The loaded page will prompt you for a Title. This will be the name displayed as a link
on the Parent Page. In addition, you will be prompted to generate a Name. This will
be the name generated for the web address. After providing a Name, there are
several options you are presented with:
a.
Blog: From here, you can select whether to create a new blog or link this blog to
an existing one. When linking to an existing blog you will not be able to add
posts until the administrator of that blog gives you authoring permissions
(Figure 3).
b.
Option: This section gives you the ability to decide whether the blog opens in a
new window or an existing one (Figure 3).
www.sharpschool.com
3
Chapter 1 Site Publish
SharpSchool User Manual
Step 3
Next you will be brought to the Blog Dashboard which has 5 main areas:
Area 1 – Title Area: This area is the central focus/description of your blog
Area 2 – Recent Posts Preview: This area displays the most recent blog
posts and a small preview of the blog’s content
Area 3 – Blog Administration: This section is visible only to the administrators
of the blog. We will be returning to this area in the following section
of this guide
Area 4 – Recent Post Headlines: Provides links to recent blog posts
Area 5 - Archives: A collection of previous blog entries sorted by date
Area 6 – Group Blogs: An area dedicated to displaying other blogs grouped
with yours
Area 7 – Content Alert Subscription: Allows users to subscribe to RSS feeds
from your blog
Area
1
Area
3
Area
Area
2
4
Area
5
Area
6
Area
7
Note: At any time, you can customize the Blog Sidebar.
www.sharpschool.com
4
SharpSchool User Manual
Chapter 1 Site Publish
3. Blog Administration
The Blog Administration field is reserved for back end functionality. This section of the
module is divided into 6 main components:
I.
Edit: This is where you can change the name of blog.
II.
Posts: Create, edit, search, and view posts.
III.
Comments: View user comments with the ability to filter, search and remove
anything you deem, or has been flagged as, inappropriate
IV.
Post Categories: Used to mark the category each blog post falls into for
sorting and separation.
V.
Configuration: This section handles blog security, permissions, podcast
licensing, and other configuration items specific to the blog.
VI.
I.
View Blog: Provides a completed overview of the blog.
Edit
The Edit Blog tab allows you to rename the blog, include a description, or change the blog’s
template.
www.sharpschool.com
5
SharpSchool User Manual
II.
Chapter 1 Site Publish
Posts
There are two important ways you can add a post to a blog; through the Main and Blog
Administration interfaces.
a. Creating a New Post
Step 1
On the main interface of the blog page, select the New Post link on the upper
right corner of the page.
Note: In addition, you may select the Add Post button in the Blog
Administration interface.
Both options will take you to the editing interface of the blog, which is divided
into two areas: Create a New Post and Uploading Your Podcast.
Step 2
Fill out details for the blog post. These include the Post Title (this title will be
displayed on the blog page), the Category (divide your posts by topic and they
can be grouped together for easy viewing), and the Tags (assign key words to
make blogs easier to find).
Step 3
Next, fill out the Post Body section of the page. This section utilizes the same
basic editor used for producing content on other parts of the site. For a detailed
www.sharpschool.com
6
SharpSchool User Manual
Chapter 1 Site Publish
explanation of the buttons in the editor, please refer to Appendix A of the
SharpSchool Documentation.
Note: The Accept Comments field determines whether you wish to enable
visitors to publish comments for your. Unchecking this box will prevent users
from posting comments.
b. Uploading Your Podcast
In addition to publishing Blogs, SharpSchool’s Blog module allows users to post podcasts. A
podcast is an audio or video file made available for download or subscription through an
RSS (Really Simple Syndication) feed.
To upload a podcast:
Step 1
Click Browse and select a file from your computer
Step 2
Enter the desired title for your podcast in the Podcast Title area, and it will be
displayed in the blog menu. For copyright purposes, it is important to indicate the
Podcast License of your media file.
Note: A Podcast License refers to the level of legal control you have over the
podcast and the material found within. After the file is successfully uploaded,
click Post Now if you want to post the podcast immediately or Save As Draft if
you wish to complete the blog or publication at a later date.
c. Managing Posts
www.sharpschool.com
7
Chapter 1 Site Publish
SharpSchool User Manual
i.
Viewing Posts: To view a post that has been created (Either in draft form or
published), click the
ii.
icon.
Deleting a Post: To delete a post click the
icon.
Note: Once you have deleted a post, it will no longer be available for viewing
and any data within the post will no longer be available.
iii.
Moderation: Blog administrators can choose to set created posts to Approved,
Unapproved, or Rejected status. Selecting Approved will change the Publish Status to
Published, meaning that everyone will be able to see the post in the blog. Selecting
Unapproved will change the Publish Status to Unapproved, and the post will not be
visible on the blog; instead, it will only be viewable by a blog administrator in the
Posts tab. Choosing Rejected prompts the blog administrator to provide a reason for
the post’s rejection, and then displays the Publish Status as Rejected.
iv.
Comment Status: Shows if the comment status is Open or Closed. An Open comment
status indicates that the blog, or post, has comments enabled, while Closed
indicates that commenting is disabled.
v.
Publish Status: Provides the blog administrator with the status of a post being
Published, Rejected or Unapproved. For clarification on the Publish Statuses, please
see their explanation above in the Moderation heading.
vi.
vii.
Date: When the post was created.
Category: Shows what category, if any, the author or administrator has designated to
the blog or post.
viii.
Title: The Title of the blog post that will appear on other pages.
www.sharpschool.com
8
SharpSchool User Manual
Chapter 1 Site Publish
d. Editing a Post
If you need to edit a post after you have published it, you can do so by clicking on the name
of the post. When you are finished making your changes, click Post Now to publish the blog.
www.sharpschool.com
9
Chapter 1 Site Publish
SharpSchool User Manual
III.
Managing Comments
Administrators can moderate comments made on Blogs. This tool is vital for an education
setting; ensuring all content is validated and approved prior to publication.
The Filter dropdown allows you to filter comments by status, such as:
a. All Comments: This view displays all comments and is the default view of the
Comments report.
b. Unapproved: Displays comments that have yet to be approved.
c. Comment IP Address – Allows for the search of comments by IP Address in
order to find posts made from a particular computer.
d. Comment Date: Shows only comments made on a particular date.
You can authorize a comment to become public by checking it off in the Approve column.
You can also delete comments by clicking on the
button in the Action column.
www.sharpschool.com
10
Chapter 1 Site Publish
SharpSchool User Manual
IV.
Post Categories
Utilizing topical categories is useful when publishing blogs, since they make it easier for
readers to find posts with specific subjects.
To create a new category for your blog:
Step 1
Type the name of the
category in the Category
field and click Add.
Step 2
Categories can either be
Public or Private. A Public
category
is
usable
by
every blog and a Private
category is only usable
by the current blog.
Step 3
A category can be deleted
by clicking the
button in
the Action column on the right side of the screen.
Note: Deleting a category does not delete the posts tagged with it. Deleting
blog posts can only be performed through the
Posts tab in Blog
Administration.
www.sharpschool.com
11
Chapter 1 Site Publish
SharpSchool User Manual
V.
Blog Configuration
The Configuration tab contains all the house-keeping components for every element of the
blog (such as RSS feeds, permissions, preferences, etc.) making it one of the most important
parts of the Blog Administration console.
The Configuration tab is further broken into 6 main categories:
a. RSS Feeds
b. Security
c. Settings
d. Sidebar
e. Licensing
f.
Moderation
a. Subscription
The Subscription tab allows for the activation, and deactivation, of RSS feeds and Email
Alerts.
Note: It is recommended that Post Titles be used for blog RSS feeds since
this will reduce the loading time for readers.
b. Security
The Security section of the blog is managed in the same manner as all other SharpSchool
modules. There are three essential user roles for Blogs:
i.
Administrator: Users with complete control of the blog.
ii.
Authors: Users that can only co-author content for the blog.
iii.
Browsers: Any User who can view, and comment, on the blog, but cannot create
any new blog posts.
Note: You must include the Guest user if you wish the blog to be public.
www.sharpschool.com
12
SharpSchool User Manual
Chapter 1 Site Publish
To add a user under a specific role, click the Add button, select the desired user in the
popup window, click Add and then OK.
Note: To remove a user, click Remove on the checkbox next to the name.
When selecting user permissions, it is important to keep in mind that there are two types of
permission designations: Direct Permissions and Actual Permissions.
i.
Direct Permissions refers to users who also have access to your blog, as these
may be inherited permissions from a parent page. You can add and remove
users from the Direct Permissions button in the same manner as the Roles.
www.sharpschool.com
13
Chapter 1 Site Publish
SharpSchool User Manual
ii.
Actual Permissions refers to all the users, within the administrator’s group, who
have access to the blog. You cannot edit the users in the Actual Permissions list
since this is controlled by site and/or global administrators.
c. Settings
With the Settings tab, administrators have the ability to make simple changes to the
blog.
This area is divided into 3 main sections:
i.
General Settings: Through here, Email Notifications can be switched on or off,
the way time is displayed can be set in Timestamp Format, the Locale can be
changed to English or French, and you can edit Podcast Availability.
ii.
Post Display Settings: You can configure the display parameters of posts on your
blog.
iii.
Comment Display Settings: Controls the number of comments displayed at once,
while the order of comments can be set to display Oldest First or Newest First.
www.sharpschool.com
14
SharpSchool User Manual
iv.
Chapter 1 Site Publish
Blog Sidebar
Allowing for total control of the blog’s sidebar items, this section allows users to select each
option they desire to display.
www.sharpschool.com
15
SharpSchool User Manual
v.
Chapter 1 Site Publish
Licensing
The Licensing tab provides the definition of all the licensing options, control to select any of
the desired licensing choices, as well as the option to assign a particular default license for
all podcasts.
www.sharpschool.com
16
SharpSchool User Manual
vi.
Chapter 1 Site Publish
Moderation
The Moderation tab allows you to assign blog moderators, specify whether approval is
required for a post, and change the options for Comment Moderation (who can comment
on the blog and if approval is required).
VI.
View Blog
This tab provides a complete and comprehensive overview of the blog including: recent
posts, the administration panel, tags, and RSS Feed information.
www.sharpschool.com
17