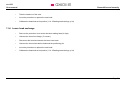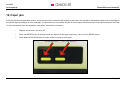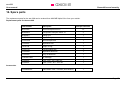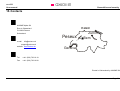
1
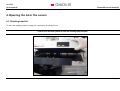
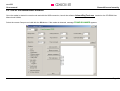
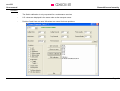
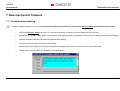
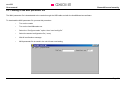
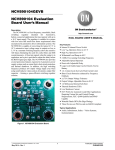
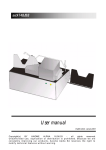
AXIOME
User Manual
AXIOME
axm998
User manual
16/05/06
Page 1
axm998
AXIOME
User Manual
Summary
1. Generality and Security............................................4
1.1.
Compliance .......................................................................4
1.2.
Safety precautions ............................................................5
2. Transport and installation........................................6
2.1.
Operating environment .....................................................6
5.2.
Input tray stop................................................................. 13
5.3.
Output tray stops ............................................................ 14
6. Maintenance software............................................ 15
6.1.
Connections and start-up ............................................... 15
6.2.
Use of the maintenance software ................................... 16
6.3.
Calibration of the light barriers (L.B.).............................. 18
Presentation of the axm 998..........................................8 7. New mechanical firmware ..................................... 20
3. Connections..............................................................8
3.1.
Reader’s connection .........................................................8
3.2.
Reader’s disconnection.....................................................9
7.1.
8. Options………......................................................... 21
8.1.
4. Opening the lid or the covers ................................10
4.1.
Reading head lid .............................................................10
4.2.
Side cache cover ............................................................11
5. Adjustments............................................................12
5.1.
16/05/06
Separation system adjustment........................................12
Connection and starting ................................................. 20
8.2.
Barcode option ............................................................... 21
8.1.1.
Readable codes ................................................. 21
8.1.2.
Reading area for Barcode option ....................... 22
8.1.3.
Adjustment of the Barcode head position........... 23
Printer option .................................................................. 24
8.2.1.
Printing area....................................................... 25
8.2.2.
Adjustment of the printing area .......................... 26
8.2.3.
Replacement of the ink cartridge........................ 26
Page 2
AXIOME
axm998
User Manual
9. First use of the axm 998 .........................................27 13. Mechanical firmware error list .............................. 36
9.1.
Documents introduction ..................................................27
14. Spare parts......... .................................................... 37
9.2.
MAX parameters file .......................................................27
15. Contacts.................................................................. 38
9.3.
9.2.1.
EXT1 parameter .................................................28
9.2.2.
CDELAY parameter ............................................28
9.2.3.
EDELAY parameter ............................................28
Loading of the MAX parameter file..................................29
10. Maintenance............................................................30
10.1. Regularly maintenance ...................................................30
10.2. Service......... ...................................................................30
11. Parts exchanges and settings ...............................31
11.1. Transport tyres exchange ...............................................31
11.2. Separation belt exchange ...............................................32
11.3. Upper head exchange.....................................................32
11.4. Lower head exchange.....................................................33
11.4.1. Reading head settings ........................................34
12. Paper jam...... ..........................................................35
16/05/06
Page 3
AXIOME
axm998
User Manual
1. Generality and Security
1.1. Compliance
The axm 998 complies with the safety regulations related to office equipment, and with the electrical safety standards for data processing
equipment. The various certifications concerned are under process, and will be indicated on the axm 998's label as they become finalized:
16/05/06
•
DIN- EN 60950
AXIOME
•
IEC 60950
Scanner
HEMERA hem3300
OMR
axm998
•
UL 60950
•
FCC classe A
•
CE
Axiome Alpha S.A.
Max. 100 VA
AC 115 V, 50/60 Hz. 3,15 A
AC 230 V, 50/60 Hz. 1,6 A
This device complies with Part 15 of the FCC Rules.
Operation is subject to the following two conditions:
(1) this device may not cause harmful interference, and
(2) this device must accept any interference received,
including interference that may cause undesired operation.
Page 4
AXIOME
axm998
User manual
Generalities and security
1.2. Safety precautions
This unit may be used continuously in normal ambient office conditions.
To ensure user hands and fingers protection, this unit is also equipped with safety devices above the automatic intake feed tray.
The following guidelines must be respected during the installation and use of the scanner.
16/05/06
•
The scanner is fitted with a power cable which must be connected to an earthed power outlet.
•
During the installation of the axm 998, always ensure the power outlet is accessible by the user.
•
Do not connect or disconnect the cables during a storm.
Page 5
AXIOME
axm998
User manual
Generalities and security
2. Transport and installation
2.1. Operating environment
The suitability of the operating environment for the axm 998 is an essential factor for its proper functioning. Issues that must be taken into account
are as follows:
•
The scanner must be placed on a stable, flat and horizontal support.
•
The axm 998 is 36 kg.
•
16/05/06
The scanner must be shielded from all heat sources, such as:
-
direct sunlight;
-
heaters;
-
spot lights and other high heat lights.
•
The axm 998 must also be protected from vibrations and humidity (40 to 80% relative humidity, with no condensation).
•
Operating temperature range: +10 to +35 °C (50 to 9 5 °F).
•
Storage temperature range: 0 to +40 °C (32 to 104 ° F).
•
Operating sound pressure level: 50 dB.
•
Never operate the axm 998 in atmospheric conditions contaminated by dust or oil products in gaseous state.
Page 6
axm998
User manual
AXIOME
Generalities and security
When connecting the axm 998 to a power outlet, ensure that it never shares the same outlet as:
- large electric motors;
- refrigerators;
- generally speaking, any equipment generating substantial inductive loads.
16/05/06
Page 7
AXIOME
axm998
User manual
Generalities and security
Presentation of the axm 998
The optical mark reader axm 998 is an automatic unit with a motorised entry feeding tray and two output tray for the document’s ejection. Its conception
allows a simple handling and easy access to the documents, it’s also easy to maintain. Its high transport speed adding to the exclusive feeding and double
detection systems make it reliable and effective.
3. Connections
3.1. Reader’s connection
During axm 998 and peripheral’s installation, cables must be plugged in the following order:
16/05/06
•
Plug the USB cable for data transfer to the reader, then to the computer
•
Plug the power cable to the reader then to the main voltage plug with earth.
•
If necessary, connect the service cable.
•
Once it’s done, turn the power ON.
Page 8
AXIOME
axm998
User manual
Generalities and security
3.2. Reader’s disconnection
16/05/06
•
Turn OFF the reader and its peripherals
•
Disconnect the power cable
•
Disconnect the USB cable for data transfer
•
If necessary, disconnect the service cable
Page 9
AXIOME
axm998
User manual
Generalities and security
4. Opening the lid or the covers
4.1. Reading head lid
To open the reading head lid, simply pull it as shown on below picture.
! There is no secured system to keep the reading head lid open !
16/05/06
Page 10
axm998
User manual
AXIOME
Generalities and security
4.2. Side cache cover
The side cache cover is simply clipped on the reader. To remove it, simply pull it to you from the bottom.
16/05/06
Page 11
AXIOME
axm998
User manual
Generalities and security
5. Adjustments
5.1. Separation system adjustment
Depending papers characteristics or according to the separation system’s wear, it can be necessary to change the initial high of the separation belt. To
process, follow the setting procedure:
•
Pull the setting button to you
•
The standard setting is reach when separation belt and separation tyre are tangent.
•
Turn the button in the direction adapted to your needs (See diagram on below the button)
•
Separation is correctly set when documents are separate without been blocked
! The more the separation belt touch the separation tyre the more the belt get used !
16/05/06
Page 12
AXIOME
axm998
User manual
Generalities and security
5.2. Input tray stop
To obtain a perfect transport and reading, a good guidance of the document in the input tray is necessary. The input tray stop help to the guidance.
! Never lift up or pull the reader by the input tray or the stop!
For the input tray adjustment, process this procedure:
16/05/06
•
Maintain the input tray with your hand
•
Push the stop to its maximum opening
•
Introduce a pile documents in the input tray
•
Place the stop so the documents are in contact with it and the reference side. Documents must be flat.
Page 13
AXIOME
axm998
User manual
Generalities and security
5.3. Output tray stops
To obtain a correct stacking result and to avoid jam in the output, stops have to be adjusted. A incorrect adjustment can be the cause of non respected
stacking order.
For the input tray adjustment, process this procedure
•
Introduce a typical document in the on of the output tray
•
Smoothly slide the stop by the document. Attention, the documents must not be too tighten.
•
Repeat for the procedure for the other output tray.
Depending paper’s quality, it can be necessary to keep more or less space between the stop and the document.
16/05/06
Page 14
AXIOME
axm998
User manual
Generalities and security
6. Maintenance software
6.1. Connections and start-up
This software allows you to check the mechanical functions of the unit and calibrate the optical parts.
To use the maintenance software, you only need the USB-2 cable
•
Connect the PC to the reader with the help of the USB cable
•
Start-up the reader using the main switch on the reader’s rear.
Main Switc h
16/05/06
Connec tion plug
Page 15
axm998
User manual
AXIOME
Generalities and security
6.2. Use of the maintenance software
Once the reader is started in normal mode and with the USB connection, launch the software AxiomeDiagTools.exe located on the CD-ROM User
Manual and Utilities.
Select the correct Comport and valid with the GO button. If the reader is detected, message FOUND SCANNER appears.
16/05/06
Page 16
axm998
User manual
AXIOME
Generalities and security
List of commands:
16/05/06
Status
Check connection by display of the mechanical firmware version (or scanner not found if no connection)
Go
Connect after com port selection
Main Motor
Run the main motor (three forward speeds)
Calling Motor
Run the calling motor (three forward speeds)
Lift
Check the functionality of the input lift (up / down)
Calling solenoid
Activate the calling arm
Tray solenoid
Activate the output tray to the upper position
Free command
To check special feature (questions from Axiome's technician)
Printer Enable
Enable or disable the printer line (used for implementing the printer option)
External Enable
Enable or disable the external data line (used for implementing of MICR or barcode option)
Switches
Check the different detection and switch features by blinking when activated
ABCDEF
Optical sensors of paper transport
Enter button
Check of the left confirmation key
<< Toggle >>
Check of the right selection key (two positions)
Double sheet
Check of double sheet sensor
Page 17
AXIOME
axm998
User manual
Generalities and security
List of commands:
Security reed
Check of upper cam closing
Call down detector
Internal position sensor
Lift down detector
Internal position sensor
View user para
Visualise the present valid parameters located on the reader flash memory
Erase user para
Erase the user parameter located in the reader flash memory
Exit
Exit the diagnostic software, the unit switch in real scanning mode
6.3. Calibration of the light barriers (L.B.)
Light barriers adaptation is done through the maintenance software. The adaptation is not continuously made to avoid useless reader’s
stops. The below operation can be done only during a maintenance service and by trained technicians.
16/05/06
•
No document or paper present in the input tray or in the transport mechanism
•
Click on the Switch Calibration button or enter the OI command in the Free Command window
•
L.B. are automatically set and keep the setting till the next switch calibration
•
Values are displayed in the communication window
•
00, L.B. is not working or not connected
•
06-98, L.B. is optimum
•
99, L.B. is working but the safety margin is low
Page 18
axm998
User manual
AXIOME
Generalities and security
Remarks:
16/05/06
-
The Switch calibration is only requested for a maintenance services
-
L.B. values are displayed is the same order as the transport sense.
-
Position 5 and 6 are not used. 00 values are normal for these positions.
Page 19
AXIOME
axm998
User manual
Generalities and security
7. New mechanical firmware
7.1. Connection and starting
To use the Loader2 software, you need a crossed serial cable 9 pins male to 25 pins female (Service cable). Not delivered with reader!
16/05/06
•
connect the Service cable from your PC com port to the serial connector (25 pins) located on the unit’s rear
•
start the unit in "loader mode", switch on the scanner with right selection key pressed, and wait for the "Loader" message on the display
•
Start the Loader2 software (CD-ROM User Manual and Utilities)
•
Choose the new firmware file and start the loading
•
Wait till the scanner finish the Firmload (confirmation message), then motor run and the unit is now in test mode
•
Switch off the scanner and turn it on again in standard mode
Page 20
AXIOME
axm998
User manual
Generalities and security
8. Options
8.1. Barcode option
Axm 998 can be mounted with a barcode head. Only printed codes or stickers placed on the recto could be read.
Remark:
Barcode option can be implemented on not already equipped axm998
8.1.1. Readable codes
The returned barcode value is always preceded with a letter corresponding to the type of code read.
I
16/05/06
=
Interleaved 2/5
forward + backward
A =
Codabar
forward + backward
C =
Code 128
forward + backward
E =
Code 39
forward + backward
G =
AXIOME
forward + backward
TA=
UPC A
forward + backward
TE =
UPC E
forward + backward
TFF=
EAN 8
forward + backward
TE =
EAN 13
forward + backward
Page 21
axm998
User manual
AXIOME
Generalities and security
8.1.2. Reading area for Barcode option
218959
16/05/06
Page 22
AXIOME
axm998
User manual
Generalities and security
8.1.3. Adjustment of the Barcode head position
The barcode head position depend of the position your codes on your documents.
For the Barcode head positioning, process this procedure:
16/05/06
•
Turn off the reader
•
Open the lid
•
Move the head along for a left or right placement
•
Correct Barcode position can be find by adding 8mm from the black sheet edge (transport side)
Page 23
axm998
User manual
AXIOME
Generalities and security
8.2. Printer option
The axm 998 can be mounted with a printer option. Printer can print one line of characters. The lateral positioning is adjustable from the reference side.
Document ending define the vertical positioning.
Remark:
Printer option can be implemented on not already equipped axm998
16/05/06
Page 24
axm998
User manual
AXIOME
Generalities and security
8.2.1. Printing area
Axm-998
16/05/06
Page 25
AXIOME
axm998
User manual
Generalities and security
8.2.2. Adjustment of the printing area
•
Remove the printer cover
•
Move the printer head along its guide
8.2.3. Replacement of the ink cartridge
16/05/06
•
Remove the printer cover
•
Remove the used cartridge
•
Install a new one
Page 26
AXIOME
axm998
User manual
Generalities and security
9. First use of the axm 998
9.1. Documents introduction
The document stack must be put on the upper lift, however, be aware that an OMR document ( optical mark reading ) always has a direction. In the
document's margin are small black ( or red ) rectangles. These small rectangles are clockmarks. They allow reading of the pre-printed cases or marks on
the document only.
•
The documents must be put on the automatic introduction lift, against the reference side of the reader (see chapter Input tray stop, p. 13)
•
The documents must be put on the automatic introduction lift with the clockmarks visible and against the reference side of the reader
•
The documents put on the lift must also touch the separation block
•
Adjust the stop of the introduction tray to the width of the document plus one or two millimetres
9.2. MAX parameters file
Adding to the normal MAX commands, the axm 998 accepts 3 news parameters for the real time mode.
Example of MAX file:
MD(CONFIG)
@CUSTOMER
CDELAY=10
EDELAY=1
EXT1=ON
END
16/05/06
Page 27
axm998
User manual
AXIOME
Generalities and security
9.2.1. EXT1 parameter
The EXT1 parameter, enable or disable the Barcode option. When activated, EDELAY and CDELAY must be considered.
9.2.2. CDELAY parameter
The CDELAY parameter represents the time delay before calling next document to read. CDELAY can have the following values:
CDELAY = x, with 0< x <20 or x =99. Values from 1 to 20 are values for corresponding delay in tenth milliseconds (for example, 8 gives 80 milliseconds).
A 99 value ask for not calling the next document before receiving a RD command.
9.2.3. EDELAY parameter
The EDELAY parameter represents adding the time to decode a Barcode. EDELAY can have the following values:
EDELAY = x, with 0 < x < 20 or x = 99. Values are in tenth milliseconds. For values different of 0, the CDELAY parameter must be increased to permit
decoding. And longer the document is, bigger the CDELAY must be. For practice cases, an A5 sized document request a EDELAY= 5 and a CDELAY= 15
(or 99). With an A4, CDELAY reach easily 20 or 99.
16/05/06
Page 28
AXIOME
axm998
User manual
Generalities and security
9.3. Loading of the MAX parameter file
The MAX parameter file is downloaded to the reader through the USB cable and with the Axm998read.exe software.
To download the MAX parameter file, process this procedure:
16/05/06
•
Turn on the reader
•
Turn on the Axm998reader.exe
•
Select the “Configure reader” option, then “send config file”
•
Select the wanted configuration file (*.max)
•
Wait till confirmation message
•
MAX parameter file is saved in the unit till next new loading
Page 29
AXIOME
axm998
User manual
Generalities and security
10. Maintenance
10.1. Regularly maintenance
•
Cleaning the reading head’s glasses (duster with alcohol or soaped water)
•
Cleaning the separation wheel and separation belt (dry duster or brush)
•
Cleaning the light barriers (dry duster or a brush)
•
Control the paper transport (duster or a brush)
•
Control the ink cartridge
10.2. Service
16/05/06
•
Regularly maintenance
•
Control the tyre’s wear. Exchange if necessary
•
Control the mechanism with the help of the test software (L.B., double sheet detector, lift, output solenoid, motors, display,...)
•
Control the separation tyre and separation belt. If necessary change them. Needs new adjustment
•
Paper transport with a full batch.
Page 30
AXIOME
axm998
User manual
Generalities and security
11. Parts exchanges and settings
11.1. Transport tyres exchange
•
For the transport tyres, remove the side cover to reach all the tyres
•
Removed the wear tyres
3°
3°
15°
3°
15°
3°
3°
3°
3°
3°
3°
3°
3°
3°
3°
For transport quality reasons, all tyres are not similar, respect the here below diagram. Find a complete spare parts list with the tyre
reference at the end of the manual.
16/05/06
Page 31
AXIOME
axm998
User manual
Generalities and security
11.2. Separation belt exchange
•
Remove the protection cover under the back reading head (4 clips).
•
Release the belt by using the setting button (see 5.1 Separation system adjustment, p.12)
•
Release the force spring and liberate the separation belt.
•
Place the new belt
•
Adjust the separation mechanism
11.3. Upper head exchange
! After a head exchange, a new calibration is necessary and a positioning too. Only Axiome’s trained people are authorised practising those
procedures!
16/05/06
•
Remove the two upper screws (cruciform, silver); remove the three lower screws (cruciform, black).
•
Remove the front plate with the display, and disconnect it.
•
Open the reader’s rear cover (7 screws)
•
Disconnect the RJ11cable on the MTUSB board positioned on the rear’s side
•
Extract the upper head’s case.
•
Release the head position’s spring
•
Unscrew the 2 torx screws of the black entry plate
Page 32
AXIOME
axm998
User manual
•
Take the head out of the case
•
Invert the procedure to replace the new head
•
Calibrate the head and set its position (11.4.1Reading head settings, p.34)
Generalities and security
11.4. Lower head exchange
16/05/06
•
Remove the protection cover under the back reading head (4 clips).
•
Unscrew the lower front flange ( 5 screws )
•
Disconnect the head and extract the lower head case.
•
Unscrew the lower sheet before head and the positioning pin
•
Invert the procedure to replace the new head.
•
Calibrate the head and set its position (11.4.1Reading head settings, p.34)
Page 33
AXIOME
axm998
User manual
11.4.1.
Generalities and security
Reading head settings
After a head exchange, it’s necessary to process a new calibration and to set its position. For the reading head installation, process these procedures:
Calibration:
•
Connect the reader to the computer with the USB cable and turn the axm 998 on.
•
Start the AxiomeDiagTools.exe software
•
Select the correct com port
•
Place a full white sheet under the reading head. The sheet must cover the full head width
•
Once the axm 998 is detected, select the TMN calibration button or enter the TC (TMN Calibration) command in the Free command
window.
•
Downer head and upper head are checked and calibrated as mentioned in the Communication window
! If OK message is not displayed in the communication window, contact an Axiome’s technician!
Positioning:
16/05/06
•
Start the Axm998read.exe program and turn on the reader
•
Select the correct com port
•
Choose the Read Image option
•
Place the test sheet in the input tray
•
Valid the NEXT button and press the validation button on reader
•
Compare the results with the reference document on the Technical Application Note (CD-ROM User Manual and Utilities)
Page 34
AXIOME
axm998
User manual
Generalities and security
12. Paper jam
Even with an efficient separation system, some document can creates double feeding or jam before the separation mechanism. When such issue happen,
the reader stops and display an error message. To solve this issue, documents that are in the transport mechanism have to be rejected with the user help.
To reject documents from the separation mechanism, process this procedure:
•
Replace documents in the entry lift
•
Press the ENTER button till all documents are rejected in the upper output tray, then let up the ENTER button
•
Press again the ENTER button to confirm reader is ready to work again
ENTER BUTTON
16/05/06
TOGGLE BUTTON
Page 35
axm998
User manual
AXIOME
Generalities and security
13. Mechanical firmware error list
•
Errors in initialisation part :
•
Errors while scanning process :
101 main motor driver not found
001 Bad feeding
102 lift motor driver not found
002 Jam before camera
103 calling motor driver not found
003 Jam under camera
104 optical switch driver not found
004 Jam after camera
105 not possible to init external com
005 Jam in sorting
106 not possible to init optical switch com
006 No sheet to read
107 not possible to init RS232 cam
011 Multiple sheet
108 not possible to control main motor
015 Jam under printer 2
109 not possible to restore parameter
019 No sheet to eject
110 not possible to init printer 1
020 Path not free
111 not possible to init printer 2
023 Entry lift error
112 separator gap not ajusted
030 Error writing in flash
113 not possible to init external 1
114 not possible to init external 2
123 not possible to control lift
16/05/06
Page 36
AXIOME
axm998
User manual
Generalities and security
14. Spare parts
The replacement parts for the axm 998 can be ordered from AXIOME Alpha SA or from your retailer.
Replacement parts for the axm 998
Part Number
Description
Units per machine
MSCA505
Green transport wheel 3°
13
MHEM504
Transparent transport wheel 15°
3
MHEM507
Calling tyre
1
MHEM506
Separation tyre
1
FCOL1630
Main transport belt
1
FCOL020
Separation belt
1
FORE148
Output O-ring
1
FCOC110
Transport MiniPitch
1
FCOC088
Separation MiniPitch
1
FCOC082
Entry lift MiniPitch
1
FCARHPC660
Ink cartridge
1
EFUE030
Fuse 1,6A T SPT 230V AC
1
EFUE036
Fuse 3,15A T SPT 115V AC
1
EC25M9F000
Cable DB25 male / 9 female (Null Modem)
1
Accessories
16/05/06
Page 37
AXIOME
axm998
User manual
Generalities and security
15. Contacts
AXIOME Alpha SA
Rue du Chasselas 1
CH-2034 Peseux
Switzerland
Peseux
e-mail
Basel
Zurich
Bern
[email protected]
[email protected]
website www.axiome.ch
Tel.
++41 (032) 732 18 18
Fax.
++41 (032) 732 18 00
Geneva
Printed in Switzerland by AXIOME SA
16/05/06
Page 38