1
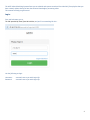
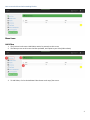
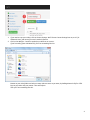
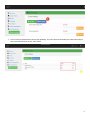
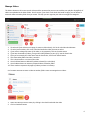
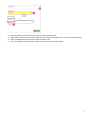
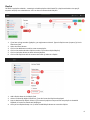
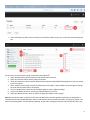
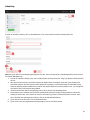
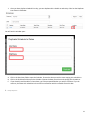
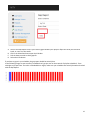
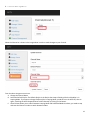
MiTV User Manual
Revision 2
July 8, 2015
Prepared by
Walter B. Schoustal
MicroVideo Learning Systems, Inc.
http://www.microvideo.com
1
The MiTV Video Scheduling System allows you to schedule and stream stored and live video 24x7 from playlists that you
have created, without having to have the technical knowledge of streaming video.
This manual will help you get started.
Login:
First, with a browser, go to:
The URL provided by email from MicroVideo, and you’ll see something like this :
Use the following to login:
Username:
Password:
see email sent to you with Login info
see email sent to you with Login info
2
Your screen should now look something like this:
Menu Items:
Add Video
1. The first item in the menu is Add Video, and we’re presently on this screen.
2. The video you see on this screen has been uploaded, and copied to your Video folder already.
3. To Add Videos, click on the Add New Video button at the top of the screen:
3
1. If you need to crop your videos, click on Custom Settings. We’ll discuss Custom Settings later on, as it’s for
Advanced Users, and most of you won’t need this feature.
2. Click on the Add files… button to upload your videos to our servers:
If you’re working from a Windows PC, you’ll see something like this:
Browse to your video folder and select as many videos at once as you want, by holding down the Shift or CTRL
keys as you select with your mouse. Then select Open.
Then you’ll see something like this:
4
1. Click on the Start upload button to Start the uploading. You’ll see check marks beside your videos when they’ve
been transcoded and sent to your Video Folder.
5
Manage Videos
The Videos shown on this screen are the videos and live streams that you can use to add to your playlists. By default, all
videos are uploaded to the Video Folder. On this screen if you check in the check box beside a video, you can delete or
move the video to another folder that you create. This way you can organize your videos into different categories.
1.
2.
3.
4.
5.
6.
7.
8.
9.
10.
To select all of the videos on this page (to move or delete them), click in the check box beside Name.
To select just one video, click in the check box beside the video you want to select.
If you want to change the name of the video, or its properties, click on the video name.
If you have thousands of videos, just type the video filename (or part of it), into the Search box.
Once you’ve entered your video name into the Search box, click on the Search button.
This shows what folder the video is stored in.
This is the duration or run-time of the video.
Use the Delete button to delete any videos selected (by a check box).
Use the Move button to move any selected videos to another folder.
These numbers represent the pages of videos you have in inventory.
Let’s suppose we want to move a video to another folder so we can categorize our videos.
1. Select the video you wish to move, by clicking in the check box beside the video
2. Click on the Move button
6
1.
2.
3.
4.
Select the folder you wish to move the file to, from the drop-down list.
If the folder you wish to move the file to doesn’t exist, add the new folder name in the Create Folder text box.
Click on the Move button when you’re ready to move the file.
If you’ve changed your mind and don’t want to move file, click on the exit button.
7
Playlists
The MiTV is a playlist scheduler… meaning it schedules playlists. With the MiTV, a playlist with videos in a specific
sequence will play at a scheduled time. Let’s see how to create and edit Playlists.
1. If you have a large number of playlists, you might want to Search. Type the Playlist name (or part of it) in the
Search text field
2. Select the Search button.
3. Click on the Add button to add or create a new playlist.
4. Click on the text box beside a Playlist to select it (or select multiple Playlists)
5. Click on the Delete button to delete selected playlists
6. Click on Edit Playlist to edit the contents and order of videos in a Playlist
1. Add a Playlist Name in the Playlist field
2. Active is selected by default. Deselect it if you don’t want the Playlist to be played.
3. Loop is deselected by default. Select it if you want the playlist to loop until the next playlist is scheduled.
Playback isn’t quite as smooth with looping on.
4. Once you’ve completed steps 1 to 3, select the Add Playlist button to create this Playlist.
8
1. Select Edit Playlist to add or remove videos from the Playlist. When you do, your screen will look something like
this:
On this screen we see the videos listed in the Playlist called April 10th.
1. Select the Add Video to Playlist button to add another video to the list
2. Select the check box Video, and all videos are selected
3. Check this check box to select only the Black Business Experience-April10th2015.mp4 playlist so you can remove
it from the playlist
4. These numbers are the order in which the videos play in the playlist. These numbers can be changed to change
the order that the videos play in the playlist.
5. Click on the Back button to go back to the Playlist page to select a different playlist
6. Click on the Remove button to remove any selected Playlist from the list.
7. Select the Update button in order to refresh the page after playlist order changes.
Note that you cannot delete a Playlist if it has been scheduled. Also note that playlists themselves can loop within a
schedule until the next scheduled playlist. Keep in mind however that the maximum number of loops for a playlist is 50
while in Scheduling Mode. For best quality streaming, do not select looping for playlists, and schedule 24 hours a day.
9
Scheduling
In order to Schedule a Playlist, Click on the Add button. Your screen should now look something like this:
Note that if you plan on streaming programming at set times, then you need to be in Scheduling Mode (see the section
on Channel Management).
1. In order to schedule a Playlist, first, select a Playlist from the Drop down box. All of your playlists will be found in
this list.
2. Next select a Start time for the playlist. Playlists by default start at midnight. Note that if you already have
scheduled a playlist, the next time you add a playlist to a schedule, it will automatically be scheduled to play
when the previous playlist ended.You can start a new playlist before the previous playlist ends… just change the
start time of the current playlist being added.
3. The Record check box doesn’t do anything unless you’ve paid for the Recording option.
4. Please make sure to schedule entire 24 hour periods (best practice) or employ looping playlists to keep the
stream full at all times. Your stream can crash or lose audio if you don’t continuously stream content. Once
you’re finished with scheduling this Playlist, click on the Add Schedule button.
5. If you need to clear all entries, click on the Reset button
6. If you want to exit this page without saving changes, click on the Cancel button.
10
1. Once you have playlists scheduled in a day, you can duplicate this schedule to other days. Clock on the Duplicate
icon shown in red below.
You will see this window open:
A. Click in the Start Date field to open the Calendar. Choose the date you wish to start copying this schedule to.
B. Click in the End Date field to open the Calendar. Choose the date you wish to end copying this schedule to.
C. If you already have Schedules in these dates, you’ll be prompted whether you wish to continue. If you do
continue, the dates with schedules in them will be overwritten with the schedule from this date.
5. G a p R e p o r t :
11
A. You use the Gap Report to see if you have any gaps between your playlists. Gaps can cause your stream to
break, or cause it to lose audio.
B. Click in the Select Date box to open the Calendar.
C. Pick the date you wish to check gaps for.
D. Select the View button.
If you have no gaps in your schedule, the gap report should be entirely blue.
In the following image, we can see a day’s schedule that’s got just over an hours worth of playlists scheduled… from
midnight to just past 1am. The red is unscheduled time. Again, make sure your schedules are entirely blue when checked
with the Gap Report:
12
6. C h a n n e l M a n a g e m e n t :
Select the Channel as is shown in the image above in order to make changes to your Channel.
From the above image we see we can:
A. Change the Channel Name
B. Select the Default Playlist. The Default Playlist is the Playlist that Loops infinitely while the Scheduler is in
Looping Mode. If you want to change Playlists while in Looping Mode, you MUST turn the MiTV off, then on
again, switching the MiTV Stopped button to MiTV Started, by clicking on the button.
C. Channel State allows you to switch between Looping Mode and Scheduled Mode. As above, you need to stop
and start the Channel in order to switch between modes.
13
D. Your Channel needs to be Active in order to play in either mode. Unless you have multiple channels, this check
box should not be deselected.
7. U s e r M a n a g e m e n t :
Here you can add or delete Users. All Users in the MiTV have the same privileges.
In the image above, we see there’s already an extra User, called Test.
In order to Add a User, click on the Add button, then provide the User Name and Password.
To Delete a User, select the check box beside the User you wish to delete, then select the Delete button.
We are finished with this instruction.
Please email [email protected] for comments.
Thank-you for trying our MiTV Video Scheduling and Streaming product.
14