1
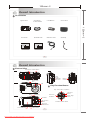
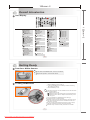
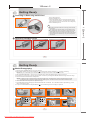
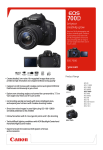
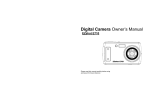
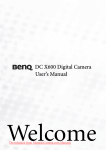
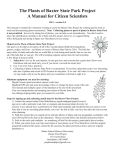
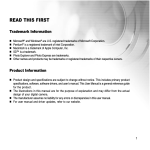
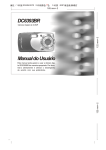
1.
3.
R4040679 (32MB)
80P
,
2.
Pantone 4695U
165mm+-2
122mm+-2
User Manual
This manual can guide you to use this camera
with proper operation and correct setting.
Please read it carefully and optimize the
performance in accordance with your
preference.
R4040679
Downloaded from ManualsCamera.com Manuals
165mm+-2
Table Of Contents
Cautions ---------------------------------------------------------------------------------- 03
04
04
05
05
06
Getting Ready --------------------------------------------------------------------Turn On or Off the Camera -----------------------------------------------------Loading the Batteries -------------------------------------------------------------Inserting or Removing an SD Card -------------------------------------------Attaching the Wrist Strap --------------------------------------------------------Basic Photography -----------------------------------------------------------------
07
07
07
08
08
09
Advanced Functionality Settings ------------------------------------------------Under Image Shooting Mode (
) -------------------------------------------TELE / WIDE Button -----------------------------------------------------------TFT LCD Monitor Button ------------------------------------------------------Macro Button --------------------------------------------------------------------Flash Button ---------------------------------------------------------------------Self-timer Button ----------------------------------------------------------------Voice Memo Button ------------------------------------------------------------Exposure / Delete Button -----------------------------------------------------Image Size Setting -------------------------------------------------------------Image Quality Setting ----------------------------------------------------------Metering Setting ----------------------------------------------------------------Sharpness Setting --------------------------------------------------------------Effect Setting ---------------------------------------------------------------------White Balance Setting ---------------------------------------------------------Photo Frame Setting -----------------------------------------------------------Night Scene Setting -----------------------------------------------------------Voice Recording Setting ------------------------------------------------------Continuous Shooting Setting -------------------------------------------------
11
11
11
11
12
12
13
13
14
15
15
16
16
17
17
18
19
19
20
Under Playback Mode (
) ----------------------------------------------------Playback of a Still Image -----------------------------------------------------Playback of a Movie Clip -----------------------------------------------------Thumbnail Display (Small Images) ----------------------------------------Exploring an Image ------------------------------------------------------------Displaying Image Information --------------------------------------------
21
21
21
22
22
23
Under Movie Clip Mode (
) --------------------------------------------Video Size Setting ----------------------------------------------------Video Quality Setting ------------------------------------------------Video Effect Setting -------------------------------------------------Video White Balance Setting ----------------------------------------
28
28
28
29
29
Under Setup Mode (
) -------------------------------------------------Setting FILE ----------------------------------------------------------Setting PWR OFF ----------------------------------------------------Setting LANGUAGE --------------------------------------------------Setting FORMAT ------------------------------------------------------Setting DATE TYPE --------------------------------------------------Setting DATE ----------------------------------------------------------Setting TIME -----------------------------------------------------------Setting IMPRINT ------------------------------------------------------Setting BEEP ----------------------------------------------------------Setting VIDEO ---------------------------------------------------------Setting QUICK VIEW ------------------------------------------------Setting RESET --------------------------------------------------------Setting START-UP SOUND -----------------------------------------Setting START-UP IMAGE ------------------------------------------Setting SHUTTER SOUND -----------------------------------------Setting USB ------------------------------------------------------------How to Play GAMES --------------------------------------------------
30
30
31
31
31
31
32
32
32
32
33
33
33
33
34
34
34
35
Printer Connection (PictBridge Mode ) ------------------------------------ 36
TV Connection ------------------------------------------------------------------ 41
PC Connection ------------------------------------------------------------------ 42
Appendix ------------------------------------------------------------------------- 53
2
Cautions
Do not try to open the camera by yourself, which may damage the camera or cause electric shock.
Do not fire the flash in a close distance (less than 1 meter ) because it may hurt your eyes.
Keep the camera away from the reach of children or animals to prevent them from swallowing the batteries or small accessories.
Stop using the camera if any kinds of liquid enter the camera. If it happens, power off the camera and contact your dealer for
further help.
Do not use this camera with wet hands, which may cause electric shock as well.
Putting the camera in a high temperature environment may damage the camera.
Do not use different types of batteries or new and old batteries at the same time.
To avoid electricity leakage, please remove the batteries if the camera is not in use for a long period.
It is normal that the temperature of the camera body rises if the camera is used for a long time.
3
Downloaded from ManualsCamera.com Manuals
122mm+-2
Overall Introduction -----------------------------------------------------------------Accessories -------------------------------------------------------------------------External View ----------------------------------------------------------------------Key Function Button ------------------------------------------------------------Icon Display ------------------------------------------------------------------------
Starting a Slide Show ------------------------------------------------ 23
Setting Image Protection -------------------------------------------- 24
Deleting All Images --------------------------------------------------- 24
Copy to Card ----------------------------------------------------------- 25
DPOF- Standard ------------------------------------------------------ 25
DPOF- Index ----------------------------------------------------------- 26
DPOF- Size ------------------------------------------------------------ 26
DPOF- Cancel --------------------------------------------------------- 26
Rotating an Image --------------------------------------------------27
Selecting a Start-up Image------------------------------------------- 27
165mm+-2
Overall Introduction
Accessories
Digital Camera
Camera Driver
& Ulead Software
Quick Start Guide
Camera Pouch
USB / Video Cable
Wrist Strap
122mm+-2
User Manual
2 x AA Batteries
Quick
Quick
Start
Guide
Start
User Manual
Guide
4
Overall Introduction
External View
Power Button Shutter Button
Top
Side
Strap
Eyelet
USB/Video
Connector
Mode Switch
Microphone
Optical Zoom
Flash
Lens
Battery
/ SD Cover
Front
LED
Key Function Button
Play / Pause / Macro / Up Button
LED
OK / Menu
Button
LCD Button
Self- timer /
Left Button
Back
Flash / Right
Button
Tele/Wide
Key Function
Button
Exposure/
Delete Button
TFT LCD Montior
Tripod Socket
5
Downloaded from ManualsCamera.com Manuals
Voice Memo / Down Button
165mm+-2
Overall Introduction
Icon Display
17
1
X 1.2
2
3
11
2
10
White Balance
( )Auto
( )Daylight
( )Cloudy
( )Fluorescent
( )Tungsten
( )Sunset
( )Custom
)Voice Memo
7
Focus Range
( )Macro
(
4
Flash Mode
( )Auto Flash
( )Auto Flash with
Red-eye Reduction
( )Slow Sync
( )Fill-in Flash
( )Flash Off
)Memory Card
13
9
Continuous Shooting
( 1 )Single
( 2 )2 Shots
( 4 )4 Shots
( 8 )8 Shots
Size
(
)3072x2304
(
)2560x1920
(
)2304x1728
(
)2048x1536
(
)1600x1200
(
)1024x768
16
12
8
Metering
( )Spot
( )Multi
)Hand Shake
15
11
Sharp
( )Soft
( )Normal
( )Vivid
( 7 ) Available Shots
17
Zoom In / Out
Indicator
(
) 2.8 X Optical/
5.0X Digital
Zoom
14
Quality
( )Super Fine
( )Fine
( )Normal
10
(
)Exposure +- 0
6
Getting Ready
Turn On or Off the Camera
Press down the "POWER" button to turn on the camera.
Repeat the way above to turn off the camera.
Loading the Batteries
1. Slide out Battery Cover to open it.
2. Load 2 x AA batteries into the battery chamber, following
the polarity indications.
3. Close the Battery cover.
The below symbols on the TFT LCD Monitor are the indication
of the battery status.
( ):Battery power is full.
( ):Battery power is half drained. Have new batteries ready.
( ):Battery power is drained. Replace the batteries you are
using now.
-
Negative
2 pcs of AA alkaline / Ni-MH batteries are strongly
recommended for normal operation.
Batteries may lose power if kept inside the camera for a long
time without using. Please remove the batteries while the
camera is not in use.
Do not use manganese batteries since they cannot supply
sufficient power to support the camera's operation.
Batteries may not work normally under 0 C or over 40 C .
+
Positive
7
Downloaded from ManualsCamera.com Manuals
122mm+-2
3
(
12
2S
6
(
15
13
5
Self-timer
( )10 Seconds
( ) 2 Seconds
( )Double
2
Working Mode
( )Image Shooting Mode
( )Playback Mode
( )Night Scene Mode
( 5 )Photo Frame Mode
( )Movie Clip Mode
( )Voice Recording
Mode
16
14
4
5
6
7
8
9
1
Battery Status
( )Battery Full
( )Battery Half
Drained
( )Battery Drained
7
5M
165mm+-2
Getting Ready
Inserting or Removing an SD Card
1.Power off the camera.
2.Open the Battery Cover.
3.Insert the SD card into the card slot and press it down
until a click sound happens. (Press down the inserted
SD card again to get it out once a click sound happens.)
4.Close the Battery Cover.
The image(s) can be stored either in built-in flash memory
or in memorycard. Only if the memory card is inserted, the
images willbe stored in the memory card rather than the
built-in flash memory.On the other hand, the images will be
stored in the built-in flashmemory only if a memory card is
not inserted.
Attaching the Wrist Strap
2
1
3
8
Getting Ready
Basic Photography
1. Press down the POWER button to turn on the camera.
2. Set the Mode Switch at Image Shooting Mode (
) for still image or Movie Clip Mode (
) for video recording.
NOTE: Hold your camera with your hand and position a subject in the center of the frame to focus on.
3. With the TELE/WIDE Button, you may have 2.8X optica zoom and 5.0X digital zoom for zooming in and out.
4. If the subject you are going to shoot is ranged from 6 cm to 80 cm, pressing down MACRO button to change the focus range.
5. Press and hold the shutter button halfway down.
NOTE: 1. When the color of the focus frame turns from white to red, it means the auto focus of this camera is not fixed.
2. When the color of the focus frame turns from white to green, it means the auto focus of this camera is fixed.
6. Press the shutter button fully down to capture an image.
7. The LED Indicator starts blinking right after the Shutter Button is released. Once the LED Indicator stops blinking, you are
ready to take another shot.
8. Or you can set Mode Switch at Playback Mode (
) to view the images or movie clips you just took.
1
2
14
1M
5
RED (Focus is not fixed)
3
4
7
8
14
1M
6
Green (Focus is fixed)
Blinking
9
Downloaded from ManualsCamera.com Manuals
100-0021
122mm+-2
Formatting a brand new SD card is strongly recommended
for first use.